

Page 1
Mopit 4
Operator’s / Service Manual
Page 2
FOR PARTS AND SERVICE 1-800-290-2833
To view Mopit 4 instructional videos scan this
qr code with your smart phone. You can also
find Mopit 4 instructional videos on the Mopit
channel at www.youtube.com
Page 3

Page 3
Table of Contents
BASIC OPERATION………………………………………………….4-8
Mopit safety information……………………………………….4
Filling the fresh water tank……………………………………..4
Using Mopit cleaning solution…………………………………4
Water level gauge………………………………………………5
Mopit switches…………………………………………………5
Draining the dirty water………………………………………...6
Water valve……………………………………………………..6
Transporting the Mopit…………………………………………6
Squeegee lift pedal……………………………………………...7
Charging the Mopit……………………………………………..7
MAINTENANCE / MOPIT SERVICE
Draining the fresh water tank…………………………………..8
Cleaning the water filter………………………………………..8
Squeegee replacement………………………………………….9
Brush pressure adjustment…………………………………….10
Belt replacement and tensioning………………………………11
Brush replacement…………………………………………….12
Cleaning the recovery tank……………………………………13
Battery pack replacement………………………………….14-15
Brush motor replacement……………………………………...16
Battery charger replacement…………………………………..17
Vacuum motor replacement…………………………………...17
Water solenoid replacement…………………………………..18
Water drip tube replacement…………………………………..18
Drain hose replacement……………………………………….19
Idle bearing replacement……………………………………...19
Drive bearing replacement…………………………………….19
TROUBLESHOOTING
Not getting any water…………………………………………20
Batteries not charging…………………………………………20
Mopit is leaving black marks………………………………….20
Mopit smells when I use it…………………………………….20
Mopit shocks me when in use…………………………………20
Mopit leaks when not in use…………………………………..21
Mopit not cleaning well……………………………………….21
Mopit is not picking up water…………………………………22
Mopit parts diagram……………………………………….23-28
Mopit maintenance chart……………………………………...29
Mopit QR codes for videos…………………………………...30
SPECIFICATIONS
Mopit specifications…………………………………………..31
Page 4
Page 4
FOR PARTS AND SERVICE 1-800-290-2833
Scan this QR code with your smart phone to watch the
Mopit 4 training video. You can view all of our Mopit
movies on the “Mopit Channel” at www.youtube.com.
BASIC OPERATION
WARNING!!!!
Do Not Use or Pick Up Flammable Materials with the Mopit.
Do Not Use Mopit Near Flammable
Liquids or Vapors.
Disconnect Battery Cables and
Charger Cord Before Servicing.
Do Not Use or Store Outdoors.
Before using the Mopit 3.0 you need to fill
it with water and cleaning solution.
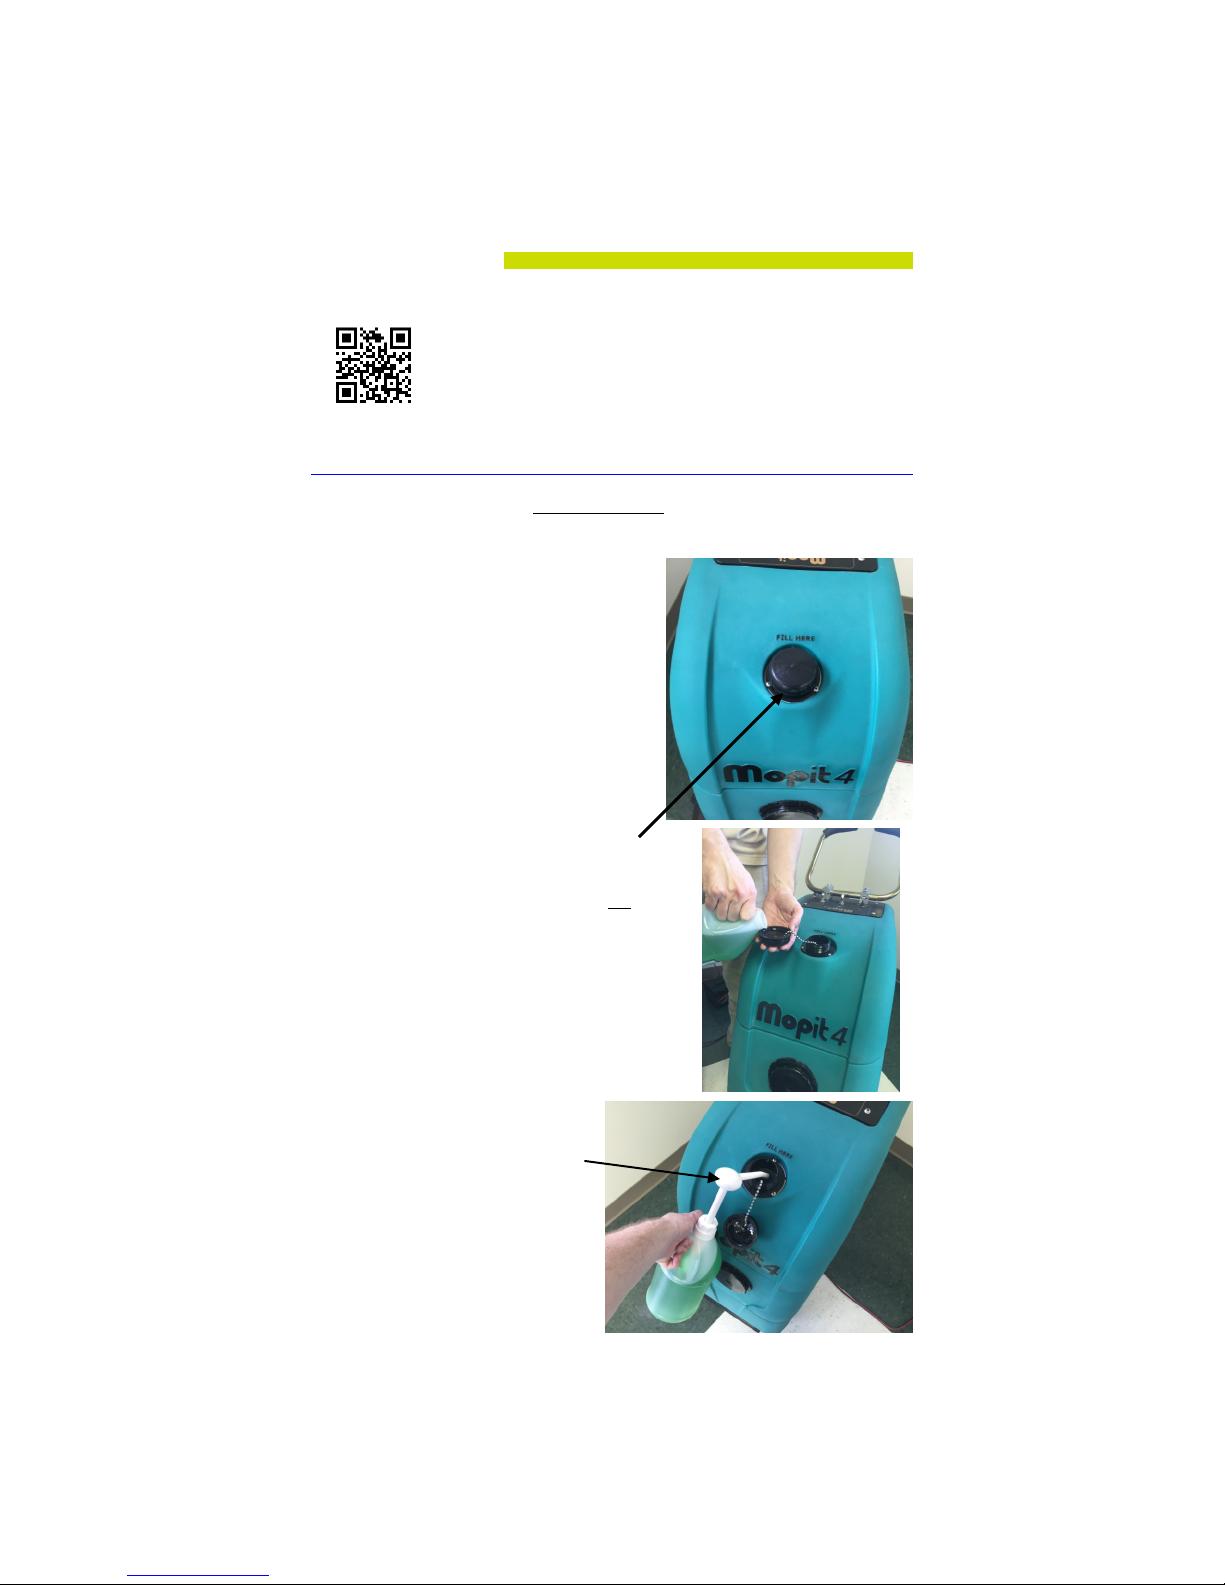
Filling The Fresh Water Tank
This is where you fill the Mopit with water. It
is best to add the cleaning solution after you
have filled the tank with water. It is ok to let
water stay in the fresh water tank for an ex-
tended period of time.
Using Mopit Cleaning Solution
Mopit cleaning solution is very concentrated.
It only takes one ounce of solution per Mopit
fill for normal cleaning. For greasy floors you
can use 2-3 ounces of solution per
Mopit fill.
The fresh water tank cap is a one
ounce measuring cup, you can also
order a one ounce per pump dis-
penser by calling us at 1-800-2902833
Page 5
Page 5
BASIC OPERATION
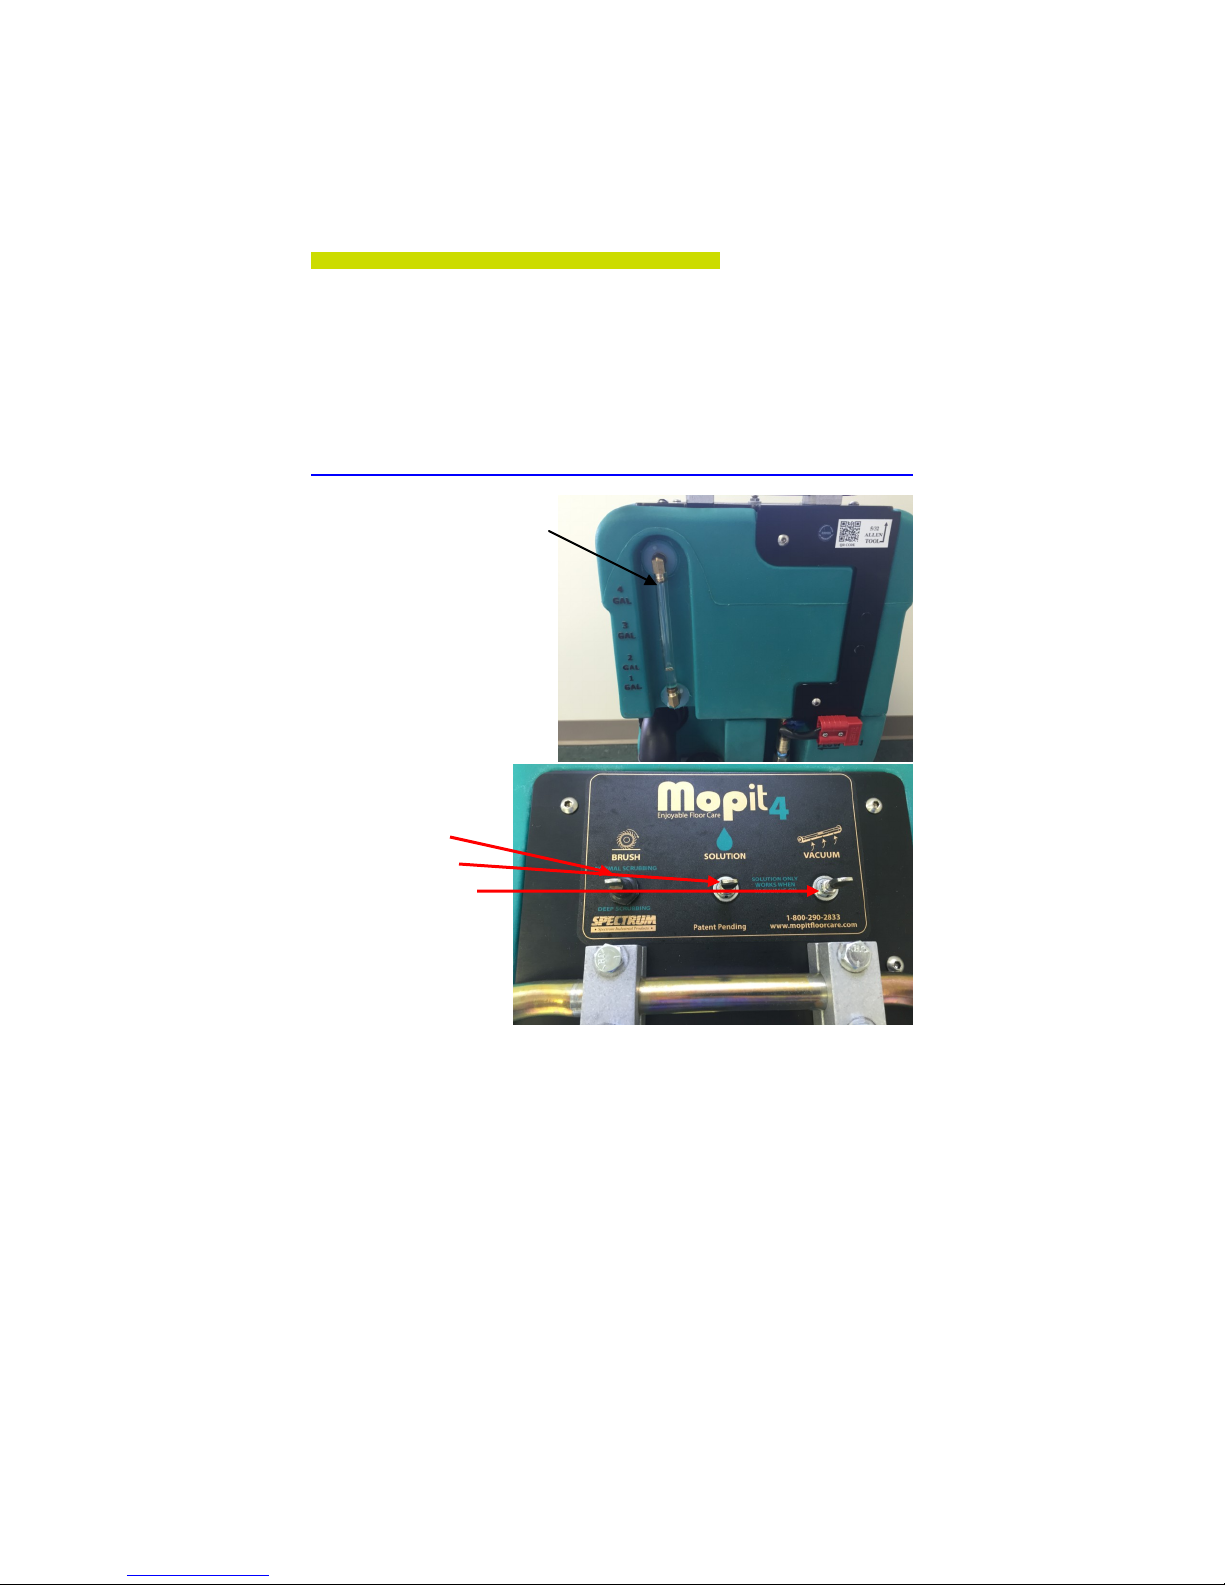
Water Level Gauge
This is the water level gauge.
Even though the gauge
shows 4 gallons the actual
fresh water capacity is 5
gallons.
The Mopit Has 3
Switches
The Brush Switch
The Solution Switch
The Vacuum Switch
Simply turn on all
three switches and
walk.
The water switch will
work only when both
the vacuum and water switches are on.
The Mopit 4 has brush assist, so the brush will help to pull the Mopit
along the floor, making it effortless to push.
When operating the Mopit you may walk at a normal pace.
If there is a really dirty area, cleaning performance is increased pushing
the Mopit slower.
Page 6
Page 6
FOR PARTS AND SERVICE 1-800-290-2833
BASIC OPERATION
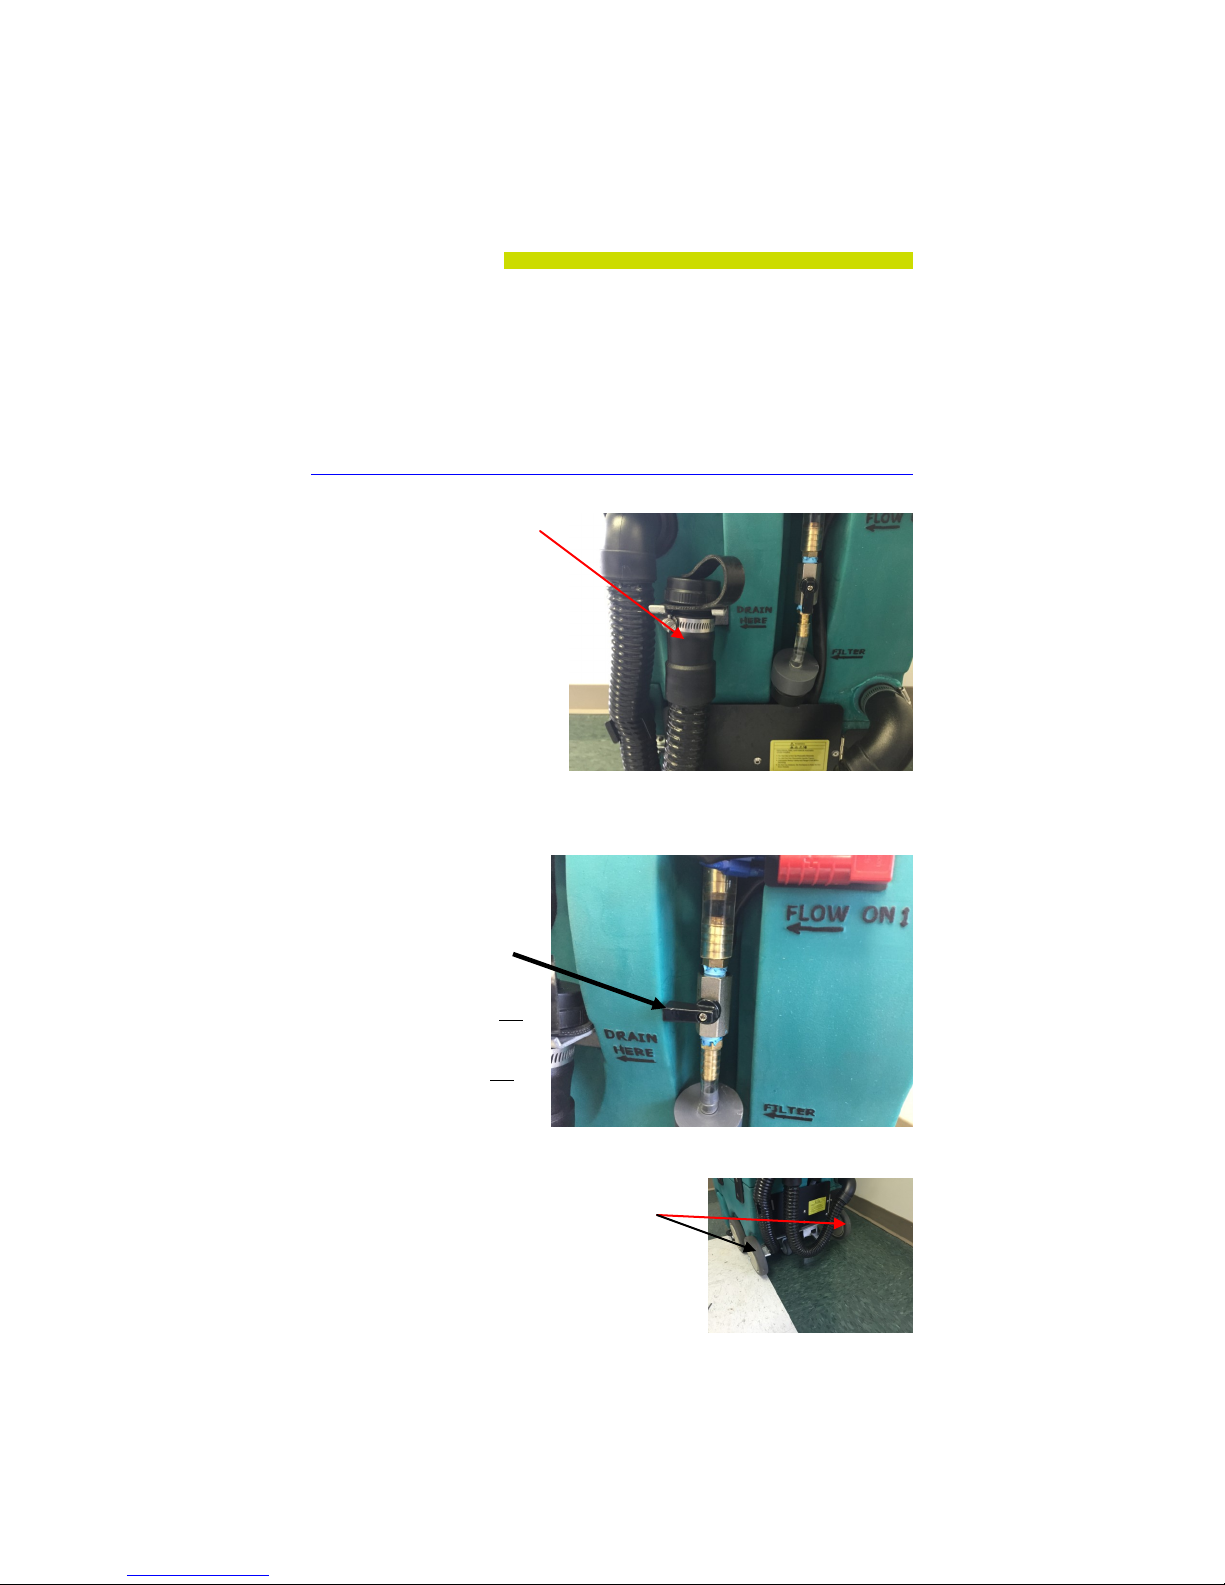
Draining The Dirty Water
This is the dirty water drain
hose
Simply remove the cap and let
the drain hose down onto a
floor drain. After draining, be
sure to put the cap on tightly.
If the cap is not screwed on
tightly the machine will lose
suction power. It is important
to drain the dirty water tank after each use. If dirty water sits in your
dirty water tank for an extended period of time, your machine will start
to stink.
Water Valve
The water control valve
controls how much water
goes onto the floor.
The water valve is full on
when the black valve handle
is horizontal, and full off
when the handle is vertical.
To lower water output,
position the valve between full on and full off.
Transporting The Mopit
When moving the Mopit, tip it on it’s back
transport wheels and move it like an upright
floor vacuum.
Page 7
Page 7
BASIC OPERATION
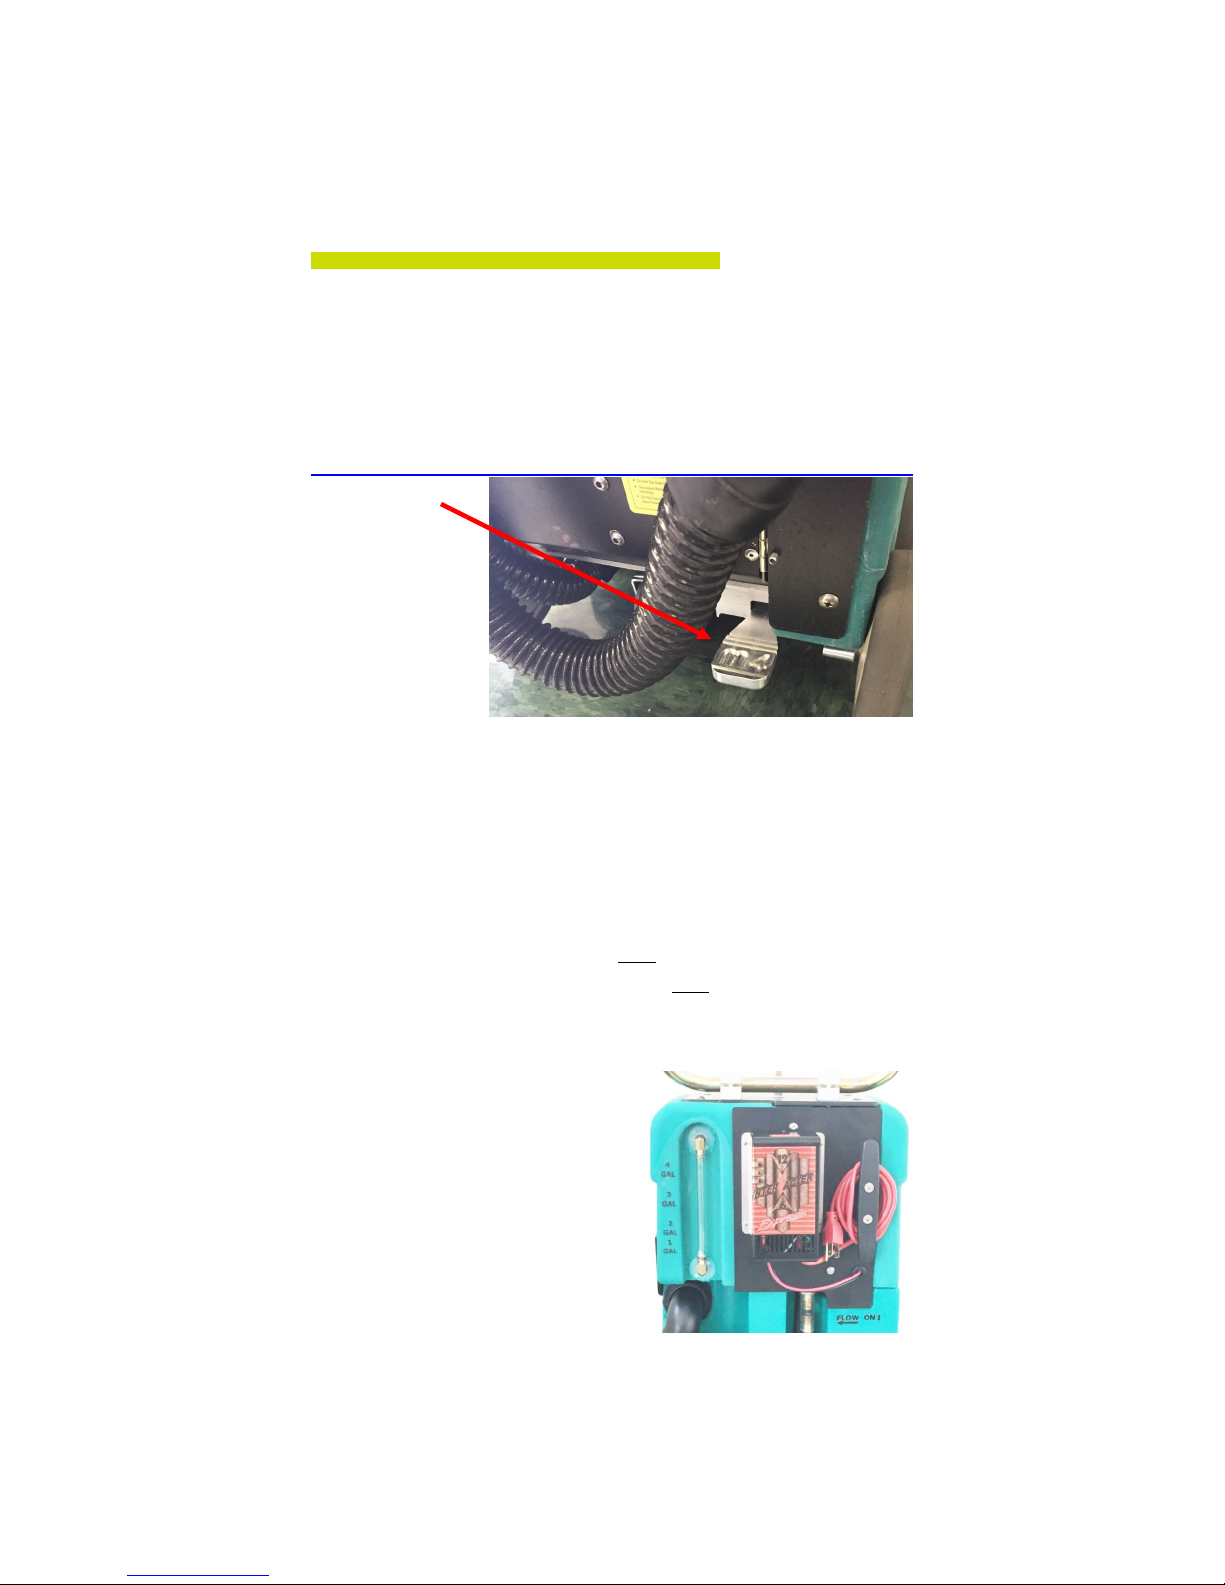
Squeegee Lift
Pedal
The squeegee lift
pedal is used for
deep cleaning. It
allows you to make
multiple scrubbing
passes without pick-
ing up the water on the floor. This is called double scrubbing. To lift the
squeegee, push the pedal down and slide it to the left. To drop the
squeegee, push the pedal down and slide it to the right.
Charging The Mopit
The Mopit is battery operated. The charger should be plugged into the
Mopit whenever it is not being used. The battery charger can be con-
stantly plugged into the wall. You do not need to wait until the batteries
are fully charged to use the Mopit. You do not need to run the batter-
ies down before you can charge the Mopit. To charge the Mopit plug
the Battery charger into the wall. The on-board charger has three indicator lights. The red power light will
always remain on. When the power
light and yellow charge lights are on the
Mopit is charger. The Mopit is fully
charged when the red power light and
the green charger lights are on. The
Mopit 4 is also available with an off-
board charger option.
Page 8
Page 8
FOR PARTS AND SERVICE 1-800-290-2833
Scan this QR code with your smart phone to watch the Mopit
water filter video. You can view all of our Mopit movies on
the “Mopit Channel” at www.youtube.com.
MAINTENANCE / SERVICE
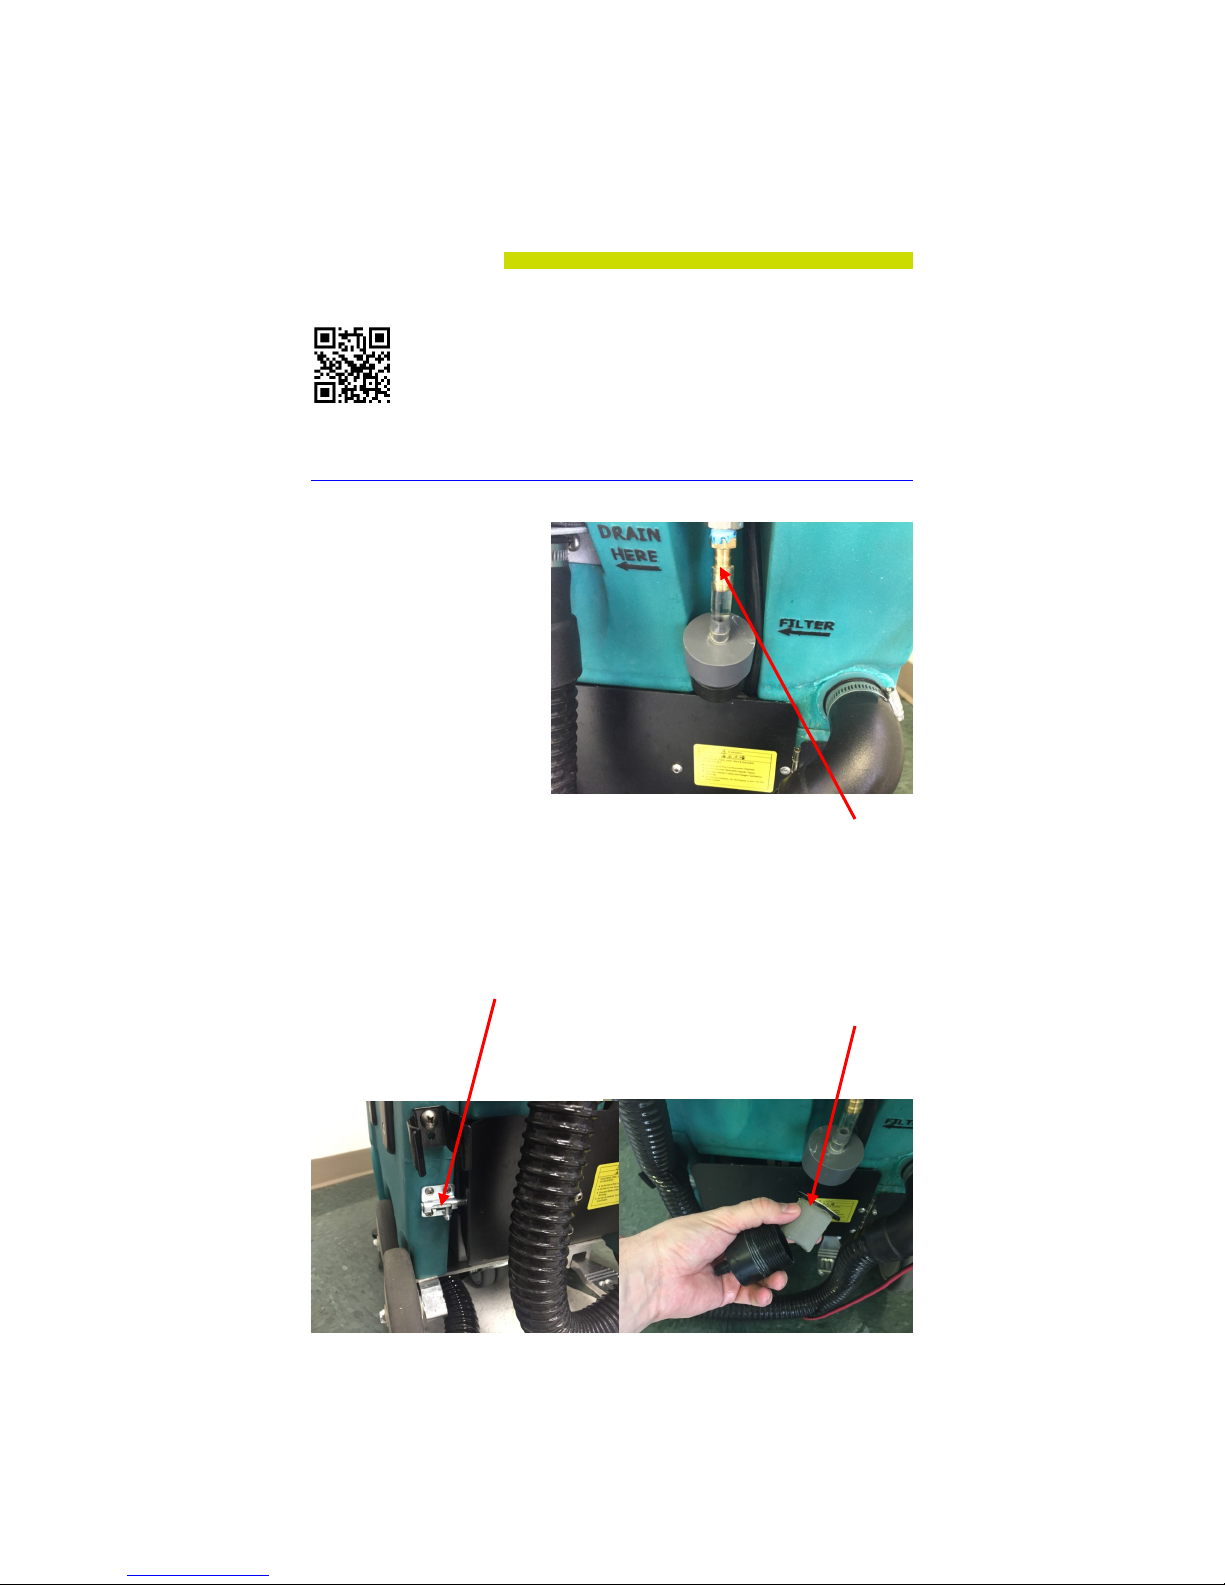
Draining The Fresh Water Tank
Occasionally you may need
to drain the fresh water
tank. The tank will need to
be drained before shipping.
There is no harm in leaving
water in the fresh water
tank for an extended period
of time. You will want to
have the machine outside
or positioned over a floor
drain when you drain the
tank. To drain the tank pull off the tubing from the brass hose fitting,
and the water will immediately begin rushing out of the tank.
Cleaning The Water Filter
When you are not getting enough water onto the floor, clean the water
filter. Before you clean the fresh water filter make sure that the water
valve that is just above the filter, is turned off. Open the battery cover
by opening the bolt latch. Pull off the tubing connected to the solenoid.
Unscrew the base of the filter housing and remove the filter. Wash the
filter out in running water, and reassemble. Don’t forget to open the
manual water valve.
Page 9

MOPIT 4
Page 9
Scan this QR code with your smart phone to watch the Mopit
squeegee replacement video. You can view all of our Mopit
movies on the “Mopit Channel” at www.youtube.com.
MAINTENANCE / SERVICE
Changing The Squeegee Blade
On average the squeegee blade will need to be changed every 6-8 weeks. If the
machine is leaving streaks, and not picking up all of the water, or the Mopit is
not cleaning very well, check your squeegee blade for wear. The squeegee
blades are reversible, so you can reverse the blade for longer squeegee life.
Often you will only need to change the rear blade, as the front blade is a more
durable material, and should last much longer than the rear blade. The front and
rear squeegee blades have different bead shapes. The rear blade bead is round
and the front blade bead is triangle, so you cannot install the blades backwards.
1. Tip the Mopit on its back
2. Remove the squeegee wheel
3. Slide out the old blades
4. Slide in reversed, or
replacement blades
5. Replace squeegee
wheels if worn
Page 10
Page 10
FOR PARTS AND SERVICE 1-800-290-2833
Scan this QR code with your smart phone to watch how to
adjust the brush pressure. You can view all of our Mopit
movies on the “Mopit Channel” at www.youtube.com.
MAINTENANCE / SERVICE
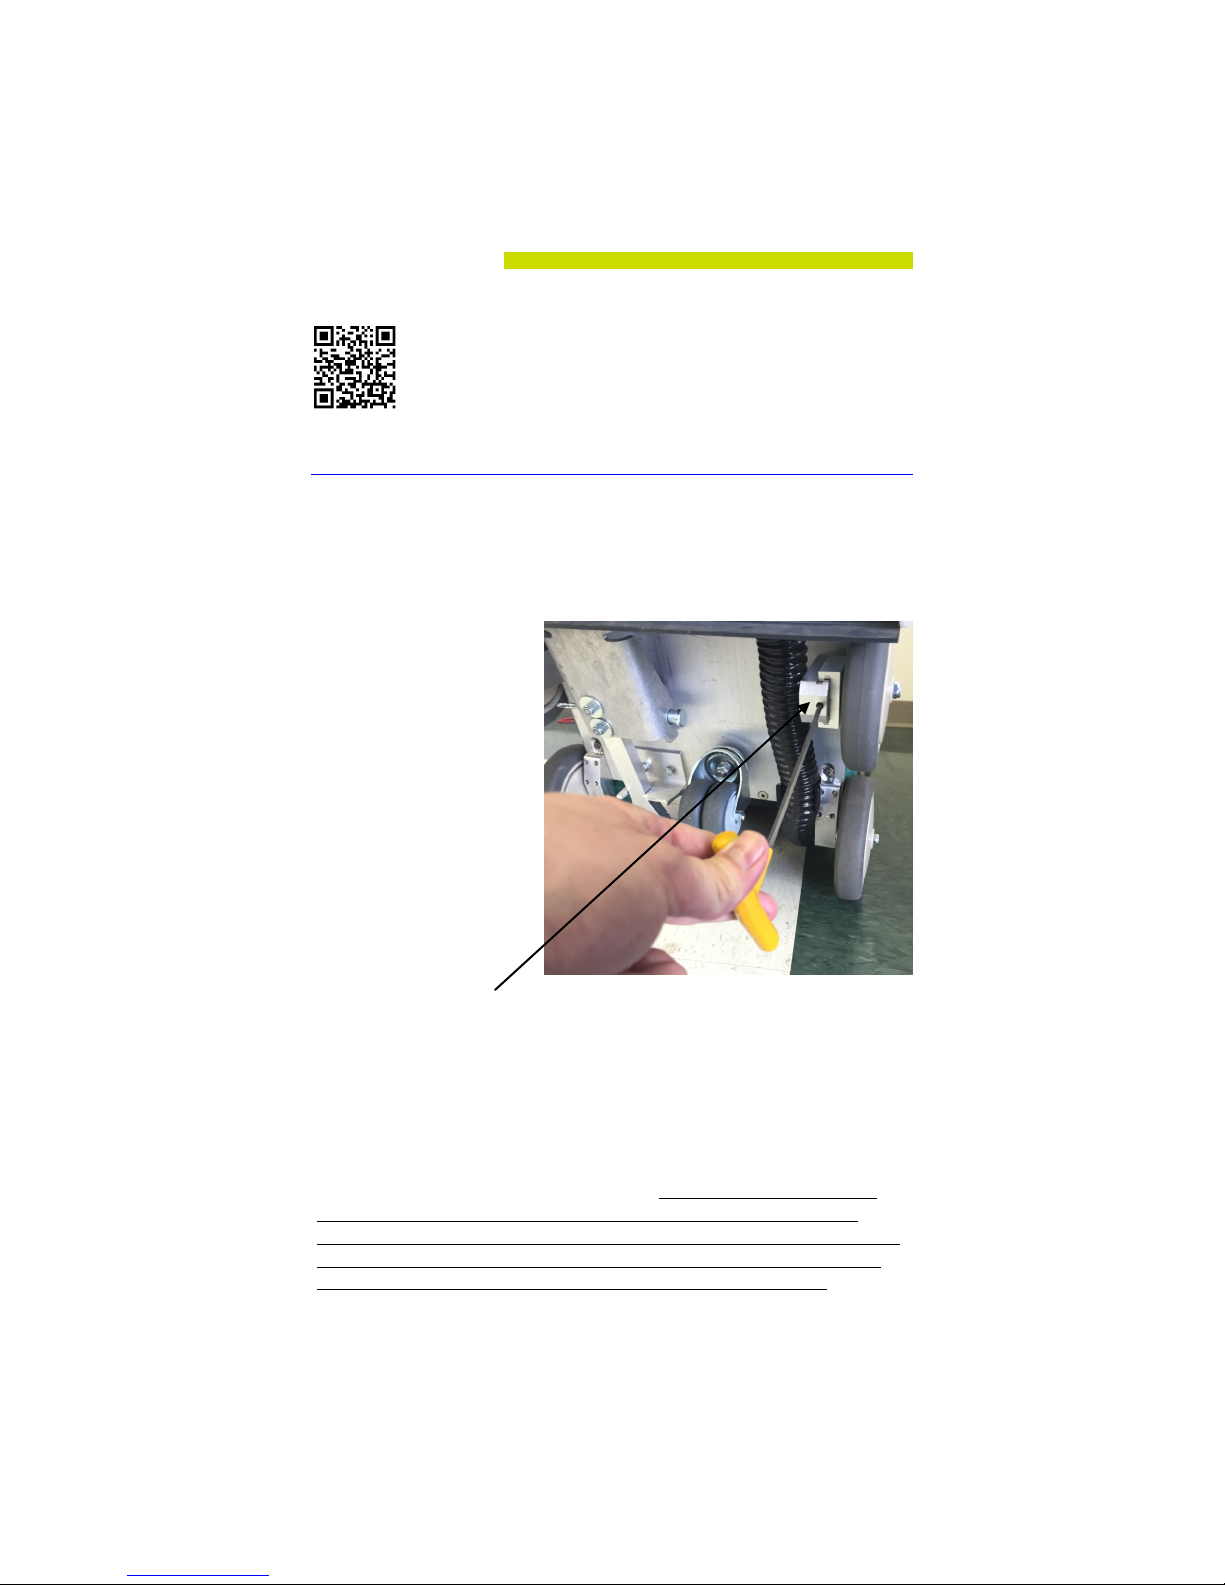
Adjusting The Brush Pressure
WARNING: Adjusting the brush too low can damage the brush motor
and lessen the cleaning performance.
As the scrub brush wears,
your brush pressure on
the floor will lessen. To
compensate for brush
wear, adjust the wheels to
lower the brush head.
To adjust the brush pressure, tip the machine on its
back.
Insert a the included 5/32
Allen wrench into the
wheel block windows.
Turn the Allen wrench counterclockwise one complete turn. Adjust
both wheels by the same amount.
IMPORTANT: You must adjust each wheel by the same amount. Failure to
do so will cause un-even brush wear. If you don’t know if the wheels have both
been evenly adjusted, turn the screw as far as you can clockwise, then begin
again to adjust each wheel counterclockwise by the same amount. It is wise,
with each full turn of the screw, to stand the machine back up and check the
brush deflection from the side of the machine. We recommend one inch of
brush of the brush touching the floor but only a 1/4 inch of the brush
height on the floor. Check the brush deflection from the sides of the brush
hood while the brush is spinning. Brush deflection means the amount of
the brush touching the floor. It is easiest to see using a flashlight.
Page 11

Page 11
MAINTENANCE / SERVICE
Belt Replacement And Tensioning
1. Tip the Mopit on its back
2. Remove belt cover with a 7/16” socket
3. Loosen these two 1/8” Allen screws with a 3/16” Allen wrench
twist the belt tensioning screw counter
clockwise
4. Remove old belt
5. Installation is the above steps in reverse
6. Tension belt to 3/8” Deflection
Page 12

Page 12
FOR PARTS AND SERVICE 1-800-290-2833
Scan this QR code to watch a short movie on how to change
the Mopit brush. All of our Mopit movies can be found on
“The Mopit Channel” at www.youtube.com.
MAINTENANCE / SERVICE
Brush Replacement
The Mopit 4.0 scrub brush is very durable and should last several years.
As the brush wears it can be lowered by fol-
lowing the instructions on page 10. For replacement follow the steps below.
1. Remove the two 5/32 Allen screws on the
right side of the brush hood with the onboard Allen tool
2. Pull off the bearing plate.
3. Pull the old brush out of
the hood
4. Installation is the above
steps in reverse
Page 13

Page 13
Scan this QR code with your smart phone to watch how to
clean the recovery tank. You can view all of our Mopit movies on the “Mopit Channel” at www.youtube.com
MAINTENANCE / SERVICE
Cleaning The Recovery Tank
If the recovery tank is not cleaned out regularly the Mopit will begin to
stink when used. To clean, remove the clean out access cap by twisting
it counterclockwise. Open the drain hose and place it over a floor drain.
Use a hose with a sprayer to spray out the recovery tank. Spray the
Vacuum ball screen. It may also help to back flush the drain hose.
After spraying out the tank, use a trigger sprayer to spray undiluted
bleach all over the inside of the recovery tank. Let the tank sit with the
clean out cap and drain hose cap off until the inside of the recovery tank
is dry. If your machine still has a foul odor order some Mopit deodor-
izer from Spectrum.
Vacuum Ball Screen
Page 14

Page 14
FOR PARTS AND SERVICE 1-800-290-2833
MAINTENANCE / SERVICE
Replacing The Battery Pack
A properly cared for lead acid battery pack should last for 800 charging cycles,
which is generally 4-5 years.
IMPORTANT: It is critical that the batteries be replaced with sealed gel cell
or AGM type lead acid type batteries. Standard wet lead acid batteries will leak,
and may be explosive. If you have questions about replacement batteries call
Spectrum at1-800 290 2833.
To change out the battery pack, you will need a Phillips screw driver and two
7/16” wrenches.
1. Drain the fresh water, and recovery tanks
2. Turn off the manual water valve
3. Open the battery cover door and pull
off the tubing that connects to the fresh
water filter to the solenoid
4. Close the battery cover
5. Remove these 4 screws. There are two
screws on each side
Page 15

MAINTENANCE / SERVICE
Replacing The Battery Pack continued
6. Gently tip the top of the Mopit
onto its side. You shouldn't have
to remove any of the hoses.
7. Disconnect the Black rubber
molded connector
8. As you complete the next
step be sure that you don’t
short circuit the battery by
touching any two battery terminals at the same time with
your wrenches
Page 15
9. Remove the Positive and Negative bat-
tery terminal wiring harness. With two
7/16” wrenches. The white harness should
not be removed.
10. Replace the batteries, and complete
the installation by following the above
steps in reverse.
Page 16

Page 16
FOR PARTS AND SERVICE 1-800-290-2833
MAINTENANCE / SERVICE
Brush Motor Replacement
On rare occasions the brush motor may need to be replaced. Please call Spectrum at 1-800-290-2833 to troubleshoot and see if your brush motor needs to
be replaced.
You do not need to remove either of the plastic tanks for motor replacement.
It is easiest to replace the brush motor with the Mopit on its back.
You will need a 7/16 socket, 5/32, 1/8, and 3/16 Allen wrenches
1. Follow the steps on page 11 to remove the belt
2. Remove the two pulleys by using a 1/8 Allen wrench to remove the set
screws
3. Remove the five Allen bolts using a 5/32 Allen wrench
4. Pull the brush motor plate out of the machine. There is enough wire on the
brush motor so you should be able to set the whole assembly on the
ground without disconnecting the wiring
5. Remove the two motor screws using a 1/8 Allen wrench
6. Replacement is the above steps in reverse
7. HINTS: Make sure that
the motor pulley is
touching only the motor
shaft, not the motor
base. Make sure that
you tighten the set
screws onto the flats of
the shafts.
Page 17

Page 17
MAINTENANCE / SERVICE
Battery Charger Replacement
On rare occasions the battery charger may need to be replaced. If the
power light does not come on when
plugged in, or if the batteries are not
accepting a charge, the charger may
need to be replaced. Call Spectrum to
help you decide if you need a new
charger.
Vacuum Motor Replacement
1. Drain your fresh water tank, and
disconnect the tubing from the
fresh water tank outlet. See draining the fresh water tank on page 8
2. Remove these four 5/32” Allen
screws (two on each side)
3. Lift the top tank off of the Mopit
and disconnect the two terminals
that go to the vacuum motor
4. Set the top tank on the floor
5. Remove the 7/16” nuts that hold
the vacuum motor onto the tank
6. To install the new motor follow the above
steps in reverse. It doesn’t matter which
wire you connect the terminals to upon
reassembly.
Page 18

Page 18
FOR PARTS AND SERVICE 1-800-290-2833
MAINTENANCE / SERVICE
Replacing Water Solenoid
1. Turn off the manual water valve
2. Open the battery cover door
3. Remove the two hoses from the solenoid
4. Disconnect the power terminals from the solenoid
5. Using a 5/32” Allen tool and a 7/16” wrench remove the solenoid
from the battery cover door
6. To replace follow the above steps in reverse
7. Don’t forget to turn the manual water valve back on
Replacing the Drip Tube
Occasionally you may need to
replace your drip tube it if become filled with debris or you
can’t get water consistently out
of it.
1. Turn off the manual water
valve
2. Remove these 4
screws with a Phil-
lips screw driver
3. Pull the drip tube
off of the tubing at
the tee
4. Replace by following the above steps
in reverse
Page 19

MAINTENANCE / SERVICE
Drain Hose Replacement
1. Drain the dirty water
2. Loosen the hose clamp
with a nut driver or flat
head screw driver and pull
off the hose
3. Replace the hose and
tighten the hose clamp
Idle Bearing Replacement
1. Remove the two 5/32 Allen
screws from the end plate,
and remove end plate.
Page 19
2. Remove the Phillips screw
and pull off the old bearing
idle cup.
3. Replace the idle cup / bearing
assembly
Drive Bearing Replacement
1. Follow the instructions on pages 11 and 16 for removing the brush
and brush motor
2. Pull off the bearing plate, and replace with a new bearing plate assembly from spectrum
Page 20

Page 20
FOR PARTS AND SERVICE 1-800-290-2833
TROUBLESHOOTING
Not Getting Any Water
1. Make sure the vacuum and solution switches are both on
2. Check to make sure the manual water valve (pg 6) is turned on.
3. Check to make sure there is water in the fresh water tank.
4. Check to make sure you are getting water past the fresh water fil-
ter. Pull off the tubing below the filter and open the manual water
valve to make sure water comes out.
5. Check to make sure that the solenoid “clicks when you turn on the
vacuum motor and flip the solution switch on and off.
6. Replace the drip tube. See page 18
7. Call Spectrum for additional troubleshooting
Mopit Batteries Not Charging
Call Spectrum for troubleshooting. Also see page 17 on charger replacement.
Mopit Is Leaving Black Marks
The most common cause is not getting water onto the floor. Black
marks can also be caused by missing or worn squeegee wheels. See
above for how to fix water issues and page 9 for squeegee replacement.
Mopit Machine Smells When I Use It
The Mopit will stink when the recovery tank is not cleaned out regu-
larly. See page 13 for how to clean the tank.
Mopit Machine Is Shocking Me When In Use
Shocking happens when no water is getting to the floor. The static elec-
tricity from the spinning brush causes the shocking. To fix this issue
follow page 20 on not getting any water.
Page 21

Page 21
TROUBLESHOOTING
Mopit Machine Leaks When Not In Use
The most common cause for this is a faulty solenoid. Until we can get
you a new solenoid simply turn off the manual water valve (pg 6) when
the Mopit is not in use. Also see solenoid replacement (pg 19). The leak
may also be coming from a drain hose that has a hole in it.
Mopit Not Cleaning Well
Several factors determine how well the Mopit will clean.
1. Water: use hot water for best cleaning. If no water is getting on the
floor or the water delivery is uneven, the cleaning will be poor. See
page 20 Not Getting Any Water, to make sure water delivery is
working
2. Brush Pressure: see adjusting and checking brush pressure (pg 10)
3. Suction and water recovery: If your machine is not sucking up the
water well, see page 22 for help. You can also lift the squeegee to
double scrub very dirty areas see page 7 (Squeegee pedal)
4. Battery Charge: If your battery is weak you won’t have much suc-
tion or scrubbing power. See page 7 on battery charging
5. For more help call Spectrum 1-800-290-2833
Page 22

Page 22
FOR PARTS AND SERVICE 1-800-290-2833
TROUBLESHOOTING
My Mopit Is Not Picking Up Water
If the Mopit is not picking up water, there is an issue with the water recovery
system. Here are the things to check:
1. Check the squeegee blades for wear and replace if necessary (pg 9)
2. Make sure the squeegee lift is in the down
position (pg 7)
3. Make sure the drain hose cap is screwed
on tightly
4. Make sure the Squeegee hose is firmly
inserted into the hose receiver
5. Check the vacuum tube for obstructions
6. Flush water down the Squeegee hose to
clear any clogs
7. Make sure the dirty water tank clean out
cap is on (pg 13)
8. Make sure the dirty water tank is empty
9. Check the Vacuum ball screen inside the
dirty water tank. Make sure the ball inside the
screen is at the bottom, not stuck in the top.
If stuck, spray as shown on page 13
10. Turn on the Vacuum switch and feel the
squeegee hole for suction
11. Make sure the squeegee horn is clear
12. Make sure both squeegee wheels are on,
and are not worn. The wheels should be replaced each time the squeegee is
replaced. They are included in each squeegee replacement kit
Page 23

MOPIT 4 PARTS DIAGRAM
Page 23
Page 24

Page 24
FOR PARTS AND SERVICE 1-800-290-2833
MOPIT 4 PARTS DIAGRAM
Page 25

MOPIT 4 PARTS DIAGRAM
Page 25
Page 26

Page 26
FOR PARTS AND SERVICE 1-800-290-2833
MOPIT 4 PARTS DIAGRAM
Page 27

Page 27
MOPIT 4 PARTS DIAGRAM
Page 28

Page 28
FOR PARTS AND SERVICE 1-800-290-2833
MOPIT 4 PARTS DIAGRAM
Page 29

Page 29
This chart can be printed from our website www.mopitfloorcare.com
Its found under the “support” tab
THE MOPIT CENTER CHART
Page 30

Page 30
FOR PARTS AND SERVICE 1-800-290-2833
MOPIT 4 QR CODES
Mopit 4 Training Video
Squeegee replacement
Charging the Mopit
Brush Pressure
Brush Replacement
Clean dirty water tank
Drain dirty water
Flush vacuum tube
Clean water filter
Operators manual pdf
All of these videos can be found on
by going to the Mopit channel on
www.youtube.com. Just search
Mopit. They can also be found under
the “support” tab on our website
www.mopitfloorcare.com
Flush squeegee hose
Mopit Chemical SDS
Mopit 4 demo video
Page 31

Page 31
MOPIT 4 SPECIFICATIONS
Cleaning Path 15 Inches
Fresh Water Capacity 5 Gallons
Dirty Water Capacity 5.5 Gallons
Solution Flow Rate .11to.31 Gallons Per Minute
Scrub Brush Speed 1200 RPM
Brush Size 4 Inches in Diameter
Vacuum Motor 24 Volt 2 Stage, 45.8” Water Lift Sealed
Run Time per Charge 45-60 Minutes
Charger On-board 24V 3 Amp
Weight 120 Pounds
Length 27 inches w/handle in working position
23.5 inches with handle folded
Height 41 inches w/handle in working position
33 inches with handle folded
Width 22.2 Inches
Page 32

868 West 400 North
Logan, Utah 84321
Phone: 1-800-290-2833
Email: spectrum.ind@gmail.com
Web: www.mopit floorcare.com
 Loading...