

Page 1
ENGLISH
64452 / 02
2nd Generation
Installation and
User Guide
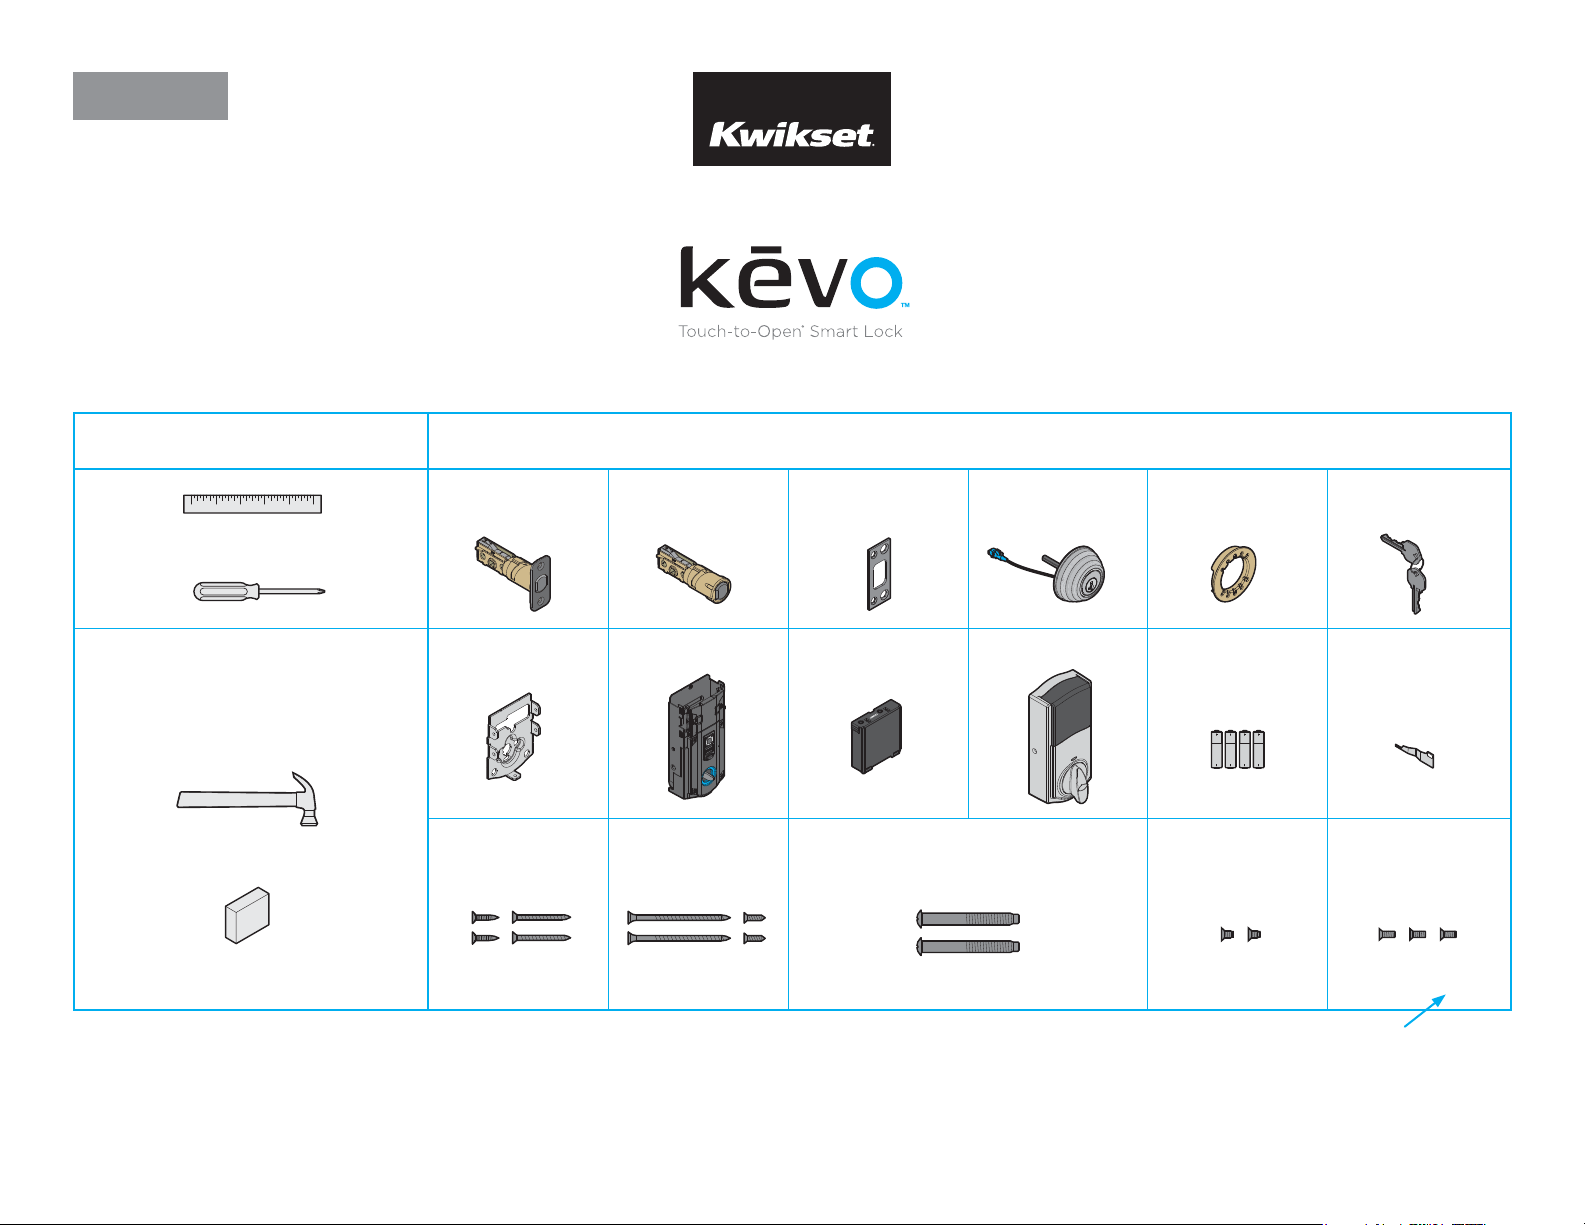
Parts in the boxRequired tools
Ruler
Phillips screwdriver
Additional tools
(depending on application)
Hammer
Wood block
Latch with
rectangular faceplate
A
Mounting plate SmartKey toolInterior assembly
G
Latch screws Strike screws Mounting plate screws
NQR T
P
03809 46780 49191 64109
Drive-in latch Strike Exterior assembly Adapter ring
BCDE F
Battery pack Interior cover Batteries
HJKLM
Keys
Interior assembly
screws
Interior cover
screws
UV
Note: Part numbers are printed on screw bags.
1 / 11 © 2016 Spectrum Brands, Inc.
Page 2
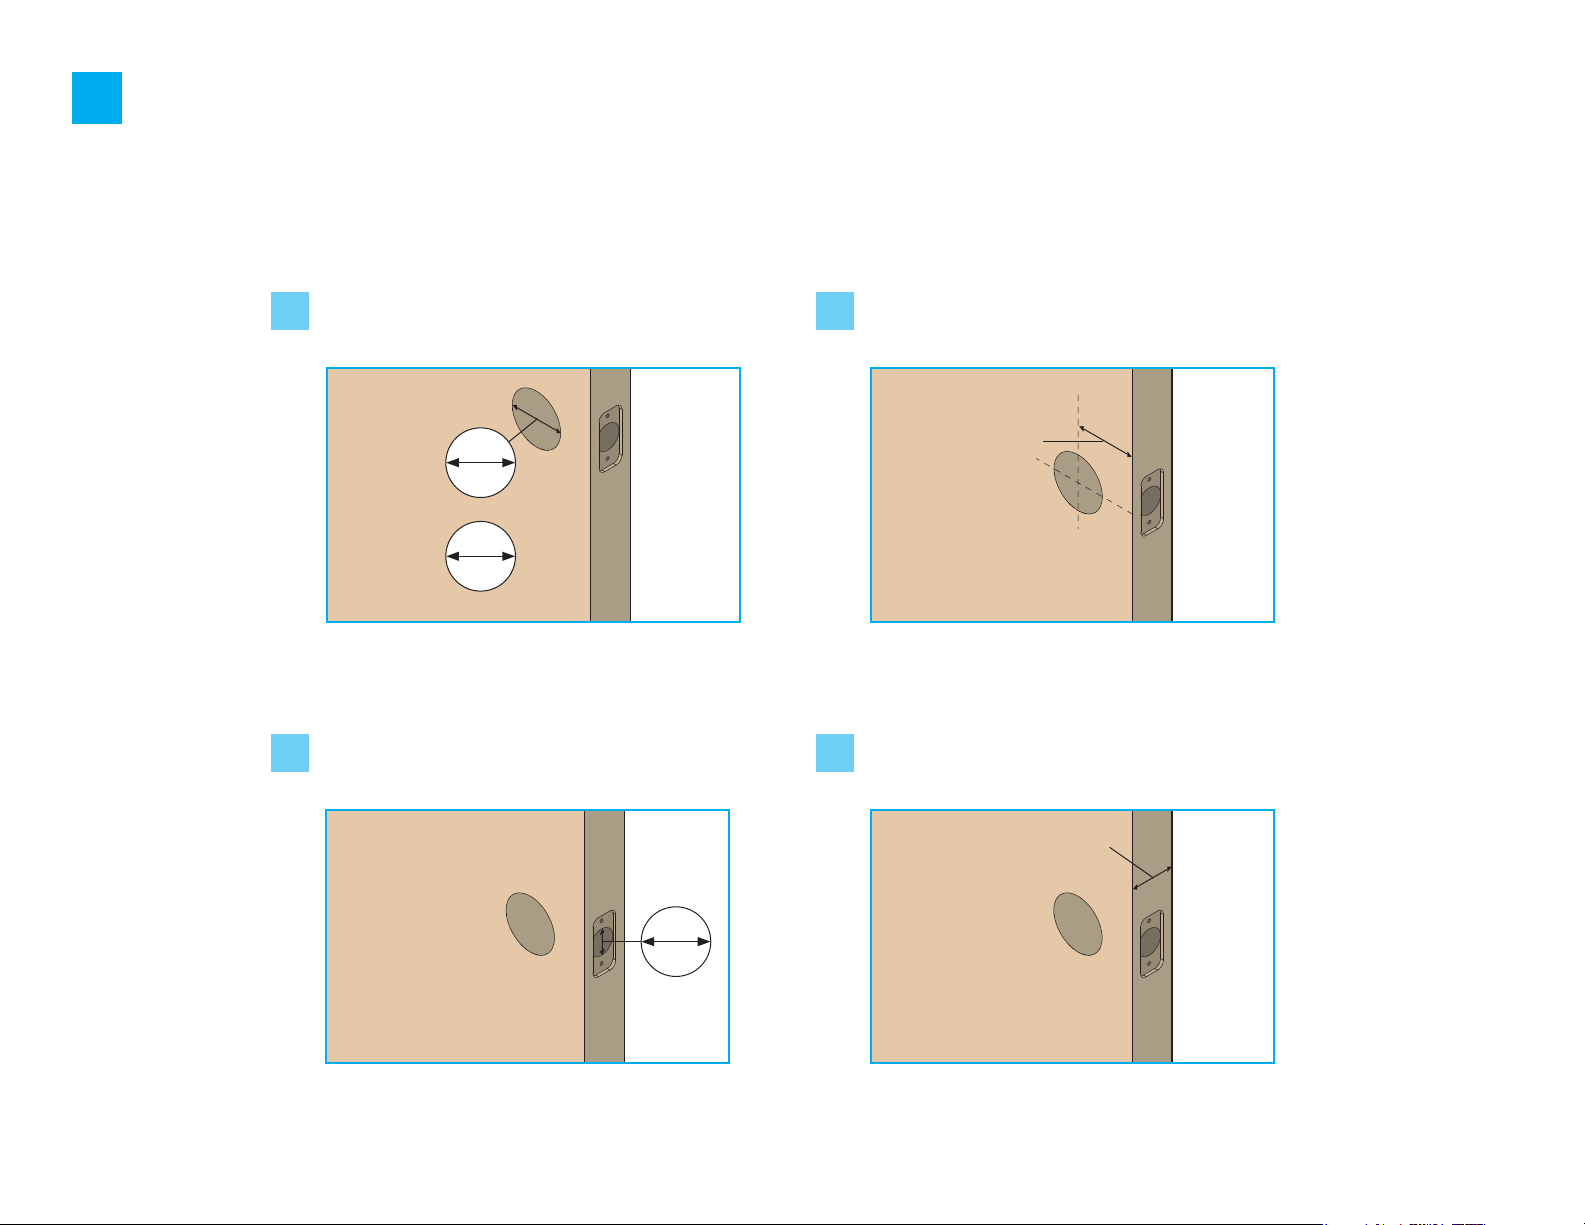
Prepare the door and check dimensions
1
If drilling a new door, use the supplied template and the complete
door drilling instructions available at www.kwikset.com/doorprep.
Measure to conirm that the hole in the door
A
is either 21/8" (54 mm) or 11/2" (38 mm).
21/8"
54 mm
or
11/2"
38 mm
Note: Additional door preparation may be required for
doors with 11/2" (3 8 mm) holes. Consult the deadb olt
drilling instructions at www.kwikset.com/doorprep
Measure to conirm that the hole in
C
the door edge is 1" (25 mm).
Measure to conirm that the backset is
B
either 23/8" or 23/4" (60 or 70 mm).
23/8" or 23/4"
60 or 70 mm
Measure to conirm that the
D
door is 13/4" (44 mm) thick.
backset
13/4"
44 mm
1"
25 mm
2 / 11 © 2016 Spectrum Brands, Inc.
Page 3

Install the latch and strike
2
Is the door edge chiseled?
A B
YES
chiseled
Use latch “A”. If the
latch bolt is not already
extended, extend the
latch bolt as shown.
A
or
NO
not
chiseled
Use latch “B”. If the
latch bolt is not already
extended, extend the
latch bolt as shown.
B
face lush against the door edge.
A
Is the D-shaped hole centered in the door hole?
C
YES
or
D-shaped hole centered D-shaped hole NOT centered
No adjustment is required.
Proceed to next step.
Rotate latch face as
shown to extend latch.
Which latch are you installing?Hold the latch in front of the door hole, with the latch
D
Latch “A” Latch “B”
or
B
B
“UP” is
on top
A
NO
Install strike on the door frame.
E
A
Make sure the hole in the door frame is drilled a
minimum of 1" (25 mm) deep.
N (2x)
“UP” is
on top
wood
block
Longer screws, Q,
install closest to
the door jamb.
B
Note: The longer screws, Q, (3" / 76 mm) must be used
to maintain highest security.
3 / 11 © 2016 Spectrum Brands, Inc.
Q (2x)
R (2x)
C
door frame
Page 4
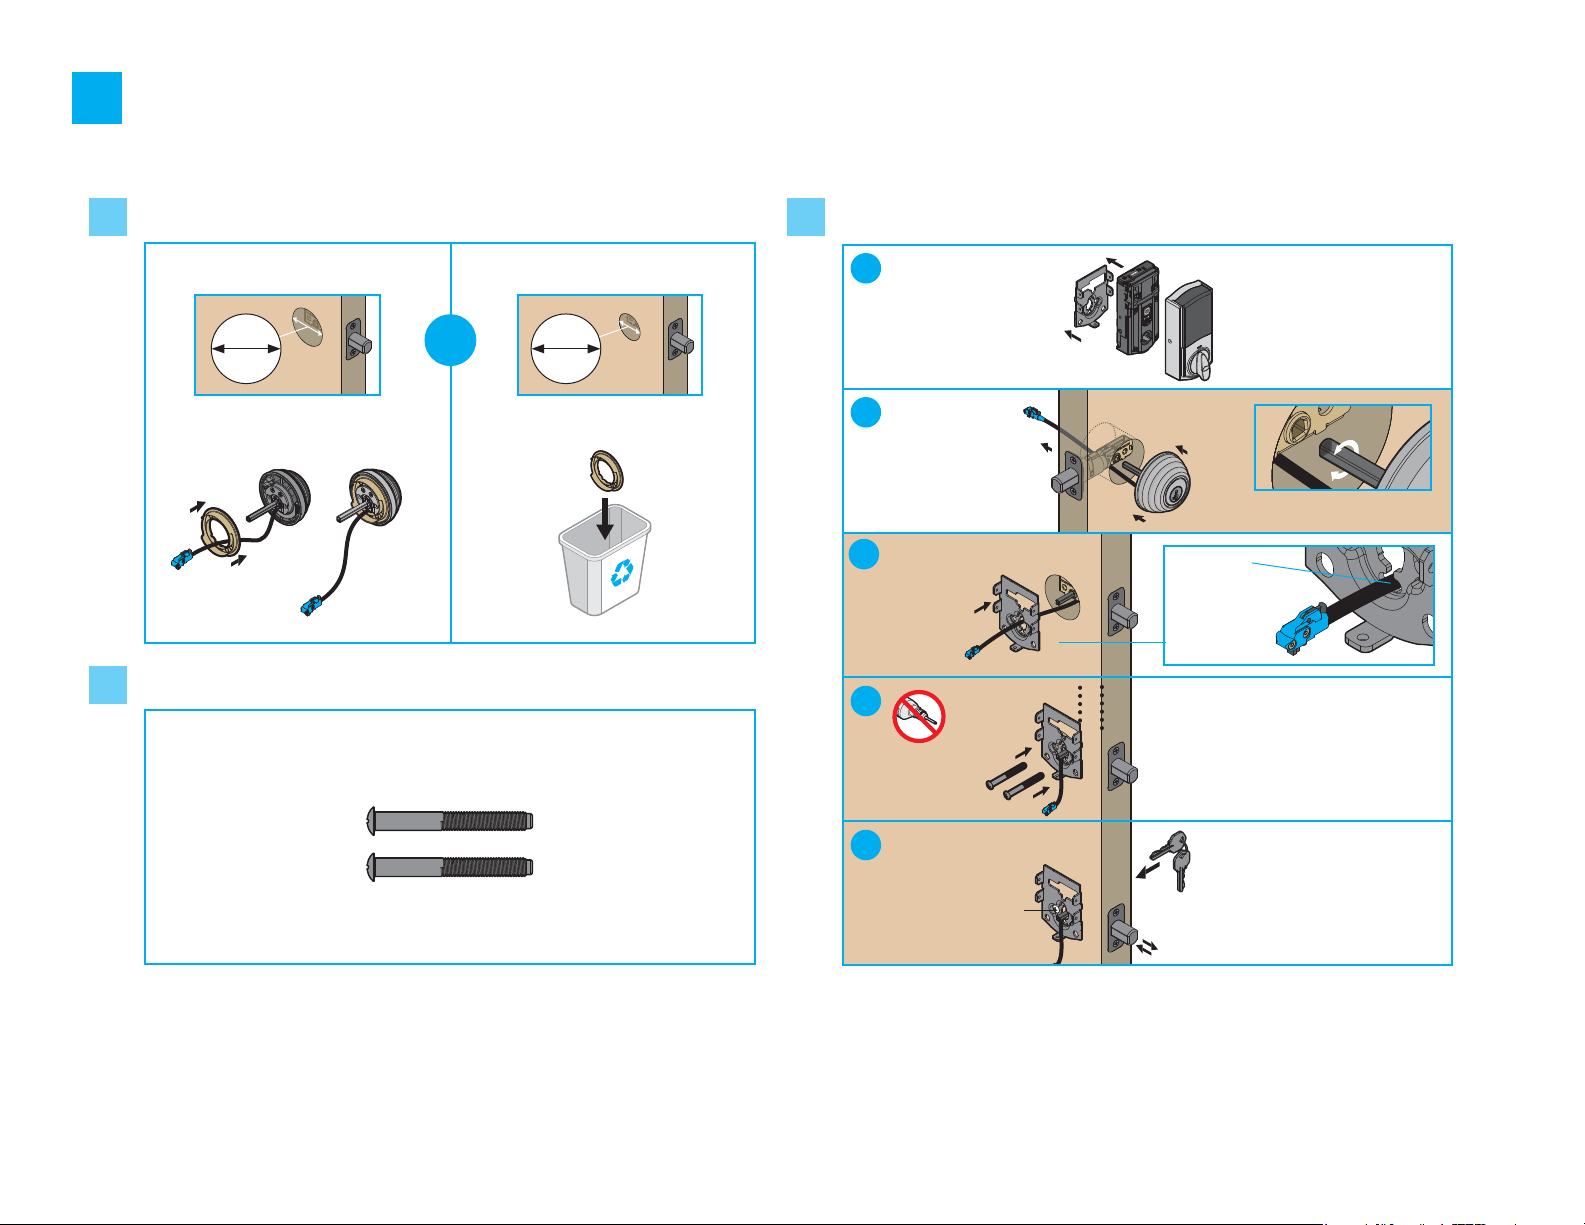
Install the exterior assembly
3
What is the diameter of the hole in the door? Install exterior assembly and mounting plate.
A C
Locate mounting plate (G).
Diameter is 21/8" (54 mm) Diameter is 11/2" (38 mm)
a
Note: It is on the back of
the interior assembly.
21/8"
54 mm
“E” is required for installation .
Install “E” on “D”.
D
E
Locate mounting screws and keep them within reach.
B
or
T
11/2"
38 mm
“E” is not n eeded for
installation. Discard “E”.
E
b
Cable goes underneath latch.
c
G
d
T (2x)
Tighten
screws evenly
e
T
G
D
Route cable
through
center hole,
then push
cable into
bottom hole.
Keep parallel to
edge of door
F
Insert key and test latch . If
latch does not extend or retract
smoothly, adjust screws ( T).
Remove key when inished
and make sure the latch
bolt is fully extended .
Rotate torq ue blade to align
with D-shaped hole.
4 / 11 © 2016 Spectrum Brands, Inc.
Page 5

Install the interior assembly
4
Remove battery cover and battery pack from interior assembly.
A
Make sure
a
turnpiece is in the
vertical position.
Connect cable and install interior assembly.
B
Make sure
a
cable “clicks”
into place.
Remove
b
interior cover.
c
Remove
battery pack.
J
KKHH
vertical
Tuck cable into
b
interior housing.
Push turnpiece shaft
c
onto torque blade.
Do not install
batteries yet.
H
turnpiece
shaft
torque
blade
Secure with
d
screws.
bottom hole
U (2x)
Tip
Use lever if
you need to
remove cable.
5 / 11 © 2016 Spectrum Brands, Inc.
Page 6

Perform the door handing process
5
This step will teach the lock the orientation of your door and is crucial for lock operation.
A B
Install 4 AA batteries in the battery pack.
L (4x)
J
Ensure correct polarity. For best
results, use new, non-rechargeable
Alkaline batteries only.
IMPORTANT: Make sure the door is open. Insert the battery pack
while PRE SSING AND HOLDING the Program button. Release the button
when the battery pack is all the way inside the lock interior.
C D
IMPORTANT: The Status LED will lash red and green, and the lock will beep. Press
and release the Program button again. The latch bolt will retract and extend on its own.
status LED
6 / 11 © 2016 Spectrum Brands, Inc.
Did the latch bolt bolt retract and extend on its own?
YES NO
or
Door handing proce ss was
successful! Proceed to next step
after latch b olt stops moving.
Remove battery pack, wait
15 seconds, then at tempt
the process again.
Page 7

OPTIONAL: Re-key the lock
6
If desired, the lock may be re-keyed to work with your existing key.
See the supplied SmartKey Re-key instructions for more information.
Download the app and set up your smartphone
7
Download the Kevo app at kwikset.com/kevo/app or scan the QR code below. Follow the instructions inside the app to create an account, enroll
A B
your irst smartphone and send eKeys to family and friends.
When using your phone to lock and unlock the door,
make sure the phone is on, Bluetooth is enabled, and
the Kevo app is running in the background.
You may hold the phone in your hand, pocket, bag or purse as long
as there is a clear line of sight between the lock and the phone.
First 10 Touches
Your irst 10 touches will teach your Kevo smart lock
about your entryway and the typical positions where
you might keep your phone during normal use.
Kevo may take longer to lock and unlock during this learning phase.
After the irst 10 touches Kevo has learned about your home's
environment and customized itself to the best performance.
See “Positioning Technology” on page 11 for more information.
Locking the doorNormal use Unlocking the door
Touch the deadbolt rose.
The light ring will spin blue,
spin amber, then lash
amber, and you will hear one
beep. The door will lock.
7 / 11 © 2016 Spectrum Brands, Inc.
Touch the deadbolt rose.
The light ring will spin blue,
spin green, then lash green,
and you will hear two beeps.
The door will unlock.
Page 8

Install the interior cover
8
Important information about the interior cover:
The buttons
on the back
panel are
used to
program
Kevo.
The interior
cover will
be installed
over the
back panel
with three
screws.
The window
on the interior
cover is locked
by default
to prevent
someone from
tampering with
the back panel.
If the window
is unlocked,
it can slide
up for quick
access to
buttons while
the cover is
installed.
If you want to keep the window locked: If you want to unlock the window (for quick access to back panel):
aa
Install
cover.
Remove
security
screw.
K
K
Install
screws.
V (3x)
Install
bb c
cover.
Install
screws.
V (3x)
K
8 / 11 © 2016 Spectrum Brands, Inc.
© 2015 Spectrum Brands, Inc.
Page 9

Reference Guide
Kevo at a Glance
1. Deadbolt rose
2. SmartKey tool
access
5. Rese t butto n
6. Back panel
7. Pr og ra m bu tt on
8. Turnpiece shaft
Switches
1234
on o
3. Light ring
4. Keyway
AB
Switch 1
9. Positioning
Tec hno lo gy b utt on
10. Switches
11. Statu s LED
Status LED
Door lock status LED blinks every 6
seconds. ON position is factory default.
Switch 2
Triple Touch Lock
See “Triple Touch Lock.”
OFF position is factory default.
Switch 3
Audio
Beeping sound is heard during
programming and normal operation.
ON position is factory default.
Switch 4
Auto-Lock
Automatically re-locks door 30
seconds after unlocking. OFF position
is factory default.
1. Touch Kevo anywhere on the
metalli c surface behind t he
light ring to l ock and unlock.
2. Insert your SmartKey tool here
when rekeyin g your lock to
work with your existing key.
3. Chan ges color to communicate
with you.
4. Insert yo ur standard key here.
Only use to re set Kevo
5.
to delete all e Keys and fobs.
See “Syste m Reset” for more
information.
6. Where all the programmin g
features are lo cated.
7. Use to e nroll phones and fo bs.
8. Engages with turnpiece when
interior cove r is installed. W hen
the cover is rem oved, the
turnpiece shaft can be used
to manually lock and unlock
the door.
9. Use to reset cal ibration that
was learn ed during irst 10
touches to the deadbo lt rose.
10. Use to enab le and disable the
Status LED, Triple Touch Lock ,
Audio, and Auto -Lock.
11. Communicates whethe r the
door is lo cked or unlocked and
lashe s red for a low battery
alert . Can be turned on and o
by Switch #1.
Triple Touch Lock and Auto-Lock
Triple Touch Lock allows you to lo ck the door from the outside
without the use of a smartphone or fob. You might use Triple
Touch Lock if you are using only a standard key in your system
but wish to lock the door by touch, if your smartphone or fob is
disabled, or if you have a visitor in your home that will leave and
lock the door behind them.
To lock the door with this feature, touch the deadbolt rose three
times, pausing briely between each touch. The light ring will spin
blue, spin amber, then lash amber, and you will hear one beep (if
switch #3 is on).
To enable Triple Touch Lock, set Switch #2 to the ON position.
Auto-Loc k will automatically re-lock the door 30 seconds after
unlocking. To enable Auto- Lock, set Switch #4 to the ON position.
Both features are OFF by default.
CAUTION: With these feature enabled, it is possible to lock
yourself outside if you don’t have an enrolled smartphone,
Kevo fob or standard key with you.
Kevo-Compatible Devices
Smartphones and Smart Devices
A Kevo-compatible smartphone (or other
mobile internet-connected device or tablet )
must have Bluetooth Smar t Ready/ Bluetooth
4.0 and an app speciic to the device must be
installed. Find out if your device is compatible
at www.kwikset.com/kevo/devices.
Kevo Fob
A Kevo Fob is a Bluetooth device that provides the
same touch-to-open convenience as a smartphone.
Up to eight fobs can be enrolled in a single Kevo lock. A
single fob can be enrolled in up to 25 di erent Kevo locks.
Note: You may choose to use only Kevo fobs, only
smartphones or a mix of both in your Kevo system.
Standard Key
Always make sure you have access to your standard key.
System Reset
WARN ING: Resetting your Kevo system will restore your
lock to factory settings and delete all smar tphones and fobs
from Kevo’s memory.
If you wish to perform a syste m reset, press a nd hold the Rese t
button on t he back panel for 10 seconds until the lock b eeps and the
light ring lashes red.
AB
Phones: After a system re set, you will need to re- enroll and your
Owner phone. You will still be able to send eKeys at no charge to
anyone who previously had an active eKey at the time of reset.
Fobs: After a system reset, all fobs will need to be re-enrolled.
See the online Troubleshooting guide for instructions.
9 / 11 © 2016 Spectrum Brands, Inc.
Page 10

Light Ring Notiications
Blue Spinning and Shutting
O : Kevo is unable to e stablish a
connec tion with your device, and it
will not lock or unlock. Make sure that
your Bluetooth and Bluetooth Sharing
(inside your phone’s privacy settings)
are enabled, and make sure you are
signed in to your Kevo app and that
it’s running in the background.
Red Light Ring Warnings
Top Two LEDs ar e Solid Red: The AA batteries in
the Kevo interior are low and need to be replaced.
Status LED Notiications
Magenta Flash: Your device is
outside of the activation range
that was established during your
irst 10 touches, an d it will not
lock or unlock. See “Positioning
Technology” on page 11. When
locking and unlocking your door,
make sure there is a clear line of sight
between the lock and your device .
Bottom LED i s Solid Red: The fob battery
(CR2025) is low and need s to be replaced.
See the online Troubleshooting Guide at
www.kwikset.com/kevo/support .
Tea l Fl as h: Kevo was tapped while the
door was already opening or closing.
Side LEDs Flashing Red: The deadbolt has
jammed . Check your door for alignment and
make sure the latch bolt can operate smoothly.
Red Flas h: Kevo has detected an
unauthorized device within activation
range, and it will not lock or unlock.
An unauthorized phone is one with
the Kevo app installed that does not
have an eKey to your lo ck, and an
unauthorized fob is one that has not
been enrolled in your Kevo system.
Amber lash
Door is locked
Green lash
Door is unlocked.
The 4 AA batteries in the Kevo interior are low and
Red la sh
need to be replaced.
10 / 11 © 2016 Spectrum Brands, Inc.
Page 11

Advanced Features
Positioning Technology
The Kevo smart lock features a unique positioning technology that can
tell if your device is inside or outside your home to help prevent your
door from being unlocked by unauthorized users while your device is
inside.
For additional security, Kevo will also limit the activation range on the
outside. During the irst 10 touches, the Kevo smart lock will learn about
your entryway and the t ypical positions where you might keep your
phone during normal use.
Kevo may take longer to lock an d unlock during this learning pha se.
After the irst 10 touches, Kevo has learned about your home's
environment and customized itself to the best performance.
If you ind that the Kevo activation range is not ideal for your use, you
can reset what Kevo learned, and Kevo will learn your environment
again. Quickly press and release the Positioning Technology button on
the lock interior. Kevo will learn your environment again during the next
10 touches.
Important Safeguards
1. Read all instructions in their entirety.
2. Familiarize yourself with all warning
and caution statements.
3. Remind all family members of safety precautions.
4. Always have access to your lock’s standard key.
5. If using the Triple Touch Lock or AutoLock features, make sure to have your
smartphone, fob or standard key with
you to prevent locking yourself out.
6. Familiarize yourself with all light
ring error notiications.
7. Replace low batteries immediately.
Preventing Inadvertent
Unloc king of Your Door
WARNING : Failure to follow t hese safeg uards
could result i n your lock ope ning inadver tently.
1. Avoid keeping and storing phones
and fobs unnecessarily close to the
lock when inside the home.
2. Restrict access to your Kevo lock’s back panel
and routinely check your settings to ensure they
have not been altered without your knowledge.
3. Protect the password to your Kevo
app and web portal accounts.
4. When sending an eKey, always double-check
that you are sending it to the correct recipient.
5. Protect and restrict access to your
smartphone so that your app settings cannot
be altered without your knowledge.
6. Enable the Kevo app’s security passcode
so that your app settings cannot be
altered without your knowledge.
7. When sending eKeys, be aware of the
di erence between an Admin user and
other users in the system: an Admin user
can send, disable and delete eKeys.
8. If your smartphone is lost or stolen, use the Kevo
web portal (www.mykevo.com) to disable it.
9. If a fob in your Kevo system is lost or stolen,
reset your lock to delete it from memory.
History Log
A history of the lock’s activity may be viewed through the Kevo app or
by logging into the web por tal: www.mykevo.com.
Notiications
The Kevo app can send noti ications when the door is locked and
unlocked by eKey holders. You can choose to receive the system’s
default notiications or set up custom notiications to monitor a speciic
user or time frame.
Dual Factor Authentication
Kevo features an optional, added-security passcode that you can enable
inside the app to be used in addition to the app’s password. Enabling the
passcode will require you to enter a 4- digit PIN whenever you access the
app, and it protects your Kevo account against unauthorized changes
when your phone is unlocked.
CAUTION : As with any radio- based
technolo gy, it shoul d be noted tha t the accurac y
and reliabili ty of the Kevo lock ’s inside-out side
sensor c annot be gua ranteed. Us ers should not
rely solely o n the Kevo lock ’s sensor for se curity
purpose s and should always use ca ution. This
manufac turer assumes no respo nsibility for
incorrec t results or dam ages resultin g from the use
of the Kevo lock ’s sensor.
Certain h ome coniguration s may impede the Kevo
lock’s s ensor more tha n others. E xample: Your
home o ic e is located ne xt to your entryway, and
part of th e o ice extends past th e front door, jutting
into the front y ard. If your device is bein g actively
used in tha t o ice extension, the Kevo lock’s sensor
could pos sibly detect the dev ice as being o utside of
your home wh ile that device is in active use.
WARNING : This Manufact urer advises th at
no lock can p rovide comple te security by i tself.
This lock may b e defeated by forcible or tech nical
means, o r evaded by entr y elsewhere on the
proper ty. No lock can su bstitute for c aution,
awareness of yo ur environmen t, and commo n
sense. B uilder’s hardw are is available in mu ltiple
perform ance grade s to suit the appli cation. In
order to enhan ce securit y and reduce risk , you
should con sult a qualii ed locksmi th or other
security professional.
Kevo Plus
With Kevo Plus, you will be able to lock and unlock your home and check
whether your door is locked or unlocked when you are away from home.
You can upgrade to Kevo Plus inside the Kevo app.
Visit www.kwikset .com/kevo/kevo-plus for more information.
Connect Smart Products
Connec t Kevo to select smart products. In the Kevo app, tap the gear
icon to connect to smart products (iOS only: select “Preferences”). Visit
www.kwik set.com/kevo/support for more information.
Need Help?
www.kwikset.com/kevo/support
18003275625
18003275625
1800 623 118
0800 736 776
528141709475
56229382400
5713441460
+86 755298331111
+65 - 666 55 888 o ice • +65 - 8181 8989 mobile
+65 - 666 55 888 o ice • +65 - 8181 8989 mobile
11 / 11 © 2016 Spectrum Brands, Inc.
Page 12

64436 / 01
Terms and Conditions
Términos y condiciones
Termes et conditions
Conformité règlementaire
Ce produit est conforme aux normes établies par
les orga nismes de règlementation suivants :
• Federal Communications Commission (FCC)
• Industrie Canada
FCC
Cet app areil est conform e aux limites prescrites dans la
parti e 15 des règlements de la Federal Communi cation
Commission (FC C) des État s-Un is. Son utilisation est
subord onnée a ux conditions suivantes : ( 1 ) l’ap pareil
ne doit pas cause r d’inter férence nuisib les, et ( 2 )
il doit accepter toute interfé rence, y compris celles
qui peu vent causer son ma uvais fon ctionnement .
Lors des te sts ee ctués , cet appareil s’est révélé confo rme
aux limites prescr ites dans l a partie 15 des règ lements de la
Federal Communicati ons Com mission (FCC) des États-Unis
pour un a ppareil numérique de Cl asse B. C es limite s ont
été fixées p our protéger raisonnablement l es insta llation s
réside ntielle s contre les interfé rences n uisibles. L’appareil
produit, utilise e t peut ém ettre des radiofréquen ces. S’il
n’est pas installé et utilisé d e la façon prescrite, il peut
brouiller les communic ations radio. Il n’est pas garanti
qu’aucu ne inter férence ne se produira. Si l ’appareil brouill e
la réception d’une radio ou d ’un téléviseur (po ur savoir
s’il est à l’origine d u brouill age, il sut de l’éteindre et de
le rallu mer), l’utilisateur e st invité à tente r de corriger la
situation en pren ant une ou plusieurs des me sures suivantes :
• réorienter ou déplacer l’antenne réceptrice;
• éloigner dava ntage l’appareil é metteur du récepteur;
• bran cher l’ap pareil dans une prise relié e à un circuit
diére nt de celu i auque l le récepteur est relié;
• consu lter le dét aillant ou un techn icien de
radioté lévision expérim enté pou r obtenir d e l’aide.
IM PO RTANT! Le s modifications qui n’ont pas été
expressément approuvées par le fabricant de l’appareil
peuvent annuler l’autorisation d’utiliser l’appareil.
Industrie Canada
Cet appareil est conforme aux normes d’Industrie Canada
exemptes d e licence RSS. L’opérati on est sujette aux
deux condition s: ( 1 ) ce dispo sitif peut ne pas causer
l’inter férence et ( 2 ) ce dispositif doit accepter n ’impor te
quelle interfé rence, y compris l ’interférence q ui peut
cause r le fonctionnement non souhaité d u dispositif.
Cumplimiento Normativo
Este producto cum ple con la s normas establ ecidas
por los siguientes organismos reguladores:
• Comisión Federal de Comunicaciones (FCC)
• Industry Canada
FCC
Este dispositivo cu mple con l a 15ª parte del reglamento
de la FCC . Su funcionamiento está sujeto a las s iguientes
dos condicione s: ( 1 ) este dis positivo no deberá causar
ninguna interferencia dañina , y ( 2 ) este dispositivo de berá
acepta r cualquier interferen cia recib ida, incluyend o aquél la
que podría causar un funcionamiento no deseado.
Se realizaron pru ebas a es te equipo cuyos resultados
revelaron que cumple con los límites establecidos par a un
dispositivo digital de la Cla se B, conforme a la 1 5ª parte del
reglam ento de la FC C. Estos límites ha n sido imp uestos para
proporcionar protección razonable contra interferencias
dañinas en una in stalac ión resid encial. Este eq uipo genera,
utiliza y puede irr adiar energía de radiofrecuen cia y, si no se
instala y utiliza se gún lo qu e indican las instruccio nes, podría
causa r interferencia dañina e n radioc omunic acion es. Sin
embargo, no hay ga rantía de que la inte rferencia no ocurrirá
en deter minadas instalaciones. Si este equipo efectiva mente
causa i nterferencia en la recepción de radio o televisión,
la cual puede determina rse ence ndien do y apagando el
equip o, sugerimos al us uario qu e intente corregir di cha
interferencia tomando u na o más de las siguie ntes med idas:
• Volver a orientar o ubicar la a ntena receptora.
• Incre mentar la distancia entre el equip o y el recibidor.
• Cone ctar el e quipo a u na toma de co rriente
en un circu ito distinto del circuito en el
cual esté conectado el recibidor.
• Consultar con el distribuidor o u n técnico d e radio
y TV con experien cia para o btener su ayuda.
¡IMPORTANTE! Todo cambio o m odific ación no
aproba do expresamente p or el fab ricante podría
desautorizar al usuario para operar el equipo.
Industria de Canada
Este dispositivo cu mple con l as normas de la Ind ustria d e
Canada licencia-exenta RSS . Su funcionamiento está sujeto a
las siguientes do s condiciones: ( 1 ) e ste dispositivo no de berá
causa r ninguna interferencia dañina , y ( 2 ) este dispositivo
deberá aceptar cualquier interferencia, incluyendo aquélla que
podría causar el funcionamiento no deseado del dispositivo.
Regulatory Compliance
This product com plies with standards esta blishe d
by the following regu latory b odies:
• Federal Communications Commission (FCC)
• Industry Canada
FCC
This devi ce complies with Part 15 of the FCC Rules.
Opera tion is sub ject to the following two conditions:
( 1 ) this device may not ca use harmful interferen ce, and
( 2 ) this device must accept any inte rference recei ved,
including inter ference that may cause und esired operation.
This equipment has bee n tested an d found to comply with
the limits for a Class B digita l device, pursuant to Part 15
of the FCC Rules. Th ese limits are designed to provide
reason able prote ction against harmful interference in a
reside ntial ins tallation. This equipm ent gen erates, uses,
and can radiate ra dio freq uency e nergy and, if not installed
and use d in accord ance with the instructions, may cau se
harmful interference to radio com munications. However,
there is no guarantee that interfere nce will not occur in
a parti cular installation. If th is equipment do es cause
harmful interference to radio or television re ception,
which ca n be deter mined by turning th e equip ment
o and on , the user is encou raged to tr y to correct the
interference by one or more of the following measures:
• Reorient or relocate the receiving antenn a.
• Increase the separation between
the equipment a nd receiver.
• Conn ect the e quipment into an outlet on a circuit
diere nt from that to which the receiver is connected.
• Consult the dealer or an experie nced
radio/ TV tech nician for help.
IM PO RTANT! C hange s or modifications not expre ssly
approved by the manufacturer could void the
user’s authority to oper ate the equ ipment .
Industry Canada
This devi ce complies with In dustr y Canada licence-exe mpt
RSS sta ndard(s). Operation is s ubject to the following two
conditions:
( 1 ) this device may not ca use inter ference, and ( 2 ) this
device must accept any interference, including interferen ce
that may cause und esired operatio n of the devi ce.
Page 13

Important Safeguards
1. Read all instructions in their entirety.
2. Familiarize yourself with all warning
and caution statements.
3. Remind all family members of safety precautions.
4. Always have access to your lock’s standard key.
5. If using the Triple Touch Lock feature, make
sure to have your smartphone, fob or standard
key with you to prevent locking yourself out.
6. Familiarize yourself with all light
ring error notifications.
7. Replace low batteries immediately.
Preventing Inadvertent
Unlocking of Your Door
WARNING: Failure to follow these safeguards
could result in your lock opening inadvertently.
1. Avoid keeping and storing phones and fobs
unnecessarily close to the lock when inside the home.
2. Restrict access to your Kevo lock’s back panel
and routinely check your settings to ensure they
have not been altered without your knowledge.
3. Protect the password to your Kevo
app and web portal accounts.
4. When sending an eKey, always double-check that
you are sending it to the correct recipient.
5. Protect and restrict access to your
smartphone so that your app settings cannot
be altered without your knowledge.
6. Enable the Kevo app’s security passcode
so that your app settings cannot be
altered without your knowledge.
7. When sending eKeys, be aware of the dierence
between an Admin user and other users in the system:
an Admin user can send, disable and delete eKeys.
8. If your smartphone is lost or stolen, use the Kevo
web portal (www.mykevo.com) to disable it.
9. If a fob in your Kevo system is lost or stolen,
reset your lock to delete it from memory.
CAUTION: As with any radio-based technology, it
should be noted that the accuracy and reliability
of the Kevo lock’s inside-outside sensor cannot
be guaranteed. Users should not rely solely on the
Kevo lock’s sensor for security purposes and should
always use caution. This manufacturer assumes
no responsibility for incorrect results or damages
resulting from the use of the Kevo lock’s sensor.
Certain home configurations may impede the Kevo
lock’s sensor more than others. Example: Your home
oce is located next to your entryway, and part
of the oce extends past the front door, jutting
into the front yard. If your device is being actively
used in that oce extension, the Kevo lock’s sensor
could possibly detect the device as being outside
of your home while that device is in active use.
WARNING: This Manufacturer advises that no lock
can provide complete security by itself. This lock
may be defeated by forcible or technical means,
or evaded by entry elsewhere on the property.
No lock can substitute for caution, awareness of
your environment, and common sense. Builder’s
hardware is available in multiple performance
grades to suit the application. In order to enhance
security and reduce risk, you should consult a
qualified locksmith or other security professional.
Medidas de protección importantes
1. Lea las instrucciones en su totalidad.
2. Familiarícese con todas las definiciones
de advertencia y precaución.
3. Recuerde a todos los integrantes de su
familia las precauciones de seguridad.
4. Siempre tenga acceso a la llave
estándar de su cerradura.
5. Si utiliza la función de cierre con tres toques,
verifique que lleve consigo el teléfono
inteligente, llavero transmisor o llave
estándar para evitar quedarse afuera.
6. Familiarícese con todas las notificaciones
de error que aparecen con anillo de luz.
7. Cambie las baterías gastadas de inmediato.
Impedir la apertura
involuntaria de la puerta
ADVERTENCIA: Si no se cumplen estas
medidas de protección, la cerradura
podría abrirse involuntariamente.
1. Evite mantener y guardar los teléfonos y
llaveros transmisores cerca de la cerradura
cuando esté en el interior de la casa.
2. Limite el acceso al panel posterior de la
cerradura Kevo y verifique en forma rutinaria
las configuraciones para comprobar que no
hayan sido alteradas sin su conocimiento.
3. Proteja las contraseñas de las cuentas
del portal web y aplicación Kevo.
4. Al enviar una llave electrónica, siempre
vuelva a comprobar que la está
enviando al destinatario correcto.
5. Proteja y limite el acceso a su teléfono inteligente
para que no se puedan alterar las configuraciones
de la aplicación sin su conocimiento.
6. Habilite el código de acceso de seguridad de la
aplicación Kevo para que no se puedan alterar las
configuraciones de la aplicación sin su conocimiento.
7. Al enviar llaves electrónicas, tenga en cuenta
la diferencia entre un usuario Admin y otros
usuarios del sistema: el usuario Admin puede
enviar, deshabilitar y eliminar llaves electrónicas.
8. Si pierde o roban su teléfono inteligente,
utilice el portal web (www.mykevo.com) para
deshabilitar el dispositivo inteligente.
9. Si pierde o roban su llavero transmisor, reinicie
la cerradura para eliminarla de la memoria.
PRECAUCIÓN: Al igual que con cualquier tecnología
de radio, se debe tener en cuenta que la precisión,
la confiabilidad o la utilidad del posicionamiento
de su dispositivo no se pueden garantizar con
ubicaciones derivadas del sensor correspondiente
a la cerradura Kevo; esta función se brinda solo por
propósitos de comodidad. Los usuarios no deben
confiar únicamente en el sensor de la cerradura
Kevo para propósitos de seguridad y siempre deben
tener precaución. Kwikset no asume responsabilidad
alguna por resultados incorrectos o daños producidos
por el uso del sensor de la cerradura Kevo.
Ciertas configuraciones domésticas pueden impedir
el funcionamiento del sensor de la cerradura Kevo
más que otras. Ejemplo: Su oficina está ubicada
junto al recibidor, y parte de la oficina se extiende
más allá de la puerta principal, proyectándose
hacia el patio principal. Si su dispositivo se utiliza
en forma activa en dicha extensión de la oficina, es
posible que el sensor de la cerradura Kevo detecte
el dispositivo en una ubicación externa al hogar
mientras dicho dispositivo se encuentra en uso activo.
ADVERTENCIA: Este Fabricante hace saber que no
hay cerrojos que puedan proporcionar completa
seguridad por sí mismos. Puede hacerse que
falle este cerrojo forzándolo o utilizando medios
técnicos, o puede evadirse entrando por otra parte
de la propiedad. No hay cerrojos que puedan
hacer de sustitutos para la precaución, el estar
al tanto del entorno, y el sentido común. Pueden
obtenerse piezas de ferretería de constructor con
diversos grados de rendimiento para ajustarse a
la aplicación. Para realzar la seguridad y reducir
los riesgos, debe consultar con un cerrajero
capacitado o otro profesional de seguridad.
Mesures de protection importantes
1. Lire toutes les instructions en entier.
2. Familiarisez-vous avec tous les
avertissements et mises en garde.
3. Rappelez les précautions de sécurité à
tous les membres de la famille.
4. Conservez un accès permanent à la
clé standard de votre serrure.
5. Lors de l’utilisation de la fonction trois touches de
la serrure, assurez-vous d’avoir avec vous votre
téléphone intelligent, porte-clés électronique
ou clé standard pour éviter que la porte ne
se verrouille alors que vous êtes dehors.
6. Familiarisez-vous avec tous les anneaux
lumineux de notification d’erreur.
7. Remplacez les piles faibles immédiatement.
Empêcher le déverrouillage
involontaire de votre porte
WARNING: Failure to follow these safeguards
could result in your lock opening inadvertently.
1. Évitez de garder ou entreposer des porte-clés
électroniques et téléphones excessivement près de la
serrure lorsque vous êtes à l’intérieur de la maison.
2. Restreignez l’accès au panneau arrière de
votre serrure Kevo et vérifiez régulièrement
vos réglages pour vous assurer qu’ils
n’ont pas été modifiés à votre insu.
3. Protégez les mots de passe de vos comptes
de portail Web et application Kevo.
4. Lors de l’envoi d’une eKey, revérifiez
systématiquement que vous êtes en train
de l’envoyer au bon destinataire.
5. Protégez et restreignez l’accès à votre téléphone
intelligent afin que les réglages de votre application
ne puissent être modifiés à votre insu.
6. Activez le code d’accès de sécurité de l’application
Kevo afin que les réglages de votre application
ne puissent être modifiés à votre insu.
7. Lors de l’envoi d’eKeys, tenez compte de la diérence
entre un utilisateur Administrateur et d’autres
utilisateurs du système ; un utilisateur Administrateur
peut envoyer, désactiver et supprimer des eKeys.
8. Si votre téléphone est perdu ou volé,
utilisez le portail Web (www.mykevo.com)
pour le supprimer ou le désactiver.
9. Si votre porte-clés électronique est perdu ou volé,
réinitialisez votre serrure pour l’eacer de la mémoire.
ATTENTION: Comme pour une technologie radio, il
est à noter que la précision, la fiabilité ou l’utilisabilité
du positionnement de votre appareil indiqué par
le capteur intérieur-extérieur de la serrure Kevo ne
peuvent être garanties; ces données sont fournies à
titre de commodité uniquement. Les utilisateurs ne
doivent pas se fier exclusivement aux capteurs de
la serrure Kevo à des fins de sécurité et ils doivent
toujours faire preuve de prudence. Le fabricant
se dégage de toute responsabilité en cas de
résultats incorrects ou de dommages découlant
de l’utilisation du capteur de la serrure Kevo.
Certaines configurations de maisons peuvent entraver
plus que d’autres le capteur de la serrure Kevo.
Exemple: Votre bureau à la maison est situé à côté
de votre entrée, et une partie du bureau s’étend
au-delà de la porte de la façade, s’avançant sur la
cour d’entrée. Si votre appareil est en train d’être
utilisé activement dans cette extension de bureau, le
capteur de la serrure Kevo pourrait éventuellement
détecter l’appareil comme étant à l’extérieur de votre
maison alors que cet appareil est en utilisation active.
AVERTISSEMENT: Le fabricant tient à vous aviser
qu’aucun verrou ne peut à lui seul orir une
sécurité complète. Ce verrou peut être mis hors
d’état par la force ou des moyens techniques ou
être évité par l’utilisation d’une autre entrée dans
la propriété. Aucun verrou ne peut remplacer la
surveillance de votre environnement et le bon
sens. Diérentes qualités de matériel d’installation
sont oertes pour diérentes applications. Afin
d’augmenter la sécurité et de réduire le risque,
vous devriez consulter un serrurier qualifié
ou un autre professionnel de la sécurité.
 Loading...