

Page 1
Not Included
Coax Cable Extra RCA Cables
Accessories
26M/27M/32M
26/27/32
TOP
BACK
Remote Power Cord VGA Cable PC Audio RCA Cables
Cable
AAA Batteries
User’s Manual
FRONT
Start Here
Easy Setup Instructions
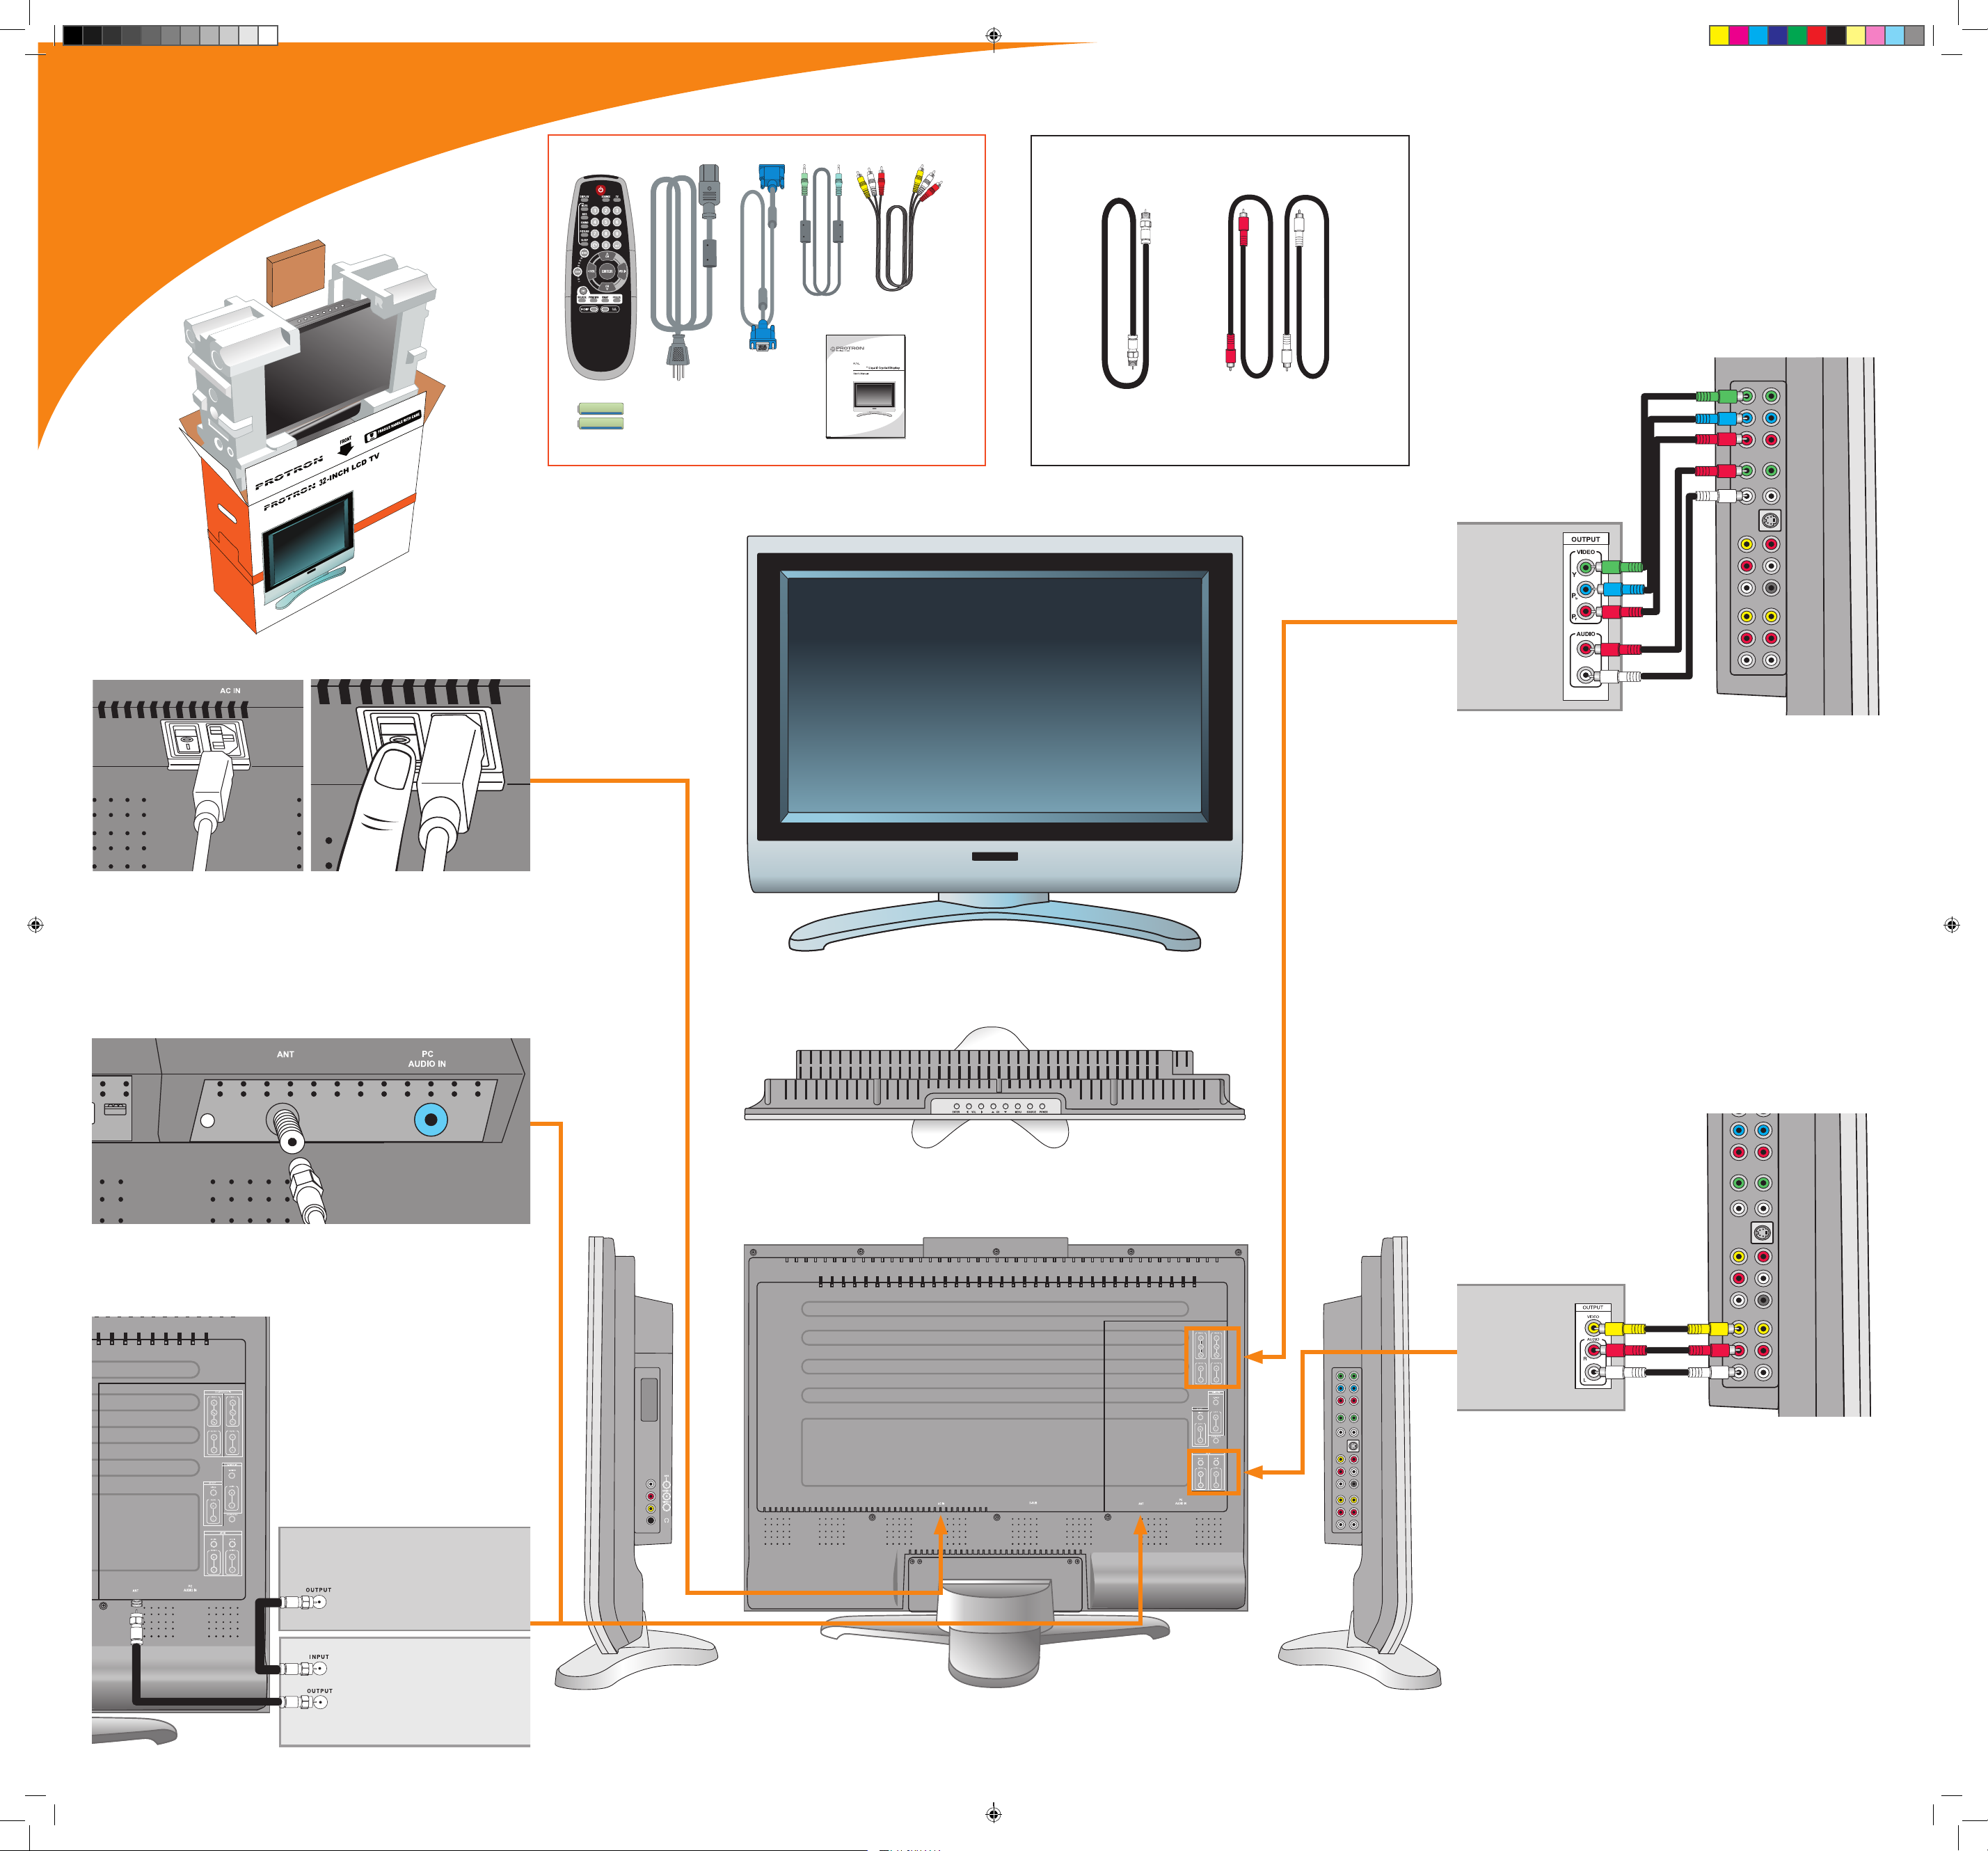
Unpacking the Display and Accessories
1. Remove the contents of the box and place the display in its
intended location.
PL
T
V
-
3
2
M
2. Plug in the display and turn it on.
Connecting to Component Video Output Components
(Ex: Progressive Scan DVD Player, HDTV Receiver)
1. Using three RCA cables, connect the three component video
outputs (Y, Pb, and Pr) to the corresponding jacks in one of the
two component video blocks on the display.
2. Using two other RCA cables, connect the right (red) and left
(white) audio outputs on the source to the corresponding jacks
in the same component video block used above.
R
L
Connecting to a TV Signal Source
(Ex: Cable Box, Satellite Receiver, Antenna)
1. Connect a coax cable between the adapter and TV signal
source.
Note: If you would like to be able to record the TV signal, connect
the TV signal source to the recording device, then connect
the recording device to the display.
Coax Video Source
Video Recorder
Connecting to Composite Video Output Components
(Ex: VCR, DVD Player)
1. Using an RCA cable, connect the composite video output (yellow)
on the source device to the corresponding jack in one of the three
composite video blocks on the display (AV 1 IN, AV 2 IN, or AV 3 IN).
2. Using two RCA cables, connect the right (red) and left (white)
audio outputs on the source to the corresponding jacks in the
same composite video block used above.
Accessories Box
Vertical fold
Vertical fold
EZPLTV26M_27M_32M.indd 1 10/10/2005 11:04:35 AM
Page 2
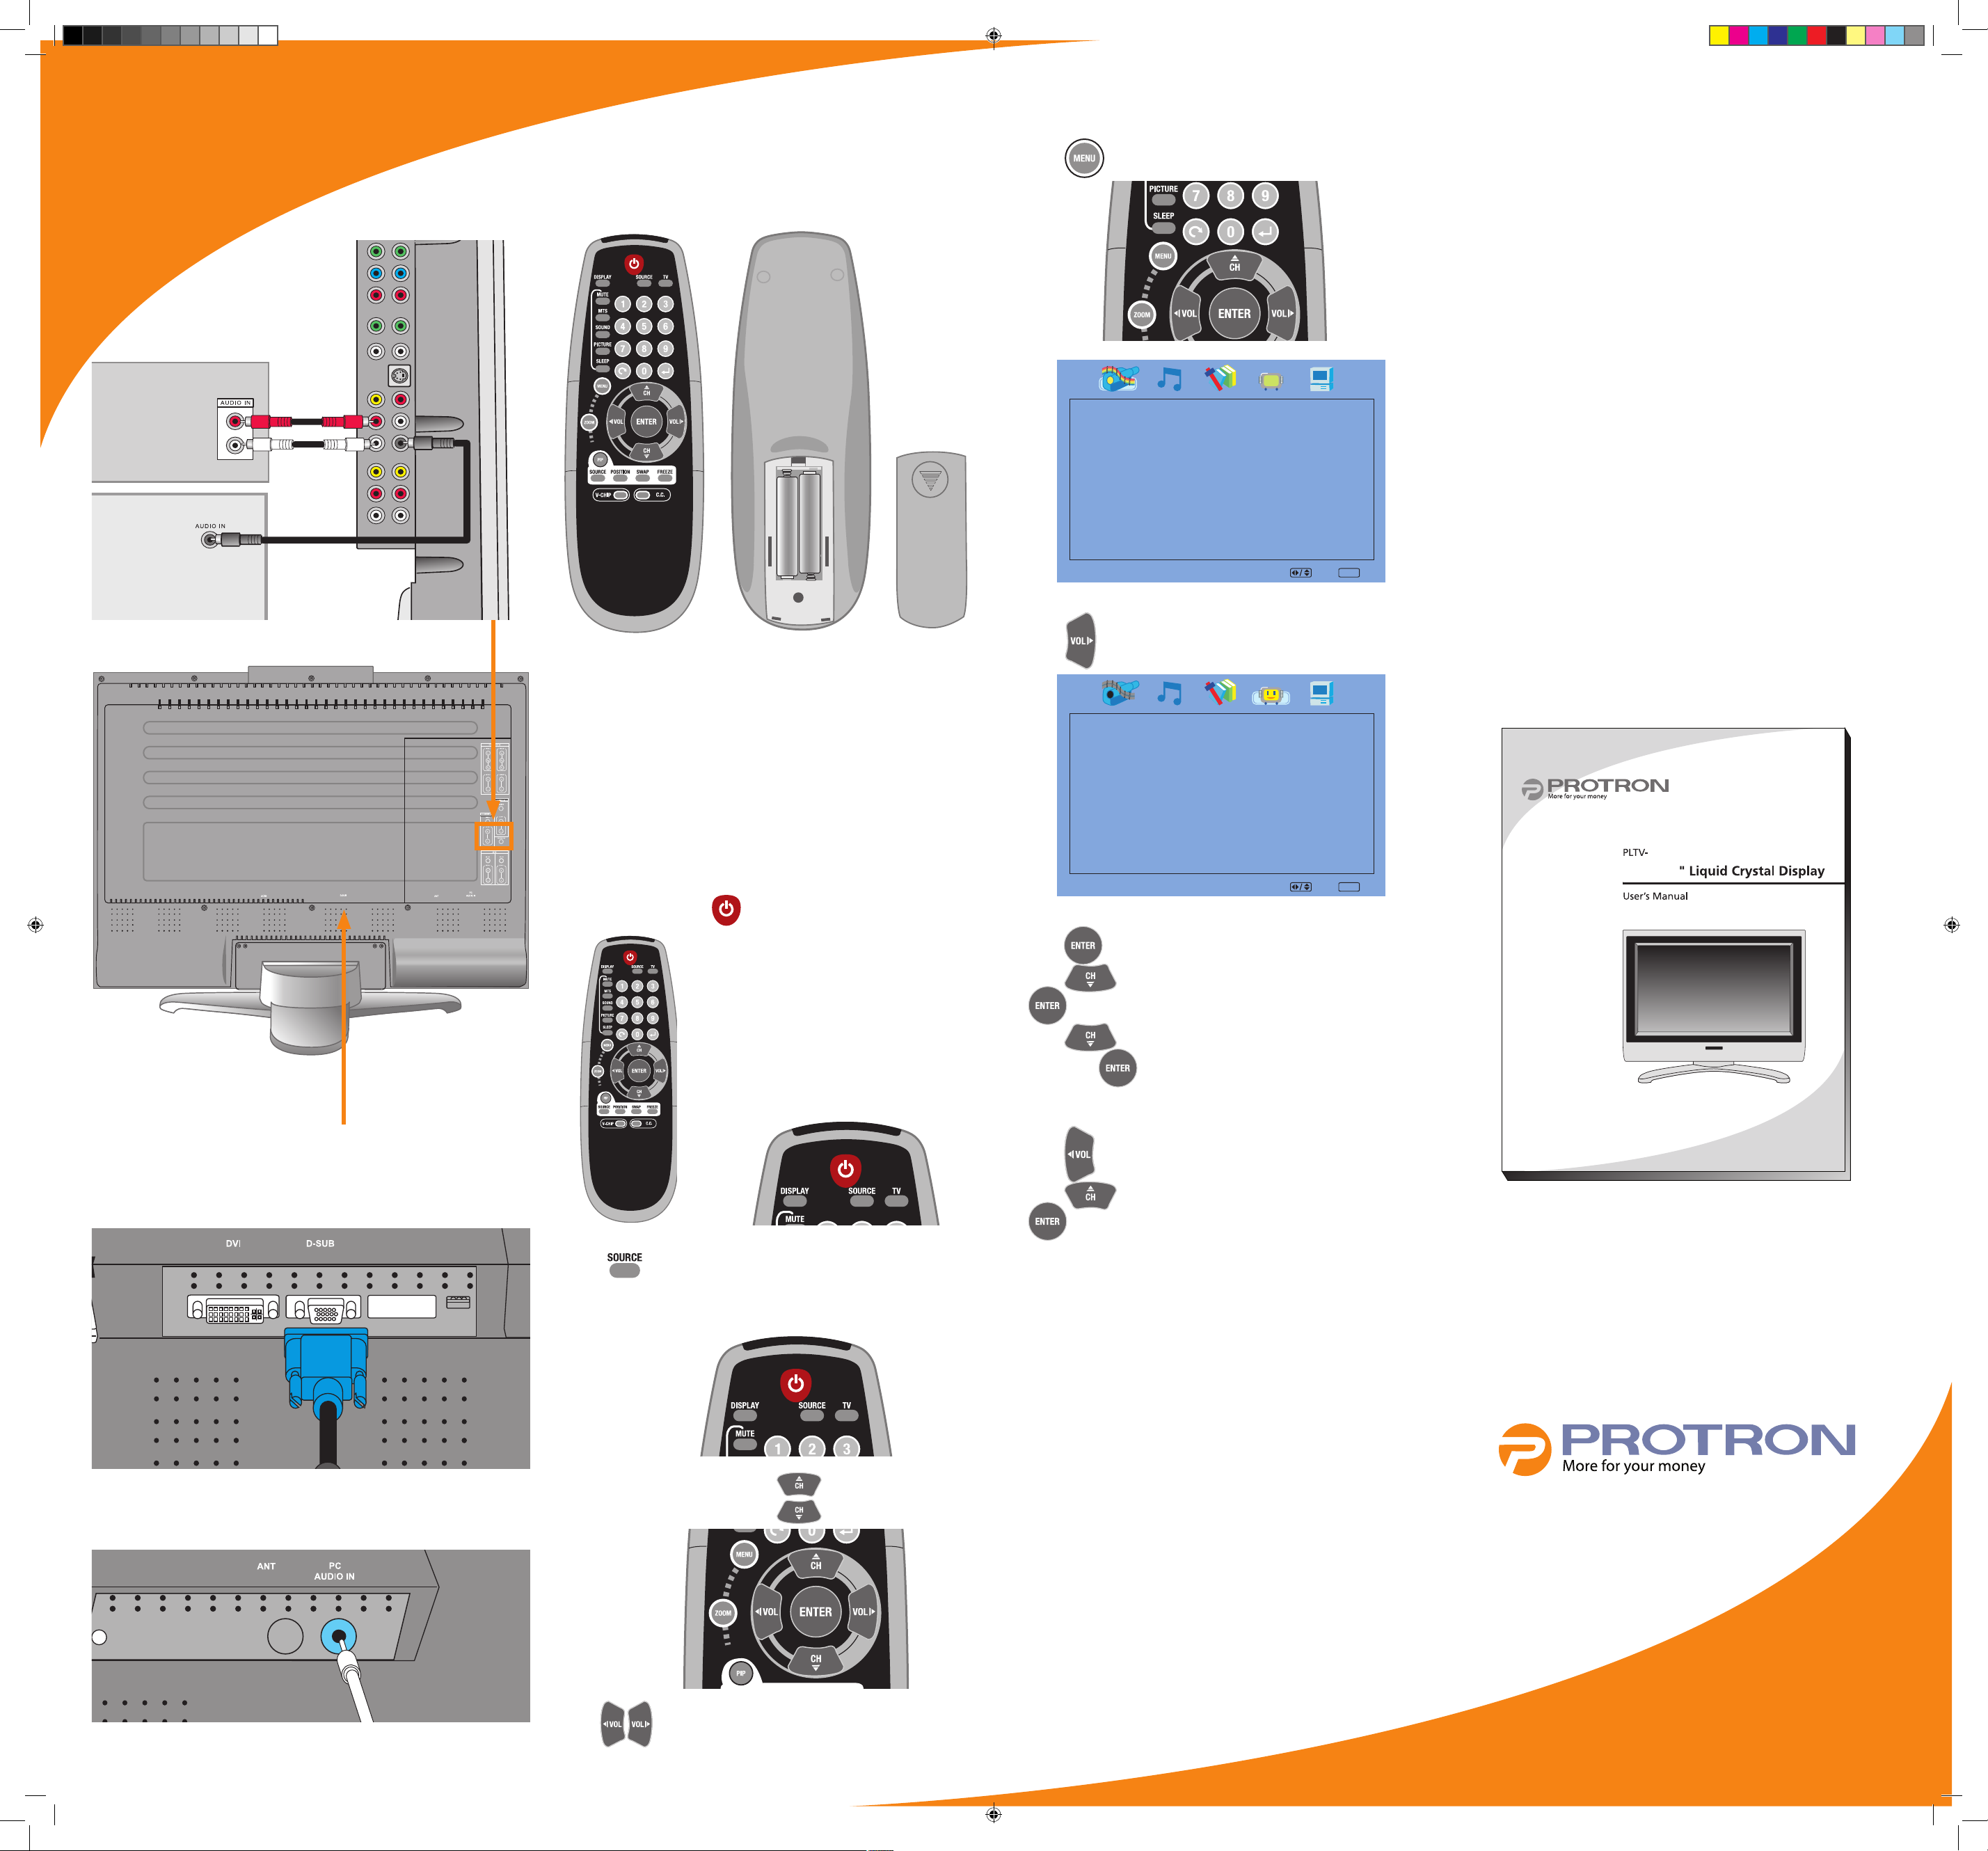
Connecting to an Audio System
1. Using two RCA cables, connect the right (red) and left (white)
audio outputs in the output block on the display (AV OUT) to
the corresponding inputs on your audio system.
2. (OPTIONAL) If you have a powered (amplified) subwoofer,
connect a third RCA cable from the SUBWOOFER output on the
display to the subwoofer’s (or amplifier’s) input.
R
L
Audio
System
Powered
Subwoofer
Installing Batteries in the Remote Control
1. Remove the plastic battery compartment cover from the rear of
the remote.
2. Insert two AAA batteries. Be sure to orient the batteries as
indicated in the compartment.
3. Replace the cover.
Setting up Television Channels
1. Ensure the display is on and the signal source is set to TV.
2. Press
to bring up the On-Screen Display (OSD).
Contrast
Brightness
Saturation
Hue
Sharpness
Flesh Tone
Color Temperature
50
50
50
50
30
ON
Warm
Video SelectSelect ExitExit
MENU
3. Press until the TV menu shows.
Auto Search
Tuner Mode
Channel Skip
Channel Name
Blue Mute
Air
ON
TV SelectSelect ExitExit
MENU
4. Press to enter the menu.
5. Press
until Tuner Mode is highlighted and then press
to select it.
6. Press
until the appropriate system is highlighted and
then press to select it.
Select Air if you are using an antenna, or Cable if you are
connecting the display directly to a cable TV wall outlet.
7. Press
to return to the TV menu.
8. Press until Auto Search is highlighted and then press
to select it.
The display will automatically scan all television channels for
those with a strong signal.
For more information, refer to the User’s Manual.
26M/27M/32M
26/27/32
Operating the Display
1. On the remote, press to turn the display on.
2. Press until the desired signal source is selected (the name
of the currently selected signal source will display at the top
right of the screen).
3. If the source is set to “TV”, use to change the channel.
4. Use to adjust the volume.
Connecting to a PC
1. Set the video resolution on the computer to 1280 × 1024 or
less.
2. Connect the included VGA cable between the VGA output on
the computer and the VGA input on the display.
3. (OPTIONAL) Using the PC audio cable, connect the computer’s
audio output (LINE OUT) to the audio input on the bottom of
the display (PC AUDIO IN).
© 2005 Protron Digital Corporation
EZPLTV26M/27M/32M
Vertical fold
Vertical fold
EZPLTV26M_27M_32M.indd 2 10/10/2005 11:04:51 AM
 Loading...