

Page 1
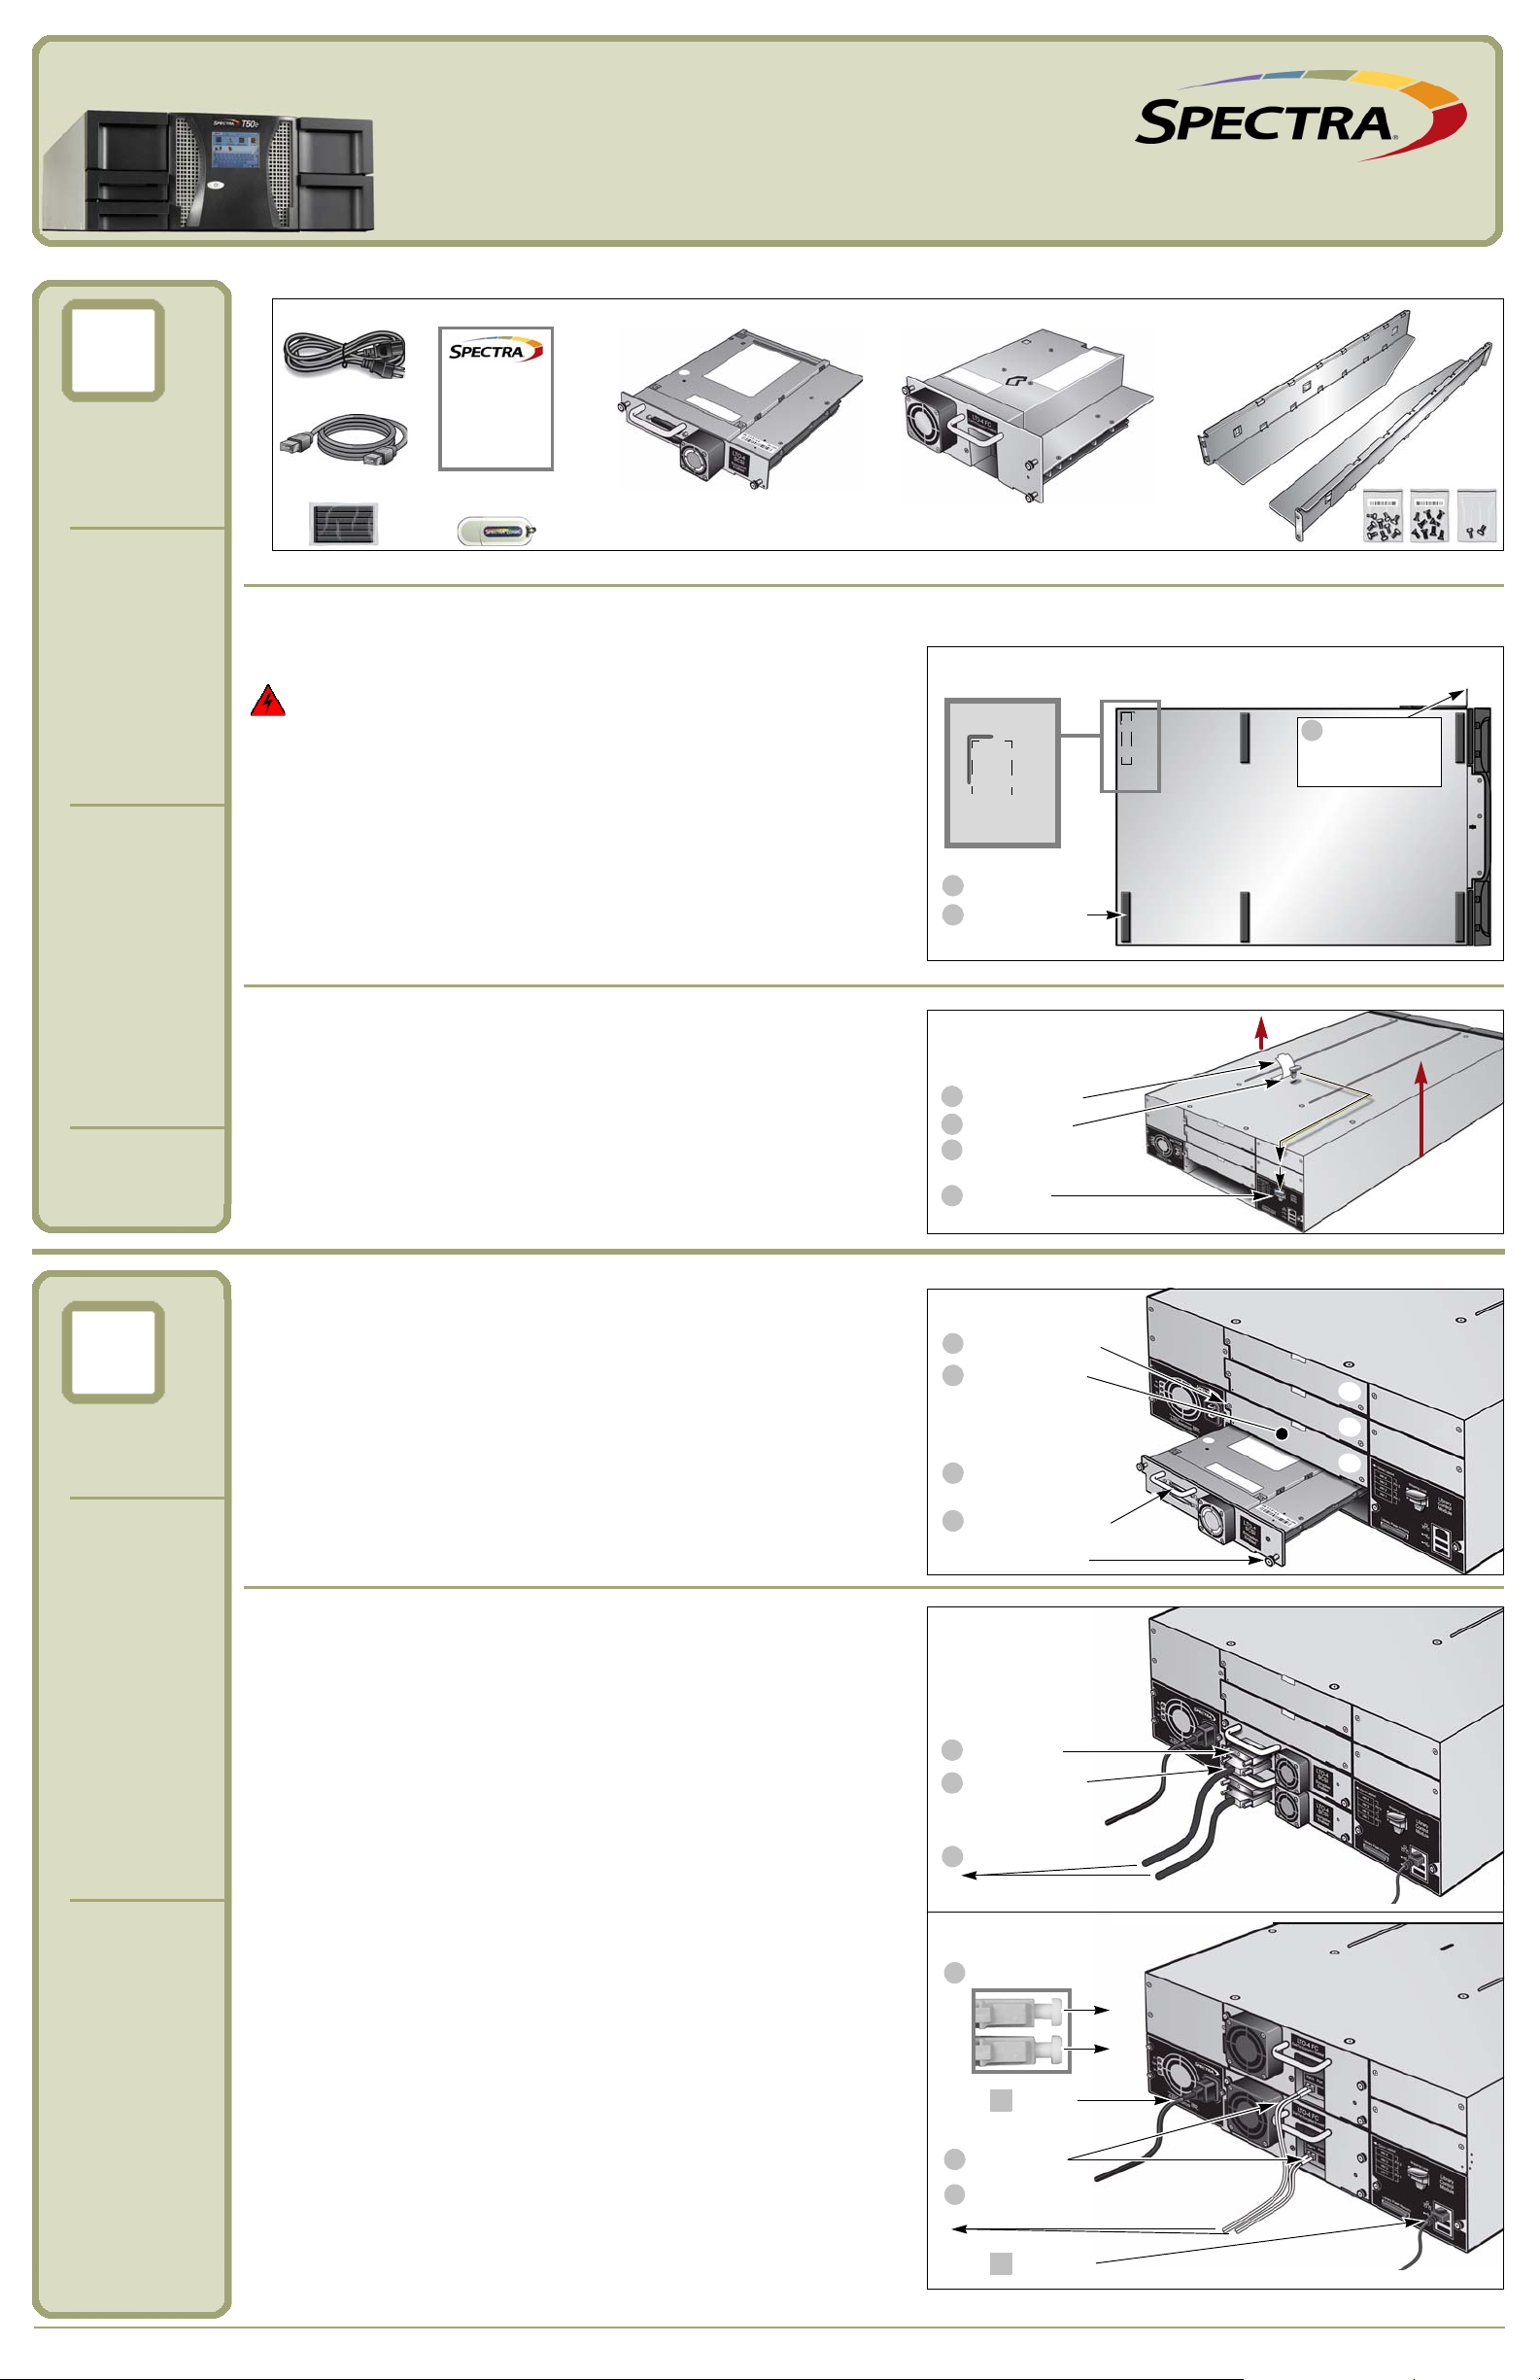
Unpack and
1
2
Power cord
Rubber feet
Half Height (HH) tape drive sled* -or- Full Height (FH) tape drive sled* Rack-mount kit
Ethernet cable
* The tape drives, the (optional) redundant power supply, and the
library may ship and arrive separately.
Documentation
Open This First
USB drive
(in kit)
Documentation
1
Access bottom
Attach six feet
2
Bottom of library
Alignment
mark (6x)
Do not set
the library on
1
the bracket.
Important! If you remove the bracket, replace the
black screw; do not replace the silver screw.
Warning! The library weighs approximately 34.4 lb. Two people are
needed to move or lift the library.
German: Die Bebliothek hat ein Gewicht vonungefähr 15,6 kg. Zwei
Personen ind notwendig, zu verschieben oder Aufhebung der Bibliothek.
1
Remove tape
3
4
Remove key
Replace tape
2
Store key
Important! Lift
only by two sides.
2
Remove screws
1
4
Remove plate
Install tape drive
Remove tape drive
3
from packaging
(remove two plates
for each full-height
Finger screws
tape drive)
2
3
4
Fibre Channel
Ethernet
3
Connect FC
Connect to Host
2
E
1
Power
P
Remove plugs
2
1
3
Te rm in a te
Connect SCSI
Connect to Host
SCSI
Two half-height SCSI
tape drives shown.
or switch
Verify the
Components
Spectra T50e
Quick Start Guide
Rack-mount Installation Refer to the Spectra T50e Rack-mount Kit Installation Instructions supplied in the Spectra T50e Documentation Kit.
Tabletop Installation You do not need to remove the brackets.
Install the
Library
Remove the
Shipping
Key
L
Install the
Tape Drives
Important! Lift the library only by the two sides—not by the front and back.
Do not stack items on top of the library, as they can restrict robot movement.
1. Carefully place the library on its side, but do not damage the bracket.
2.Remove the paper backing from the six feet and install as shown.
3.Place the library on a level surface in a well ventilated location.
Note: Do not install the feet if you are rack-mounting the library.
Shipping Key Removal Follow these steps to remove the shipping key:
1. Remove the tape securing the shipping key.
2.Pull the key straight up and out of the library.
3.Place the tape back over the opening in the top of the library.
4.Store the key in the tab at the back of the library.
Tape Drive Installation Install the tape drives from bottom to top.
1. Using a #2 Phillips screwdriver, remove the screws securing the cover plate
(or plates), as needed. Important! Do not leave openings uncovered.
2.Remove the plate and store it and the screws for future use.
3.Remove the tape drive from its protective packaging.
4.While supporting the bottom of the drive sled, slide it into the
empty drive bay. Push the drive sled in until it fits flush against
the chassis and tighten the finger screws.
Connect the
Cables
Note: Refer to the Spectra T50e Tape Drive Installation Instructions for
additional information.
SCSI Follow these steps to connect SCSI tape drives.
Important! Do not mix full-height and half-height tape drives in the
library. Do not daisy-chain LTO-4 SCSI tape drives.
1. Connect SCSI cables to the tape drives, as shown.
2.Terminate as follows:
LTO-3—terminate if it is the last device on the SCSI bus. Every
connector on an LTO-3 tape drive must either be connected to a host,
connected to the next tape drive, or terminated. A maximum of two
LTO-3 SCSI tape drives can be daisy-chained on a single SCSI bus.
LTO-4—terminate the second connector on every tape drive.
Do not daisy-chain LTO-4 tape drives.
3.Connect the other end of the cable to the host computer.
Fibre Channel Follow these steps to connect FC tape drives.
1. Remove the protective plugs from the optical connector.
2.Insert one end of the cable into the tape drive (either port).
3.Connect the other end of the cable into the HBA or switch.
Note: See the Spectra T50e Library User Guide for information about
dual-port tape drives.
Power Connect the power cord to the library and to an outlet.
Ethernet If you want to use the Ethernet option (remote management or
email notification), connect the Ethernet cable to the library and to the host.
Note: If you purchased an optional redundant power supply, refer to
the Spectra T50e Power Supply Installation Instructions for
information about installing it in the library.
• 2009 Spectra Logic Corporation. All rights reserved worldwide. BlueScale, Spectra, SpectraGuard, TeraPack, and the Spectra Logic logo are registered trademarks of Spectra Logic Corporation.
All other trademarks and registered trademarks are the property of their respective owners. Subject to change without notice.
Page 2
Spectra T50e Quick Start Guide
3
4
5
6
7
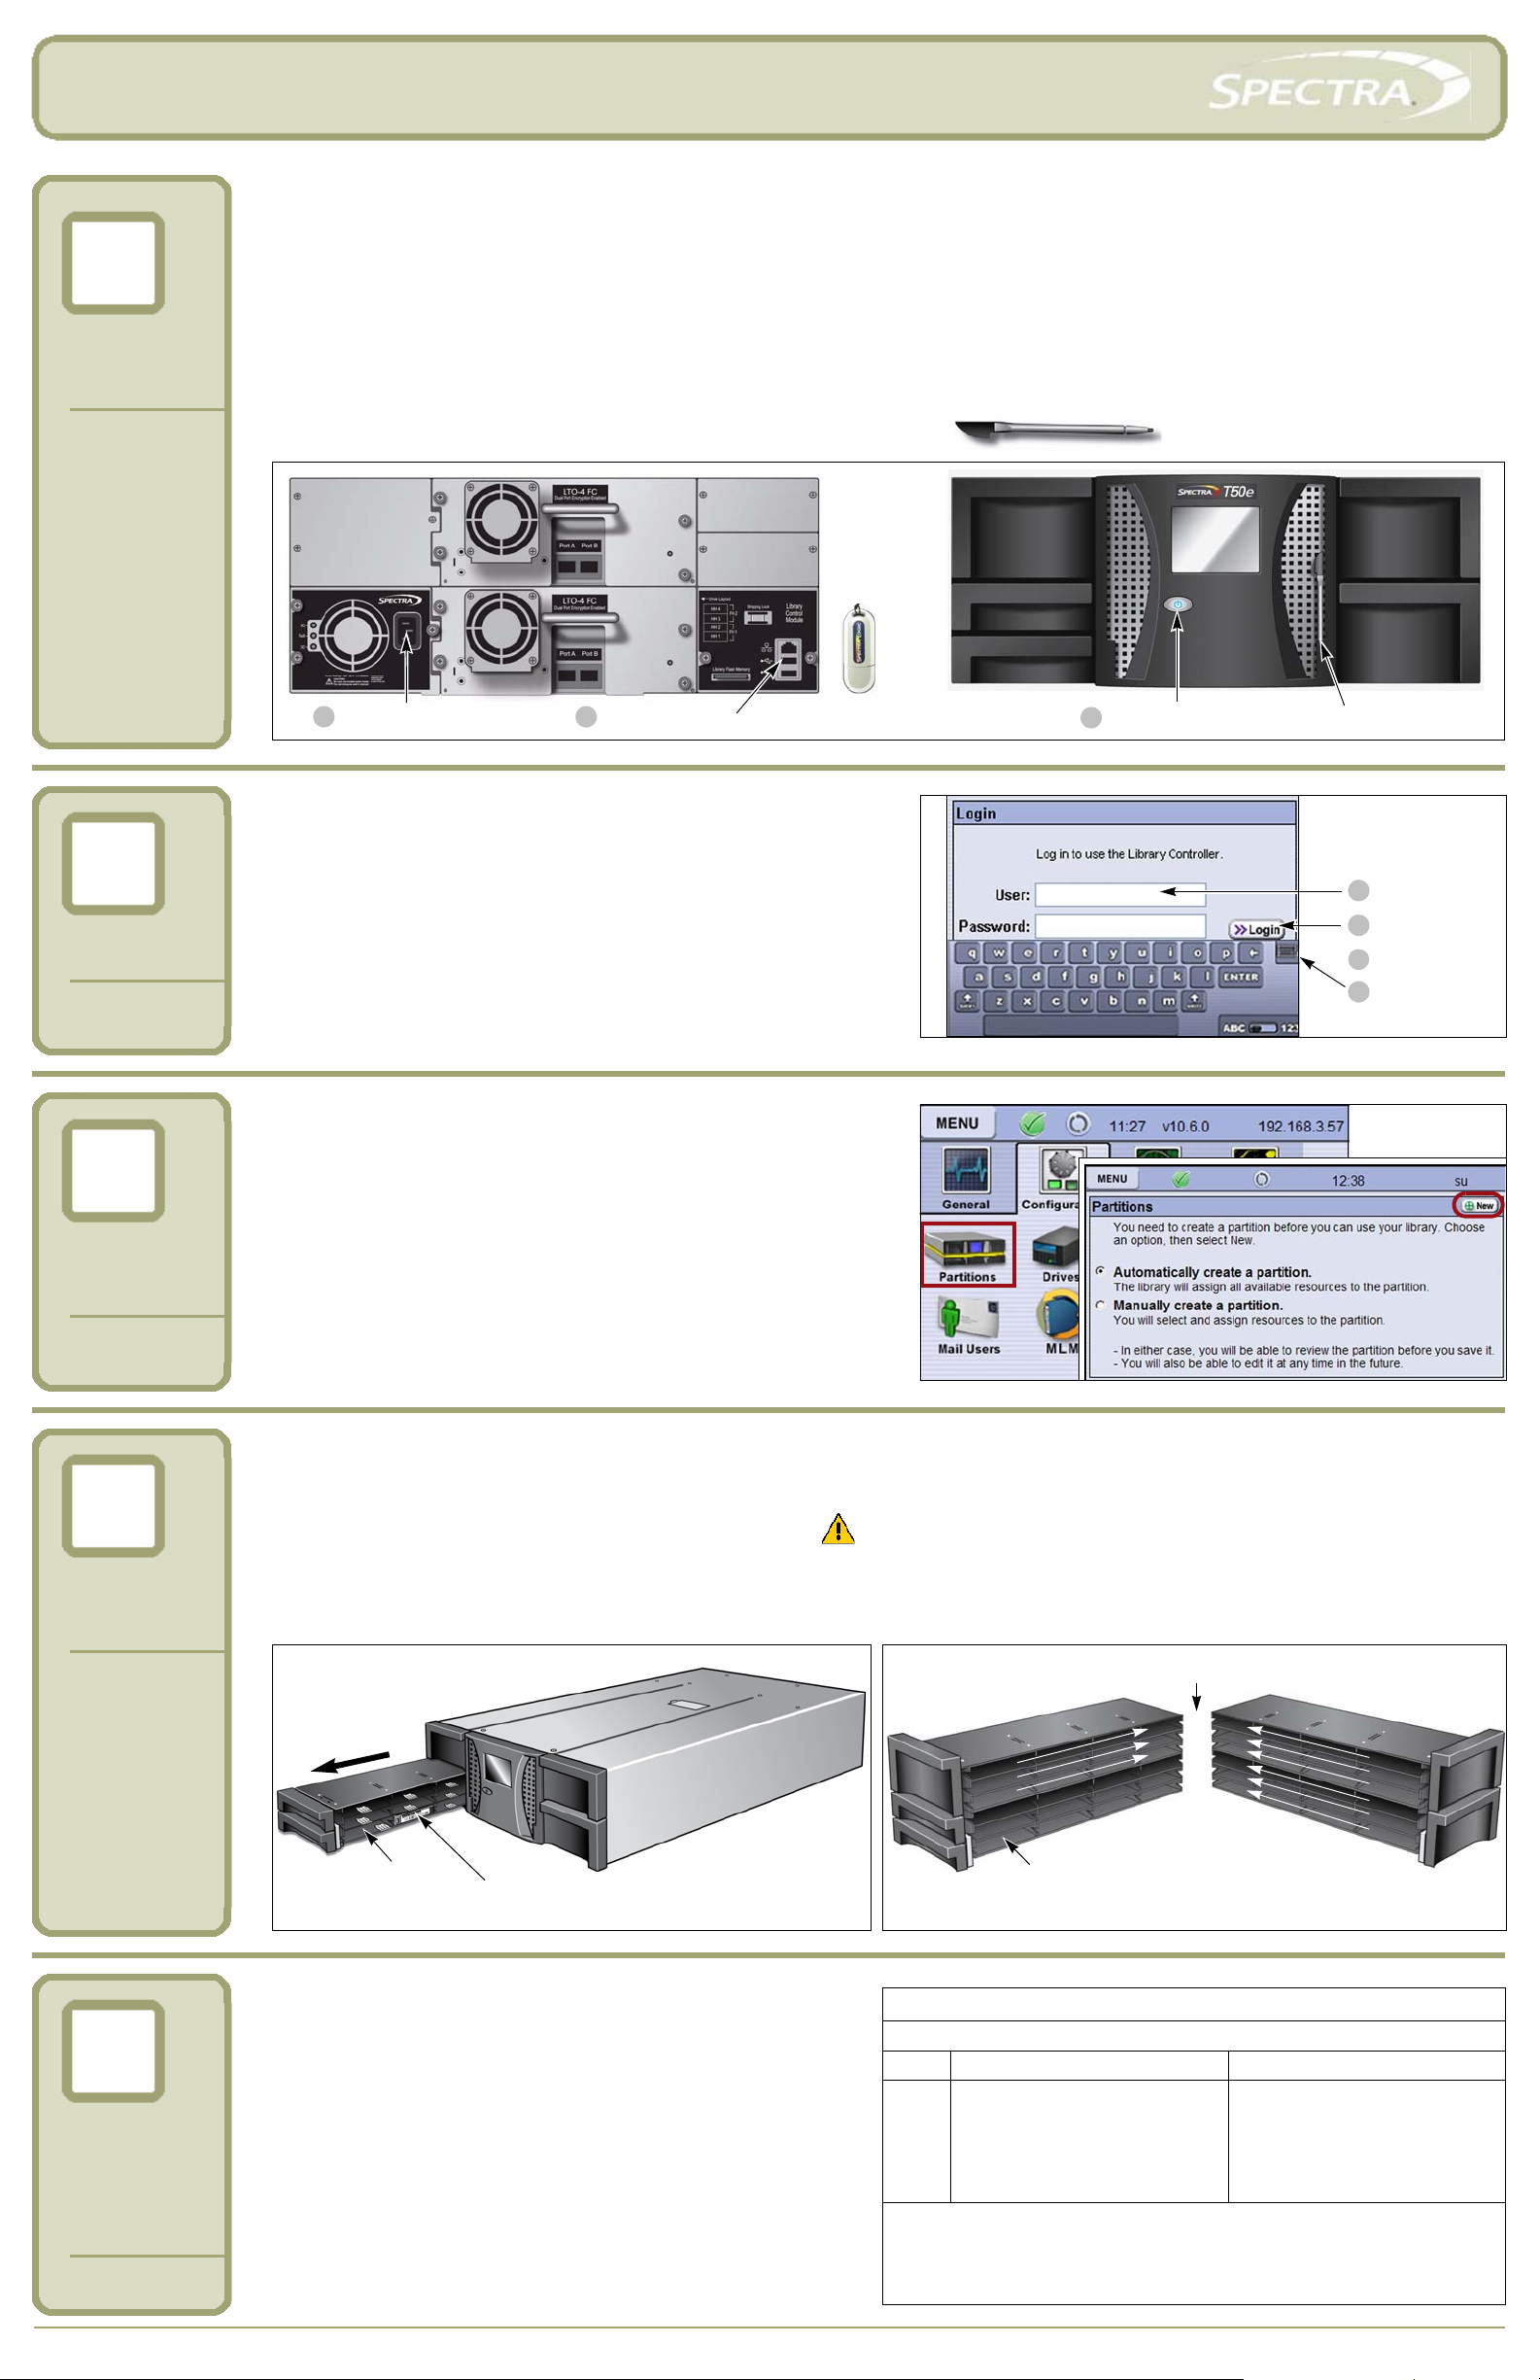
Stylus—used to navigate in screens.
1
Insert USB drive
2
Connect power cord
USB
drive
3
Press power button
Stylus in holder
1
Type “su”
3
4
Login
Close keyboard
Wait
su
2
Slot 1
Access port
Important! Replace magazines
in the same locations.
Right
Left
(bar code labels must face out)
Important! Load cartridges sequentially starting at slot 1.
To p
To p
Bottom
2
3
4
7
11
8
23
20
12
24
5
6
15
9
10
16
19
27
32
36
44
28
47
35
31
39
40
43
1
Access port
50
49
48
Left-side magazines
Bottom
Right-side magazines
Expansion slots
Perform the
AutoInstall
AutoInstall (Firmware and Option Keys)
The USB drive that came in your Document Kit (see Unpack and Verify the
Components on page 1) contains the library’s firmware as well as the option
keys that you purchased. Follow these steps to load the firmware and keys.
1. Insert the USB drive in the USB port at the back of the library.
2.Plug the power cord in if it is not already connected.
3.Press the front panel power button for two to three seconds.
4.Wait while the library performs its power-on sequence, which typically
takes six to nine minutes.
During the AutoInstall process, the library upgrades the firmware from
the USB drive, reboots itself, and automatically installs the option keys
during the remainder of the power-on sequence.
Important! Do not remove the USB drive until after the Login screen
appears, but do not leave the USB drive in the library after the
installation.
Log In
Create a
Partition
BlueScale User Interface Log In
After the power-on sequence completes, the login screen displays.
1. Using the stylus, touch (to select) the User box and type su.
2.Leave the password field blank, and select Login.
3.Wait for the initialization process to complete.
4.Close the keyboard by selecting its icon with the stylus.
Note: If you are prompted to calibrate the touch screen, follow the
instructions on the screen. You must use the stylus for the
calibration procedure to complete successfully.
Partition Creation Follow these steps to allow the library to automatically
create a partition.
1. Using the stylus, select Menu > Configuration > Partitions >
Automatically create a partition > New.
2.Use the wizard to create the partition, and then choose one option:
Save Library Configuration to USB (recommended)
Save Library Configuration to autosupport@spectralogic.com
(recommended)
Don’t Save Library Configuration (not recommended)
3.Select Next and Save.
To manually create partitions, see the Spectra T50e Library User Guide
for instructions.
Load
Cartridges
Cartridge Loading
more than one partition.
1. Using the stylus, select Menu > General > Import/Export > Bulk Load. Both left-side magazines release.
2.Remove the bottom left magazine and set it on a stable surface. CAUTION! Be careful while handling fully-loaded magazines as they are heavy!
3.
Load the cartridges sequentially starting at slot 1 and continue with the top left-side magazine, if needed. Reinsert the left-side magazine(s) and continue
with the right-side magazines, if needed. See the
4.Gently push each magazine into the library until it is fully seated and press Stop Importing. The library inventories the cartridges.
If you have only one partition enabled, use Bulk Load for the initial setup. Refer to the
Spectra T50e Library User Guide
for information about the expansion slots (slots 48 through 50).
Spectra T50e Library User Guide
if you have
Reboot
System and
Perform a
Backup
Host System Reboot Follow these steps:
1. Ensure that your SCSI HBA BIOS has LUN support enabled.
2.Reboot your host system, if needed.
3.Install your backup application, if it is not already installed.
4.Configure the application to work with the Spectra T50e library.
Go to www.spectralogic.com/downloads to download device drivers
for the library.
Initial Backup Create a test backup job.
Refer to the documentation that came with your backup application
for instructions.
P.N. 90970017, Rev. C www.spectralogic.com Page 2 of 2
Spectra Logic Technical Support
If you need assistance, contact us using one of these options.
Option US, Canada/Outside Europe Europe, Middle East, and Africa
Email:
Web:
Phone:
Note: Reference the Spectra T50e Library User Guide for comprehensive
instructions on how to operate your new library. Access the manual either
on the Product CD or at www.spectralogic.com/documents.
support@spectralogic.com
www.spectralogic.com/support
1.800.227.4637
1.303.449.0160
support@spectralogic.com
www.spectralogic.com/support
44 (0) 870.112.2185
 Loading...