

Page 1

Spectra T50e
Flash (SD) Card Installation
Instructions
PN 90970021 Revision A
Page 2

Notices
Notices
Except as expressly stated herein, Spectra Logic Corporation makes available this Spectra® library and associated
documentation on an “AS IS” BASIS, WITHOUT WARRANTY OF ANY KIND, EITHER EXPRESSED OR IMPLIED, INCLUDING BUT NOT
LIMITED TO THE IMPLIED WARRANTIES OF MERCHANTABILITY OR FITNESS FOR A PARTICULAR PURPOSE, BOTH OF WHICH ARE
EXPRESSLY DISCLAIMED. In no event shall Spectra Logic be liable for any loss of profits, loss of business, loss of use or data,
interruption of business, or for indirect, special, incidental or consequential damages of any kind, even if Spectra Logic has been
advised of the possibility of such damages arising from any defect or error.
Information furnished in this manual is believed to be accurate and reliable. However, no responsibility is assumed by
Spectra Logic for its use. Due to continuing research and development, Spectra Logic may revise this publication from time
to time without notice, and reserves the right to change any product specification at any time without notice.
If you do not agree to the above, do not use the Spectra library; instead, promptly contact Spectra Logic for instructions on
how to return the library for a refund.
RXT is a trademark of and BlueScale, Spectra, SpectraGuard, TeraPack, and the Spectra Logic logo are registered
trademarks of Spectra Logic Corporation. All rights reserved worldwide. All other trademarks and registered trademarks
are the property of their respective owners.
Spectra T50e Flash (SD) Card Installation Instructions
Revision A, August 2008
Copyright © 2008 Spectra Logic Corporation. All rights reserved.
Contacting Spectra Logic
Spectra Logic Web Site: www.spectralogic.com
United States Headquarters European Office
Spectra Logic Corporation
1700 North 55th Street
Boulder, CO 80301
USA
Phone: (800) 833-1132 or (303) 449-6400
International: 00.1.303.449.6400
Fax: (303) 939-8844
SpectraGuard Technical Support
Web Site: www.spectralogic.com/support
Knowledge Base: www.spectralogic.com/knowledgebase
Email: support@spectralogic.com
Spectra Logic Europe Ltd.
Magdalen Centre
Robert Robinson Avenue
Oxford Science Park
OXFORD
OX4 4GA
United Kingdom
Phone: +44 (0) 870 112 2150
Fax: +44 (0) 870 112 2175
Phone Numbers: United States and Canada: (800) 227 4637
International: 00 (1) 303 449 0160
2
Page 3

Contents
Replacing the Flash (SD) Card 4
Before You Begin . . . . . . . . . . . . . . . . . . . . . . . . . . . . . . . . . . . . . . . . . . . . . . . . . 4
Gathering Tools and Supplies . . . . . . . . . . . . . . . . . . . . . . . . . . . . . . . . . . . . . . 4
Continuing Backups . . . . . . . . . . . . . . . . . . . . . . . . . . . . . . . . . . . . . . . . . . . . . 4
Preparing for Replacement . . . . . . . . . . . . . . . . . . . . . . . . . . . . . . . . . . . . . . . . 5
Replacing the Flash (SD) Card . . . . . . . . . . . . . . . . . . . . . . . . . . . . . . . . . . . . . . . 14
Removing the Flash Card . . . . . . . . . . . . . . . . . . . . . . . . . . . . . . . . . . . . . . . . 14
Installing the Flash Card . . . . . . . . . . . . . . . . . . . . . . . . . . . . . . . . . . . . . . . . . 15
Restoring the Library Configuration . . . . . . . . . . . . . . . . . . . . . . . . . . . . . . . . . . . 17
Restoring the Configuration via USB . . . . . . . . . . . . . . . . . . . . . . . . . . . . . . . . 17
Restoring the Configuration via the RLC . . . . . . . . . . . . . . . . . . . . . . . . . . . . . 17
Restoring the Configuration via Gathered Information . . . . . . . . . . . . . . . . . . . 19
Restarting Backups . . . . . . . . . . . . . . . . . . . . . . . . . . . . . . . . . . . . . . . . . . . . . 19
Storing Configuration Changes . . . . . . . . . . . . . . . . . . . . . . . . . . . . . . . . . . . . . . . 19
Returning Components 20
3
Page 4

Replacing the Flash (SD) Card
These instructions describes how to replace the Flash (SD) card (flash card).
Before You Begin
Ensure that the work area is free from conditions that could cause
electrostatic discharge (ESD). Discharge static electricity from your body by
touching a known grounded surface, such as a computer’s metal chassis.
Ensure that the library is not accessing the flash card—It is important that you
do not interrupt the card during write or erase activity.
Ensure that you have saved a backup copy of your library’s configuration—see
Preparing for Replacement on page 5).
Power the library off—Ensure that the library and flash card are both idle, and
then power the library off (Resetting the Library on page 19 for important
information).
Note: If the system is stable at power off, a message displays indicating
that the power button was pressed.
If the system is unstable at power off—if you power off the library
when it is in an error state—the power off time will take
approximately one minute and will show no indication that it is
powering off. Wait for the sequence to complete.
Gathering Tools and Supplies
A new Flash (SD) card from Spectra Logic Corporation
A #2 Phillips screwdriver
Continuing Backups
If the flash card is malfunctioning, you have no control of the library through the
Library Controller (LC) on the front panel or through the Remote Library Controller
(RLC). A malfunctioning flash card can also affect robotics and tape drives. Backups are
interrupted if the robotics or tape drives are affected and cannot be restarted until after
the flash card is replaced.
4
Page 5

Before You Begin
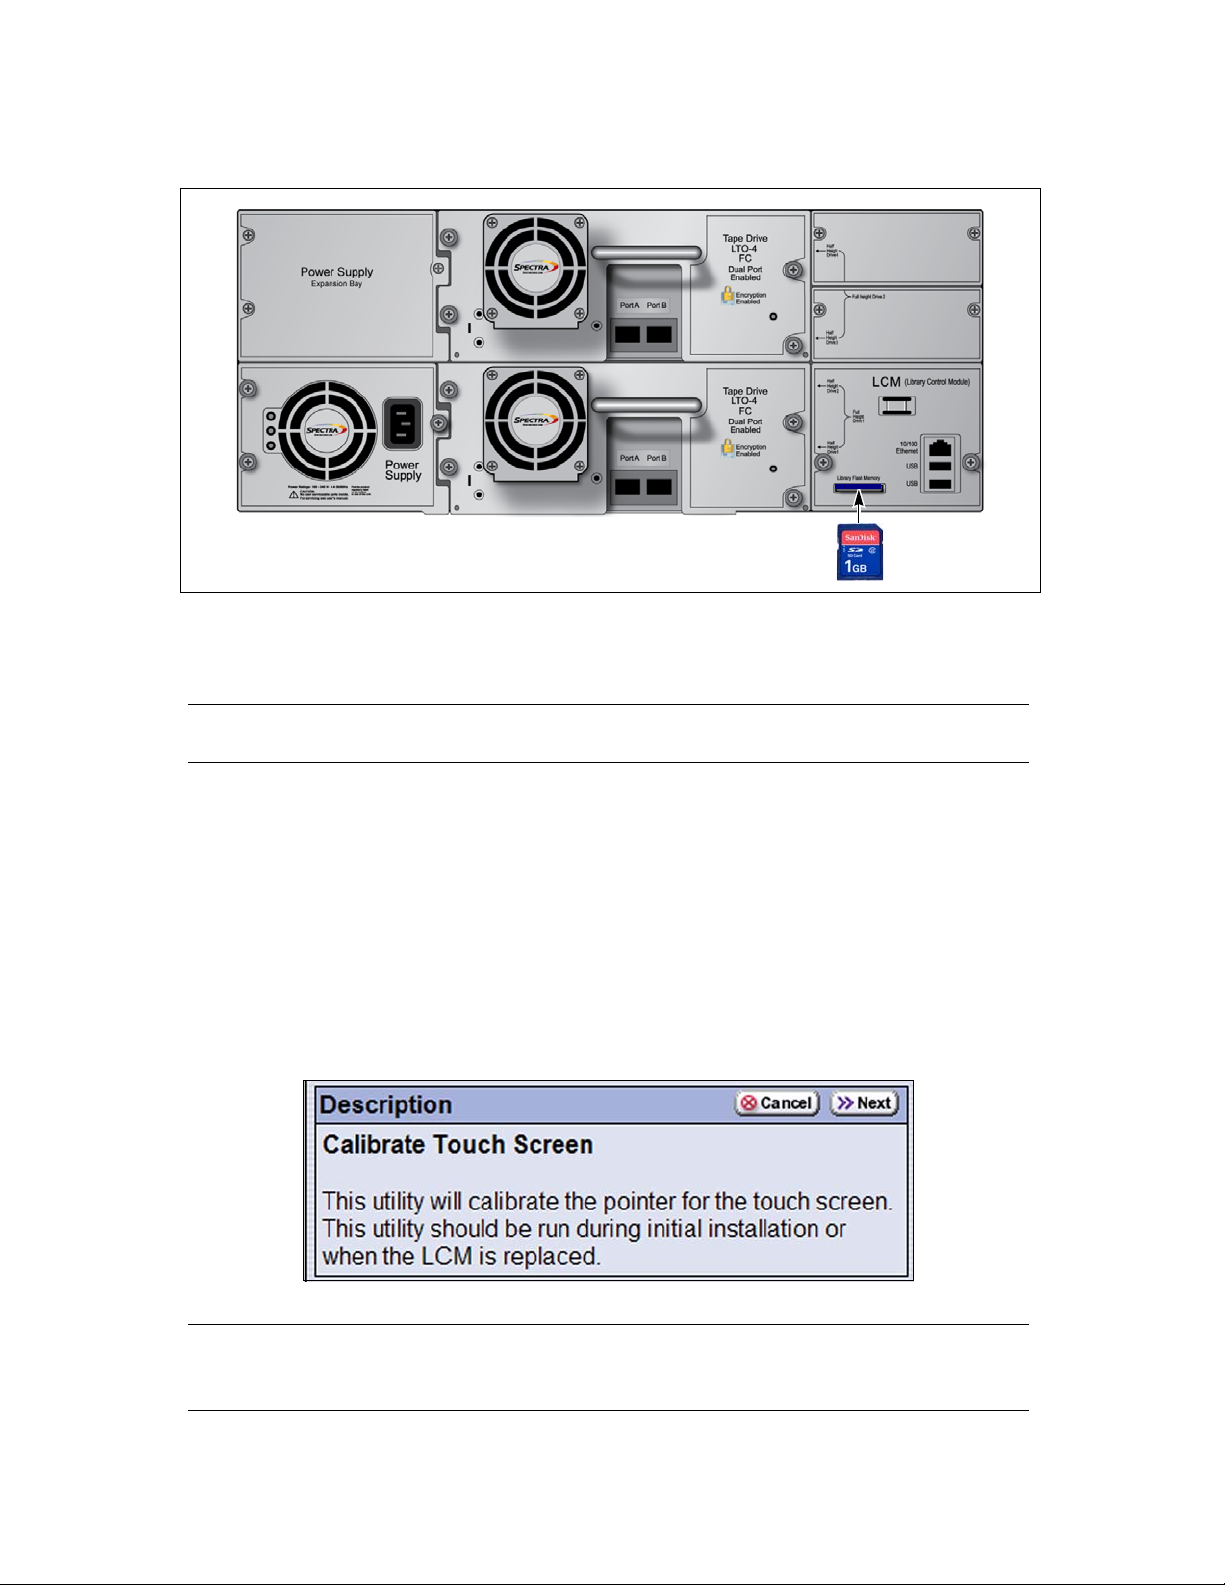
Ethernet connector
USB ports
Flash card
LCM
Preparing for Replacement
Figure 1 Rear panel components
You have a Valid Backup Library Configuration Whenever you modify the
configuration of the library or a partition, you have the option of saving the
configuration to a USB storage device, as described in the Spectra T50eLibrary User
Guide. The saved configuration can be used to restore a lost configuration.
If you previously saved the library configuration on a USB storage device or uploaded
it to a file on your computer, locate the most current configuration file before
beginning the replacement procedure. You can use this saved configuration to restore
the library configuration after you replace the flash card.
If you have a valid saved configuration, continue with Replacing the Flash (SD) Card
on page 15.
Caution: Do not attempt to save the library configuration if the flash
card is malfunctioning. Any information saved at this point may
be corrupted.
You do
library configuration, or are unable to locate it, you may need to reconfigure your
library manually after replacing the flash card.
In this case, it is important to write down the following library information before
continuing. The items to write down are listed here and described below:
Option keys
Encryption keys
Partition information
not
have a Valid Backup Library Configuration If do not have a valid backup
Network information
Email Users and SMTP IP Address
AutoSupport Log Profile information for each profile
General settings
5
Page 6

Replacing the Flash (SD) Card
Library Logon Users and Passwords
Auto Support Log file
Option Keys
1. Select Configuration > Option Keys. The Option Keys screen appears.
2. Write down all of the 15-character alphanumeric keys.
Encryption Keys
This information is only needed if you have enabled encryption in a partition in the
library.
1. Select Security > Encryption. The Encryption configuration screen appears.
2. Follow these steps for each encryption key.
6
Page 7

Before You Begin
a. Select Export.
b. Decide whether to save the key to a USB device, or to mail it to a previously
defined email recipient.
Spectra Logic recommends saving the key to a USB device as it allows he library
to verify that the save completed successfully by using the Check Key Files
option. If you plan to save the key to a USB device, plug the USB device into the
LCM before proceeding (see Figure 1).
Note: Do not use the default autosupport@spectralogic.com email
recipient. Spectra Logic does not save emailed configuration files.
c. Enter a password, which is used to encrypt the key itself, select Next.
d. Make a record of the password, which you will need to import the key. Without
it, you cannot import the key, and the data which was encrypted using the key
will be inaccessible.
e. Confirm that the encrypted key copied correctly by using one of these methods:
USB device—Select the Check Key Files button.
If the confirmation indicates the key did not copy correctly, delete all data from
the USB device so that no trace of the failed key attachment remains, then reexport the key to a different USB device, beginning with Step 2.
Emailed—Confirm the receipt of the attachment by contacting the user to whom
you sent the encrypted key file and verifying receipt and validity of the key.
7
Page 8
Replacing the Flash (SD) Card
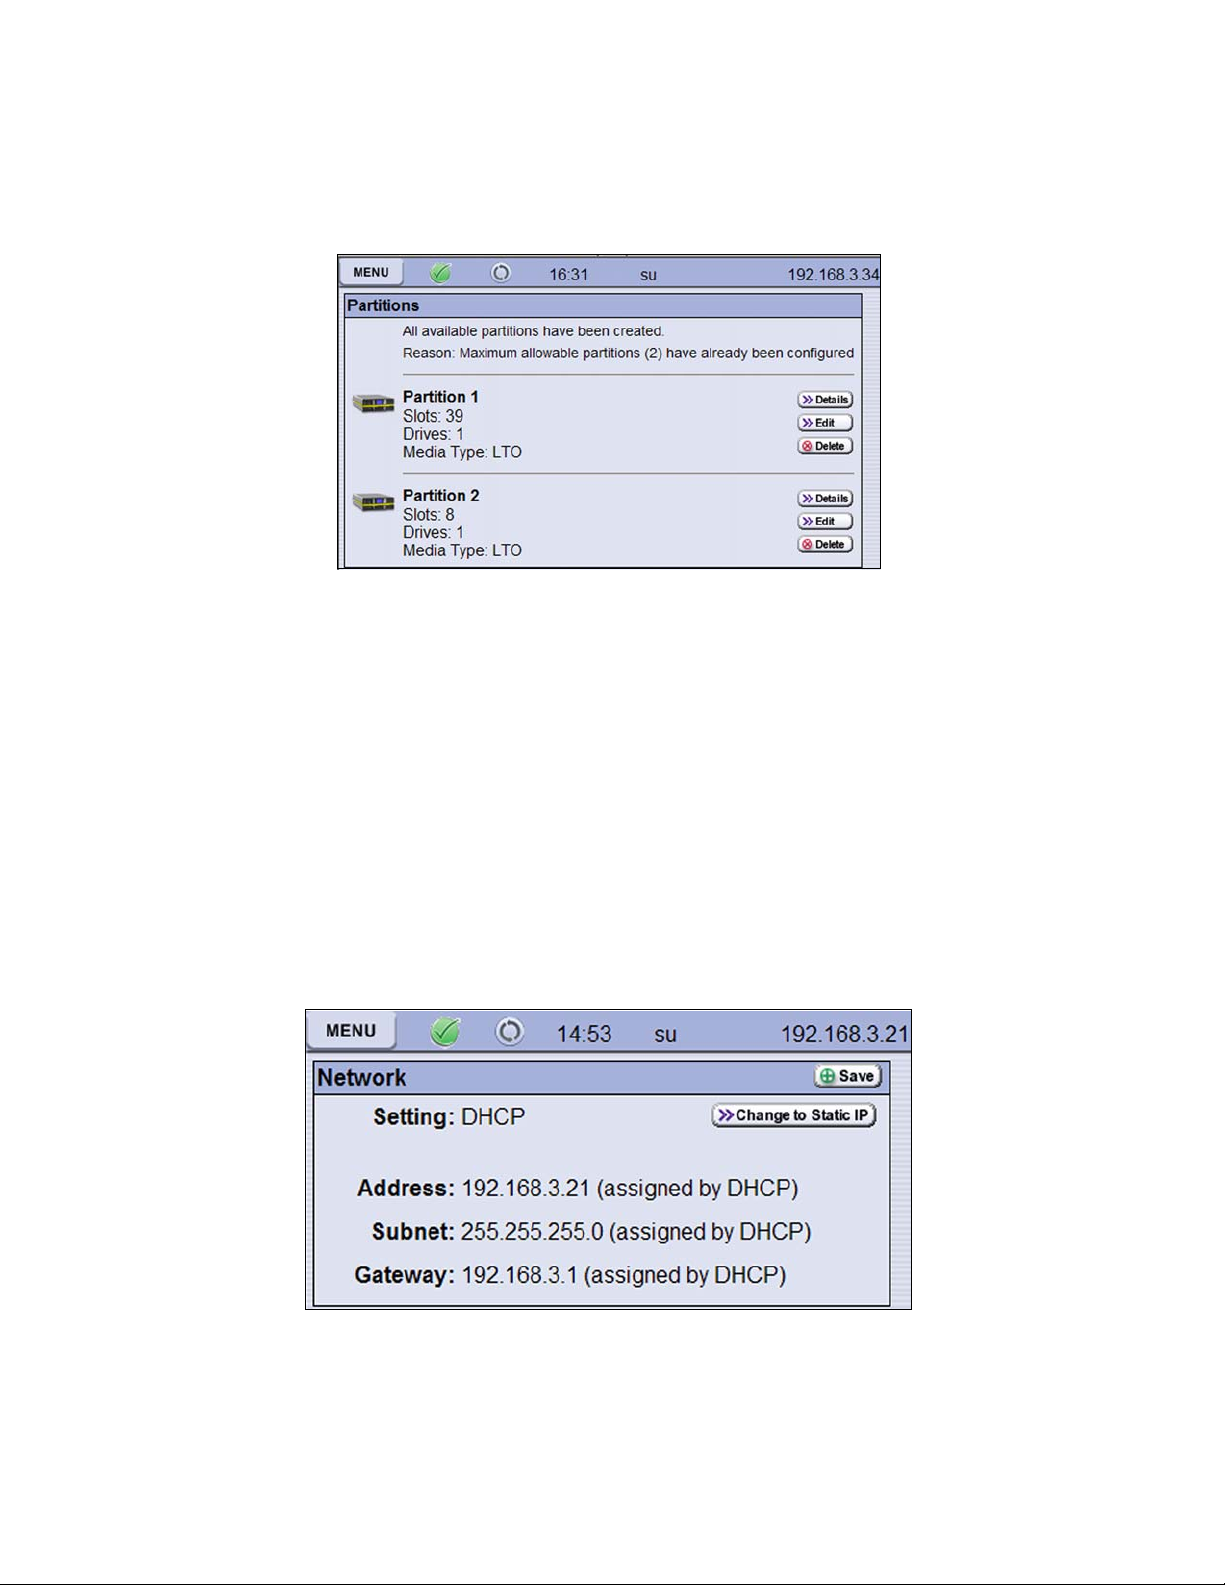
Partition Settings
1. Select Configuration > Partitions. The Partitions screen appears.
2. Select Details and write down all partition information (for each partition),
including:
Name of each partition
Number of storage slots for each partition
Number of drives for each partition
Which tape drive acts as the “exporter” for the library
Which tape drives, their physical location or their designation are configured for
each partition
Network Information
1. Select Configuration > Network. The Network screen appears.
2. Write down all of the Network information.
8
Page 9

Before You Begin
Email Users and SMTP IP Address
1. Select Configuration > Mail Users. The Mail Users screen appears.
2. Select Edit to see more details, including the SMTP IP address, and write down the
information.
3. Note which users receive which notifications (error, fatal, warning, and info).
AutoSupport Log (ASL) Profile
Gather the ASL information for each profile. Do not attempt to make any changes at
this time; record any desired changes to implement after the replacement procedure is
complete.
9
Page 10

Replacing the Flash (SD) Card
1. Select Maintenance -> AutoSupport -> Manage Profile > Edit to navigate through
the wizard and record the information. The Company Info screen appears.
2. Write down all information for each profile, including:
Contract number
Company name and site address
3. Select Next to view and record the contact name, phone number, and email address.
General Library Information
Select Configuration -> Settings -> to gather the general library settings.
10
Page 11

Before You Begin
Users and Passwords
1. Select Security -> Edit Users -> Edit to gather the user settings.
2. Write down the user name, user type, and password of each user. Passwords are not
shown, so write down the passwords, if they are known.
Create an Auto Support Log (ASL) File
The ASL creates a backup copy of your current configuration and gathers all the logs
from the library. You can email the ASL file to SpectraGuard Support and they can
provide you with the detailed information to reconfigure your library as a last resort.
The only information not contained in this log file are the BlueScale logon passwords,
and the Encryption keys. The Encryption keys must be backed up or saved separately.
If you do not have an AutoSupport Log Profile configured, creating one at this time
may not work if the flash card is malfunctioning. If this is the case, make sure you
record all the information in the previous sections to restore your library configuration
after replacing the flash card.
Able to Create ASL If you are able to create a log, follow these steps:
1. Select Maintenance > Auto Support. The Auto support screen appears.
11
Page 12
Replacing the Flash (SD) Card
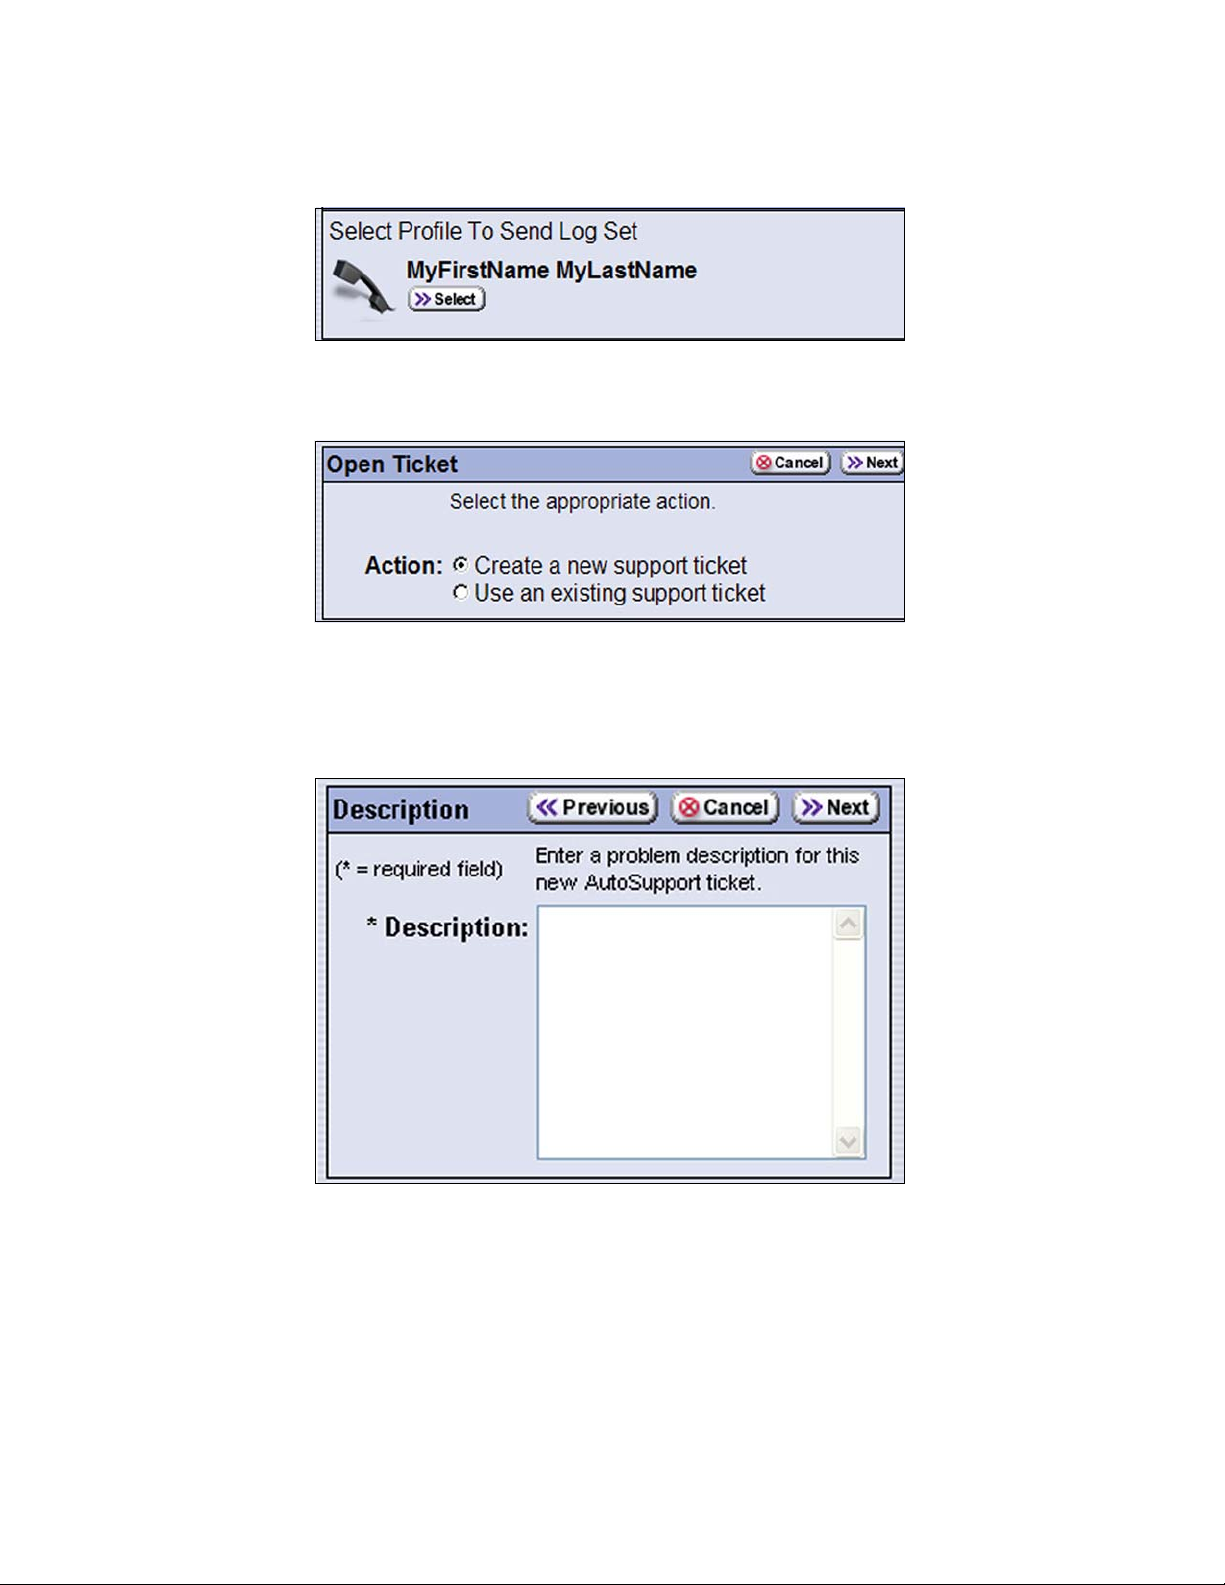
2. Select Send Log Set and Select the appropriate profile.
3. Select Create a new support ticket and select Next.
4. Use the keyboard to enter a description of the problem in the box. A description
must be entered before the library allows you to continue. Enter the description and
select Next.
12
Page 13

Before You Begin
5. Preview the Profile Information and select Next. Do not attempt to make any
changes at this time; record any desired changes to implement after the
replacement procedure is complete.
6. The Summary page displays.
7. Save the information using one of these options:
Save to a USB device, if possible (this is the recommended method)
Important! Verify that all of the information that you saved to the USB device is
available on the device before proceeding.
E-mail the information to the desired recipient and verify that they received a
valid copy of the information.
Unable to Create ASL If your flash card is malfunctioning, you might not be able to
generate an AutoSupport Log (ASL). If you are unable to generate an ASL, make a note
of all of your configured information.
13
Page 14

Replacing the Flash (SD) Card
1. Select Maintenance > AutoSupport > Send Log Set > Next > (through the screens
to the Profile Info screen) > Override button to view the information for each
heading.
2. Make a note of all of the information (especially your contract number).
14
Page 15

Replacing the Flash (SD) Card
Power button
Replacing the Flash (SD) Card
Removing the Flash Card
Follow these steps to remove the card:
1. Power off the library—Press and hold the front panel power button for one second.
The power-off sequence takes approximately two minutes while the library allows
applications to shut down gracefully.
Figure 2 Power off the library.
2. Push the flash card in until you feel it click, let it eject a short distance out of the
library, and then pull it gently out of the slot (see Figure 3).
If Support requests that you return the card, place it in a padded envelope mailer and
mail it to Spectra Logic (see Returning Components on page 20 for the mailing
address).
If you are not asked to return the component, dispose of it in the same manner as
other electrical components, such as computer monitors and keyboards.
Installing the Flash Card
Follow these steps to install the card:
1. Access the back of the library (see Figure 3).
15
Page 16
Replacing the Flash (SD) Card
2. Orient the card with the exposed contacts down and toward the front of the library.
Figure 3 Flash card orientation.
3. Gently push the card into the open slot until it snaps (clicks) into place.
Note: The card inserts easily when it is oriented correctly. Do not force it.
4. Power on the library via the front panel (see Figure 2).
a. Press and hold the front panel power button for two to three seconds until the
button’s LED illuminates.
b. Wait while the library completes its power-on sequence, which takes six to nine
minutes, depending on the library configuration.
5. Calibrate the front panel—After the power-on initialization, the calibration screen
displays. When this screen appears, select Next. It is important for you to use the
stylus to calibrate the front panel, and not your fingers
16
Note: To properly calibrate the touch screen, press and hold the stylus
on the “+” for two to three seconds. Do not use excessive force.
Page 17

Restoring the Library Configuration
Restoring the Library Configuration
After the library restarts, restore the partition definitions and library configuration
settings using one of the following methods.
Via USB—Restore the configuration you previously saved to a USB storage device
or uploaded to a file on a computer.
Note: If you were unable to save the configuration to a USB, reconfigure
the library using the information that you wrote down in You do
not have a Valid Backup Library Configuration on page 5.
Via the Remote Library Controller (RLC)—Re-enter the partition configurations
and other library configuration settings as described below.
Via Gathered Information—If there is no stored configuration, or if the restoration
of the configuration from the USB key fails, use the information that you gathered
in You do not have a Valid Backup Library Configuration.
Restoring the Configuration via USB
1. Insert the USB device with the saved configuration into one of the USB ports in the
back of the library (see Figure 1).
2. Select Maintenance > Utilities > Tools > Advanced > Next.
3. Select the Restore Configuration from USB and RUN this test. The library power-cycles
after this utility completes.
If you do not have a saved configuration on the USB device, but have one saved in
email or on your local system, you must set up networking and then access the library
via the RLC to restore the configuration saved in email or on your local system.
Restoring the Configuration via the RLC
1. Log into the library front panel with superuser or administrator privileges.
2. Determine your network address requirements (Static or Dynamic).
Dynamic IP addressing is the default setting.
To change the address to static, select Menu > Configuration > Network. Set the
static address.
17
Page 18

Replacing the Flash (SD) Card
Press this button
to begin the upload
process.
3. Select Maintenance > Utilities > Show Advanced > Yes.The Utilities screen
refreshes to show the advanced utilities.
4. Scroll through the options and select the one that is most suitable for your situation:
Option Use this option to...
Restore Configuration
from Checkpoint
Upload Backup
Configuration
a
Restore Library
Configuration from
Uploaded File
a b
Restore the configuration from the last firmware update.
Upload a configuration file that you previously saved on a
computer to a temporary location in the library memory.
Note: If you used this option, you must then run the
Library Configuration from Backup Uploaded File
restore the library configuration.
Complete the restore process started by Upload Backup
Configuration
a computer using the RLC.
Note: This option is used in conjunction with
Configuration
by uploading a a saved configuration file from
Upload Backup
, which must be completed first.
Restore
utility to
a. These options are only available when you access the library from a web browser using the RLC.
b. Please note that this option may not be possible until you configure your library network settings.
5. Press Select. The screen refreshes to show the details for the selected utility.
18
Page 19

Storing Configuration Changes
6. Select Run to execute the utility. After a brief delay, the Utility Results screen
appears, showing that the configuration file was uploaded and/or the configuration
restored.
Note: Running any one of these utilities requires the library to reboot.
Restoring the Configuration via Gathered Information
If there is no stored configuration, or if the restoration of the configuration from the
USB key fails, follow the procedures outlined in the Spectra T50e Library User Guide to
build new partitions and to program the necessary user settings. Use the information
that you gathered in You do not have a Valid Backup Library Configuration.
Rebuild the configuration in this order:
1. Option keys
2. Encryption keys
3. Partitions
4. Networking
5. Email and SMTP information
6. Date and Time
7. Settings
8. AutoSupport Log profiles
9. Users and passwords
Restarting Backups
After you restore the library configuration and the library finishes rebooting, use your
backup software to restart any backup processes.
Storing Configuration Changes
Spectra Logic recommends that you always store a copy of the current library
configuration on a USB device. Any time you make a change to a partition parameter,
the library asks you to save the configuration change to a USB device; Spectra Logic
recommends taking advantage of this feature.
19
Page 20

Returning Components
Returning Components
After you complete the replacement procedure, you may be asked to return the
component to Spectra Logic. If you need to return the flash card, ship it in a padded
envelope mailer. If you are not asked to return the flash card, dispose of it in the same
manner as other electrical components, such as computer monitors and keyboards.
1. Before you ship a component back to Spectra Logic, obtain a Return Materials
Authorization (RMA) number from a SpectraGuard Technical Support
representative. Spectra Logic needs this number to identify the part on its arrival.
2. Write the RMA number on the shipping label. If you fail to include the RMA number
on the label, the package will be returned to you. If you do not know your RMA
number, contact SpectraGuard Technical Support.
3. Follow the steps in the table below that are appropriate for your location.
Instructions for Domestic Returns Notes
Ship the package to:
Spectra Logic Corporation
ATTN: {RMA Number}
Suite B
5571 Arapahoe Avenue
Boulder CO 80303
• Make sure you write the RMA number on the
shipping label.
• For follow-up on RMA equipment service
and returns, contact SpectraGuard Technical
Support either by phone or email (see
Contacting Spectra Logic on page 2).
Instructions for International Returns Notes
1. Fill out your portion of the International
Shipping Instructions form, available on
the Spectra Logic Web site.
2. Return the form to Spectra Logic in one
of the following ways:
Email: intlreturns@spectralogic.com
Fax: 303.939.8844
Post:Spectra Logic
International Returns
1700 N 55th Street
Boulder CO 80301
USA
• Spectra Logic arranges for return shipment
when a request is made to International
Shipping.
• When you receive confirmation from Spectra
Logic, follow the instructions given to
prepare the component for pickup by the
shipper.
20
 Loading...