

Page 1

NetLink 7000 Series
Wireless Telephone and Accessories
Draft 3 PN 72-1301-00
Page 2

SpectraLink Corporation
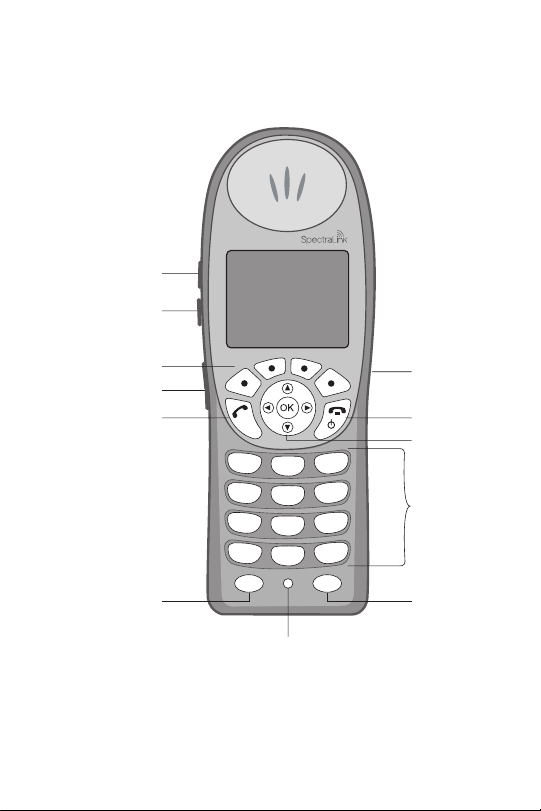
NetLink 7020 Basic Wireless Telephone
Volume Up
Volume Down
Softkeys
START
Headset
Jack
END
Nav keys
DEF
3
ABC
2
MNO
6
JKL
5
WXYZ
9
TUV
8
# >
0
LINE
Keypad
Right/Down
LINE
Left/Up
FCN
1
GHI
4
PQRS
7
< *
FCN
Microphone
2
Page 3
NetLink 7000 Serues Wireless Telephone and Accessories User Guide
NetLink 7020 Enhanced Wireless Telephone
Volume Up
Volume Down
Softkeys
Push-to-talk
START
FCN
1
GHI
4
PQRS
7
<
*
FCN
ABC
2
JKL
5
TUV
8
0
Microphone
Headset
Jack
END
NAV Keys
DEF
3
MNO
6
WXYZ
9
Keypad
# >
LINE
LINE
3
Page 4

SpectraLink Corporation
Trademark Information
SpectraLink
The SpectraLink logo
LinkPlus
Link
NetLink
Are trademarks and registered trademarks of SpectraLink Corporation.
All other trademarks used herein are the property of their respective owners.
Copyright © 2006 SpectraLink Corporation.
All rights reserved
Information in this document is subject to change without notice and does not represent
a commitment on the part of SpectraLink Corporation. The software described in this
document is furnished under a license and/or copyright and may only be used with the
terms of SpectraLink’s software license agreement as found in this manual or at
http://www.spectralink.com/consumer/resources/software_updates.jsp.
The software may be used only in accordance with the terms of the agreement. No part
of this manual, or the software described herein, may be reproduced or transmitted in any
form or by any means, electronic or mechanical, including photocopying and recording,
for any purpose except for the sole intent to operate the product or without the express
written permission of SpectraLink Corporation.
For regulatory information, please see NetLink Wireless Telephone Regulatory Guide
(72-1303-00).
Registered Model Numbers
This document covers registered handset model: 702X/703X
Registered charger models: PCS1850
Registered Battery Pack models: PBP0850, PBP1300, PBP1850
SpectraLink Corporation
5755 Central Avenue
Boulder, CO 80301
303 440 5330
800 676 5465
www.spectralink.com
Please email questions or comments about this document to feedback@spectralink.com.
4
Page 5

NetLink 7000 Serues Wireless Telephone and Accessories User Guide
Introduction
Your NetLink 7020/7030 Wireless Telephone is a state-ofthe-art communication device that utilizes radio wave technology to send and receive voice transmissions. It is
designed to operate like a cell phone. However, the handset
utilizes the private telephone system installed in your facility
and will not operate outside the area covered by this system.
About This Guide
This guide is meant to provide general information about
your handset. Contact your phone system administrator for
additional information on how your handset functions
within your telephone system. This guide includes information about:
• The Handset
•Getting Started
• Advanced Features
• Handset Accessories
•Handset Administration
5
Page 6

SpectraLink Corporation
Table of Contents
The Handset ............................................................... 8
Modes of Operation ..............................................................10
Menu Navigation ...................................................................11
Handset Displays ...................................................................12
Status Bar Indicators .............................................................17
Softkey Labels ........................................................................19
Feature Menu .........................................................................22
One Touch Dialing or Speed-dial .......................................22
Phonebook .............................................................................23
Predial ......................................................................................23
Profiles .....................................................................................23
Redial .......................................................................................24
Speakerphone .........................................................................25
Battery Packs ..........................................................................25
About Push-to-talk ................................................................26
Getting Started ........................................................32
Charging Your Handset ........................................................33
Basic Handset Operation Summary ..................................33
Redial .......................................................................................38
Phonebook .............................................................................38
Speed-dial ................................................................................41
Indications of Low Battery ..................................................43
Removing and Inserting Battery Packs ..............................44
PTT Operation Summary .....................................................44
Advanced Features ................................................... 47
Text Messaging (OAI) Navigation ......................................49
Advanced Feature Activation ..............................................49
6
Page 7

NetLink 7000 Series Wireless Telephone and Accessories User Guide
The Standby Menu ................................................................49
Lock Keys ...............................................................................52
User Profiles ...........................................................................53
Phone Settings ........................................................................68
Menu Grid ..............................................................................80
Advanced Telephony Features ............................................82
Handset Accessories ................................................ 84
About Chargers ......................................................................85
Single Charger ........................................................................89
Dual Charger ..........................................................................90
Quad Charger .........................................................................92
Headsets ..................................................................................93
Carrying Options ...................................................................93
Handset Administration ............................................ 95
FAQs .......................................................................................96
Specifications ..........................................................................97
About Safe Use of Wireless Telephones ...........................98
Care of Your Handset .........................................................101
Notice ....................................................................................104
7
Page 8

SpectraLink Corporation
The Handset
Modes of Operation ..............................................................10
Menu Navigation ....................................................................11
The Handset
Shortcut Keys ..................................................................12
Handset Displays ....................................................................12
Standby Mode Display ......................................................12
Calling Display ...................................................................13
Active Mode Display ........................................................13
Pre-dial Display ..................................................................14
Feature Menu Display .......................................................15
Push-to-talk (PTT) Mode Display ..................................16
Standby Menu Mode Display ..........................................16
Status Bar Indicators ..............................................................17
Softkey Labels .........................................................................19
Feature Menu ..........................................................................22
One Touch Dialing or Speed-dial ........................................22
Phonebook ..............................................................................23
Predial ......................................................................................23
Profiles .....................................................................................23
Redial ........................................................................................24
Speakerphone ..........................................................................25
Battery Packs ...........................................................................25
Important Note About Battery Packs .............................26
About Push-to-talk ................................................................26
Interaction with Profiles ....................................................27
Priority channel ...................................................................27
Call period ............................................................................27
Selecting a channel .............................................................28
Initiating a call .....................................................................29
8
Page 9

NetLink 7000 Series Wireless Telephone and Accessories User Guide
Transmitting ........................................................................ 29
Receiving ............................................................................. 30
Change PTT volume ......................................................... 30
Muting a PTT call .............................................................. 30
Incoming PBX call during a PTT call ............................. 31
Making a PBX call during a PTT call .............................. 31
Incoming PTT call during a PBX call ............................. 31
The Handset
9
Page 10

SpectraLink Corporation
Modes of Operation
Your handset has five modes of operation:
Mode Description
The Handset
Push-to-talk (PTT) The Link 7030 Enhanced model
Standby The handset is on-hook and idle.
Active The handset is in a call, a call is
coming in, or a call is being dialed.
Standby menu User preferences are being accessed
in the standby menu. In this mode
the handset is on, but will not
receive calls.
a
Application Custom OAI
applications may be
programmed for your facility. This
mode is activated through the
menu.
utilizes channels for incoming and
outgoing radio communication.
While PTT is active, the handset is in
PTT mode.
a
Open Application Interface (OAI) is an advanced telephony feature that allows the NetLink 7020/7030 to utilize
custom messaging applications.
FCN
The handset uses different amounts of power and bandwidth in different modes of operation. Bandwidth is provided by access points located throughout your facility.
10
Page 11

NetLink 7000 Series Wireless Telephone and Accessories User Guide
K
Bandwidth availability varies by type of access point. Active
mode uses the most power and bandwidth.
In the NetLink 7030 Enhanced model, PTT outgoing communication uses the same amount of bandwidth as the
active mode. Incoming communication uses about half as
much. If PTT is enabled by the phone system administrator
and in use, standby Battery Pack life is decreased by about
60%.
Conservation of battery life and bandwidth is possible
when you understand the modes and use them appropriately.
For all questions concerning available bandwidth in your
facility, please contact your phone system administrator.
For more information on Battery Pack options, see the Bat-
tery Packs section of this document.
Menu Navigation
The Handset
Nav
Nav
Nav
NavO
Nav
The navigation keys just below the softkeys are used to navigate through and select menu options. These are referred
to in this guide as
NavS, NavT, NavW, NavX, and NavOK.
11
Page 12
SpectraLink Corporation
Shortcut Keys
When available, the shortcut key is displayed on the right
edge of the menu line. Press this key to activate the corresponding selected menu option.
The Handset
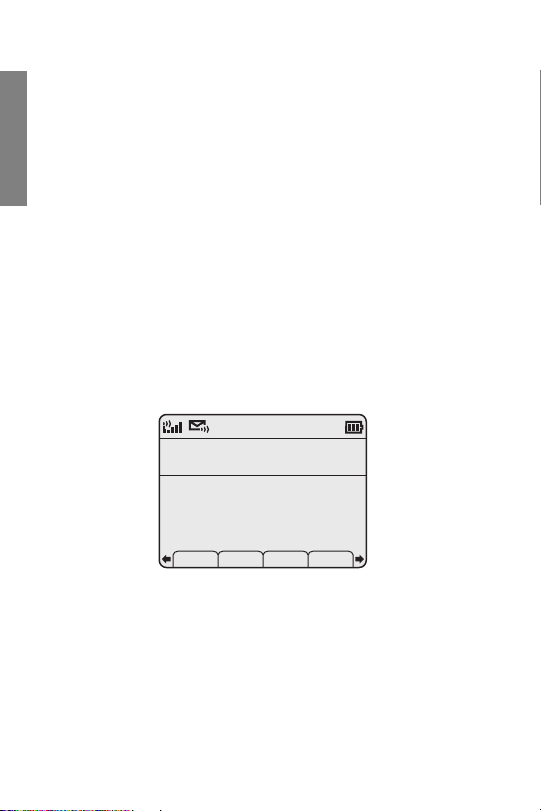
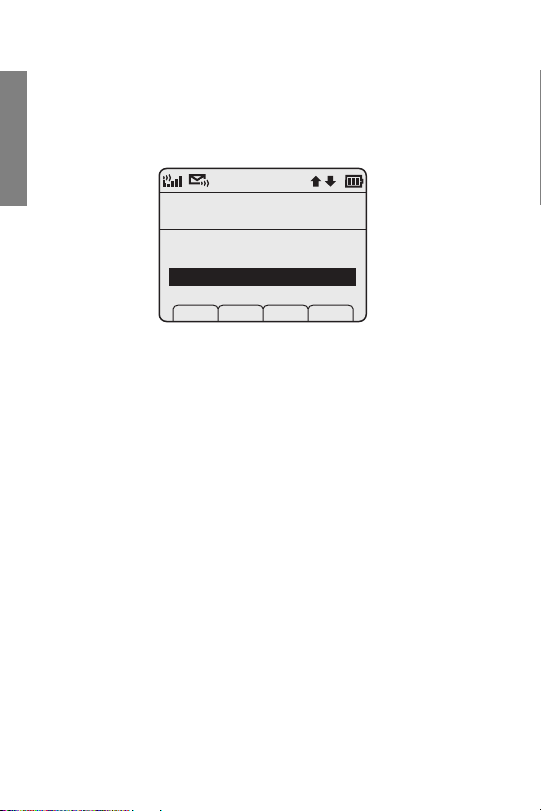
Handset Displays
The top row of the display provides status indicators for
various handset conditions. It is referred to as the status
bar.
The middle lines display information about the handset
identity, user profile, calls in progress, menu options, and
data from PBX.
The bottom row displays softkey labels.
Standby Mode Display
Locked
Ext. 555
John Doe
05-05- 12:19p
Profile: Loud
1: General
Spkr Phbk Redl Spdl
This display shows that there is excellent signal strength, a
voicemail message is available, a text message may be
retrieved, the keypad is locked, the Battery Pack is fully
charged, the extension number assigned to this handset is
555, the date is May 5
file is Loud, and the default PTT channel is 1: General
(Link 7030 Enhanced model only).
th
, the time is 12:19 p.m., the user pro-
12
Page 13

NetLink 7000 Series Wireless Telephone and Accessories User Guide
Additional standby mode softkeys are:
Spdl Prof Cfg USB
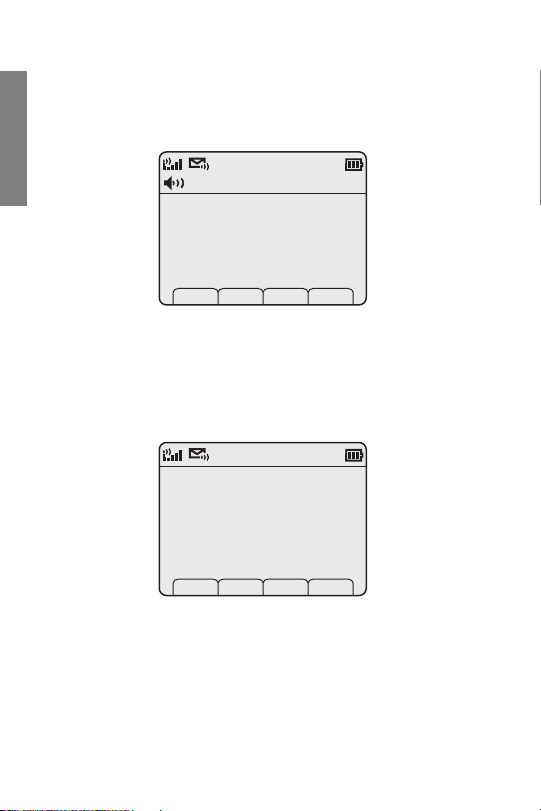
Calling Display
Calling...
Toll free info
8185551212
This display shows that the handset is in the process of calling the number shown. Once the dial sequence ends, you
will hear ringing in the earpiece.
Active Mode Display
1
Ext 111
Caller ID: Jack Black
The Handset
Spkr
This example shows that the phone is ringing in a PBX call
on line 1 from Jack Black at extension 111. Note that this
display is dependent upon the programming of the PBX in
13
Page 14
SpectraLink Corporation
your facility and your handset may not appear like the above
example.
The Handset
1
Ext 111
Caller ID: Jack Black
Spkr Mute Hold
Muted
This example shows that you are in a PBX call on line 1
with Jack Black at extension 111. You are using the speakerphone and the handset is muted.
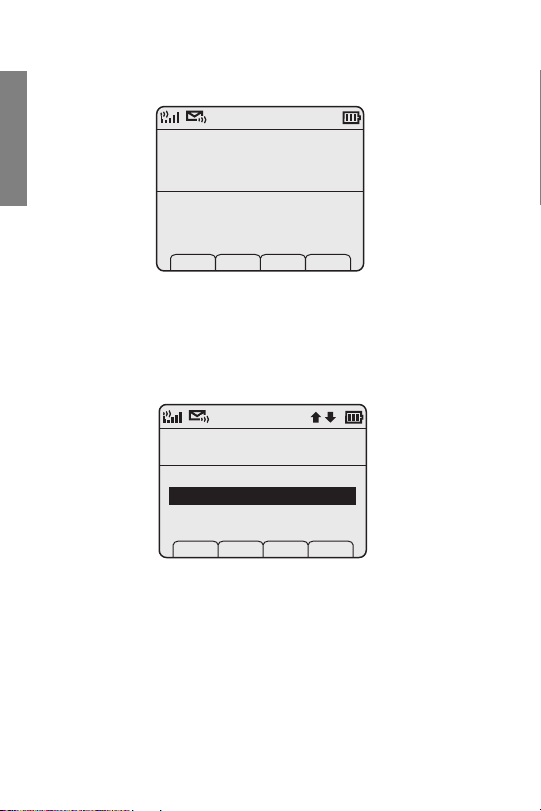
Pre-dial Display
9337558885
5512_
Spkr Save Del Cncl
This example shows that you have dialed 14 digits and the
insertion point indicates that additional digits may be
entered. The Spkr softkey indicates you can start the call via
speakerphone. The
Save softkey indicates that this number
14
Page 15

NetLink 7000 Series Wireless Telephone and Accessories User Guide
may be saved to the phonebook. Del allows you to delete
the entry and Cncl returns you to the standby mode display.
Feature Menu Display
1
Transfer
Conference
Redial
Camp-On
Prof Pl Cncl
This display is reached by pressing the FCN key while offhook. It displays a list of features that may be activated
while in-call. Available features vary by facility. In the above
example, the line indicator lets you know which line is
active. The up/down icons indicate that there are additional
menu items. The
active in-call display.
Cncl softkey will take you back to the
The Handset
15
Page 16
SpectraLink Corporation
Push-to-talk (PTT) Mode Display
The Handset
Channel 20
Facilities Channel
Receiving....
Ext. 3456
This example shows that you are receiving a call from
extension 3456 on channel 20 which has been named the
Facilities Channel.
Standby Menu Mode Display
Main Menu
Ring/Tone Settings
Lock Keys
User Profiles
Phone Settings
Prof Pl Exit
This example shows that you are in the Main Menu at the
top level. User Profiles is the selected menu option. The info
line describes that this option will adjust
The shortcut key is 2.
2
Ring/Tone settings.
16
Page 17
NetLink 7000 Series Wireless Telephone and Accessories User Guide
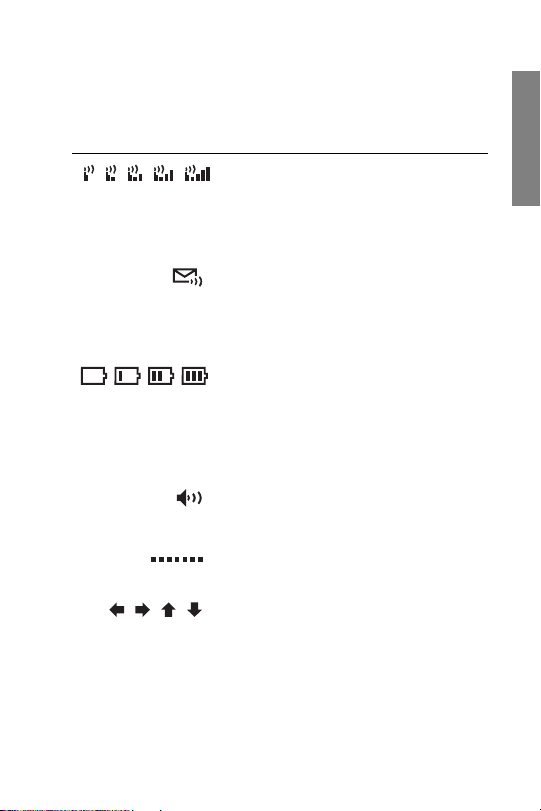
Status Bar Indicators
Indicator Function
The signal-strength icon indicates
the strength of the signal and can
assist the user in determining if the
handset is moving out-of-range.
The voicemail icon is activated when
a new voicemail message is received
if the feature is supported by the
phone emulation.
The battery icon indicates the
amount of charge remaining in the
Battery Pack. When only one level
remains, the Battery Pack needs to
be charged.
The speakerphone icon displays
when the speakerphone is active.
The Handset
1
The line indicators are associated
with telephone line status and access.
Up and down arrows are displayed
when the menu has additional
options above or below.
Left or right arrows are displayed
during editing when the cursor may
be moved left or right.
17
Page 18

SpectraLink Corporation
The Handset
Indicator Function
PBX ring icon. A regular telephone
call is coming in.
OAI ring icon. A call is coming in
from the OAI application.
The push-to-talk ring icon. A PTT
call is coming in.
The priority push-to-talk ring icon.
A call is coming in on the priority
PTT channel. This call will override
any other.
Muted The muted indicator displays after
Mute softkey has been pressed. It
the
indicates that the microphone is not
transmitting sound. Press the Mute
softkey again to unmute the
microphone.
Locked Locked indicates that the keypad is
locked to prevent accidental
activation. Use the
Unlk softkey plus
the # key to unlock it.
18
Page 19

NetLink 7000 Series Wireless Telephone and Accessories User Guide
Indicator Function
[No Service
message]
If warning tones are not disabled, an
alarm will sound and a descriptive
message displays when the handset
cannot receive or place calls. You
may be outside of the covered area.
Walk back into the covered area. The
in-service tone indicates service is
re-established.
The download icon indicates that
the handset is downloading code.
This icon only appears while the
handset is running the over-the-air
downloader. It appears to the right
of the Signal Strength icon in the
same location as the Voicemail icon.
Softkey Labels
The bottom row of the handset displays labels associated
with the four softkeys just below it. When a softkey is
active, a label appears to describe its function. Pressing the
softkey will activate the feature. When additional softkeys
are available,
softkey labels. Press
softkey labels.
Nav arrows appear to the left and right of the
NavX or W to view the additional
The Handset
19
Page 20

SpectraLink Corporation
These are some of the softkeys you will see.
Label Description Action
Back Go back Returns to the previous
The Handset
CAPS
Change case Toggles to allow a change
caps
menu display.
in case when entering
alphabetical text.
Clr Clear Deletes the entry.
Cncl Cancel Returns to the previous
menu display without
saving any data that might
have been entered.
Del Delete Deletes the character to
the left of the cursor.
Dial Dial number Dials the number just
entered in the
phonebook.
Edit Edit Opens an editing window
so you can change
information about an
entry in the phonebook.
Exit Exit Exits out of the menus.
Hold Hold Places a call on hold.
Cfg Configure Opens the standby menu.
20
Page 21

NetLink 7000 Series Wireless Telephone and Accessories User Guide
Label Description Action
Mute Mute Toggles to mute/unmute
the microphone.
No Negative reply Press to reply No to a
displayed question.
Phbk Phonebook Opens the phonebook.
Play Play Plays the selected ring
tone.
Prof Profile Opens the Profile menu.
Redl Redial Displays a list of the last
10 numbers dialed.
Save Save Saves the current entry to
the phonebook
Set Set From the speed-dial
assignment display, opens
the phonebook listing for
assigning a phonebook
entry to a speed-dial key.
Spdl Speed-dial Opens the list of speed-
dial numbers.
Spkr Speakerphone Toggles speakerphone
function.
The Handset
21
Page 22

SpectraLink Corporation
Label Description Action
Unlk Unlock keys Press
Unlk, then the # key
to unlock a locked
The Handset
keypad.
View View Displays information
about an entry in the
phonebook or redial list.
Yes Positive reply Press to reply Yes to a
displayed question.
Feature Menu
While off-hook press the FCN key to display the menu of
advanced telephony features available in your facility. The
features may be activated by pressing the corresponding
shortcut key or by using the
Nav keys to highlight the
option and pressing NavOK.
One Touch Dialing or Speed-dial
The NetLink 7000 Series Wireless Telephone can assign up
to 10 speed-dial keys from numbers entered into the
phonebook.
Open the speed-dial list by pressing the
standby mode. If programmed, the first item on this list is
the system-wide speed-dial number set by the phone system
administrator. It is specially marked with as asterisk (*) as
the first character in its name. It is usually reserved for
emergency situations.
Spdl softkey from
22
Page 23

NetLink 7000 Series Wireless Telephone and Accessories User Guide
See the speed-dial section in Getting Started for detailed
information about using speed-dial keys.
To make a speed-dial call, press and hold the corresponding
key for one (1) second. The system one touch dialing key
must be pressed for three (3) seconds. The handset will display the name and number for one (1) second before the
call is dialed. You may press
END during this second to ter-
minate the call.
Phonebook
The phonebook in your NetLink 7000 Series Wireless Telephone can store up to 20 user-defined numbers. Open the
phonebook by pressing the
Phbk softkey from the standby
mode or by pressing the Save softkey during predial. You
may enter, delete, or edit a phonebook entry, open the
speed-dial list or start a call from the phonebook.
See the phonebook section in Getting Started for detailed
information about using the phonebook.
Predial
Predial is automatically activated when you begin pressing
numbers on the keypad while in standby mode. Up to 256
numbers may be pressed. The call is then placed by pressing
START key, NavOK, or the Spkr softkey. Press Save to
the
add the dialed number to the phonebook before placing the
call.
The Handset
Profiles
Your handset ring behavior is established by five User Profiles: Silent, Vibrate, Loud, Soft, and Custom. The currently
23
Page 24
SpectraLink Corporation
active user profile is shown on the standby display. The ring
behavior can be easily changed when the handset is in
standby mode by pressing the
Prof softkey and selecting a
new profile from the list
The Handset
User Profiles
Current Profile
Silent
Vibrate
Loud
*
Soft
Prof P Cncl
The currently active user profile is Loud, indicated by
the asterisk (*) on its left. Use NavS and NavT to
scroll through the profile options. Press NavOK to set a
new profile and exit to the standby display.
3
See User Profiles in the standby menu to customize your profiles.
Redial
The Redl softkey is available in the standby mode. When
pressed, a list of the last 10 outgoing called will be displayed. Use the Nav keys to highlight the number and press
START to dial the number.
You may save any of these numbers to the phonebook by
pressing the
already saved in the phonebook by pressing the View softkey.
See the Redial section in Getting Started for detailed information about using redial.
24
Save softkey. You may also view any entry
Page 25

NetLink 7000 Series Wireless Telephone and Accessories User Guide
Speakerphone
Your phone system administrator can enable or disable the
speakerphone mode. If the speakerphone is enabled, it is
activated by pressing the Spkr softkey. Press the Spkr softkey again to end speakerphone mode. The audio then transfers to the handset earpiece. When speakerphone mode is
disabled,
Spkr will not appear as a softkey label.
Battery Packs
The handset will need to have its Battery Pack recharged
periodically. Three Battery Pack types are available:
Type Talk Time Standby Time
Standard 4 hours 80 hours
Extended 6 hours 120 hours
Ultra-Extended 8 hours 160 hours
The Battery Pack icon on the status row indicates the
charge amount remaining. Additionally the handset will
sound warning tones and display the Battery Low message
when there is less than two minutes of talk time remaining.
A melody will play when the handset is powered on for the
first time after being fully charged, unless this feature has
been disabled. Each Battery Pack type has a different melody.
See your phone system administrator if you have questions
about the type of Battery Pack you have been issued.
The Handset
25
Page 26

SpectraLink Corporation
Important Note About Battery Packs
• Only use SpectraLink Battery Packs with NetLink
7020/7030 Wireless Telephones.
• Do not dip the Battery Pack in water or throw into fire.
The Handset
• Do not throw away the Battery Pack with your domestic waste. Please recycle appropriately.
• It is normal for the Battery Pack to become warm
when charging.
• Never use non-SpectraLink charging units as they
could damage the Battery Pack.
Note
The type of Battery Pack is printed on the
label. Remove the Battery Pack and view the
label to determine the type of Battery Pack
you have been issued.
About Push-to-talk
The PTT feature allows NetLink 7030 Enhanced Wireless
Telephones to operate in a group broadcast mode in addition to the standard PBX telephone operation. The group
broadcast mode allows the phones to behave like walkietalkies, where a single phone can transmit to multiple listeners.
PTT is enabled by the phone system administrator and set
up by the user in the standby menus. See Setting User Preferences for complete information about setting up PTT. If
the phone system administrator has disabled PTT, the PTT
options will not appear in the standby menus.
26
Page 27

NetLink 7000 Series Wireless Telephone and Accessories User Guide
NetLink Wireless Telephones support twenty-four multicast channels, with the currently subscribed channels to
saved in memory on the handset.
A PTT channel may be selected and a call initiated by press-
Talk button located on the right side of the handset.
ing the
All handsets that have subscribed to that channel will hear
the transmission.
PTT dialogue is interrupted when you answer a PBX call.
When the PBX call is ended, PTT dialogue resumes if the
call is still active.
Interaction with Profiles
PTT is disabled by default in the Silent and Vibrate user
profiles. When PTT is disabled, PTT calls cannot be
received or transmitted.
Priority channel
If configured, the priority channel (25) can be used to call
all PTT subscribers. It does not guarantee delivery of the
message, but will interrupt existing PTT conversations. If a
receiving handset is in another application (such as a PBX
call or an OAI application), the handset will ring in-ear to
indicate the priority call. Unlike a normal PTT call, which
rings only once, the priority call will ring every five seconds
for a total of four rings, unless the PTT call terminates
sooner.
The Handset
Call period
The NetLink 7000 Series Wireless Telephone in PTT mode
operates like a two-way radio. A push-to-talk call period
27
Page 28

SpectraLink Corporation
begins with the first transmission and ends when there has
been no two-way radio traffic on the channel for ten seconds.
The PTT mode controls the keypad during a PTT call
The Handset
period. Therefore it is not possible to use the keypad for
any other function such as accessing the standby menus or
an OAI application, unless the PTT call is terminated.
However, it is possible to easily place a PBX call.
The handset plays a start tone sequence when receiving a
call and at the beginning of each transmit. At the end of
each transmit or receive, an end tone sequence will play. A
different tone sequence plays to inform you of a priority
channel call.
Selecting a channel
If PTT is enabled and the phone is in standby mode, the
current transmit channel is displayed on the screen on the
bottom line above the softkey display. The channel’s name
will be displayed, unless a name has not been assigned.
If you wish to transmit on a different channel, press and
release the
appear. The default channel will be at the top of the list.
The last channel used (which may also be the default channel) will be second on the list. The priority channel, if configured, will be third. The remaining items will be the rest of
the available channels listed in sequential order. Use the
NavT button to highlight the channel you wish to use.
Tal k button. A menu of available channels will
28
Page 29

NetLink 7000 Series Wireless Telephone and Accessories User Guide
Once you have highlighted the desired channel, press and
hold the Talk button to initiate the call. To abort the call
and return to Standby mode, press the
End key.
Initiating a call
To start a PTT call on the default channel, press and hold
Talk button. Wait briefly to activate the mode before
the
talking. You may begin talking when the display shows
Transmitting.
Transmitting
Once a call has been initiated, hold the handset two inches
from your mouth and talk into the microphone while continuing to hold down the
ton to end the transmission.
At the end of a transmission, the handset enters the waiting
state where it monitors the channel for up to ten seconds
and displays
Waiting and the channel name and/or number.
If you press the Talk button to transmit while in this state,
the handset automatically transmits on the currently active
channel. If no other transmission occurs within ten seconds
the handset reverts to standby mode.
Note that while in an active PTT session, or in a waiting
state, conversations from other channels will be ignored. To
transmit on another channel, press the
current conversation; then briefly press the
display and select another channel.
Tal k button. Release the Talk but-
END key to exit the
Tal k button to
The Handset
29
Page 30

SpectraLink Corporation
Receiving
Upon receiving a PTT transmission, the handset plays the
“receiving alert” tones and enters the receive state.
In this state the handset receives all conversations on the
The Handset
selected channels. The handset ignores the
Tal k button
while in the receive state. The screen shows the current
active channel, the caller ID information of the current
transmitter, and a PTT call icon.
A transmission on the priority channel will override the current PTT conversation. The priority channel then becomes
the current channel.
If you press the
END key while in the receive state, the hand-
set exits the current conversation and returns to standby
mode.
Change PTT volume
Volume levels for tones and speaker audio can be configured in the standby menu for PTT.
If you want to change the volume level while in a PTT call,
use the volume buttons on the side of the handset to raise
or lower PTT volume.
Muting a PTT call
To mute a current call, press the Mute softkey. This brings
up a Mute Two-Way Radio? prompt. Press the Yes or No
softkey. Use the
Mute only affects the current PTT call. Mute does not allow
the user to use the handset’s keypad for anything else,
including an OAI application.
UnMt softkey to unmute the PTT call.
30
Page 31

NetLink 7000 Series Wireless Telephone and Accessories User Guide
When the next PTT call period starts, the audio is automatically unmuted.
Incoming PBX call during a PTT call
A telephone call may be answered while in a PTT call session. To announce an incoming call, the handset will ring
with a low-volume ring and display the PBX system message.
To answer the call, press the
START key. The PTT call ses-
sion will be pre-empted and no PTT audio will be heard.
After the PBX call is over, press the
END key as usual to go
back on-hook, at which time PTT goes out of pre-empted
mode and becomes active again. If an already active PTT
call has not ended, you will hear the PTT audio again.
If you do not answer the PBX call by pressing the
START
key, the PTT display will reappear after the ring has
stopped.
Making a PBX call during a PTT call
To start a telephone call during a PTT call session, press the
START key. This causes the two-way radio to be pre-empted
as described above.
Incoming PTT call during a PBX call
The PTT receiving alert sound will play softly in the speaker
audio if you are in a PBX call. You may continue your PBX
call normally, or you may exit the PBX call and switch to
the PTT call by pressing the
calls at the same time.
END key. You cannot hear both
The Handset
31
Page 32

SpectraLink Corporation
Getting Started
Charging Your Handset ........................................................33
Basic Handset Operation Summary ...................................33
Redial ........................................................................................38
Phonebook ..............................................................................38
Phonebook Entry Options: .............................................39
Phonebook View Display Options ................................. 41
Speed-dial ................................................................................41
View Speed-Dial List .........................................................42
Getting Started
Assign Speed-Dial Number ..............................................43
Indications of Low Battery ...................................................43
Removing and Inserting Battery Packs ...............................44
PTT Operation Summary .....................................................44
Your NetLink 7020/7030 Wireless Telephone is
designed for full mobility within the workplace and
operates similar to a cellular phone. However, it also
interfaces with the telephone system at your workplace
and incorporates advanced telephony features. This section covers the basic functionality available in every
facility. For specific telephony system functions, see the
Advanced Telephony Features section or contact your phone
system administrator.
32
Page 33

NetLink 7000 Series Wireless Telephone and Accessories User Guide
Charging Your Handset
The handset’s Battery Pack must be charged before its first
use. See the section Handset Accessories for complete information about charging your handset.
Basic Handset Operation Summary
If you want to Then
Turn handset on Press and hold the
two chirps sound.
Turn handset off Press and hold the
chirp will sound. If in a call, hang up
first, then turn the handset off.
Unlock keypad Press the
Unlk softkey, then #, to
unlock the keypad.
END key until
END key. One
Gettting Started
Make an
emergency call
Lock keypad Press the
Make an internal
call
Make an external
call
If programmed, press and hold the
key assigned to the system one touch
dialing key for 3 seconds.
Menu softkey then NavOK,
to manually lock the keypad. See
Setting User Preferences to activate or
deactivate Autolock.
Press the
START key, wait for dial
tone, then dial the extension.
Press the
START key, wait for dial
tone, then dial the number just as
you would from your desk phone.
33
Page 34

SpectraLink Corporation
If you want to Then
Getting Started
Predial a number From standby mode, press the
Redial a number Press the
Select line If multiple lines are available, your
telephone system may require you to
select a line before dialing a number.
LINE and the number key
Press
corresponding to the desired line.
You will hear a dial tone.
Dial number Once you hear a dial tone, press the
number keys to dial the number.
keypad to enter up to xx numbers.
Then dial the call by pressing
NavOK or the Spkr softkey.
Redl softkey from standby
START,
mode. A list of recently-dialed
numbers displays. Select the number
and press
START, NavOK or the Spkr
softkey.
Make a
speed-dial call
Make a phonebook
34
Press and hold the speed-dial key
assigned to the number.
Press the Phbk softkey from standby
call
mode. Highlight the name and press
Dial softkey.
the
Page 35

NetLink 7000 Series Wireless Telephone and Accessories User Guide
If you want to Then
Answer call The handset will ring or vibrate to
alert you of an incoming call.
Additionally, a line indicator on the
display may flash and the display
may show information about the
call, such as caller’s name and
extension.
To answer a call, press the
START key
and hold the earpiece to your ear.
You may also activate the
speakerphone function or use a
headset.
Answer call on
second line
If you are on a call and hear subdued
ringing, a call is coming in on a
second line. The line number on the
display may be flashing. To answer
this call, put your first call on hold
and press the
LINE key then the line
number of the second call.
Gettting Started
Mute microphone Press the
Place call on hold Press the
Resume held call Press the
line number key.
Mute softkey.
Hold softkey.
LINE key followed by the
35
Page 36

SpectraLink Corporation
If you want to Then
Change speaker
Getting Started
Open the speed-
Hang up Press the END key. Be sure to do this
at the end of each call to return to
the standby mode.
Press the up/down volume buttons
volume
on the side of the handset during the
call.
Change ring
volume
Press the up/down volume buttons
on the side of the handset during
ringing. The default ring volumes are
set in the User Profile menus.
Silence while
Press the
END key to silence the ring.
ringing
dial list
Activate
speakerphone
Press the
mode. Press NavOK and then press
the
Press the
towards the handset. Note that this
Phbk softkey from standby
Spdl softkey.
Spkr softkey and speak
feature may be unavailable in your
facility.
Headset answer Press any key (other than
key, or a softkey) to answer a call
when a headset is plugged-in.
END, a Nav
36
Page 37

NetLink 7000 Series Wireless Telephone and Accessories User Guide
If you want to Then
Headset volume Press the up/down volume buttons
on the side of the handset during the
call.
Change profile Press the
Nav keys to select a new profile while
Prof softkey and use the
in standby mode.
Open the
phonebook
Press the
mode.
Phbk softkey from standby
Backlight The backlight comes on when any
key is pressed or when there is an
incoming call and stays on for ten
seconds. It turns off after ten
seconds if another key is not pressed
within that period.
Gettting Started
37
Page 38

SpectraLink Corporation
Redial
The Redl softkey is available in the standby mode. When
pressed, a list of the last 10 outgoing called will be displayed. Use the Nav keys to highlight the number and press
START or the Spkr softkey to dial the number.
Getting Started
Choose a Number
918005551212
3196
[Name]
[Name]
Spkr Save View
Call Log
1
View information about the entry by pressing the View softkey. You may also add any of these numbers to the phonebook by pressing the
Save softkey which opens the add
name display in the phonebook. The Save and View softkeys are only available when appropriate for the selected
entry.
Phonebook
The phonebook is opened by pressing the Phbk softkey
which appears on the standby mode display and during predialing. In standby mode, the phonebook can be opened to
display a list of entries. The phonebook holds a maximum
of 20 user-defined entries. The list is sorted alphabetically.
If the system one touch dialing key has been programmed,
it will be listed as the first entry with an asterisk (*) as the
first character. Only the phone system administrator may
38
Page 39

NetLink 7000 Series Wireless Telephone and Accessories User Guide
change this entry. The <new> option appears if the maximum number of entries has not been entered.
Phone Book
Choose a Name
[System Name]
*
<new>
[Name]
[Name]
Spkr Del Edit Exit
Phonebook Entry Options:
Dial number Press START or the Spkr softkey.
View entry Press
Enter new name Select the
Delete entry Press the
Edit entry Press the
NavOK.
<new> entry (if available)
and press the Edit softkey to open
the add number display.
Del softkey to delete an
entry.
Edit softkey to open the
add number display and edit the
existing number. Use the
highlight and select an entry. Press
Dial softkey to dial the number.
the
1
Gettting Started
Nav keys to
39
Page 40

SpectraLink Corporation
During predialing, when Phbk is pressed, the add number
display opens.
Add number display:
Getting Started
Enter the number and press
Phone Book
Enter Number
New
_
Clr Del Cncl
NavOK. The add name display
1
opens:
Phone Book
New
_
Clr Del Cncl
Enter the name and press
Enter Name
NavOK. The phonebook display
1
opens. The entry may be viewed, dialed, edited and assigned
to a speed-dial key by pressing the View softkey.
40
Page 41

NetLink 7000 Series Wireless Telephone and Accessories User Guide
View entry display
Phone Book
Spdl 7
George Anthiel
Number:
1959
Spkr Spdl Edit Back
Phonebook View Display Options
Dial number Press START or the Spkr softkey.
Assign a speed-dial
Press the
Spdl softkey.
number to this
entry
Edit entry Press the
Edit softkey to open the
add number display and edit the
existing number.
Return to
Press the
Back softkey or NavOK.
phonebook list
Speed-dial
The speed-dial list may be opened from the standby mode
to dial a number or from the phonebook for speed-dial key
administration.
Gettting Started
41
Page 42

SpectraLink Corporation
View Speed-Dial List
To display the list of speed-dial keys from the standby
mode, press the Spdl softkey.
Speed Dial List
Select a Key
1*Emergency 911
2 Help desk
3
4
Getting Started
Nav keys to highlight a key and then press START or
Use the
the Spkr softkey to dial the number. The Exit softkey
returns you to the standby mode.
A phonebook entry may be assigned to a speed-dial key
from this display. Select the speed-dial key that you wish to
assign and then press the
phonebook entries. Use the Nav keys to select the desired
entry.
Spkr Set Exit
Set softkey to open the list of
Speed Dial Key 3
Choose an Entry
*[System Name]
[Name]
[Name]
[Name]
Back
NavOK to assign the selected name to that speed-dial
Press
key. The Back softkey returns you to the speed-dial list.
42
Page 43

NetLink 7000 Series Wireless Telephone and Accessories User Guide
Speed-dial entries may be edited through the phonebook, as
described above.
Assign Speed-Dial Number
To add a phonebook number to the speed-dial list, view the
entry in the phonebook and press the
Spdl softkey. When
opened, the list of speed-dial keys is displayed.
Edit [Name]
Assign Speed Dial
1*Emergency 911
2 Help desk
3
4
Nav keys to highlight an empty slot and then press
Use the
NavOK to assign that speed-dial key to the phonebook entry.
Clr softkey deletes the highlighted entry. The Cncl soft-
The
Clr Cncl
key returns you to the phonebook list.
Indications of Low Battery
The Battery Pack icon on the status line of the display gives
you a visual indication of the amount of charge remaining
in the Battery Pack. Additionally, when the icon shows
empty, if the handset is in standby mode, you will hear a
brief, modulated-ring signal and the
displays. The handset may not be used until charged. If you
are in a call, soft beeps will sound, first slow and then fast,
until the handset becomes unusable. When you first start to
Battery Low message
Gettting Started
43
Page 44

SpectraLink Corporation
hear the beeps, you have two minutes to end the call or
change the Battery Pack
The Battery Pack can be changed while the call is still in
progress. Do not press
END. Quickly remove the discharged
Battery Pack and replace with a charged Battery Pack, press
END to turn the handset back on and then press START to
resume the call.
See the Handset Accessories section for complete information
about chargers.
Removing and Inserting Battery Packs
Getting Started
To remove the Battery Pack, press down on the latch on the
Battery Pack on the back of the handset and pull the Battery Pack towards you. The Battery Pack releases outward.
To replace, slide the lip of the Battery Pack into the bottom
of the cavity. Push the top of the Battery Pack until it snaps
into place. You should not have to force it into the handset.
PTT Operation Summary
(Link 7030 Enhanced Model Only)
Make a PTT call To call on the default channel press
and hold the
the display to show
then hold the handset 2 inches from
your mouth and speak.
TAL K button. Wait for
Transmitting and
Respond to a PTT
44
Press and hold the
call
during the 10 second wait period.
TAL K button
Page 45

NetLink 7000 Series Wireless Telephone and Accessories User Guide
Select a different
PTT channel
Press and release the TALK button.
Select a different channel from the
list.
End one PTT call
and start another
Press the
call. Press and release the
one
button and select a different channel
from the list. Press and hold the
TALK button to being transmitting
on the different channel.
Receive a PTT call
while in a PBX call
Transmit on the
priority channel
Press the
call. The PTT call can then be heard.
Press and release the
Select the priority channel from the
list. Press and hold
End a PTT call Press the
call.
Change PTT volume Use the
buttons on the side of the handset.
Answer a PBX call
during a PTT
transmission
Start a PBX call
during a PTT
transmission
Press the
transmissions will be pre-empted by
the PBX call.
Press the
number. PTT transmissions will be
pre-empted during the PBX call.
END key to exit the PTT
TALK
Gettting Started
END key to end the PBX
TALK button.
TAL K, then speak.
END key to exit the PTT
Up and Down volume
START key. PTT
START key and dial the
45
Page 46

SpectraLink Corporation
Getting Started
Turn off PTT Change to a different profile (Silent
and Vibrate disable PTT by default)
or unsubscribe from all PTT
channels.
46
Page 47

NetLink 7000 Series Wireless Telephone and Accessories User Guide
Advanced Features
Text Messaging (OAI) Navigation ...................................... 49
Advanced Feature Activation .............................................. 49
The Standby Menu ................................................................ 49
Data Entry and Editing ................................................. 50
Lock Keys ............................................................................... 52
User Profiles ........................................................................... 53
Default Profile Settings ..................................................... 55
Set or Edit a Profile ........................................................ 56
Ring Settings Grid .......................................................... 57
Telephone Ring Settings .................................................. 59
Ring Cadence .................................................................. 59
Ring Tone ........................................................................ 61
Ring Volume ................................................................... 62
Vibrate Cadence ............................................................. 63
Ring Delay ....................................................................... 63
Auxiliary Ring 1 and 2 ....................................................... 64
Noise Mode ........................................................................ 65
Headset/Speaker Ring ...................................................... 66
Key Tones Enable/Disable .............................................. 66
Warning Tones Enable/Disable ...................................... 67
Push-to-talk On/Off ......................................................... 67
Phone Settings ........................................................................ 68
Keypad Autolock ............................................................... 69
Set Language ....................................................................... 70
Set Extension ...................................................................... 71
Set User Name .................................................................... 72
Set Display Contrast .......................................................... 73
Hearing Aid ......................................................................... 74
Advanced Features
47
Page 48

SpectraLink Corporation
Startup Song Play/Inhibit .................................................74
Push-to-talk .........................................................................75
Default Channel ..............................................................76
Subscribed Channel ........................................................77
PTT Audio Volume ........................................................78
PTT Tone Volume .........................................................79
Menu Grid ...............................................................................80
Advanced Telephony Features .............................................82
Advanced Features
48
Page 49

NetLink 7000 Series Wireless Telephone and Accessories User Guide
Text Messaging (OAI) Navigation
Custom applications may allow you to read and respond to
text messages. The OAI application is available through the
FCN menu as programmed for your facility. While off-hook,
FCN to view the menu, then press one or more num-
press
ber keys to open the application. The handset is now in
application mode. The Nav keys are not enabled by messaging
applications. Instead, use
<* to move left or up and #> to
move right or down.
Advanced Feature Activation
The features that have been programmed in your system
may be viewed and activated through the Feature menu.
Press the
FCN key while off-hook to display the menu of
advanced telephony features available in your facility. The
features may be activated by pressing the corresponding
shortcut key or by using the
option and pressing
Nav keys to highlight the
NavOK.
See Advanced Telephony Features for more information about
additional features that may be activated in your facility.
The Standby Menu
When the handset is in standby mode, press the Menu softkey to enter standby menu mode and use the standby menu.
Advanced Features
49
Page 50

SpectraLink Corporation
This menu allows you to set user preferences. The handset
cannot make or receive calls while in standby menu mode.
Main Menu
General Settings
Lock Keys
User Profiles
Phone Settings
Prof Pl Exit
Scroll through menu options by using
3
NavS and NavT.
When an asterisk (*) appears to the left of an option, it indicates the option is currently selected. Press the
to return to standby mode. Use the Back softkey to return
to the previous menu.
Data Entry and Editing
Advanced Features
Enter numbers by pressing the buttons on the keypad. The
blinking underscore identifies the current cursor position.
When entering alphanumeric strings, the
CAPS/caps soft-
key will appear and may be pressed to toggle the case. Enter
letters by repeatedly pressing the corresponding key until
the desired letter displays on the screen. Use the
key to change the case as needed.
To edit during entry, delete the character to the left of the
cursor by pressing the
Del softkey. To replace an entry,
delete it by pressing the Clr softkey and then enter the new
data. To edit an existing entry, use NavW and NavX to move
the cursor position, and then press the
Del softkey to delete
Exit softkey
CAPS soft-
50
Page 51

NetLink 7000 Series Wireless Telephone and Accessories User Guide
the character to the left. Insert new data by pressing the
buttons on the keypad.
Alphanumeric entries:
Key caps CAPS
1 11
2 2 a b c 2 A B C
3 3 d e f 3 D E F
4 4 g h i 4 G H I
5 5 j k l 5 J K L
6 6 m n o 6 M N O
7 7 p q r s 7 P Q R S
8 8 t u v 8 T U V
9 9 w x y z 9 W X Y Z
0 00
* * . - ! $ % & ’ ( ) + , : ; / \ = @ ~
# <space>
Advanced Features
51
Page 52

SpectraLink Corporation
Lock Keys
The keypad may be locked to prevent accidental activation.
Main Menu
Manual Keypad Lock
Lock Keys
User Profiles
Phone Settings
Prof Pl Exit
1
Lock Keys is the first option on the standby menu enabling
the keypad to be quickly locked in standby mode by press-
Fcn+NavOK. The Unlk softkey will then display on the
ing
standby screen. The keypad may be unlocked by pressing
Unlk softkey and then the # key.
the
Advanced Features
52
Page 53

NetLink 7000 Series Wireless Telephone and Accessories User Guide
User Profiles
Advanced Features
53
Page 54

SpectraLink Corporation
Ring Settings, Noise Mode, Headset/Speaker Ring, Key
Tones
, Warning Tones and Push-to-talk may be changed for
each user profile.
Main Menu
Ring/Tone Settings
Lock Keys
User Profiles
Phone Settings
Prof Exit
NavOK to select option.
Press
The default user profile is Loud. Use
2
NavT to see remain-
ing user profile options. Press NavOK to edit the selected
profile’s settings.
Advanced Features
User Profiles
Choose a Profile
Vibrate
*
Loud
Soft
Custom
Prof P Back
5
When a profile is selected and its settings are changed,
those changes only affect the selected profile.
54
Page 55

NetLink 7000 Series Wireless Telephone and Accessories User Guide
Default Profile Settings
Setting/Profile Silent Vibrate Soft Loud Custom
Ring Cadence Off Off PBX PBX PBX
Ring ToneTone 1Tone 1Tone 1Tone 1Tone 1
Ring Volume11375
Vibrate Cadence Off PBX Off Off PBX
Ring Delay00006
Noise Mode Normal Normal Normal Normal Normal
Headset/
Speaker
Key Tones Off Of f On On On
Warning Tones Off Off On On On
Push-to-talk Off Off On On On
Contact your phone system administrator to reset all user
profiles back to these default settings.
Speaker Speaker Speaker Speaker Speaker
Advanced Features
55
Page 56

SpectraLink Corporation
Set or Edit a Profile
A profile may be set or edited.
User Profiles
Choose a Profile
Soft
Vibrate
Silent
Custom
Prof P Back
To select a profile, press
Edit Custom
Use this Profile
Set as Active
Advanced Features
Set as Active and then press NavOK to make the
Use
Ring Settings
Noise Mode
Key Tones Off
Prof P Back
5
NavOK.
1
selected profile become the active one. Scroll to the other
menu options to edit the profile.
56
Page 57

NetLink 7000 Series Wireless Telephone and Accessories User Guide
Ring Settings Grid
Advanced Features
57
Page 58

SpectraLink Corporation
Use the Ring Settings option to adjust the ring attributes,
including volume, tones, delay, and vibrate. All Ring Settings
may be customized for each profile.
Edit Custom
Configure Ringer
Set as Active
Ring Settings
Noise Mode
Ring in Headset
Prof P Back
NavOK to select option.
Press
Ring Type
Normal Call Ring
Advanced Features
Telephone
Auxiliary Ring 1
Auxiliary Ring 2
Prof P Back
2
1
Telep hone settings are used for the primary PBX functions.
Auxiliary Ring 1 and 2 are used for additional call systems
such as messaging applications. Auxiliary Ring options are
identical to
Telepho ne options. Different ring styles can be
set for each call system so that you are alerted to the type of
call coming in. See your phone system administrator for
information about auxiliary call or messaging systems in
your facility.
58
Page 59

NetLink 7000 Series Wireless Telephone and Accessories User Guide
Telephone Ring Settings
Ring Settings
Ringing Rules
Ring Cadence
Ring Tone
Ring Volume
Vibrate Cadence
Prof P Back
1
Ring Cadence
Ring cadence is the rhythm of the ring.
Ring Cadence
Follow Phone Sys
Off
PBX
*
Continuous
Short Pulse
Prof Cncl
The default cadence is set by the
PBX (e.g. the PBX may
2
send rings that differentiate between internal and external
calls). Use the
Off option to silence all rings.
Advanced Features
59
Page 60

SpectraLink Corporation
Scroll to see additional selections:
Ring Cadence
Ring Long Bursts
PBX
Continuous
Short Pulse
Long Pulse
*
Prof Cncl
Continuous: rings continually until answered.
Short Pulse: rings in short bursts.
Long Pulse: rings in long bursts.
NavS and NavT to highlight an option. Press Play to
Use
preview ring cadence. Press NavOK to set a new ring
cadence and return to the previous menu level.
Advanced Features
5
60
Page 61

NetLink 7000 Series Wireless Telephone and Accessories User Guide
Ring Tone
Select the ring style from ten available tones. Scroll down to
see all available
off, the
Ring Tone
Ring Tone
options. If
Ring Cadence
is turned
option will not appear on the menu.
Ring Settings
Choose a Tone
Ring Cadence
Ring Tone
Ring Volume
Vibrate Cadence
Prof P Back
2
Press NavOK to select option.
Ring Tone
Choose a Tone
*
Ton e 1
Ton e 2
Ton e 3
Ton e 4
Prof Play Cncl
NavS and NavT to highlight an option. Press Play to
Use
2
preview ring tone. Press NavOK to set a new ring tone and
return to the previous menu level. Press
Cncl to retain cur-
rent ring tone and return to the previous menu level.
Advanced Features
61
Page 62

SpectraLink Corporation
Ring Volume
There are eight volume settings from soft to loud, indicated
by a graduated bar. This setting may be overridden by
adjusting the volume while the handset is ringing.
Ring Settings
Volume Level
Ring Cadence
Ring Tone
Ring Volume
Vibrate Cadence
Prof P Back
NavOK to select option.
Press
Advanced Features
Ring Volume
Set w/Side Buttons
Volume:
Prof P Cncl
3
Adjust ring volume by pressing the volume up and down
buttons on the side of the handset. The graduated bar indicates the ring volume. Press
NavOK to save and return to
the previous menu level.
62
Page 63

NetLink 7000 Series Wireless Telephone and Accessories User Guide
Vibrate Cadence
Vibrate Cadence options are the same as for Ring Cadence.
Ring Delay
Ring Delay determines how long the vibrate cadence will
play before the audible ring starts.
Ring Settings
Ring after Vibrate
Ring Tone
Ring Volume
Vibrate Cadence
Ring Delay
Prof P Back
NavOK to select option.
Press
Ring Delay
Choose a Delay
None
5 seconds
*
10 seconds
Prof P Cncl
NavS and NavT to highlight an option. Press NavOK
Use
4
2
to set new ring delay and return to the previous menu
level.Press
Cncl to return to the previous menu level with-
out changing the ring delay.
Advanced Features
63
Page 64

SpectraLink Corporation
Auxiliary Ring 1 and 2
Ring Type
Application 1 Ring
Telephone
Auxiliary Ring 1
Auxiliary Ring 2
Prof P Back
2
Auxiliary Rings 1 and 2 have the same options as Tel ephon e.
These additional settings are used when additional call system applications are used at your facility. Set a unique ring
style for each system so that you are alerted to the type of
call coming in. See your phone system administrator for
additional information.
Advanced Features
64
Page 65

NetLink 7000 Series Wireless Telephone and Accessories User Guide
Noise Mode
Use the Noise Mode option to adjust the microphone for
the level of ambient noise:
Edit Custom
Background Noise
Set as Active
Ring Settings
Noise Mode
Ring in Headset
Prof P Back
NavOK to select option.
Press
Noise Mode
Office Environment
Normal
*
High
Severe
Prof P Cncl
Normal setting is suitable for most office environ-
The
3
1
ments. Select High for moderate background noise and
Severe for very noisy environments. Use
NavS and NavT
to highlight an option. Press NavOK to set a new Noise
Mode
and return to the previous menu level.
Advanced Features
65
Page 66

SpectraLink Corporation
Headset/Speaker Ring
When using a headset, the ring may be adjusted to ring as a
softly modulated sound in the headset or as usual in the
speaker. When no headset is plugged in, the ring goes to the
speaker.
Edit Custom
Rings in Speaker
Set as Active
Ring Settings
Noise Mode
Ring in Headset
Prof P Back
4
The current setting is displayed on the info line. Press
NavOK to toggle to the alternate setting.
Key Tones Enable/Disable
Advanced Features
Key tones sound when the keypad is pressed. They may be
turned off for silent handset dialing.
Edit Custom
Key Tones Enabled
Ring Settings
Noise Mode
Ring in Headset
Key Tones Off
Prof P Back
5
The current setting is displayed on the info line. Press
NavOK to toggle to the alternate setting
66
Page 67

NetLink 7000 Series Wireless Telephone and Accessories User Guide
Warning Tones Enable/Disable
Warning tones sound when the handset is moved out of
range. They may be turned off for silent handset operation.
Edit Custom
Warning Tones Enabled
Noise Mode
Ring in Headset
Key Tones Off
Warning Tones Off
Prof P Back
6
The current setting is displayed on the info line. Press
NavOK to toggle to the alternate setting.
Push-to-talk On/Off
Push-to-talk (PTT) may be turned on or off by Profile.
PTT is available only in the NetLink 7030 Wireless Telephone.
Edit Custom
Push-to-talk Disabled
Ring in Headset
Key Tones Off
Warning Tones Off
Push-to-talk On
Prof P Back
The current setting is displayed on the info line. Adjust
PTT settings in the Phone Settings menu. Press
toggle to the alternate setting.
5
NavOK to
Advanced Features
67
Page 68

SpectraLink Corporation
Phone Settings
Phone settings options are used to customize your handset’s functions.
Advanced Features
68
Page 69

NetLink 7000 Series Wireless Telephone and Accessories User Guide
Keypad Autolock
The handset may be set to lock the keypad automatically
when in standby mode. The automatic locking function of
the keypad may be disabled or adjusted for a five, 10 or 20second delay before locking.
Phone Settings
Configure Autolock
Keypad Autolock
Language
Set Entension
Set User Name
Prof P Back
NavOK to select option.
Press
Keypad Autolock
Lock Delay
Disable
*
5 seconds
10 seconds
20 seconds
Prof P Cncl
Use
NavS and NavT to highlight an option. Press NavOK
1
1
to set the Autolock option and return to the previous menu
level. Press Cncl to return to the previous menu level without changing the Autolock option.
69
Advanced Features
Page 70

SpectraLink Corporation
Set Language
The Language option will list what languages are available.
Select the language from the list.
Phone Settings
Language Options
Keypad Autolock
Language
Set Extension
Set User Name
Prof P Back
NavOK to select option.
Press
Set Language
Advanced Features
NavS and NavT to highlight an option. Press NavOK
Use
Choose a Language
English
*
Françias
Español
Prof P Cncl
2
to set language option and return to the previous menu
level. Press
Cncl to return to the previous menu level with-
out changing the language.
1
70
Page 71

NetLink 7000 Series Wireless Telephone and Accessories User Guide
Set Extension
Set Extension is used to change the extension displayed in
the standby menu. Changing the extension in the standby
menu does not affect the extension number assigned to this
handset in the PBX. Please see the phone system administrator if you have questions about the correct extension
number for your handset.
Phone Settings
Change Extension
Keypad Autolock
Set Language
Set Extension
Set User Name
Prof S Back
NavOK to select option.
Press
Set Extension
Phone Number
Enter Number:
_
Prof Clr Del Cncl
3
Enter the extension number by pressing the keypad. For
entry information, see Data Entry and Editing above. Press
NavOK to save and return to the previous menu level. Press
71
Advanced Features
Page 72

SpectraLink Corporation
Cncl to return to the previous menu level without changing
the extension.
Set User Name
A name may be entered to identify the handset’s owner. It
may be 18 or fewer characters.
Phone Settings
Change User's Name
Keypad Autolock
Language
Set Extension
Set User Name
Prof S Back
NavOK to select option.
Press
Advanced Features
Set User Name
OK to Save
Enter Name:
_
caps Clr Del Cncl
4
Enter the name number by pressing the keypad. For entry
information, see Data Entry and Editing above. Press
to save and return to the previous menu level. Press
return to the previous menu level without entering or
changing the name.
72
NavOK
Cncl to
Page 73

NetLink 7000 Series Wireless Telephone and Accessories User Guide
Set Display Contrast
Display contrast may be adjusted to accommodate light
conditions.
Phone Settings
Darker/Lighter
Language
Set Extension
Set User Name
Display Contrast
Prof S Back
NavOK to select option.
Press
Set Contrast
Set w/Nav Left/Rt
Display Contrast:
Cncl
NavX to increase contrast and NavW to decrease con-
Use
5
trast. Press NavOK to save and return to the previous menu
level. Press
Cncl to return to the previous menu level with-
out changing the display contrast.
Advanced Features
73
Page 74

SpectraLink Corporation
Hearing Aid
The handset may be adjusted for hearing aid compatibility.
Phone Settings
Currently Off
Set Extension
Set User Name
Display Contrast
Use Hearing Aid
Prof S Back
6
The current setting is displayed on the info line. Press
NavOK to toggle to alternate setting.
Startup Song Play/Inhibit
The melody that plays when the handset is turned on after
being fully charged may be silenced.
Advanced Features
Phone Settings
Currently Enabled
Set User Name
Display Contrast
Use Hearing Aid
Inhibit Song
Prof S Exit
The current setting is displayed on the info line. Press
NavOK to toggle to alternate setting.
7
74
Page 75

NetLink 7000 Series Wireless Telephone and Accessories User Guide
Push-to-talk
Push-to-talk (PTT) is available only in the NetLink 7030
Wireless Telephone.
Advanced Features
Phone Settings
Change PTT Settings
Display Contrast
Use Hearing Aid
Inhibit Song
Push-to-talk
Prof P Exit
NavOK to change PTT settings.
Press
5
75
Page 76

SpectraLink Corporation
Default Channel
The Default Channel menu is used to set the default channel for the handset.
Push-to-talk
Current Dflt=1
Default Channel
Subscribed Channels
PTT Audio Volume
PTT Tone Volume
Prof P Back
NavOK to select the Default Channel.
Press
1
The screen now displays the first four subscribed channels.
These channels are shown here as Channel 1, Channel 2,
etc. but they may be assigned unique names by the phone
system administrator. If so, those names will appear instead.
The lowest enabled channel is set by default as the default
Advanced Features
channel. If you wish to select a different default channel for
your handset, use
NavT to scroll down to the channel you
want.
Default Channel
Current Default
1 Channel 1
*
2 Channel 2
3 Channel 3
4 Channel 4
Prof P Back
1
76
Page 77

NetLink 7000 Series Wireless Telephone and Accessories User Guide
Press NavOK to select your default channel. Press Back to
return to the previous menu.
Subscribed Channel
You may select the channels to which you wish to subscribe
from the list of available channels under the Subscribed
Channels menu.
Push-to-talk
Subscribed Channels
Default Channel
Subscribed Channels
PTT Audio Volume
PTT Tone Volume
Prof P Back
NavOK to select Subscribed Channels. Use NavT to
Press
2
scroll down to the first channel to which you wish to subscribe. (Channel 1 is subscribed to by default.)
Subscribed Channels
Use OK to Deselect
1 Channel 1
*
*
2 Channel 2
*
3 Channel 3
*
4 Channel 4
Prof P Back
NavOK to subscribe to a channel. An * will appear to
Press
1
the left of the subscribed channel.
Repeat this operation for each channel to which you wish to
subscribe. Press
Back to return to the Main menu.
77
Advanced Features
Page 78

SpectraLink Corporation
PTT Audio Volume
The PTT speaker volume may be set through the PTT
Audio Volume menu.
Push-to-talk
Adjust Voice Volume
Default Channel
Subscribed Channels
PTT Audio Volume
PTT Tone Volume
Prof P Back
NavOK to select PTT Audio Volume.
Press
PTT Audio Volume
Use Vol Up/Down
Advanced Features
Use
NavX and NavW or the Up/Down volume buttons on
Audio Volume:
Prof P Cncl
3
the side of the handset to adjust the volume level of the
speaker. The graduated bars on the screen indicate the volume level. Press
NavOK to save.
The selected PTT audio volume may be temporarily
changed while in PTT mode by using the Up/Down keys.
Cncl to return to the Push-to-talk menu without
Press
changing the volume.
78
Page 79

NetLink 7000 Series Wireless Telephone and Accessories User Guide
PTT Tone Volume
The volume of the PTT tones may be set through the PTT
Tone Volume menu.
Push-to-talk
Adjust Tone Vol
Default Channel
Subscribed Channels
PTT Audio Volume
PTT Tone Volume
Prof P Back
NavOK to select PTT Tone Volume.
Press
PTT Tone Volume
Use Vol Up/Down
Tone Volume:
Prof P Cncl
Use
NavX and NavW or the Up/Down volume buttons on
4
the side of the handset to adjust the volume level of the
tones. The graduated bars on the screen indicate the volume level. Press
NavOK to save.
Press Cncl to return to the Push-to-talk menu without
changing the volume.
Advanced Features
79
Page 80

SpectraLink Corporation
Menu Grid
Advanced Features
80
Page 81

NetLink 7000 Series Wireless Telephone and Accessories User Guide
Advanced Features
81
Page 82

SpectraLink Corporation
Advanced Telephony Features
Advanced telephony features are accessed through the FCN
key followed by one or two additional key presses depending on the telephone system in use at your facility.
Check with your phone system administrator for specific
features supported by your handset.
For your convenience, the following table has been provided to allow you to record the feature access sequences
used in your facility.
Advanced Features
82
Page 83

NetLink 7000 Series Wireless Telephone and Accessories User Guide
Feature Key Press
Transfer
Fcn + _________
Forward
Conference
Camp on
Redial
Voi cemail
Flash
Application Mode
_________
_________
_________
_________
_________
_________
Fcn + _________
Fcn + _________
Fcn + _________
Fcn + _________
Fcn + _________
Fcn + _________
Fcn + _________
Fcn + _________
Fcn + _________
Fcn + _________
Fcn + _________
Fcn + _________
Fcn + _________
Advanced Features
83
Page 84

SpectraLink Corporation
Handset Accessories
About Chargers ......................................................................85
Charging Status ...................................................................86
Charging Times ...................................................................87
Single Charger .........................................................................89
Dual Charger ...........................................................................90
Quad Charger ..........................................................................92
Headsets ...................................................................................93
Carrying Options ....................................................................93
Handset Accessories
84
Page 85

NetLink 7000 Series Wireless Telephone and Accessories User Guide
About Chargers
Three charger models are available for the NetLink 7020/
7030 Wireless Telephone. The Single Charger will charge a
single handset with an installed Battery Pack. The Dual
Charger will charge the handset and a spare Battery Pack.
The Quad Charger can charge up to four Battery Packs at a
time. Any NetLink 7020/7030 Battery Pack can be charged
in any charger.
The Single and Dual Chargers allow the handset to remain
operative in speakerphone mode or with a headset while
charging. Handsets may be charged while in standby mode,
while in an active call or while turned off.
Place the Single or Dual Charger on a flat, horizontal surface and plug the power supply into the charger and into an
appropriate wall outlet. The Quad Charger may be
mounted on a horizontal or vertical surface.
Handset Accessories
85
Page 86

SpectraLink Corporation
Charging Status
The handset display and the LED on the Dual and Quad
Chargers indicate whether or not charging is occurring or
completed or if a Battery Pack failure has been detected.
Handset/LED* Charging Status
Charging
LED Solid On
Charge Complete
LED Off
Battery Failure
LED Flash
Handset Accessories
* Note: the Single Charger does not have an LED
indicator.
The Battery Pack in the handset is
charging.
Battery Pack is charging. Note that
in the Dual Charger, the handset’s
Battery Pack takes charging
precedence, and when it is finished
charging, the single Battery Pack in
the rear slot will charge.
The Battery Pack in the handset has
finished charging.
Battery Pack fully charged, empty
slot, or unit is not powered.
Error. Battery Pack not able to be
charged. Reinsert Battery Pack or
replace Battery Pack.
86
Page 87

NetLink 7000 Series Wireless Telephone and Accessories User Guide
Charging Times
Each type of Battery Pack requires a different amount of
time to achieve a fully charged state from a fully depleted
state.
Type Charging time
Standard 2 hours
Extended 3 hours
Ultra-Extended 4 hours
Note
The type of Battery Pack is printed on the
label. Remove the Battery Pack and view the
label to determine the type of Battery Pack
you have been issued.
! Caution
• It is normal for the Battery Pack to become warm
when charging.
• Chargers are only authorized for use in the U.S. and
Canada. The correct power supply for your charger will
be provided with the charger.
• Chargers operate in a 50° to 85° F (10° to 30° C) environment. Do not expose them to freezing temperatures
or direct sunlight.
Handset Accessories
87
Page 88

SpectraLink Corporation
• Do not place anything in the charger other than the
handset or single Battery Pack as appropriate as the
contacts could be bent. Bent contacts can keep the Battery Pack from charging.
• Only use SpectraLink Battery Packs with Spectra-Link
chargers.
• Never use non-SpectraLink charging units as they
could damage the Battery Pack.
2
• Only use the original plug-in power adapter for the
chargers.
• Contact your service representative for assistance if you
have a faulty Battery Pack or a problem with your
charger.
Handset Accessories
2
If you have been issued a charger that carries another
brand, please check with your phone system administrator
for directions on how to properly use it.
88
Page 89

NetLink 7000 Series Wireless Telephone and Accessories User Guide
Single Charger
1
ABC
2
DEF
3
GHI
4
J
5
K
L
MNO
6
P
7
Q
R
S
TUV
8
WXYZ
9
<
*
0
# >
F
C
N
L
IN
E
The Single Charger is designed to allow the handset to
remain operational through speakerphone or headset use
while the handset's Battery Pack is being charged. The
handset may also be charged while it is in standby mode or
turned off.
Place the handset into the Single Charger facing for-ward.
While the handset is charging in standby mode, it will display its extension number and
charge icon will indicate that charging is in progress. The
handset is fully operational and will ring if called. When the
handset is charging while turned off, only
display and no calls will be received. The dots will be racing
during the charging cycle.
When the handset is fully charged,
display.
No charging information will display during an active call.
Charging…. An animated
Charging… will
Charge Complete will
Handset Accessories
89
Page 90

SpectraLink Corporation
Dual Charger
1
A
2
B
C
D
3
E
F
G
4
H
I
JK
5
L
M
6
N
O
P
7
Q
R
S
T
8
U
V
W
9
X
Y
Z
<
*
0
# >
FCN
LINE
The Dual Charger is designed to charge the Battery Pack in
the handset while it remains operational and also charge an
additional Battery Pack in the rear charging bay. The hand-
Handset Accessories
set has charging priority when both slots are occupied.
Place the handset in the front slot, facing forward. The Battery Pack alone snaps into the charging bay as shown in the
illustration.
90
Page 91

NetLink 7000 Series Wireless Telephone and Accessories User Guide
The LED indicates the status of the Battery Pack in the rear
bay. The handset displays its charging status as described
for the Single Charger.
When the handset is fully charged or is removed, the Battery Pack will begin charging.
Note that the time it takes for the Battery Pack to charge
will be lengthened if its charging cycle is inter-rupted for a
handset to charge.
Handset Accessories
91
Page 92

SpectraLink Corporation
Quad Charger
The Quad Charger is designed to simultaneously charge
four Battery Packs. It may be mounted on a horizontal or
vertical surface.
The Battery Pack snaps into the charging slot. The LED
above the occupied bay indicates the charging status of the
Battery Pack in the bay.
Note
If a flashing LED indicates a Battery Pack failure, verify the condition before replacing the
Battery Pack. First check the Battery Pack in
a different bay or substitute another charger
Handset Accessories
and repeat the operation that caused the failure. If the same Battery Pack lights a steady
LED when inserted in a different bay or
charger, the first charger may be faulty. Contact your phone system administrator for service information.
92
Page 93

NetLink 7000 Series Wireless Telephone and Accessories User Guide
Headsets
SpectraLink offers optional headsets for use in noisy environments or if you need to have your hands free while talking on the handset.
To use the headset, simply plug it into the jack on the right
side of the handset.
While using a headset, the handset will ring according to the
user profile setting established in the Headset/Speaker Ring
option. The external ring will ring according to the setting
of the profile.
The headsets offered by SpectraLink are specially designed
to work properly with the NetLink 7020/7030 Wireless
Telephone. SpectraLink does not recommend using other
headsets.
Carrying Options
The following options are available for handset protection
and easy handset carrying and removal.
Belt clip: Spring-loaded plastic belt clip that attaches to the
back of the handset.
Swivel belt clip: Swivel-style belt clip that attaches to the
back of the handset with full 360 degree swivel or eightposition ratchet options.
Swivel carrying case: Black leather case with keypad cover
and swivel-style quick release belt clip.
Rugged holster: Black holster with belt clip.
Cord lanyard: Nylon cord lanyard with quick disconnect.
Coiled lanyard: Plastic coiled lanyard with clothing clip.
Handset Accessories
93
Page 94

SpectraLink Corporation
Handset Accessories
94
Page 95

NetLink 7000 Series Wireless Telephone and Accessories User Guide
Handset Administration
FAQs ....................................................................................... 96
Specifications .......................................................................... 97
About Safe Use of Wireless Telephones ........................... 98
Operational Warnings ....................................................... 98
Potentially Explosive Atmospheres ............................. 98
Care of Your Handset ......................................................... 101
Notice .................................................................................... 104
Handset Adminis tration
95
Page 96

SpectraLink Corporation
FAQs
TBD
Handset Administr ation
96
Page 97

NetLink 7000 Series Wireless Telephone and Accessories User Guide
Specifications
Radio frequency
Transmission type
FCC certification
Voice encoding
Transmit power
Display
Model dimensions
Model weight
Standard Battery
Pack capacity
Extended Battery
Pack capacity
Ultra-Extended
Battery Pack
capacity
Handset Adminis tration
97
Page 98

SpectraLink Corporation
About Safe Use of Wireless Telephones
WARNING: Changes or modifications to this
!
!
equipment not approved by SpectraLink Corporation may cause this equipment to not
comply with par t 15 of the FCC rules and voi d
the user’s authority to operate this equipment.
WARNING: SpectraLink products contain no
user-serviceable parts inside. Refer servicing to qualified service personnel.
Operational Warnings
Potentially Explosive Atmospheres
Turn off your handset, prior to entering any area with a potentially
explosive atmosphere. Do not remove, install, or charge batteries in
such areas. Sparks in a potentially explosive atmosphere can cause
an explosion or fire resulting in bodily injury or even death.
The areas with potentially explosive atmo-
!
spheres referred to above include fueling
areas such as below decks on boats, fuel or
chemical transfer or storage facilities, areas
where the air contains chemicals or particles
such as grain, dust, or metal powders, and
any other area where you would normally be
advised to turn off your vehicle engine. Areas
with potentially explosive atmospheres are
often but not always posted.
Handset Administr ation
98
Page 99

NetLink 7000 Series Wireless Telephone and Accessories User Guide
Batteries
All batteries can cause property damage and/or bodily
injury, such as burns if a conductive material such as jewelry, keys, or beaded chains touches exposed terminals. The
conductive material may complete an electrical circuit
(short circuit) and become quite hot. Exercise care in handling any charged battery, particularly when placing it inside
a pocket, purse, or other container with metal objects.
Electromagnetic Interference and
Compatibility
Nearly every electronic device is susceptible
to electromagnetic interference (EMI) if inadequately shielded, designed, or otherwise
configured for electromagnetic compatibility.
Facilities
To avoid electromagnetic interference and/or compatibility
conflicts, turn off your handset in any facility where posted
notices instruct you to do so. Hospitals or health care facilities may be using equipment that is sensitive to external RF
energy.
Pacemakers
The Health Industry Manufacturers Association recommends that a minimum separation of 6 inches (15 cm) be
maintained between a handheld, wireless-radio product and
a pacemaker. These recommendations are consistent with
the independent research by, and recommendations of,
99
Handset Adminis tration
Page 100

SpectraLink Corporation
Wireless Technology Research. Persons with pacemakers
should:
• ALWAYS keep the handset more than 6 inches (15 cm)
from their pacemaker when the handset is turned ON.
• Not carry the handset in a breast pocket.
• Use the ear opposite the pacemaker to minimize the
potential for interference.
• Turn the handset OFF immediately if you have any reason to suspect that interference is taking place.
Hearing Aids
Some digital wireless handsets may interfere with some
hearing aids. In the event of such interference, you may
want to consult your hearing-aid manufacturer to discuss
alternatives.
Other Medical Devices
If you use any other personal medical device, consult the
manufacturer of your device to determine if it is adequately
shielded from external RF energy. Your physician may be
able to assist you in obtaining this information.
Use While Driving
Campus installations and warehouse facilities that use vehicles such as forklifts or golf carts should abide by these
guidelines when using Wireless Telephones:
• Give full attention to driving and to the road, aisle, or
path.
Handset Administr ation
100
 Loading...