

Page 1
STEREO CLOCK RADIO/RECHARGING STATION
FOR iPod
®
OWNER'S MANUAL
KT4560
(iPod Not Included)
PLEASE READ THIS OPERATING MANUAL COMPLETELY BEFORE
OPERATING THIS UNIT AND RETAIN THIS BOOKLET FOR FUTURE REFERENCE
Page 2

DEAR HELLO KITTY® CUSTOMER
Selecting fine audio equipment such as the unit you've just purchased is only the start of your musical
enjoyment. Now it's time to consider how you can maximize the fun and excitement your equipment offers.
This manufacturer and the Electronic Industries Association's Consumer Electronics Group want you to get
the most out of your equipment by playing it at a safe level. One that lets the sound come through loud and
clear without annoying blaring or distortion and, most importantly, without affecting your sensitive hearing.
Sound can be deceiving. Over time your hearing "comfort level" adapts to higher volumes of sound. So
what sounds "normal" can actually be loud and harmful to your hearing. Guard against this by setting your
equipment at a safe level BEFORE your hearing adapts.
To establish a safe level:
· Start your volume control at a low setting.
· Slowly increase the sound until you can hear it comfortably and clearly, and without distortion.
Once you have established a comfortable sound level:
· Set the dial and leave it there.
Taking a minute to do this now will help to prevent hearing damage or loss in the future. After all, we want
you listening for a lifetime.
We Want You Listening For a Lifetime
Used wisely, your new sound equipment will provide a lifetime of fun and enjoyment. Since hearing
damage from loud noise is often undetectable until it is too late, this manufacturer and the Electronic
Industries Association's Consumer Electronics Group recommend you avoid prolonged exposure to
excessive noise.
Customer's Record:
The serial number of this product is found on its battery compartment. You should note the serial number
unit in the space provided as a permanent record of your purchase to aid in identification in the
theft of loss.
Model Number: KT4560
Serial Number:
____________________
of this
event of
1
Page 3

2
SAFETY INSTRUCTIONS
“See Bottom of Unit”
WARNING: TO PREVENT FIRE OR SHOCK HAZARD, DO NOT EXPOSE THIS APPLIANCE TO
RAIN OR MOISTURE.
THE IMPORTANT SAFETY INSTRUCTIONS SHALL INCLUDE, AS APPLICABLE TO THE APPLIANCE,
STATEMENTS THAT CONVEY TO THE USER THE INFORMATION ITEMIZED IN THIS PARAGRAPH:
1. Read instructions - All the safety and operating instructions should be read before the appliance is
operated
2. Retain instructions - The safety and operating instructions should be retained for future reference.
3. Heed Warnings - All warnings on the appliance and in the operating instructions should be adhered to.
4. Follow instructions - All operation and use instructions should be followed.
5. Water and Moisture - The appliance should not be used near water; for example, near a bathtub,
washbowl, kitchen sink, laundry tub, in a wet basement, or near a swimming pool, and the like.
6. Carts and Stands - The appliance should be used only with a cart or stand that is
recommended by the manufacturer.
An appliance and cart combination should be moved with care. Quick stops,
excessive force, and uneven surfaces may cause the appliance and cart
combination to overturn.
7. Wall and Ceiling Mounting - The appliance should be mounted to a wall or ceiling
only as recommended by the manufacturer.
8. Ventilation - The appliance should be situated so that its location or position does not interfere with its
proper ventilation. For example, the appliance should not be situated on a bed, sofa, rug, or similar
surface that may block the ventilation openings; or placed in a built-in installation, such as a bookcase
or cabinet that may impede the flow of air through the ventilation openings.
9. Heat - The appliance should be situated away from heat sources such as radiators, heat registers,
stoves or other appliances (including amplifiers) that produce heat.
10. Power Sources - The appliance should be connected to a power supply only of the type described in the
operating instructions or as marked on the appliance.
11. Grounding or Polarization - Precautions should be taken so that the grounding or polarization means of
an appliance is not defeated.
12. Power-Cord Protection - Power supply cords should be routed so that they are not likely to be walked
on or pinched by items placed upon or against them, paying particular attention to cords at plugs,
convenience receptacles and the point where they exit from the appliance.
13. Protective Attachment Plug - The appliance is equipped with an attachment plug having overload
protection. This is a safety feature. See Instruction Manual for replacement or resetting of protective
device. If replacement of the plug is required, be sure the service technician has used a replacement
plug specified by the manufacturer that has the same overload protection as the original plug.
14. Cleaning - The appliance should be cleaned only as recommended by the manufacturer.
15. Power Lines - An outdoor antenna should be located away from power lines.
Page 4

16. Outdoor Antenna Grounding - If an outside antenna is connected to the receiver, be sure the antenna
system is grounded so as to provide some protection against voltage surges and built up static charges.
Section 810 of the National Electrical Code, ANSI/ NFPA No.70-1984, provides information with respect
to proper grounding of the mast and supporting structure, grounding of the lead-in wire to an antenna
discharge unit, size of grounding conductors, location of antenna discharge unit, connection to
grounding electrodes, and requirements for the grounding electrode. See figure 1.
17. Nonuse Periods - The power cord of the appliance should be unplugged from the outlet when left
unused for a long period of time.
18. Object and Liquid Entry - Care should be taken so that objects do not fall and liquids are not spilled into
the enclosure through openings.
19. Damage Requiring Service - The appliance should be serviced by qualified service personnel when:
A. The power supply cord or the plug has been damaged; or
B. Objects have fallen, or liquid has been spilled into the appliance; or
C. The appliance has been exposed to rain; or
D. The appliance does not appear to operate normally or exhibits a marked change in performance; or
E. The appliance has been dropped, or the enclosure damaged.
20. Servicing - The user should not attempt to service the appliance beyond that described in the operating
instructions. All other servicing should be referred to qualified service personnel.
CAUTION:
TO PREVENT ELECTRIC SHOCK, MATCH
WIDE BLADE OF PLUG TO WIDE SLOT.
FULLY INSERT THE PLUG TO MAIN POWER
SOCKET.
COMPLIANCE WITH FCC REGULATIONS
This equipment has been tested and found to comply with the limits for a radio receiver and Class B digital
device, pursuant to Part 15 of the FCC Rules. These limits are designed to provide reasonable protection
against harmful interference in a residential installation. This equipment generates, uses and can radiate
radio frequency energy and, if not installed and used in accordance with the instructions, may cause harmful
interference to radio communications. However, there is no guarantee that interference will not occur in a
particular installation. If this equipment does cause harmful interference to radio or television reception, which
can be determined by turning the equipment off and on, the user is encouraged to try to correct the
interference by one or more of the following measures:
- Reorient or relocate the receiving antenna.
- Increase the separation between the equipment and receiver.
- Connect the equipment into an outlet on a circuit different from that to which the receiver is connected
CAUTION: Changes or modifications not expressly approved by the party responsible for
compliance could void the user’s authority to operate the equipment.
- Consult the dealer or an experienced radio technician for help.
3
Page 5
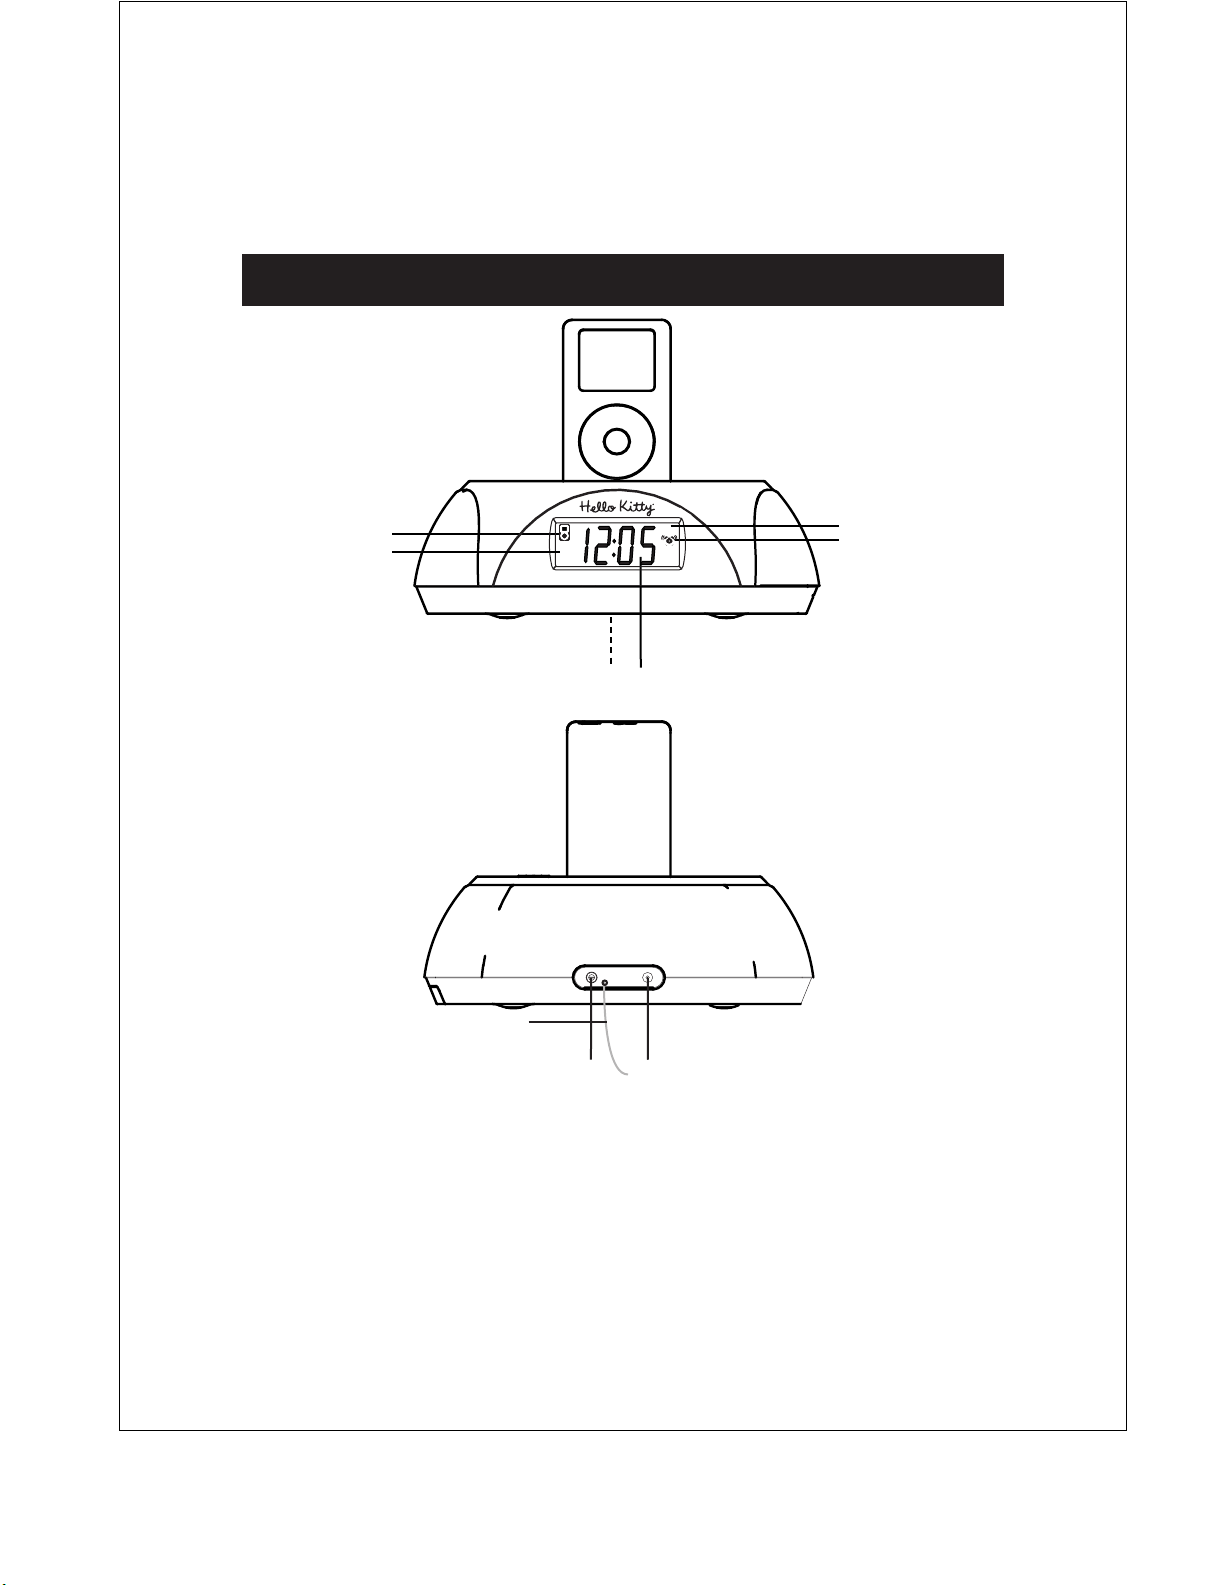
L O C A T IO N O F C ONT R OL S
1
2
AM
SLEEP
6
5
3 4
9
7
8
1. IPOD INDICATOR
2. AM/FM INDICATOR
3. BACKUP BATTERY
COMPARTMENT (BOTTOM OF UNIT)
4. CLOCK/RADIO FREQUENCY DISPLAY
4
5. ALARM INDICATOR
6. SLEEP INDICATOR
7. AUX IN (REAR OF UNIT)
8. VIDEO OUT (REAR OF UNIT)
9. FM ANTENNA (REAR OF UNIT)
Page 6
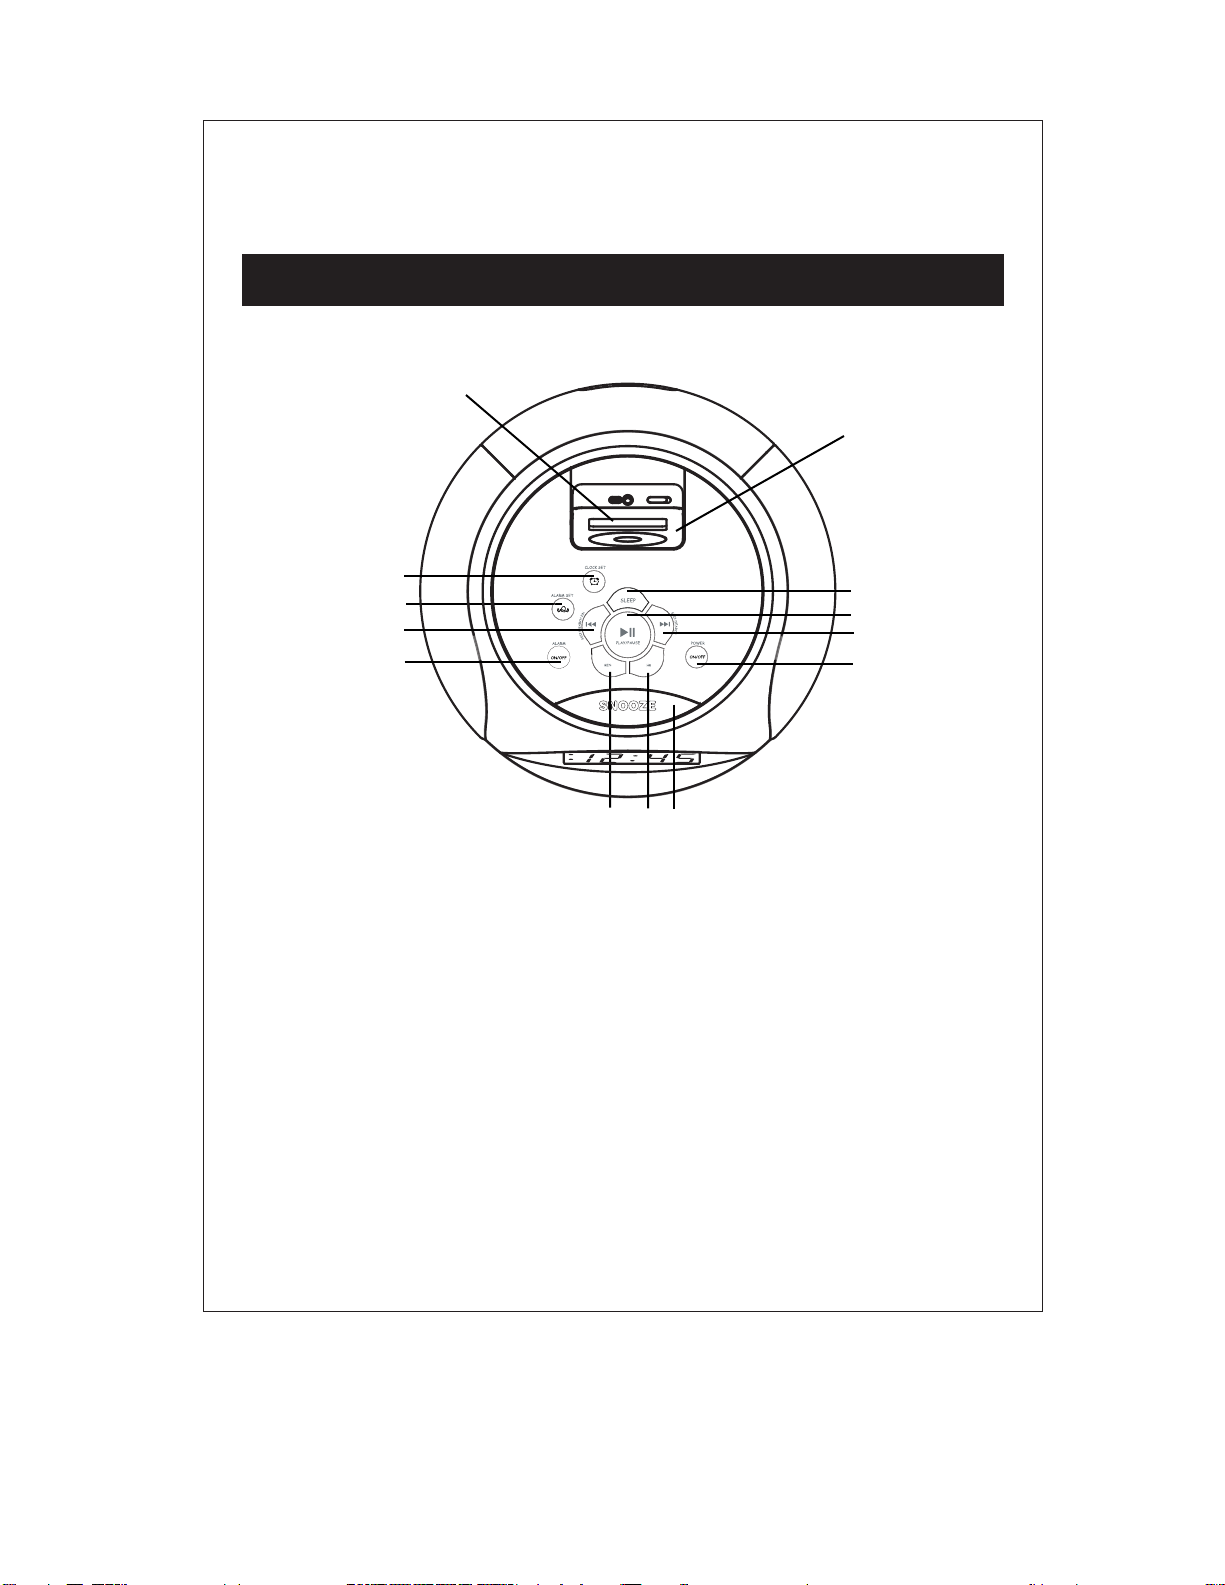
L O C A T IO N O F C ONT R OL S
13
12
1
2
3
4
5
1. CLOCK SET BUTTON
2. ALARM SET BUTTON
3. SKIP/SEARCH
BACKWARD BUTTON
4. ALARM ON/OFF BUTTON
5. MINUTE BUTTON
11
10
9
8
7
6
7. SNOOZE BUTTON
8. POWER BUTTON
9. SKIP/SEARCH
FORWARD BUTTON
10. IPOD PLAY/PAUSE BUTTON
11. SLEEP BUTTON
6. HOUR BUTTON
12.IPOD DOCK
13.IPOD DOCKING CONNECTOR
5
Page 7

L O C A T IO N O F C ONT R OL S
1. RADIO TUNING CONTROL
2. FUNCTION SWITCH
(AM OR FM OR IPOD/AUX)
1
2
3
4
3. WAKE TO SWITCH
(BUZZER OR RADIO/IPOD)
4. VOLUME CONTROL
6
Page 8

iPod with Color Display 20GB
iPod 3rd Gen
10, 15, 20GB
iPod 4th Gen 40GB
iPod Photo 30GB
iPod 3rd Gen 30, 40GB
iPod 4th Gen 20GB
iPod U2 30GB
1
iPod Video 30GB
3
iPod Mini
iPod with Color Display 60GB
iPod Photo 40GB/60GB
2
iPod Video 60GB
4
iPod Nano
7
Page 9

This unit uses a backup battery system to provide continuous alarm
operation and clock settings in the event of a power failure. If the
Backup Battery has been installed and a power failure occurs or the
AC cord is accidentally disconnected, the display will not remain lit,
but the current time and alarm time setting will be temporarily
maintained. Otherwise, you must reset the time and alarm setting.
cord
M3
damage
8
Page 10

(No iPod inserted in dock)
9
setting.
setting.
Page 11

O P E R A T IN G INS TR UC T IO N S
Wake to iPod:
1. Slide the WAKE TO switch to Radio/iPod setting.
2. Slide the FUNCTION switch to iPod/AUX IN setting.
3. Turn your iPod OFF and properly insert it into the dock.
4. Press the ALARM ON Button (Alarm indicator on), then the
POWER ON Button to turn the iPod on (iPod indicator on).
5. Press the PLAY/PAUSE Button to begin playing the iPod.
6. Select the song or playlist you wish to be woken up to and Press
the PLAY/PAUSE Button again once your selection begins to play.
7. Press the POWER OFF. The Alarm indicator remains on.
Stop Alarm
- When the desired alarm time is reached, the backlight of LCD will turn
ON with full brightness, and the alarm will sound for approximately one hour.
- Press the Alarm ON/OFF button once to stop the alarm, the Alarm will
activate again once the pre-set alarm time is reached the next day.
Alarm SNOOZE Function
- Press the SNOOZE button once to activate the snooze function when
the alarm is sounding.
- LCD backlight will go dim and alarm sound will be turned off temporarily.
- Alarm will sound again in 5 minutes, Snooze function can be repeated
for maximum 12 times.
Note:
1. Your iPod must be properly docked in order for the Wake to iPod
Function to work properly.
10
Page 12

10
Page 13

O P E R A T IN G INS TR UC T IO N S
Setting up your radio
Checking AM/FM Radio reception
Your clock radio has a built-in antenna for the AM radio. To improve
reception, you may need to rotate your unit.
Unwind the external FM wire antenna and extend it to its full length.
Listening to Radio
1. Press the POWER button to turn the unit on.
2. Slide the FUNCTION switch to select the AM or FM band.
3. Use the TUNING control to select the desired AM or FM station.
4. Press the POWER button to turn the radio off.
11
Page 14

O P E R A T IN G INS TR UC T IO N S
This unit is designed specifically to work with your docking iPod.
Please read this instruction carefully before operating the unit.
iPod Adaptors:
Your unit comes with removable adaptors to ensure your iPod fits
properly in the dock on the top of the unit.
To Insert the Adaptor:
1. Select the adaptor for your iPod (see adaptors for iPod
page). Using the correct adaptor ensures a proper fit for
your iPod.
2. Gently press the iPod adaptor into the dock.
3. Carefully place your iPod into the dock.
4. To remove/replace an adaptor, first remove your iPod, then
grip the adaptor and pull gently upwards.
Listening to your iPod:
1. When the iPod is docked and in standby mode
2. Press the POWER button to turn on the unit.
3. Slide the FUNCTION switch to iPod/AUX setting.
4. Press the PLAY/PAUSE button to play the iPod.
5. Press the iPod SKIP/SEARCH FORWARD OR
BACKWARD button to skip to the next or previous song;
6. Hold the iPod SKIP/SEARCH FORWARD OR
BACKWARD button for fast-forwarding or fast-rewinding
during playback.
12
Page 15

O P E R A T IN G INS TR UC T IO N S
Charging your iPod:
1. When the iPod is docked and it recharges until fully charged.
Listening to your iPod:
1. When the iPod is docked and in standby mode
2. Press the POWER button to turn on the unit.
3. Slide the FUNCTION switch to iPod/AUX setting.
4. Press the PLAY/PAUSE button to play the iPod.
Sleep Operation:
1. When listening to radio or iPod, press SLEEP button to enter
sleep mode.
2. You can adjust the sleep timer from 60 mins to 10 mins by
pressing the SLEEP button.
3. To cancel the sleep, set the sleep timer to "00".
Video Out (For iPods with video ONLY):
1. You can connect this unit to need a television or other video device
that has a composite video input.
2. Securely dock the iPod with video.
3. Connect the yellow RCA cable into the rear video out jack on
the unit.
4. Connect the other end of the yellow RCA cable to the video device.
5. Slide the FUNCTION switch to iPod/AUX setting.
6. Select a movie from your iPod menu.
7. iPod: On the main menu choose video then select video setting.
8. iPod: Make sure the TV Out is section is set to "ON".
9. iPod: Switch back to the movie library and play the movie of your
choice.
13
Page 16

O P E R A T IN G INS TR UC T IO N S
For Photo View: (For iPod with color display ONLY excludes nano)
1. Slide the FUNCTION switch to iPod/AUX setting.
2. Securely dock the iPod with color display.
3. iPod: On the main menu choose Photo then select slideshow
setting.
4. iPod: At TV out section, make sure it is set to "ON".
5. iPod: Go to the Photo Library and then press play. The slideshow
will play on your device.
Note: 1. The RCA Video input connector on a television is usually color
coded yellow to match the color on the AV cable.
2. When playing slideshows or video, the audio will only playback on the unit
speakers.
3. RCA Cable is not included.
AUX In:
The AUX in jack can be used to playback external audio sources on the
unit speakers.
1. Plug the audio connectors from a 3.5mm audio cable (not included)
into the AUX IN jack of the system.
2. Plug the other end of the audio cable into the Audio out jack on the
external audio input device.
3. Slide the FUNCTION button to iPod/AUX setting.
4. Turn on the external audio device and use the device's controls to
control playback.
Note:1. 3.5mm audio cable is not included.
2. If the AUX IN jack is plugged in, the system will playback the external
audio source. The iPod sound will be cut off so the user needs to turn
off the iPod manually.
14
Page 17

1. In the event, unplug and take out all the backup batteries, then
reconnect the AC Power plug into the wall outlet.
2. The reset operation clears the system memory and all of your
previous settings will be erased.
3. If you would like to keep the backup clock going, please reinstall
the backup batteries.
15
Page 18

T R O UB L E S H O O T I NG G UID E
TROU
Should you experience difficulties in the use of this unit please refer to the following chart or call 1-800-7775331 for Customer Service.
Symptom
Possible Problem
Solution
AC power cord is not plugged
into a wall outlet or the
connector is not plugged into
the power supply jack on the
back of the unit.
Plug the AC adaptor into a wall outlet and plug the
connector into the supply jack on the unit.
The unit does not
respond (no power)
Wall outlet is not functioning.
Plug another device into the same outlet to confirm
the outlet is working.
Using no/wrong iPod®
Adaptor.
Make sure the dock insert is the proper fit for your
iPod®.
iPod® does not
dock properly
iPod® does not install
properly.
Remove your iPod® from the dock and check for
obstruction on the connectors in the dock and on
your iPod®. Then reseat it in the dock.
iPod® is not installed properly.
Remove your iPod® from the dock and check for
obstruction on the connectors in the dock and on
your iPod®. Then reseat it on the dock.
iPod® does not
respond to the
speaker system
Your iPod® is locked up.
Please make sure that your iPod® is working
properly before docking into the unit. Please refer to
your iPod® manual for details.
iPod® is not installed properly.
Remove your iPod® from the dock and check for
obstruction on the connectors in the dock and on
your iPod®. Then reseat it in the dock.
iPod® does not
charge up
iPod® is locked up/ frozen.
iPod® battery has problem.
Please make sure your iPod® is working properly
before docking into the unit. Please refer to your
iPod® manual for details.
AM band is too
noisy
The reception at the set
location is poor.
Slightly rotate the unit for the best reception.
Volume level is set too high.
Decrease the volume.
If the iPod original sound source is of poor quality,
distortion and noise are easily noticed with highpower speakers. Try a different audio source such
as a music CD.
Sound is distorted
Sound source is distorted.
If you are using an external sound source like older
generation of iPod®, try reducing the output volume
on the device itself. Also try turning bass boost OFF
or change the EQ setting.
16
Page 19

Power Requirement
Input: AC120V/60Hz
Battery Back-up for Clock:
2 X DC1.5V ‘AA’ (UM-3) Batteries
Frequency Range
Radio Receiving:
AM 520 – 1710 KHz,
FM 88 – 108 MHz,
Power Consumption
Docking system: 12 Watts
Speaker output: 2 X 2 Watts RMS
Please refer to the instructions on the enclosed warranty card for returning
your unit for service. When returning the unit, please remove batteries to prevent
damage to the unit in transit and/or from possible leakage. We are not responsible
for batteries returned with the product or for the cost of replacement
Distributed by:
SPECTRA Merchandising International, Inc.
Chicago Industry Tech Park
4230 North Normandy Avenue
Chicago, IL 60634, U.S.A.
Please have model number ready, for Customer Service, call 1-800-777-5331.
*The specification and external appearance of the set are subject to change
without prior notice.*
SPECIFICATIONS
SERVICE
17
Printed in China
 Loading...