

Page 1
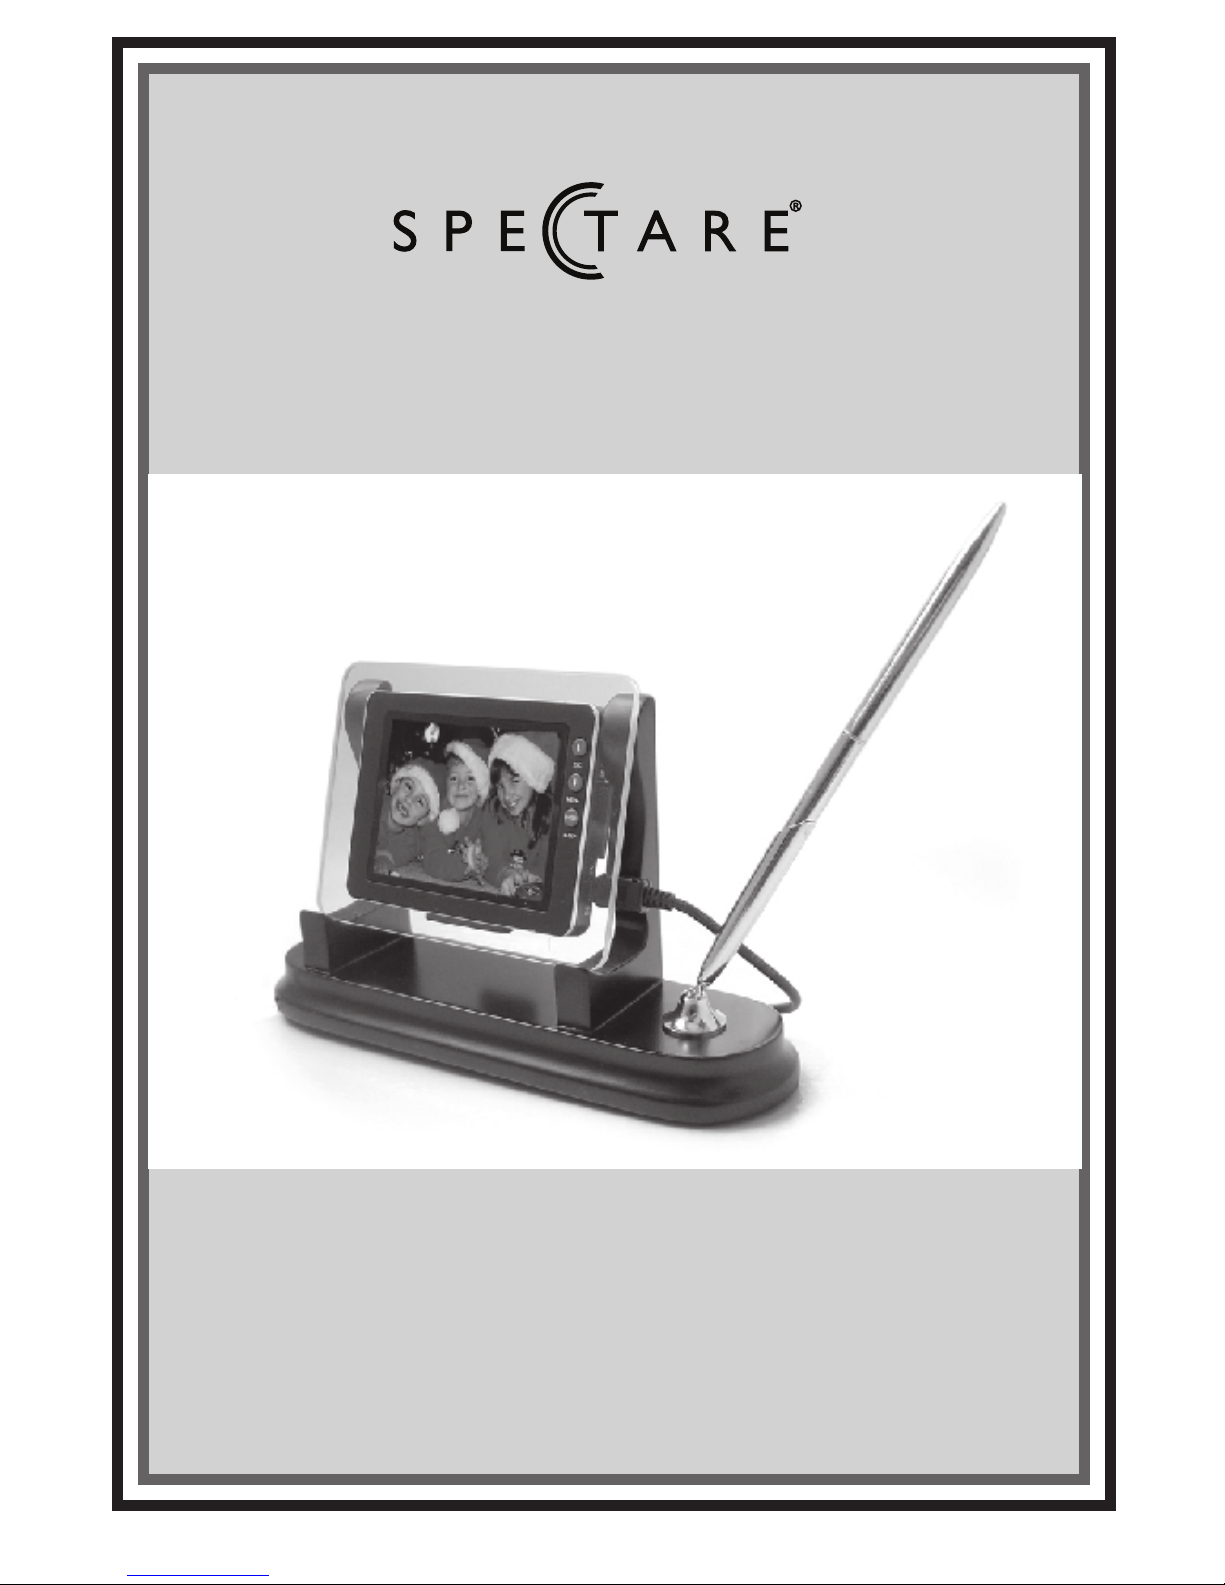
User Guide for the Spectare
Time Frame: DeskTop
Model: SP 12101
TimeFrame
Page 2
Discarded electric appliances are recyclable and should not be discarded n
domestic waste. Please actively support us in conserving resources and
protecting the environment by returning this appliance to the collection
centers (if available).
Battery Disposal: Do not incinerate, disassemble or short circuit the battery.
Do not expose the battery to temperatures above
113o Fahrenheit.
Please observe the local regulations regarding the
disposal of exhausted batteries and old equipment.
Page 3

1
user's guideSpectare TimeFrame
Thank you for purchasing the Spectare Time Frame. Please take some time to
read through and follow these important safety and operation
instructions.
WARNING: TO REDUCE THE RISK OF FIRE OR SHOCK HAZARD, DO NOT
EXPOSE THIS PRODUCT TO RAIN OR MOISTURE.
CAUTION: RISK OF ELECTRIC SHOCK. DO NOT DISASSEMBLE THIS UNIT.
TO PREVENT THE RISK OF ELECTRIC SHOCK, DO NOT REMOVE
COVER. NO USER- SERVICEABLE PARTS INSIDE. REFER
SERVICING TO QUALIFIED PERSONNEL.
VENTILATION - The device should be situated so that its location or position does
not interfere with its proper ventilation. For example, the unit should
not be situated on a bed, sofa, rug or similar surface that may block
the ventilation openings.
HEAT - The device should be situated away from sources of high heat such as
radiators or stoves.
POWER SOURCE - The device should be connected to a power supply only of
the type described in the technical specification of this user guide.
CLEANING - The device should be cleaned gently using a soft cloth dampened
with water. Do not clean the inside of the unit.
NON USE PERIOD - The power cord for the device should be unplugged from the
outlet when the unit is left unused for a long period of time.
AVOIDING SURGES- For added protection during a lightning storm, unplug the
device from wall outlets to prevent damage to the product due to
power line surges.
OVERLOADING - Do not overload wall outlets or extension cords, as this may
result in fire or electrical shock
SERVICING - The user should not attempt to service the device beyond those
means described in the operating instructions. All other servicing
should be referred to qualified service personnel.
Page 4
2 Spectare TimeFrame
PROBLEM: My pictures do not display on the frame.
SOLUTION: The Spectare TimeFrame supports.jpg, .BMP and GIF files only. It does not support other
PROBLEM: The frame will not connect to the computer properly
SOLUTION: Check your operating system. If you have and older operating system such as Windows 98
If you have Windows XP or Vista and are still having troubles try the following:
1. Try connecting to a different USB port on your computer
2. Disconnect any other USB devices connected to your computer.
3. If possible try another USB cable
4 Restart your computer
PROBLEM: The frame is frozen-- an image or menu screen remains on the screen and no buttons are
SOLUTION: You must reset your frame
1. Unplug the frame from the USB connection or AC Adapter
2. Turn the Power switch to the OFF position
3. Wait a few seconds
4. Plug the AC Power back in and Turn the Power Switch to the ON position.
FOR THE MOST RECENT TROUBLESHOOTING TIPS AND SUPPORT GO TO
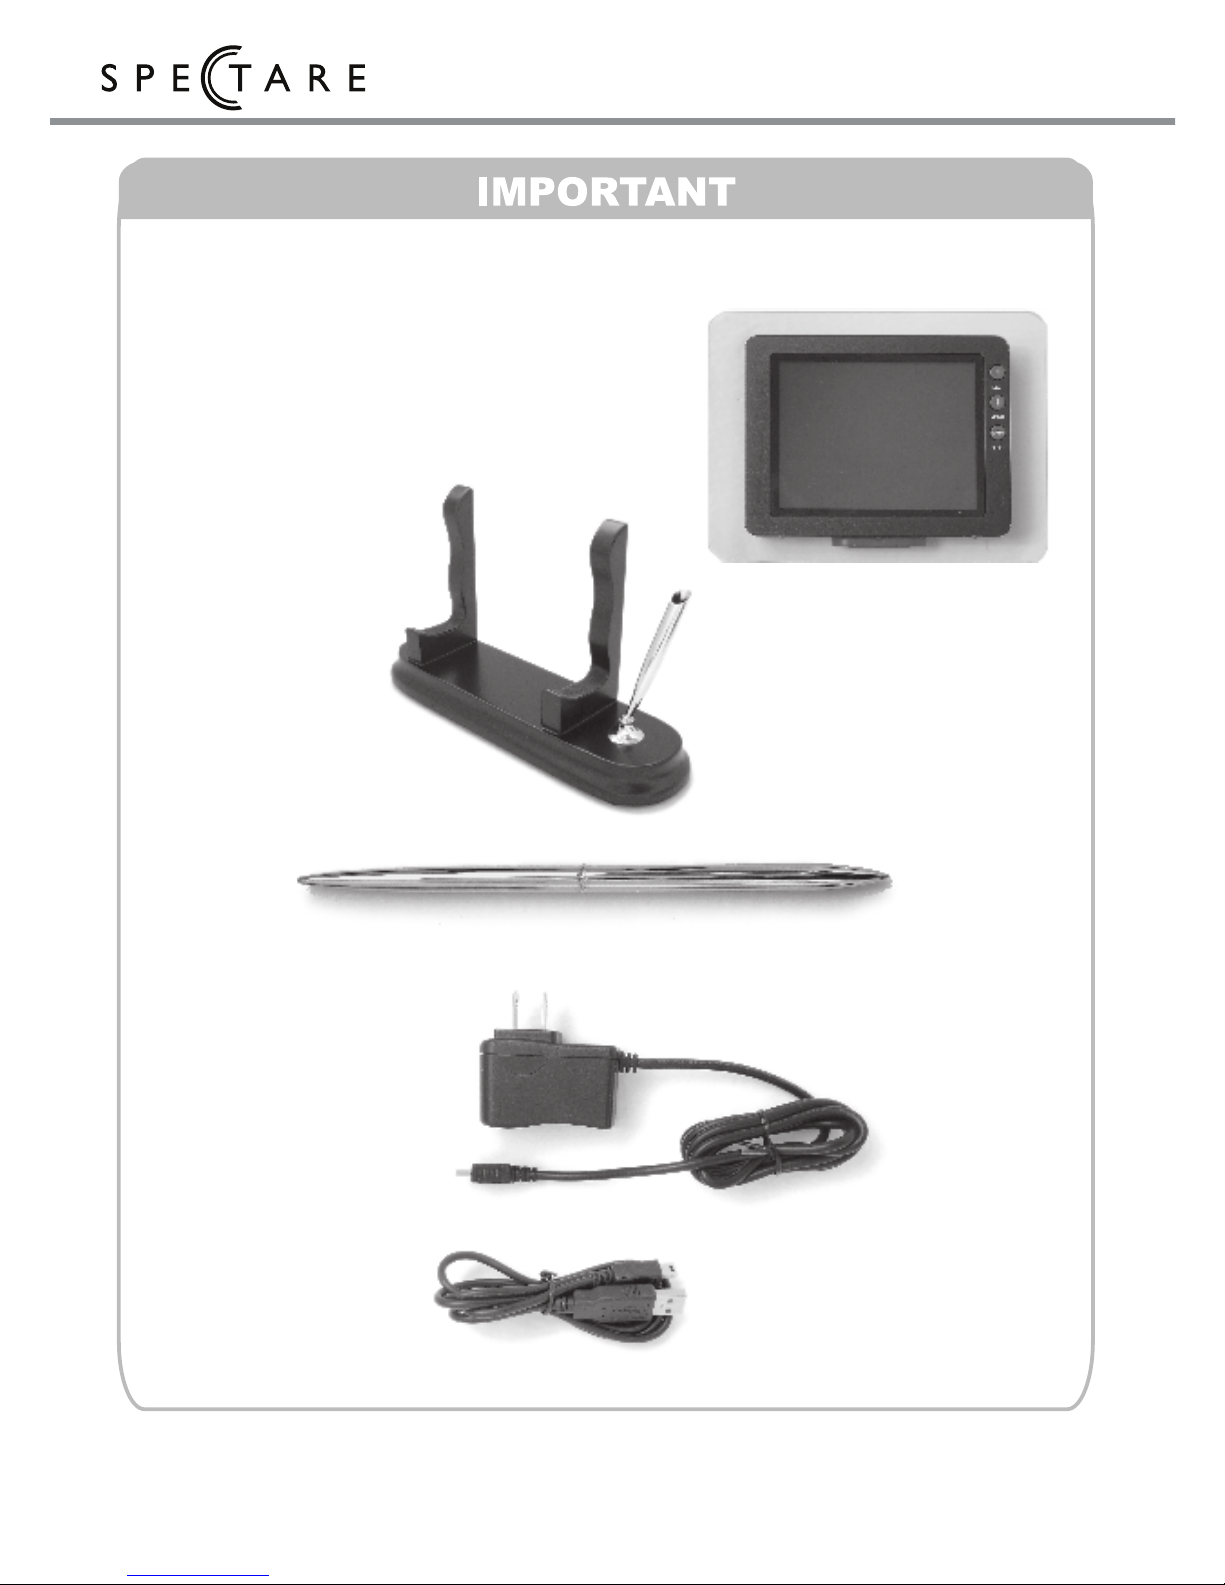
The following items should be included:
Please contact your retailer if you have not received any of these items
1. 3.5” TimeFrame and Clear Acrylic Bezel
2. Wooden Base
with pen holder
3. Pen
4. AC Adapter plug
5. USB Cable
Page 5

3
user's guide
For questions and support on this product that can not be solved
by your retailer please contact:
Spectare Products
6081 Meridian Ave Suite 70-308
San Jose, CA 95120
http://spectareproducts.com
[email protected]
The Spectare Logo and the Spectare brand are trademarked by SuMaWah LLC, San Jose, CA.
Copyright 2008 SuMaWah LLC, All Rights Reserved Worldwide.
Contact
Quick Start Guide .................................................................
Setting up the Frame ........................................
Turning on the TimeFrame................................
Product Description .............................................................
Frame Display
Start-up.............................................................
Main Menu.......................................................
Photos...............................................................
Notes ...............................................................
Settings ...........................................................
Clock.................................................................
Calendar ........................................................
Connection to Computer .....................................................
Trouble Shooting ..................................................................
Technical Specifications .......................................................
4
5
6
8
9
10
12
13
15
16
17
19
20
Contents
Warranty
Please contact the original retail location where this product was
purchased to obtain warranty information and service.
Page 6
4 Spectare TimeFrame
1
3
2
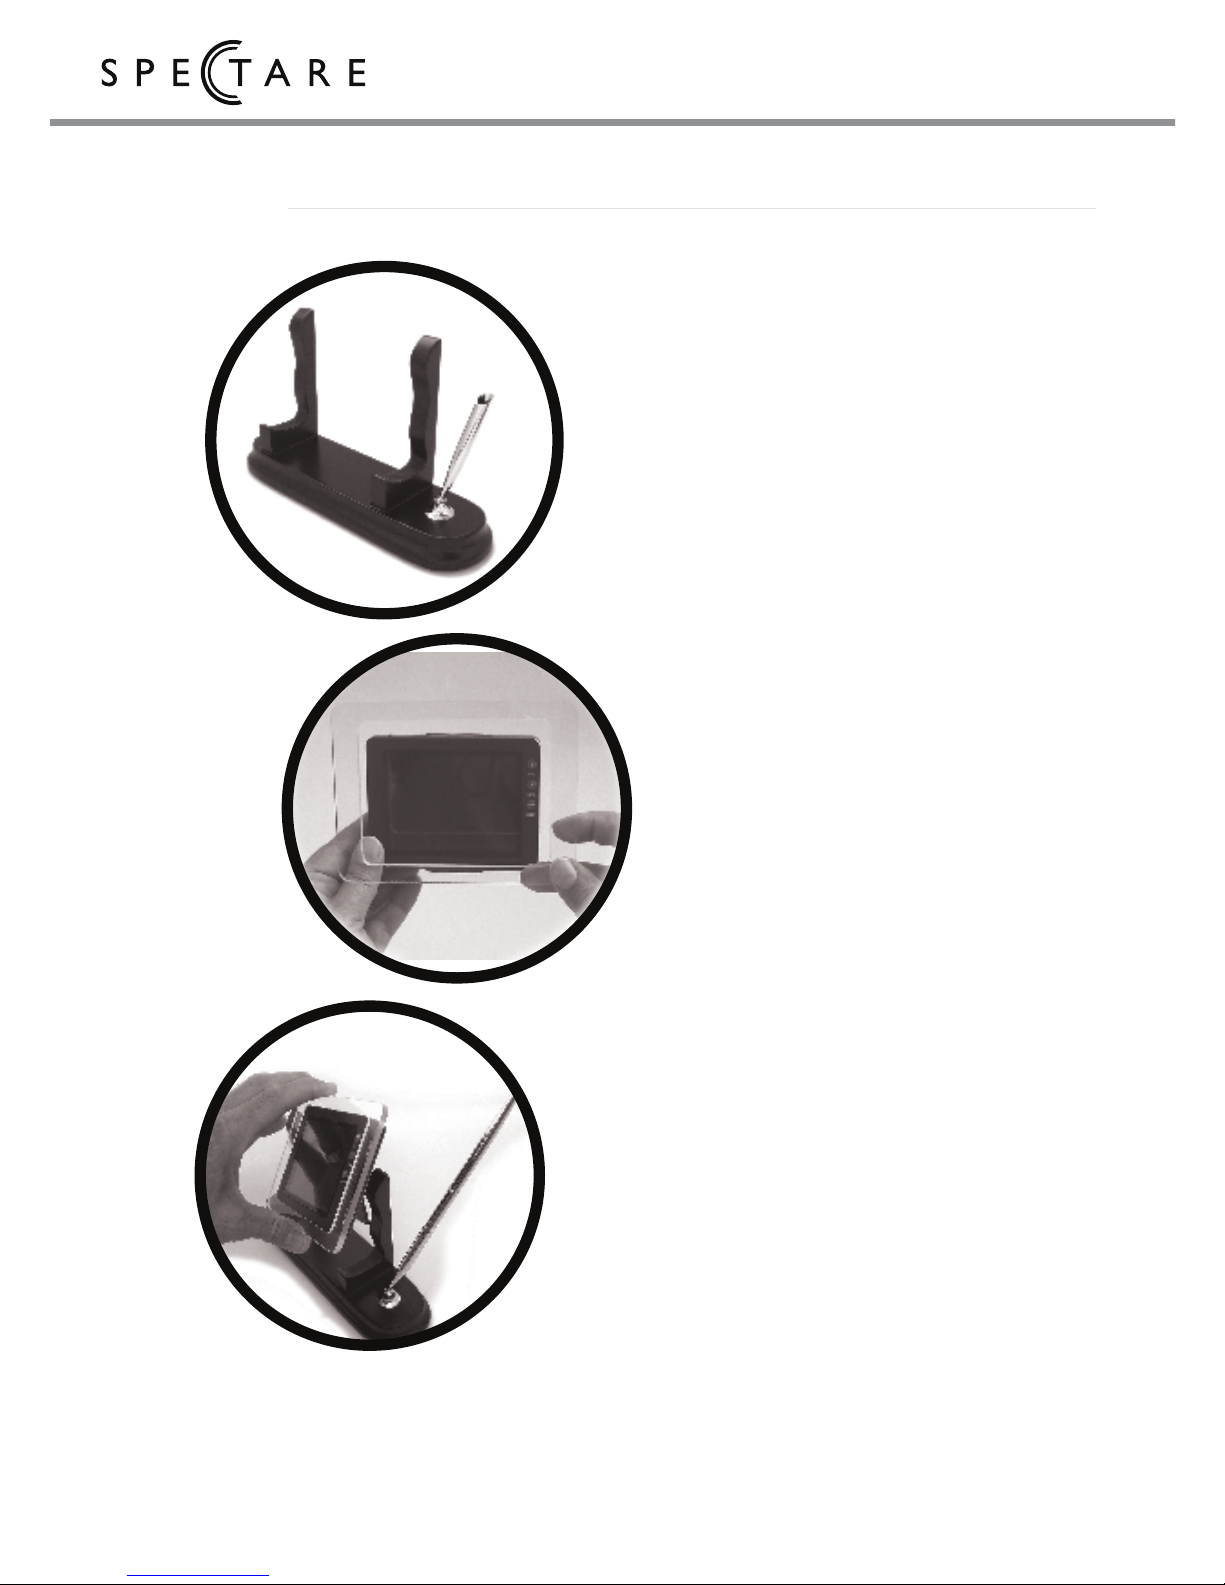
Quick Start Guide: Setting up the TimeFrame
To begin using your Spectare
TimeFrame follow these simple
instructions:
Unpack the wooden base with
the pen holder attached from
the package and set on your
table or desktop.
Next remove the TimeFrame
and the clear acrylic outer
bezel. Place the clear acrylic
bezel around the outside of the
digital frame as shown.
Place the pen in the holder, then
place the TimeFrame with the
clear bezel installed onto the
wooden base.
1
3
5
Page 7
5
user's guide
Quick Start Guide: Turning on the TimeFrame
1
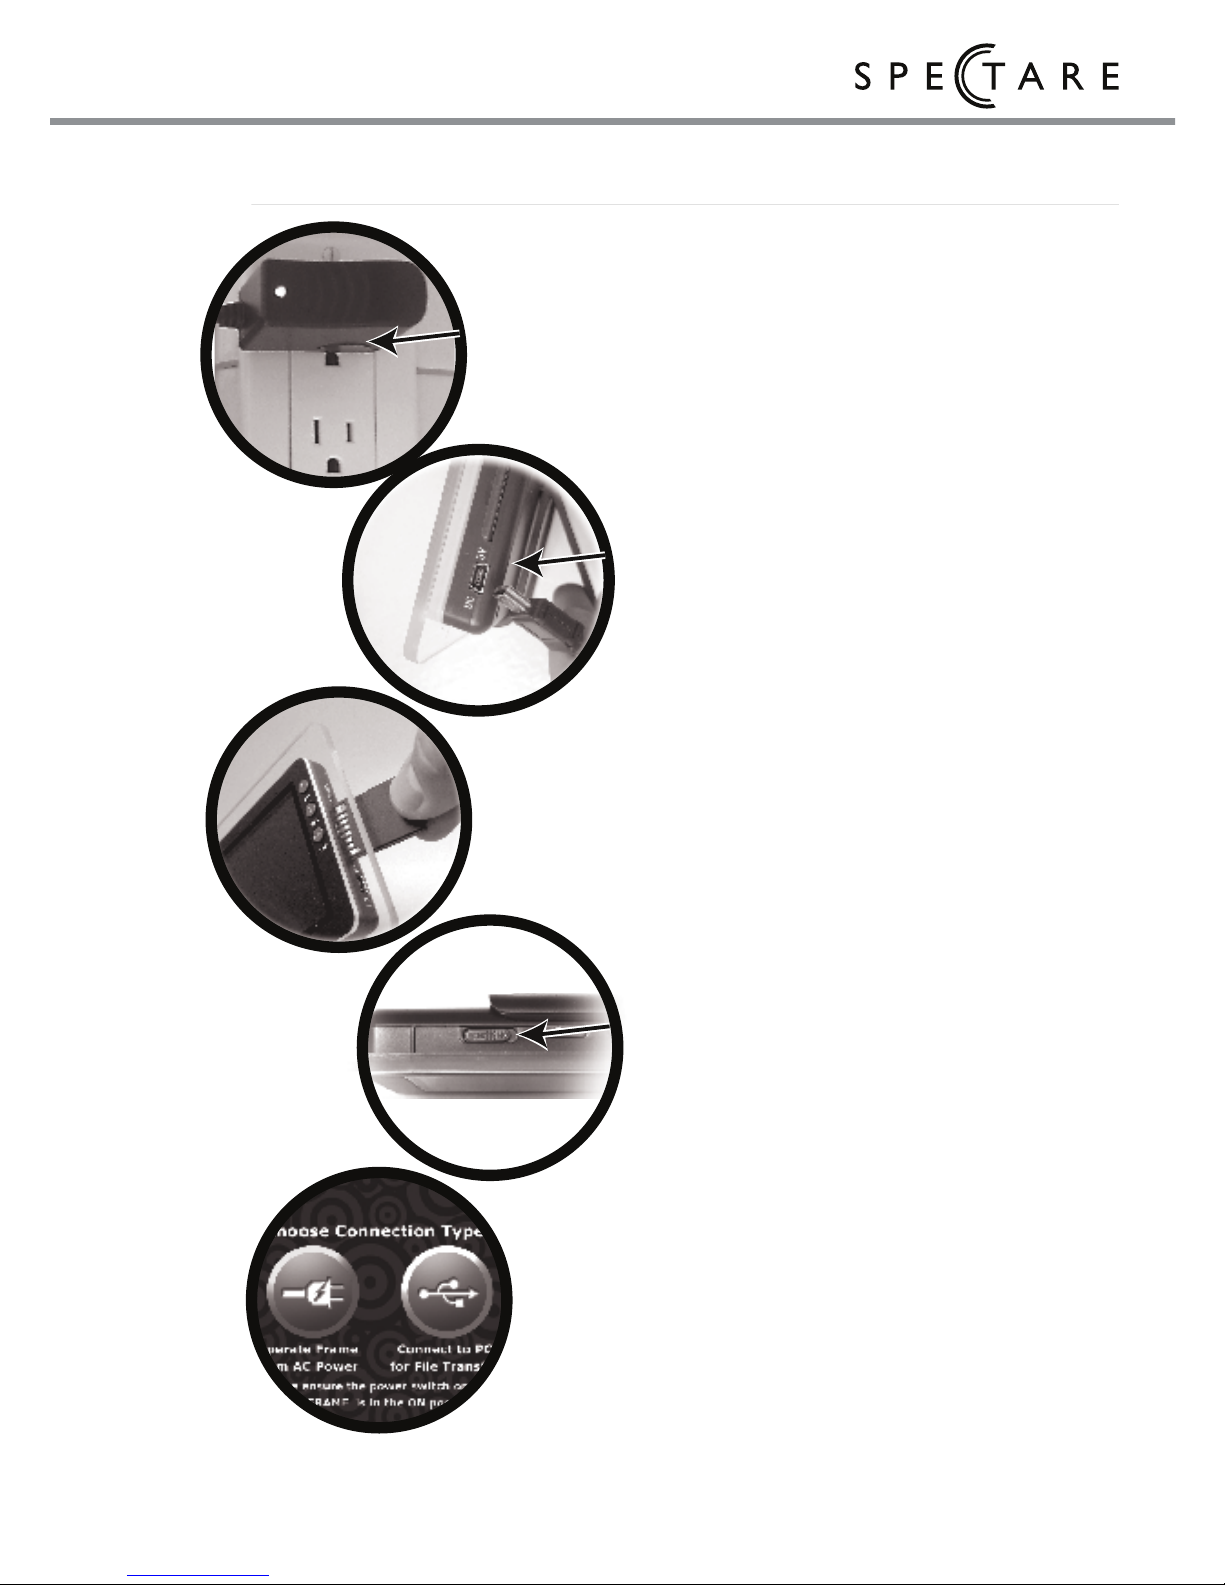
Remove the power adapter and plug
into the a wall outlet
Connect the small end of the USB
cable into the digital frame
Place an SD memory card with images
that you want to display on the frame
into the card slot. The metal
connections of the card should face
forward. NOTE: you may also use
the internal storage on the frame to
store and display images. See
COMPUTER USB CONNECTION to
computer on PAGE 17
Turn the power switch on the top of the
frame to the ON position. The internal
battery on the frame will begin to
charge. Leave the frame connected to
the power supply for 24 hours to fully
charge the battery before
disconnecting.
On the first interface screen Press
Once:
or
to select the AC
Adapter connection then press and
ENTER
The frame will start playing the photos
on your SD Card or internal memory
automatically.
2
3
4
5
Page 8
6
Spectare TimeFrame
Product Description: Front Panel
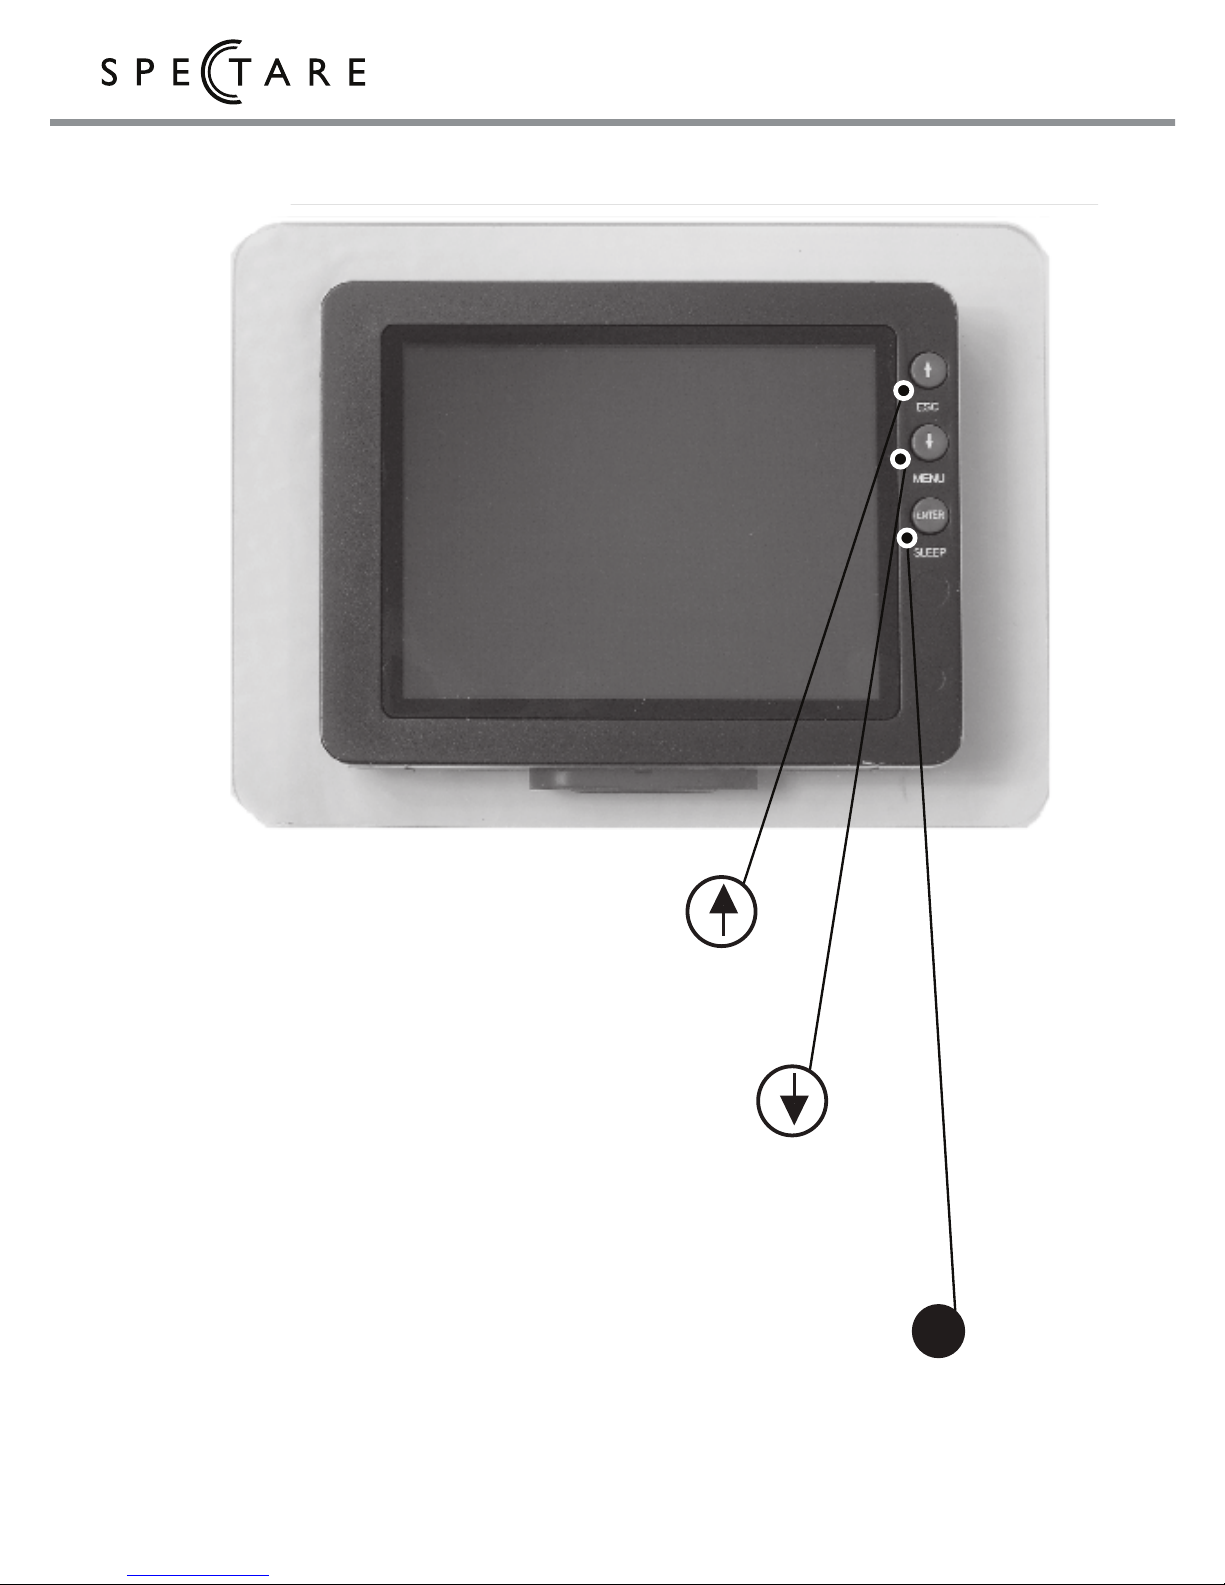
ENTER
Press quickly once to Confirm the selection
SLEEP
Press and Hold for 3 seconds then release
to turn off the display
and put into Sleep mode
Up arrow
Press quickly once to move to the next selection UP
ESC
Press and Hold for 3 seconds then release
to go back to the last menu screen
Down arrow
Press quickly once to move to the next selection DOWN
MENU
Press and Hold for 3 seconds then release
to go to the MAIN MENU
ESC
MENU
SLEEP
ENTER
Page 9

7
user's guide
Product Description: Back and Side Panels
USB / AC Power connection
Main
Power button
Shuts off the main power to the frame.
NOTE: to charge the battery make
sure the switch is in the ON position when
connected to an AC power source.
SD / MMC card Slot
Leg Support
Fold out for frame support when not
inside the TimeFrame: DeskTop holder.
NOTE: This can be removed
by removing the screw here
LEFT arrow
Press quickly once to select
the next selection left
RIGHT arrow
Press quickly once to select
the next selection RIGHT
SWITCH
Press and Hold for 3 seconds then release
to toggle the display from
PHOTOS > CLOCK > CALENDAR
SWITCH
SWITCH
SWITCH
Page 10
8 Spectare TimeFrame
Frame Display: Start Up
SWITCH
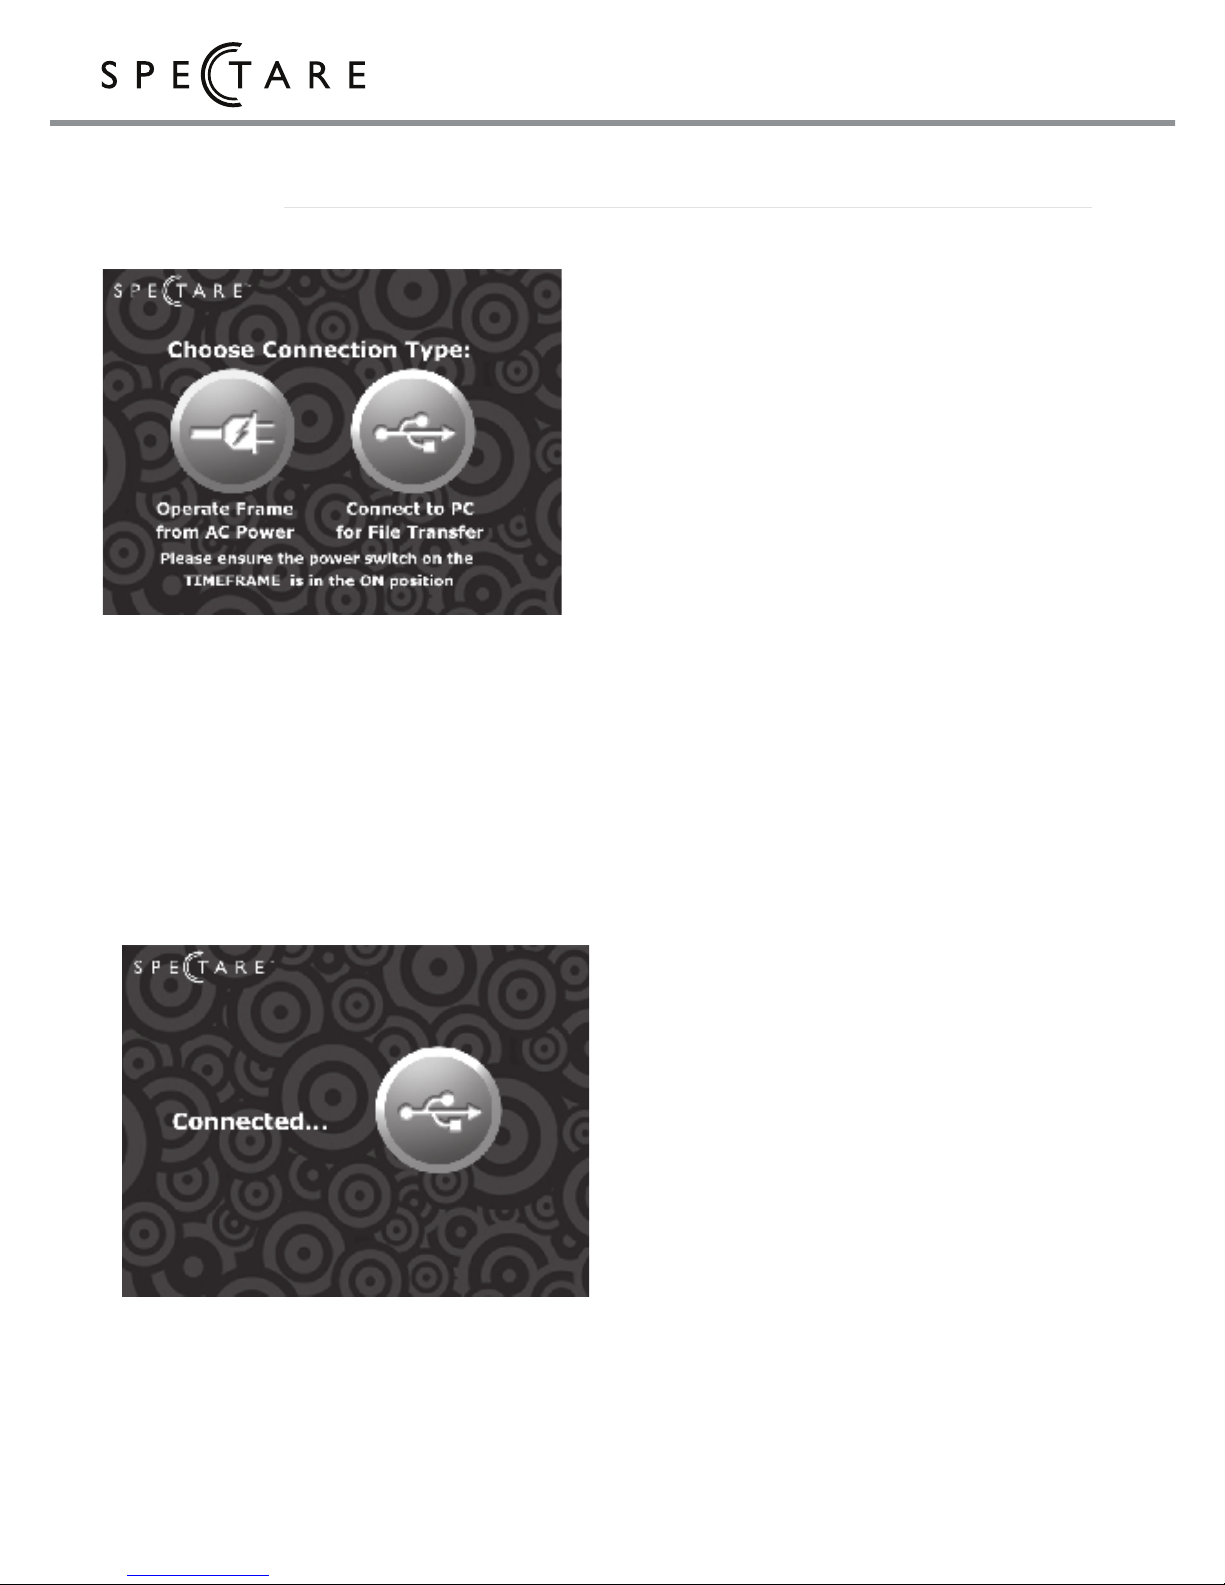
Upon Power Start up
When connected via USB to
computer or AC power source you
will be prompted with the screen
shown on the left.
1. Press Once:
/ ESC
or
/ MENU
to choose AC power operation in
order operate your frame normally
OR
Connection to the computer for
file transfer.
2. Press once:
ENTER/SLEEP
to
confirm you selection
IF you are connecting to the computer
you will see the “Connected”
screen -- refer to Page 17 on
transferring files from the
computer.
If you choose the AC power selection
you may operate the frame
normally. Upon start up the
frame will automatically go into a
slide show from the files that are
on the Frame. See the following
pages for the normal operation of
the frame.
Page 11
9
user's guide
SWITCH
Frame Display: Main Menu
Exiting to the Main Menu
Press and hold
/ MENU
for 3
seconds and release to return to
the main menu screen
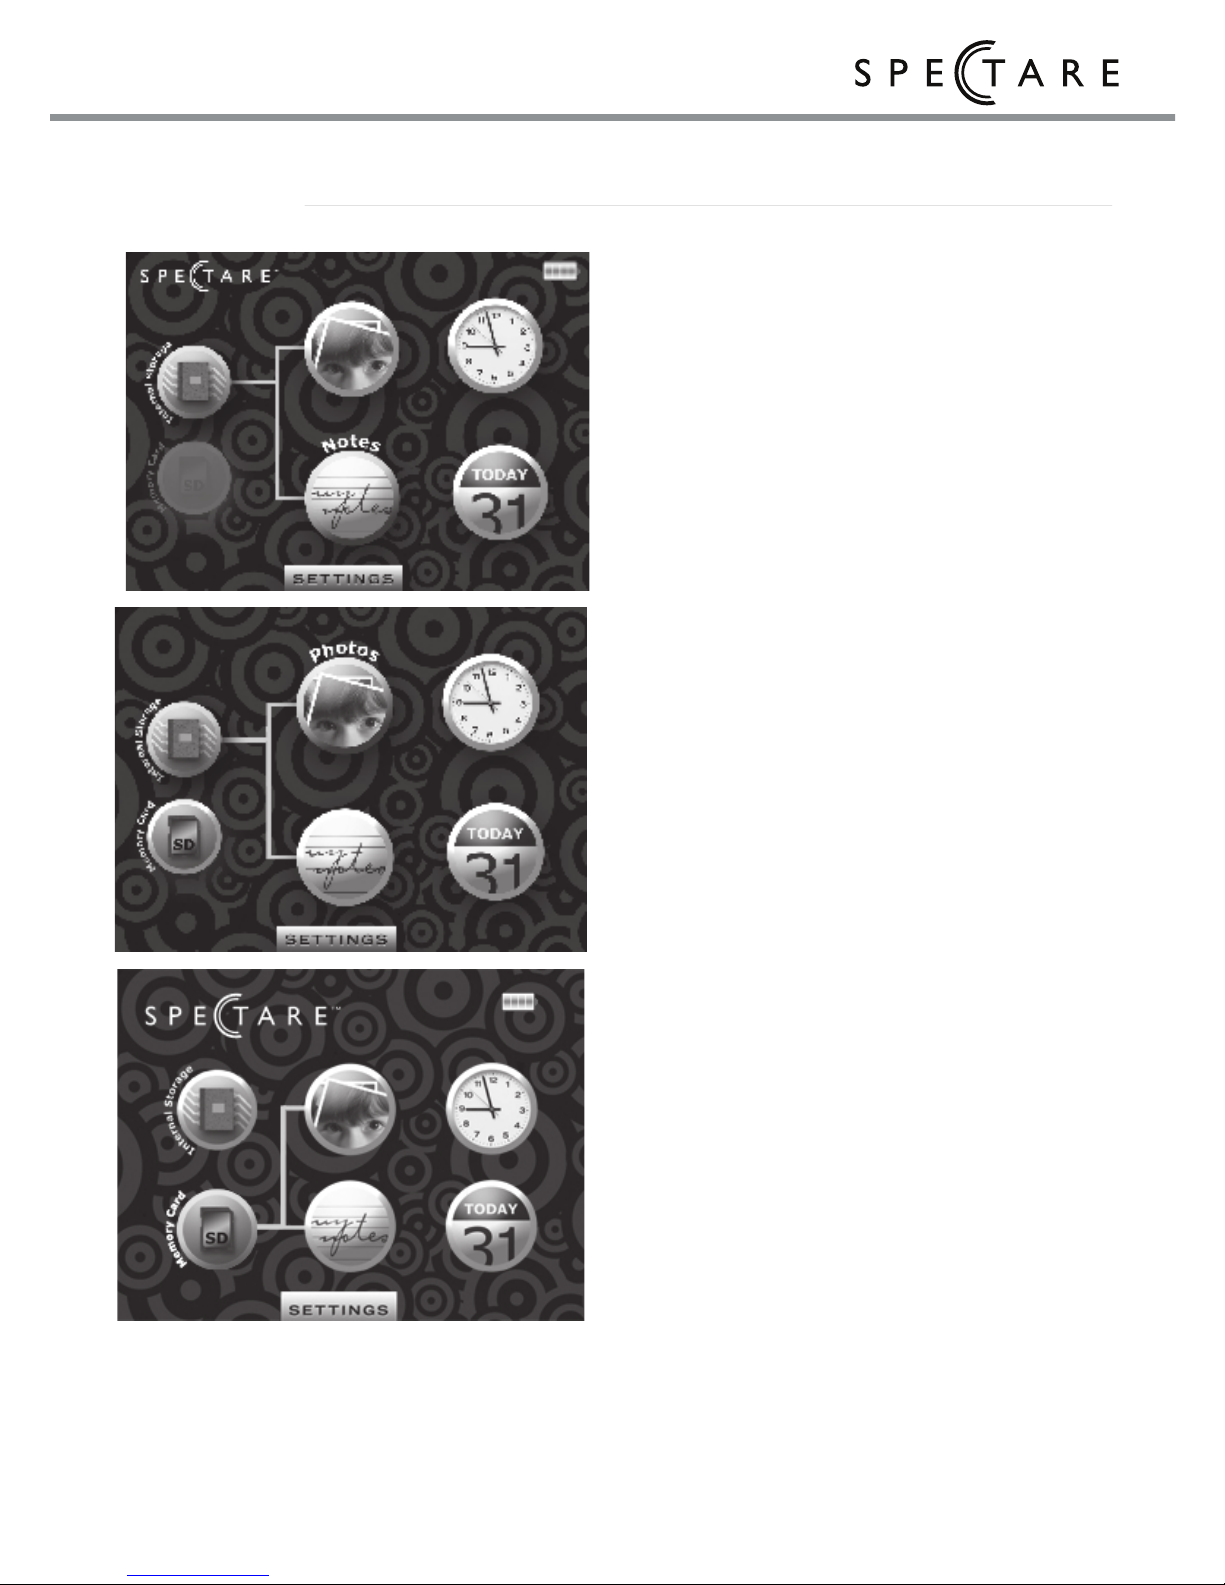
If no memory card is in the frame the
SD Card icon will be grayed out
and the frame will only play
images that are copied to the
internal flash memory.
Choosing the Viewing location
When an SD Card is Inserted the
MEMORY CARD Icon will be
activated.
1. Press Once; ,,
or
to highlight the desired selection
of the Internal Memory or the SD
Card Memory.
2. Press Once:
ENTER
to confirm your selection
once this selection has been
made the images will be played
from the chosen location
To turn the display of the Frame OFF
Press and hold
ENTER/SLEEP
for
3 seconds and release to turn off
the LCD display when not in use.
Press and hold
ENTER/SLEEP
again to turn display on again
Page 12

10
Spectare TimeFrame
SWITCH
Frame Display: Displaying Photos
Displaying Photos
After selecting the location where you
wish to view the photos,
1. Press Once:
,,
or
until the PHOTOS icon is highlighted.
2. Press once:
ENTER/SLEEP
to confirm
A photo slide show will automatically
launch from the chosen location.
Manual operation
During the slide show Press Once:
ENTER/SLEEP
The slide show will stop and will allow
manual advance and rotation of
images:
Press Once:
or
to go forward or backward through
images
OR Press
or
to rotate the image.
QUICK SWITCH from Clock, Calendar
and Photos;
Press and HOLD:
/ SWITCH
for 3 seconds and release
to switch to the CALENDAR; Press
again to go to the CLOCK.
Page 13

11
user's guide
SWITCH
Frame Display: Displaying Photos
Thumbnail view
During the slide show
Press and HOLD:
/ ESC
for 3 seconds and release
to go the Thumbnail selection.
1. Press Once:
,,
or
to choose the Thumbnail of the photo
you wish to view.
2. Press once:
ENTER/SLEEP
to confirm .
3. The chosen photo will be displayed as
full screen.
Directory Selection
When on the Thumbnail screen
Press and HOLD:
/ ESC
for 3 seconds and release
to go the directory selection.
1. Press Once:
,,
or
to choose the directory on the memory
card or Internal memory of where you
want to view the photos from.
2. Press once:
ENTER/SLEEP
to confirm .
3. After selected the Slide show and
thumbnail view will only show images
from the chosen directory.
Page 14
12 Spectare TimeFrame
SWITCH
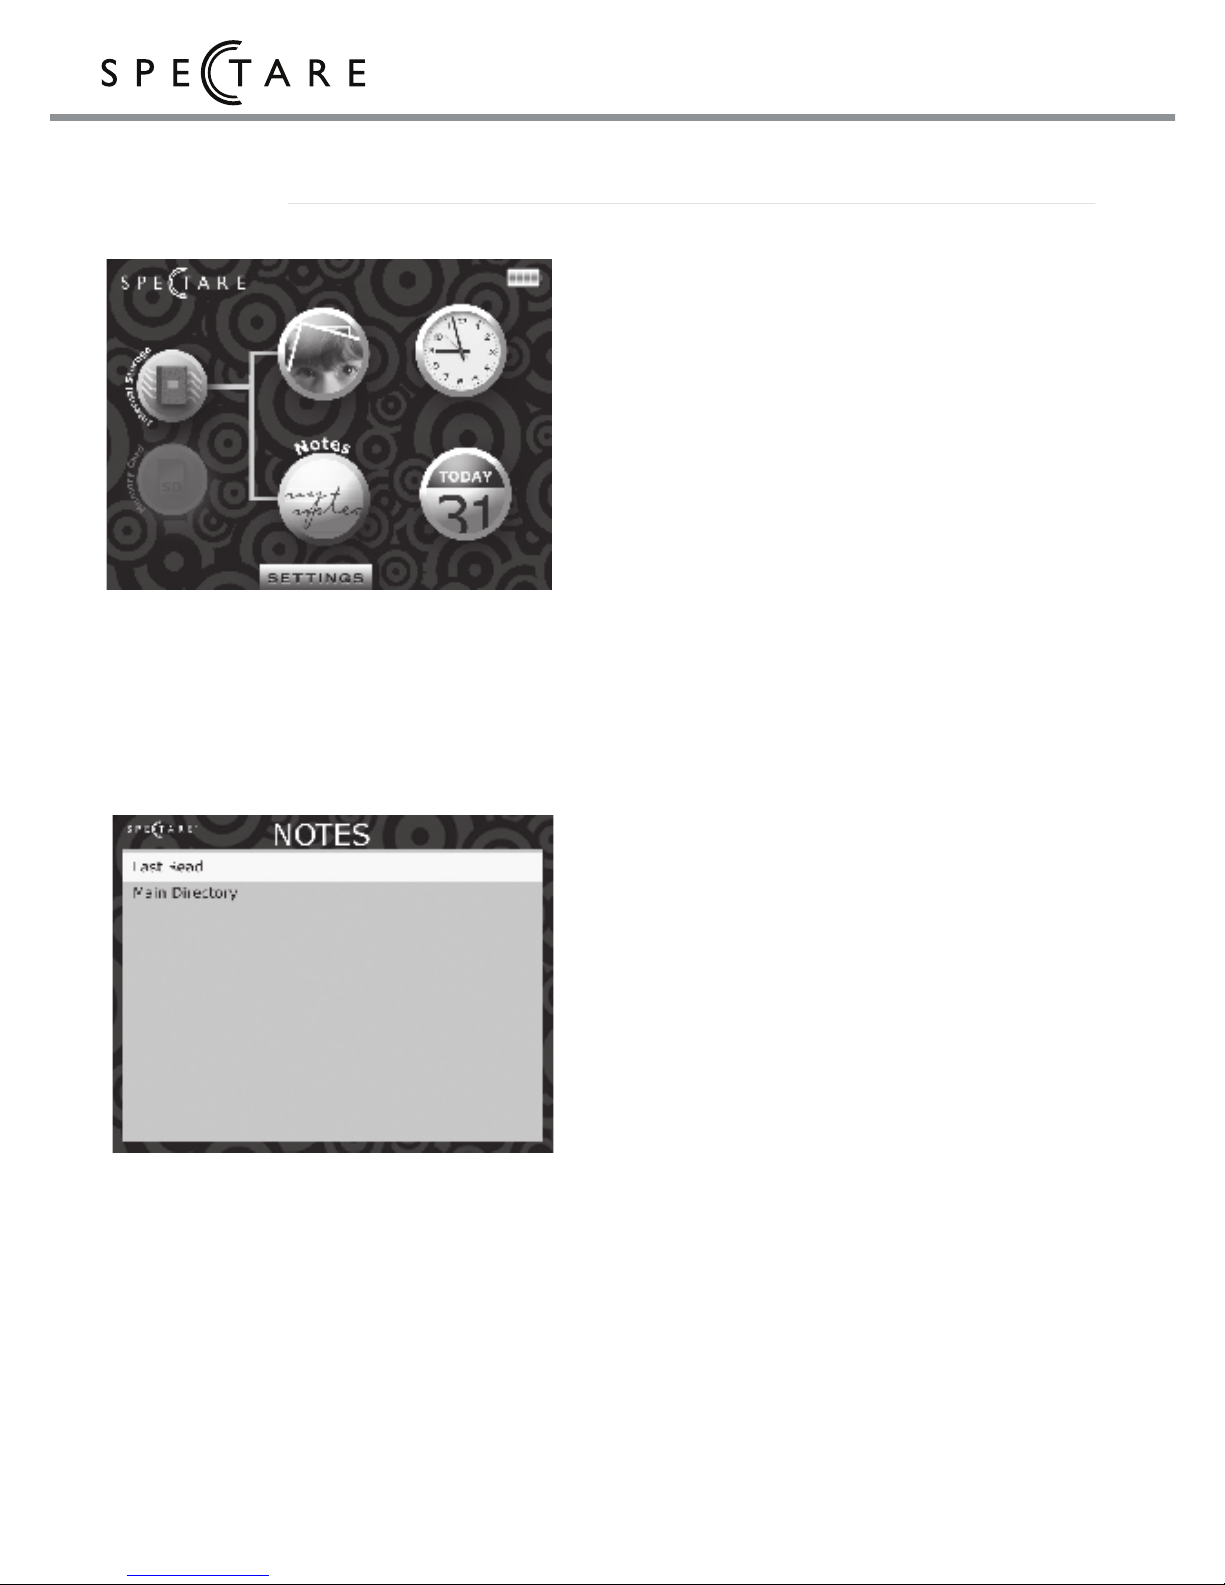
Frame Display: Notes
Displaying Notes
NOTE: The TimeFrame is capable of
displaying any .txt file such as a recipe,
notes or reminders. These files should be
saved from your computer as .TXT (text)
format then copied either to the SD Card or
to the internal memory. See page 17 for
information on connecting and copying files
from your computer to the frame
After selecting the location where you wish
to view the notes,
1. Press Once:
,,
or
until the NOTES icon is highlighted.
2. Press once:
ENTER/SLEEP
to confirm .
The Notes screen will give you the
ability to select from any .txt file that is
copied to the chosen location.
3. Press Once:
or
to choose a file to view
4. Press once:
ENTER/SLEEP
to confirm .
The selected Note will be displayed on
the screen
Exiting Notes
Press and HOLD:
/ MENU
for 3 seconds and release
to go the Main Menu.
Page 15
13
user's guide
SWITCH
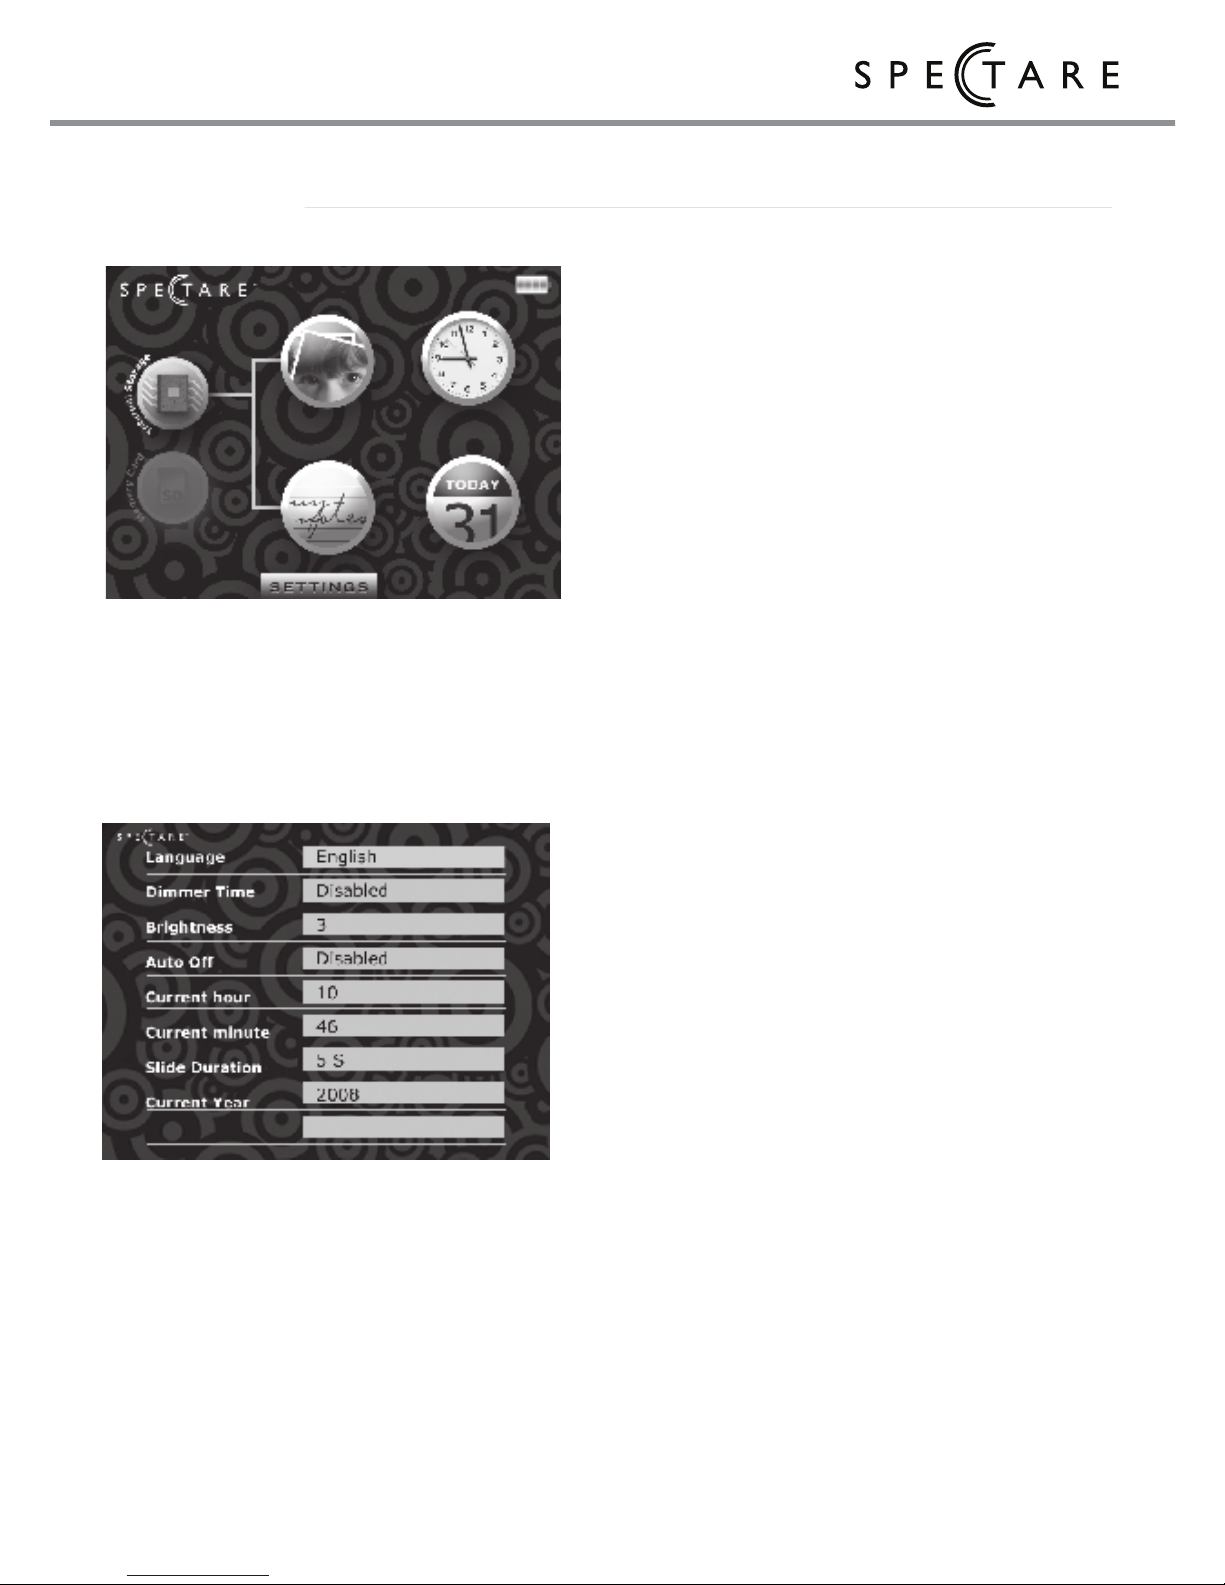
Frame Display: Settings
Entering Settings mode
From the Main Menu
1. Press Once: ,,
or
until the SETTINGS icon is
highlighted.
2. Press once:
ENTER/SLEEP
to
confirm .
The settings screen will appear
3. Press Once: or
to choose a the Setting to change.
4. Press Once: or
to change the setting.
5. Press once:
ENTER/SLEEP
to exit
the Settings menu and confirm your
settings.
Page 16
14 Spectare TimeFrame
Shuts off the main power to the frame.
sure the switch is in the ON position when
inside the TimeFrame: DeskTop holder.
Press and Hold for 3 seconds then release
SWITCH
Frame Display: Settings
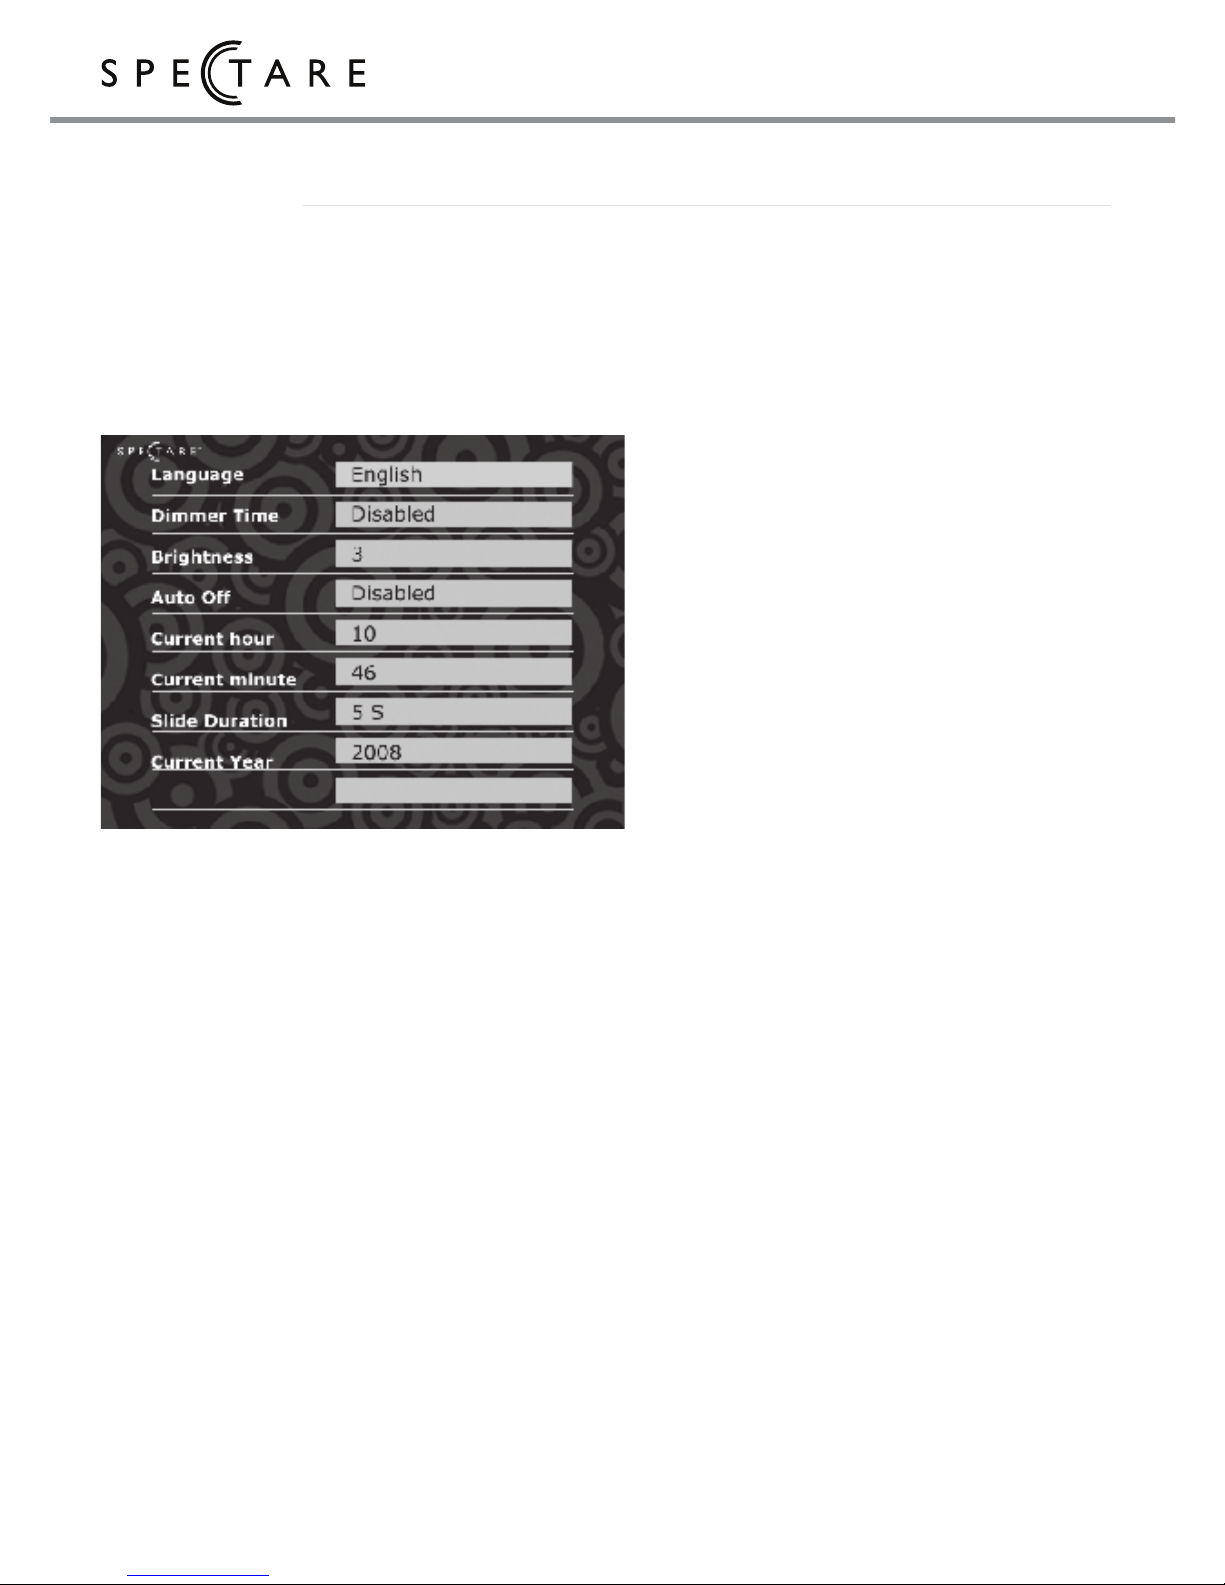
Settings Selections
Language: set the language for
the settings interface (NOTE:
this will not affect the main
menu)
Dimmer Time: the amount of
time before the LCD screen
will dim to conserve power.
Press any button to return
monitor brightness.
NOTE: The screen will not
Dim when playing a slide
show .
Brightness: Adjust the
brightness level of the LCD
monitor
Auto Off: Sets the amount of
time (if desired) for the
frame to automatically turn
off.
Current Hour: Set the hour of
the day in 24 hour format
Current Minute: Set the
minute of the day.
Slide Duration: set the amount
of time each image will
display on the slide show
Current Year: set the year
NOTE: The Month, Day and
Year are set on the Calendar
Page.
Page 17

15
user's guide
Frame Display: Clock
Displaying the Clock
1. Press Once:
,,
or
until the CLOCK icon is
highlighted.
2. Press once:
ENTER/SLEEP
to
confirm .
The Clock with the date will
display on your screen
Exiting Clock
Press and HOLD:
/ MENU
for 3 seconds and release
to go the Main Menu.
QUICK SWITCH from Clock,
Calendar and Photos;
Press and HOLD:
/ SWITCH
for 3 seconds and release
to switch to PHOTOS ; Press
again to go to the CALENDAR.
15
Page 18
16 Spectare TimeFrame
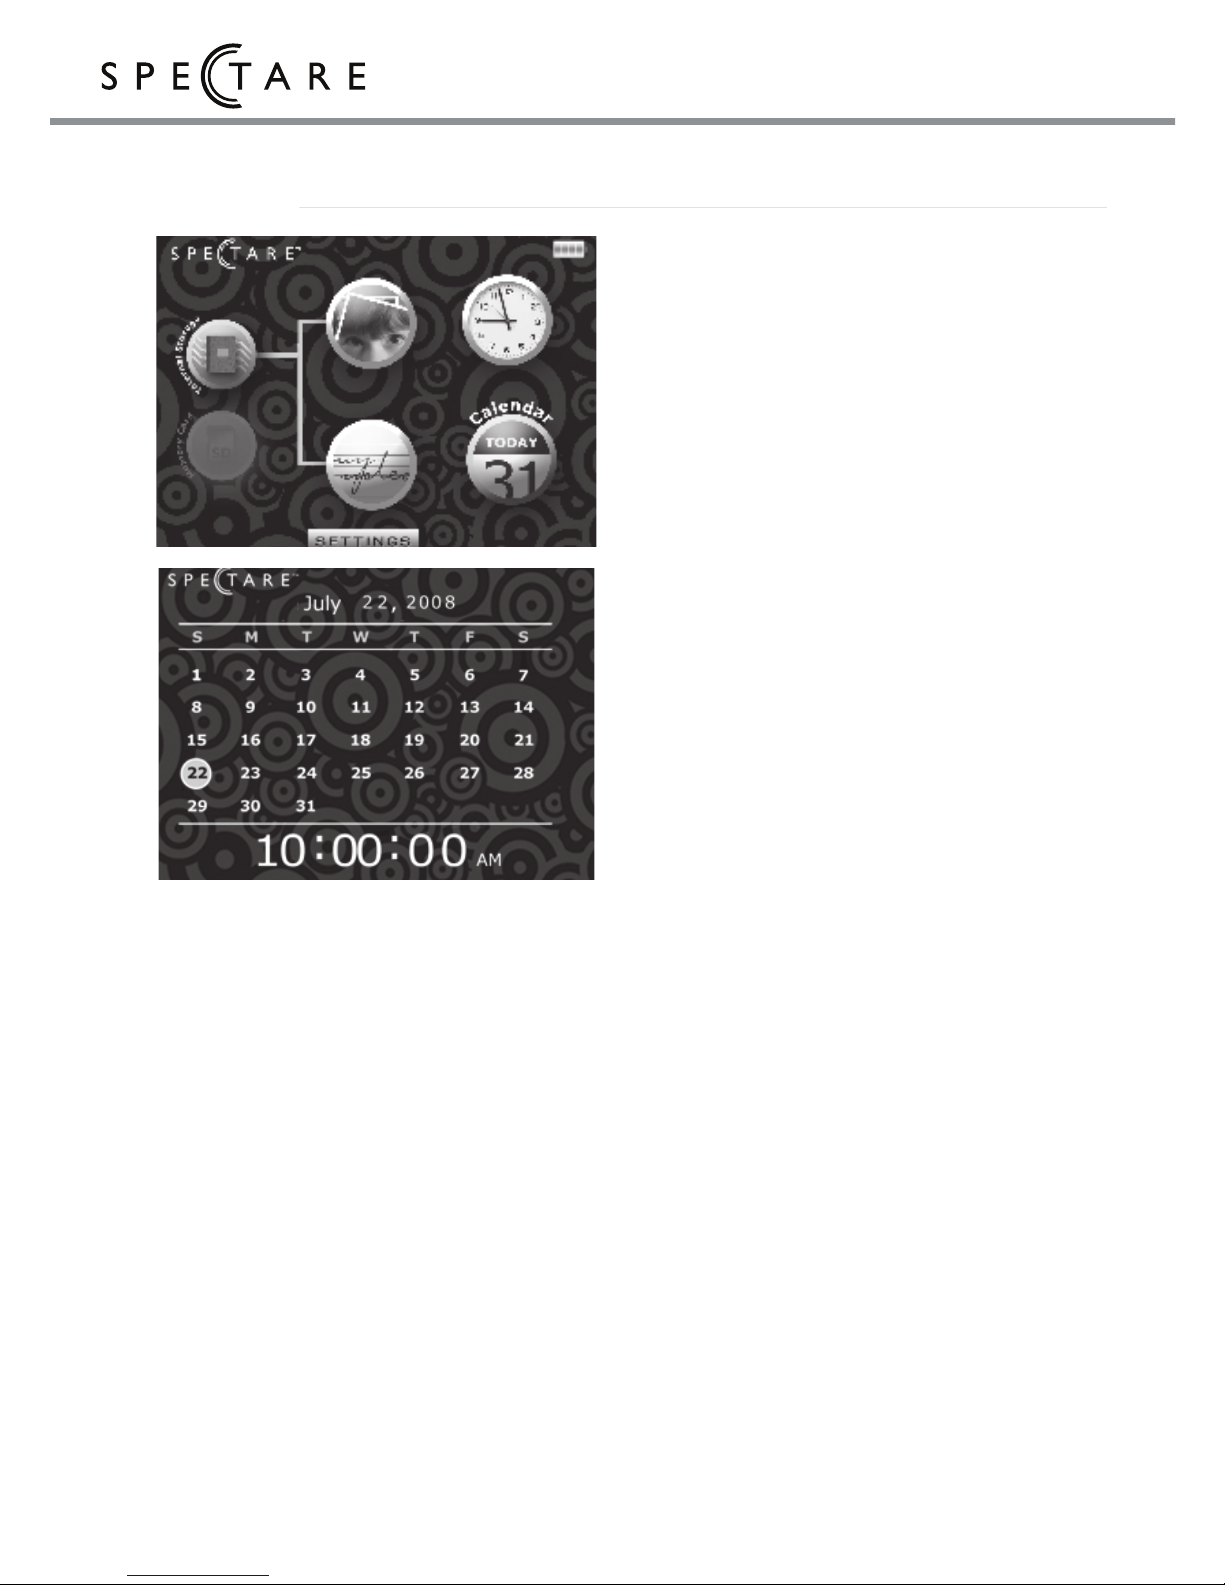
Frame Display: Calendar
Displaying the Calendar
1. Press Once:
,,
or
until the CALENDAR icon is
highlighted.
2. Press once:
ENTER/SLEEP
to
confirm .
The Calendar will display on your
screen
Setting the Calendar
1. Press Once:
,,
or
to select today’s date
2. Press once:
ENTER/SLEEP
to
confirm .
The Calendar and Clock Time
and Date will now be set.
Exiting Clock
Press and HOLD:
/ MENU
for 3 seconds and release
to go the Main Menu.
QUICK SWITCH from Clock,
Calendar and Photos;
Press and HOLD:
/ SWITCH
for 3 seconds and release
to switch to the CLOCK ; Press
again to go to PHOTOS.
1
Page 19
17
user's guide
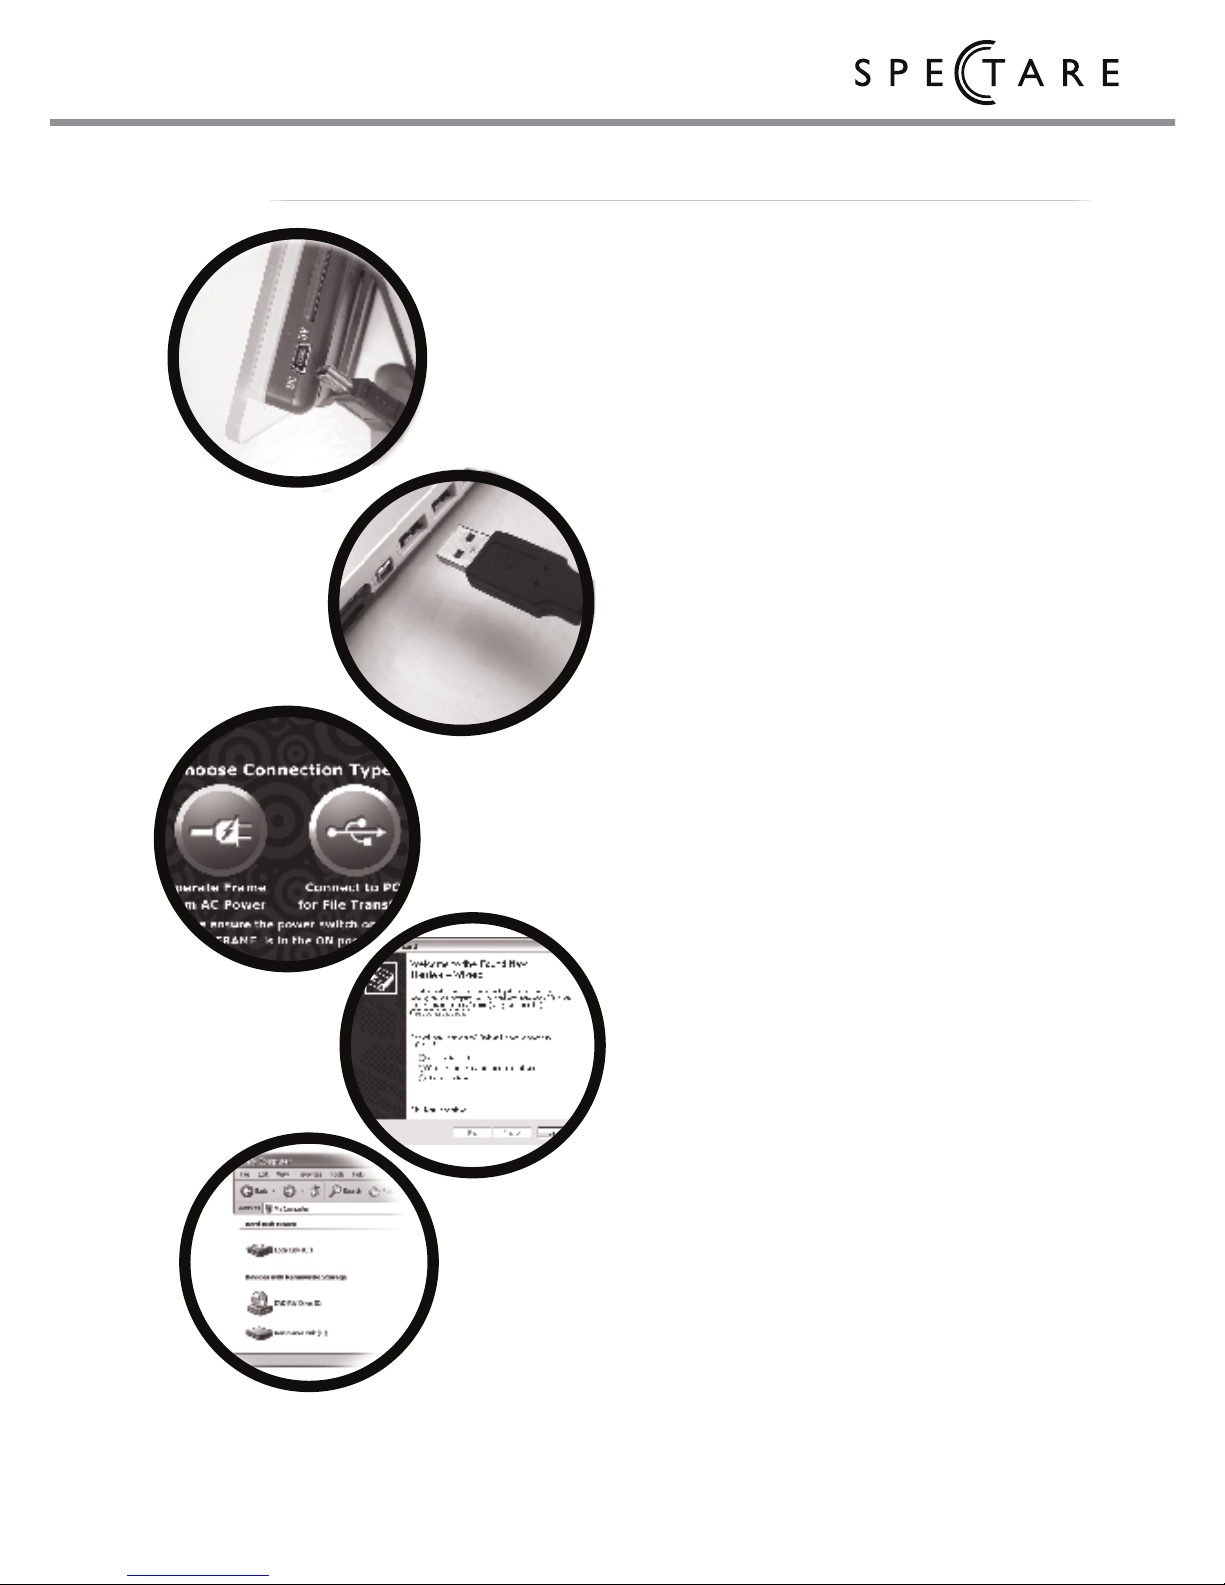
Computer USB Connection
To connect to your Windows PC or
Mac Computer
1. Connect the small end of the USB
cable to the USB port on the side
panel of the device.
2. Connect the larger end of the USB
cable to a free USB port on the
computer.
3. On the USB connection screen on
the frame Press Once:
or
to select “Connect to PC”
Press Once:
ENTER/SLEEP
to confirm.
4. The hardware device will be
automatically detected under
Windows XP , Vista and Mac
OS-X. Upon the first usage the
hardware drivers will automatically
install. Click OK on the hardware
wizard installation screens
5. 2 partitions entitled "removable
disc" will automatically be mounted
under the "My Computer" Window-one partition is the internal storage
on the frame and the other is the
Memory card slot.
Double click these removable disk
icons to access, copy and manage
the files in these locations.
1
2
3
4
5
Page 20
18 Spectare TimeFrame
Computer USB Connection
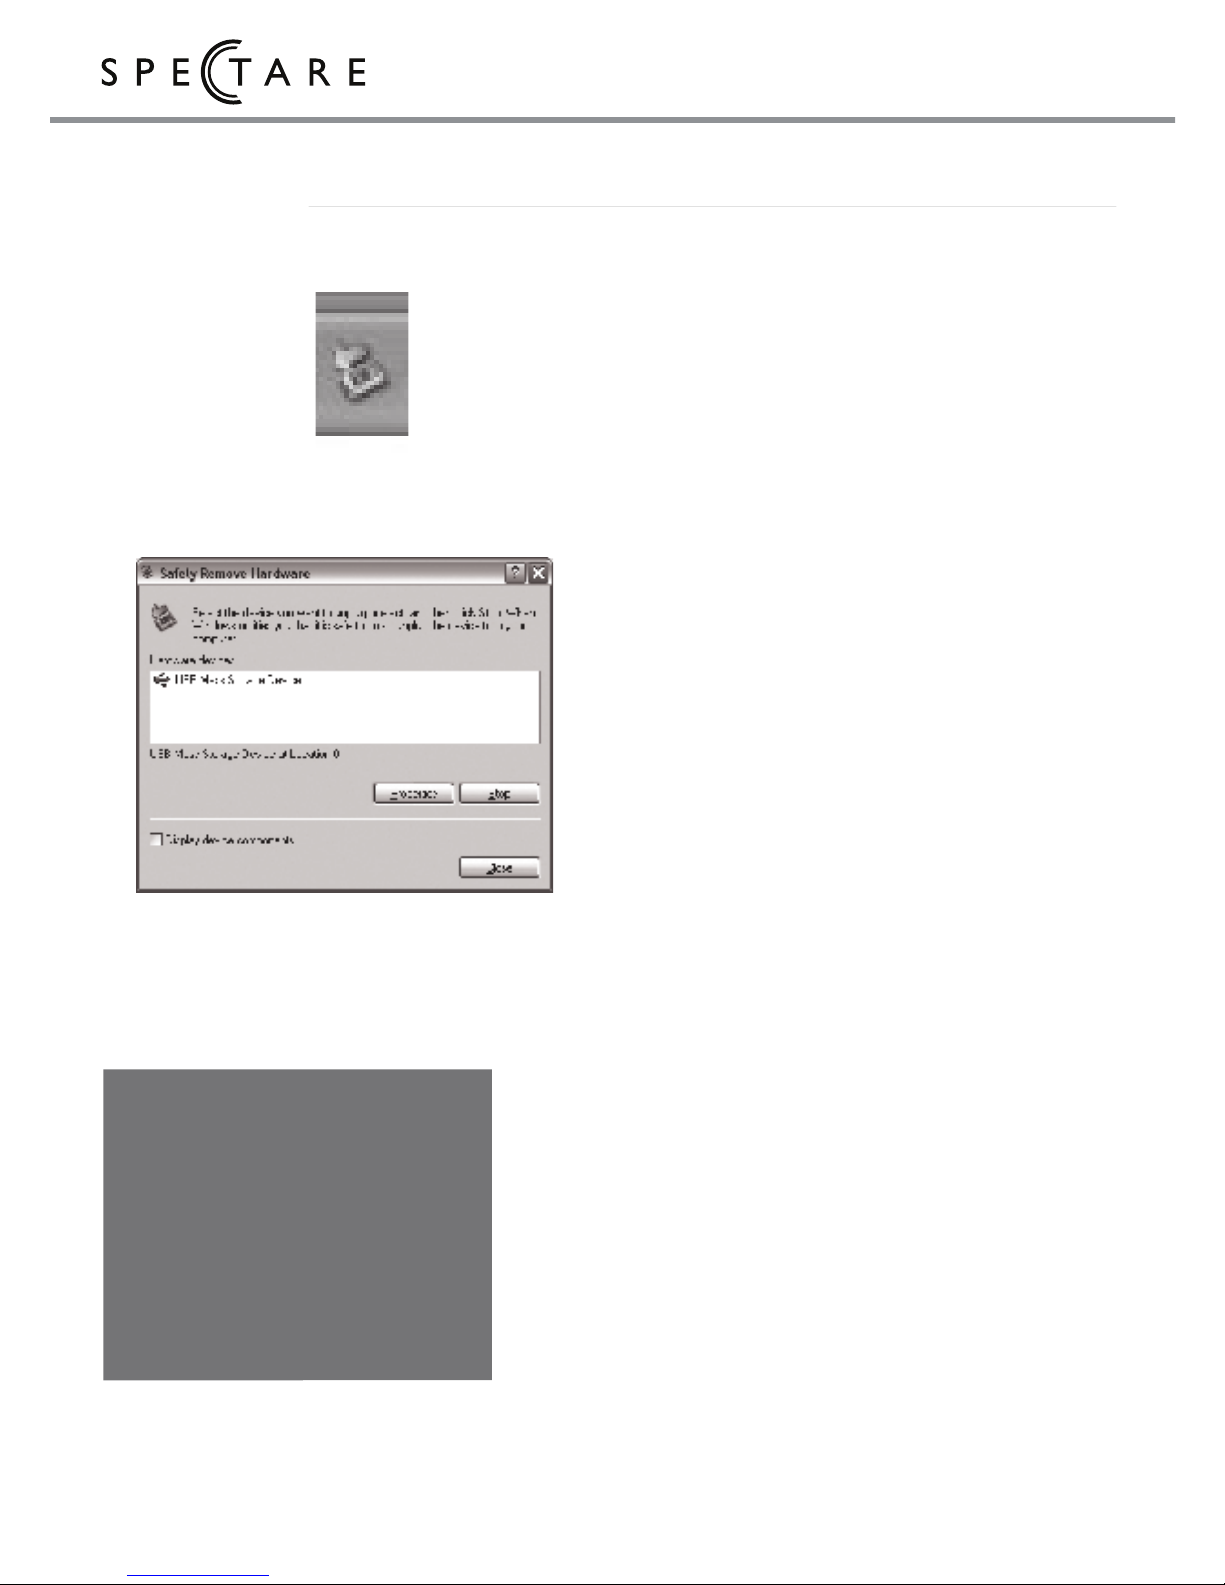
To Disconnect from the Computer.
1. On Windows click this icon on the
bottom task bar labeled "Safely
Remove Hardware."
2. A dialog box will appear "Safely
Remove Hardware."
3. Select USB Mass Storage Device and
click "STOP."
4. On the next dialog box click OK to
remove the storage device.
5. On the final dialog box select
"CLOSE" and disconnect the device
from the computer. A final message
should appear under Windows that
says “Safe to Remove Hardware"
afterwhich you can remove the USB
cable from the device.
6. Once the frame has been disconnected from the computer it will return
to normal operation.
Note: in some cases when attempting
to disconnect the frame you may get
the message ”The Volume cannot be
stopped right now. Try stopping the
device again later”. This generally
means there is some other application
that is accessing files on the frame. In
this case please quit all of the other
applications that are running and try it
again.
NOTE: For use with
Windows 2000, XP, ME, Mac
OS-10.3 and above. The
Frame is not compatible with
Windows 98,
Mac 10.2 or older systems.
Page 21

19
user's guide
Troubleshooting
PROBLEM: My pictures do not display on the frame.
SOLUTION: The Spectare TimeFrame supports.jpg, .BMP and GIF files only. It does not support other
picture file types (i.e. .tif, PDF, PIC, PCX), nor do they support progressive or grayscale .jpgs.
You can resave your photos in a baseline .jpg format using the paint application which comes
with windows.
1) Right click the photo file, and left click on "Open with..."
2) Select the "Paint" program.
3) Open the File menu in the upper left hand corner, and click "Save As..."
4) Under the file name, click the drop-down menu next to where it says, "Save as type:", and
select "JPEG (*.JPG, *JPEG, *.JPE, *JFIF)
5) Click Save.
Your photo will now be saved as a baseline RGB jpg file.
PROBLEM: The frame will not connect to the computer properly
SOLUTION: Check your operating system. If you have and older operating system such as Windows 98
the frame can not connect to these systems.
If you have Windows XP or Vista and are still having troubles try the following:
1. Try connecting to a different USB port on your computer
2. Disconnect any other USB devices connected to your computer.
3. If possible try another USB cable
4 Restart your computer
PROBLEM: The frame is frozen-- an image or menu screen remains on the screen and no buttons are
active
SOLUTION: You must reset your frame
1. Unplug the frame from the USB connection or AC Adapter
2. Turn the Power switch to the OFF position
3. Wait a few seconds
4. Plug the AC Power back in and Turn the Power Switch to the ON position.
FOR THE MOST RECENT TROUBLESHOOTING TIPS AND SUPPORT GO TO
http://spectareproducts.com then click on SUPPORT
19
Page 22

20 Spectare TimeFrame
This device complies with part 15 of the FCC rules. Operation is subject to the following two
conditions: (1) This device may not cause harmful interference and (2) this device must accept
any interference received, including interference that may cause undesired operation.
Technical Specifications
MADE IN CHINA
Display 3.5” high resolution TFT, 24bits color,
320X240 Adjustable Backlight setting
Internal Memory 128 MB
Memory card Supports SD,MMC (32MB~2GB);
Media Supports JPEG, BMP, GIF
Photo Features Slide show, manual photo selection, rotate,
adjustable display time
Connections USB connection
Clock Feature Frame can display time and date
Dimensions Frame: 4.8” x 3.6 x .6: (12.2 x 9.2 x 1.6 cm)
Frame and Podium: 8 x 2.5 x 5”
Power AC Adaptor and USB cable;
5v 650Mah DC, 100V-240V AC
Battery Built-in 800 mAh rechargeable lithium
battery
Page 23

21
user's guide
21
Page 24

Spectare is a registered trademark of SuMaWah LLC. © 2008
www.spectareproducts.com
 Loading...