

Page 1
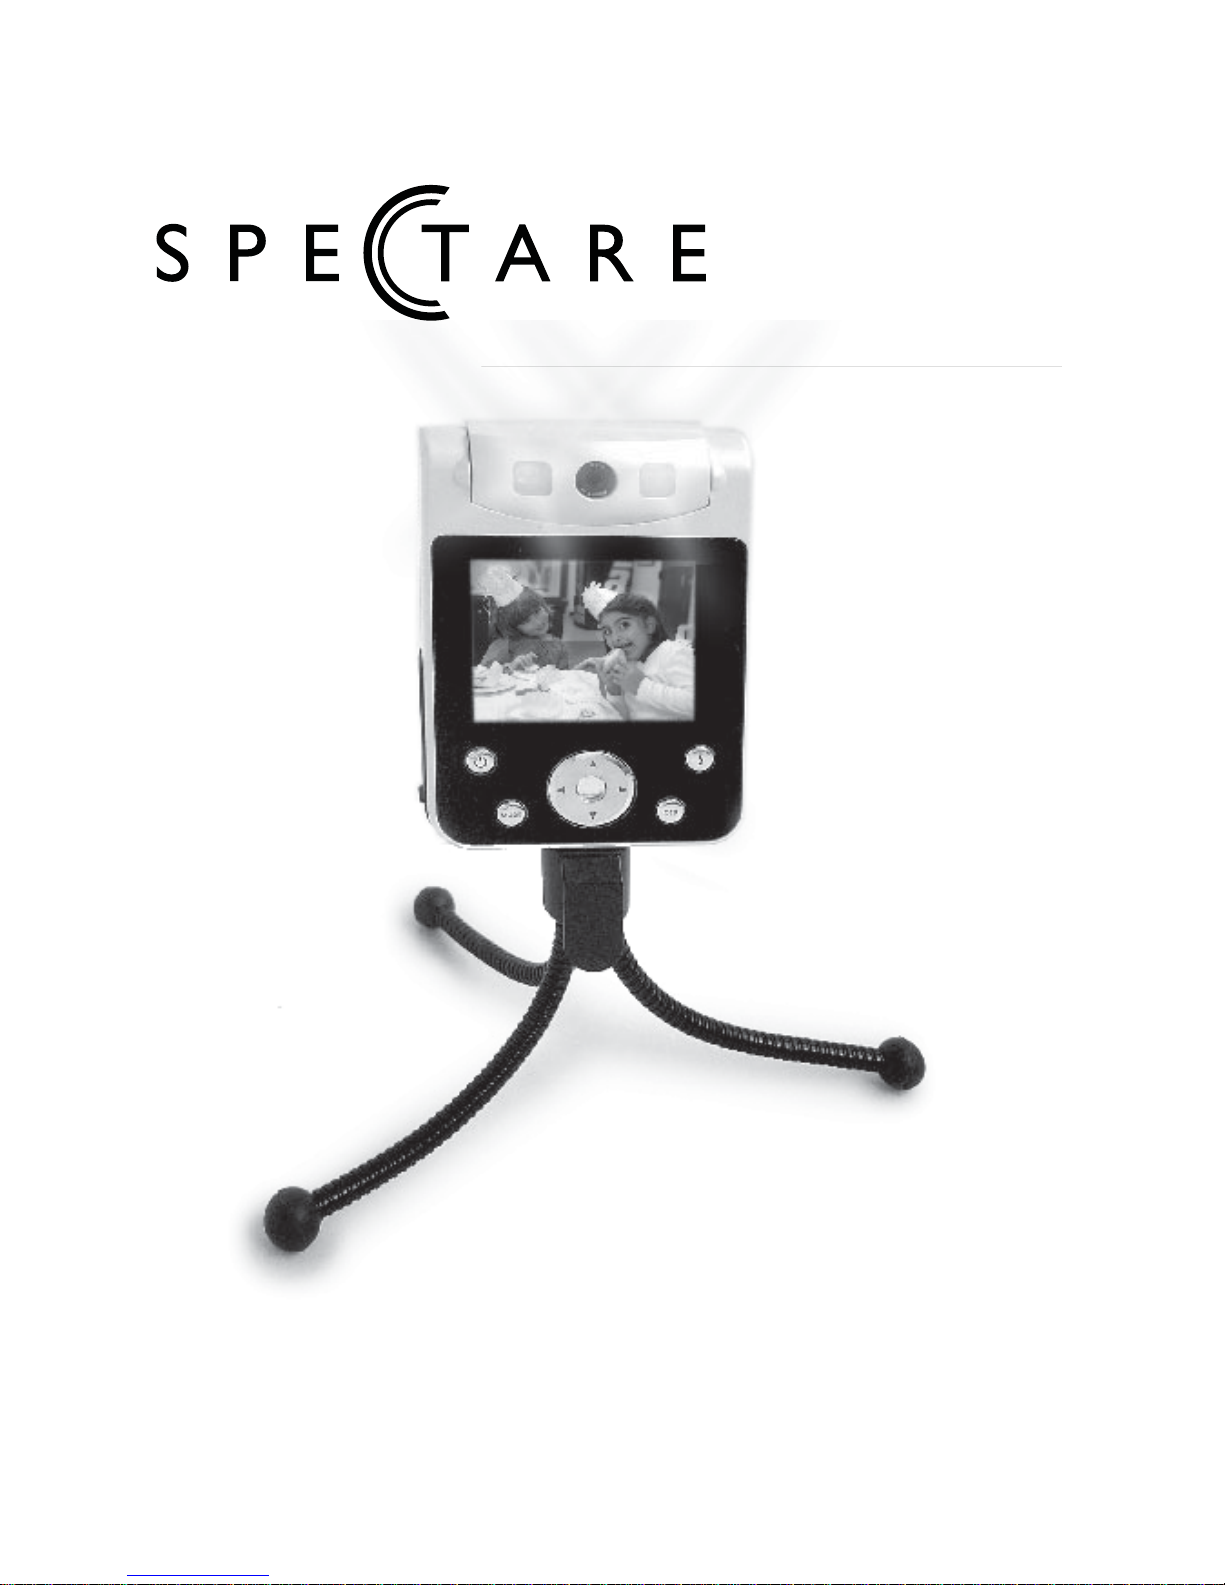
7 in 1 Media Player and Recorder
User's Guide
English
™
Page 2

Page 3

1
user's guideSpectare 7 in 1 Media Recorder / Player
Thank you for purchasing the Spectare 7 in 1 Player. Please take some time to read
through and follow these important safety and operation instructions.
WARNING: TO REDUCE THE RISK OF FIRE OR SHOCK HAZARD, DO NOT
EXPOSE THIS PRODUCT TO RAIN OR MOISTURE.
CAUTION: RISK OF ELECTRIC SHOCK. DO NOT DISASSEMBLE THIS UNIT. TO
PREVENT THE RISK OF ELECTRIC SHOCK, DO NOT REMOVE
COVER. NO USER- SERVICEABLE PARTS INSIDE. REFER
SERVICING TO QUALIFIED PERSONNEL.
VENTILATION - The device should be situated so that its location or position does not
interfere with its proper ventilation. For example, the unit should not be
situated on a bed, sofa, rug or similar surface that may block the
ventilation openings.
HEAT - The device should be situated away from sources of high heat such as
radiators or stoves.
POWER SOURCE - The device should be connected to a power supply only of the
type described in the technical specification of this user guide.
CLEANING - The device should be cleaned gently using a soft cloth dampened with
water. Do not clean the inside of the unit.
NON USE PERIOD - The power cord for the device should be unplugged from the
outlet when the unit is left unused for a long period of time.
AVOIDING SURGES- For added protection during a lightning storm, unplug the
device from wall outlets to prevent damage to the product due to power
line surges.
OVERLOADING - Do not overload wall outlets or extension cords, as this may result
in fire or electrical shock
SERVICING - The user should not attempt to service the device beyond those means
described in the operating instructions. All other servicing should be
referred to qualified service personnel.
Page 4
2 Spectare 7 in 1 Media Recorder / Player
Getting Started:
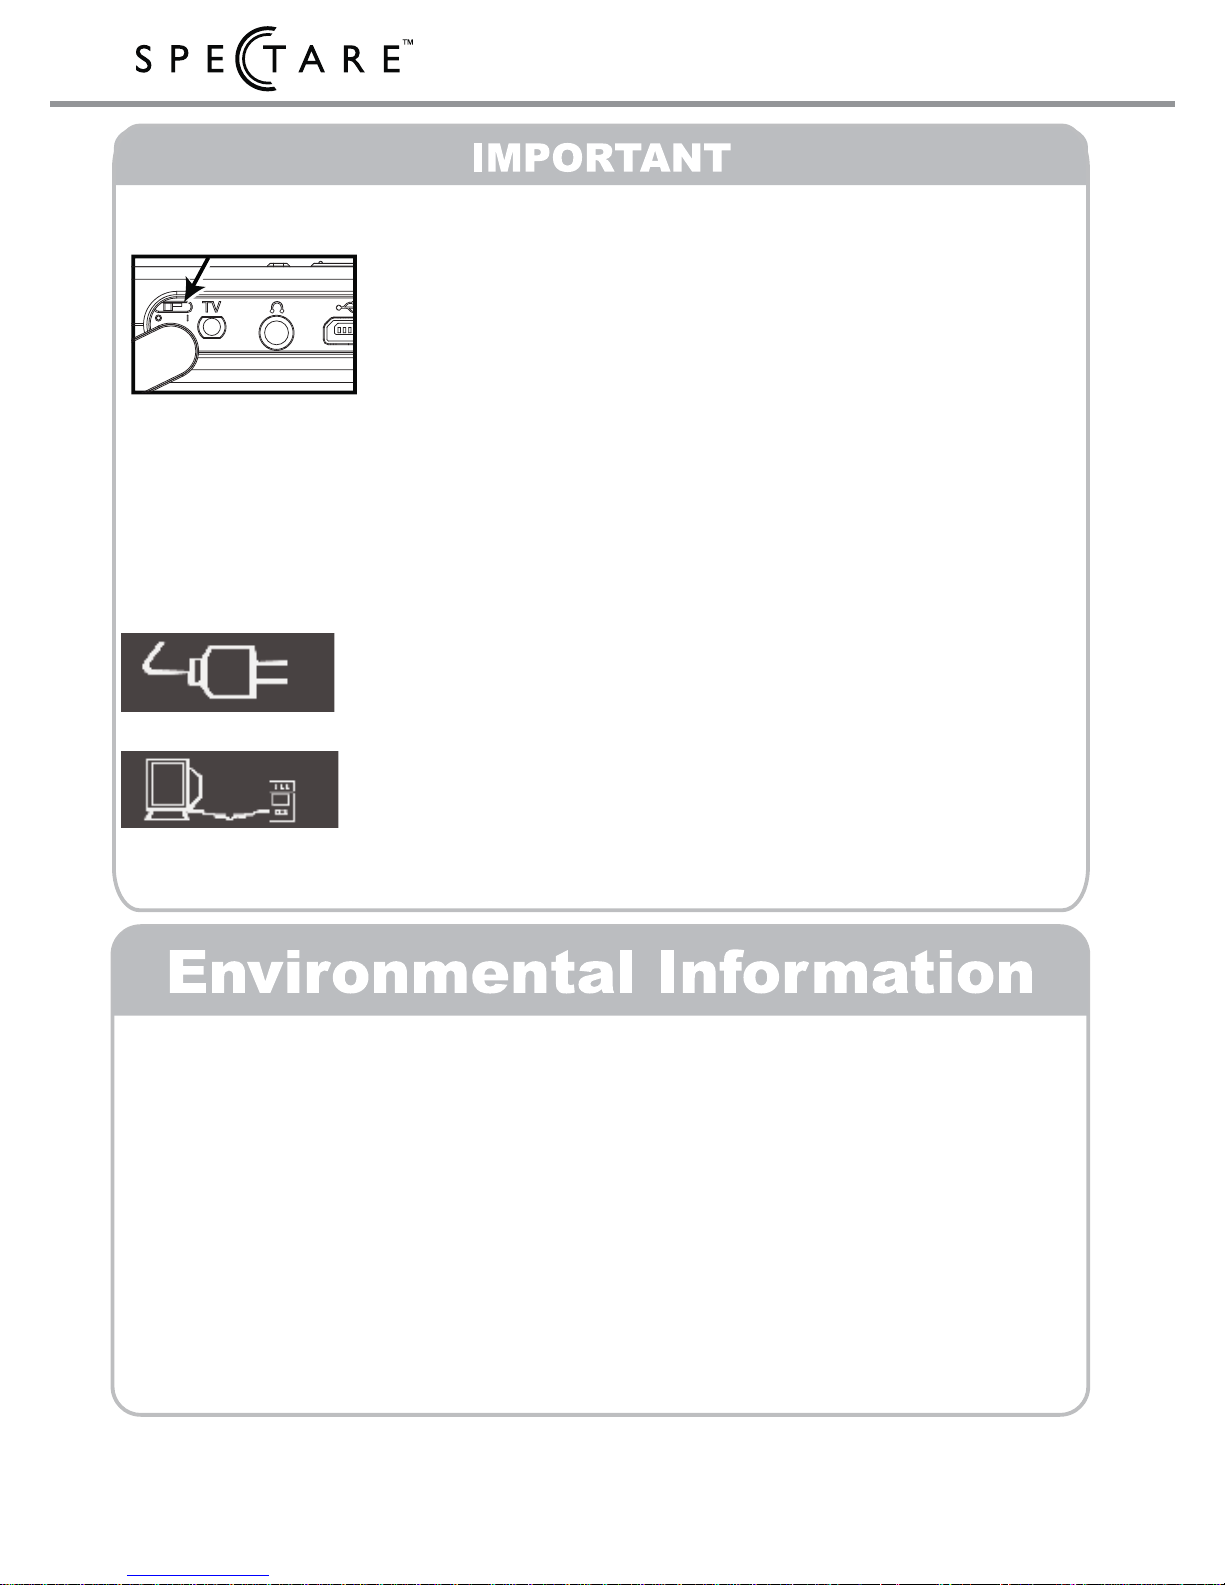
1. Ensure that the power switch on the side panel is
set to the “|” position, you may need to use a pen point
or stylus to move this selector. See page 11.
2. Connect the device using the AC adapter and
charge for 3 hours.
The USB connection port on this unit charges the battery and allows you to
connect to a PC.
When connecting the USB Cable to the device the following choices will
appear on the screen:
1. AC Adapter icon: Select this icon for charging and
normal use with AC Power- Also choose this mode
for use as a PC Web Cam
2. Computer Icon: Select the this icon for connection
to a PC for use as a memory card reader- See Page
21 for details.
The packaging has been minimized and is designed for easy recycling and
separation into cardboard, expandable polystyrene and polyethylene.
Please make an effort to recycle this package.
Battery Disposal: Do not incinerate, disassemble or short circuit the battery.
Do not expose the battery to temperatures above 113
o
Fahrenheit.
Please observe the local regulations regarding the disposal of exhausted
batteries and old equipment.
Page 5

3
user's guide
For questions and support on this product that can not be solved
by your retailer please contact:
Spectare Products
6081 Meridian Ave Suite 70-308
San Jose, CA 95120
http://spectareproducts.com
[email protected]
The Spectare Logo and the Spectare brand are trademarked by SuMaWah LLC, San Jose, CA.
Copyright 2006 SuMaWah LLC, All Rights Reserved Worldwide.
Quick Start Guide ........................................................
Product Description .....................................................
Modes of Operation
Camera ......................................................
Video ..........................................................
Continuous .................................................
Record Audio .............................................
MP3 Player ..................................................
PC Web Cam .............................................
Playback .....................................................
Settings .....................................................
Memory Card Reader ................................
Output to TV ..............................................
Trouble Shooting .........................................................
File Conversion Overview ...........................................
DV/DVP File Converter ...............................................
Technical Specifications ..............................................
4
6
12
13
14
15
16
17
19
20
21
22
23
24
26
28
Contents
Contact
Page 6
4 Spectare 7 in 1 Media Recorder / Player
1
2
3
4
Quick Start Guide
To begin using your Spectare 7 in 1 player
follow these simple instructions:
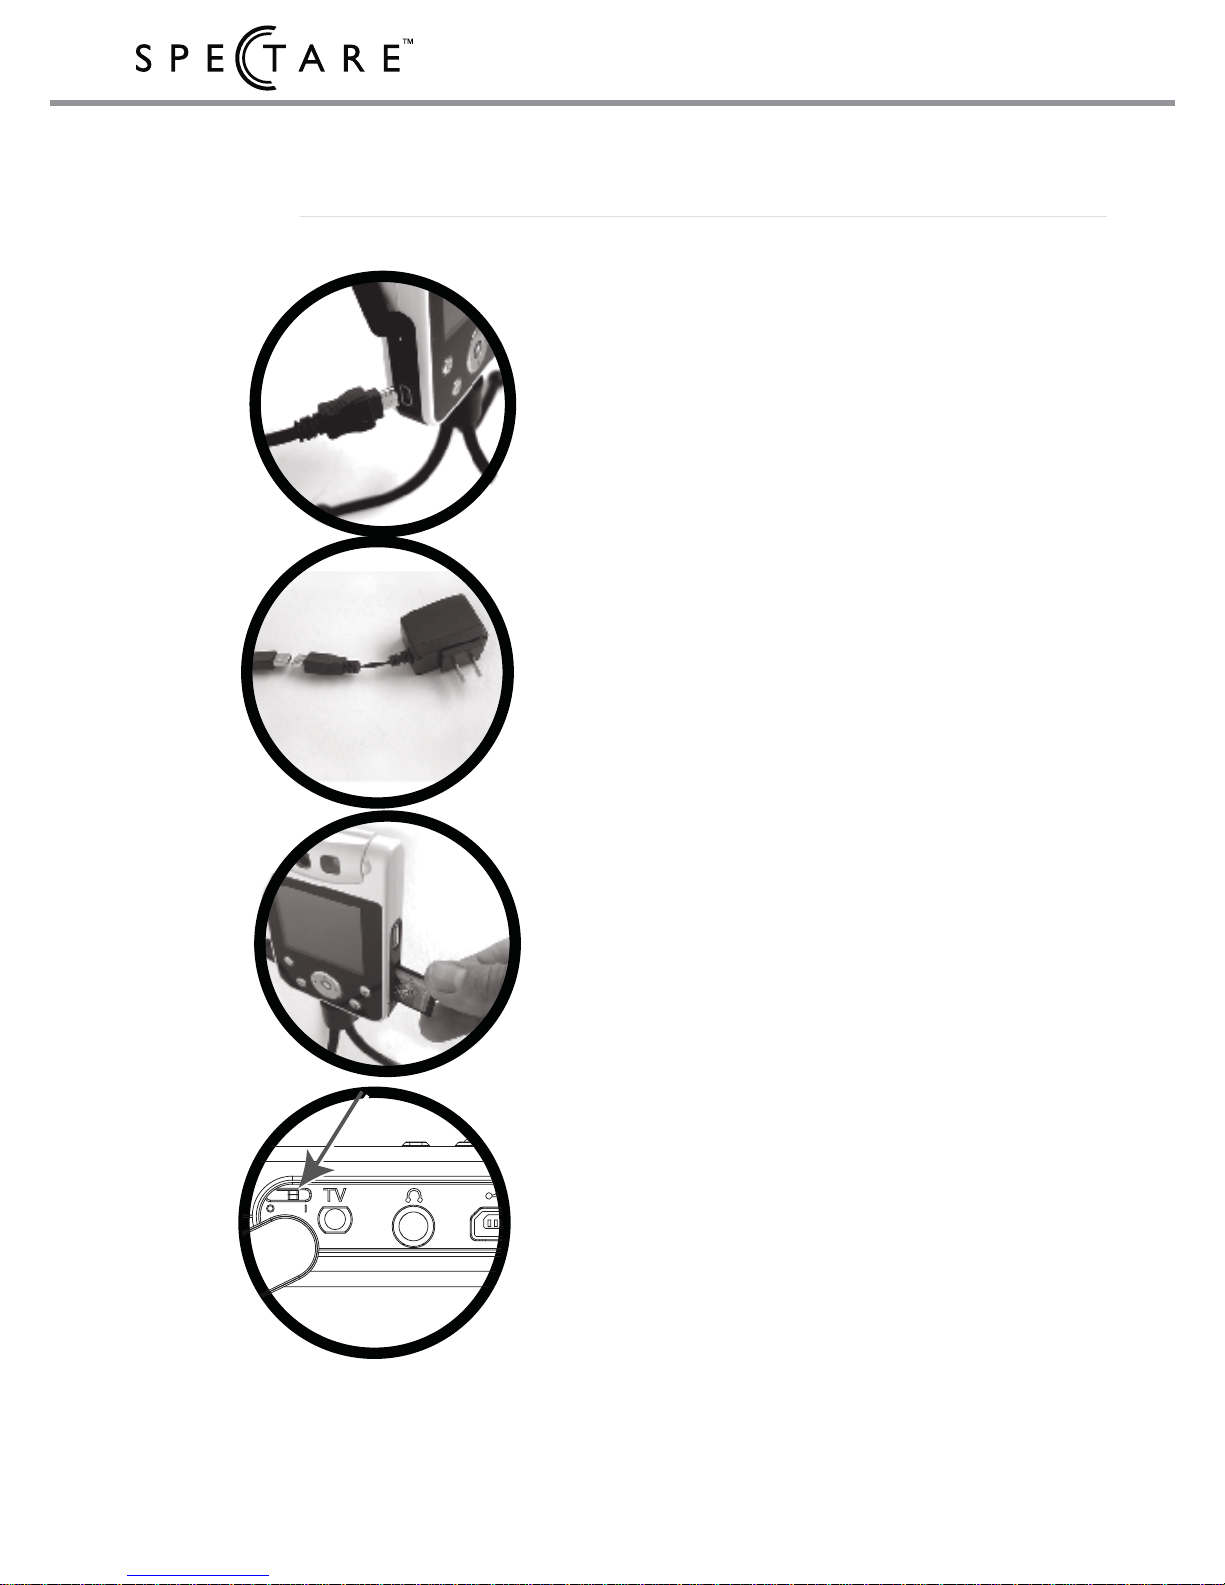
Using the USB cable provided connect the
small end into the player.
Insert the large end of the USB cable into
the AC Adapter provided, then plug into wall
socket. Let the device charge for 3 hours
before the first use.
Insert a SD or MMC memory card into the
memory slot (not included). NOTE: The
card will only fit in one direction do not force
it. If it does not go in all the way turn the
card around.
Open the side panel of the device and
ensure that the power switch is set to the “|”
position for STANDBY. You may need to
use a pen point or stylus to move this
selector.
Page 7
5
user's guide
Quick Start Guide
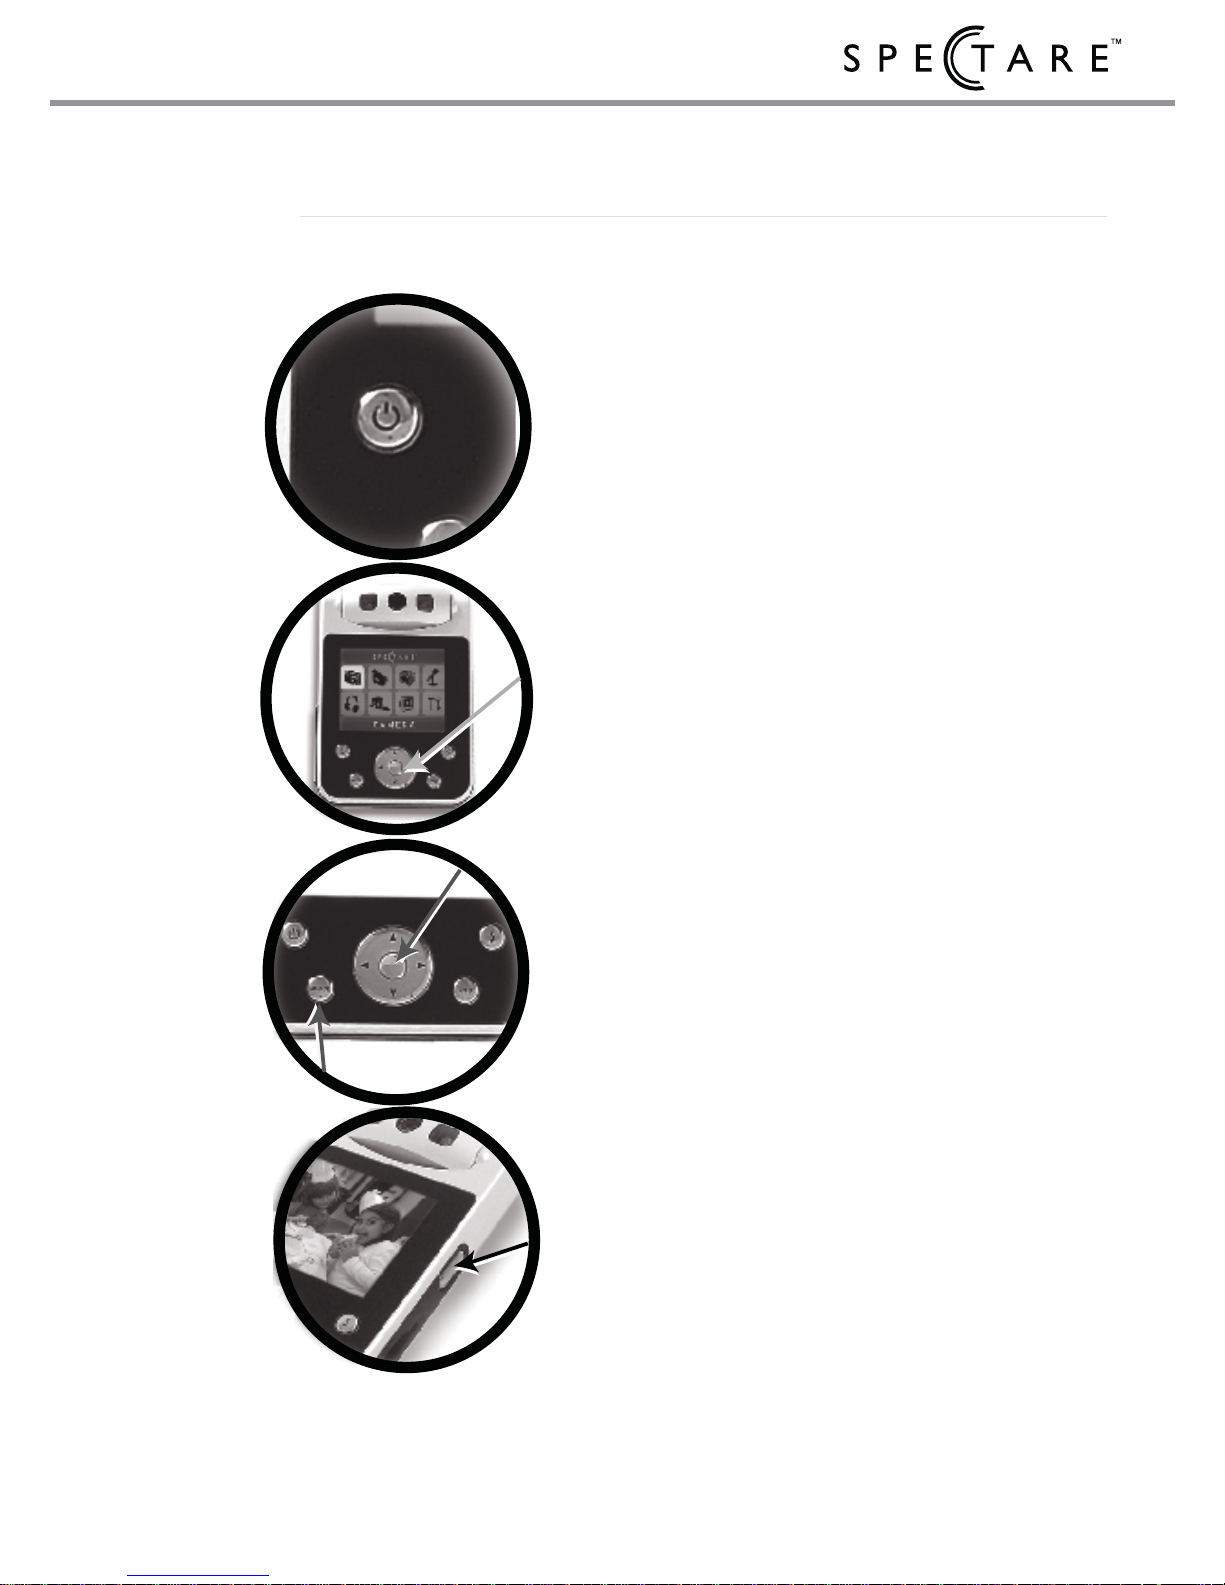
Press and hold the power button located on
the front of the device for about 3 seconds.
Upon startup the device will display the
main menu. Use the RIGHT/LEFT/
UP/DOWN keys to select one of the icons:
CAMERA- see page 12
VIDEO- see page 13
CONTINUOUS- see page 14
RECORD AUDIO- see page 15
MP3 PLAYER- see page 16
PC WEB CAM- see page 17
PLAYBACK- see page 19
SETTINGS- see page 20
When the desired icon is selected press the
ENTER button in the center of the arrows to
enter that function. To return back to the
previous menu press the MODE button.
Use the SHUTTER button on the side of
the device for taking photos and video as
well as playing MP3 Music files.
5
6
7
8
Page 8
6 Spectare 7 in 1 Media Recorder / Player
1
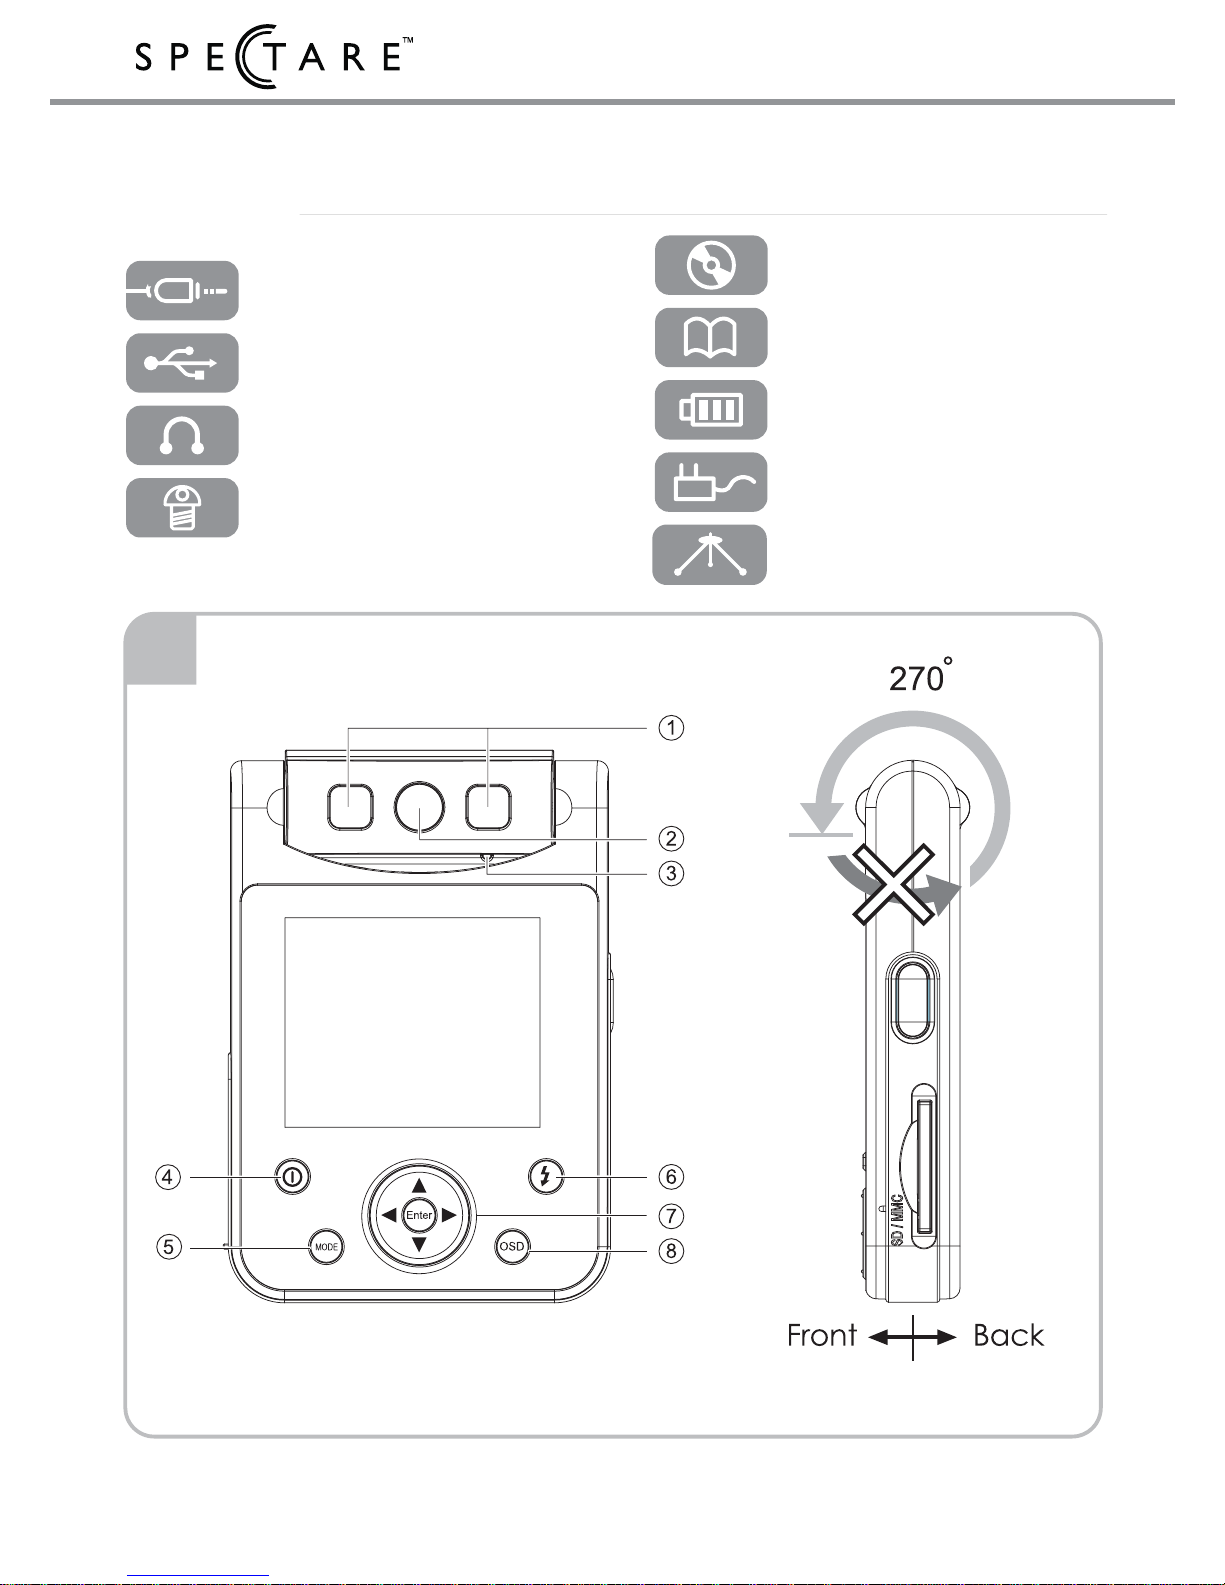
Product Description: Accessories Included
AV Cable
USB Cable
Earphones
Wrist Strap Screw
Software Installer
User Manual
Lithium Battery
AC Adapter/ Charger
Mini Tripod
Page 9
7
user's guide
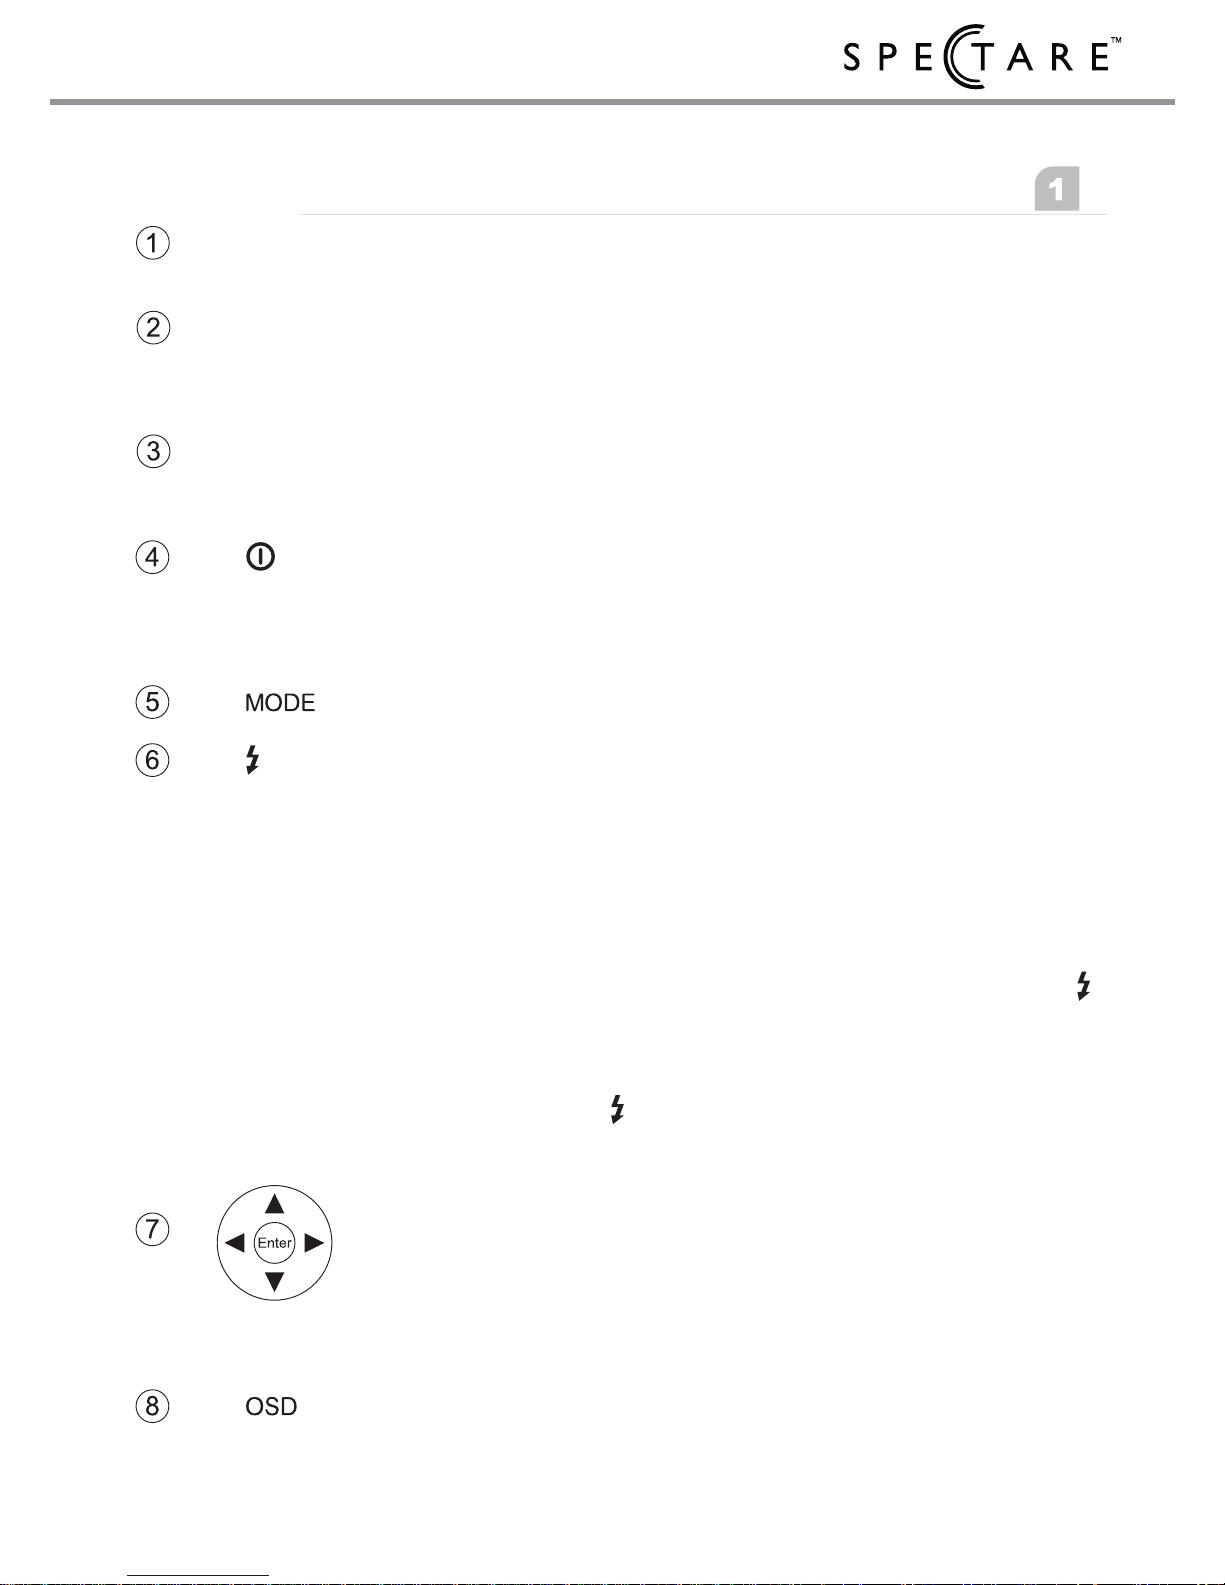
Exposure Light If there is insufficient light the exposure light can be
turned on for additional exposure compensation.
Lens The lens can be swiveled 270 degrees to face in either
direction or point straight down for storage and
protection of the lens.
Orange LED Light Indicates that the self timer or exposure light has been
activated.
Power button: Turns on the device when in standby
mode. (NOTE: Ensure the power switch is placed in
the “|” position on the side of the camera: see page
11)
Escape back to the previous menu
Under CAMERA mode press this button if there is
insufficient light, this will activate the exposure light for
additional lighting compensation. Choose the light
mode by pressing the button repeatedly:
Light off / Automatic light / Light On / Red-eye
reduction / Night mode
THUMBNAIL: Under PLAYBACK Mode press the
button to display the movies and photos in a
Thumbnail view.
NOTE: the button will not function in modes of
operation other than CAMERA and PLAYBACK.
Use the UP/DOWN/RIGHT/LEFT buttons for selection
of the menu items. The ENTER button confirms the
selection at the Main Menu. When a Mode has been
selected (when viewing the camera for example) the
ENTER button will bring up the settings menu.
Turns the screen icon display on and off under
CAMERA, VIDEO, CONTINUOUS and PLAYBACK
Modes.
Product Description: Front Panel (Figure )
Page 10
8 Spectare 7 in 1 Media Recorder / Player
2
Page 11
9
user's guide
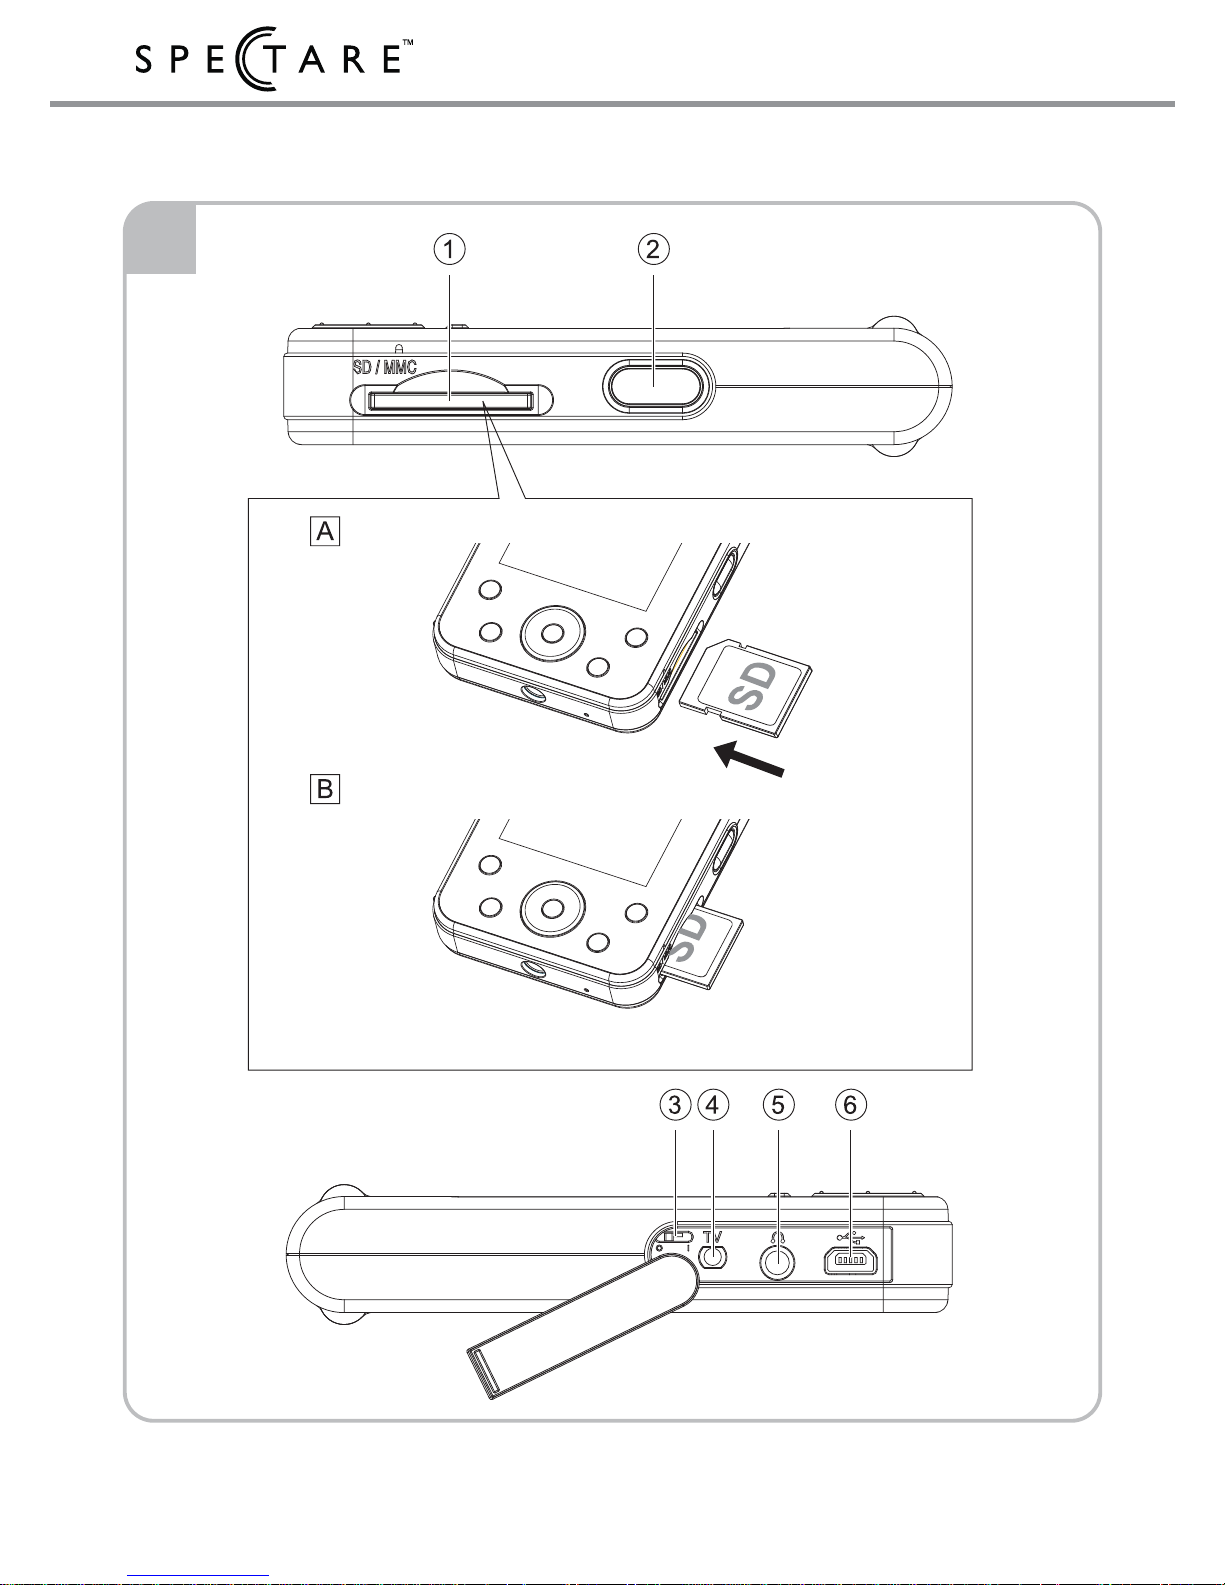
Memory Card Slot Accepts both SD and MMC cards up to 1 GB.
To install a memory card:
Turn the device front side up and insert an SD
or MMC card.
Press the card into the slot until it clicks.
Press again to release the card.
Record / Play Button performs the following functions in each of
the Modes listed below:
CAMERA/ CONTINUOUS: Takes photos
VIDEO: Start/stop recording
RECORD AUDIO: Start/stop recording or
playback
PLAYBACK: Starts / stops the movie playback.
Stops the Auto Slide Show for photos
MP3 MUSIC PLAYER: Starts/stops the music
clip.
Power switch: standby/ Power Off
Output for TV Connection: see page 22
Earphone jack
USB Port connection to PC: see page 21
Product Description: Front Panel (Figure )
Page 12
10
Spectare 7 in 1 Media Recorder / Player
Page 13
11
user's guide
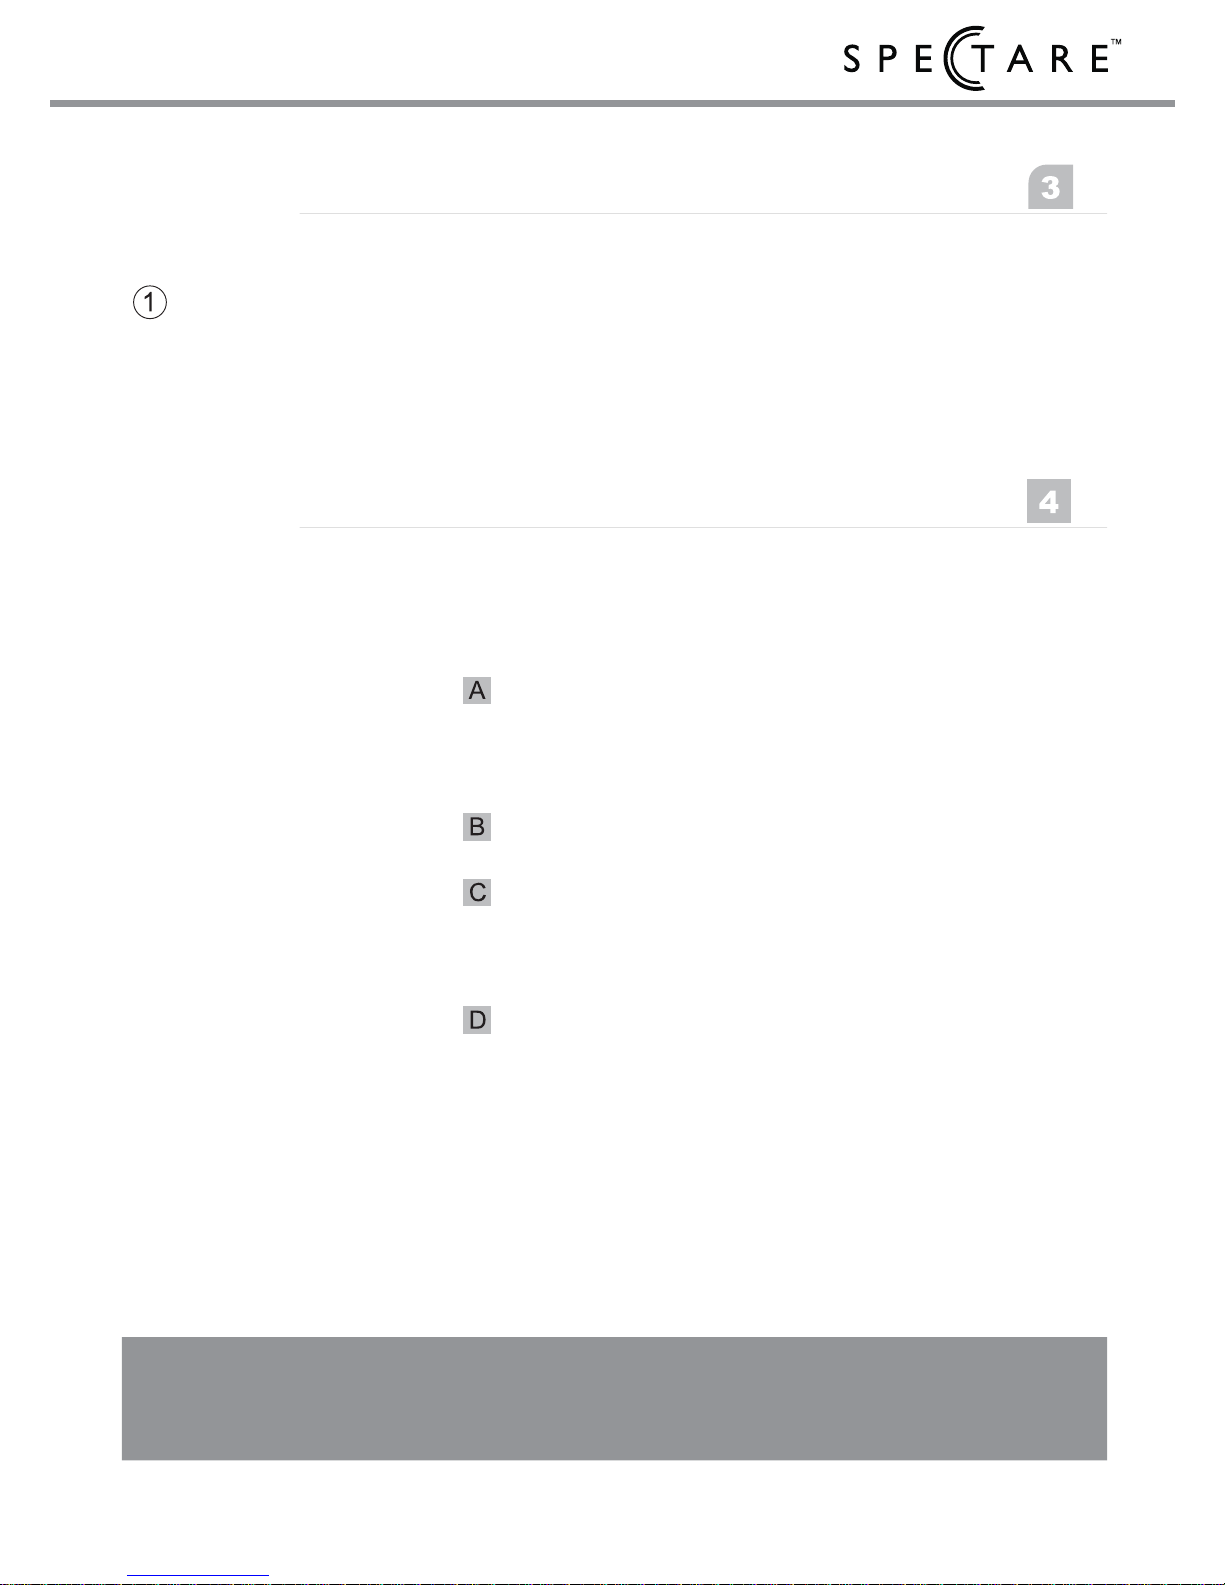
Tripod Socket Attach the tripod included or any standard tripod
using the screw hole on the bottom panel.
Alternately you can attach the wrist strap holder
screw here.
The battery comes pre installed. If you need to replace the battery follow
these instructions:
Place the camera back-side up then open the
battery cover by placing your finger nail in the
notch and pulling the cover forward.
Remove the battery cover
Insert the battery pack into the compartment in
the direction shown on arrow 1, then click into
place as shown in arrow 2
Replace the battery cover and turn the power
switch to “ | ” on the side panel before you turn
the power on.
Battery is charged either by connecting the device to a PC using the USB Cable
or using the AC Adapter that is provided. Charging time is around 2.5 to 3
hours.
Product Description: Front Panel (Figure )
Product Description: Front Panel (Figure )
Page 14
12 Spectare 7 in 1 Media Recorder / Player
Starting Camera Mode
From the Main Menu select the
CAMERA icon and press the
ENTER button to enter this
mode.
TO EXIT: Press the MODE
button to return to the MAIN
MENU
Exposure Light
Press the LED button to turn
on / off the LED exposure
compensation light
Button Functions
UP: Zoom in
DOWN: Zoom Out
LEFT: Decrease exposure
RIGHT: Increase exposure
SHUTTER: Takes the photo
Camera Settings
Press the ENTER button to
enter the settings screen.
Press the UP or DOWN to
choose the setting.
Press the RIGHT or ENTER button
to select the desired function to
set.
Press the MODE or LEFT
button to return to the previous
menu or exit the set up screen.
Setting Items
Self Timer: OFF / 5 Sec / 10
Sec / 15 sec
Image Size: 2848x2136 /
2048x1536 / 1600x1200 /
1024x768 / 800x600 / 640x480
Image Quality: Super Fine /
Fine / Standard / Economy
Quick Preview: On / Off
Sharpness: Sharp / Normal /
Soft
White Balance:
Adjusts the
color according to the lighting
conditions:
Auto / Daylight /
Cloudy / Tungsten / Fluorescent
After selection press the
ENTER button to save the
settings.
OSD (On Screen Display)
Press the OSD button to turn
the text and icon overlay ON
and OFF
Camera Mode
For taking still images
Page 15
13
user's guide
Starting Video Mode
From the Main Menu select
the VIDEO icon and press the
ENTER button to enter this
mode.
TO EXIT: Press the MODE
button to return to the MAIN
MENU
Button Functions
UP: Zoom in
DOWN: Zoom out
LEFT: Decrease exposure
RIGHT: Increase exposure
SHUTTER: Starts and stops
the recording
Video Settings
Press the ENTER button to
enter the settings screen.
Press the UP or DOWN to
choose the setting.
Press the RIGHT or ENTER
button to select the desired
function to set.
Press the MODE or LEFT
button to return to the previous
menu or exit the set up screen.
Setting Items
White Balance: Adjusts the
color according to the lighting
conditions: Auto / Daylight /
Cloudy / Tungsten / Fluorescent
Video Resolution: CIF 320x240
/ VGA 640x480
After selection press the
ENTER button to save the
settings.
OSD (On Screen Display)
Press the OSD button to turn
the text and icon overlay ON
and OFF
Video Mode
For taking motion video clips
Page 16
14 Spectare 7 in 1 Media Recorder / Player
Starting Continuous Mode
From the Main Menu select
the CONTINUOUS icon and
press the ENTER button to
enter this mode.
TO EXIT: Press the MODE
button to return to the MAIN
MENU
Button Functions
UP: Zoom in
DOWN: Zoom Out
LEFT: Decrease exposure
RIGHT: Increase Exposure
SHUTTER: Takes 3 photos
with each press.
Continuous Settings
Press the ENTER button to
enter the settings screen.
Press the UP or DOWN to
choose the setting.
Takes 3 still images in rapid sequence
Press the RIGHT or ENTER
button to select the desired
function to set.
Press the MODE or LEFT
button to return to the
previous menu or exit the set
up screen.
Setting Items
Image Size: 2848x2136 /
2048x1536 / 1600x1200 /
1024x768 / 800x600 /
640x480
Image Quality: Super Fine /
Fine / Standard / Economy
White Balance: Auto /
Daylight / Cloudy / Tungsten /
Fluorescent
After Selection press the
ENTER button to save the
settings.
OSD (On Screen Display)
Press the OSD button to turn
the text and icon overlay ON
and OFF
Continuous Mode
Page 17
15
user's guide
Starting Audio Record Mode
From the Main Menu select
the RECORD AUDIO icon
and press the ENTER button
to enter this mode.
Next select one of the icons:
MAKE A RECORDING (using
the internal microphone) or
PLAY RECORDING (to listen
to previous recorded WAV
files). Use the RIGHT and
LEFT arrows to select- press
enter to confirm.
TO EXIT: Press the MODE
button to return to the MAIN
MENU
Recording Function
After selecting MAKE A
RECORDING press the
SHUTTER button to start and
stop the recording.
Instant Playback
After recording you can
playback instantly.
UP ARROW: Playback of the
last recording
MODE: Stop audio and return
the menu for a new recording.
Audio Playback Function
Select the PLAY A RECORD-
ING icon on the Record Audio
Menu.
UP / DOWN: Selects the
desired file to play
SHUTTER BUTTON: Play /
Pause the audio
LEFT / RIGHT: Adjusts the
volume of the audio during the
playback.
MODE: Stop the audio
playback and return to the
menu.
Audio Playback Settings
ENTER: press this button while
the audio is stopped to enter the
settings menu for the Record
Audio Mode
Setting items
Delete This File: Deletes the
current WAV file.
Delete All: Deletes ALL Audio
Files (.WAV).
Repeat: Replays the current
Audio file.
Record Audio Mode
For making voice or general audio recordings in WAV format
Page 18
16 Spectare 7 in 1 Media Recorder / Player
Starting MP3 Player Mode
From the Main Menu select
the MP3 MUSIC PLAYER icon
and press the ENTER button
to enter this mode.
TO EXIT: Press the MODE
button to return to the MAIN
MENU
Playback of MP3 Files
UP / DOWN: Selects the
desired file to play
SHUTTER BUTTON: Play /
Pause the audio
LEFT / RIGHT: Adjusts the
volume of the audio during the
playback.
To Stop the Audio playback
press MODE.
MP3 Settings
ENTER: Press this button
while the audio is stopped to
enter the settings menu for the
MP3 Music mode
Press the UP or DOWN to
choose the setting.
Press the RIGHT or ENTER
button to select the desired
function to set.
Press the MODE or LEFT
button to return to the
previous menu or exit the set
up screen.
Setting items
Song Repeat Setup
Shuffle: Randomized
Repeat All
Repeat Off: Play
normally in order.
Bass Control: set Bass Level
from 1 though 5
Treble Control:set Level from
1 though 5
3D Effect Control:set Level
from 1 though 5
Auto -Off Timer: Turns off the
monitor to conserve battery
power. Set for 5, 10, 15
seconds.
Delete This File: for the
selected file.
To turn on the display after
the monitor is off press the
OSD button.
MP3 Music Player Mode
For playing standard MP3 music files
Page 19
17
user's guide
FIRST RUN: Install the Software
Before starting the PC Web
Cam Mode for the first time
insert the CD ROM and install
the DV/DVP Series Driver
onto your PC. Follow the on
screen instructions.
Connect the camera
Using the supplied USB
cable connect the camera to
the PC.
Turn on the power switch to
the camera and select the AC
ADAPTER ICON.
From the Main Menu select
the PC WEB CAM and press
the ENTER button
NOTE: The display on the
device will turn off--- THIS IS
NORMAL. While camera is
connected as a PC camera
you will be unable to exit
using the MODE button.
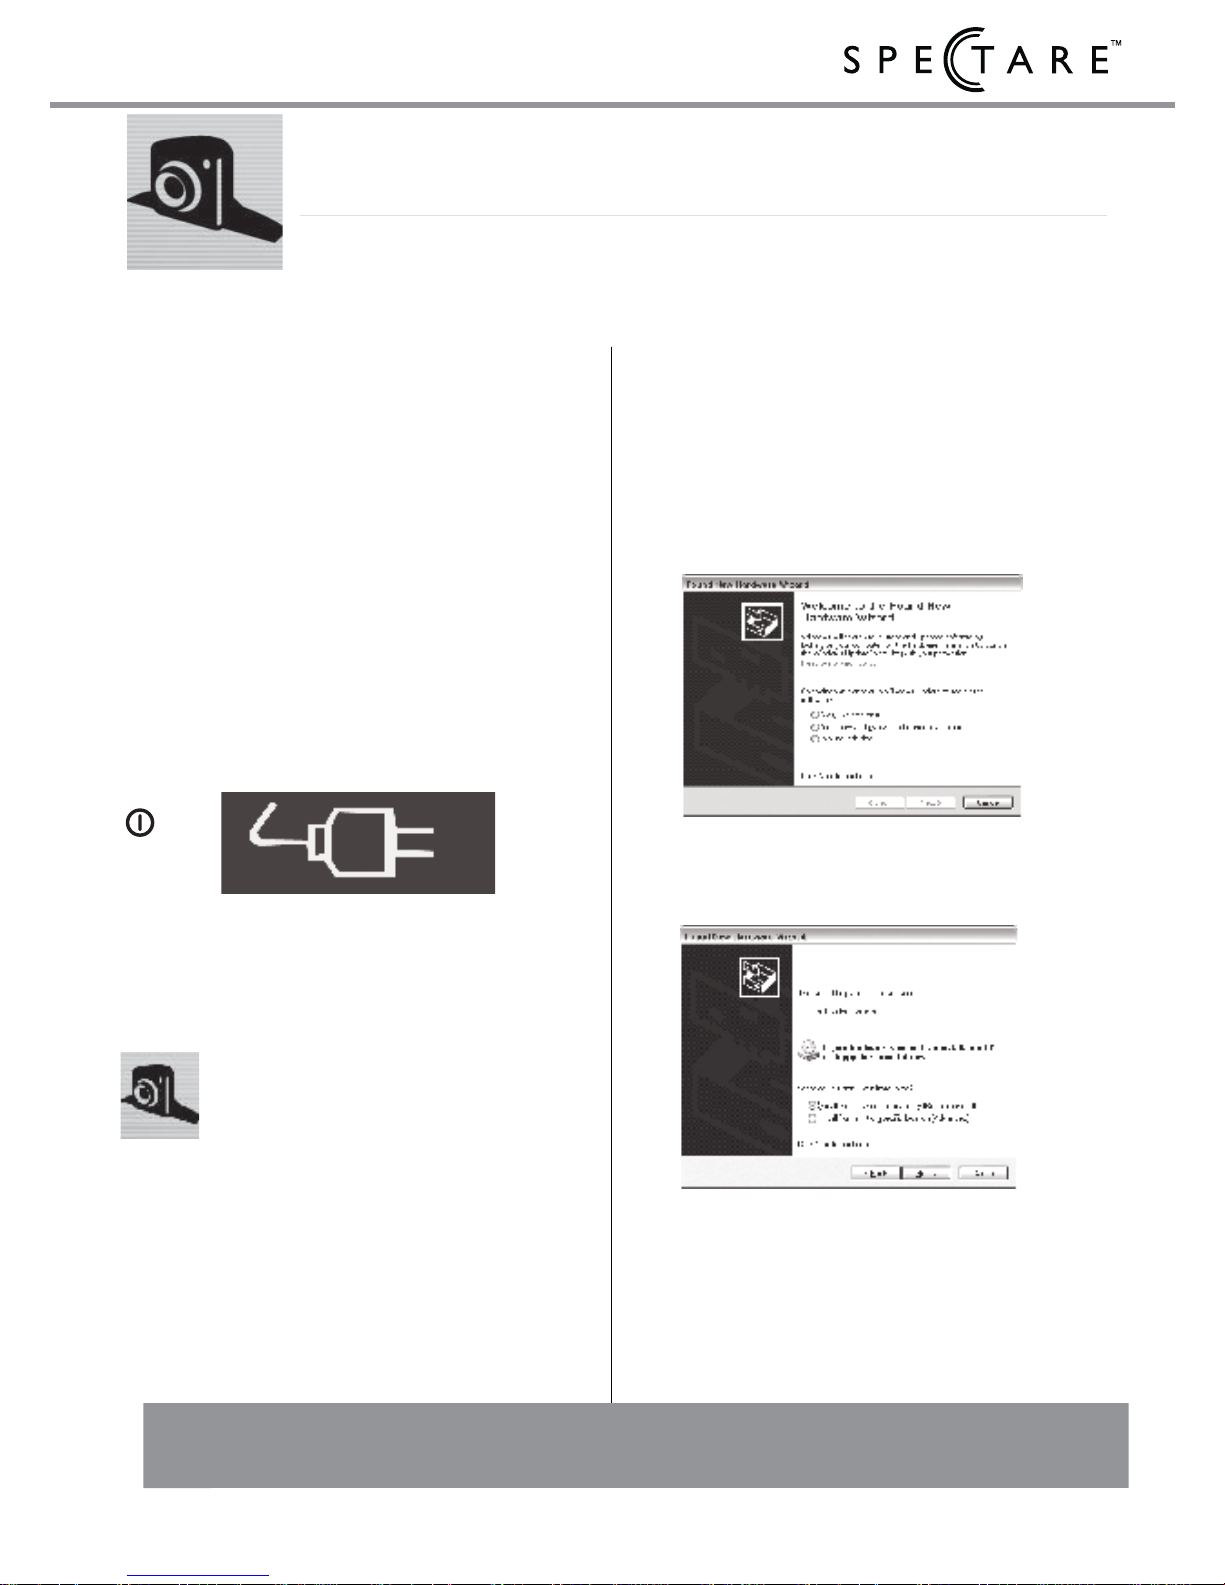
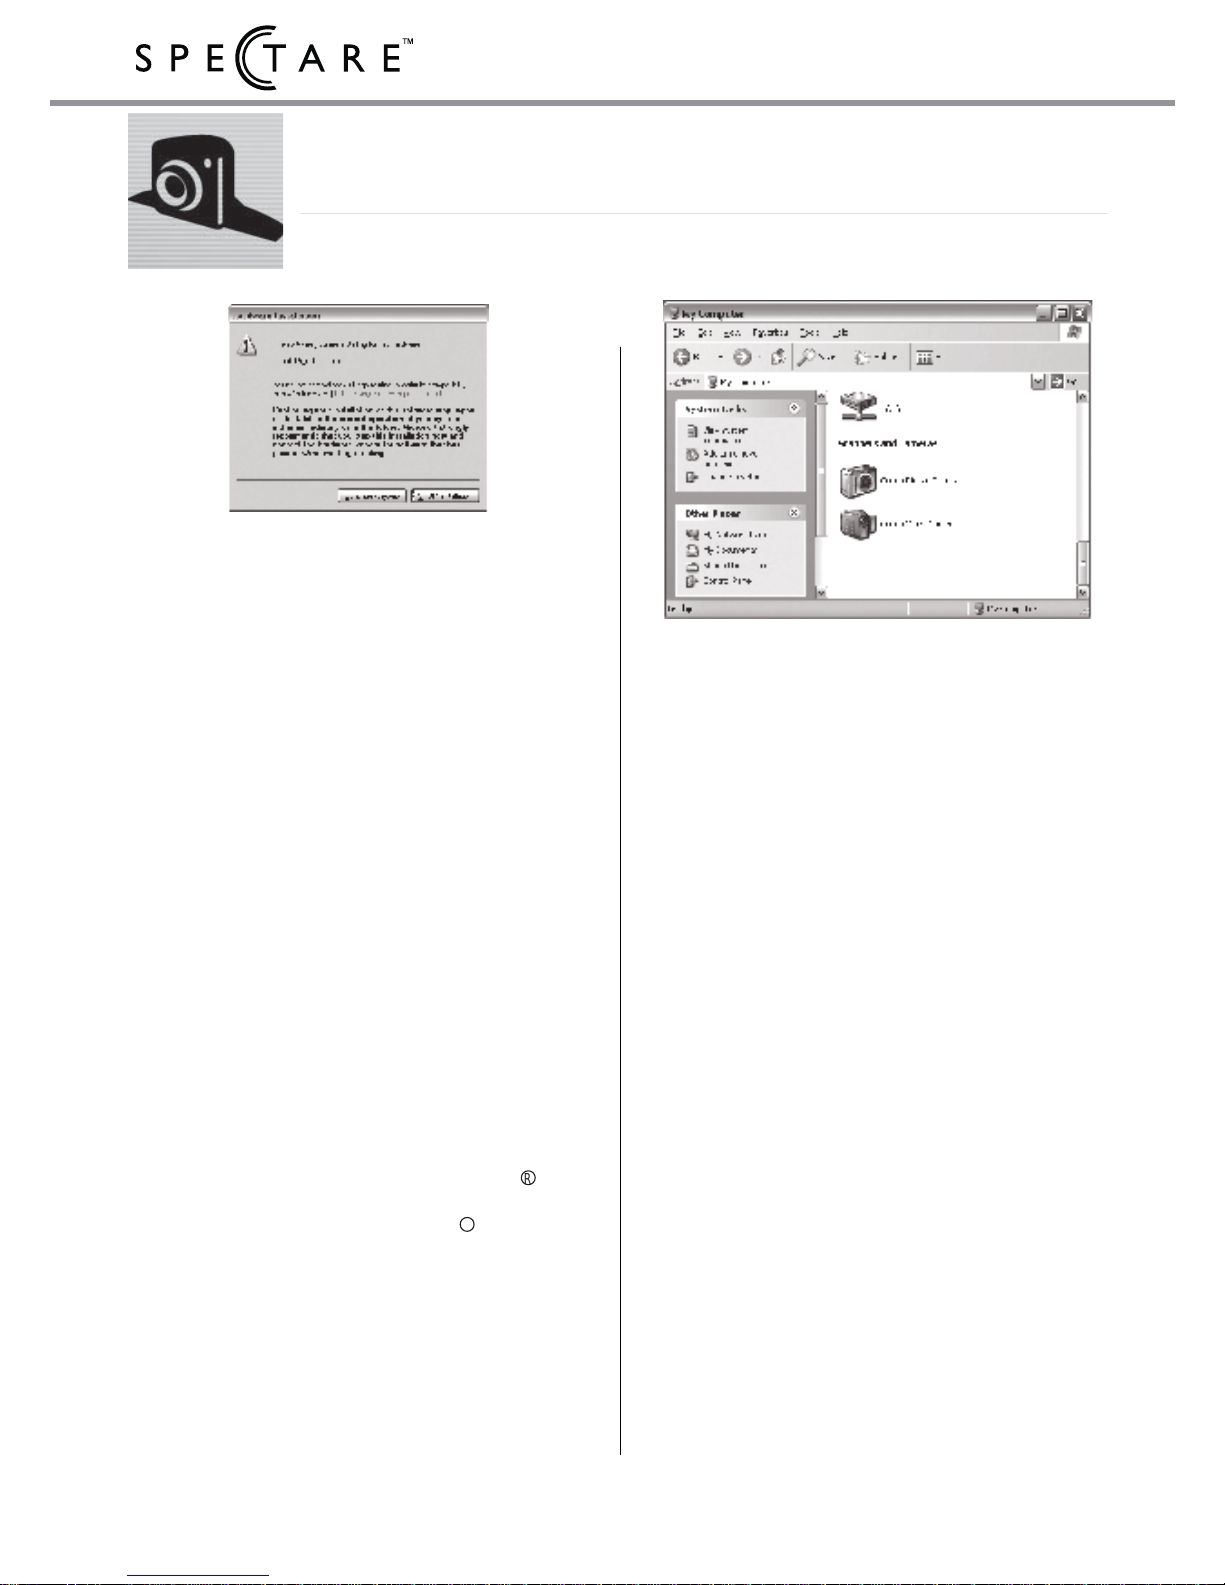
FIRST RUN: Install the Hardware
Drivers
Upon the first connection of the
camera, the “Found New Hardware
Wizard” will automatically launch
and you will be prompted to install
the hardware drivers.
On the first screen click YES- to
search for new hardware.
The hardware Wizard should
detect the “Coach Video Camera”
select the option to “Install the
software automatically”
PC Web Cam Mode
For use on PC with Web Video Messenger software
NOTE: PC Web Cam mode is intended for use with Windows 2000, XP, ME and
above. Use with other operating systems as a PC Web Cam is not recommended.
Page 20
18 Spectare 7 in 1 Media Recorder / Player
Next, a warning will be
displayed about the hardware
installation. You must select
“Continue Anyway” in order to
install the drivers. The
software has been tested and
is safe for PC usage.
At the end of the installation
process a message will appear
that the hardware is ready to
use.
Accessing the camera
Once the software and
hardware are installed properly
the camera can be used on
any application that utilizes a
Web cam such as MSN
R
Messenger , YahooR Messenger
or Skype
TM
. With the camera
connected and placed in PC
Web Cam mode the application can automatically utilize
the camera.
You can also access the PC
Web Cam under the MY
COMPUTER Window- after
installation two icons will
appear under SCANNERS
AND CAMERAS. Double
click the icons to access the
camera features directly from
Windows.
To Close the PC CAM
Exit the software application
that is using the camera (ie
MSN Messenger)
unplug the USB cable from
the camera and the device will
automatically turn off.
Turn on the power to the
device again
PC Web Cam Mode Cont..
Page 21
19
user's guide
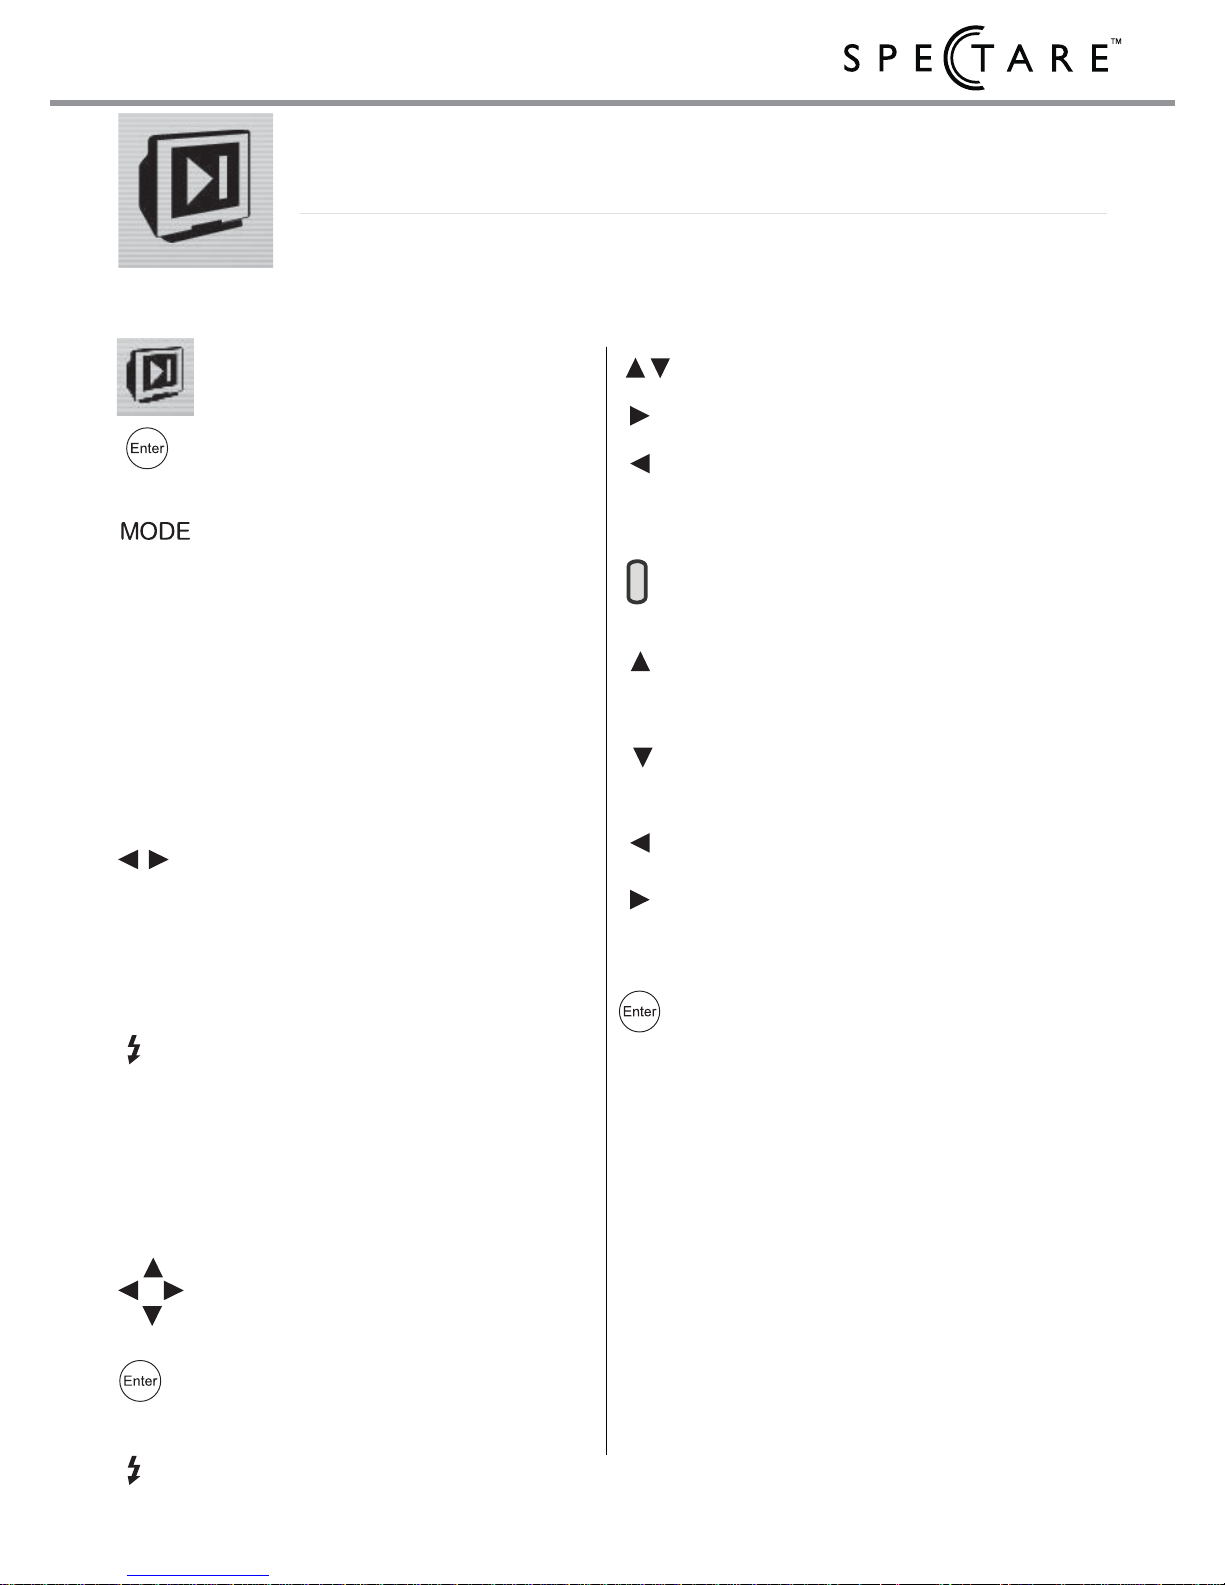
Starting PLAYBACK Mode
From the Main Menu select the
PLAYBACK icon and press
ENTER.
TO EXIT: Press the MODE
button to return to the MAIN
MENU
Full Screen Preview
By default the full screen
display will come up when
entering the playback mode
RIGHT/LEFT: Use the arrow
buttons to page through the
images and movies.
Thumbnail Preview
Press the EXPOSURE
COMPENSATION to enter
Thumbnail preview. When
viewing the thumbnail screen
the following functions are
available:
UP/ DOWN/ RIGHT/ LEFT
allows selecting the desired
image.
ENTER displays the selected
image full screen
EXPOSURE COMPENSATION
returns to PREVIEW
Playback of STILL Images
UP / DOWN: Zooms image
RIGHT: Next image or movie
LEFT: Previous image or movie.
Playback of Movie clips
SHUTTER BUTTON: Play /
Pause the movie
UP: Fast Forward 1X, 2X and 4X
with each press.
DOWN: Slow Motion 1X, 1/2X and
1/4X with each press.
LEFT: Volume Down
RIGHT: Volume Up
Playback Settings
ENTER: press this button while
the playback is stopped to enter
the settings menu.
Delete This File: For selected file.
Delete All: For all movie and
picture clips
Automatic Slide Show: plays an
automatic slide show of the
picture clips.
Enable Audio: Enable sound on
movie clips
Playback Movies & Photos
For playback and slide shows of images and movies.
Page 22
20 Spectare 7 in 1 Media Recorder / Player
To make general settings on the device.
Starting Setup Mode
From the Main Menu select the
SETTINGS icon and press the
ENTER.
TO EXIT: Press the MODE
button to return to the MAIN
MENU
When Selecting Menu items:
UP/DOWN: Selects an item
from the menu.
ENTER or RIGHT: Confirms the
selection
LEFT or MODE: Returns to the
previous menu.
Setup items
Language: Select Language for
the on screen display:
English, German, Italian,
Japanese, Spanish,
Simplified Chinese,
Traditional Chinese,
Korean, Dutch.
TV Out Format: For viewing on
a television set the TV system.
NTSC: North America,
Japan, Taiwan.
PAL: Europe
Format Card / Storage:
Completely erases the memory
card or internal storage.
Key Sound: Select ON to
activate the sound on each key
press.
Power Saver Settings: This
feature will automatically turn off
the camera if not in use for the
designated time. Choose
between 5 min, 3 min 1 min or
OFF.
Time and Date Setting:
RIGHT LEFT: Selects the
field to change
UP/DOWN: Changes the
selected field.
Date Imprint: Select this feature
to imprint the date stamp on
each photo.
Reset: Select this to reset the
date and time
Settings
Page 23
21
user's guide
Card Reader: USB Connection
To use as a CARD READER
Connect the small end of
the USB cable to the
USB port on the side
panel of the device.
Connect the larger end
of the USB cable to a
free USB port on the
computer.
Press the power button
on the front of the device
and choose the
COMPUTER ICON from
the menu.
A partition entitled
"removable disc" will
automatically be
mounted under the "My
Computer" Window.
If a card is inserted the computer will
access the memory card- otherwise it
will read the internal memory. From
this window you can copy and delete
file from your computer and memory
cards.
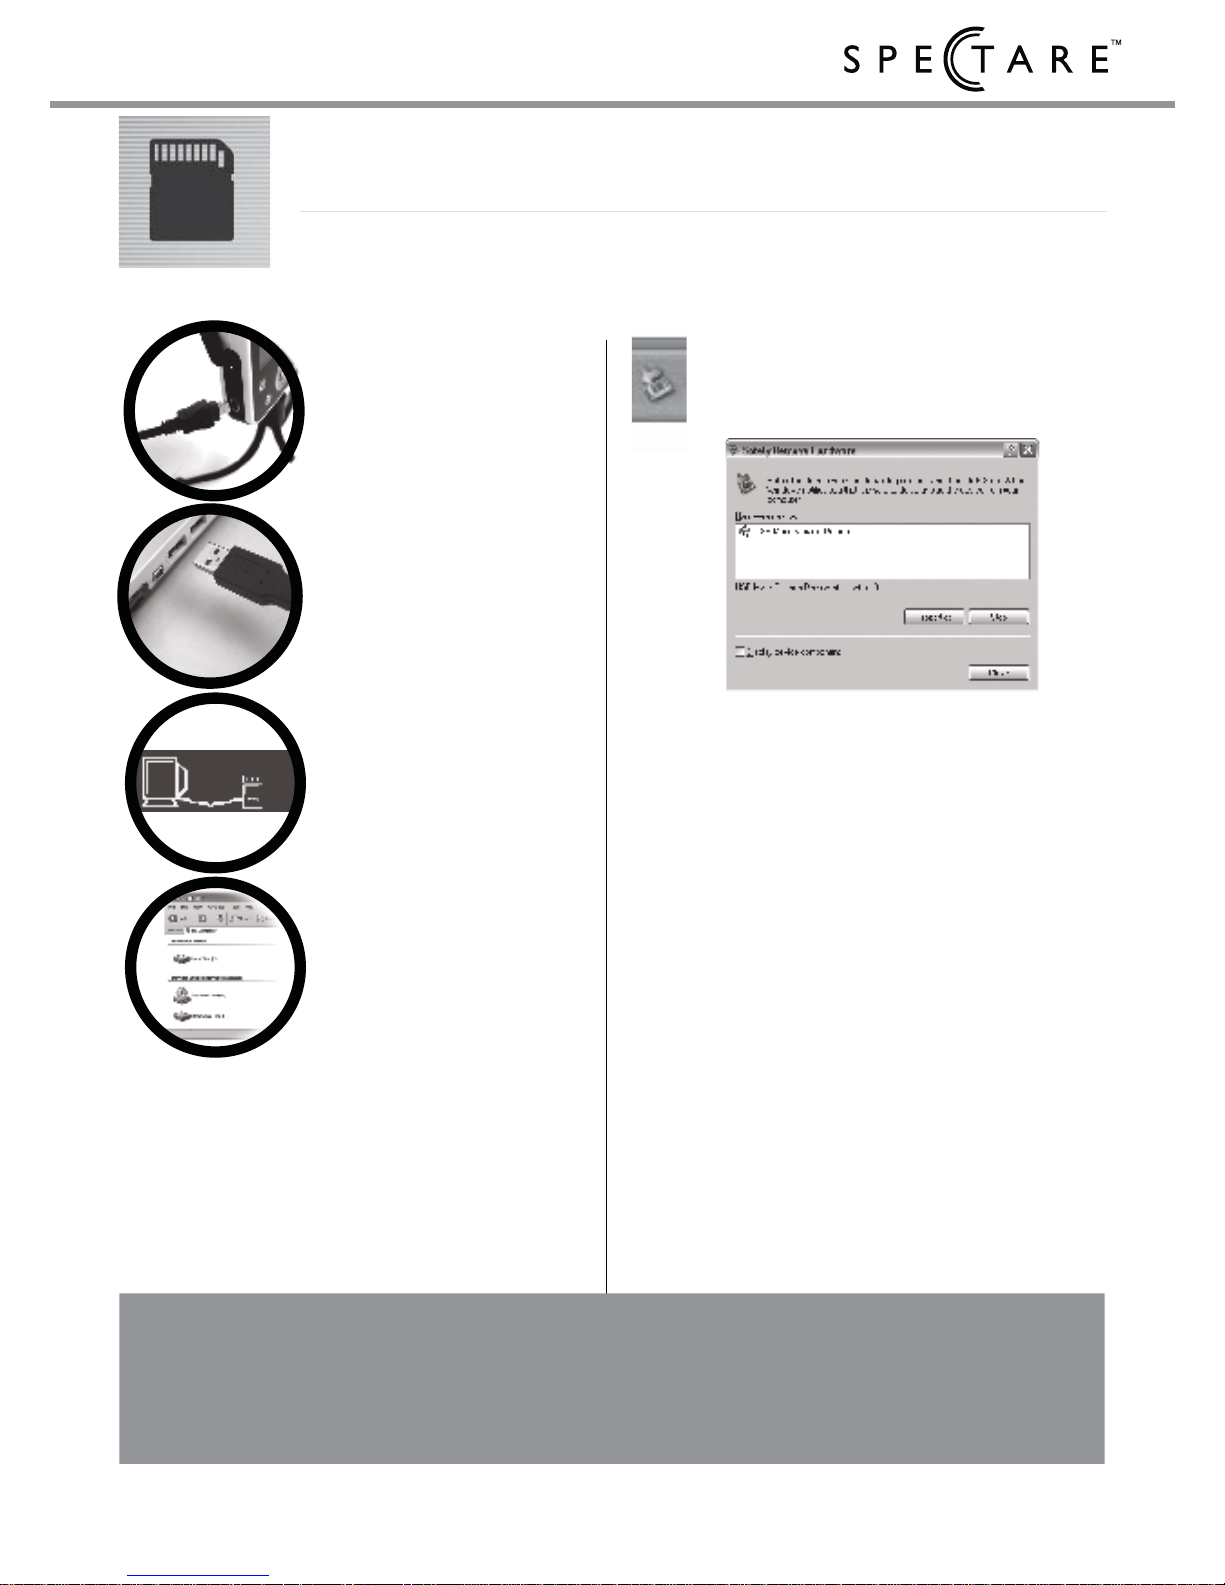
To Disconnect from the Computer.
On Windows click this icon on
the bottom task bar labeled
"Safely Remove Hardware."
A dialog box will appear "Safely
Remove Hardware."
Select USB Mass Storage
Device and click "STOP."
On the next dialog box click OK
to remove the storage device.
On the final dialog box select
"CLOSE" and disconnect the device
from the computer. A final message
should appear under Windows that
says “Safe to Remove Hardware"
afterwhich you can remove the USB
cable from the device.
To access the card storage and copy files from the PC.
NOTE: For use with Windows 2000, XP, ME, Mac OS-X and above. If you are using
this device with Windows 98 operating system you will need to install the DV/DVP
drivers that are on the CD ROM. If you do not have a USB connection on your
computer you will need to purchase an adapter from your local electonics store.
Page 24
22 Spectare 7 in 1 Media Recorder / Player
Output to TV
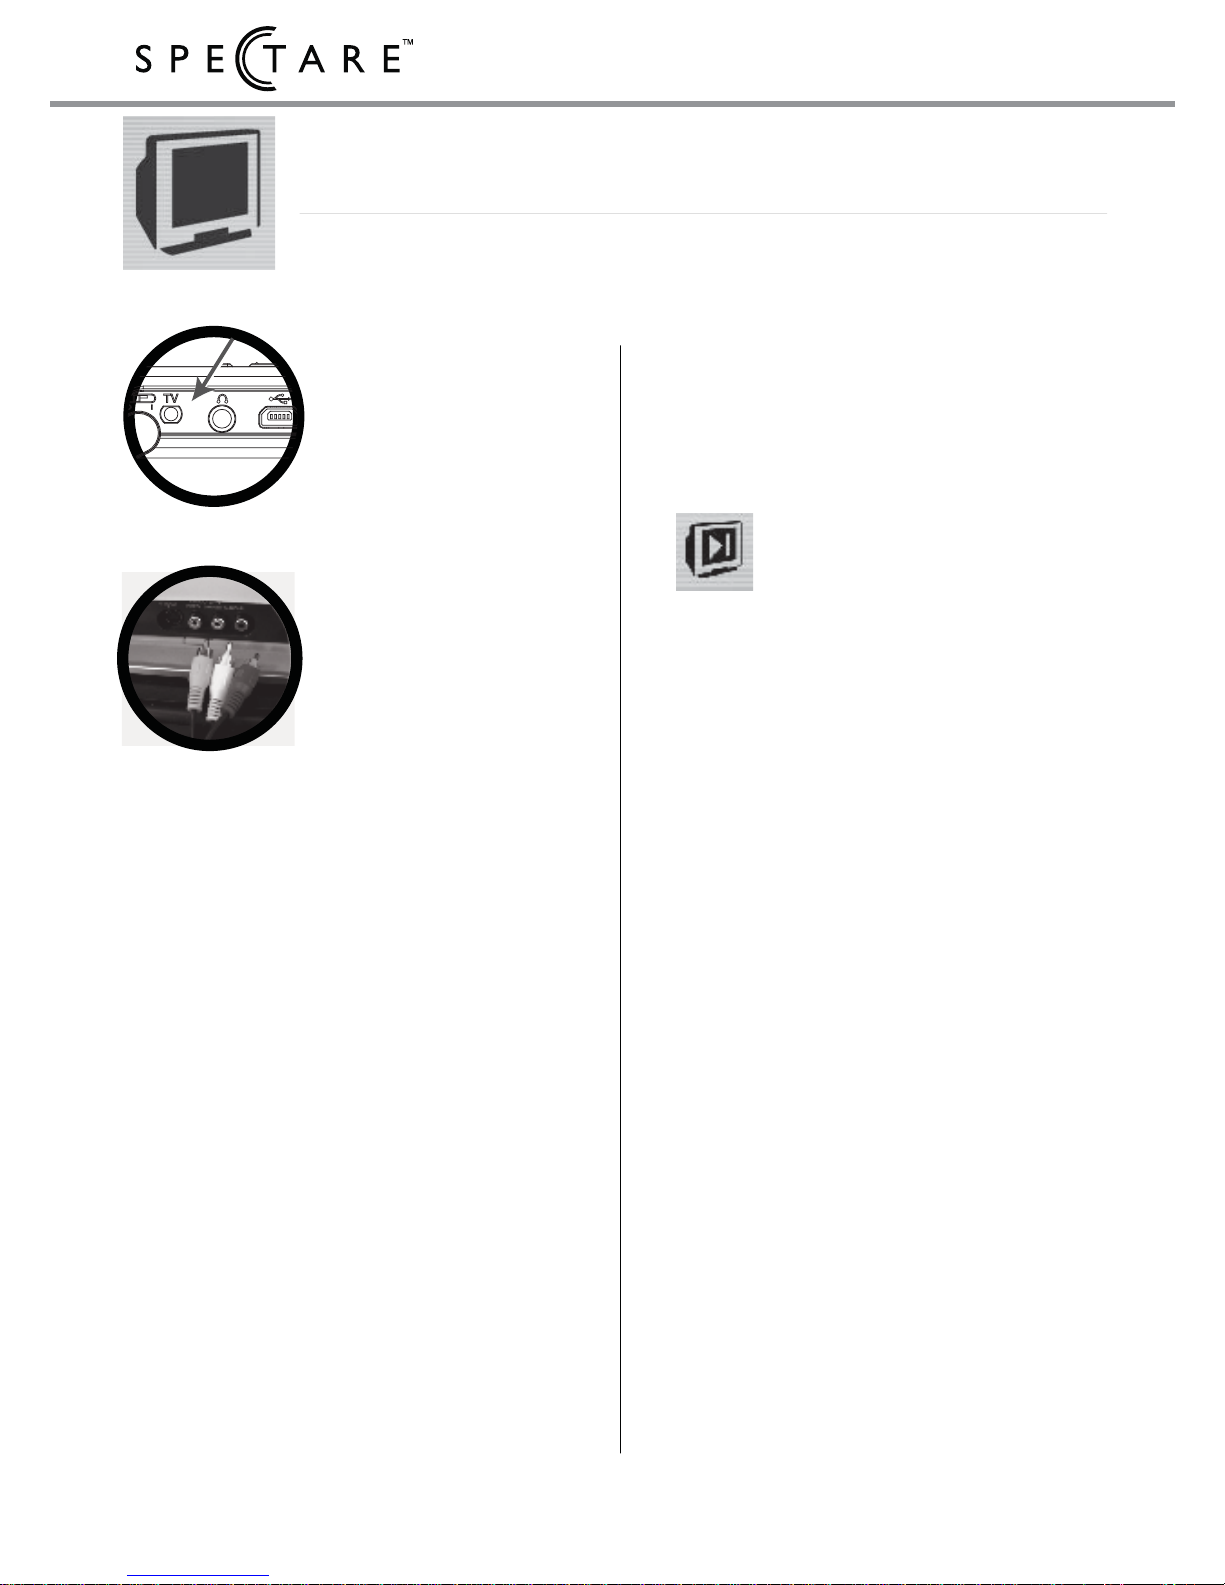
To Connect to Television
Using the supplied AV
connector insert the
small end of the cable
into the side panel of
the device labeled
“TV”.
Connect the Yellow
(video) and White and
Red (Audio) connections on the other end
of the cable to the
Video and Audio input
connection on the back
of your television or
VCR unit.
Turn on your TV and switch the
input mode until you get an
image. Refer to your television
owners manual for guidance on
setting the input to your
television.
NOTE: If you do not have RCA
connections on your TV you will
need to purchase an adapter at
your local electronics store.
Playback of images
Once connected to your
TV use the controls on
your device to access
features normally.
Go to the PLAYBACK
mode on your device
and access the photos
and movies for viewing.
See Page 19 for more
details.
Page 25

23
user's guide
Troubleshooting
PROBLEM: The LCD display will not come on.
SOLUTION: Possibly it is a low battery. Try connecting the camera to an
AC Adapter to charge the battery. Additionally, if the camera is
connected to a computer as a PC Web cam the display will
remain off when connected to the computer. See page 18 for the
procedures on exiting the Web Cam Mode.
PROBLEM: The arrow buttons do not do what is expected.
SOLUTION: If the buttons are pressed to rapidly the device will not respond
properly try slowing down when pressing the buttons.
PROBLEM: The earphones are not working or sound is only coming out of
one side.
SOLUTION: Make sure the earphone connection is pressed all the way into
the device.
PROBLEM: The system turns off automatically.
SOLUTION: The Power Saver feature may be set. Go to the SETTINGS
section to disable this function see page 20.
PROBLEM: Unable to turn off the system by pressing the POWER button.
SOLUTION: The system may need to be reset. Move the power switch on
the side panel to the “0” position for power off then switch it back
to the “|” position for the “Stand-by” Mode. Next press the power
button on the front panel and the device should return to normal.
Page 26

24 Spectare 7 in 1 Media Recorder / Player
This section is a quick tutorial on how to convert MPG, AVI, VCD, and
JPG files into MPEG-4 specific AVI / JPG format for playback on your 7 in 1
Player device. Please refer to the complete tutorial in the installation CD
included with the player.
There are many types of digital video and image files and formats such
as MPEG-2, MPEG-4, JPEG, DivX, XviD, AVI, MPG etc. The MPEG-4
format has been developed by MPEG (Moving Picture Experts Group. This
group also developed MPEG-2 which is the standard for DVD movies.
Within the MPEG-4 format there are several CODECs (enCOder and
DECoder) which are software or hardware schemes to compress and
decompress media files such as text, picture, music, audio and video.
Currently, there are many CODECs such as DivX and XviD that meet the
MPEG-4 standard.
AVI is not a video format or a CODEC. You could imagine this as a
wrapper format or a container to hold the audio and video to play as one file.
You may wish to play other digital media files that are acquired from
other cameras, discs or files from the Internet on your 7 in 1 Player.
However, there are some certain “variations” between these media files
even when the extension name (*.avi or .jpg) is the same. Because there
are so many different video formats, codecs and wrapper formats it is very
possible these video sources may not play on this 7 in 1 Media Player
device directly.
To solve this problem we have provided translation software application
to change the video file into a specific file format (*.avi) that can be read and
played by this device. The following pages will explain how to use the
conversion tools to translate media files into AVI, MP3, WAV or JPEG
format. The file converter only supports certain file formats (Please see File
Converter Supported File Types on page 26).
File Conversion Overview
Page 27
25
user's guide
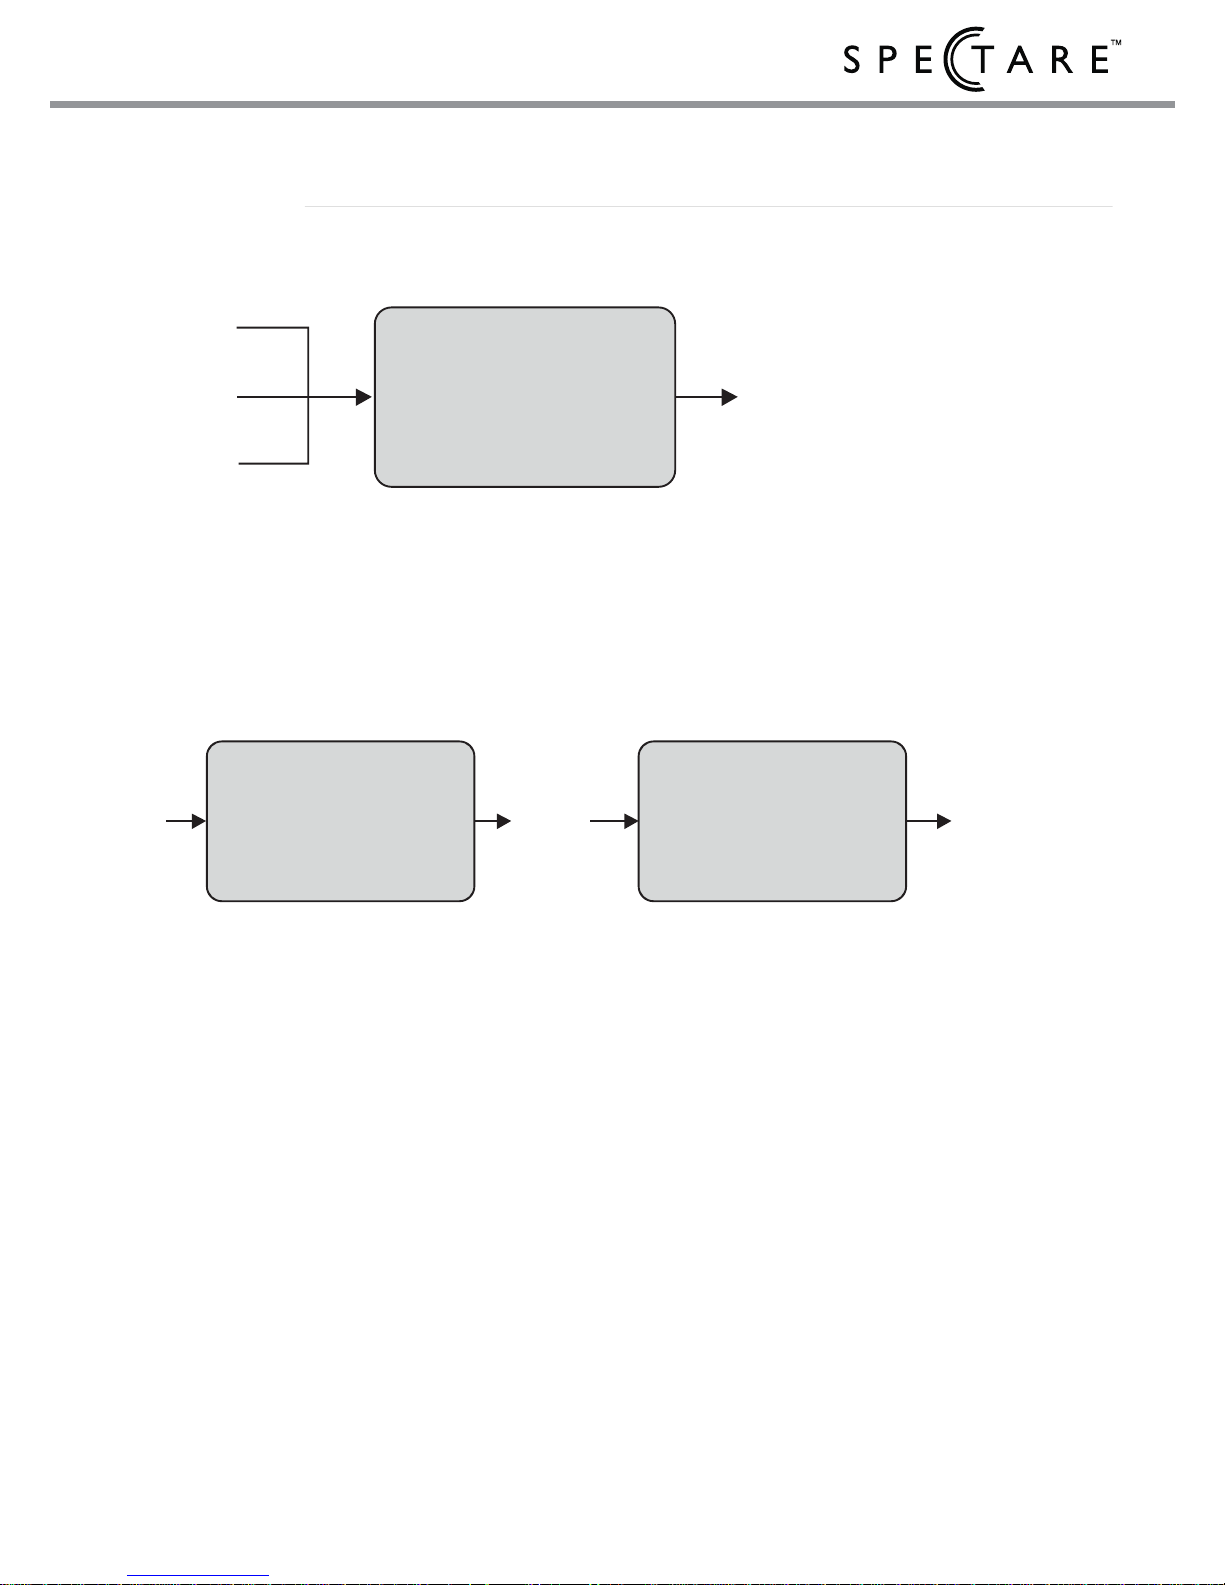
Files that can be converted directly:
Some video formats will only require a one step conversion, like MPG, AVI,
and JPEG. These file types can be converted directly using the DV/DVP series
File Converter for playback on the 7 in 1 player device.
Files that require a two step conversion process:
Some video formats will require a two step process, for example VCD.
Another conversion software application is needed to convert the VCD into MPG
format. This software is not provided or supported with this player, however,
there are many translation software applications available on the internet. Please
use caution when using an application from an unknown source. Once files are
converted into an MPG format they can be translated into AVI files by using the
File Converter application that is provided (see File Converter Usage on page
26). After conversion you can play the video files (*.avi) on the device.
.
DV/DVP Series
File Converter
DV/DVP Series
File Converter
MPG
AVI
JPG
Specific AVI / JPG format for
playback on the device
Other 3rd Party
Conversion tool
(Not Provided)
VCD
MPG
Specific A VI
format for
playback on
the device
File Conversion Overview
DV/DVP Series
File Converter
Page 28

26 Spectare 7 in 1 Media Recorder / Player
System requirements:
Microsoft Windows 98SE / Windows 2000
/ Windows XP(RECOMMENDED)
Installation of the CODECs:
1. Insert the CD ROM and select the option
to install the “DV/DVP Series Drivers”
(First Option) on your computer. Follow
the on screen instructions.
2 There are several video codecs that will be
installed on your computer. There are
options for these Codecs under the K-Lite
Codec Pack in Programs under the START
menu in Windows. If you need to convert
other from files with other codecs you can
obtain free codec packs (ex. K-Lite codec
pack) from the internet web.
http://www.free-codecs.com/download/K_Lite_Codec_Pack.htm
http://home.hccnet.nl/h.edskes/mirror.htm
Please make sure your computer has the
appropriate codec installed for the file you
wish to convert.
Installation of the DV/DVP Series File
Converter:
1 Insert the CD ROM and select the second
option to install the “DV/DVP Series File
Converter” on your computer. Follow the
on screen instructions. After installation
launch the “File Converter” program from
the START Menu.
File Converter Supported File Type:
The following file types are supported by
the DV/DVP File Converter:
Video files; mpg .mpeg (supported
only as MPEG-1 files); .avi
Picture: .jpg, .jpeg
Music: .MP3
Audio: .WAV (supported in the
RECORD AUDIO Mode of
the device)
Directory Structure and File Naming:
The device will create the following directory
structure automatically for storage of files:
Video File (*.avi):
”Device:\DCIM\100COACH\
PICTXXXX.AVI” (XXXX can
be 0001~9999)
Photo File (*.jpg):
”Device:\DCIM\100COACH\
PICTXXXX.JPG” (XXXX
can be 0001~9999)
MP3 (*.mp3): (default directory is :
“Device:\”
Audio Record File (*.wav)?
”Device:\WAV\”
NOTE: “Device” is the disk drive,
storage card, or device (C,
D, E…etc).
Installing the DV/DVP File Converter
Page 29
27
user's guide
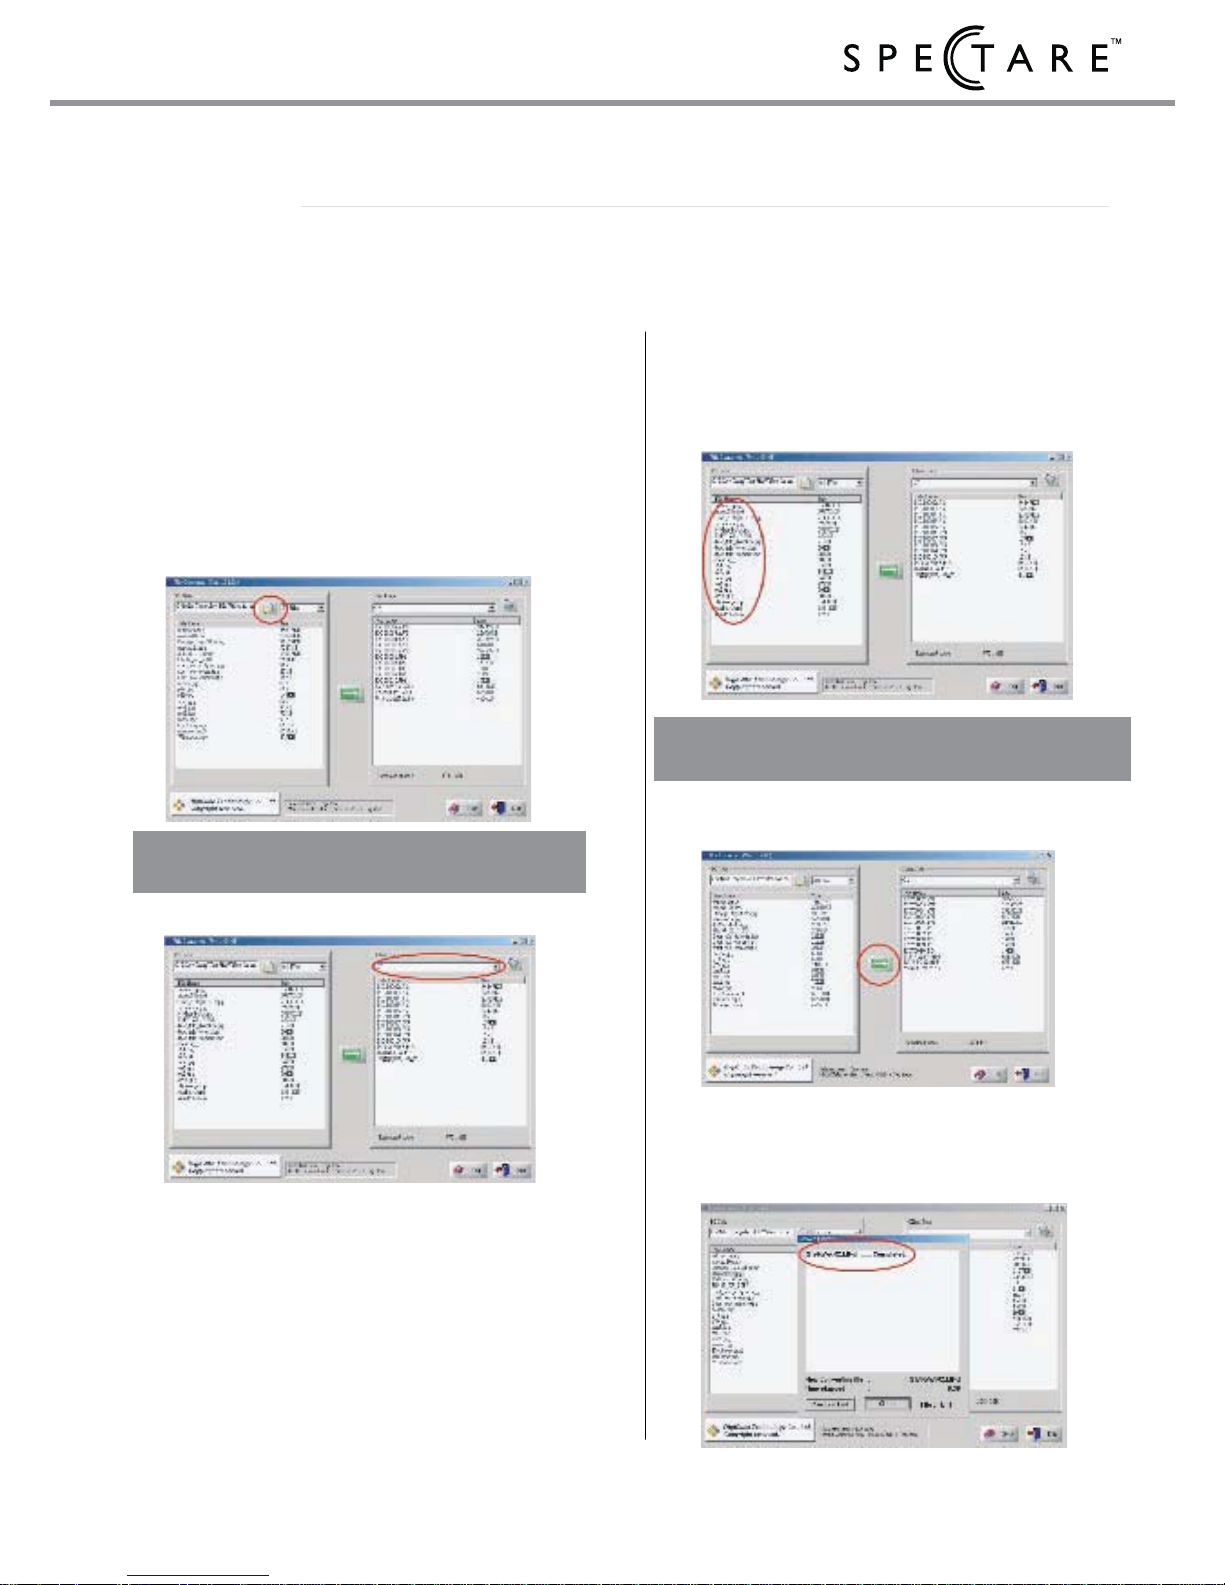
Note :Select the file type filter to show the
file types you wish to covert.
Note: You can press <Ctrl> + left mouse key
to select multiple items.
1. Insert the CD ROM and select the
option to install the “DV/DVP Series File
Converter” on your computer. Follow
the on screen instructions. After
installation launch the “File Converter”
program from the START Menu.
2: Click on the folder icon to select the
directory on your computer where the
files are located that you need
converted.
3: Select your destination location.
To copy directly to your 7 in 1 Player
insert a card into your device and
connect to the computer via the USB
cable (see page 21: Card Reader USB
Connection). Once connected choose
the drive letter of the device as the
destination for the files.
The File Converter will automatically
create the directory: \DCIM\100COACH
in the root on your target device and
place the converted files there.
4: Choose the files you want to convert
(ex. AVI, MPG, or JPG…etc
5: Click the green arrow to convert files.
6: When finished, you will see the
completed message box..
Using the DV/DVP File Converter
Page 30

28 Spectare 7 in 1 Media Recorder / Player
Product:
Input Formats:
Media Formats:
OS Support:
USB Port:
Internal Memory
Display:
Camera:
Max image size:
Lens:
Audio Output:
TV Formats:
Functions:
Power:
Battery:
Battery Life:
Weight
Dimensions:
Spectare 7 in 1 Media Player and Recorder
MultiMedia Card
TM
(MMC), Secure DigitalTM (SD)
JPEG, MP3, MP4, WAV
Windows XP/XP Pro/ME/ 2000SP3,
Mac OS-10.x (card reader function only)
2.0
32 MB Flash Memory
2.5" LPTS LCD display.
3 Million Pixel CMOS Camera
2848x2136
4X Digital Zoom
Internal Speakers plus stereo headphone connection.
NTSC and PAL Television output
Still camera and playback (JPEG), Video camera and
playback (MP4), Audio recording, MP3 Playback, PC
camera, Memory card reader, TV Output
Output:5V DC, 500 mA
Lithium rechargeable battery
2.5 hours
6 oz..
4" X 2.75" X .75"
This device complies with part 15 of the FCC rules. Operation is subject to the following two
conditions: (1) This device may not cause harmful interference and (2) this device must accept
any interference received, including interference that may cause undesired operation.
Technical Specifications
Page 31

Page 32

Spectare is a registered trademark of SuMaWah LLC. © 2006
www.spectareproducts.com
D40-102-D09070
 Loading...