

Page 1

ENGLISH - USER MANUAL
FRANÇAIS - MANUEL UTILISATEUR
DEUTSCH - BENUTZERHANDBUCH
ČESKY - UŽIVATELSKÁ PŘÍRUČKA
SLOVENŠČINA - NAVODILA ZA UPORABO
HRVATSKI - KORISNIČKE UPUTE
Page 2

TABLE OF CONTENTS
1. INTRODUCTION .................................................................................................................... 1
1.1. WARRANTY ..........................................................................................................................................................................1
2. VADO/COMO COMPONENTS ................................................................................................ 2
3. GENERAL INFORMATION ABOUT YOUR VADO/COMO ........................................................... 3
3.1. INTENDED USE ...................................................................................................................................................................3
3.2. PEDELEC / EPAC ................................................................................................................................................................ 3
3.3. STARTING THE SYSTEM ...................................................................................................................................................3
4. GENERAL NOTES ABOUT ASSEMBLY ................................................................................... 4
4.1. SPEED SENSOR ..................................................................................................................................................................4
4.2. BOTTOM BRACKET ...........................................................................................................................................................4
4.3. HEADSET ............................................................................................................................................................................4
4.4. SEATPOST ..........................................................................................................................................................................5
4.5. REPLACEMENT PARTS AND ACCESSORIES .................................................................................................................5
5. GENERAL NOTES ABOUT RIDING ......................................................................................... 6
5.1. RIDING TIPS .........................................................................................................................................................................6
5.2. BEFORE YOUR FIRST RIDE ..............................................................................................................................................7
5.3. RIDING WITH KIDS ............................................................................................................................................................7
6. GENERAL NOTES ABOUT MAINTENANCE ............................................................................. 8
7. SYSTEM INTERFACE ............................................................................................................ 9
7.1. SUPPORT MODES ...............................................................................................................................................................9
7.2. CONNECTIVITY OPTIONS ..................................................................................................................................................10
7.3. INSTALLATION ....................................................................................................................................................................11
7.4. BATTERY ACTIVATION / REPLACEMENT ........................................................................................................................11
7.5. DISPLAY FEATURES ..........................................................................................................................................................12
7.6. MAIN SCREENS ..................................................................................................................................................................12
7.7. SETTINGS LEGEND ............................................................................................................................................................12
7.8. DEFAULT PAGE SETTINGS / NAVIGATION .......................................................................................................................13
7.9. CUSTOMIZING PAGES .......................................................................................................................................................13
7.10. SYSTEM SETUP ................................................................................................................................................................ 14
7.11. CONNECT TO MISSION CONTROL APP ..........................................................................................................................14
7.12. ERROR MESSAGES ..........................................................................................................................................................15
7.13 GENERAL INFO ...................................................................................................................................................................15
7.14. FUNCTION OPTIONS / SPECIFICATIONS .......................................................................................................................15
8. BATTERY / CHARGER........................................................................................................... 16
8.1. OBSERVE AND OBEY .........................................................................................................................................................16
8.2. CHARGING AND USING THE BATTERY ........................................................................................................................... 16
8.3. CHARGE LEVEL DISPLAY .................................................................................................................................................18
8.4. INSTALLING THE BATTERY ..............................................................................................................................................18
8.5. REMOVING THE BATTERY ................................................................................................................................................19
8.6. CLEANING ...........................................................................................................................................................................19
8.7. STORAGE .............................................................................................................................................................................19
8.8. BATTERY TECHNICAL DATA .............................................................................................................................................20
8.9. CHARGER TECHNICAL DATA ...........................................................................................................................................20
8.10. TRANSPORT......................................................................................................................................................................21
8.11. DISPOSAL ...........................................................................................................................................................................21
9. LIGHTING ............................................................................................................................ 21
10. SPECIFICATIONS ................................................................................................................ 22
10.1. BOLT SIZE / TORQUE SPECS ...........................................................................................................................................22
10.2. FRAME SPECIFICATIONS ................................................................................................................................................22
10.3. RECOMMENDED TIRE PRESSURES ..............................................................................................................................22
11 .REGULATORY STATEMENTS ................................................................................................ 23
12. EC – DECLARATION OF CONFORMITY ................................................................................. 24
This manual was drafted in the English language (Original instructions) and may have been translated into other
languages as applicable (translation of Original instructions).
EN 15194
SPECIALIZED BICYCLE COMPONENTS
15130 Concord Circle, Morgan Hill, CA 95037 (408) 779-6229
0000115651_UM_EN_R1, 09/18
Please note all instructions and notices are subject to change and updates without notice.
Please visit www.specialized.com for periodic tech updates.
Feedback: techdocs@specialized.com
ENGLISH
FRANÇAISDEUTSCHČESKÁHRVATSKASLOVENSKI
Page 3

1. INTRODUCTION
IMPORTANT:
This user manual is specific to your Specialized Turbo VADO or COMO bicycle (VADO/COMO) and should be read in
addition to the Specialized Bicycle Owner’s Manual (“Owner’s Manual”). It contains important safety, performance and
technical information, which you should read before your first ride and keep for reference. You should also read the entire
Owner’s Manual, because it has additional important general information and instructions which you should follow. If
you do not have a copy of the Owner’s Manual, you can download it at no cost at www.specialized.com, or obtain it from
your nearest Authorized Specialized Retailer or Specialized Rider Care.
Additional safety, performance and service information for specific components such as suspension or
pedals on your bicycle, or for accessories such as helmets or lights, may also be available. Make sure that your
Authorized Specialized Retailer has given you all the manufacturers’ literature that was included with your bicycle
or accessories. In case of a conflict between the information in this user manual and information provided by a
component manufacturer, please contact your nearest Authorized Specialized Retailer.
The VADO / COMO is classified as an EPAC (
referred to in this manual as a bicycle unless otherwise noted.
ADDITIONAL LANGUAGES ARE AVAILABLE FOR DOWNLOAD AT www.specialized.com.
When reading this user manual, you will note various important symbols and warnings, which are explained below:
WARNING! The combination of this symbol and word indicates a potentially hazardous situation
which, if not avoided, could result in serious injury or death. Many of the Warnings say “you
may lose control and fall.” Because any fall can result in serious injury or even death, we do not
always repeat the warning of possible injury or death.
CAUTION: The combination of the safety alert symbol and the word CAUTION indicates a
potentially hazardous situation, which, if not avoided, may result in minor or moderate injury, or
is an alert against unsafe practices.
The word CAUTION used without the safety alert symbol indicates a situation which, if not
avoided, could result in serious damage to the bicycle or the voiding of your warranty.
Electrically Pedal Assisted Cycle, otherwise known as a Pedelec), and is
INFO: This symbol alerts the reader to information which is particularly important.
TECH TIP: Tech Tips are useful tips and tricks regarding installation and use.
GREASE: This symbol means that high quality grease should be applied as illustrated.
CARBON FRICTION PASTE: This symbol means that carbon friction paste should be applied as
illustrated to increase friction.
TORQUE: This symbol highlights the correct torque value for a specific bolt. In order to achieve
the specified torque value, a quality torque wrench must be used.
1.1. WARRANTY
Please refer to the written warranty provisions provided with your bicycle, or visit www.specialized.com. A copy is
also available at your Authorized Specialized Retailer.
1
Page 4

2. VADO/COMO COMPONENTS
8
9
44
45
43
6
11
35
42
12
13
14
5
1. Top tube
2. Down tube
3. Seat tube
4. Head tube
5. Chainstay
6. Seatstay
7. Fork
8. Saddle
9. Seatpost
10. Seatpost clamp
11. Cassette
12. Derailleur hanger
13. Rear derailleur
14. Chain
15. Chainring
16. Crank arm
30
28
29
10
34
1
15 16 17
20
31
2
28
3
18
17. Pedal
18. Motor
19. Handlebar
20. Grip
21. Shifter
22. Brake lever
23. Remote
24. Headlight*
25. Display
26. Stem
27. Headset
28. Battery
29. Charging socket
30. Lock
31. Power switch
32. Front brake caliper
19
22
27
4
32
33. Front brake rotor
34. Rear brake caliper
35. Rear brake rotor
36. Spoke
37. Rim
38. Tire
39. Hub
40. Valve
41. Thru-axle
42. Kickstand
43. Fender
44. Rear rack*
45. Taillight
* Not all models have a rear rack, headlights and/or saddle or rack mounted taillights.
26
25
24 21
23
ENGLISH
38
37
7
39
41
33
36
40
FRANÇAISDEUTSCHČESKÁHRVATSKASLOVENSKI
2
Page 5

3. GENERAL INFORMATION ABOUT YOUR VADO/COMO
80-100%
60-79%
40-59%
20-39%
0-19%
3.1. INTENDED USE
The VADO/COMO is intended and tested for General Purpose Riding (Condition 2) use only. For more information on
intended use and structural weight limits for the frame and components, please refer to the Owner’s Manual.
The VADO
/COMO
while pedaling. Depending on the classification, there can be different requirements and regulations affecting your
use of the bicycle.
is classified as a Pedelec/EPAC. Regardless of its classification, it will provide motor support only
Before using your VADO
and regulations in your country or state. There may be restrictions on riding your VADO
bicycles on public roads, cycling paths, and/or trails. There may also be applicable helmet
requirements, age restrictions or license or insurance requirements. Specialized does not, and
will not, make any promise, representation, or warranty regarding the use of your VADO
bicycle. As laws and regulations regarding electric bicycles vary by country and/or state and are
constantly changing, please make sure to obtain the latest information. You should also regularly
see your Authorized Specialized Retailer for updated information.
CAUTION: All VADO
will automatically shut off. Any (attempted) tampering with the power output and/or system is
prohibited and will void the warranty.
VADO
/COMO
speed of 25 km/h (15.5 mph) or 20/28 mph depending on the country.
To start the system, press and hold the power button
To turn the battery (and support) off again, press and
is classified as a Pedelec, your motor support will automatically switch off when you reach a maximum
(fig 3.3) located on the top of the battery, until the
LEDs glow green. The number of LEDs that glow
green will depend on the level of charge in the battery.
hold the power button until the LEDs turn off.
/COMO
bicycle, please inform yourself of all applicable legal requirements
/COMO
bicycles have a fixed pre-set speed limit at which the motor support
3.2. PEDELEC / EPAC
3.3. STARTING THE SYSTEM
3.3
/COMO
/COMO
3
Page 6

4. GENERAL NOTES ABOUT ASSEMBLY
This user manual is not intended as a comprehensive use, service, repair or maintenance guide. Please see your
Authorized Specialized Retailer for all service, repairs or maintenance. Your Authorized Specialized Retailer may
also be able to refer you to classes, clinics or books on bicycle use, service, repair, and maintenance.
WARNING! Due to the complexity of the VADO/COMO bicycle, proper assembly requires a high degree
of mechanical expertise, skill, training and specialty tools. Therefore, it is essential for your safety that
the assembly, maintenance and troubleshooting be performed by an Authorized Specialized Retailer.
Before your first ride, make sure your components, such as brakes and drivetrain, are assembled and
adjusted in accordance with the manufacturer’s instructions and are functioning properly
WARNING! Many components on the VADO/COMO, including, but not limited to the motor, battery
and cable guides, are proprietary to the VADO/COMO. Only use originally supplied components and
hardware at all times. Use of other components or hardware will compromise the integrity and strength
of the assembly. VADO/COMO specific components should only be used on the VADO/COMO and not
on other bicycles, even if they fit. Failure to follow this warning could result in serious injury or death.
WARNING! Never modify your frame or bicycle in any way. Do not sand, drill, file or remove parts
from your bicycle. Do not install incompatible components or hardware. Failure to follow this warning
may result in serious personal injury or death.
WARNING! Electrical components can be exposed when working on your bicycle. Do not touch
any part of the electrical system while under electric charge. Do not expose the connections of
the battery and frame to water. If any live components or the battery are damaged, stop riding
immediately and bring your bicycle to your Authorized Specialized Retailer.
4.1. SPEED SENSOR
When assembling the rear brake disc, the Speed Sensor Magnet must be installed on the rotor (fig 4.1). Four of
the six bolts are standard rotor bolts. The remaining two bolts (M5 x 0.8 pitch x 15mm length, with countersunk flat
head) attach the Speed Sensor Magnet to the rotor.
4.1
DISC BRAKE ROTOR
STANDARD
ROTOR
BOLTS
ENGLISH
FRANÇAISDEUTSCHČESKÁHRVATSKASLOVENSKI
FLAT HEAD
M5 x 15mm
SPEED SENSOR MAGNET
4.2. BOTTOM BRACKET
The bottom bracket is an integrated part of the motor, and does not require any pre-installation preparation.
4.3. HEADSET
The headset uses a 1 1/8” (41.8mm x 30.5 x 8mm, 45x45°) Campagnolo Standard compatible upper bearing
and a 1.5” (52mm x 40 x 7mm, 45x45°) lower bearing. Ensure that replacement bearings are compatible with
the Specialized headset specification. No tools are needed for installation or removal of both bearings. Grease
4
Page 7

bearing surfaces before installation.
Inspect the fork, stem, seatpost and seat tube, to ensure that there are no burrs or sharp edges. Remove any
burrs or sharp edges using fine grit sandpaper.
All edges of the stem in contact with the steerer tube should be rounded out to eliminate any stress points.
WARNING! Burrs and sharp edges can damage the carbon and alloy surfaces of the components.
Any deep scratches or gouges in the stem or fork can weaken the components.
4.4. SEATPOST
VADO/COMO frames have a 30.9mm seatpost diameter and require that the seatpost have a tolerance of 30.78mm
to 30.95mm.
SEATPOST MINIMUM INSERTION:
4.4
To prevent damage to the frame and/or seatpost, it is important
to have a minimum amount of seatpost insertion in the
seat tube. This minimum insertion must meet the following
requirements:
The seatpost must be inserted into the frame deep enough
so the minimum insertion/maximum extension (min/max)
mark on the seatpost is not visible (fig 4.4 A).
The seatpost must also be inserted into the seat tube deep
enough to be visible through the sight hole (fig 4.4 B), or if no
sight hole is present, the insertion must meet or exceed the
minimum measured insertion depth (fig 4.4 B) required by the
size of the frame (see below).
A
insertion
min
If the seatpost and frame minimum insertion requirements
differ from each other, always use the longer minimum
B
insertion. For example, if the frame requires 90mm, but the
seatpost requires 100mm, then 100mm is the minimum
insertion required.
• All VADO/COMO MODELS: Minimum insertion 90mm
If the seatpost is at the min/max mark and the seatpost is not visible through the sight hole or does not meet or
exceed the minimum measured insertion depth of the frame, the seatpost is not inserted deeply enough into the
seat tube and should be lowered until it can be seen through the sight hole. This may result in the saddle being too
low. If so, the seatpost must be replaced with a longer seatpost.
WARNING! Failure to follow the seatpost and frame minimum insertion requirements may result in
damage to the frame and/or seatpost, which could cause you to lose control and fall.
If the seatpost is cut short, the min/max mark on the seatpost may no longer be accurate. Before
cutting the seatpost, note the min/max depth required by the seatpost manufacturer.
WARNING! For general instructions regarding the installation of the seatpost, refer to the appropriate
section in the Owner’s Manual. Riding with an improperly tightened seatpost can allow the saddle to
turn or move and cause you to lose control and fall.
CAUTION: Inspect the seatpost and seat tube to ensure that there are no burrs or sharp edges.
Remove any burrs or sharp edges using fine grit sandpaper.
4.5. REPLACEMENT PARTS AND ACCESSORIES
Specialized replacement parts and accessories are available through your Authorized Specialized Retailer.
5
Page 8

5. GENERAL NOTES ABOUT RIDING
The VADO/COMO motor provides pedal assistance only while you are pedaling and the bicycle is in motion. The
amount of pedal assistance will be higher or lower depending on the amount of force applied to the pedals. If you
stop pedaling, the motor will stop providing any assistance.
The VADO/COMO bicycle can also be ridden as a normal bicycle without motor assistance by switching the display
to the OFF mode. The same applies if the battery charge drops below 1%.
The VADO/COMO bicycle has a walk-assist mode (the motor engages without pedal force being applied) which is
designed to provide assistance when walking the bicycle up a hill, up to a speed of 6 km/h (3.7 mph), so long as the
+ button is pressed down.
5.1. RIDING TIPS
Because of the electric motor assist, the VADO/COMO offers a unique ride compared to a bicycle without motor
assist. Below are some riding tips which may also reduce component wear and increase battery range:
Pay attention to your speed going into a corner and be sure to stop pedaling well before entering the corner.
Otherwise you may carry too much speed as you enter the corner.
Ride efficiently and look ahead. Any time braking force is applied, more energy is needed to get the bicycle back
up to speed.
Shift gears regularly to stay in an optimal cadence range and downshift before coming to a stop.
Reduce pedal force before initiating a gear shift to reduce drivetrain wear.
Check the tire pressure regularly. Low pressure can cause the tires to roll inefficiently.
If your bicycle is exposed to cooler weather, keep the battery stored indoors until just before riding.
Do not expose your bicycle to prolonged excessive heat (e.g. direct sunlight).
Only carry the cargo you need. More cargo weight requires more energy to move.
WARNING! The motor support is activated as soon as you step onto the pedals and the bicycle
is in motion. You should be seated on the bicycle and engage at least one brake before starting
to pedal. Do not put one foot on a pedal and throw a leg over the bicycle, as it could accelerate
unexpectedly. Failure to follow this warning may result in serious personal injury or even death.
WARNING! The acceleration of an electric bicycle can be faster than anticipated and may feel
unusual at first. Before your first ride, you should use the lowest power ECO mode and become
familiar with the operation of the electric bicycle by practicing starting and stopping, cornering
and navigating obstacles in a safe environment away from other bicycles, pedestrians and/or
vehicles. Due to the greater acceleration of an electric bicycle, you should also pay particular
attention to terrain conditions as you may approach obstacles faster than expected. Please note
the default motor support mode upon startup is always SPORT mode.
CAUTION: The weight of your VADO/COMO is significantly higher than a bicycle without motor
support. Use caution when handling the bicycle (including, but not limited to parking, lifting,
pushing, loading it into a car or onto a bicycle carrier and unloading it).
CAUTION: Do not ride your VADO/COMO without the battery installed. Riding without a battery
may damage exposed electrical components.
ENGLISH
FRANÇAISDEUTSCHČESKÁHRVATSKASLOVENSKI
6
Page 9

5.2. BEFORE YOUR FIRST RIDE
Regardless of your experience level, you should read the “FIRST” section of your Owner’s Manual (Bike Fit, Safety
First, Mechanical Safety Check and First Ride) and carry out all important safety checks. In addition, make sure you
are familiar with the following areas of the bicycle that are specific to electric bicycles.
BEFORE EVERY RIDE
Battery
• Are all connections plugged in correctly?
• Do you have sufficient battery charge?
• Is the battery properly inserted and locked in the frame?
Display
• Is the display functioning correctly?
BEFORE YOUR FIRST RIDE
Battery
• Is the battery fully charged?
Display
• Are you familiar with the function of the display features?
Remote
• Are you familiar with the function of the buttons on the remote?
• Do you know how to use the remote to change the motor support level from ECO to SPORT to TURBO?
WARNING! If your battery, charger or other component exhibits any signs of damage, do not use
the bicycle and immediately bring it to your Authorized Specialized Retailer for inspection.
5.3. RIDING WITH KIDS
There are many different setups that allow you to ride with kids. Please look at the Riding Safely section in the
Owner’s Manual regarding general information and instructions on child carriers or trailers.
If you regularly ride with kids on your bicycle, your Authorized Specialized Retailer should conduct a periodic safety
inspection.
WARNING! Specialized bicycles are only designed and tested for use by one person at a time.
Carrying a child on your Specialized bicycle is at your own risk. If you choose to install an
accessory on your Specialized bicycle such as a trailer, carrier, or trailer cycle, make sure it is
compatible and refer to the manufacturer’s instructions and your Authorized Specialized Retailer.
You should make sure your bicycle is still safe to ride with the accessory installed. Be sure to not
exceed the structural weight limit of the bicycle if you use a trailer, trailer cycle or child carrier.
Also make sure not to exceed the maximum cargo weight if you use a child carrier.
WARNING! Riding with kids on your bicycle will affect the handling by altering the center of gravity,
weight and balance. It may also negatively impact your cornering ability, increase your stopping
distance and reduce your ability to slow down and maneuver, especially at higher speeds or down
a steep grade. All of this can result in a loss of control, potentially causing serious injury and/or
death. You should also become familiar with and practice riding with the accessory in a controlled
environment away from traffic.
WARNING! Do not attach a child carrier, trailer or similar accessory to a composite or carbon
fiber part or component, either directly or indirectly. For example, do not attach a trailer to a rear
axle when the rear triangle is made of composite or carbon fiber. Likewise, do not attach a trailer
cycle bicycle to a composite or carbon seatpost or a child carrier to a composite or carbon fork.
Either may potentially apply unusual forces on your bicycle frame or component which could
result in damage and cause a complete failure, with the risk of serious injury or death. If you have
previously attached an accessory to a composite or carbon fiber part or component, do not ride
until you have had your Authorized Specialized Retailer conduct a careful safety inspection.
Before riding with kids on your bicycle, please inform yourself of all applicable legal requirements
and regulations in your country and state. There may be restrictions on riding your bicycle with
certain or any accessory(ies). This is especially true for electric and pedal-assist bicycles.
7
Page 10

6. GENERAL NOTES ABOUT MAINTENANCE
The VADO/COMO is a high performance bicycle. All regular maintenance, troubleshooting, repair and parts
replacement must be performed by an Authorized Specialized Retailer. For general information regarding
maintenance of your bicycle, please refer to the Owner’s Manual. In addition, routinely perform a Mechanical Safety
Check before each ride, as described in the Owner’s Manual.
Great care should be taken to not damage carbon fiber or composite material. Any damage may result in a
loss of structural integrity, which may result in a catastrophic failure. This damage may or may not be visible
in inspection. Before each ride, and after any crash, you should carefully inspect your bicycle for any fraying,
gouging, scratches through the paint, chipping, bending, or any other signs of damage. Do not ride if your bicycle
shows any of these signs. After any crash, and before you ride any further, take your bicycle to an Authorized
Specialized Retailer for a complete inspection.
While riding, listen for any creaks, as a creak can be a sign of a problem with one or more components.
Periodically examine all surfaces in bright sunlight to check for any small hairline cracks or fatigue at stress
points, such as welds, seams, holes, and points of contact with other parts. If you hear any creaks, see signs of
excessive wear, discover any cracks, no matter how small, or any damage to the bicycle, immediately stop riding
the bicycle and have it inspected by your Authorized Specialized Retailer.
Lifespan and the type and frequency of maintenance depends on many factors, such as use, rider weight,
riding conditions and/or impacts. Additionally, the VADO/COMO uses a power-assisted drive system, which
means more distance is covered in the same amount of time. Components may be subject to increased wear at
different rates, depending on the component. Drivetrain and brake components are especially subject to wear.
Periodically have your Authorized Specialized Retailer inspect your bicycle and components.
Exposure to harsh elements, especially salty air (such as riding near the ocean or in the winter), can result in
galvanic corrosion of components such as the crank spindle and bolts, which can accelerate wear and shorten
the lifespan. Dirt can also accelerate wear of surfaces and bearings. The surfaces of the bicycle should be
cleaned before each ride. The bicycle should also be maintained regularly by an Authorized Specialized Retailer,
which means it should be cleaned, inspected for signs of corrosion and/or cracks and lubricated. If you notice
any signs of corrosion or cracking on the frame or any component, the affected item must be replaced.
Regularly clean and lubricate the drivetrain according to the drivetrain manufacturer’s instructions.
Do not use a high pressure water spray directly on the bearings. Even water from a garden hose can penetrate
bearing seals and crank interfaces, increasing bearing and crank wear. Use a clean, damp cloth and bicycle
cleaning agents for cleaning.
Do not expose the bicycle to prolonged direct sunlight or excessive heat, such as inside a car parked in the sun
or near a heat source such as a radiator.
ENGLISH
FRANÇAISDEUTSCHČESKÁHRVATSKASLOVENSKI
WARNING! Failure to follow the instructions in this section may result in damage to the components
on your bicycle and will void your warranty, but, most importantly, may result in serious personal injury
or death. If your bicycle exhibits any signs of damage, do not use it and immediately bring it to your
Authorized Specialized Retailer for inspection.
WARNING! When placing the frame and/or bicycle in a repair stand, clamp the stand to the
seatpost and not the frame. Clamping the frame can cause damage to the frame that may or may
not be visible, and you may lose control and fall.
WARNING! Always turn off the battery when not in use and/or when working on it.
CAUTION: Do not open the motor assembly. The motor assembly is a sealed maintenance-free
system. Any work on the motor assembly must be performed by a Specialized Service Center.
8
Page 11

7. SYSTEM INTERFACE
The VADO and COMO models are equipped with an LCD display.
WARNING! Use caution when viewing or using the display while riding, as it can be distracting and
can lead to accidents. You should always stop before changing settings or operating the various
functions of the display.
The handlebar remote (fig 7) controls certain functions of the display and the level of motor support.
7
SET
+
-
LIGHT
SET BUTTON: Allows for the user to toggle through the pages (trip distance, state of charge, ride time and
odometer).
+ BUTTON: Increases the amount of support. Pressing and holding activates the walk-assist mode.
- BUTTON: Decreases the amount of support. Pressing and holding for 2 seconds resets the day trip.
LIGHT: Turns the light on/off.
The light spec may vary depending on the bike model and country requirements.
7.1. SUPPORT MODES
The VADO motor offers five different drive settings. TURBO,
SPORT, ECO, OFF and SMART CONTROL.
TURBO MODE: Maximum power mode for high speed
sections and climbing.
SPORT MODE: Maximum control, with sufficient power
on demand.
ECO MODE: Most efficient mode for maximum range while
offering good power.
OFF MODE: The motor will not offer any assistance, but
the display and lights will still function.
SMART CONTROL MODE: The motor, while pedaling,
adjusts the power output based on the ride parameters
determined in the Mission Control App.
The various modes are managed using the +/- buttons on the
remote (Fig 7), and displayed on the TCD (Fig 7.1).
On the remote, after reaching the strongest or weakest mode, the system will not continue to switch. To reduce from
TURBO to SPORT to ECO to OFF, you have to press the - button. To increase from OFF to ECO to SPORT to TURBO,
you have to press the + button.
7.1
TURBO
MODE
SPORT
MODE
ECO
MODE
OFF
MODE
SMART
CONTROL
9
Page 12

INFINITE TUNE: With Infinite Tune in the Mission Control App, the motor Peak Power can now be adjusted
separately from the motor Support and vice versa. The amount of Peak Power the motor draws from the battery
can be tuned independently for each Support mode and adjusted to your riding style, terrain, desired performance
and desired range. We recommend starting with following settings. Turbo: 100% (Support) / 100% (Peak Power).
Sport: 70% / 100%. Eco: 35% / 35%.
SUPPORT: The Support mode sliders change how much assistance the motor
provides in each mode, based on pedaling input. Generally, more Support
provides faster acceleration and easier climbing at the expense of shorter
range and greater chance of wheelspin. Less Support results in longer range,
and more control in situations where traction is limited. For example, pedaling
in Sport mode with Support set at 50% will require approximately double the
effort to get the same motor assist as compared to pedaling in Turbo mode with
Support set at 100%.
PEAK POWER: In addition to the Support mode setting, there is also the Peak
Power setting. This refers to the maximum power output by the motor for each
Support mode. This can be set at up to 100% for all Support modes. If Peak
Power is set to 100% for all Support modes, the harder you pedal the more
assist you get in each Support mode. For example, if a Support mode is set at
35% with Peak Power set at 100%, you can still achieve 100% Peak Power
by pedaling with more effort and high rider torque. If Peak Power is set at less
than 100%, you will limit the amount of current the motor provides, creating an artificial ceiling for
the current. Setting Eco mode with an artificial Peak Power ceiling will improve range, as well as
provide greater differentiation between Support modes.
Specialized recommends experimenting with the power settings that work best for your riding
style and conditions.
7.2. CONNECTIVITY OPTIONS
The motor support system provides a high degree of interface flexibility, through Bluetooth and/or ANT+
connectivity. Depending on the device and the connectivity option, a variety of features can be accessed.
BLUETOOTH LE: The Mission Control App (iOS or Android) provides an enhanced ride experience by recording
rides while syncing with Strava, eliminating “range anxiety” with the Smart Control function, GPS-based ride
recording, and system diagnostics. Android and iOS devices can sync to all VADO & COMO bicycles via Bluetooth
LE. Visit Google Play or the Apple App Store for the latest version of the free Mission Control App. All Mission
Control functionality instructions can be found within the App itself.
ANT+: The ANT+ Protocol offers a range of devices that sync with the VADO and COMO bicycles.
The LEV (Light Electric Vehicle) profile allows visibility of additional types of data, including cadence, rider power
output, motor temperature, battery temperature, battery State of Charge, and speed. For an up-to-date list of
VADO & COMO compatible ANT+ devices go to https://www.thisisant.com/directory/filter/~/~/~/200/.
The “Fake Channel” option allows the battery state of charge to be displayed, as an unused Power, Heart rate, or
cadence channel, on ANT+ compatible cycling computers. The Mission Control App must be used to select this
option.
ENGLISH
FRANÇAISDEUTSCHČESKÁHRVATSKASLOVENSKI
10
Page 13

7.3. INSTALLATION
B
A
C
7.3.1
7.3.2
Twist to install the display onto the display mount, then fasten the anti-twist plate (fig 7.3.1 a) with the small
screw (fig 7.3.1 b). Recommended torque is 4.4 in-lbf / 0.5 Nm.
Remove the components from the side of the handlebar intended for the installation of the display mount, it can
be installed on the right or left side of the stem.
Tighten until the mount does not slip easily (fig 7.3.2 C). Do not overtighten. Recommended torque is 4.4 in-lbf
/ 0.5 Nm.
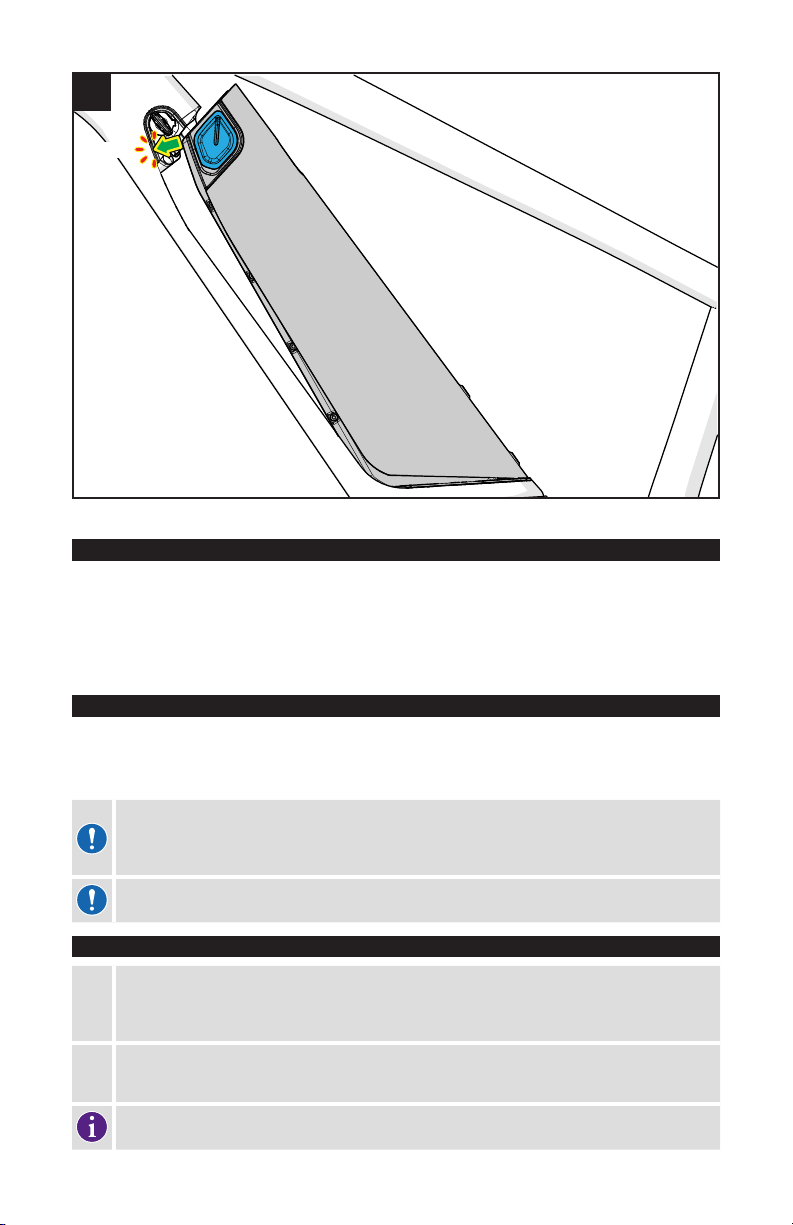
7.4. BATTERY ACTIVATION / REPLACEMENT
7.4.1
7.4.2
Use a flat head screwdriver to lift up the edge of the battery cap (fig 7.4.1), then gently lift the battery out of the
cap.
Replace the battery with a new CR 1220 coin cell battery, with the text facing the cap (fig 7.4.2). Make sure the
seal is not damaged and press the cap back in.
When the battery is replaced, all information stored on the display (time, trips, and pairing) is erased. If desired,
take note of the information before replacing the battery.
The USB port is only for use by retailers or service centers.
11
Page 14

Data Field 1, Descriptor
Main Battery Level
A
Shown in 10% Increments.
7.5. DISPLAY FEATURES
Data Field 1
Data Field 3
1
1
1
A
2
7 8
Left Button Right Button
7.6. MAIN SCREENS
Turbo Mode
3
Sport Mode
4
Eco mode
5
Clock
6
Data Field 2
1
Data Field 2, Descriptor
1
ENGLISH
FRANÇAISDEUTSCHČESKÁHRVATSKASLOVENSKI
B
In Use
B
”In Use” Typical User Scenario
C
“LO BAT” Blinks on/off (coin cell battery low)
Press left button quickly
Press right button quickly
Press left and right buttons quickly
Customize Pages: Press left and right buttons for three (3) seconds
System Setup: Press left button for five (5) seconds
C
Low Battery TCD
D
Blinking Battery Bar, indicates charge level
7.7. SETTINGS LEGEND
D
Charge Mode
12
Page 15

7.8. DEFAULT PAGE SETTINGS / NAVIGATION
There are 5 preset pages, each of which displays a different combination of information.
The pages can be navigated using the left / right buttons or with the SET button on the remote.
The information shown on each page can be customized.
The computer displays Page 1 when powered on.
SET
Page 1 Page 2
Page 3 Page 4 Page 5
7.9. CUSTOMIZING PAGES
Scroll to the page you wish to customize, then press and hold the L+R buttons for three seconds.
Data Field 1 will start to blink. Press the L or R button to cycle through the options.
Press the L+R buttons quickly to confirm the chosen function and move to Data Field 2.
Repeat the steps for Data Field 2 & 3.
Repeat the steps for Pages 2 through 5.
F
Yellow box denotes blinking (adjustable) field.
G
Reset AVG, MAX, DIST, TRIP, KCAL: Press L+R buttons together for 0.5 seconds and release.
Reset can also be done by pressing the (-) on the remote for 2 seconds.
13
F
FUNCTIONS
L R L R L R
Heart Rate
Battery %
Cadence
G
Page 16
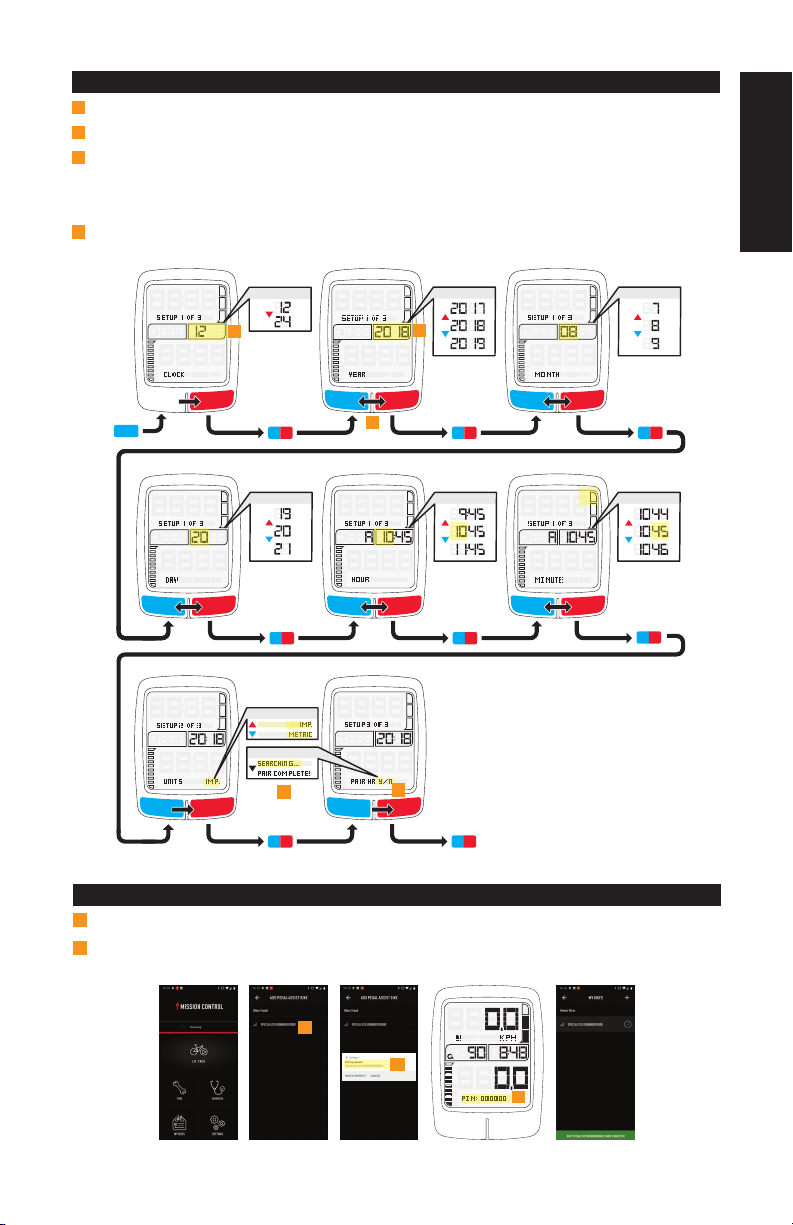
7.10. SYSTEM SETUP
Time always defaults to 12:00.
H
To change settings, press L or R button. Press and hold = quick scroll. Press and release = 1 unit increments.
I
Pairing options:
J
• Confirmed connections: blinking to solid.
• Pairing unsuccessful: display = “PAIR FAILED!”
Separate heart rate chest strap required.
K
ENGLISH
5 sec
TIME 12/24
H
L R
DAY HOUR MIN
L R L R
UNITS
HR Y / N
K
L R L R
I
YEAR MONTH
I
L R L R
J
FRANÇAISDEUTSCHČESKÁHRVATSKASLOVENSKI
L R
7.11. CONNECT TO MISSION CONTROL APP
L
With the bike turned on, open Mission Control App on your mobile device, search for, and add your bike.
M
Once connected, enter the pin code, displayed on the TCD-W, to pair the Mission Control App with your bike.
Once paired you can make full use of Mission Control functionality.
L
M
M
14
Page 17

7.12. ERROR MESSAGES
If the Display shows and error message, make sure everything
is connected, then try restarting your bike. If the problem
ERROR MESSAGES
persists, check the Mission Control App for more details, or
contact your dealer.
Depending on the type of error message, the system may be
switched off automatically. In any case, the bike can be ridden
without motor support, with the system turned off.
7.13 GENERAL INFO
• This display is designed for use with VADO and COMO bicycles.
• If the bike’s power is turned off, the information will not be displayed.
• The display has a backlight which turns on when the bicycle lights are powered on.
• Pay attention to the ride, not the display. Do not attempt to customize the pages or perform setup adjustments while riding.
CLEANING/CARE:
• Do not expose the display to intense heat or sunlight for a prolonged period of time. This can damage the display and/or
battery.
• Only use a damp or dry soft cloth to clean the display. Do not use harsh cleaning products.
• Do not disassemble or drop the display.
• Make sure the display and mount are firmly installed on the handlebar before riding.
7.14. FUNCTION OPTIONS / SPECIFICATIONS
DATA FIELD 1 & 2
KPH/MPH
AVG
DIST
TIMER
KCAL
POWER
MAX
ODO
DATA FIELD 3
DISPLAY
Clock 00:00 - 23:59 (24hr) / 1:00 - 12:59 (12hr)
Battery type Coin Cell CR 1220
Dimensions 62mm x 46.5mm x 17.5mm
Operating temperature -10° C — +60° C / +14° F — +140° F
Radio frequency/protocol ANT+ / BT
Water/dust protection IP67
Speed 0 - 200 kph / 0.0 - 199.9 mph
Average Speed 0.0 - 199.9 kph / mph
Distance 0.0 - 999.9 km/mi
Trip Time 0:00’ - 99:59’
Calories Burned 0.0 - 9999 KCal
Rider Power 0.0 - 9999 W
Max Speed 0.0 - 199.9 kph / mph
Odometer 0.0 - 9999 km/mi/
Heart Rate 0 - 240 bpm
Battery % 0 - 100%
Cadence 0 - 240 rpm
15
Page 18

8. BATTERY / CHARGER
Your bicycle is powered by a Lithium-Ion (Li-Ion) battery. Always adhere to the following instructions when handling
or charging the battery or when using the VADO/COMO bicycle:
Only operate the battery between the temperature range of -20° C (-4° F) and +70° C (+158° F).
Only use the VADO/COMO battery with the VADO/COMO bicycle. Do not use the VADO/COMO battery with any
other bicycle or any other battery with the VADO/COMO bicycle, even if it fits.
Always turn the battery off before connecting or disconnecting the wiring harness or charger to or from the battery.
Turn off the battery, unplug the charger from the battery and remove the battery from the bicycle before
performing work of any kind, such as installation, maintenance, cleaning and/or repair. When transporting or
handling the battery separately from the bicycle, ensure the battery is OFF. Touching the contacts when the
battery is ON can result in electric shock and/or injury.
Before riding the bicycle, make sure the battery is properly secured in the frame.
8.1. OBSERVE AND OBEY
Do not modify, open or disassemble the battery or charger. Modification or disassembly may result in a short
circuit, fire or malfunction.
The battery is very heavy. Be careful when handling it and do not drop it.
Do not allow any nails, screws or other small, sharp and/or metallic objects to come in contact with the battery or
the battery’s charging socket.
Do not allow the battery to overheat. Protect the battery from excessive sun exposure.
Do not expose the battery to an open fire or radiator heat.
Do not submerge the battery in water.
Keep the battery away from metal objects as that can cause a short-circuit.
Do not use a battery that shows any signs of damage to the casing or charging port, or is leaking any fluids.
Battery liquid can cause skin irritation and burns. In the event of damage that results in skin or eye contact with
any liquid from the battery, immediately flush with water and seek medical assistance.
ENGLISH
FRANÇAISDEUTSCHČESKÁHRVATSKASLOVENSKI
WARNING! Failure to follow the instructions in this section may result in damage to electrical
components on your bicycle and will void your warranty, but, most importantly, may result in
serious personal injury or death. If your battery or charger exhibits any signs of damage, do not
use it and immediately bring it to your Authorized Specialized Retailer for inspection.
8.2. CHARGING AND USING THE BATTERY
Regularly inspect the battery and charger for damage. Never charge a battery which you suspect is damaged or
know is broken, and do not use it.
Make sure the charging socket and plug are dry before connecting and charging the battery.
Only use the Specialized charger supplied with the bicycle or other chargers approved by Specialized. Inspect
the charger before every use for possible damage to the charger itself, the cable or the charging plug. Never use
a charger which you suspect is damaged or know is broken.
Place the charger on a stable, level surface unaffected by heat. If the battery is charged outside of the frame,
place the battery on the same surface as the charger.
You should charge the battery in a dry, well ventilated area and make sure the battery and charger are uncovered
during the charging process. Ensure that the battery and charger are not exposed to any flammable or
dangerous substances.
16
Page 19

WARNING! Failure to follow the instructions in this section may result in damage to electrical
components on your bicycle and will void your warranty, but, most importantly, may result in
serious personal injury or death. If your battery or charger exhibits any signs of damage, do not
use it and immediately bring it to your Authorized Specialized Retailer for inspection.
The battery can be charged whether installed in the bicycle or not. Refer to the appropriate
instructions regarding removing and installing the battery. Only charge the battery at an ambient
temperature between 0° C and +50° C (+32° F and +122° F). If outside temperatures are too hot or
too cold, charge the battery inside. For safety reasons, if the battery is too hot, it will not charge.
8.2.1
CHARGING
SOCKET
8.2.2
SOCKET
COVER
FULLY CHARGED
CHARGING
FULLY CHARGED
PROBLEM
BATTERY
CHARGER
CHARGING
PROBLEM
Plug the charger’s plug into an outlet (100 - 240V), using the appropriate plug for the country’s standards.
Uncover the charging socket on the battery, then connect the charging plug with the charging socket on the
battery (fig.8.2.1). You should charge the battery in an area with a smoke detector.
When charging is complete, disconnect the charging plug from the battery socket.
Unplug the charger from the wall socket.
During the charging process, the diode on the charger will glow red (fig.8.2.2). When the battery is fully charged,
the diode on the charger will turn green.
CAUTION: If the red LED flashes during the charging process, a charging error has occurred. In
that case, immediately remove the charger from the socket, discontinue use of the motor support
and contact your Authorized Specialized Retailer.
Please note that Li-ion batteries gradually lose capacity depending on age and use. Strongly
reduced operating time after charging can be a sign that the battery is reaching the end of its
useful life and has to be replaced. Provided the bicycle has been used properly, approximately
75% of the battery’s original capacity should remain after 300 charging cycles or two years.
Replacement batteries can be purchased from your Authorized Specialized Retailer.
17
Page 20

8.3. CHARGE LEVEL DISPLAY
The charge level of the battery is permanently displayed during your ride. The number of LEDs glowing will indicate
the remaining battery charge (fig.8.3).
At 10% battery charge remaining, the system will start to reduce the amount of support. At 1%, the system switches
off the motor support.
If your bicycle is at a standstill for at least 10 minutes, the Battery Management System will switch the system off. In
order to continue riding with support, you have to switch the system on again.
ENGLISH
8.3.
8.4.1
CAUTION: ALWAYS
TURN OFF THE
BATTERY BEFORE
INSTALLING OR
80-100%
60-79%
40-59%
20-39%
FRANÇAISDEUTSCHČESKÁHRVATSKASLOVENSKI
0-19%
8.4. INSTALLING THE BATTERY
REMOVING!
BATTERY
CONNECTOR
Lower the bottom edge of the battery into the bottom of the battery cavity (fig.8.4.1), then align the top of the
battery with the top of the cavity.
The key does not need to be in the lock to install the battery. The battery will lock in place
automatically when installed. The key is required only to remove the battery.
18
Page 21
CLICK!
8.4.2
Press down on the battery near the power button until it clicks and engages with the lock (fig.8.4.2).
8.5. REMOVING THE BATTERY
Reverse the installation steps:
Turn the key clockwise until the top end of the battery pops up slightly.
Holding the battery with two hands, lift the battery up slightly at the top, rotate the battery out toward the non-
drive-side of the bike then pull it out of the frame.
Turn the key counter-clockwise to remove the key from the lock.
8.6. CLEANING
Always turn the battery off and remove the charger from the battery before cleaning the bicycle. Remove the battery
from the bicycle before cleaning the battery.
Always unplug the charger from the battery and the wall socket before cleaning.
CAUTION: Never use a high-pressure cleaner when cleaning your VADO/COMO. Instead, use a dry
or slightly damp cloth. Please ensure no water comes into contact with the electrical components
while washing. Ask your Authorized Specialized Retailer for additional information about cleaning
your bicycle.
CAUTION: Do not use alcohol, solvents or abrasive cleaners to clean the charger or battery.
Instead, use a dry or slightly damp cloth.
8.7. STORAGE
CAUTION: If the battery is not being used for an extended period of time, remove the battery from
the frame and store it in a dry, well ventilated area and leave it uncovered. Only store the battery
at an ambient temperature between -20° C and +35° C (-4° F and +95° F). If outside temperatures
are too hot or too cold, store the battery inside.
CAUTION: If the battery is stored and not in use for extended periods of time, be sure to charge the
battery at least every three months so at least 2 LEDs (20-39%) are glowing green. If the battery
is not charged over a period longer than three months, it can cause damage to the battery.
Do not leave the battery connected to the charger for extended periods after the battery is
charged.
19
Page 22

8.8. BATTERY TECHNICAL DATA
DESCRIPTION UNIT SPECIFICATION
OPERATING VOLTAGE V 36
CHARGING TEMPERATURE
DISCHARGING TEMPERATURE
STORAGE TEMPERATURE
DEGREE OF PROTECTION IP67
WEIGHT
BATTERY SBC-B09 SBC-B10 SBC-B11 SBC-B17
RATED CAPACITY 16.8AH 14AH 12.5AH 11.5AH
ENERGY 604WH 504WH 460WH 400WH
CHARGE TIME (SBC-C04) 4:35H 3:50H 3:30H 3:15H
CHARGE TIME (SBC-C05) 9:10H 7:40H 7:00H 6:30H
DESCRIPTION UNIT SPECIFICATION
CHARGER MODEL NUMBER SBC-C04 SBC-C05
CHARGING TEMPERATURE
STORAGE TEMPERATURE
OPERATING VOLTAGE V 42 42
AC INPUT VOLTAGE V 100 — 240 100 — 240
FREQUENCY Hz 50 / 60 50 / 60
MAX CHARGE CURRENT A 4 2
DIMENSIONS mm 179 X 80 X 37.2 147 X 65.5 X 34.2
°C 0 — +50
°F +32 — +122
°C -20 — +70
°F -4 — +158
°C -20 — +35
°F -4 — +95
KG 2.7
LB 6.0
8.9. CHARGER TECHNICAL DATA
°C -10 — +40 0 — +40
°F 14 — +104 +32 — +104
°C -20 — +65 -20 — +60
°F -4 — +149 -4 — +140
ENGLISH
FRANÇAISDEUTSCHČESKÁHRVATSKASLOVENSKI
The range of the battery can vary considerably depending on the model/capacity of the battery and riding
conditions, such as the gradient of your route and the support mode. See “GENERAL NOTES ABOUT RIDING” on
page 6 for additional information about battery range and tips on maximizing range.
WARNING! Please read the label on the battery (fig.8.9) supplied with your bicycle before first use.
20
Page 23

8.9
8.10. TRANSPORT
Transporting and/or shipping your VADO/COMO battery may be subject to certain restrictions and
may require special handling, labelling, and/or packaging. Be sure to inform yourself beforehand
of all applicable legal requirements and regulations in your country or state. Your Authorized
Specialized Retailer may also have helpful information available. When carrying the battery
outside the frame, you should use an approved battery transport box.
CAUTION: Be aware that your VADO/COMO bicycle is significantly heavier than a bicycle without
motor support. Use caution when handling, carrying or lifting your VADO/COMO bicycle.
8.11. DISPOSAL
Batteries and chargers must not be disposed of in your household trash! All batteries
and chargers must be disposed of in an environmentally friendly manner, in accordance
LI-
with the battery disposal regulations in your country or state. Ask your Authorized
ION
Specialized Retailer for information about how to dispose of a battery or charger and
any applicable take-back program.
9. LIGHTING
Some VADO/COMO models are equipped with an LED headlight and taillight.
The headlight is wired to the battery system and turns on when the bike is turned on.
RACK-EQUIPPED MODELS: The taillight is wired through the fender. Removal of the fender will result in no longer
having a taillight powered by the bicycle’s battery.
The headlight and taillight spec may vary depending on the bike model and country requirements.
For models equipped with a taillight, it can be located on the fender or under the saddle.
21
Page 24

10. SPECIFICATIONS
10.1. BOLT SIZE / TORQUE SPECS
WARNING! Correct tightening force on fasteners (nuts, bolts, screws) on your bicycle is important
for your safety. If too little force is applied, the fastener may not hold securely. If too much force is
applied, the fastener can strip threads, stretch, deform or break. Either way, incorrect tightening
force can result in component failure, which can cause you to lose control and fall.
Where indicated, ensure that each bolt is torqued to specification. After your first ride, and
consistently thereafter, recheck the tightness of each bolt to ensure secure attachment of the
components. The following is a summary of torque specifications in this guide:
LOCATION IN-LBF Nm LOCATION IN-LBF Nm
SEAT COLLAR 45 5.1 FRONT AXLE 133 15
SEATPOST @ SADDLE 120 13.5 CRANK BOLTS 443 50
STEM @ STEERER TUBE 52 6.0 CHAINRING BOLTS 89 10
STEM @ HANDLEBAR 52 6.0 SPIDER LOCKRING 443 50
DERAILLEUR HANGER 35 4 REAR BRAKE GUIDES 6 0.7
REAR AXLE 133 15 WATER BOTTLE BOLTS 25 2.8
REMOTE 7 0.8
CAUTION: Ensure all contact surfaces are clean and bolt threads are greased or have a
threadlocking compound (refer to the instructions for each bolt) prior to installation.
10.2. FRAME SPECIFICATIONS
ITEM SPECIFICATION
HEADSET 1 1/8” UPPER / LOWER
SEAT COLLAR DIAMETER 34.9MM
SEATPOST DIAMETER 30.9MM
DERAILLEUR HANGER S172600003 (AMAZINGER 2.1)
REAR HUB 148MM X 12MM
FRONT HUB 100MM X 15MM
ENGLISH
FRANÇAISDEUTSCHČESKÁHRVATSKASLOVENSKI
WARNING! VADO/COMO frames are compatible only with VADO/COMO rigid forks or suspension
forks with 50mm maximum fork travel. Use of different forks negatively affect geometry and ride
quality, and, most importantly, may result in catastrophic failure of the frame which may result in
serious personal injury or death.
10.3. RECOMMENDED TIRE PRESSURES
Proper tire pressure is critical for optimal performance. Tires with higher pressure will typically roll faster and provide
less rolling resistance, but provide less traction. Tires with lower pressure will typically provide increased traction
and control at the expense of rolling resistance.
Use a quality pressure gauge and refer to the tire pressure recommendations written on the side of the tires.
Because of the extra weight of the VADO/COMO, as a rule of thumb, tire pressure should generally
be higher compared to a regular bicycle.
22
Page 25

11 .REGULATORY STATEMENTS
RoHS:
Specialized Bicycle Components, Inc. certifies that this product and its packaging are in compliance with European
Union Directive 2011/65/EU on the Restriction of the Use of Certain Hazardous Substances in Electrical and
Electronics Equipment, commonly known as RoHS.
FCC Statement:
This device complies with Part 15 of the FCC Rules.
Caution: If any changes or modifications not expressly approved by the party responsible for compliance could void
the user’s authority to operate the equipment.
Operation is subject to the following two conditions: (1) This device may not cause harmful interference, and (2)
This device must accept any interference received, including interference that may cause undesired operation.
The grantee is not responsible for any changes or modifications not expressly approved by the party responsible for
compliance. Such modifications could void the user’s authority to operate the equipment.
The RF Exposure Compliance distance is 20 millimeters.
NOTE: This equipment has been tested and found to comply with the limits for a Class B digital device, pursuant to
part 15 of the FCC Rules. These limits are designed to provide reasonable protection against harmful interference in
a residential installation. This equipment generates, uses and can radiate radio frequency energy and, if not installed
and used in accordance with the instructions, may cause harmful interference to radio communications. However,
there is no guarantee that interference will not occur in a particular installation. If this equipment does cause harmful
interference to radio or television reception, which can be determined by turning the equipment off and on, the user
is encouraged to try to correct the interference by one or more of the following measures:
• —Reorient or relocate the receiving antenna.
• —Increase the separation between the equipment and receiver.
• —Connect the equipment into an outlet on a circuit different from that to which the receiver is connected.
• —Consult the dealer or an experienced radio/TV technician for help.
ISED Statement
This device complies with Innovation, Science and Economic Development Canada licence‐exempt RSS
standard(s). Operation is subject to the following two conditions: (1) this device may not cause interference, and (2)
this device must accept any interference, including interference that may cause undesired operation of the device.
CAN ICES-3(B)/NMB-3(B)
The device meets the exemption from the routine evaluation limits in section 2.5 of RSS 102 and compliance with
RSS-102 RF exposure, users can obtain Canadian information on RF exposure and compliance.
This transmitter must not be co-located or operating in conjunction with any other antenna or transmitter. This
equipment should be installed and operated with a minimum distance of 20 millimeters between the radiator and
your body.
23
Page 26

12. EC – DECLARATION OF CONFORMITY
The manufacturer:
Specialized Bicycle Components Inc.
15130 Concord Circle
Morgan Hill, CA 95037, USA
Tel: +1 408 779-6229
hereby confirms for the following products:
Product description: EPAC (Electrically Pedal Assisted Cycle)
Model designation:
The conformity with all applicable
directives from the guideline:
The machine also conforms to all the
directives in the guideline:
The following harmonizing norms were
applied to the product:
Serial number:
Technical documentation by:
TURBO VADO 3.0
TURBO VADO 4.0
TURBO VADO 5.0
Machines (2006/42/EC).
Electromagnetic Compatibility (2004/108/EC).
Radio Equipment (2014/53/EU)
EN15194 Cycles - Electrically power assisted cycles - EPAC
Bicycles
Frame decal adhered to the back page of the user manual
Specialized Europe GmbH
Werkstattgasse 10
6330 Cham, Switzerland
TURBO COMO 3.0
TURBO COMO 4.0
TURBO COMO 5.0
ENGLISH
FRANÇAISDEUTSCHČESKÁHRVATSKASLOVENSKI
Signature:
Jan Talavasek (European Engineering Manager)
Specialized Europe GmbH
6330 Cham, Switzerland
September 1st, 2018
NOTE: This declaration of conformity applies only to bikes sold in countries following the CE marking directives.
NOTE: IN ORDER TO CONNECT THE BICYCLE AND THIS USER MANUAL TOGETHER, THE YELLOW SERIAL
NUMBER DECAL LOCATED ON THE FRAME OF THE BICYCLE MUST BE PLACED OVER THE FACSIMILE OF THE
DECAL ON THE BACK PAGE OF THIS USER MANUAL.
24
Page 27

Page 28

TABLE DES MATIÈRES
1. INTRODUCTION .................................................................................................................... 1
1.1. GARANTIE .............................................................................................................................................................................1
2. COMPOSANTS VADO/COMO ................................................................................................ 2
3. INFORMATION GÉNÉRALE À PROPOS DE VOTRE VADO/COMO ............................................. 3
3.1. CONDITIONS D’UTILISATION ............................................................................................................................................3
3.2. PEDELEC / EPAC ................................................................................................................................................................ 3
3.3. DÉMARRAGE DU SYSTÈME .............................................................................................................................................3
4. NOTES GÉNÉRALES À PROPOS DU MONTAGE ..................................................................... 4
4.1. CAPTEUR DE VITESSE .......................................................................................................................................................4
4.2. BOÎTIER DE PÉDALIER ......................................................................................................................................................4
4.3. JEU DE DIRECTION ............................................................................................................................................................5
4.4. TIGE DE SELLE ...................................................................................................................................................................5
4.5. REMPLACEMENT DE PIÈCES ET ACCESSOIRES ..........................................................................................................5
5. NOTES GÉNÉRALES À PROPOS DE L’UTILISATION............................................................... 6
5.1. CONSEILS D’UTILISATION ................................................................................................................................................. 6
5.2. AVANT VOTRE PREMIÈRE SORTIE ..................................................................................................................................6
5.3. ROULER AVEC DES ENFANTS..........................................................................................................................................7
6. NOTES GÉNÉRALES SUR LA MAINTENANCE ........................................................................ 8
7. INTERFACE SYSTÈME .......................................................................................................... 9
7.1. MODES D’ASSISTANCE ......................................................................................................................................................9
7.2. OPTIONS DE CONNECTIVITÉ ............................................................................................................................................10
7.3. INSTALLATION ....................................................................................................................................................................11
7.4. ACTIVATION/REMPLACEMENT DE LA PILE ....................................................................................................................11
7.5. FONCTIONNALITÉS DE L’APPAREIL................................................................................................................................12
7.6. ÉCRANS PRINCIPAUX ........................................................................................................................................................12
7.7. LÉGENDE .............................................................................................................................................................................12
7.8. PARAMÈTRES/NAVIGATION SUR LA PAGE PAR DÉFAUT .............................................................................................13
7.9. PERSONNALISATION DES PAGES ...................................................................................................................................13
7.10. CONFIGURATION DU SYSTÈME ......................................................................................................................................14
7.11. CONNEXION À L’APPLICATION MISSION CONTROL.....................................................................................................14
7.12. MESSAGES D’ERREUR ....................................................................................................................................................15
7.13. INFORMATIONS GÉNÉRALES..........................................................................................................................................15
7.14. OPTIONS/CARACTÉRISTIQUES DES FONCTIONNALITÉS .......................................................................................... 15
8. BATTERIE / CHARGEUR ....................................................................................................... 16
8.1. CONSIGNES À APPLIQUER................................................................................................................................................16
8.2. CHARGER ET UTILISER LA BATTERIE ............................................................................................................................16
8.3. AFFICHAGE DU NIVEAU DE CHARGE .............................................................................................................................17
8.4. INSTALLER LA BATTERIE .................................................................................................................................................18
8.5. RETIRER LA BATTERIE .....................................................................................................................................................19
8.6. NETTOYAGE ........................................................................................................................................................................ 19
8.7. STOCKAGE ..........................................................................................................................................................................19
8.8. CARACTÉRISTIQUES TECHNIQUES DE LA BATTERIE ..................................................................................................20
8.9. CARACTÉRISTIQUES TECHNIQUES DU CHARGEUR ....................................................................................................20
8.10. TRANSPORT......................................................................................................................................................................21
8.11. RECYCLAGE ....................................................................................................................................................................... 21
9. ÉCLAIRAGES ....................................................................................................................... 21
10. SPÉCIFICATIONS ................................................................................................................ 21
10.1 SPÉCIFICATIONS VISSERIE / COUPLE DE SERRAGE ...................................................................................................21
10.2. SPÉCIFICATIONS DU CADRE ..........................................................................................................................................22
10.3. PRESSIONS DE GONFLAGE RECOMMANDÉES ...........................................................................................................22
11. DISPOSITIONS RÉGLEMENTAIRES ...................................................................................... 22
12. DÉCLARATION DE CONFORMITÉ CE ................................................................................... 23
Ce manuel a été rédigé initialement en anglais (Notice originale). Cette version est une « Traduction de la notice originale ».
EN 15194
SPECIALIZED BICYCLE COMPONENTS
15130 Concord Circle, Morgan Hill, CA 95037 (408) 779-6229
0000115652_UM_FR_R1, 09/18
Veuillez noter que tous les avis et instructions sont susceptibles d’être modifiés et mis à jour sans préavis.
Rendez-vous sur www.specialized.com pour les toutes dernières informations techniques.
Commentaires : techdocs@specialized.com
ENGLISH
FRANÇAIS
DEUTSCHČESKÁHRVATSKASLOVENSKI
Page 29

1. INTRODUCTION
ATTENTION :
Ce Manuel utilisateur est spécifique à votre TURBO VADO ou COMO (VADO/COMO) et il doit être utilisé en parallèle
du manuel général Specialized Bicycle Owner’s Manual (Manuel utilisateur). Il contient des mentions importantes
concernant la sécurité, la performance et l’entretien. Lisez-le avant de partir rouler et conservez-le pour vous y
référer ultérieurement. Merci de lire complètement le “Specialized Bicycle Owner’s Manual” avant de procéder au
montage de votre vélo et de partir rouler. Si vous ne disposez pas du “Specialized Bicycle Owner’s Manual” vous
pouvez le télécharger gratuitement sur www.specialized.com ou le réclamer à votre Revendeur Specialized ou
encore à notre Rider Care Specialized.
Des informations complémentaires relatives à la sécurité, à la performance et à l’entretien peuvent également
être disponibles pour les composants spécifiques tels que la suspension, les pédales ou les accessoires comme
les casques ou éclairages. Assurez-vous que votre Revendeur Specialized vous ait livré toute la documentation
des fabricants de composants livrés avec votre vélo ou vos accessoires. En cas de contradiction entre ce Manuel
utilisateur et les informations fournies par le fabricant du composant, suivez toujours les instructions fournies par le
fabricant du composant.
Votre VADO/COMO est classé dans la catégorie EPAC (vélo à assistance électrique, aussi connu comme Pedelec),
et est cité dans ce manuel comme vélo sauf contre-indication.
DES LANGAGES ADDITIONNELS SONT DISPONIBLES SUR www.specialized.com.
Lors de la lecture de ce Manuel utilisateur, vous pourrez noter différents symboles ATTENTION et avertissement
qui sont définis ci-dessous :
AVERTISSEMENT ! L’association de ce symbole et de ce mot indique une situation
potentiellement dangereuse qui, si elle n’est pas évitée, pourrait entraîner des blessures
graves, voire mortelles. De nombreux avertissements préviennent que « vous pourriez perdre le
contrôle de votre vélo et chuter ». Comme toute chute peut entraîner des blessures graves, voire
mortelles, nous ne répétons pas toujours l’avertissement de blessures graves, voire mortelles.
ATTENTION : L’association du symbole d’alerte de sécurité et du mot ATTENTION indique
une situation potentiellement dangereuse qui, si elle n’est pas évitée, pourrait entraîner des
blessures mineures ou modérées. C’est aussi une alerte contre les pratiques dangereuses.
Le mot ATTENTION utilisé sans le symbole d’alerte de sécurité indique une situation qui, si elle
n’est pas évitée, pourrait gravement endommager le vélo ou annuler sa garantie.
INFO : Ce symbole attire l'attention du lecteur sur des informations particulièrement
importantes.
CONSEIL PRATIQUE : Les conseils pratiques sont des conseils utiles et des astuces concernant
l'installation et l'utilisation de l'équipement.
GRAISSE : Ce symbole signifie qu'une graisse de haute qualité doit être appliquée comme illustré.
PÂTE DE MONTAGE CARBONE : Ce symbole informe qu’une pâte de montage carbone doit être
appliquée comme illustré pour augmenter l’adhérence.
SERRAGE: Ce symbole souligne la valeur du couple de serrage préconisé pour une vis
spécifique. Une clé dynamométrique de qualité est nécessaire afin d’atteindre le couple de
serrage spécifié.
1.1. GARANTIE
Pour les termes complets de la garantie reportez-vous au document fourni avec votre vélo ou veuillez vous rendre
sur www.specialized.com ou chez votre revendeur agréé pour en obtenir la copie.
1
Page 30

2. COMPOSANTS VADO/COMO
28
8
9
10
44
45
43
6
11
35
42
12
13
14
5
1. Tube Supérieur
2. Tube Diagonal
3. Tube de selle
4. Douille de direction
5. Base
6. Hauban
7. Fourche
8. Selle
9. Tige de selle
10. Serrage de tige de selle
11. Cassette
12. Patte de dérailleur
13. Dérailleur arrière
14. Chaîne
15. Plateau
16. Manivelles
30
29
1
34
15 16 17
17. Pédales
18. Moteur
19. Cintre
20. Poignée
21. Manette de changement de vitesse
22. Levier de frein
23. Commande au guidon
24. Eclairage avant*
25. Ecran affichage
26. Potence
27. Jeu de direction
28. Batterie rechargeable
29. Port de charge
30. Serrure
31. Bouton on/off
32. Etrier de frein avant
20
31
2
28
3
18
19
22
27
32
25
26
4
33. Disque de frein avant
34. Etrier de frein arrière
35. Disque de frein arrière
36. Rayon
37. Jante
38. Pneu
39. Moyeu
40. Valve
41. Axe Traversant
42. Béquille
43. Garde-boue
44. Porte-bagages arrière*
45. Eclairage arrière*
24 21
23
ENGLISH
38
37
7
39
41
33
36
40
FRANÇAIS
DEUTSCHČESKÁHRVATSKASLOVENSKI
* Tous les modèles ne sont pas équipés d’un porte-bagages, d’un feu avant et/ou d’un feu arrière fixé à la selle ou
au porte-bagages.
2
Page 31
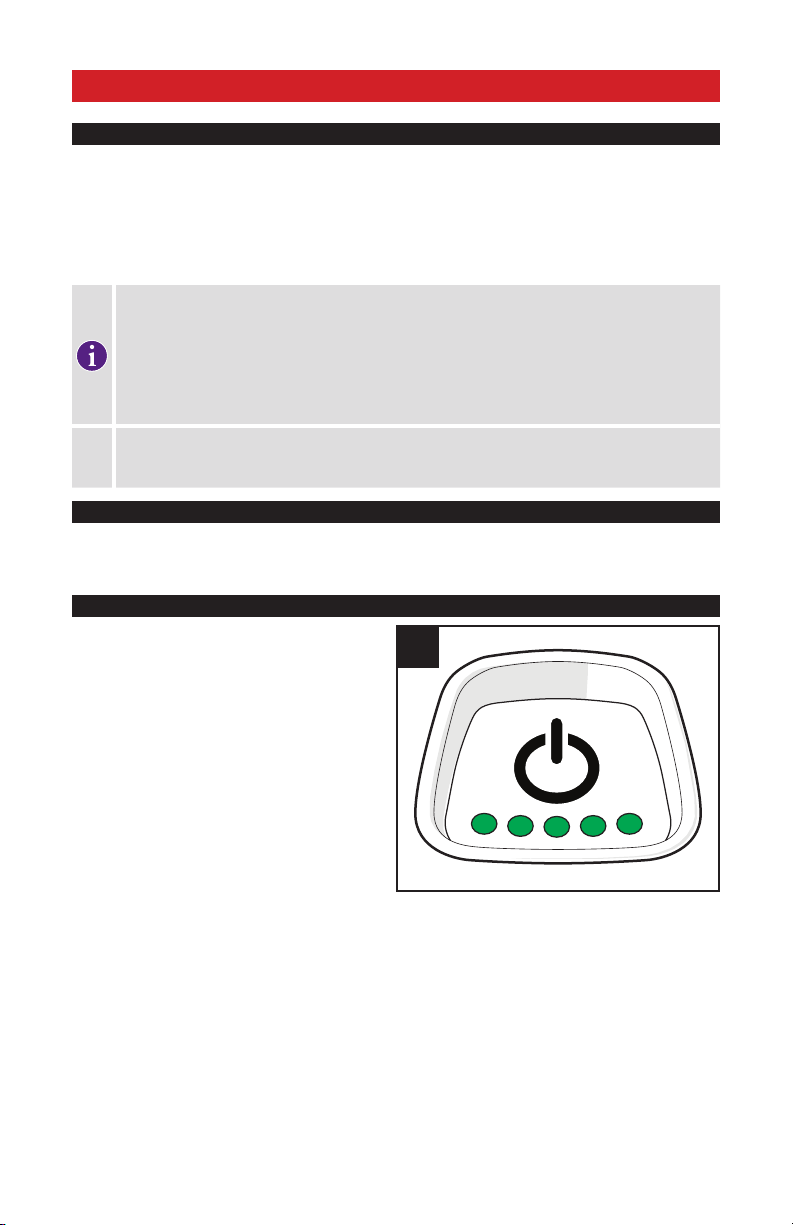
3. INFORMATION GÉNÉRALE À PROPOS DE VOTRE VADO/COMO
80-100%
60-79%
40-59%
20-39%
0-19%
3.1. CONDITIONS D’UTILISATION
Le VADO/COMO est conçu et testé pour un usage général d’utilisation (Condition 2) seulement. Pour plus
d’informations sur les conditions d’utilisation et sur les limites structurelles de poids pour le cadre et les composants,
reportez-vous au Manuel utilisateur général.
Le VADO/COMO est classé dans la catégorie Pedelec/EPAC. Quelle que soit la classification, l’assistance du moteur
ne s’active qu’au pédalage. Selon la classification, des exigences et règlementations différentes peuvent avoir un
impact sur l’utilisation de votre vélo.
Avant d’utiliser votre VADO/COMO, prenez connaissance des obligations légales ou des
régulations en vigueur dans votre pays. Il peut exister des restrictions d’utilisation de votre VADO/
COMO sur la voie publique, piste cyclable et/ou chemins. Il peut également exister des exigences
sur le port d’un casque, d’un âge minimum requis, un permis ou une assurance. Specialized ne
fait et ne fera aucune promesse, déclaration ou garantie concernant l’utilisation de votre VADO/
COMO. Les lois et régulations sur les vélos électriques variant d’un pays à l’autre et évoluant
constamment, assurez-vous d’obtenir les dernières informations. Vous devriez également
consulter votre revendeur agréé Specialized pour obtenir des informations à jour.
ATTENTION : Tous les modèles VADO/COMO ont une vitesse limite préréglée à laquelle le moteur
va automatiquement se couper. Toute tentative de ou manipulation de la distribution de puissance
est interdite et annulera la garantie.
3.2. PEDELEC / EPAC
Le VADO/COMO est classé dans la catégorie Pedelec, de sorte que l’assistance du moteur se coupera
automatiquement quand vous atteindrez la vitesse de 25 km/h (15,5 mph) ou 32/45 km/h (20/28 mph) selon le
pays.
3.3. DÉMARRAGE DU SYSTÈME
Pour démarrer le système, maintenez enfoncé
le bouton ON / OFF (fig. 3.3) sur le dessus de la
batterie, jusqu’à ce que les LED s’allument en vert. Le
nombre de LED s’allumant en vert dépendra du niveau
de charge de la batterie.
Pour éteindre la batterie (et l’assistance) maintenez
enfoncé le bouton ON / OFF jusqu´à ce que les LED
s’éteignent.
3.3
3
Page 32

4. NOTES GÉNÉRALES À PROPOS DU MONTAGE
Ce manuel ne remplace pas le bon sens d’utilisation, la compétence et les manuels techniques pour réparer ou
pour l’entretien. Merci de vous rapprocher de votre Revendeur Specialized pour tout réglage, entretien ou toute
réparation. Votre Revendeur Specialized dispose d’ailleurs d’un soutien spécifique comme des formations, des
cliniques et de la documentation relative à l’utilisation, les réglages, les réparations et l’entretien.
En raison du niveau de complexité du VADO/COMO, un bon montage nécessite un haut niveau
d'expertise mécanique, du talent et des outils spécifiques. Ainsi, il est essentiel que le montage,
l'entretien et la réparation soient réalisés par un Revendeur agréé Specialized. Avant votre première
sortie, assurez-vous que les composants comme les freins ou la transmission soient assemblés et
réglés en accord avec les préconisations du fabricant et qu'ils fonctionnent correctement.
AVERTISSEMENT ! Beaucoup de composants du VADO/COMO, incluant, le moteur, la batterie ou
les guides câbles et d’autres composants sont spécifiques au VADO/COMO. Utilisez uniquement
les composants fournis d’origine. L’utilisation d’autres composants compromet l’intégrité et
la solidité du montage. Les composants spécifiques du VADO/COMO ne doivent être utilisés
sur aucun autre vélo, même s’ils peuvent être installés. Un non-respect de ces consignes peut
conduire à des blessures ou à la mort.
AVERTISSEMENT ! Ne jamais modifier votre cadre ou votre vélo. Ne pas sabler, percer, retirer
de pièces de votre vélo. N’installez pas de composants incompatibles. Un non-respect de ces
consignes peut conduire à des blessures ou à la mort.
AVERTISSEMENT ! Les composants électriques peuvent être exposés quand vous travaillez sur votre
vélo. Ne touchez aucune partie du système électrique quand celui-ci est sous charge. N’exposez pas
à l’eau les connecteurs de la batterie et du cadre. Si des composants électriques ou la batterie sont
endommagés, arrêtez d’utiliser votre vélo et présentez-le chez votre revendeur agréé.
4.1. CAPTEUR DE VITESSE
Lors de l’assemblage du disque de frein arrière, montez l’aimant du capteur de vitesse sur le disque (fig. 4.1).
Quatre des six vis sont des vis de disque standard. Les deux autres vis (M5 x pas de 0,8 x longueur 15 mm, à tête
fraisée) fixent l’aimant du capteur de vitesse sur le disque.
4.1
DISQUE DE FREIN
ENGLISH
FRANÇAIS
DEUTSCHČESKÁHRVATSKASLOVENSKI
VIS DE
DISQUE
STANDARD
VIS À TÊTE FRAISÉE
M5 x 15 mm
AIMANT DU CAPTEUR
DE VITESSE
4.2. BOÎTIER DE PÉDALIER
Le boîtier de pédalier fait partie du moteur et ne requiert aucune pré-installation ou préparation.
4
Page 33

4.3. JEU DE DIRECTION
Le jeu de direction utilise un roulement haut 1, 1/8 (41.8 mm x 8 mm x 45 degrés) au standard Campagnolo et
un roulement bas 1,5” (52 mm x40 x7 mm, 45x45°). Assurez-vous que les roulements de remplacement soient
compatibles avec les spécifications Specialized. Aucun outil spécifique n’est nécessaire pour le montage/
démontage des roulements. Graissez les roulements avant installation.
Inspectez la fourche, la potence, la tige de selle et le tube de selle. Assurez-vous qu’il n’y ait pas de bavure ou de
bord tranchant. Retirez les bavures ou les bords tranchants à l’aide de papier abrasif à grains fins.
Toutes les parties de la potence en contact avec le pivot de fourche doivent être arrondies pour éliminer tout
point de contrainte.
AVERTISSEMENT ! Les bavures et bords tranchants peuvent endommager les surfaces en carbone
ou en aluminium. Tout dommage sur la potence ou la fourche peut fragiliser ces composants.
4.4. TIGE DE SELLE
Le cadre du VADO/COMO possède un diamètre interne du tube de selle de 30.9 mm et requiert une tige de selle
avec des tolérances comprises entre 30.78 mm et 30.95 mm.
INSERTION MINIMUM DE LA TIGE DE SELLE
4.4
Afin de prévenir les dommages sur le tube ou la tige de selle
il est important que la tige de selle soit suffisamment insérée
dans le tube de selle. Cette insertion minimale doit répondre
aux exigences suivantes :
La tige de selle doit être suffisamment insérée dans le
cadre afin que la marque d’insertion minimum/maximum
(min/max) sur la tige de selle ne soit pas visible (fig. 4.4 A).
La tige de selle doit également être suffisamment insérée
dans le tube de selle pour être visible à travers l’orifice
prévu à cet effet (fig. 4.4 B) si l’orifice n’est pas présent,
l’insertion doit égaler ou excéder le minimum d’insertion
(fig. 4.4 B) nécessaire pour la taille de cadre (voir ci-
A
insertion
min
dessous).
Si l’insertion minimum de la tige de selle et celle du
B
cadre diffèrent, toujours utiliser la plus longue valeur. Par
exemple, si le cadre nécessite 90 mm d’insertion mais que la tige de selle requiert 100 mm, alors 100 mm est le
minimum d’insertion requis.
• Tous les modèles VADO/COMO : insertion minimum 90 mm.
Si la tige de selle est insérée jusqu’à la marque minimum/maximum mais que la tige de selle n’est pas visible à travers
l’orifice ou si elle n’est pas suffisamment insérée dans le tube de selle, celle-ci doit être insérée davantage et donc
abaissée. Ceci peut rendre la selle trop basse, la tige de selle doit alors être changée pour une tige de selle plus longue.
AVERTISSEMENT ! Les casses dues au non-respect des limites d’insertions min/max de la tige
de selle et du cadre peuvent causer des dommages pour le cadre ou la tige de selle et causer une
perte de contrôle et une chute.
Si la tige de selle est coupée, les limites inscrites sur la tige de selle peuvent être modifiées. Avant
de couper la tige de selle noter la marge d’insertion prévue par le fabricant.
AVERTISSEMENT ! Pour obtenir des instructions générales concernant l’installation de la tige de
selle, reportez-vous à la section appropriée du Manuel utilisateur. Rouler avec un mauvais serrage
de selle peut faire tourner ou bouger la selle et provoquer ainsi une perte de contrôle et une chute.
ATTENTION : Inspecter la tige de selle et le tube de selle à la recherche d’arête ou bavures.
Ebavurez et cassez ces arêtes à l’aide de papier abrasif à grains fins.
4.5. REMPLACEMENT DE PIÈCES ET ACCESSOIRES
Les pièces de remplacement et accessoires Specialized sont disponibles chez votre revendeur agréé Specialized.
5
Page 34

5. NOTES GÉNÉRALES À PROPOS DE L’UTILISATION
Le moteur du VADO/COMO vous assiste uniquement au pédalage et quand le vélo roule. Le niveau d’assistance
sera alors plus ou moins grand en fonction de la force appliquée sur les pédales. Si vous arrêtez de pédaler le
moteur arrêtera alors d’assister.
Le VADO/COMO peut aussi être utilisé comme un vélo traditionnel sans assistance du moteur en sélectionnant le
mode OFF sur l’écran d’affichage. Le fonctionnement est le même si la batterie passe sous le seuil de 1 %.
Le VADO/COMO possède une fonction assistance à la marche (le moteur s’engage sans force appliquée sur les
pédales) qui est prévue pour vous assister lorsque vous devez pousser le vélo en montée. La vitesse est de 6 km/h
cette assistance fonctionne en maintenant enfoncée la touche + de la commande au guidon.
5.1. CONSEILS D’UTILISATION
Grâce à l’assistance de son moteur électrique le VADO/COMO offre une expérience unique en comparaison avec
un vélo traditionnel. Vous trouverez ci-dessous quelques conseils concernant l’utilisation de votre VADO/COMO, qui
réduiront l’usure de certains composants et augmenteront l’autonomie de la batterie :
Soyez attentif en arrivant dans les virages et soyez sûr d’arrêter de pédaler bien avant d’entrer dans le virage. Si
vous continuez à pédaler vous risquez d’avoir trop de vitesse en entrant dans le virage.
Roulez avec anticipation et portez votre regard loin devant vous. À chaque fois qu’une force de freinage est
appliquée, plus d’énergie est nécessaire pour amener le vélo à la vitesse d’origine.
Passez les vitesses régulièrement pour optimiser la cadence de pédalage et planifiez vos rapports avant un arrêt.
Réduisez la pression sur les pédales avant de changer de vitesse pour diminuer l’usure de la transmission.
Contrôlez la pression des pneus régulièrement. Une pression trop basse peut causer un roulage inefficace des pneus.
Si votre vélo est exposé à de basses températures, gardez votre batterie à l’intérieur jusqu’à ce que vous partiez rouler.
N’exposez pas votre vélo à des chaleurs excessives (ex. exposition directe au soleil).
N’embarquez que le chargement nécessaire. Plus de poids requiert plus d’énergie pour faire avancer le vélo.
AVERTISSEMENT ! Le moteur s’active dès que vous appuyez sur les pédales et que le vélo est en
mouvement. Vous devriez être assis sur le vélo avec au moins un levier de frein engagé avant de
commencer à pédaler. Ne pas enjamber le vélo en marche, le vélo pourrait accélérer de manière
inattendue. Ne pas suivre cet avertissement pourrait engendrer des blessures graves ou la mort.
AVERTISSEMENT ! L’accélération d’un vélo électrique peut être plus rapide qu’anticipée et
peut surprendre. Lors de votre première utilisation vous devriez utiliser le mode d’assistance le
plus bas, qui est le mode ECO. Cela vous permettra de vous familiariser avec le vélo électrique,
entraînez-vous à démarrer et à vous arrêter, à tourner et franchir des obstacles dans un
environnement sécurisé loin d’autres vélos, piétons ou véhicules. En raison de l’accélération
importante d’un vélo électrique, vous devriez porter une attention particulière aux conditions du
terrain car vous pouvez approcher les obstacles plus rapidement que prévu. Notez que le réglage
par défaut du moteur avant démarrage est toujours le mode SPORT.
ATTENTION : Le poids de votre VADO/COMO est plus élevé que le poids d’un vélo sans assistance
moteur. Soyez prudent en manipulant votre vélo (y compris en le garant, le portant, le poussant et
en le chargeant dans une voiture ou sur un porte vélo).
ATTENTION : N’utilisez pas votre VADO/COMO sans, au préalable, installer sa batterie. Rouler
sans batterie peut endommager les composants électriques exposés.
ENGLISH
FRANÇAIS
DEUTSCHČESKÁHRVATSKASLOVENSKI
5.2. AVANT VOTRE PREMIÈRE SORTIE
Indépendamment de votre expérience, lisez la section « Pour commencer » de votre Manuel utilisateur général
(Réglages du vélo ; La sécurité avant tout ; Vérification de l’état mécanique ; Première sortie) et procédez à tous
les contrôles de sécurité. Additionnellement assurez-vous de vous être familiarisé avec les éléments spécifiques
de votre vélo électrique.
6
Page 35

AVANT CHAQUE SORTIE
Batterie
• Est-ce que tous les connecteurs sont correctement branchés ?
• Votre batterie est-elle suffisamment chargée ?
• La batterie est-elle correctement installée et verrouillée dans le cadre ?
Ecran d’affichage
• Est-ce que l’écran fonctionne correctement ?
AVANT VOTRE PREMIÈRE SORTIE
Batterie
• Est-ce que la batterie est complètement chargée ?
Ecran d’affichage
• Etes-vous familier avec les fonctions de votre écran d’affichage ?
Commande au guidon
• Etes-vous familier avec les fonctions de votre commande au guidon ?
• Savez-vous comment utiliser la commande au guidon pour changer le mode d’assistance moteur d’ECO à SPORT et TURBO ?
AVERTISSEMENT ! Si votre batterie, chargeur et/ou tout autre composant montrent des signes
de dommage, n’utilisez pas votre vélo et amenez-le immédiatement chez votre revendeur agréé
Specialized pour inspection.
5.3. ROULER AVEC DES ENFANTS
Il existe différents montages qui permettent de transporter un enfant. Consultez la section sécurité de votre Manuel
utilisateur pour les informations générales et instructions pour les sièges spéciaux et remorques.
Si vous utilisez régulièrement votre vélo avec des éléments permettant le transport d’un enfant consultez votre
revendeur agréé Specialized afin de conduire une inspection périodique.
AVERTISSEMENT ! Les vélos Specialized sont conçus et testés pour être utilisés par une seule
personne à la fois. Transporter un enfant sur votre vélo Specialized se fait à vos risques. Si vous
installez des accessoires comme une remorque, un siège pour enfant ou une barre de tirage sur votre
vélo Specialized, assurez-vous que cet accessoire soit compatible et reportez-vous aux instructions
du fabricant et à votre revendeur agréé Specialized. Assurez-vous que votre vélo soit utilisable sans
danger après installation de ces accessoires. Assurez-vous également de ne pas dépasser la limite de
poids structurelle du vélo si vous utilisez une remorque, un siège pour enfant ou une barre de tirage et
de ne pas dépasser la charge de transport limite quand vous utilisez un siège pour enfant.
AVERTISSEMENT ! Rouler avec un enfant sur votre vélo va affecter le maniement du vélo en
modifiant le centre de gravité, le poids et l’équilibre. Cela peut également affecter votre capacité
à prendre les virages, augmenter votre distance de freinage et réduire votre capacité à ralentir et
à manœuvrer, spécialement à haute vitesse ou en descente. Tout cela peut conduire à une perte
de contrôle, des blessures potentielles et/ou à la mort. Vous devriez également vous entraîner à
rouler avec l’accessoire en question dans un environnement loin de tout danger.
AVERTISSEMENT ! N’attachez pas de siège enfant, remorque ou accessoires similaires à une
pièce ou un composant carbone, directement ou indirectement. Par exemple, n’attachez pas de
remorque à l’axe de roue arrière quand le triangle arrière est en composite ou carbone. De la même
façon, n’attachez pas de remorque ou de siège pour enfant sur une tige de selle ou une fourche
composite ou carbone. Cela pourrait appliquer des forces inhabituelles sur le cadre de votre vélo ou
composant; ce qui peut conduire à une casse complète, avec le risque de blessure ou de mort. Si
vous avez précédemment attaché un accessoire sur une pièce ou un composant carbone, n’utilisez
plus votre vélo jusqu’à ce que celui-ci soit inspecté par un revendeur Specialized agréé.
Avant de rouler avec un enfant sur votre vélo, informez-vous de toutes les lois et règlements
en vigueur dans votre pays. Il peut exister des restrictions sur l’utilisation d’un ou de tous les
accessoires. Spécifiquement pour les vélos à assistance électrique.
7
Page 36

6. NOTES GÉNÉRALES SUR LA MAINTENANCE
Le VADO/COMO est un vélo haute performance. Ainsi, il est essentiel que le montage, l’entretien et la réparation
soient réalisés par un Revendeur agréé Specialized. Pour les informations générales sur la maintenance de votre
vélo, consultez votre Manuel utilisateur. Effectuez également un contrôle de routine et un contrôle mécanique de
sécurité avant chaque sortie, comme décrit dans votre Manuel utilisateur.
• Un soin particulier doit être pris pour éviter toute détérioration de fibre de carbone ou de matériau composite. Tout dommage
pourrait engendrer une perte d’intégrité structurelle qui pourrait se traduire par une défaillance catastrophique. Cette détérioration
pourrait être visible ou complètement invisible lors d’une inspection. Vous devez inspecter votre vélo avant chaque sortie et après
chaque chute afin de vérifier qu’il ne présente aucun délaminage, trace d’impact, rayure sous peinture, écaillage, déformation ou
tout autre signe de détérioration. Ne roulez pas si votre vélo présente un de ces symptômes. Après toute chute et avant que vous
ne continuiez à rouler, apportez votre vélo chez votre Revendeur agréé Specialized pour une inspection complète.
• Lors de votre sortie, soyez à l’écoute de tout craquement car tout bruit de craquement peut être le signe d’un problème avec
un ou plusieurs composants. Examinez périodiquement toutes les surfaces à la lumière du soleil pour repérer toute craquelure,
fissure ou signe de fatigue au niveau des zones de contraintes - soudures, jointures, trous et zones de contact avec d’autres
pièces. Si vous entendez un craquement, voyez des signes d’usure excessifs , ou si vous trouvez une craquelure, même la plus
petite sur le vélo, arrêtez d’utiliser le vélo immédiatement et faites-le inspecter par un Revendeur agréé Specialized.
• La durée, le type et la fréquence de maintenance dépend de plusieurs facteurs comme la fréquence et le type d’utilisation, le
poids de l’utilisateur, les conditions de roulage et/ou impacts. Le VADO/COMO utilise un système d’assistance moteur, ce qui
signifie que vous parcourez plus de distance pour un temps imparti. Les composants peuvent alors être sujets à une usure
plus rapide. La transmission et les freins sont particulièrement sujets à une usure rapide. Faites inspecter votre vélo et vos
composants périodiquement par votre Revendeur agréé Specialized.
• L’exposition à certaines conditions difficiles, comme l’air salé (rouler en région côtière), peut entraîner la corrosion galvanique
de composants comme l’axe de pédalier et les vis, et ainsi accélérer l’usure de ces pièces et raccourcir leur durée de vie. La
boue peut également accélérer l’usure des surfaces et des roulements. Les par ties externes du vélo doivent être nettoyées avant
chaque sortie. La maintenance du vélo doit être effectuée de manière régulière par un Revendeur agréé Specialized. Ce qui
signifie que le vélo doit être nettoyé, inspecté pour des signes de corrosion ou de fissures et lubrifié. Si vous observez des signes
de corrosion ou de fissures sur le cadre ou les composants, les équipements concernés doivent êtres remplacés.
• Nettoyez régulièrement et lubrifiez votre transmission en accord avec les préconisations du fabricant.
• N’utilisez pas de nettoyeur haute pression directement sur les roulements. Même de l’eau provenant d’un tuyau de jardinage peut
pénétrer les roulements et accroître leur usure et celle du pédalier. Utilisez un chiffon propre et humide ainsi qu’un produit de
nettoyage pour votre vélo.
• N’exposez pas votre vélo de manière prolongée directement au soleil ou à une source de chaleur excessive, comme un radiateur
ou dans une voiture exposée au soleil.
ENGLISH
FRANÇAIS
DEUTSCHČESKÁHRVATSKASLOVENSKI
AVERTISSEMENT ! Le non-respect des instructions de cette section peut conduire à des dommages
sur les composants de votre vélo et annulera votre garantie et surtout, peut conduire à de sérieuses
blessures ou la mort. Si votre vélo montre des signes de dommages, ne l’utilisez pas et amenez-le
directement chez votre Revendeur agréé Specialized pour inspection.
AVERTISSEMENT ! Lorsque vous placez le cadre et/ou le vélo sur un pied d'atelier, fixez-le par la
tige de selle et non pas par le cadre. Un serrage par le cadre pourrait occasionner des dommages,
visibles ou non, qui pourraient entraîner une perte de contrôle et une chute.
AVERTISSEMENT ! Eteignez toujours la batterie quand vous n’utilisez pas le vélo ou quand vous
entretenez votre vélo.
ATTENTION : Ne pas ouvrir le système moteur. Le moteur se compose d’un système fermé qui ne
nécessite pas de maintenance. Toute intervention sur le moteur doit être effectuée par un Service
Center Specialized.
8
Page 37

7. INTERFACE SYSTÈME
Les modèles VADO et COMO sont équipés d’un écran LCD.
AVERTISSEMENT ! Soyez vigilant si vous consultez ou utilisez l’écran lorsque vous roulez car cela
risque de vous distraire et de causer des accidents. Vous devez toujours vous arrêter avant de
modifier des réglages ou d’utiliser les différentes fonctions de l’écran.
La commande au guidon (fig. 7) contrôle certaines fonctions de l´écran et le niveau d’assistance.support.
7
SET
+
-
LUMIÈRE
BOUTON DE RÉGLAGE : Permet à l’utilisateur de parcourir les pages (distance parcourue, état de
charge, temps de trajet et odomètre).
BOUTON + : Augmenter le niveau d’assistance. Maintenir enfoncé permet d’activer l’aide à la marche.
BOUTON - : Diminue le niveau d’assistance. Le fait de maintenir le bouton enfoncé pendant 2 secondes
réinitialise la distance du jour.
LUMIÈRE : Allume/éteint la lumière.
Les caractéristiques d’éclairage et d’avertisseur sonore peuvent varier en fonction du modèle de
vélo et des exigences de chaque pays.
7.1. MODES D’ASSISTANCE
Le moteur du VADO dispose de cinq niveaux d’assistance
différents. TURBO, SPORT, ÉCO, OFF et SMART CONTROL.
MODE TURBO : mode de puissance maximale pour les
portions à grande vitesse et les montées.
MODE SPORT : une maîtrise optimale avec une
puissance suffisante en cas de besoin.
MODE ÉCO : mode le plus efficace dans de
nombreuses conditions qui propose une bonne
puissance.
MODE OFF : Le moteur ne fournit aucune assistance
mais l’écran et les lumières continuent de fonctionner.
MODE SMART CONTROL : le moteur, au pédalage,
règle la puissance délivrée en fonction des paramètres du
parcours définis dans l’appli Mission Control.
Les différents modes sont gérés à l’aide des boutons +/- sur la
commande à distance (Fig. 7) et affichés sur le TCD. (Fig 7.1).
Après avoir activé le mode plus ou moins puissant de votre choix à partir de la commande à distance, le système ne
changera plus de mode. Pour passer de TURBO à SPORT, puis ÉCO, puis OFF, appuyez sur le bouton -. Pour passer
d’OFF à ÉCO, puis SPORT, puis TURBO, appuyez sur le bouton +.
9
7.1
TURBO
MODE
SPORT
MODE
ECO
MODE
OFF
MODE
SMART
CONTROL
Page 38

INFINITE TUNE : Grâce à Infinite Tune de l’appli Mission Control, la puissance moteur (Peak Power) du moteur
peut désormais être réglé indépendamment de l’Assistance (Support) du moteur et vice versa.La quantité d’énergie
que la puissance moteur puise dans la batterie peut-être réglée indépendamment pour chaque mode d’Assistance
et personnalisée en fonction de votre type de pratique, du terrain, de l’efficacité et de l’autonomie souhaités. Nous
vous recommandons de commencer avec les réglages suivants. Turbo : 100 % (Assistance) / 100 % (Puissance
moteur). Sport : 70 % / 100 %. Eco : 35 % / 35 %.
ASSISTANCE : Les curseurs du mode Assistance changent le niveau d’assistance fourni par le moteur
pour chaque mode, en fonction de la force de pédalage. En règle générale, un
surcroît d’assistance assure des accélérations plus rapides et facilite les ascensions
au prix d’une diminution de l’autonomie et d’un plus grand risque de patinage. Une
assistance faible garantit une autonomie plus longue et un meilleur contrôle du vélo
dans les conditions où l’adhérence est limitée. Par exemple, le fait de pédaler en
mode Sport avec une assistance réglée à 50 % demandera le double d’efforts pour
obtenir la même assistance que celle fournie en mode Turbo avec une assistance
réglée à 100 %.
PUISSANCE MOTEUR: en plus du réglage du mode Assistance, vous disposez
également du réglage de la puissance moteur. Celle-ci fait référence à la puissance
maximale délivrée par le moteur pour chaque mode d’Assistance. Elle peut être
réglée jusqu’à 100 % pour tous les modes d’Assistance. Si la puissance moteur est
réglée à 100 % pour tous les modes d’Assistance, plus vous pédalez fort, et plus
vous aurez de puissance quel que soit le mode d’Assistance activé. Par exemple, si un mode d’Assistance
est réglé à 35 % mais que la puissance moteur est réglée à 100 %, il est quand même possible d’obtenir
100 % de la puissance moteur en pédalant de manière plus soutenue et avec un couple plus élevé. SSi
la puissance moteur est réglée en dessous de 100 %, vous pourrez limiter la puissance électrique fournie
par le moteur et créer un plafond artificiel pour cette puissance. Le réglage du mode Eco avec un plafond
artificiel de la puissance moteur améliorera l’autonomie tout en différenciant plus nettement les modes
d’Assistance entre eux.
Specialized vous recommande de faire des essais de modes de puissance afin de trouver les
réglages qui correspondent le mieux à votre pratique et aux conditions d’utilisation.
7.2. OPTIONS DE CONNECTIVITÉ
Le système d’assistance offre un haut niveau de souplesse d’interface grâce à la connectivité Bluetooth et/ou
ANT+. En fonction du dispositif et de l’option de connectivité, différentes fonctions sont accessibles.
BLUETOOTH LE : L’application Mission Control (iOS ou Android) offre une expérience de roulage améliorée
en enregistrant les parcours réalisés tout en permettant la synchronisation avec Strava, en éliminant toute
inquiétude concernant l’autonomie grâce à la fonction Smart Control, en permettant l’enregistrement d’itinéraires
GPS et les diagnostics système. Les dispositifs Android et iOS peuvent se synchroniser avec tous les VADO &
COMO via Bluetooth LE. Rendez-vous sur Google Play ou dans l’App Store Apple pour la version la plus récente
de l’application Mission Control gratuite. Toutes les instructions d’utilisation Mission Control sont intégrées à
l’application.
ANT+ : Le protocole ANT+ permet de synchroniser divers appareils avec les vélos VADO et COMO.
Le profil LEV (Light Electric Vehicle, véhicule électrique léger) permet d’accéder à des types supplémentaires de
données, notamment la cadence, la puissance développée par le cycliste, la température du moteur, la température
de la batterie, l’état de charge de la batterie et la vitesse. Pour une liste actualisée des appareils ANT+ compatibles
VADO & COMO, rendez-vous sur https://www.thisisant.com/directory/filter/~/~/~/200/.
L’option « Canal Truqué » permet d’afficher l’état de charge de la batterie, en tant que canal Puissance,
Fréquence cardiaque ou Cadence inutilisé, sur les compteurs cyclistes compatibles ANT+. Utilisez
l’application Mission Control pour sélectionner cette option.
ENGLISH
FRANÇAIS
DEUTSCHČESKÁHRVATSKASLOVENSKI
10
Page 39

7.3. INSTALLATION
B
A
C
7.3.1
7.3.2
Tournez pour installer l’écran sur le support, puis serrez la plaque anti-rotation (7.3.1 a) à l’aide de la petite vis
(7.3.1 b). Le couple de serrage recommandé est de 4,4 lbf/0,5 Nm.
Retirez les composants fixés sur le côté du cintre servant à installer le support de l’écran. Celui-ci peut être fixé à
gauche ou à droite de la potence.
Serrez le support suffisamment pour qu’il ne glisse pas. (7.3.2 C) Ne serrez pas de manière excessive. Le couple
de serrage recommandé est de 4,4 lbf/0,5 Nm.
7.4. ACTIVATION/REMPLACEMENT DE LA PILE
À l’aide d’un tournevis plat, soulevez le bord du couvercle de la pile, puis libérez délicatement la pile de son
emplacement.
Remplacez la pile par une pile bouton CR1220 neuve, en positionnant son côté imprimé contre le couvercle.
Vérifiez que le joint n’est pas endommagé puis appuyez sur le couvercle pour le remettre en place.
À chaque fois que la pile est remplacée, l’ensemble des informations sauvegardées dans l’appareil (compteur
kilométrique, chronomètre, synchronisation de vos appareils) est perdu. Si nécessaire, notez vos informations
avant de remplacer la pile.
Le port USB est réservé aux revendeurs ou au service après-vente.
11
Page 40

7.5. FONCTIONNALITÉS DE L’APPAREIL
Champ des données 1
Champ des données 1, description
Champ des données 3
Niveau principal de la pile
Mode Turbo
1
1
1
A
2
3
Mode Sport
4
Mode Eco
5
Horloge
6
Champ des données 2
1
Champ des données 2, description
1
ENGLISH
Bouton gauche Bouton droit
A
Affichage par paliers de 10 %
7.6. ÉCRANS PRINCIPAUX
B
Utilisé
En cours d’utilisation : Scénario d’utilisation standard
B
“LO BAT” clignote (pile bouton faible)
C
Appuyer brièvement sur le bouton gauche
Appuyer brièvement sur le bouton droit
7 8
C
Pile Faible
Barre de la batterie clignotante, indique le
D
niveau de charge
7.7. LÉGENDE
FRANÇAIS
DEUTSCHČESKÁHRVATSKASLOVENSKI
D
Mode de charge
Appuyer brièvement sur les boutons gauche et droit
Personnaliser les pages : appuyer sur les boutons gauche et droit pendant trois
(3) secondes
Configuration du système : appuyer sur le bouton gauche pendant cinq (5)
secondes
12
Page 41

7.8. PARAMÈTRES/NAVIGATION SUR LA PAGE PAR DÉFAUT
Il y a 5 pages programmées et chacune d’entre elles affiche différentes informations.
Utilisez les boutons droite/gauche ou le bouton RÉGLAGE sur la commande à distance pour naviguer dans les
pages.
Les informations affichées sur chaque page peuvent être personnalisées.
L’ordinateur affiche la Page 1 dès que le vélo est alimenté.
SET
Page 1 Page 2
Page 3 Page 4
Page 5
7.9. PERSONNALISATION DES PAGES
Affichez la page que vous souhaitez personnaliser, puis appuyez sur les boutons G et D pendant trois secondes.
Le Champ des données 1 va clignoter. Appuyez sur le bouton G ou D pour faire défiler les différentes options.
Appuyez brièvement sur les boutons G et D pour confirmer la fonctionnalité choisie et passer au Champ des
données 2.
Répétez les étapes précédentes pour les Champs des données 2 et 3.
Répétez les étapes précédentes pour les Pages 2 à 5.
La case en jaune sur le schéma signifie qu’elle clignote en réalité (champ réglable).
F
Reprogrammer AVG, MAX, DIST, TRIP, KCAL : Appuyez simultanément sur les boutons G et D pendant
G
0,5 secondes puis relâchez.
Il est également possible de faire une réinitialisation en appuyant sur le (-) de la commande à distance pendant
2 secondes.
F
FUNCTIONS
L R L R L R
Heart Rate
Battery %
Cadence
G
13
Page 42

7.10. CONFIGURATION DU SYSTÈME
L R L R
Horloge par défaut à 12:00.
H
Pour modifier les réglages, appuyez sur le bouton G ou D. Maintenir appuyé = défilement rapide. Appuyer
I
brièvement = paliers de 1 unité.
Options de synchronisation :
J
• Connexions confirmées : clignotant puis fixe.
• Échec de la synchronisation : affichage = « PAIR FAILED! ».
Ceinture cardiofréquencemètre nécessaire (vendue séparément).
K
ENGLISH
5 sec
TIME 12/24
H
L R
DAY HOUR MIN
L R L R
UNITS
HR Y / N
K
I
YEAR MONTH
I
L R L R
J
FRANÇAIS
DEUTSCHČESKÁHRVATSKASLOVENSKI
L R
7.11. CONNEXION À L’APPLICATION MISSION CONTROL
L
Lorsque le vélo est sous tension, ouvrez l’application Mission Control sur votre appareil mobile, recherchez votre
vélo et ajoutez-le.
M
Une fois connecté, saisissez le code PIN, affiché sur le TCD-W, pour synchroniser l’application Mission
Control et votre vélo. Lorsque cela est fait, vous pouvez exploiter pleinement les fonctionnalités Mission Control.
L
M
M
14
Page 43

7.12. MESSAGES D’ERREUR
Si l’écran affiche un message d’erreur, vérifiez que tout est connecté
puis essayez de redémarrer votre vélo. Si le problème persiste, consultez
ERROR MESSAGES
l’application Mission Control pour plus de détails ou contactez votre
revendeur.
Avec certains messages d’erreur, le système s’éteindra automatiquement.
Dans tous les cas, le vélo pourra être utilisé sans l’assistance du moteur
avec le système désactivé.
7.13. INFORMATIONS GÉNÉRALES
• Cet écran est conçu pour être utilisé avec les vélos VADO et COMO.
• Si l’alimentation du vélo est éteinte, les informations ne pourront pas s’afficher.
• L’écran est doté d’un rétro-éclairage qui s’allume lorsque les lumières du vélo sont allumées.
• Restez concentré sur votre parcours, et non sur l’appareil. N’essayez ni de personnaliser les différentes
pages ni de procéder aux différents réglages lorsque vous pédalez.
NETTOYAGE/ENTRETIEN :
• N’exposez jamais l’appareil à des sources de chaleur excessive ou aux rayons du soleil pendant une longue
période. Cela pourrait endommager l’appareil et/ou la pile.
• Pour nettoyer l’appareil, utilisez uniquement un chiffon en tissu doux humide ou sec. N’utilisez pas de
détergents agressifs.
• Ne démontez pas et ne faites jamais tomber l’appareil.
• Vérifiez que l’appareil et son support sont parfaitement fixés sur le cintre de votre vélo avant de l’utiliser.
7.14. OPTIONS/CARACTÉRISTIQUES DES FONCTIONNALITÉS
CHAMP DES DONNÉES 1 ET 2
KM/H OU MI/H
AVG
DIST
CHRONOMÈTRE
KCAL
PUISSANCE
MAX
ODO
CHAMP DES DONNÉES 3
AFFICHAGE
Horloge 00:00 - 23:59 (24 h) / 1:00 - 12:59 (12 h)
Type de pile Pile bouton CR 1220
Dimensions 62 mm x 46.5 mm x 17.5 mm
Température de fonctionnement
Fréquence/protocole radio ANT+/ BT
Protection contre l’humidité/la poussière IP67
Vitesse 0 – 200 km/h ou 0,0 - 199,9 mi/h
Vitesse moyenne 0,0 – 199,9 km/h ou mi/h
Distance 0,0 – 999,9 km/mile
Temps de trajet 0:00’ - 99:59’
Calories dépensées 0,0 – 9 999 KCal
Puissance du cycliste 0,0 – 9 999 W
Vitesse maximale 0,0 – 199,9 km/h ou mi/h
Odomètre 0,0 – 9 999 km/mile
Fréquence cardiaque 0 – 240 bpm
% de la batterie 0 – 100 %
Cadence 0 – 240 tr/min
-10° C — +60° C
+14° F — +140° F
15
Page 44

8. BATTERIE / CHARGEUR
Votre vélo est alimenté par une batterie Lithium-Ion (Li-Ion). Appliquez toujours les instructions suivantes quand
vous manipulez ou chargez votre batterie ou quand vous utilisez votre VADO/COMO :
Utilisez la batterie uniquement avec une température comprise entre -20° C (-4° F) et +70° C (+158° F).
Utilisez la batterie du VADO/COMO uniquement avec le modèle de vélo VADO/COMO. Ne pas utiliser la batterie
du VADO/COMO avec un autre vélo. De même n’utilisez pas de batterie d’un autre modèle sur le VADO/COMO,
même si celle-ci peut être insérée dans le cadre.
Eteignez toujours la batterie avant de connecter ou déconnecter le chargeur ou le câble (harnais) de connexion.
Eteignez la batterie, débranchez le chargeur de la batterie et retirez la batterie avant d’intervenir sur le vélo. Quand
vous transportez ou manipulez la batterie hors du vélo, assurez-vous que la batterie soit éteinte (OFF). Le fait de
toucher les contacts quand la batterie est allumée (ON) peut conduire à un choc électrique et/ou une blessure.
Avant d’utiliser le vélo, assurez-vous que la batterie soit correctement sécurisée dans le cadre.
ENGLISH
8.1. CONSIGNES À APPLIQUER
Ne modifiez pas, n’ouvrez ou ne désassemblez pas la batterie ou le chargeur. Une modification ou le
désassemblage peut conduire à un court-circuit, un feu ou une défaillance.
La batterie est très lourde. Soyez prudent quand vous la manipulez et ne la faites pas tomber.
Empêchez tout clou, vis, ou toutes autres pointes et/ou objet métallique de venir en contact avec la batterie ou le
port de chargement.
Empêchez la batterie de chauffer de manière excessive et protégez la batterie d’une exposition excessive au soleil.
N’exposez pas la batterie à un feu ou un radiateur.
N’immergez pas la batterie sous l’eau.
Evitez le contact avec les objets métalliques qui pourraient causer un court-circuit.
N’utilisez pas de batterie qui pourrait montrer une partie externe ou un port de chargement endommagé ou si vous
observez une perte de liquide. Ce liquide peut causer des irritations et des brûlures de la peau. En cas de contact
avec les yeux ou la peau avec le liquide provenant de la batterie, rincez immédiatement à l’eau et consultez un
médecin.
AVERTISSEMENT ! Un non-respect de ces consignes peut conduire à un dommage des composants
électriques de votre vélo et annulera votre garantie, mais PLUS GRAVE ENCORE, cela peut conduire
à de sérieuses blessures ou à la mort. Si votre batterie ou chargeur montrent des signes de
dommages, ne les utilisez pas et amenez-les directement à votre revendeur agréé Specialized.
8.2. CHARGER ET UTILISER LA BATTERIE
Inspectez régulièrement la batterie et le chargeur pour vous assurer de l’absence de dommage. Ne chargez et
n’utilisez jamais la batterie si vous suspectez qu’elle soit endommagée ou défectueuse.
Assurez-vous que la fiche du chargeur et le connecteur batterie soient secs avant de les connecter et de charger
la batterie.
Utilisez uniquement le chargeur Specialized livré avec le vélo ou un autre chargeur approuvé par Specialized.
Inspecter le chargeur avant chaque usage pour tout signe de dommage sur le chargeur lui-même, le câble ou la
fiche. N’utilisez jamais un chargeur que vous suspectez endommagé.
Placez le chargeur sur une surface stable loin de toute source de chaleur. Si la batterie est chargée en dehors du
cadre, placez la batterie sur le même plan que le chargeur.
Vous devez charger la batterie dans un environnement sec et ventilé. Assurez-vous que la batterie et le chargeur
ne sont pas couverts pendant le chargement. Assurez-vous que la batterie et le chargeur ne sont pas exposés à
des produits inflammables ou des matières dangereuses.
FRANÇAIS
DEUTSCHČESKÁHRVATSKASLOVENSKI
16
Page 45

AVERTISSEMENT ! Le non-respect de ces consignes peut conduire à endommager les
composants électriques de votre vélo et annulera la garantie, mais PLUS GRAVE ENCORE,
peut causer des blessures ou la mort. Si votre batterie ou votre chargeur présente tout signe de
dommage, ne l’utilisez pas et présentez-le à votre revendeur agréé Specialized pour inspection.
La batterie peut être chargée dans ou en dehors du cadre. Reportez-vous aux consignes en
question pour le retrait de la batterie. Chargez uniquement la batterie à une température ambiante
comprise entre 0° C et +50° C (+32° F and +122° F). Si la température extérieure est trop haute ou
trop basse, chargez votre batterie à l’intérieur. Pour des raisons de sécurité si la température de la
batterie est trop haute elle ne chargera pas.
8.2.1
PORT DE
CHARGE
PROTECTION
DE PRISE
BATTERIE
8.2.2
CHARGEUR
CHARGING
CHARGEMENT
FULLY CHARGED
CHARGE COMPLÈTE
PROBLEM
PROBLÈME
Branchez le chargeur à votre prise murale (100-240V), en utilisant la prise correspondant à votre standard national.
Retirez la protection du port de charge sur la batterie et connectez la fiche du chargeur sur le port de charge de
la batterie (fig. 8.2.1). Vous devez charger la batterie dans un environnement équipé de détecteurs de fumée.
Quand la charge est complète, déconnectez la fiche du chargeur du port de charge de la batterie.
Débranchez le chargeur de votre prise murale.
Au cours du chargement, la LED s’allumera en rouge (fig. 8.2.2). Une fois le chargement terminé la diode passe au
vert.
ATTENTION : Si la LED rouge clignote pendant la charge, c’est qu’une erreur s’est produite. Dans
ce cas, débranchez immédiatement le chargeur de la prise, cessez d’utiliser l’assistance moteur et
contactez votre revendeur agréé Specialized.
Notez que les batteries Li-Ion perdent en capacité au fil du temps en fonction de l’utilisation et du
vieillissement. Un temps de fonctionnement réduit après chargement peut être un signe que la
batterie arrive à la fin de sa durée de vie et doit être remplacée. Si le vélo est correctement utilisé,
la batterie devrait encore posséder approximativement 75 % après 300 cycles de charge ou 2
ans. Une batterie de remplacement peut être achetée chez votre revendeur agréé Specialized.
8.3. AFFICHAGE DU NIVEAU DE CHARGE
Le niveau de charge de la batterie est continuellement affiché pendant votre sortie. Le nombre de LED allumées
indique la charge restante de la batterie (fig. 8.3).
17
Page 46

Avec 10% de charge restante le système commencera à réduire l’assistance moteur. Avec 1% de charge restante le
moteur se coupera.
Au delà de 10 minutes d’inutilisation de votre vélo, le système de management de la batterie (BMS) coupera le
système. Pour continuer à rouler avec assistance vous devez redémarrer la batterie.
8.3
80-100%
60-79%
40-59%
20-39%
ENGLISH
8.4.1
ATTENTION : ÉTEINDRE
LA BATTERIE AVANT
SON INSTALLATION OU
SON RETRAIT.
8.4. INSTALLER LA BATTERIE
CONNECTEUR
BATTERIE
0-19%
FRANÇAIS
DEUTSCHČESKÁHRVATSKASLOVENSKI
Insérez le bas de la batterie dans la partie basse de la cavité (fig. 8.4.1), puis aligner le haut de la batterie avec le
haut de la cavité.
La clé n’a pas besoin d’être dans la serrure pour installer la batterie. La batterie se verrouillera
automatiquement quand elle sera installée. La clé est uniquement nécessaire pour retirer la
batterie du cadre.
18
Page 47

CLICK!
8.4.2
Appuyez sur la batterie à proximité du bouton ON/OFF jusqu’à ce que le verrou s’engage (fig. 8.4.2).
8.5. RETIRER LA BATTERIE
Inversez les étapes de l’installation :
Tournez la clé dans le sens horaire, jusqu’à ce que le haut de la batterie sorte légèrement du cadre.
Tenez la batterie à deux mains, levez doucement le haut de la batterie, tournez la batterie vers l’extérieur du
cadre (côté opposé à la transmission) puis retirez-la du cadre.
Tournez la clé dans le sens antihoraire pour retirer la clé de la serrure.
8.6. NETTOYAGE
Toujours éteindre la batterie et retirer le chargeur de la batterie avant de nettoyer votre vélo. Retirez la batterie du
vélo avant de nettoyer la batterie.
Toujours débrancher le chargeur de la batterie et du port de charge avant de commencer le nettoyage.
ATTENTION : Ne jamais utiliser de nettoyeur haute pression pour nettoyer votre VADO/COMO.
Utilisez à la place un chiffon sec ou légèrement humide. Assurez-vous qu’à aucun moment de l’eau
entre en contact avec les composants électriques. Consulter votre Revendeur agréé Specialized
pour plus d’informations sur le nettoyage de votre vélo.
ATTENTION : Ne pas utiliser d’alcool, solvants ou agents abrasifs pour nettoyer le chargeur ou la
batterie. Utilisez plutôt un chiffon sec ou légèrement humide.
8.7. STOCKAGE
ATTENTION : Si la batterie n’est pas utilisée pendant une longue période. Retirer la batterie du
cadre et la stocker dans un endroit sec et ventilé, laissez-la découverte. Stocker la batterie à une
température ambiante comprise entre -20° C and +35° C (-4° F and +95° F). Si la température
extérieure est trop basse ou trop haute la stocker à l’intérieur.
ATTENTION : Si la batterie est stockée et inutilisée pour une période prolongée, assurez-vous de
charger la batterie au moins tous les 90 jours, jusqu’à ce que la charge atteigne 2 LEDs (20-39%)
allumées en vert. Si la batterie n’est pas chargée pendant une longue période (plus de 3 mois)
cela peut endommager la batterie.
Ne pas laisser la batterie connectée au chargeur pour une longue période après le chargement
complet de la batterie.
19
Page 48

8.8. CARACTÉRISTIQUES TECHNIQUES DE LA BATTERIE
DESCRIPTION UNITÉ SPÉCIFICATION
TENSION DE VOLTAGE V 36
TEMPÉRATURE DE CHARGE
TEMPÉRATURE DE DÉCHARGE
TEMPÉRATURE DE STOCKAGE
INDICE DE PROTECTION IP67
POIDS
BATTERIE SBC-B09 SBC-B10 SBC-B11 SBC-B17
CAPACITÉ NOMINALE 16.8AH 14AH 12.5AH 11.5AH
ÉNERGIE 604WH 504WH 460WH 400WH
TEMPS DE CHARGE (SBC-C04) 4:35H 3:50H 3:30H 3:15H
TEMPS DE CHARGE (SBC-C05) 9:10H 7:40H 7:00H 6:30H
°C 0 — +50
°F +32 — +122
°C -20 — +70
°F -4 — +158
°C -20 — +35
°F -4 — +95
KG 2.7
LB 6.0
ENGLISH
FRANÇAIS
8.9. CARACTÉRISTIQUES TECHNIQUES DU CHARGEUR
DESCRIPTION UNITÉ SPÉCIFICATION
NUMÉRO DE MODÈLE DU CHARGEUR SBC-C04 SBC-C05
TEMPÉRATURE DE CHARGEMENT
TEMPÉRATURE DE STOCKAGE
TENSION DE SERVICE V 42 42
VOLTAGE ENTRÉE DE COURANT ALTERNATIF V 100 — 24 0 100 — 240
FRÉQUENCE Hz 50 / 60 50 / 60
COURANT DE CHARGE MAX A 4 2
DIMENSIONS mm 179 X 80 X 37.2 147 X 65.5 X 34.2
L’autonomie de la batterie peut varier considérablement en fonction du modèle/capacité de la batterie et conditions
d’utilisation, comme le dénivelé du parcours et le mode d’assistance utilisé. Consultez « NOTES GÉNÉRALES À
PROPOS DE L’UTILISATION » en page 6 pour les informations complémentaires sur l’utilisation de la batterie
et comment optimiser son autonomie.
AVERTISSEMENT ! Lire l’étiquette sur la batterie (fig. 8.9) avant votre première utilisation.
°C -10 — +40 0 — +40
°F 14 — +104 +32 — +104
°C -20 — +65 -20 — +60
°F -4 — +149 -4 — +140
DEUTSCHČESKÁHRVATSKASLOVENSKI
20
Page 49

8.9
8.10. TRANSPORT
Le transport ou l’envoi de la batterie de votre VADO/COMO peut être sujet à certaines restrictions
et peut nécessiter un transport, étiquette et/ou paquet spécifique. Informez-vous au préalable de
toutes les règles et obligations en vigueur dans votre pays. Votre Revendeur agréé Specialized
peut aussi avoir en sa possession ces informations. Quand vous transportez la batterie en dehors
du cadre vous devez utiliser une boîte spécialement approuvée à cet effet.
ATTENTION : Votre VADO/COMO est plus lourd qu’un vélo sans assistance électrique. Soyez
prudent pendant le maniement ou le portage de celui-ci.
8.11. RECYCLAGE
Les batteries et chargeurs ne doivent pas être jetés avec vos déchets traditionnels. Tous
les chargeurs et les batteries doivent être déposés à un endroit prévu à cet effet, en
LI-
règle avec les régulations de votre pays. Consulter votre Revendeur agréé Specialized
ION
pour plus d’informations sur le recyclage de votre batterie ou chargeur et sur l’existence
d’un programme de recyclage.
9. ÉCLAIRAGES
L’éclairage avant est raccordé à la batterie et s’allume quand la batterie est allumée.
Pour les modèles équipés de porte-bagages : L’éclairage arrière est raccordé à travers le garde-boue et le
porte-bagages. Le démontage du porte-bagages ou du garde-boue conduira à la perte de l’éclairage arrière
alimenté par la batterie sur votre vélo.
Les caractéristiques des éclairages avant et arrière peuvent varier en fonction du modèle de vélo
et des exigences de chaque pays. Pour les modèles équipés d’un éclairage arrière, celui-ci peut
être installé sur le porte-bagages arrière ou au-dessous de la selle.
10. SPÉCIFICATIONS
10.1 SPÉCIFICATIONS VISSERIE / COUPLE DE SERRAGE
AVERTISSEMENT! Il est IMPORTANT pour votre sécurité de serrer les éléments de fixation (écrous,
boulons, vis) de votre vélo au couple de serrage prescrit. Si une force insuffisante est exercée, la fixation
pourra ne pas être suffisamment serrée. Si une force excessive est exercée, l´élément de fixation peut
subir un arrachement des filets, s’étirer, se déformer ou casser. Dans les deux cas, une force de serrage
incorrecte peut entraîner une défaillance du composant et donc la perte de contrôle et la chute.
Serrez chaque vis au couple indiqué le cas échéant. Après la première utilisation et régulièrement
par la suite, contrôlez le couple de serrage de chaque vis pour garantir la bonne fixation des
composants. Ci-après un récapitulatif des spécifications de couple de serrage dans ce guide :
EMPLACEMENT
COLLIER DE SELLE 45 5.1 AXE DE SERRAGE DE ROUE AVANT 133 15
ENTRE TIGE DE SELLE ET SELLE 120 13.5 VIS DE MANIVELLE 443 50
21
IN-LBF
Nm EMPLACEMENT
IN-LBF
Nm
Page 50

ENTRE POTENCE ET PIVOT DE FOURCHE
ENTRE POTENCE ET CINTRE 52 6.0 ÉCROU DE SERRAGE D’ÉTOILE 443 50
PATTE DE DÉRAILLEUR ARRIÈRE 35 4
AXE DE SERRAGE DE ROUE ARRIÈRE 133 15 VIS DE PORTE-BIDON 25 2.8
COMMANDE AU GUIDON
ATTENTION : Assurez-vous que les surfaces de contact soient propres et que les filets soient
graissés ou aient reçu du frein-filet (reportez-vous aux instructions pour chaque vis) avant
installation.
*Appliquer de la Loctite bleue sur les vis de plateau
ÉLÉMENT SPÉCIFICATION
JEU DE DIRECTION 1 1/8” HAUT/BAS
DIAMÈTRE DU COLLIER DE TIGE DE SELLE 34.9 MM
DIAMÈTRE DE LA TIGE DE SELLE 30.9 MM
PATTE DE DÉRAILLEUR ARRIÈRE S172600003 (AMAZINGER 2.1)
MOYEU ARRIÈRE 148 MM X 12 MM
MOYEU AVANT (FOURCHE RIGIDE) 100 MM X 12 MM
MOYEU AVANT (FOURCHE À SUSPENSION) 100 MM X 15 MM
AVERTISSEMENT ! Le cadre du VADO/COMO est compatible uniquement avec la fourche rigide
VADO/COMO ou la fourche à suspension avec 50 mm de débattement maximum. L’utilisation d’une
fourche différente affectera négativement la géométrie et la qualité de roulage du vélo; plus GRAVE
ENCORE, cela peut entraîner une défaillance du cadre et conduire à de sérieuses blessures ou la mort.
52 6.0 VIS DE PLATEAUX 89 10*
GUIDES DE DURITE DE FREINS ARRIÈRE
7 0.8
10.2. SPÉCIFICATIONS DU CADRE
6 0.7
ENGLISH
FRANÇAIS
DEUTSCHČESKÁHRVATSKASLOVENSKI
10.3. PRESSIONS DE GONFLAGE RECOMMANDÉES
Une bonne pression de gonflage est essentielle pour des performances optimales. Des pneus légèrement surgonflés roulent plus vite et présentent une moindre résistance au roulement mais offrent moins de traction. Des
pneus sous-gonflés offrent plus de traction et de contrôle au détriment de la résistance au roulement.
Utilisez un manomètre de qualité et reportez-vous aux indications de gonflage inscrites sur le côté du pneu.
En raison du poids supplémentaire du VADO/COMO, la pression des pneus doit généralement être
plus élevée que sur un vélo traditionnel.
11. DISPOSITIONS RÉGLEMENTAIRES
RoHS: Specialized Bicycle Components, Inc. certifie que ce produit et son emballage sont conformes
à la directive de l’Union européenne 2011/65/EU relative à la limitation de l’utilisation de certaines
substances dangereuses dans les équipements électriques et électroniques, communément appelée
directive RoHS.
FRANÇAIS - Déclaration ISDEC: Cet appareil respecte la ou les normes RSS non soumises à licence d’Innovation,
Sciences et Développement économique Canada (ISDE). Son fonctionnement est soumis aux deux conditions
suivantes : (1) cet appareil ne doit pas causer d’interférences et (2) cet appareil doit accepter toute interférence, y
compris les interférences pouvant entraîner un fonctionnement non désiré de l’appareil. CAN ICES-3(B)/NMB-3(B).
Ce dispositif respecte l’exemption d’évaluation de routine des limitations de la section 2.5 de la RSS 102 et la
conformité à l’exposition aux RF de la RSS-102. Les utilisateurs peuvent obtenir des informations canadiennes relatives
à l’exposition et la conformité aux RF.
Cet émetteur ne doit pas être installé ou utilisé en conjonction avec d’autres antennes ou autres émetteurs.
22
Page 51

12. DÉCLARATION DE CONFORMITÉ CE
Le fabricant :
Specialized Bicycle Components Inc.
15130 Concord Circle
Morgan Hill, CA 95037, USA
Tel: +1 408 779-6229
confirme par la présente pour les produits suivants :
Description du produit : EPAC (Electrically Pedal Assisted Cycle)
Désignation du
modèle :
La conformité à toutes les dispositions
en vigueur de la directive :
La machine est également conforme à
toutes les dispositions de la directive :
Les normes harmonisées suivantes ont
été appliquées au produit :
Numéro de Série:
Documentation technique réalisée
par :
TURBO VADO 3.0
TURBO VADO 4.0
TURBO VADO 5.0
Machines (2006/42/CE).
Compatibilité électromagnétique (2004/108/CE).
Équipements radioélectriques (2014/53/UE)
EN 15194 Cycles - Cycles à assistance électrique - Bicyclettes
EPAC.
Situé sur l’étiquette sur la dernière page de ce manuel
Specialized Europe GmbH
Werkstattgasse 10
6330 Cham, Switzerland
TURBO COMO 3.0
TURBO COMO 4.0
TURBO COMO 5.0
Signature:
Jan Talavasek (European Engineering Manager)
Specialized Europe GmbH
6330 Cham, Switzerland
1er septembre 2018
REMARQUE : La présente déclaration de conformité s’applique uniquement aux vélos vendus dans les pays
assujettis aux directives de marquage CE.
REMARQUE : POUR CONNECTER LE MANUEL UTILISATEUR À VOTRE VÉLO, COLLEZ L’ÉTIQUETTE JAUNE
AVEC LE NUMÉRO DE SÉRIE SITUÉE SUR LE CADRE DU VÉLO PAR-DESSUS L’ÉTIQUETTE IMPRIMÉE AU DOS
DE CE MANUEL.
23
Page 52

INHALT
1. EINFÜHRUNG ............................................................................................................................................ 1
1.1. GARANTIE .............................................................................................................................................................................1
2. VADO/COMO KOMPONENTEN ................................................................................................................... 2
3. ALLGEMEINE INFORMATIONEN ZU IHREM VADO/COMO............................................................................ 3
3.1. VERWENDUNGSZWECK ....................................................................................................................................................3
3.2. PEDELEC / EPAC ................................................................................................................................................................ 3
3.3. STARTEN DES SYSTEMS ..................................................................................................................................................3
4. GENERELLE INFORMATIONEN ZUM ZUSAMMENBAU ................................................................................ 4
4.1. GESCHWINDIGKEITSSENSOR ..........................................................................................................................................4
4.2. TRETLAGER ........................................................................................................................................................................4
4.3. STEUERSATZ ...................................................................................................................................................................... 4
4.4. SATTELSTÜTZE ..................................................................................................................................................................5
4.5. ERSATZTEILE UND ZUBEHÖR .........................................................................................................................................6
5. ALLGEMEINE HINWEISE ZUM FAHREN...................................................................................................... 6
5.1. FAHRTIPPS .......................................................................................................................................................................... 6
5.2. VOR DER ERSTEN FAHRT .................................................................................................................................................7
5.3. FAHREN MIT KINDERN ......................................................................................................................................................7
6. ALLGEMEINE HINWEISE ZUR WARTUNG ................................................................................................... 8
7. SYSTEM INTERFACE (DISPLAY) ................................................................................................................9
7.1. UNTERSTÜTZUNGS-MODI ................................................................................................................................................. 9
7.2. KONNEKTIVITÄTSOPTIONEN ...........................................................................................................................................10
7.3. INSTALLATION ....................................................................................................................................................................11
7.4. AKTIVIERUNG/AUSTAUSCH DER BATTERIE ..................................................................................................................11
7.5. DISPLAY-FUNKTIONEN .....................................................................................................................................................12
7.6. HAUPTANZEIGEN ............................................................................................................................................................... 12
7.7. TASTENBEFEHLE ...............................................................................................................................................................12
7.8. STANDARDEINSTELLUNG / NAVIGATION DER SEITEN ................................................................................................13
7.9.ANPASSUNG DER SEITEN .................................................................................................................................................13
7.10. SYSTEMEINRICHTUNG .................................................................................................................................................... 14
7.11. MIT MISSION CONTROL APP VERBINDEN .....................................................................................................................14
7.12. FEHLERMELDUNG ............................................................................................................................................................15
7.13. ALLGEMEINE INFORMATIONEN ......................................................................................................................................15
7.14. FUNKTIONSOPTIONEN/TECHNISCHE DATEN .............................................................................................................. 15
8. BATTERIE / LADEGERÄT ...........................................................................................................................16
8.1. BEOBACHTEN UND BEACHTEN ....................................................................................................................................... 16
8.2. AUFLADEN UND BENUTZEN DER BATTERIE ................................................................................................................16
8.3. LADEANZEIGE AUF DEM DISPLAY ..................................................................................................................................18
8.4. EINBAU DER BATTERIE..................................................................................................................................................... 18
8.5. AUSBAU DER BATTERIE ...................................................................................................................................................19
8.6. REINIGUNG .........................................................................................................................................................................19
8.7. LAGERUNG ..........................................................................................................................................................................19
8.8. TECHNISCHE BATTERIEDATEN .......................................................................................................................................20
8.9. LADEGERÄT - TECHNISCHE DATEN ............................................................................................................................... 20
8.10. TRANSPORT......................................................................................................................................................................21
8.11. ENTSORGUNG....................................................................................................................................................................21
9. BELEUCHTUNG .........................................................................................................................................21
10. SPEZIFIKATIONEN...................................................................................................................................21
10.1. SCHRAUBEN-DIMENSIONEN / DREHMOMENT-ANGABEN ........................................................................................21
10.2. RAHMEN SPEZIFIKATIONEN ..........................................................................................................................................22
10.3. EMPFOHLENER REIFEN-LUFTDRUCK ..........................................................................................................................22
11 .
GESETZLICHE VORGABEN ...................................................................................................................... 22
12. EC - KONFORMITÄTSERKLÄRUNG ...........................................................................................................23
ENGLISHFRANÇAIS
DEUTSCH
ČESKÁHRVATSKASLOVENSKI
Die Originalbetriebsanleitung wurde in der englischen Sprache verfasst. Die vorliegende Anleitung ist somit eine
“Übersetzung der Originalbetriebsanleitung”.
EN 15194
SPECIALIZED BICYCLE COMPONENTS
15130 Concord Circle, Morgan Hill, CA 95037 (408) 779-6229
0000115653_UM_DE_R1, 09/18
Hinweise und Anweisungen können ohne Bekanntgabe geändert werden.
Bitte besuchen Sie www.specialized.com für regelmäßige Aktualisierungen und erweiterte Produktionformationen.
Rückmeldung bitte auf Englisch an: techdocs@specialized.com
Page 53

1. EINFÜHRUNG
WICHTIG:
Diese Anleitung enthält ausschließlich spezifische Informationen zu Ihrem Turbo VADO/COMO Bike und sollte
in Verbindung mit der Specialized Bedienungsanleitung für Fahrräder verwendet werden (“Owner’s Manual”).
Bitte lesen Sie das “Owner’s Manual” vollständig vor der Nutzung Ihres Turbo VADO/COMO. Sollten Sie keine
Druckversion des “Owner’s Manual” vorliegen haben, laden Sie sich diese Anleitung bitte unter www.specialized.
com herunter oder kontaktieren Sie Ihren lokalen Specialized-Händler oder unser Specialized Rider Care Team.
Zusätzliche Sicherheitshinweise und Produktinformationen zu spezifischen Komponenten bzw. Zubehör wie
zur Federgabel, zu den Pedalen, Helmen oder Beleuchtung sind ebenso erhältlich. Stellen Sie sicher, dass Sie
von Ihrem autorisierten Specialized-Händler alle zum Produkt gehörigen Dokumente ausgehändigt bekommen.
Sollten bestimmte Informationen in dieser Anleitungen mit Produktinformationen eines Komponentenherstellers in
Widerspruch stehen, kontaktieren Sie bitte Ihren lokalen Specialized-Händler.
Das VADO / COMO ist als sog. EPAC (Electrically Pedal Assisted Cycle, allgemein “Pedelec”) klassifiziert und wird in
dieser Anleitung als “Fahrrad” oder “Bike” bezeichnet, sofern nicht anders angegeben.
WEITERE SPRACHEN STEHEN ALS DOWNLOAD UNTER www.specialized.com BEI DEN JEWEILIGEN
PRODUKTEN ZUR VERFÜGUNG.
Da Sie beim Lesen der Anleitung auf zahlreiche wichtige Symbole und Warnhinweise stoßen werden, erläutern
wir diese im Folgenden:
WARNUNG! Die Kombination dieses Sicherheitswarnsymbols mit dem Wort “WARNUNG”
weist auf eine potentiell gefährliche Situation hin, die, sofern sie nicht verhindert wird, zu
schwerwiegenden Verletzungen oder gar dem Tod führen kann. Viele Warnhinweise lauten “Sie
können die Kontrolle verlieren und stürzen”. Da jeder Sturz zu schweren Verletzungen oder
dem Tod führen kann, wiederholen wir die Verletzungs- oder Todesgefahr nicht in jedem Fall.
Die Kombination aus dem Sicherheitswarnsymbol und dem Wort “VORSICHT” weist auf
eine potenziell gefährliche Situation hin, die, wenn sie nicht vermieden wird, zu leichten oder
mittelschweren Verletzungen führen kann; ebenso gemeint sein kann eine Warnung bezogen
auf unsichere Vorgehensweisen und/oder Situationen.
Das Wort “VORSICHT” ohne Verwendung des Warnsymbols deutet auf eine Situation hin, die,
sofern sie nicht verhindert wird, zu einer gravierenden Beschädigung des Fahrrades oder zum
Wegfall der Garantie führen kann.
"INFO": Dieses Symbol macht Sie auf eine besonders wichtige Information aufmerksam.
"TECH TIP": Tech Tipps sind praktische und nützliche Tipps betreffend Montage und
Verwendung.
"FETT": Dieses Symbol empfiehlt die Verwendung hochwertigen Fetts gemäß Illustration.
"KARBONPASTE": Dieses Symbol bedeutet, dass gemäß Beschreibung Karbonpaste
verwendet werden sollte, um den Reibwert an der entsprechenden Stelle zu erhöhen.
"ANZUGSMOMENT": Dieses Symbol gibt das richtige Anzugsmoment für die jeweilige
Schraube an. Zur Einhaltung des angegebenen Anzugsmoments ist ein hochwertiger
Drehmomentschlüssel zu verwenden.
1.1. GARANTIE
Eine Kopie der “Specialized Limited Warranty” Bedingungen liegt Ihrem Vado bei und ist auch über Ihren autorisierten
Specialized-Fachhändler erhältlich. Sie können das Dokument auch über www.specialized.com herunterladen.
1
Page 54
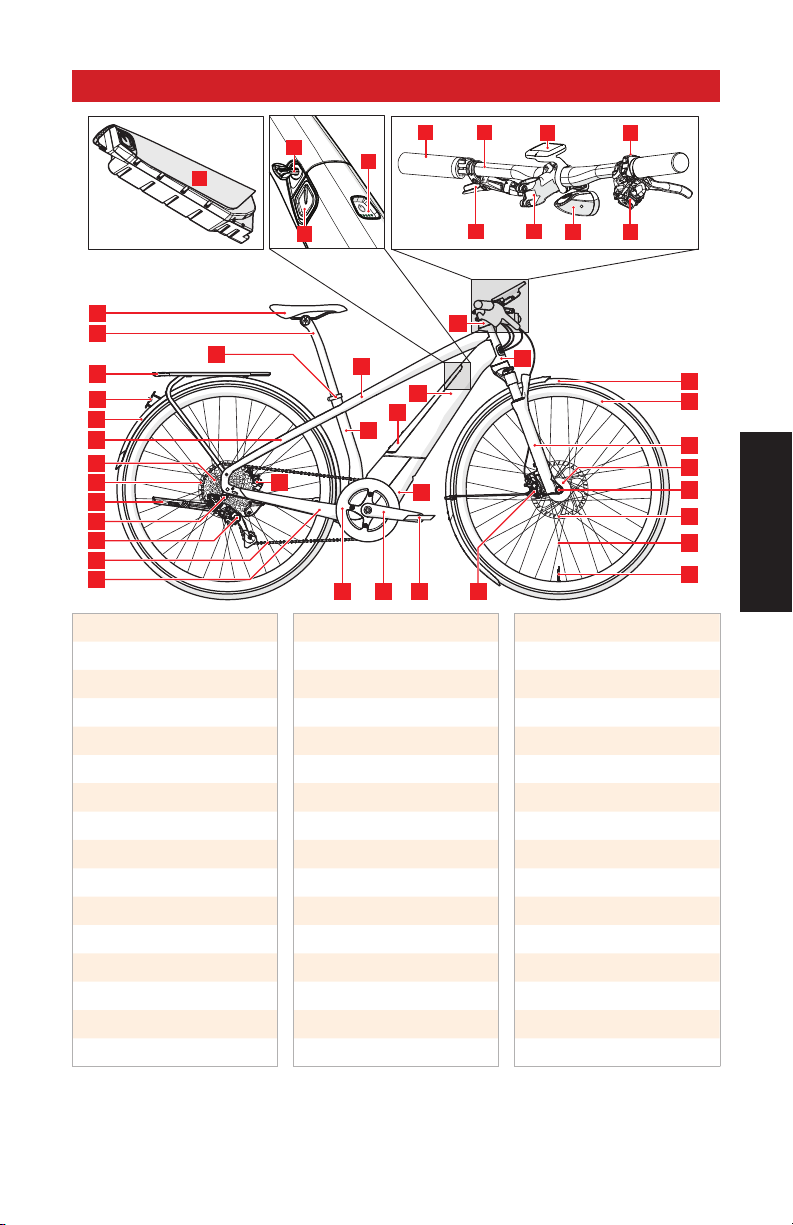
2. VADO/COMO KOMPONENTEN
20
30
28
31
19
25
23
8
9
44
45
43
6
11
35
42
12
13
14
5
1. Oberrohr
2. Unterrohr
3. Sitzrohr
4. Steuerrohr
5. Kettenstrebe
6. Sitzstrebe
7. Gabel
8. Sattel
9. Sattelstütze
10. Sattelstützklemme
11. Kassette
12. Ausfallende
13. Schaltwerk
14. Kette
15. Kettenblatt
16. Kurbelarm
22
26
29
27
10
34
1
28
3
15 16 17
2
18
32
17. Pedal
18. Motor
19. Lenker
20. Griffe
21. Schalthebel
22. Bremshebel
23. Bedienelement
24. Scheinwerfer*
25. Display
26. Vorbau
27. Steuersatz
28. Batterie
29. Ladeport
24 21
4
38
37
7
39
41
33
36
40
33. Vordere Bremsscheibe
34. Hinterer Bremssattel
35. Hintere Bremsscheibe
36. Speiche
37. Felge
38. Reifen
39. Nabe
40. Ventil
41. Steckachse
42. Ständer
43. Schutzblech
44. Gepäckträger*
45. Rücklicht*
ENGLISHFRANÇAIS
DEUTSCH
ČESKÁHRVATSKASLOVENSKI
30. Schloss
31. An/Aus Taster
32. Vorderer Bremssattel
* Nicht alle Modelle verfügen über einen Gepäckträger, Scheinwerfer und/oder am Sattel bzw. am Gepäckträger
angebrachte Rückleuchten.
2
Page 55

3. ALLGEMEINE INFORMATIONEN ZU IHREM VADO/COMO
80-100%
60-79%
40-59%
20-39%
0-19%
3.1. VERWENDUNGSZWECK
Das VADO/COMO ist ausschließlich für den Alltags- und Touren-Einsatz gemäß “Condition 2” (siehe “Owner’s
Manual”) auf festen Untergründen vorgesehen und für diesen Einsatzbereich getestet worden. Weitere Informationen
zur bestimmungsgemäßen Verwendung sowie zu den strukturellen Gewichtsgrenzen für Rahmen und Komponenten
finden Sie in der Bedienungsanleitung.
Das VADO/COMO ist als Pedelec/EPAC klassifiziert. Unabhängig von seiner Klassifizierung bietet der Motor nur
beim Treten Unterstützung. Je nach Klassifizierung kann es unterschiedliche Anforderungen und Vorschriften für
die Nutzung des Fahrrades geben.
Bevor Sie Ihr VADO/COMO Fahrrad benutzen informieren Sie sich bitte über alle geltenden
gesetzlichen Bestimmungen und Vorschriften in Ihrem Land. Es kann Einschränkungen für die
Benutzung Ihres VADO/COMO auf öffentlichen Straßen, Radwegen und/oder abseits asphaltierter
Strecken geben. Es kann auch eine Helmpflicht, Altersbeschränkung, Führerscheinpflicht sowie
bestimmte Versicherungsbestimmungen geben. Specialized leistet zu keinem Zeitpunkt eine
Zusicherung, rechtliche Vertretung oder Garantie in Bezug auf die Nutzungsbedingungen Ihres
VADO/COMO. Da Gesetze und Vorschriften für Elektrofahrräder je nach Land variieren und sich
ständig ändern, stellen Sie bitte sicher, über die aktuell geltenden Bestimmungen informiert zu
sein. Bitte besuchen Sie regelmäßig Ihren autorisierten Fachhändler für aktuelle Informationen.
VORSICHT: Alle VADO/COMO-Fahrräder haben eine fest vorgegebene Geschwindigkeitsbegrenzung,
bei der sich die Motorunterstützung automatisch abschaltet. Durch jede (versuchte) Manipulation
der Leistung und/oder des Systems erlischt die Garantie und Gewährleistung durch Specialized.
3.2. PEDELEC / EPAC
Das VADO / COMO ist als Pedelec klassifiziert. Die Motorunterstützung schaltet je nach Land automatisch bei
etwa 25 km/h (ca. 15,5 mph) bzw. 32/45 km/h (20/28 mph) ab.
3.3. STARTEN DES SYSTEMS
Um das System zu starten, drücken und halten Sie
den An-Aus-Taster (Abb. 3.3) oben auf der Batterie,
bis die LEDs grün leuchten. Die Anzahl der grün
leuchtenden LEDs hängt vom Ladezustand der
Batterie ab.
Um die Batterie (und somit die Motor-Unterstützung)
wieder auszuschalten, halten Sie den An-Aus-Taster
gedrückt, bis sich die LEDs ausschalten.
3.3
3
Page 56

4. GENERELLE INFORMATIONEN ZUM ZUSAMMENBAU
Dieses Benutzerhandbuch ist nicht als umfassende Gebrauchs-, Service-, Reparatur- oder Wartungsanleitung
gedacht. Für alle Reparatur- und Wartungsarbeiten wenden Sie sich bitte an Ihren Specialized Fachhändler.
Ihr autorisierter Specialized Fachhändler wird Ihnen darüber hinaus weitere Hilfsquellen nennen können, etwa
Fachbücher und Technik-Kurse.
WARNUNG! Aufgrund der Komplexität des VADO/COMO erfordert eine ordnungsgemäße Montage ein
hohes Maß an technischem Fachwissen. Fachspezifische Fertigkeiten, Schulungen sowie bestimmte
Spezialwerkzeuge sind unerlässlich. Daher ist für Ihre Sicherheit wesentlich, dass Montage, Wartung
und Fehlersuche von einem autorisierten Specialized Fachhändler durchgeführt werden. Stellen Sie
sicher, dass vor der ersten Fahrt Komponenten wie Bremsen, Schaltung und Antrieb entsprechend
der Hersteller-Angaben montiert und eingestellt worden sind.
WARNUNG! Einige Komponenten an einem VADO/COMO, beispielsweise, aber nicht ausschließlich, Motor,
Batterie und Kabel, sind Fahrrad-spezifisch. Es sind ausschließlich die original mitgelieferten Komponenten
und Anbauteile zu verwenden. Die Verwendung nicht-originaler Komponenten oder Anbauteile kann die
strukturelle Festigkeit des Fahrrades beeinträchtigen. VADO/COMO-spezifische Komponenten sollten nur
an VADO/COMO Fahrrädern und nicht an anderen Fahrrädern verbaut werden. Jegliches Handeln entgegen
dieser Richtlinie kann zu schwerwiegenden Verletzungen oder gar dem Tod führen.
WARNUNG! Modifizieren Sie niemals den Rahmen Ihres VADO oder COMO. Schleifen, bohren, feilen
oder entfernen Sie keine Teile von Ihrem Fahrrad. Installieren Sie keine inkompatiblen Komponenten oder
Zubehörteile. Die Nichtbeachtung dieser Warnung kann zu schweren Verletzungen oder zum Tod führen.
WARNUNG! Bei Arbeiten an Ihrem Fahrrad können Sie in Kontakt mit elektrischen Bauteilen
kommen. Berühren Sie kein elektrisches Bauteil bei eingeschaltetem System. Bringen Sie
die Kontakte der Batterie und im Inneren des Rahmens nicht mit Wasser in Berührung. Wenn
irgendwelche spannungsführenden Bauteile oder die Batterie beschädigt werden, stoppen Sie
sofort Ihre Fahrt und bringen Sie Ihr Fahrrad zu Ihrem autorisierten Specialized Fachhändler.
4.1. GESCHWINDIGKEITSSENSOR
Bei Montage der Hinterradbremse muss der Speed Sensor auf der Bremsscheibe angebracht werden. (Abb. 4.1).
Vier der sechs Bremsscheiben-Schrauben entsprechen den Standard-Maßen. Die verbleibenden beiden SenkkopfSchrauben (M5 x 0.8 x 15mm) befestigen den Speed Sensor auf dem Rotor.
4.1
BREMSSCHEIBE
ENGLISHFRANÇAIS
DEUTSCH
ČESKÁHRVATSKASLOVENSKI
STANDARD
BREMSSCHEI-
BEN-SCHRAUBE
FLACHKOPF
M5 x 15mm
SPEED SENSOR MAGNET
4.2. TRETLAGER
Das Tretlager bzw. die Kurbelwelle sind ein im Motor fest integrierter Bestandteil, der keine vorbereitenden EinbauMaßnahmen erfordert.
4.3. STEUERSATZ
Die VADO/COMO Rahmen sind im Steuerrohr mit zwei identischen 1 1/8 Zoll Industrielagern gemäß
Spezifikation 41.8mm x 8mm x 45° (“Campy Style”) ausgestattet. Stellen Sie sicher, dass Ersatzlager mit den
4
Page 57
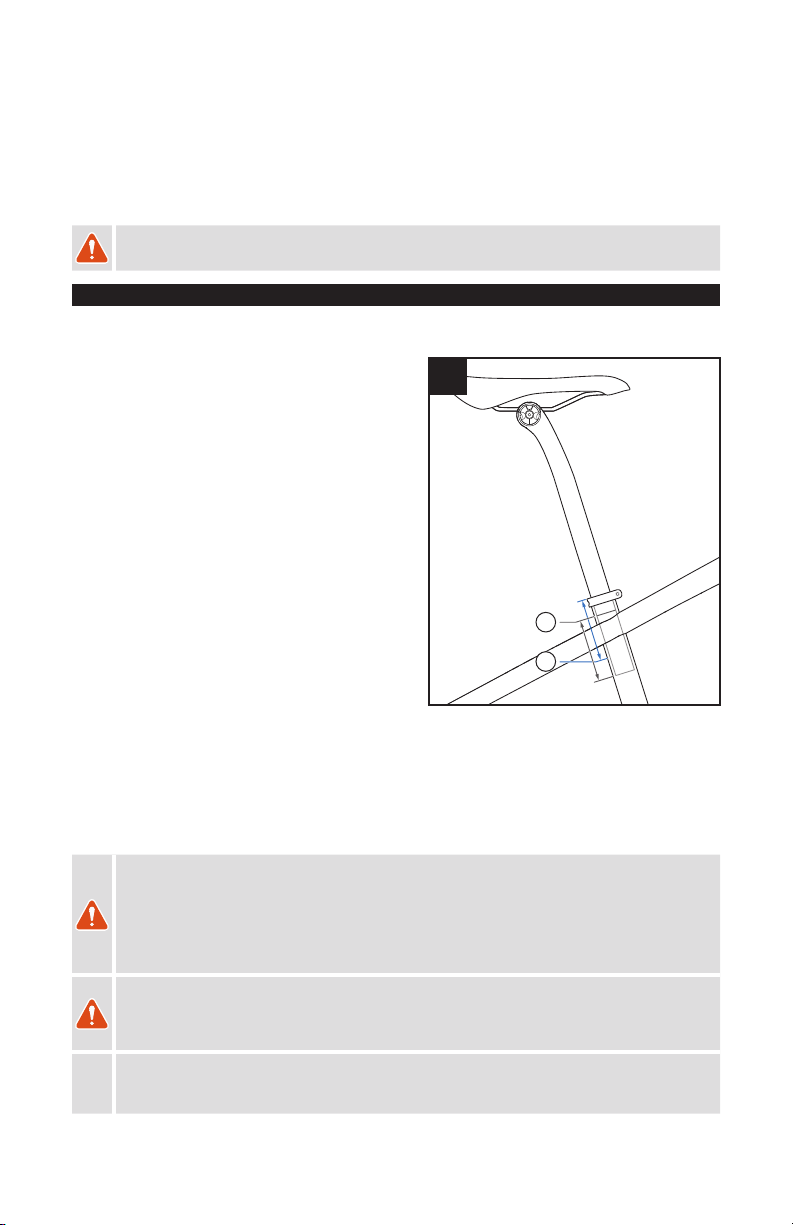
Spezifikationen des Steuersatzes kompatibel sind. Für die Montage oder Demontage der beiden Lager werden
keine Werkzeuge benötigt. Schmieren Sie die Lagerflächen mit einem hochwertigen Lagerfett vor der Montage.
Inspizieren Sie den Gabelschaft, die Vorbau-Klemmungen und das Sattelrohr, um sicherzustellen, dass die
Klemmbereiche keine scharfen Kanten oder Grate aufweisen. Entfernen Sie alle Kanten oder Grate mit einem
feinkörnigen Schleifpapier.
Alle Kanten im Bereich der Klemmfläche zwischen Vorbau und Gabelschaft sollten entfernt werden, um eine
Kerbwirkung zu vermeiden.
WARNUNG! Kanten, Riefen und Grate können Karbon- oder Aluminium-Oberflächen von Komponenten
beschädigen und zu einer Schwächung führen, etwa im Bereich der Vorbau und Gabel-Klemmflächen.
4.4. SATTELSTÜTZE
Specialized VADO/COMO Rahmen erfordern Sattelstützen mit einem Durchmesser von 30.9 mm, wobei der
Toleranzbereich zwischen 30.78 mm und 30.95 mm liegt.
MINIMALE EINSCHUBTIEFE DER SATTELSTÜTZE
4.4
Um Schäden am Rahmen und/oder der Sattelstütze zu
vermeiden, ist die Mindest-Einschubtiefe in das Sitzrohr stets
zu beachten. Die Mindesteinschubtiefe muss die folgenden
Kriterien erfüllen:
Die Sattelstütze muss so tief in das Sitzrohr eingeschoben
sein, dass die “Min/Max” Markierung für die Einschubtiefe
bzw. Ausziehlänge auf der Stütze nicht sichtbar ist (Abb. 4.4
A).
Die Sattelstütze muss zudem so weit in das Sitzrohr
eingeschoben werden, dass sie durch die an manchen
Modellen vorhandene kleine Kontroll-Öffnung hinten im
Sitzrohr sichtbar ist. Gibt es diese Öffnung nicht, muss
A
insertion
min
die mindestens vorgeschriebene Einschubtiefe der Stütze
gemäß Rahmengröße eingehalten werden (siehe unten).
B
Falls die minimal geforderte Einschubtiefe des Rahmens
und der Stütze voneinander abweichen, orientieren Sie sich
stets an der längeren minimalen Einschubtiefe. Beispiel: Sollte der Rahmen 90 mm erfordern, die Stütze aber
100 mm, so beträgt die Mindest-Einschubtiefe 100 mm.
• Alle VADO/COMO Modelle: Mindest-Einschubtiefe 90 mm
Sollte Ihre Stütze bis zur Min/Max Markierung ausgezogen, nicht durch die Kontroll-Öffnung im Sitzrohr sichtbar oder
die Mindest-Einschubtiefe für den Rahmen nicht eingehalten sein, so ist die Stütze nicht ausreichend tief eingeschoben
und muss entsprechend der Bestimmungen justiert oder gegen eine längere Version ausgetauscht werden.
WARNUNG! Bei Nichtbeachtung der Mindesteinschubtiefe der Sattelstütze sowie des Rahmens
kann es zu Beschädigungen des Rahmens und/oder der Sattelstütze kommen, wodurch Sie die
Kontrolle verlieren und stürzen können.
Wenn die Sattelstütze zu stark gekürzt wird, ist die Min/Max-Markierung auf der Sattelstütze
nicht mehr korrekt. Bevor Sie die Sattelstütze kürzen, beachten Sie die vom Sattelstützhersteller
vorgeschriebene Min /Max-Tiefe.
WARNUNG! Ziehen Sie für die korrekte Installation der Sattelstütze das entsprechende Kapitel des
“Owner’s Manual” zu Rate. Das Fahren mit einer unsachgemäß angezogenen Sattelstütze kann
zu einer ungewollten vertikalen Bewegung und/oder axialen Rotation selbiger führen, wodurch Sie
die Kontrolle verlieren und stürzen können.
VORSICHT: Stellen Sie sicher, dass an der Sattelstütze und im Sitzrohr keine Grate oder scharfen
Kanten vorhanden sind. Grate oder scharfe Kanten können mit feinkörnigem Schleifpapier
entfernt werden.
5
Page 58

4.5. ERSATZTEILE UND ZUBEHÖR
Specialized Ersatzteile und Zubehör erhalten Sie bei Ihrem autorisierten Specialized Fachhändler.
5. ALLGEMEINE HINWEISE ZUM FAHREN
Der VADO/COMO-Motor leistet nur beim Treten Unterstützung und wenn das Fahrrad in Bewegung ist. Der Grad der
Unterstützung steht in Abhängigkeit zur Kraft, die auf die Pedale ausgeübt wird und ist somit je nach eigener Kraft
höher oder niedriger. Wenn Sie aufhören zu pedalieren, stoppt der Motorantrieb.
Das VADO/COMO kann auch als normales Fahrrad ohne Motorunterstützung gefahren werden, indem das Display
in den AUS-Modus geschaltet wird. Das gleiche gilt, wenn die Akkuladung unter 1% sinkt.
Das VADO/COMO verfügt über einen Schiebehilfe-Modus, der den Motor ohne Pedalkraft aktiviert, falls Sie
Steigungen schiebend leichter bewältigen möchten. Dieser Modus unterstützt bis zu einer Gehgeschwindigkeit von
6 km/h, solange die Taste + gedrückt wird.
5.1. FAHRTIPPS
Aufgrund der Unterstützung durch den Elektromotor bietet das VADO/COMO ein einzigartiges Fahrerlebnis
verglichen mit einem Fahrrad ohne Motorunterstützung. Im Folgenden finden Sie einige Tipps, die den Verschleiß
der Komponenten verringern und die Reichweite erhöhen können:
Kontrollieren Sie Ihre Geschwindigkeit rechtzeitig vor einer Kurve und achten Sie darauf, vor der Kurve das
Pedalieren zu stoppen. Andernfalls fahren Sie möglicherweise zu schnell in die Kurve ein.
Fahren Sie effizient und vorausschauend. Jedes Mal, wenn Sie bremsen, wird zusätzlich Energie benötigt, um
das Fahrrad wieder zu beschleunigen.
Schalten Sie rechtzeitig und der Situation angepasst, um in einem optimalen Kadenzbereich zu bleiben.
Vermeiden Sie schwere Gänge bzw. eine niedrige Trittfrequenz. Schalten Sie herunter, bevor Sie zum Stillstand
kommen, damit Sie leicht wieder anfahren können.
Reduzieren Sie die Pedalkraft, bevor Sie einen Gangwechsel durchführen, um den Verschleiß des Antriebs zu
reduzieren.
Überprüfen Sie den Reifendruck regelmäßig. Niedriger Druck kann dazu führen, dass die Reifen ineffizient rollen.
Wenn Ihr Fahrrad kälteren Temperaturen ausgesetzt ist, bewahren Sie den Akku bis kurz vor der Fahrt drinnen
auf. Beachten Sie ebenso die Hinweise auf dem Akku selbst.
Setzen Sie das Fahrrad nicht länger und unnötig Hitze aus (z. B. direktem Sonnenlicht).
Nehmen Sie nur die nötigste Zuladung mit. Mehr Zuladung erfordert mehr Energie und reduziert die Reichweite.
ENGLISHFRANÇAIS
DEUTSCH
ČESKÁHRVATSKASLOVENSKI
WARNUNG! Die Motorunterstützung wird aktiviert, sobald Sie in die Pedale treten und das Fahrrad
in Bewegung ist. Sie sollten auf dem Fahrrad sitzen und mindestens eine Bremse betätigen,
bevor Sie mit dem Pedalieren beginnen. Setzen Sie nicht einen Fuß auf ein Pedal und werfen Sie
ein Bein über das Fahrrad, da es unerwartet beschleunigen könnte. Die Nichtbeachtung dieser
Warnung kann zu schweren Verletzungen oder sogar zum Tod führen.
WARNUNG! Die Beschleunigung eines elektrischen Fahrrades kann schneller als erwartet
und somit anfangs ungewohnt sein. Vor der ersten Fahrt sollten Sie den ECO-Modus mit der
niedrigsten Leistung nutzen und sich mit dem Verhalten Ihres VADO/COMO vertraut machen,
indem Sie in einem sicheren Umfeld, getrennt von anderen Fahrrädern, Fußgängern und/oder
Fahrzeugen, fahren. Aufgrund der stärkeren Beschleunigung Ihres VADO/COMO sollten Sie die
Bodenbeschaffenheiten stets berücksichtigen und sich bewusst sein, dass Sie womöglich weniger
Reaktionszeit haben, um sich auf verändernde Situationen einzustellen. Bitte beachten Sie, dass
der Standard-Modus beim Start immer der SPORT-Modus ist.
VORSICHT: Das Gewicht Ihres VADO/COMO ist deutlich höher als das eines Fahrrades ohne
Motorunterstützung. Seien Sie vorsichtig beim Umgang mit dem Fahrrad (einschließlich, aber
nicht beschränkt, auf Parken, Heben, Schieben sowie den Transport im Auto, sei es im Innenraum
oder auf einem Fahrradträger).
VORSICHT: Fahren Sie nicht mit Ihrem VADO/COMO, wenn die Batterie entfernt ist. Das Fahren
ohne Batterie kann elektrische Bauteile beschädigen.
6
Page 59

5.2. VOR DER ERSTEN FAHRT
Unabhängig von Ihrem Erfahrungsniveau sollten Sie den Abschnitt “FIRST” der Bedienungsanleitung
(Bike Fit, Safety First, Mechanical Safety Check und “VOR DER ERSTEN FAHRT”) lesen und alle wichtigen
Sicherheitskontrollen durchführen. Darüber hinaus stellen Sie bitte sicher, dass Sie mit den folgenden, spezifischen
Aspekten Ihres VADO/COMO vertraut sind.
VOR JEDER FAHRT
Batterie
• Sind alle Anschlüsse richtig verbunden?
• Ist die Batterie ausreichend geladen?
• Ist die Batterie richtig eingerastet und im Rahmen verriegelt?
Display
• Funktioniert das Display korrekt?
VOR DER ERSTEN FAHRT
Batterie
• Ist der Akku vollständig geladen?
Display
• Sind Sie mit den Display-Funktionen vertraut?
Bedienelement
• Sind Sie mit den Tastenfunktionen des Bedienelements vertraut?
• Wissen Sie, wie das Bedienelement verwendet wird, um die Motor-Unterstützungsstufe von ECO auf SPORT und TURBO
umzustellen?
WARNUNG! Wenn Ihr Akku, Ladegerät oder andere Komponenten Anzeichen von Beschädigungen
aufweisen, benutzen Sie das Fahrrad nicht und bringen Sie es sofort zur Überprüfung zu Ihrem
autorisierten Specialized Fachhändler.
5.3. FAHREN MIT KINDERN
Es gibt viele verschiedene Möglichkeiten, wie Sie mit Kindern fahren können. Bitte beachten Sie den Abschnitt “Riding
Safely” in der Bedienungsanleitung zu allgemeinen Informationen und Anweisungen für Kindersitze oder Anhänger.
Wenn Sie regelmäßig Kinder an oder auf Ihrem Fahrrad mitführen, sollte Ihr autorisierter Specialized Fachhändler
eine regelmäßige Sicherheitsinspektion durchführen.
WARNUNG! Specialized Fahrräder werden ausschließlich für die Nutzung von einer Person
entworfen und geprüft. Die Mitnahme eines Kindes auf Ihrem Specialized Fahrrad erfolgt auf eigene
Gefahr. Wenn Sie Zubehör auf Ihrem Specialized Fahrrad montieren möchten, etwa Anhänger,
Kindersitz oder Anhängeraufnahme, vergewissern Sie sich, dass dieses Zubehör kompatibel ist
und beziehen Sie sich auf die Anweisungen des Herstellers sowie Ihren autorisierten Specialized
Fachhändler. Sie sollten sicherstellen, dass Ihr Fahrrad mit dem angebrachten Zubehör immer noch
sicher zu fahren ist. Achten Sie auf die Einhaltung der strukturellen Gewichtsgrenze Ihres Fahrrades,
wenn Sie einen Anhänger, eine Anhängeraufnahme oder einen Kindersitz verwenden. Achten Sie
darauf, dass Sie die maximale Zuladung nicht überschreiten, wenn Sie einen Kindersitz verwenden.
WARNUNG! Das Fahren mit Kindern auf bzw. an Ihrem Fahrrad wirkt sich auf die Beherrschbarkeit
aus, indem der Schwerpunkt, das Gewicht und die Balance verändert wird. Es kann auch negative
Auswirkungen auf das Fahrverhalten in Kurven geben, Ihren Bremsweg erhöhen und Ihre Fähigkeit,
zu bremsen und auszuweichen beeinträchtigen, vor allem bei höheren Geschwindigkeiten oder
bei steilen Abfahrten. All dies kann zu Kontrollverlust über das Fahrrad führen, was zu schweren
Verletzungen und/oder zum Tod führen kann. Sie sollten sich ebenso mit dem Zubehör vertraut
machen und das Fahren in einer kontrollierten Umgebung abseits vom Verkehr üben.
WARNUNG! Klemmen Sie keine Kindersitze, Anhänger oder ähnliches Zubehör direkt oder indirekt
an ein Bauteil oder eine Komponente aus Karbon. Bauen Sie zum Beispiel keinen Anhänger an
einer Hinterachse an, wenn das hintere Rahmendreieck aus Karbon besteht. Ebenso ist der Anbau
eines Anhängers bzw. Kindersitzes an eine Karbon-Sattelstütze oder eine Karbon-Gabel unzulässig.
Eventuell können übermäßige Kräfte auf den Fahrradrahmen oder die Fahrradkomponente
einwirken, die zu Schäden und einem vollständigen Ausfall führen können. Dies kann schwere
Verletzungen oder den Tod zur Folge haben. Wenn Sie bereits ein Zubehörteil an ein Fahrrad-Bauteil
aus Karbon befestigt haben, dürfen Sie nicht fahren, bevor Ihr autorisierter Specialized Fachhändler
das Fahrrad bzw. die Komponente(n) sorgfältig kontrolliert hat.
7
Page 60

Bevor Sie mit Kindern auf dem Fahrrad fahren, informieren Sie sich bitte über die geltenden gesetzlichen
Bestimmungen und Vorschriften in Ihrem Land. Es gibt Einschränkungen für das Fahrradfahren mit
bestimmten Zubehörteilen. Dies gilt insbesondere für Pedelecs und L1e Fahrzeuge.
6. ALLGEMEINE HINWEISE ZUR WARTUNG
Das VADO/COMO ist ein Hochleistungsfahrrad. Alle regelmäßigen Wartungs-, Diagnose- und Reparaturarbeiten
müssen von einem autorisierten Specialized Fachhändler durchgeführt werden. Allgemeine Informationen zur
Wartung Ihres Fahrrades finden Sie in der Bedienungsanleitung. Darüber hinaus führen Sie bitte stets eine
mechanische Sicherheitsüberprüfung vor jeder Fahrt durch, wie in der Bedienungsanleitung beschrieben.
• Es ist darauf zu achten, dass die Karbon- oder Kompositstruktur nicht beschädigt wird. Jeder Schaden kann zu einem
Verlust der strukturellen Festigkeit und somit zu einem schwerwiegenden Ausfall führen. Dieser Schaden kann bei einer
Inspektion erkennbar sein oder nicht. Vor jeder Fahrt und nach jedem Sturz sollten Sie Ihr Fahrrad sorgfältig auf Risse,
Dellen, Lackschäden, Absplitterungen, Deformierungen oder andere Beschädigungen untersuchen. Fahren Sie nicht, wenn
Ihr Fahrrad irgendwelche dieser Zeichen aufweist. Nach jedem Sturz, und bevor Sie weiterfahren, geben Sie Ihr Fahrrad bitte
zu einem autorisierten Specialized Fachhändler, um eine vollständige Inspektion durchführen zu lassen.
• Wenn beim Fahren Knack- oder Knarz-Geräusche auftreten, kann dies ein Zeichen für ein Problem mit einer Komponente
oder mehreren Bauteilen sein. Überprüfen Sie regelmäßig alle Oberflächen unter einer hellen Lichtquelle, um diese auf
kleinste Haarrisse oder Ermüdung im Bereich von Schweißnähten, Bohrungen, Klemmflächen und Berührungspunkten mit
anderen Teilen zu prüfen. Wenn Sie Knarzen hören oder selbst kleinste Risse oder Schäden an Bauteilen vorfinden, fahren
Sie Ihr Vado nicht weiter, und lassen Sie es von Ihrem autorisierten Specialized Fachhändler überprüfen.
• Lebensdauer und Wartungshäufigkeit hängen von vielen Faktoren wie Häufigkeit und Art der Nutzung, Fahrergewicht,
Fahrbedingungen und/oder vom befahrenen Gelände ab. Zusätzlich nutzt das VADO/COMO ein kraftunterstützendes
Antriebssystem, wodurch mehr Distanz in gleicher Zeit möglich ist. Komponenten können je nach Bauteil unterschiedlichen
Verschleißerscheinungen unterliegen. Antriebsstrang und Bremsenteile sind besonders von erhöhtem Verschleiß
betroffen. Lassen Sie Ihr Vado in regelmäßigen Abständen von Ihrem autorisierten Specialized Fachhändler überprüfen, um
verschlissene Teile rechtzeitig tauschen zu können.
• Durch Umwelteinflüsse, insbesondere salzhaltige Luft (z.B. Fahren in Meeresnähe oder im Winter), kann es zu einer
galvanischen Korrosion an Bauteilen kommen, die den Verschleiß beschleunigen und die Lebensdauer verkürzen können.
Schmutz kann ebenfalls den Verschleiß von Oberflächen und Lagern beschleunigen. Die Oberflächen des Fahrrades sollten
vor jeder Fahrt gereinigt werden. Das Fahrrad sollte auch regelmäßig von einem autorisierten Specialized Fachhändler
gewartet werden, was bedeutet, dass es gereinigt, auf Anzeichen von Korrosion und Risse geprüft wird und an den
betreffenden Stellen geschmiert werden sollte. Wenn Sie Anzeichen von Korrosion oder Rissbildung am Rahmen oder an
einer Komponente feststellen, muss das betreffende Bauteil ersetzt werden.
• Reinigen und ölen Sie den Ketten-Antriebsstrang regelmäßig unter Einhaltung der jeweiligen Herstellerangaben. Vermeiden
Sie ein exzessives Auftragen von Öl.
• Halten Sie keinen Hochdruckreiniger direkt auf die Lager. Sogar Wasser aus einem Gartenschlauch kann Lagerdichtungen
durchdringen, was zu erhöhtem Lagerverschleiß führt und die normale Funktion der Lager beeinträchtigt. Ver wenden Sie
zum Reinigen saubere, feuchte Tücher zusammen mit geeigneten Reinigungs- und Pflegemitteln.
• Setzen Sie das Fahrrad keinem direkten Sonnenlicht oder übermäßiger Hitze aus, z. B. in einem Auto, das in der Sonne
parkt, oder einer anderen Wärmequelle wie einem Heizkörper.
ENGLISHFRANÇAIS
DEUTSCH
ČESKÁHRVATSKASLOVENSKI
WARNUNG! Wenn Sie die Anweisungen in diesem Abschnitt nicht befolgen, können die
Komponenten des Fahrrades beschädigt werden und Ihre Garantie erlischt, aber vor allem
kann es zu schweren Verletzungen oder zum Tod kommen. Wenn Ihr Fahrrad Anzeichen von
Beschädigungen aufweist, verwenden Sie es nicht und bringen Sie es sofort Ihrem autorisierten
Specialized Fachhändler zur Kontrolle.
WARNUNG! Wenn der Rahmen in einem Montageständer fixiert werden soll, klemmen Sie stets
die Sattelstütze und niemals den Rahmen. Das Klemmen am Rahmen kann diesen sichtbar oder
unsichtbar beschädigen, sodass Sie die Kontrolle verlieren und stürzen können.
WARNUNG! Schalten Sie den Akku immer aus, wenn er nicht benutzt und/oder wenn am Fahrrad
bzw. Akku gearbeitet wird.
VORSICHT: Motor-Einheit nicht öffnen. Der Motor ist ein abgedichtetes, wartungsfreies System.
Arbeiten am Motor müssen von einem Specialized Service Center durchgeführt werden.
8
Page 61

7. SYSTEM INTERFACE (DISPLAY)
Die Modelle VADO und COMO sind mit einem LCD-Display ausgestattet..
WARNUNG! Seien Sie vorsichtig, wenn Sie während der Fahrt auf das Display schauen oder
es bedienen. Sie können abgelenkt werden, was die Unfallgefahr erhöht. Sie sollten immer an
einer sicheren Stelle anhalten, bevor Sie Einstellungen ändern oder die Funktionen des Displays
bedienen.
Die Lenkerfernbedienung (Abb. 7) steuert bestimmte Funktionen des Displays und den Grad der motorunterstützung.
7
SET
+
-
LICHT
SET-TASTE: Erlaubt dem Benutzer das Wechseln der Menüs (Tageskilometer, Ladestand, Fahrzeit,
Gesamtkilometer).
“+” TASTER: Erhöht den Grad der Unterstützung. Durch Drücken und Halten wird die Schiebehilfe aktiviert.
“-” TASTER: Verringert den Grad der Unterstützung. Drücken und halten für 2 Sekunden setzt die
Tageskilometer zurück
LICHT: Schaltet das Licht ein/aus.
Die Ausstattung mit Licht hängt vom Modell sowie den Regularien des jeweiligen Landes ab.
7.1. UNTERSTÜTZUNGS-MODI
Der VADO-Motor bietet fünf verschiedene Einstellungen.
TURBO, SPORT, ECO, OFF und SMART CONTROL.
TURBO-MODUS: Modus mit maximaler Leistung für
schnellere Strecken und kraftsparendes Bergauffahren.
SPORT-MODUS: Maximale Kontrolle mit ausreichender
Leistung bei Bedarf.
ECO-MODUS: Effizientester Modus für maximale
Reichweitebei angenehmer Motorunterstützung.
“OFF” MODUS: Der Motor bietet keine Unterstützung,
aber die Anzeige und die Lampen funktionieren weiterhin.
SMART CONTROL-MODUS: Der Motor passt die Leistung
beim Treten basierend auf den Fahrparametern an, die in der
Mission Control App festgelegt wurden.
Die verschiedenen Modi werden mit der Plus- und Minus-Taste
auf der Fernbedienung (Abb. 7) gesteuert und auf dem TCDisplay (Abb. 7.1) angezeigt.
Auf der Fernbedienung schaltet das System nach Erreichen des
stärksten oder schwächsten Modus nicht weiter. Um von TURBO auf SPORT, ECO oder OFF umzustellen, drücken Sie
die Minus-Taste. Um von OFF nach ECO, SPORT oder TURBO umzustellen, drücken Sie die Plus-Taste.
9
7.1
TURBO
MODE
SPORT
MODE
ECO
MODE
OFF
MODE
SMART
CONTROL
Page 62

INFINITE TUNE: Mit Infinite Tune in der Mission Control App kann der maximale Motorstrom (Peak Power) separat
von der Motorunterstützung (Support) und umgekehrt angepasst werden. Der maximale Motorstrom, den der Motor
aus dem Akku zieht, kann für jeden Unterstützungs-Modus einzeln abgestimmt und an Ihren Fahrstil, das Gelände,
die gewünschte Leistung und die gewünschte Reichweite angepasst werden. Wir empfehlen, mit den folgenden
Einstellungen zu beginnen. Turbo: 100 % (Unterstützung) / 100 % (Maximaler Motor-Strom). Sport: 70 % / 100 %.
Eco: 35 % / 35 %.
SUPPORT (UNTERSTÜTZUNGSGRAD): Die Schieberegler für den Unterstützungs-Modus geben
an, wie viel Unterstützung der Motor basierend auf der Pedalkraft leistet. Grundsätzlich bewirkt ein
höherer Unterstützungsgrad eine schnellere Beschleunigung und leichteres
Bergauffahren zu Lasten einer verkürzten Reichweite und einer höheren
Wahrscheinlichkeit von Traktionsverlust. Ein geringerer Unterstützungsgrad
hingegen verlängert die Reichweite und bietet mehr Kontrolle bei reduzierter
Traktion. Beispielsweise erfordert das Treten im Sport-Modus bei Einstellung
der Unterstützung auf 50 % ca. doppelt so viel Kraft, um dieselbe
Motorunterstützung wie im Turbo-Modus mit auf 100 % eingestellter
Unterstützung zu erhalten.
PEAK POWER (MAX. MOTORSTROM): Zusätzlich zur Einstellung für Support
(Unterstützungs-Modus) gibt es die Einstellung „Peak Power“. Diese bezieht
sich auf die maximale Leistung, die vom Motor in jedem Unterstützungs-Modus ausgegeben wird. Dieser Wert kann für alle Unterstützungs-Modi auf
100 % eingestellt werden. Wenn „Peak Power“ für alle Unterstützungs-Modi
auf 100 % eingestellt ist, gilt: Je stärker Sie treten, desto mehr Unterstützung
erhalten Sie in jedem Unterstützungs-Modus. Wenn ein Unterstützungs-Modus z. B. auf 35 % und „Peak Power“ auf 100 % eingestellt ist, können Sie 100 % der maximalen
Motorunterstützung erreichen, indem Sie stärker und mit einem höheren Fahrerdrehmoment
treten. Wenn „Peak Power“ auf weniger als 100 % eingestellt ist, begrenzen Sie den vom Motor
erzeugten Strom und legen eine künstliche Höchstgrenze dafür fest. Indem Sie den Modus Eco
mit einer künstlichen Begrenzung des maximalen Motorstroms einstellen, verbessern Sie die
Reichweite und erhöhen die Unterschiede zwischen den Unterstützungs-Modi.
Specialized empfiehlt, die verschiedenen Unterstützungsgrade zu testen, damit Sie entscheiden
können, welcher Modus für Ihren Fahrstil und Ihre Anforderungen am besten geeignet ist.
7.2. KONNEKTIVITÄTSOPTIONEN
Die Motor-System erlaubt einige Konnektivitäts-Optionen, durch Bluetooth und/oder ANT+ Datenübertragung.
In Abhängigkeit des Geräts und des Datenübertragungs-Protokolls kann eine Reihe zusätzlicher Funktionen
genutzt werden.
BLUETOOTH LE: Die Mission Control App (iOS oder Android) verbessert das Fahrerlebnis, indem sie das
Aufzeichnen Ihrer Fahrten und die Synchronisierung mit Strava ermöglicht. Die Smart-Control-Funktion erlaubt
Ihnen die Kontrolle der Reichweite, damit Sie sich keine Gedanken über die Anpassung des Systems während der
Fahrt machen müssen. Zudem können Sie eine GPS-basierte Aufzeichnung Ihrer Fahrten und Funktionen für die
Systemdiagnose nutzen. Android- und iOS-Geräte lassen sich über Bluetooth LE mit allen VADO & COMO Bikes
synchronisieren. Die aktuelle Version der Mission Control App finden Sie auf Google Play oder im Apple App Store.
ANT+: Das ANT+ Protokoll erlaubt das Verbinden zahlreicher Geräte mit Ihrem VADO oder COMO Bike.
Das sogenannte LEV-Protokoll (Light Electric Vehicle) ermöglicht die Anzeige bestimmter Daten, z. B.
Trittfrequenz, Fahrerleistung, Motortemperatur, Batterietemperatur, Ladezustand und Geschwindigkeit. Eine
aktuelle Liste mit dem VADO & COMO kompatibler ANT+-Geräte finden Sie auf https://www.thisisant.com/
directory/filter/~/~/~/200/.
Mit dem “Fake Channel” kann auf jedem ANT+ fähigen Fahrradcomputer über einen nicht verwendeten
Kanal des Geräts (z. B. Leistung, Herz- oder Trittfrequenz) der Batterie-Ladestand angezeigt werden. Zur
Auswahl dieser Option muss die Mission Control App verwendet werden.
ENGLISHFRANÇAIS
DEUTSCH
ČESKÁHRVATSKASLOVENSKI
10
Page 63

7.3. INSTALLATION
B
A
C
7.3.1
7.3.2
Drehen Sie das Display, um es in die Display-Halterung einzusetzen, und fixieren Sie dann die
Verdrehsicherungsplatte (7.3.1 a) mit der kleinen Schraube (7.3.1 b). Das empfohlene Drehmoment beträgt
0,5 Nm (4,4 in-lbf).
Entfernen Sie die Komponenten von der Seite des Lenkers, an der die Display-Halterung installiert werden soll.
Sie kann links oder rechts vom Vorbau angebracht werden.
Ziehen Sie die Halterung fest, bis sie nicht mehr leicht verschoben werden kann. Die Halterung nicht zu fest
anziehen. Das empfohlene Drehmoment beträgt 0,5 Nm (4,4 in-lbf).
7.4. AKTIVIERUNG/AUSTAUSCH DER BATTERIE
7.4.1
7.4.2
Heben Sie die Kante der Batterieabdeckung mit einem Schlitzschraubendreher an und nehmen Sie die Batterie
vorsichtig aus der Abdeckung heraus.
Ersetzen Sie die Batterie durch eine neue CR 1220-Knopfzelle (Beschriftung weist zur Abdeckung). Achten Sie
darauf, dass die Dichtung unbeschädigt ist, und setzen Sie die Abdeckung wieder ein.
Beim Austausch der Batterie werden alle im Display gespeicherten Informationen (Kilometerstand, Timer,
Kopplung von Geräten) gelöscht. Zeichnen Sie diese Informationen falls gewünscht auf, bevor Sie die Batterie
ersetzen.
Der USB-Anschluss ist nur für Händler oder Service-Center vorgesehen.
11
Page 64

Ladestand der Hauptbatterie
A
Anzeige in 10-%-Schritten
Datenfeld 1
Datenfeld 1, Deskriptor
Datenfeld 3
7.5. DISPLAY-FUNKTIONEN
1
1
1
A
2
7 8
Linke Taste Rechte Taste
7.6. HAUPTANZEIGEN
Turbo-Modus
3
Sport Modus
4
Eco Modus
5
Uhr
6
Datenfeld 2
1
Datenfeld2, Deskriptor
1
ENGLISHFRANÇAIS
DEUTSCH
B
Gebraucht
B
Gebrauch: Typisches Benutzerszenario
C
“LO BAT“ blinkt (niedriger Knopfzellen-Ladestand)
Niedriger
7.7. TASTENBEFEHLE
Linke Taste kurz drücken
Rechte Taste kurz drücken
Linke und rechte Taste kurz drücken
Seiten anpassen: Linke und rechte Taste drei (3) Sekunden lang drücken
Systemeinrichtung: Linke Taste fünf (5) Sekunden lang drücken
C
Knopfzellen-Ladestand
D
Blinkende Batterieleiste, gibt Ladestand an
D
Lademodus
ČESKÁHRVATSKASLOVENSKI
12
Page 65

7.8. STANDARDEINSTELLUNG / NAVIGATION DER SEITEN
Es sind 5 Seiten voreingestellt, von denen jede eine unterschiedliche Kombination von Informationen anzeigt.
Die Seiten können mit der linken/rechten Taste oder mit der SET-Taste auf der Fernbedienung durchlaufen werden.
Die auf jeder Seite angezeigten Informationen sind vom Anwender anpassbar.
Nach dem Einschalten zeigt der Computer Seite 1 (Page1) an.
SET
Seite 1 Seite 2
Seite 3 Seite 4
Seite 5
7.9.ANPASSUNG DER SEITEN
Zeigen Sie die Seite an, die Sie anpassen möchten, und halten Sie dann die L+R Taste drei Sekunden lang
gedrückt.
Das Datenfeld 1 blinkt. Drücken Sie die L- oder R-Taste, um die Optionen zu durchlaufen.
Drücken Sie kurz die L+R Taste, um die gewählte Funktion zu bestätigen und zum Datenfeld 2 zu gelangen.
Wiederholen Sie die Schritte für das Datenfeld 2 und 3.
Wiederholen Sie die Schritte für die Seiten 2 bis 5.
Gelbes Feld weist auf blinkendes (anpassbares) Feld hin
F
Rücksetzen von AVG, MAX, DIST, TRIP, KCAL: Drücken Sie die L+R Taste 0,5 Sekunden gleichzeitig und lassen
G
Sie sie dann los.
Zum Zurücksetzen drücken Sie die Minus-Taste (-) auf der Fernbedienung 2 Sekunden lang.
F
FUNCTIONS
L R L R L R
Heart Rate
Battery %
Cadence
G
13
Page 66

7.10. SYSTEMEINRICHTUNG
Die Uhrzeit wird zunächst als 12:00 angezeigt
H
Zum Ändern von Einstellungen die L- oder R-Taste drücken. Gedrückt halten = Schnelldurchlauf. Drücken und
I
loslassen = in Schritten von 1 Einheit
Kopplungsoptionen:
J
• Bestätigte Verbindungen: wechselt von Blinken auf ständiges Leuchten.
• Kopplung fehlgeschlagen: Display = “PAIR FAILED!”
Separater Herzfrequenz-Brustgurt erforderlich
K
ENGLISHFRANÇAIS
5 sec
TIME 12/24
H
L R
DAY HOUR MIN
L R L R
UNITS
HR Y / N
K
L R L R
I
YEAR MONTH
I
L R L R
J
DEUTSCH
L R
ČESKÁHRVATSKASLOVENSKI
7.11. MIT MISSION CONTROL APP VERBINDEN
L
Öffnen Sie bei eingeschaltetem Fahrradsystem die Mission Control App auf Ihrem Mobilgerät, suchen Sie nach
Ihrem Bike und fügen Sie es hinzu.
M
Nachdem die Verbindung hergestellt wurde, geben Sie den auf dem TCD-W angezeigten PIN-Code ein, um
die Mission Control App mit Ihrem Fahrrad zu koppeln. Danach können Sie die Mission Control-Funktionalität
vollständig nutzen.
L
M
M
14
Page 67

7.12. FEHLERMELDUNG
Wenn auf dem Display eine Fehlermeldung angezeigt wird, stellen Sie sicher,
dass alle Komponenten verbunden sind, und starten Sie dann Ihr Fahrrad
ERROR MESSAGES
neu. Wenn das Problem weiterbesteht, sehen Sie für Details in der Mission
Control App nach, oder wenden Sie sich an Ihren Händler.
Je nach Art der Fehlermeldung wird das System möglicherweise automatisch ausgeschaltet. Das Fahrrad kann bei ausgeschaltetem System ohne
Motorunterstützung gefahren werden.
7.13. ALLGEMEINE INFORMATIONEN
• Das Display ist zur Verwendung mit VADO und COMO Bikes vorgesehen.
• Wenn die Spannungsversorgung des Bikes ausgeschaltet wird, werden keine Informationen angezeigt.
• Das Display verfügt über eine Hintergrundbeleuchtung, die sich einschaltet, wenn die Fahrradbeleuchtung eingeschaltet
wird.
• Konzentrieren Sie sich stets auf das Fahren, nicht auf das Display. Versuchen Sie nicht, die Seiten oder die
Systemeinrichtung während der Fahrt anzupassen.
REINIGUNG/PFLEGE:
• Das Display nicht für längere Zeit starker Hitze oder Sonneneinstrahlung aussetzen. Dadurch können das Display und/oder
die Batterie beschädigt werden.
• Zum Reinigen des Displays ausschließlich ein feuchtes oder trockenes weiches Tuch verwenden. Keine aggressiven
Reinigungsmittel verwenden.
• Das Display nicht zerlegen oder fallen lassen.
• Vor Beginn der Fahrt sicherstellen, dass das Display und die Halterung fest am Lenker installiert sind.
7.14. FUNKTIONSOPTIONEN/TECHNISCHE DATEN
DATENFELD 1 UND 2
KPH/MPH
AVG
DIST
TIMER
KCAL
POWER
MAX
ODO
DATENFELD 3
DISPLAY
Uhr 00:00–23:59 (24 Std.) / 1:00–12:59 (12 Std.)
Batterietyp Knopfzelle CR 1220
Abmessungen 62 mm x 46.5 mm x 17.5 mm
Betriebstemperatur -10° C – +60° C / +14° F – +140° F
Funkfrequenz/-protokoll ANT+ / BT
Gehäuseschutzart IP67
Fahrgeschwindigkeit 0 - 200 km/h / 0,0 - 199,9 mph
Durchschnittsgeschwindigkeit 0,0–199,9 km/h / mph
Entfernung 0,0–999,9 km / meile
Fahrtzeit 0:00–99:59’
Kalorienverbrauch 0,0–9999 kcal
Fahrerleistung 0,0–9999 W
Höchstgeschwindigkeit 0,0–199,9 km/h / mph
Kilometerstand 0,0 - 9999 km / meile
Herzfrequenz 0–240 S/min
Batterie % 0–100 %
Trittfrequenz 0–240 U/min
15
Page 68

8. BATTERIE / LADEGERÄT
Ihr Fahrrad wird mit einer Lithium-Ionen-Batterie (Li-Ion) betrieben. Beachten Sie beim Umgang mit dem Akku und
bei Benutzung Ihres VADO/COMO stets folgende Hinweise:
Betreiben Sie den Akku in einem Temperaturbereich von -20 ° C (-4° F) bis + 70 ° C (+ 158 ° F).
Verwenden Sie nur die VADO/COMO-Batterie mit Ihrem VADO/COMO. Verwenden Sie die VADO/COMO-
Batterie nicht mit einem anderen Fahrrad oder eine andere Batterie mit dem VADO/COMO, selbst wenn diese
bauartbedingt passen würde.
Schalten Sie den Akku immer aus, bevor Sie den Kabelbaum oder das Ladegerät anschließen oder von der
Batterie trennen.
Schalten Sie den Akku aus, entfernen Sie das Ladegerät von der Batterie und entfernen Sie den Akku aus dem,
bevor Sie Installations-, Wartungs-, Reinigungs- und/oder Reparaturarbeiten durchführen. Wenn Sie die Batterie
separat transportieren oder handhaben, stellen Sie sicher, dass die Batterie ausgeschaltet ist. Das Berühren der
Kontakte bei eingeschaltetem Akku kann zu Stromschlägen und/oder Verletzungen führen.
Bevor Sie das Fahrrad fahren, vergewissern Sie sich, dass die Batterie ordnungsgemäß im Rahmen befestigt ist.
8.1. BEOBACHTEN UND BEACHTEN
Bitte verändern, öffnen oder zerlegen Sie weder Ladegerät noch Akku. Diese Eingriffe können zu Kurzschlüssen,
Feuer oder Fehlfunktionen führen.
Die Batterie ist sehr schwer. Seien Sie vorsichtig beim Umgang damit und lassen Sie die Batterie nicht fallen.
Lassen Sie keine Nägel, Schrauben oder andere kleine, scharfe und/oder metallische Gegenstände in Berührung
mit der Batterie oder der Ladebuchse des Akkus kommen.
Lassen Sie die Batterie nicht überhitzen. Schützen Sie die Batterie vor übermäßiger Sonneneinstrahlung.
Setzen Sie den Akku keinem offenen Feuer oder einer anderen Wärmequelle aus (Heizung etc.)
Tauchen Sie den Akku nicht in Wasser ein.
Halten Sie die Batterie von metallischen Gegenständen fern, da diese einen Kurzschluss verursachen können.
Verwenden Sie keine Batterien, die Anzeichen einer Beschädigung des Gehäuses oder des Ladeanschlusses
aufweisen oder wenn Flüssigkeiten austreten. Batterie-Flüssigkeit kann Hautreizungen und Verbrennungen
verursachen. Im Falle von Schäden durch Flüssigkeit aus der Batterie, bei Kontakt mit der Haut oder bei
Augenkontakt, bitte sofort mit reichlich Wasser spülen und medizinische Hilfe aufsuchen.
WARNUNG! Wenn Sie die Anweisungen in diesem Abschnitt nicht befolgen, können elektrische
Komponenten des Fahrrades beschädigt und die Garantie ungültig werden, aber vor allem kann
es zu schweren Verletzungen oder zum Tod kommen. Wenn Akku oder Ladegerät irgendwelche
Anzeichen von Beschädigungen aufweisen, verwenden Sie diese nicht mehr, sondern bringen Sie
diese sofort Ihrem autorisierten Specialized Fachhändler zur Überprüfung.
ENGLISHFRANÇAIS
DEUTSCH
ČESKÁHRVATSKASLOVENSKI
8.2. AUFLADEN UND BENUTZEN DER BATTERIE
Überprüfen Sie regelmäßig den Akku und das Ladegerät auf Beschädigungen. Laden und verwenden Sie
niemals eine Batterie, wenn Sie vermuten, dass diese beschädigt ist oder Sie wissen, dass sie defekt ist.
Stellen Sie sicher, dass die Ladebuchse und der Ladestecker trocken sind, bevor Sie die Batterie anschließen
und aufladen.
Verwenden Sie ausschließlich das mit dem Fahrrad gelieferte Spezialladegerät oder andere von Specialized
zugelassene Ladegeräte. Prüfen Sie das Ladegerät vor jeder Benutzung auf eventuelle Beschädigungen des
Ladegeräts, des Kabels oder des Ladesteckers. Verwenden Sie niemals ein Ladegerät, wenn Sie vermuten, dass
dieses beschädigt oder defekt ist.
Stellen Sie das Ladegerät auf eine stabile, ebene, hitzeunempfindliche Oberfläche. Wenn die Batterie außerhalb
des Rahmens geladen wird, legen Sie die Batterie auf die gleiche Oberfläche wie das Ladegerät.
Sie sollten den Akku in einem trockenen, gut belüfteten Bereich aufladen und sicherstellen, dass weder Akku
noch Ladegerät während des Ladevorgangs abgedeckt sind. Stellen Sie sicher, dass Akku und Ladegerät keiner
brennbaren oder gefährlichen Substanz ausgesetzt sind.
16
Page 69

WARNUNG! Wenn Sie die Anweisungen in diesem Abschnitt nicht befolgen, können elektrische
Komponenten des Fahrrades beschädigt und die Garantie ungültig werden, aber vor allem kann
es zu schweren Verletzungen oder zum Tod kommen. Wenn Akku oder Ladegerät irgendwelche
Anzeichen von Beschädigungen aufweisen, verwenden Sie diese nicht mehr, sondern bringen Sie
diese sofort Ihrem autorisierten Specialized Fachhändler zur Überprüfung.
Die Batterie kann im VADO/COMO oder extern geladen werden. Beziehen Sie sich auf die
entsprechenden Anweisungen zum Entfernen und Installieren der Batterie. Laden Sie den Akku
nur bei einer Umgebungstemperatur zwischen 0 ° C und + 50 ° C (+ 32 ° F und + 122 ° F) auf.
Wenn die Außentemperaturen von diesem Bereich abweichen, laden Sie die Batterie in einer
entsprechenden geschlossenen Umgebung auf. Aus Sicherheitsgründen kann die Batterie
außerhalb dieses Temperaturbereichs nicht laden.
8.2.1
LADE-
BUCHSE
8.2.2
BUCHSENAB-
DECKUNG
LADEN
VOLLSTÄNDIG GELADEN
FULLY CHARGED
PROBLEM
BATTERIE
LADEGERÄT
CHARGING
PROBLEM
Stecken Sie den Stecker des Ladegeräts in eine Steckdose (100 - 240V), verwenden Sie dafür den
entsprechenden Stecker.
Entfernen Sie die Ladebuchsenabdeckung am Akku und schließen Sie dann den Ladestecker an der
Ladebuchse des Akkus an (Abb. 8.2.1). Sie sollten die Batterie in einem Bereich aufladen, der mit einem
Rauchmelder ausgestattet ist.
Wenn der Ladevorgang abgeschlossen ist entfernen Sie den Ladestecker von der Ladebuchse der Batterie.
Ziehen Sie den Netzstecker aus der Steckdose.
Während des Ladevorgangs leuchtet die Diode am Ladegerät rot (Abb. 8.2.2). Wenn der Akku vollständig
aufgeladen ist, leuchtet die Diode des Ladegeräts grün.
ACHTUNG: Wenn die rote LED während des Ladevorgangs blinkt, ist ein Ladefehler aufgetreten.
In diesem Fall ziehen Sie bitte das Ladegerät sofort aus der Steckdose und fahren Ihr Vado
sicherheitshalber vorerst nicht. Kontaktieren Sie Ihren autorisierten Specialized Fachhändler.
Bitte beachten Sie, dass Lithium-Ionen-Batterien je nach Alter und Verwendung allmählich
an Kapazität verlieren. Eine stark reduzierte Betriebszeit bzw. Reichweite trotz voller Ladung
kann ein Anzeichen dafür sein, dass die Batterie das Ende ihrer Nutzungsdauer erreicht hat und
ausgetauscht werden muss. Bei ordnungsgemäßer Benutzung des Fahrrades sollten mindestens
75% der ursprünglichen Kapazität des Akkus nach 300 Ladezyklen oder zwei Jahren verbleiben.
Ersatzbatterien können bei Ihrem autorisierten Specialized Fachhändler erworben werden.
17
Page 70

8.3. LADEANZEIGE AUF DEM DISPLAY
Der Ladezustand der Batterie wird während des Fahrens dauerhaft angezeigt. Die Anzahl der leuchtenden LEDs
zeigt die verbleibende Akkuladung an (Abb. 8.3).
Bei noch verbleibenden 10 % Akku-Ladung beginnt das System, die Unterstützung zu reduzieren. Bei 1 % schaltet
das System die Motorunterstützung ab.
Wenn Ihr Fahrrad mindestens 10 Minuten im Stillstand gewesen ist, schaltet das Batterie-Management-System das
System aus. Um mit Motorunterstützung weiter zu fahren, müssen Sie das System wieder einschalten.
ENGLISHFRANÇAIS
8.3
8.4.1
ACHTUNG: BATTERIE
VOR DEM EINBAU
UND AUSBAU IMMER
AUSSCHALTEN!
80-100%
60-79%
40-59%
20-39%
0-19%
8.4. EINBAU DER BATTERIE
DEUTSCH
ČESKÁHRVATSKASLOVENSKI
BATTERIEANSCHLUSS
Senken Sie die untere Kante der Batterie in den Boden des Batteriehohlraums (Abb. 8.4.1), und richten Sie
dann die Oberseite der Batterie mit der Oberseite des Hohlraums aus.
Der Schlüssel muss nicht im Schloss sein, um die Batterie zu installieren. Der Akku wird bei der
Installation automatisch einrasten. Der Schlüssel wird nur benötigt, um die Batterie zu entfernen.
18
Page 71

CLICK!
8.4.2
Drücken Sie auf die Batterie in der Nähe des An/Aus Tasters, bis sie einrastet und durch das Schloss gesichert ist (Abb.
8.4.2).
8.5. AUSBAU DER BATTERIE
Gehen Sie in umgekehrter Reihenfolge vor:
Drehen Sie den Schlüssel im Uhrzeigersinn, bis das obere Ende des Akkus etwas nach oben zeigt.
Indem Sie den Akku mit zwei Händen halten heben Sie ihn etwas nach oben an, um ihn dann seitlich aus dem
Rahmen zu entnehmen.
Drehen Sie den Schlüssel gegen den Uhrzeigersinn, um den Schlüssel aus dem Schloss zu entfernen.
8.6. REINIGUNG
Schalten Sie die Batterie immer aus und entkoppeln Sie das Ladegerät von der Batterie, bevor Sie das Fahrrad
reinigen. Nehmen Sie die Batterie aus dem Fahrrad, bevor Sie die Batterie reinigen.
Entkoppeln Sie vor dem Reinigen stets den Ladestecker vom Akku und ziehen Sie den Stecker des Ladegeräts aus
der Steckdose.
VORSICHT: Verwenden Sie zum Reinigen des VADO/COMO niemals einen Hochdruckreiniger.
Verwenden Sie stattdessen ein trockenes oder leicht angefeuchtetes Tuch. Achten Sie darauf, dass
beim Waschen kein Wasser mit den elektrischen Komponenten in Berührung kommt. Fragen Sie Ihren
autorisierten Specialized Fachhändler nach weiteren Informationen zum Reinigen Ihres Fahrrades.
VORSICHT: Verwenden Sie zum Reinigen des Ladegeräts oder Akkus keinen Alkohol,
Lösungsmittel oder Scheuermittel. Verwenden Sie stattdessen ein trockenes oder leicht
angefeuchtetes Tuch.
8.7. LAGERUNG
ACHTUNG: Wenn der Akku längere Zeit nicht benutzt wird, entfernen Sie den Akku aus dem
Fahrrad und bewahren Sie ihn trocken und gut belüftet auf. Lagern Sie den Akku nur bei
einer Umgebungstemperatur zwischen -20 ° C und + 35 ° C (-4 ° F und + 95 ° F). Wenn die
Außentemperatur zu heiß oder zu kalt ist, lagern Sie bitte die Batterie innen.
ACHTUNG: Wenn der Akku längere Zeit nicht benutzt wird, laden Sie den Akku mindestens alle
drei Monate auf mindestens 2 grüne LEDs (20-39 %) auf. Wenn der Akku nicht alle drei Monate
geladen wird, kann die Batterie beschädigt werden.
19
Page 72

Lassen Sie den Akku nicht längere Zeit am Ladegerät angeschlossen, nachdem der Akku
vollständig aufgeladen worden ist.
8.8. TECHNISCHE BATTERIEDATEN
BESCHREIBUNG EINHEIT SPEZIFIKATION
BETRIEBSSPANNUNG IN VOLT V 36
LADETEMPERATUR
ENTLADETEMPERATUR
LAGERUNGSTEMPERATUR
SCHUTZGRAD IP67
GEWICHT
BATTERIE SBC-B09 SBC-B10 SBC-B11 SBC-B17
KAPAZITÄT 16.8AH 14AH 12.5AH 11.5AH
ENERGIE 604WH 504WH 460WH 400WH
LADEZEIT (SBC-C04) 4:35H 3:50H 3:30H 3:15H
LADEZEIT (SBC-C05) 9:10H 7:40H 7:00H 6:30H
8.9. LADEGERÄT - TECHNISCHE DATEN
BESCHREIBUNG EINHEIT SPEZIFIKATION
MODELL-NUMMER DES LADEGERÄTS SBC-C04 SBC-C05
LADETEMPERATUR
LAGERUNGSTEMPERATUR
LAGERUNGSTEMPERATUR V 42 42
EINGANGSWECHSELSPANNUNG V 100 — 24 0 100 — 240
FREQUENZ Hz 50 / 60 50 / 60
MAXIMALER LADESTROM A 4 2
ABMESSUNGEN mm 179 X 80 X 37.2 147 X 65.5 X 34.2
°C 0 — +50
°F
°C -20 — +70
°F -4 — +158
°C -20 — +35
°F -4 — +95
KG 2.7
LB 6.0
°C -10 — +40 0 — +40
°F 14 — +104 +32 — +104
°C -20 — +65 -20 — +60
°F -4 — +149 -4 — +140
+32 — +122
ENGLISHFRANÇAIS
DEUTSCH
ČESKÁHRVATSKASLOVENSKI
Die Reichweite der Batterie kann erheblich variieren je nach Modell/Kapazität der Batterie sowie den
unterschiedlichen Fahrbedingungen (z.B. Modus, Streckenprofil, Fahrergewicht, Zuladung, Fahrweise,
Umweltbedingungen etc.). Siehe “ALLGEMEINE HINWEISE ZUM FAHREN” auf Seite 6 für weitere
Informationen zur Reichweite und Tipps zu deren Optimierung.
WARNUNG! Bitte lesen Sie vor dem ersten Gebrauch das Etikett auf der mitgelieferten Batterie
(Abb. 8.9).
20
Page 73

8.9
8.10. TRANSPORT
Der Transport und/oder Versand Ihrer VADO/COMO-Batterie unterliegt möglicherweise bestimmten
Beschränkungen und kann eine spezielle Handhabung, Etikettierung und/oder Verpackung
erfordern. Achten Sie darauf, sich vorher über alle geltenden gesetzlichen Bestimmungen und
Vorschriften in Ihrem Land oder Staat zu informieren. Ihr autorisierter Fachhändler kann auch
hilfreiche Informationen zur Verfügung stellen. Wenn Sie die Batterie außerhalb des Rahmens
transportieren, sollten Sie eine zugelassene Batterie-Transportbox verwenden.
VORSICHT: Achten Sie darauf, dass Ihr VADO/COMO wesentlich schwerer ist als ein Fahrrad
ohne Motorunterstützung. Agieren Sie behutsam und vorausschauend beim Steuern, Tragen oder
Heben Ihres Vado.
8.11. ENTSORGUNG
Batterien und Ladegeräte dürfen nicht im Hausmüll entsorgt werden! Sämtliche Batterien und
Ladegeräte müssen gemäß den Entsorgungsbestimmungen in Ihrem Land umweltschonend
LIION
entsorgt werden. Fragen Sie Ihren autorisierten Specialized Fachhändler nach Informationen zur
Entsorgung einer Batterie oder eines Ladegeräts und über eventuelle Rücknahmeprogramme.
9. BELEUCHTUNG
Der VADO/COMO ist mit einem LED-Scheinwerfer und LED-Rücklicht ausgestattet.
Der Scheinwerfer (Abb. 11) ist an das Batteriesystem angeschlossen und schaltet sich ein, wenn das Fahrrad
eingeschaltet wird.
Modelle mit Gepäckträger: Die Rückleuchte ist durch das Schutzblech verkabelt. Das Entfernen des Schutzblechs
führt dazu, dass das Rücklicht nicht mehr über die Batterie des Fahrrades mit Strom versorgt werden kann,
wodurch es nicht mehr leuchtet.
Die Ausstattung mit Frontlicht bzw. Rücklicht hängt vom Modell sowie den Regularien des jeweiligen Landes
ab. Ist ein Rücklicht vorhanden, so ist es entweder auf dem Schutzblech oder unter dem Sattel zu finden.
10. SPEZIFIKATIONEN
10.1. SCHRAUBEN-DIMENSIONEN / DREHMOMENT-ANGABEN
WARNUNG! Korrekte Anzugsmomente an den Befestigungen (Muttern, Schrauben und Bolzen) Ihres
VADO/COMO sind wichtig für Ihre Sicherheit. Wenn zu geringe Anzugsmomente angewendet werden, kann
das Befestigungselement nicht sicher halten. Wenn zu viel Kraft ausgeübt wird, können Befestigungselemente zerspanen, dehnen, deformieren oder brechen. In jedem Fall kann ein falsches Anzugsmoment zu
Bauteilversagen führen, was einen Kontrollverlust mit Sturzfolge bedeuten kann.
Vergewissern Sie sich, dass jede Schraube entsprechend der Spezifikation gesichert ist. Überprüfen
Sie nach Ihrer ersten Fahrt, und in regelmäßigen Abständen danach, die Anzugsmomente der einzelnen
Schrauben, um eine sichere Befestigung der Komponenten sicherzustellen. Nachfolgend finden Sie eine
Zusammenfassung der Drehmoment-Spezifikationen in diesem Handbuch:
21
Page 74
POSITION
SATTELKLEMME 45 5.1 HINTERRADACHSE 133 15
SATTELSTÜTZE AM SATTEL 120 13.5 VORDERRADACHSE 133 15
VORBAU AM STEUERROHR 52 6.0 KURBELSCHRAUBE 443 50
VORBAU AM LENKER 52 6.0 KETTENBLATTSCHRAUBEN 89 10*
LEITUNGSFÜHRUNG DER HINTERRADBREMSE
AUSFALLENDE 35
BEDIENELEMENT 7 0.8
ACHTUNG: Vergewissern Sie sich vor Aufbau und Montage, dass alle Kontaktflächen sauber und dass
Schraubengewinde gefettet sind oder eine Schraubensicherung aufgebracht ist (siehe Anleitung für jede Schraube).
* Mittelfeste Schraubensicherung auf Kettenblattschrauben auftragen.
PUNKT SPEZIFIZIERUNG
STEUERSATZ 1 1/8” UNTEN/OBEN
DURCHMESSER DER SATTELSTÜTZKLEMME 34.9MM
DURCHMESSER DER SATTELSTÜTZE 30.9MM
AUSFALLENDE S172600003 (AMAZINGER 2.1)
HINTERRADNABE 148MM X 12MM
VORDERRADNABE (STARRE GABEL) 100MM X 12MM
VORDERRADNABE (FEDERGABEL) 100MM X 15MM
IN-
Nm POSITION
LBF
6 0.7 SPIDER SICHERUNGS-SCHRAUBE 443 50
4
FLASCHENHALTERSCHRAUBEN 25
10.2. RAHMEN SPEZIFIKATIONEN
INLBF
Nm
ENGLISHFRANÇAIS
2.8
DEUTSCH
WARNUNG! VADO/COMO Rahmen sind nur mit VADO/COMO Starrgabeln oder Federgabeln mit max. 50
mm Federweg kompatibel. Die Verwendung anderer Gabeln beeinträchtigt Geometrie und Fahrqualität
und kann zu einem schwerwiegenden Schaden am Rahmen führen. Dies kann zu schweren Verletzungen
oder zum Tod führen.
10.3. EMPFOHLENER REIFEN-LUFTDRUCK
Ein angemessener Reifen-Luftdruck ist für eine optimale Leistung des VADO/COMO unerlässlich. Reifen mit einem höheren
Luftdruck rollen auf sanftem Untergrund in der Regel leichter, bieten aber weniger Traktion und geringeren Komfort. Ein niedrigerer
Luftdruck bietet in aller Regel mehr Traktion bei etwas schlechterem Rollwiderstand, zumindest auf harten Untergründen.
Benutzen Sie hochwertige Druckanzeigen und beziehen Sie den Reifendruck auf die Empfehlungen, die auf die
Seitenwand des Reifens aufgedruckt sind.
Durch das höhere Gewicht des VADO/COMO sollte der Luftdruck hier etwas höher ausfallen als bei
einem Bike ohne Motor.
11 .
GESETZLICHE VORGABEN
RoHS: Specialized Bicycle Components, Inc. versichert, dass dieses Produkt und seine Verpackung die
Anforderungen der Richtlinie 2011/65/EU zur Beschränkung der Verwendung bestimmter gefährlicher Stoffe in
Elektro- und Elektronikgeräten, gemeinhin als RoHS bezeichnet, erfüllt.
22
ČESKÁHRVATSKASLOVENSKI
Page 75

12. EC - KONFORMITÄTSERKLÄRUNG
Der Hersteller
Specialized Bicycle Components Inc.
15130 Concord Circle
Morgan Hill, CA 95037, USA
Tel: +1 408 779-6229
bestätigt hiermit für die folgenden Modelle der
Kategorie: EPAC (Electrically Pedal Assisted Cycle)
mit der
Modellbezeichnung:
Die Konformität mit allen anwendbaren
Verordnungen mit der Richtlinie:
Diese Maschine ist ebenso konform mit
allen Verordnungen der Richtlinie:
Die folgenden Homologisierungs-Normen
wurden auf das Produkt angewendet:
Seriennummer:
Technische Dokumentation von:
TURBO VADO 3.0
TURBO VADO 4.0
TURBO VADO 5.0
Maschinen (2006/42/EC)
Elektromagnetische Kompatibilität (2004/108/EC).
Funkanlagen (2014/53/EU)
EN 15194 Fahrräder - elektromotorisch unterstützte Räder -
EPACs
Die Seriennummer befindet sich auf dem Aufkleber auf der
letzten Seite der Bedienungsanleitung
Specialized Europe GmbH
Werkstattgasse 10
6330 Cham, Switzerland
TURBO COMO 3.0
TURBO COMO 4.0
TURBO COMO 5.0
Unterschrift:
Jan Talavasek (European Engineering Manager)
Specialized Europe GmbH
6330 Cham, Switzerland
1. September 2018
HINWEIS: Diese Konformitätserklärung gilt nur für Bikes, die in Ländern verkauft werden, in denen die CERichtlinien Gültigkeit besitzen.
HINWEIS: UM DAS FAHRRAD DIESER BEDIENUNGSANLEITUNG ZUZUORDNEN, MUSS DER GELBE
SERIENNUMMERN-AUFKLEBER AUF DEM RAHMEN DES FAHRRADS ÜBER DEM AUFKLEBER-BEISPIEL AUF
DER RÜCKSEITE DIESER BEDIENUNGSANLEITUNG PLATZIERT WERDEN.
23
Page 76

OBSAH
1. ÚVOD ........................................................................................................................................................ 1
1.1. ZÁRUKA .............................................................................................................................................................. 1
2. KOMPONENTY VADO/COMO..................................................................................................................2
3. OBECNÉ INFORMACE O VAŠEM KOLE VADO/COMO ......................................................................... 3
3.1. URČENÍ............................................................................................................................................................... 3
3.2. PEDELEC / EPAC ............................................................................................................................................... 3
3.3. SPUŠTĚNÍ SYSTÉMU ........................................................................................................................................ 3
4. OBECNÁ UPOZORNĚNÍ OHLEDNĚ MONTÁŽE ..................................................................................... 4
4.1. SENSOR PRO MĚŘENÍ RYCHLOSTI ................................................................................................................ 4
4.2. STŘEDOVÉ SLOŽENÍ ........................................................................................................................................ 4
4.3. HLAVOVÉ SLOŽENÍ ........................................................................................................................................... 5
4.4. SEDLOVKA ......................................................................................................................................................... 5
4.5. NÁHRADNÍ DÍLY A PŘÍSLUŠENSTVÍ ................................................................................................................ 5
5. OBECNÁ USTANOVENÍ OHLEDNĚ JÍZDY ............................................................................................. 6
5.1. JEZDECKÉ TIPY .................................................................................................................................................6
5.2. PŘED PRVNÍ JÍZDOU ........................................................................................................................................7
5.3. JÍZDA S DĚTMI ................................................................................................................................................... 7
6. OBECNÁ UPOZORNĚNÍ OHLEDNĚ ÚDRŽBY........................................................................................ 8
7. ROZHRANÍ SYSTÉMU ............................................................................................................................. 9
7.1. UNTERSTÜTZUNGS-MODI ...............................................................................................................................9
7.2. MOŽNOSTI PŘIPOJENÍ .....................................................................................................................................10
7.3. MONTÁŽ ............................................................................................................................................................. 11
7.4. AKTIVACE/VÝMĚNA BATERIE ........................................................................................................................... 11
7.5. FUNKCE DISPLEJE............................................................................................................................................ 12
7.6. HLAVNÍ OBRAZOVKY ........................................................................................................................................ 12
7.7. LEGENDA ........................................................................................................................................................... 12
7.8. VÝCHOZÍ NASTAVENÍ STRÁNKY / NAVIGACE ................................................................................................13
7.9. PŘIZPŮSOBENÍ STRÁNEK................................................................................................................................ 13
7.10. NASTAVENÍ SYSTÉMU ....................................................................................................................................14
7.11. CONNECT TO MISSION CONTROL APP ........................................................................................................14
7.12. CHYBOVÉ ZPRÁVY .........................................................................................................................................15
7.13. OBECNÉ INFORMACE..................................................................................................................................... 15
7.14. MOŽNOSTI/SPECIFIKACE FUNKCÍ ................................................................................................................ 15
8. BATERIE / NABÍJEČKA ........................................................................................................................... 16
8.1. DODRŽUJTE NÁSLEDUJÍCÍ POKYNY: .............................................................................................................16
8.2. NABÍJENÍ A POUŽITÍ BATERIE .......................................................................................................................... 16
8.3. ZOBRAZENÍ ÚROVNĚ NABITÍ ........................................................................................................................... 17
8.4. INSTALACE BATERIE ........................................................................................................................................ 18
8.5. VYJMUTÍ BATERIE .............................................................................................................................................19
8.6. ČIŠTĚNÍ .............................................................................................................................................................. 19
8.7. SKLADOVÁNÍ .....................................................................................................................................................19
8.8. BATERIE - TECHNICKÉ ÚDAJE ........................................................................................................................ 20
8.9. NABÍJEČKA - TECHNICKÉ ÚDAJE ....................................................................................................................20
8.10. PŘEPRAVA ....................................................................................................................................................... 21
8.11. LIKVIDACE ........................................................................................................................................................21
9. OSVĚTLENÍ .............................................................................................................................................. 21
10. SPECIFIKACE ........................................................................................................................................ 21
10.1. ROZMĚRY ŠROUBŮ / UTAHOVACÍ MOMENTY .............................................................................................21
10.2. SPECIFIKACE RÁMU ....................................................................................................................................... 22
10.3. DOPORUČENÝ TLAK V PLÁŠTÍCH .................................................................................................................22
11. ZÁKONNÁ USTANOVENÍ ...................................................................................................................... 22
12. EC - PROHLÁŠENÍ O SHODĚ ............................................................................................................... 23
Tato příručka byla koncipována v anglickém jazyce (původním návodem k používání). Tato verze je překladem
původního návodu k používání.
EN 15194
SPECIALIZED BICYCLE COMPONENTS
15130 Concord Circle, Morgan Hill, CA 95037 (408) 779-6229
0000115654_UM_CZ_R1, 09/18
Pamatujte, že všechny pokyny a poznámky se mohou změnit a být aktualizovány bez upozornění.
Pravidelně kontrolujte technické aktualizace na adrese www.specialized.com.
Zpětná vazba: techdocs@specialized.com
ENGLISHFRANÇAISDEUTSCH
ČESKY
HRVATSKASLOVENSKI
Page 77

1. ÚVOD
DŮLEŽITÉ:
Tato Uživatelská příručka ke kolu (dále jen Uživatelská příručka) je určena pro kolo Specialized Turbo VADO/
COMO (dále jen VADO/COMO) a slouží jako detailnější dodatek k obecné Uživatelské příručce ke kolu
Specialized. Uživatelská příručka obsahuje důležité informace o bezpečnosti, provozu a servisu, které byste si měli
přečíst před Vaší první jízdou a následně si ji uschovat pro pozdější použití. Také byste si měli přečíst Uživatelskou
příručku ke kolu Specialized, ve které najdete důležité informace a instrukce, jež by měly být dodrženy. Pokud
nemáte tištěnou verzi Uživatelské příručky, můžete si ji stáhnout zdarma na www.specialized.com, nebo ji získat u
Vašeho nejbližšího autorizovaného prodejce Specialized, či v oddělení Specialized Rider Care.
Mohou být k dispozici další informace ohledně bezpečnosti, výkonu a servisu pro konkrétní komponenty jako
je odpružení nebo pedály na vašem kole nebo pro příslušenství jako jsou helmy či světla. Ujistěte se, že vám
Autorizovaný prodejce Specialized poskytl veškerou literaturu od výrobce, který byla součástí vašeho kola nebo
příslušenství. V případě koniktu mezi informacemi v Uživatelské příručce a informacemi od výrobce komponentů
se vždy řiďte pokyny výrobce komponentu a kontaktujte Vašeho nejbližšího Autorizovaného prodejce Specialized.
Vaše VADO / COMO je klasikováno jako EPAC (Electrically Pedal Assisted Cycle, nebo také Pedelec, česky
Jízdní kolo s elektrickou podporou šlapání) a v tomto manuálu je zjednodušeně nazýváno kolem, pokud není
uvedeno jinak.
UŽIVATELSKÉ PŘÍRUČKY V JINÝCH JAZYCÍCH JSOU K DISPOZICI KE STAŽENÍ NA ADRESE
www.specialized.com.
Při čtení této Uživatelské příručky si všimnete různých symbolů a varování, které jsou vysvětleny níže:
VAROVÁNÍ! Kombinace tohoto slova a symbolu označuje potenciálně nebezpečnou
situaci, které když se nevyhnete, tak může mít za následek vážné zranění nebo smrt.
Mnoho z Varování udává, že “můžete ztratit kontrolu a spadnout”. Protože každý pád může
skončit vážným zraněním nebo smrtí, neopakujeme vždy varování před možným zraněním
nebo smrtí.
UPOZORNĚNÍ: Kombinace bezpečnostního symbolu a slova UPOZORNĚNÍ označuje
potenciálně nebezpečnou situaci, které když se nevyhnete, tak může mít za následek lehké
nebo středně těžké zranění, nebo slouží jako varování před nebezpečnými postupy.
Slovo UPOZORNĚNÍ bez výstražného symbolu označuje situaci, které když se nevyhnete,
tak může mít za následek poškození Vašeho kola nebo propadnutí záruky.
INFO: Symbol upozorňuje čtenáře na obzvláště důležité informace.
TECHNICKÝ TIP: Technické tipy jsou užitečné tipy a triky pro instalaci a použití.
VAZELÍNA: Tento symbol značí, že je třeba použít vysoce kvalitní vazelínu dle nákresu.
PROTISKLUZNÁ PASTA NA KARBON: Tento symbol značí, že pro zvýšení tření je třeba
použít pastu na karbon zvyšující tření.
MOMENT: Tento symbol zvýrazňuje správnou hodnotu utahovacího momentu pro
konkrétní šroub. K dosažení konkrétní hodnoty momentu je nutné použít kvalitní
momentový klíč.
1.1. ZÁRUKA
S Vaším kolem Vám byla dodána kopie záručních podmínek pro kola Specialized. Ty jsou k dispozici i u Vašeho
Autorizovaného prodejce Specialized nebo ke stažení na adrese www.specialized.com.
1
Page 78

2. KOMPONENTY VADO/COMO
28
8
9
10
44
45
43
6
11
35
42
12
13
14
5
1. Horní rámová trubka
2. Spodní rámová trubka
3. Sedlová trubka
4. Hlavová trubka
5. Řetězová vzpěra
6. Sedlová vzpěra
7. Vidlice
8. Sedlo
9. Sedlovka
10. Objímka sedlovky
11. Kazeta
12. Patka přehazovačky
13. Přehazovačka
14. Řetěz
15. Převodník
16. Klika
30
29
34
17. Pedál
18. Motor
19. Řídítka
20. Grip
21. Řazení
22. Brzdová páka
23. Dálkový ovladač
24. Světlomet*
25. Displej
26. Představec
27. Hlavové složení
28. Baterie
29. Nabíjecí zdířka
30. Zámek
31. Vypínač
32. Přední brzdový třmen
31
1
3
15 16 17
20
2
28
18
19
22
27
32
25
26
4
33. Kotouč přední brzdy
34. Zadní brzdový třmen
35. Kotouč zadní brzdy
36. Drát
37. Ráfek
38. Plášť
39. Náboj
40. Ventilek
41. Pevná osa
42. Stojánek
43. Blatník
44. Zadní nosič*
45. Zadní světlo*
24 21
23
ENGLISHFRANÇAISDEUTSCH
38
37
7
39
41
33
36
40
ČESKY
HRVATSKASLOVENSKI
* Ne všechny modely mají zadní nosič, přední světlo a/nebo zadní světlo namontované na sedle či nosiči.
2
Page 79

3. OBECNÉ INFORMACE O VAŠEM KOLE VADO/COMO
80-100%
60-79%
40-59%
20-39%
0-19%
3.1. URČENÍ
VADO/COMO je určeno a testováno výhradně pouze pro jízdu. Pro více informací o užívání a konstrukčních
váhových limitech pro rám a komponenty najdete v Uživatelské příručce ke kolu Specialized.
VADO/COMO je klasikováno jako Pedelec/EPAC. Bez ohledu na svou klasikaci poskytne podporu motoru
pouze během šlapání. V závislosti na klasikaci se mohou vyskytnout různé požadavky a předpisy, které ovlivní
vaše používání kola.
Před používáním kola VADO/COMO se seznamte s veškerými zákonnými požadavky a
nařízeními ve Vaší zemi nebo státu. Mohou existovat omezení ohledně jízdy s kolem VADO/
COMO na veřejných silnicích, cyklistických stezkách nebo pěšinách. Také mohou existovat
platná věková omezení nebo požadavky na pojištění či požadavky na použití helmy.
Specialized neslibuje nyní, ani do budoucnosti a netvrdí ani neposkytuje záruku ohledně užití
Vašeho kola VADO/COMO. Protože se zákony a nařízení ohledně elektrických kol mění země
od země/státu a mění se neustále, ujistěte se, že máte nejčerstvější informace. Také byste měli
pravidelně navštěvovat Autorizovaného prodejce Specialized, kde získáte aktuální informace.
UPOZORNĚNÍ: Všechna kola VADO/COMO mají pevně přednastavený rychlostní omezovač,
díky kterému se podpora automaticky vypne. Jakýkoliv pokus či manipulace s výkonem a/či
systémem je zakázána a záruka nebude platná.
3.2. PEDELEC / EPAC
VADO/COMO je klasikováno jako Pedelec, podpora motoru funguje do rychlosti 25 km/h (15,5 míle/h) nebo
32/45 km/h (20/28 míle/h) podle konkrétní země. Při rychlejší jízdě se podpora motoru vypíná.
3.3. SPUŠTĚNÍ SYSTÉMU
Systém spustíte stiskem a podržením tlačítka
vypínače (Obr. 3.3), které se nachází v horní části
baterie, dokud se nerozsvítí kontrolka LED zeleně.
Počet kontrolek LED svítících zeleně závisí na stavu
nabití baterie.
Chcete-li baterii (a podporu) vypnout, stiskněte a
podržte tlačítko vypínače na baterii dokud kontrolka
LED nezhasne.
3.3
3
Page 80

4. OBECNÁ UPOZORNĚNÍ OHLEDNĚ MONTÁŽE
Tato Uživatelská příručka není vyčerpávajícím průvodcem pro použití, servis, opravy nebo údržbu. S veškerým
servisem, opravami a údržbou se obraťte na Autorizovaného prodejce Specialized. Váš Autorizovaný prodejce
Specialized Vás také může odkázat na semináře, kurzy nebo knihy ohledně používání kol, servisu, oprav a údržby.
VAROVÁNÍ! Díky složitosti kola VADO/COMO vyžaduje správná montáž vysokou úroveň
mechanické odbornosti, dovedností, školení a speciální nástroje. Proto je pro Vaši bezpečnost
nezbytné, aby montáž, údržbu a řešení problémů prováděl Autorizovaný prodejce Specialized.
Před první jízdou se přesvědčte, že je vybavení, jako brzdy a pohon, správně nainstalované,přesně dle instrukcí výrobce a ověřte takéjejich správnou funkci.
VAROVÁNÍ! Mnoho dílů na kolech VADO/COMO, které (ale nejen tyto) jsou specicky určené
pouze pro tyto modely (motor,kabely, baterie). Používejte vždy pouze originálně dodané
díly a hardware. Použití neoriginálních dílu může mít za následek celistvost a tuhost celku.
Komponenty specické pro VADO/COMO smí být použity jen na těchto modelech a nikoli na
jiných kolech, i přesto, že mohou být tvarově vhodné. Porušení těchto pokynů může mít za
následek vážné zranění nebo smrt.
VAROVÁNÍ! Nesnažte se upravovat nebo měnit kolo či rám jakýmkoli způsobem.Díly Vašeho kola
se nesnažte brousit, vrtat, pilovat nebo odstraňovat. Nemontujte nekompatibilní komponenty
nebo díly. Neuposlechnutí tohoto pokynu může mít za následek vážné zranění osob nebo smrt.
VAROVÁNÍ! Elektrické komponenty mohou být odkryty během práce na kole. Nedotýkejte se
žádné části elektrického systému, je-li pod napětím. Nevystavujte konektory baterie a rámu
vodě. Pokud jsou poškozeny či zničeny živé části baterie, ihned zastavte a dopravte kolo k
Vašemu Autorizovanému prodejci Specialized.
4.1. SENSOR PRO MĚŘENÍ RYCHLOSTI
Při montáži zadní kotoučové brzdy musí být magnet pro měření rychlosti umístěn na kotouči (Obr. 4.1). Čtyři
ze šesti šroubů jsou standardní šrouby pro kotouče. Zbývající dva šrouby (M5 x 15mm se zapuštěnou plochou
hlavou) upevňují magnet pro měření rychlosti.
4.1
ENGLISHFRANÇAISDEUTSCH
BRZDOVÝ KOTOUČ
STANDARDNÍ
ŠROUBY PRO
KOTOUČ
ŠROUB M5 x 15mm
SE ZAPUŠTĚNOU
HLAVOU
MAGNET PRO MĚŘENÍ RYCHLOSTI
4.2. STŘEDOVÉ SLOŽENÍ
Středové složení je integrovanou součástí motoru a nevyžaduje žadnou přípravu před instalací.
ČESKY
HRVATSKASLOVENSKI
4
Page 81

4.3. HLAVOVÉ SLOŽENÍ
Rám VADO používá horní hlavové ložisko 1 1/8” (41.8mm x 8mm x 45”, norma Campagnolo) a spodní
ložisko 1,5”(52mm x 40 x 7mm, 45x45°). Ujistěte se, že náhradní ložiska jsou kompatibilní se specikací
Specialized. K výměně obou ložisek není potřeba žádné speciální nářadí. Před instalací musí být montážní
plochy rámu namazané vazelínou.
Prohlédněte vidlici, představec, sedlovku a sedlovou trubku, abyste zajistili, že zde nejsou žádné otřepy
nebo ostré hrany. Odstraňte jakékoliv otřepy nebo ostré hrany jemným brusným papírem.
Všechny hrany představce, které jsou v kontaktu se sloupkem vidlice, by měly být zaobleny, aby se
odstranila místa možného poškození.
VAROVÁNÍ! Otřepy a ostré hrany mohou poškodit povrchy karbonových i hliníkových součástek.
Jakékoli hluboké škrábance nebo drážky v představci nebo vidlici mohou způsobit jejich oslabení.
4.4. SEDLOVKA
Rámy VADO/COMO mají sedlovky s průměrem 30,9 a tolerancí pro průměr sedlovky v rozmezí 30,78 mm až
30,95 mm.
MINIMÁLNÍ ZASUNUTÍ SEDLOVKY:
4.4
Abyste zabránili poškození rámu a / nebo sedlovky, je důležité
dodržet minimální zasunutí sedlovky do sedlové trubky. Toto
minimální zasunutí musí splňovat následující požadavky:
Sedlovka musí být vložena do rámu dostatečně hluboko,
aby nebyla na sedlovce viditelná značka minimálního
zasunutí / maximální prodloužení (min / max) (Obr.4.4 A).
Sedlovka musí být také zasunuta do sedlové trubky tak, aby
byla viditelná přes kontrolní otvor (Obr. 4.4 B), nebo pokud
není přítomen žádný otvor na kontrolu, musí být splněna
nebo překročena minimální měřená hloubka zasunutí (Obr.
4.4 B) požadovaná dle velikostí rámu (viz níže).
Pokud se požadavky na minimální vložení sedlovky
a rámu od sebe liší, vždy použijte to delší minimální
vložení. Pokud například rám vyžaduje 90 mm, ale
A
B
insertion
min
sedlovka potřebuje 100 mm, pak je požadované
minimální vložení je 100 mm.
• VŠECHNY MODELY VADO/COMO: minimální vložení je 90 mm
Je-li sedlovka umístěna na značce min / max a sedlovka není viditelná kontrolním otvorem nebo nedosahuje
nebo nepřesahuje minimální hloubku zasunutí v rámu, není sedlovka dostatečně hluboko zasunuta do sedlové
trubky a měla by být zasunuta dále, až dokud není vidět přes otvor. To může mít za následek, že sedlo bude
příliš nízko. Pokud ano, musí být sedlovka nahrazena delším modelem.
VAROVÁNÍ! Neuposlechnutí pokynů ohledně minimálního zasunutí sedlovky do rámu v této
části může mít za následek zničení rámu a/nebo sedlovky, ale hlavně, může způsobit ztrátu
Vaší kontroly nad kolem a následný pád.
Pokud je sedlovka zkrácena příliš, značka min/max na sedlovce již nemusí být přesná.
Před zkracováním sedlovky si vždy označte doporučenou min./max. délku sedlovky
požadovanou výrobcem.
VAROVÁNÍ! Obecné pokyny týkající se instalace sedlovky naleznete v příslušné části v
Uživatelské příručce. Jízda s nesprávně upevněnou sedlovkou může způsobit otočení či
sklopení sedla, díky čemuž hrozí ztráta kontroly nad kolem a následný pád.
UPOZORNĚNÍ: Zkontrolujte sedlovku a sedlovou trubku, abyste se přesvědčili, že tam nejsou
otřepy či ostré hrany. Odstraňte všechny otřepy či ostré hrany za použití jemného brusného papíru.
4.5. NÁHRADNÍ DÍLY A PŘÍSLUŠENSTVÍ
Specialized náhradní díly a příslušenství jsou k dostání u Autorizovaných prodejců Specialized.
5
Page 82

5. OBECNÁ USTANOVENÍ OHLEDNĚ JÍZDY
VADO/COMO motor poskytuje podporu šlapání pouze pokud šlapete a kolo je v pohybu. Míra podpory šlapání
závisí na intenzitě (síle), s jakou šlapete. Pokud přestanete šlapat, motor Vám přestane pomáhat.
Kolo VADO/COMO může být používáno také jako normální kolo bez asistence při vypnuté baterii.
Kolo VADO/COMO je vybaveno režimem asistence při chůzi (motor zabírá aniž by byla přenášena síla do
pedálů), což slouží jako asistence při chůzi s kolem do kopce, a to až do rychlosti 6 km/h tak dlouho, dokud je
stisknuté tlačítko +.
5.1. JEZDECKÉ TIPY
Díky asistenci elektromotoru poskytuje VADO/COMO unikátní zážitek z jízdy v porovnání s koly bez asistence.
Níže najdete několik jezdeckých tipů, které pomohou snížit opotřebení součástek a zvýšit výdrž baterie:
Věnujte pozornost rychlosti do zatáček a ujistěte se, že jste přestali šlapat v dostatečném předstihu před
zatáčkou. Jinak se může stát, že v ní budete příliš rychlí.
Jezděte plynule a koukejte se dopředu. Při každém brždění ztrácíte rychlost, a proto budete potřebovat více
energie k tomu, abyste opět zrychlili.
Pravidelně přeřazujte pro udržení optimálních otáček šlapání a podřazujte před zastavením.
Před započetím změny převodů vždy snižte sílu, kterou působíte na pedály, abyste omezili opotřebení nebo
poškození převodů.
Pravidelně kontrolujte tlak v pláštích. Nízký tlak může způsobit neefektivní odvalování plášťů.
Je-li kolo vystaveno chladnějšímu počasí, uchovávejte baterii v budově až do doby těsně před jízdou.
Nevystavujte kolo po delší dobu nadměrnému horku (např. přímému slunečnímu záření).
Vezte pouze náklad, který potřebujete. Více nákladu vyžaduje více energie pro pohyb.
VAROVÁNÍ! Podpora motorem se aktivuje jakmile šlápnete do pedálů a kolo se dá do pohybu.
Měli byste sedět na sedle a držet zmáčknutou alespoň jednu brzdu, než začnete na pedály
působit silou. Nepokládejte jednu nohu na pedál s přehozením druhé nohy přes kolo, protože
kolo může nečekaně zrychlit. Neuposlechnutí tohoto pokynu může mít za následek vážné
zranění nebo i smrt.
VAROVÁNÍ! Zrychlení elektrického kola může být větší, než byste očekávali, a na první
pocit může působit nezvykle. Specialized doporučuje před první jízdou použít režim ECO s
nejnižším výkonem a seznámit se s provozem elektrického kola v bezpečném prostředí dále
od ostatních kol, chodců nebo vozidel. Kvůli většímu zrychlení elektrického jízdního kola
byste měli také věnovat zvláštní pozornost terénním podmínkám, protože se můžete přiblížit
k překážce rychleji, než jste očekávali. Pamatujte, že ve výchozím nastavení se systém vždy
zapne v režimu SPORT.
UPOZORNĚNÍ: Váha kola VADO/COMO je výrazně vyšší, než u normálních kol bez motoru.
Buďte proto při manipulaci s kolem (včetně zvedání, tlačení, nakládání do auta či do nosičů,
stejně tak při sundávání či vyndávání kola z nosiče/auta) opatrní.
UPOZORNĚNÍ: Nejezděte na kole VADO/COMO bez instalované baterie. Jízda bez instalované
baterie může zničit elektrické komponenty.
ENGLISHFRANÇAISDEUTSCH
ČESKY
HRVATSKASLOVENSKI
6
Page 83

5.2. PŘED PRVNÍ JÍZDOU
Bez ohledu na Vaši úroveň zkušeností byste si měli přečíst “PRVNÍ” sekci Uživatelské příručky ke kolu Specialized
(Bike t, Bezpečnost především, Mechanická bezpečnostní kontrola a První jízda) a vykonat všechny nezbytné
kontroly. Kromě toho se ujistěte, že jste obeznámeni s následujícími prvky, které jsou specické pro elektro kola.
PŘED KAŽDOU JÍZDOU
Baterie
• Jsou všechny konektory zapojeny správně?
• Máte baterii dostatečně nabitou?
• Je baterie řádně vložena a uzamčena v rámu?
Displej
• Pracuje displej správně?
PŘED PRVNÍ JÍZDOU
Baterie
• Je baterie plně nabita?
Displej
• Jste obeznámeni s funkcemi a ovládáním displeje?
Dálkové ovládání
• Jste obeznámeni s funkcemi a ovládáním dálkového ovladače?
• Víte jak používat dálkové ovládání ke změně úrovně podpory z ECO na SPORT a TURBO režim?
VAROVÁNÍ! Vykazuje-li Vaše baterie nebo nabíječka jakékoliv známky poškození, nepoužívejte
kolo a okamžitě jej dopravte k Vašemu Autorizovanému prodejci Specialized na kontrolu.
5.3. JÍZDA S DĚTMI
Existuje mnoho různých způsobů, které umožňují jezdit s dětmi. Podívejte se do sekce Bezpečná jízda v
Uživatelské příručce ke kolu Specialized pro obecné informace a pokyny o dětských nosičích či přívěsech.
Pokud jezdíte s dětmi na kole pravidelně, měl by Váš Autorizovaný prodejce Specialized provádět pravidelnou
bezpečnostní kontrolu.
VAROVÁNÍ: Kola Specialized jsou navržena a testována vždy pro jednu osobu. Jízda s dítětem
na kole Specialized je na vlastní nebezpečí. Pokud se rozhodnete instalovat na kolo Specialized
příslušenství jako je přívěsný vozík, nosič či závěsné kolo, ujistěte se, zda je kompatibilní s
pokyny jak výrobce, tak i Vašeho Autorizovaného prodejce Specialized. Měli byste se ujistit,
zda je kolo s namontovaným příslušenstvím pro jízdu stále bezpečné. V případě, že používáte
přívěsný vozík, závěsné kolo či dětský nosič, ujistěte se, že nepřekračujete strukturální váhový
limit kola. Také se ujistěte, že nepřekračujete váhový limit nákladu při použití dětského nosiče.
VAROVÁNÍ: Jízda na kole s dětmi ovlivní jízdní vlastnosti kola kvůli jinému těžišti, váze a
rovnováze. To může mít také negativní dopad na Vaše schopnosti při zatáčení, prodloužit
brzdnou dráhu a redukovat Vaši schopnost zpomalit či manévrovat s kolem, především pak
ve vyšších rychlostech či prudkých klesáních. Vše zmiňované může vést ke ztrátě kontroly,
což by mohlo způsobit vážná zranění a/nebo smrt. Měli byste se tedy s jízdou s příslušenstvím
seznámit v bezpečném prostředí daleko od běžného provozu.
VAROVÁNÍ: Nepřipojujte dětský nosič, přívěs či podobné doplňky ke kompozitovým nebo
karbonovým dílům ani přímo, ani nepřímo. Například, nepřipojujte dětský přívěs k zadní ose,
pokud je zadní stavba (trojúhelník) z kompozitu či karbonu. Stejně tak nepřipojujte závěsné
kolo ke kompozitové či karbonové sedlovce či dětský nosič ke kompozitové nebo karbonové
vidlici. Ve všech případech může dojít k nepředpokládanému přepětí v rámu či komponentech,
což může mít za následek poničení a způsobit celkovou poruchu s vážným rizikem úrazu,
nebo smrtí. Jestliže jste již nějaký doplněk ke kompozitovým či karbonovým částem kola
připevnili, nejezděte na něm dokud si nenecháte udělat bezpečnostní prohlídku u Vašeho
Autorizovaného Prodejce Specialized.
Před jízdou s dětmi na kole se informujte o všech platných zákonných požadavcích a pravidlech
ve Vašem státě. Mohou existovat omezení týkající se používání některého či všech příslušenství,
která jsou k přepravě dětí potřeba. Toto platí zejména u elektrických kol či kol s podporou šlapání.
7
Page 84

6. OBECNÁ UPOZORNĚNÍ OHLEDNĚ ÚDRŽBY
VADO/COMO je výkonnostní kolo. Veškerou údržbu, řešení problémů, opravy a výměny dílů musí provádět
Váš Autorizovaný prodejce Specialized. Obecné informace ohledně údržby Vašeho kola naleznete v příslušné
části Uživatelské příručky ke kolu Specialized. Navíc před každou jízdou provádějte pravidelně mechanické
bezpečnostní kontroly popsané v Uživatelské příručce ke kolu Specialized.
• Velkou pozornost vyžadují karbonové či kompozitové díly, které se nesmí poškodit. Jakékoliv poškození může vést
ke ztrátě strukturální integrity, což může mít za následek katastrofické selhání. Takové poškození může či nemusí být
zřetelné při kontrole. Před každou jízdou a po každém pádu byste měli na kole pečlivě zkontrolovat všechny případné
škrábance, roztřepení, sekance, porušení barevné vrstvy, ohyby či jiné podezřelé známky poničení. Nejezděte na kole,
pokud vykazuje některý ze zmíněných znaků. Po každém pádu a před dalším použitím kola vezměte kolo na kompletní
kontrolu k Vašemu Autorizovanému prodejci Specialized.
• Při jízdě poslouchejte, zda neuslyšíte jakékoliv vrzání, protože vrzání může být známkou problémů s jedním nebo
více komponenty. Pravidelně kontrolujte všechny povrchy na jasném slunečním světle a kontrolujte, zda neobsahují
drobné vlasové praskliny nebo netrpí únavou v bodech velkého namáhání, jako jsou sváry, švy, otvory nebo styčné
body s dalšími díly. Uslyšíte-li jakékoliv vrzání nebo objevíte-li jakoukoliv prasklinu (bez ohledu na to jak malou), nebo
jakékoliv poškození komponentů, okamžitě přestaňte používat daný komponent při jízdě a nechte jej prohlédnout u
Autorizovaného prodejce Specialized.
• Způsob a četnost údržby záleží na mnoha faktorech jako jsou frekvence a způsob používání, váha jezdce, jízdní
podmínky a/nebo nárazy. VADO/COMO navíc používá přídavný asistenční systém, což znamená, že ve stejném
čase zdoláte větší vzdálenosti. Komponenty mohou podléhat zvýšenému opotřebení v různých směrech a v různých
mírách v závislosti na daném komponentu. Převody a brzdové komponenty podléhají opotřebení nejvíce. Proto nechte
pravidelně komponenty kontrolovat u Vašeho Autorizovaného prodejce Specialized.
• Vystavením drsným podmínkám, především slanému vzduchu (ježdění blízko moře či v zimním období) může
způsobovat galvanickou korozi komponentů, což může urychlit opotřebení a zkrátit životnost. Špína a prach může také
urychlit opotřebení povrchů a ložisek. Povrch kola by měl být očištěn před každou jízdou. Vaše kolo by mělo pravidelně
podstupovat servis a prohlídky u Vašeho Autorizovaného prodejce Specialized, což znamená, že by mělo být vyčištěné,
promazané a zkontrolované na známky koroze a/nebo praskliny. Pokud zaznamenáte jakékoliv známky koroze či trhliny
na rámu nebo komponentech, musí být postižená součástka vyměněna.
• Pravidelně čistěte a mažte pohon kola podle pokynů výrobce.
• Při čištění Vašeho kola nikdy nestříkejte vodu tlakovou myčkou - WAP přímo na ložiska. I voda ze zahradní hadice
může proniknout těsněním ložiska či do prostoru klik, což může mít za následek jejich rychlejší opotřebení, a to může
narušit normální funkci ložisek. Místo toho použijte suchý nebo lehce vlhký hadr.
• Nevystavujte Vaše kolo po delší dobu nadměrnému horku (např. přímému slunečnímu záření) jako je například uvnitř
zaparkovaného auta na slunci či blízko zdroje tepla jako je radiátor.
VAROVÁNÍ! Neuposlechnutí pokynů v této části může mít za následek poškození elektrických
komponentů na Vašem kole a způsobí propadnutí záruky, ale především, může způsobit
vážné zranění Vaší osoby nebo smrt. Vykazuje-li Vaše baterie nebo nabíječka jakékoliv
známky poškození, nepoužívejte ji a okamžitě ji dopravte k Vašemu Autorizovanému prodejci
Specialized na kontrolu.
VAROVÁNÍ! Při umisťování rámu nebo kola do opravárenského stojanu upínejte sedlovku a
ne rám. Upnutí za rám může rám poškodit tak, že to může, ale nemusí být viditelné a může to
způsobit ztrátu kontroly a pád.
ENGLISHFRANÇAISDEUTSCH
ČESKY
VAROVÁNÍ! Vždy vypněte baterii, když není používána a/nebo se na ní pracuje.
UPOZORNĚNÍ: Neotevírejte komplet motoru. Sestavený komplet motoru je zapouzdřený a
bezúdržbový. Jakékoliv práce na motoru mohou být prováděny pouze v Servisním středisku
Specialized.
HRVATSKASLOVENSKI
8
Page 85

7. ROZHRANÍ SYSTÉMU
Modely VADO a COMO jsou vybaveny LCD displejem.
VAROVÁNÍ! Dbejte opatrnosti při sledování displeje nebo jeho používání během jízdy, neboť to může
narušit vaši soustředěnost a vést k nehodám. Před změnou nastavení nebo ovládáním různých
funkcí na displeji byste měli vždy zastavit.
Dálkové ovládání na řídítkách (Obr. 7) ovládá některé funkce displeje a režim podpory motoru.
7
SET
+
-
support.
TLAČÍTKO NASTAVENÍ: Umožňuje uživateli přepínat mezi jednotlivými stránkami (ujetá vzdálenost, stav
nabití, doba jízdy a celková ujetá vzdálenost).
+ TLAČÍTKO: Zvyšuje úroveň podpory. Zmáčknutím a podržením se aktivuje režim asistence při chůzi.
- TLAČÍTKO: Sníží úroveň podpory. Stisknutí a podržení tlačítka po dobu 2 sekund vynuluje denní výlet.
SVĚTLO: Zapne/vypne světlo.
Specikace světla/klaksonu se může měnit v závislosti na modelu kola a místních nařízení.
Elektromotor VADO nabízí pět různých jízdních režimů.
TURBO, SPORT, ECO, OFF a SMART CONTROL.
REŽIM TURBO: Režim nabízející maximální výkon,
určený pro rychlejší jízdu a pro výjezdy do svahů.
REŽIM SPORT: Maximální ovladatelnost kola, s
dostatečným výkonem podle momentální potřeby.
REŽIM ECO: Nejúspornější režim zajišťující maximální
dojezd, přičemž je k dispozici dostatek výkonu pro jízdu.
REŽIM OFF: Motor nebude nabízet žádnou asistenci,
ale displej a světla budou fungovat i nadále.
REŽIM SMART CONTROL: Výstupní výkon elektro-
motoru se při šlapání neustále upravuje podle jízdních
parametrů vypočítaných aplikací Mission Control.
Různé režimy se ovládají pomocí tlačítek +/- na dálkovém
ovladači (obr. 7) a jsou zobrazeny na TCD (obr. 7.1).
Jakmile na dálkovém ovladači dojdete k nejsilnějšímu nebo nejslabšímu režimu, přepínání se zastaví. Stiskem
klávesy - snížíte výkon z TURBO na SPORT, ECO, OFF. Stiskem klávesy + zvýšíte výkon z OFF na ECO, SPORT,
TURBO.
SVĚTLOMET
7.1 REŽIMY PODPORY
7.1
TURBO
MODE
SPORT
MODE
ECO
MODE
OFF
MODE
SMART
CONTROL
9
Page 86

INFINITE TUNE: Pomocí funkce Innite Tune v aplikaci Mission Control lze přepnout režim elektromotoru Peak
Power (Nejvyšší výkon) do samostatného nastavení režimu Support (Podpora) a zpět. Maximální množství
energie (Peak Power), které elektromotor z akumulátoru odebírá, lze pro každý režim podpory (Support)
nastavit nezávisle a vyladit je podle vašeho jízdního stylu, terénu, požadovaného výkonu a dojezdu. Pro
začátek doporučujeme následující nastavení: Turbo: 100 % (Support) / 100 % (Peak Power). Sport: 70 % /
100 %. Eco: 35 % / 35 %.
PODPORA: Pomocí jezdců režimu podpory lze nastavit úroveň asistence, kterou elektromotor
v každém režimu na základě odezvy z pedálů poskytuje. Obecně lze říci, že
vyšší podpora poskytuje větší zrychlení a snadnější jízdu ve stoupání na
úkor kratšího dojezdu a vyšší šance prokluzu kola. Méně podpory
znamená delší dojezd a také lepší ovladatelnost kola v situacích s
omezenou trakcí. Pokud například šlapete v režimu Sport s úrovní podpory
nastavenou na 50 %, budete potřebovat přibližně dvakrát větší úsilí
k dosažení stejné úrovně asistence elektromotoru než při šlapání v režimu
Turbo s nastavenou podporou 100 %.
PEAK POWER: Kromě nastavení režimu podpory (Support) lze nastavit
také režim maximálního výkonu (Peak Power). Tato hodnota určuje
maximální výkon elektromotoru pro jednotlivé režimy podpory (Support).
Ve všech režimech Support lze maximální výkon nastavit až do hodnoty
100 %. Pokud Peak Power ve všech režimech podpory nastavíte na
hodnotu 100 %, bude se vám v každém režimu Support dostávat tím větší
podpory, čím usilovněji se budete opírat do pedálů. Pokud například pro
některý režim Support nastavíte 35 % a zároveň pro Peak Power hodnotu
100 %, můžete při usilovném šlapání a vysokém vyvíjeném točivém momentu stále dosáhnout
podpory Peak Power 100 %. Nastavíte-li Peak Power na hodnotu nižší než 100 %, denujete
tím umělou horní hranici pro proud využívaný elektromotorem. Pokud nastavíte režim Eco
s umělou horní hranicí Peak Power, prodloužíte tím dojezd elektrokola a zároveň vytvoříte
větší rozrůznění mezi režimy podpory (Support).
Specialized doporučuje experimentovat s nastavením výkonu, který nejlépe vyhovuje Vašemu
stylu jízdy a podmínkám.
7.2. MOŽNOSTI PŘIPOJENÍ
Systém podpory motoru poskytuje vysoký stupeň exibility rozhraní, pomocí rozhraní Bluetooth a ANT+. V
závislosti na zařízení a možnostech připojení je možné přistoupit k široké škále funkcí:
BLUETOOTH LE: Aplikace Mission Control (pro iOS nebo Android) poskytuje lepší zážitek z jízdy díky tomu,
že zaznamenává jízdy a synchronizuje se s portálem Strava, eliminuje obavu z nedostatečného dojezdu
pomocí funkce Smart Control, zaznamenává jízdu pomocí GPS a diagnostikuje funkce systému. Zařízení se
systémy Android a iOS se mohou synchronizovat se všemi koly VADO a COMO pomocí rozhraní Bluetooth LE.
Nejnovější verzi aplikace Mission Control najdete zdarma v obchodech Google Play nebo Apple App Store.
ANT+: Protokol ANT+ umožňuje připojit řadu zařízení, která se pak mohou synchronizovat s koly VADO a
COMO.
Prol LEV (Light Electric Vehicle) umožňuje zobrazení dalšího typu dat, včetně kadence, výstupního výkonu
jezdce, teploty elektromotoru, teploty akumulátoru, stavu nabití baterie a rychlosti. Aktualizovaný seznam
zařízení s protokolem ANT+ kompatibilní s VADO a COMO najdete na https://www.thisisant.com/directory/
lter/~/~/~/200/.
Možnost „Falešného kanálu“ umožňuje zobrazit stav nabití baterie na kompatibilním cyklistickém zařízení
ANT+, jako nepoužívaný kanál Výkon, Srdeční tep nebo Kadence. Pro výběr tohoto nastavení je nutné
použít aplikaci Mission Control.
ENGLISHFRANÇAISDEUTSCH
ČESKY
HRVATSKASLOVENSKI
10
Page 87

7.3. MONTÁŽ
B
A
C
7.3.1
7.3.2
Po otočení displej namontujte do konzoly displeje, poté utáhněte protiskluzovou destičku (7.3.1 a) pomocí
malého šroubováku (7.3.1 b). Doporučený utahovací moment je 0,5 Nm / 4,4 in-lbf.
Sejměte komponenty ze strany řídítek, na kterou chcete displej displeje namontovat. Montáž lze provést na
levé i pravé straně představce.
Utahujte, dokud se konzola nepřestane snadno otáčet (g 7.3.2 c). Neutahujte nadměrnou silou.
Doporučený utahovací moment je 0,5 Nm / 4,4 in-lbf.
7.4. AKTIVACE/VÝMĚNA BATERIE
7.4.1
7.4.2
Plochým šroubovákem zvedněte okraj krytu baterie a poté baterii jemně vytáhněte z krytu.
Vyměňte baterii za novou knoíkovou baterii typu CR1220 tak, aby text směřoval ven ke krytu. Zkontrolujte,
zda není poškozené těsnění, a zatlačte kryt zpět na místo.
Po výměně baterie se veškeré informace uložené v displeji (ujetá vzdálenost, stopky, párování zařízení)
vymažou. Pokud chcete tyto informace uchovat, nezapomeňte si je před výměnou baterie poznamenat.
USB port je určen pouze pro použití prodejci a servisními středisky.
11
Page 88

Datové pole 1, popis
Hlavní úroveň nabití baterie
A
Zobrazení v přírůstcích po 10 %
7.5. FUNKCE DISPLEJE
Datové pole 1
Datové pole 3
1
1
1
A
2
7 8
Levé tlačítko Pravé tlačítko
7.6. HLAVNÍ OBRAZOVKY
Režim Turbo
3
Režim Sport
4
Režim Eco
5
Hodiny
6
Datové pole 2
1
Datové pole 2, popis
1
ENGLISHFRANÇAISDEUTSCH
B
Používání
Používání: Typický uživatelský scénář
B
Blikání zprávy “LO BAT“ (nízká úroveň nabití knoíkové
C
Slabá baterie
baterie).
7.7. LEGENDA
Rychlé stisknutí levého tlačítka
Rychlé stisknutí pravého tlačítka
Rychlé stisknutí levého a pravého tlačítka současně
Přizpůsobení stránek: Podržte levé a pravé tlačítko stisknuté po dobu tři (3)
sekund
Nastavení systému: Podržte levé tlačítko stisknuté po dobu pěti (5) sekund
C
Blikající značka baterie značí úroveň nabití
D
D
Režim nabíjení
ČESKY
HRVATSKASLOVENSKI
12
Page 89

7.8. VÝCHOZÍ NASTAVENÍ STRÁNKY / NAVIGACE
K dispozici je 5 přednastavených stránek, z nichž na každé se zobrazuje jiná kombinace informací.
Mezi stránkami lze přecházet pomocí levého/pravého tlačítka nebo pomocí tlačítka NASTAVENÍ na
dálkovém ovladači.
Informace zobrazené na každé stránce lze přizpůsobit.
Počítač po zapnutí zobrazí stránku 1 (Page 1).
SET
Page 1 Page 2
Page 3
Page 4 Page 5
7.9. PŘIZPŮSOBENÍ STRÁNEK
Přejděte na stránku, kterou chcete přizpůsobit, a poté podržte současně levé a pravé tlačítko stisknuté po
dobu tři sekund.
Datové pole 1 začne blikat. Levým nebo pravým tlačítkem můžete procházet dostupné možnosti.
Současným rychlým stisknutím levého a pravého tlačítka současně potvrdíte vybranou funkci a přejdete na
datové pole 2.
Zopakujte stejné kroky pro datové pole 2 a 3.
Zopakujte stejné kroky pro stránky 2 až 5.
Žlutý obdélník označuje pole, které bliká (lze je nastavit).
F
Vynulování hodnot AVG, MAX, DIST, TRIP, KCAL: Podržte současně levé a pravé tlačítko po dobu 0,5
G
sekundy. Pak tlačítko uvolněte.
Vynulování je možné rovněž provést stisknutím tlačítka (-) na dálkovém ovladači po dobu 2 sekund.
F
FUNCTIONS
L R L R L R
Heart Rate
Battery %
Cadence
G
13
Page 90

7.10. NASTAVENÍ SYSTÉMU
Jako výchozí je vždy nastaven čas 12:00.
H
Chcete-li změnit nastavení, stiskněte levé nebo pravé tlačítko. Podržení = rychlý posun. Stisknutí
I
a uvolnění = přírůstky po 1 jednotce
Možnosti párování::
J
• Potvrzená připojení: blikání se změní na trvalé svícení.
• Neúspěšné párování: zpráva na displeji = „PAIR FAILED!“
Je vyžadován samostatný hrudní pás na měření tepové frekvence.
K
ENGLISHFRANÇAISDEUTSCH
5 sec
TIME 12/24
H
L R
DAY HOUR MIN
L R L R
UNITS
HR Y / N
K
L R L R
I
YEAR MONTH
I
L R L R
L R
ČESKY
J
7.11. PŘIPOJTE SE K APLIKACI MISSION CONTROL
L
Mějte kolo zapnuté, otevřete aplikaci Mission Control na mobilním zařízení, vyhledejte kolo a přidejte je..
M
Jakmile budete připojeni, zadejte PIN kód zobrazený na TCD-W, abyste spárovali aplikaci s kolem. Jakmile
proběhne spárování, můžete začít plně využívat funkce aplikace Mission Control.
L
M
M
HRVATSKASLOVENSKI
14
Page 91
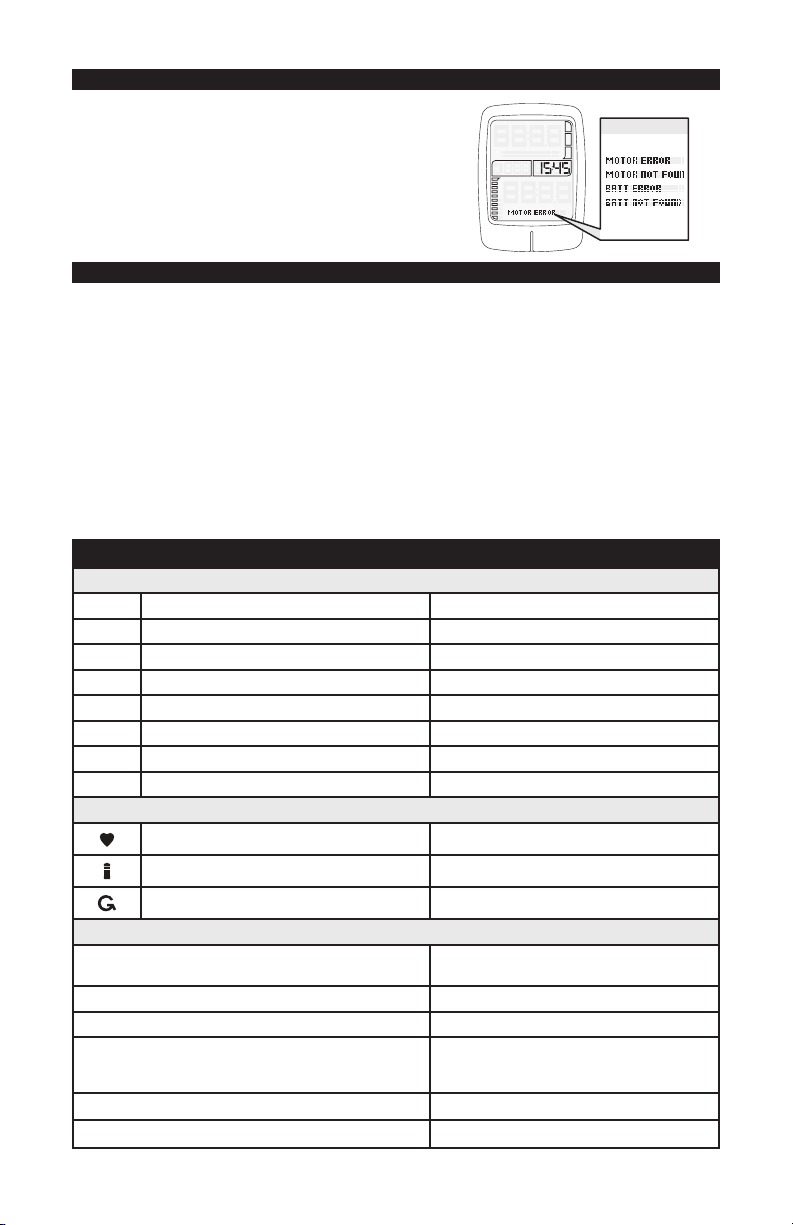
7.12. CHYBOVÉ ZPRÁVY
Pokud se na displeji zobrazí chybová zpráva, ujistěte se, že je
vše připojené, a poté zkuste kolo restartovat. Pokud problémy
ERROR MESSAGES
přetrvávají, vyhledejte v aplikaci Mission Control podrobnější
informace nebo kontaktujte prodejce.
V závislosti na typu chybové zprávy se může systém automaticky vypnout. Každopádně lze i po vypnutí systému na
bicyklu pokračovat v jízdě bez podpory elektromotoru.
7.13. OBECNÉ INFORMACE
• Tento displej byl navržen pro použití s koly VADO a COMO.
• Pokud je napájení kola vypnuto, informace se nezobrazují.
• Displej je vybaven podsvícením, které se zapne, jakmile se rozsvítí světla kola.
• Věnujte pozornost jízdě, nikoli displeji. Nepokoušejte se přizpůsobovat stránky ani provádět úpravy
nastavení během jízdy.
ČIŠTĚNÍ/PÉČE:
• Nevystavujte displej intenzivnímu teplu či slunečnímu záření po delší dobu. Mohlo by dojít k poškození
displeje nebo baterie.
• K čištění displeje používejte pouze vlhký nebo suchý měkký hadřík. Nepoužívejte nešetrné čisticí
přípravky.
• Displej nerozebírejte a chraňte jej před pádem.
• Před jízdou zkontrolujte, že je displej včetně konzoly pevně namontován na řídítka.
7.14. MOŽNOSTI/SPECIFIKACE FUNKCÍ
DATOVÉ POLE 1 A 2
KPH/MPH Rychlost 0 až 200 km/h / 0,0 až 199,9 mil/h
AVG Průměrná rychlost 0,0 až 199,9 km/h / mil/h
DIST Vzdálenost 0,0 až 999,9 km/mil
TIMER Trvání jízdy 0:00’ až 99:59’
KCAL Spálené kalorie 0,0 až 9999 kcal
POWER Výkon jezdce 0,0 až 9999 W
MAX Maximální rychlost 0,0 až 199,9 km/h / mil/h
ODO Celková ujetá vzdálenost 0,0 až 9999 km/mil
DATOVÉ POLE 3
Tepová frekvence 0 až 240 úderů za minutu
Úroveň nabití baterie (%) 0 až 100 %
Kadence 0 až 240 otáček za minutu
DISPLEJ
Hodiny
Typ baterie Knoíková baterie CR 1220
Rozměry 62 mm x 46.5 mm x 17.5 mm
Provozní teplota
00:00 až 23:59 (24hodinový formát) / 1:00 až 12:59
(12hodinový formát)
-10 °C až +60 °C
+14 °F až +140 °F
Radiofrekvenční protokol ANT+ / BT
Ochrana proti vodě/prachu IP67
15
Page 92

8. BATERIE / NABÍJEČKA
Kolo je poháněno Lithiovo-Ionovou (Li-Ion) baterií. Vždy dodržujte následující pokyny při manipulaci či nabíjení
baterie, nebo při používání kola VADO/COMO:
Baterie funguje v teplotním rozmezí od -20°C do +70°C.
Baterii kola VADO/COMO používejte pouze s kolem VADO/COMO. Nepoužívejte baterii z kola VADO/
COMO pro jiné kolo. Nepoužívejte jinou baterii do kola VADO/COMO, i když do něj pasuje.
Před připojením nebo odpojením kabeláže od baterie vždy nejprve baterii vypněte.
Baterii vypněte, od baterie odpojte nabíječku a baterii vyjměte z kola před prováděním jakýchkoliv prací
libovolného druhu, jako je montáž, údržba, čištění a/nebo oprava. Při přepravě či manipulaci s baterií
oddělenou od kola se vždy ujistěte, že je vypnutá. Dotýkání se kontaktů, když je baterie zapnutá, může mít
za následek úraz elektrickým proudem a/nebo zranění.
Před jízdou na kole se ujistěte, že je baterie řádně zajištěna v rámu.
8.1. DODRŽUJTE NÁSLEDUJÍCÍ POKYNY:
Nemodikujte, neotvírejte a nerozebírejte baterii nebo nabíječku. Modikace nebo rozebrání může mít za
následek zkrat, požár nebo chybnou funkci.
Baterie je velmi těžká. Při manipulaci s ní buďte opatrní a neupusťte ji.
Nedovolte, aby hřebíky, šrouby nebo jiné malé, ostré nebo kovové předměty přišly do styku s baterií nebo s
nabíjecí zdířkou.
Nedovolte, aby se baterie přehřála. Chraňte baterii před nadměrným slunečním zářením.
Baterii nevystavujte otevřenému ohni nebo tepelnému záření.
Baterii neponořujte do vody.
Baterii udržuje dál od kovových předmětů, které mohou způsobit její zkrat.
Nepoužívejte baterii, která vykazuje známky poškození obalu nebo nabíjecího konektoru nebo z ní unikají
jakékoliv tekutiny. Tekutina z baterie může podráždit kůži nebo způsobit popáleniny. V případě poškození, při
kterém dojde ke kontaktu pokožky nebo oka s jakoukoliv tekutinou z baterie okamžitě opláchněte zasažené
místo vodou a vyhledejte lékařskou pomoc.
VAROVÁNÍ! Neuposlechnutí pokynů v této části může mít za následek poškození elektrických
komponent na Vašem kole s následkem ztráty záruky, ale hlavně, může způsobit vážné zranění
nebo smrt. Vykazuje-li Vaše baterie nebo nabíječka jakékoliv známky poškození, nepoužívejte
ji a okamžitě ji dopravte na kontrolu k Vašemu Autorizovanému prodejci Specialized.
ENGLISHFRANÇAISDEUTSCH
ČESKY
8.2. NABÍJENÍ A POUŽITÍ BATERIE
Pravidelně kontrolujte baterii a nabíječku, zda nejsou poškozeny. Baterii, u které máte podezření, že je
poškozená, nebo víte, že je nefunkční, nenabíjejte a nepoužívejte.
Před připojením a nabíjením baterie se ujistěte, že nabíjecí zdířka i konektor jsou suché.
Používejte pouze nabíječky Specialized dodané s kolem nebo jiné nabíječky schválené Specialized. Před
každým nabíjením zkontrolujte, zda není poškozena samotná nabíječka, kabel nebo nabíjecí zástrčka. Nikdy
nepoužívejte nabíječku, o které máte podezření, že je poškozená, nebo víte, že je nefunkční.
Nabíječku umístěte na stabilní vodorovný povrch neovlivnitelný teplem. Pokud je baterie nabíjena mimo rám,
mějte položenou baterii na stejné podložce jako nabíječku.
Baterii byste měli nabíjet v suchém a odvětrávaném prostoru a zajistit, že baterie ani nabíječka nebudou
během procesu nabíjení ničím přikryté. Zajistěte, aby baterie ani nabíječka nebyly vystaveny žádné hořlavé
nebo nebezpečné látce.
16
HRVATSKASLOVENSKI
Page 93

VAROVÁNÍ! Neuposlechnutí pokynů v této části může mít za následek poškození elektrických
komponent na Vašem kole s následkem ztráty záruky, ale hlavně, může způsobit vážné zranění
nebo smrt. Vykazuje-li Vaše baterie nebo nabíječka jakékoliv známky poškození, nepoužívejte
ji a okamžitě ji dopravte na kontrolu k Vašemu Autorizovanému prodejci Specialized.
Nabíjení: Baterii lze nabíjet ať je namontovaná na kole nebo ne. Viz příslušné pokyny týkající
se demontáže a montáže baterie. Baterii nabíjejte pouze v teplotním rozsahu 0° C až +50° C.
Pokud je teplota venku příliš vysoká či naopak nízká, nabíjejte baterii uvnitř. Z bezpečnostních
důvodů se v příliš horkém prostředí baterie nebude nabíjet.
8.2.1
8.2.2
NABÍJECÍ
ZDÍŘKA
KRYT
ZDÍŘKY
BATERIE
NABÍJEČKA
CHARGING
NABÍJENÍ
FULLY CHARGED
PLNĚ NABITO
PROBLEM
PROBLÉM
Zasuňte zástrčku nabíječky do zásuvky (100 - 240V) pomocí příslušné koncovky pro danou zemi.
Odejměte kryt z nabíjecí zdířky na baterii, pak připojte nabíjecí konektor na baterii (Obr. 8.2.1). Baterii byste
měli nabíjet v místnosti s detektorem kouře.
Pokud je baterie plně nabita, odpojte nabíjecí konektor ze zdířky na baterii.
Odpojte nabíječku ze zásuvky.
Během procesu nabíjení dioda na nabíječce bude svítit červeně (Obr. 8.2.2). Když je baterie plně nabitá, barva
dioda na nabíječce se změní na zelenou.
UPOZORNĚNÍ: Bliká-li kontrolka LED během nabíjení červeně, došlo k chybě nabíjení. V
takovém případě okamžitě vyjměte nabíječku ze zásuvky, přestaňte používat podporu motoru
a kontaktujte svého Autorizovaného prodejce Specialized.
Pamatujte, že Li-Ion baterie postupně ztrácí kapacitu v závislosti na stáří a používání. Výrazně
snížená doba provozu po nabití může být znakem toho, že baterie se již blíží ke konci své
životnosti a je třeba ji vyměnit. Za předpokladu, že jste kolo používali řádně, zhruba 75%
původní kapacity baterie by mělo zůstat po 300 nabíjecích cyklech nebo dvou letech. Náhradní
baterie lze zakoupit od Autorizovaného prodejce Specialized.
8.3. ZOBRAZENÍ ÚROVNĚ NABITÍ
Úroveň nabití baterie je během Vaší jízdy neustále zobrazena. Počet svítících kontrolek LED ukazuje zbývající
stav baterie (Obr. 8.3).
Když bude zbývat 10% baterie, systém začne omezovat úroveň podpory. Při 1% systém vypne podporu motoru.
17
Page 94

Bude-li Vaše kolo v klidu po dobu alespoň 10 minut, řídící systém baterie (BMS) automaticky systém vypne.
Chcete-li pokračovat v jízdě s podporou, musíte systém znovu zapnout.
8.3
80-100%
8.4.1
UPOZORNĚNÍ! PŘED
VLOŽENÍM ČI VYJMUTÍM
BATERIE VŽDY BATERII
VYPNĚTE!
60-79%
ENGLISHFRANÇAISDEUTSCH
40-59%
20-39%
0-19%
8.4. INSTALACE BATERIE
ČESKY
KONEKTOR
BATERIE
Vložte spodní stranu baterie do spodní části prostoru pro baterii (Obr. 8.4.1), poté zarovnejte horní část
baterie s vrchní částí prostoru pro baterii.
Pro instalaci baterie nemusí být klíč zasunut v zámku. Baterie se zamkne automaticky po
vložení na své místo. Klíč je potřeba pouze pro vyjmutí baterie.
HRVATSKASLOVENSKI
18
Page 95

CLICK!
8.4.2
Zatlačte na baterii v blízkosti tlačítka vypnout/zapnout, až se zacvakne a zamkne (Obr. 8.4.2).
8.5. VYJMUTÍ BATERIE
Vyjmutí baterie se provádí obráceným postupem její instalace:
Otočte klíčkem ve směru hodinových ručiček, až horní konec baterie nepatrně povyskočí.
Chytněte baterii oběma rukama, zvedněte ji lehce nahoru, otočte směrem od převodníku kola a vytáhněte ji
z rámu.
Otočte klíčem proti směru hodinových ručiček a vyjměte klíč ze zámku.
8.6. ČIŠTĚNÍ
Před čištěním kola vždy baterii vypněte a odpojte nabíječku. Pokud chcete čistit baterii, nejprve ji vyjměte z
kola.
Před čištěním vždy odpojte nabíječku od baterie a také ze zásuvky.
UPOZORNĚNÍ: Při čištění Vašeho kola VADO/COMO nikdy nepoužívejte tlakové myčky WAP. Místo toho použijte suchý nebo lehce vlhký hadr. Zajistěte, aby během čištění nepřišly
elektrické komponenty do styku s vodou. Další informace ohledně čištění kola Vám poskytne
Autorizovaný prodejce Specialized.
UPOZORNĚNÍ: Při čištění nabíječky a baterie nepoužívejte alkohol, rozpouštědla či abrazivní
čistící prostředky. Místo toho použijte suchý, nebo mírně vlhký hadřík.
8.7. SKLADOVÁNÍ
UPOZORNĚNÍ: Pokud baterii delší dobu nepoužíváte, vyjměte ji z rámu a skladujte ji odkrytou
na suchém a dobře odvětrávaném místě. Baterii skladujte pouze na chladném místě od -20°C
do +35°C. Pokud je teplota venku příliš vysoká či nízká, skladujte baterii uvnitř.
Pokud se baterie skladuje a po delší dobu se nepoužívá, zajistěte její dobíjení minimálně
jednou za tři měsíce alespoň tak, aby 2 LED diody (20-39%) svítily zeleně. Pokud není baterie
nabita po dobu delší než tři měsíce, může se poškodit.
Nenechávejte baterii připojenou k nabíječce po delší dobu po skončení nabíjení.
19
Page 96

8.8. BATERIE - TECHNICKÉ ÚDAJE
POPIS JEDNOTKA SPECIFIKACE
SPECIFIKACE V 36
NABÍJECÍ TEPLOTA
VYBÍJECÍ TEPLOTA
TEPLOTA PRO SKLADOVÁNÍ
STUPEŇ OCHRANY IP67
HMOTNOST (BEZ CHRÁNIČE)
BATERIE SBC-B09 SBC-B10 SBC-B11
JMENOVITÁ KAPACITA 16.8AH 14AH 12.5AH
ENERGIE 604WH 504WH 460WH
DOBA NABÍJENÍ (SBC-C04) 4:35H 3:50H 3:30H
DOBA NABÍJENÍ (SBC-C05) 9:10H 7:40H 7:00H
8.9. NABÍJEČKA - TECHNICKÉ ÚDAJE
POPIS JEDNOTKA SPECIFIKACE
ČÍSLO MODELU NABÍJEČKY SBC-C04 SBC-C05
NABÍJECÍ TEPLOTA
TEPLOTA PRO SKLADOVÁNÍ
PROVOZNÍ NAPĚTÍ V 42 42
VSTUPNÍ NAPĚTÍ STŘÍDAVÉHO PROUDU
FREKVENCE Hz 50 / 60 50 / 60
MAXIMÁLNÍ NABÍJECÍ PROUD A 4 2
ROZMĚRY mm 179 X 80 X 37.2 147 X 65.5 X 34.2
°C 0 — +50
°F +32 — +122
°C -20 — +70
°F -4 — +158
°C -20 — +35
°F -4 — +95
KG 2.7
LB 6.0
SBC-B17
11.5AH
400WH
3:15H
6:30H
°C -10 — +40 0 — +40
°F 14 — +104 +32 — +104
°C -20 — +65 -20 — +60
°F -4 — +149 -4 — +140
V 100 — 240 100 — 240
ENGLISHFRANÇAISDEUTSCH
ČESKY
Dojezd na baterii se může výrazně měnit v závislosti na modelu/kapacitě baterie a jízdních podmínkách, jako
je prol Vaší trasy a úroveň podpory. Na straně 6 v části “OBECNÁ UPOZORNĚNÍ OHLEDNĚ JÍZDY”
naleznete další informace o dojezdu na baterii a tipy pro zvýšení dojezdu.
VAROVÁNÍ! Před prvním použitím si přečtěte štítek na baterii dodané s Vaším kolem (Obr. 8.9).
HRVATSKASLOVENSKI
20
Page 97

8.9
8.10. PŘEPRAVA
Přeprava a/nebo posílání Vaší baterie VADO/COMO může podléhat určitým omezením a může
vyžadovat speciální zacházení, označení a/nebo zabalení. Předem se seznamte s veškerými
zákonnými požadavky a nařízeními ve Vaší zemi nebo státě. Váš Autorizovaný prodejce
Specialized může mít také k dispozici užitečné informace. Při přenášení baterie mimo rám
Specialized doporučuje použít schválený transportní box na baterii.
UPOZORNĚNÍ: Pamatujte, že Vaše kolo VADO/COMO je výrazně těžší než kolo bez motoru. Při
manipulaci, přenášení nebo zvedání Vašeho kola VADO/COMO buďte opatrní.
8.11. LIKVIDACE
Baterie a nabíječky nesmí být vyhozeny do Vašeho domovního odpadu! Všechny
baterie a nabíječky musí být zlikvidovány ekologicky šetrným způsobem, v souladu
LI-
s místním nařízením o likvidaci baterií ve Vašem státu nebo zemi. Informace o
ION
tom, jak zlikvidovat baterii nebo nabíječku a o jakýchkoliv fungujících programech
zpětného odběru získáte od Vašeho Autorizovaného prodejce Specialized.
9. OSVĚTLENÍ
Některé modely VADO/COMO jsou vybaveny předním i zadním LED světlometem
Přední světlomet je zapojen do systému baterie kola VADO/COMO a rozsvítí se vždy, když je zapnuta baterie.
Modely s nosičem: Kabeláž zadního světla je vedena nosičem a blatníkem. Odstranění nosiče a/či blatníku
způsobí, že světlo již nebude napájeno a nebude moci být nabito z baterie kola VADO/COMO.
Specikace předního a zadního světla se mohou lišit dle modelu a místních nařízení. Modely
se zadním světlem jej mohou mít instalované přímo v nosiči nebo pod sedlem.
10. SPECIFIKACE
10.1. ROZMĚRY ŠROUBŮ / UTAHOVACÍ MOMENTY
VAROVÁNÍ! Správná síla utažení v upevňovacích prvcích (matky, vruty, šrouby) na Vašem kole
je důležitá pro Vaši bezpečnost. Použijete-li příliš malou sílu, upevňovací prvek nemusí držet
bezpečně. Použijete-li příliš velkou sílu, může dojít ke stržení závitů, natažení, deformaci nebo
prasknutí. Tak či tak, nesprávná síla utažení může mít za následek selhání komponentu, což
může způsobit ztrátu kontroly a pád.
Všude, kde je to uvedeno, zajistěte, že každý šroub je dotažen na stanovený moment. Po
Vaší první jízdě a dále pravidelně kontrolujte utažení každého šroubu a zajistěte bezpečné
připevnění komponentů. Následuje přehled utahovacích momentů v tomto průvodci:
21
Page 98

UMÍSTĚNÍ
PODSEDLOVÁ OBJÍMKA 45 5.1 PŘEDNÍ OSA 133 15
SEDLOVKA SE SEDLEM 120 13.5 ŠROUBY KLIK 443 50
PŘEDSTAVEC SE SLOUPKEM VIDLICE 52 6.0 ZÁVĚRNÁ MATICE PAVOUKA 443 50
PŘEDSTAVEC S ŘÍDÍTKY 52 6.0 ŠROUBY PŘEVODNÍKU 89 10*
VÝMĚNNÁ PATKA 35 4 VEDENÍ ZADNÍ BRZDY 6 0.7
ZADNÍ OSA
DÁLKOVÝ OVLADAČ 7 0.8
UPOZORNĚNÍ: Před montáží se ujistěte, že všechny kontaktní povrchy jsou před montáž čisté
a závity šroubů jsou namazané vazelínou nebo pojistným tmelem (prostudujte si pokyny ke
každému šroubu).
* Na šrouby převodníku aplikujte modrý Loctite.
POLOŽKA SPECIFIKACE
HLAVOVÉ SLOŽENÍ 1 1/8” HORNÍ / SPODNÍ
PRŮMĚR PODSEDLOVÉ OBJÍMKY 34.9MM
PRŮMĚR SEDLOVKY 30.9MM
VÝMĚNNÁ PATKA S172600003 (AMAZINGER 2.1)
ZADNÍ NÁBOJ 148MM X 12MM
PŘEDNÍ NÁBOJ (PEVNÁ VIDLICE) 100MM X 12MM
PŘEDNÍ NÁBOJ (ODPRUŽENÁ VIDLICE) 100MM X 15MM
IN-
Nm UMÍSTĚNÍ
LBF
133 15
10.2. SPECIFIKACE RÁMU
ŠROUBY KOŠÍKU NA LÁHEV 25
INLBF
Nm
ENGLISHFRANÇAISDEUTSCH
2.8
VAROVÁNÍ! Rám VADO/COMO je kompatibilní pouze s pevnými vidlicemi VADO/COMO, nebo
odpruženými vidlicemi s maximálním zdvihem 50mm. Použití jiných vidlic negativně ovlivňuje
geometrii a kvalitu jízdy, především pak může mít za následek fatální selhání rámu, což může
vést k vážným zraněním, nebo smrti.
10.3. DOPORUČENÝ TLAK V PLÁŠTÍCH
Správný tlak v pláštích je zásadní pro optimální výkon. Pláště s vyšším tlakem se budou obecně odvalovat
rychleji a mít menší valivý odpor, ale poskytnou horší trakci. Pláště s nižším tlakem obecně poskytnou lepší
trakci a jistější ovládání na úkor valivého odporu.
Používejte kvalitní měřič tlaku a přečtěte si doporučené rozmezí tlaků uvedené na bocích plášťů.
Kvůli vyšší hmotnosti kola VADO/COMO by tlak v pláštích obecně měl být vyšší ve srovnání s
klasickým kolem.
11. ZÁKONNÁ USTANOVENÍ
RoHS: Společnost Specialized Bicycle Components, Inc. potvrzuje, že tento produkt a jeho obal splňují
směrnici Evropské unie 2011/65/EU o omezení používání některých nebezpečných látek v elektrických
a elektronických zařízeních, která se obvykle označuje zkratkou RoHS.
ČESKY
HRVATSKASLOVENSKI
22
Page 99

12. EC - PROHLÁŠENÍ O SHODĚ
Výrobce:
Specialized Bicycle Components Inc.
15130 Concord Circle
Morgan Hill, CA 95037, USA
Tel: +1 408 779-6229
zde potvrzuje pro následující výrobky:
Popis výrovku: EPAC (Electrically Pedal Assisted Cycle)
Označení
modelu:
Shodu se všemi platnými nařízeními
z průvodce:
Přístroj také splňuje všechna nařízení
z průvodce:
Na výrobek uplatněny následující
harmonizační normy:
Serióvé číslo: Je umístěno na samolepce na poslední stránce tohoto manuálu
Technickou dokumentaci zpracoval: Specialized Europe GmbH
TURBO VADO 3.0
TURBO VADO 4.0
TURBO VADO 5.0
TURBO COMO 3.0
TURBO COMO 4.0
TURBO COMO 5.0
Přístroje (2006/42/EC).
Elektromagnetická kompatibilita (2004/108/EC).
Rádiové zařízení (2014/53/EU)
EN 15194 Kola - kola podporovaná elektrickou energií - kola
EPAC
Werkstattgasse 10
6330 Cham, Switzerland
Podpis:
Jan Talavasek (Manažer výroby pro Evropu)
Specialized Europe GmbH
6330 Cham, Switzerland
1. září 2018
POZNÁMKA: Toto prohlášení o shodě platí pouze pro kola prodávaná v zemích, které se řídí nařízením o
značení CE.
POZNÁMKA: CHCETE-LI VZÁJEMNĚ SPÁROVAT JÍZDNÍ KOLO A TUTO UŽIVATELSKOU PŘÍRUČKU,
PŘELEPTE ŽLUTÝ ŠTÍTEK SE SÉRIOVÝM ČÍSLEM UMÍSTĚNÝM NA RÁMU JÍZDNÍHO KOLA PŘES KOPII
ŠTÍTKU NA ZADNÍ STRANĚ TÉTO PŘÍRUČKY.
23
Page 100

VSEBINA
1. PREDSTAVITEV........................................................................................................................................ 1
1.1. JAMSTVO ........................................................................................................................................................... 1
2. KOMPONENTE KOLESA VADO/COMO .................................................................................................. 2
3. SPLOŠNE INFORMACIJE O VAŠEM KOLESU VADO/COMO ............................................................... 3
3.1. NAMENJENA UPORABA ....................................................................................................................................3
3.2. PEDELEK / EPAC ............................................................................................................................................... 3
3.3. VKLOP SISTEMA ................................................................................................................................................ 3
4. SPLOŠNE OPOMBE GLEDE SESTAVLJANJA ...................................................................................... 4
4.1. SENZOR HITROSTI............................................................................................................................................ 4
4.2. GONILKA OS ...................................................................................................................................................... 4
4.3. KRMILNI LEŽAJ .................................................................................................................................................. 5
4.4. SEDEŽNA OPORA ..............................................................................................................................................5
4.5. ZAMENJAVA DELOV IN DODATNE OPREME ................................................................................................... 5
5. SPLOŠNE OPOMBE GLEDE KOLESARJENJA ..................................................................................... 6
5.1. NASVETI ZA KOLESARJENJE...........................................................................................................................6
5.2. PRED VAŠO PRVO VOŽNJO .............................................................................................................................6
5.3. KOLESARJENJE Z OTROCI .............................................................................................................................. 7
6. SPLOŠNE OPOMBE GLEDE VZDRŽEVANJA ........................................................................................ 8
7. SISTEMSKI VMESNIK .............................................................................................................................. 9
7.1. NAČINI DELOVANJA .......................................................................................................................................... 9
7.2. MOŽNOSTI POVEZOVANJA .............................................................................................................................. 10
7.3. NAMESTITEV ..................................................................................................................................................... 11
7.4. AKTIVACIJA/ZAMENJAVA BATERIJE ................................................................................................................ 11
7.5. FUNKCIJE ZASLONA ......................................................................................................................................... 12
7.6. GLAVNI PRIKAZI ................................................................................................................................................ 12
7.7. LEGENDA NASTAVITEV .................................................................................................................................... 12
7.8. PRIVZETE NASTAVITVE STRANI/NAVIGACIJA ................................................................................................ 13
7.9. PRILAGAJANJE STRANI PO MERI ................................................................................................................... 13
7.10. NASTAVITEV SISTEMA .................................................................................................................................... 14
7.11. POVEZAVA Z APLIKACIJO MISSION CONTROL ............................................................................................ 14
7.12. SPOROČILA O NAPAKI .................................................................................................................................... 15
7.13. SPLOŠNE INFORMACIJE ................................................................................................................................ 15
7.14. MOŽNOSTI/SPECIFIKACIJE FUNKCIJ............................................................................................................ 15
8. BATERIJA / POLNILEC ............................................................................................................................ 16
8.1. OPAZUJTE IN UPOŠTEVAJTE .......................................................................................................................... 16
8.2. POLNJENJE IN UPORABA BATERIJE ............................................................................................................... 16
8.3. PRIKAZ NAPOLNJENOSTI BATERIJE .............................................................................................................. 18
8.4. NAMESTITEV BATERIJE ................................................................................................................................... 18
8.5. ODSTRANITEV BATERIJE ................................................................................................................................. 19
8.6. ČIŠČENJE........................................................................................................................................................... 19
8.7. HRANJENJE ....................................................................................................................................................... 19
8.8. TEHNIČNI PODATKI BATERIJE ......................................................................................................................... 20
8.9. TEHNIČNI PODATKI POLNILCA ........................................................................................................................ 20
8.10. TRANSPORT .................................................................................................................................................... 21
8.11. RAVNANJE Z ODSLUŽENO BATERIJO ........................................................................................................... 21
9. SVETILKE ................................................................................................................................................. 21
10. SPECIFIKACIJE ..................................................................................................................................... 21
10.1. DIMENZIJA VIJAKA / NAVORNA VREDNOST ................................................................................................. 21
10.2. SPECIFIKACIJE OKVIRJA................................................................................................................................22
10.3. PRIPOROČEN PRITISK V PLAŠČIH ............................................................................................................... 22
11. ZAKONSKE ZAHTEVE ........................................................................................................................... 22
12. ES – IZJAVA O SKLADNOSTI ............................................................................................................... 23
Ta navodila za uporabo so v originalu napisana v angleškem jeziku (izvirna navodila). Ta verzija je “prevod
izvirnih navodil”.
EN 15194
SPECIALIZED BICYCLE COMPONENTSz
15130 Concord Circle, Morgan Hill, CA 95037 (408) 779-6229
0000115655_UM_SI_R1, 09/18
Vsa navodila in obvestila se lahko spremenijo in posodobijo brez predhodnega obvestila.
Obiščite www.specialized.com, kjer boste našli občasne tehnične posodobitve.
Povratne informacije: techdocs@specialized.com
ENGLISHFRANÇAISDEUTSCHČESKÁHRVATSKA
SLOVENŠČINA
 Loading...