

Page 1

INSTRUCTION
1300W
ELECTRIC SCARIFIER
AND RAKER
YT6702
ORIGINAL
MANUAL
Important - Please read these instructions
fully before starting assembly
These instructions contain important information that will help
you get the best from your scarifer and raker, ensuring it is assembled
correctly and safely. If you need help or have damaged or missing parts,
call the Customer Helpline on 0345 605 2070
AFTER SALES SUPPORT
0345 605 2070
Page 2

SPEAR & JACKSON SINCE 1760
For more than 250 years gardeners have enjoyed high quality performance
and great results using Spear & Jackson tools.
Our garden power tools combine continuous innovation and the latest in
manufacturing technologies with a proud heritage.
Each product is carefully designed with performance,comfort and
durability rmly in mind,which has earned Spear & Jackson an enviable
reputation as a maker of tools to trust.
3 YEARS GUARANTEE
As a testament to the quality of our products, we offer a 3 year
manufacturers warranty and a comprehensive after sales service.
The warranty covers manufacturing faults, however in the event that the
item has been deliberately damaged, used in a commercial environment or
disassembled then the warranty will be null and void.
Please retain proof of purchase.
7 DAYS A WEEK TECHNICAL SUPPORT
We want you to get the best out of your products. Our easy-to-read
instruction manu-al guides you with best practice use and maintenance
tips. Please call 0345 605 2070 for technical support, we can solve around
80% of questions directly over the phone.
We hope you enjoy your product and we look forward to any feedback, as
this allows us to develop even better products for the future.
2 AFTER SALES SUPPORT 0345 605 2070
Page 3

CONTENTS
SAFETY INFORMATION.........................................................................................................4
Description of symbols.......................................................................................4
General power tool safety warning......................................................................6
Work area safety.................................................................................................6
Electrical safety...................................................................................................6
Personal safety...................................................................................................7
Power tool use and care...................................................................................9
Intended use....................................................................................................10
Residual risks...................................................................................................11
IN THE BOX.....................................................................................................................13
Parts list...........................................................................................................13
ASSEMBLE..........................................................................................................................14
Hand bar assembly...........................................................................................14
PREPARE......................................................................................................................16
Settle the power cord.......................................................................................16
Install correct cutting device .............................................................................16
Install grass bag...............................................................................................18
Adjusting the working height setting.................................................................19
Supply power source........................................................................................19
OPERATE.........................................................................................................................20
Switch on/off ...................................................................................................20
Hold the machine.............................................................................................20
Scarifying work.................................................................................................20
Raking work.....................................................................................................21
Stop machine...................................................................................................21
Disconnected power source.............................................................................22
Empty grass bag..............................................................................................22
MAINTENANCE.. .................................................................................................................23
Cleaning machine body ...................................................................................23
Clean scarifying cylinder with blades.................................................................23
Clean raking cylinder with ne needles..............................................................23
Storage............................................................................................................23
TECHNICAL DATA................................................................................................................24
TROUBLESHOOTING............................................................................................................25
WARRANTY.........................................................................................................................26
AFTER SALES SUPPORT 0345 605 2070 3
Page 4
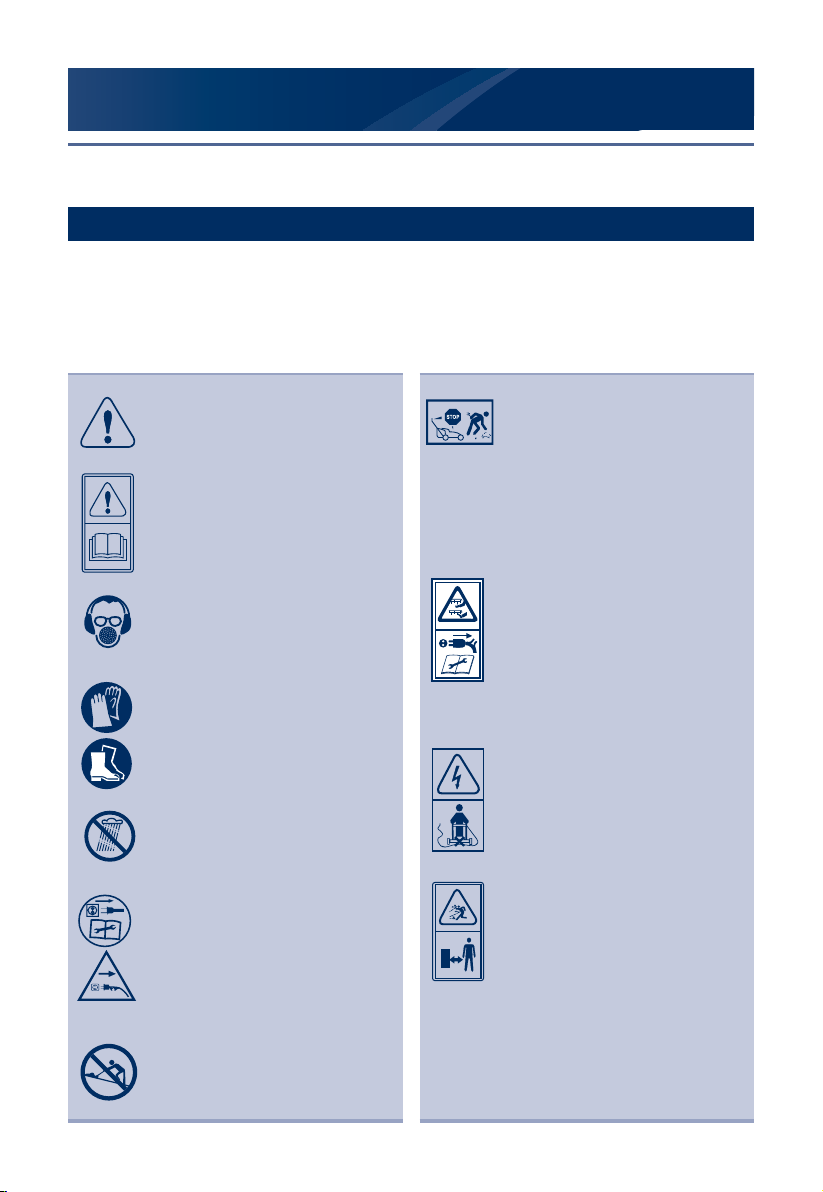
SAFETY INFORMATION
Please read these instructions fully before operating or maintaining your machine.
Description of symbols
The following symbols may be used on your tool. Be sure to study them
and learn their meaning. Proper interpretation of these symbols will allow you
to use the machine more effectively and reduce the risk of accident.
Indicates danger, warning, or
caution.
Read the instruction manual.
Wear eye protection, ear
protection and breath
protection.
Gloves with hand protection
and boots with feet protection,
steel toecap and non-slip sole.
To avoid potential electric
shock, do not use the unit in
humid or wet conditions.
Switch off! Remove plug from
mains before cleaning or
maintenance.
Switch off! Remove plug from
thee mains immediately if the
cable is damaged or cut.
Work across the face of
slopes, never up and down.
Inspect the area where the
product is to be used and
remove all objects which could
be thrown by the product.
If objects are hidden while
operating stop the motor and
remove them.
Beware of sharp tines. Tines
continue to rotate after the
motor is switched off.
Remove plug from power
supply before maintenance or
if the power cord is damaged.
Keep supply cord away from
the cutting device.
Objects thrown by the product
could hit the user or other
bystanders.
Always ensure that other
people and pets remain at a
safe distance from the product
when it is in operation. In
general, children must not
come near the area where the
product is.
4 AFTER SALES SUPPORT 0345 605 2070
Page 5

SAFETY INFORMATION
Please read these instructions fully before operating or maintaining your machine
DESCRIPTION OF SYMBOLS
The following warning symbols appear throughout this manual and indicate
the appropriate safety measures you should take when operating and
maintaining the pressure washer.
Conforms to relevant safety
standards.
This class II symbol indicates
that the product is correctly
insulated.
Grounding this machine is
therefore unnecessary.
WEEE symbol. Tools that
are no longer usable should
not be disposed of with
household waste but in an
environmentally friendly way.
Please recycle where facilities
exist. Check with your local
council authority for recycling
advice.
Guaranteed sound power level
((tested according too Directive
2000/14/ EC as amended by
20005/88/EC).
AFTER SALES SUPPORT 0345 605 2070 5
Page 6

SAFETY INFORMATION
Please read these instructions fully before operating or maintaining your machine
GENERAL POWER TOOLS SAFETY WARNINGS
General power tool safety
warnings
WARNING Read all
safety warnings and all
instructions.
Failure to follow the
warnings and instructions
may result in electric shock,
re and/or serious injury.
WARNING! Depending
on the actual use of the
product the vibration values
can differ from the
declared total! Adopt
proper measures to protect
yourself against vibration
exposures. Take the whole
work process including
times the product is running
under no load or switched
off into Consideration.
Proper measures include
among others regular
maintenance and care of
the product and application
tools, keeping hands warm,
periodical breaks and
proper planning of work
processes.
Work Area Safety
a) Keep work area clean
and well lit.
Cluttered or dark areas
invite accidents.
b) Do not operate power
tools in explosive
atmospheres, such
ass in the presence of
ammable liquids, gases
or dust.
Power tools create
sparks which may ignite
the dust or fumes.
c) Keep children and
bystanders away while
operating a power toll.
Distractions can cause
you to lose control.
Electrical Safety
a) Power tool plugs must
match the outlet. Never
6 AFTER SALES SUPPORT 0345 605 2070
Page 7

SAFETY INFORMATION
Please read these instructions fully before operating or maintaining your machine
modify the plug in any
way. Do not use any
adapter plugs with
earthed (grounded)
power tools.
Unmodied plugs and
matching outlets will
reduce risk of electric
shock.
b) Avoid body contact with
earthed or grounded
surfaces, such as pipes,
radiators, ranges and
refrigerators.
There is an increased
risk of electric shock if
your body is earthed or
grounded.
c) Do not expose power
tools to rain or wet
conditions.
Water entering a power
tool will increase the risk
of electric shock.
d) Do not abuse the cord.
Never use the cord
for carrying, pulling or
unplugging the power
tool.
Keep cord away from
heat, oil , sharp edges or
moving parts.
Damaged or entangle d
cords increase thee risk
of electric shock.
e) When operating a power
tool outdoors, use an
extension cord suitable
for outdoor use.
Use of a cord suitable for
outdoor use reduces the
risk of electric shock.
f) The use of a residual
current device (RCD)
when using this tool is
recommended.
Use of an RCD reduces
the risk of electric shock.
Personal Safety
a) Stay alert, watch what
you are doing and use
common sense when
operating a power tool.
AFTER SALES SUPPORT 0345 605 2070 7
Page 8

SAFETY INFORMATION
Please read these instructions fully before operating or maintaining your machine
Do not use a power
tool while you are tired
or under the inuence
of drugs, alcohol or
medication.
A moment of inattention
while operating power
tools may result in serious
personal injury.
b) Use personal protective
equipment. Always wear
eye protection.
Protective equipment
such as dust mask, nonskid safety shoes, hard
hat, or hearing protection
used for appropriate
conditions will reduce
personal injuries.
c) Prevent unintentional
starting. Ensure the
switch is in the offposition before
connecting to power
source and/or battery
pack, picking up or
carrying the tool.
Carrying power tools with
your nger on the switch
or energising power tools
that have the switch on
invites accidents.
d) Remove any adjusting
key or wrench before
turning the power tool
on.
A wrench or a key left
attached to a rotating
part of the power tool
may result in personal
injury.
e) Do not overreach. Keep
proper footing and
balance at all times.
This enables better
control of the power tool
in unexpected situations.
f) Dress properly. Do not
wear loose clothing or
jewellery. Keep your hair,
clothing and gloves away
from moving parts.
Loose clothes, jewellery
8 AFTER SALES SUPPORT 0345 605 2070
Page 9

SAFETY INFORMATION
Please read these instructions fully before operating or maintaining your machine
or long hair can be
caught in moving parts.
g) If devices are provided
for the connection of dust
extraction and collection
facilities, ensure these
are connected and
properly used.
Use of dust collection
can reduce dust-related
hazards.
Power tool use and care
a) Do not force the power
tool. Use the correct
power tool for your
application.
The correct power tool
will do the job better and
safer at the rate for which
it was designed.
b) Do not use the power
tool if the switch does not
turn it on and off.
Any power tool that
cannot be controlled with
the switch is dangerous
and must be repaired.
c) Disconnect the plug from
the power source and/
or the battery pack from
the power tool before
making any adjustments,
changing accessories, or
storing power tools.
Such preventive safety
measures reduce the risk
of starting the power tool
accidentally.
d) Store idle power tools out
of the reach of children
and do not allow persons
unfamiliar with the power
tool or these instructions
to operate the power
tool.
Power tools are
dangerous in the hands
of untrained users.
e) Maintain power tools.
Check for misalignment
or binding of moving
parts, breakage of parts
and any other condition
AFTER SALES SUPPORT 0345 605 2070 9
Page 10

SAFETY INFORMATION
Please read these instructions fully before operating or maintaining your machine
that may affect the
power tool’s operation.
If damaged, have the
power tool repaired
before use. Many
accidents are caused by
poorly maintained power
tools.
f) Keep cutting tools sharp
and clean.
Properly maintained
cutting tools with sharp
cutting edges are less
likely to bind and are
easier to control.
g) Use the power tool,
accessories and tool bits
etc. in accordance with
these instructions, taking
into account the working
conditions and the work
to be performed.
Use of the power tool for
operations different from
those intended could
result in a hazardous
situation.
Intended use
This product is not intended
for use by persons
(including children) with
reduced physical, sensory
or mental capabilities, or
lack of experience and
knowledge, unless they
have been given supervision
or instruction concerning
use of the product by a
person responsible for their
safety.
Children should be
supervised too ensure that
they do not play with the
product.
1). This scarier and raker
is designated with a
rated input of 13300
Watts. Depending on
the tted cutting device
this product it is either
intended for scarifying
and removing thatch
from lawns or for raking
in domestic and hobby
10 AFTER SALES SUPPORT 0345 605 2070
Page 11

SAFETY INFORMATION
Please read these instructions fully before operating or maintaining your machine
gardens.
2). When used as a scarier,
this product works by
scratching through and
between the grass with
specially adapted prongs
that collect and remove
any unwanted parts from
the lawn whilst leaving
the grass blades intact.
At the same time the
product scaries the
ground resulting in a
better airing.
3). When used as a raker,
the ne needles will
scratch the surface of the
lawn while simultaneously
picking light debris for
better oxygen absorption,
airing and draining.
4). This product is not too
be used in wet weather
conditions and may not
be used to mow dry, wet
or unusually high grass,
e. g. pasture grass or for
shredding leaves.
5). This product is intended
for private domestic
use only, not for any
commercial trade use.
It must not be used for
any purposes other than
those described .
Residual risks
Even if you are operating
this product in accordance
with all the safety
requirements, potential
risks of injury and damage
remain. The following
dangers can arise in
connection
with the structure and
design of this product:
1. Health defects resulting
from vibration emission
if the product is being
used over long periods
of time or not adequately
managed and properly
maintained.
AFTER SALES SUPPORT 0345 605 2070 11
Page 12

SAFETY INFORMATION
Please read these instructions fully before operating or maintaining your machine
2. Injuries and damage to
property due to broken
application tools or thee
sudden impact of hidden
objects during use.
3.Danger of injury and
property damage caused
by ying objects.
12 AFTER SALES SUPPORT 0345 605 2070
Page 13

IN THE BOX
Part list
1. Start/stop lever
2.Upper handle
3. Upper handle bar
4. Mounting set (X4) for handle bar
4a. Knob
4b. Bolt
5. Middle handle bar
6. Lower handle bar
7. Screw (x2)
8. Air vents
9. Depth adjustment lever
10. Front wheel
1
18
16
17
15
19
11.Rear wheel
12.Lower handle bar Installation
location
13.Grass bag
14. Deector guard
15.Cord clip (X2)
16. Switch box
17.Cord stain relief
18. Lock-off button
19. Power cord
20. Cutting device (scarifying
cylinder)
21. Cutting device (raking cylinder)
202
3
4
5
4a
4b
21
6
14
13
12
11
10
9
8
7
AFTER SALES SUPPORT 0345 605 2070 13
Page 14

ASSEMBLE
Handle Bar Assembly
1. Place the machine on a plant ground.Take
out handles and hand bars.
2. Align the lower handle bars with frame(Lower
hand bar hole). Keep the direction of both
lower handle bar in line with the wheels will
be helpful to make the holes on the handle
bar correspond those in the frame.
3. Secure the bars with one screw each to the
support.
4. Align the middle handle bars to the lower
ones. Make sure the holes of the handle
bars correspond and secure them with one
mounting set on each side.
14 AFTER SALES SUPPORT 0345 605 2070
Page 15

ASSEMBLE
5. Put the cord strain relief on the upper handle
bar,just under the switch box,align the upper
handle bar with the middle handle bar and
secure them with one mounting sett on each
side.
6. Fix the cord with the cord clips to the handle
bar.
AFTER SALES SUPPORT 0345 605 2070 15
Page 16

PREPARE
1. Settle the power cord.
The power cord should be wrapped around
the cord stain relief to avoid long lines
stumbling pedestrians or causing electric
shock.Get children, pets out of working
area.
2. Install correct cutting device
The machine is fitted with a scarifying
cylinder blade before delivery.
A. For scarifying
Correct cutting blade tted already thus no
need for extra installation.
B. For raking
You need to disassemble the scarifying
cylinder blade rstly before tting the raking
blade.
First step,disassemble the scarifying cylinder
blade:
a. Place the product upside down on a
at stable ground to have access to the
under-body.
b. Loosen the two bolts with a suitable
wrench, remove them together with
the spring washers and the presently
attached cutting device.
c. To remove the cutting device, rst lift the
bearing and then pull it out from the drive
shaft.
16 AFTER SALES SUPPORT 0345 605 2070
Page 17

PREPARE
d. Slide the hex nut out the socket of driving
shaft and the bearing from the support
with the bolts and spring washers.
e.Then you can take out Scarifying cylinder
with blades.
Second step, install the raking cylinder
blade:
a. Place the product upside down on a
at stable ground to have access to the
under-body.
b. Slide the hex nut into the socket of driving
shaft.Put drive shaft into socket stably.
AFTER SALES SUPPORT 0345 605 2070 17
Page 18

PREPARE
1
3
2
c. Put the the drive shaft on upper bearing
seat,and keep it in correct position
steadily.
d.Tighten drive shaft with two bolts by
suitable wrench with the spring washers
and x cutting device tightly.
e.Check the installation,and keep it can
work normally.
3. Install the grass bag.
Depending the work you intend to do,you
may need to install the grass bag.
For scarifying mode there is no need to do
so.
For raking mode,just lift the rear deflector
guard and attach the grass bag to the rear
side of the machine.
18 AFTER SALES SUPPORT 0345 605 2070
Page 19

PREPARE
1
2
4.Adjust the working height setting
Push the depth adjustment lever towards
the wheel and then move it forward or
backward to adjust the cutting depth. as per
your needs.
Scale /
Position
Setting Appplication
Depth Scarifying Raking
1 high 10 mm do not use for scarifying for pushing behind with the
machine; and removing thin
thatch layers
2 minimal 5 mm do not use for scarifying raking healthy lawn
3 middle 0 mm transport, storage and
scarifying
4 deep -5 mm use for scarifying not recommended for raking
5 deep -10 mm use for scarifying do not use for raking
transport, storage and
raking
5. Connect to the power source
Insert the power cord/plug to the power
source before starting to work.
AFTER SALES SUPPORT 0345 605 2070 19
Page 20

OPERATE
1
2
1
2
1. Switch on/off
Firstly,press the lock-off buttonķ fully,then
hold the start/stop leverĸ.when machine
is operated,the lock-off button can be
released.
2. Hold the machine
Keep your body straight to work with
double hands,and keep your feet away from
dangerous zone,and avoid hurting by blades
or needles of devices.
3. Scarifying work
Scarifying work is run with scarifying cylinder
with blades,you can adjust the working
depth by depth adjustment lever accordingly.
Consider the weather when scarifying.
Scarify the lawn with an increased depth
setting during spring time between April
and May as the lawn is better able to
recover during this season. During a wet
summer scarify again in late summer with
a decreased depth setting. Do not scarify
during periods of hot weather condition.
During a dry rainless summer do not scarify
a second time in autumn.
20 AFTER SALES SUPPORT 0345 605 2070
Page 21

OPERATE
4. Raking work
Raking work is run with raking cylinder
with fine needles,you can adjust the
working depth by depth adjustment lever
accordingly. In order that a healthy lawn
can develop in the spring, it is necessary
for greater amounts of air to penetrate the
area around the roots of the grass. We
recommend aerate the lawn every 4 - 6
weeks depending on the state of your lawn.
NOTE:Overload protection
The overload protection will be activated
the following circumstances:
1). A build up of scaried material around
cutting device.
2). If the material scaried is larger then
motor capacity.
3). Where there is too much resistance
against the cutting device.
When the circuit breaker has been activated
switch off the product and disconnect from
the power supply.
Let the product cool down and eliminate
cause before using the product again.
5. Stop machine
Release the start/stop lever,machine will
stop running.press the lock-off button and
hold the Start/stop lever,restart the machine.
AFTER SALES SUPPORT 0345 605 2070 21
Page 22

OPERATE
1
2
6. Disconnect power source
When you nish work,remember disconnect
power source.
7. Empty grass bag
Take out grass bag,clean out grass what
you raked in this bag.and keep grass bag
clean and intact.
a) Open the deflector guard , hold it in
position and align the hooks on the grass
bag with the hinges to hang it onto.
b) Empty the grass bag frequently during
use. Do not wait until it is completely full.
We recommend emptying it when it is half
full.
c). Lift the deector guard and pull the grass
bag off the hinges to remove it.
d) Empty the collected material onto a
compost heap and reattach it onto the
product.
22 AFTER SALES SUPPORT 0345 605 2070
Page 23

MAINTENANCE
1. Clean machine body
Clean the deflector guard and handle
bars,and other necessary parts with clean
cloth
When you end work.or it will be with dust
and dirt,etc.Reduce the life of components.
2. Clean scarifying cylinder with blades.
After scarifying work,clean the scarifying
cylinder and blades ,Plastic frame with clean
cloth or Brush,or water it and keep it clean.
Get blades and drive shaft out of sand and
dust.
3. Clean raking cylinder with ne needles
After raking work,clean the raking cylinder
and needles ,remove the grass from needles
carefully,keep it clean and sweep plastic
frame with clean cloth or Brush.
4. Storage
Store your product in a dry place. You’d
better use original package to maintain.
To ensure a long service life all screw parts
should be cleaned and then oiled.
AFTER SALES SUPPORT 0345 605 2070 23
Page 24

TECHNICAL DATA
Model YT6702
Rated voltage 220-240V/50Hz
Power input power 1300W
No-load speed 3000/min
Max.cutting width 32cm
Working height setting 5 adjustments(-10/-5/0/5/10mm)
Grass catcher bag 30L
Vibration 3.591m/s² K=1.5m/s²
Measured sound pressure level LPA 84.5dB(A) K=3dB(A)
Measured sound power level LwA 97.9dB(A) K=3dB(A)
Guaranteed sound power level LwA 104dB(A)
Protection class II
Degree of protection IPX4
Machine weight 12.25KG
Cable length 10m
PARTS NUMBER ACCESSORIES
L1710033 Cutting device (scarifying cylinder)
L1710034 Cutting device (raking cylinder)
WARNINNG! Depending on the actual use of the product the vibration
values can differ from the declared total! Adopt proper measures to
protect yourself against vibration exposures. Take the whole work
process including times the product is running under no load or
switched off into consideration.
Proper measures include among others regular maintenance and care
of the product and application tools, keeping hands warm, periodical
breaks and proper planning of work processes.
Environmental Protection
Waste electrical products should not be disposed of with household waste.
Please recycle where facilities exist. Check with your Local Authority or retailer for
recycling advice.
24 AFTER SALES SUPPORT 0345 605 2070
Page 25

TROUBLESHOOTING
TROUBLESHOOTING
Suspected malfunctions are often due to causes that the users can x themselves.
Therefore check the product using this section. In most cases the problem can be
solved quickly.
WARNING! Only perform thee steps described within these instruction s! All further
inspection, maintenance and repair work must be performed by an authorized service
centre or a similarly qualied specialist if you cannot solve the problem yourself!
Problem Possible cause Solution
Product does not start
Product does not reach
full power
Power result
- Not connectted to power
supply
- Power cord or plug
defective
- Other electrical defect to
the product
- Lock-off button not press
- Power source(e.g.
generator)has to low
voltage.
- Air vents blocked
- Cutting device is dull/
damaged
- Scaried material
exceeds capacity
- Scarifying depth is
incorrect
- Connect to power supply
- Check by a specilist
electrician
- Check by a specilist
electrician
- Press lock-off button
rst,then the start/stop lever.
- Connect to another power
source
- Clean the air vents
- Replace a new one
- Only scarify materials
according to capacity of the
product
- Adjust depth
AFTER SALES SUPPORT 0345 605 2070 25
Page 26

WARRANTY
If your device develops a fault, please don’t hesitate to contact our customer service
department on 0345 605 2070, we can solve 80% of problems via the phone.
1. These warranty terms cover additional warranty rights and do not affect your
statutory warranty rights. All our products are covered by a 3 year manufacturer
warranty.
2. Claims must be accompanied by proof of purchase. This must be in the form
of a sales receipt or bank statement and must show that the product has been
purchased within the warranty period as described under point 1, from the retailer
that it was originally bought from. Please keep your receipt safe or staple it to the
back of this manual for future reference.
3. Our warranty covers problems caused by material or manufacturing defects, and
will result in the repair of these defects or replacement of the device with a like for
like or similar article.
4. Our devices have not been designed for commercial, trade or industrial
applications, any signs of use of the equipment in these application or equivalent
activities, invalidates the warranty.
5. The following are also excluded from our warranty:
A. Faults due to accidents, customer misuse or unauthorized repairs
B. Consumable Parts such as cutting device (scarifying cylinder), cutting device
(raking cylinder) and other accessories that are compatible with the product.
C. Failure due to lack of routine maintenance.
D. Failure as a result of not using the equipment in accordance with the manual
and safety instructions.
Warranty claims should be submitted before the end of the warranty period, see point
1,but a paid service exists for repairs commissioned after this period. The original
warrantyperiod remains applicable to the device even if repairs are carried out or
parts are replaced. In such cases, the work performed or parts tted will not result in
an extension of the warranty period, and no new warranty will become active for the
work performed or parts tted.
If you have any problems or questions concerning your garden power tool, please
contact our after sales service at 0345 605 2070.
This device may be re-conditioned, like for like or upgraded replacement.
26 AFTER SALES SUPPORT 0345 605 2070
 Loading...