

Page 1

Operating instruction Petrol Chain Saw
" WARNING! PLEASE READ THESE INSTRUCTIONS
BEFORE OPERATING THIS UNIT"
"KEEP THIS MANUAL FOR FUTURE REFERENCE”
SPJCS 3740
Page 2

2
Helpline No: UK 0151 649 1500 / IRE 189 094 6244
Read and follow the operating instructions and safety
information before using for the first time.
Always wear PPE (Personal Protective Clothing).
Wear gloves!
Wear safety shoes!
Wear a safety helmet, eye and ear protection!
Page 3

Please read these instructions carefully
before installing and operating the
petrol motor scythe!
Petrol Engine Quick Start Guide
Ensure correct fuel/oil mixture 50:1
STARTING
1. Set the On/Off switch to “On (I)” to start the
machine.
2. Pull out the throttle lever until it locks.
3. Push the primer bulb 10 times.
4. Place saw on a firm, flat surface. Hold saw
firmly as shown. Pull starter rapidly 2 times.
Beware of moving chain!
5. Push in the throttle lever as far as it will go .
Note - the amount of Choke will vary slightly
depending on the weather conditions, a small
amount of experimentation is advised.
6. Hold saw firmly and pull starter rapidly 4
times. Engine should start.
7. Let the engine run for 10 seconds to warm
up. Press the throttle lever briefly, the engine
will go to “idling” speed.
Note - this quick start guide is intended for
experienced users who have already
assembled the tool, please refer to the
manual for details.
If machine does not start after minimum 6 pulls
on starter cord refer to petrol Engine Q & A on
page 21.
3
Helpline No: UK 0151 649 1500 / IRE 189 094 6244
Page 4
4
Helpline No: UK 0151 649 1500 / IRE 189 094 6244
2
10
6
7
11
14
1
9
19
20
4
3
18
16
13
17
15
12
8
1
2
B
A
D
F
G
E
3A
3C 3D
3B
5
24
Page 5
5
Helpline No: UK 0151 649 1500 / IRE 189 094 6244
A
D
B
C
4A 4B
D
BCA
5 6
7A
8
7B
9A
B
A
C
A
I
A
0
Page 6
6
Helpline No: UK 0151 649 1500 / IRE 189 094 6244
10 11
A
B
9B 9D
B
D
A
B
C
9E
9C
C
13 1412
A
B
Page 7
7
Helpline No: UK 0151 649 1500 / IRE 189 094 6244
16A 16B15
17 18A
16C
19
18B
21A 21B
20
A
A
B
C
A
B
D
C
A
Page 8
8
Helpline No: UK 0151 649 1500 / IRE 189 094 6244
24
23
25
26
22
A
1
2345
6
7
27
28
1
2
3
4
29
A
B
A
A
30
A
B
C
Page 9

9
Helpline No: UK 0151 649 1500 / IRE 189 094 6244
Table of contents Page
1. General safety instructions 10
2. Layout 12
3. Proper use 12
4. Environmental protection 12
5. Installation 12
6. Before starting the machine 13
7. Operation 14
8. Technical data 16
9. Maintenance 16
10. Storage 18
11. Waste disposal 19
12. Ordering spare parts 19
13. Troubleshooting 20
Page 10

10
Helpline No: UK 0151 649 1500 / IRE 189 094 6244
Packaging
The unit is supplied in packaging to prevent it from
being damaged in transit. The raw materials in this
packaging can be reused or recycled.
When using the equipment, a few safety
precautions must be observed to avoid injuries
and damage.
Read the operating instructions carefully and
comply with them at all times. It is important to
consult these instructions in order to acquaint
yourself with the unit, its proper use and the
important safety regulations.
Keep this manual in a safe place, so that the
information is available at all times.
If you give the equipment to any other person,
make sure that you pass on these operating
instructions as well.
We can accept no liability for damage or
accidents which arise due to non-compliance
with these instructions.
1. General safety instructions
1.1 Explanation of the symbols and warning
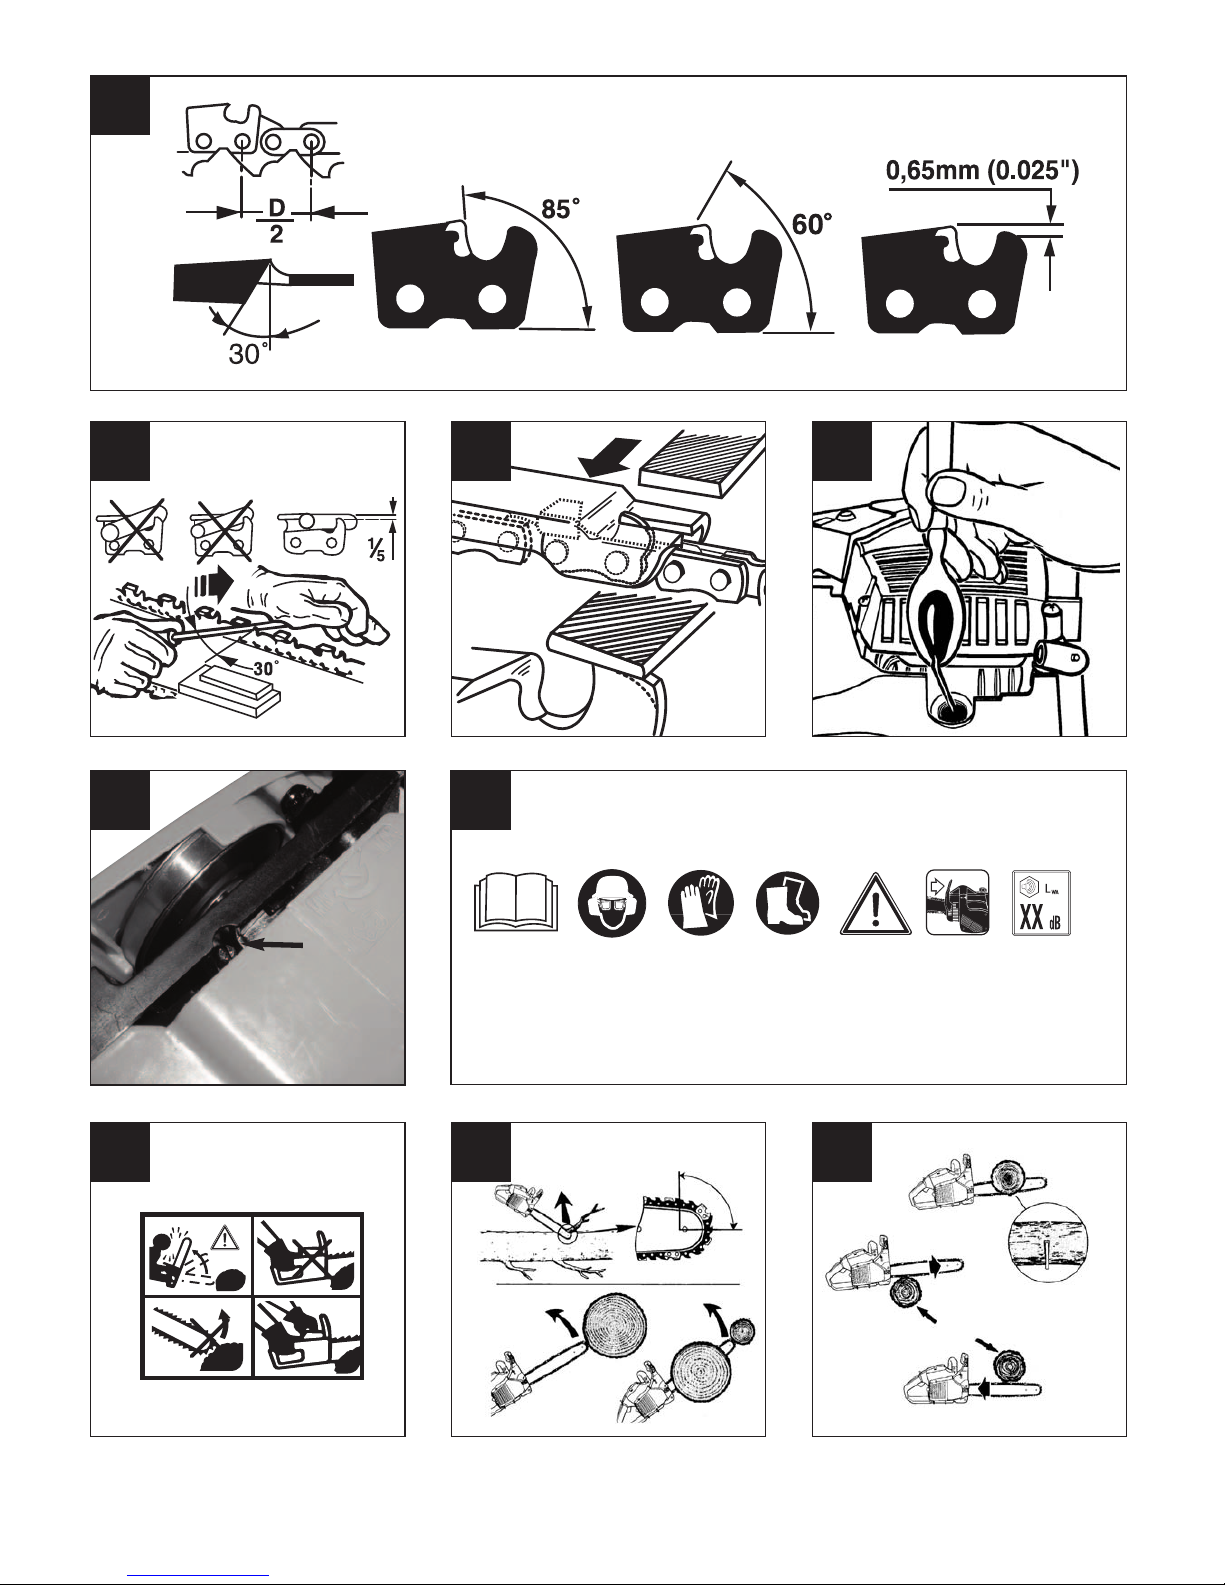
signs on the machine (Fig. 27)
1. Read the user manual before using the machine
2. On all jobs performed with the saw you must
always wear safety goggles to guard your eyes
from flying materials/objects and a sound-proof
helmet, ear plugs or the like to protect your
hearing. Wear a safety helmet if there is a risk of
objects falling on you from above.
3. Wear gloves to protect your hands.
4. Wear safety shoes to protect your feet.
5. Warning! Danger!
6. Make sure that the chain brake is released. Pull
back the handle/chain brake before operating.
7. Noise emission complies with Directive
2000/14/EC!
1.2 Explanation of the pictograms for handling
on the machine (Fig. 28)
A safety sign is fitted to the chain sawʼs fan filter
cover. This label, along with the safety instructions
on these pages, should be carefully read before
attempting to operate this unit.
Important: Picture 1/2/3 Warns about a
dangerous method of working that must not be used.
Picture 4 RECOMMENDED
Recommended operation for safe sawing.
IMPORTANT:
1. Beware of recoil.
2. Do not hold the saw in one hand.
3. Avoid contact with the tip of the rail (chain return
point).
RECOMMENDED
4. Hold the saw firmly with both hands. Place your
right hand on the rear handle and your left hand
on the front handle.
1.3 Kickback safety precautions
Warning: Kickback can lead to dangerous loss
of control of the chain saw and result in serious or
fatal injury to the saw operator or to anyone standing
close by. Always be alert. Rotational kickback and
pinch-kickback are major chain saw operational
dangers and the leading cause of most accidents.
KICKBACK may occur when the NOSE or TIP of the
guide bar touches an object, or when wood closes in
and pinches the saw chain in the cut.
Tip contact in some cases may cause a lightning-fast
reverse reaction, kicking the guide bar up and back
toward the operator.
PINCHING the saw chain along the BOTTOM of the
guide bar may PULL the saw forward away from the
operator. PINCHING the saw chain along the TOP of
the guide bar may PUSH the guide bar rapidly back
toward the operator.
Any of these reactions may cause you to lose control
of the saw, which could result in serious personal
injury.
Beware of the following:
Rotary recoil (Fig. 29)
A = Recoil distance
B = Recoil reaction zone
Impact/Jamming recoil and pulling reactions
(Fig. 30)
A = Pull
B = Solid objects
C = Push
To prevent pulling reactions, place the wood you wish
to cut against the claw stop. Use the claw stop as a
pivot point during cutting.
1.4 Safety Instructions
Warning: When using petrol tools, basic safety
precautions, including the following, should always
be followed to reduce the risk of serious personal
injury and/or damage to the unit.
Page 11

11
Helpline No: UK 0151 649 1500 / IRE 189 094 6244
Read all these instructions before operating this
product and save these instructions.
1. DO NOT operate a chain saw with one hand!
Serious injury to the operator, helpers,
bystanders, or any combination of these persons
may result from one-handed operation. A chain
saw is intended for two-handed use.
2. Do NOT use the saw if you are tired, ill or under
the influence of alcohol and/or drugs.
3. Use safety footwear, snug-fitting clothing,
protective gloves, and eye, hearing and head
protection devices.
4. Use caution when handling fuel. Move the chain
saw at least 10 feet (3m) from the fueling point
before starting the engine.
5. DO NOT allow other persons to be near when
starting or cutting with the chain saw. Keep
bystanders and animals out of the work area.
6. DO NOT start cutting until you have a clear work
area, secure footing, and a planned retreat path
from the falling tree.
7. Keep all parts of your body away from the saw
chain when the engine is running.
8. Before you start the engine, make sure that the
saw chain is not contacting anything.
9. Carry the chain saw with the engine stopped, the
guide bar and saw chain to the rear, and the
exhaust away from your body.
10. NEVER use a chainsaw which is damaged,
incorrectly set or incompletely and loosely
assembled. Make sure that the chainsaw stops
when the chain brake is applied.
11. Shut off the engine before setting the chain saw
down.
12. Use extreme caution when cutting small size
brush and saplings because slender material
may catch the saw chain and be whipped toward
you or pull you off balance.
13. When cutting a limb that is under tension, be
alert for springback so that you will not be struck
when the tension in the wood fibers is released.
14. Keep the handles dry, clean, and free of oil or
fuel mixture.
15. Operate the chain saw only in well-ventilated
areas.
16. DO NOT operate a chain saw in a tree unless
you have been specifically trained to do so.
17. All chain saw service, other than the items listed
in the user manual safety and maintenance
instructions, should be performed by competent
chain saw service personnel.
18. When transporting your chain saw, use the
appropriate guide bar scabbard.
19. DO NOT operate your chain saw near or around
flammable liquids or gases whether in or out of
doors. An explosion and/or fire may result.
20. Do not tank fuel, oil or lubrication when the
engine of chain saw is running.
21. USE THE RIGHT TOOL: Cut wood only. Do not
use the chain saw for purposes for which it was
not intended. For example, do not use the chain
saw for cutting plastic, masonry, or non building
materials.
22. The engine will create toxic exhaust fumes as
soon as the engine is started. Never work in
enclosed rooms or in rooms with poor ventilation.
Note: The following appendix is primarily for the end
user or occasional user. The chainsaw is designed for
occasional use by home owners, garden owners and
campers and is for general work such as stumpgrubbing, cutting firewood, etc. It is not designed for
lengthy use. If it is used for a lengthy period, the
vibrations it causes in the hands of the user may
result in circulation problems (white finger syndrome).
Kickback may occur when the nose or tip of the
guide bar touches an object, or when the wood
closes in and pinches the saw chain in the cut. If the
bar tip contacts, it may cause a lightning-fast reverse
reaction, kicking the guide bar up and back towards
the operator. Pinching the saw chain along the top of
the guide bar may push the guide bar rapidly back
towards the operator. Either of these reactions may
cause you to loose control of the saw, which could
result in serious personal injury. Do not rely
exclusively upon the safety devices built into your
saw. As a chain saw user, you should take several
steps to keep your cutting jobs free from accident or
injury.
1. With a basic understanding of kickback, you can
reduce or eliminate the element of surprise.
Sudden surprise contributes to accidents.
2. Keep a good firm grip on the saw with both
hands, the right hand on the rear handle, and the
left hand on the front handle, when the engine is
running. Use a firm grip with thumbs and fingers
encircling the chain saw handles. A firm grip will
help you reduce kickback and maintain control of
the saw. Donʼt let go.
3. Make sure that the area in which you are cutting
is free from obstructions. Do not let the nose of
the guide bar contact a log, branch, or any other
obstruction which could be hit while you are
operating the saw.
4. Cut at high engine speeds.
5. Do not overreach or cut above shoulder height.
6. Follow manufacturerʼs sharpening and
maintenance instructions for the saw chain.
7. Only use replacement bars and chains specified
by the manufacturer or the equivalent.
Page 12

12
Helpline No: UK 0151 649 1500 / IRE 189 094 6244
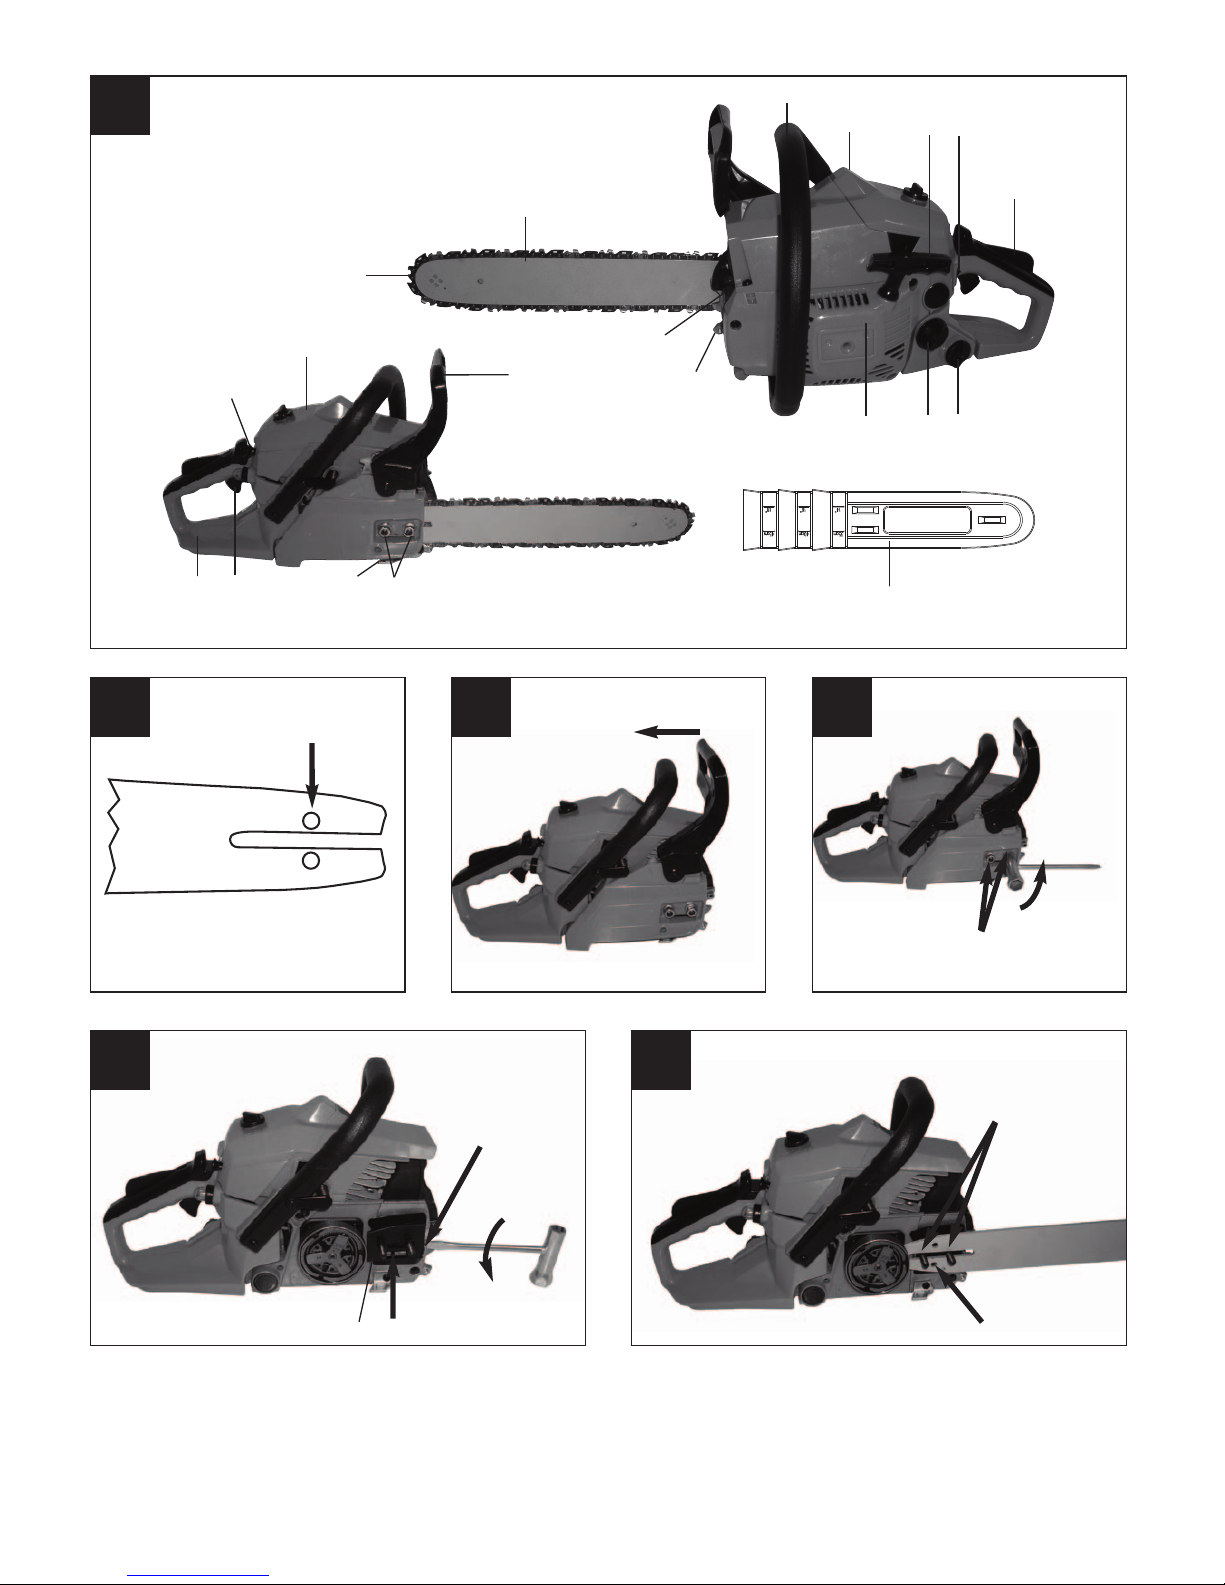
2. Layout (Fig. 1)
1. Chain bar
2. Saw chain
3. Chain tensioning screw
4. Stop claw
5. Chain brake lever / front hand
guard
6. Front handle
7. Starter handle
8. Spark plug (under the air filter cover)
9. Air filter cover
10. Stop switch
11. Safety lock
12. Oil tank cap
13. Fan housing
14. Fuel tank cap
15. Rear handle / bootstrap
16. Chain guard
17. Choke / (carburetor setting)
18. Bar fastening nut
19. Throttle lever
20. Chain catch
Safety features (Fig.1)
2 LOW KICKBACK SAW CHAIN helps significantly
reduce kickback, or the intensity of kickback, due
to specially designed depth gauges and guard
links.
5 CHAIN BRAKE LEVER / HAND GUARD protects
the operator’s left hand in the event it slips off the
front handle while saw is running.
5 CHAIN BRAKE is a safety feature designed to
reduce the possibility of injury due to kickback by
stopping a moving saw chain in milliseconds. It is
activated by the CHAIN BRAKE lever.
10 STOP SWITCH immediately stops the engine
when tripped. Stop switch must be pushed to ON
position to start or restart engine.
11 SAFETY TRIGGER prevents accidental
acceleration of the engine. Throttle trigger (19)
cannot be squeezed unless the safety latch is
depressed.
20 CHAIN CATCHER reduces the danger of injury in
the event saw chain breaks or derails during
operation. The chain catcher is designed to
intercept a whipping chain.
Note: Study your saw and be familiar with its parts.
3. Proper use
The chain is designed exclusively for sawing wood.
You may only fell trees if you have received the
appropriate training. The manufacturer cannot be
held liable for damage caused by improper or
incorrect usage.
Please note that our equipment has not been
designed for use in commercial, trade or industrial
applications. Our warranty will be voided if the
machine is used in commercial, trade or industrial
businesses or for equivalent purposes.
4. Environmental protection
Dispose of soiled maintenance material and
operating materials at the appropriate collection
point.
Recycle packaging material, metal and plastics.
5. Installation
Important: Do not start the engine until the saw
is fully assembled.
Important: Wear protective gloves at all times
when handling the chain.
5.1 Fit the chain bar
To ensure that the bar and the chain are supplied
with oil, USE ONLY THE ORIGINAL BAR. The oiling
hole (Fig. 2/Item A) must be kept clear of dirt and any
build-up of residue.
1. Make sure the Chain brake lever is pulled back
into the DISENGAGED position (Fig. 3A)
2. Remove the two bar fastening nuts (B). Remove
the cover (Fig. 3B).
Important: When assembling for the first time,
the material fitted to provide protection during
transportation (Fig. 3C/Item 24) must be removed
first.
3. Using a screwdriver, run the adjustment screw
(D) COUNTERCLOCKWISE until the TANG (E)
(projecting prong) is to the end of its travel toward
the clutch drum and sprocket (Fig. 3C).
4. Fit the open end of the chain bar over the die bar
pins (F) (Fig. 3D).
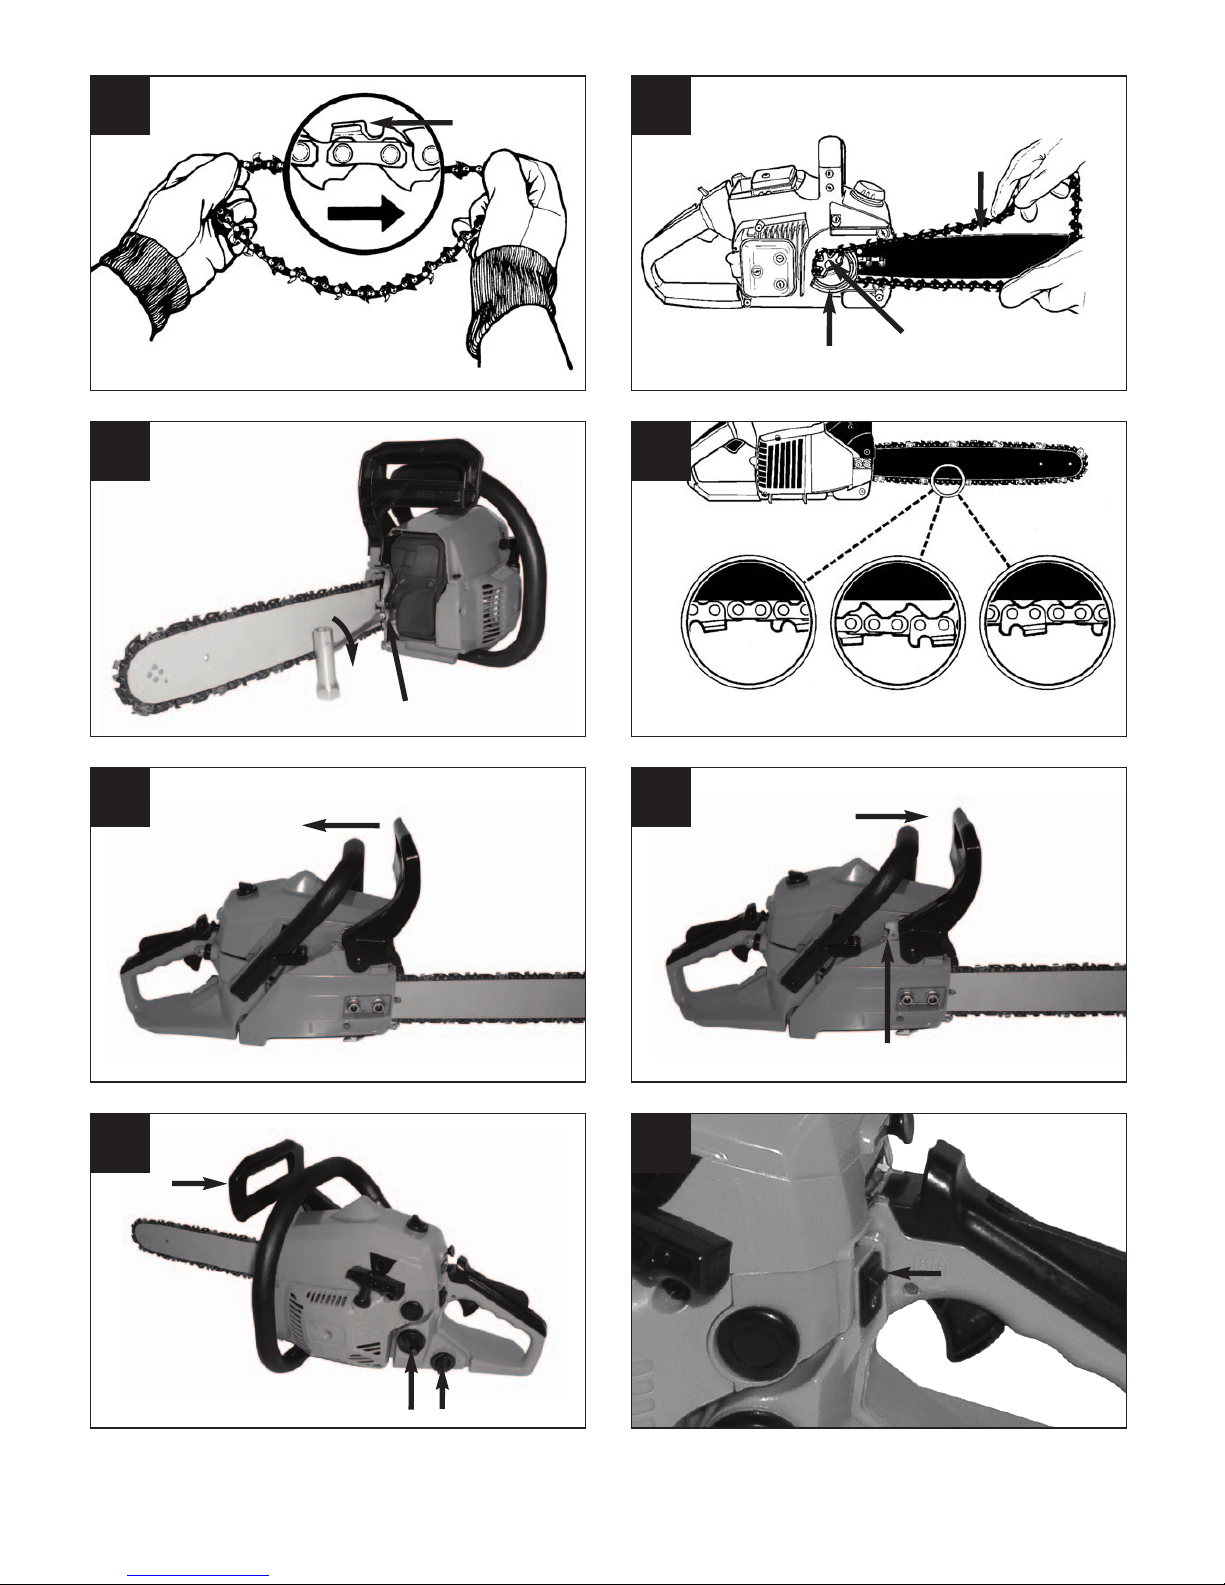
5.2 To install saw chain
1. Spread chain out in a loop with cutting edges (A)
pointing CLOCKWISE around loop (Fig. 4A).
2. Slip the chain around the sprocket (B) behind the
clutch (C). Make sure the links fit between the
sprocket teeth (Fig. 4B).
3. Guide the drive links into the groove (D) and
Page 13

13
Helpline No: UK 0151 649 1500 / IRE 189 094 6244
around the end of the bar (Fig. 4B).
NOTE: The saw chain may droop slightly on the lower
part of bar. This is normal.
4. Pull the chain bar forward until the chain is closely
seated. Make sure that all the drive links are in
the groove of the bar.
5. Fit the clutch cover and fasten it with 2 screws.
Make sure that the pivot (Fig. 3C/Item E) fits into
the chain bar (Fig. 3D/Item G). The chain must
not slip off the bar when you do this. Tighten the
two nuts by hand and then follow the instructions
for adjusting the tension in ADJUSTING THE
CHAIN TENSION.
5.3 Saw chain tension adjustment
Proper tension of saw chain is extremely important
and must be checked before starting, as well as
during any cutting operation.
Taking the time to make needed adjustments to the
saw chain will result in improved cutting performance
and prolonged chain life.
Warning: Always wear heavy duty gloves when
handling saw chain or making saw chain adjustments.
1. Before adjusting the chain tension screw you
must slacken the 2x retaining nuts. Otherwise this
will damage tension screw.
2. Hold nose of guide bar up and turn adjustment
screw (D) CLOCKWISE to increase chain
tension. Turning screw COUNTERCLOCKWISE
will decrease amount of tension on chain. Ensure
the chain fits snugly all the way around the guide
bar (Fig. 5).
3. After making adjustment, and while still holding
nose of bar in the uppermost position, tighten the
bar retaining nuts securely. Chain has proper
tension when it has a snug fit all around and can
be pulled around by gloved hand.
NOTE: If chain is difficult to rotate on guide bar or if it
binds, too much tension has been applied. This
requires minor adjustment as follows:
A. Loosen the bar retaining nut so they are finger
tight. Decrease tension by turning the bar
adjustment screw COUNTERCLOCKWISE
slowly. Move chain back and forth on bar.
Continue to adjust until chain rotates freely, but
fits snugly. Increase tension by turning bar
adjustment screw CLOCKWISE.
B. When saw chain has proper tension, hold nose of
bar in the uppermost position and tighten the bar
retaining nut securely.
Caution: A new saw chain stretches, requiring
adjustment after as few as 5 cuts. This is normal with
a new chain, and the interval between future
adjustments will lengthen quickly.
Caution: If the saw chain is TOO LOOSE or TOO
TAUT, the drive wheel, chain bar, chain and crank
shaft bearing will suffer premature wear. Fig. 6 shows
the correct tension A (when cold) and tension B
(when warm). Fig. C shows a chain that is too loose.
6. Before starting the machine
6.1 Chain break mechanical test
Your chain saw is equipped with a Chain brake that
reduces possibility of injury due to kickback. The
brake is activated if pressure is applied against brake
lever when, as in the event of kickback, operator’s
hand strikes the lever. When the brake is actuated,
chain movement stops abruptly.
Warning: The purpose of the chain brake is to
reduce the possibility of injury due to kickback;
however, it cannot provide the intended measure of
protection if the saw is operated carelessly. Always
test the chain brake before using your saw and
periodically while on the job.
To test chain brake
1. The Chain brake is DISENGAGED (chain can
move) when BRAKE LEVER IS PULLED BACK
AND LOCKED (Fig. 7A).
2. The chain brake is ENGAGED (the chain is
locked) when the brake lever is pulled forward
and the mechanism (Fig. 7B/Item A) can be
seen. It should not be possible to move the chain
(Fig. 7B).
NOTE: The brake lever should snap into both
positions. If strong resistance is felt, or lever does not
move into either position, do not use your saw. Take it
immediately to a professional Service Center for
repair.
6.2 Fuel and lubrication
Fuel
Use regular grade unleaded fuel mixed with 50:1
custom 2-cycle engine oil for best results.
Mixing fuel
Mix fuel with 2 cycle oil in an approved container.
Shake gently and ensure thorough mix.
Page 14
14
Helpline No: UK 0151 649 1500 / IRE 189 094 6244
Warning: Never use straight fuel in your unit.
This will cause permanent engine damage and void
the manufacturer’s warranty for that product. Never
use a fuel mixture that has been stored for over 90
days.
Warning: If 2-cycle lubricant is to be used, it
must be a premium grade oil for 2-cycle air cooled
engines mixed at a 50:1 ratio. Do not use any 2-cycle
oil product with a recommended mixing ratio of
100:1. If insufficient lubrication is the cause of engine
damage, it voids the manufacturer’s engine warranty
for that occurrence.
Recommended fuels
Some conventional fuels are being blended with
oxygenates such as alcohol or an ether compound to
meet clean air standards. Your engine is designed to
operate satisfactorily on any fuel intended for
automotive use including oxygenated fuel. It is
recommended to use unleaded petrol as fuel.
Lubrication of chain and chain bar
Whenever you refill the fuel tank with petrol you must
also top up the level of chain oil in the chain oil tank. It
is recommended to use standard chain oil.
Engine pre-start checks
Warning: Never start or operate the saw unless
the bar and chain are properly installed.
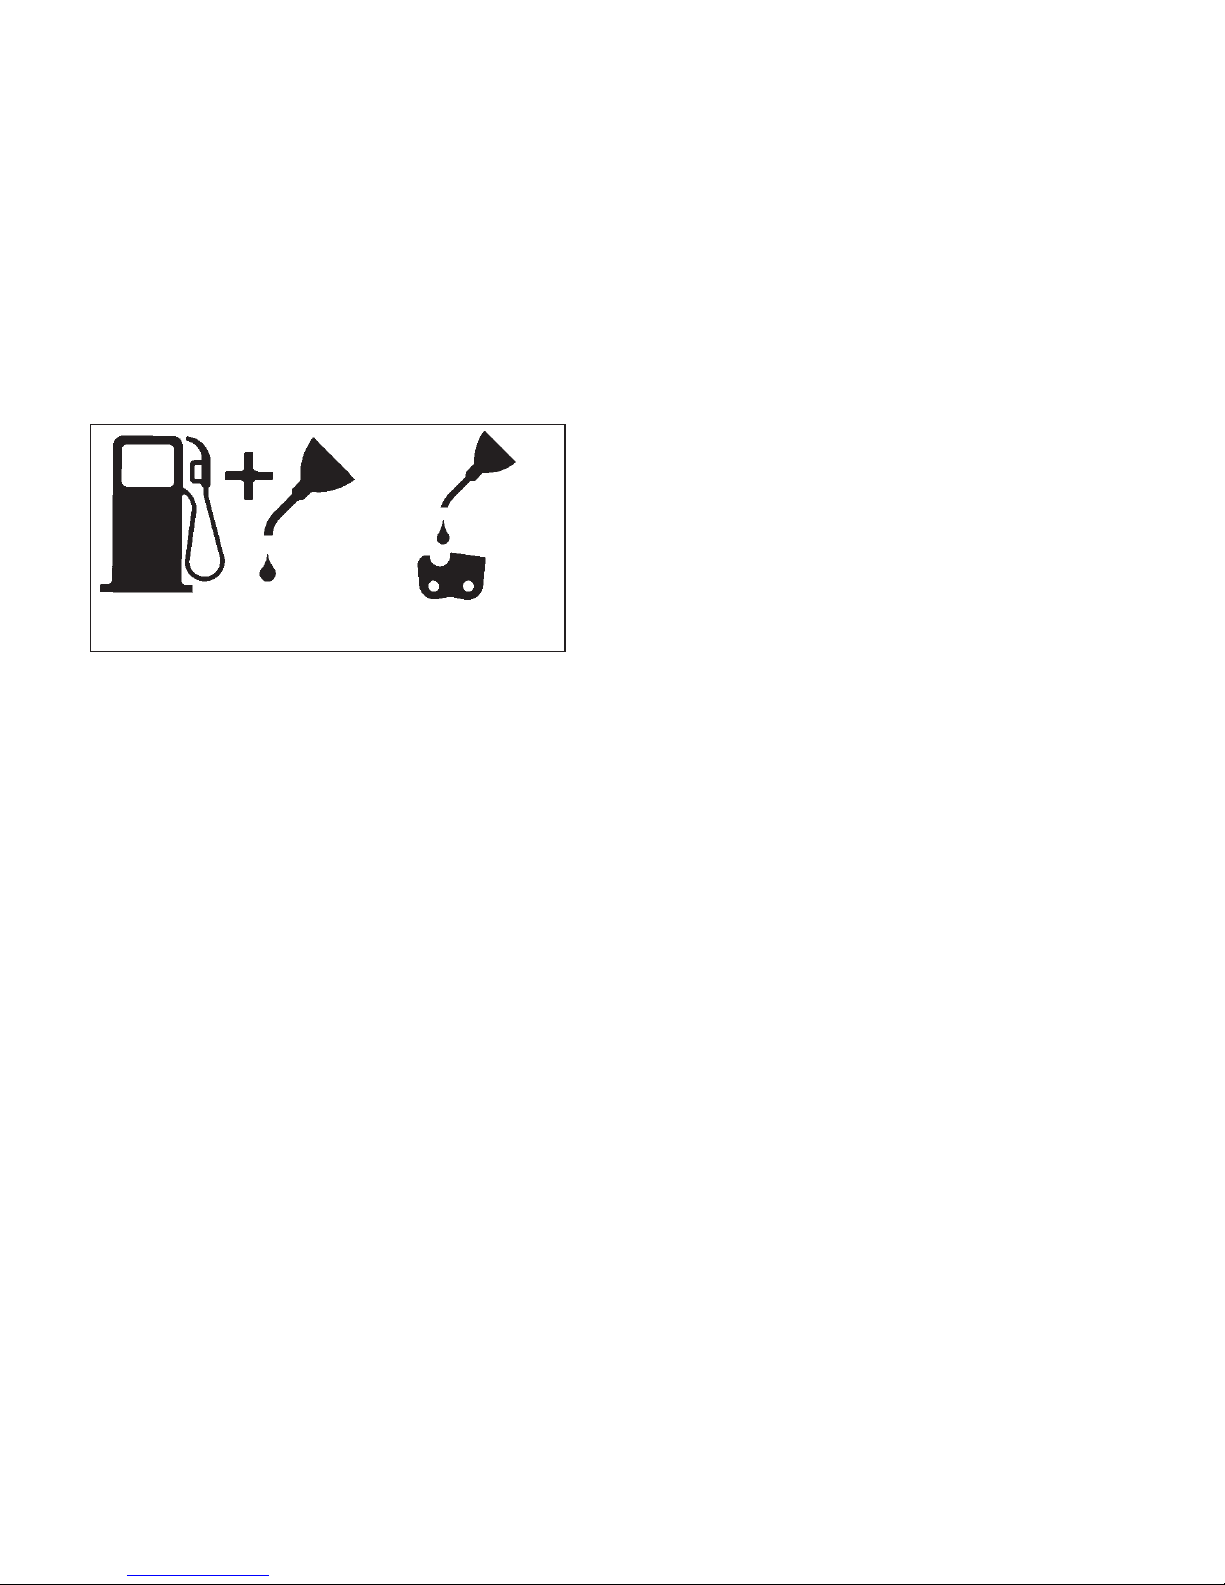
1. Fill the fuel tank (A) with correct fuel mixture
(Fig. 8).
2. Fill the oil tank (B) with chain oil (Fig. 8).
3. Be certain the chain brake is disengaged (C)
before starting unit (Fig. 8).
Once you have filled the chain and oil tank,
tighten the tank cover securely by hand. Do not
use any tools to do so.
7. Operation
7.1 Starting the engine
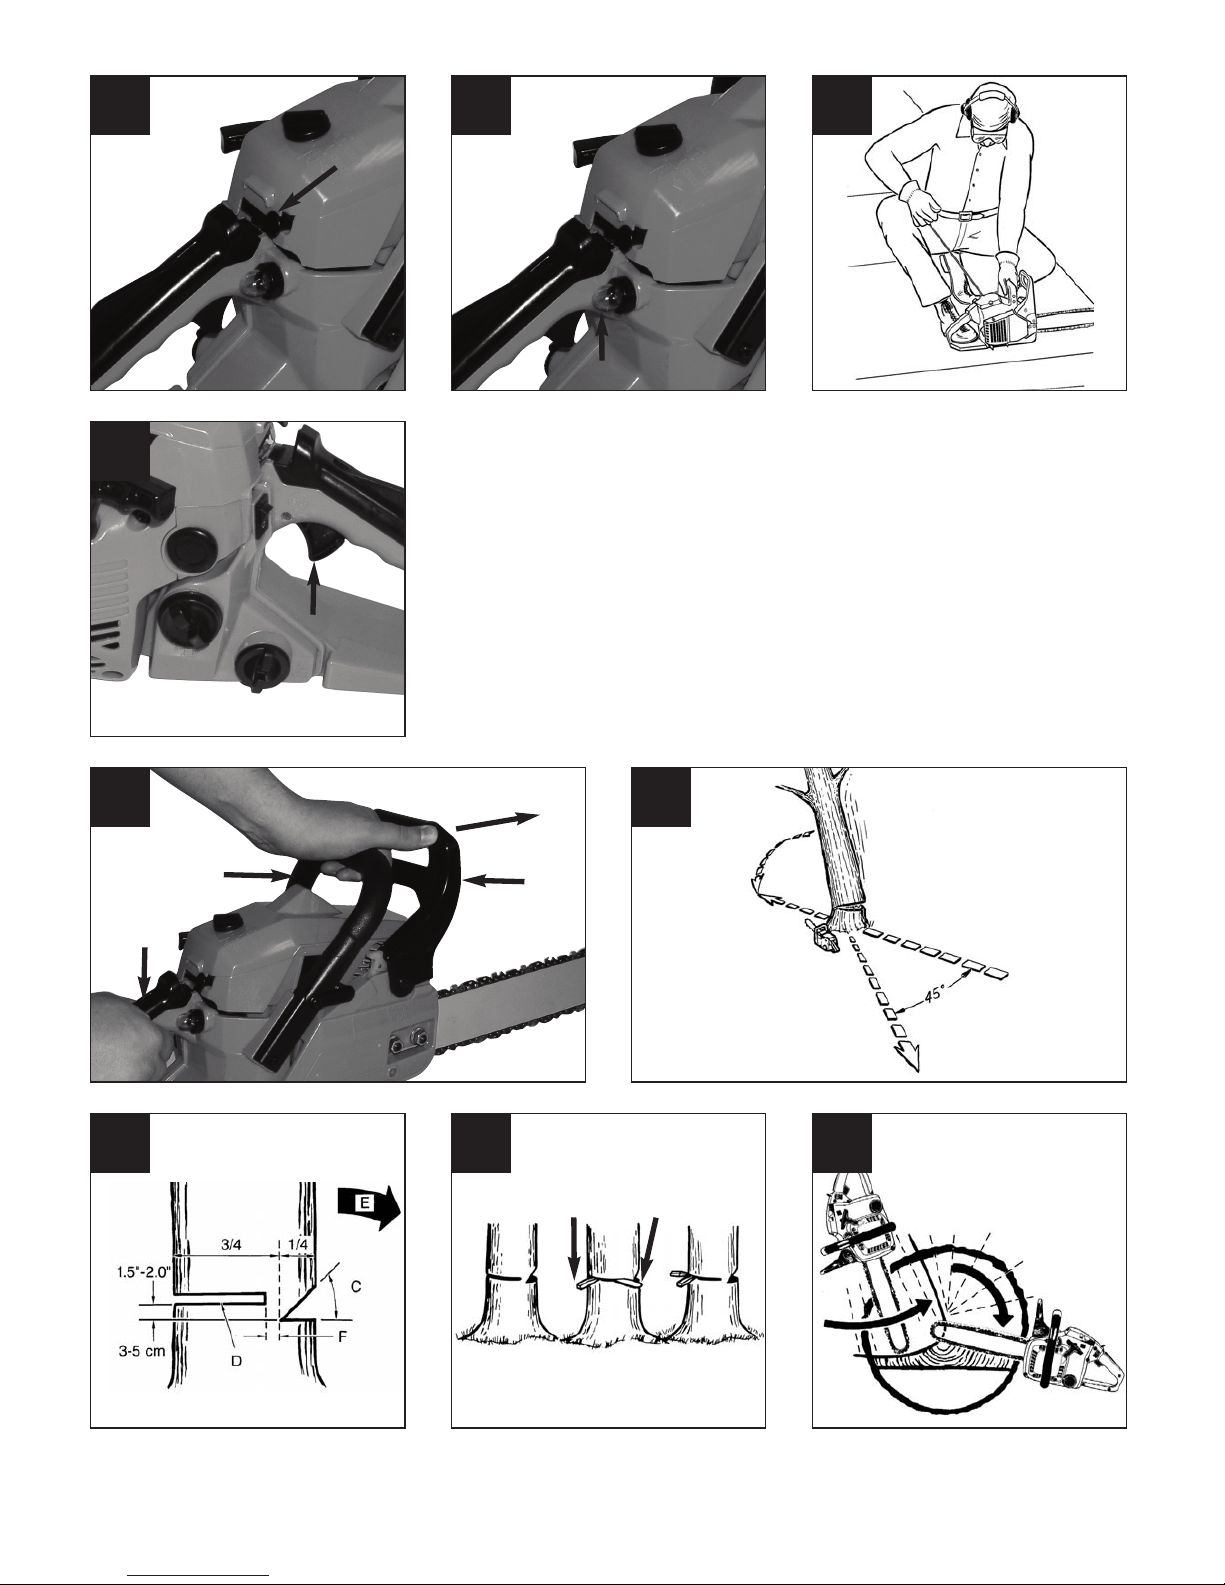
1. Set the On/Off switch (A) to “On (I)” to start the
machine (Fig. 9A).
2. Pull out the throttle lever (B) (Fig. 9B) until it
locks.
3. Push the primer bulb (C) 10 times (Fig. 9C).
4. Place saw on a firm, flat surface. Hold saw firmly
as shown. Pull starter rapidly 2 times. Beware of
moving chain! (Fig.9D)
5. Push in the throttle lever (B) as far as it will go
(Fig. 9B).
6. Hold saw firmly and pull starter rapidly 4 times.
Engine should start (Fig. 9D).
7. Let the engine run for 10 seconds to warm up.
Press the throttle lever (D) briefly, the engine will
go to “idling” speed (Fig. 9E).
If engine failed to start, repeat these instructions.
Important: Always pull the starter cable slowly
until you feel the initial resistance before you then pull
it quickly to start the engine. Do not allow the starter
cable to whip back of its own accord.
7.2 Restarting a warm engine
1. Make sure the switch is in the ON position.
2. Pull the starter rope rapidly 6 times. The engine
should start.
7.3 To stop engine
1. Release trigger and allow engine to return to idle
speed.
2. Move STOP switch down to stop engine.
Note: To stop the engine in an emergency, activate
the chain brake and switch the ON/OFF switch to
“Stop (0)”.
7.4 General cutting instructions
IMPORTANT: Felling trees is prohibited without
the necessary training!
Felling
Felling is the term for cutting down a tree. Small trees
up to 6-7 inches (15-18cm) in diameter are usually cut
in a single cut. Larger trees require notch cuts. Notch
cuts determine the direction the tree will fall.
Warning: A retreat path (A) should be planned
and cleared as necessary before cuts are started.
The retreat path should extend back and diagonally to
the rear of the expected line of fall, as illustrated in
Fig. 11.
Warning: If felling a tree on sloping ground, the
chain saw operator should keep on the uphill side of
the terrain, as the tree is likely to roll or slide downhill
after it is felled.
Fuel and Oil Mix 50:1 Oil Only
Page 15

15
Helpline No: UK 0151 649 1500 / IRE 189 094 6244
NOTE: Direction of fall (B) is controlled by the
notching cut. Before any cuts are made, consider the
location of larger branches and natural lean of the
tree to determine the way the tree will fall (Fig. 11).
Warning: Do not cut down a tree during high or
changing winds or if there is a danger to property.
Consult a tree professional. Do not cut down a tree if
there is a danger of striking utility wires; notify the
utility company before making any cuts.
General guidelines for felling trees (Fig. 12)
Normally felling consists of 2 main cutting operations,
notching (C) and making the felling cut (D).
Start making the upper notch cut (C) on the side of
the tree facing the felling direction (E). Be sure you
don t make the lower cut too deep into the trunk.
The notch (C) should be deep enough to create a
hinge (F) of sufficient width and strength. The notch
should be wide enough to direct the fall of the tree for
as long as possible.
Warning: Never walk in front of a tree that has
been notched. Make the felling cut (D) from the other
side of the tree and 1.5 - 2.0 inches (3-5 cm) above
the edge of the notch (C).
Never saw completely through the trunk. Always
leave a hinge. The hinge guides the tree. If the trunk
is completely cut through, control over the felling
direction is lost.
Insert a wedge or felling lever in the cut well before
the tree becomes unstable and starts to move. This
will prevent the guidebar from binding in the felling cut
if you have misjudged the falling direction. Make sure
no bystanders have entered the range of the falling
tree before you push it over.
Warning: Before making the final cut, always
recheck the area for bystanders, animals or
obstacles.
Felling cut
1. Use wooden or plastic wedges (A) to prevent
binding the bar or chain (B) in the cut. Wedges
also control felling (Fig. 13).
2. When diameter of wood being cut is greater than
the bar length, make 2 cuts as shown (Fig. 14).
Warning: As the felling cut gets close to the
hinge, the tree should begin to fall. When tree begins
to fall, remove saw from cut, stop engine, put chain
saw down, and leave area along retreat path (Fig.
11).
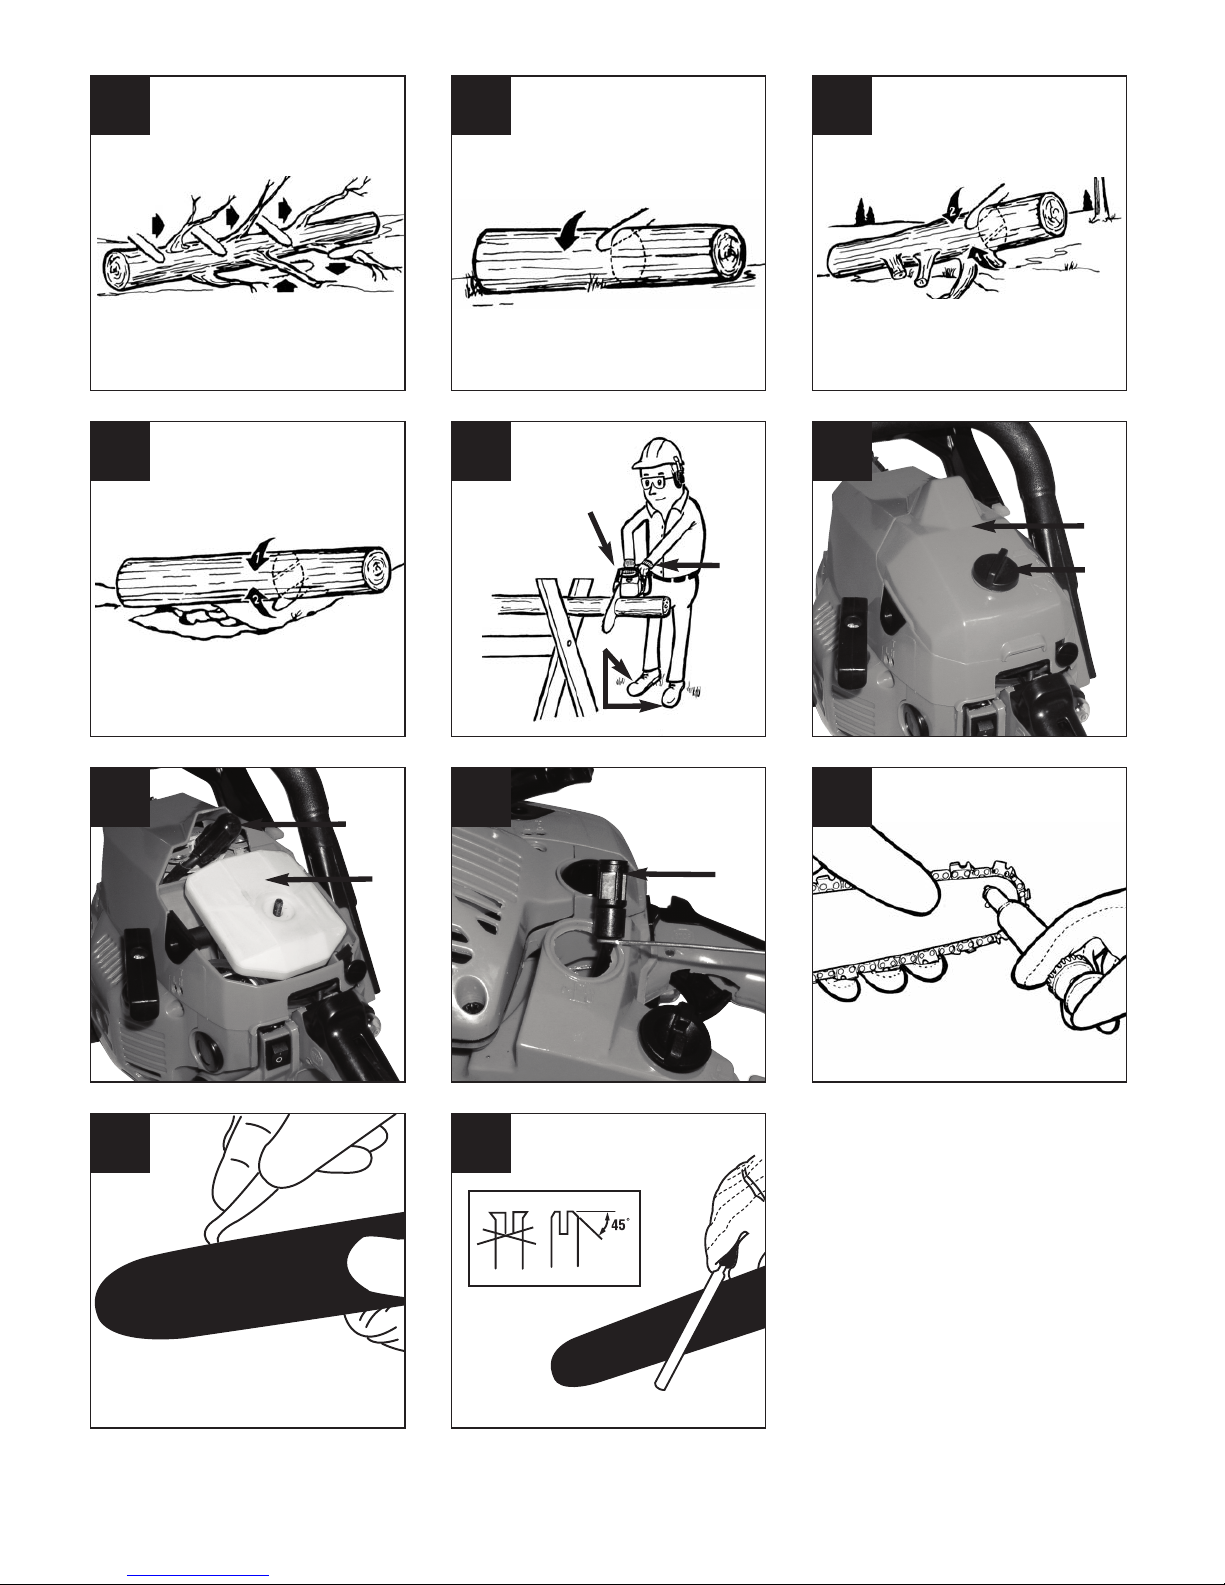
Limbing
Limbing a tree is the process of removing the
branches from a fallen tree. Do not remove
supporting limbs (A) until after the log is bucked (cut)
into lengths (Fig. 15). Branches under tension should
be cut from the bottom up to avoid binding the chain
saw.
Warning: Never cut tree limbs while standing on
tree trunk.
Bucking
Bucking is cutting a fallen log into lengths. Make sure
you have a good footing and stand uphill of the log
when cutting on sloping ground. If possible, the log
should be supported so that the end to be cut off is
not resting on the ground. If the log is supported at
both ends and you must cut in the middle, make a
downward cut halfway through the log and then make
the undercut. This will prevent the log from pinching
the bar and chain. Be careful that the chain does not
cut into the ground when bucking as this causes rapid
dulling of the chain. When bucking on a slope,
always stand on the uphill side.
1. Log supported along entire length: Cut from
top (overbuck), being careful to avoid cutting into
the ground (Fig. 16A).
2. Log supported on 1 end: First, cut from bottom
(underbuck) 1/3 diameter of log to avoid
splintering. Second, cut from above (overbuck) to
meet first cut and avoid pinching (Fig. 16B).
3. Log supported on both ends: First, overbuck
1/3 diameter of log to avoid splintering. Second,
underbuck to meet first cut and avoid pinching
(Fig. 16C).
Note: The best way to hold a log while bucking is to
use a sawhorse. When this is not possible, the log
should be raised and supported by the limb stumps or
by using supporting logs. Be sure the log being cut is
securely supported.
Bucking using a sawhorse (Fig. 17)
For personal safety and ease of cutting, the correct
position for vertical bucking is essential (Fig. 17).
A. Hold the saw firmly with both hands and keep the
saw to the right of your body while cutting.
B. Keep the left arm as straight as possible.
C. Keep weight on both feet.
Caution: When working with the saw, always
make sure that the saw chain and chain bar are
sufficiently lubricated.
Page 16

Page 17

17
Helpline No: UK 0151 649 1500 / IRE 189 094 6244
filter is damaged, dispose of it.
6. Insert a new filter. Place one end of the filter into
the tank opening. Make sure that the filter is
seated in the lower corner of the tank. If
necessary, use a long screwdriver to move the
filter to its correct position, taking care not to
damage in the process.
7. Fill tank with fresh fuel / oil mixture. See Section
Fuel and Lubrication. Install fuel cap.
9.4 Spark plug (Fig. 18B)
Warning: To ensure that the saw’s engine
retains its power, the spark plug must be clean and
have the correct electrode gap (0.6 mm). The spark
plug must be cleaned or replaced after every 20
hours of service.
1. Set the On/Off switch to Stop (0)”.
2. Remove the top cover (A) by undoing the cover
fastening screw (B) on the cover. You can then
remove the cover (Fig. 18A).
3. Disconnect the ignition cable (D) from the spark
plug by pulling and twisting it simultaneously (Fig.
18B).
4. Remove the spark plug using a spark plug
wrench. DO NOT USE ANY OTHER TOOLS.
5. Clean the spark plug with a copper wire brush or
fit a new one.
9.5 Carburetor setting
The carburetor has been set to its perfect adjustment
at the factory. If it requires adjusting, take the saw to
your nearest authorized after-sales service outlet.
9.6 Chain bar maintenance
Regular lubrication of the chain bar (guide rail for the
chain and teeth) is essential. The chain bar needs the
maintenance described in the following section in
order for the saw to work at an optimum level of
performance.
Caution: The sprocket tip on your new saw has
been pre-lubricated at the factory. Failure to lubricate
the guide bar sprocket tip as explained below will
result in poor performance and seizure, voiding the
manufacturer’s warranty.
Tools for lubrication
The Lube Gun is recommended for applying grease
to the guide bar sprocket tip. The Lube Gun is
equipped with a needle nose tip which is necessary
for the efficient application of grease to the sprocket
tip.
To lubricate sprocket tip
Lubrication of the sprocket tip is recommended after
10 hours of use or once a week, which ever occurs
first. Always thoroughly clean guide bar sprocket tip
before lubrication.
Note: The saw chain does not have to be removed in
order to lubricate the teeth of the chain bar.
Lubrication is possible during work, with the engine
switched off.
Warning: Wear heavy duty work gloves when
handling the bar and chain.
1. Set the On/Off switch to Stop (0)”.
2. Clean the guide bar sprocket tip.
3. Using the Lube Gun (optional), insert needle nose
into the lubrication hole and inject grease until it
appears at outside edge of sprocket tip (Fig .20).
4. Rotate saw chain by hand. Repeat lubrication
procedure until the entire sprocket tip has been
greased.
Most guide bar problems can be prevented merely by
keeping the chain saw well maintained.
Insufficient guide bar lubrication and operating the
saw with chain that is TOO TIGHT will contribute to
rapid bar wear.
To help minimize bar wear, the following guide bar
maintenance procedures are recommended.
Warning: Always wear protective gloves during
maintenance operations. Do not carry out
maintenance when the engine is hot.
Turning the chain bar
The bar should be reversed every 8 working hours to
ensure uniform wear.
Keep the bar groove and lubrication hole clean using
the bar groove cleaner supplied optional. (Fig. 21A)
Check the bar rails frequently for wear and, if
necessary, remove the burs and square-up the rails
using the flat file. (Fig. 21B)
Warning: Never fit a new chain to a worn chain
bar.
Oil passages
Oil passages on the bar should be cleaned to ensure
proper lubrication of the bar and chain during
operation.
Note: The condition of the oil passages can be easily
checked. If the passages are clear, the chain will
automatically give off a spray of oil within seconds of
starting the saw. Your saw is equipped with an
automatic oiler system.
Automatic chain lubrication.
The chain saw is equipped with an automatic oil
Page 18

lubrication system with a toothed wheel drive. It
automatically supplies the bar and the chain with the
right quantity of oil. The moment the engine is
accelerated, the oil also starts to flow through the bar
plate more quickly as well.
The chain lubrication system has been set to its
perfect adjustment at the factory. If it requires
adjusting, take the saw to your nearest authorized
after-sales service outlet.
A setting screw for adjusting the chain lubrication
(Fig. 26/ Item A) is located on the underside of the
chain saw. Turning the screw counter-clockwise
increases the chain lubrication, turning it clockwise
decreases the chain lubrication.
To check the chain lubrication, hold the chain saw,
with the chain, over a piece of paper and run it at full
speed for a few seconds. You will be able to judge
the set amount of oil from the paper.
9.7 Chain maintenance
Chain sharpening
Chain sharpening requires special tools to ensure
that cutters are sharpened at the correct angle and
depth. For the inexperienced chain saw user, we
recommend that the saw chain be professionally
sharpened by the nearest professional Service
Center. If you feel comfortable sharpening your own
saw chain, special tools are available from the
professional Service Center.
Chain sharpening (Fig. 23)
Sharpen the chain using protective gloves and a
round file of ø3/16” (4.8mm).
Always sharpen the cutters only with outward strokes
(Fig. 23) observing the values given in Fig. 22.
After sharpening, the cutting links must all have the
same width and length.
Warning: A sharp chain produces well-defined
chips. When your chain starts to produce sawdust, it
is time to sharpen.
After the blades have been sharpened 3-4 times,
check the height of the depth limiter and if necessary
lower it with a flat file and then round off the front
corner (Fig. 24).
Chain tension
Check the chain tension frequently and adjust as
often as necessary to keep the chain snug on the bar,
but loose enough to be pulled around by hand. (see
also point 5.3)
Breaking in a new saw chain
A new chain and bar will need chain readjustment
after as few as 5 cuts. This is normal during the
break-in period, and the interval between future
adjustments will begin to lengthen quickly.
Warning: Never have more than 3 links removed
from a loop of chain. This could cause damage to the
sprocket.
Chain lubrication
Always make sure the automatic oiler system is
working properly. Keep the oil tank filled with Chain,
Bar and Sprocket Oil.
Adequate lubrication of the bar and chain during
cutting operations is essential to minimize friction with
the guide bar.
Never starve the bar and chain of lubricating oil.
Running the saw dry or with too little oil will decrease
cutting efficiency, shorten saw chain life, cause
rapid dulling of chain, and lead to excessive wear of
bar from overheating. Too little oil is evidenced by
smoke or bar discoloration.
10. Storage
Caution: Never put a chain saw into storage for
longer than 30 days without carrying out the following
steps.
Storing a chain saw
Storing a chain saw for longer than 30 days requires
storage maintenance. Unless the storage instructions
are followed, fuel remaining in the carburetor will
evaporate, leaving gum-like deposits. This could lead
to difficult starting and result in costly repairs.
1. Remove the fuel tank cap slowly to release any
pressure in tank. Carefully drain the fuel tank.
2. Start the engine and let it run until the unit stops
to remove fuel from carburetor.
3. Allow the engine to cool (approx. 5 minutes).
4. Remove the spark plug (9.4).
5. Pour 1 teaspoon of clean 2-cycle oil into the
combustion chamber. Pull starter rope slowly
several times to coat internal components.
Replace spark plug (Fig. 25).
Note: Store the unit in a dry place and away from
possible sources of ignition such as a furnace, gas
hot water heater, gas dryer, etc.
18
Helpline No: UK 0151 649 1500 / IRE 189 094 6244
Page 19

Puttig the saw back into operation
1. Remove spark plug (see also point 9.4).
2. Pull starter rope briskly to clear excess oil from
combustion chamber.
3. Clean the spark plug and check that the electrode
gap is correct.
4. Prepare unit for operation.
5. Fill fuel tank with proper fuel / oil mixture. See
Fuel and Lubrication Section.
11. Waste disposal
The equipment and its accessories are made of
various types of material, such as metal and plastic.
Defective components must be disposed of as
special waste. Ask your dealer or your local council.
12. Ordering replacement parts
Please quote the following data when ordering
replacement parts:
Type of machine
Article number of the machine
Identification number of the machine
Replacement part number of the part required
For our latest prices and information please go to
www.isc-gmbh.info
Helpline Numbers:
UK: 0151 649 1500
IRE: 189 094 6244
19
Helpline No: UK 0151 649 1500 / IRE 189 094 6244
Page 20

20
Helpline No: UK 0151 649 1500 / IRE 189 094 6244
13. Troubleshooting
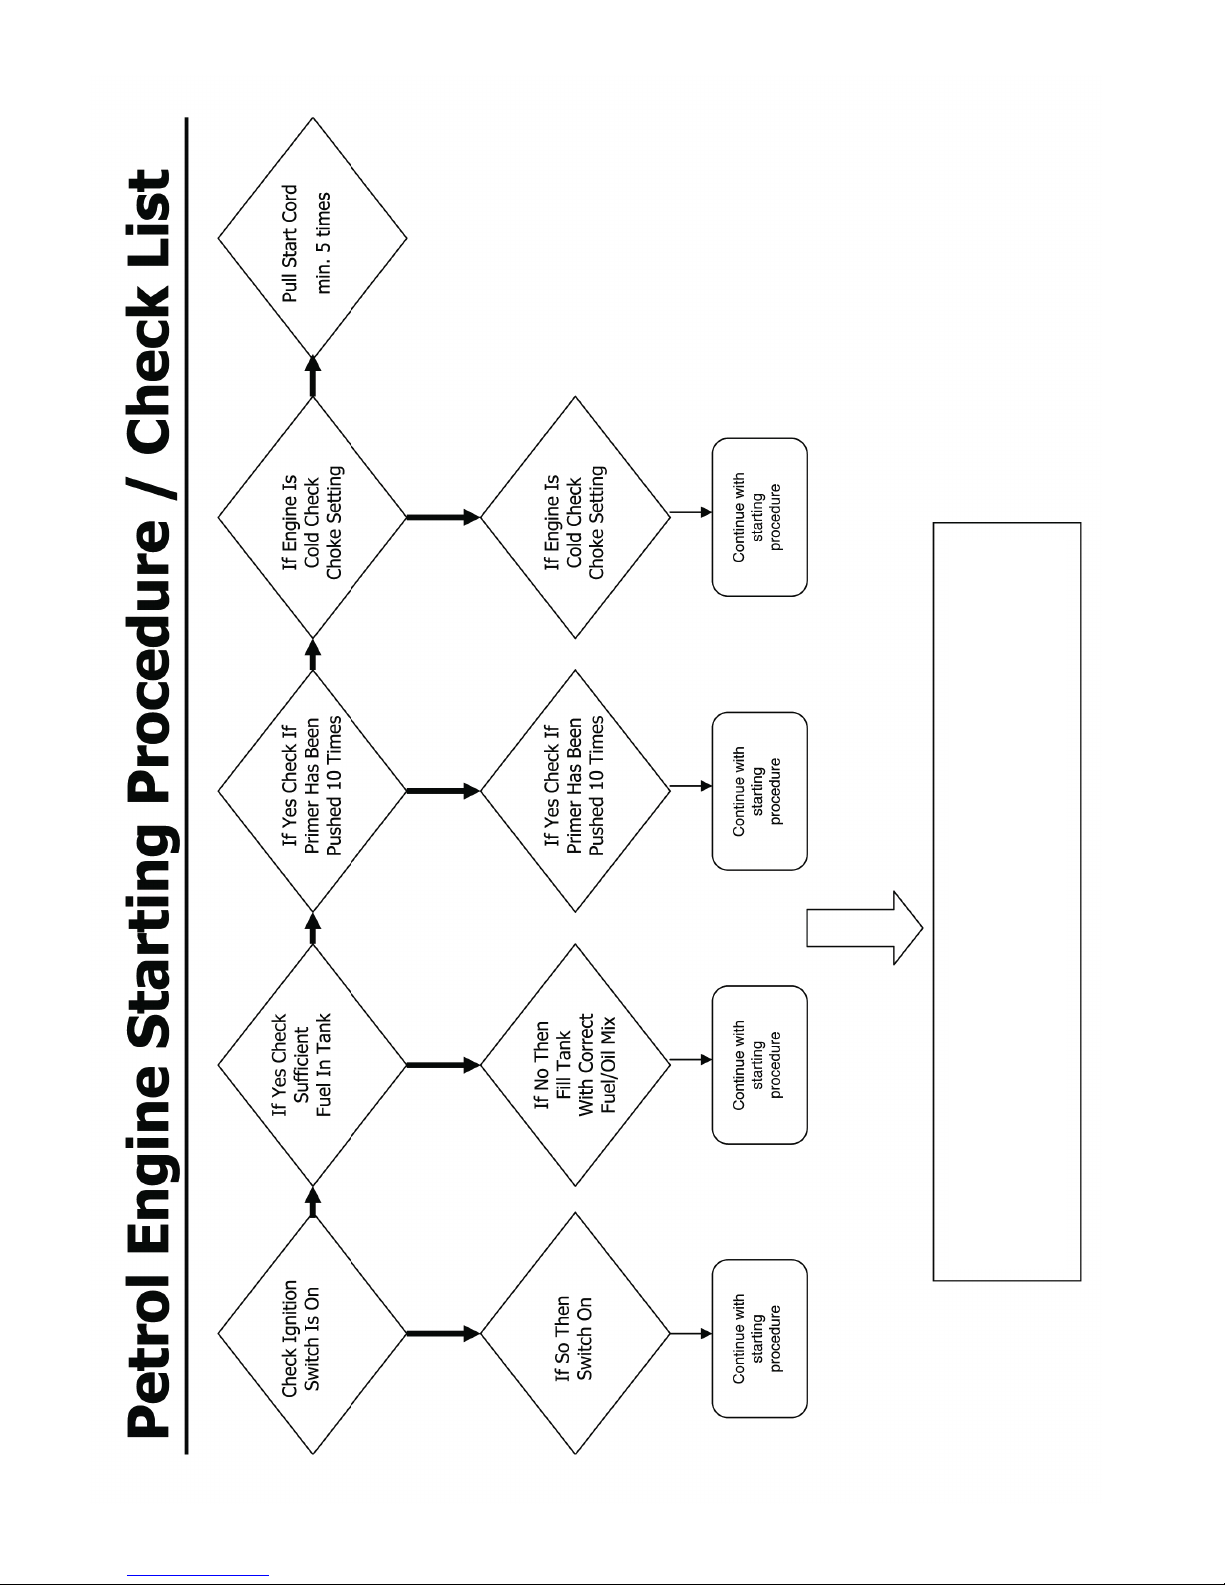
Problem Probable cause Corrective Action
Unit wonʼt start or starts but will not
run.
Incorrect starting procedures. Follow instructions in the User
Manual.
Incorrect carburetor mixture
adjustment setting.
Have carburetor adjusted by an
Authorized Service Center.
Fouled spark plug. Clean / gap or replace plug.
Fuel filter plugged. Replace fuel filter.
Chain brake is on. Put Chain brake in off position.
Unit starts, but engine has low
power.
Incorrect lever position on choke. Move to RUN position.
Dirty air filter. Remove, clean and reinstall filter.
Incorrect carburetor mixture
adjustment setting.
Have carburetor adjusted by an
Authorized Service Center.
Engine hesitates. Incorrect carburetor mixture
adjustment setting.
Have carburetor adjusted by an
Authorized Service Center.
No power under load. Incorrectly gapped spark plug. Clean / gap or replace plug.
Runs erratically. Incorrect carburetor mixture
adjustment setting.
Have carburetor adjusted by an
Authorized Service Center.
Smokes excessively. Incorrect fuel mixture. Use properly mixed fuel (50:1
mixture).
Poor performance when operated Blunt chain
Loose chain
Sharpen or replace the chain
Tension the chain
Engine dies Empty petrol tank
Fuel filter in the wrong position in
the tank
Fill up the petrol tank
Completely fill the petrol tank or or
re-position the fuel filter in the
petrol tank
Insufficient chain lubrication
(the cutter rail and chain get hot)
Empty oil tank for the chain
Oil lubrication openings moved
Top up the oil tank for the chain
Clean the oil lubrication hole in the
cutter bar (Fig. 2/Item A)
Clean the groove in the cutter bar
Page 21
21
Helpline No: UK 0151 649 1500 / IRE 189 094 6244
If after trying all of the above procedures please
call the help line for further assistance
Page 22
22
Helpline No: UK 0151 649 1500 / IRE 189 094 6244
k
erklärt folgende Konformität gemäß EU-Richtlinie
und Normen für Artikel
t
declares conformity with the EU Directive
and standards marked below for the article
p
déclare la conformité suivante selon la
directive CE et les normes concernant lʼarticle
verklaart de volgende conformiteit in overeenstemming met de EU-richtlijn en normen voor
het artikel
m
declara la siguiente conformidad a tenor de la
directiva y normas de la UE para el artículo
O
declara a seguinte conformidade de acordo
com a directiva CE e normas para o artigo
U
förklarar följande överensstämmelse enl. EUdirektiv och standarder för artikeln
q
ilmoittaa seuraavaa Euroopan unionin direktiivien ja normien mukaista yhdenmukaisuutta
tuotteelle
erklærer herved følgende samsvar med EUdirektiv og standarder for artikkel
T
заявляет о соответствии товара
следующим директивам и нормам EC
B
izjavljuje sljedeću uskladjenost s odredbama i
normama EU za artikl.
Q
declarå urmåtoarea conformitate cu linia directoare CE μi normele valabile pentru articolul.
Z
ürün ile ilgili olarak AB Yönetmelikleri ve
Normlar∂ gere©ince aμa©∂daki uygunluk aç∂kla
mas∂n∂ sunar.
z
‰ЛПТУВИ ЩЛУ ·ОfiПФ˘ıЛ Ы˘МКˆУ›· Ы‡МКˆУ· МВ
ЩЛУ √‰ЛБ›· ∂∂ О·И Щ· ЪfiЩ˘Ф БИ· ЩФ ЪФ˚fiУ
C dichiara la seguente conformità secondo la
direttiva UE e le norme per lʼarticolo
l
attesterer følgende overensstemmelse i
henhold til EU-direktiv og standarder for produkt
j
prohlašuje následující shodu podle směrnice
EU a norem pro výrobek.
A
a következő konformitást jelenti ki a termékekre vonatkozó EU-irányvonalak és normák szerint
X
pojasnjuje sledečo skladnost po smernici EU
in normah za artikel.
deklaruje zgodność wymienionego poniżej
artykułu z następującymi normami na
podstawie dyrektywy WE.
W
vydáva nasledujúce prehlásenie o zhode podľa
smernice EÚ a noriem pre výrobok.
e
деклаpиpа следното съответствие съгласно
диpективите и ноpмите на ЕС за пpодукта.
1
заявляє про відповідність згідно з Директивою
ЄС та стандартами, чинними для даного товару
.
deklareerib vastavuse järgnevatele EL direktiivi
dele ja normidele
G
deklaruoja atitikti pagal ES direktyvas ir normas
straipsniui
4
izjavljuje sledeçi konformitet u skladu s odred
bom EZ i normama za artikl
H
Atbilstības sertifikāts apliecina zemāk minēto preču
atbilstību ES direktīvām un standartiem
E
Samræmisyfirl‡sing sta›festir eftirfarandi samræmi
samkvæmt reglum Evfrópubandalagsins og stö›lum
fyrir vörur
Konformitätserklärung
ISC-GmbH · Eschenstraße 6 · D-94405 Landau/Isar
Petrol Chain Saw SPJCS 3740
Art.-Nr.: 45.013.61 I.-Nr.: 01017 Archivierung: 4501360-28-4155050-07
Subject to change without notice
98/37/EC
2006/95/EC
97/23/EC
89/336/EWG_93/68/EEC
90/396/EEC
89/686/EEC
87/404/EEC
R&TTED 1999/5/EC
2000/14/EC:
95/54/EC:
97/68/EC:
X
X
X
X
EN ISO 11681-1; EN 55012; KBV V;
Intertek Deutschland GmbH, Nikolaus-Otto-Str. 13, 70771 Leinfelden Echterdingen
07SHW2983-02
LWM= 110 dB; LWA= 114 dB
P = 1,2 kW
Landau/Isar, den 08.10.2007
Frank
Product-Management
Weichselgartner
General-Manager
e11*97/68SA*2004/26*0747*01
Page 23

23
Helpline No: UK 0151 649 1500 / IRE 189 094 6244
GUARANTEE CERTIFICATE
Dear Customer,
All of our products undergo strict quality checks to ensure that they reach you in perfect condition. In the
unlikely event that your device develops a fault, please contact our service department at the address
shown on this guarantee card. Of course, if you would prefer to call us then we are also happy to offer our
assistance under the service number printed below. Please note the following terms under which guarantee
claims can be made:
1. These guarantee terms cover additional guarantee rights and do not affect your statutory warranty
rights. We do not charge you for this guarantee.
2. Our guarantee only covers problems caused by material or manufacturing defects, and it is restricted to
the rectification of these defects or replacement of the device. Please note that our devices have not
been designed for use in commercial, trade or industrial applications. Consequently, the guarantee is
invalidated if the equipment is used in commercial, trade or industrial applications or for other
equivalent activities. The following are also excluded from our guarantee: compensation for transport
damage, damage caused by failure to comply with the installation/assembly instructions or damage
caused by unprofessional installation, failure to comply with the operating instructions (e.g. connection
to the wrong mains voltage or current type), misuse or inappropriate use (such as overloading of the
device or use of non-approved tools or accessories), failure to comply with the maintenance and safety
regulations, ingress of foreign bodies into the device (e.g. sand, stones or dust), effects of force or
external influences (e.g. damage caused by the device being dropped) and normal wear resulting from
proper operation of the device.
The guarantee is rendered null and void if any attempt is made to tamper with the device.
3. The guarantee is valid for a period of 2 years starting from the purchase date of the device. Guarantee
claims should be submitted before the end of the guarantee period within two weeks of the defect being
noticed. No guarantee claims will be accepted after the end of the guarantee period. The original
guarantee period remains applicable to the device even if repairs are carried out or parts are replaced.
In such cases, the work performed or parts fitted will not result in an extension of the guarantee period,
and no new guarantee will become active for the work performed or parts fitted. This also applies when
an on-site service is used.
Of course, we are also happy offer a chargeable repair service for any defects which are not covered by
the scope of this guarantee or for units which are no longer covered. To take advantage of this service,
please send the device to our service address.
Page 24

The reprinting or reproduction by any other means, in whole or in part,
of documentation and papers accompanying products is permitted only
with the express consent of ISC GmbH.
Technical changes subject to change
EH 11/2007
Argos Ltd
489-499 Avebury Boulevard
Saxon Gate West
Central Milton Keynes
MK9 2NW
Helpline Numbers:
UK: 0151 649 1500
IRE: 189 094 6244
Einhell UK Ltd
Unit 5 Morpeth Wharf
Twelve Quays
Birkenhead, Wirral
CH41 1LF
Tel. 0151 6491500, Fax 0151 6491501
 Loading...