

Page 1
ORIGINAL
INSTRUCTION
MANUAL
36V
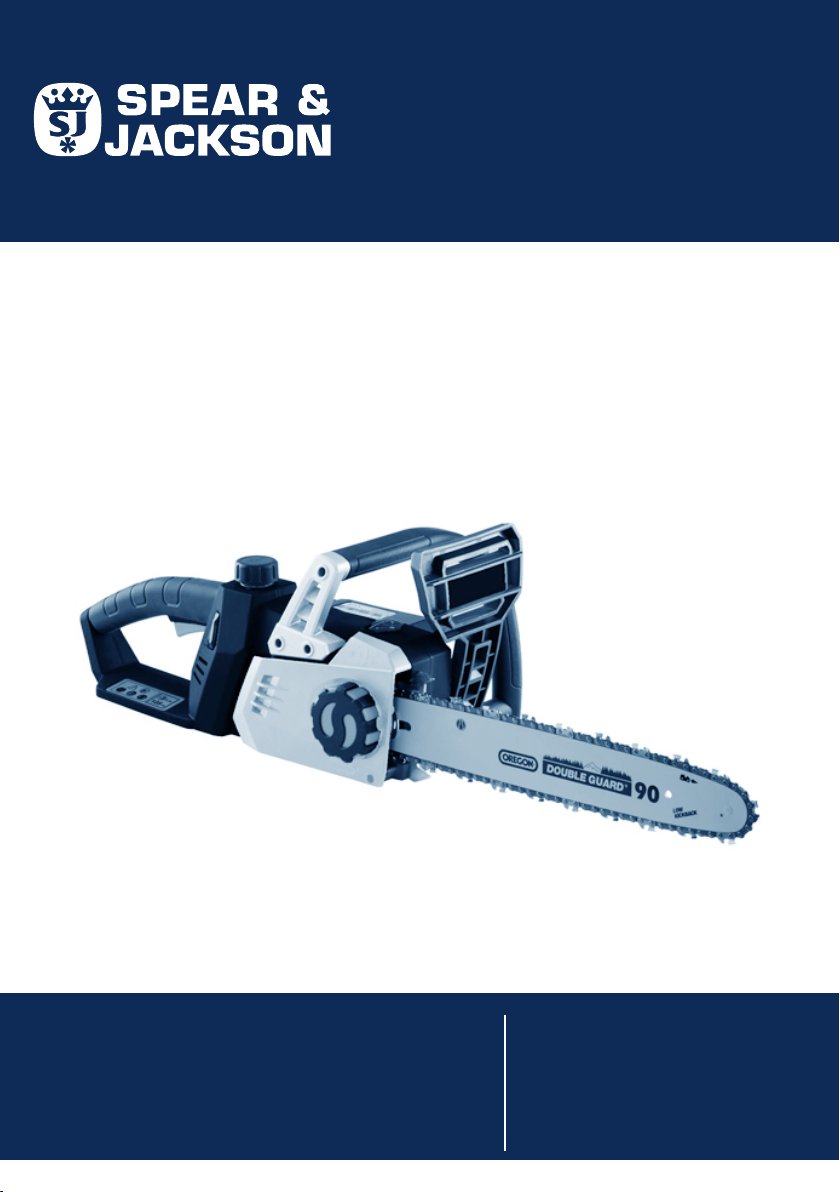
Cordless Chainsaw
S3635CC
Important - Please read these instructions
fully before starting assembly
These instructions contain important information that will help
you get the best from your chainsaw, ensuring it is assembled correctly
and safely. If you need help or have damaged or missing parts,
call the Customer Helpline on 0345 605 2067
AFTER SALES SUPPORT
0345 605 2067
SAN NO.: 0321/8019/70ZA
Page 2

SPEAR & JACKSON SINCE 1760
For more than 250 years gardeners have enjoyed high quality performance and
great results using Spear & Jackson tools.
Our garden power tools combine continuous innovation and the latest in
manufacturing technologies with a proud heritage.
Each product is carefully designed with performance, comfort and durability
rmly in mind, which has earned Spear & Jackson an enviable reputation as a
maker of tools to trust.
3 YEAR GUARANTEE
As a testament to the quality of our products, we offer a 3 year manufacturers warranty and a comprehensive after sales service.
The warranty covers manufacturing faults, however in the event that the item has
been deliberately damaged, used in a commercial environment or disassembled then
the warranty will be null and void.
Please retain proof of purchase.
7 DAYS A WEEK TECHNICAL SUPPORT
We want you to get the best out of our products. Our easy-to-read instruction manual
guides you with best practice use and maintenance tips. Please call 0345 605 2067
for technical support, we can solve around 80% of questions directly over the phone.
We hope you enjoy your product and we look forward to any feedback, as this allows
us to develop even better products in the future.
CONTENTS
Safety Information 04
Description of symbols 04
Warning symbols on the charger 05
Warning symbols on the battery pack 05
General safety 06
Additional safety instructions for batteries and chargers 10
Chain saw safety warnings 14
Intended use 18
Box Contents / Parts 19
Assembly 20
Unpacking 20
Checking the chain tension 20
Filling oil tank 21
Installing or removing battery pack 22
Checking battery capacity 23
Charging the battery pack 23
Operation 25
Maintenance 32
Disposal 39
Troubleshooting 40
Technical Data 41
Warranty 43
2 3AFTER SALES SUPPORT 0345 605 2067 AFTER SALES SUPPORT 0345 605 2067
Page 3
SAFETY INFORMATION SAFETY INFORMATION
Please read these instructions fully before operating or maintaining your machine Please read these instructions fully before operating or maintaining your machine
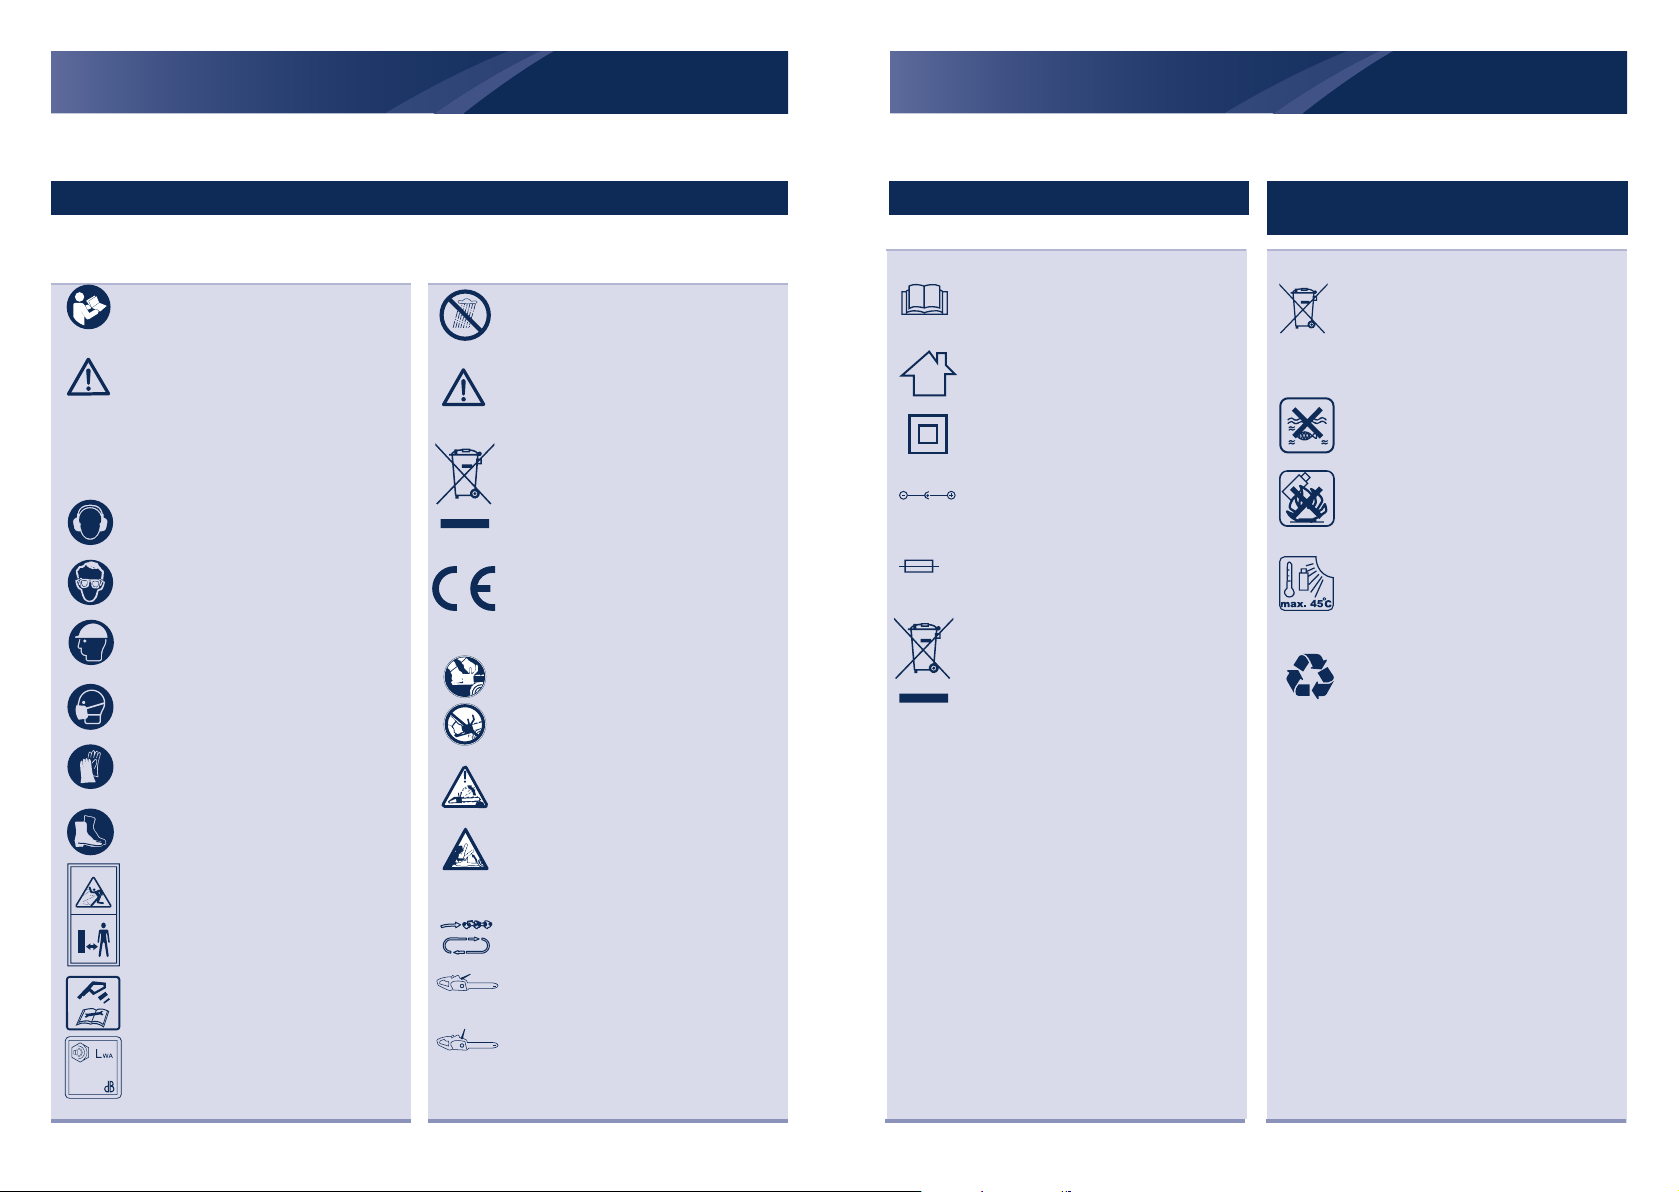
DESCRIPTION OF SYMBOLS
The following warning symbols appear throughout
safety measures you should take when operating and maintaining the chainsaw.
Please read the instruction handbook
before operating this machine.
WARNING!
This is a warning symbol. This
symbol is used throughout the user
guide whenever there is a risk of
personal injury. Ensure that these
warnings are read and understood at
all times.
Wear ear protection
Wear eye protection
Wear safety helmet
Wear protect mask
Wear protective gloves
this manual and indicate the appropriate
Do not expose or operate the tool in
rain.
DANGER! Beware of kickback.
Waste electrical products should not
be disposed of with household waste.
Please recycle where facilities exist.
Check your Local Authority or retailer
for recycling advice.
The product complies with the
applicable European directives and an
evaluation method of conformity for
these directives was done.
Always use two hands when
operating the product.
Contact of the guide bar tip with any
object should be avoided.
WARNING SYMBOLS ON THE CHARGER
Read instruction handbook before
operating this machine.
The charger is for indoor use only.
Double insulation.
Pole orientation.
T/5A
Fuse 5A
Waste electrical products should not
be disposed of with household waste.
Please recycle where facilities exist.
Check your Local Authority or retailer
for recycling advice.
WARNING SYMBOLS ON THE BATTERY
PACK
Batteries contain Li-ion, waste
batteries should be sorted for ecofriendly. Do not dispose of waste
li-ion
batteries as unsorted municipal
waste.
Do not throw in water.
Do not throw on fire.
Do not subject the battery to strong
sunlight over long periods and do not
leave it on a heater (max.45oC).
Do not dispose of batteries. Return
exhausted batteries to your local
collection or recycling point.
Wear proper safety shoes
Keep bystanders away.
Thrown objects can cause serious
injury
Disconnect the battery pack before
any repair or maintenance.
Guaranteed sound power level in
96dB.
96
4
Tip contact can cause the guide
bar to move suddenly upward and
backward which can cause serious
injury.
Rotation direction of chainsaw.
In this position the brake is engaged
and the chainsaw will not run or start.
In this position the brake is
disengaged and the chainsaw will
start to operate.
5AFTER SALES SUPPORT 0345 605 2067 AFTER SALES SUPPORT 0345 605 2067
Page 4

SAFETY INFORMATION SAFETY INFORMATION
Please read these instructions fully before operating or maintaining your machine
GENERAL SAFETY
create sparks which may
WARNING Read all
safety warnings and all
instructions. Failure to
follow the warnings and
instructions may result in
electric shock, fire and/or
ignite the dust or fumes.
■
Keep children and
bystanders away while
operating a power tool.
Distractions can cause
you to lose control.
serious injury.
Save all warnings and
instructions for future
reference.
The term “power tool”
in the warnings refers
to your mains-operated
(corded) power tool
or battery-operated
(cordless) power tool.
Electrical safety
■
Power tool plugs must
match the outlet. Never
modify the plug in any
way. Do not use any
adapter plugs with
earthed (grounded) power
tools. Unmodified plugs
and matching outlets will
reduce the risk of electric
Work area safety
■
Keep work area clean and
well lit.
Cluttered or dark areas
invite accidents.
■
Do not operate power
tools in explosive
atmospheres, such
as in the presence of
flammable liquids, gases
or dust. Power tools
shocks.
■
Avoid body contact with
earthed or grounded
surfaces, such as pipes,
radiators, ranges and
refrigerators. There is an
increased risk of electric
shocks. If your body is
earthed or grounded.
■
Do not expose power
tools to rain or wet
Please read these instructions fully before operating or maintaining your machine
conditions. Water entering
a power tool will increase
the risk of electric shocks.
■
Do not abuse the cord.
Never use the cord
for carrying, pulling or
unplugging the power
tool. Keep cord away from
heat, oil, sharp edges or
moving parts.
Damaged or entangled
cords increase the risk of
electric shocks.
■
When operating a power
tool outdoors, use an
extension cord suitable for
outdoor use. When using
a cord suitable for outdoor
use, this will reduce the
risk of electric shocks.
inattention while operating
power tools may result in
serious personal injury.
■
Use personal protective
equipment. Always wear
eye protection. Protective
equipment such as dust
mask, non-skid safety
shoes, hard hat, or
hearing protection used
for appropriate conditions
will reduce personal
injuries.
■
Prevent unintentional
starting. Ensure the switch
is in the off-position before
connecting to a power
source and/or battery
pack, picking up or
carrying the tool. Carrying
power tools with your
Personal safety
■
Stay alert, watch what
you are doing and use
common sense when
operating a power tool.
Do not use a power
tool while you are tired
or under the influence
of drugs, alcohol or
finger on the switch or
energy sing power tools
that have the switch on
invites accidents.
■
Remove any adjusting
key or wrench before
turning the power tool
on. A wrench or a key
left attached to a rotating
medication. A moment of
6 7AFTER SALES SUPPORT 0345 605 2067 AFTER SALES SUPPORT 0345 605 2067
Page 5

SAFETY INFORMATION
Please read these instructions fully before operating or maintaining your machine Please read these instructions fully before operating or maintaining your machine
SAFETY INFORMATION
part of the power tool may
result in personal injury.
■
Do not overreach. Keep
proper footing and
balance at all times. This
enables better control
of the power tool in
unexpected situations
■
Dress properly. Do not
wear loose clothing or
jewellery. Keep your hair,
clothing and gloves away
from moving parts. Loose
clothes, jewellery or long
hair can be caught in
moving parts.
■
If devices are provided
for the connection of dust
extraction and collection
facilities, ensure these
are connected and
properly used. Use of
dust collection can reduce
dust-related hazards.
Power tool use and care
■
Do not force the power
tool. Use the correct
power tool for your
application.
The correct power tool will
do the job better and safer
at the rate for which it was
designed.
■
Do not use the power
tool if the switch does
not turn it on and off. Any
power tool that cannot be
controlled with the switch
is dangerous and must be
repaired.
■
Disconnect the plug from
the power source and/
or the battery pack from
the power tool before
making any adjustments,
changing accessories,
or storing power tools.
Such preventive safety
measures reduce the risk
of starting the power tool
accidentally.
■
Store idle power tools out
of the reach of children
and do not allow persons
unfamiliar with the power
tool or these instructions
to operate the power tool.
Power tools are
dangerous in the hands of
untrained users.
■
Maintain power tools.
Check for misalignment or
binding of moving parts,
breakage of parts and any
other condition that may
affect the power tool’s
operation. If damaged,
have the power tool
repaired before use. Many
accidents are caused by
poorly maintained power
tools.
■
Keep cutting tools sharp
and clean. Properly
maintained cutting tools
with sharp cutting edges
are less likely to bind and
are easier to control.
■
Use the power tool,
accessories and tool
bits etc. in accordance
with these instructions,
taking into account the
working conditions and
the work to be performed.
Use of the power tool for
operations different from
those intended, could
result in a hazardous
situation.
Battery tool use and care
■
Recharge only with the
charger specified by the
manufacturer. A charger
that is suitable for one type
of battery pack may create
a risk of fire when used
with another battery pack.
■
Use power tools only with
specifically designated
battery packs. Use of any
other battery packs may
create a risk of injury and
fire.
■
When a battery pack is not
in use, keep it away from
other metallic objects, like
paperclips, coins, keys,
nails, screws or other small
metallic objects, that can
make a connection from
one terminal to another.
Shorting the battery
terminals together may
cause burns or a fire.
■
Under abusive conditions,
liquid may be ejected from
the battery; avoid contact.
If contact accidentally
occurs, flush with water.
8 9AFTER SALES SUPPORT 0345 605 2067 AFTER SALES SUPPORT 0345 605 2067
Page 6

SAFETY INFORMATION SAFETY INFORMATION
Please read these instructions fully before operating or maintaining your machine
If liquid contacts eyes,
additionally seek medical
help. Liquid ejected from
ADDITIONAL SAFETY INSTRUCTIONS FOR BATTERIES AND
CHARGERS
the battery may cause
irritation or burns.
SAFETY WARNINGS FOR
Service
Have your power tool
serviced by a qualified
technician using only
identical replacement
parts. This will ensure that
the safety of the power
tool is maintained.
BATTERY PACK
WARNING! Read all
safety warnings and all
instructions. Failure to
follow the warnings and
instructions may result
in electric shocks, fire
and/or serious injury.
Save all warnings and
instructions for future
reference.
■
Do not dismantle, open or
shred cells or battery pack.
■
Do not short-circuit a
battery pack. Do not store
battery packs haphazardly
in a box or drawer where
they may short circuit each
other or be short-circuited
by conductive materials.
When the battery pack is
not in use, keep it away
from other metallic objects,
like paper clips, coins,
keys, nails, screws or other
Please read these instructions fully before operating or maintaining your machine
small metal objects, that
can make a connection
from one terminal to
another. Shorting the
battery terminals together
may cause burns or a fire.
■
Do not expose battery
packs to heat or fire. Avoid
storage in direct sunlight.
■
Do not subject battery
packs to mechanical
shock.
■
In the event of the battery
leaking, do not allow the
liquid to come into contact
with the skin or eyes. If
contact has been made,
wash the affected area
with copious amounts of
water and seek medical
advice.
■
Seek medical advice
immediately if a cell or
battery pack has been
swallowed.
■
Keep the battery pack
clean and dry.
■
Wipe the battery pack
terminals with a clean dry
cloth if become dirty.
■
Battery packs needs
to be charged before
use. Always refer to
this instruction and use
the correct charging
procedure.
■
Whilst the battery pack is
being charge, refrain from
any maintenance.
■
After extended periods
of storage, it may be
necessary to charge and
discharge the battery pack
several times to obtain
maximum performance.
■
Battery pack gives its best
performance when it is
operated at normal room
temperature (20 °C ± 5
°C).
■
When disposing of battery
packs, keep battery packs
of different electrochemical
systems separate from
each other.
■
Recharge only with the
charger specified by the
manufacturer. Do not
use any charger other
than that specifically
provided for use with the
10 11AFTER SALES SUPPORT 0345 605 2067 AFTER SALES SUPPORT 0345 605 2067
Page 7

SAFETY INFORMATION SAFETY INFORMATION
SAFETY INFORMATION SAFETY INFORMATION
Please read these instructions fully before operating or maintaining your machine
equipment. A charger that
is suitable for one type of
shock, fire and/or serious
injury.
battery pack may create a
risk of fire when used with
another battery pack.
■
Do not use any battery
pack which is not
designed for use with the
equipment.
■
Keep battery pack out of
the reach of children.
■
Retain the original product
literature for future
reference.
Save all warnings and
instructions for future
reference.
- This appliance is not
intended for use by
persons (including
children) with reduced
physical, sensory or
mental capabilities,
or lack of experience
and knowledge, unless
they have been given
■
Remove the battery from
the equipment when not in
use.
■
Dispose of the battery
properly.
supervision or instruction
concerning use of the
appliance by a person
responsible for their safety.
- Children should be
supervised to ensure that
they do not play with the
SAFETY WARNINGS FOR YOUR
appliance.
BATTERY CHARGER
Change to “Additional
WARNING! Read all
safety warnings and
Safety Instructions For
Your Battery And Charger”
all instructions. Failure
■
to follow the warnings
and instructions may
result in an electric
Before charging, read the
instructions.
■
After charging, disconnect
Please read these instructions fully before operating or maintaining your machinePlease read these instructions fully before operating or maintaining your machine
Please read these instructions fully before operating or maintaining your machine
the battery and charger
from the supply mains.
Then remove the chassis
connection and then the
battery connection.
■
Do not charge a leaking
battery.
■
Do not use chargers for
purposes in which they
are not designed for.
■
Before charging, ensure
your charger is matching
the local AC supply.
■
Do not charge the
batteries of other
manufactures or ill-suited
models.
■
Ensure that the connection
between the battery
charger and battery is
correctly positioned and is
not obstructed by foreign
bodies.
■
Ensure the slot for the
batter charger is clear and
unobstructed. Store in a
dry and frost-free place
■
Charge the battery indoors
and use only in dry
conditions.
■
The charging device
must be protected from
moisture.
■
Do not use the charging
device in the open.
■
Shorting the battery
terminals together may
cause burns or a fire.
■
Respect the polarity “+/-“
when charging.
■
Do not open the unit and
keep out of the reach of
children.
to protect against dirt and
humidity.
■
When charging batteries,
ensure that the battery
charger is in a wellventilated area and
away from inflammable
materials. Batteries can
get hot during charging”
to “Batteries can heat up
quickly whilst charging.
Ensure that batteries
and chargers are not
left unsupervised during
charging.
■
Do not recharge non-
rechargeable batteries,
12 13AFTER SALES SUPPORT 0345 605 2067 AFTER SALES SUPPORT 0345 605 2067
Page 8

SAFETY INFORMATION SAFETY INFORMATION
Please read these instructions fully before operating or maintaining your machine
as they can overheat and
break.
■
Longer life and better
performance can be
obtained if the battery pack
is charged when the air
temperature is between
18°C and 24°C. Do not
charge the battery pack
in air temperatures below
0°C, or above 45°C.This is
important as it can prevent
serious damage to the
battery pack.
■
Charge only the battery
pack of the same
model provided by the
manufacturer and those of
models recommended by
the manufacturer.
sure the chain saw is not
contacting anything.
A moment of inattention
while operating chain
saws may cause
entanglement of your
clothing or body with the
saw chain.
■
Always hold the chain
saw with your right hand
on the rear handle and
your left hand on the front
handle. Holding the chain
saw with a reversed hand
configuration increases the
risk of personal injury and
should never be done.
■
Wear safety glasses and
hearing protection. Further
protective equipment for
head, hands, legs and
feet is recommended.
CHAIN SAW SAFETY
WARNINGS
Adequate protective
clothing will reduce
personal injury by flying
debris or accidental
■
Keep all parts of the body
away from the saw chain
when the chain saw is
operating. Before you
start the chain saw, make
contact with the chain
saw.
■
Do not operate a chain
saw in a tree. Operation of
a chain saw while up in a
Please read these instructions fully before operating or maintaining your machine
tree may result in personal
injury.
■
Always keep proper
footing and operate the
chain saw only when
standing on a fixed,
secure and level surface.
Slippery or unstable
surfaces such as ladders
may cause a loss of
balance or control of the
chain saw.
■
When cutting a limb that
is under tension be alert
for spring back. When the
tension in the wood fibers
is released the spring
loaded limb may strike the
operator and/or throw the
chain saw out of control.
■
Use extreme caution
when cutting brush and
saplings. The slender
material may catch
the chain saw and be
whipped toward you or
pull you off balance.
■
Carry the chain saw by
the front handle with
the chain saw switched
off and away from your
body. When transporting
or storing the chain saw
always fit the guide bar
cover. Proper handling of
the chain saw will reduce
the likelihood of accidental
contact with the moving
chain saw.
■
Follow instructions
for lubricating, chain
tensioning and changing
accessories.
■
Improperly tensioned
or lubricated chain may
either break or increase
the chance for kickback.
■
Keep handles dry, clean,
and free from oil and
grease. Greasy, oily
handles are slippery
causing loss of control.
■
Cut wood only. Do
not use chain saw for
purposes not intended.
For example: do not use
chain saw for cutting
plastic, masonry or nonwood building materials.
Use of the chain saw for
14 15AFTER SALES SUPPORT 0345 605 2067 AFTER SALES SUPPORT 0345 605 2067
Page 9

SAFETY INFORMATION SAFETY INFORMATION
Please read these instructions fully before operating or maintaining your machine
operations different than
intended could result in a
hazardous situation.
steps to keep your cutting
jobs free from accident or
injury.
Kickback is the result of
CAUSES AND OPERATOR
PREVENTION OF KICKBACK:
tool misuse and/or incorrect
operating procedures or
conditions and can be
Kickback may occur when
the nose or tip of the guide
bar touches an object, or
when the wood closes in
and pinches the chain saw in
the cut.
avoided by taking proper
precautions as given below:
■
Do not overreach and do
not cut above shoulder
height. This helps prevent
unintended tip contact
Tip contact in some cases
may cause a sudden reverse
reaction, kicking the guide
bar up and back towards the
operator.
and enables better control
of the chain saw in
unexpected situations.
■
Only use replacement
bars and chains specified
Pinching the chain saw along
the top of the guide bar may
push the guide bar rapidly
back towards the operator.
Either of these reactions may
cause you to lose control of
the saw which could result
in serious personal injury.
Do not rely exclusively upon
the safety devices built into
your saw. As a chain saw
user, you should take several
by the manufacturer.
Incorrect replacement bars
and chains may cause
chain breakage and/or
kickback.
■
Follow the manufacturer’s
sharpening and
maintenance instructions
for the chain saw.
Decreasing the depth
gauge height can lead to
increased kickback.
Please read these instructions fully before operating or maintaining your machine
WARNING!
Residual risks
Even when the tool is used
as prescribed it is not
possible to eliminate all
residual risk factors. The
following hazards may arise
in connection with the tool’s
construction and design:
WARNING! This
machine produces
an electromagnetic
field during operation.
This field may under
some circumstances
interfere with active
or passive medical
implants. To reduce
the risk of serious
■ Damage to lungs if an
effective dust mask is not
worn.
■
Damage to hearing
if effective hearing
protection is not worn.
■
Health defects resulting
from vibration emission
if the appliance is being
or fatal injury, we
recommend persons
with medical implants
to consult their
physician and the
medical implant
manufacturer before
operating this
machine.
used over longer periods
of time or not adequately
managed and properly
maintained.
16 17AFTER SALES SUPPORT 0345 605 2067 AFTER SALES SUPPORT 0345 605 2067
Page 10
SAFETY INFORMATION
BOX CONTENTS
Please read these instructions fully before operating or maintaining your machine
INTENDED USE
conditions.
This cordless chainsaw
(hereinafter productor “
power tool”) is designed
for cutting wood only.The
product is not designed
for any other types of
application (e. g. cutting of
brickwork, plastic or food).
Observe all applicable
local safety regulations,
standards and ordinances.
The use of noise emitting
power tools may be
restricted to certain
times by national or local
regulations.
The product is to be used
by adults. Children under
the age of 16 may not
use the tool except under
supervision.
Any other use or
modification of the
product are considered
improper use and can
result in hazards such
as death, life-threatening
injuries and damage. The
manufacturer is not liable
for any damages caused
by improper use. The
product is not intended for
commercial use or for any
otheruse.
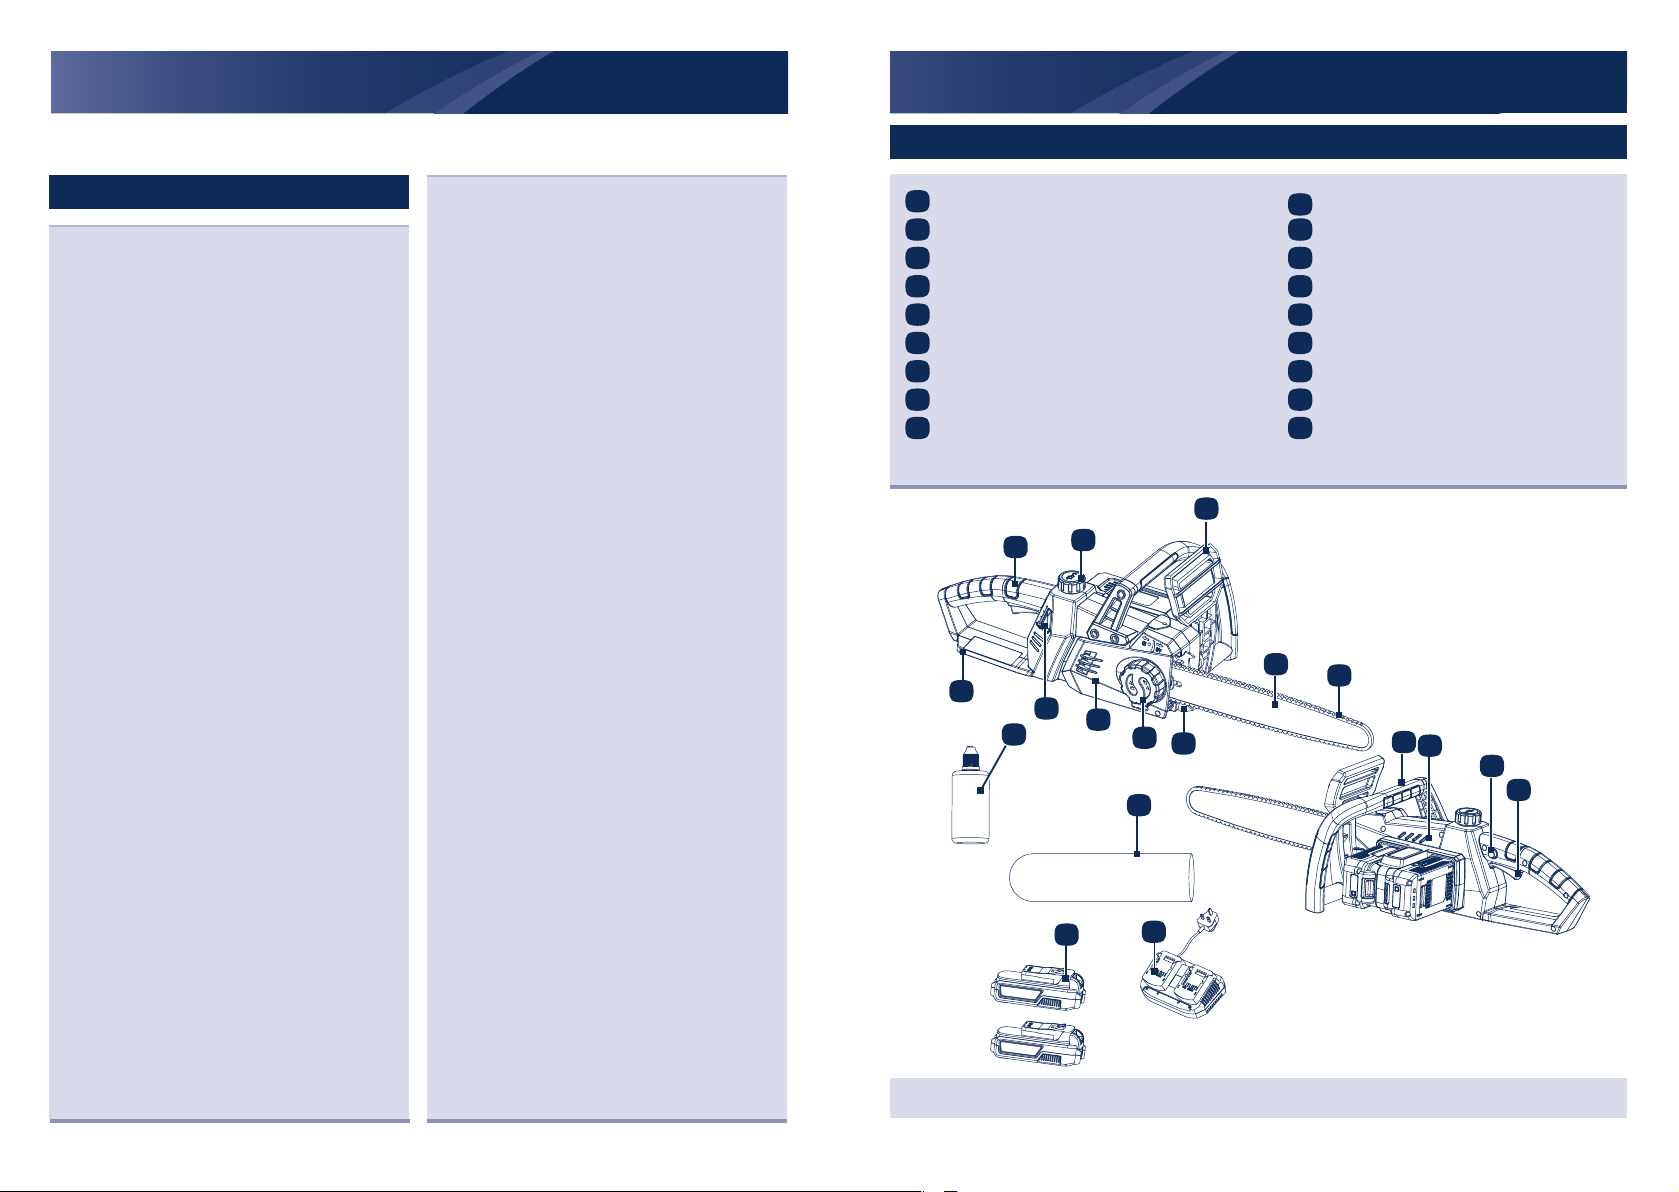
PARTS
1
Rear handle
2
Oil tank cap
Front guard / chain brake
Guide bar
Saw chain
Lock knob / Chain tension knob
Drive cover
8
100ml lubrication oil
9
Rear guard
2
1
1
9
9
8
8
2
15
15
17
17
10
Spiked bumper
11
Front handle
123
Motor housing
134
On / off switch
145
Lock-off button
156
Oil level indicator
167
Guide bar cover
17
Battery pack X2
18
Charger
3
3
4
4
7
7
6
6
10
10
16
16
18
18
5
5
11
11
12
12
14
14
13
13
Do not use and store the
power tool in rain or wet
If there are any parts missing, please call the customer helpline on 0345 605 2067
18 19AFTER SALES SUPPORT 0345 605 2067 AFTER SALES SUPPORT 0345 605 2067
Page 11
ASSEMBLY
Unpacking
1
i. Unpack all parts and lay them on a flat and stable
surface.
ii. Remove all packing materials and shipping devices
if applicable.
iii. Make sure the delivery contents are complete
and free of any damage. If you find that parts are
missing or show damage do not use the product
but contact the aftersales service within 28 days
of purchase. Using an incomplete or damaged
product represents a hazard to people and
property.
iv. Ensure that you have all the accessories and tools
needed for assembly and operation. This also
includes suitable personal protective equipment.
ASSEMBLY
NOTE: A new chain and bar will need readjusting
after as few as 5 cuts. This is normal during the
break- in period, and the interval between future
adjustments will lengthen quickly.
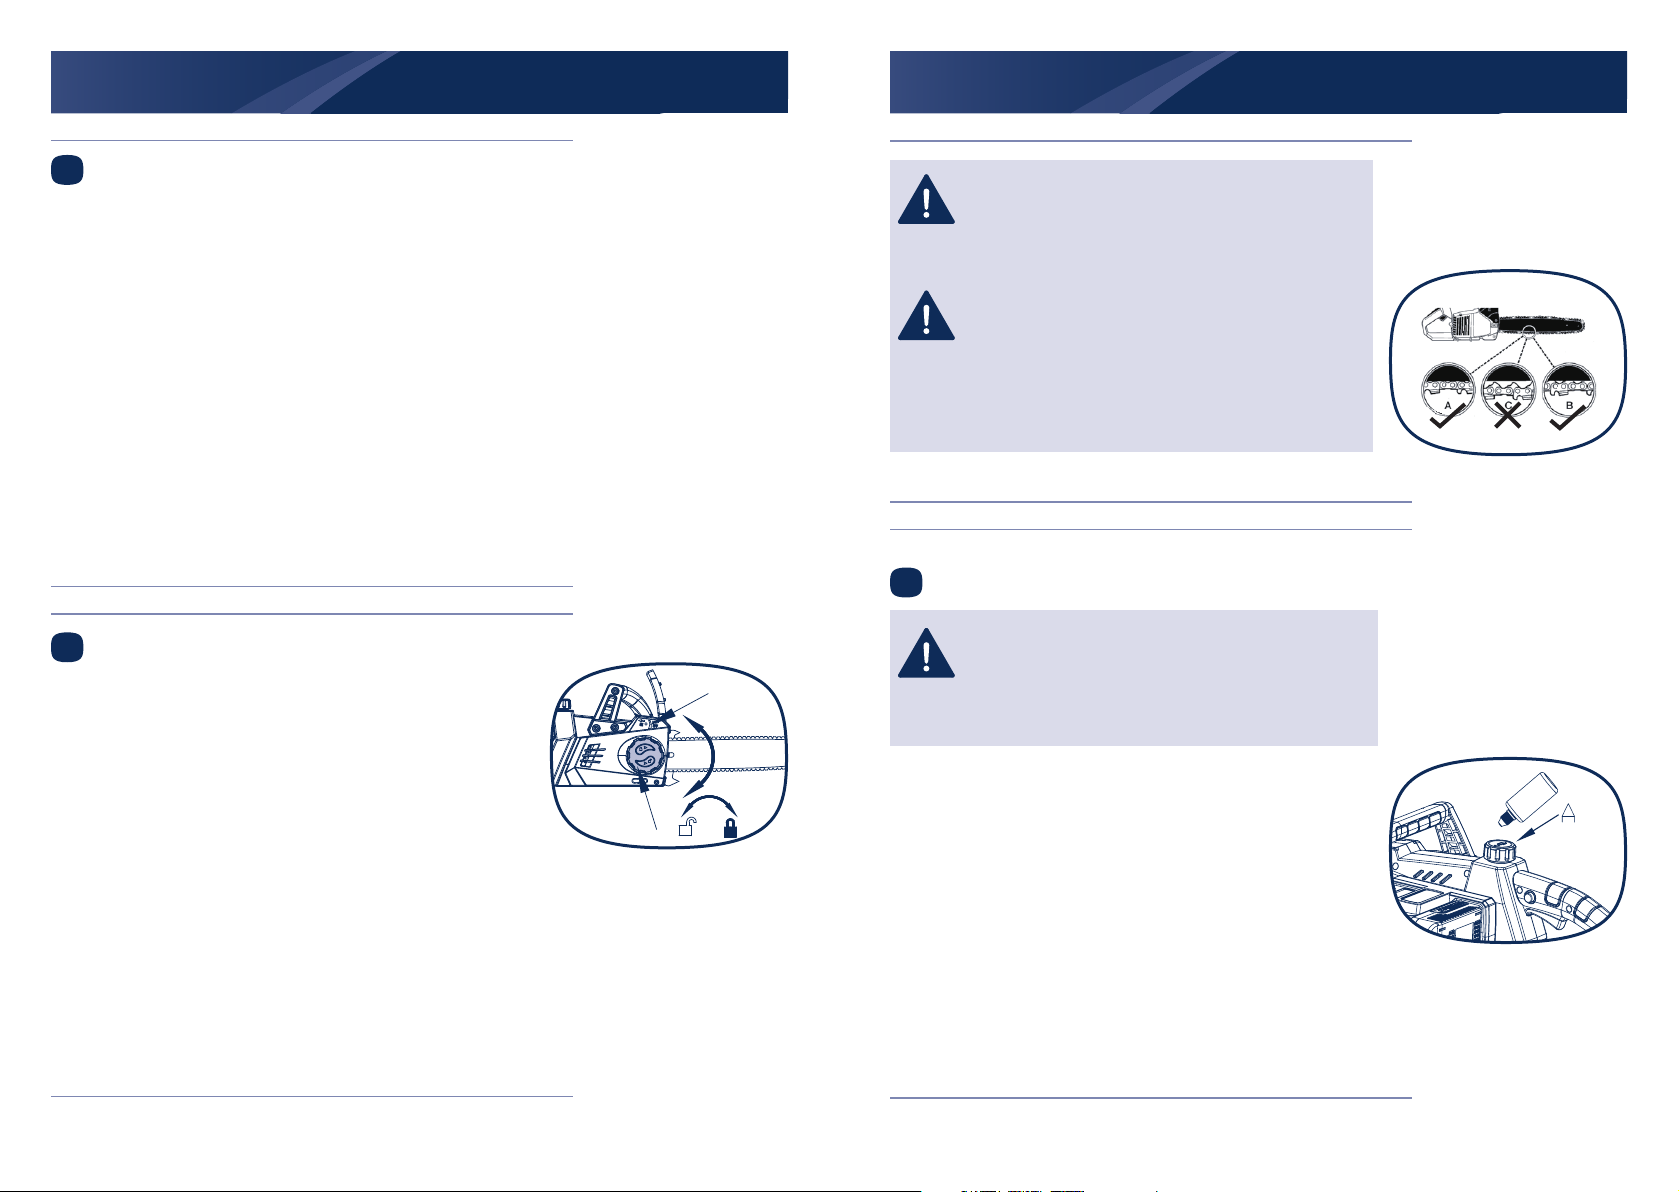
CAUTION: If a chain is TOO LOOSE or TOO
TIGHT, the bar chain and saw bearings will wear
more rapidly. Study for information concerning
correct cold tension (A), correct warm tension (B),
and as a guide for when chain saw needs adjusting
(C).
3
Filling oil tank
Checking the chain tension
2
Proper tension of the chain saw is extremely important
and must be checked before starting, as well as
during, any cutting operation. Taking the time to make
needed adjustments to the chain saw will result in
improved cutting performance and prolonged chain
life.
20 21AFTER SALES SUPPORT 0345 605 2067 AFTER SALES SUPPORT 0345 605 2067
WARNING! The product is not lled with oil. It is
essential to ll the product with oil before using it!
Never operate the product without chain oil or with
an empty oil tank, as this will result in extensive
damage to the product!
i. Park the chainsaw on a level surface.
ii. Clean the area around the oil tank cap (A) and then
open.
iii. Fill the oil tank with saw chain oil. Make sure that no dirt
gets into the oil tank, so that the oil nozzle does not
clog up.
iv. Close oil tank cover (A).
Page 12
ASSEMBLY
4
Installing or removing battery pack
i. Hold the tool and the battery pack firmly when installing
or removing the battery pack. Failure to hold the tool
and the battery pack firmly may cause them to slip
off your hands and result in damage to the tool and
battery pack, potentially causing a personal injury.
ii. Always switch off the tool before installing or removing
the battery pack.
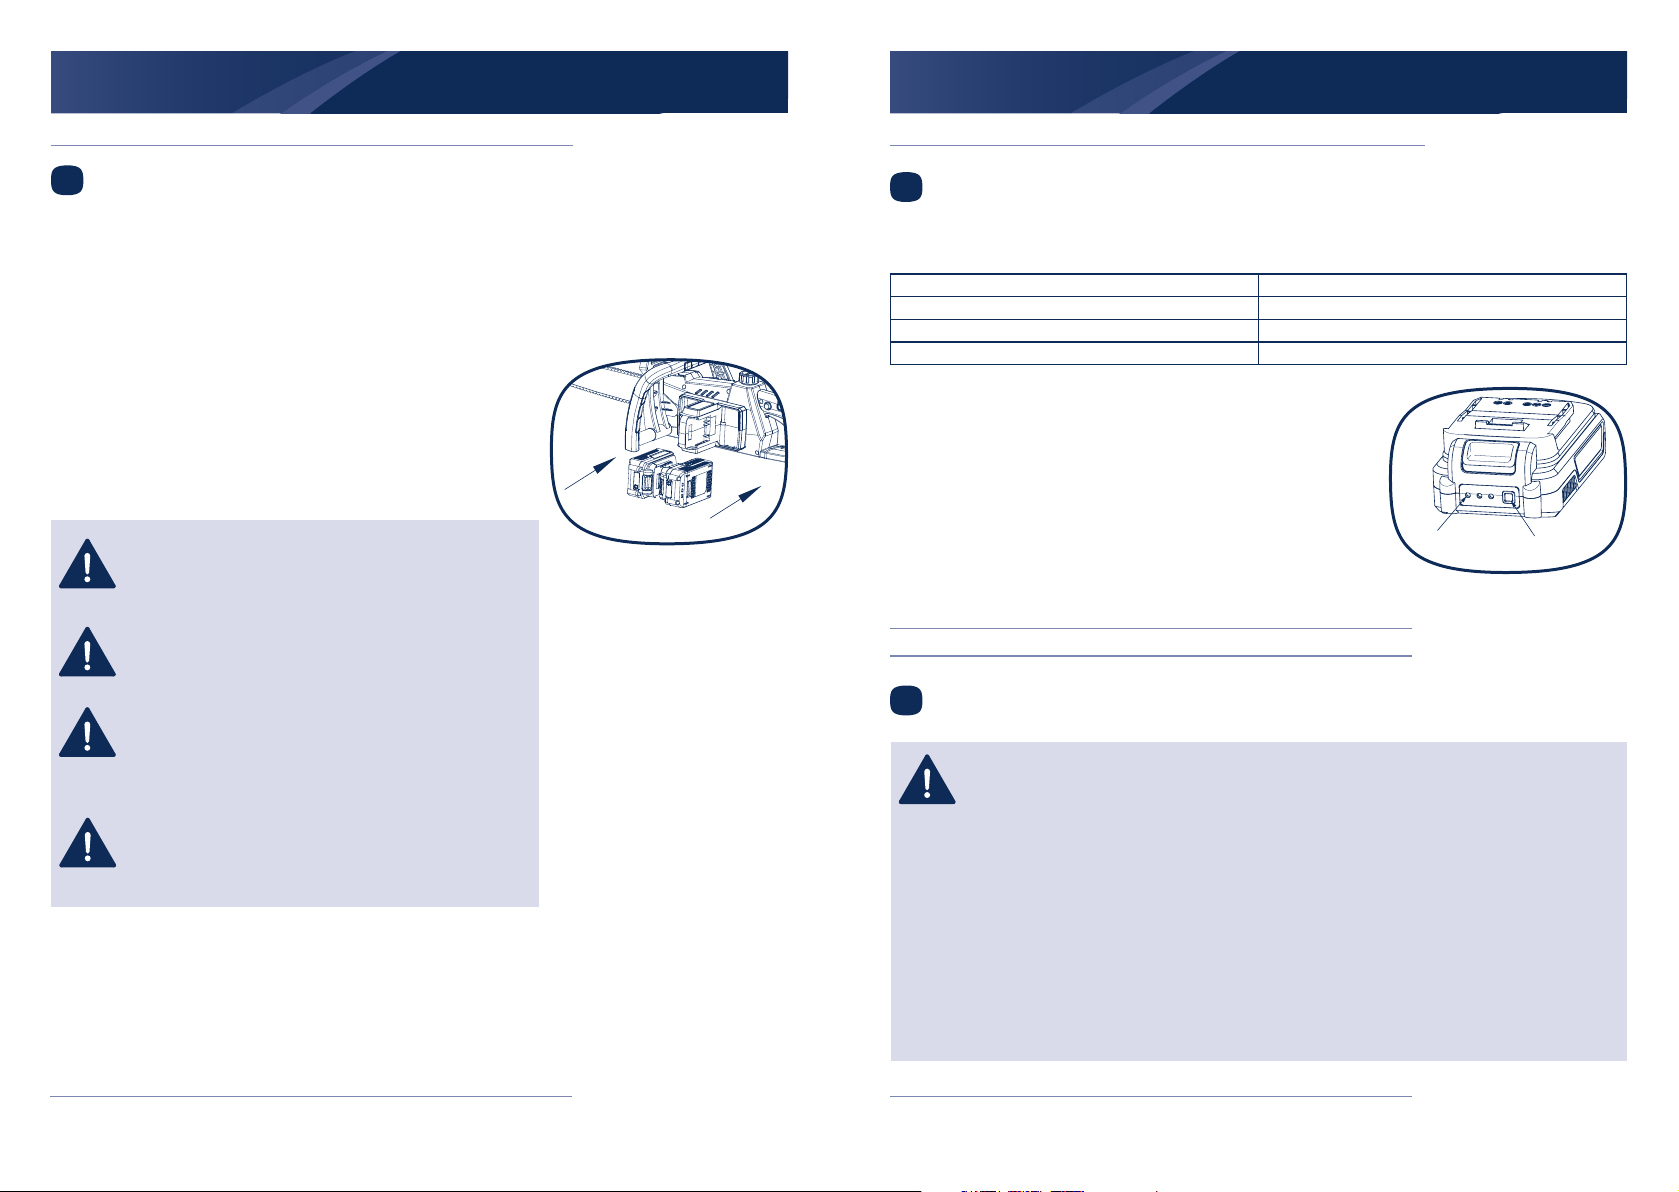
iii. To remove battery pack, press the release button, and
pull out. To install the battery pack, align the tongue on
the battery pack with the groove in the housing and
slip it into place. Always insert it all the way until it locks
in place with a little click. If not, it may accidentally
fall out of the tool, causing injury to you or someone
around you.
ASSEMBLY
Checking battery capacity
5
Press the battery capacity level button to check the charging level of the battery pack. The status /
remaining charge will be shown on the battery charging level indication light.
3 Green LEDs continuously lit Battery pack fully charged
2 Green LEDs continuously lit Battery pack 65% charged
1 Green LED continuously lit Battery pack 35% charged
No LED lit Battery is dead and needs to be charged
Charge the battery pack before operating when it is at
medium or low battery charging level.
NOTE: Do not use force when installing the battery
pack. If the battery pack does not slide in easily, it is
not being inserted correctly.
WARNING : Verify that the switch is in the OFF
position before inserting or removing the battery
pack.
WARNING : Verify that the battery pack is removed
and the switch is in the OFF position before
inspecting, adjusting or performing maintenance on
any part of the chain saw.
WARNING : Read, understand and follow the
instructions contained in the section entitled charging
procedure.
Charging the battery pack
6
NOTE : The battery pack comes partly charged. Charge the battery pack prior to
rst use, ideally at least 60 minutes.
. Always pull out the plug of charger from the mains before removing or connecting
the battery pack to the charger.
. Never charge the battery pack when the ambient temperature is below 5 °C or
above 40°C.
. Never recharge a battery pack again immediately after rapid charging. This could
overcharge the battery pack, thus reducing the lifespan of the battery pack and
charger.
. Rest the charger for at least 15 minutes between continuously charging sessions.
. If no battery pack is inserted into the charger and the charger is connected to
mains, the charging status LED shows red.
LED
button
22 23AFTER SALES SUPPORT 0345 605 2067 AFTER SALES SUPPORT 0345 605 2067
Page 13
ASSEMBLY
A
OPERATION
i. Connect the battery pack to the battery charger.
ii. Insert the mains plug into the socket. The green charging status LED light will flash. Once the
battery pack is completely charged, the green charging status LED is lit continuously, indicating
that the charging process is complete.
iii. Disconnect the charger from the mains and remove the battery pack from the charger.
iv. Attach the battery pack back to the product.
Charging status LEDs
RED LED turn on Charger ready
green LED ash Battery pack charging
Green LED continuously lit Battery pack fully charged
Red and green LEDs ashing Battery pack defect
Red and green LEDs continuously lit Battery pack too cold or warm
red LED
green LED
red LED
green LED
STARTING THE CHAINSAW
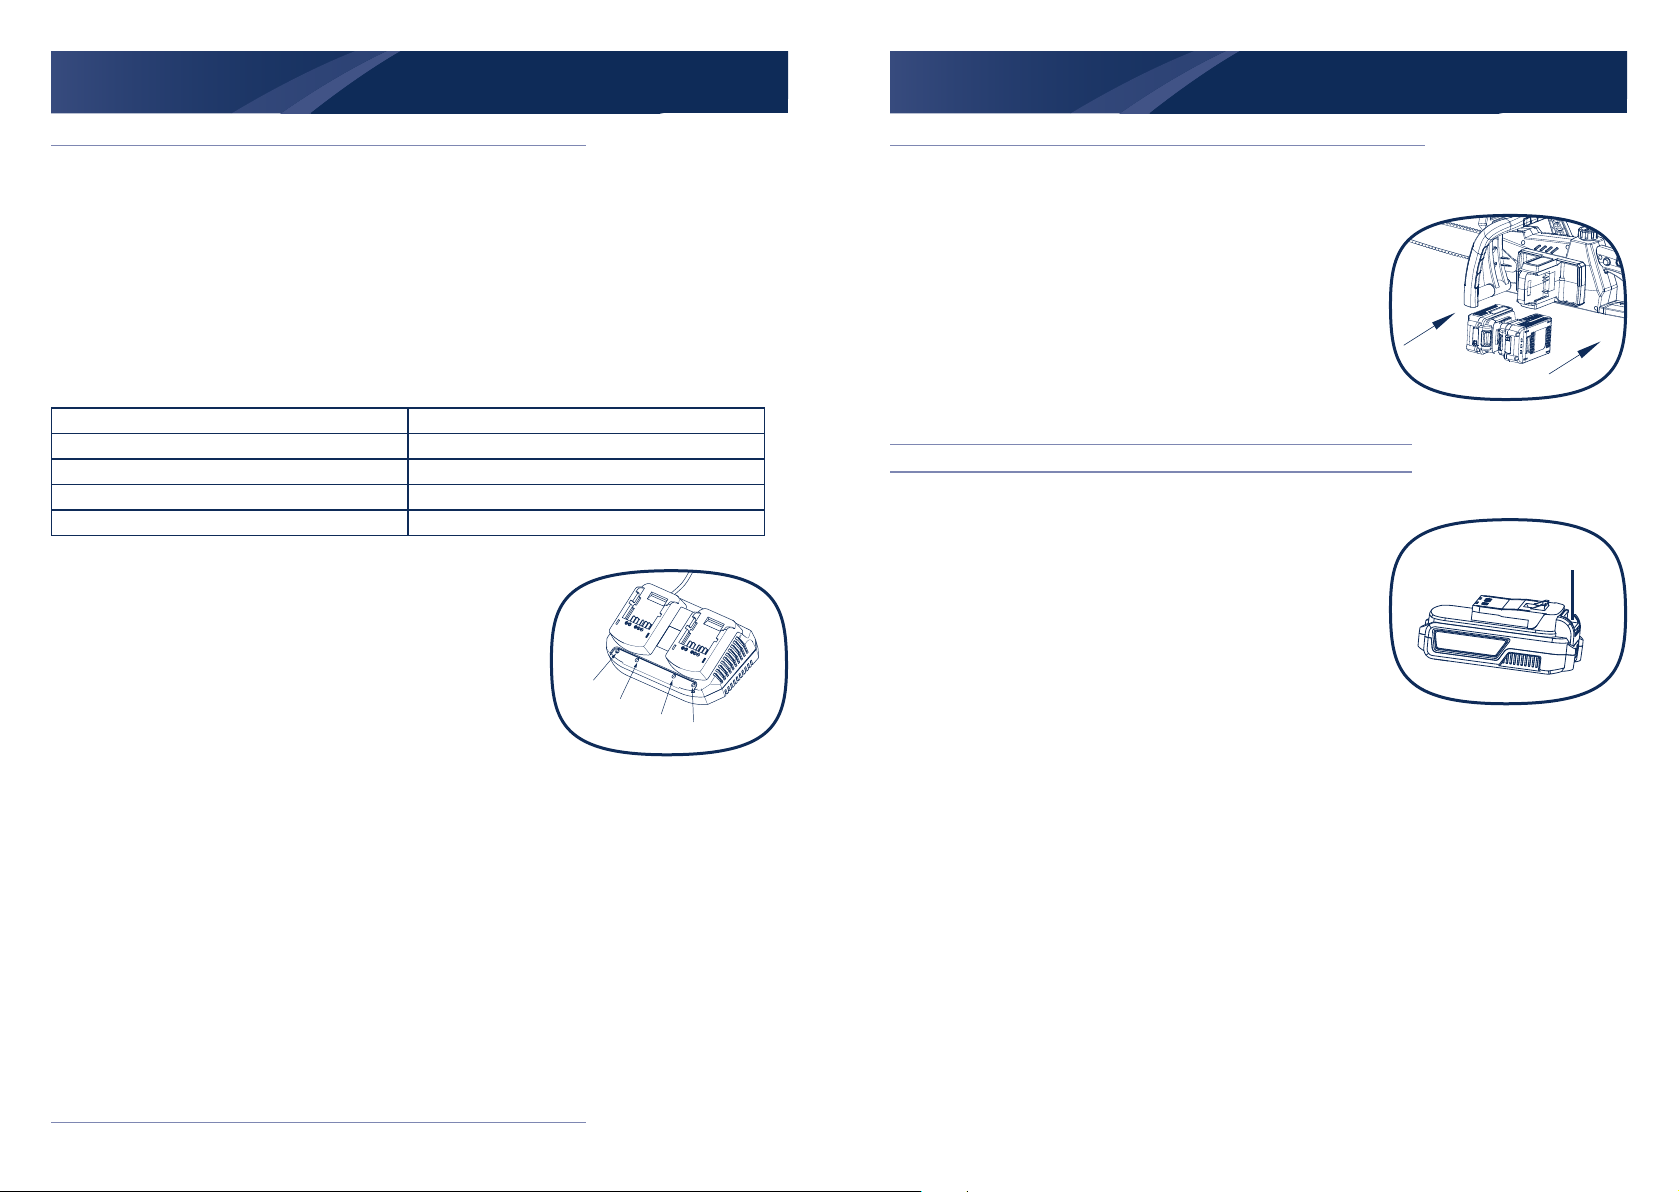
Installing the battery pack
i. Keep the battery pack in line with the holder on the device.
ii. Push it forward until it reaches the bottom. Before starting,
make sure the battery pack is firmly locked in place.
Removing the battery from the product
i. Press the battery pack release button (A) downward.
ii. Pull the battery pack towards the operator, then remove it.
24 25AFTER SALES SUPPORT 0345 605 2067 AFTER SALES SUPPORT 0345 605 2067
Page 14
OPERATION
OPERATION
Attention! The battery cannot be charged
immediately after use, it should be left to cool down
for a period of time. The LED lights on the charger
switching from green to red, meaning the battery
can be charged.
Switching on/off
NOTE: Hold the chain saw away from yourself
using both hands. Stand in a secure and stable
position.
i. Push the safety switch (14) forward and press the on/off
switch (13) to turn the product on.
ii. Release the on/off switch (13) to turn the product off.
Check the oil supply
NOTE! With the chainsaw fully assembled and
adjusted it is important to check the chain oil
supply is dispensing adequate lubrication.
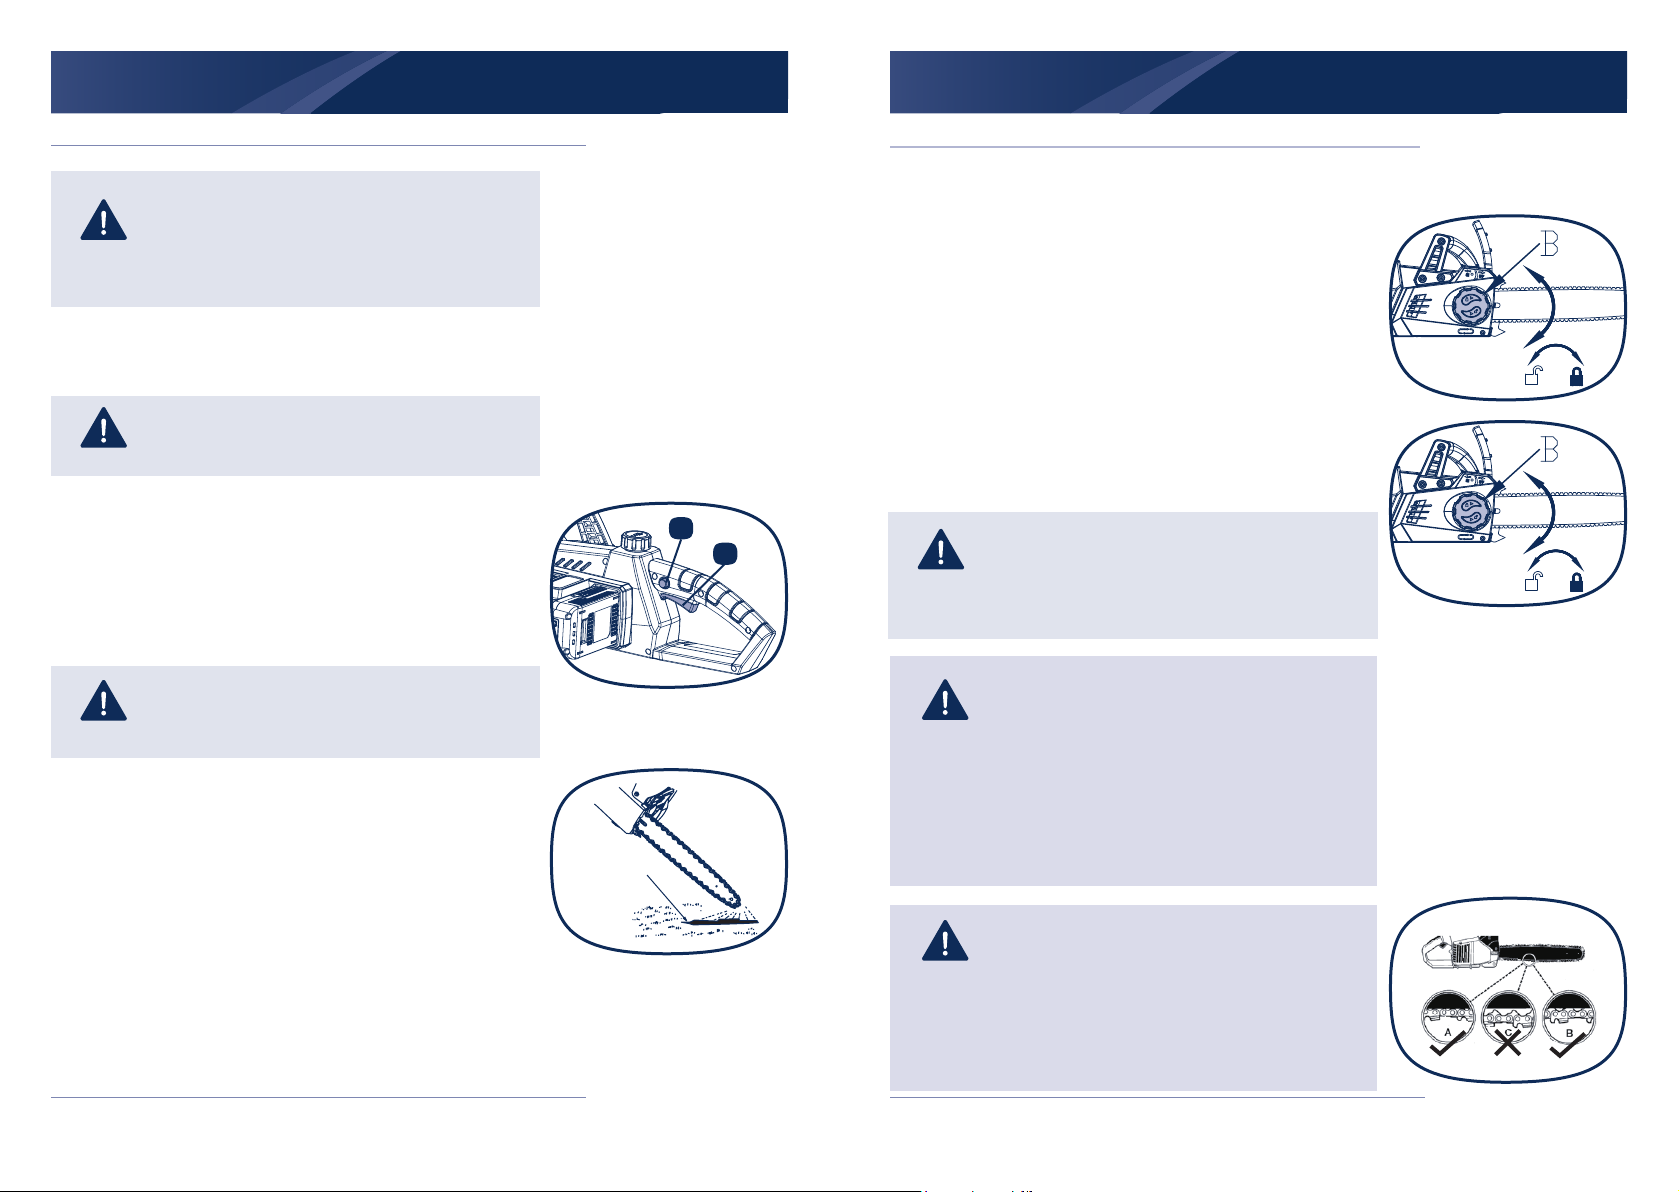
After switching on, run the chain and see if chain oil is being
dispensed as shown.
Chain oil
Chain Tension
1. Loosen the lock knob B before adjusting the chain.
2. Turn the chain tension knob until slack is out of chain.
3. Whilst wearing protective gloves, pull down on the chain to
check the chain tension.
4. Do not use excessive tension on the chain. Doing this will
cause excessive wear and will reduce the life of the guide
bar and chain. Using excessive tension will also reduce the
amount of cuts per battery charge.
5. Only when the tension on the chain is right, then tighten the
tension wheel firmly.
14
13
Important!
It is very important to adjust the chain tension if the
chain is loose.
Check if the chain is loose every 10mins.
NOTE! When tensioned correctly it should be
possible to pull one full chain link free of the bar
channel with ease.
- A new chain will expand its length during the first
period of use. Check and re-adjust the tension
frequently as a loose chain can easily derail or
cause rapid wear of itself and the chain bar.
CAUTION! If the saw chain is TOO LOOSE or
TOO TIGHT the V-drive wheel, chain bar, chain
and crank shaft bearing will suffer premature wear.
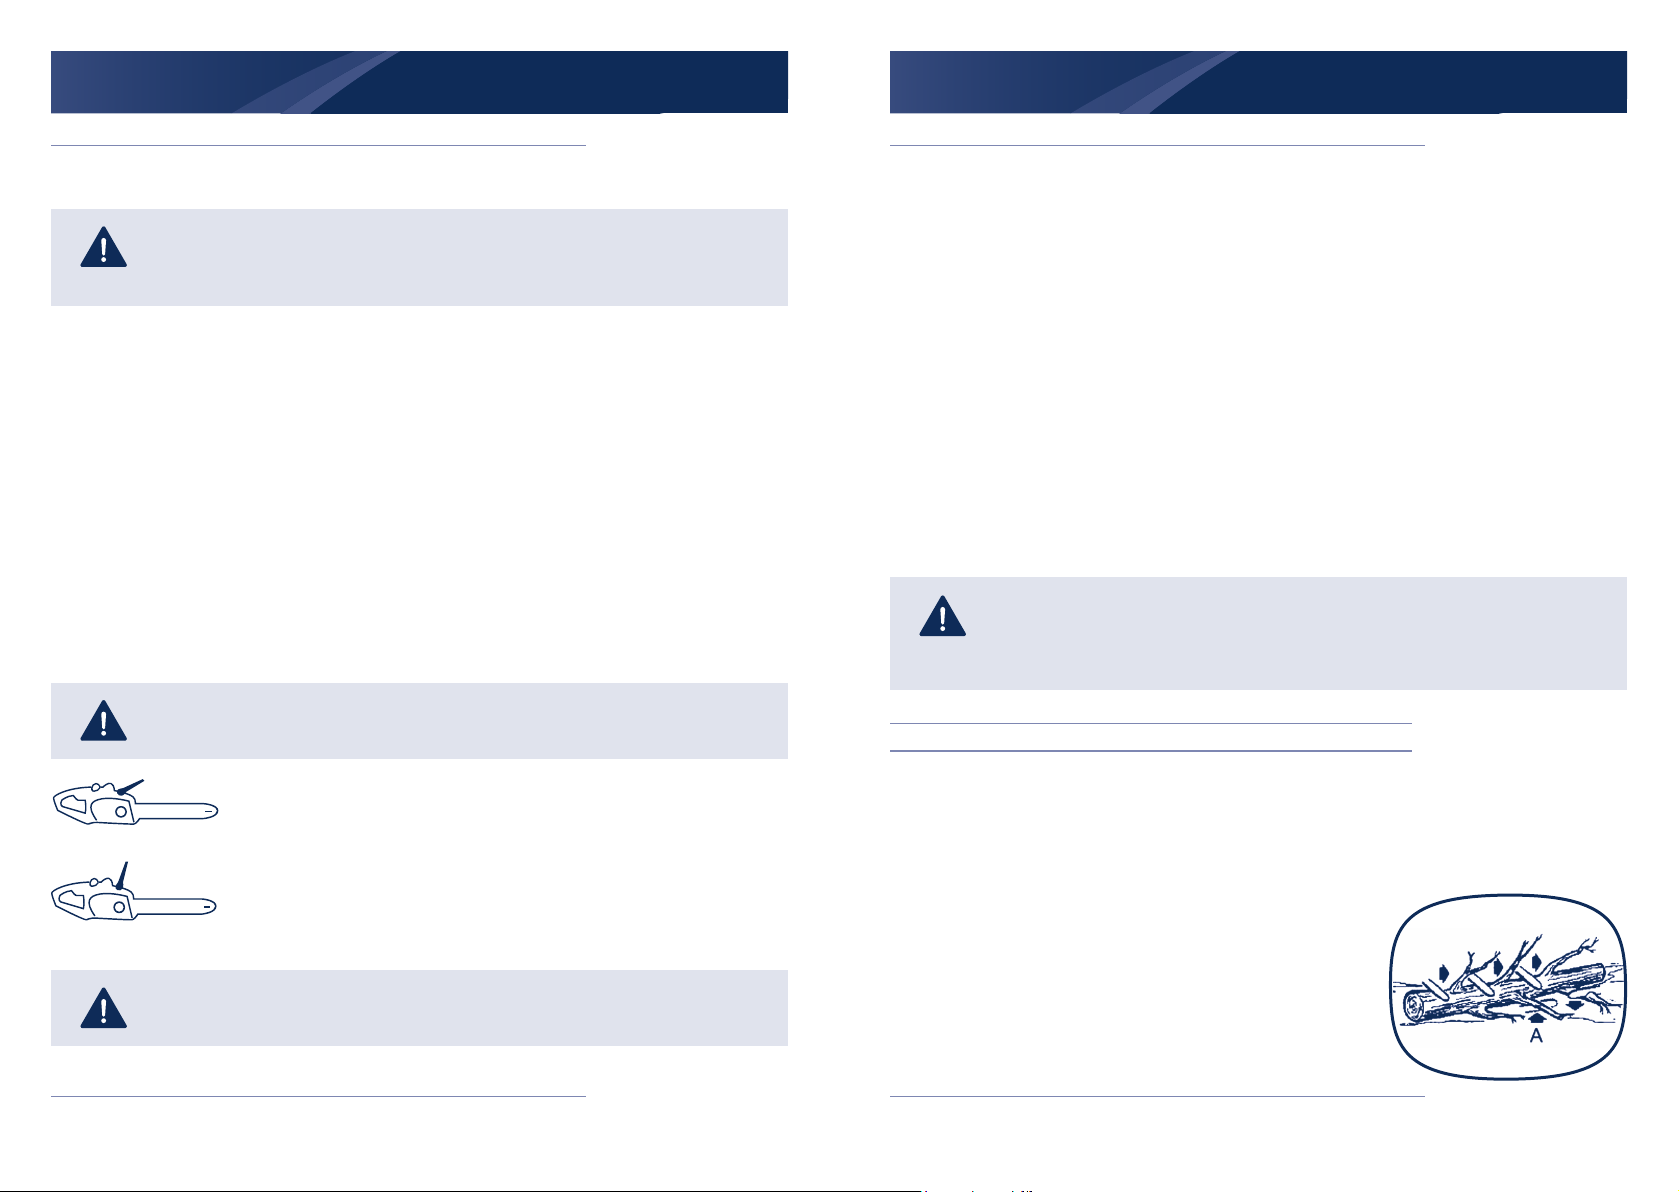
Right Fig. shows the correct tension A (when cold)
and tension B (when warm). Fig. C shows a chain
that is too loose.
26 27AFTER SALES SUPPORT 0345 605 2067 AFTER SALES SUPPORT 0345 605 2067
Page 15
OPERATION
OPERATION
Chain brake / hand guard
CAUTION: A loose chain can jump off the bar while you are cutting, as well as
wear the bar and chain. A chain that is too tight can damage the saw. Either way,
if a chain is too loose or too tight, it could cause serious personal injury.
This chain saw is equipped with a Chain brake/Hand guard which stops a moving chain in
milliseconds,helping to reduce the hazard of kickback, a fast upward motion of the guide bar
which occurs when the saw chain at the nose of the bar accidentally strikes an object or is
pinched in the cut. The Hand Guard also protects your left hand in the event it slips off the front
handle.
The chain brake is a safety feature which is activated if pressure is applied against the guard or
when, in the event of kickback, the operator’s hand strikes the lever. When the chain brake is
activated, chain movement abruptly stops and the power supply to the motor is immediately cut
off.
The purpose of the chain brake is to reduce the possibility of injury due to kickback. The chain
brake cannot, however, provide the measure of intended protection if the saw is carelessly
operated. The chain brake is disengaged (chain can move) when the brake is pulled back and
locked. This is the normal running position. The chain brake is engaged (chain cannot move) when
the brake is in the forward position.
CAUTION: NOTE: The motor will not start if the chain brake is in the engaged
position.
Chain brake test
Before cutting with your saw, the chain brake should be tested as follows:
A. Make sure the chain brake is disengaged.
B. Place the saw on a firm, flat, dry surface that is clear of any debris. Do not let the saw come in
contact with any objects.
C. Instal of the battery pack.
D. Grasp the front handle (not the Chain Brake / Hand Guard Lever) with your left hand. Thumb
and fingers should encircle the handle.
E. Grasp the rear handle with your right hand .Thumb and fingers should encircle the handle.
F. Depress the Lock-off button with your right thumb. Squeeze the trigger with your index finger.
G. While the motor is running, activate the chain brake by rolling your left hand forward against the
lever.
H. Chain and motor should stop abruptly.
WARNING: If the chain and motor fail to stop when the chain brake is engaged,
take the saw to the nearest professional Service Center. Do not use the saw if the
chain brake is not in proper working order.
Cutting
Brake is engaged and the product can not be started or run.
Brake is disengaged and the product can be operated.
CAUTION: NOTE: The motor will not start if the chain brake is in the engaged
position.
28 29AFTER SALES SUPPORT 0345 605 2067 AFTER SALES SUPPORT 0345 605 2067
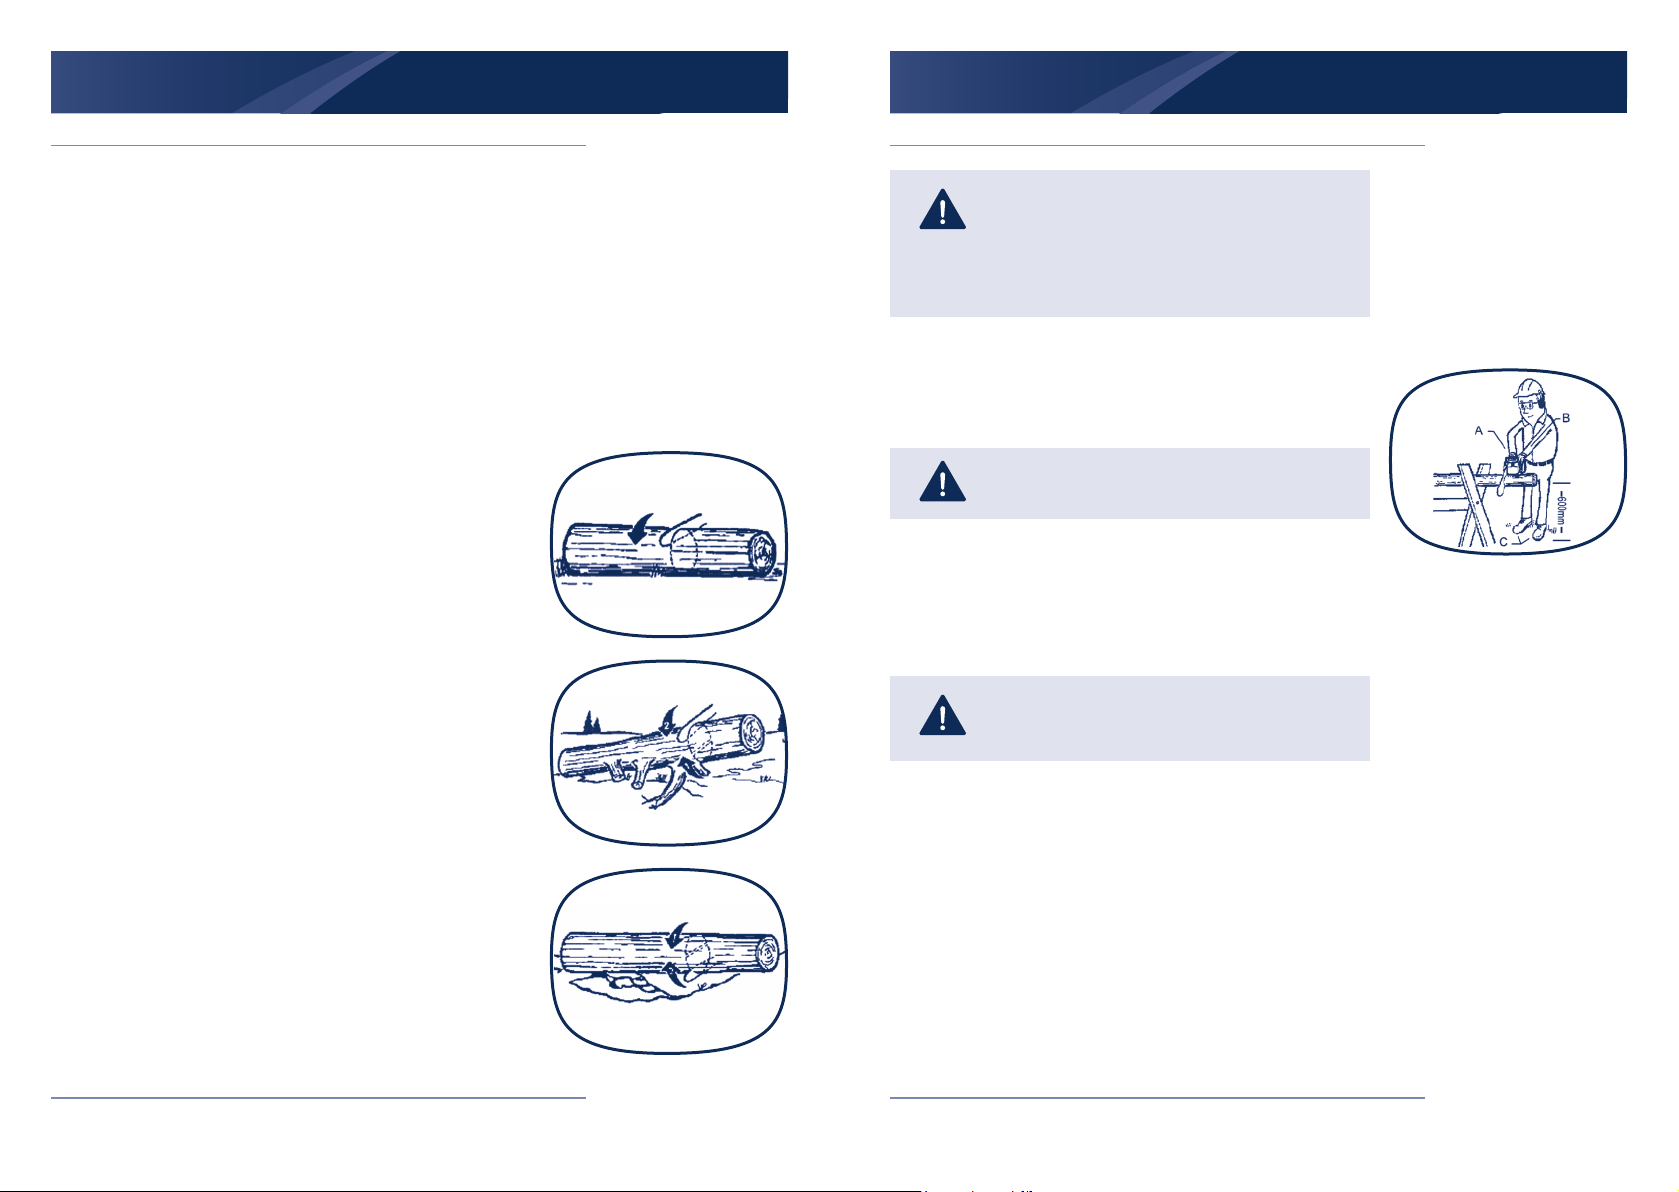
Felling
Felling is the term for cutting down a tree. Small trees up to 1215cm in diameter are usually cut in a single cut.
Limbing
Limbing a tree is the process of removing the branches from a
fallen tree. Do not remove supporting limbs (A) until after the log
is bucked (cut) into lengths. Branches under tension should be
cut from the bottom up to avoid binding the chain saw.
Page 16
OPERATION
Bucking
Bucking is cutting a fallen log into lengths. Make sure you have
a good footing and stand uphill of the log when cutting on
sloping ground. If possible, the log should be supported so that
the end to be cut off is not resting on the ground. If the log is
supported at both ends and you must cut in the middle, make
a downward cut halfway through the log and then make the
undercut. This will prevent the log from pinching the bar and
chain. Be careful that the chain does not cut into the ground
when bucking as this causes rapid dulling of the chain.
When bucking on a slope, always stand on the uphill side.
1. Log supported along entire length: Cut from top (over buck),
being careful to avoid cutting into the ground.
OPERATION
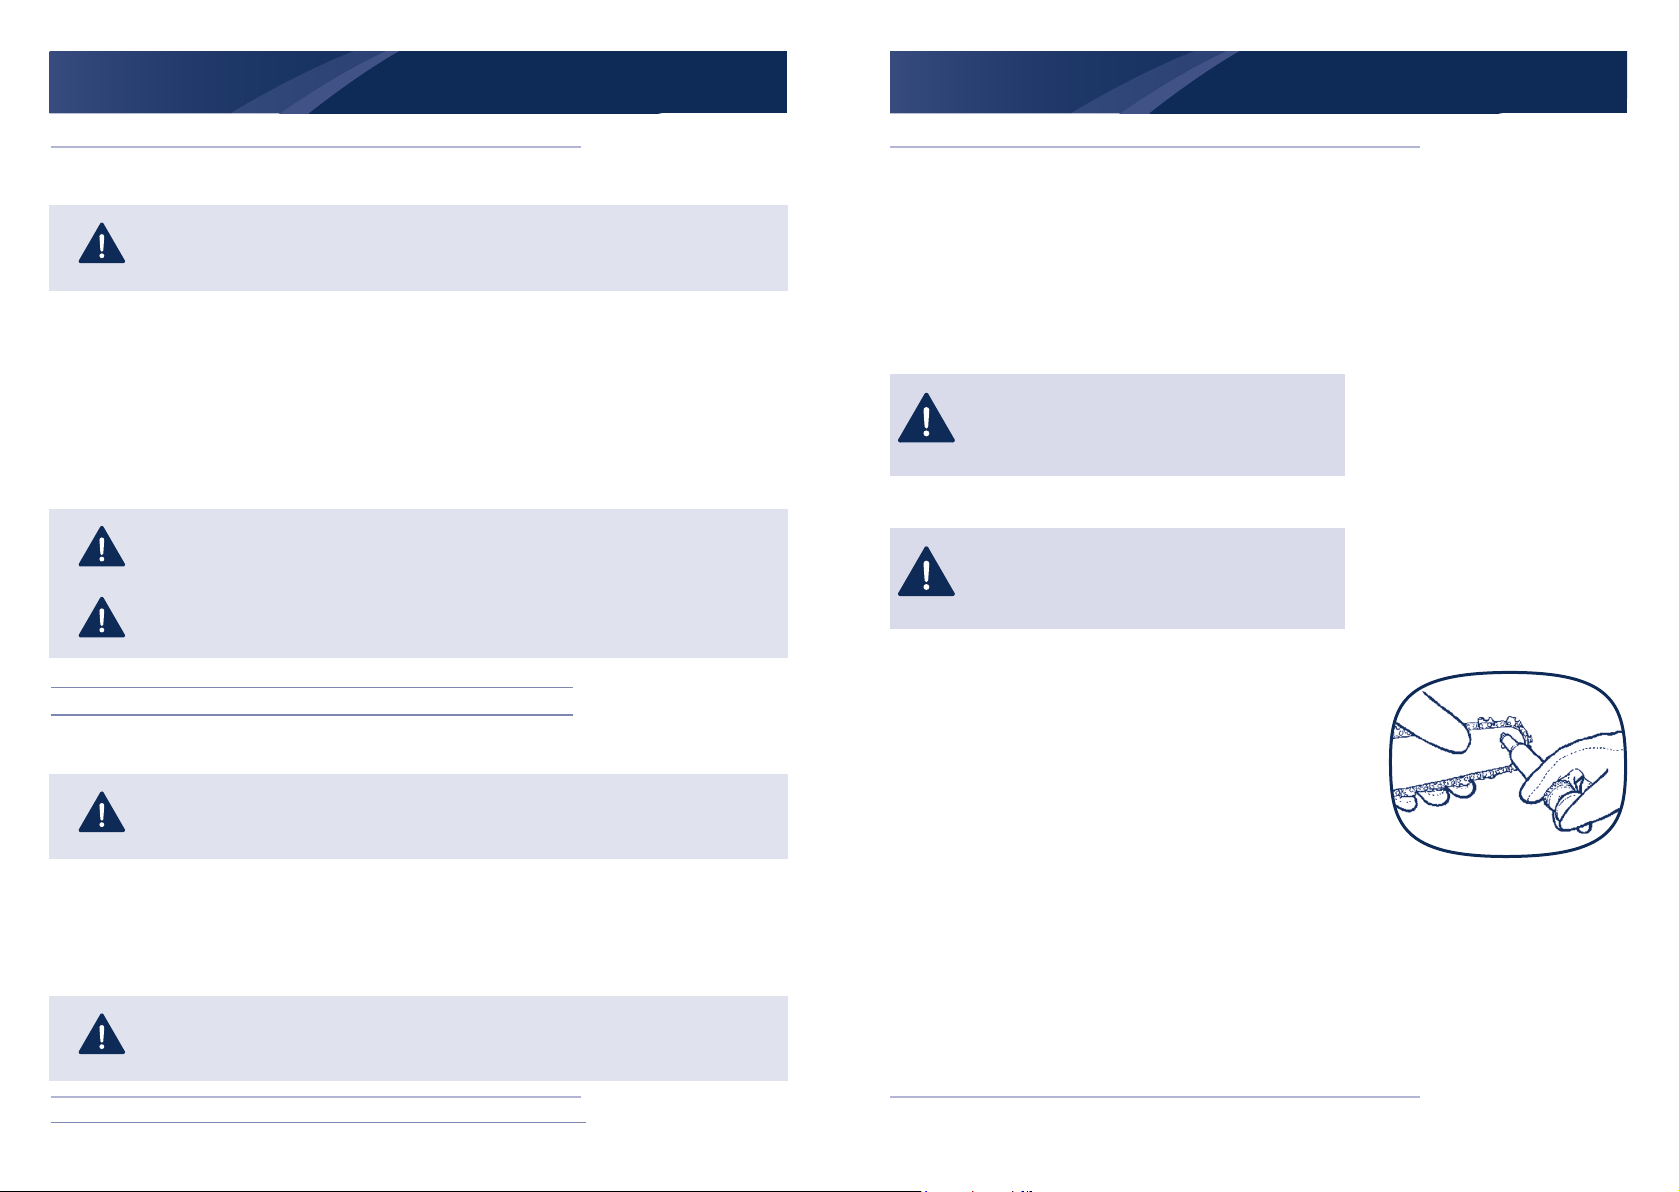
NOTE: The best way to hold a log while bucking
is to use a saw horse. When this is not possible,
the log should be raised and supported by the
limb stumps or by using supporting logs. Be sure
the log being cut is securely supported.
For personal safety and ease of cutting, the correct position for
vertical bucking is essential.
VERTICAL CUTTING:
A. Hold the saw firmly with both hands and keep the saw to the
right of your body while cutting.
B. Keep the left arm as straight as possible.
C. Keep weight on both feet.
2. Log supported on 1 end: First, cut from the bottom (under
buck) 1/3 diameter of log to avoid splintering. Second,
cut from above (over buck) to meet the first cut and avoid
pinching.
3. Log supported on both ends: First, over buck 1/3 diameter
of log to avoid splintering. Second, under buck to meet first
cut and avoid pinching.
30 31AFTER SALES SUPPORT 0345 605 2067 AFTER SALES SUPPORT 0345 605 2067
CAUTION: While the saw is cutting, be sure the
chain and bar are being properly lubricated.
Page 17
MAINTENANCE
MAINTENANCE
Preventative maintenance
CAUTION: Place switch in OFF position and remove the battery pack before the
appliance is serviced, cleaned, or maintenance is performed.
1. Keep the air intake clean and air vents free of debris to avoid overheating the motor.
2. Clean with a damp sponge and mild soap. Do not squirt with a water hose or douse with
water or other liquids.
3. Inspect the saws chain for proper tension before each use and frequently during cutting.
4. Clean the guide bar and bar pad to ensure free path for oil.
5. Turn the bar over after each use to achieve even wear.
NOTE: No motor lubrication is necessary. The motor is equipped with lifetime
lubricated bearings.
NOTE: If the chainsaw do not operate, turn switch to OFF position and remove
the battery pack rst. Do not attempt to repair it yourself.
Bar/chain maintenance
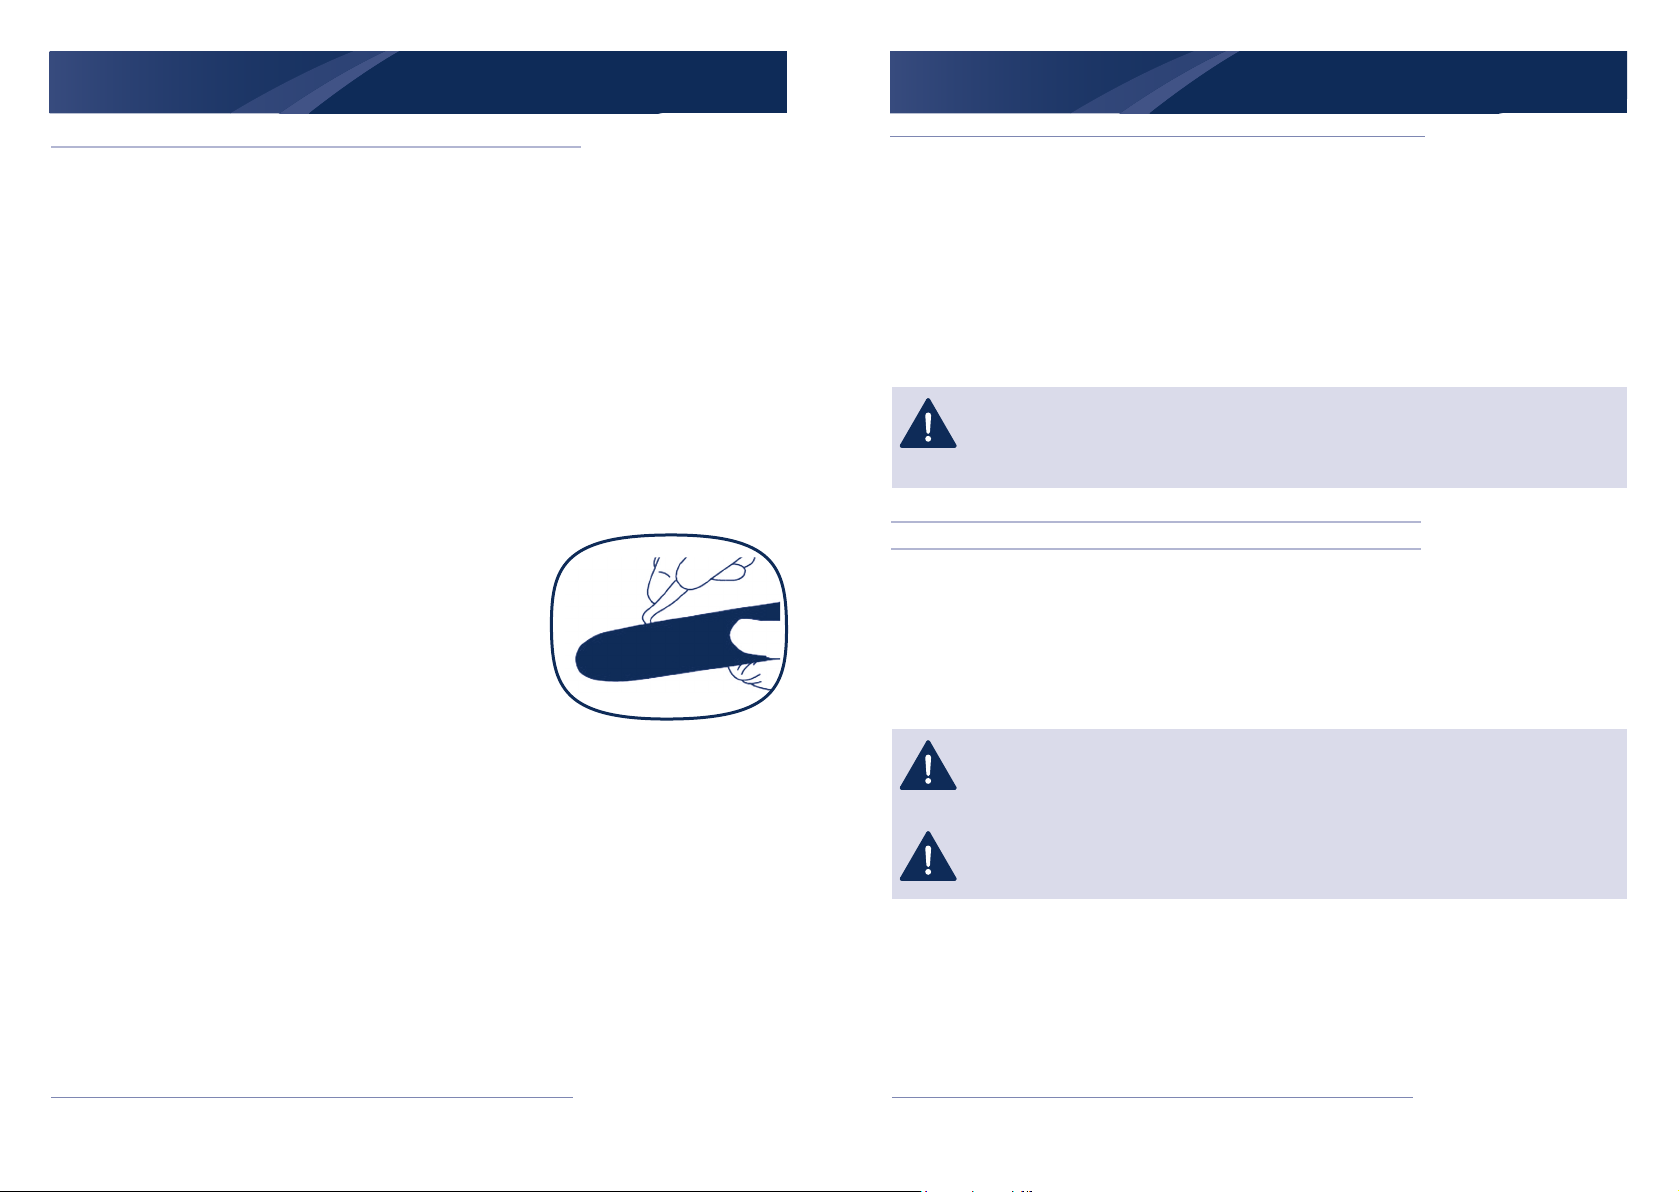
CAUTION: Failure to lubricate the guide bar sprocket tip as
explained below will result in poor performance and seizure,
voiding the manufacturer’s warranty.
Lubrication of the sprocket tip is recommended after each
saw use. Always thoroughly clean the guide bar sprocket tip
before lubrication.
TO LUBRICATE SPROCKET TIP:
WARNING: Wear heavy duty work gloves when
performing this application to reduce risk of
personal Injury.
1. Remove the battery pack from the chain saw.
NOTE: It Is not necessary to remove the chain
saw to lubricate the guide bar sprocket tip.
Lubrication can be done on the Job.
2. Clean the guide bar sprocket tip.
3. Using disposable Lube gunp insert the needle nose into
the lubrication hole and inject grease until it appears at
the outside edge of the sprocket tip.
WARNING: Before servicing the saw, make sure that the battery pack is
removed.
Proper maintenance of the rail, as explained here, is essential to keep your saw in good working
order.
SPROCKET TIP LUBRICATION:
(For unite supplied with sprocket tip guide bars only)
WARNING: Failure to lubricate the reversing star will result in poor performance
and jamming, and will void the warranty.
32 33AFTER SALES SUPPORT 0345 605 2067 AFTER SALES SUPPORT 0345 605 2067
4. Turn the chain by hand. Repeat this procedure until the
entire deflection star is greased.
Page 18
MAINTENANCE
MAINTENANCE
Guide bar maintenance
Most guide bar problems can be prevented merely by keeping
the chain saw well maintained.
Incorrect filing and non-uniform cutter and depth gauge
settings cause most guide bar problems, primarily resulting in
uneven bar wear. As the bar wears unevenly the rails widen,
which may cause chain clatter and difficuhy in making straight
cuts.
Insufficient guide bar lubrication and operating the saw with a
chain that is TOO TIGHT will contribute to rapid bar wear (see
Section CHAIN MAINTENANCE INSTRUCTIONS).
To help minimize bar wear, the following guide bar
maintenance is recommended.
GUIDE BAR - The bar should be reversed every 8 working
hours to ensure uniform wear. Keep the bar groove and
lubrication hole dean using the bar groove cleaner supplied
optional.
BAR WEAR - Tum guide bar frequently at regular intervals(for example, after 8 hours of use), to
ensure even wear on top and bottom of the bar.
BAR GROOVES - Bar grooves (or rails which support and carry the chain) should be cleaned if
the saw has been heavity used or if the saw chain appears dirty. Rails should always be cleaned
every time the saw chain is removed.
OIL PASSAGES - Oil passages at bar pad should be cleaned to ensure proper lubrication of the
bar and chain during operation. This can be done using a soft wire small enough to insert into the
oil discharge hole.
NOTE: The condition of the oil passages can be easily checked. If the passages
are clean the chain will automatically give off a spray of oil within seconds of starting
the saw. Your saw is equipped with an automatic oiler system.
What is a low kickback saw chain?
Lowkickback saw chain is a chain which has met the kickback performance requirements of
ISO 9518. By keeping the chain brake and saw chain in good working condition and correctly
serviced as recommended in this manual, you will be able to maintain the safety system of your
chain saw over the life of the product.
WARNING: Never remove, modify or make inoperative any safety device furnished
with your unit. The Chain Braks/Hand Guard and low-kickback saw chain are major
safety features provided for your protection.
WARNING: Always wear heavy duty protection work gloves and disconnect the
battery pack when working on the saw chain.
34 35AFTER SALES SUPPORT 0345 605 2067 AFTER SALES SUPPORT 0345 605 2067
Page 19
MAINTENANCE MAINTENANCE
Direction of chain
Tension
pin
Chain Maintenance
CHAIN TENSION:
Check the chain tension frequently and adjust as often as necessary to keep the chain snug
on the bar, but loose enough to be pulled around by hand. (See Section chainsaw TENSION
ADJUSTMENT)
BREAKING IN A NEW SAW CHAIN:
A new chain and bar will need readjusting after as few as 5 cuts. This is normal during the breakin period, and the interval between future adjustments will begin to lengthen quickly.
Over a period of time, however, the moving parts of the saw chain will become worn, resulting in
what is called CHAIN STRETCH. This is normal. When it is no longer possible to obtain correct
chain tension adjustment, a link will have to be removed to shorten the chain.
WARNING: Never have more than 3 links removed from a loop of chains as this
could could cause damage to the sprocket.
CHAIN LUBRICATION:
Always make sure the automatic oiler system is working property. Keep the oil tank filled with
Chain, Bar and Sprocket Oil.
Adequate lubrication of the bar and chain during cutting operations is essential to minimize
friction with the guide bar.
Never starve the bar and chain of lubricating oil. Running the saw dry or with too little oil will
decrease rapid cutting efficiency, shorten saw chain life, cause rapid dulling of the chain, and
lead to excessive wear of the bar from overheating. Too little oil is evidenced by smoke or bar
discoloration.
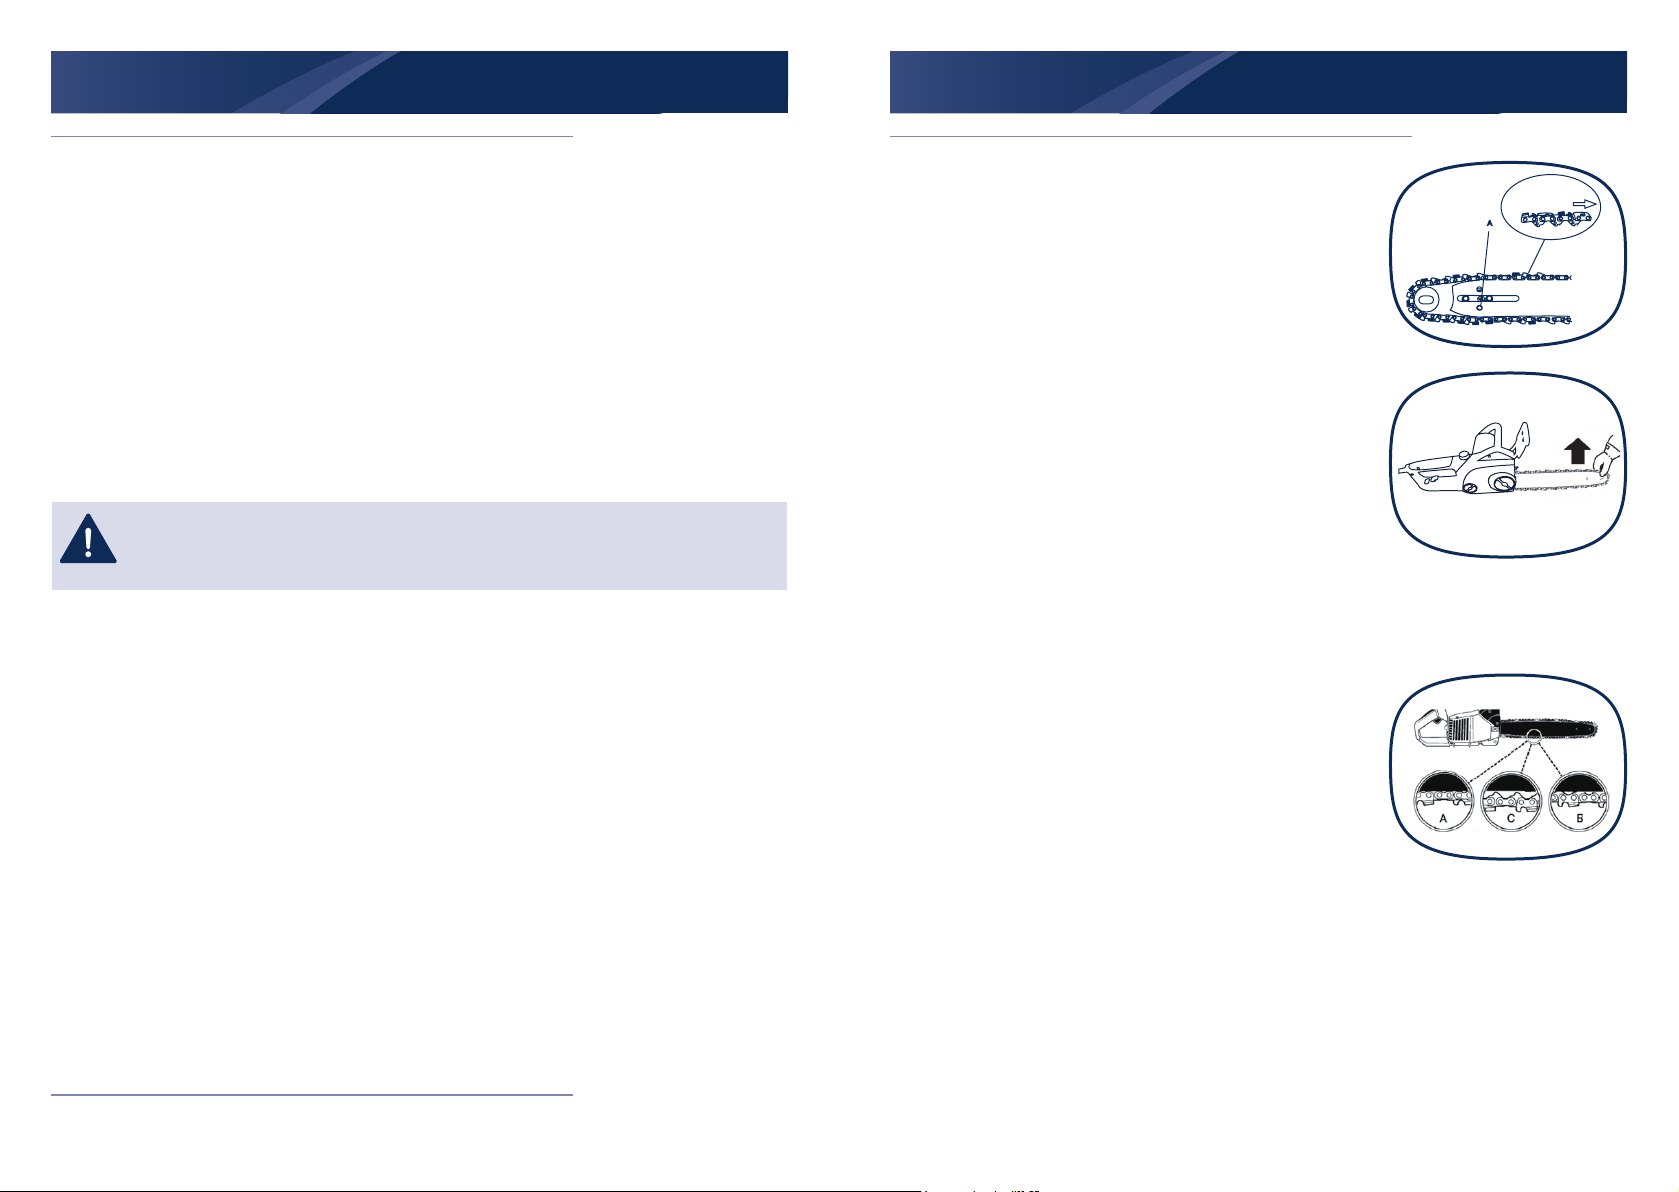
Replace the chain
i. Remove the clamp knob (6) and the chain cover
ii. Fit the chain around the bar ensuring that the direction of the
chain is as depicted in the picture on the bar. Fit the chain
on the sprocket.
iii. Adjust the tension to ensure that there is not too much
slack in the chain. Pay attention to the correct
direction of the saw chain.
iv. Fit the chain cover to the power unit. While lifting the tip of
guide bar, tighten the bar knob securely (clockwise). Hand
tighten only!
NOTE!
A new chain will expand its length during the first
period of use. Check and re-adjust the tension frequently as a
loose chain can easily derail or cause rapid wear of itself and
the chain bar. If the saw chain is TOO LOOSE or TOO TAUT,
the Vdrive wheel, the chain bar, the chain and the crank shaft
bearing will suffer premature wear.
36 37AFTER SALES SUPPORT 0345 605 2067 AFTER SALES SUPPORT 0345 605 2067
Page 20
MAINTENANCE
DISPOSAL
CHAIN AND BAR LUBRICATION
Adequate lubrication of the chain saw during cutting operations
is essential to minimize friction with the guide bar. Your chain
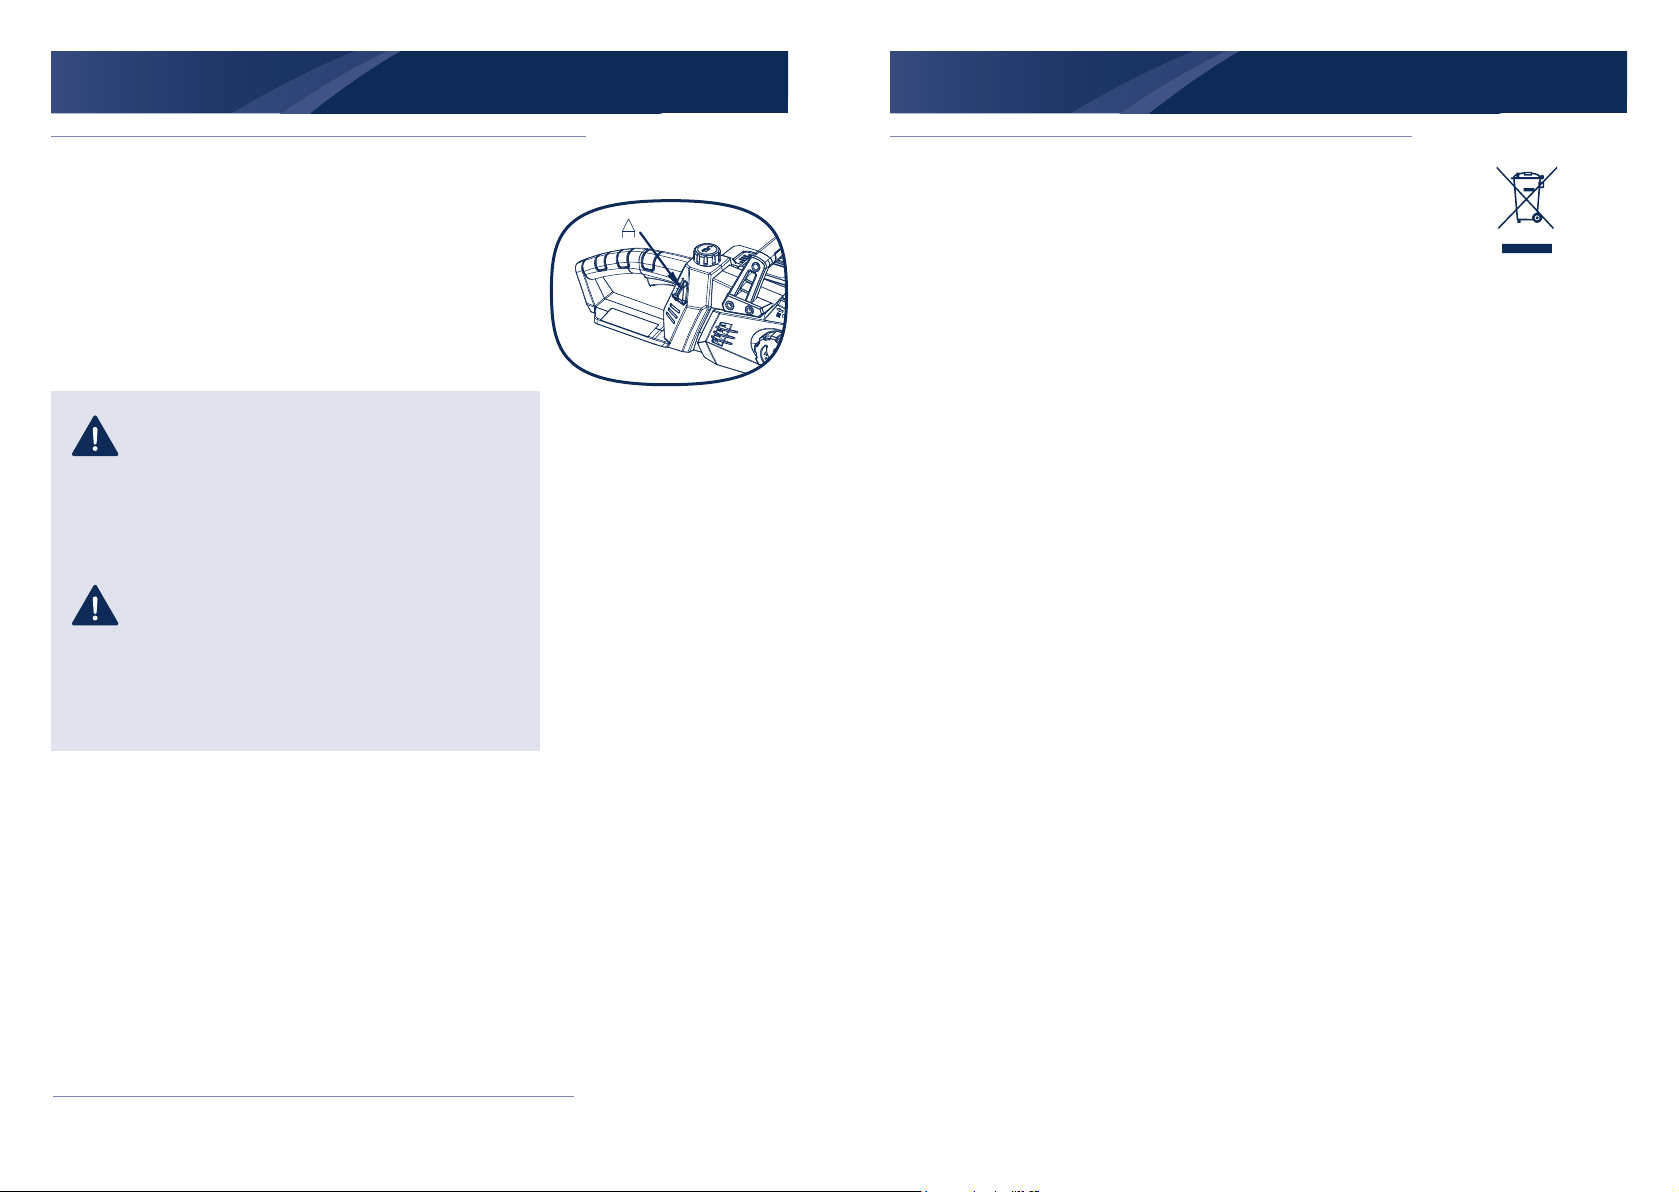
saw is equipped with an automatic oiler system. The oiler
automatically delivers the proper amount of oil to the bar and
chain. The oil tank level can be checked in the oil inspection
window (A) provided on the right side of the saw. The tank is full
when oil is at the top of the slot.
CAUTION: Never starve the bar and chain of
lubrication oil. Running the saw DRY or with TOO
LITTLE OIL will decrease cutting efciency, shorten
chain saw life, and cause rapid dulling of the chain
and excessive wear of the bar from overheating.
Too little is evidenced by smoke or bar discoloration.
NOTE: The chain saw stretches during use,
particularly when it is new, and occasional
adjustment will be needed. A new chain requires
more frequent adjustment during the break-in
period. This is normal. See Section chain saw
Tension Adjustment instructions.
To help protect the environment, please dispose of the product
properly when it has reached the end of its useful life and not in
the household waste. Information on collection points and their
opening hours can be obtained from your local authority. Faulty
or used batteries / rechargeable batteries must be recycled in
accordance with Directive 2006/66/EC and its amendments.
Please return the batteries / rechargeable batteries and / or the
product to the available collection points.
38 39AFTER SALES SUPPORT 0345 605 2067 AFTER SALES SUPPORT 0345 605 2067
Page 21
TROUBLESHOOTING
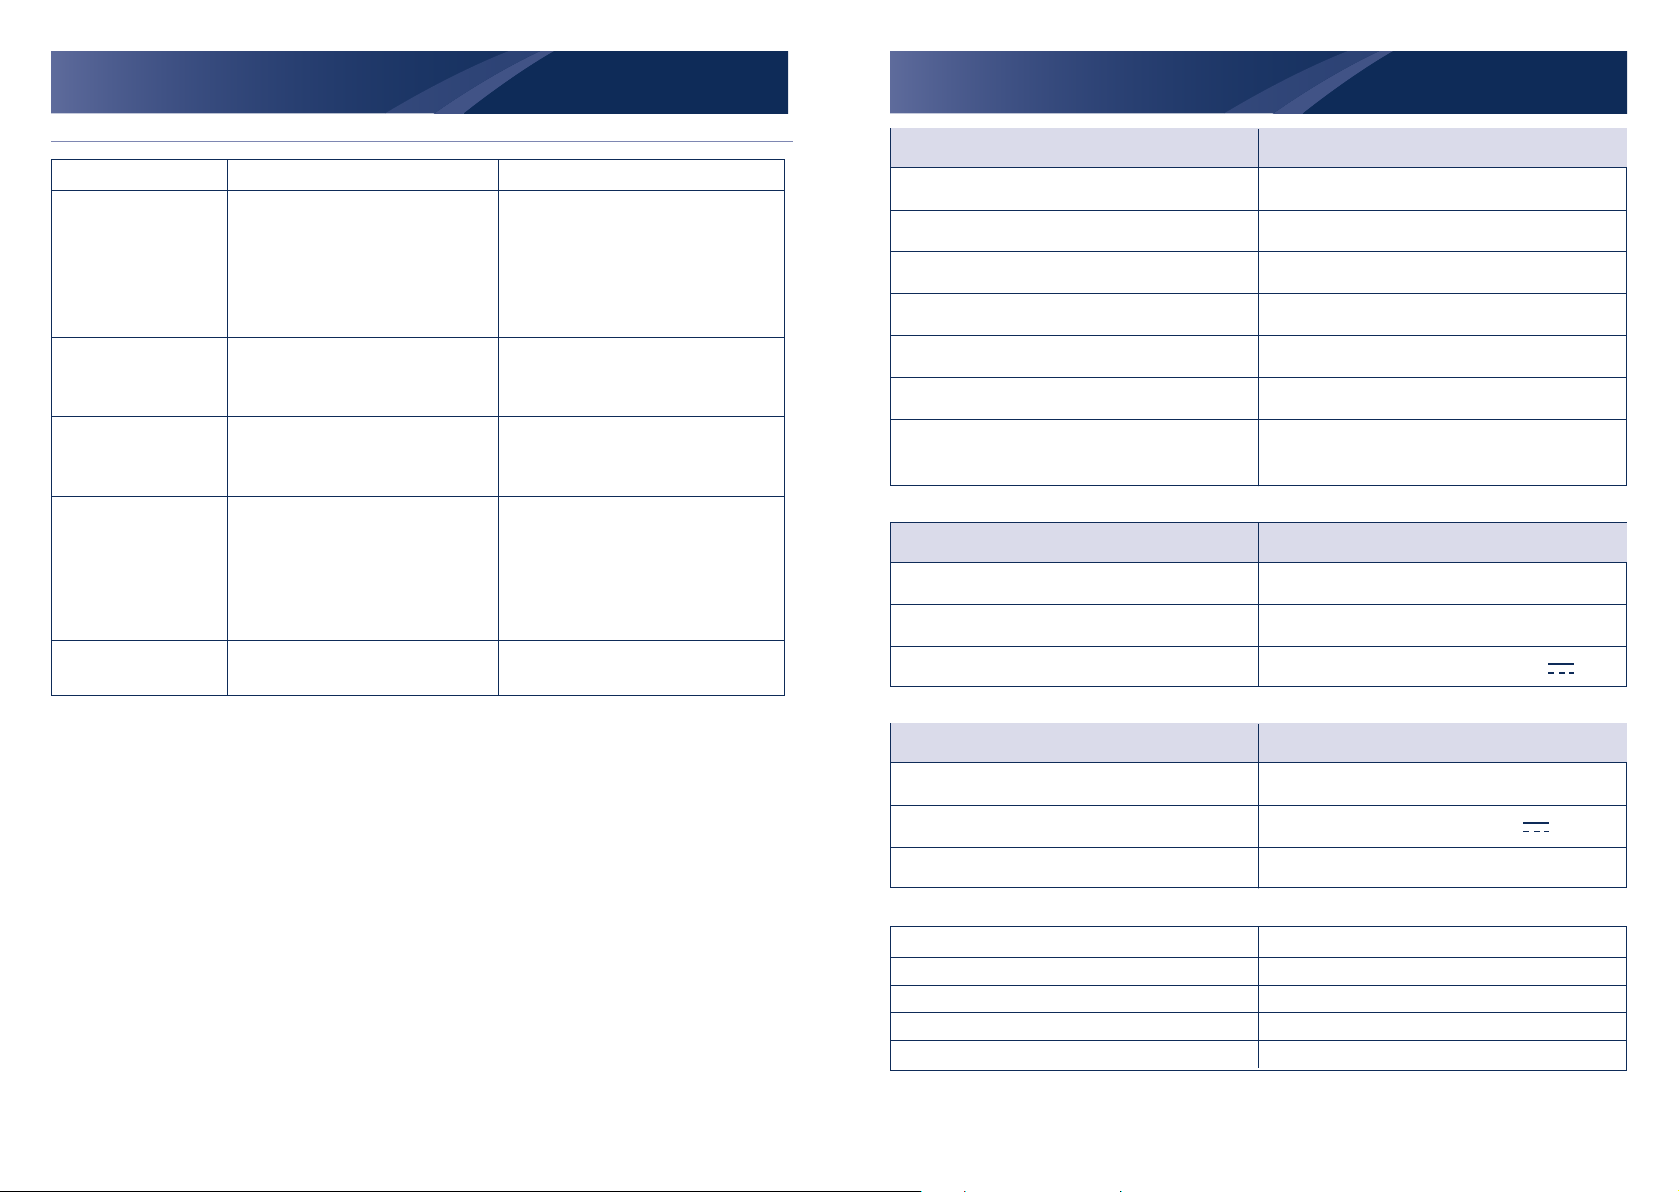
Problem Possible cause Solution
Product does not
start
Product does not
reach full power
Unsatisfactory result
Product suddenly
stops
Excessive vibration
or noise
• Battery pack not properly attached
• Battery pack discharged
• Battery pack damaged
• Other electrical defect to the
product
• Battery pack capacity too low
• Air vents are blocked
• Accessory is worn
• Accessory not suitable for
intended operation
• Product overloaded
• Battery pack discharged
• Battery pack too hot
• Accessory is dull / damaged
• Bolts/nuts are loose
• Atach properly
• Remove and charge the battery
pack
• Check by a specialist electrician
• Check by a specialist electrician
• Remove and charge the battery
pack
• Clean the air vents
• Replace with a new one
• Use suitable accessory
• Remove the product from the
workpiece and switch it on again
• Remove and charge the battery
pack
• Remove the battery pack and let
it cool down
• Replace with a new one
• Tighten bolts/nuts
TECHNICAL DATA
Model No. S3635CC
Nominal voltage of product with battery 2x18V 2.0Ah Li-ion
Chain speed 8.5m/s
Bar length 350mm(14”)
Bar/chain code Oregon, 90PX052X / 144MLEA041
Net weight 3.8kg
Oil tank capacity 150ml
Vibrations Rear handle: 4.92m/s2, K=1.5m/s
Front handle: 2.57m/s2, K=1.5m/s
Charger
Model No. B0Q-SP07-2040ZB
Input voltage & power 220-240V AC, 50/60Hz 120W
Output voltage & current 21V , 4A
2
2
Battery pack
Model No. B0P-SP07-18-D(5INR19/65)
Battery voltage 18V , Li-ion
Battery capacity 2.0Ah
Part Number Accessories
1970ZA0026 Bar
1970ZA0027 Chain
S3635cc-01 Battery
S3635cc-02 Charger
40 41AFTER SALES SUPPORT 0345 605 2067 AFTER SALES SUPPORT 0345 605 2067
Page 22

TECHNICAL DATA
Noise emission value:
Noise measurement value determined in accordance with EN 60745. The A-rated noiselevel of
the power tool is typically as follows:
Sound pressure level LPA: 81.9dB(A)
Uncertainty k= 3 dB(A)
Sound power level LWA: 92.8dB(A)
Uncertainty k= 2.6 dB(A)
Guaranteed sound power level LWA: 96dB(A)
The vibration level varies in accordance with the use of the power tool and may be higher than
the value specified in these instructions in some cases.There is a risk of underestimation of the
vibration load if the power tool is used regularly in this manner. Try to keep the vibration loads as
low as possible. Measures to reduce the vibration load are, e.g. wearing gloves and limiting the
working time. Where in all states of operation must be included (e. g.times when the power tool
is switched off and times where the power tool is switched on but running without load).
NOTE
The vibration level specied in these instructions has been measured in accordance
with a standardised measuring procedure specied in EN 607 45 and can be used
to make equipment comparisons. The specied vibration emission value can also
be used to make an initial exposure estimate.
WARRANTY
If your device develops a fault, please don’t hesitate to contact our customer service
department on 0345 605 2067, the majority of problems can be solved directly on the
phone.
1. These warranty terms cover additional warranty rights and do not affect your statutory
warranty rights. All our products are covered by a 3 year manufacturer warranty.
2. Claims must be accompanied by proof of purchase. This must be in the form of a sales
receipt or bank statement and must show that the product has been purchased within the
warranty period as described under point 1, from the retailer that it was originally bought
from. Please keep your receipt safe or staple it to the back of this manual for future
reference.
3. Our warranty covers problems caused by material or manufacturing defects, and will
result in the repair of these defects or replacement of the device with a like for like or
similar article.
4. Our devices have not been designed for commercial, trade or industrial applications, any
signs of use of the equipment in these application or equivalent activities, invalidates the
warranty.
5. The following are also excluded from our warranty:
A. Faults due to accidents, customer misuse or unauthorised repairs
B. Consumable parts such as batteries, chargers, blades, quick release locks, and other
accessories that are compatible with the product.
C. Failure due to lack of routine maintenance.
D. Failure as a result of not using the equipment in accordance with the manual and
safety instructions
E. The adjustment of cables, chargers, or battery packs
Warranty claims should be submitted before the end of the warranty period, see point 1, but
a paid service exists for repairs commissioned after this period. The original warranty period
remains applicable to the device even if repairs are carried out or parts are replaced.
In such cases, the work performed or parts tted will not result in an extension of the
warranty period, and no new warranty will become active for the work performed or parts
tted.
If you have any problems or questions concerning your garden power tool, please contact
our after sales service at 0345 605 2067.
42 43AFTER SALES SUPPORT 0345 605 2067 AFTER SALES SUPPORT 0345 605 2067
 Loading...