

Page 1

设计人员: QQ:
TEL:0573-83225888-503 Http:www.yattool.com
张妹珍 99739279 2018-1-26 Adobe Acrobat 7 Pro
制作日期: 运用软件:
名 称:
客 户:
料 号:
成品尺寸:
材 质:
说明书
CH171
8458-4353017-011
A5(148.5x210mm)
80g双胶纸
颜 色:
页 数:
备注:
一个专色(PT282U)
8张A4纸
Page 2

INSTRUCTION
MANUAL
2000W 40cm
Electric
Chainsaw S2040EC
YT4353-01
Important - Please read these instructions
fully before starting assembly
The instruction contain important information that will help you
get the best from your chain saw,ensuring it is assembled
correctly and safely.If you need help or have damaged or
missing parts, call the customer helpline on 0345 605 2070
AFTER SALES SUPPORT
0345 605 2070
Page 3

SPEAR & JACKSON SINCE 1760
For more than 250 years gardeners have enjoyed high quality performance
and great results using Spear & Jackson tools. Our garden power
tools combine continuous innovation and the latest in manufacturing
technologies with a proud heritage. Each product is carefully designed
with performance,comfort and durability rmly in mind,which has earned
Spear & Jackson an enviable reputation as a maker of tools to trust.
3 YEARS GUARANTEE
As a testament to the quality of our products, we offer a 3 year
manufacturers warranty and a comprehensive after sales service.
The warranty covers manufacturing faults, however in the event that the
item has been deliberately damaged, used in a commercial environment or
disassembled then the warranty will be null and void.
Please retain proof of purchase.
TECHNICAL SUPPORT
We want you to get the best out of your products. Our easy-to-read
instruction manu-al guides you with best practice use and maintenance
tips. Please call 0345 605 2070 for technical support, we can solve around
80% of questions directly over the phone.
We hope you enjoy your product and we look forward to any feedback, as
this allows us to develop even better products for the future.
2 AFTER SALES SUPPORT 0345 605 2070
Page 4

CONTENTS
SAFETY INFORMATION.........................................................................................................4
Description of symbols.....................................................................................4
General Power Tool Safety Warning..................................................................5
Work Safety.......................................................................................................5
Electrical Safety.................................................................................................5
Personal Safety.................................................................................................6
Power Tool Use and Care.................................................................................8
Intended use.....................................................................................................9
Residual risks...................................................................................................9
IN THE BOX.....................................................................................................................11
Parts list...........................................................................................................11
ASSEMBLE & PREPARE...............................................................................................12
PREPARE.............................................................................................................................12
Oil filling..........................................................................................................12
Remove the bar sheath...................................................................................12
Check the chain tension..................................................................................12
Settle the power cord......................................................................................13
Connect to the power source..........................................................................13
Locate the chain brake . ................................................................................13
Check the oil passes.......................................................................................14
OPERATE.........................................................................................................................14
Hold the machine............................................................................................15
Switch On/Off...................................................................................................16
Start cutting ...................................................................................................16
Disconnect the power source.........................................................................18
Limbing...........................................................................................................20
Bucking...........................................................................................................20
Bucking using a sawhorse..............................................................................21
Maintenance ....................................................................................................................23
Adjust the chain tension.................................................................................23
Cleaning saw body ........................................................................................24
Care of the chain.............................................................................................24
Care of guide bar.............................................................................................25
Flip the bar......................................................................................................25
Storing............................................................................................................26
TECHNICAL DATA................................................................................................................27
Environmental protection..................................................................................................27
TROUBLESHOOTING............................................................................................................28
WARRANTY..........................................................................................................................29
AFTER SALES SUPPORT 0345 605 2070 3
Page 5

SAFETY INFORMATION
Please read these instructions fully before operating or maintaining your machine
DESCRIPTION OF SYMBOLS
The following warning symbols appear throughout this manual and indicate
the appropriate safety measures you should take when operating and
maintaining the electric chain saw.
Indicates danger, warning, or
caution.
WARNING – To reduce the
risk of injury, user must read
instruction manual.
Wear ear protection, eye
protection, respirator and
gloves when using the
product.
Wear safety boots to protect
against electric shock
Do not expose to rain
Remove plug from the
mains immediately if cable is
damaged or cut
Make sure the
“chain brake” is
disengaged.
Conforms to relevant safety
standards.
This class II symbol indicates
that the product is correctly
insulated. Grounding
this machine is therefore
unnecessary.
onmentally friendly way. Please
recycle where facilities exist.
Check with your
local council authority for
recycling advice.
Guaranteed sound power level
(tested according to Directive
2000/14/EC as amended
by 2005/88/EC)
4 AFTER SALES SUPPORT 0345 605 2070
Page 6

SAFETY INFORMATION
Please read these instructions fully before operating or maintaining your machine
GENERAL POWER TOOLS SAFETY WARNINGS
WARNING Read all
safety warnings and
all instructions.
Failure to follow the
warnings and instructions
may result in electric shock,
re and/or serious injury.
WARNING! Read all
safety warnings
designated by the symbol
and all instructions.
Save all warnings and
instructions for future
reference.
The term "power tool" in
the warnings refers to your
mains-operated (corded)
power tool or batteryoperated (cordless) power
tool.
Work Area Safety
a) Keep work area clean
and well lit.
Cluttered or dark areas
invite accidents.
b) Do not operate power
tools in explosive
atmospheres, such
as in the presence of
ammable liquids, gases
or dust.
Power tools create
sparks which may ignite
the dust or fumes.
c) Keep children and
bystanders away while
operating a power tool.
Distractions can cause
you to lose control.
Electrical Safety
a) Power tool plugs must
match the outlet. Never
modify the plug in any
way. Do not use any
adapter plugs with
earthed (grounded)
power tools.
Unmodied plugs and
matching outlets will
reduce risk of electric
shock.
AFTER SALES SUPPORT 0345 605 2070 5
Page 7

SAFETY INFORMATION
Please read these instructions fully before operating or maintaining your machine
b) Avoid body contact with
earthed or grounded
surfaces, such as pipes,
radiators, ranges and
refrigerators.
There is an increased
risk of electric shock if
your body is earthed or
grounded.
c) Do not expose power
tools to rain or wet
conditions. Water
entering a power tool
will increase the risk of
electric shock.
d) Do not abuse the cord.
Never use the cord
for carrying, pulling or
unplugging the power
tool. Keep cord away
from heat, oil, sharp
edges or moving parts.
Damaged or entangled
cords increase the risk of
electric shock.
e) When operating a power
tool outdoors, use an
extension cord suitable
for outdoor use.
Use of a cord suitable for
outdoor use reduces the
risk of electric shock.
f) The use of a residual
current device (RCD)
when using this tool is
recommended. Use of
an RCD reduces the risk
of electric shock.
Personal Safety
a) Stay alert, watch what
you are doing and use
common sense when
operating a power tool.
Do not use a power
tool while you are tired
or under the inuence
of drugs, alcohol or
medication.
A moment of inattention
while operating power
tools may result in
serious personal injury.
b) Use personal protective
6 AFTER SALES SUPPORT 0345 605 2070
Page 8

SAFETY INFORMATION
Please read these instructions fully before operating or maintaining your machine
equipment. Always wear
eye protection.
Protective equipment
such as dust mask, nonskid safety shoes, hard
hat, or hearing protection
used for appropriate
conditions will reduce
personal injuries.
c) Prevent unintentional
starting. Ensure the
switch is in the offposition before
connecting to power
source and/or battery
pack, picking up or
carrying the tool.
Carrying power tools with
your nger on the switch
or energising power tools
that have the switch on
invites accidents.
d) Remove any adjusting
key or wrench before
turning the power tool
on.
A wrench or a key left
attached to a rotating
part of the power tool
may result in personal
injury.
e) Do not overreach. Keep
proper footing and
balance at all times.
This enables better
control of the power tool
in unexpected situations.
f) Dress properly. Do not
wear loose clothing or
jewellery. Keep your hair,
clothing and gloves away
from moving parts.
Loose clothes, jewellery
or long hair can be
caught in moving parts.
g) If devices are provided
for the connection of dust
extraction and collection
facilities, ensure these
are connected and
properly used.
Use of dust collection
can reduce dust-related
hazards.
AFTER SALES SUPPORT 0345 605 2070 7
Page 9

SAFETY INFORMATION
Please read these instructions fully before operating or maintaining your machine
Power Tool Use and Care
a) Do not force the power
tool. Use the correct
power tool for your
application.
The correct power tool
will do the job better
and safer at the rate for
which it was designed.
b) Do not use the power
tool if the switch does
not turn it on and off.
Any power tool that
cannot be controlled with
the switch is dangerous
and must be repaired.
c) Disconnect the plug from
the power source and/
or the battery pack from
the power tool before
making any adjustments,
changing accessories, or
storing power tools.
Such preventive safety
measures reduce the risk
of starting the power tool
accidentally.
d) Store idle power tools
out of the reach of
children and do not allow
persons unfamiliar with
the power tool or these
instructions to operate
the power tool. Power
tools are dangerous in
the hands of untrained
users.
e) Maintain power tools.
Check for misalignment
or binding of moving
parts, breakage of parts
and any other condition
that may affect the
power tool’s operation.
If damaged, have the
power tool repaired
before use.
Many accidents are
caused by poorly
maintained power tools.
f) Keep cutting tools sharp
and clean.
Properly maintained
cutting tools with sharp
8 AFTER SALES SUPPORT 0345 605 2070
Page 10

SAFETY INFORMATION
Please read these instructions fully before operating or maintaining your machine
cutting edges are less
likely to bind and are
easier to control.
g) Use the power tool,
accessories and tool bits
etc. in accordance with
these instructions, taking
into account the working
conditions and the work
to be performed.
Use of the power tool for
operations different from
those intended could
result in a hazardous
situation.
Intended use
The chain saw is intended
for sawing of trees, tree
trunks, branches, wooden
beams, planks, etc. Cuts
can be sawed with or
across the grain. This
product is not suitable for
sawing mineral materials.
Furthermore a professional
use for tree services is
strictly forbidden.
The user and not the
manufacturer is liable
for every accident which
results from a combination
of not intended use or a
not allowed change of
the construction on the
machine.
The chain saw is only
intended to use outdoor.
Residual risks
Even with the intended
use of the appliance there
is always a residual risk,
which can not prevented.
According to the type
and construction of the
appliance the following
potential hazards might
apply:
- Contact with exposed
saw teeth of the saw
chain (cutting hazards)
AFTER SALES SUPPORT 0345 605 2070 9
Page 11

SAFETY INFORMATION
Please read these instructions fully before operating or maintaining your machine
- Access to the rotating
saw chain (cutting
hazards)
- Unforeseen, abrupt
movement of the guide
bar (cutting hazards)
- Flung out of parts from
the saw chain (Cutting /
injection hazards)
- Flung out of parts of the
work piece
- Inhalation of work peace
particles,
- Skin contact with the oil,
- Loss of hearing, if no
required ear protection
used during work.
10 AFTER SALES SUPPORT 0345 605 2070
Page 12
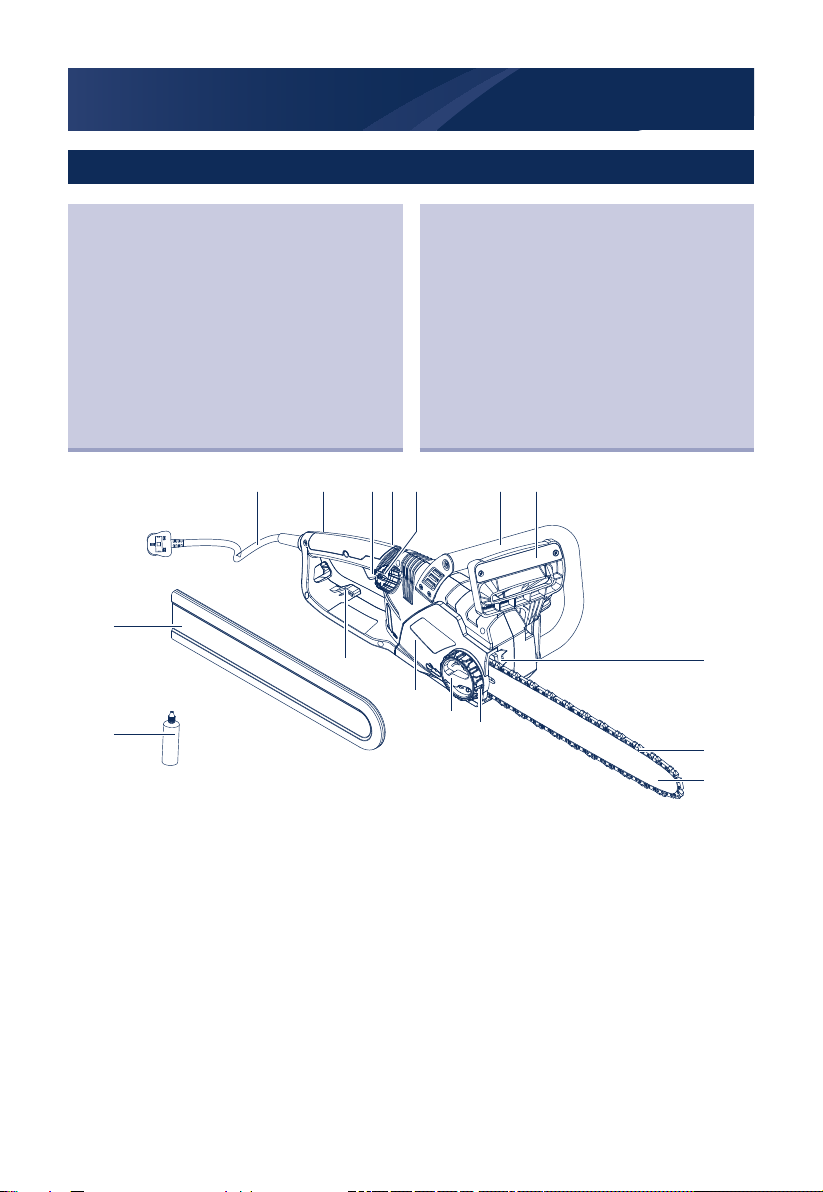
IN THE BOX
Parts List
1.REAR HANDLE
2.SWITCH ON/OFF
3.LOCK-OFF BUTTON
4.OIL TANK CAP
5.FRONT HANDLE
6.BRAKE (HAND GUARD)
7.GUIDE BAR
8.CHAIN
9.BAR COVER
14
13
15
10.BAR LOCKING KNOB
11.CHAIN TENSIONING KNOB
12.SPIKED BUMPER
13.CHAIN SHEATH
14.POWER CORD/CABLE
15.OIL BOTTLE.
16.CABLE CLIP
1
2 3 5 64
16
9
10
11
12
8
7
AFTER SALES SUPPORT 0345 605 2070 11
Page 13
ASSEMBLE
The chain saw has been assembled in
the standard delivery so no need for extra
assembling steps.
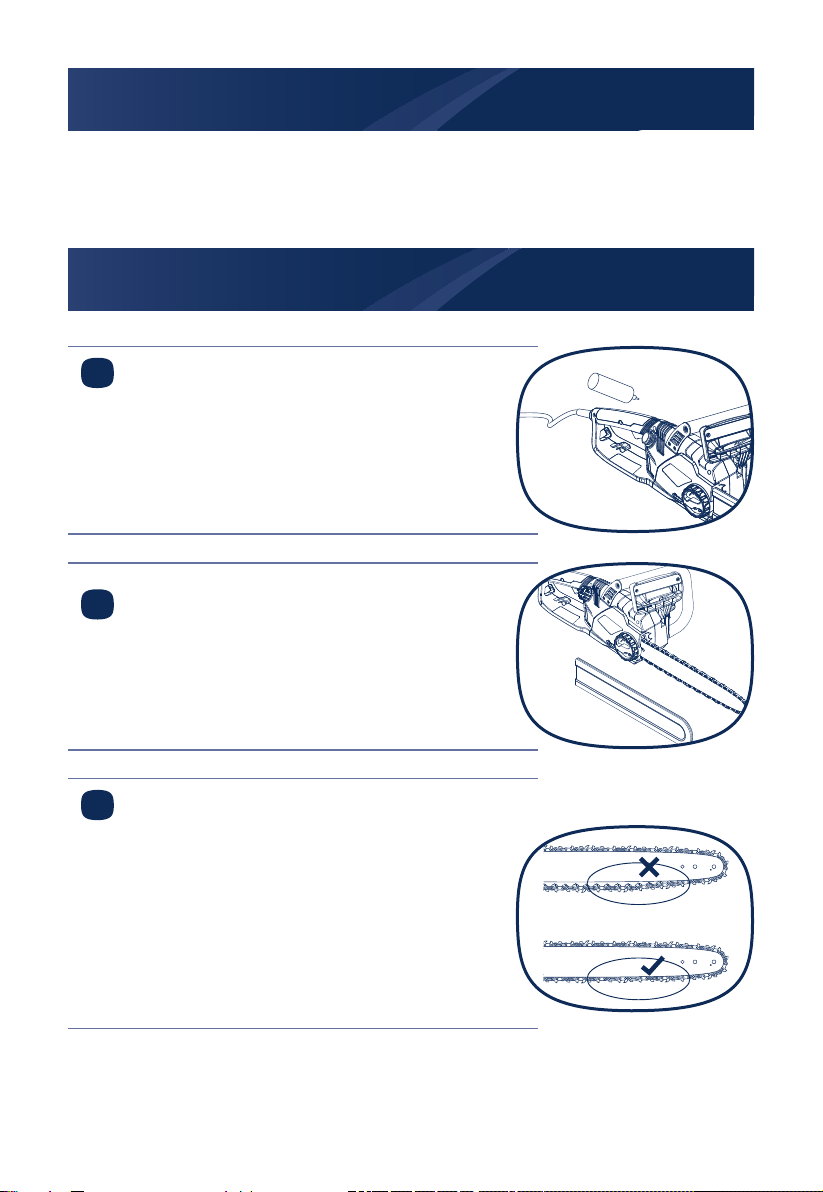
PREPARE
1
Oil lling
Open the oil bottle (press the cap on the oil
bottle and turn counterclockwise to open it ),
then open oil tank cap to ll in the oil.
Remove the bar sheath
2
Check the chain tension
3
Always check the chain tension before use, after
the rst cuts and regularly during use, approx.
every 10 minutes.
The lowest cutters should be underneath the
bar solidly and contact the bar,if not,adjust the
chain with protection gloves ( Please refer to the
detailed info in later chapter "Adjust the chain
tension" ).
12 AFTER SALES SUPPORT 0345 605 2070
Page 14

PREPARE
brake disengage
brake engage
4
Settle the power cord.
The power cord should be wrapped around
the cable clip to avoid long lines stumbling
pedestrians or causing electric shock.
5
Connect to the power source
Insert the power cord/plug to the power source
before starting to work.
6
Locate the chain brake
The motor will not start if the chain brake is in
the engaged position.
Disengage the chain brake level by pulling
backward toward the front handle. Keep brake
setting is in correct position before use,and
ensure chain saw operate normally.
AFTER SALES SUPPORT 0345 605 2070 13
Page 15

PREPARE
Chain oil
Make sure the chain brake is working before
using the chain saw. To check brake operation:
• Place the saw on a rm, at surface.
• Start the saw briey. Please refer to later
chapter "switch on/off" for how to start the
machine
• Keep the left hand on the front handle and
roll the left wrist to move the front hand guard
forward to manually activate the chain brake.
If the chain brake works normally the machine
will stop after brake engage.Otherwise there is
malfunction to the machine and seek help from
service center before using.
Check the oil passes
7
Start the machine and check whether the chain
can give off a spray of oil within a few seconds.
If an oil trace can be seen, the chainsaw is
lubricating.
NOTE! Never saw when a sufcient chain
lubrication is not guaranteed. Before starting
work check the oil level in the tank and the oil
feeding.
14 AFTER SALES SUPPORT 0345 605 2070
Page 16

PREPARE
Caution! Never starve the bar and chain of
lubrication oil. Running the saw dry or with too little
oil will decrease cutting efciency, shorten chain
saw life, and cause rapid during of the chain and
excessive wear of the bar from overheating. Too little
is evidenced by smoke or bar discoloration.
> Kickback.
Kickback is the sudden backward/upward motion
of the chain saw, occurring when the chain (at the
tip of the chain bar) comes in contact with a log or
wood, or when the chain becomes jammed. When
kickback occurs the chain saw reacts unpredictably
and can cause severe injuries to the operator or
bystanders. Particular attention must be given when
sawing sideward, slanted or during length cuts, as
the spiked bumper usually can not be applied.
To avoid kickback:
> Saw with guide bar at a at angle:
> Never work with a loose, widely stretched or the
heavily worn out chain:
> Ensure chain is sharpened correctly:
> Never saw above shoulder height:
> Never work with the tip of the guide bar:
> Always hold the chain saw rmly with both hands:
> Always use a low kickback chain:
> Apply the metal gripping teeth for leverage:
> Ensure correct chain tension:
Hold the machine
Always hold the chain saw rmly with both hands.
Front grip with the left hand and rear grip with the
right hand. Fully grip both handles at all times during
operation. Never operate chain saw using only one
hand. Ensure power cord is located to the rear, away
from the chain and wood and so positioned that it will
AFTER SALES SUPPORT 0345 605 2070 15
Page 17

OPERATE
brake
disengaged
1
2
not be caught on branches or the like during cutting.
Use the chain saw only with secure footing. Hold the
chain saw at the right-hand side of your body
Switch on / off
Switch on the machine: press the lock-off button 1
, then fully press the on/off switch 2 and hold in this
position to start the cutting work.
The lock-off button 1 can now be released.
Release the Trigger switch On / Off 2 to stop the
machine,the chain stops completely after a few
seconds.
Do not stop chain saw when sawing through activating
the front hand guard (chain brake)!
Start cutting
The chain must be running at full speed before it
makes contact with the wood. Use the metal gripping
teeth to secure the saw onto the wood before starting
to cut. Use the gripping teeth as a leverage point
while cutting.
> Reset the gripping teeth at a low point when
sawing thicker logs by pulling the chain saw slightly
backwards until the gripping teeth release, and
reposition at lower level to continue sawing. Do not
remove the saw completely from the wood.
> Do not force the chain while cutting, let the chain do
the work, using the gripping teeth to apply minimal
leverage pressure.
16 AFTER SALES SUPPORT 0345 605 2070
Page 18

OPERATE
> Do not operate the chain saw with arms fully
extended or attempt to saw areas which are difcult
to reach, or on a ladder. Never use the chain saw
above shoulder height.
> Sawing is optimized when the chain speed remains
steady during cutting.
> Beware when reaching the end of the cut. The
weight of the saw may change unexpectedly as it
cuts free from the wood. Accidents can occur to
the legs and feet. Always remove the saw from a
wood cut while the saw is running.
> Cutting logs. Observe the following safety
instructions:
> Support logs so that the face sides at the cut do
not close in against each other, which would result
in the chain being jammed or pinched.
> Position and set short logs safety prior to sawing.
Saw only wood or wooden objects. When sawing,
always take care to avoid hitting stones, nails, etc,
as these could be thrown up or cause damage
to the chain or serious injury to the operator or
bystanders.
> Keep a running saw clear or wire fencing or the
ground. Use of the saw to thin out branches or
bushes is not approved.
> Length cuts must be carried out with care, as
leverage with the gripping teeth is not possible.
Saw at a at angle to avoid kickback.
> When working on a slope, operate above or to the
side of the trunk or laying tree.
> Be careful not to trip over tree stumps, branches,
roots, etc.
AFTER SALES SUPPORT 0345 605 2070 17
Page 19

OPERATE
Disconnect the power source
Disconnect the plug source for safety. When the
machine is cooled down for several minutes, it is
advised to put on the blade protection cover for
longer storage.
Tips:
I. Felling.
Felling is the term for cutting down a tree. Small trees
up to 15-18cm in diameter are usually cut in a single
cut. Larger trees require notch cuts. Notch cuts
determine the direction the tree will fall.
Warning! A retreat path (A) should be planned and
cleared as necessary before cuts are started. The
retreat path should extend back and diagonally to the
rear of the expected line.
Warning! If felling a tree on sloping ground, the chain
saw operator should keep on the uphill side of the
terrain, as the tree is likely roll or slide down hill after is
felled.
Note: Direction of fall (B) is controlled by the notching
cut. Before any cuts are made, consider the location
of larger branches and natural leaves of the tree as
well as the wind direction to determine the way the
tree will fall.
Warning! Do not cut down a tree during high or
changing winds or if there is a danger to properly.
Consult a tree professional. Do not cut down a tree
if there is a danger of striking utility wires: notify the
utility company before making any cuts. Remove dirt,
stones, loose bark, nails, staples and wire from the
tree.
18 AFTER SALES SUPPORT 0345 605 2070
Page 20

OPERATE
II. General guidelines for felling trees.
Normally felling consists of 2 main cutting operations,
notching(C) and making the felling cut (D). Start
making the upper notch cut (C) on the side of the
tree facing the felling direction (E). Be sure you don't
make the lower cut too deep into the trunk. The notch
(e) should be deep enough to create a hinge (F) of
sufcient width and strength. The notch should be Fig
23 wide enough to direct the fall of the tree for as long
as possible.
Warning! Never walk in front of a tree that has been
notched. Make the felling cut (D) from the other side
of the tree and 3-5cm above the edge of the notch (C).
Warning! Don’t use the saw above shoulder-height,
because of difcult handling of the chainsaw which
can cause serious injury. Take care of a stable position
so you have good control on the chain saw.
Never saw completely through the trunk. Always
leave a hinge. The hinge guides the tree. If the trunk
is completely cut through, control over the felling
direction is lost. Insert a wedge or felling lever in the
cut well before the tree becomes unstable and starts
to move. This will prevent the guide bar from binding
in the felling cut if you have misjudged the falling
direction. Make sure no bystanders have entered the
range of the falling tree before you push it over.
Warning: As the felling cut (D) gets close to the hinge
(F), the tree should begin to fall. Remove saw from
cut, stop the engine, put the chainsaw down and
leave the area by the retreat path.
III. Felling cut.
Use wooden or plastic wedges (A) to prevent binding
the bar or chain (B) in the cut. Wedges also control
felling.
AFTER SALES SUPPORT 0345 605 2070 19
Page 21

OPERATE
A
When diameter of wood being cut is greater than the
bar length, make 2 cuts as shown.
Limbing
Limbing a tree is the process of removing the
branches from a fallen tree. Do not remove supporting
limbs (A) until after the log is bucked (cut) Into lengths.
Branches under tension should be cut from the
bottom up to avoid binding the chain saw.
Warning: Never cut tree limbs while standing on tree
trunk.
Bucking
Bucking is cutting a fallen log into lengths. Make sure
you have a good footing and stand up hill of the log
when cutting on sloping ground. If possible, the log
should be supported so that the end to be cut off is
not resting on the ground. If the log is supported at
both ends and you must cut in the middle, make a
downward cut halfway through the log and then make
the undercut. This will prevent the log from pinching
the bar and chain.
Be careful that the chain does not cut Into the ground
when bucking as this causes rapid dulling of the
chain. When bucking on a slope, always stand on the
uphill side.
> Log supported along entire length: Cut from top
(over buck), being careful to avoid cutting into the
ground
20 AFTER SALES SUPPORT 0345 605 2070
Page 22

OPERATE
Log supported on 1end: First, cut from bottom (under
buck) 1/3 diameter of log to avoid splintering.
Second, cut from above (over buck) to meet rst cut
and avoid pinching
> Log supported on both ends: First. over buck 1/3
diameter of log to avoid splintering. Second, under
buck to meet rst cut and avoid pinching.
Note: The best way to hold a log while bucking is to
use a sawhorse. When this is not possible, the log
should be raised and supported by the limb stumps
or by using supporting logs. Be sure the log being cut
is securely supported.
Bucking using a sawhorse
For personal safety and ease of cutting, the correct
position for vertical bucking is essential. Vertical
cutting:
> Hold the saw rmly with both hands and keep the
saw to the right of your body while cutting.
> Keep the left arm as straight as possible.
> Keep weight on both feel.
Caution! While the saw is cutting, be sure the chain
and bar are being properly lubricated.
The three golden rules for care
1. Regularly grease the moving parts .
2. Check that ventilation holes , bar rails and oil
passages are always unobstructed and clean.
3. Clean the chain saw with a soft brush and clean
cloth . Do not use water , solvents or polishers.
AFTER SALES SUPPORT 0345 605 2070 21
Page 23

OPERATE
Replacing/changing chain and guide bar
Fit the chain and guide bar as described in “Assembly
and Tensioning Chain”. The circular groove of the
guide bar will wear particularly on the lower edge
with time. When replacing the chain turn the chain
bar 180° to allow even wear, thus extending chain
bar life. Check drive sprocket. If it is worn out or
damaged due to strain, have it exchanged by an
authorized service agent. If the chain bar is worn out
or damaged, have it exchanged by an authorized
service agent
22 AFTER SALES SUPPORT 0345 605 2070
Page 24

MAINTENANCE
Max.2mm
9N
Warning: Disconnect the power source before
servicing, sever injury or death could occur
from electrical shock or body contact with
moving chain.
Warning: Cutting edges or chain are sharp, use
protective gloves when handling chain.
Warning: Do not use water, solvents or polishes
as medium for clearance and maintenance.
Remove all debris, especially from the motor
cooling vents.
Adjust the chain tension
Loosen the bar locking knob(the inner circle) slightly,
but do not remove the side cover.
Hold up the nose of the guide bar and turn the chain
tensioning knob(the out circle) clockwise.
When the saw chain is tensioned with 9N (approx.1kg),
the gap between the saw chain and the guide rail
should never be more that 2mm.
Do not over tension the chain as this will reduce life of
chain bar and motor. With a correctly tensioned chain
you will get good cutting performance and a longer
life.
AFTER SALES SUPPORT 0345 605 2070 23
Page 25

MAINTENANCE
1
5
Tighten the bar locking knob(the inner circle) by
turning it counter-clockwise.
Cleaning saw body
Keep saw body clean, use a soft cloth dampened
with a mild soap and water mixture, wipe saw body to
clean.
clean the area under the cover plate, the drive procket
and chain bar assembly using a soft brush. And oil
outlet with a clean cloth.
Care of the chain
Remove sheath and clean the chain with a clean cloth
after 1 to 3 hours of use.
When working,keep it is with chain oil.
And use tool to sharpen the chain when it become
not sharp.
24 AFTER SALES SUPPORT 0345 605 2070
Page 26

MAINTENANCE
Care of guide bar
Wear gloves.
• Unplug the chain saw.
• Loosen the side cover release knob slightly, but do
not remove the side cover.
• Loosen the chain tensioning ring (turn it counter
clockwise) as far as it will go.
• Loosen the side cover release knob and remove
the side cover.
• Remove the bar and chain and inspect for damage
and wear.
• Remove the screw from the back side of the chain
tensioning gear and remove the chain tensioning
gear from the guide bar.(Fig.9)
Flip the bar
• There is a rubber washer that is important to the
function of the chain lubrication. The rubber washer
must be in place around the pin on the tensioner
before the tensioner is screwed onto the bar
AFTER SALES SUPPORT 0345 605 2070 25
Page 27

MAINTENANCE
BAR PAD
ALIGNMENT FLANGE
MOUNTING STUD
• Place the chain tensioning gear on the side of the
guide bar facing you such that the rectangular
piece does not protrude past the edges of the
guide bar and replace the screw.
• Place the guide bar on the bar pad by sliding the
bar slot over the alignment ange.
Remove guide bar from chain saw. remove sawdust
from guide bar groove periodically. use putty knife
or wire. clean oil slots after each day of use. remove
burrs from sides of guide bar. use at le to make side
edges square.
IMPORTANT! Remove and brush clean the cover
plate, chain and chain bar after 1 to 3 hours
of use.
Inspect guide bar before sharpening chain. A worn
or damaged guide bar is unsafe. A worn or damaged
guide bar will damage chain, it will also make cutting
harder. replaces guide bar if this occurs.
Storing
If the chain saw is to be stored for a longer period of
time, clean chain and chain bar.
Store in a secure, dry place out of the reach of
children. do not place other objects on the chain
saw. to prevent leakage ensure machine is left in a
horizontal position (oil tank cap 4 uppermost). when
storing machine in original packaging the oil tank
must be completely emptied.
26 AFTER SALES SUPPORT 0345 605 2070
Page 28

TECHNICAL DATA
Model YT4353-01
Voltage
Rated power 2000W
No-load speed
Bar length 40cm
Chain speed
Oil tank capacity 150ml
Chain pitch
Number of chain links 56
Chain gauge 0.05”
Protection class II
Machine weight (chain & bar included) 6.6kg
Sound pressure level LPA 93.99dB(A)
Sound power level LWA 104.32dB(A)
Guaranteed sound power level LWA 110dB(A)
Vibration a
PART NUMBER ACCESSORIES
91PJ056X Chain
h
220-240V/50Hz
8000/min
13.5 m/s
3/8”
5.084m/s2 K=1.5m/s
2
160SDEA041 Bar
Environmental Protection
Waste electrical products should not be disposed of with household waste.
Please recycle where facilities exist. Check with your Local Authority or retailer for
recycling advice.
AFTER SALES SUPPORT 0345 605 2070 27
Page 29

TROUBLESHOOTING
Never use tools with defective On/Off switches or defective Kickback brake(Hand
Guard).
In the case of all other types of technical faults, please contact helpline 0345 605 2070
or local service center.
Fault Possible Cause Solution
Tool will not start Lock button not pressed. Press the lock button.
"Front guard in the
brake position"
Blown fuse Replace fuse
Tripped RCD Check RCD
TMains loead not connected Check mains supply
Chain does not stop within
2 seconds when the tool is
switched off
"Bar/chain appear hot/
smoking"
Chainsaw does not cut well Chain on backwards "Check/modify chain
Chainsaw not using oil Debris in tank Empty oil from tank and
Chain tension is too slack Check chain tension
Oil tank empty Check oil tank level
Oil hole blocked on chain
bar
Chain tension is too tight Check chain tension
"Guide bar sprocket
nose needs greasing"
Oil hole in cap blocked "Remove debris from
Debris in chain bar "Remove debris and
Debris in oil outlet Remove debris
Reset front guard
Clean oil hole and clear the
groove around the edge of
the chainbar.
"Oil the guide bar
sprocket nose"
direction"
Sharpen
replace
hole"
clean the chain bar"
28 AFTER SALES SUPPORT 0345 605 2070
Page 30

WARRANTY
If your device develops a fault, please don’t hesitate to contact our customer service
department on 0345 605 2070, we can solve 80% of problems via the phone.
1. These warranty terms cover additional warranty rights and do not affect your statutory
warranty rights. All our products are covered by a 3 year manufacturer warranty.
2. Claims must be accompanied by proof of purchase. This must be in the form of a
sales receipt or bank statement and must show that the product has been purchased
within the warranty period as described under point 1, from the retailer that it was
originally bought from. Please keep your receipt safe or staple it to the back of this
manual for future reference.
3. Our warranty covers problems caused by material or manufacturing defects, and will
result in the repair of these defects or replacement of the device with a like for like or
similar article.
4. Our devices have not been designed for commercial, trade or industrial applications,
any signs of use of the equipment in these application or equivalent activities,
invalidates the warranty.
5. The following are also excluded from our warranty:
A. Faults due to accidents, customer misuse or unauthorized repairs
B. Consumable Parts such as chain, bar and other accessories that are compatible
with the product.
C. Failure due to lack of routine maintenance.
D. Failure as a result of not using the equipment in accordance with the manual and
safety instructions
Warranty claims should be submitted before the end of the warranty period, see point 1,
but a paid service exists for repairs commissioned after this period. The original warranty
period remains applicable to the device even if repairs are carried out or parts are
replaced. In such cases, the work performed or parts tted will not result in an extension
of the warranty period, and no new warranty will become active for the work performed
or parts tted.
If you have any problems or questions concerning your garden power tool, please
contact our after sales service at 0345 605 2070.
This device may be re-conditioned, like for like or upgraded replacement.
AFTER SALES SUPPORT 0345 605 2070 29
Page 31

Page 32

Page 33

 Loading...