

Page 1

18V
Cordless
Pole Saw
N0F-GT-250/18-D
ORIGINAL
INSTRUCTION
MANUAL
Important - Please read these instructions
fully before starting assembly
These instructions contain important information that will help
you get the best from your pole saw, ensuring it is assembled correctly
and safely. If you need help or have damaged or missing parts,
call the Customer Helpline on 0345 605 2067
AFTER SALES SUPPORT
0345 605 2067
Page 2

SPEAR & JACKSON SINCE 1760
For more than 250 years gardeners have enjoyed high quality performance and
great results using Spear & Jackson tools.
Our garden power tools combine continuous innovation and the latest in
manufacturing technologies with a proud heritage.
Each product is carefully designed with performance, comfort and durability
rmly in mind, which has earned Spear & Jackson an enviable reputation as a
maker of tools to trust.
3 YEARS GUARANTEE
As a testament to the quality of our products, we offer a 3 year manufacturers warranty and a comprehensive after sales service.
The warranty covers manufacturing faults, however in the event that the item has
been deliberately damaged, used in a commercial environment or disassembled then
the warranty will be null and void.
Please retain proof of purchase.
7 DAYS A WEEK TECHNICAL SUPPORT
We want you to get the best out of your products. Our easy-to-read instruction manual guides you with best practice use and maintenance tips. Please call 0345 605 2067
for technical support, we can solve around 80% of questions directly over the phone.
We hope you enjoy your product and we look forward to any feedback, as this allows
us to develop even better products for the future.
2 AFTER SALES SUPPORT 0345 605 2067
Page 3

CONTENTS
Safety Information 04
Description of symbols 04
Warning symbols on the charger
Warning symbols on the battery pack
General safety
Additional safety instructions for batteries and chargers
Additional safety instructions for pole saw
Training
Prepare
Operate
Intended use
06
17
17
18
18
Box Content / Parts 19
Assemble 20
Unpacking 20
Assemble the front handle
Assemble the shoulder strapper
Fill lubrication oil
Charging the battery
Check battery capacity
21
22
24
Operate 25
Telescopic handle adjustment 25
Install battery pack
Remove the battery from product
Switching on/off
Check the oil supply
Chain tension
Pruning
Pull sawing
Push sawing
Tree cutting
28
28
29
25
26
26
27
29
Maintenance 30
Troubleshooting 36
Technical Data 37
Warranty 39
05
05
10
14
20
21
25
3AFTER SALES SUPPORT 0345 605 2067
Page 4
SAFETY INFORMATION
Please read these instructions fully before operating or maintaining your machine
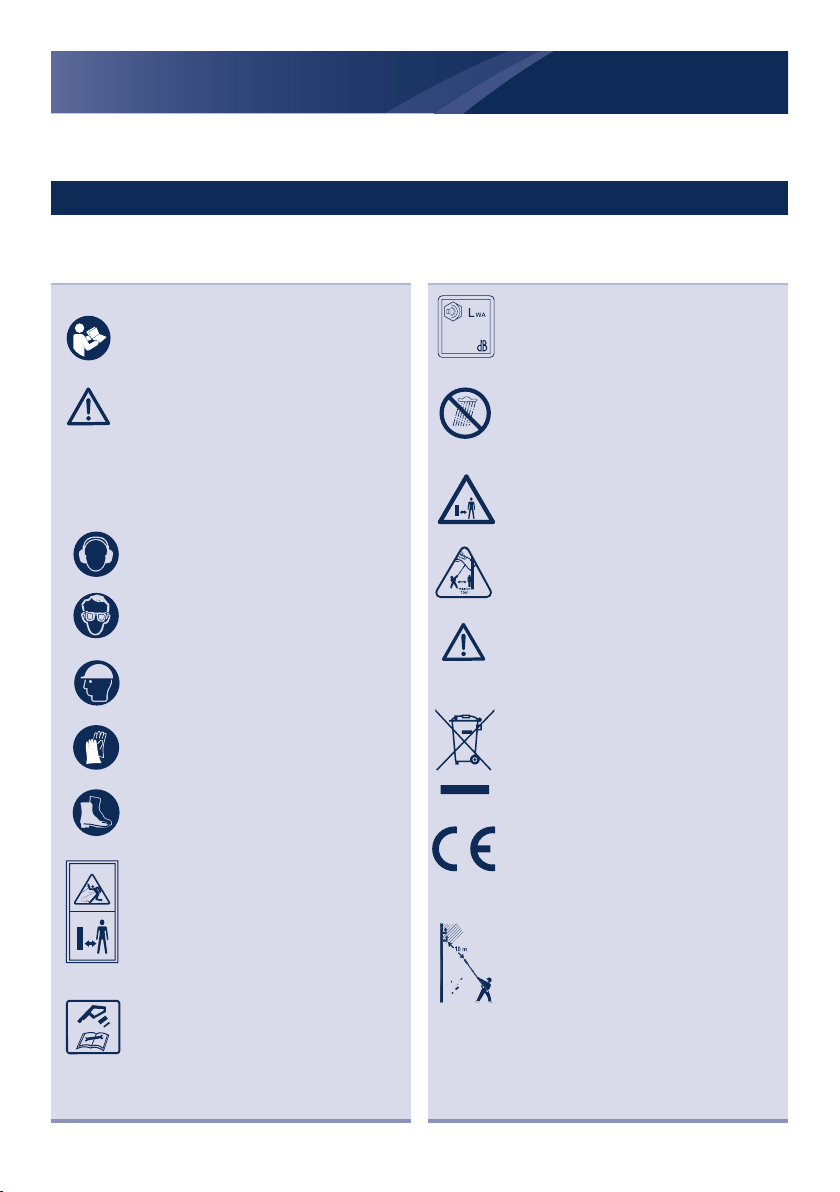
DESCRIPTION OF SYMBOLS
The following warning symbols appear throughout
safety measures you should take when operating and maintaining the pole saw.
Read instruction handbook before
operating this machine.
WARNING!
This is a warning symbol. This
symbol is used throughout the user
guide whenever there is a risk of
personal injury. Ensure that these
warnings are read and understood at
all times.
this manual and indicate the appropriate
Guaranteed sound power level in
93dB.
93
Do not expose and operate the tool
in rain.
Risk of fatal electric shock. At least
10m distance from overhead lines to
keep.
This symbol indicates the
requirement of wearing ear.
Keep all bystanders at least 50
ft.(15m) away.
Protection and eye protection when
using the product.
DANGER! Beware of kickback.
Wear safety helmet
Waste electrical products should not
Wear protection gloves
be disposed of with household waste.
Please recycle where facilities exist.
Check your Local Authority or retailer
for recycling advice.
Wear proper safety shoes.
The product complies with the
applicable European directives and an
Keep bystanders away.
Thrown objects can cause serious
injury
Disconnect the battery pack before
any repair or maintenance.
evaluation method of conformity for
these directives was done.
Warning! The device is not protected
against electric shocks when it
touches high-voltage lines! Maintain
a safe distance of 10m from live
electrical lines.
AFTER SALES SUPPORT 0345 605 2067
4
Page 5
SAFETY INFORMATION
Please read these instructions fully before operating or maintaining your machine
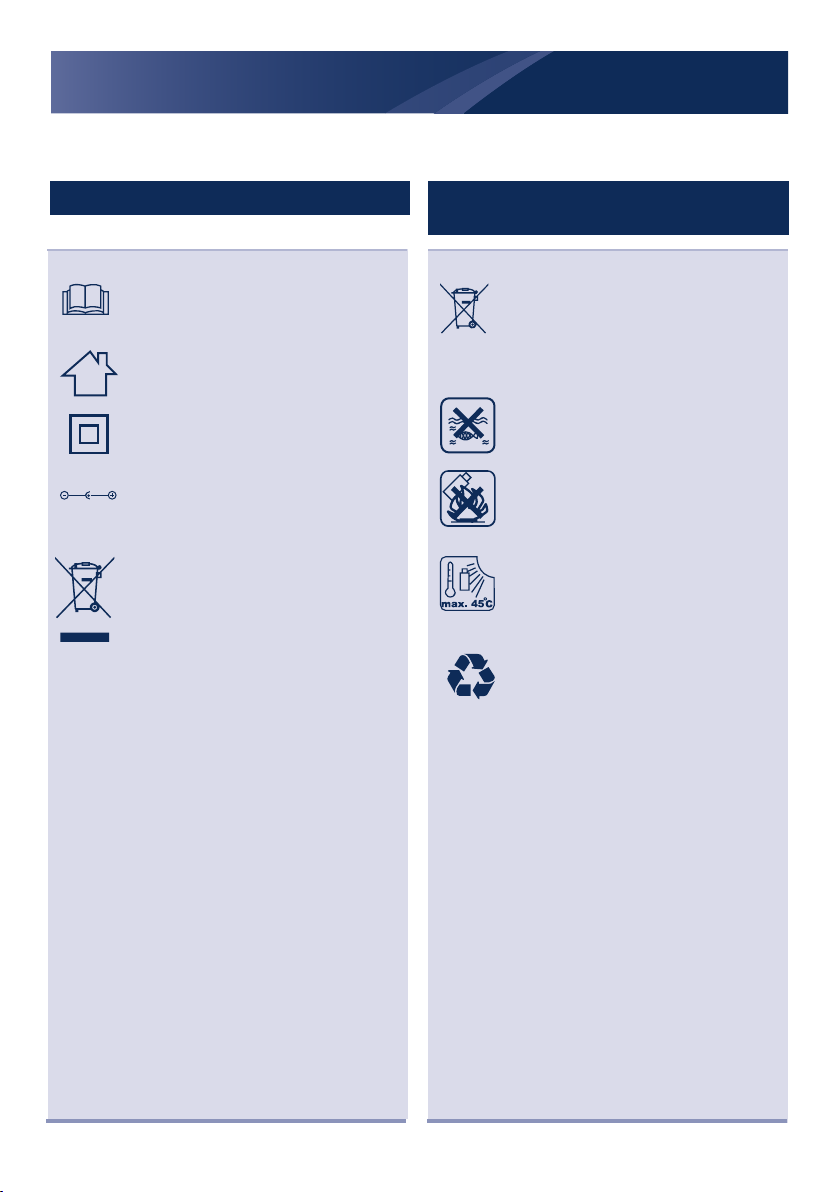
WARNING SYMBOLS ON THE CHARGER
Read instruction handbook before
operating this machine.
The charger is for indoor use only.
Double insulation.
Pole orientation.
Waste electrical products should not
be disposed of with household waste.
Please recycle where facilities exist.
Check your Local Authority or retailer
for recycling advice.
WARNING SYMBOLS ON THE BATTERY
PACK
Batteries contain Li-ion, waste
batteries should be sorted for ecofriendly. Do not dispose of waste
li-ion
batteries as unsorted municipal
waste.
Do not dispose of batteries in rivers or
immerse in water.
Do not litter to fire.
Do not subject the battery to strong
sunlight over long periods and do not
leave it on a heater (max.45
Do not dispose of batteries. Return
exhausted batteries to your local
collection or recycling point.
o
).
5 AFTER SALES SUPPORT 0345 605 2067
Page 6

SAFETY INFORMATION
Please read these instructions fully before operating or maintaining your machine
GENERAL SAFETY
flammable liquids, gases
GENERAL POWER TOOL
SAFETY
WARNING Read all
safety warnings and
all instructions. Failure
to follow the warnings
and instructions may
result in electric shock,
fire and/or serious
injury.
Save all warnings and
instructions for future
reference.
The term “power
tool” in the warnings
refers to your mainsoperated (corded)
power tool or batteryoperated (cordless)
power tool.
or dust. Power tools
create sparks which may
ignite the dust or fumes.
■
Keep children and
bystanders away while
operating a power tool.
Distractions can cause
you to lose control.
Electrical safety
■
Power tool plugs must
match the outlet. Never
modify the plug in any
way. Do not use any
adapter plugs with
earthed (grounded) power
tools. Unmodified plugs
and matching outlets will
reduce risk of electric
shock.
Work area safety
■
Keep work area clean and
well lit. Cluttered or dark
areas invite accidents.
■
Do not operate power
tools in explosive
atmospheres, such
as in the presence of
6 AFTER SALES SUPPORT 0345 605 2067
■
Avoid body contact with
earthed or grounded
surfaces, such as pipes,
radiators, ranges and
refrigerators. There is an
increased risk of electric
shock if your body is
earthed or grounded.
Page 7

SAFETY INFORMATION
Please read these instructions fully before operating or maintaining your machine
■
Do not expose power
tools to rain or wet
conditions. Water entering
a power tool will increase
the risk of electric shock.
■
Do not abuse the cord.
Never use the cord
for carrying, pulling or
unplugging the power
tool. Keep cord away from
heat, oil, sharp edges or
moving parts. Damaged
or entangled cords
increase the risk of electric
shock.
■
When operating a power
tool outdoors, use an
extension cord suitable
for outdoor use. Use of a
cord suitable for outdoor
use reduces the risk of
electric shock.
■
If operating a power
tool in a damp location
is unavoidable, use a
residual current device
(RCD) protected supply.
Use of an RCD reduces
the risk of electric shock.
NOTE: The term “residual
current device(RCD)”
may be replaced by the
term “ground fault circuit
interrupter (GFCI)” or
“earth leakage circuit
breaker(ELCB)”.
Personal safety
■
Stay alert, watch what
you are doing and use
common sense when
operating a power tool.
Do not use a power
tool while you are tired
or under the influence
of drugs, alcohol or
medication. A moment of
inattention while operating
power tools may result in
serious personal injury.
■
Use personal protective
equipment. Always wear
eye protection. Protective
equipment such as dust
mask, non-skid safety
shoes, hard hat, or
hearing protection used
for appropriate conditions
will reduce personal
injuries.
7 AFTER SALES SUPPORT 0345 605 2067
Page 8

SAFETY INFORMATION
Please read these instructions fully before operating or maintaining your machine
■
Prevent unintentional
starting. Ensure the switch
is in the off-position
before connecting to
power source and/or
battery pack, picking
up or carrying the tool.
Carrying power tools with
your finger on the switch
or energysing power tools
that have the switch on
invites accidents.
■
Remove any adjusting
key or wrench before
turning the power tool
on. A wrench or a key left
attached to a rotating part
of the power tool may
result in personal injury.
■
Do not overreach. Keep
proper footing and
balance at all times. This
enables better control
of the power tool in
unexpected situations.
■
Dress properly. Do not
wear loose clothing or
jewellery. Keep your hair,
clothing and gloves away
from moving parts. Loose
clothes, jewellery or long
hair can be caught in
moving parts.
■
If devices are provided
for the connection of dust
extraction and collection
facilities, ensure these
are connected and
properly used. Use of
dust collection can reduce
dust-related hazards.
Power tool use and care
■
Do not force the power
tool. Use the correct
power tool for your
application. The correct
power tool will do the job
better and safer at the rate
for which it was designed.
■
Do not use the power
tool if the switch does
not turn it on and off. Any
power tool that cannot be
controlled with the switch
is dangerous and must be
repaired.
■
Disconnect the plug from
the power source and/
or the battery pack from
the power tool before
8 AFTER SALES SUPPORT 0345 605 2067
Page 9

SAFETY INFORMATION
Please read these instructions fully before operating or maintaining your machine
making any adjustments,
changing accessories,
or storing power tools.
Such preventive safety
measures reduce the risk
of starting the power tool
accidentally.
■
Store idle power tools out
of the reach of children
and do not allow persons
unfamiliar with the power
tool or these instructions
to operate the power
tool. Power tools are
dangerous in the hands of
untrained users.
■
Maintain power tools.
Check for misalignment or
binding of moving parts,
breakage of parts and any
other condition that may
affect the power tool’s
operation. If damaged,
have the power tool
repaired before use. Many
accidentsare caused by
poorly maintained power
tools.
■
Keep cutting tools sharp
and clean. Properly
maintained cutting tools
with sharp cutting edges
are less likely to bind and
areeasier to control.
■
Use the power tool,
accessories and tool bits
etc. in accordance with
these instructions, taking
into account the working
conditions and the work to
be performed. Use of the
power tool for operations
different from those
intended could result in a
hazardous situation.
Battery tool use and care
■
Recharge only with the
charger specified by the
manufacturer. A charger
that is suitable for one type
of battery pack may create
a risk of fire when used
with another battery pack.
■
Use power tools only with
specifically designated
battery packs. Use of any
other battery packs may
create a risk of injury and
fire.
■
When battery pack is not
9 AFTER SALES SUPPORT 0345 605 2067
Page 10

SAFETY INFORMATION
Please read these instructions fully before operating or maintaining your machine
in use, keep it away from
other metal objects, like
paperclips, coins, keys,
nails, screws or other
small metal objects, that
can make a connection
from one terminal to
another. Shorting the
battery terminals together
may cause burns or a fire.
■
Under abusive conditions,
liquid may be ejected from
the battery; avoid contact.
If contact accidentally
occurs, flush with water.
If liquid contacts eyes,
additionally seek medical
help. Liquid ejected from
the battery may cause
irritation or burns.
ADDITIONAL SAFETY INSTRUCTIONS FOR BATTERIES AND
CHARGERS
SAFETY WARNINGS FOR
BATTERY PACK
WARNING! Read all
safety warnings and all
instructions. Failure to
follow the warnings and
instructions may result
in electric shock, fire
and/or serious injury.
Save all warnings and
instructions for future
reference.
■
Do not dismantle, open or
shred cells or battery pack.
Service
a) Have your power tool
serviced by a qualified
repair person using only
identical replacement
parts. This will ensure that
the safety of the power
tool is maintained.
10 AFTER SALES SUPPORT 0345 605 2067
■
Do not short-circuit a
battery pack. Do not store
battery packs haphazardly
in a box or drawer where
they may short circuit each
other or be short-circuited
by conductive materials.
When battery pack is not
in use, keep it away from
other metal objects, like
paper clips, coins, keys,
Page 11

SAFETY INFORMATION
Please read these instructions fully before operating or maintaining your machine
nails, screws or other
small metal objects, that
can make a connection
from one terminal to
another. Shorting the
battery terminals together
may cause burns or a fire.
■
Do not expose battery
pack to heat or fire. Avoid
storage in direct sunlight.
■
Do not subject battery
pack to mechanical shock.
■
In the event of battery
leaking, do not allow the
liquid to come into contact
with the skin or eyes. If
contact has been made,
wash the affected area
with copious amounts of
water and seek medical
advice.
■
Seek medical advice
immediately if a cell or
battery pack has been
swallowed.
■
Battery pack needs
to be charged before
use. Always refer to
this instruction and use
the correct charging
procedure.
■
Do not maintain battery
pack on charge when not
in use.
■
After extended periods
of storage, it may be
necessary to charge and
discharge the battery pack
several times to obtain
maximum performance.
■
Battery pack gives its best
performance when it is
operated at normal room
temperature (20 °C ± 5
°C).
■
When disposing of battery
packs, keep battery packs
of different electrochemical
systems separate from
each other.
■
Keep battery pack clean
and dry.
■
Wipe the battery pack
terminals with a clean dry
cloth if they become dirty.
■
Recharge only with the
charger specified by
manufacturer. Do not
use any charger other
than that specifically
11 AFTER SALES SUPPORT 0345 605 2067
Page 12

SAFETY INFORMATION
SAFETY INFORMATION
Please read these instructions fully before operating or maintaining your machine
Please read these instructions fully before operating or maintaining your machine
provided for use with the
equipment. A charger that
is suitable for one type of
battery pack may create a
risk of fire when used with
another battery pack.
■
Do not use any battery
pack which is not
designed for use with the
equipment.
■
Keep battery pack out of
the reach of children.
■
Retain the original product
literature for future
reference.
■
Remove the battery from
the equipment when not in
use.
■
Dispose of properly.
SAFETY WARNINGS FOR YOUR
BATTERY CHARGER
WARNING! Read all
safety warnings and
all instructions. Failure
to follow the warnings
and instructions may
result in electric shock,
fire and/or serious
injury.
Save all warnings and
instructions for future
reference.
- This appliance is not
intended for use by
persons (including
children) with reduced
physical, sensory or
mental capabilities,
or lack of experience
and knowledge, unless
they have been given
supervision or instruction
concerning use of the
appliance by a person
responsible for their safety.
- Children should be
supervised to ensure that
they do not play with the
appliance.
Additional Safety
Instructions For Your
Battery Charger
■
Before charging, read the
instructions.
■
After charging, disconnect
12 AFTER SALES SUPPORT 0345 605 2067
Page 13

SAFETY INFORMATION
SAFETY INFORMATION
Please read these instructions fully before operating or maintaining your machine
Please read these instructions fully before operating or maintaining your machine
the battery charger from
the supply mains. Then
remove the chassis
connection and then the
battery connection.
■
Do not charge a leaking
battery.
■
Do not use chargers for
works other than those for
which they are designed.
■
Before charging, ensure
your charger is matching
the local AC supply.
■
For indoor use, or do not
expose to rain.
■
The charging device
must be protected from
moisture.
■
Do not use the charging
device in the open.
■
Do not short out the
contacts of battery or
charger.
■
Respect the polarity “+/-“
when charging.
■
Do not open the unit and
keep out of the reach of
children.
■ Do not charge the
batteries of other
manufactures or ill-suited
models.
■ Ensure that the connection
between the battery
charger and battery is
correctly positioned and is
not obstructed by foreign
bodies.
■ Keep battery charger’s
slots are free of foreign
objects and protect
against dirt and humidity.
Store in a dry and frostfree place.
■ When charging batteries,
ensure that the battery
charger is in a wellventilated area and
away from inflammable
materials. Batteries can
get hot during charging.
Do not overcharge any
batteries. Ensure that
batteries and chargers
are not left unsupervised
during charging.
■
Do not recharge non-
rechargeable batteries,
13 AFTER SALES SUPPORT 0345 605 2067
Page 14

SAFETY INFORMATION
Please read these instructions fully before operating or maintaining your machine
as they can overheat and
break.
■
Longer life and better
performance can be
obtained if the battery
pack is charged when the
air temperature is between
o
18
C and 24oC. Do not
charge the battery pack
in air temperatures below
o
0
C, or above 45oC.This is
important as it can prevent
serious damage to the
battery pack.
■
Charge only battery
pack of the same
model provided by
manufacturer and of
models recommended by
manufacturer.
ADDITIONAL SAFETY INSTRUCTIONS FOR POLE SAW
POLE SAW SAFETY WARNINGS
sure the saw chain is not
contacting anything. A
moment of inattention
while operating pole saws
may cause entanglement
of your clothing or body
with the saw chain.
■
Always hold the pole saw
with your right hand on
the rear handle and your
left hand on the front
handle. Holding the pole
saw with a reversed hand
configuration increases the
risk of personal injury and
should never be done.
■
Wear safety glasses and
hearing protection. Further
protective equipment for
head, hands, legs and
feet is recommended.
Adequate protective
clothing will reduce
personal injury by flying
debris or accidental
contact with the saw
chain.
■
Keep all parts of the body
away when the saw is
operating. Before you
start the pole saw, make
14 AFTER SALES SUPPORT 0345 605 2067
■
Do not operate a pole
saw in a tree. Operation of
a pole saw while up in a
tree may result in personal
Page 15

SAFETY INFORMATION
Please read these instructions fully before operating or maintaining your machine
injury.
■
Always keep proper
footing and operate the
pole saw only when
standing on fixed, secure
and level surface. Slippery
or unstable surfaces such
as ladders may cause a
loss of balance or control
of the pole saw.
■
When cutting a limb that
is under tension be alert
for spring back. When the
tension in the wood fibers
is released the spring
loaded limb may strike the
operator and/or throw the
pole saw out of control.
■
Use extreme caution
when cutting brush and
saplings. The slender
material may catch
the saw chain and be
whipped toward you or
pull you off balance.
■
When transporting or
storing the pole saw
always fit the guide bar
cover. Proper handling of
the pole saw will reduce
the likelihood of accidental
contact with the moving
saw chain.
■
Follow instructions
for lubricating, chain
tensioning and changing
accessories.
■
Improperly tensioned
or lubricated chain may
either break or increase
the chance for kickback.
■
Keep handles dry, clean,
and free from oil and
grease. Greasy, oily
handles are slippery
causing loss of control.
■
Cut wood only. Do not use
pole saw for purposes not
intended. For example:
do not use pole saw for
cutting plastic, masonry
or non-wood building
materials. Use of the
pole saw for operations
different than intended
could result in a hazardous
situation.
15 AFTER SALES SUPPORT 0345 605 2067
Page 16

SAFETY INFORMATION
Please read these instructions fully before operating or maintaining your machine
PRECAUTIONS FOR POLE SAW
■
Never stand directly under
the limb you are trimming.
Always position yourself
out of the path of falling
debris.
■
Never stand on a ladder
or other type of unstable
support while using the
pole saw.
■
Always use both hands to
operate pole saw. Keep a
firm, steady pressure on
the pole saw while cutting
but do not try to force the
saw through the wood.
■
Do not use the pole saw
to cut limbs larger in
diameter than the length
of the guide bar.
■
Keep other persons away
from cutting end of pole
saw and at a safe distance
from work area.
■
Do not use pole saw near
cable, electric power or
telephone lines. Maintain a
minimum clearance of 10
feet from all power lines.
Residual risks
Even when the tool is used
as prescribed it is not
possible to eliminate all
residual risk factors. The
following hazards may arise
in connection with the tool’s
construction and design:
■
Damage to lungs if an
effective dust mask is not
worn.
■
Damage to hearing
if effective hearing
protection is not worn.
■
Health defects resulting
from vibration emission
if the appliance is being
used over longer period
of time or not adequately
managed and properly
maintained.
WARNING! This
machine produces an
electromagnetic field
during operation. This
field may under some
circumstances interfere
with active or passive
16 AFTER SALES SUPPORT 0345 605 2067
Page 17

SAFETY INFORMATION
Please read these instructions fully before operating or maintaining your machine
■
medical implants.
To reduce the risk
of serious or fatal
injury, we recommend
persons with medical
implants to consult
their physician and
the medical implant
manufacturer before
operating this
machine.
TRAINING
■
Read the instructions
carefully. Be familiar
with the controls and
the proper use of the
appliance.
■
Never allow children to
use the product.
■
Never allow people
unfamiliar with these
instructions to use
the appliance. Local
regulations may restrict
the age of the operator.
The operator or user is
responsible for accidents
or hazards occurring
to other people or their
property.
PREPARE
■
Wear safety goggles and
ear muffs while operating.
■
Always wear substantial
footwear and long
trousers. Do not operate
the equipment when
barefoot or wearing open
sandals.
■
Always wear suitable
working clothes during
working, which allow
freedom of movement.
■
Never operate the
appliance which is
damaged, incomplete or
changed without approval
of the manufacturer.
■
Never operate the
appliance while people,
especially children, or pets
are nearby.
17 AFTER SALES SUPPORT 0345 605 2067
Page 18

SAFETY INFORMATION
Please read these instructions fully before operating or maintaining your machine
OPERATE
■
Operate the product only
in daylight or in good
artificial light.
■
Do not overreach and
keep your balance at all
times.
■
Always be sure of your
footing on slopes.
■
Walk, never run.
■
Keep all ventilation
openings clear of debris.
■
Never blow debris in the
direction of bystanders.
INTENDED USE
intended use and is
not included in these
instructions is considered
unauthorized use and
relieves the manufacturer
from his or her legal liability.
■
This machine may only be
used outdoors for cutting
wood and in combination
with the original cutting
chains.
This machine is not
designed for heavy duty or
commercial use.
Any use of the machine
that deviates from its
18 AFTER SALES SUPPORT 0345 605 2067
Page 19

BOX CONTENT
PARTS
1 11
Working head
2 12
Oil bottle cap
3 13
Bar sheath
4 14
Guide Bar
5 15
Saw Chain
6 16
Battery pack
7 17
Charger
8 18
Charger base
9 19
Safety lock-off button
10
Shoulder strapper
Front handle
Quick release for telescopic pole
Main switch
Hang buckle
Konb
Pole
Tension Wheel
Adjusting Wheel
100ml lubrication oil
2
11
10
9
15
14
13
6
12
16
19
1
17
3
8
If there are any parts missing, please call the customer helpline on 0345 605 2067
5
4
18
7
19 AFTER SALES SUPPORT 0345 605 2067
Page 20
ASSEMBLE
Unpacking
1
i. Unpack all parts and lay them on a flat, stable surface.
ii. Remove all packing materials and shipping devices if
applicable.
iii. Make sure the delivery contents are complete and
free of any damage. If you find that parts are missing
or show damage do not use the product but contact
the aftersales service within 28 days of purchase.
Using an incomplete or damaged product represents
a hazard to people and property.
iv. Ensure that you have all the accessories and tools
needed for assembly and operation. This also includes
suitable personal protective equipment.
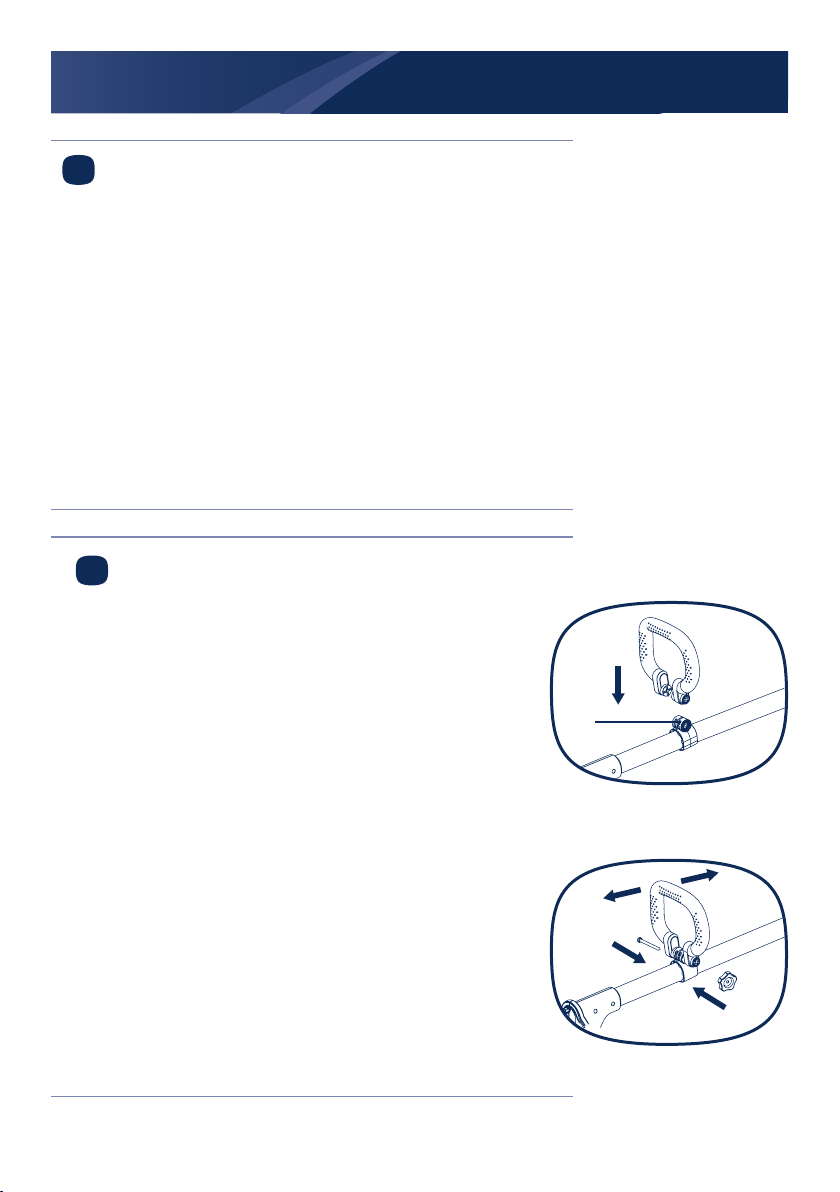
Assemble the front handle
2
i Attach the front handle to the block (A) on the lower
handle, and insert the bolt. Tighten the knob to the
bolt.
ii Adjust the front handle forward or backwards to a
proper position.
20 AFTER SALES SUPPORT 0345 605 2067
(A)
Page 21

ASSEMBLE
Assemble the shoulder strapper
3
Fill lubrication oil
4
i. Push the oil bottle cap and unscrew it, and add proper
lubrication oil.
Note: Make sure the oil level is between
Min and Max.
ii. Tighten the oil bottle cap.
21 AFTER SALES SUPPORT 0345 605 2067
Page 22

ASSEMBLE
Charging the battery
5
NOTE: This battery pack has been shipped in a low
charge condition. It should be fully charged before rst
use. Make sure the main voltage is the same as rating
label which located on the charger.
WARNING!
The charger and battery pack are specically designed
to work together so do not attempt to use any other
devices. Never insert or allow metallic objects into
your charger or battery pack connections because an
electrical failure and hazard will occur.
The battery needs to be charged before rst use and
whenever it fails to produce sufcient power on jobs
that were easily done before.
lithium ion battery pack. Lithium Ion batteries don’t lose
charge when not in use, and don’t lose charging capacity
overtime. Never the less it is best practice to charge the
battery when empty or insufficient to do the job.
This product comes with a
22 AFTER SALES SUPPORT 0345 605 2067
Page 23

ASSEMBLE
Connect the mains plug with charger (7) to the charger base (8) .
1. Plug the charger into an appropriate AC power outlet. The LED lights green to tell you that
the charger is ready for use.
2. Slide the charger base (8) into the battery pack (6), make sure the charger base is fully
seated in the battery pack. The LED lights up red to tell you that the battery pack is on
charge.
3. The battery pack will be fully charged in 1 hour. And the LED lights up green again to tell
you that the battery pack is fully charged.
Important charging notes
Longest life and best performance can be obtained if the battery pack is charged when the air
temperature is between 18-24°C. Do not charge the battery pack in a very low or very high air
temperature. This is important and will prevent serious damage to the battery pack.
■ When using your tool continuously, the batteries in your battery pack will become hot. You
should let a hot battery pack cool down for approximately 30 minutes before attempting
to recharge.
■ The charger and battery pack may become warm to touch while charging. This is a
normal condition, and does not indicate a problem.
■ Use the charger in normal room temperatures whenever possible. To prevent overheating,
do not cover the charger
sources.
■ If the battery pack does not charge properly;
(1). Check the main socket by plugging in a lamp or other appliance.
(2). Move the charger and battery pack to a location where the surrounding air
temperature is approximately 18-24°C.
(3). If charging problems persist, take or send the tool, battery pack and charger to your
local service center.
■ The battery pack should be recharged when it fails to produce sufficient power on jobs
which were easily done previously. DO NOT CONTINUE to use under these conditions.
Follow the charging procedure. You may also charge a partially used pack whenever you
desire with no adverse effect on the battery pack.
■ Under certain conditions, with the charger plugged in to the power supply, the exposed
charging contacts inside the charger can be shorted by foreign material. Foreign materials
of a conductive nature such as, but no limited to, steel wool, aluminum foil, or any buildup
of metallic particles should be kept away from charger cavities. Always unplug the charger
from the power supply when there is no battery pack in the cavity. Unplug charger before
attempting to clean.
■ Do not immerse charger in water or any other liquid.
and do not charge battery packs in direct sunlight or near heat
23 AFTER SALES SUPPORT 0345 605 2067
Page 24

ASSEMBLE
WARING!
Don’t allow any liquid to get inside charger. Electric shock may result. To facilitate the
cooling of the battery pack after use, avoid placing the charger or battery pack in a
warm environment such as in a metal shed, or an un-insulated trailer.
CAUTION!
Never attempt to open the battery pack for any reason. If the plastic housing of the
battery pack breaks or cracks, return to a service center for recycling; do not put it
into further use.
Check battery capacity
7
Push the power indicator button, the remaining
percentage of battery capacity will show on screen.
FU means 100% fully charged.
General operation
i. Check the product, its battery pack as well as
accessories for damage before each use. Do not use
the product if it is damaged or shows wear.
ii. Double check that accessories or cutting device are
properly fixed.
iii. Always hold the product on its handles Keep the
handles dry to ensure safe support.
24 AFTER SALES SUPPORT 0345 605 2067
Page 25

OPERATE
Telescopic handle adjustment
i. Lift the clamping lever and extend upper part of handle to
desired handle length. Then push the clamping lever to fix
the tube tight.
Install battery pack
i. Keep the battery pack in line with the holder on the device.
ii. Push it forward until it reaches the bottom. Before starting make
sure the battery pack is firmly locked in place.
Remove the battery from product
i. Press the battery pack release button (A) downward,
ii. Pull the battery pack towards operator, then remove it.
A
25 AFTER SALES SUPPORT 0345 605 2067
Page 26
OPERATE
Attention! The battery cannot be charged
immediately after use, it should cool off for a
period of time. The LED lights switching from
green to red means it can be charged.
Switch on/off
NOTE: Hold the pole saw away from yourself
using both hands. Stand in a secure and stable
position.
i. Push safety switch (10) forward, and press the on/off
switch (14) to turn the product on.
ii. Release the on/off switch (14) to turn the product off.
Check the oil supply
NOTE! With the pruner fully assembled and
adjusted it is important to check the chain oil
supply is dispensing adequate lubrication.
After switching on, run the chain and see if chain oil is being
dispensed as shown.
26 AFTER SALES SUPPORT 0345 605 2067
Chain oil
Page 27
OPERATE
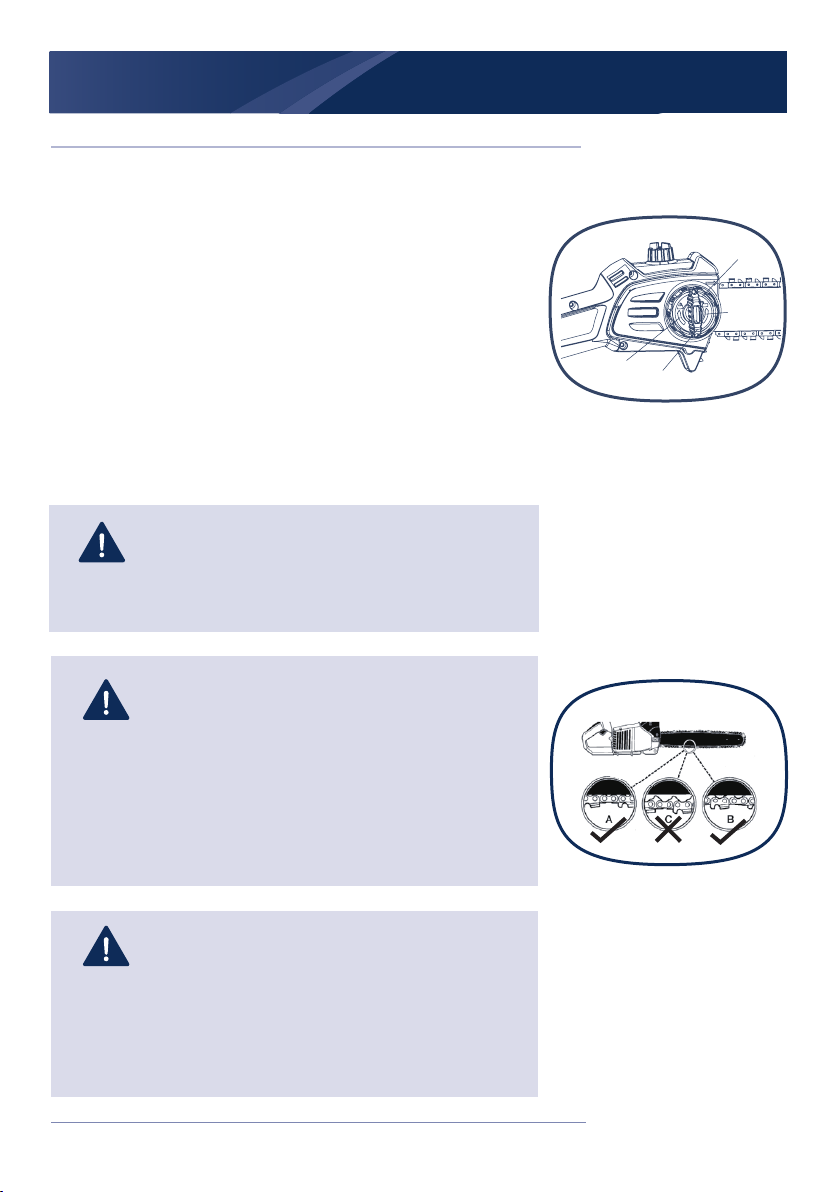
Chain Tension
1. Loosen tension wheel (5) before adjusting chain.
2. Turn the adjusting wheel (6) until slack is out of chain.
3. Wearing protective gloves, pull down on chain to check
chain tension
4. Do not over-tension chain. Over-tensioning will cause
excessive wear and will reduce the life of the guide bar and
chain. Over-tensioning also reduces the amount of cuts per
battery charge.
5. After chain tension is correct, tighten tension wheel (5) firmly.
Important!
It is very important to adjust the chain tension if the
chain is loose.
Check that if the chain is loose in every 10mins.
Tighten
6
Loosen
5
NOTE! When tensioned correctly it should be
possible to pull one full chain link free of the bar
channel with ease.
- A new chain will expand its length during the first
period of use. Check and re-adjust the tension
frequently as a loose chain can easily derail or
cause rapid wear of itself and the chain bar.
CAUTION! If the saw chain is TOO LOOSE or
TOO TIGHT the V-drive wheel, chain bar, chain
and crank shaft bearing will suffer premature wear.
Above Fig. shows the correct tension A (when
cold) and tension B (when warm). Fig. C shows a
chain that is too loose.
27 AFTER SALES SUPPORT 0345 605 2067
Page 28

OPERATE
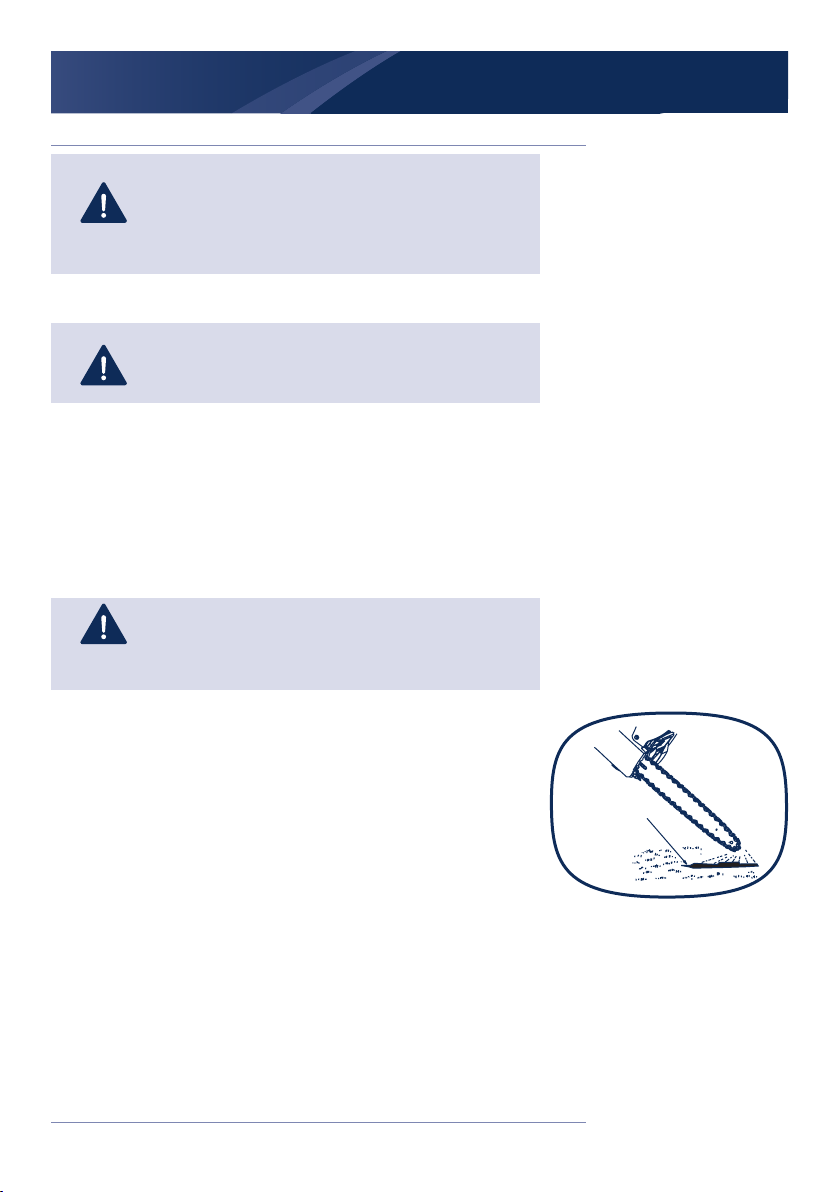
Pruning
Warning! Always turn off the motor before laying
down the machine!
Risk of recoil!
Recoil is caused by wood or other rm objects
coming into contact with the top side or the tip of
the saw rail. This may cause the machine to be
thrown back with force at the operator, which may
cause serious injuries.
Warning! Danger of injury!
Dangerous recoil may occur during the operation
of the machine! This may cause serious injuries or
death!
Make absolutely sure that no wood or other rm objects can
come into contact with the area shown in the diagram on
the right.
Only if you work carefully and properly can you reliably
reduce the risk of recoil!
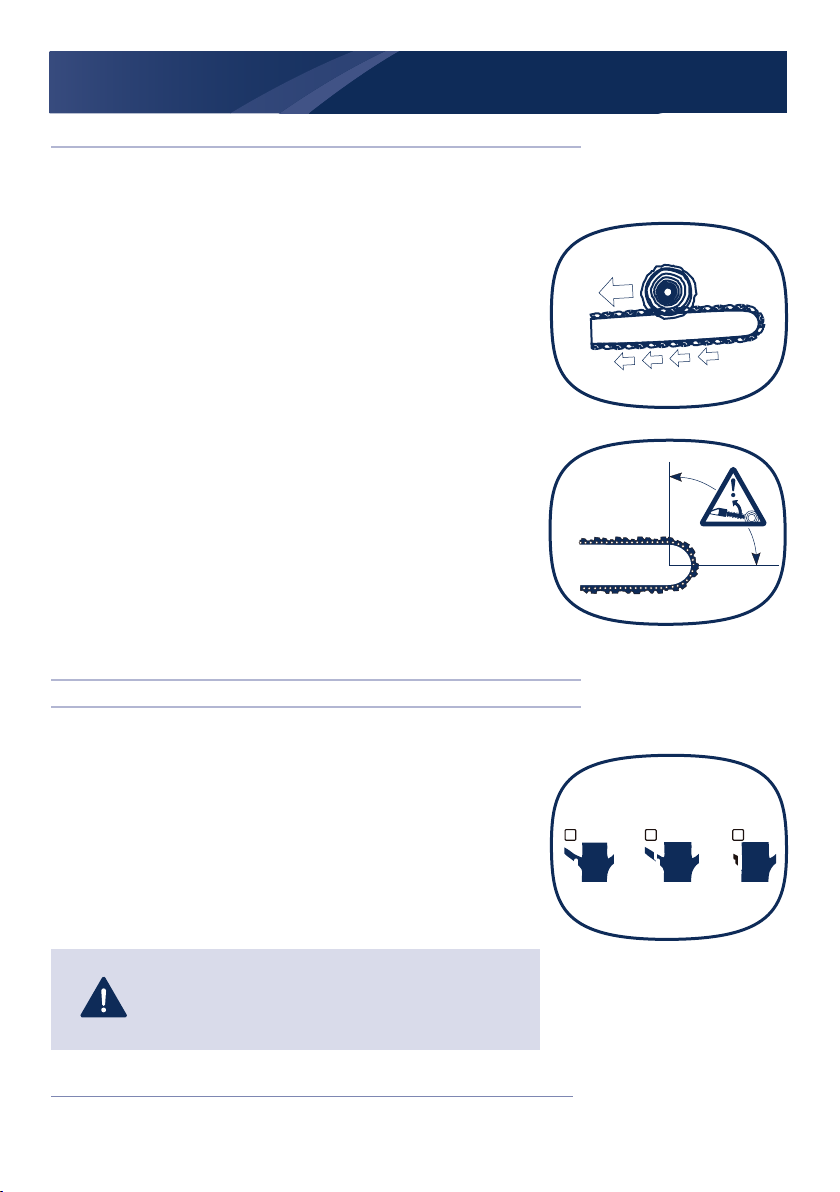
Pull sawing
This technique involves sawing with the bottom side of the
saw rail from top to bottom. The sawing chain pushes the
machine forward away from the operator. The front edge
of the machine forms a support rest absorbing the forces
caused by sawing into a tree trunk.
Pull sawing allows the operator to exercise much more
control over the machine and to prevent it from recoiling.
This is why you should make pull sawing the sawing
technique of your choice.
28 AFTER SALES SUPPORT 0345 605 2067
Page 29
OPERATE
Push sawing
This technique involves sawing with the top side of the
saw rail from bottom to top. The sawing chain pushes
the machine backward toward the operator. If the saw
rail becomes jammed, the machine may be thrown back
toward the operator with great force.
If the operator is unable to counterbalance the backward
pushing force of the sawing chain by his own body
weight, only the tip of the sawing chain may be in contact
with the wood, which may cause a recoil.
Tree cutting
Note! Always work on the opposite side of the branch you
want to cut down. Always start at the bottom of the trunk
and work your way up.
When removing larger branches, first cut the branch from
below (1).
Then cut through from above (2), and finally cut off the
remaining branch (3).
Danger of injury. Branches that rest against a
surface or are under tension may cause the
sawing chain to become jammed in the wood!
11 2 3
6
29 AFTER SALES SUPPORT 0345 605 2067
Page 30

MAINTENANCE
This product does not contain any parts that can be repaired
by the consumer. Contact an authorised service centre or a
similarly qualied person to have it checked and repaired.
WARNING! Always switch the product off, disconnect it from the
battery pack and let the product cool down before performing
inspection, maintenance and cleaning work!
General cleaning
i. Switch the product off, disconnect it from the battery pack and let it
cool down.
ii. Check, clean and store the product as described below.
iii. Clean the product with a damp cloth and pH-neutral soap.
Use a brush for areas that are hard to reach.
iv. In particular clean the air vents after every use with a cloth and
brush.
v. Remove stubborn dirt with high pressure air (max. 3 bar).
NOTE:
Do not use chemical, alkaline, abrasive or other
aggressive detergents or disinfectants to clean this product
as they might be harmful to its surfaces.
30 AFTER SALES SUPPORT 0345 605 2067
Page 31
MAINTENANCE
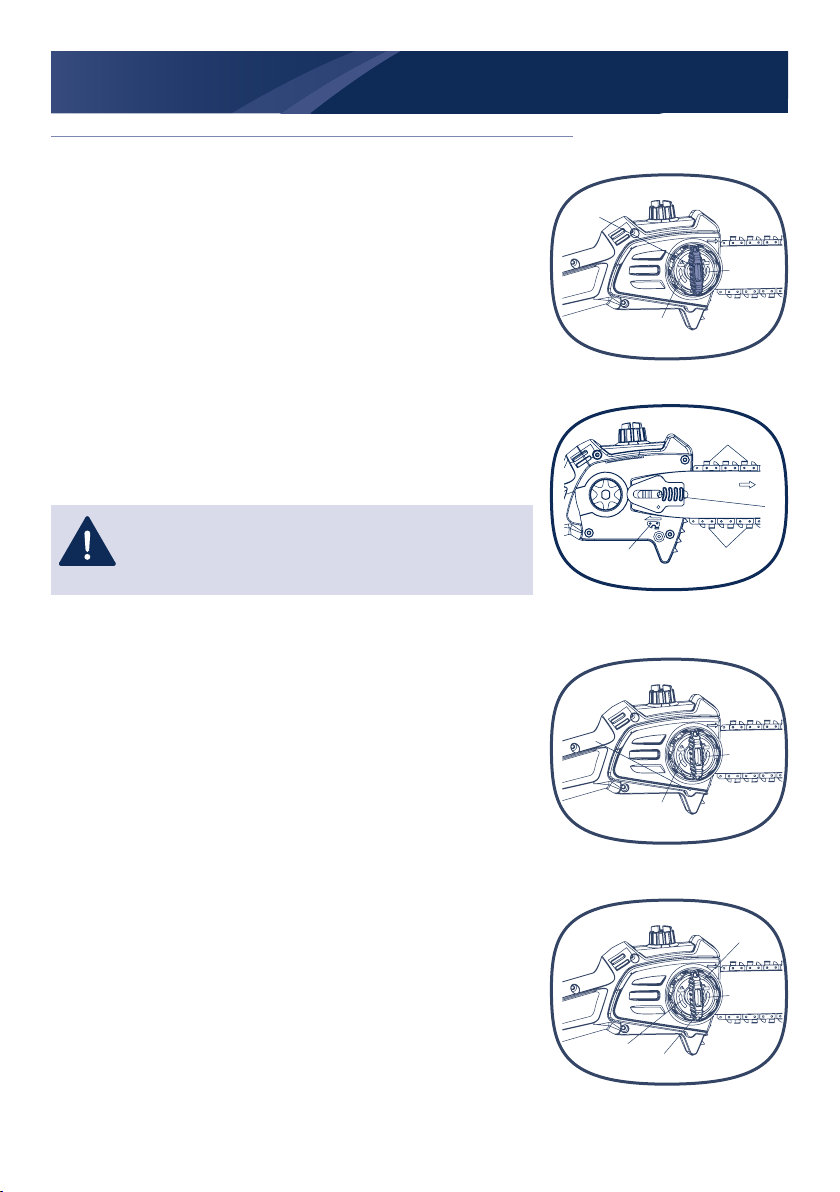
Change the chain and bar
i. Loosen tension wheel (A). Remove chain cover with
adjusting wheel together.
A
Loosen
Tighten
ii. Fit the chain around the bar ensuring that the direction of
the chain is as depicted in the picture on the bar. Fit the
chain on the sprocket.
Note:
Make sure cutting edges of chain are facing
in right direction. Make sure the tension guide
plate (B) is facing outside.
Change the chain and bar
i. Loosen tension wheel (A). Remove chain cover with
adjusting wheel together.
Saw Chain Tension Adjustment
1. Loosen tension wheel (5) before adjusting chain.
2. Turn the adjusting wheel (6) until slack is out of chain.
3. Wearing protective gloves, pull down on chain to
check chain tension
4. Do not over-tension chain. Over-tensioning will cause
excessive wear and will reduce the life of the guide
bar and chain. Over-tensioning also reduces the
amount of cuts per battery charge.
chain slide
C
Tighten
cutting edges
guide bar nose
B
cutting edges
Loosen
Tighten
6
Loosen
5
31 AFTER SALES SUPPORT 0345 605 2067
Page 32

MAINTENANCE
5. After chain tension is correct, tighten tension wheel (5)
firmly.
NOTE! When tensioned correctly it should be
possible to pull one full chain link free of the bar
channel with ease.
- A new chain will expand its length during the first
period of use. Check and re-adjust the tension
frequently as a loose chain can easily derail or
cause rapid wear of itself and the chain bar.
CAUTION! If the saw chain is TOO LOOSE or
TOO TIGHT the V-drive wheel, chain bar, chain
and crank shaft bearing will suffer premature wear.
Above Fig. shows the correct tension A (when cold)
and tension B (when warm). Fig. C shows a chain
that is too loose.
Care of Guide Bar
Uneven bar wear causes most guide bar problems. Incorrect
sharpening of chain cutter and depth gauge settings often
cause this. When bar wears unevenly, it widens guide bar
groove. This causes chain clatter and rivet popping. Saw will
not cut straight. Replace guide bar if this occurs.
Inspect guide bar before sharpening chain. A worn or damaged
guide bar is unsafe. A worn or damaged guide bar will damage
chain. It will also make cutting harder.
Normal Guide Bar Maintenance
1. Reverse the bar occasionally to prevent partial wear.
2. The bar rail should always have parallel internal faces (see
32 AFTER SALES SUPPORT 0345 605 2067
Page 33

MAINTENANCE
diagram). Check for wear of the bar rail. Apply a ruler to
the bar and the outside of a cutter. If a gap is observed
between them, the rail is normal. Otherwise, the bar rail is
worn. Such a bar needs to be corrected or replaced.
Sharpening Saw Chain
Keep chain sharp. Your saw will cut faster and more safely.
A dull chain will cause undue sprocket, guide bar, chain, and
motor wear. If you must force chain into wood and cutting
creates only sawdust with few large chips, chain is dull.
Sharpening Cutters
Use file guide for 30° filing.
1. Make sure the saw is held securely.
2. Make sure the battery is taken off.
3. Adjust chain for proper tension.
4. Clamp guide bar in vise to hold saw steady. (Note: Do not
clamp chain.)
5. Press 5/32” round fi le (attached to fi le guide) into groove
between top plate and depth gauge on chain. File guide
should rest on both top plate and depth gauge. (Note: File
at midpoint of guide bar.)
Note:
This illustration shows le guide placement and
ling direction for sharpening cutters on leftside of
chain.
6. Hold file guide level. Make sure 30° mark on file guide is
parallel to center of guide bar. This will insure that you file
cutters at 30° angle.
7. File from inside towards outside of cutter until sharp. Only
file in this one direction. (Note: Two or three strokes with
file should sharpen cutter.)
33 AFTER SALES SUPPORT 0345 605 2067
Page 34

MAINTENANCE
Filing Cutter Depth Gauges
The cutter depth gauge clearance is reduced as cutters are
sharpened. After every second or third sharpening, reset cutter
depth gauges.
1. Place depth gauge tool (.025”) firmly across top of two
cutters. Make sure depth gauge enters slot in depth gauge
tool.
2. Use medium flat file. File depth gauge level with depth
gauge tool.
3. Remove depth gauge tool. With flat file, round off front
corner of cutter depth gauge.
After several hand filings, have authorized service center or
sharpening service machine sharpen chain. This will insure even
filing.
Cleaning the bar and saw
WARNING!
and close to it! Use appropriate tools to remove debris,
e.g. a brush or wooden stick! Never use your bare
hands!
Always use original spare parts for replacement.
i. Keep the bar and chain clean and free of debris. Remove
debris.
ii. Apply a small amount of suitable lubricant, like gear grease, on
the cutting device to retain a good cutting performance.
34 AFTER SALES SUPPORT 0345 605 2067
Wear safety gloves when working on blades
Page 35

MAINTENANCE
Recycling and disposal
i. Waste electrical products should not be disposed of with household
waste. Please recycle where facilities exist. Check with your Local Authority
or local store for recycling advice.
ii. The product comes in a packaging that protects it against transportation
damage. Keep hold of the packaging until you are sure that all the parts
have been delivered and the product is functioning properly. Recycle the
packaging afterwards.
iii. To preserve natural resources, please recycle or dispose of batteries
properly. This product contains a lithium-ion battery. Local, provincial or
federal laws may prohibit disposal of lithium-ion batteries in ordinary trash.
Consult your local waste authority for information regarding available
recycling and/or disposal options.
Storage
1. Make sure that the product has been thoroughly
cleaned before storing it in a cleandry place out of the
reach of children.
2. Remove and clean guide bar and chain. Clean guide
bar and chain by soaking in petroleum based solvent or
mild soap and water mixture. Place chain in container
filled with oil. This will prevent rust.
Li-Ion
35 AFTER SALES SUPPORT 0345 605 2067
Page 36

TROUBLESHOOTING
Problem Possible cause Solution
- Charge rechargeable battery
- Install the battery pack once
again
- Contact service center
-Mount saw chain correctly
-Sharpen cutting teeth or placeon
new chain
-Check chain tension
-Check bar lube reservoir, where
appropriate, rell with oil
-Tension chain. Refer to Chain Ten
sion in this manual
Product not running.
Chain does not cut
ting properly
Bar and chain run
ning hot and smoking.
-
- Battery discharged
- Battery pack does not sit
its place correctly
- Device defective
-Incorrectly mounted saw
chain
-Saw chain blunt
-
-Chain tension insufcient
-Too little oil
-Tension over tightened
-
36 AFTER SALES SUPPORT 0345 605 2067
Page 37

TECHNICAL DATA
Model M0L-10ET-200
Nominal voltage of product with battery 18 V d.c.
Chain speed 2.8m/s
Cutting length 20 cm
Bar/chain code 080SDEA041/91P033X
Net weight 3.75 kg
Vibrations 1.5 m/s² , K=1.5 m/s²
Charger
Model no. SMVCH001212000B
Input voltage & power 230-240V~ 50/60Hz, 50W
Output voltage & current 21V d.c. 2A
Charger time 60mins
Battery pack
Model no. B0P-SP02-20-15A
Battery type Lithium-Ion
Battery capacity 18V d.c. 1.5Ah 27Wh
PART NUMBER ACCESSORIES
CGT-04 Battery pack
080SDEA041 Bar
91P033X Chain
CGT-50 Charger
37 AFTER SALES SUPPORT 0345 605 2067
Page 38

TECHNICAL DATA
A weighted sound pressurel: 78dB(A), KPA=2dB(A)
A weighted sound powerl: 93dB(A), KWA=2dB(A)
The guaranteed sound power level: 93dB(A)
Wear ear protection
The sound values have been determined according to noise test code given in EN 60745-1
ENISO 3744, using the basic standards EN 60745-1.
The sound intensity level for the operator may exceed 80dB(A) and ear protection measures are
necessary.
The declared vibration value has been measured in accordance with a standard test method
(according to EN60745-1+EN ISO 11680-1) and may be used for comparing one product with
another. The declared vibration value may also be used in a preliminary assessment of exposure.
WARNING! Depending on the actual use of the product the vibration values can differ from the
declared total! Adopt proper measures to protect yourself against vibration exposures! Take the
whole work process including times the product is running under no load or switched off into
consideration!
Proper measures include among others regular maintenance and care of the product and cutting
attachments, keeping hands warm, periodical breaks and proper planning of work processes!
38 AFTER SALES SUPPORT 0345 605 2067
Page 39

WARRANTY
If your device develops a fault, please don’t hesitate to contact our customer service
department on 0345 605 2067, the majority of problems can be solved directly on the
phone.
1. These warranty terms cover additional warranty rights and do not affect your statutory
warranty rights. All our products are covered by a 3 year manufacturer warranty.
2. Claims must be accompanied by proof of purchase. This must be in the form of a Sales
receipt or bank statement and must show that the product has been purchased within the
warranty period as described under point 1, from the retailer that it was originally bought
from. Please keep your receipt safe or staple it to the back of this manual for future
reference.
3. Our warranty covers problems caused by material or manufacturing defects, and will
result in the repair of these defects or replacement of the device with a like for like or
similar article.
4. Our devices have not been designed for commercial, trade or industrial applications, any
signs of use of the equipment in these application or equivalent activities, invalidates the
warranty.
5. The following are also excluded from our warranty:
A. Faults due to accidents, customer misuse or unauthorized repairs
B. Consumable Parts such as batteries, chargers, blades, quick release locks, and other
accessories that are compatible with the product.
C. Failure due to lack of routine maintenance.
D. Failure as a result of not using the equipment in accordance with the manual and
safety instructions
E. The adjustment of cables, chargers, or battery packs
Warranty claims should be submitted before the end of the warranty period, see point 1, but
a paid service exists for repairs commissioned after this period. The original warranty period
remains applicable to the device even if repairs are carried out or parts are replaced.
In such cases, the work performed or parts tted will not result in an extension of the
warranty period, and no new warranty will become active for the work performed or parts
tted.
If you have any problems or questions concerning your garden power tool, please contact
our after sales service at 0345 605 2067.
39 AFTER SALES SUPPORT 0345 605 2067
 Loading...