

Page 1

18V
Cordless
Li-Ion Blower
S18BL
ORIGINAL
INSTRUCTION
MANUAL
Important - Please read these instructions
fully before starting assembly
These instructions contain important information that will help
you get the best from your blower, ensuring it is assembled correctly
and safely. If you need help or have damaged or missing parts,
call the Customer Helpline on 0345 605 2069
AFTER SALES SUPPORT
0345 605 2069
Page 2

SPEAR & JACKSON SINCE 1760
For more than 250 years gardeners have enjoyed high quality performance and
great results using Spear & Jackson tools.
Our garden power tools combine continuous innovation and the latest in
manufacturing technologies with a proud heritage.
Each product is carefully designed with performance,comfort and durability
firmly in mind,which has earned Spear & Jackson an enviable reputation as a
maker of tools to trust.
3 YEARS GUARANTEE
As a testament to the quality of our products, we offer a 3 year manufacturers warranty
and a comprehensive after sales service.
The warranty covers manufacturing faults, however in the event that the item has
been deliberately damaged, used in a commercial environment or disassembled then
the warranty will be null and void.
Please retain proof of purchase.
7 DAYS A WEEK TECHNICAL SUPPORT
We want you to get the best out of your products. Our easy-to-read instruction manual
guides you with best practice use and maintenance tips. Please call 0345 605 2069
for technical support, we can solve around 80% of questions directly over the phone.
We hope you enjoy your product and we look forward to any feedback, as this allows
us to develop even better products for the future.
2
AFTER SALES SUPPORT 0345 605 2069
Page 3

CONTENTS
Safety information -------------------------------------------------------------------------04
Box content / parts -----------------------------------------------------------------------11
Assemble ----------------------------------------------------------------------------------12
Prepare -------------------------------------------------------------------------------------13
Operate -------------------------------------------------------------------------------------14
Maintenance and storage----------------------------------------------------------------15
Technical data ----------------------------------------------------------------------------16
Trouble shooting---------------------------------------------------------------------------17
Environmental protection ---------------------------------------------------------------17
Warranty -----------------------------------------------------------------------------------18
AFTER SALES SUPPORT 0345 605 2069
3
Page 4
SAFETY INFORMATION
Please read these instructions fully before operating or
maintaining your machine
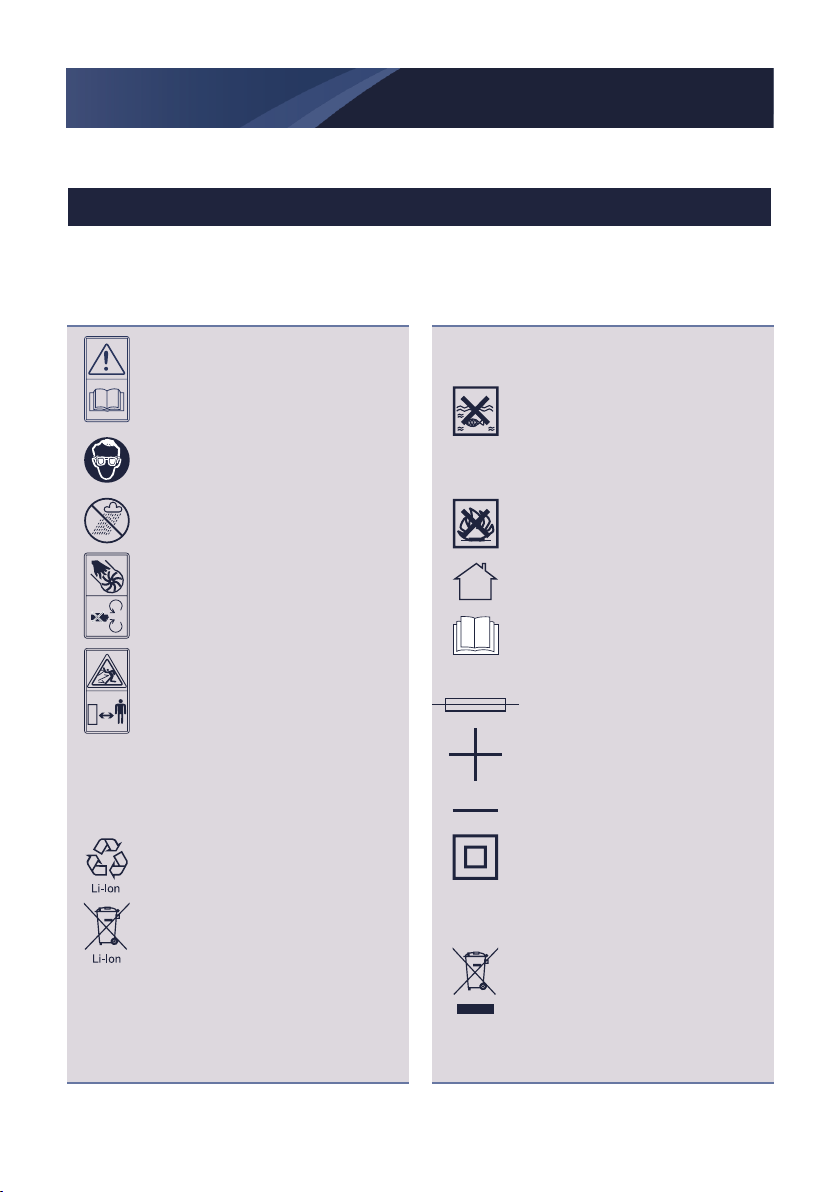
DESCRIPTION OF SYMBOLS
The following warning symbols appear throughout this manual
and indicate the appropriate safety measures you should take
when operating and maintaining the blower.
Read the operator’s
manual
Wear eye protection
Do not expose to rain
Warning of hazard
Keep bystanders away
Li-Ion battery This product
has been marked with a
symbol relating to ‘separate
collection’ for all battery
packs and battery pack.
It will then be recycled
or dismantled in order to
reduce the impact on the
environment. Battery packs
can be hazardous for the
environment and for human
health since they contain
hazardous substances.
T 2A
Batteries may enter water
cycle if disposed improperly,
which can be hazardous for
ecosystem. Do not dispose
of waste batteries as
unsorted municipal waste.
Do not burn
For indoor use only
Read the operator’s
manual.
Fuse
Positive terminal
Negative terminal
Double insulation
Waste electrical products
must not be disposed of
with household waste.
Please recycle where
facilities exist. Check with
your local authorities or
retailer for recycling advice.
4
AFTER SALES SUPPORT 0345 605 2069
Page 5

SAFETY INFORMATION
Please read these instructions fully before operating or
maintaining your machine
GENERAL SAFETY
WARNING:
Read all safety warnings
and all instructions. Failure
to follow the warnings and
instructions may result in electric
shock, fire and/or serious injury.
Save all warnings and
instructions for future
reference.
The appliance is only to be
used with the power supply unit
provided with the appliance.
IMPORTANT
READ CAREFULLY BEFORE
USE.
KEEP FOR FUTURE
REFERENCE.
Safe operating practices
1) Training
a) Read the instructions
carefully. Be familiar with the
controls and the correct use
of the machine.
b) Never allow children,
persons with reduced
physical, sensory or mental
capabilities or lack of
experience and knowledge
or people unfamiliar with
these instructions to use the
machine, local regulations
may restrict the age of the
operator.
c) Never operate the machine
while people, especially
children, or pets are nearby.
d) Keep in mind, that
the operator or user is
responsible for accidents or
hazards occurring to other
people or their property.
2) Preparation
a) While operating the machine,
always wear substantial
footwear and long trousers.
Do not operate the machine
when barefoot or wearing
open sandals. Avoid wearing
clothing that is loose fitting
or that has hanging cords or
ties.
b) Do not wear loose clothing or
jewellery that can be drawn
into the air inlet. Keep long
hair away from the air inlets.
c) Obtain ear protection and
safety glasses. Wear them at
all times while operating the
machine.
AFTER SALES SUPPORT 0345 605 2069
5
Page 6

SAFETY INFORMATION
Please read these instructions fully before operating or
maintaining your machine
d) Operate the machine in a
recommended position and
only on a firm, level surface.
e) Do not operate the machine
on a paved or gravel surface
where ejected material could
cause injury.
f) Before using, always visually
inspect to see, that the
fasteners are secure, the
housing is undamaged and
that guards and screens are
in place. Replace worn or
damaged components in sets
to preserve balance. Replace
damaged or unreadable
labels.
3) Operation
a) Before starting the machine,
make certain that the feeding
chamber is empty.
b) Keep your face and body
away from the feed intake
opening.
c) Do not allow hands or any
other part of the body or
clothing inside the feeding
chamber, discharge chute, or
near any moving part.
d) Keep proper balance and
footing at all times. Do not
overreach. Never stand at a
higher level than the base of the
machine when feeding material
into it.
e) Always stand clear of the
discharge zone when operating
this machine.
f) If the machine should start
making any unusual noise or
vibration, immediately shut off
the power source and allow the
machine to stop. Remove the
battery pack from the machine
and take the following steps
before restarting and operating
the machine:
i) inspect for damage;
ii) replace or repair any
damaged parts;
iii) check for and tighten any
loose parts.
g) Do not allow processed material
to build up in the discharge
zone; this may prevent proper
discharge and can result in
kickback of material through the
intake opening.
h) If the machine becomes
clogged, shut-off the power
source and remove the battery
pack from the machine before
cleaning debris.
i) Never operate the machine with
defective guards or shields, or
6
AFTER SALES SUPPORT 0345 605 2069
Page 7

SAFETY INFORMATION
Please read these instructions fully before operating or
maintaining your machine
without safety devices.
j) Keep the power source
clean of debris and other
accumulations to prevent
damage to the power source
or possible fire.
k) Do not transport this machine
while the power source is
running.
l) Always disconnect the
machine from the power
supply (e.g. remove the
battery pack from the
machine)
- whenever you leave the
machine,
- before clearing blockages or
unclogging chute,
- before checking, cleaning or
working on the machine.
m) Avoid using the machine
in bad weather conditions
especially when there is a risk
of lightning.
4) Maintenance and storage
a) Keep all nuts, bolts and
screws tight to be sure the
appliance is in safe working
condition.
b) Replace worn or damaged
parts.
c) Use only genuine replacement
parts and accessories.
d) Store the machine in a dry
place out of the reach of
children.
e) When the machine is stopped
for servicing, inspection,
or storage, or to change
an accessory, shut off the
power source, disconnect the
machine from the supply and
make sure that all moving parts
are come to a complete stop.
Allow the machine to cool
before making any inspections,
adjustments, etc. Maintain the
machine with care and keep it
clean.
f) Store the machine in a dry
place out of the reach of
children.
g) Always allow the machine to
cool before storing.
h)Never attempt to override
the interlocked feature of the
guard.
AFTER SALES SUPPORT 0345 605 2069
7
Page 8

SAFETY INFORMATION
Please read these instructions fully before operating or
maintaining your machine
SAFETY WARNINGS FOR
BATTERY PACK
a)Do not dismantle, open or
shred cells or battery pack.
b)Do not short-circuit a
battery pack. Do not store
battery packs haphazardly
in a box or drawer where
they may short-circuit
each other or be shortcircuited by conductive
materials. When battery
pack is not in use, keep
it away from other metal
objects, like paper
clips, coins, keys, nails,
screws or other small
metal objects, that can
make a connection from
one terminal to another.
Shorting the battery
terminals together may
cause burns or a fire.
c)Do not expose battery
pack to heat or fire. Avoid
storage in direct sunlight.
d)Do not subject battery
pack to mechanical shock.
e)In the event of battery
leaking, do not allow the
liquid to come into contact
with the skin or eyes. If
contact has been made,
wash the affected area with
copious amounts of water
and seek medical advice.
f) Seek medical advice
immediately if a cell or
battery pack has been
swallowed.
g)Keep battery pack clean
and dry.
h)Wipe the battery pack
terminals with a clean dry
cloth if they become dirty.
i) Battery pack needs to be
charged before use. Always
refer to this instruction and
use the correct charging
procedure.
j) Do not maintain battery
pack on charge when not in
use.
k)After extended periods
of storage, it may be
necessary to charge and
discharge the battery pack
several times to obtain
maximum performance.
l) Battery pack gives its best
performance when it is
operated at normal room
temperature (20°C ± 5°C).
m)When disposing of battery
packs, keep battery packs
of different electrochemical
8
AFTER SALES SUPPORT 0345 605 2069
Page 9

SAFETY INFORMATION
Please read these instructions fully before operating or
maintaining your machine
systems separate from
each other.
n)Recharge only with the
charger specified by
SPEAR & JACKSON. Do
not use any charger other
than that specifically provided
for use with the equipment.
A charger that is suitable for
one type of battery pack may
create a risk of fire when used
with another battery pack.
o)Do not use any battery
pack which is not
designed for use with the
equipment.
p)Keep battery pack out of
the reach of children.
q)Retain the original product
literature for future
reference.
r)Remove the battery from
the equipment when not in
use.
s)Dispose of properly.
GENERAL SAFETY WARNINGS
FOR BATTERY CHARGER
This appliance can be used by
children aged from 8 years and
above and persons with reduced
physical, sensory or mental
capabilities or lack of experience
and knowledge if they have been
given supervision or instruction
concerning use of the appliance
in a safe way and understand
the hazards involved. Children
shall not play with the appliance.
Cleaning and user maintenance
shall not be made by children
without supervision.
If the supply cord is damaged,
it must be replaced by the
manufacturer, its service agent
or similarly qualified persons in
order to avoid a hazard.
AFTER SALES SUPPORT 0345 605 2069
9
Page 10

SAFETY INFORMATION
Please read these instructions fully before operating or
maintaining your machine
ADDITIONAL SAFETY
INSTRUCTIONS FOR YOUR
BATTERY CHARGER
1.Before charging, read the
instructions.
2.Do not charge a leaking
battery.
3.Do not use chargers for works
other than those for which they
are designed.
4.Before charging, ensure your
charger is matching the local
AC supply.
5.For indoor use, or do not
expose to rain.
6.The charging device must be
protected from moisture.
7.Do not use the charging device
in the open.
8.Do not short out the contacts
of battery or charger.
9.Respect the polarity “+/-“
when charging.
10.Do not open the unit and keep
out of the reach of children.
11.Do not charge the batteries of
other manufactures or ill-suited
models.
12.Ensure that the connection
between the battery charger
and battery is correctly
positioned and is not
obstructed by foreign bodies.
13.Keep battery charger’s slots
are free of foreign objects and
protect against dirt and humidity.
Store in a dry and frost-free
place.
14.When charging batteries,
ensure that the battery charger
is in a well-ventilated area
and away from inflammable
materials. Batteries can get
hot during charging. Do not
overcharge any batteries.
Ensure that batteries
and chargers are not left
unsupervised during charging.
15.Do not recharge nonrechargeable batteries, as they
can overheat and break.
16.Longer life and better
performance can be obtained
if the battery pack is charged
when the air temperature is
between 18
o
C and 24oC. Do
not charge the battery pack in
air temperatures below 4.5
above 40.5
o
C. This is important
o
C, or
as it can prevent serious
damage to the battery pack.
17.Charge only battery pack
of the same model provided
by SPEAR & JACKSON and
of models recommended by
SPEAR & JACKSON.
10
AFTER SALES SUPPORT 0345 605 2069
Page 11

BOX CONTENT
PARTS
1
Handle
2
On /Off Switch
3
Tube Release Button
4
Blower Tube
5
Battery Pack
6
Battery Pack Release Button
7
Battery Charger
1
2
3
4
If there are any parts missing, please call the customer helpline on 0345 605 2069
AFTER SALES SUPPORT 0345 605 2069
6
5
7
11
Page 12

ASSEMBLE
ASSEMBLING THE BLOWER TUBE (See Fig. A1-A3)
1
1) Before assembling the Blower Tube (4), be sure the On/Off
Switch (2) is in ‘’O’’ position.
2) Fit the Blower Tube to the motor housing as shown in Fig. A1.
3) Fix the blower tube to the blower port with the screw
provided(See A2).
4) Check the Blower Tube is firmly secured(See A3).
WARNING! Do not attempt to operate the On/Off Switch by any means
other than the normal assembly or removal of the tube.
Fig.A1
Fig.A2
Fig.A3
12
AFTER SALES SUPPORT 0345 605 2069
Page 13

PREPARE
INTENDED USE
The blower is intended for blow debris. It’s not intended for use
indoors and animal grooming.
WARNING!
The charger and battery pack are specially designed to work
together so do not attempt to use any other devices. Never
insert or allow metallic objects into your charger or battery pack
connections because of an electrical failure and hazard will occur.
BEFORE USING YOUR CORDLESS BLOWER
1
Your battery pack is UNCHARGED fully and you must charge before use.
CHARGING YOUR BATTERY PACK (See Fig. B1, B2, B3)
2
Do not use any charger other than that specifically provided for use with the
equipment.
If the battery pack is very hot you must remove your battery pack from the
charger and allow time for the battery to cool down before recharging.
Please charge the battery to reach full before storage. If the tool will not be
used for long periods of time, charge the battery every 3 months.
CHARGING PROCEDURE
1) Plug the charger into an appropriate outlet. The light will be green.
2) Slide the battery pack into the charger, make sure the battery is in the
correct charge position firmly. the light will turn to red to indicate the charging
process has started.
3) When charging is completed, the light will turn to green.
4) After fully charged, unplug the charger and remove the battery pack.
NOTE:
If the battery pack is locked in the charger, press the battery pack release button and
remove it.
Fig.B1
WARNING!
When battery runs out after continuous use or exposure to direct sunlight or heat,
allow time for the battery to cool down before re-charging to achieve the full charge.
CHARGING INDICATOR
Light ON/OFF flash Status
Red on
Red flash
Green on
Green flash
REMOVE OR INSTALL BATTERY PACK TO THE BLOWER (See Fig. C)
3
1) Depress the Battery Release Button (6) to release battery pack from your
tool.
2) Depress the Battery Release Button (6) to install battery pack on your tool.
Charging
Defective Battery
Fully Charged
Battery Too Hot/Cold
AFTER SALES SUPPORT 0345 605 2069
Red light
Fig.B2
Green light
Fig.B3
6
Fig.C
13
Page 14

OPERATE
STARTING/STOPPING (See Fig. D)
1
1) Starting
Move the On/Off switch (2) to the “I” position.
2) Stopping
Move the On/Off switch (2) to the “O” position.
WARNING!
The tool runs for a few seconds after it has been switched off. Let the motor come to a
complete standstill before setting the tool down.
USING THE BLOWER (See Fig. E)
2
1) Use the blower outdoors to move debris from hard surfaces.
2) This blower is not designed to clear leaves from large grassy areas, or move
wet, heavy debris.
USER TIPS
- Hold the blow tube approx 180mm above the ground when operating the
tool.
Use a sweeping motion from side to side. Advance slowly keeping the
accumulated debris/leaves in front of you.
- After blowing the debris/leaves into a pile, it is easy to dispose of the pile.
CAUTION!
- Do not blow hard objects such as nails, bolts, or rocks.
- Do not operate the blower near bystanders or pets.
- Use extra care when cleaning debris from stairs or other tight areas.
- Wear safety goggles or other suitable eye protection, long pants, and shoes.
Fig.D
Fig.E
14
AFTER SALES SUPPORT 0345 605 2069
Page 15

MAINTENANCE AND STORAGE
1. Remove the battery pack from the machine before carrying out any
adjustment, servicing, cleaning or maintenance.
2. Clean the tool regularly.
3. Disassembling the blower tube(see fig. F)
1) Before disassembling the Blower Tube, be sure the On/Off Switch (2) is
in “O’’ position.
2) Loosen the screw.
3) Press the Release Button (3), so that you can separate the tube.
4) Do not try to separate the tubes by force or by using tools.
4. Keep all nuts, bolts and screws tight to be sure the appliance is in safe
working condition.
5. Replace worn or damaged parts.
6. Use only genuine replacement parts and accessories.
7. Store the machine in a dry place out of the reach of children.
8. When the machine is stopped for servicing, inspection, or storage, or to
change an accessory, shut off the power source, disconnect the machine
from the supply and make sure that all moving parts are come to a
complete stop. Allow the machine to cool before making any inspections,
adjustments, etc. Maintain the machine with care and keep it clean.
9. Store the machine in a dry place out of the reach of children.
10.Always allow the machine to cool before storing.
11.Never attempt to override the interlocked feature of the guard.
WARNING!
Keep your product dry. Under no circumstances spray with water.
- To clean the tool, use only mild soap and a damp cloth.
- Do not use any type of detergent, cleaner or solvent which may contain chemicals
that could seriously damage the plastic.
- Self lubricating bearings are used in your product, therefore lubrication is not
required.
Fig.F
AFTER SALES SUPPORT 0345 605 2069
15
Page 16

TECHNICAL DATA
Blower S18BL
Rated voltage 18V
No load speed 12500 /min
Blow speed 200 km/h
Machine weight 1.6kg
Charger ACG18G25
Charger input 100-240V~50/60Hz 70W
Charger output 20V
Charging time 1 hr
Battery pack ABP118W2
Battery type Lithium-Ion
Battery capacity 18V
Noise data
A weighted sound pressure L
A weighted sound power L
Wear ear protection.
Vibration Information
Typical weighted vibration a
Uncertainty K =1.5m/s²
The declared vibration total value may be used for comparing one tool with another, and may also be used in a
preliminary assessment of exposure.
=82dB(A) KpA= 3.0dB(A)
pA
2.5A
2.0Ah, 36Wh
=89.2dB(A)
wA
= 1.82m/s
h
WARNING: The vibration emission value during actual use of the power tool can differ from the
declared value depending on the ways in which the tool is used dependant on the following examples and other
variations on how the tool is used:
How the tool is used and the materials being cut or drilled.
The tool being in good condition and well maintained
Using the correct accessory for the tool and ensuring it is sharp and in good condition.
The tightness of the grip on the handles and if any anti vibration accessories are used.
And the tool is being used as intended by its design and these instructions.
This tool may cause hand-arm vibration syndrome if its use is not adequately managed.
2
16
AFTER SALES SUPPORT 0345 605 2069
Page 17

TECHNICAL DATA
WARNING: To be accurate, an estimation of exposure level in the actual conditions of use should also
take account of all parts of the operating cycle such as the times when the tool is switched off and when it is running idle
but not actually doing the job. This may significantly reduce the exposure level over the total working period.
Helping to minimise your vibration exposure risk.
ALWAYS use sharp chisels, drills and blades
Maintain this tool in accordance with these instructions and keep well lubricated (where appropriate)
If the tool is to be used regularly then invest in anti vibration accessories.
Plan your work schedule to spread any high vibration tool use across a number of days.
ACCESSORIES
Battery charger 1
Battery pack 1
We recommend that you purchase your accessories from the same store that sold you the tool. Refer to the
accessory packaging for further details. Store personnel can assist you and offer advice.
TROUBLE SHOOTING
Problem Possible cause Solution
Check the battery pack, charger, where appropriate,
repair through electrical specialist
Repair through customer service
Repair through customer service
Device does not
start
Device works with
interruptions
Mains voltage is not present
Defective on/off switch
Defective motor
Damaged battery pack Check the battery pack, replace it
Internal loose connection
Defective on/off switch
ENVIRONMENTAL PROTECTION
Waste electrical products should not be disposed of with household waste. Please recycle where facilities exist.
Check with your Local Authority or retailer for recycling advice.
AFTER SALES SUPPORT 0345 605 2069
17
Page 18

WARRANTY
If your device develops a fault, please don’t hesitate to contact our customer service
department on 0345 605 2069, we can solve 80% of problems via the phone.
1. These warranty terms cover additional warranty rights and do not affect your
statutory warranty rights. All our products are covered by a 3 year manufacturer
warranty.
2. Claims must be accompanied by proof of purchase. This must be in the form
of a sales receipt or bank statement and must show that the product has been
purchased within the warranty period as described under point 1, from the retailer
that it was originally bought from. Please keep your receipt safe or staple it to the
back of this manual for future reference.
3. Our warranty covers problems caused by material or manufacturing defects, and
will result in the repair of these defects or replacement of the device with a like for
like or similar article.
4. Our devices have not been designed for commercial, trade or industrial
applications, any signs of use of the equipment in these application or equivalent
activities, invalidates the warranty.
5. The following are also excluded from our warranty:
1) Faults due to accidents, customer misuse or unauthorized repairs
2) Consumable Parts such as cutting line, plant protectors, handles, knobs,
extension cable and other accessories that are compatible with the product.
3) Failure due to lack of routine maintenance.
4) Failure as a result of not using the equipment in accordance with the manual and
safety instructions
5) The adjustment of cables, battery pack, chargers or switches.
Warranty claims should be submitted before the end of the warranty period, see point
1, but a paid service exists for repairs commissioned after this period. The original
warranty period remains applicable to the device even if repairs are carried out or
parts are replaced.
In such cases, the work performed or parts tted will not result in an extension of the
warranty period, and no new warranty will become active for the work performed or
parts tted.
If you have any problems or questions concerning your garden power tool, please
contact our after sales service at 0345 605 2069.
This device may be re-conditioned, like for like or upgraded replacement.
18
AFTER SALES SUPPORT 0345 605 2069
Page 19

Page 20

 Loading...