

Page 1

®
SPEAKMAN
SLV-1410
Installation, Operation & Maintenance Instructions
NEO™ COLLECTION COMBINATION SERIES
DESCRIPTION
Speakman Neo™ Collection Combination Series, SLV-1410 includes: Trim with integral Volume Control Handle
(CPT-1401), Shower Arm with Wall Flange (S-2540), and Low Flow Multi Function Shower Head (S-3010-E2).
This combination does not include the Shower Valve.
This combination should be installed with one of the following
Speakman Sentinel Mark II® Pressure Balance Diverter Shower Valves
CPV-PB-DV: Thermostatic Diverter Shower Valve
Sweat & Thread Connections
CPV-PB-DV-PXC: Thermostatic Diverter Shower Valve
PEX F1807 Crimp Inlet Connections
CPV-PB-DV-PXE: Thermostatic Diverter Shower Valve
PEX F1960 Cold-Expansion Inlet Connections
This combination should be installed with one of the following
Speakman Sentinel Mark II® Thermostatic Diverter Shower Valves
CPV-T-DV: Thermostatic Diverter Shower Valve
Sweat & Thread Connections
CPV-T-DV-PXC: Thermostatic Diverter Shower Valve
PEX F1807 Crimp Inlet Connections
CPV-T-DV-PXE: Thermostatic Diverter Shower Valve
PEX F1960 Cold-Expansion Inlet Connections
SPECIFICATIONS
CPT-1401 SENTINEL MARK II® DIVERTER SHOWER VALVE TRIM:
COMPLIANCE: ASME A112.18.1 / CSA B125.1 Standard
S-2540 SHOWER ARM WITH WALL FLANGE:
CONNECTIONS: ½” NPT Male Inlet & Outlet
S-3010-E2 LOW FLOW MULTI FUNCTION SHOWER HEAD:
CONNECTIONS: ½” NPT Female Inlet
FLOW RATE: 2.0 gpm (7.6 L/min)
COMPLIANCE: ASME A112.18.1 / CSA B125.1 Standard & WaterSense Certified
INSTRUCTIONS
See individual products for installation of the components and warranty information.
SPEAKMAN®
Phone: 800-537-2107 Fax: 800-977-2747
12/11/18 www.speakman.com 92C-SLV-1410-01
Page 2
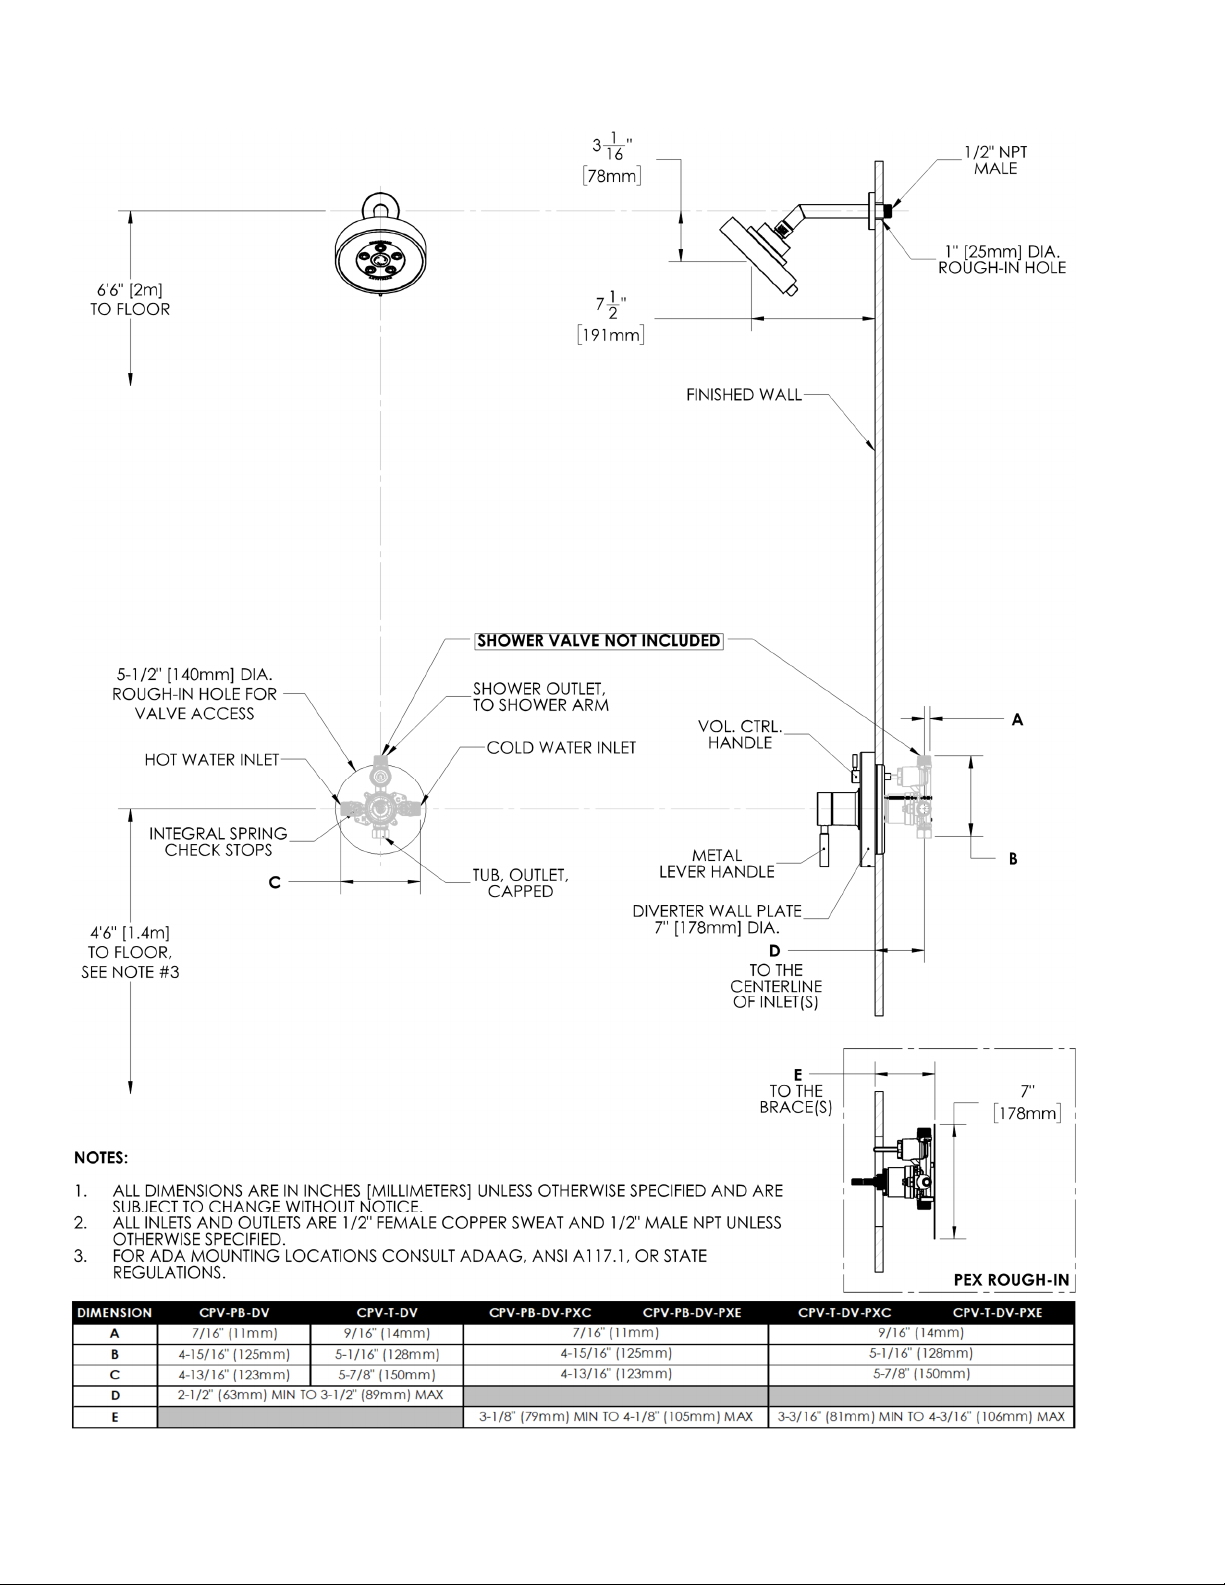
ROUGH-IN
SPEAKMAN®
Phone: 800-537-2107 Fax: 800-977-2747
12/11/18 www.speakman.com 92C-SLV-1410-01
Page 3
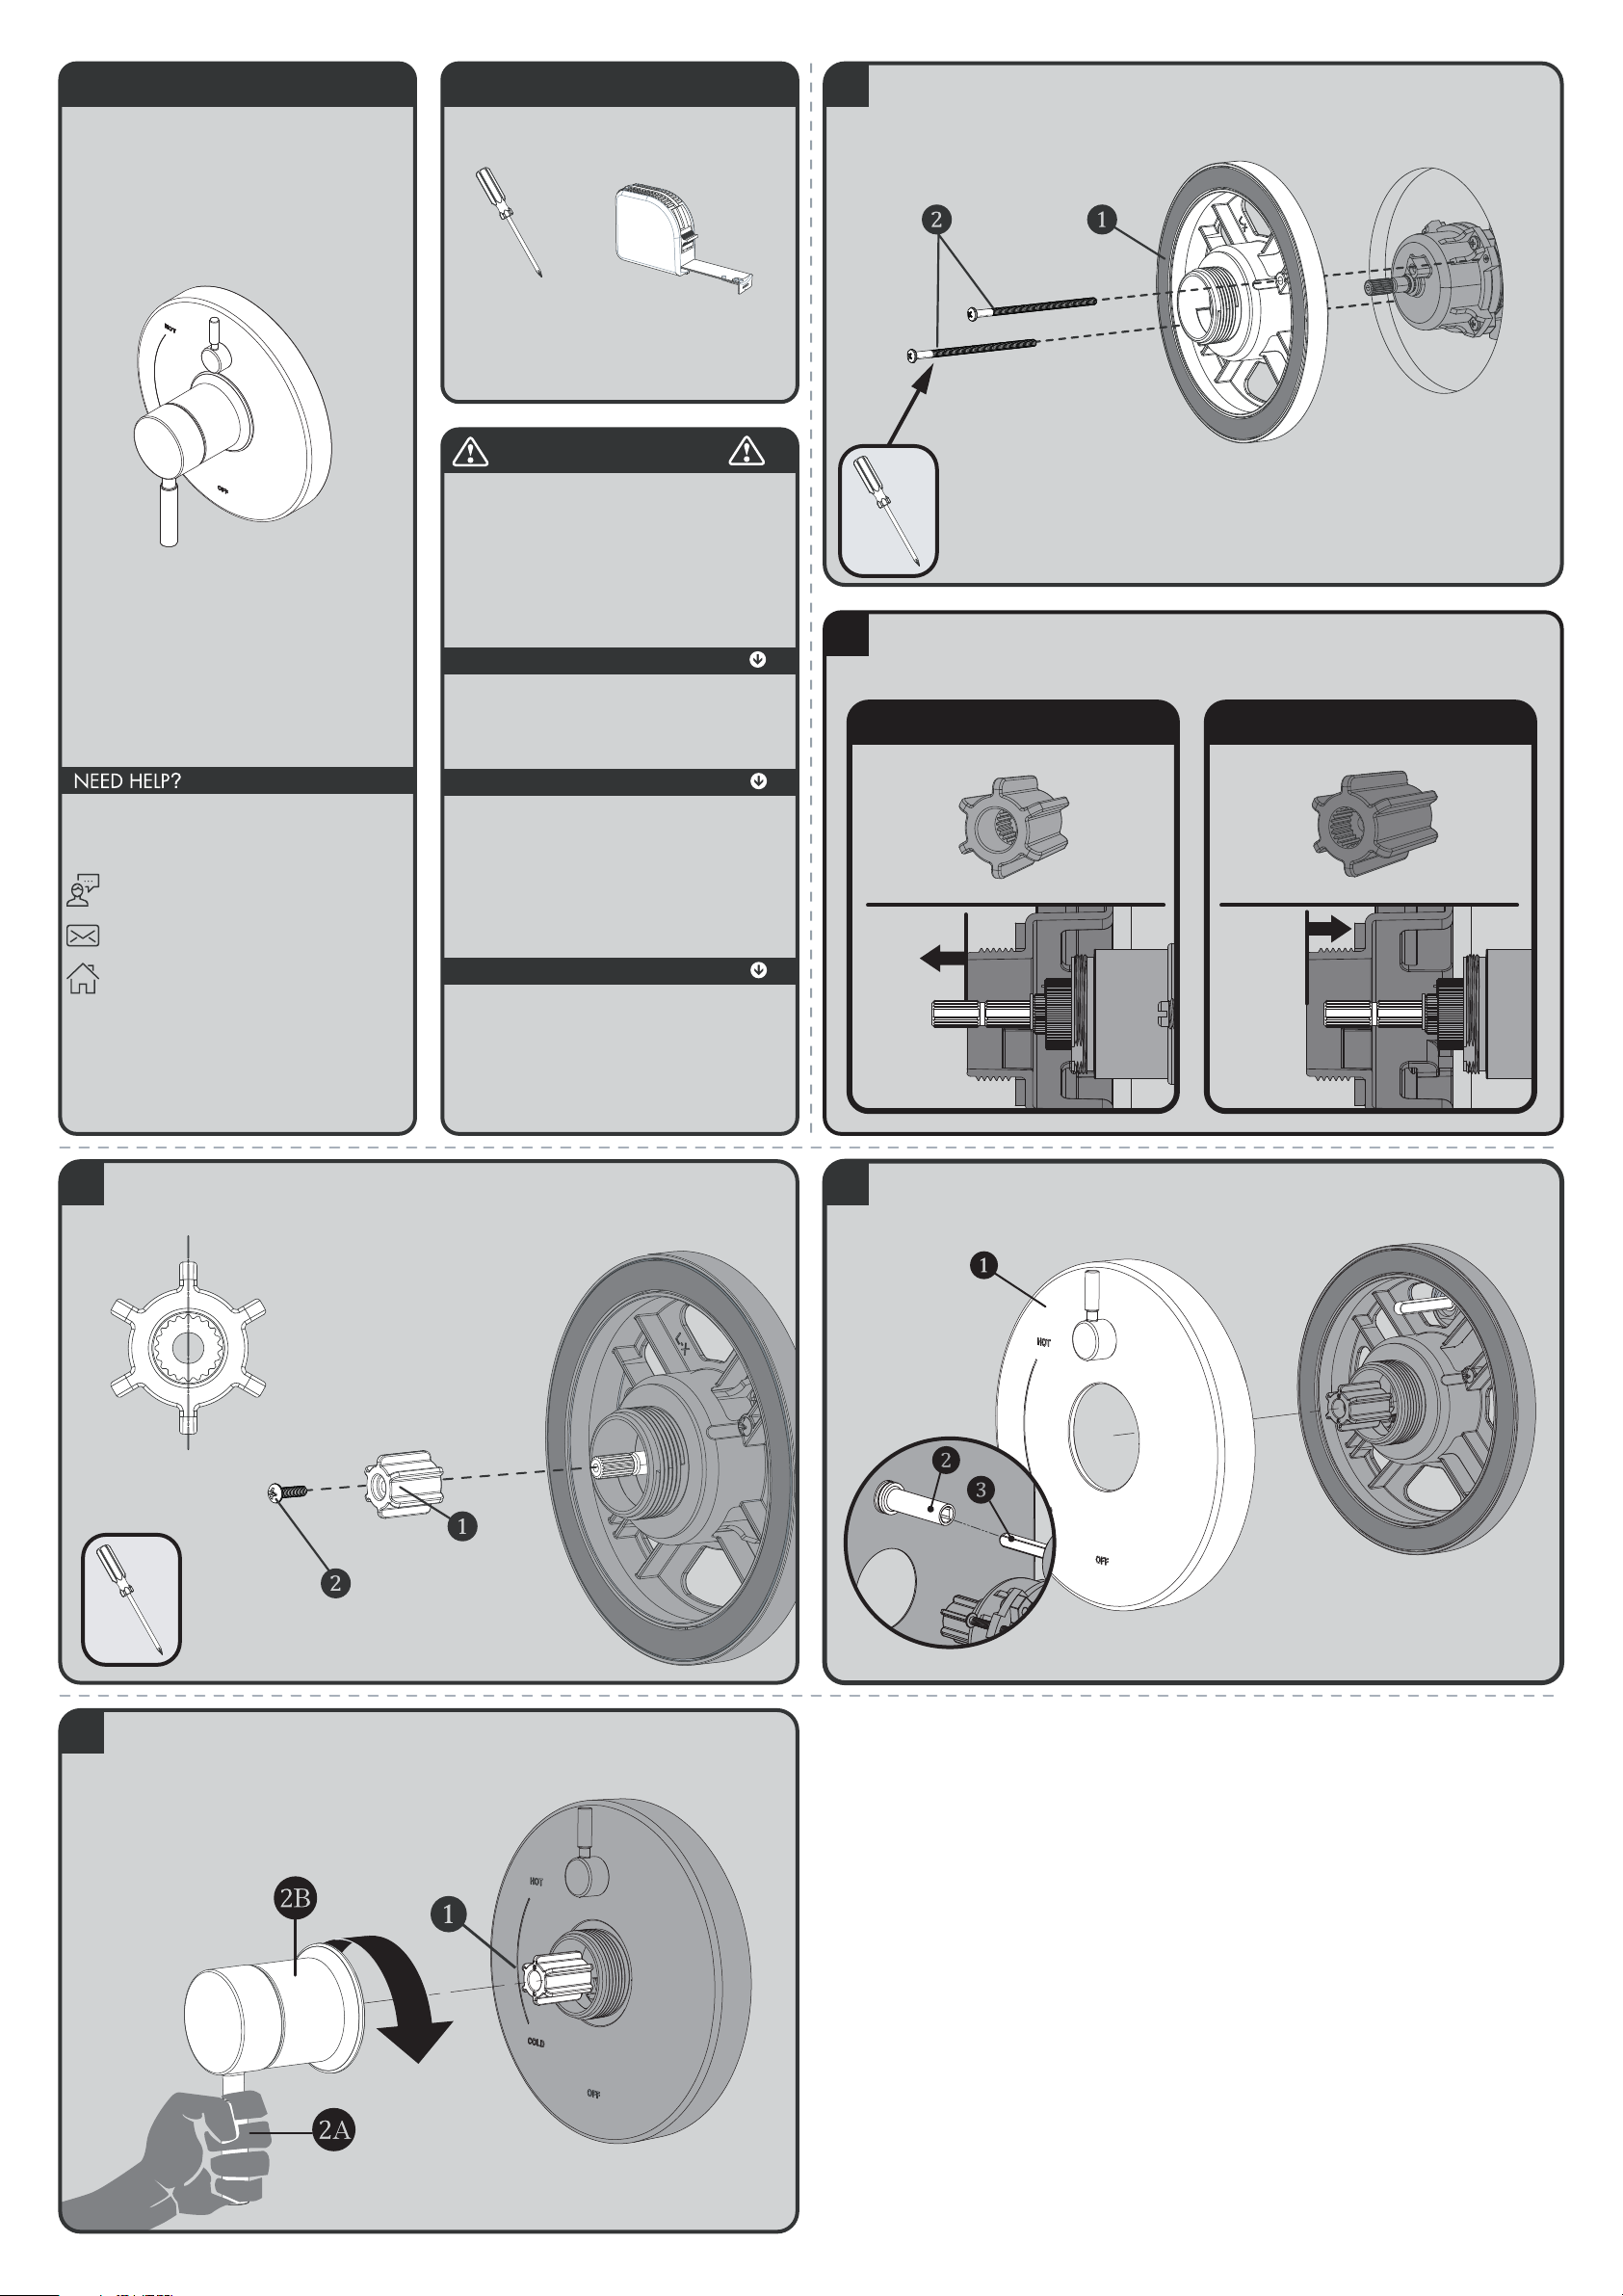
INSTRUCTIONS FOR MODELS
92-CPT-1401-01
For additional assistance or service please contact:
SPEAKMAN
®
800-537-2107
www.speakman.com
CPT-1401
TOOLS AND SUPPLIES
Phillips
Screwdriver
Measuring
Tape
Warranty information can be found at:
www.speakman.com
WARRANTY
MAINTENANCE
Cover your drain to prevent loss of parts.
SAFETY TIPS
IMPORTANT
• Be sure to read instructions thoroughly before
beginning installation.
• Do not over-tighten any connections or damage
may occur.
• Be sure to have properly adjusted the Temperature
Limiting Stop (TLS) as per the Valve Installation
Instructions before installing Valve Trim.
Your new Speakman Product is designed for years of
trouble-free performance. Keep it looking new by
cleaning it periodically with a soft cloth. The use of harsh
chemicals and abrasives on any of the Speakman custom
finish products may damage the finish and void the
product warranty. Please be sure to only use approved
cleaners. Please contact Speakman for any clarification
of acceptable cleaners.
1
Clean wall surface. Place Mounting Base (1) onto the valve, align mounting holes, and secure with
supplied screws (2).
2
Verify the position of the Spindle within the Mounting Plate, as shown below. If the end of the
Spindle extends beyond the Mounting Plate, then use the Shallow Mount Adapter. If the end of the
Spindle is flush to, or is within the Mounting Plate, then use the Deep Mount Adapter.
FOR SHALLOW MOUNT APPLICATION
FOR DEEP MOUNT APPLICATION
3
Confirm that Valve is in the “Off” position. Place appropriate Connector (1) on to the Spindle of the
Valve, making sure to orient the Connector so that one set of Splines are in a perfectly vertical
position. Secure Connector with 8-32 screw provided (2).
Splines in Vertical Position
4
Place Wall Plate (1) on Mounting Base. Take care to orient the Wall Plate as shown below. Verify the
Diverter Valve Stem is in the OFF (vertical) position. Align the Diverter Drive Tube (2) on the Wall
Plate to the Stem (3) of the Diverter Valve.
* VIEW FROM BACK OF WALL PLATE
5
Align Handle Assembly with Connector (1) and Escutcheon as shown below. Keep Handle (2A) in a
stationary vertical position and place over Connector (1) and engage the Splines of the Connector
with the Handle Assembly. Keep Handle in the vertical position as you thread Handle Hub (2B) on to
Mounting Base. Tighten until snug.
Page 4
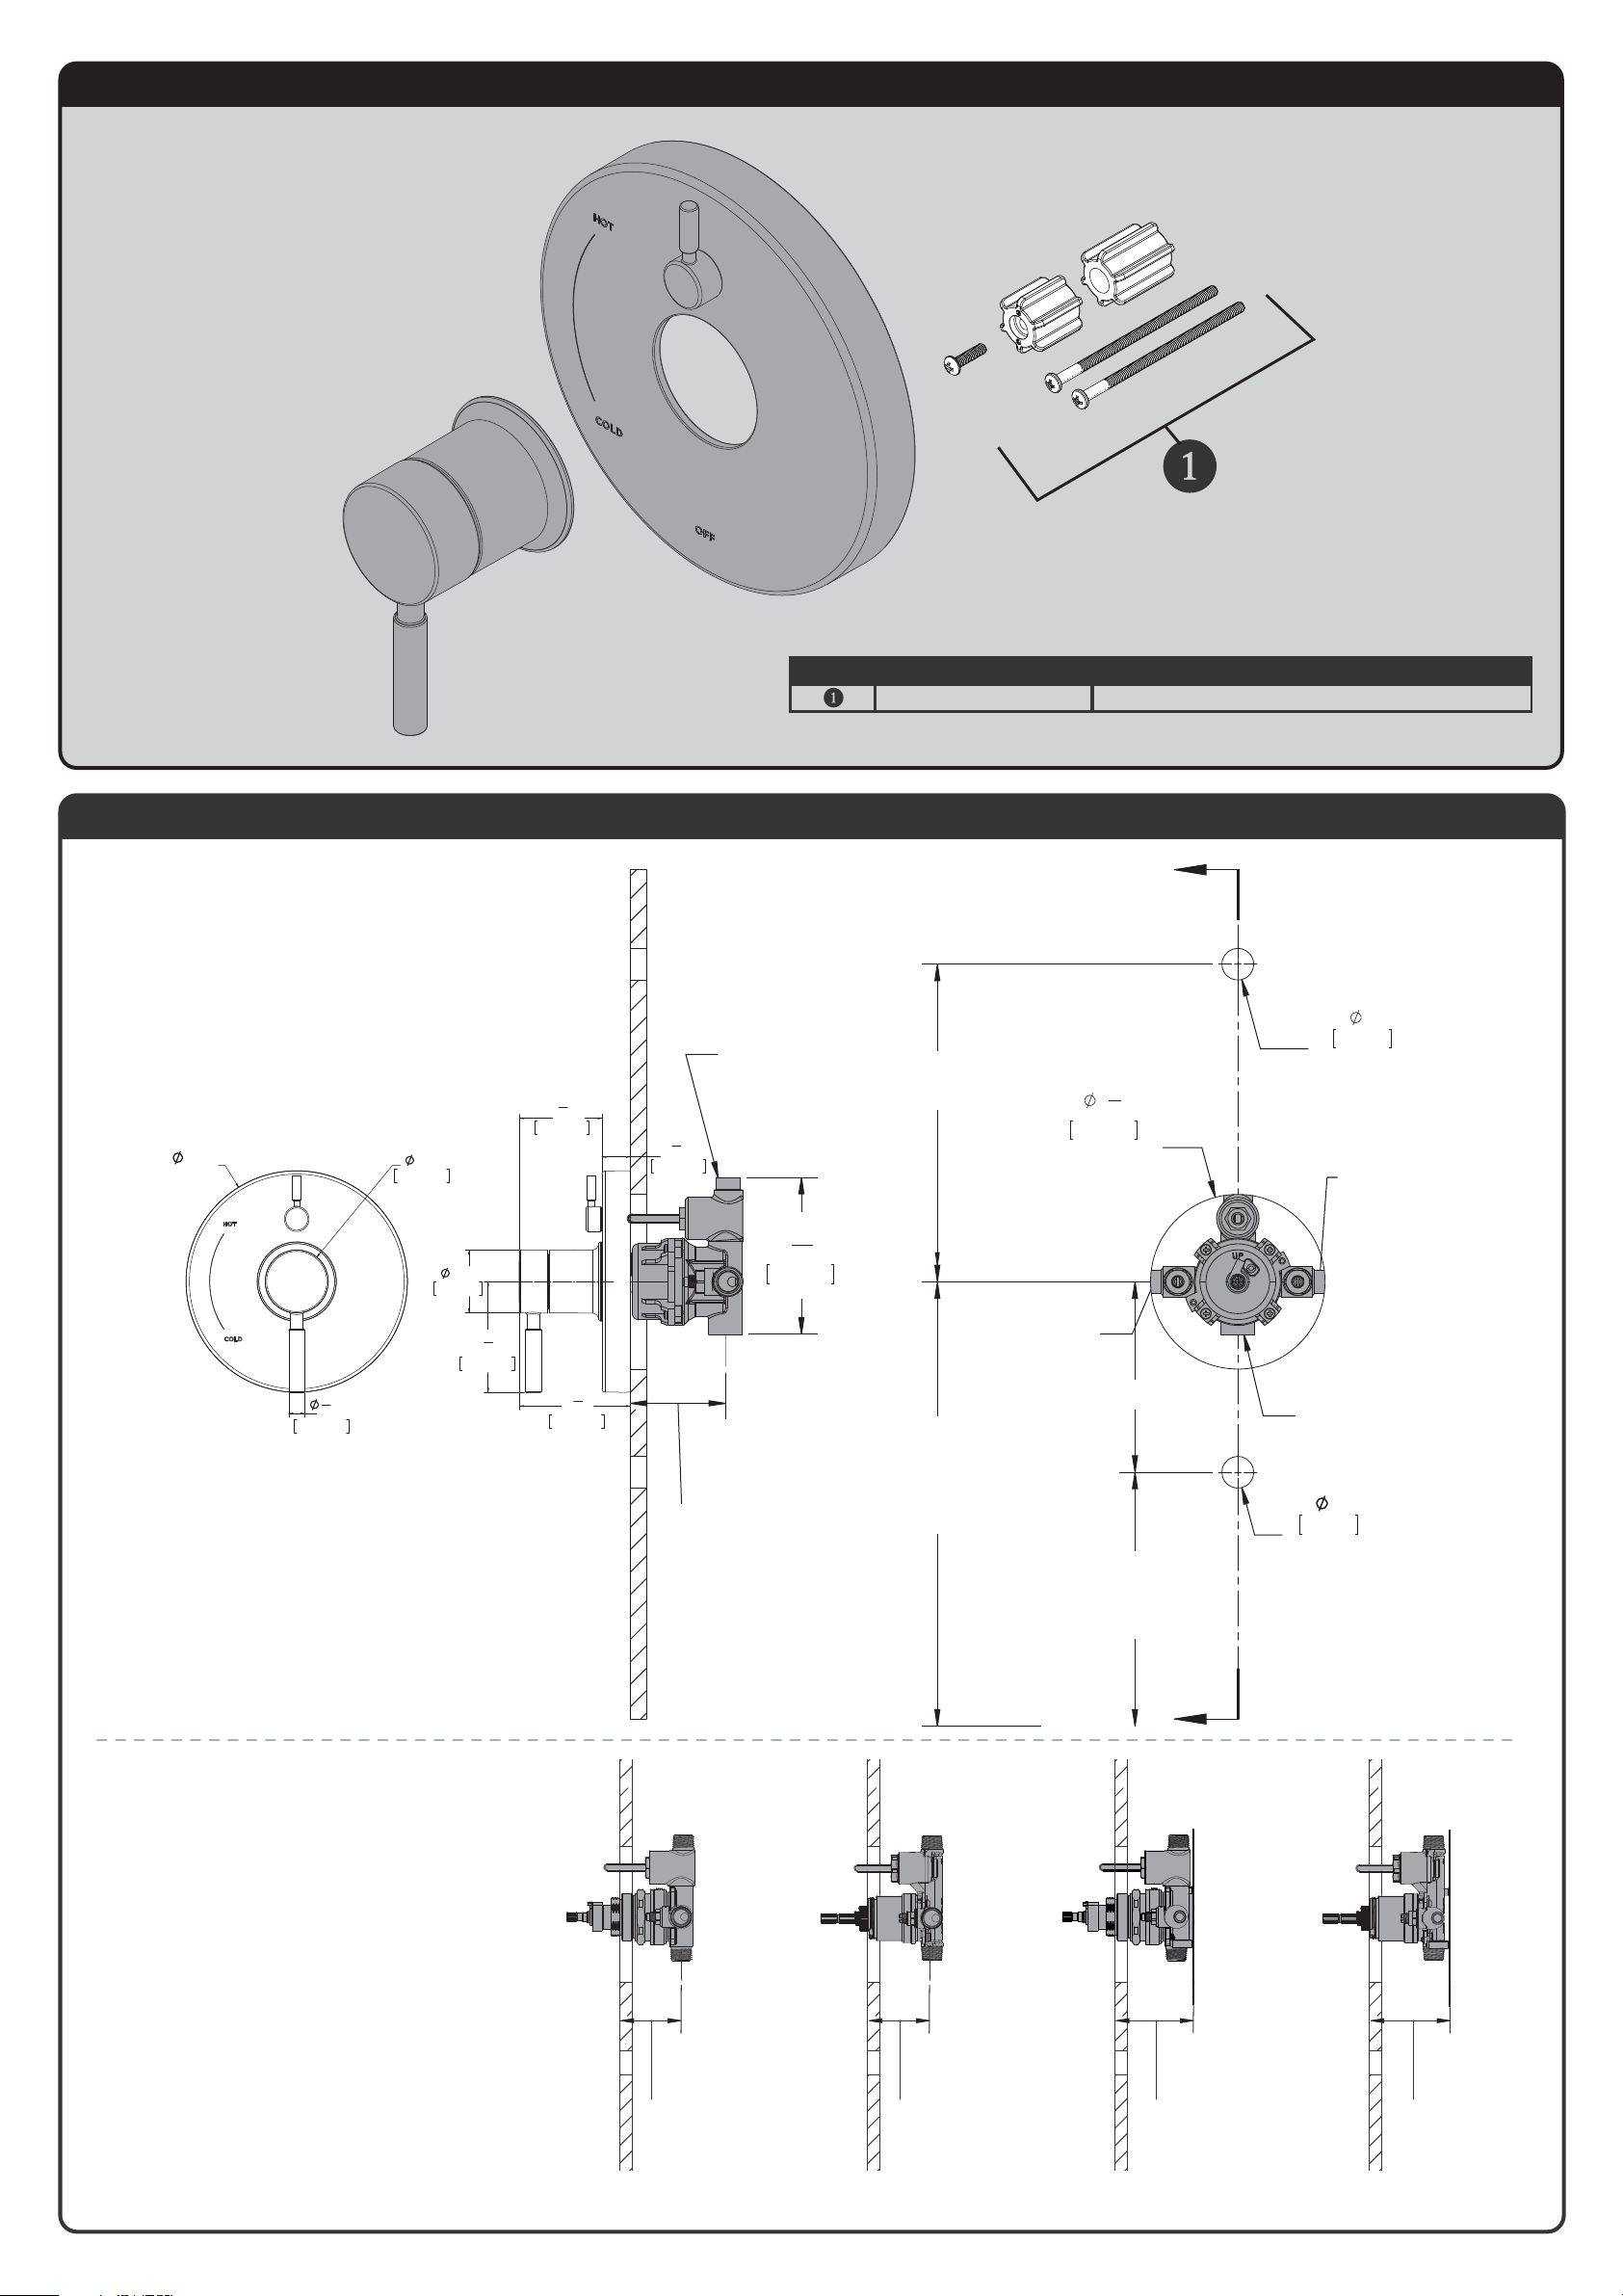
CPT-1401 REPAIR PARTS
SPEAKMAN
®
RPG05-0874 SCREWS AND SPLINE ADAPTERS
ITEM NO. PART NO. DESCRIPTION
CPT-1401 ROUGH-IN DIAGRAM
SPEAKMAN
®
DIMENSIONS SUBJECT TO CHANGE WITHOUT NOTICE.
VALVE MOUNTING IS SHOWN FOR REFERENCE ONLY.
VALVE IS NOT INCLUDED WITH CPT-1401.
1"
25mm
HOLE FOR
SHOWER ARM
5
1
2
"
140mm
HOLE FOR
VALVE ACCESS
1"
25mm
HOLE FOR
TUB SPOUT
6'-6" [2 METERS]
TO FLOOR
4'-6" [1.4 METERS]
TO FLOOR
(SHOWER
INSTALLATION ONLY)
1'-9" [533mm]
4" [102mm
TO TOP OF
TUB LEDGE
A
A
1/2 NPT FEMALE
1/2" SWEAT
CONNECTION
1/2" SWEAT
CONNECTION
2-1/2"MIN
[64mm]
3-1/2"MAX
[89mm]
(ADJUSTMENT)
4
15
16
"
125mm
1/2" SWEAT
CONNECTION
7in
[177.8mm]
2.0in
50.42mm
1
2
"
12.70mm
7
8
"
22.86mm
3
1
2
"
89.13mm
2
5
8
"
66.27mm
2.0in
50.4mm
3
1
2
"
88.81mm
NOTE: TRIM FITS DIFFERENT VALVES. ROUGH-IN
DIMENSIONS PROVIDED FOR REFERENCE ONLY.
2-1/2" MIN
[64mm]
3-1/2" MAX
[89mm]
(ADJUSTMENT)
2-1/2" MIN
[64mm]
3-1/2" MAX
[89mm]
(ADJUSTMENT)
3-3/16" MIN
[81mm]
4-3/16" MAX
[106mm]
(ADJUSTMENT)
3-1/8" MIN
[80mm]
4-1/8" MAX
[105mm]
(ADJUSTMENT)
CPV-T-DV CPV-PB-DV CPV-T-PXC-DV
CPV-T-PXE-DV
CPV-PB-PXC-DV
CPV-PB-PXE-DV
Page 5
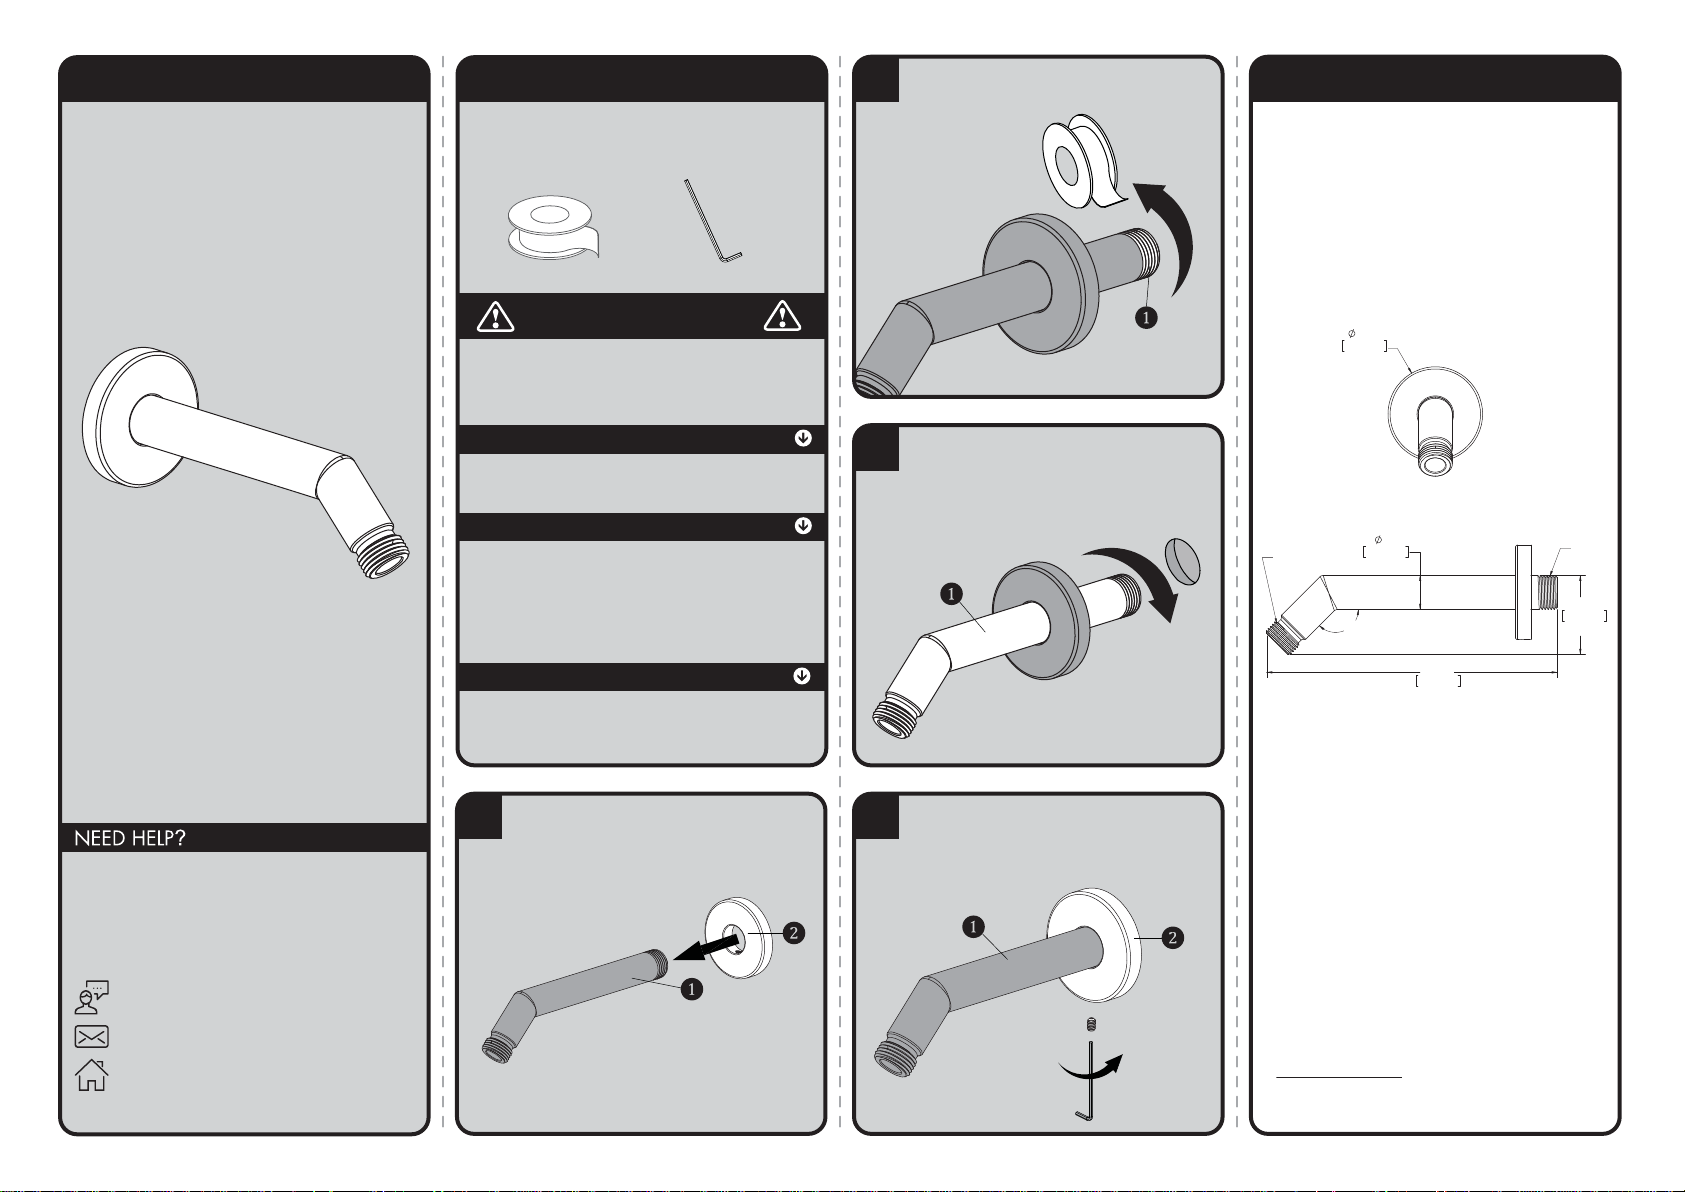
INSTRUCTIONS FOR MODELS
92-S-2540-03
For additional assistance or service please contact:
SPEAKMAN
®
Company
400 Anchor Mill Road
New Castle, DE 19720
800-537-2107
www.speakman.com
S-2540
TOOLS AND SUPPLIES
1
Slide Escutcheon Plate (2) over the long
end of the Shower Arm (1).
2
Apply Thread Seal Tape to inlet side of
Shower Arm (1).
3
Thread Shower Arm (1) into Female Pipe
Fitting within the wall. Firmly tighten, and
make sure Shower Arm (1) Outlet is
pointing in a downward position.
4
Position Escutcheon Plate (2) flat against
wall. Secure Escutcheon Plate (2) to Shower
Arm (1) by tightening set screw with Allen
Wrench (Hex: 2.0mm) provided.
ROUGH IN DIMENSIONS
Specifications:
Supply Inlet: 1/2" NPT
Outlet: 1/2" NPT
7in
175.4mm
REF
.8in
20.62mm
REF
1.9in
47.78mm
REF
135°
REF
1/2" NPT
1/2" NPT
2.25in
57.15mm
REF
Thread Seal
Tape
Allen Wrench
(Included)
IMPORTANT
Be sure to read instructions thoroughly before
beginning installation. Do not overtighten any
connections or damage may occur.
SAFETY TIPS
Cover your drain to prevent loss of parts.
MAINTENANCE
Your new Shower Arm is designed for years of
trouble-free performance. Keep it looking new by
cleaning it periodically with a soft cloth. Avoid
abrasive cleaners, steel wool and harsh chemicals
as these will dull the finish and void your warranty.
WARRANTY
Additional warranty information can be found at:
www.speakman.com
Page 6
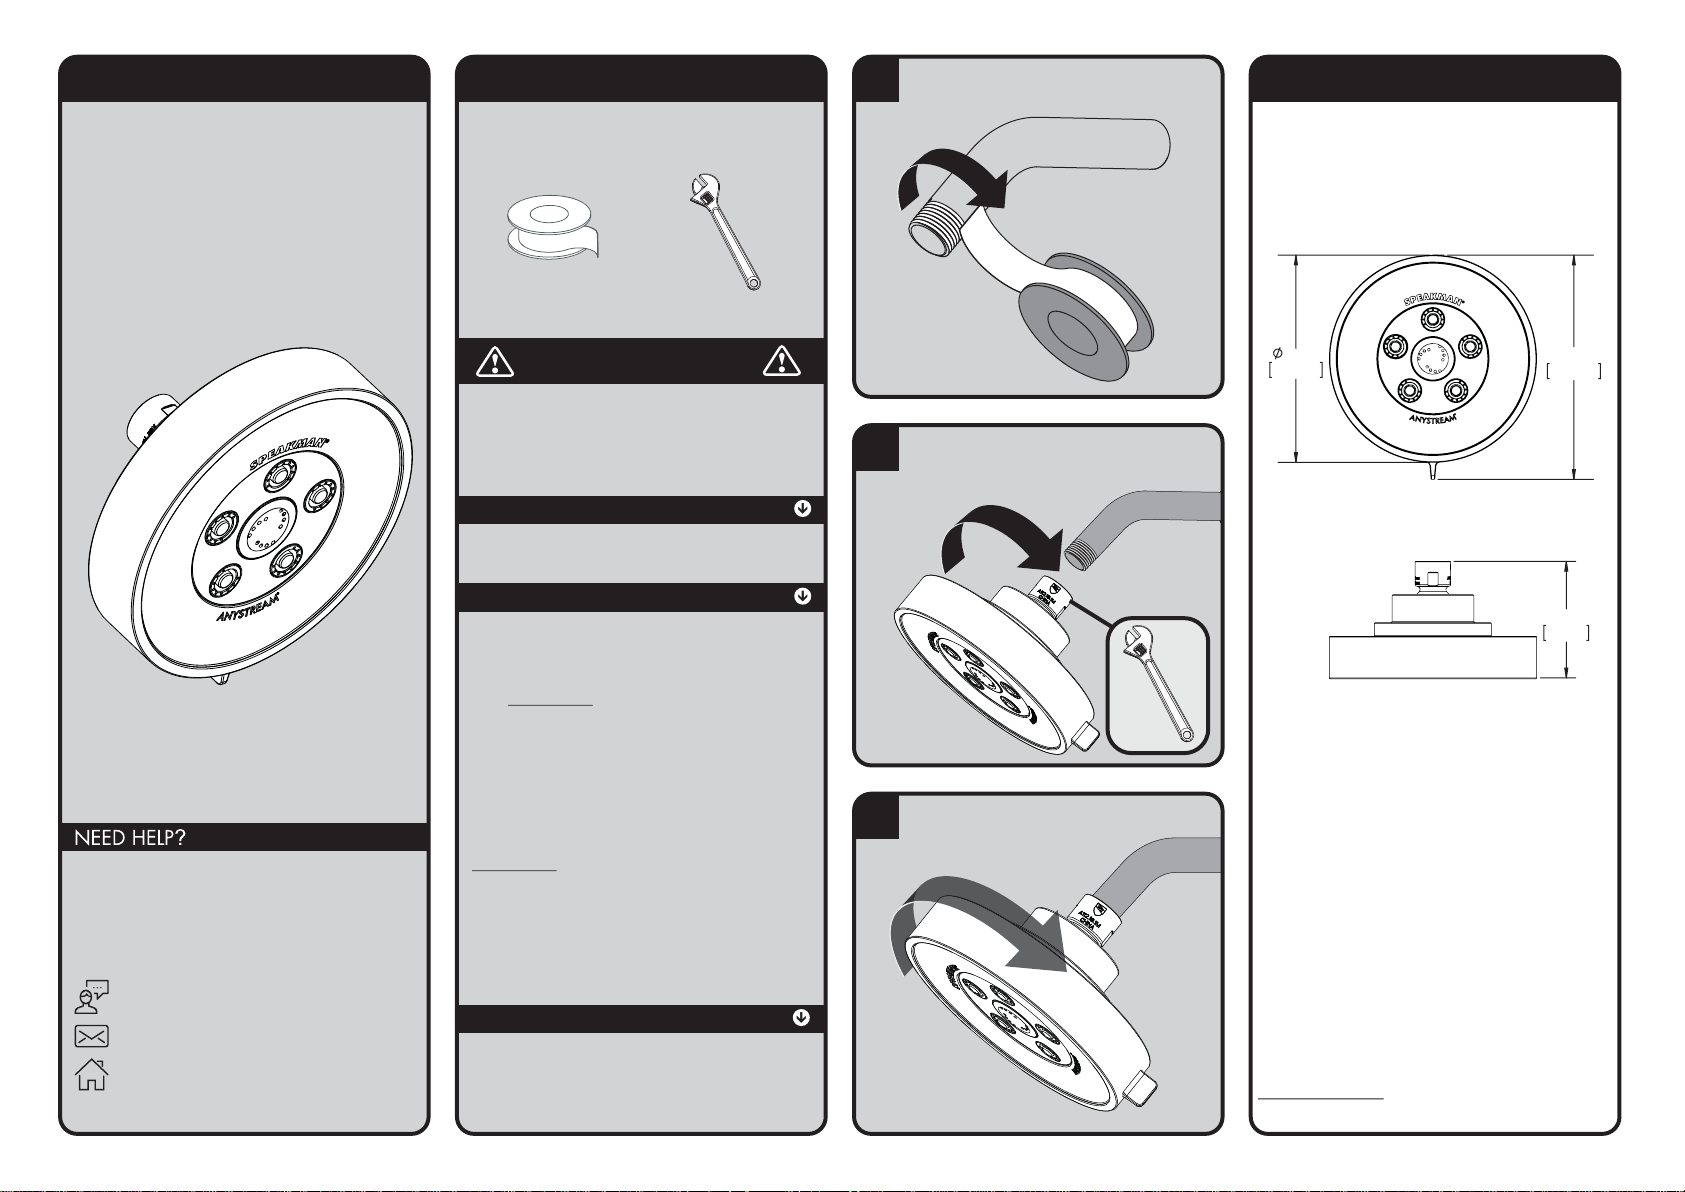
INSTRUCTIONS FOR MODELS
TOOLS AND SUPPLIES
ROUGH IN DIMENSIONS
1
Apply Thread Seal Tape to the outlet side of
shower arm in a clockwise direction.
2
Thread Shower head onto shower arm by turning
it in a clockwise direction. Tighten with adjustable
wrench. Turn water supply on and check for leaks.
3
Adjust spray pattern by rotating faceplate to
preferred Anystream® position.
S-3010
S-3010-E2
S-3010-E175
Thread Seal
Tape
(included)
Adjustable
Wrench
For additional assistance or service please contact:
SPEAKMAN
400 Anchor Mill Road
New Castle, DE 19720
800-537-2107
www.speakman.com
®
Company
92-S-3010-03
IMPORTANT
Be sure to read instructions thoroughly before
beginning installation. Do not overtighten any
connections or damage may occur.
SAFETY TIPS
Cover your drain to prevent loss of parts.
MAINTENANCE
Periodic cleaning using a mild soap and warm water
will help keep your Showerhead's appearance in its
original condition.
For best results, dry immediately with a soft, clean
cloth. DO NOT USE harsh and/or abrasive cleaners.
To help restore the finish, occasionally apply a
non-abrasive wax to your showerhead body (follow
manufacturers’ instructions).
On CHROME PLATED SHOWER HEADS, a two (2)
part white vinegar, one (1) part water solution can be
used to break down excessive mineral deposits on the
sprays. Let the showerhead soak in the solution for
about ½ hour then rinse thoroughly. Brush off any
remaining mineral deposits if necessary.
DO NOT USE the vinegar/water treatment on any
finish other than Chrome.
To reduce mineral build-up, turn the handle to FLOOD
position to let the water drain out after every use.
WARRANTY
Additional warranty information can be found at:
www.speakman.com
5-1/2"
140mm
Model: S-3010
Max. Flow Rate: 2.5 gpm (9.5L/min)
Min. Flow Rate: 2.0 gpm (7.6 L/min) @ 45psi
FOR USE WITH AUTOMATIC COMPENSATING VALVES RATED
AT 7.6 L/MIN (2.0 GPM) OR LESS.
Model: S-3010-E2
Max. Flow Rate: 2.0 gpm (7.6 L/min)
Min. Flow Rate: 1.5 gpm (5.7 L/min) @ 45psi
FOR USE WITH AUTOMATIC COMPENSATING VALVES RATED
AT 6.6 L/MIN (1.75 GPM) OR LESS.
Model: S-3010-E175
Max. Flow Rate: 1.75 gpm (6.6 L/min)
Min. Flow Rate: 1.3 gpm (4.9 L/min) @ 45psi
FOR USE WITH AUTOMATIC COMPENSATING VALVES RATED
AT 5.7 L/MIN (1.5 GPM) OR LESS.
6"
152mm
3-1/8"
80mm
Specifications:
Inlet: 1/2” NPT FEMALE
 Loading...