

Page 1
User’s Manual
SP-6VA1S
Mini Scaler Switcher
Page 2

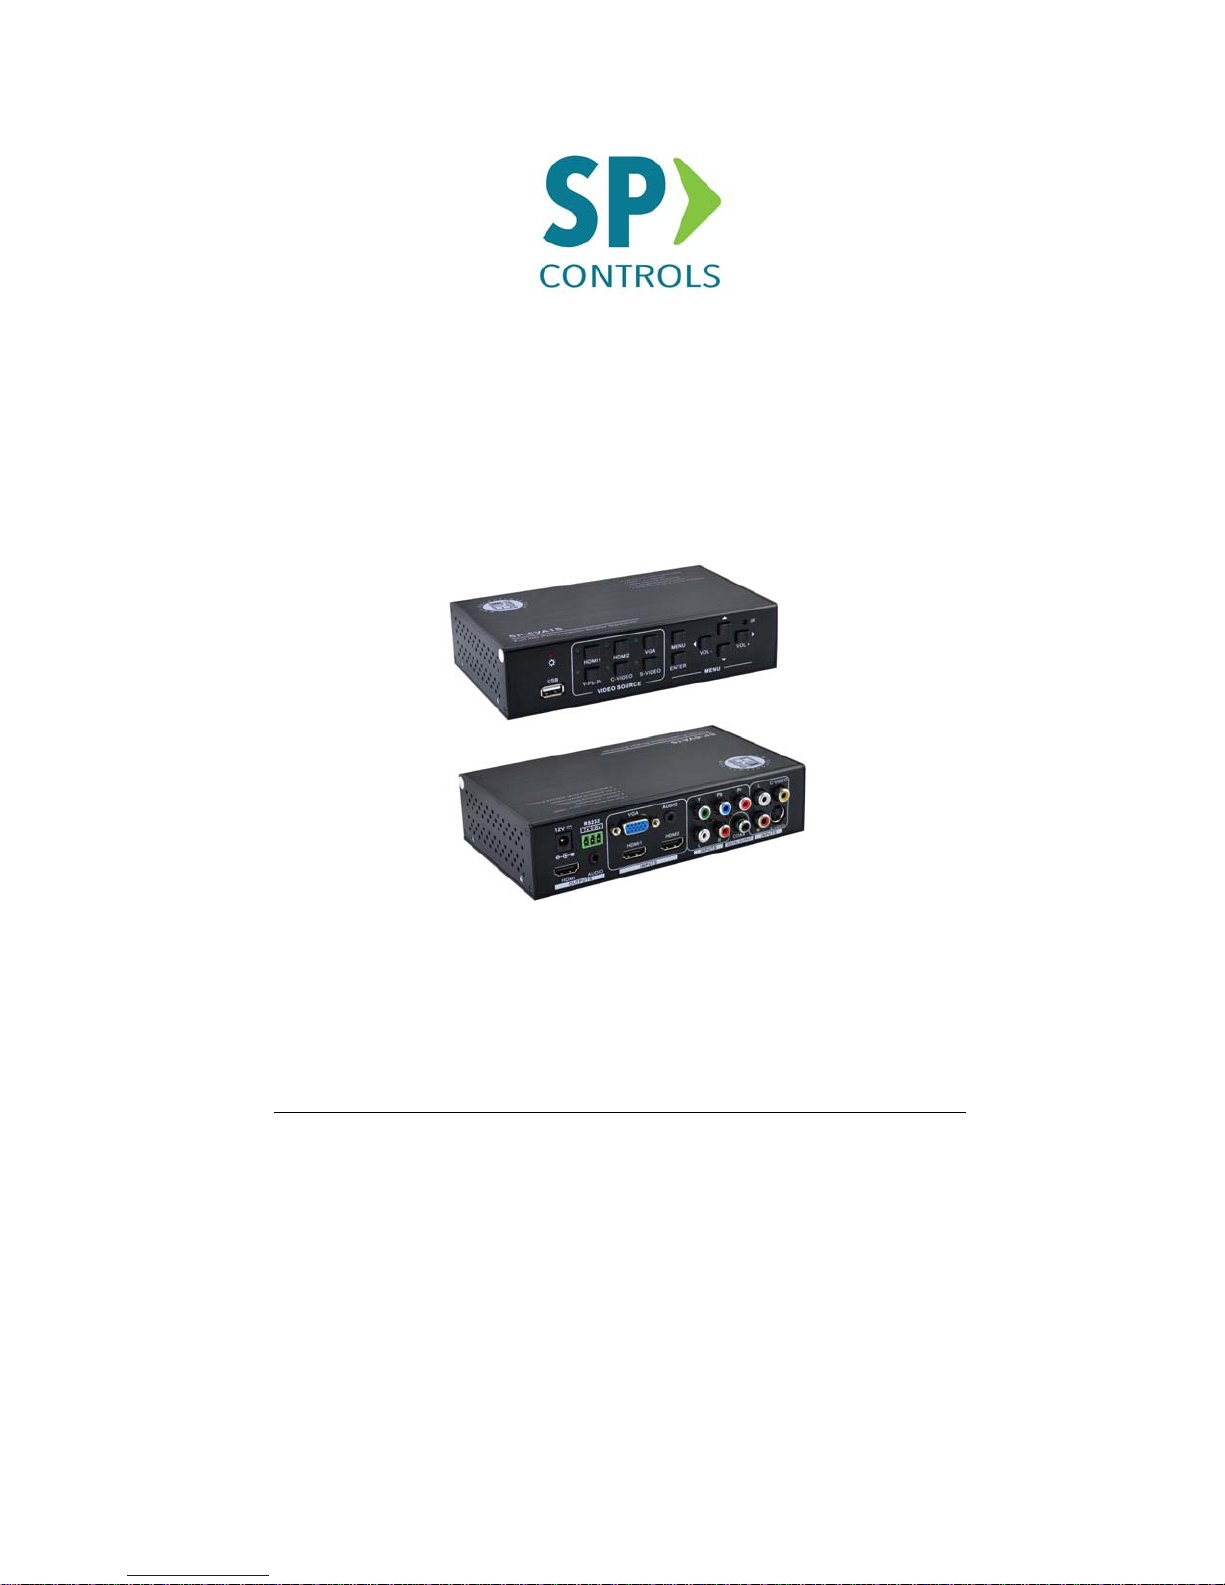
SP-6VA1S Mini Scaler Switcher
Table of Contents
Introduction ..................................................................................................................... 1
Product Appearance ..................................................................................................... 2
System Connection ......................................................................................................... 4
System Operations ......................................................................................................... 5
Specification .................................................................................................................. 14
Advanced Function ....................................................................................................... 14
Video and Audio Signal Introduction ............................................................................. 16
Panel Drawing .............................................................................................................. 18
Troubleshooting & Maintenance ................................................................................... 19
Safety Operation Guide ................................................................................................ 20
Warranty ....................................................................................................................... 21
SP Controls, Inc. www.spcontrols.com
Page 3

SP-6VA1S Mini Scaler Switcher
Introduction
1.1 Introduction to SP-6VA1S
SP-6VA1S is a full HD scaler switcher with 6 video & 3 audio inputs, it scales & switches
any video signal HDMI, VGA, YPbPr, C-Video & S-video to HDMI up to 1080P.
It is controllable via the IR and RS232 buttons. The SP-6VA1S is a high performance
switcher scaler for educational institutions, meeting rooms, conference rooms, etc.
1.2 Features
6 video Inputs: 2 x HDMI, 1 x VGA, 1 x YPbPr, 1 x C-video & 1 x S-video, and
upscale to HDMI output at 1080P
Support VGA resolutions: 640x480, 800x600, 1024x768, 1280x1024, 1280x768,
1360x768@60Hz, 1920x1080
Built-in PAL/NTSC and audio format automatic identification technologies, with good
video and audio processing technology for high performance
Output display H/V size: adjustable to resolve any overscale issue
Output display H/V position moveable
Picture/MP3 display via USB
Video parameter setting and preset
Powerful OSD function with full control, support output freeze function
Built-in break-point memory and power-off protection function
HDMI1.3 and HDCP compatible
Firmware upgradeable via USB
Front panel lockout
Controllable via button, IR & RS232
1.3 Package Contents
1 x SP-6VA1S
2 x Mounting ears
1 x IR remote (battery not included)
1 x Power adapter (DC 12V)
4 x Screws
1 x RS232 cable
1 x User Manual
Notes:Please confirm if the product and the accessories are all included, if not,
please contact with the dealers.
SP Controls, Inc. www.spcontrols.com
1
Page 4
SP-6VA1S Mini Scaler Switcher
Product Appearance
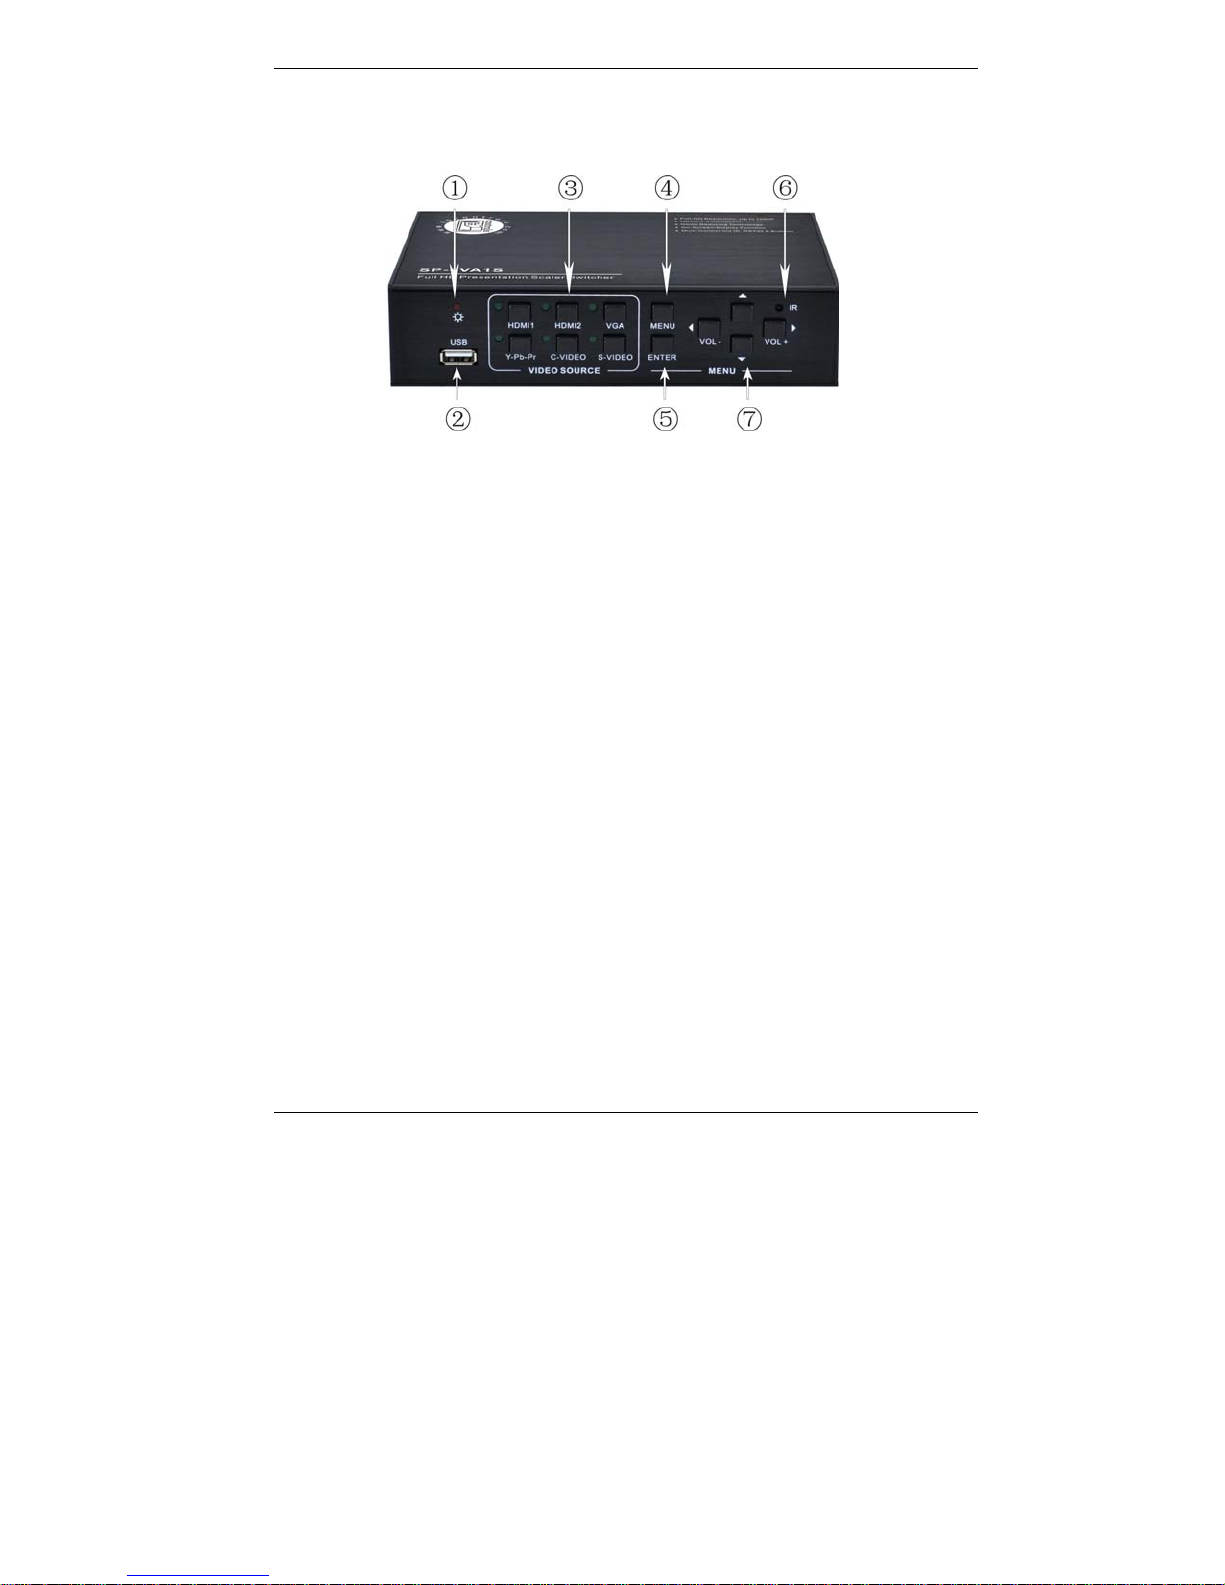
1.4 SP-6VA1S Front Panel
1 Power indicator
It will show as red when the unit is connected with power.
2 USB input
It can work as the USB flash disk, support the JPEG picture presentation playing,
and MP3 audio playing. It is operated by the on-screen display.
It can work as the firmware updating port (connect to computer via USB cable).
3 Video source selection buttons
You can select the video/audio source by these six buttons: HDMI1, HDMI2, VGA,
YPbPr, C-VIDEO and S-VIDEO.
4 MENU button
To active OSD (on-screen display), works with the direction key. When pressed, it
will enter into the Picture setting, Audio setting, System setting and USB setting
mode. The MENU button also can cancel the last operation.
5 ENTER button
This button works with the MENU button and the direction key. When pressed, it can
confirm the setting parameter.
When in USB mode, the ENTER button also acts as the confirm function.
6 IR sensor
Receives the signal from the IR remote.
7 Direction key
When entering into OSD mode, the four buttons will active. When OSD is off, only
the left button and the right button can be used for controlling the volume (VOL-,
VOL+).
SP Controls, Inc. www.spcontrols.com
2
Page 5
SP-6VA1S Mini Scaler Switcher
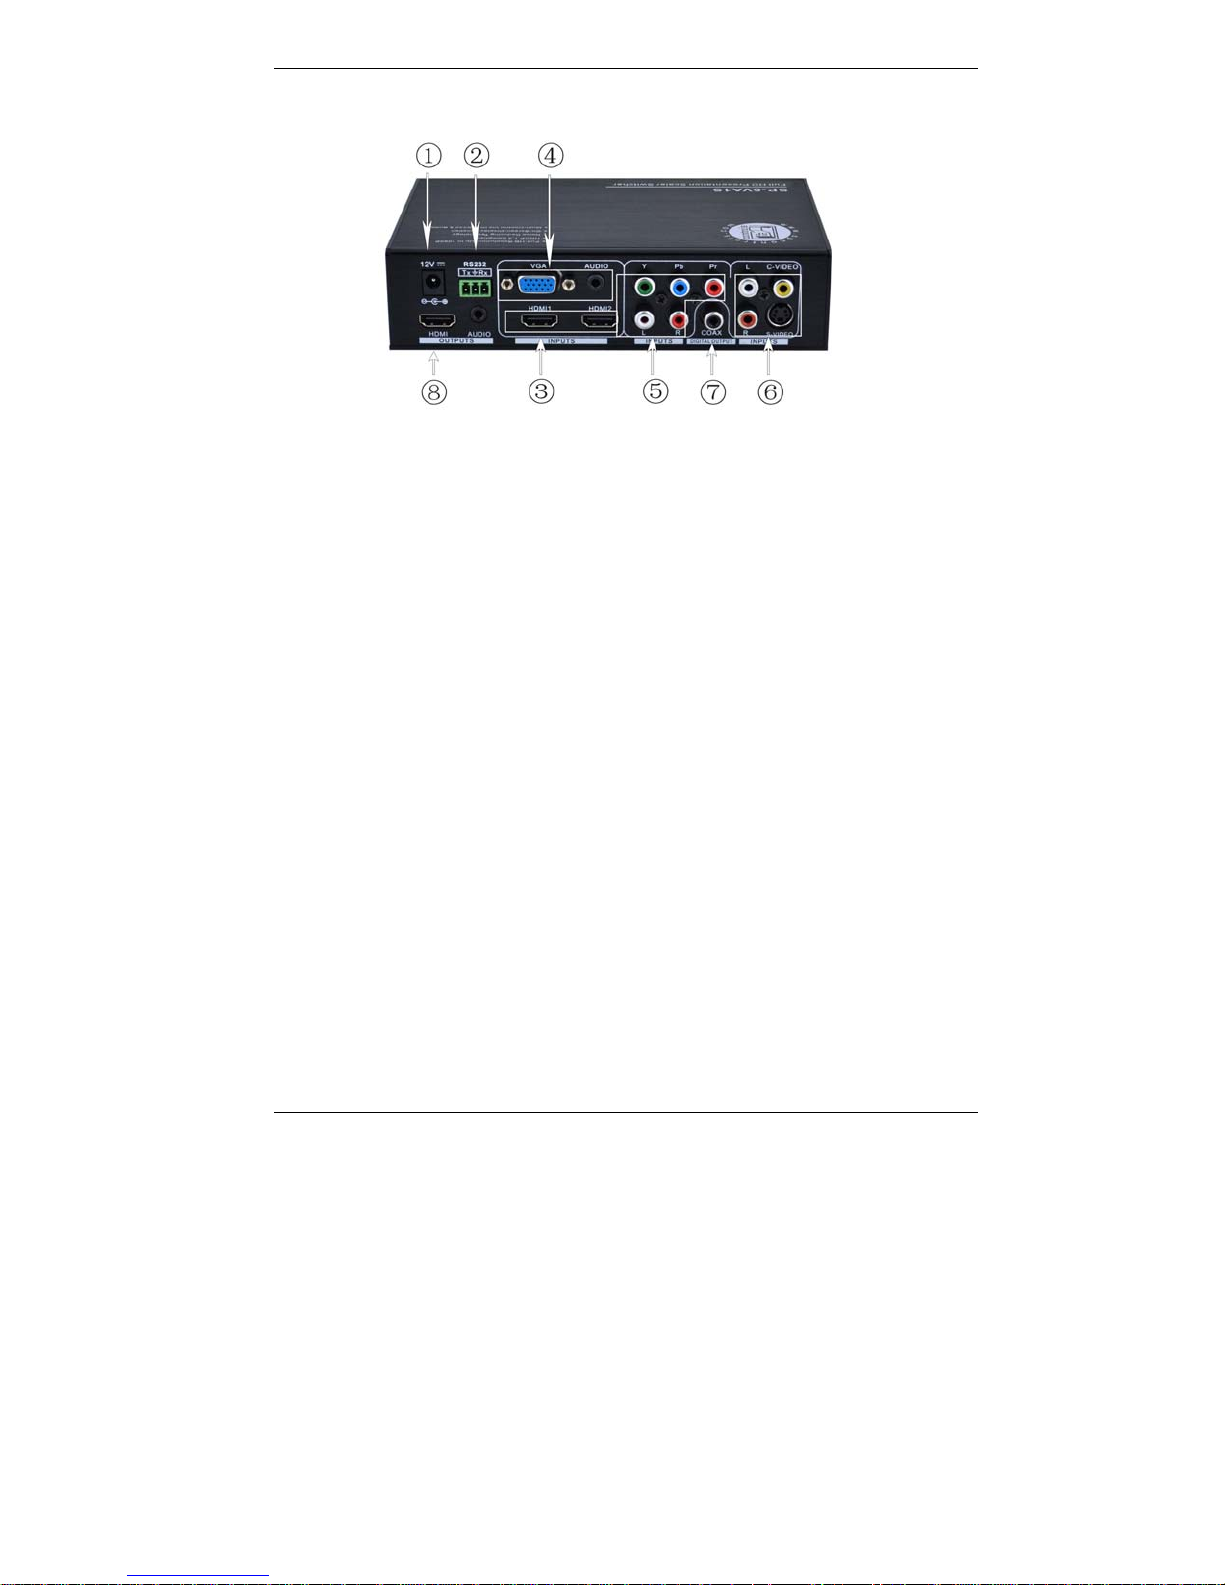
1.5 SP-6VA1S Rear Panel
1 Power port: Connects with the 12VDC power.
2 RS232 control port: connects with a control device, such as a computer.
3 HDMI1 & HDMI2: HDMI inputs.
4 VGA & stereo audio input:
VGA: VGA input supports different resolutions and format.
AUDIO: Stereo audio input.
5 YPbPr, L&R:
YPbPr: Component video YPbPr input.
L&R: Analog audio input (Left and Right channel).
6 C-VIDEO, L&R, S-VIDEO:
C-VIDEO: Composite video input.
L&R: Analog audio input (Left and Right channel).
S-VIDEO: Separate video input, shares the same stereo audio with C-video.
7 DIGITAL OUTPUT:
Coax: Coaxial audio output, with SPDIF format.
8 OUTPUTS:
AUDIO: Stereo audio output. All the input audio will be switched to this output,
including the embedded HDMI audio.
HDMI: HDMI output. Embedded digital audio, with adjustable volume.
SP Controls, Inc. www.spcontrols.com
3
Page 6

SP-6VA1S Mini Scaler Switcher
System Connection
1.6 System Diagram
1.7 Usage Precautions
1) System should be installed in a clean environment and has proper temperature and
humidity.
2) All of the power switches, plugs, sockets and power cords should be insulated and
safe.
3) All devices should be connected before power is turned on.
1.8 Application
The SP-6VA1S is good for various applications such as Broadcast, multi-media meeting
rooms, large screen displays and command & control centers, etc.
SP Controls, Inc. www.spcontrols.com
4
Page 7
SP-6VA1S Mini Scaler Switcher
System Operations
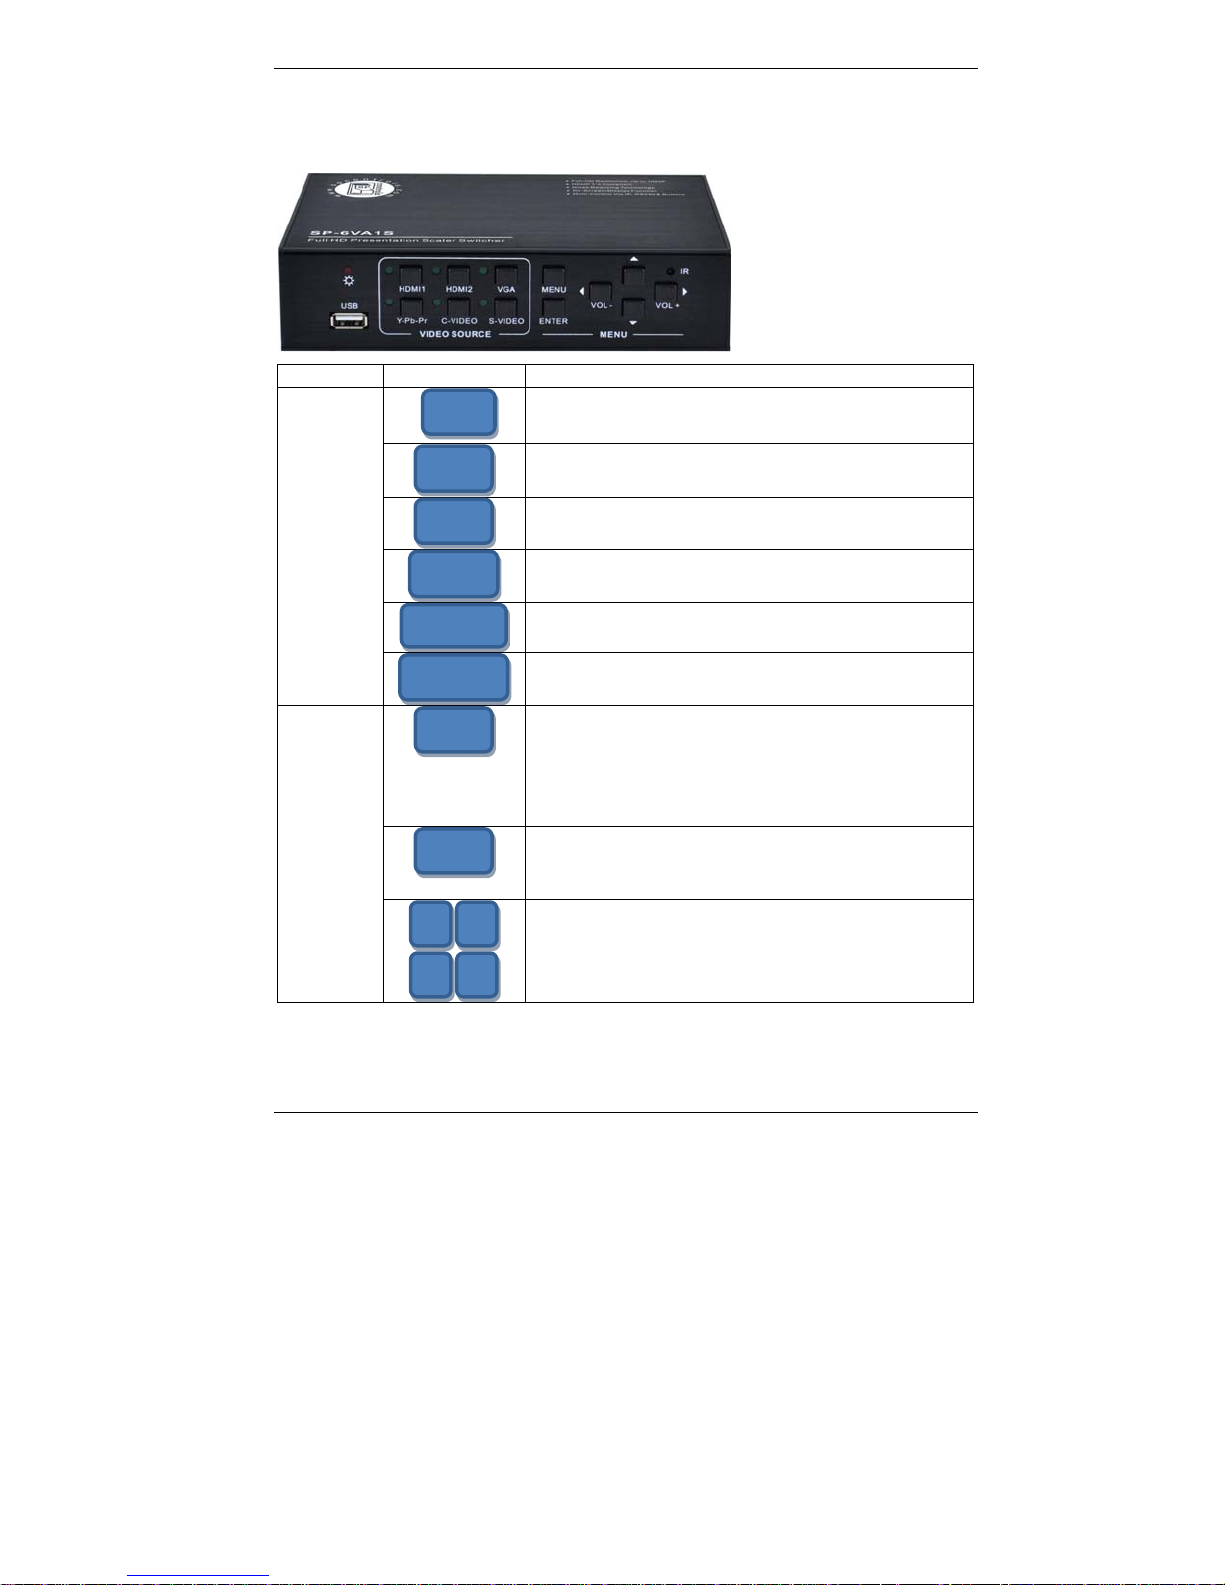
1.9 Operations of Buttons
Module Button Description
VIDEO
SOURCE
MENU
HDMI1
1
HDMI2
VGA
YPBPR
C-VIDEO
S-VIDEO
MENU
ENTER
↑ ↓
← →
Switching to HDMI1 input
Switching to HDMI2 input
Switching to VGA input
Switching to YPbPr input
Switching to C-video input
Switching to S-video input
MENU button, to activate OSD (on-screen display) for
using the direction keys. When pressed, it will enter
into the Picture setting, Audio setting, System setting
and USB setting mode. The MENU button will also
cancel the last operation.
ENTER button works with the MENU button and the
direction keys. When pressed, it will confirm the
setting parameter.
When using the Direction keys in OSD mode, all four
buttons are active. When OSD is off, only the left
button and the right button can be used for controlling
the volume (VOL-, VOL+).
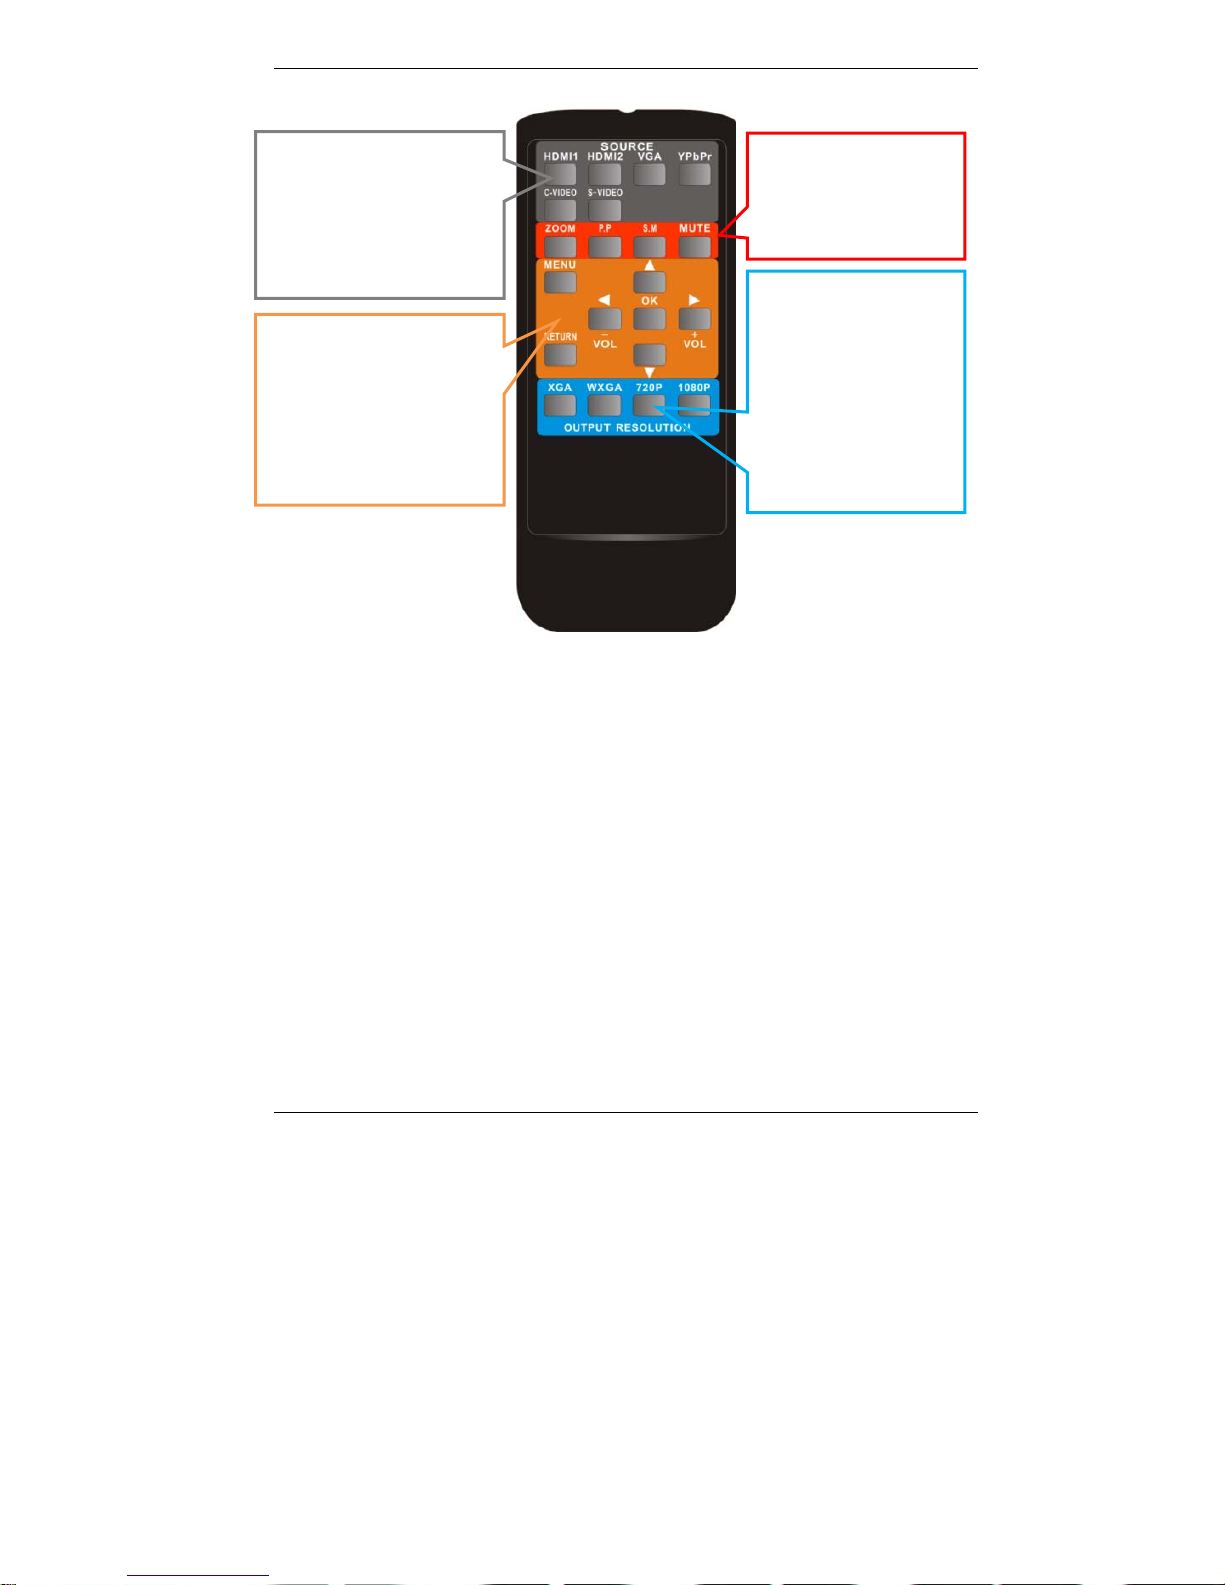
1.10 Operations of IR Remote
SP Controls, Inc. www.spcontrols.com
5
Page 8
SP-6VA1S Mini Scaler Switcher
Select the video source,
audio following switching
OSD operation and volume
control
Status setting for
audio/video
Select the output
resolution
XGA:1024x768
WXGA:1280x800
720P:1280x720
1080P:1920x1080
SP Controls, Inc. www.spcontrols.com
6
Page 9

SP-6VA1S Mini Scaler Switcher
1.11 Operation of Control Software
1.11.1 RS232 Connection with Computer
When SP-6VA1S connects to the COM1 or COM2 of the computer with control software,
users can control it by that computer.
To control the scaler switcher, users should use a 3-pole male captive screw to 9-pin HD
female connector and use the public COM software.
The definition of its pins is as the table below:
No. Pin Function
1 N/u Unused
2 Tx Transmit
3 Rx Receive
4 N/u Unused
5 Gnd Ground
6 N/u Unused
7 N/u Unused
8 N/u Unused
9 N/u Unused
1.11.2 Installation/uninstalling of RS232 Control Software
Installation: Copy the control software file to the computer which is connected with
SP-6VA1S.
Uninstalling: Delete all the control software files in corresponding file path.
1.11.3 Basic Settings
First to connect SP-6VA1S with all input source devices and output displaying devices
needed, then to connect SP-6VA1S with a computer which is installed with RS232
control software. Double-click the software icon to run this software.
Here we take the software CommWatch.exe as example. The icon is showed as below:
The interface of the control software is showed as below:
SP Controls, Inc. www.spcontrols.com
7
Page 10

SP-6VA1S Mini Scaler Switcher
Parameter Configuration area
Monitoring area, indicates if the
command sent works.
Command Sending area
Please set the parameters of COM number, bound rate, data bit, stop bit and the parity
bit correctly, and then you are able to send command in Command Sending Area.
SP Controls, Inc. www.spcontrols.com
8
Page 11

SP-6VA1S Mini Scaler Switcher
1.11.4 RS232 Communication Commands
Communication protocol: RS232 Communication Protocol
Baud rate: 9600 Data bit: 8 Stop bit: 1 Parity bit: none
Command Function Feedback Example
0600% MUTE Mute On
0601% UnMute Mute Off
0602% Audio volume up Volume: XX
0603% Audio volume down Volume: XX
0604% Lock the front panel button Panel Locked
0605% Unlock the front panel button Panel UnLocked
01XX%
02XX%
03XX%
04XX%
05XX%
0606%
0607% Auto-adjust the color temperature Color Temp: XX
0608% ZOOM the image, set the aspect ratio Aspect Ratio: XX
0609% OK, for OSD selection OK
0610%
0611%
0612% Up of OSD Up
0613% Down of OSD Down
0614% set the picture mode Picture Mode : XX
0615% SM Mode Sound Mode: XX
0616% MENU of OSD MENU
0617% Reset to factory defaults Factory reset
0620% Switching to HDMI1 input Source: HDMI 1
0621% Switching to HDMI2 input Source: HDMI 2
0622% Switching to VGA input Source: VGA
0623% Switching to YPbPr input Source: YPbPr
0624% Switching to S-Video input Source: SVIDEO
Preset the volume. The XX is ranging
from 00 to 99
Preset the brightness. The XX is ranging
from 00 to 99
Preset the contrast. The XX is ranging
from 00 to 99
Preset the saturation. The XX is ranging
from 00 to 99
Preset the sharpness. The XX is ranging
from 00 to 07
Auto-adjust the input parameter(VGA
only)
Left of OSD or volume up when not in
OSD menu mode
Right of OSD or volume down when not
in OSD menu mode
Volume: XX
Brightness: XX
Contrast: XX
Saturation: XX
Sharpness: XX
VGA Adjustment
Left
Right
SP Controls, Inc. www.spcontrols.com
9
Page 12

SP-6VA1S Mini Scaler Switcher
0625% Switching to composite video input Source: CVIDEO
0626% Change the resolution to 1024X768 XGA
0627%
0628%
0629%
0630% Check the volume level Volume: XX
0631% Check the input source Source: XXXXXX
0632% Check the output resolution Resolution: XXXXXXXX
0633% Check the image mode Picture Mode : XX
0634% Check the audio mode Sound Mode: XX
0635% Check the image aspect ratio Aspect Ratio: XX
0636% Check the brightness Brightness: XX
0637% Check the contrast Contrast: XX
0638% Check the saturation Saturation: XX
0639% Check sharpness Sharpness: XX
0640% Check the color temperature Color Temp: XX
0699% Check the firmware version SP-6VA1S V XXXXX
0644% Enable OSD CHANNEL display OSD Source: Display
0645% Disable OSD CHANNEL display
0646% Enable Volume Bar display Volume Bar: Display
0647% Disable Volume Bar display Volume Bar: No Display
0648%
0649%
0650% Check OSD CHANNEL display status OSD Source: Display
0651% Check Volume Bar display status Volume Bar: Display
0652% Check Digital audio output status
0655% Freeze output image Freeze: Enable
0656% Cancel the freezing of output image Freeze: Disable
Change the resolution to 1280X720
720P
Change the resolution to 1280X800
WXGA
Change the resolution to 1920X1080
1080P
Enable Digital audio(HDMI and SPDIF
)output
Disable digital audio (HDMI and SPDIF)
output
Resolution: XGA
1024X768
Resolution: 720P
1280X720
Resolution: WXGA
1280X800
Resolution: 1080P
1920X1080
OSD Channel
(Source):No Display
Digital Sound Ouput:
Enable
Digital Sound Ouput:
Disable
Digital Sound Ouput:
Enable
SP Controls, Inc. www.spcontrols.com
10
Page 13

SP-6VA1S Mini Scaler Switcher
1.12 Firmware Update
SP-6VA1S supports firmware field-updating, by USB flash disk. The Operation is:
1) Copy the file “MT23ATV.bin” to a USB flash disk. (The “MT23ATV.bin” file is
provided/authorized by SP CONTROLS engineering department)
2) Plug the USB flash disk to the SP-6VA1S USB port on its front panel.
3) Press the button “MENU” for 15 seconds or more, until it comes out an update OSD.
4) The SP-6VA1S will capture the new firmware from USB flash disk.
5) After update to the new firmware, reboot and send the command “0617%” to restore
to factory settings.
6) After that, reboot again.
Notice: If send the RS232 command to restore factory setting is unsuccessful, please
change the baud rate to 115200 and try again.
Advanced Function
SP Controls, Inc. www.spcontrols.com
11
Page 14

SP-6VA1S Mini Scaler Switcher
The SP-6VA1S provides an OSD operation menu, with various functions and
languages.
1.13 Picture Setting
The first icon from left of OSD menu is to set the picture parameter. It includes the
pictures mode preset, color temperature, contrast, brightness, hue, saturation,
sharpness, scale, and Advance picture adjust.
Some parameters are available depending on different input. The Advance Picture
Adjust can set the Digital Noise Reduction, dynamic color, skin tone and Adaptive Luma
adjustment function on or off. And DNR is suggested to be on, it can make the output
image clear and smooth.
Please check the picture below:
SP Controls, Inc. www.spcontrols.com
12
Page 15

SP-6VA1S Mini Scaler Switcher
1.14 Audio Setting
The Second icon from left of OSD menu is to set the audio/sound parameter. It includes
the sound effect preset, bass, treble, balance, scene mode, surround and smart volume
setting. Some parameters are available depending on different input.
Please check the picture below:
1.15 System Setting
The Third icon from left of OSD menu is the system setting. It includes the OSD
language setting, Listen, output image freeze, VGA setting, output adjustment and
output resolution change.
Listen: Audio output only. To resume video output, please press button “MENU”.
VGA setting: Adjust the H/V signal of VGA input, includes auto adjustment.
Output adjustment: Adjust H/V size and H/V position of the output. This function is
available only with HDMI and VGA inputs.
SP Controls, Inc. www.spcontrols.com
13
Page 16

SP-6VA1S Mini Scaler Switcher
1.16 Operations of USB Menu
The last icon from left of OSD menu is the USB operation menu. You can enter the USB
flash disk, to play music and picture. And, you can set the picture presentation order,
and picture presentation speed.
When you enter this page, you can select the file from USB flash disk, which is plugged
into the SP-6VA1S. You can use the up/down/left/right buttons to control it.
The USB can play MP3 music and JPG picture. And it can show the lyric of MP3 file, if
the lyric is in the same folder of MP3 file. The lyric should be in .LRC format:
NOTE:
1 When you are in the USB folder page, the ENTER button is for confirm function.
When use the IR remote, the OK button is for confirm function. The button “Menu” is
the return function. The RETURN button on the IR remote is for return function.
2 When the resolution is 1024x768, it does not support the USB flash disk.
3 When the resolution is changed, the OSD menu will be off.
SP Controls, Inc. www.spcontrols.com
14
Page 17

SP-6VA1S Mini Scaler Switcher
Specification
Video Input Video Output
2 HDMI, 1 VGA, 1
Input
Input
Connector
Video Signal
Video General
Resolution
Range
Maximum
Pixel Clock
VGA Cross
Ta lk
Gain 0dB HDCP
Audio Input Audio output
Input
YPbPr
1 C-Video1 S-Video
1 USB multimedia input
Female HDMI
Female VGA(15 pin HD)
Female RCA
4 pin mini DIN
connector
USB-A connector
HDMI 1.3/DVI, VGA,
RGBHV, RGBs, RGsB,
RsBsGs,
NTSC 3.58, NTSC 4.42,
PAL, SECAM
MPEG / AVI / JPG for
USB input
1080P, 1920*1080 ;
720P, 1280*720;
WXGA,1280*800 ;
XGA, 1024*768.
145MHz
-50dB@5MHz
1 Dual-mono stereo
audio for YPbPr
1 Dual-mono stereo
audio for C-VIDEO and
S-VIDEO
1 3.5mm stereo audio
2 digital HDMI
Output 1 HDMI
Output
Connector
Video Signal HDMI
Bandwidth
Video
Impedance
Input / Output
Level
Output
HDMI female connector
HDMI:4.95Gbps(1.65Gb
ps per color)
C-Video/S-Video:150M
Hz
YPbPr: 170MHz
VGA: 375MHz
75Ω
0.5V~2.0Vp-p
Compliant with DVI &
HDMI 1.3 standards
1 3.5mm stereo audio
1 COAX and HDMI
audio
SP Controls, Inc. www.spcontrols.com
15
Page 18

SP-6VA1S Mini Scaler Switcher
embedded audio
2 RCA (L&R) for YPbPr
2 RCA (L&R) for
C-Video & S-Video
Input
Connector
Input
Impedance
Audio General
Frequency
Response
CMRR
Control Parts
Control/
Remote
General
Temperature -20 ~ +70 Humidity 10% ~ 90%
Power
Supply
Case
Dimension
audio
1 3.5mm jack for VGA
audio
2 HDMI for embedded
audio
>10kΩ
20Hz~20K Hz
>90dB @20Hz to 20K
Hz
IR remote, Buttons &
RS232
DC12V adapter
W182x H42x D104mm
Output
Connector
Output
Impedance
Stereo
Channel
Separation
Pin
Configuration
Power
Consumption
Product
Weight
1 3.5mm jack for line
audio
1 RCA for CO-AX audio
(SPDIF)
1 HDMI for embedded
audio
50Ω
>80dB @1KHz
2 = TX, 3 = RX, 5 =
GND
6W
0.5Kg
Video and Audio Signal Introduction
1.17 Video Signal
SP-6VA1S supports a wide range of video signals, such as C-Video, S-Video, YPbPr,
VGA and HDMI. And all can be scaled to high-resolution HDMI format and switched to
output on HDMI.
1.17.1 C-Video and S-Video input
Supporting PAL/SECAM/NTSC format
Changeable aspect ratio. (Full-screen, wide screen, 4:3)
Color RGB adjustable
SP Controls, Inc. www.spcontrols.com
16
Page 19

SP-6VA1S Mini Scaler Switcher
1.17.2 YPbPr input
Aspect ratio adjustment (Full-screen, wide screen, 4:3):
Input
Resolution
720×480 I 2:1 525 15.75 60 4:3
720×480 P 1:1 525 31.5 60 4:3
720×576 I 2:1 625 15.625 50 4:3
720×576 P 1:1 625 31.25 50 4:3
1280×720P 1:1 750 45 60 16:9
1280×720P 1:1 750 37.50 50 16:9
1920×1080 I 2:1 1125 28.125 50 16:9
1920×1080 I 2:1 1125 33.75 60 16:9
1920×1080 I 2:1 1250 31.25 50 16:9
1920×1080 p 1:1 1250 62.5 50 16:9
1920×1080 p 1:1 1250 67.5 60 16:9
1.17.3 VGA input
The VGA resolution is VESA standard, supporting:
No. Resolution No. Resolution No. Resolution
1 640×480@60 Hz 6 800×600@75 Hz 11 1280×768
2 640×480@72 Hz 7 1024×768@60 Hz 12 1360×768@60 Hz
3 720×400@70 Hz 8 1024×768@70 Hz 13 1920×1080
4 800×600@60 Hz 9 1024×768@75 Hz
5 800×600@72 Hz 10 1280×1024@75 Hz
The bandwidth is up to 375MHz (-3dB).
The following audio can adjust bass/treble
Aspect ratio adjustment. (Full-screen, 4:3)
1.17.4 HDMI input
HDMI resolution support:
No. Resolution No. Resolution No. Resolution
1 640×480@60Hz 8 1024×768@60 Hz 15 1600×900@60Hz
2 640×480@72Hz 9 1024×768@70 Hz 16 1600×1200@60Hz
3 640×480@75Hz 10 1024×768@75 Hz 17 1920×540
Frame
frequency
The bandwidth is up to170MHz
Display Parameter
Frame
frequency
Frame
frequency
SP Controls, Inc. www.spcontrols.com
17
Page 20

SP-6VA1S Mini Scaler Switcher
4 800×600@56Hz 11 1280×720P 18 1920×1080I
5 800×600@60 Hz 12 1280×1024@75Hz 19 1920×1080P
6 800×600@72 Hz 13 1280×800@60Hz 20 1920×1200@60Hz
7 800×600@75Hz 14 1360×768
Digital embedded audio decoding.
Aspect ratio adjustment (Full-screen, wide screen, 4:3, auto-adjust).
Support HDCP1.3, compatible with DVI signal.
1.18 Audio Signal
3 Stereo audio input & 2 HDMI embedded audio input
3 simultaneous outputs. 3.5mm stereo audio, COAX (SPDIF), and HDMI embedded
audio.
Volume/Bass/Treble adjustable
Audio status presets
Panel Drawing
SP Controls, Inc. www.spcontrols.com
18
Page 21

SP-6VA1S Mini Scaler Switcher
T roubleshooting & Maintenance
1) When images of terminal unit output with ghost, such as the projector output with
ghost. Generally this is not a faulty unit; this may be caused by an incorrect setting
on the projector or a bad cable. Please check the projector’s setting or try another
high quality connection cable.
2) When there is a color loss or no video signal output, check the input and output
end connections of the cables.
3) When the IR remote doesn’t work, check the battery and replace with a new one.
4) When user cannot control the switcher by computer through its COM port, check
the COM port number in the software and make sure the COM port is correct.
5) If the POWER indicator doesn’t work or does not respond to any operation, please
make sure the power cord connection is good.
6) When there is no output image or audio while there is feedback from RS232
command:
The audio/video connector is loose, please connect again.
The audio/video connector has a broken circuit or a short circuit inside it. Please
replace the cable.
Check if there is any signal at the input/output end. You can check it by using an
oscilloscope or a multimeter.
7) If the static becomes stronger when connecting the BNC connectors, it is probably
due to the incorrect grounding, please correct it otherwise it would damage the
switcher.
8) If the switcher cannot be controlled by the buttons on the front panel, RS232 port
or IR remote, the switcher may have broken. Contact our tech support department
at help@spcontrols.com.
SP Controls, Inc. www.spcontrols.com
19
Page 22

SP-6VA1S Mini Scaler Switcher
Safety Operation Guide
In order to guarantee the reliable operation of the equipment, please abide by the
following installation and maintenance guidelines:
1) The system must be mounted properly. Please use 3-prong plugs and an
alternating power supply ranging from 100v to 240v and from 50Hz to 60Hz.
2) Store device at room temperature (not very hot or very cold).
3) As the unit generates heat when running, the working environment should have
adequate ventilation to avoid damage caused by overheating.
4) Cut off the general power switch in humid weather, or if left unused for long time.
5) Before using, ensure that the alternating current wire is pulled out of the power
supply:
Take off or reship any components of the equipment.
Take off or rejoin any pin or other link of the equipment.
6) DO NOT try to open the casing of the equipment, DO NOT repair it on your own in
case of injury, or causing damage to the equipment.
7) DO NOT splash liquid in or around the equipment.
SP Controls, Inc. www.spcontrols.com
20
Page 23

SP-6VA1S Mini Scaler Switcher
Warranty
1) We offer a three-year warranty on the SP-6VA1S from the date of purchase.
2) Warranty repair or replacement will not apply if the unit is:
Beyond the warranty period.
Damaged due to incorrect usage, storage or repaired by user.
Damaged caused by force majeure.
All returns require prior authorization. To obtain a return authorization, contact our
technical support department at (877) 367-8444 ext. 302 or email help@spcontrols.com.
SP Controls, Inc. www.spcontrols.com
21
Page 24

SP-6VA1S Mini Scaler Switcher
SP Controls, Inc.
Tel: (650) 392-7880
Toll Free (US): (877)-367-8444
Email: help@spcontrols.com
Website: www.spcontrols.com
SP Controls, Inc. www.spcontrols.com
22
 Loading...