

Page 1
Read This First
Setup Guide
You cannot use the machine unless you perform
the following:
1
Setting Up the Machine
2
Installing the Software
PaaS (Printer as a Service) Settings
3
Troubleshooting
Terminology
P.2
P.6
P.30
P.34
P.35
Page 2

Page 3

How to Read This Manual
For safe and correct use, be sure to read the Safety Information in "Safety Information" before using the machine.
•
Introduction
This product requires special network settings.
What Can be Done with this Machine
The rental model is a printing equipment management system using a cloud service. Using the rental model, you can receive the following ser vice:
Preventing Equipment Failure
•
By periodic inspection according to the machine’s condition, you can prevent equipment failure.
Minimizing downtime by prompt action
•
You can minimize the device downtime at the time of failure by such means as automatic notification, checking the status, promptly
calling the customer engineer, and simplifying the procedure for requesting repair.
Maintaining print quality
•
You can secure an environment in which genuine toner is always available according to use. Thus, you can prevent consumable
shortage and specify where to buy consumables.
Supporting device management
•
Using the web browser, you can check the use counter and operational status of the device.
1
Page 4
70 cm
(27.6")
20 cm
(7.9")
40 cm
(15.8")
20 cm
(7.9")
10 cm
(4")
DPH142
CER119
DPH121
DPH122
DPH105
CVV017
1. Setting Up the Machine
Place to Install
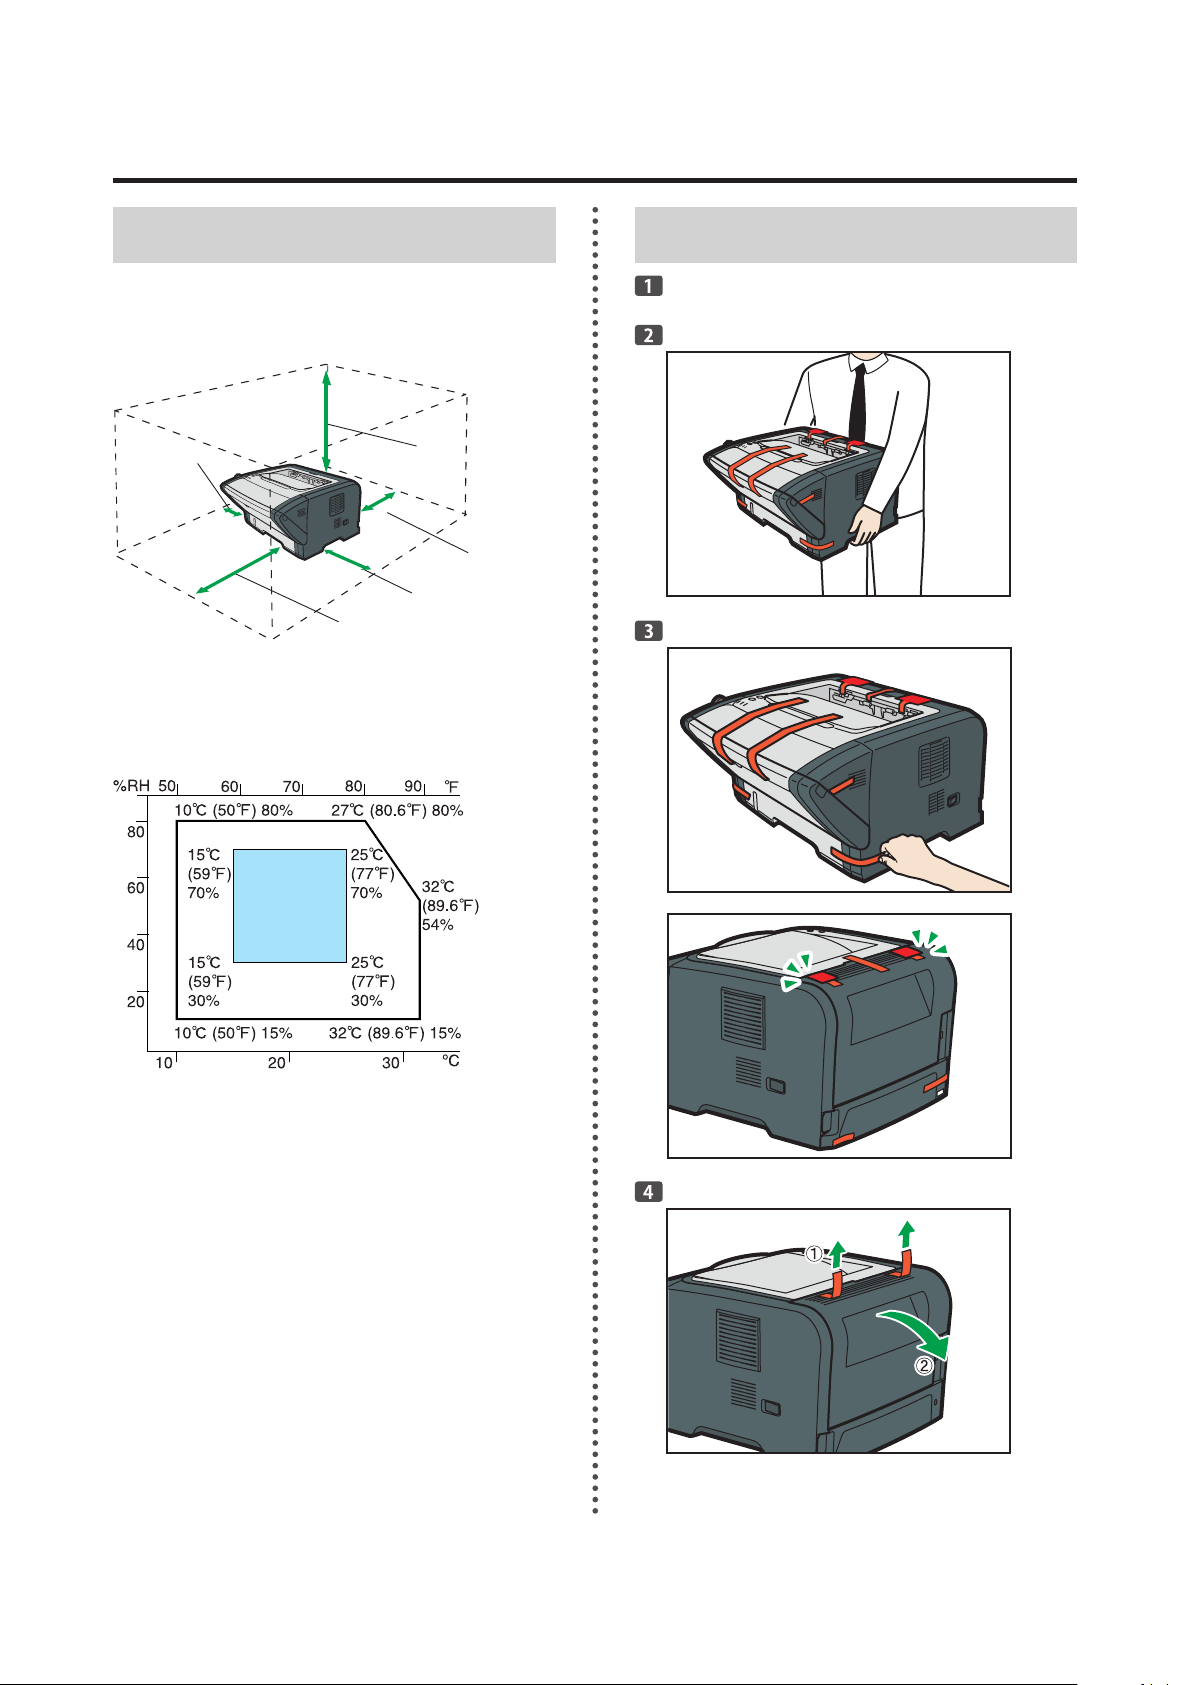
Space Required for Installation
The recommended (or minimum) space requirements are as
follows:
Optimum Environmental Conditions
Permissible and recommended temperature and humidity
ranges are as follows:
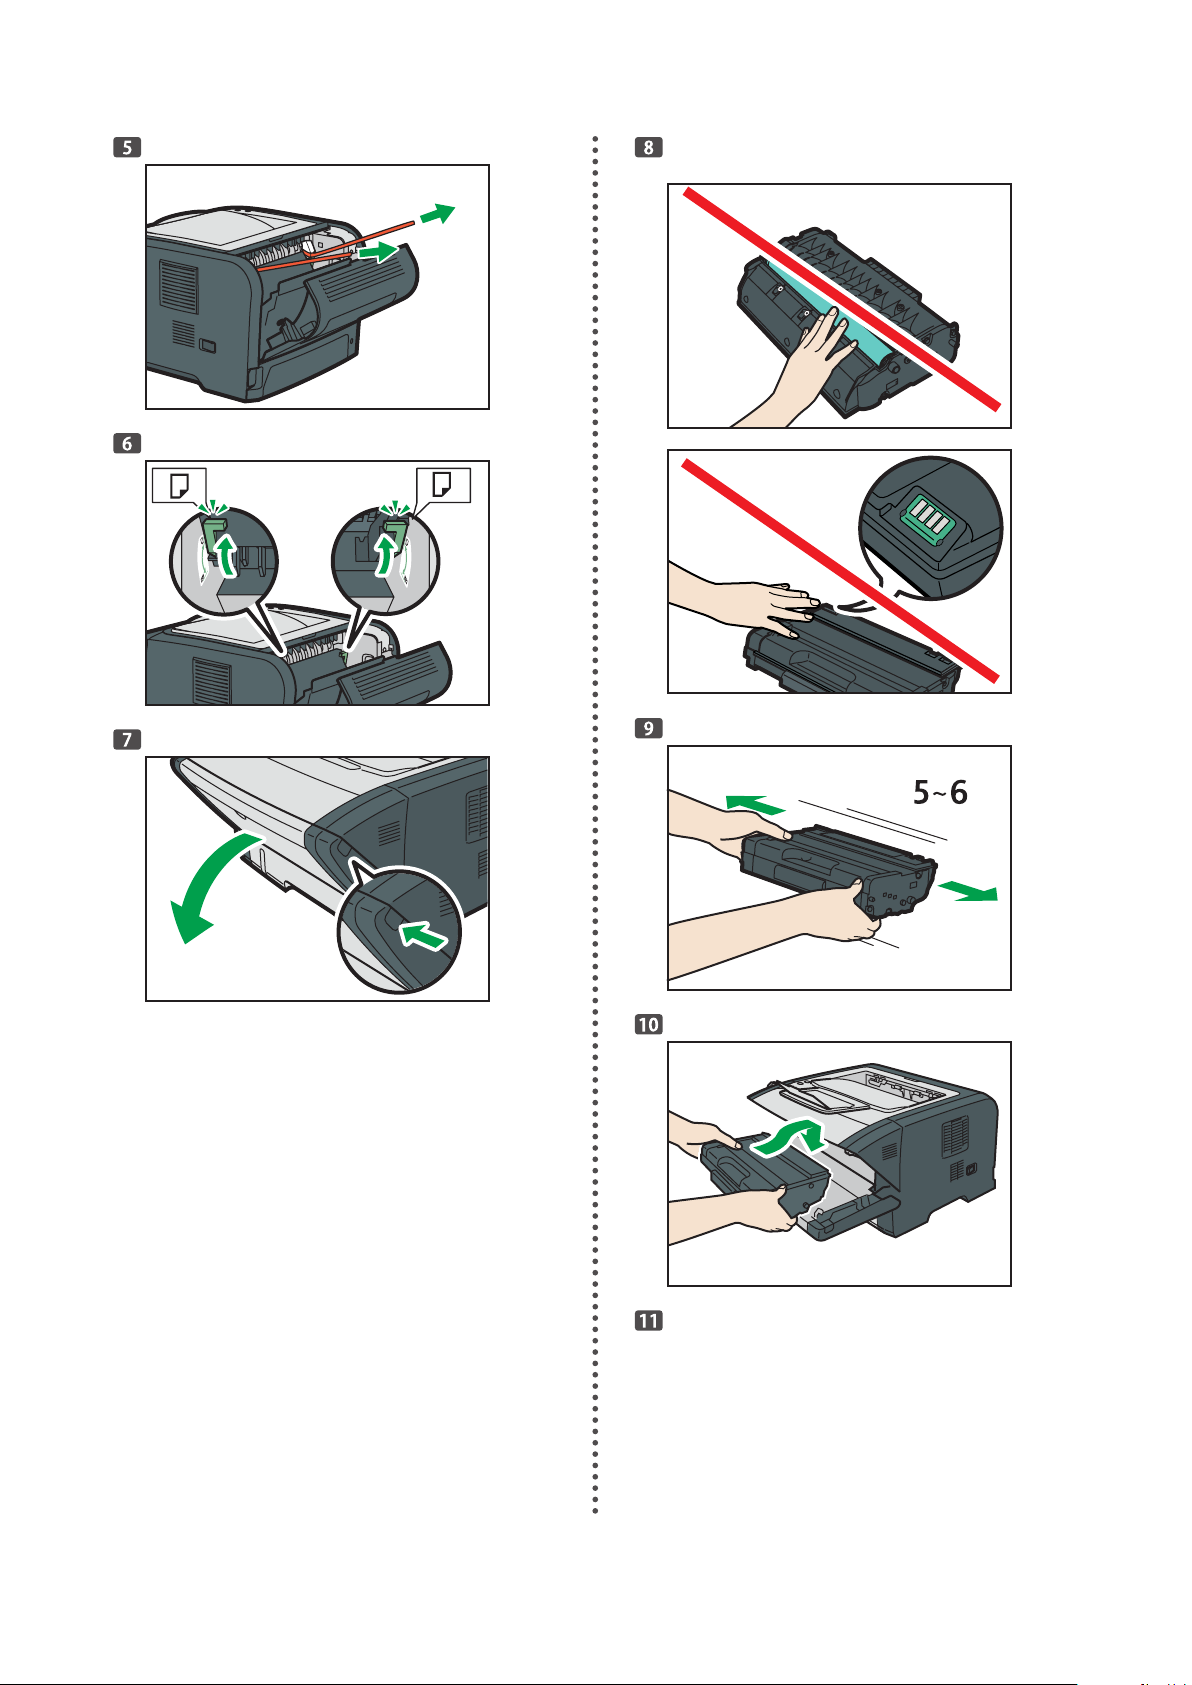
Unpacking
Take the machine out of the box and then out of the
plastic bag.
White area: Permissible Range
•
Blue area: Recommended Range
•
To avoid possible build-up of ozone, locate this machine in
large well ventilated room that has an air turnover of more
than 30m3/hr/person.
2
Page 5
CVW520
DPH106
DPH123
CMC013
CMC014
DPH045
DPH140
Take the toner out of the box and then out of the
plastic bag.
Close the cover.
3
Page 6
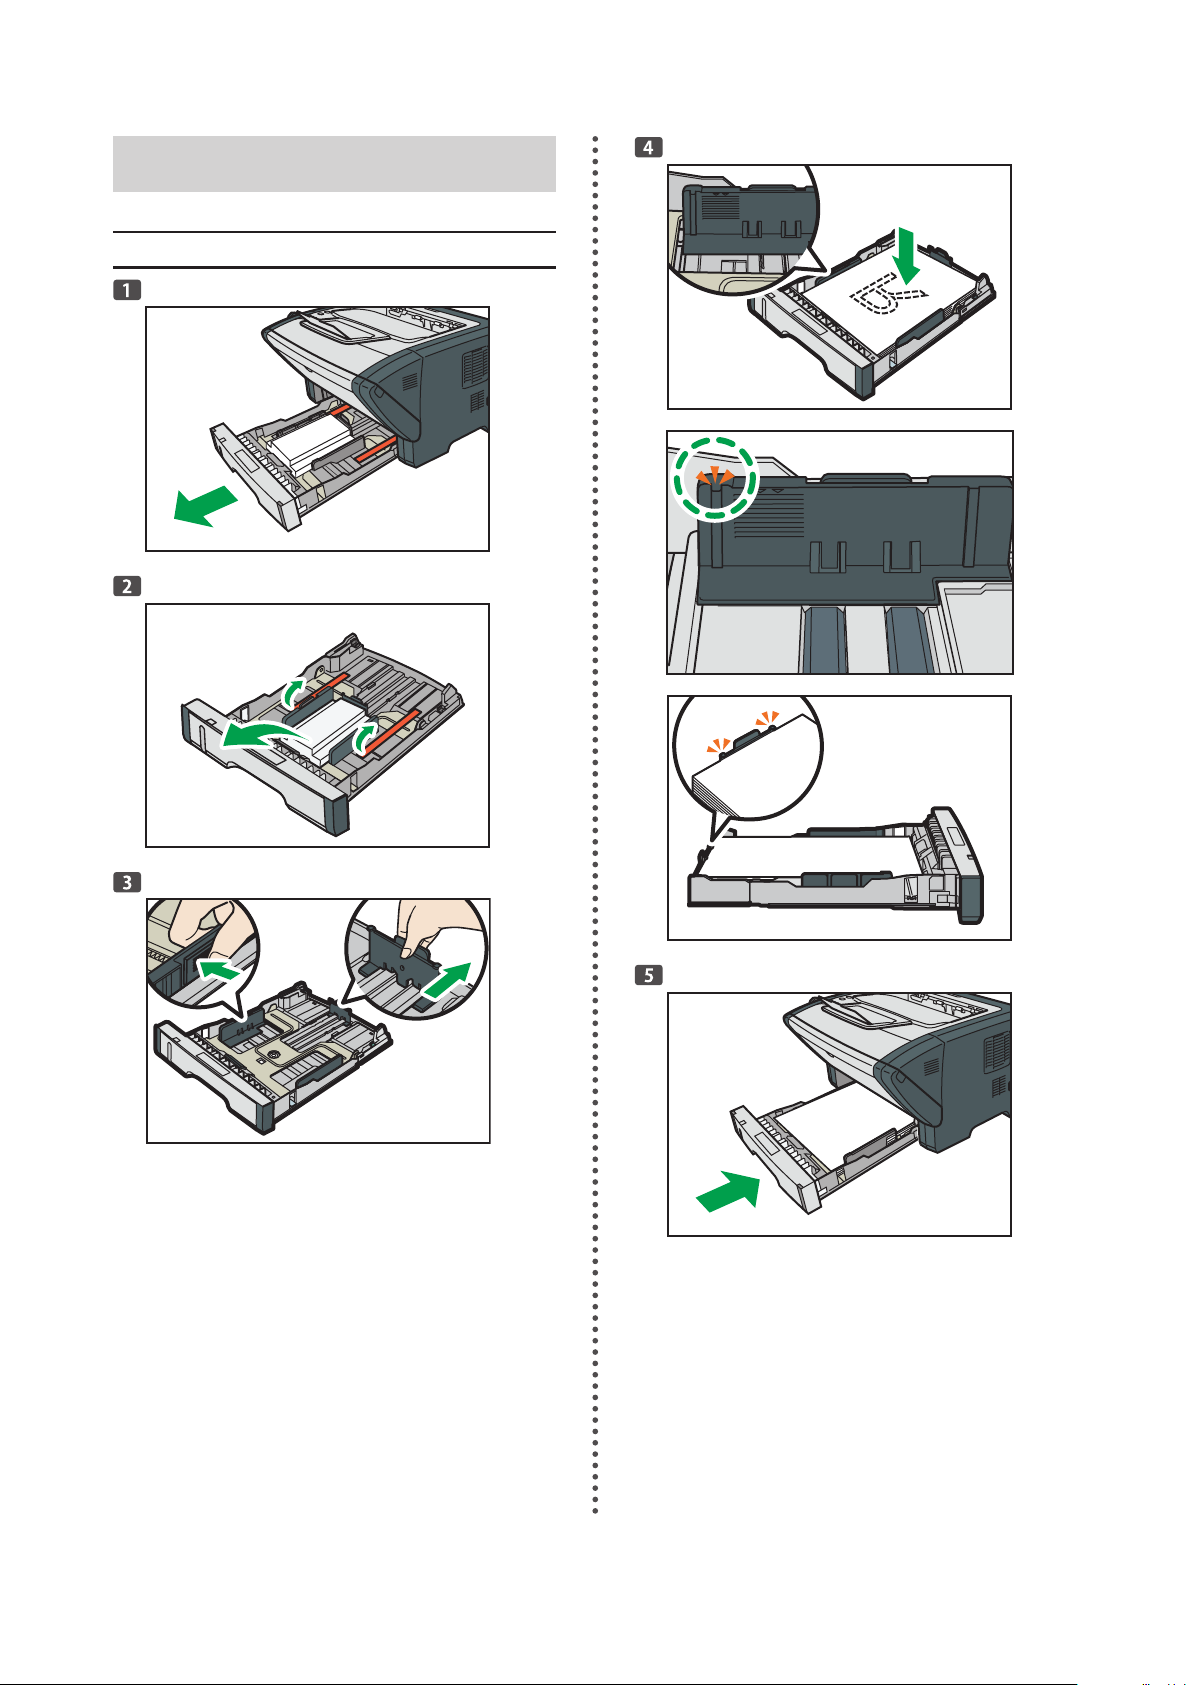
Loading Paper
DPH134
CVW519
CVW522
CVW047
CVW032
CVW033
DPH135
Loading Paper into Tray 1
4
Page 7
1
2
DPH136
DPH137
DPH138
DPH139
1
2
DPH107
DPH108
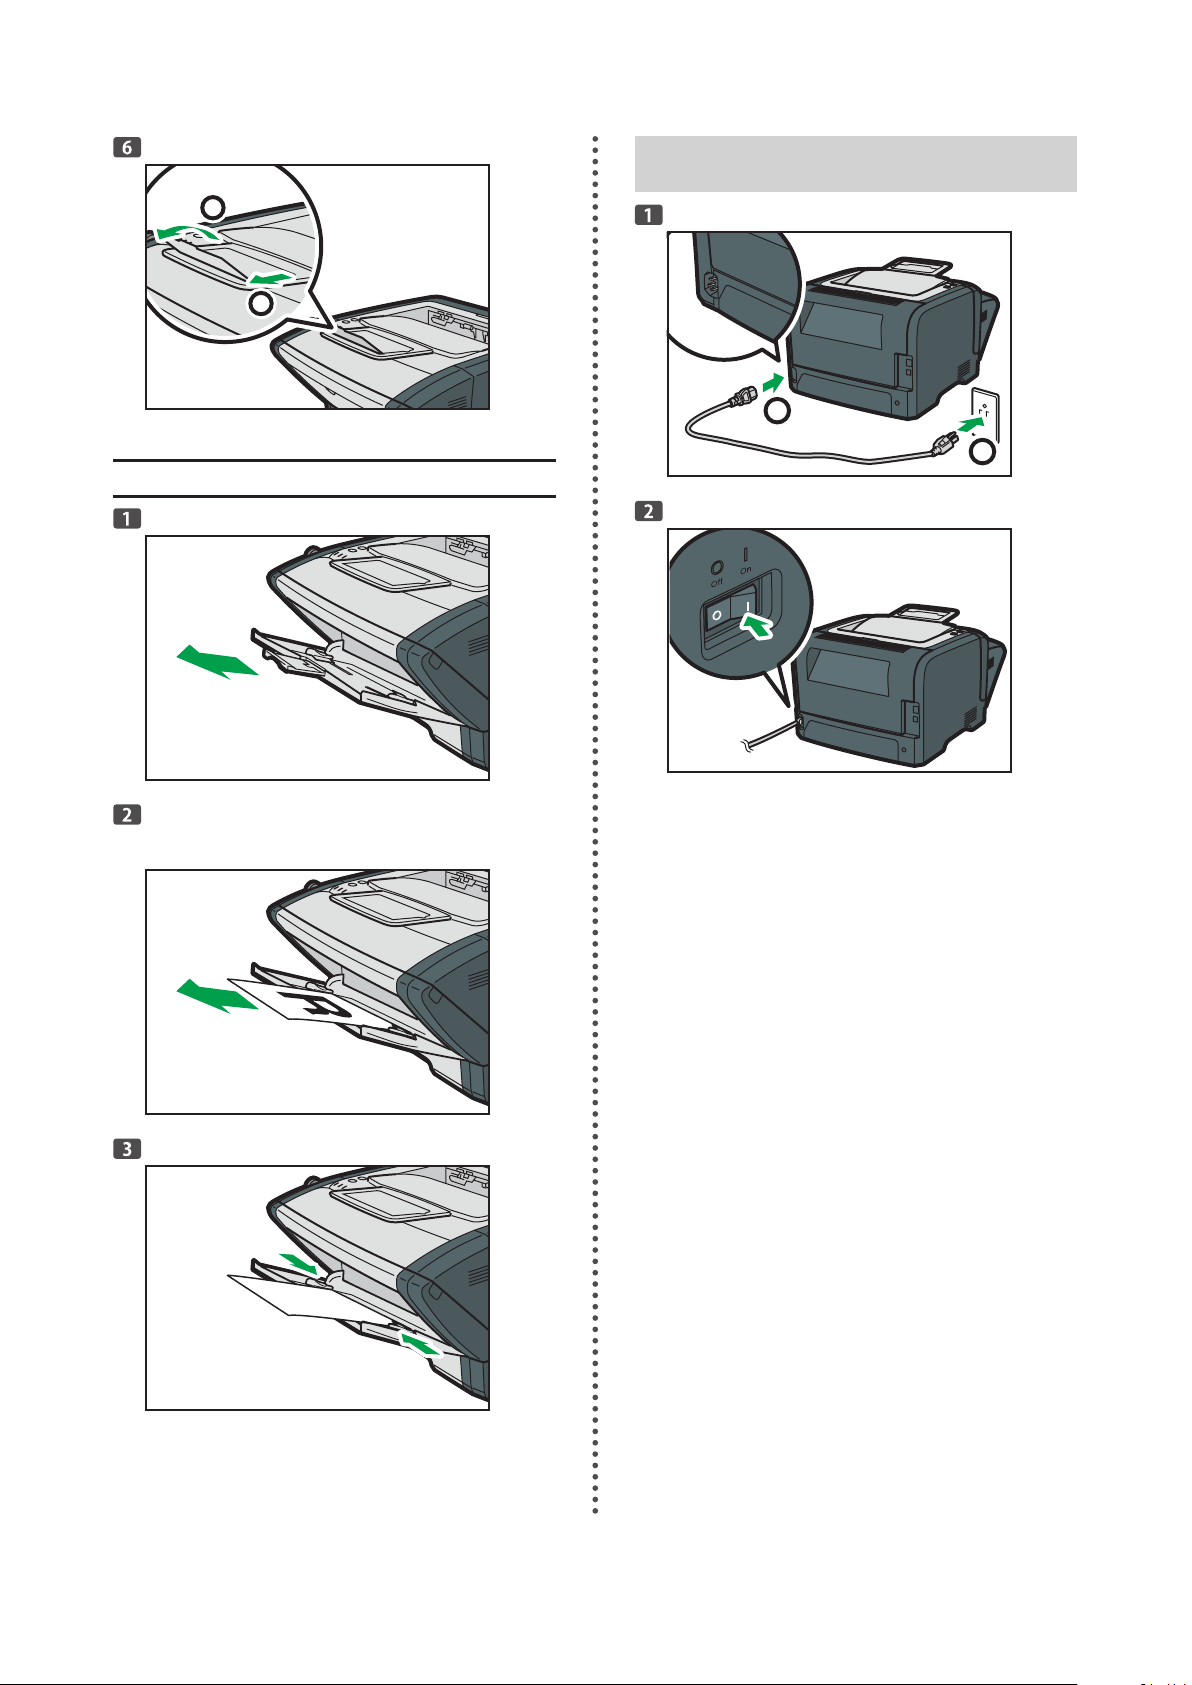
Loading Paper into Bypass Tray
Open the bypass tray.
Connection
Slide the side guides outward, then load paper with
the print side up, and push in until it stops against
the machine.
Adjust the side guides to the paper width.
5
Page 8
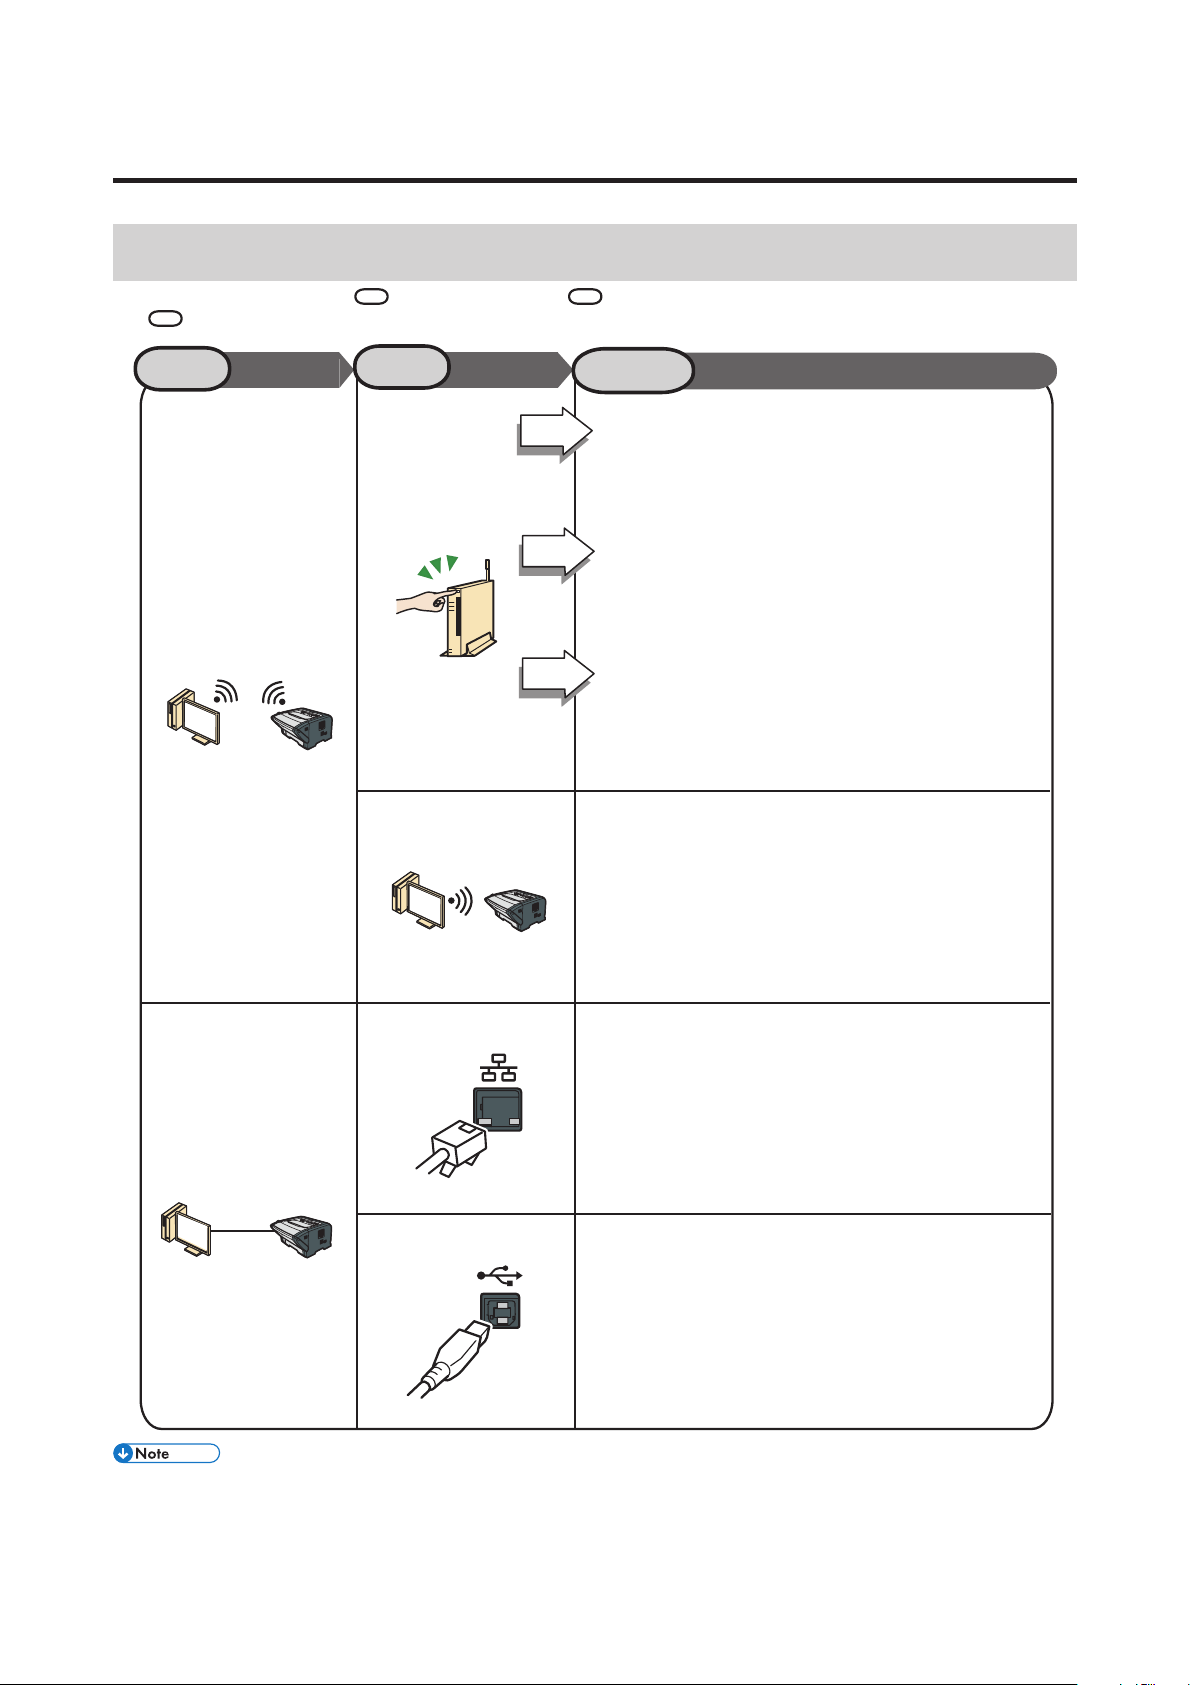
2. Installing the Software
2
3
Yes
No
No
1
Want to use it
wireless
Want to use it
wired
Can you press
the router button?
Ethernet
USB
“Connecting the Machine via USB”
“Connecting the Machine via Network”
“Wire LAN Settings”
“Connecting the Machine via Network” ,
User Guide
“Quick and Easy Setup Using the WPS Button”
“Quick and Easy Setup Using the PIN Code”
“Manual Settings (Confirm the SSID and
Encryption key)”
“Connecting the Machine via Network”
“Connecting the Machine via Network”
“Connecting the Machine via Network”
Want to use the PIN code
Want to set manually
See page 7
See page 9
See page 20
See page 9, 12
See page 9, 13
See page 9, 15
Ad-hoc Mode
Select the available connection
Select the connection method in 1, Internet environment in 2, and then follow the procedure described in the sections referred
to in 3.
This machine must be connected to the Internet.Even when printing via a USB connection, use the network cable for connection.
•
For details, see page 30 "3. PaaS (Printer as a Service) Settings".
6
Page 9
Connecting the Machine via USB
DPH124
DPH125
DPH109
CXP122
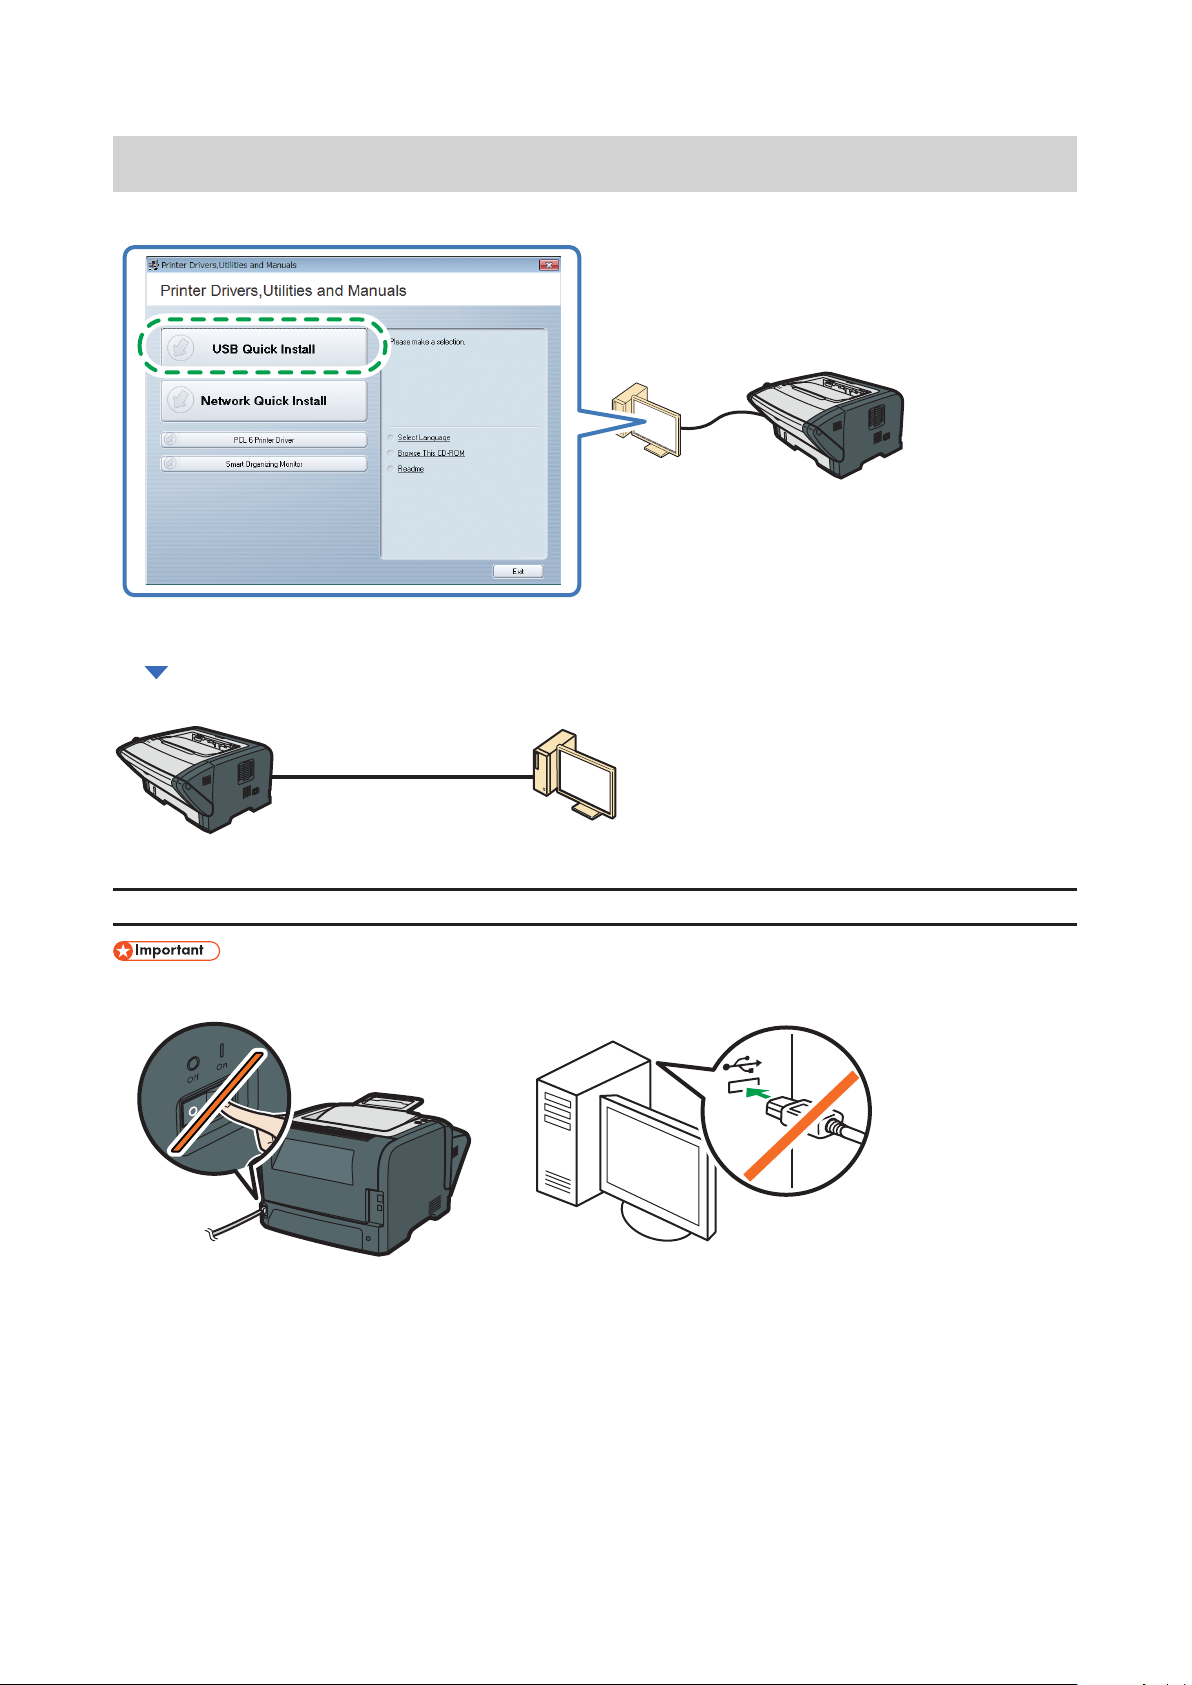
This section explains how to connect the machine to a computer using a USB cable.
Perform the setup according to the following procedures.
1. Quick Install for USB (See page 7)
2. Connecting the Computer and Machine (See page 8)
1. Quick Install for USB
Do not turn the machine on until prompted to do so in the installer window.
•
Do not connect the USB cable to the machine until prompted to do so in the installer window.
•
7
Page 10
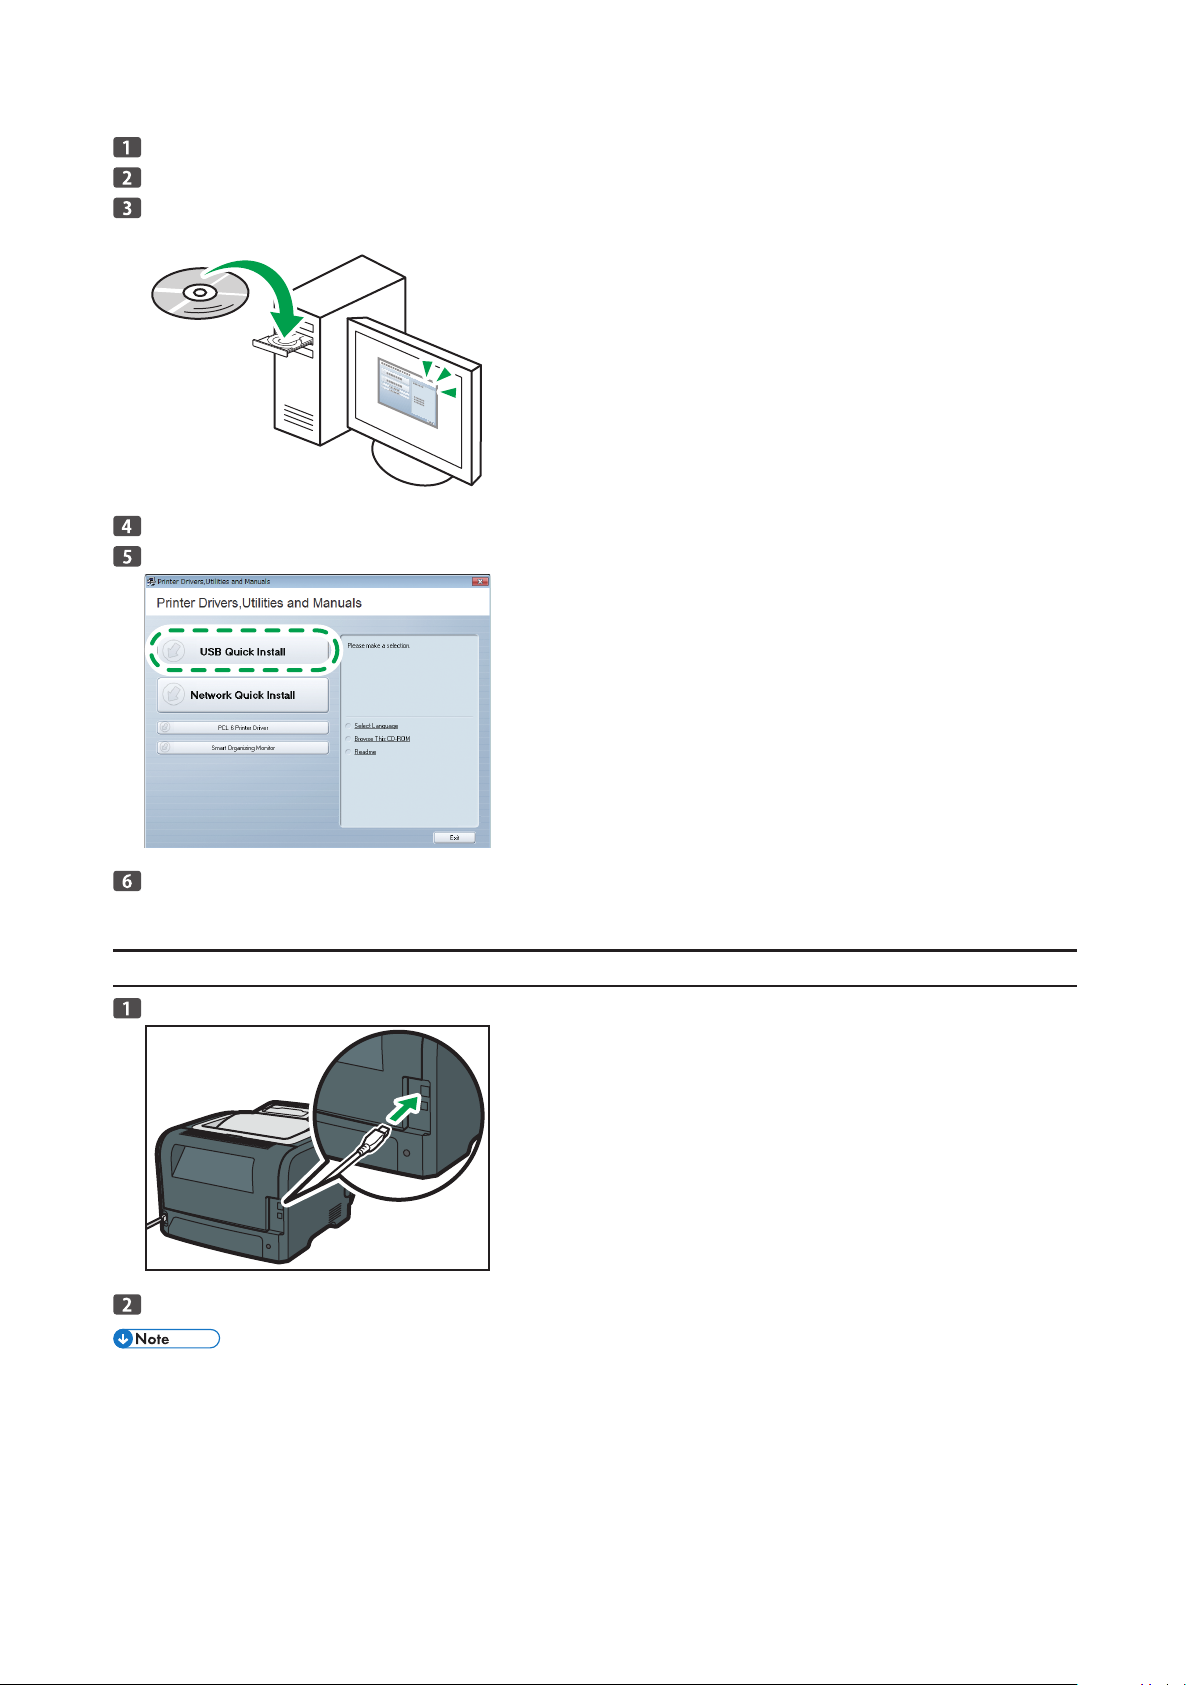
Make sure the machine is off.
CXP066
DPH126
DPH110
Turn on the power of the computer.
Insert the CD-ROM into the CD- ROM drive.
If the CD-ROM cannot be used, see page 26 "Installing the Soft ware without Using the CD-ROM".
Select a language and product for the interface, and then click [OK].
Click [USB Quick Install].
Follow the instructions in the installation wizard.
If a message to turn on the power and connect the USB cable appears, do the following.
2. Connecting the Computer and Machine
Connect the machine and computer with a USB cable.
Plug the other end of the cable into a network device, such as a hub.
If it is necessary to specify the subnet mask, gateway, DNS server, or proxy server, see page 28 "How to Specify the Subnet, Gate-
•
way, DNS Server, and Proxy Server".
8
Page 11
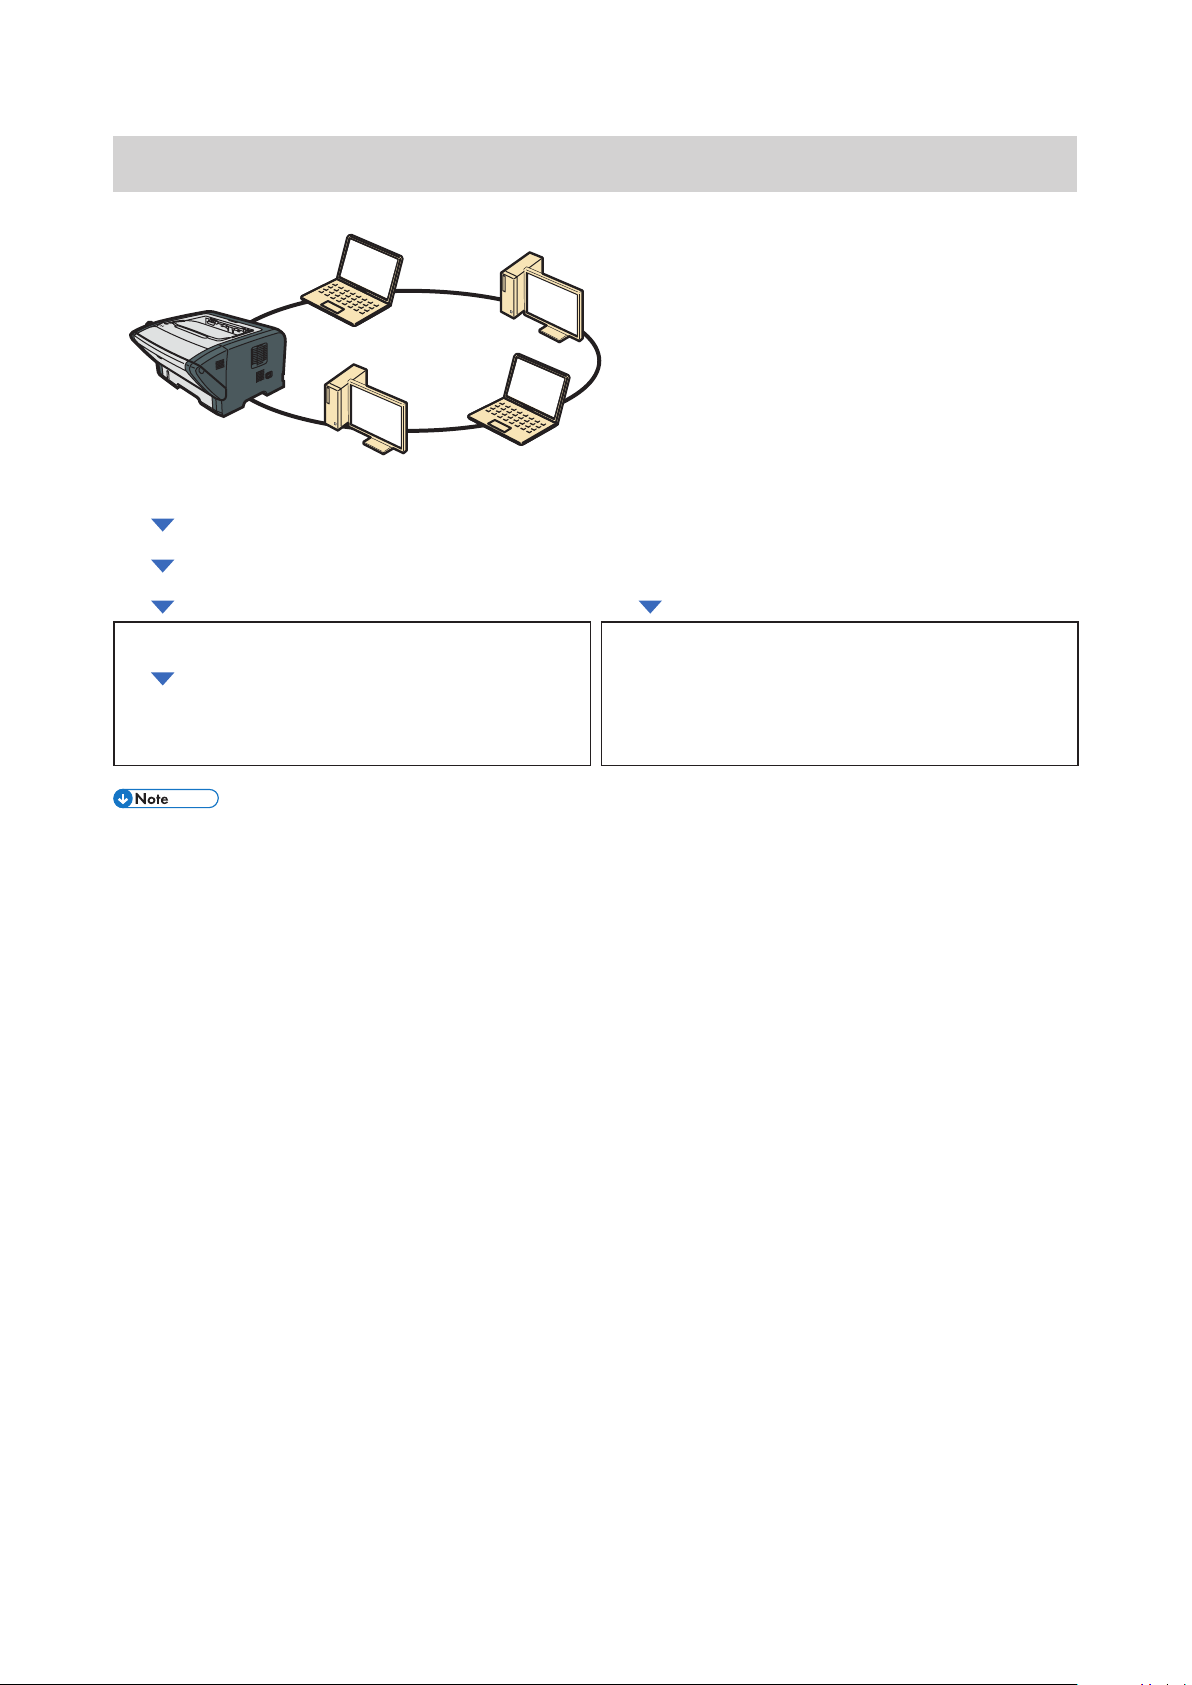
Connecting the Machine via Network
DPH127
This section explains how to connect the machine to a computer using a network cable or wireless L AN.
Perform the setup according to the following procedures.
1. Checking the IP Address Settings(See page 10)
2. Printing the Test Page (See page 10)
3. Quick Install for Network (See page 11)
4. Wire L AN Settings (See page 20)
Connecting the Computer and Machine (See page 21)
Configuring network settings (See page 21)
IPv4
•
IPv6
•
If using the Ethernet cable, proceed to step 4. If using Wi-Fi connection, proceed to step 5.•
5. Wi- Fi Settings (See page 12)
•
Quick and Easy Setup Using the WPS Button (See page 12)
Quick and Easy Setup Using the PIN Code (See page 13)
•
Manual Settings (Confirm the SSID and Encryption key) (See
•
page 15)
9
Page 12
1. Checking the IP Address Settings
1
2
CVW601
CVW254
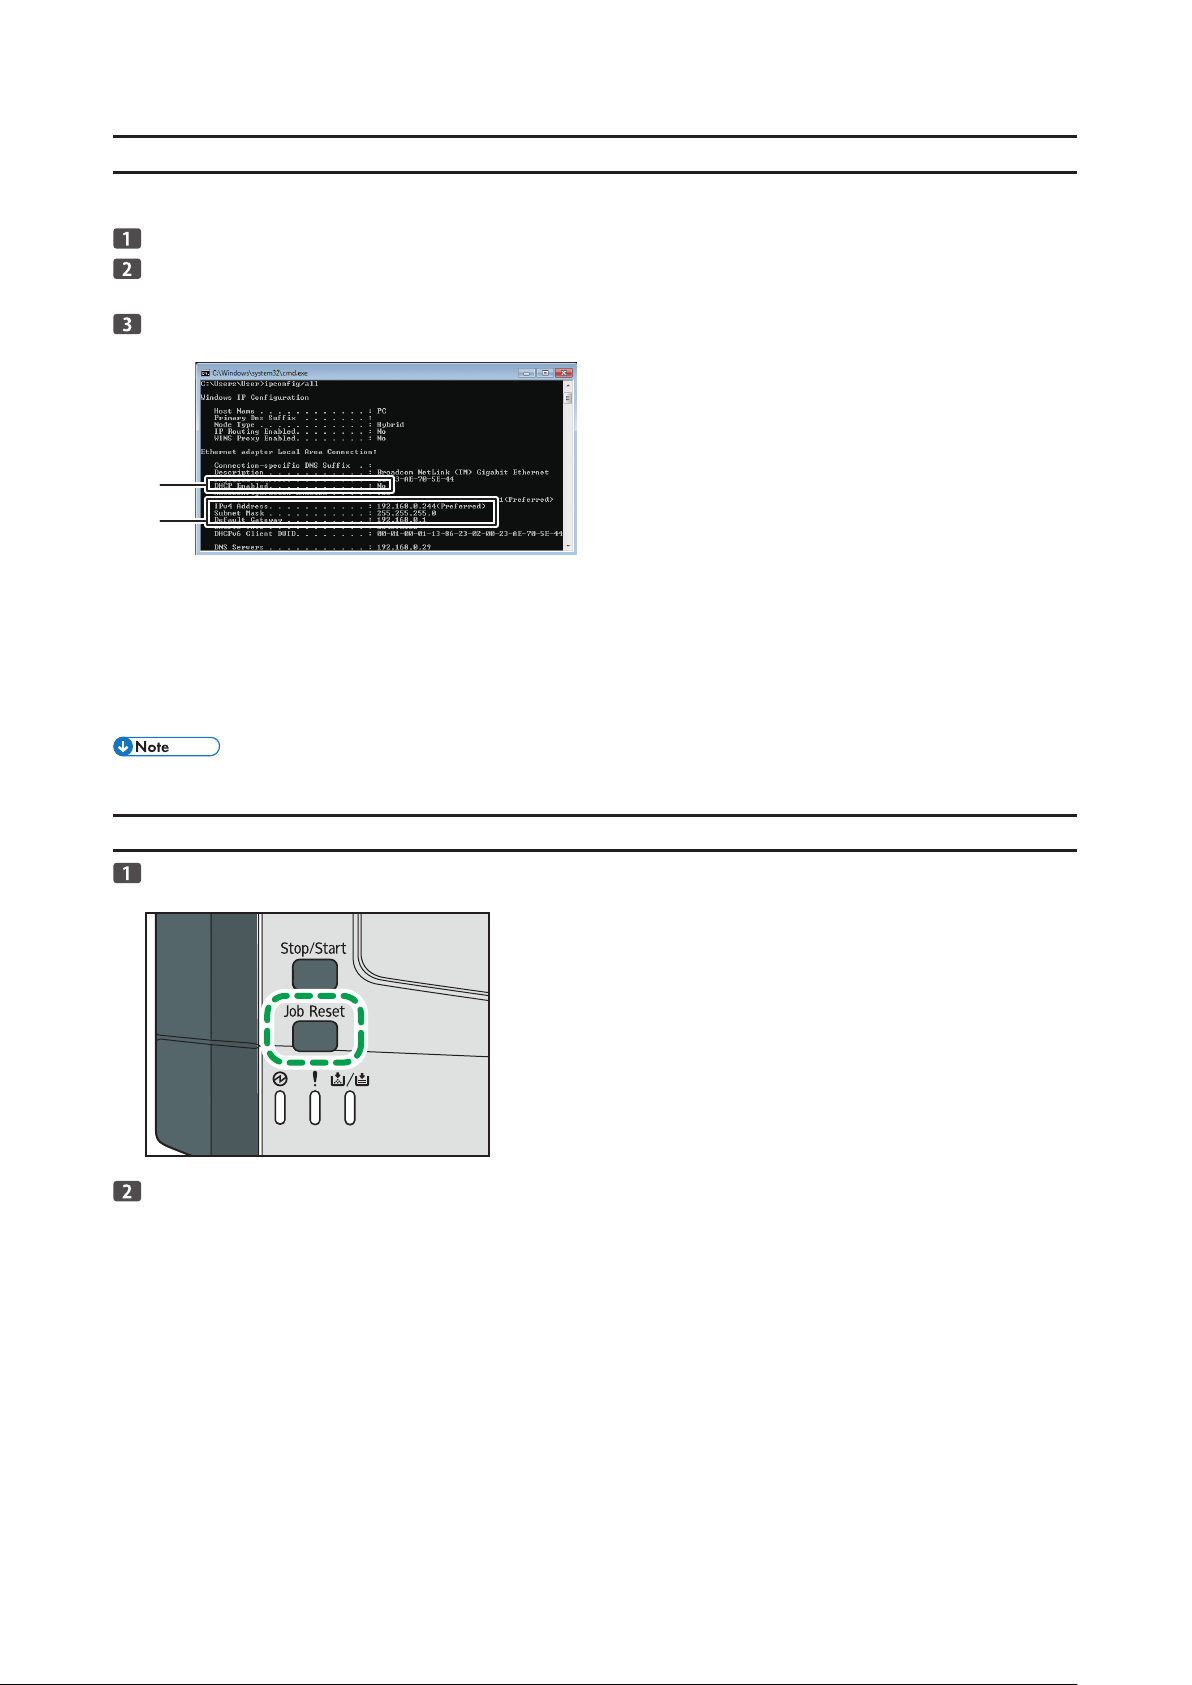
Confirm the network environment you want to use. Per form the following procedure using a computer on the network to which the
printer will be connected. The following procedure uses Windows 7 as an example.
Click the [Start] menu.
Enter "cmd" in the [Search programs and files] field, and then press the [Enter] key.
The command prompt appears.
Enter "ipconfig /all", and then press the [Enter] key.
The details about the network environment appear.
1. DHCP Enabled
"Yes" is displayed if the addresses on the screen were assigned by DHCP. The network settings can be automatically configured.
"No" is displayed if the addresses on the screen were not assigned by DHCP.
2. IP address, subnet mask, and default gateway
The IP address, subnet mask, and default gateway that have been assigned to the computer are displayed.
For manual configuration, use the same values as displayed here.
To manually specify the setting using Ethernet connection, make a note of the checked IP address.
•
2. Printing the Test Page
While holding down the [Job Reset] key, turn the machine on.
After the Power indicator lights and the alarm indicator ( ᴿ ) starts flashing, release the key.
Printing the test page.
10
Page 13
3. Quick Install for Network
CXP066
DPH128
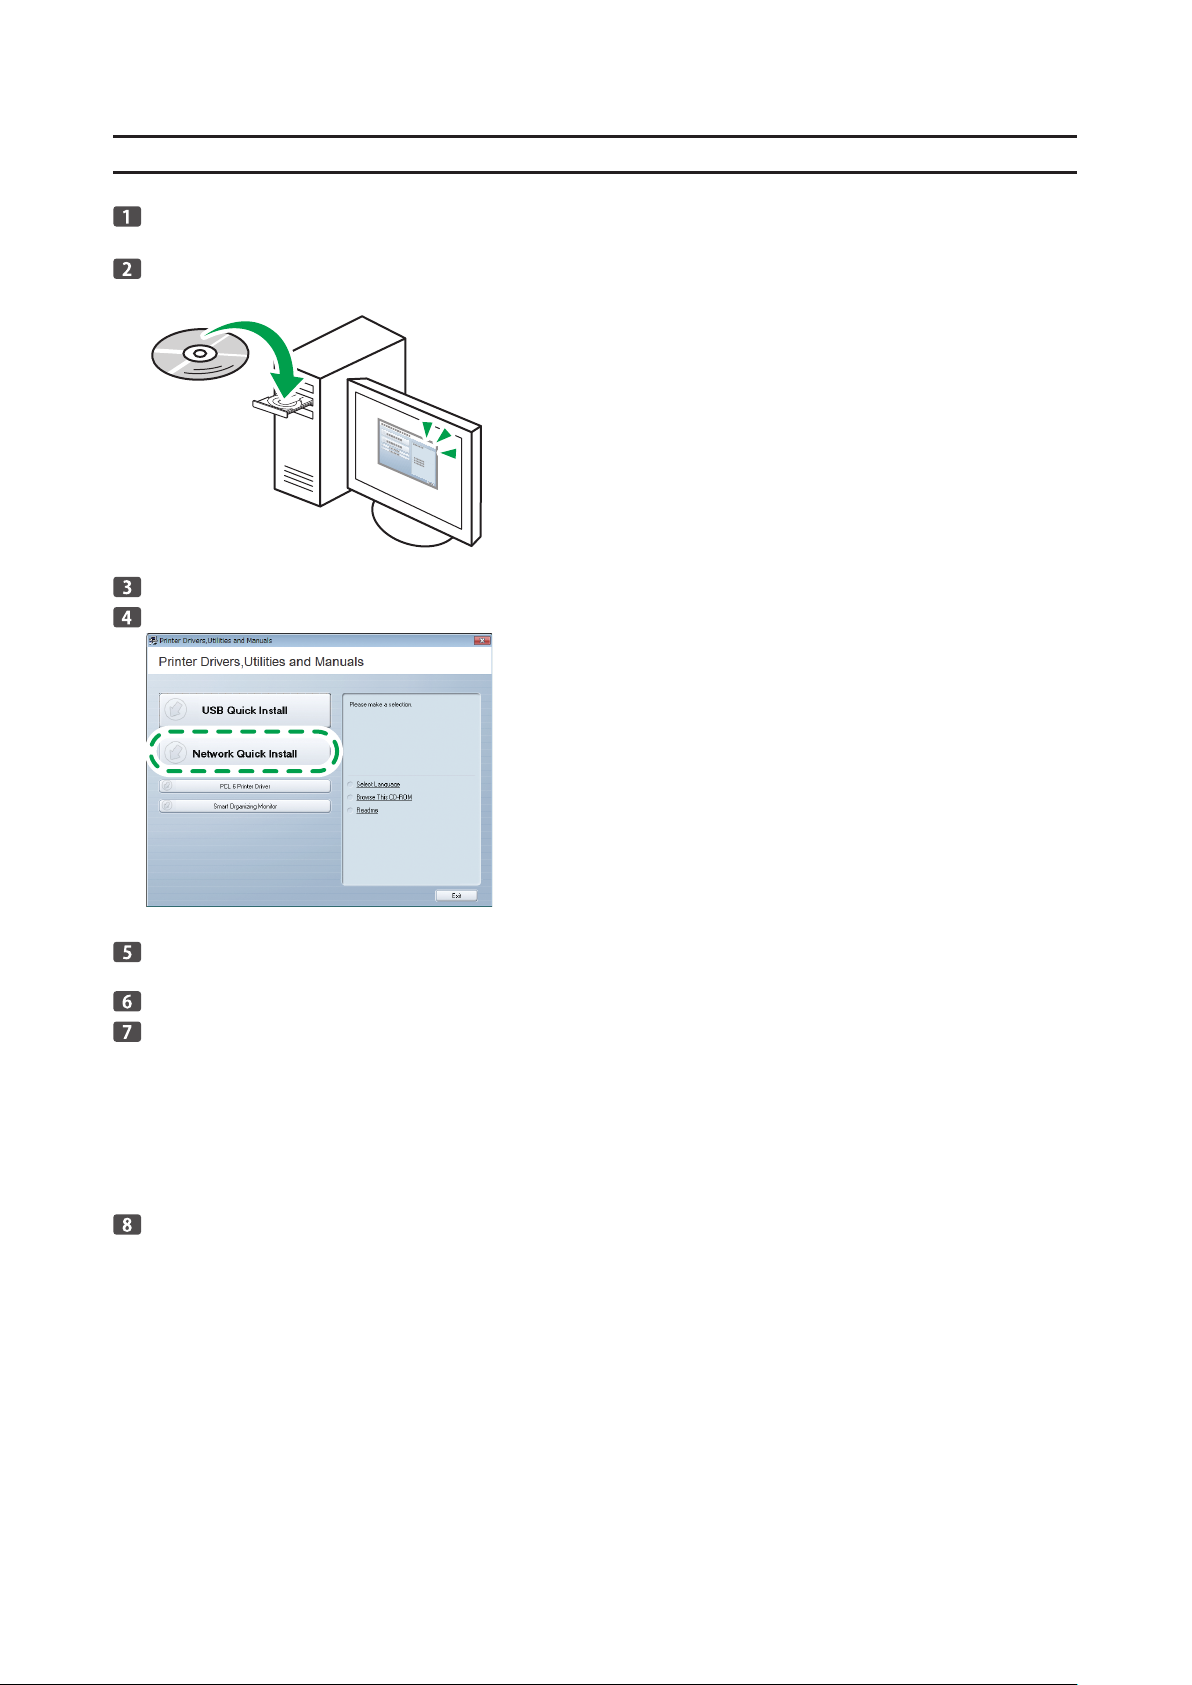
Use Quick Install to install the printer driver, and Smart Organizing Monitor from the CD -ROM.
Turn on the power of the computer.
Quit all applications currently running.
Insert the CD-ROM into the CD- ROM drive.
If the CD-ROM cannot be used, see page 26 "Installing the Soft ware without Using the CD-ROM".
Select a language and product for the interface, and then click [OK].
Click [Network Quick Install].
Read the entire license agreement carefully. If you accept its terms, click [I accept the agreement.], and then click
[Next >].
Select [Add a new printer], and then click [Next>].
Select the printer detection method, and then click [Next>].
If DHCP is On:
•
Search for printers automatically, select [Search for printers automatically].
If DHCP is Off:
•
To search for a printer by its IP address, select [Search for printers by specified IP Address].
If the two settings stated above cannot be configured:
•
To select a port or specify a new port, select [Select a port or specify a new port]. If a dialog box for selecting the port type ap pears, it is recommended to select the standard TCP/IP port.
Follow the instructions in the installation wizard.
11
Page 14
Wi-Fi Settings
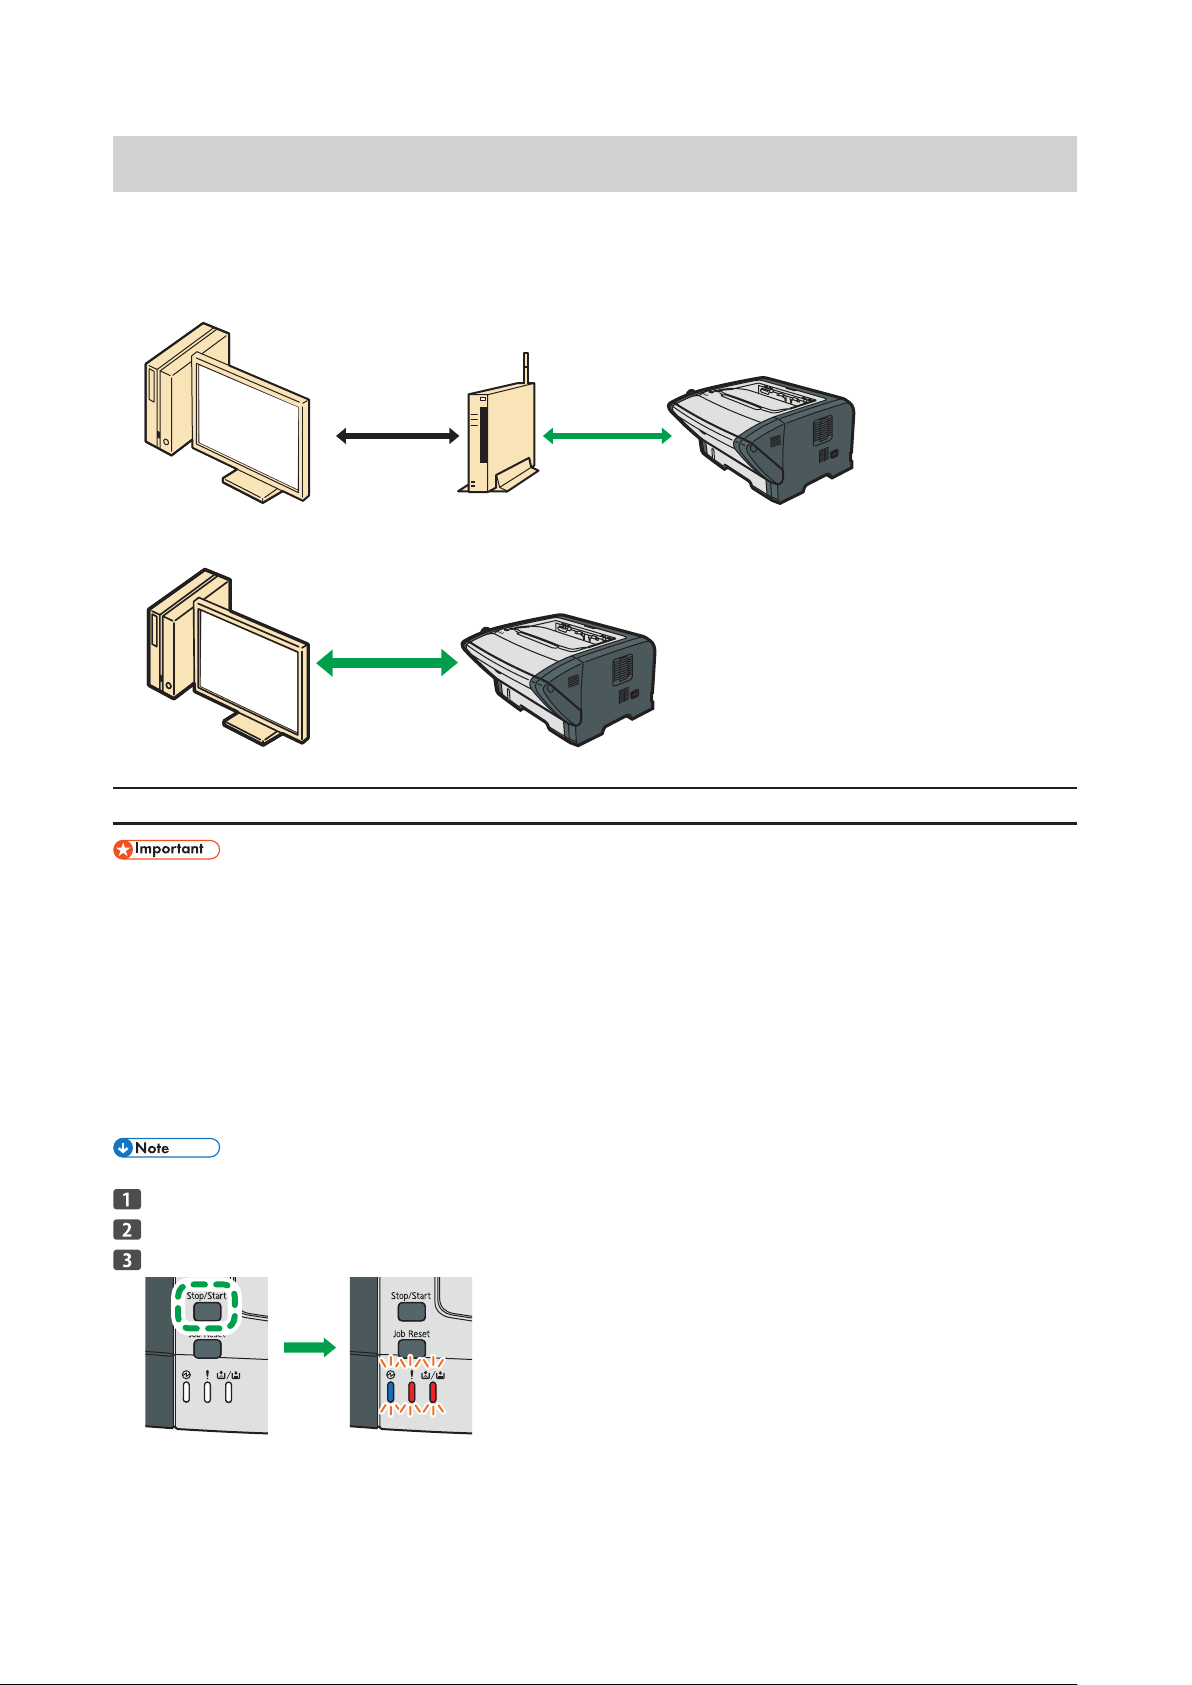
Wireless LAN has two modes: infrastructure mode for connection through an access point and ad-hoc mode for establishing direct
connection with a wireless LAN-capable device (such as a laptop). For details about specifying Ad-hoc mode, see User Guide.
Infrastructure mode
Infrastructure mode can be specified by either of the following three methods: specifying the PIN code, pressing the WPS button,
or manually specifying the mode when the WPS button is unavailable.
Ad-hoc mode
To connect directly to a device that has a wireless LAN such as laptop, you need to configure the settings manually.
Quick and Easy Setup Using the WPS Button
First, follow the procedure described on page 9, "Connecting the Machine via Network".
•
About the WPS button and connection using a PIN code
Depending on the access point (router) used, setup may be possible using either the WPS button, a PIN code, or both meth-
•
ods.
To establish a connection using a PIN code, the configuration screen of the access point (router) must be displayed on the
•
computer.
About WPS connection security
The encryption method for the devices is automatically configured by WPS.
•
Security settings depend on the connection environment. Accordingly, it cannot be assumed that the configured security set-
•
ting is the most secure.
For details, see "Configuring the Machine Settings", User Guide and the Smar t Organizing Monitor Help.
•
Check that the wireless LAN router and the access point are working correctly.
Check that the USB and LAN cable are not connected to the machine, and then turn on the machine.
Wait a while, and then hold the [Stop/Start] key down for two seconds or less.
The Power indicator, Alert indicator, and Toner/Paper End indicator will repeatedly flash in this order, and the machine starts to
connect in PBC method.
If you press and hold the [Stop/Start] key for more than two seconds, the PIN code will be printed.
12
Page 15
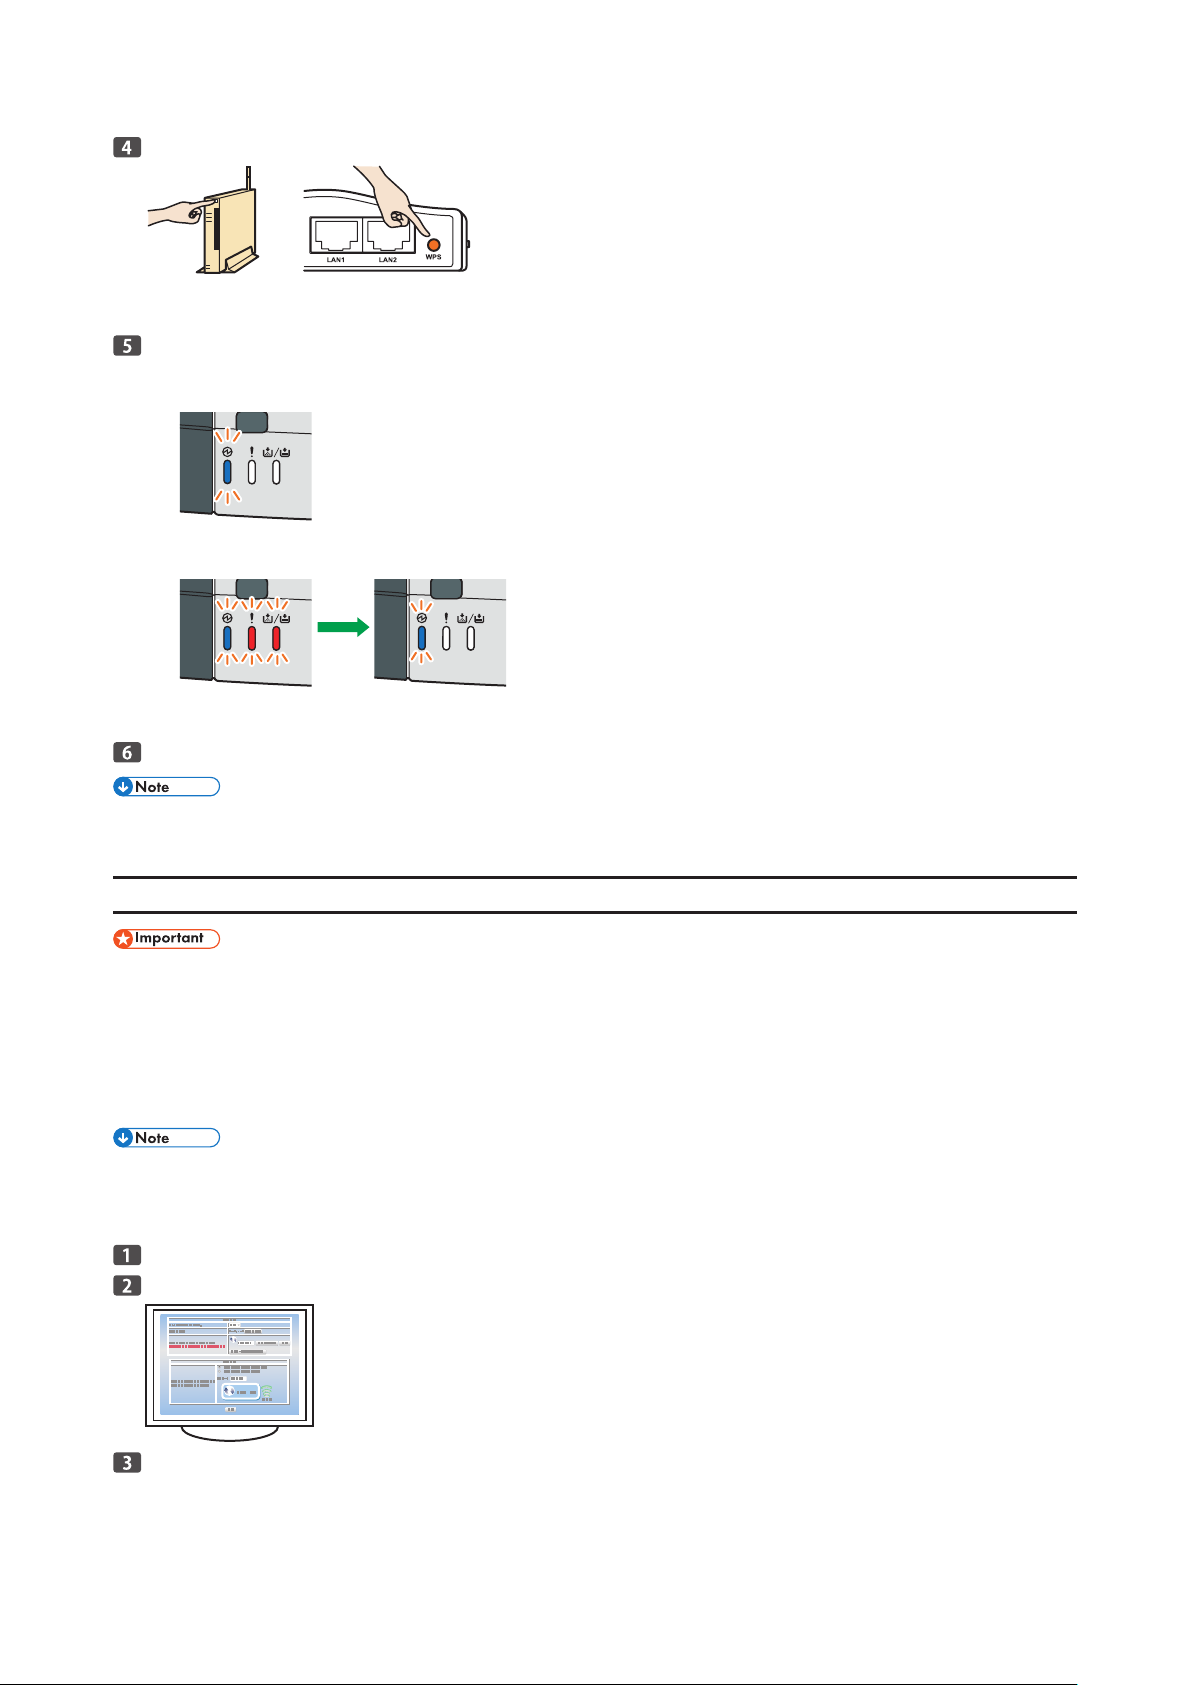
Press the WPS button on the access point within two minutes.
For details about how to use the WPS button, refer to the manual for the wireless LAN router and access point.
•
The name of the button may vary depending on the device you are using.
•
Check the result.
Connection has succeeded:
The Power indicator lights up.
Connection has failed:
All the indicators start to flash simultaneously, and after 30 seconds, only the Power indicator lights up.
Check the configurations of the wireless L AN router and the access point, and then reconnect the router and the access
point to the machine.
Configuring the Wi-Fi settings is complete.
If it is necessary to specify the subnet mask, gateway, DNS server, or proxy server, see page 28 "How to Specify the Subnet, Gate-
•
way, DNS Server, and Proxy Server".
Quick and Easy Setup Using the PIN Code
First, follow the procedure described on page 9, "Connecting the Machine via Network".
•
About the WPS button and connection using a PIN code
Depending on the access point (router) used, setup may be possible using either the WPS button, a PIN code, or both meth-
•
ods.
To establish a connection using a PIN code, the configuration screen of the access point (router) must be displayed on the
•
computer.
The following operations can be performed only when a WPS connection is configured for the first time. Once a WPS connection is
•
configured, use Smart Organizing Monitor to configure the WPS connection again when changes are added to the access point or
other settings.
Check that the wireless LAN router and the access point are working correctly.
Open the PIN code configuration screen for the wireless LAN router or the access point on your computer.
Check that the USB and LAN cable are not connected to the machine, and then turn on the machine.
13
Page 16
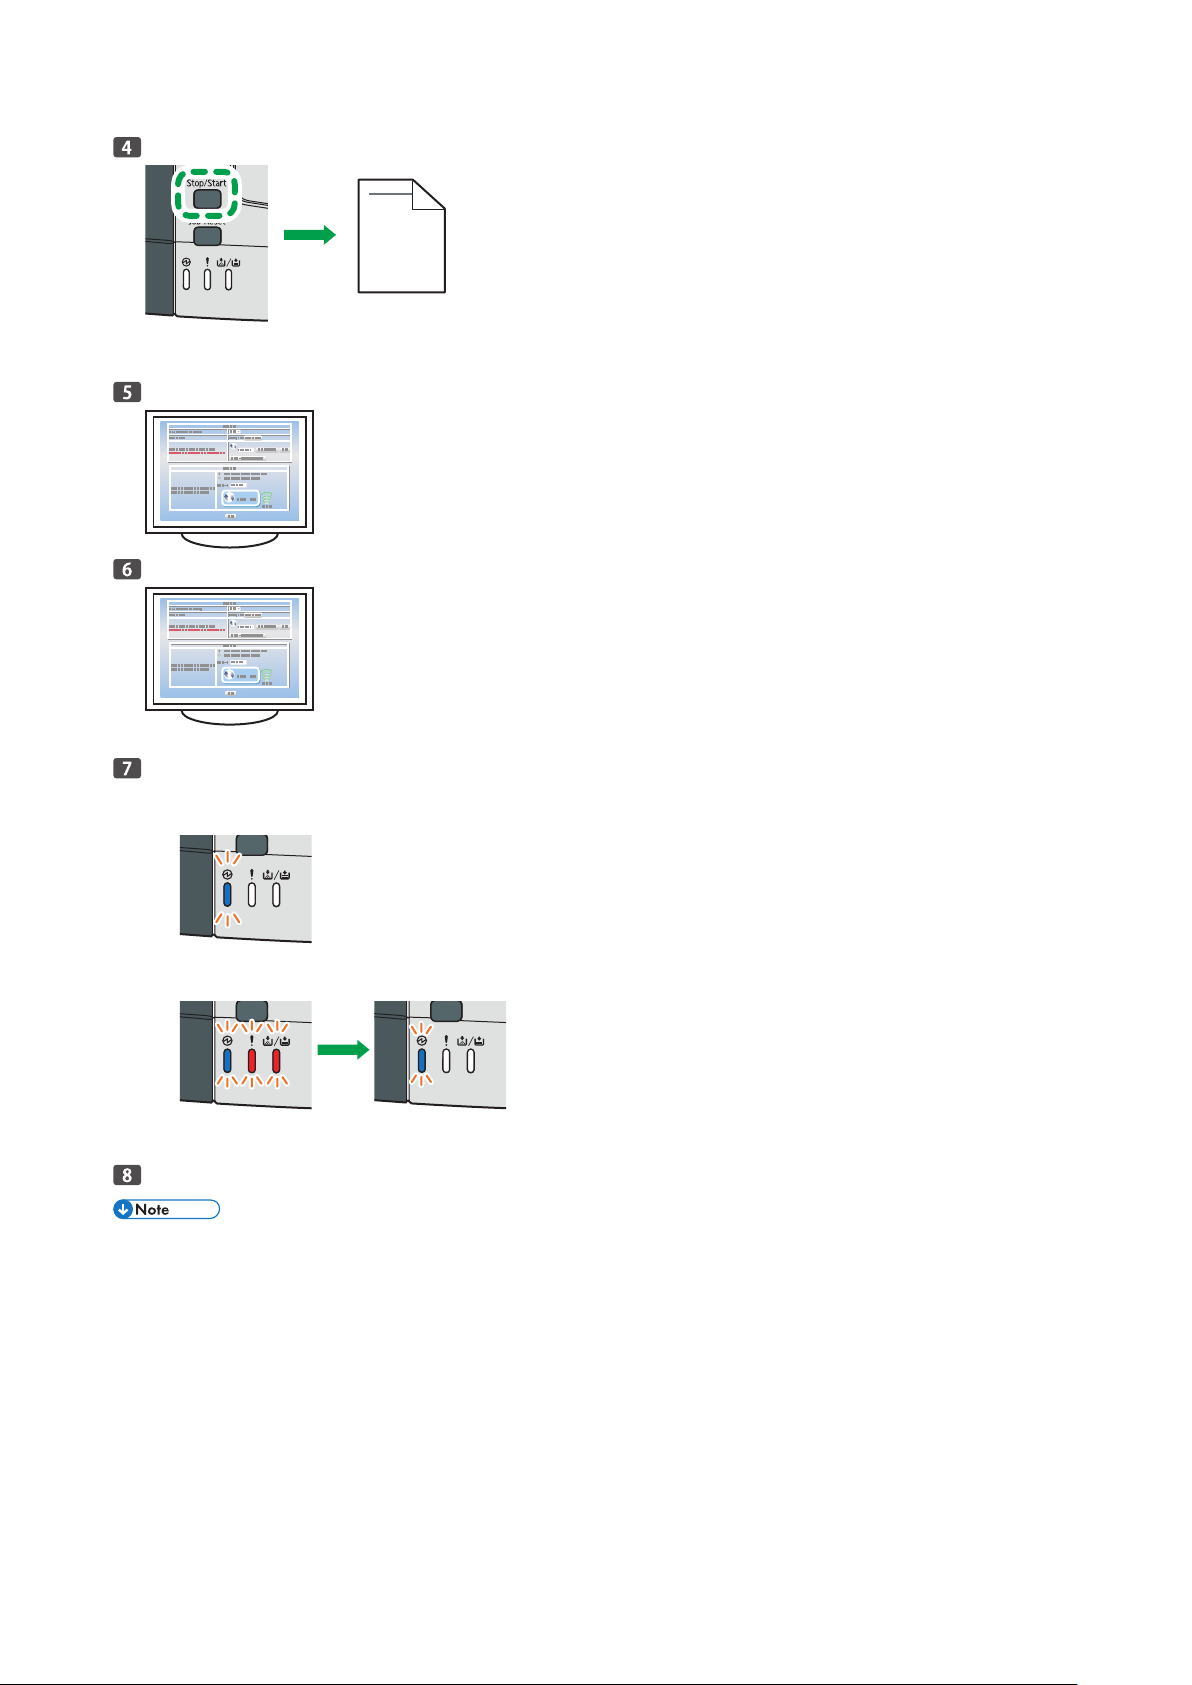
Wait a while, and then hold the [Stop/Start] key down for two seconds or less.
The PIN code will be printed.
•
The machine starts to connect in PIN method.
•
Enter the machine's PIN code (8 digits) on the access point's web page.
Execute WPS (PIN system) from the access point's web page.
Wait for about two minutes until the result is displayed.
Check the result.
Connection has succeeded:
The Power indicator lights up.
Connection has failed:
All the indicators start to flash simultaneously, and after 30 seconds, only the Power indicator lights up.
Check the configurations of the wireless L AN router and the access point, and then reconnect the router and the access
point to the machine.
Configuring the Wi-Fi settings is complete.
If it is necessary to specify the subnet mask, gateway, DNS server, or proxy server, see page 28 "How to Specify the Subnet, Gate-
•
way, DNS Server, and Proxy Server".
14
Page 17
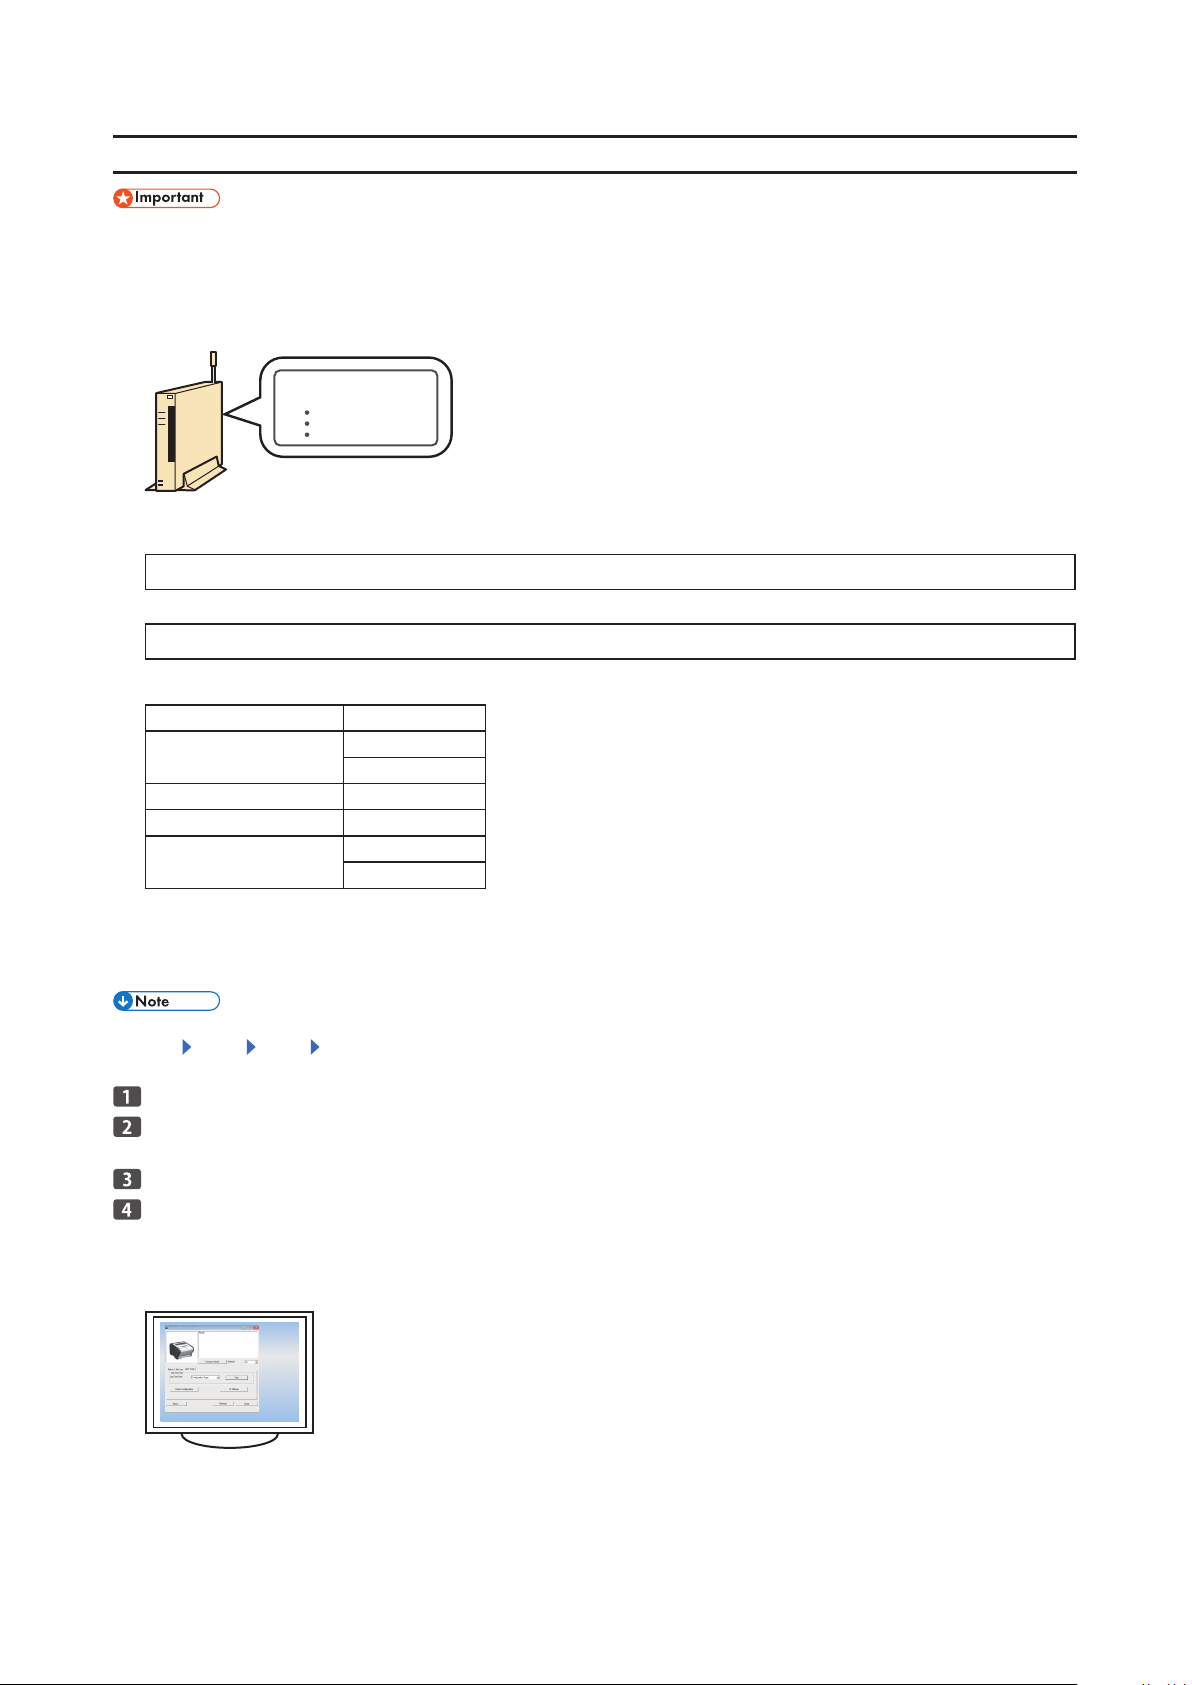
Manual Settings (Confirm the SSID and Encryption key)
SSID :XXXXXXXXXXXXX
Encryption key :XXXXXXXXXXXXX
CVW901
DPH151
First, follow the procedure described on page 9, "Connecting the Machine via Network".
•
This information is required when you configure wireless LAN settings manually. It cannot be viewed using the machine.
Checking the SSID and encryption key
The SSID and encryption key for the wireless LAN access point (router) may be printed on a label affixed to the access point
(router). For details about the SSID and encryption key, refer to the access point (router) manual.
Check the SSID and encr yption key, and write them down on the blank space as shown.
SSID
Encryption key
Encryption type
Authentication Encr yption
Open System None
WEP
Shared Key WEP
WPA2-PSK
Mix Mode WPA2/ WPA
*1 Supported authentication methods are as follows:
- WPA2-PSK
- WPA-PSK
- WPA2/ WPA mixed mode
*2 According to the connected device, either method is automatically selected.
*1
CCMP(AES)
*2
TKIP
CCMP (AES)
*2
The encryption level becomes increasingly stronger in the following order:
•
[None] [WEP] [TKIP] [CCMP(AES)]
Check that the wireless LAN router and the access point are working correctly.
Connect to the computer using the USB cable.
Remove the Ethernet cable if connected.
Turn on the printer.
Start Smart Organizing Monitor.
1. On the [Star t] menu, click [All Programs].
2. Click [Smart Organizing Monitor].
3. Click [Smart Organizing Monitor Status].
15
Page 18
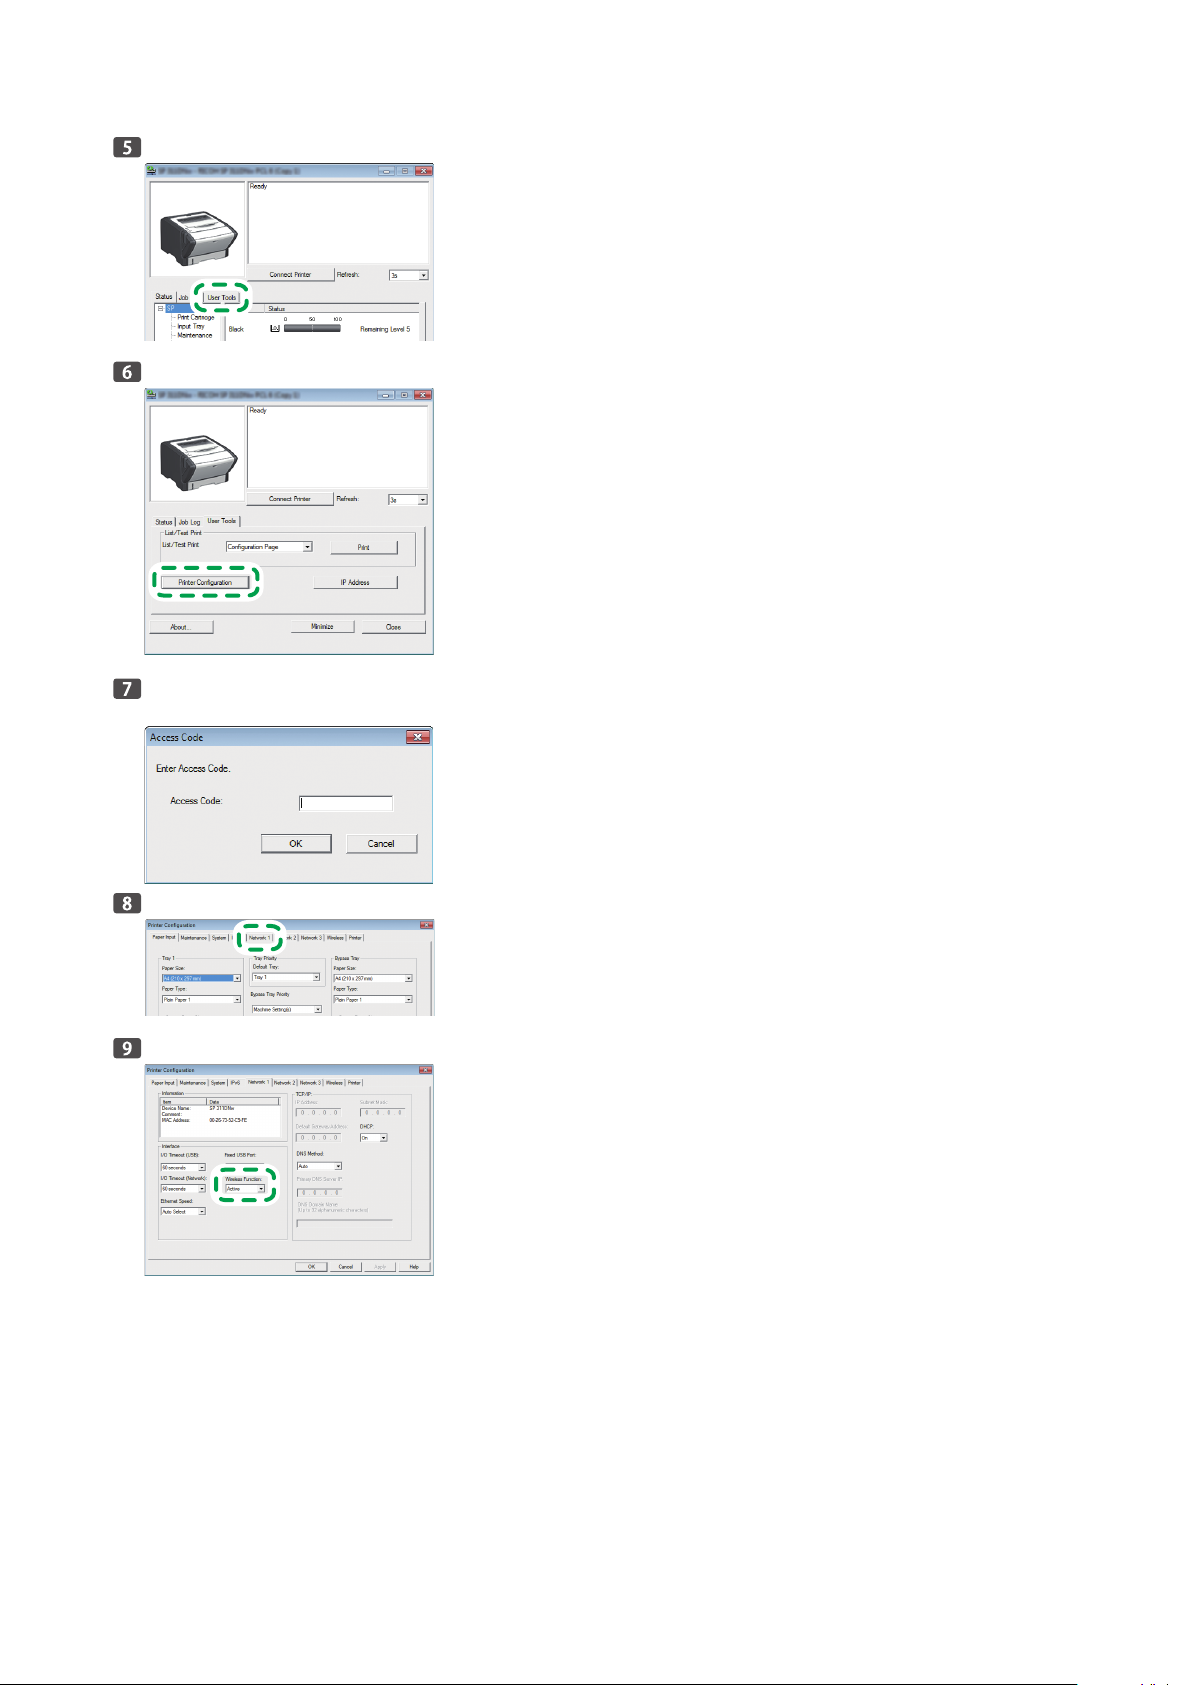
Click [User Tools] tab.
DPH152
DPH153
CVW906
CVW907
Click [Printer Configuration].
Enter the access code, and then click [OK].
The default access code is "Admin".
Click the [Net work 1] tab.
Make sure [Wireless Function:] is set to [Active].
When [Inactive] is set, follow the steps below:
1. Select [Active], and then click [OK].
2. "The settings will become effective af ter restart of the printer" is displayed on the screen, and then click [OK].
3. Restart the machine, and then go back to the step to continue the setting process after Smart Organizing Monitor has dis
played "Ready".
-
16
Page 19
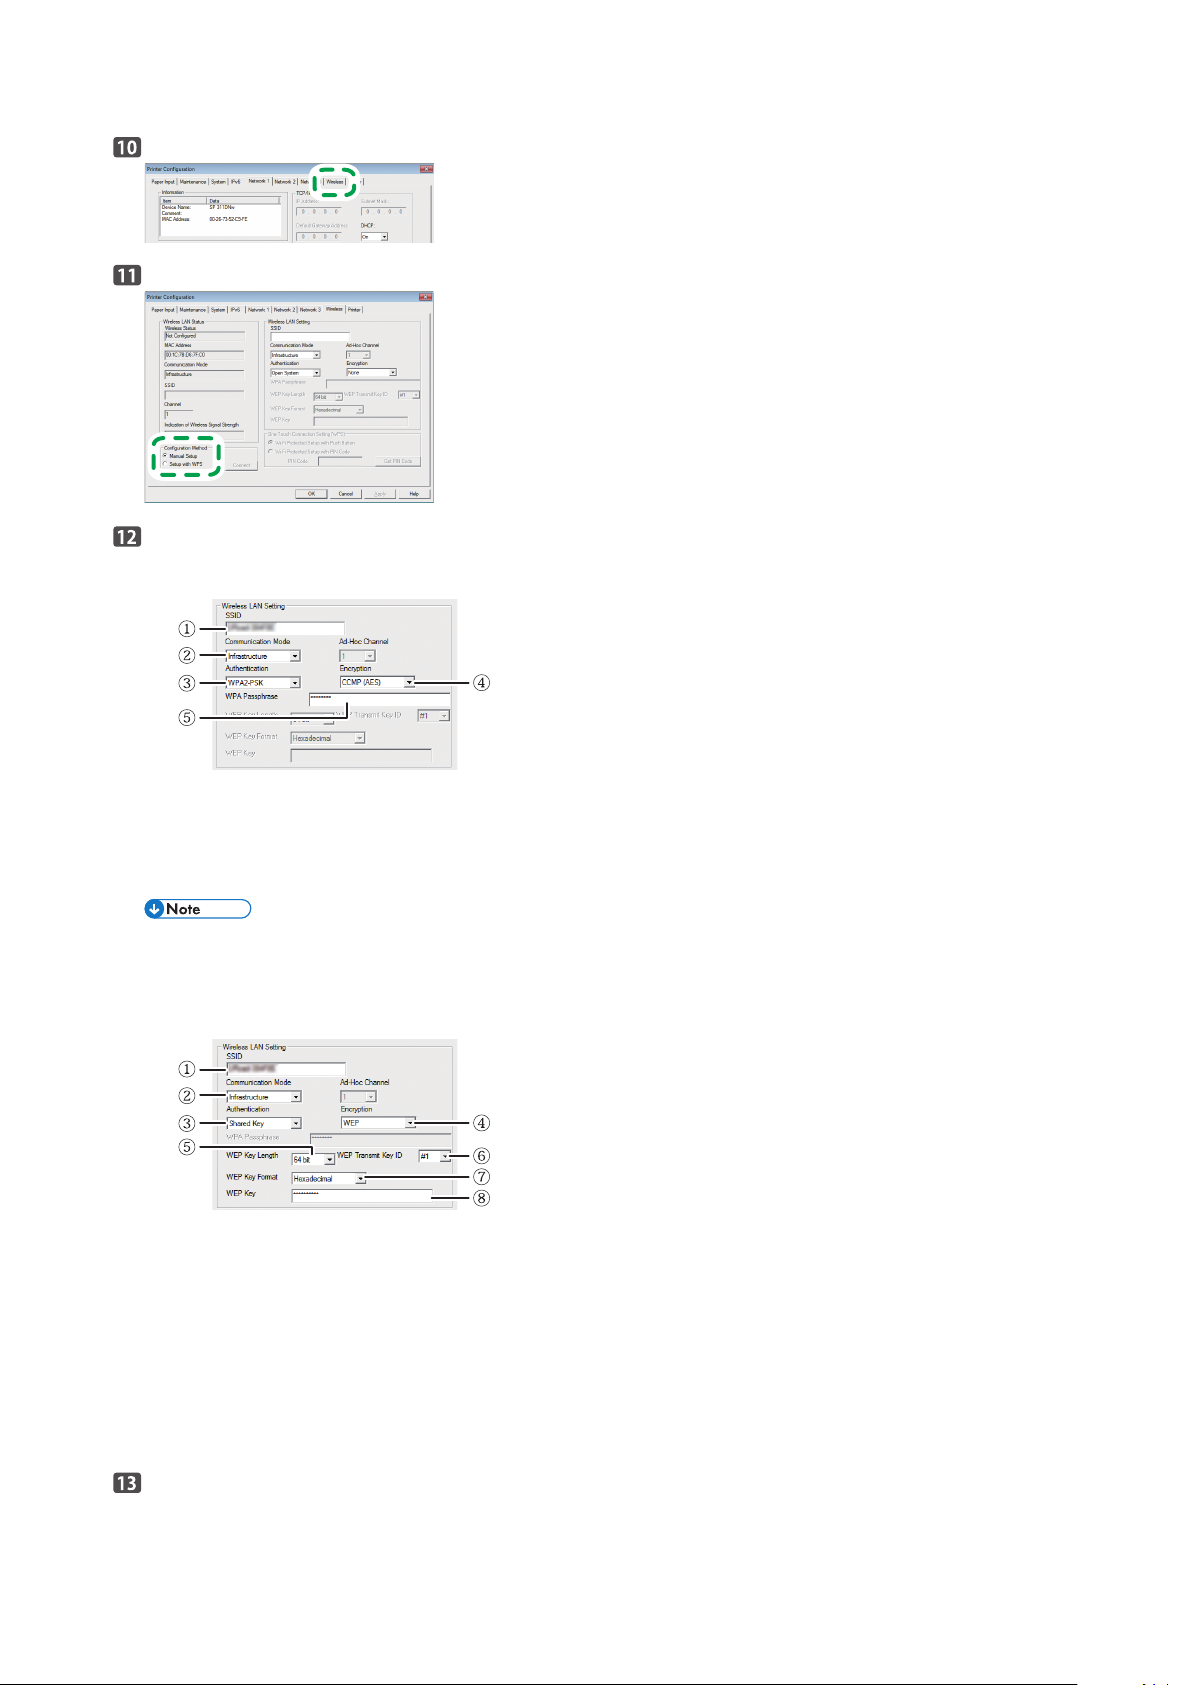
Click the [Wireless] tab.
CVW908
CVW909
CVW911
CVW912
Select [Manual Setup] for [Configuration Method].
Refer to "Connecting to the devices using WPA2-PSK or Mixed WPA2/ WPA authentication" or "Connecting to the de-
vices using Open System or Shared Key authentication" described below to configure the wireless L AN setting.
Connecting to the devices using WPA2-PSK or Mixed WPA2/WPA authentication
1. Enter the SSID.
2. Select [Infrastructure].
3. Select [WPA2-PSK] or [Mixed WPA2/WPA].
4. Select [CCMP(AES)].
5. Enter the WPA Passphrase.
In Mixed WPA2/WPA, the authentication method and encryption method are determined according to the connected wireless
•
LAN router or access point. Select Mixed WPA2/WPA when the connected device’s authentication method is WPA-PSK or
TKIP is used as an encryption method.
Connecting to the devices using Open System or Shared Key authentication
1. Enter the SSID.
2. Select [Infrastructure].
3. Select [Open System] or [Shared Key].
4. Select [WEP].
Do not select [None] except in special cirmunstances.
If selected, the security system will not work.
5. Select [64 bit] or [128 bit].
6. When you register multiple encryption keys,
Select a registration number between [#1] and [#4].
7. Select [Hexadecimal] or [ASCII].
8. Enter the WEP key.
Click [Apply], and then click [OK].
17
Page 20
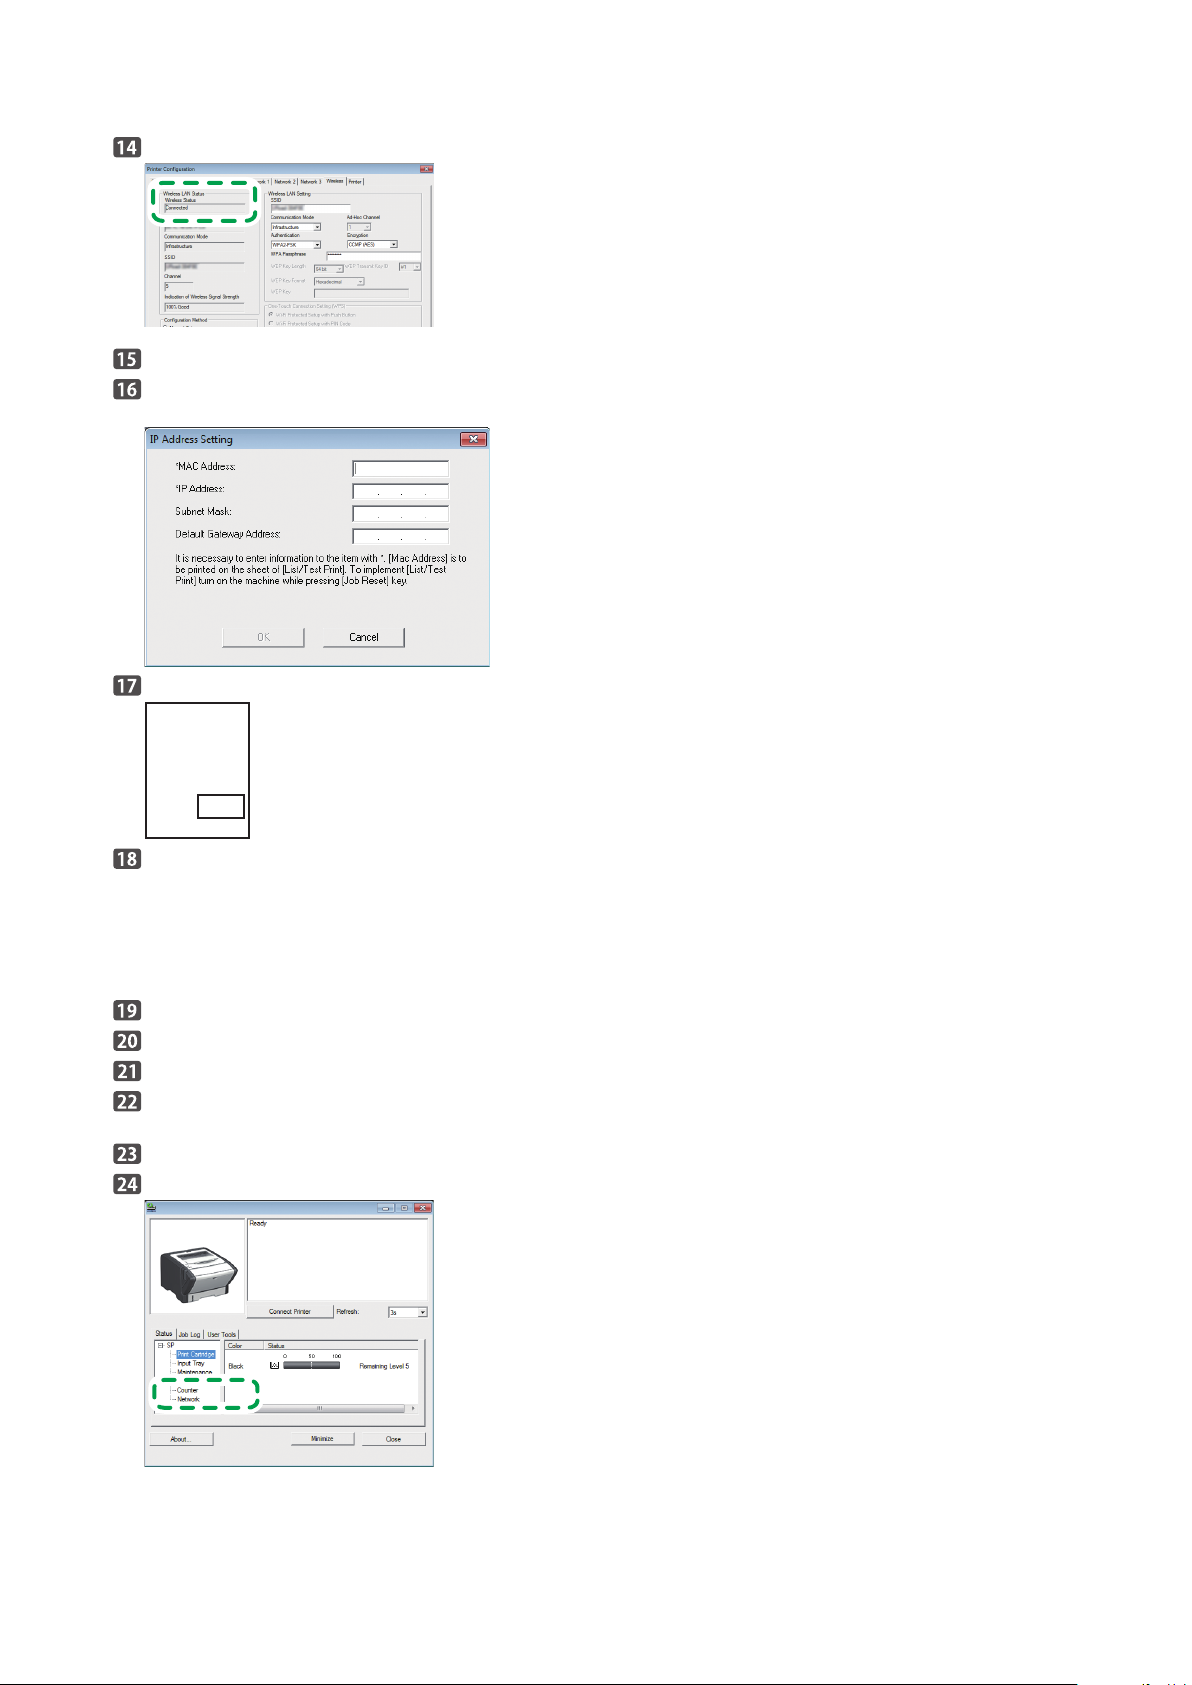
When "Connected" is displayed in [Wireless Status] in [Wireless LAN Status], the connection has been established.
CVW910
DPH154
Click [OK].
Click [IP Address].
The following screen appears:
Enter the MAC address printed in the lower right part of the test page.
Enter the IP address that your administrator has assigned to the printer.
IPv4 IP addresses consist of four sections with three digits each. If you want to enter a single digit such as "7", enter 3 digits
•
such as "007".
Enter a unique IP address that does not conflict with the IP addresses of any other devices on the network.
•
Once the MAC address and IP address are determined, the subnet mask and default gateway are automatically entered.
•
Enter the subnet mask and gateway address, when necessary.
•
Click [OK].
Click [OK] when the dialog appear on the screen.
After confirming that the configuration is complete, restar t the printer.
Click [Connect Printer].
A list of printers currently connected to the network appears.
Select your printer, and then click [OK].
If the printer information appears af ter a while, the connection was established successfully.
If nothing appears on the screen, repeat this procedure.
18
Page 21

The network settings are complete.
For details about Wi-Fi related terms, see page 35 "Terminology".
•
If it is necessary to specify the subnet mask, gateway, DNS server, or proxy server, see page 28 "How to Specify the Subnet, Gate-
•
way, DNS Server, and Proxy Server".
19
Page 22
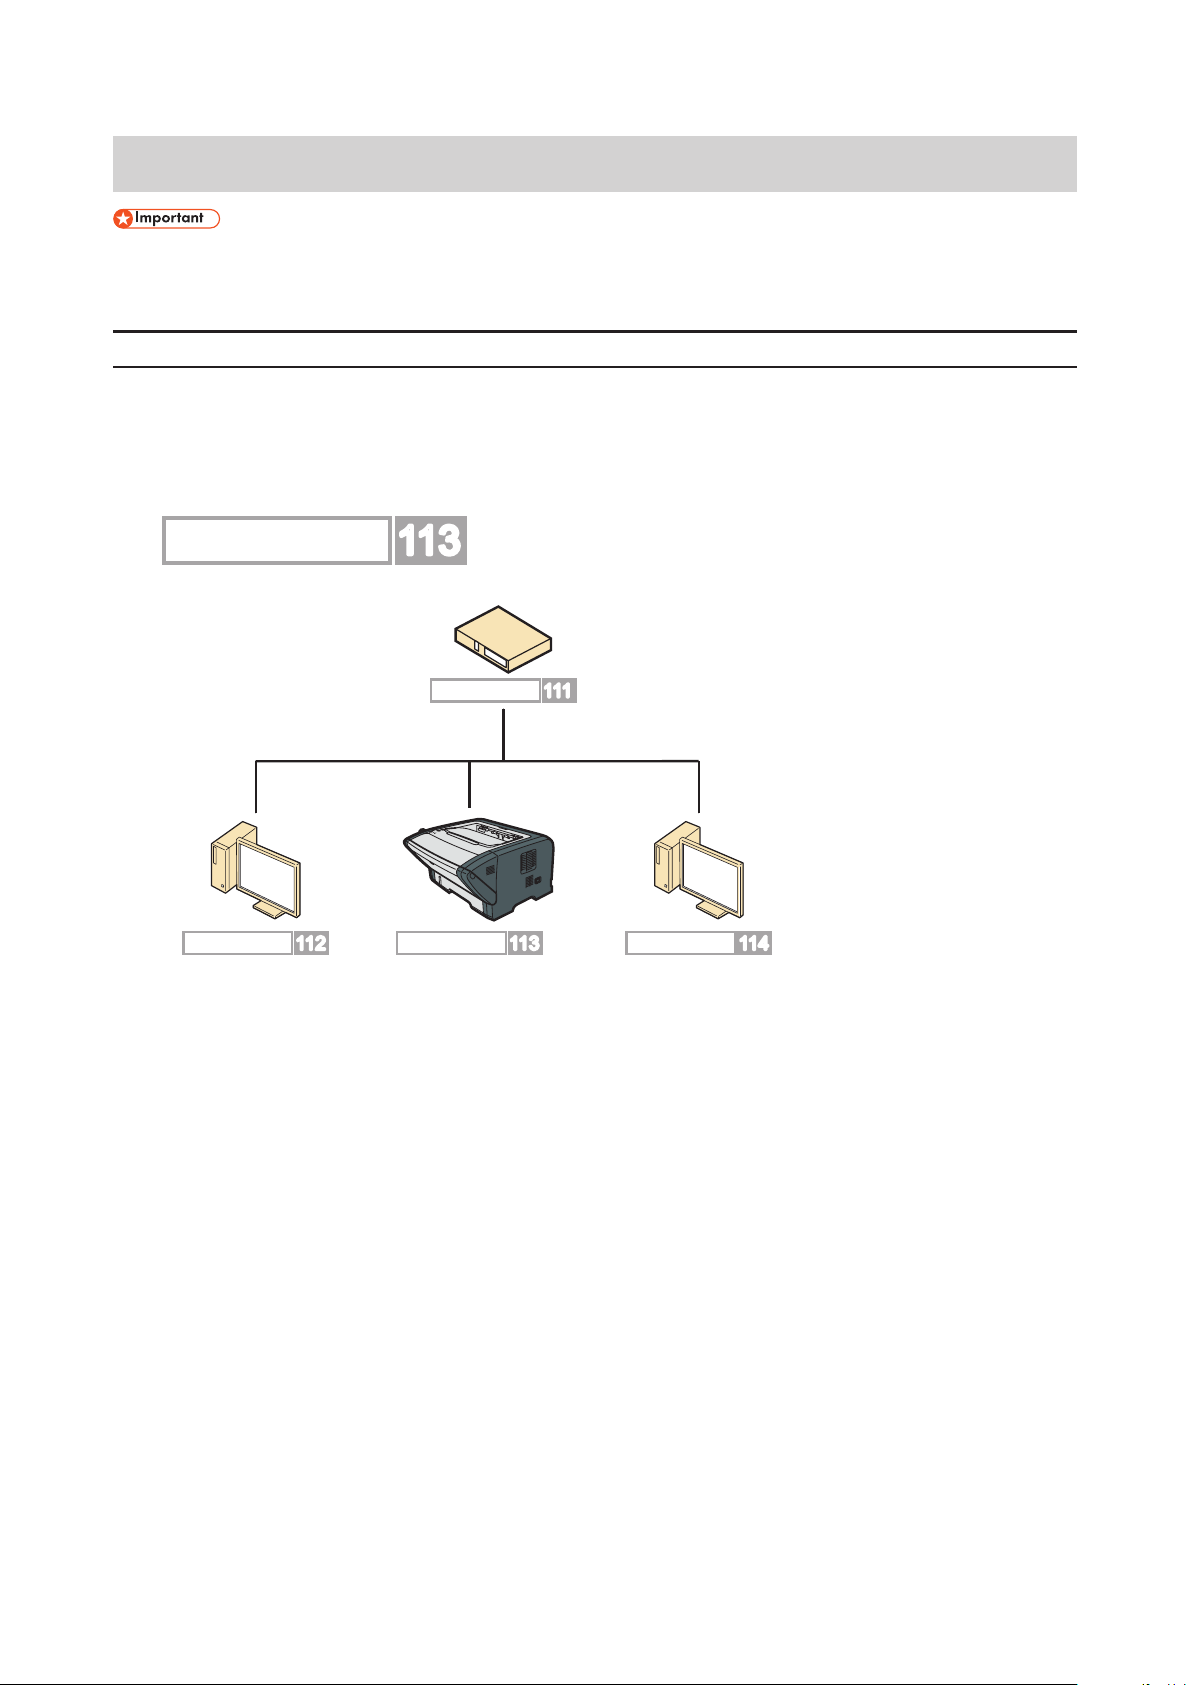
Wire LAN Settings
192. 168. 0. 113
DCT046
DPH144
1
2 3 4
192. 168. 0. 111
192. 168. 0. 113 192. 168. 0. 114192. 168. 0. 112
First, follow the procedure described on page 9, "Connecting the Machine via Network".
•
This section explains how to connect the machine to a computer using a network cable.
Selecting the Type and Method of IP Address Configuration
What is an IP address?
The IP address is an identification number allocated to computers and other devices connected to an IP network. An IP address
is an address for use on a network. There are two types of IP address: IPv4 and IPv6.
IPv4 address
•
The IPv4 address consists of four fields, such as "192.168.0.113".
The first three fields (192.168.0) are fixed, and the last one (113) is variable.
1. Router
2. Another computer
3. Machine
4. Your computer
IPv6 address
•
Because IPv4 addresses are running out as a result of the widespread use of the Internet, IPv6 has been developed as a next
generation Internet protocol.
Specifying the IP Address
You can specify the IP address as follows:
Obtaining the IP address from the DHCP server
•
Specifying a static IP address manually
•
What is a DHCP?
DHCP is a networking protocol that automatically assigns an IP address and other information to the connected device. You can
automatically obtain the IP address by enabling the machine's DHCP setting.
20
Page 23
Connecting the Computer and Machine
DPH111
DPH151
DPH155
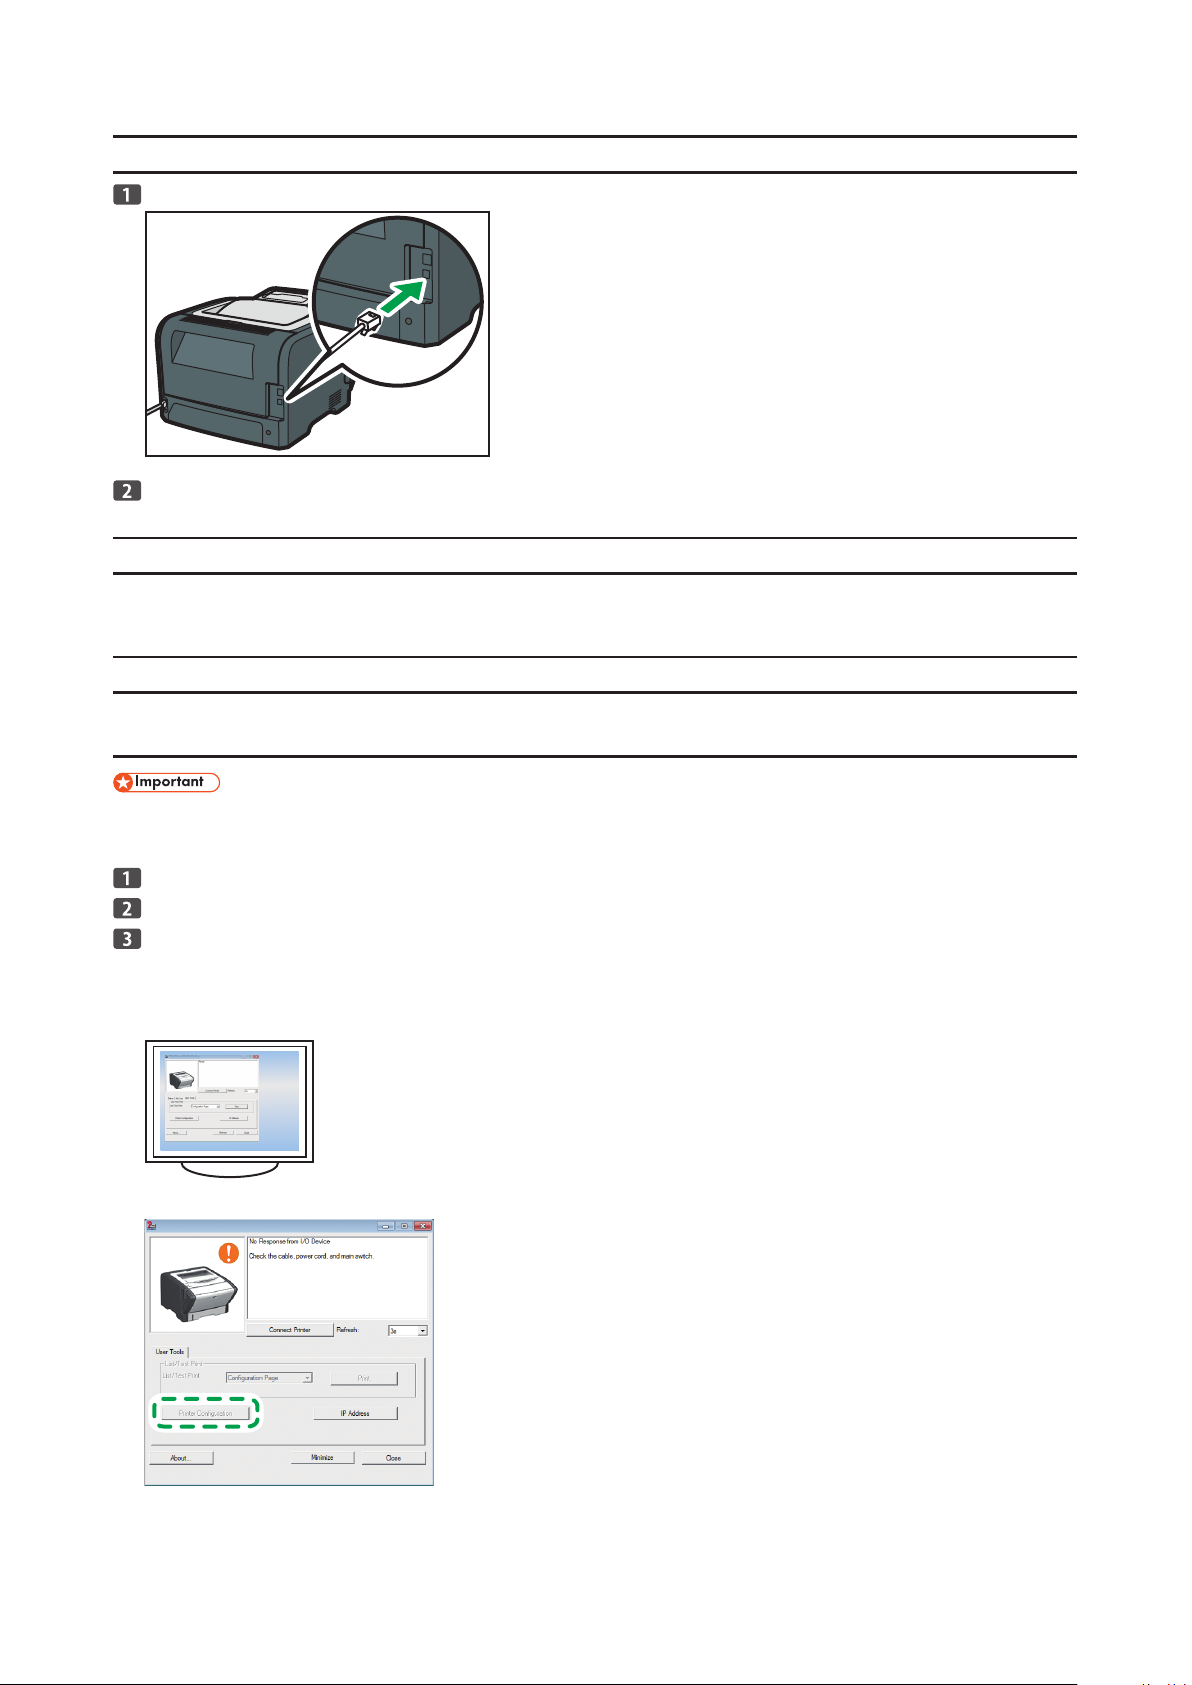
Connect the network cable to the Ethernet por t.
Plug the other end of the cable into a network device, such as a hub.
Configuring Network Settings
Network connection methods vary depending on the network environment and the machine type. Select the method from among the
following that is most appropriate for your network environment, and then see the section for your machine type.
IPv4
Automatic configuration (DHCP enabled)
A router with DHCP functionality or a DHCP server is required.
•
Make sure the USB cable is not connected to the printer beforehand.
•
Connect the printer to the router or the hub using the Ethernet cable.
Turn on the printer.
Start Smart Organizing Monitor.
1. On the [Star t] menu, click [All Programs].
2. Click [Smart Organizing Monitor].
3. Click [Smart Organizing Monitor Status].
The following screen appears if the connection has not been established yet.
21
Page 24
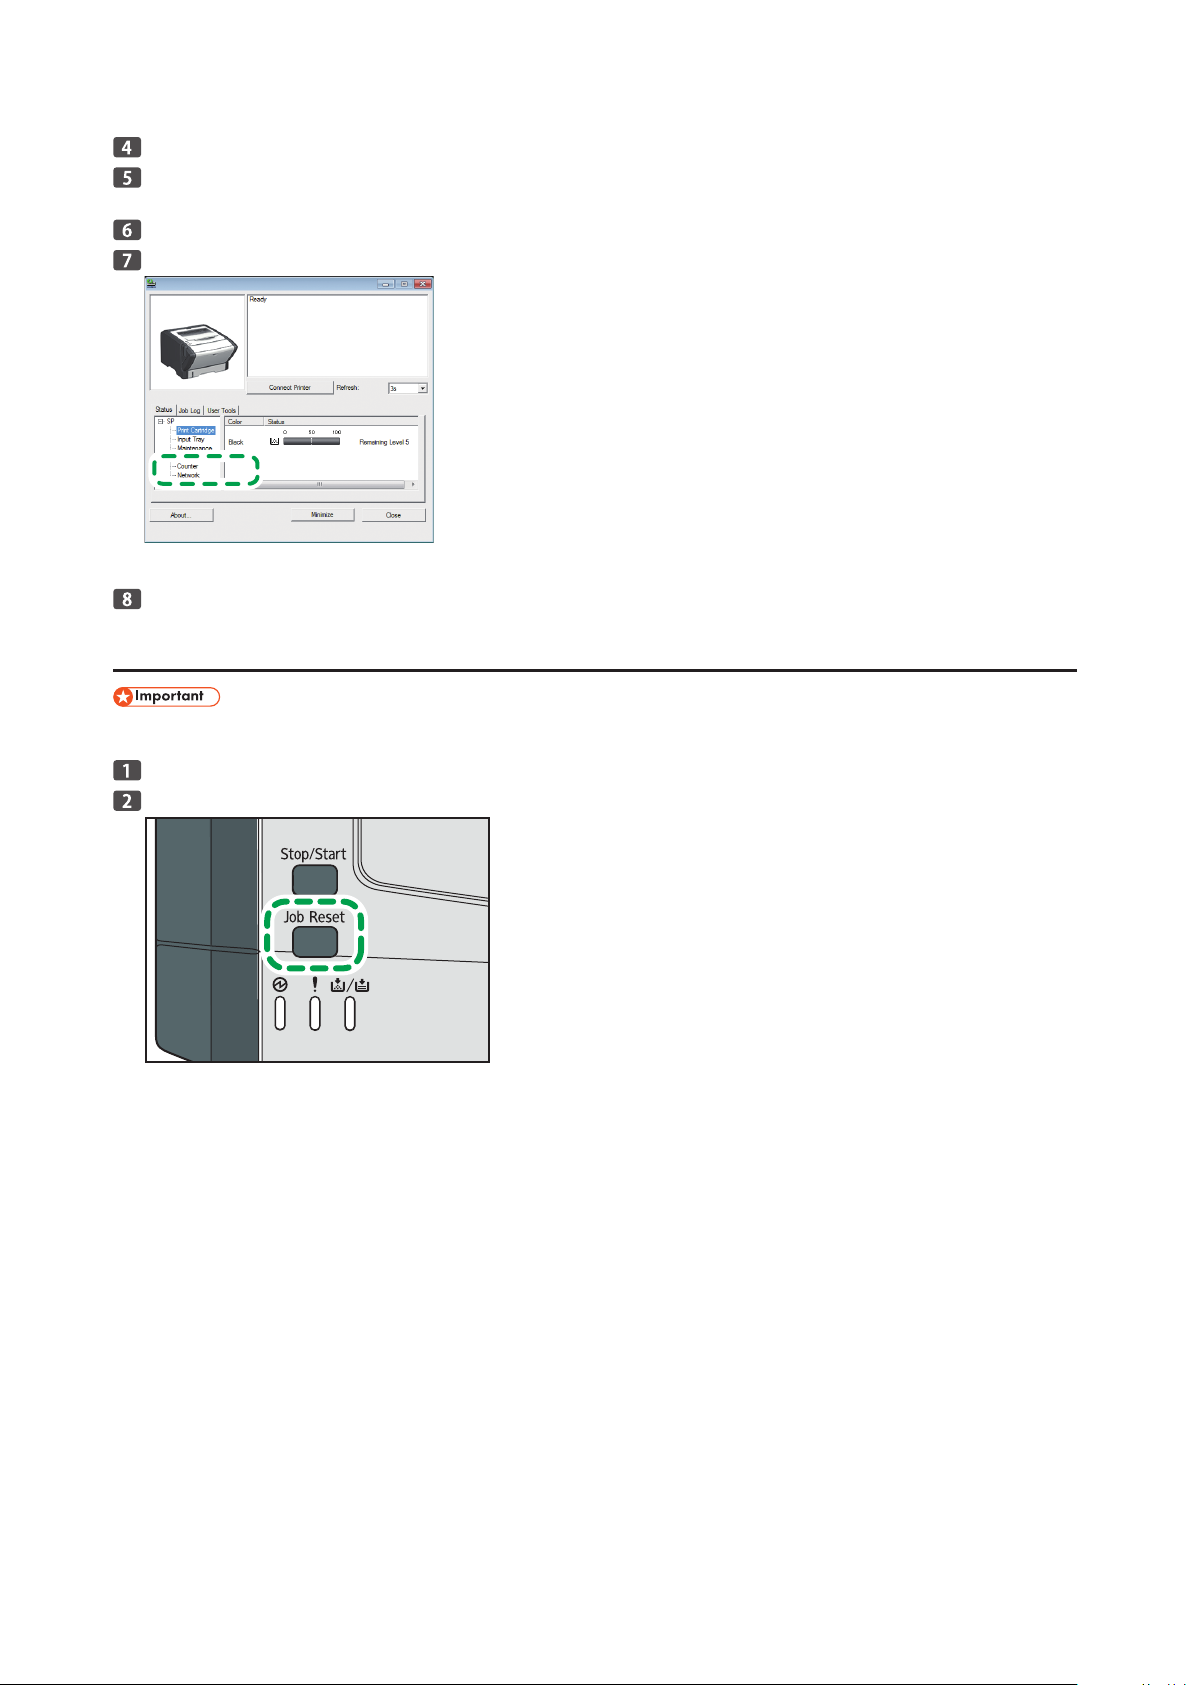
Click [Connect Printer].
DPH154
CVW254
Click [Search Network Printer].
A list of printers currently connected to the network appears.
Select your printer, and then click [OK].
If the printer information appears af ter a while, the connection was established successfully.
If nothing appears on the screen, repeat this procedure.
The network settings are complete.
Manual Configuration (DHCP Disabled)
The printer's MAC address is required.
•
Connect the printer to the router or the hub using the Ethernet cable.
Hold down the [Job Reset] key and turn on the printer.
When the Power indicator lights up and the Alert indicator starts to flash, release the key. The printer's power is turned on, and
the test page is printed out. Printing starts approximately 30 seconds after the Alert Indicator starts blinking.
22
Page 25
Start Smart Organizing Monitor.
DPH151
DPH155
1. On the [Star t] menu, click [All Programs].
2. Click [Smart Organizing Monitor].
3. Click [Smart Organizing Monitor Status].
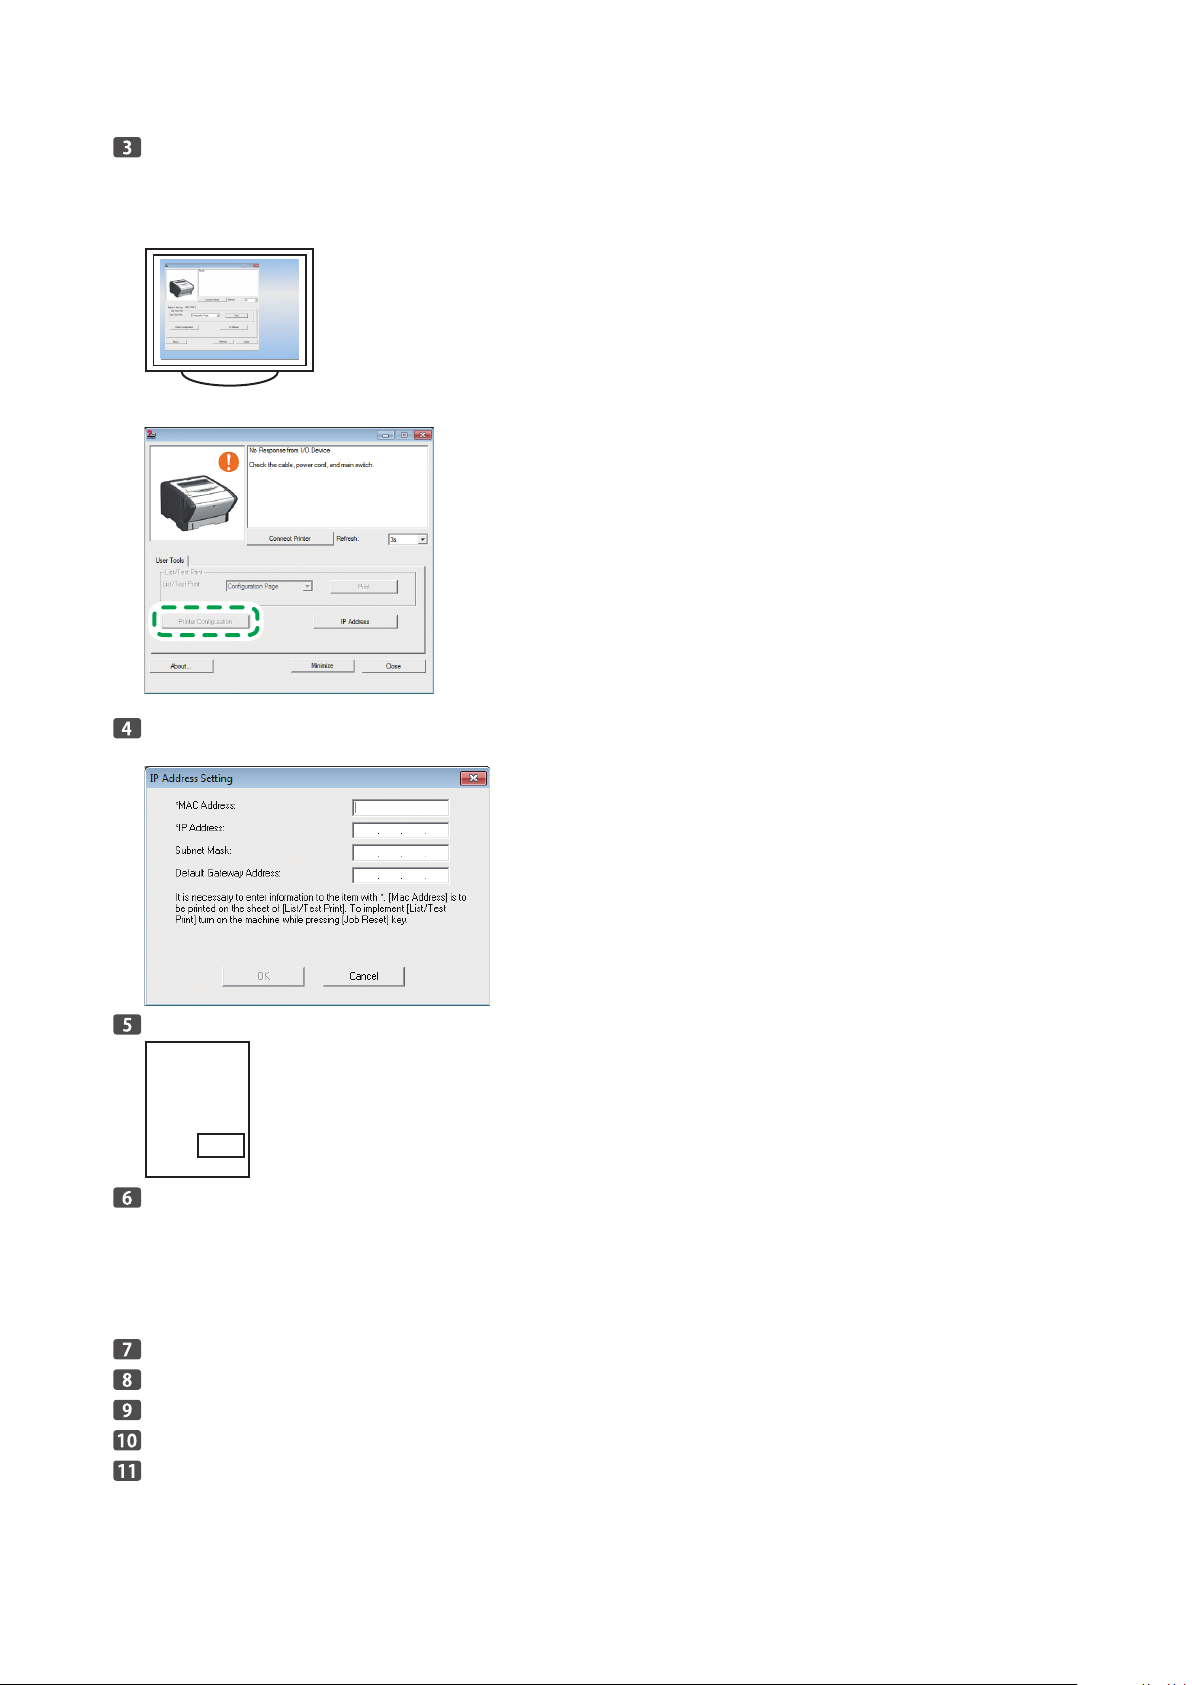
The following screen appears if the connection has not been established yet.
Click [IP Address].
The following screen appears:
Enter the MAC address printed in the lower right part of the test page.
Enter the IP address that your administrator has assigned to the printer.
IPv4 IP addresses consist of four sections with three digits each. If you want to enter a single digit such as "7", enter 3 digits
•
such as "007".
Enter a unique IP address that does not conflict with the IP addresses of any other devices on the network.
•
Once the MAC address and IP address are determined, the subnet mask and default gateway are automatically entered.
•
Enter the subnet mask and gateway address, when necessary.
•
Click [OK].
Click [OK] when the dialog appear on the screen.
After confirming that the configuration is complete, restar t the printer.
Click [Connect Printer].
Click [Search Network Printer].
A list of printers currently connected to the network appears.
23
Page 26
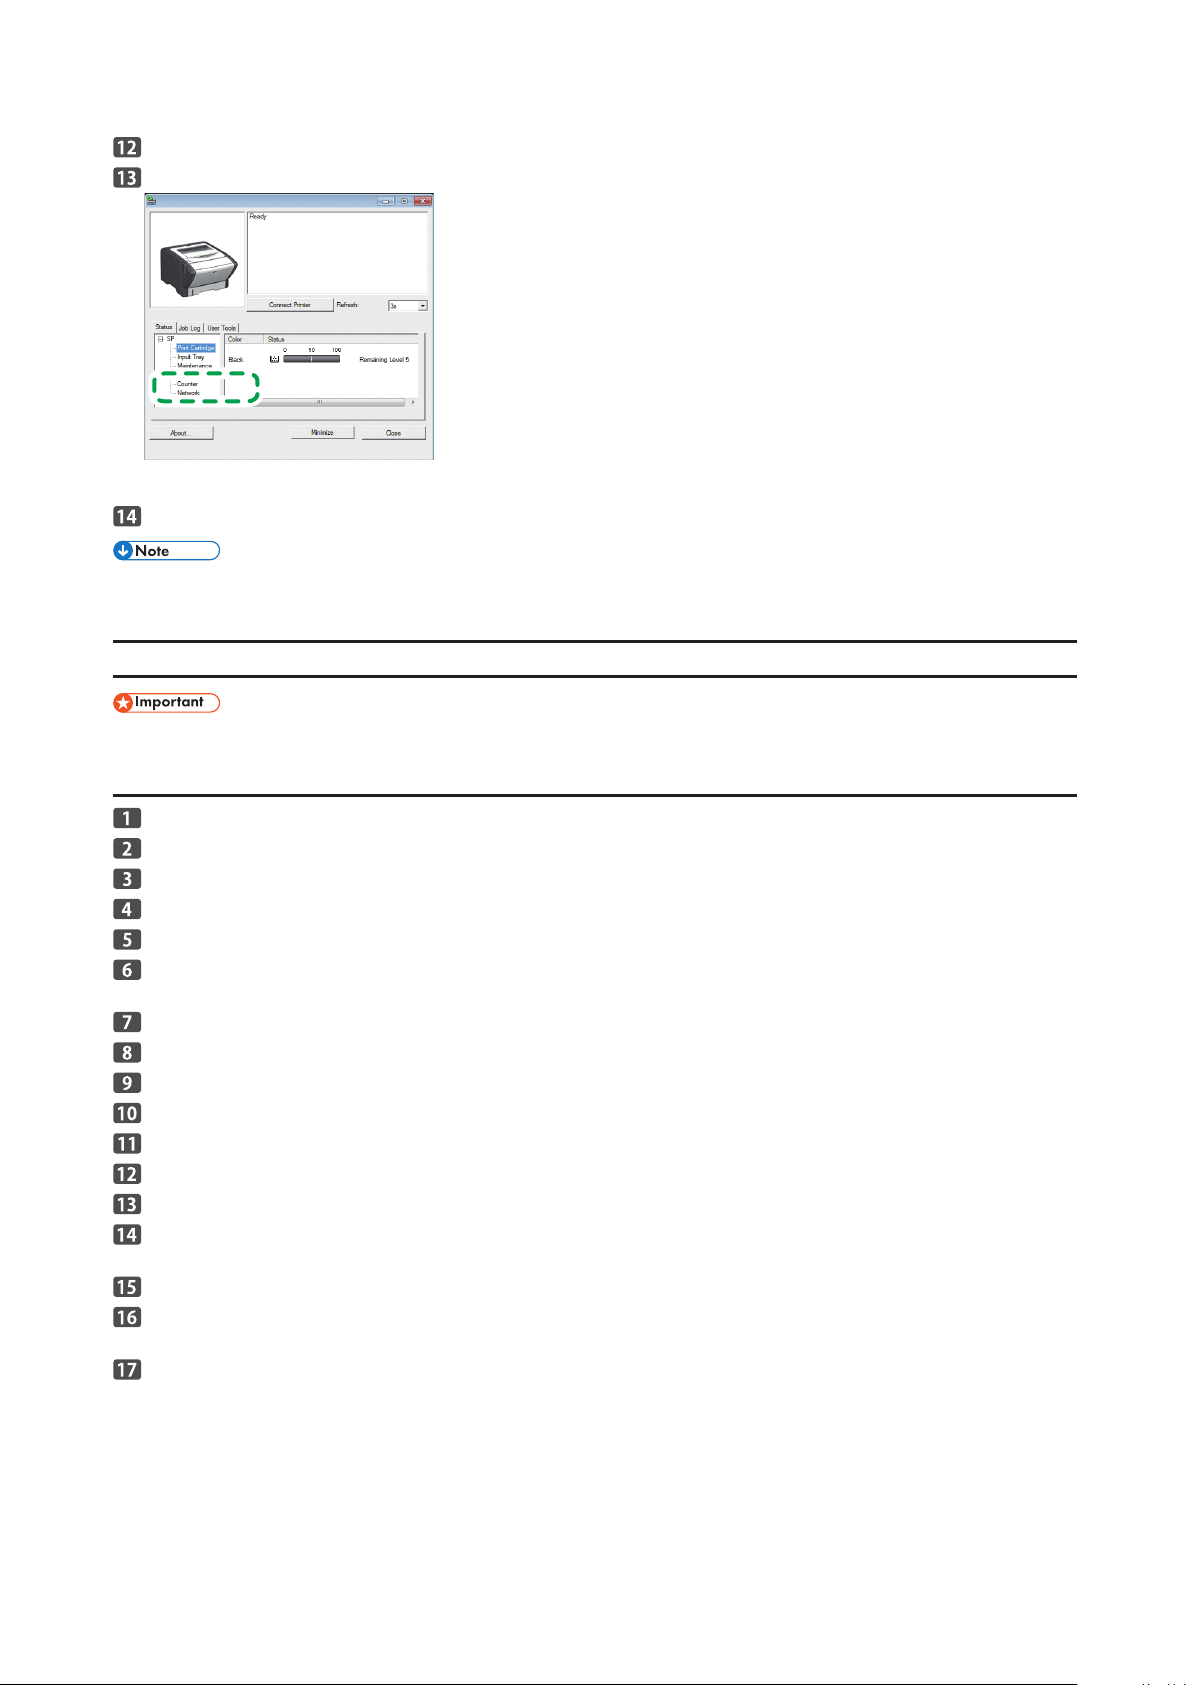
Select your printer, and then click [OK].
DPH154
If the printer information appears af ter a while, the connection was established successfully.
If nothing appears on the screen, repeat this procedure.
The network settings are complete.
If it is necessary to specify the subnet mask, gateway, DNS server, or proxy server, see page 28 "How to Specify the Subnet, Gate-
•
way, DNS Server, and Proxy Server".
IPv6
A router with DHCP functionality or a DHCP server that is suppor ted by IPv6 is required.
•
Automatic Configuration (DHCP Enabled)
On the [Star t] menu, click [All Programs].
Click [Smart Organizing Monitor].
Click [Smart Organizing Monitor Status].
Click the [User Tools] tab.
Click [Printer Configuration].
Enter the access code, and then click [OK].
The default access code is "Admin". Enter "Admin" if it has not been changed. Case is significant.
Click the [IPv6] tab.
Select [Enable] in [IPv6 DHCP:], and the click [OK].
Click [OK] when the dialog appear on the screen.
Turn off the machine.
Connect the machine to the router or the hub using the Ethernet cable.
Turn on the machine.
Click [Connect Printer].
Click [Search Network Printer].
A list of printers currently connecting to the network appears.
Select your printer, and then click [OK].
If the printer information appears af ter a while, the connection is established successfully.
If nothing appears on the screen in about two minutes, repeat this procedure.
The network settings are complete.
24
Page 27
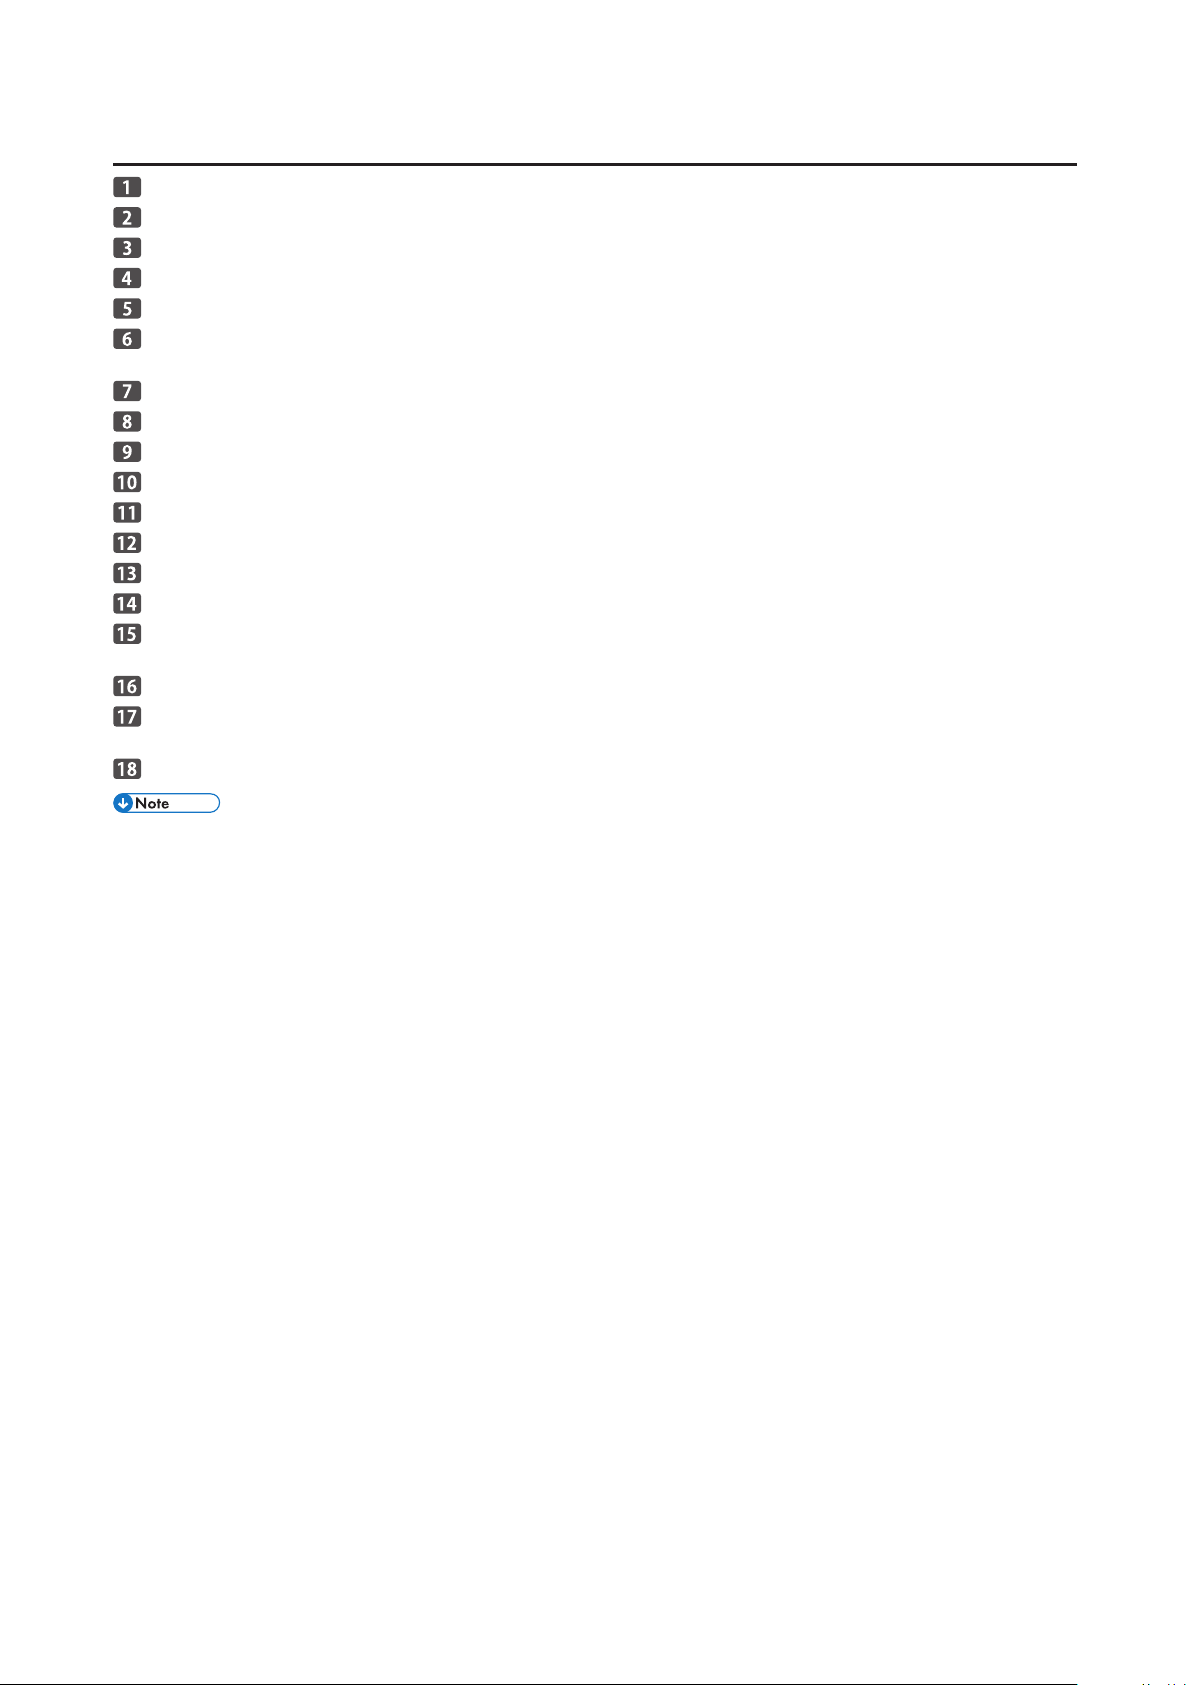
Manual Configuration (DHCP Disabled)
On the [Star t] menu, click [All Programs].
Click [Smart Organizing Monitor].
Click [Smart Organizing Monitor Status].
Click the [User Tools] tab.
Click [Click Printer Configuration].
Enter the access code, and then click [OK].
The default access code is "Admin". Enter "Admin" if it has not been changed. Case is significant.
Click the [IPv6] tab.
Select [Disable] in [IPv6 DHCP:].
Enter values in [Manual address:], [Prefix length:], and [Gateway:], and then click [OK].
Click [OK] when the dialog appear on the screen.
Turn off the machine.
Connect the machine to the router or the hub using the Ethernet cable.
Turn on the machine.
Click [Connect Printer].
Click [Search Network Printer].
A list of printers currently connecting to the network appears.
Select your printer, and then click [OK].
If the printer information appears af ter a while, the connection is established successfully.
If nothing appears on the screen in about two minutes, repeat this procedure.
The network settings are complete.
If it is necessary to specify the subnet mask, gateway, DNS server, or proxy server, see page 28 "How to Specify the Subnet, Gate-
•
way, DNS Server, and Proxy Server".
25
Page 28
Installing the Software without Using the CD-ROM
Installing the Driver
If you cannot install the driver using the supplied CD -ROM, access the website to install the driver.
Access to the website.
Download the file.
Double-click the file.
Follow the instructions in the installation wizard.
Installing the Smart Organizing Monitor
Access to the website.
Download the file.
Double-click the file.
Click the exe file.
Follow the instructions in the installation wizard.
26
Page 29
Sharing the Printer on the Network
Set up the computer so that the printer can be used for all computers on the network.
Perform the following procedure using a computer on the network:
To change printer properties, you need access privileges for Printer Management. Log on using an account in the Administrator
•
group.
The following procedure is based on Windows 7. If you are using another operating system, the procedure might differ slightly.
•
On the [Star t] menu, click [Devices and Printers].
Right-click the icon of the printer you want to use, and then click [Printer properties].
The printer properties window appears.
On the [Sharing] tab, click [Share this printer].
To share this printer with users using a different version of Windows, continue with this procedure.
•
If you installed an alternative driver by selecting [Share this printer] during the printer driver installation, proceed to Step 8.
•
Click [Additional Drivers...].
Select the version of Windows with which you want to share the printer, and then click [OK].
Click [Browse...], select the driver file, and then click [Open].
Click [OK].
On the [Advanced] tab, click the [Printing Defaults...] button. Specify the default values for the printer driver that will be
distributed to client computers, and then click [OK].
Click [Apply].
Click [OK].
27
Page 30
Change the IP address
Change the IP address
Check the computer's IP address.
1. Click the [Start] menu.
2. Enter "cmd" in the [Search programs and files] field, and then press the [Enter] key.
The command prompt appears.
3. Enter "ipconfig /all", and then press the [Enter] key.
The details about the network environment appear.
Select the environment to which you want to connect and follow the procedure given in "2.Installing the Software" on
page 6.
How to Specify the Subnet, Gateway, DNS Server, and Proxy Server
Subnet Mask
•
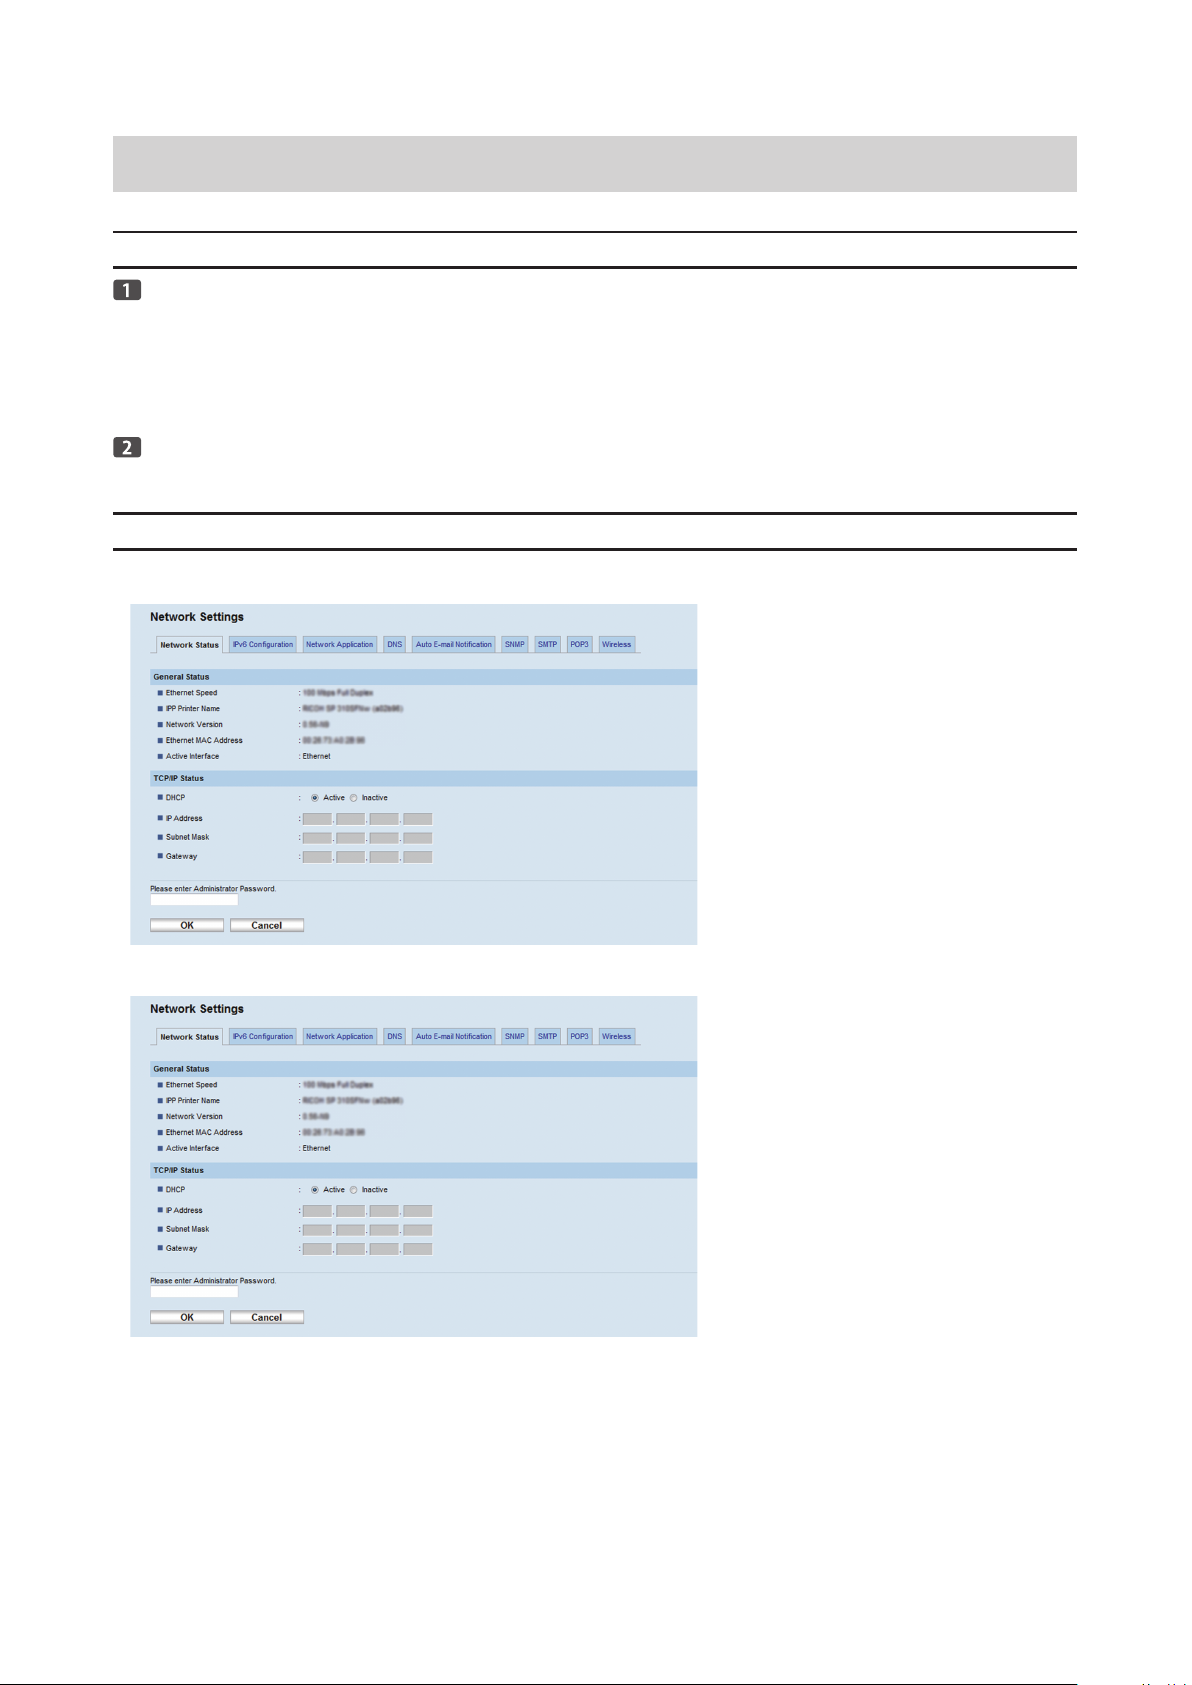
You can specify the subnet mask using [Network Settings] tab in [Network Settings] on the Web Image Monitor.
Gateway
•
You can specify the gate way using [Network Settings] tab in [Network Settings] on the Web Image Monitor.
28
Page 31
DNS server
•
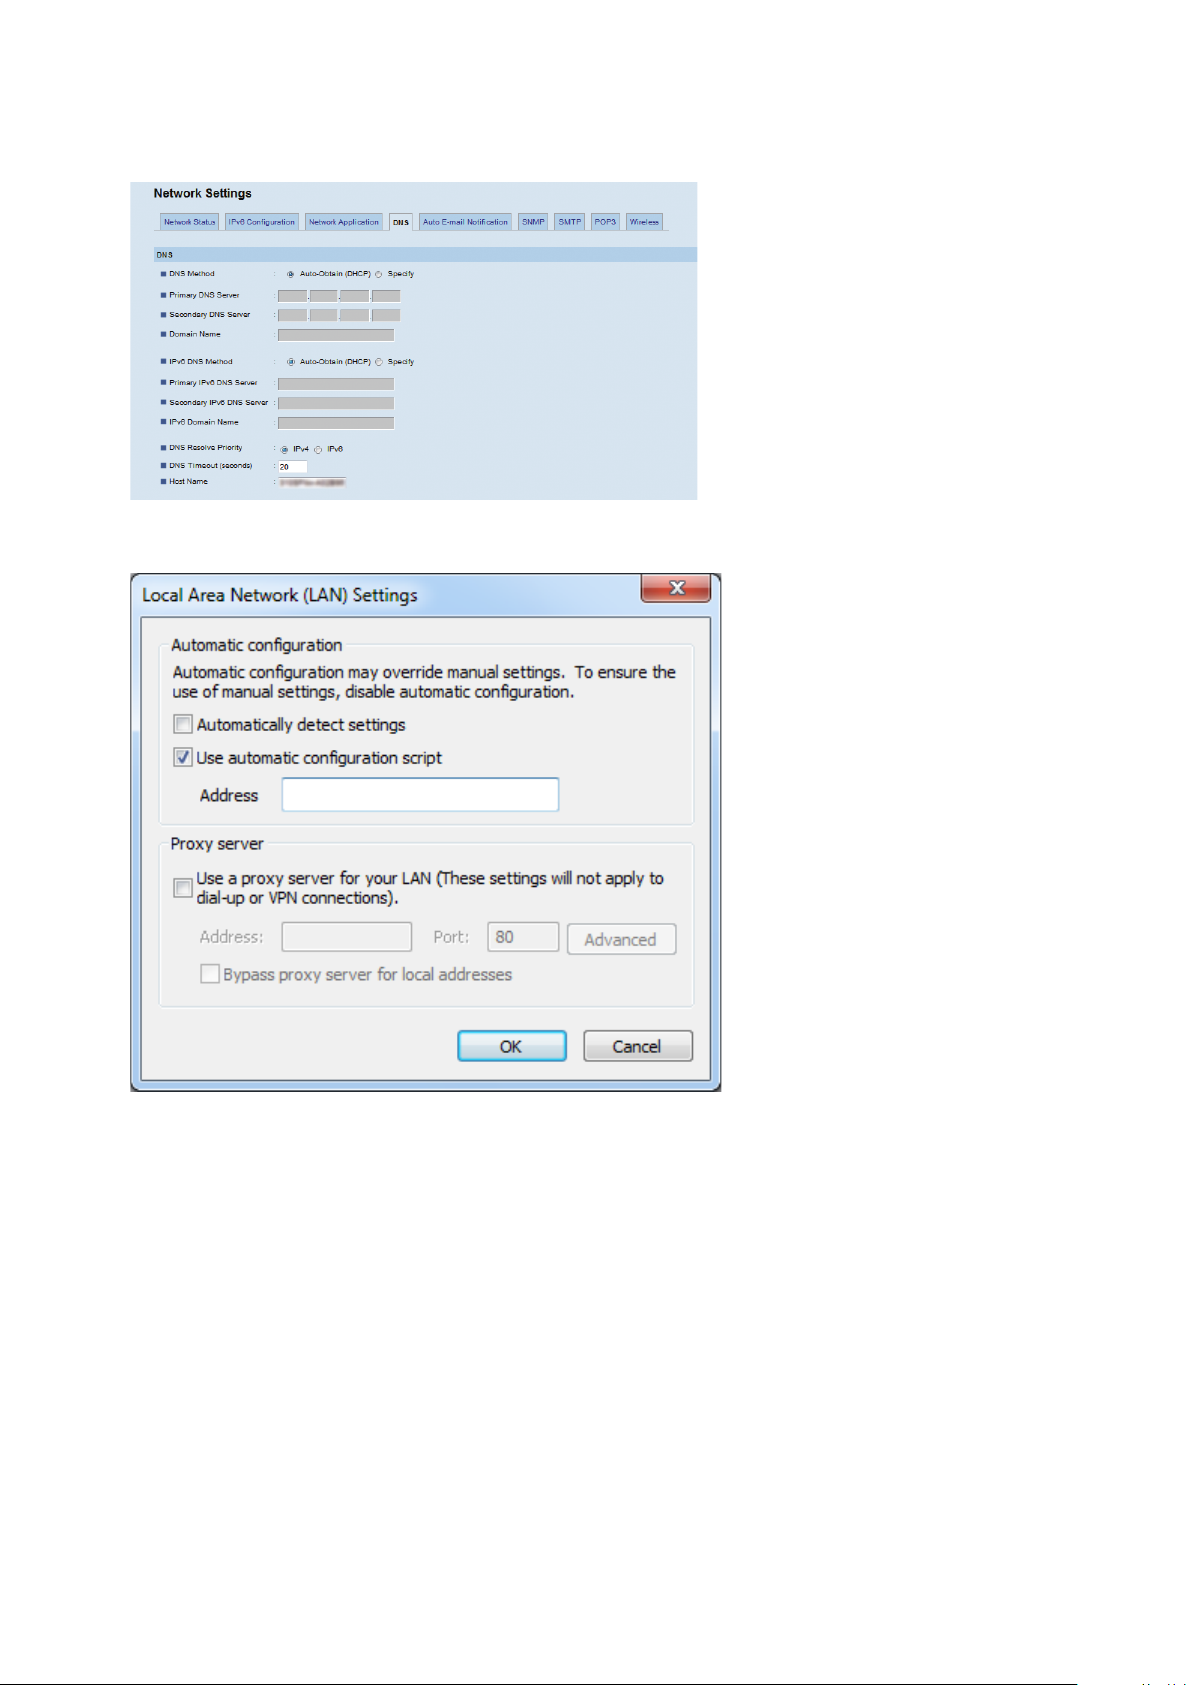
You can specify the DNS using [DNS] tab in [Network Settings] on the Web Image Monitor.
Proxy server
•
You can change this setting using [Proxy ser ver] on the [Local Area Network (LAN) Settings] tab in [Internet Option]. For details
about the necessary information for specifying this setting, contact the net work administrator.
29
Page 32
3. PaaS (Printer as a Service) Settings
DPH145
Settings PaaS Server
This section explains settings for "PaaS (Printer as a Service) Settings" with Web Image Monitor. Proceed to "How to Specify the 3G
Dongle” if you do not have a networked environment and proceed to "Settings for " PaaS (Printer as a Service) Settings" with Web Image Monitor" if you do.
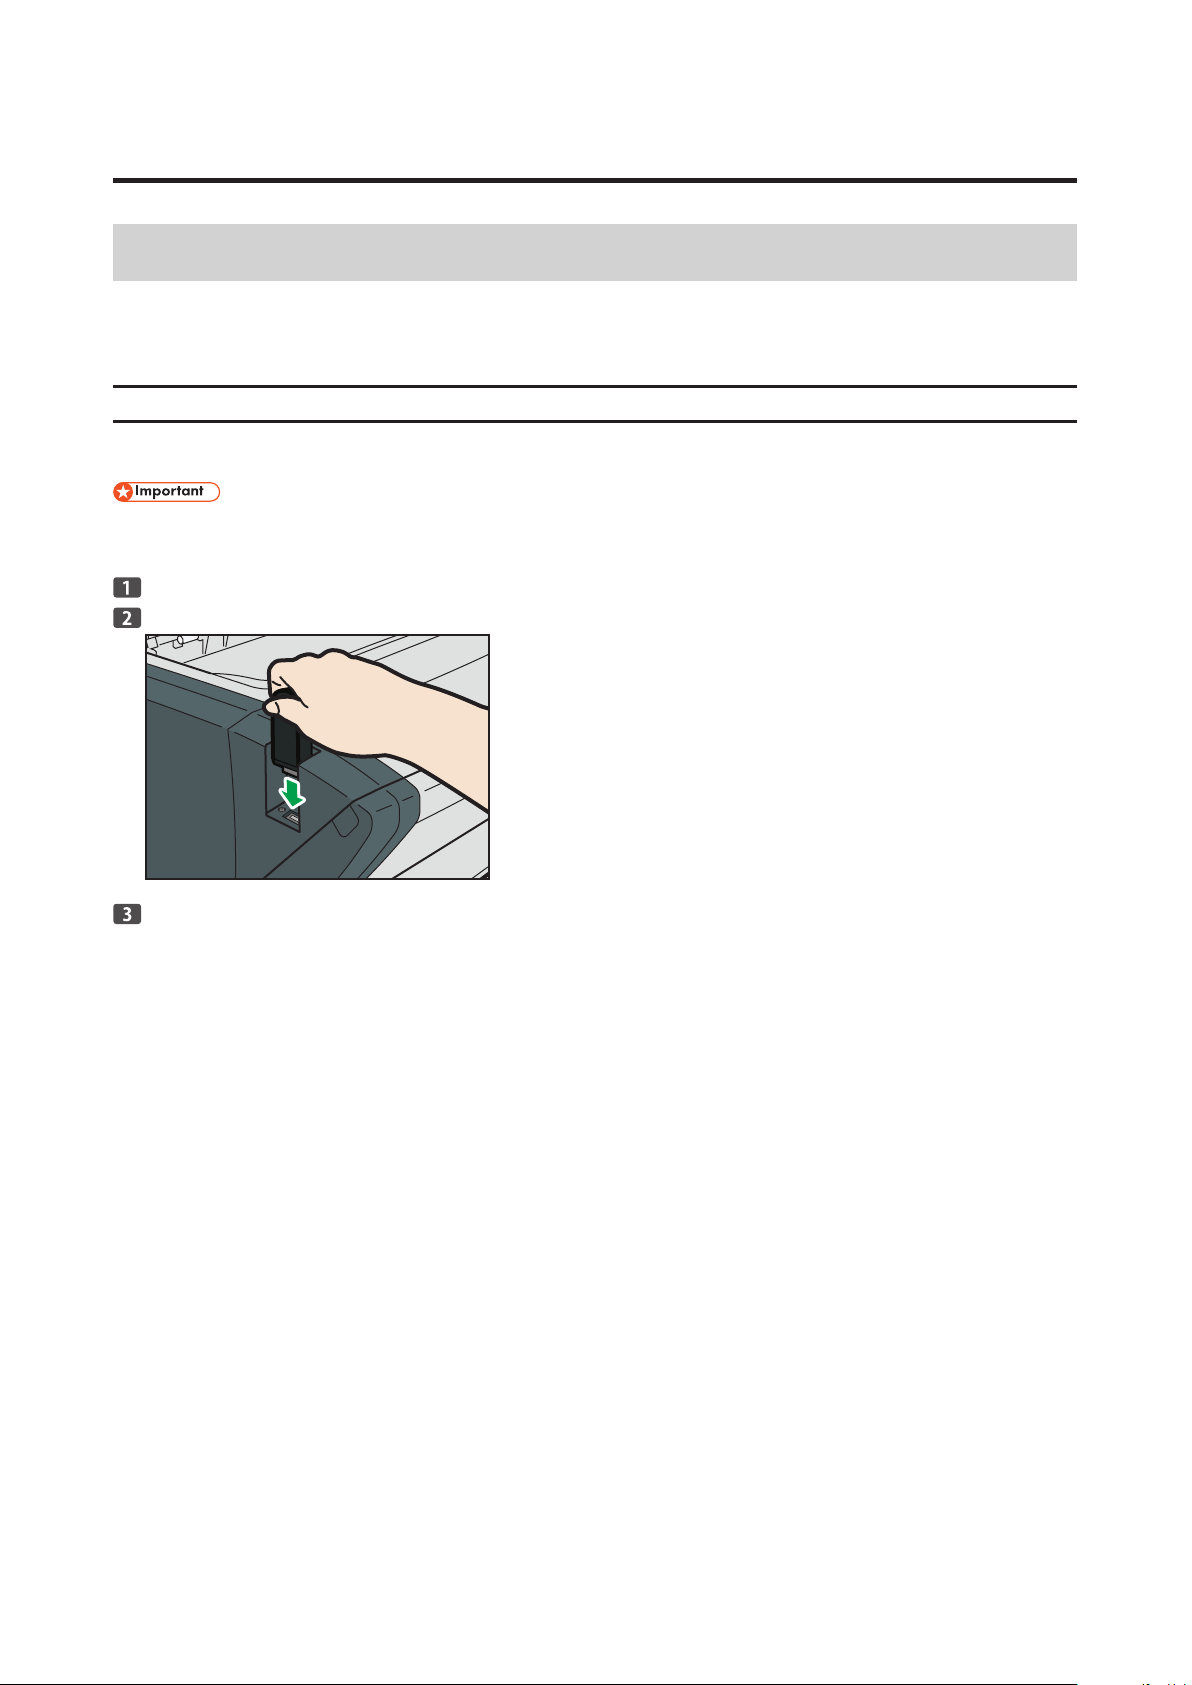
How to Specify the 3G Dongle
If you do not have a networked environment, configure the network using the 3G dongle.
To use the 3G dongle, do as follows:
If you connect the 3G dongle with the power on, an error occurs. Be sure to turn off the power before connecting the 3G dongle. If
•
an error message appears, contact your ser vice representative.
Turn off the machine.
Connect the 3G dongle.
Turn on the machine.
A network connection will be established automatically when you turn on the power.
30
Page 33
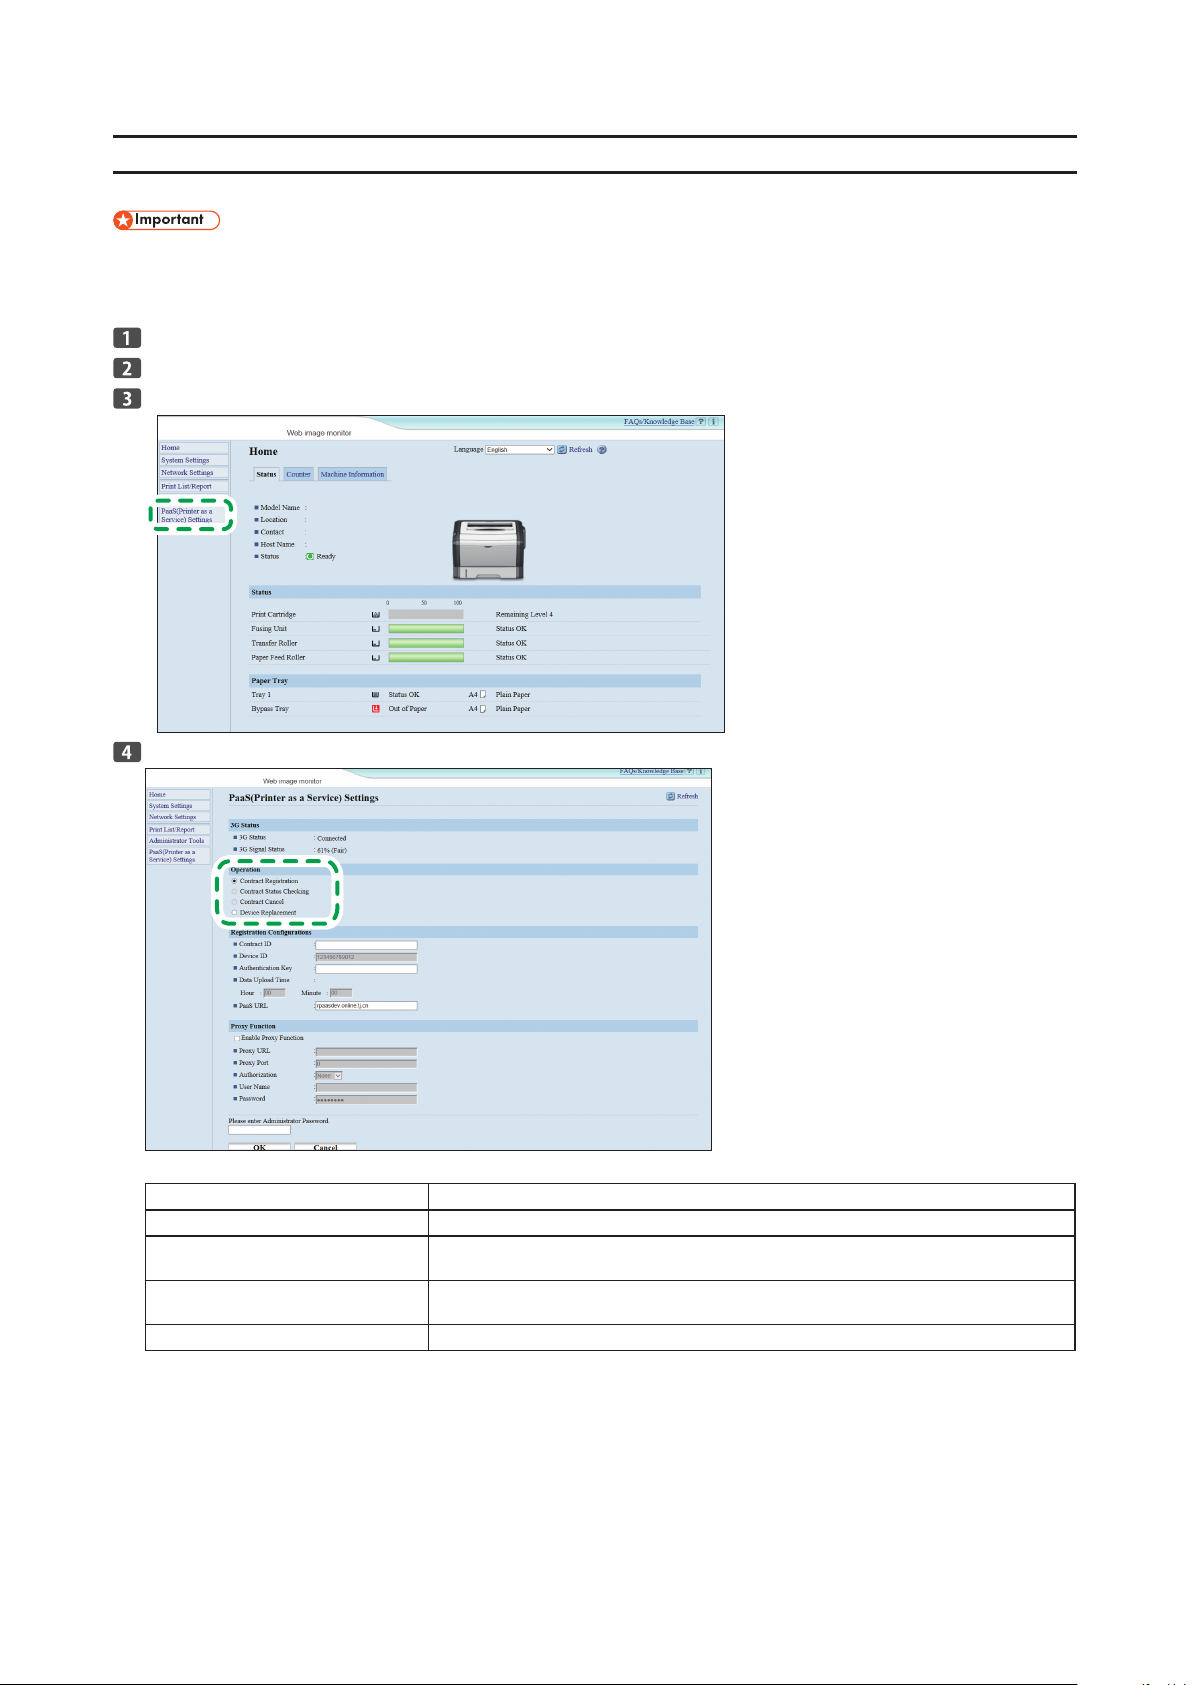
Specifying the PaaS (Printer as a Service) Setting with Web Image Monitor
After the machine's settings have been configured, perform the machine's PaaS server authentication.
Authentication requires your user ID and authentication key, which are provided by the sales representative with whom you signed
•
your contract.
The machine will not operate unless this setting is configured.
•
Launch the Web browser.
In the web browser's address bar, enter "http://(machine's IP address)/" to access the machine.
Using the menu on Web Image Monitor, select [PaaS (Printer as a Service) Setting].
Check that [Operation] is set to [Contract Registration].
Operation
Item Description
Contract Registration Select this to enter the Contract ID and Authentic ation Key af ter registration.
Contract Status Checking Select this if the machine stops operating.
Contract Cancel Select this to cancel the registration.
Device Replacement Select this to replace the machine you are using.
The machine inquires of the ser ver about its registration status.
To cancel the registration, first contact your sales or ser vice representative.
31
Page 34
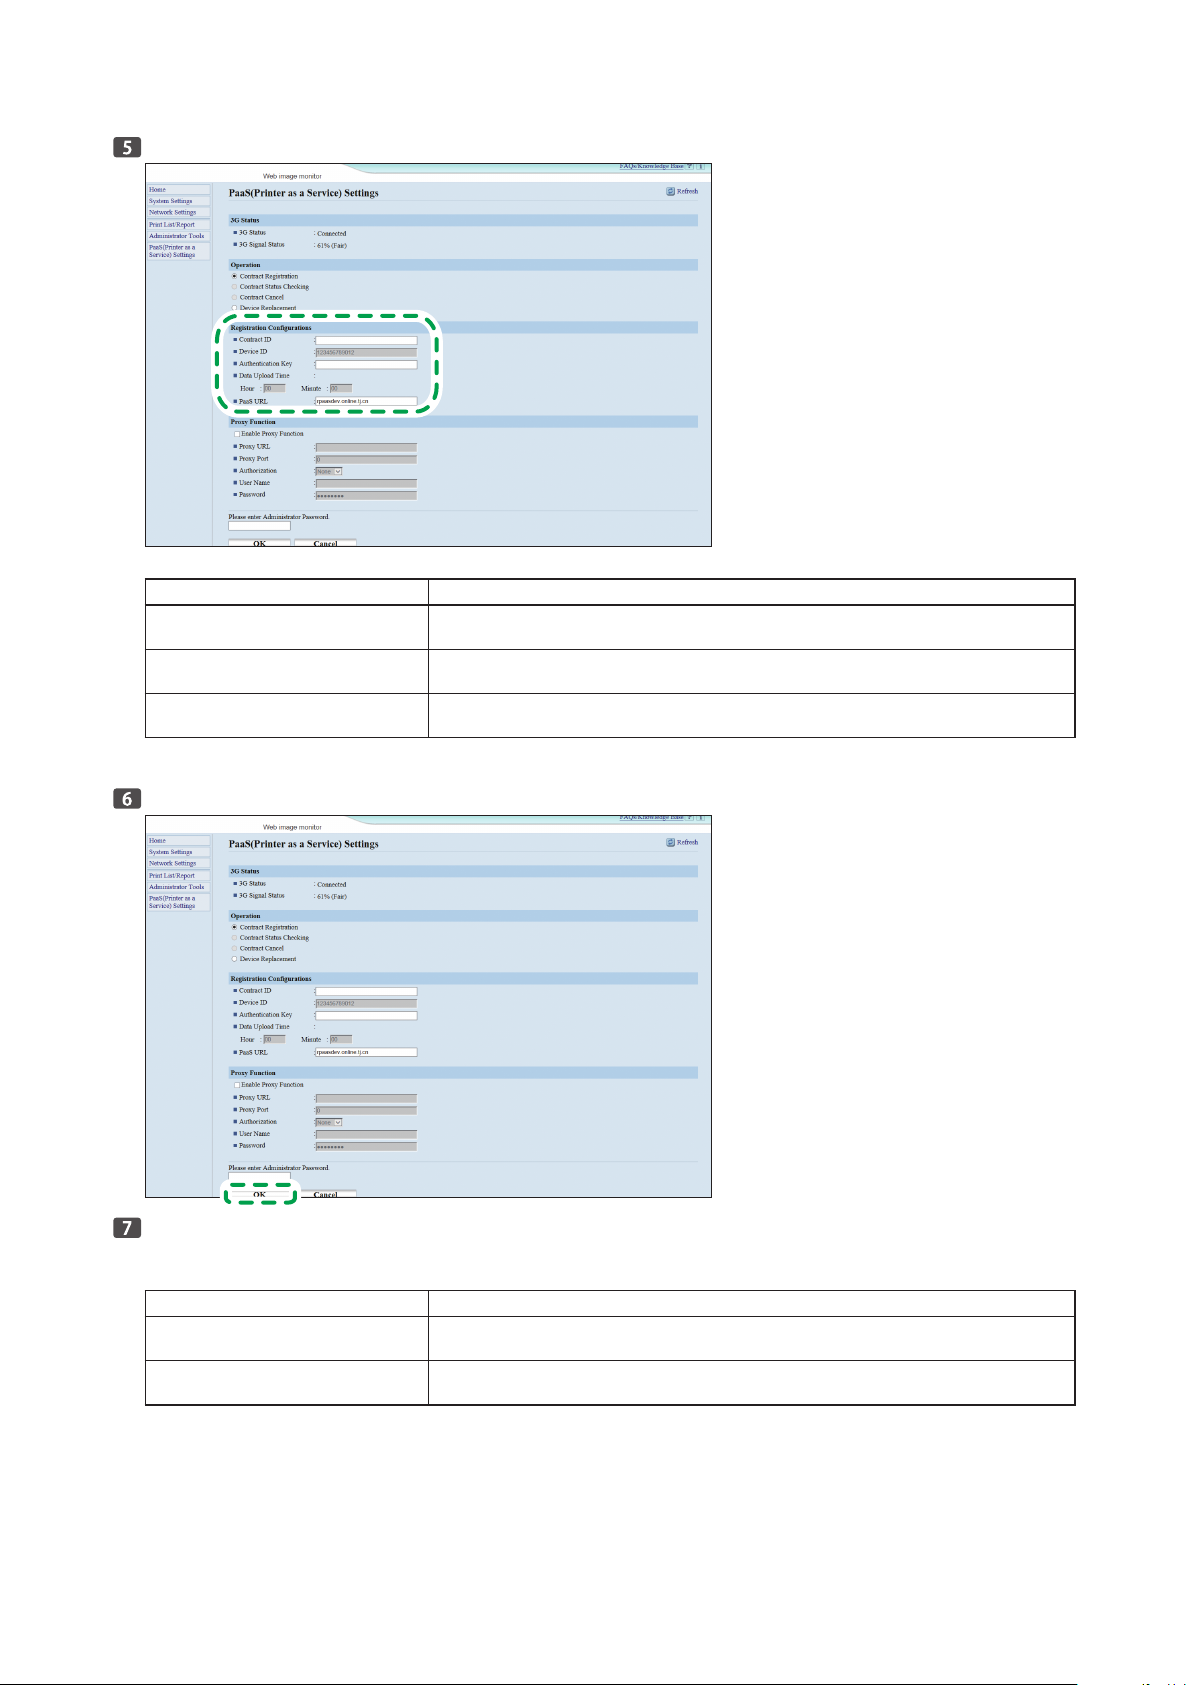
Check and enter [Contract ID], [Authentication Key], and [PaaS URL].
Registration Configurations
Item Description
Contract ID* Enter your Contract ID. Enter this only when you have selected Contract Registration for [Operation]
Authentication Key* Enter your Authentication Key. Enter this only when you have selected Contract Registration for
PaaS URL If no PaaS URL is specified, enter your PaaS URL. Enter this only when you have selected Contract
* The sales dealer you have made a contract with will provide you with your Contract ID and Authentication Key. Address any inquiries to the
sales dealer.
above.
[Operation] above.
Registration for [Operation] above.
After making the entries, click [OK].
If the message "Operation Successful" appears, authentication is complete. For other messages, check the following
table:
Messages
Message Description
Registration Configuration is not correct The Contract ID or Authentication Key you have entered is either wrong or already used. Check that
Operation failed, please contact service
center (Code:xx x)
the entered Contract ID or Authentication Key is correct.
Please contact the service center.
32
Page 35
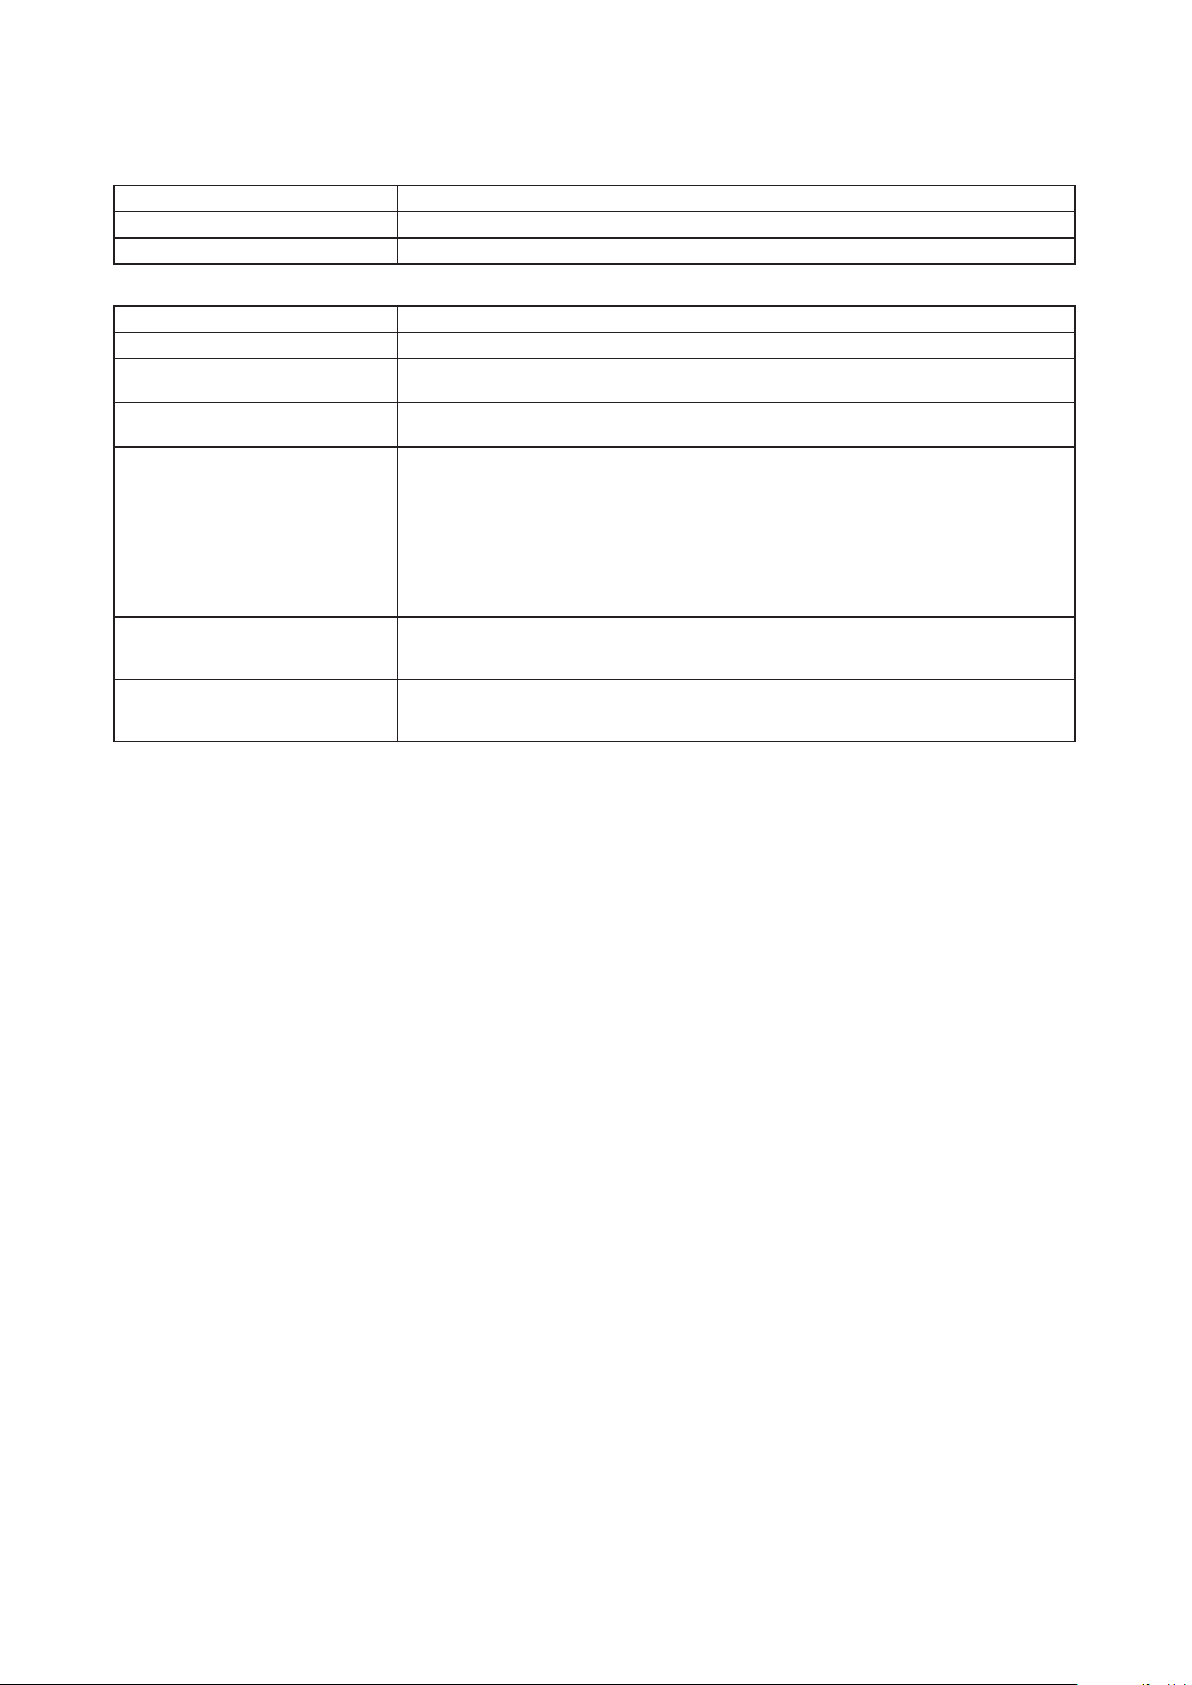
For other settings, see the following table:
3G Status
Message Description
3G Status Displays the current connection status.
3G Signal Status Displays the current 3G signal strength.
Proxy Function*
Item Description
Enable Prox y Function Check this to enable the proxy server.
Proxy URL Set the prox y server address.
Proxy Por t Number Enter the port number of proxy server.
Authorization Authorization method of link to proxy server.
User Name Account to log in prox y server.
Password Password for this user name to log in proxy server.
* In an environment using a proxy ser ver, specif y [Proxy Function].
The legal character can be input is: 0- 9, A-Z, a-z,
The range is 1-65535.
The options are:
-None
-Basic
-Digest
The default value is None.
When the option of Basic or Digest is selected, the bellow items of User Name and Password are editable
and the user name & password should not be NULL.
When the option of None is selected, the bellow items of User Name and Password are read only.
The legal character can be input is: 0x20- 0x7e.
The max length is 32.
The legal character can be input is: 0x20- 0x7e.
The max length is 32.
33
Page 36

4. Troubleshooting
USB Connection
The plug-in launcher does not work.
1. Check that the CD-ROM is inser ted properly and is undamaged.
2. Check that the CD-ROM drive is working properly.
When you cannot install properly.
1. Check that the USB cable is connected properly and is undamaged.
2. Quit all other applications when installing software.
Installation may be disrupted if other applications are open. Also, quit any anti-virus applications that are running.
3. From Control Panel, open "Printers and Faxes", delete the machine's icon, then reinstall the driver.
Network Connection
Is the printer turned on? Is the Ethernet cable connected properly?
Has the network environment changed? (For example, have you changed the printer's location?)
IPv4 automatic setting
•
Does your network device have DHCP functionality? Is the DHCP function enabled?
•
The DHCP functionality is required for automatic configuration.
If you are not sure whether the network has DHCP functionality, connect to the network manually.
IPv4 manual setting
•
Does another IP address conflict with the printer’s IP address?
•
If you have specified the same IP address as any of other computers’ IP addresses, the connection will fail.
Specify another IP address and try again.
Wi-Fi Connection
Are the settings for the wireless LAN router and the access point correctly configured?
Check that the WPS function is not set to "inactive" or "Off ".
•
Functions other than WPS may interfere with the WPS function depending on their settings. For details, refer to the manuals for
•
the wireless LAN router and access point.
Are the wireless LAN router and the access point placed in an area in which they can receive radio waves?
The area in which the devices can receive radio waves varies depending on the structure of the building. If the machine is away
•
from the wireless LAN router or the access point, place it closer to either of them. Then connect the machine to the devices.
Is the button you pressed the WPS button?
The WPS button has different names, pressing or holding times depending on the wireless LAN router or the access point you
•
are using. For details about which button you need to press or hold for a specific period of time, refer to the manual.
Is the PIN code configured correctly?
Configure the PIN code correctly according to the manuals for the wireless LAN router and access point.
•
Check the PIN code when it is displayed or printed.
•
How to reset the setting?
1. Turn the machine off.
2. Turn the machine on while holding down [Job Reset] and [Stop/Start].
PaaS Server Connection
Fails the machine authentication and PaaS server authentication.
The network cable is not connected properly.
•
The 3G dongle is not connected properly.
•
The user ID, authentication key or PaaS URL has not been entered correctly.
•
DNS server setting is not specified correctly.
•
The print job cannot be printed out.
Disconnected from the PaaS server. (Network communication has failed.)
•
The 3G dongle may not be connected properly. Connect the dongle properly.
•
The power is off.
•
34
Page 37

5. Terminology
Terminology Description
Broadband router A device for connecting to the Internet, mainly used in home networks. It combines a DHCP function and a few
Hub A device that contains multiple Ethernet ports and that can be used to establish a L AN. A hub does not usually
MAC address A unique identifier assigned to each network communication device. MAC addresses are registered by the manu-
IP address An identifier assigned to each device on the networ k or a LAN. An IP address is like a home address on the net-
IPv4/IPv6 There are two types of IP addresses: IPv4 and IPv6. The term "IP address" usually refers to an IPv4 address. An
DHCP A protoc ol that assigns necessar y information, such as an IP address, to devices on the network on a temporary
LAN A network that spans a relatively small area such as a single building. It enables connections between computers,
Wi-Fi Wi-Fi is a standard for the connection between devices that have a wireless LA N. The devices supporting this
WPS (Wi-Fi Protected Setup) WPS is a standard for encryption set tings for connections between devices that support Wi-Fi. Devices that sup-
PBC A WPS connection method using a push button.
PIN A WPS connection method using a PIN code.
AP An access point.
Ethernet c able A LAN cable cable for establishing a network environment.
Ethernet ports, which makes it possible to easily establish a LA N.
contain DHCP functionality, but such functionality is available if the hub is connected to a router that has DHCP
functionality or a DHCP server.
facturer, and it cannot be changed.
work.
IPv6 address is referred to as an "IPv6 address". IPv6 addresses might not be available depending on the network
environment.
basis. This type of functionality provides reliable and simple network configuration without user inter vention. This
function is convenient for users who are not familiar with net work configuration.
printers, and other communication devices to interact with each other on the network.
standard can be connected using a wireless L AN.
port this standard can be c onnected easily using a wireless LAN with encryption.
35
36
Page 38

EN AU M292-8673
Page 39

© 2016
Page 40

EN
AU
M292-8673
 Loading...