

Page 1

名称/料号
说明书PR8458-620132
2014-10-14
A5(145x210)mm
PDF
CH171
70g双胶纸
张妹珍
页 数
12 张A5纸
Page 2

Sovereign
2600
These instructions contain important information that will help you
product
missing parts, call the Customer Helpline o
Sovereign
2600
Instruction Manual
WARNING
These instructions contain important information that will help you
product
missing parts, call the Customer Helpline o
, ensuring it is assembled correctly and safely.
W
ImImportant
Blower Vac
- Please read these instructions fully before starting assembly
n
0345 077 8888
After Service Support
Helpline
Web site
N
: h
If you need help or have damaged or
o.:
ttp://www.
03
45 077 8888
argos
get the best from your
2921084
(Model: YT6201
spares
2921084
(Model: YT6201
co.u
.
12)
-
.
k
.
Page 3

CONTENTS
GENERAL POWER TOOLS SAFETY WARNINGS……………………………………………...….3
SPECIAL SAFETY INSTRUCTIONS FOR SHREDDERS…………………………………………..…5
SYMBOLS…………………………………………………………………………………………...….7
DIAGRAM…………………………………………………………………………………………...…9
PARTS LIST………………………………………………………………………………………………9
INTENDED USE………………………………………………………………………………….….…10
ASSEMBLY……………………………………………………………………………………………..11
OPERATION………………………………………………………………………………….……….14
CLEANING AND MANTENIANCE ………………………………………………………….….…18
TECHNICAL DATA…………………………………………………………………………………...20
GUARANTEE …………………………………...……………………………..…………………….. 21
TROUBLESHOOTING ……….……………………………………………………………………….22
RECYCLING AND DISPOSAL……………………………………………………………….……..22
2
Page 4

GENERAL POWER TOOLS SAFETY WARNING
General Power Tool Safety Warnings
The term "power tool" in the warnings refers to your mains
battery
WARNING! Depending on the actual use of the product the vibration
declared total! Adopt proper measures to protect yourself against vibration exposures. Take the
whole work process including times the product is running under no load or switched off into
consideration.
Proper measures include a
application tools, keeping hands warm, periodical breaks and proper planning of work processes.
Work Area Safety
a)
Cluttered or dark areas invite accidents.
b)
liquids, gases or dust.
Power tools create sparks which may ignite the dust or fumes.
c)
Distractions can cause you to lose control.
Electrical Safety
a) Power tool plugs must match the outlet. Never modify the plug in any way. Do not use any adapter
plugs with earthed (grounded) power tools.
Unmodified plugs and matching outlets will reduce risk of electric shock.
b) Avoid body contact with earthed or grounded surfaces, such as pipes, radiators, ranges and
refrigerators.
There is an increased risk of electric shock if your body is earthed or
c) Do not expose power tools to rain or wet conditions.
Water entering a power tool will increase the risk of electric shock.
d) Do not abuse the cord. Never use the cord for carrying, pulling or unplugging the power tool. Keep
cord away from
Damaged or entangled cords increase the risk of electric shock.
e) When operating a power tool outdoors, use an extension cord suitable for outdoor use.
Use of a cord suitable for outdoor use reduces the risk of
f) The use of a residual current device (RCD) when using this tool is recommended.
Use of an RCD reduces the risk of electric shock.
GENERAL POWER TOOLS SAFETY WARNING
General Power Tool Safety Warnings
The term "power tool" in the warnings refers to your mains
battery
WARNING! Depending on the actual use of the product the vibration
declared total! Adopt proper measures to protect yourself against vibration exposures. Take the
whole work process including times the product is running under no load or switched off into
consideration.
Proper measures include a
application tools, keeping hands warm, periodical breaks and proper planning of work processes.
Work Area Safety
a) Keep work area clean and well lit.
Cluttered or dark areas invite accidents.
b)
liquids, gases or dust.
Power tools create sparks which may ignite the dust or fumes.
c)
Keep children and bystanders
Distractions can cause you to lose control.
Electrical Safety
a) Power tool plugs must match the outlet. Never modify the plug in any way. Do not use any adapter
plugs with earthed (grounded) power tools.
Unmodified plugs and matching outlets will reduce risk of electric shock.
b) Avoid body contact with earthed or grounded surfaces, such as pipes, radiators, ranges and
refrigerators.
There is an increased risk of electric shock if your body is earthed or
c) Do not expose power tools to rain or wet conditions.
Water entering a power tool will increase the risk of electric shock.
d) Do not abuse the cord. Never use the cord for carrying, pulling or unplugging the power tool. Keep
cord away from
Damaged or entangled cords increase the risk of electric shock.
e) When operating a power tool outdoors, use an extension cord suitable for outdoor use.
Use of a cord suitable for outdoor use reduces the risk of
f) The use of a residual current device (RCD) when using this tool is recommended.
Use of an RCD reduces the risk of electric shock.
Do not operate power tools in explosive atmospheres, such as in the presence of flammable
WARNING Read all safety warnings and all instructions.
Failure to follow the warnings and instructions may result in electric shock, fire and/or
serious injury
WARNING! Read all safety warnings
Save all warnings and instructions for future reference.
-
operated (cordless) power tool.
heat, oil, sharp edges or moving parts.
.
mong others regular maintenance and care of the product and
away while operating a power tool.
designated by the
S
electric shock.
operated (corded) power tool or
symbol and all
values can differ from the
grounded.
instructions.
-
3
Page 5

GENERAL POWER TOOLS SAFETY WARNINGS
Personal Safety
a) Stay alert, watch what you are doing and use common sense when operating a power tool. Do not
use a power tool while you are tired or under the influence of drugs, alcohol or medication.
A moment of inattention while operating power tools may result in serious personal injury.
b) Use personal protective equipment. Always wear eye protection.
Protective equipment such as dust mask, non-skid safety shoes, hard hat, or hearing
protection used for appropriate conditions will reduce personal injuries.
c) Prevent unintentional starting. Ensure the switch is in the off-position before connecting to power
source and/or battery pack, picking up or carrying the tool.
Carrying power tools with your finger on the switch or energising power tools that have the
switch on invites accidents.
d) Remove any adjusting key or wrench before turning the power tool on.
A wrench or a key left attached to a rotating part of the power tool may result in personal
injury.
e) Do not overreach. Keep proper footing and balance at all times.
This enables better control of the power tool in unexpected situations.
f) Dress properly. Do not wear loose clothing or jewellery. Keep your hair, clothing and gloves away
from moving parts.
Loose clothes, jewellery or long hair can be caught in moving parts.
g) If devices are provided for the connection of dust extraction and collection facilities, ensure these
are connected and properly used.
Use of dust collection can reduce dust-related hazards.
Power Tool Use and Care
a) Do not force the power tool. Use the correct power tool for your application.
The correct power tool will do the job better and safer at the rate for which it was designed.
b) Do not use the power tool if the switch does not turn it on and off.
Any power tool that cannot be controlled with the switch is dangerous and must be repaired.
c) Disconnect the plug from the power source and/or the battery pack from the power tool before
making any adjustments, changing accessories, or storing power tools.
Such preventive safety measures reduce the risk of starting the power tool accidentally.
d) Store idle power tools out of the reach of children and do not allow persons unfamiliar with the
power tool or these instructions to operate the power tool.
Power tools are dangerous in the hands of untrained users.
e) Maintain power tools. Check for misalignment or binding of moving parts, breakage of parts and
any other condition that may affect the power tool’s operation. If damaged, have the power tool
repaired before use. Many accidents are caused by poorly maintained power tools.
f) Keep cutting tools sharp and clean.
Properly maintained cutting tools with sharp cutting edges are less likely to bind and are
easier to control.
g) Use the power tool, accessories and tool bits etc. in accordance with these instructions, taking
into account the working conditions and the work to be performed.
Use of the power tool for operations different from those intended could result in a hazardous
situation.
4
Page 6

GENERAL POWER TOOLS SAFETY WARNINGS
Service
1. Have your power tools serviced by a qualified repair person using only identical
replacement parts. This will ensure that safety of the power tool is maintained.
2. For cable replacement, please contact the specified helpline for spare parts.
SPECIAL SAFETY INSTRUCTIONS FOR BLOWER VAC
NOTE
It is recommended that appliances should be supplied via a residual current device (RCD) with a
tripping current of not more than 30mA.
Before Using
- Study this manual thoroughly.
- Familiarize yourself with the operation of the blower vac and learn to use it properly.
- Never allow others (especially children) who have not read the manual to use the machine.
- If the unit must be given to other people, give them as this manual.
- Never remove the labels or security elements.
- Check that the voltage and frequency indicated on the specification label affixed to the
electrical blower vac correspond to the mains electricity supply.
- To connect the blower vac to the power, use only appropriate and compliant power
equipment in perfect condition.
- Keep the cord away from the radius of action of the machine and make sure it is not
subjected to tension. Move the cable from water, heat and sharp edges.
- Never use the cord for carrying, pulling or unplugging the power tools.
- Do not use the blower vac if the trigger on / off does not work properly. If necessary,
contact your stores for any repair.
- Never expose the electric blower vac to rain or moisture. Never allow water or other liquids
enter the machine.
- Do not operate blower vac in an environment with flammable items such as liquids, gases or
dust. The sparks generated by the operation of the machine can cause an explosion.
When Using
- Use the blower vac only in daylight or good artificial light.
- The use of power equipment can be regulated. Remember to comply with legal regulations
which may differ from one location to another.
- Do not use the machine if you are tired or ill. Also avoid use if you have consumed alcohol
or taken drugs. A moment of inattention can result in serious injury.
- When using, keep the hair away from the machine. Never wear loose clothing or
accessories such as tie, cord, scarf or jewelry that could get caught in the machine.
- Wear close-fitting clothing, convenient and protect you from cuts. Always wear long pants,
sturdy and non-slip shoes, and protective equipment such as gloves, goggles, a helmet with
5
Page 7

SPECIAL SAFETY INSTRUCTIONS FOR BLOWER VAC
a visor and acoustic shield, etc.
- Never blow dust, ash or harmful substances.
- Do not vacuum wet materials, water or other liquids.
- Never vacuum solids, such as chips, branches on ground which may damage the mulching
system.
- Never vacuum hot material, incandescent, inflammable substances or explosives.
- Make sure the blower vac is switched off before plugging it to the power supply to avoid
sudden and unexpected machine starting.
- Do not allow anyone to remain in the range of the electric grass size during use. Keep
people, children and animals away from work area. If it is a group work, keep sufficient
distance between people.
- Always work in a stable balanced and firm position. Do not work on slippery or unstable
ground.
- Never operate a damaged machine repaired poorly, poorly fitted or changed arbitrarily.
- Do not overload the machine. Always use the proper equipment for the job.
After Using
- Always unplug the unit before making any checking or maintenance.
- Always follow the instructions provided for maintenance. Replace worn or damaged parts.
- Electric blower vac shall be repair by qualified personnel. For safety reasons, use only
original spare parts.
- Keep the electric blower vac clean and keep it always disconnected in a dry place, away
from direct sunlight and out of reach of children.
- Keep this manual carefully and consult it whenever you use the machine.
6
Page 8
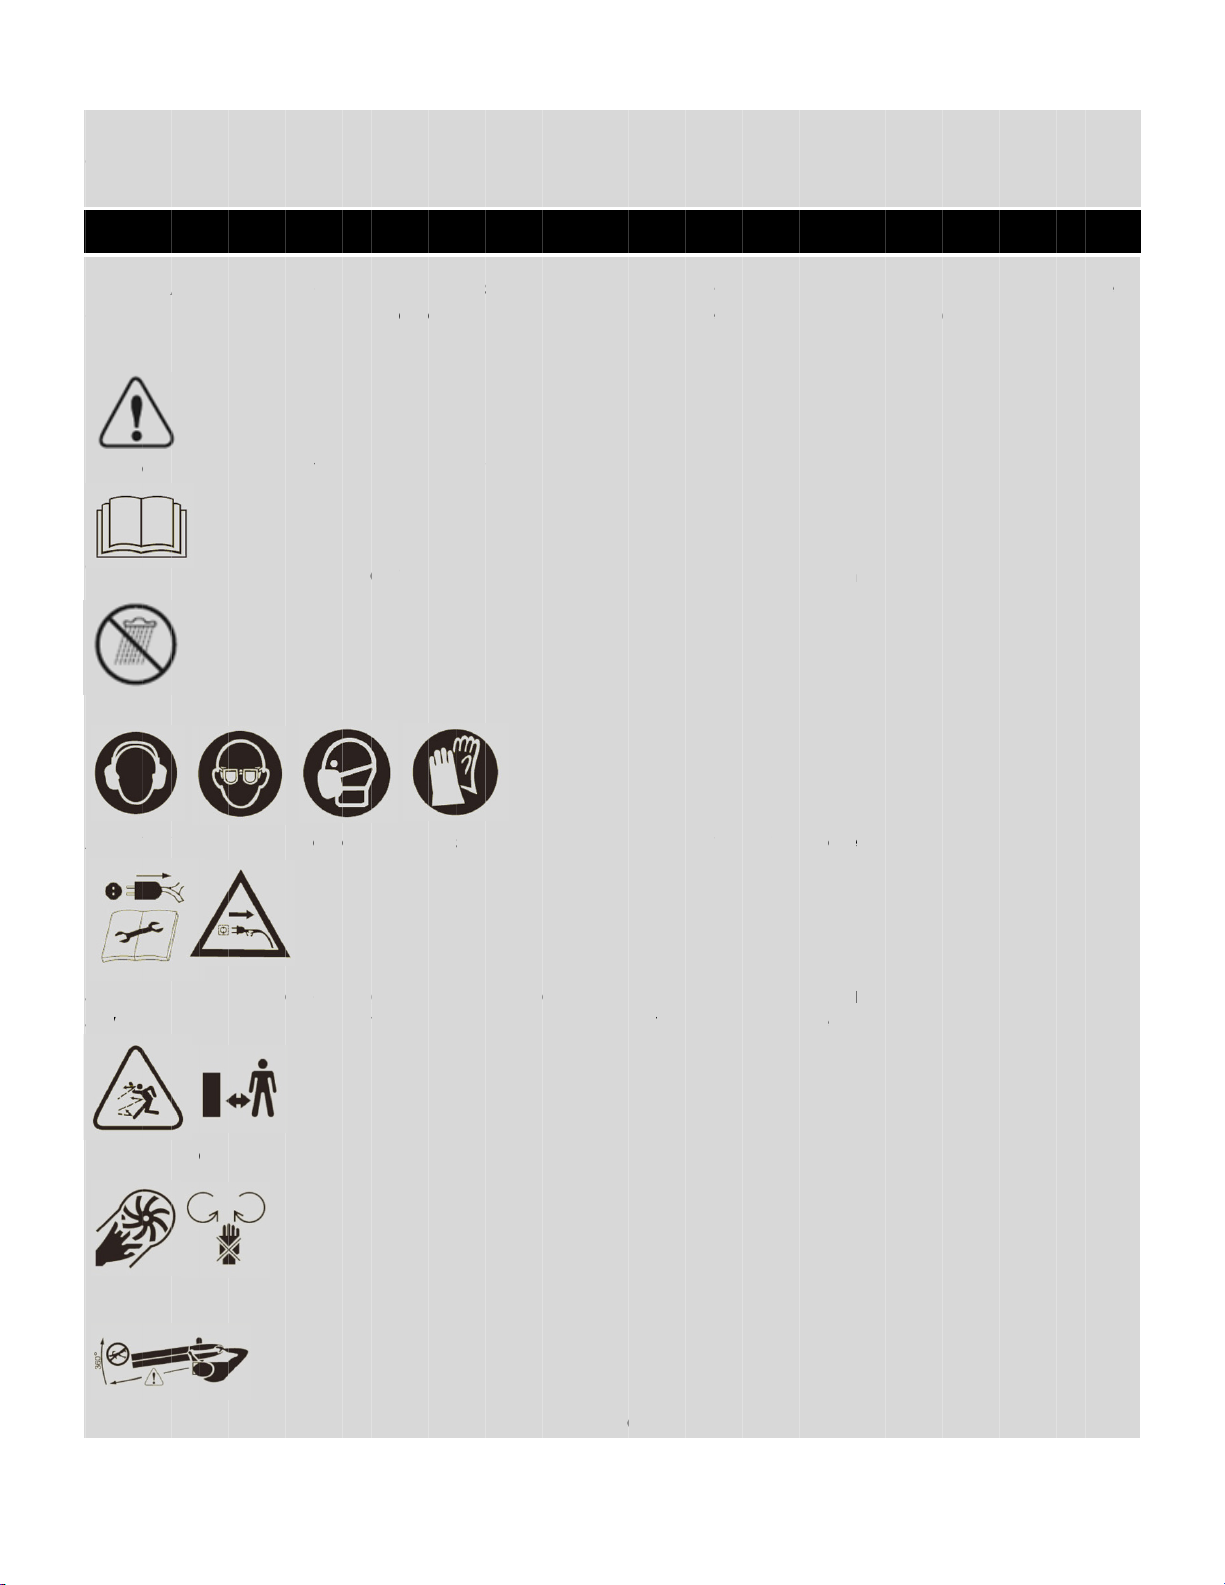
SYMBOL
IMPORTANT: Some of the following
and learn their meaning.
machine more effectively
Indicates danger, warning, or caution.
WARNING
Protect the machine from the
Always wear safety goggles,
SWITCH OFF: Remove plug
Switch off! Remove plug from the
Keep bystanders away
Keep hands out of the
Keep a safety distance
S
To reduce the risk of injury, user must read instruction manual.
openings while the tools is
of at least 5m
Proper interpretation of these symbols will allow you to use the
and reduce the risk of accident.
from
masks, ear muffs and
damp and never expose it to rain.
mains before cleaning or
symbols may be used on your tool. Be sure to study
mains immediately if the cable is
from
bystanders
running
protective gloves
maintenance
damaged or cut.
them
–
.
7
Page 9

SYMBOL
Conforms to relevant safety standards.
This class II symbol indicates that the product is correctly insulated.
Grounding this machine is therefore unnecessary.
WEEE symbol.
but in an environmentally friendly way. Please recycle where facilities exist. Check with your
local council authority for recycling advice.
Guaranteed sound power level (tested according to Directive 2000/14/EC as amended by
2005/88/EC)
S
Tools that are no longer usable
should not be disposed of with household waste
8
Page 10

2.
3.
4.
5.
6.
Fig. 1
DIAGRAM
PARTS LIST
(See Fig. 1)
1. ON/OFF SWITCH
MAIN HANDLE
AIR VENTS
POWER CORD WITH PLUG
CORD RETAINER
MODE LEVER FOR BLOW-VAC
7. OUTLET NOZZLE
9
Page 11

12.
PARTS LIST
(See Fig. 1 continued)
8. COLLECTION BAG
8a. COLLECTOR
8b. HANGING LOOP
9. HOOK
10. GUIDE WHEELS
11. NOZZLE
LOWER TUBE (LARGE)
13. LOWER TUBE (SMALL)
14. UPPER TUBE ASSEMBLY
15. FRONT HANDLE
16. CLIP
17. HARNESS
18. CROSSHEAD SCREW (4X55MM) (x1PC)
19. CROSSHEAD SCREW (4X45MM) (x1PC)
20. CROSSHEAD SCREW (4X20MM) (x1PC)
Remark: Above are all assembled in the standard delivery.
INTENDED USE
This product is not intended for use by persons (including children) with reduced physical,
sensory or mental capabilities, or lack of experience and knowledge, unless they have been
given supervision or instruction concerning use of the product by a person responsible for
their safety.
Children should be supervised to ensure that they do not play with the product.
This device is intended solely for blow or to collect the leaves in private gardens. Any other
use not expressly permitted in these instructions may result in damage and may pose a
serious hazard to the user and is not permitted.
In particular, the unit must never be used:
- On steep land;
- On a rainy day or in a humid environment;
- From intensively;
- For children under 16;
- For unaccompanied minors.
10
Page 12

ASSEMBLY
U
1. Unpack all parts and lay them on a flat, stable surface.
2. Remove all packing materials and shipping devices if applicable.
3. Make sure the delivery
parts are missing or show damage do
incomplete
4. Ensure that you have all th
also includes suitable personal
f
ASSEMBLY
U
npacking
1. Unpack all parts and lay them on a flat, stable surface.
2. Remove all packing materials and shipping devices if applicable.
3. Make sure the delivery
parts are missing or show damage do
incomplete
4. Ensure that you have all th
also includes suitable personal
f
WARNING!
is only partly assembled or assembled with damaged parts
Follow the assembly instructions step
guide to easily assemble the p
Do not connect the product to power supply before it is completely assembled
NOTE:
adjustments. Keep them secure to avoid loss.
NOTE
fixation threads on the tubes.
: Pay attention to the alignment of the
or damaged product represents a hazard to people and property.
Take care of small parts that are removed during assembly or when making
The product must be fully assembled before operation! Do not use a product that
Fig. 2
contents are complete and free of any
e accessories and tools needed for
protective equipment.
roduct
not use the
by
-
step and use the pictures provided as a visual
tubes. In particular observe the orientation of the
product but contact your
assembly and operation. This
damage. If you find that
store
. Using an
-
by
11
Page 13

ASSEMBLY
(See Fig. 2
1. Align the large (12) and small lower tube (13) to the upper tube assembly (14). First insert
the small lower tube (13) all the way to the stop. Then repeat the step with the large lower
tube (12). Secure the connection with the middle crosshead screw (1
tubes. (Fig.
2. Align the assembled tubes to the motor unit and insert them all the way to the stop. Secure
the tubes with the long crosshead screw (18) in the middle of both tubes. (Fig.
3. Attach the guide roller
screw (20). (Fig.
NOTE: Ensure that all screws are securely tightened with a suitable crosshead screwdriver.
4. Align the connector (8a) on the collection bag (8) with the
place. Attach the hanging loop (8b) to
WARNING! Once t
removed from the motor unit! Contact a qualified specialist in case the tube must be
disassembled, e.g. for removing blockages or replacing damaged tube parts!
WARNING! Always use the product with its collection bag
protect yourself against dashed
damaged collection bag or without one at all!
)
2
, detail A)
, detail C)
, detail C)
Fig. 3
he tube has been completely assembled it may not be disassembled or
(10) to the tubes. Fix the guide roller (10)
debris and to avoid injuries! Do not use this product with a
the hook (9).
(Fig. 3)
outlet
attached when operating it to
with the short crosshead
9) in the middle of both
nozzle (7) and insert it in
, detail B)
2
2
12
Page 14

ASSEMBLY
Connection to the
1. Double the cord back, about a foot from the end and lead the loop through the hole on
the motor unit. Pull it over the cord retainer (
firmly secured (Figs.
2. Ensure the on/off switch (5) is in its off position.
3. Connect the
4. Your product is now ready to be used.
ASSEMBLY
Connection to the
1. Double the cord back, about a foot from the end and lead the loop through the hole on
the motor unit. Pull it over the cord retainer (
firmly secured (Figs.
2. Ensure the on/off switch (5) is in its off position.
3. Connect the
4. Your product is now ready to be used.
WARNING! For your safety, it is required that the plug attached to this pr
connected to
Always use a residual current supply (RCD) protected supply!
WARNING! Check the voltage! The voltage must comply with the
label!
plug
the cord retainer.
P
).
of 10M cable
ower
S
upply
5
Fig. 4
) and gently tug on the cord to ensure that it is
5
information on the rating
oduct is always
4
.
13
Page 15

OPERATION
1. Check the product, its power cord and plug as well as accessories for damage before
each use. Do not use the product if it is damaged or shows wear.
2. Double check that accessories or application tools are properly fixed.
3. Always hold the product on its handle(s)/gripping surface(s).
Keep the handle(s)/gripping surface(s) dry and clean to ensure safe support.
4. Ensure that the air vents are always unobstructed and clear.
Clean them if necessary with a soft brush. Blocked air vents may lead to overheating and
damage the product.
5. Switch the product off immediately if you are disturbed while working by other people
entering the working area. Always let the product come to complete stop before putting it
down.
6. Do not overwork yourself. Take regular breaks to ensure you can concentrate on the work
and have full control over the product.
7. Before switching the product on, check whether it has been assembled correctly and all
the moving parts are running smoothly!
8. While working, ensure that the product does not strike hard objects, as this can cause
damage.
9. Do not blow any solid bodies such as stones, branches or pieces of branch, fir cones or
similar.
10. We recommend slightly dampening surfaces in dusty conditions or using a mister
attachment.
Harness
The harness (17) helps the operator carry the product.
1. Place the harness (17) so that is runs over the left shoulder, crossing the breast and the
back (Fig. 5).
2. Attach the harness (17) to the clip (16) on the upper side of the motor unit (Fig. 6).
Fig. 5 Fig. 6
14
Page 16

OPERATION
Harness (continued)
3. Open the buckle to quickly release the harness (17).
Operating M
the operating mode!
1.
2. Move the lever (6) to the
3. Move the lever (6) to the
4.
position!
On
1. Press the on/off switch (1) to turn the product on.
2. Release
OPERATION
Harness (continued)
3. Open the buckle to quickly release the harness (17).
Operating M
the operating mode!
1.
Select the operating mode by moving the mode lever (6) to the
2. Move the lever (6) to the
3. Move the lever (6) to the
4.
Always ensure that the lever is adjusted in either end positions.
position!
On
1. Press the on/off switch (1) to turn the product on.
2. Release
off
WARNING! Always use the
WARNING! Always turn the product off and let it come to a
witch
WARNING! The product will continue to work for some time even after the motor has been
switched off! Wait until it comes to a complete stop before putting the product down!
the on/off switch (1) to turn the product off.
ode
Fig.
7
proper
proper
product with the harness! Do not carry it only with your hands!
position to use the product
position to use the product
complete stop before changing
as a vacuum (Fig.
as a blower (Fig.
Fig.
respective symbol.
Do not use it in any other
7
).
).
8
8
/
S
15
Page 17

OPERATION
Blowing
1. Before blowing, loosen leaves that are stuck to the ground using a broom or rake.
2. Hold the tube approximately 10 cm above the ground and walk slowly forward using a
sweeping motion from side to side (Fig. 9)
Fig. 9
.
3. Direct the air stream away from yourself.
4. Ensure that you do not stir up any heavy objects and hurt somebody or damage
something.
Vacuum
1. Push the product in front of you. The guide rollers (10) make it easy to guide the tube along
the ground.
2. The leaves will be sucked up into the tube and thrown into the collection bag (8).
3. Make sure the volume of leaves sucked in at one time is not too large. This will avoid
clogging the tube and blocking the impeller wheel.
NOTE: Switch the product off and disconnect it from the power supply if it stops suddenly during
operation and does not produce any suction. Refer to the instructions below about removing
blockages and the “Troubleshooting” section.
Collection Bag
1. Always operate the product with the collection bag (8) attached.
2. Inspect the collection bag (8) each time before use. Do not use it if you detect any
damage.
3. Empty frequently during use. Do not wait until the collection bag (8) is completely full. We
recommend emptying it when it is half full
.
16
Page 18

OPERATION
Collection bag (continued)
NOTE: A full collection bag reduces the performance of this product.
4. Switch the product off and disconnect it from the power supply.
5. Open the collection bag (8) by its zipper and empty the clippings onto a compost heap.
6. Close the zipper before continuing operation.
17
Page 19

CLEANING AND MAINTENANCE
Keep the product clean. Remove debris from it after each use
Regular and proper cleaning will help ensure safe use and
Inspect the product before
find broken and worn parts.
General cleaning
1. Make sure the product is switched off, cooled down and
supply.
2. Clean the product with a slightly damp cloth and
hard to reach.
3. In particular clean the air vents (3) after every use with a cloth
4. Remove stubborn dirt with high pressure air (max. 3 bar).
5. Check for any damage and wear. Repair damages in accordance
manual or take it to an authoriz
C
1. Place the product on an even surface and remove the collection
of assembly.
2. Clean the collection bag (8) after operation by turning it inside
3. Replace the collection
4. Refit as described.
Removing blockages
1. Place the product on
of assembly.
2. Check the upper tube assembly (14) and lower tubes (12, 13)
the tubes (12, 13, 14) to loosen the
CLEANING AND MAINTENANCE
Keep the product clean. Remove debris from it after each use
Regular and proper cleaning will help ensure safe use and
Inspect the product before
find broken and worn parts.
General cleaning
1. Make sure the product is switched off, cooled down and
supply.
2. Clean the product with a slightly damp cloth and
hard to reach.
3. In particular clean the air vents (3) after every use with a cloth
4. Remove stubborn dirt with high pressure air (max. 3 bar).
5. Check for any damage and wear. Repair damages in accordance
manual or take it to an authoriz
C
ollection bag
1. Place the product on an even surface and remove the collection
of assembly.
2. Clean the collection bag (8) after operation by turning it inside
3. Replace the collection
4. Refit as described.
Removing blockages
1. Place the product on
of assembly.
2. Check the upper tube assembly (14) and lower tubes (12, 13)
the tubes (12, 13, 14) to loosen the
WARNING! Always switch the product off, disconnect it
product cool down before
NOTE: Do not use chemical, alkaline, abrasive or other
to clean this product
WARNING! Wear safety gloves when removing blockages!
Use proper tools to remove debris, e. g. a wooden stick!
Never use your bare hands!
an even surface and remove the collection
as they might be harmful to its surfaces.
bag with one of the same type if it is
each use for worn and damaged
performing inspection, maintenance and cleaning work!
ed service
blockage.
centre before using the
mild soap. Use
from the power supply and let the
aggressive detergents or disinfectants
prolong the life of the product.
disconnected from the power
parts. Do not operate it if you
disconnected from the power
and before storage.
damaged.
for blockages. Carefully tap
a brush for areas that are
and brush.
product again.
out and brushing it.
bag (8) in reverse order
bag (8) in reverse order
with this inst
ruction
18
Page 20

CLEANING AND MAINTENANCE
Removing blockages
3. Check the openings on the motor unit for blockages. Remove
tool or wooden stick if required.
Power cord
If the power cord is damaged, it must be replaced by the
similarly qualified persons in
UK plug
If you need to replace the fitted plug, then follow the instructions
IMPORTANT: The wires in the mains lead are coloured in
Blue
As the colours of the wire in the mains lead of this product may not
coloured marking identifying the terminals in
coloured blue, must
The wire, which is coloured brown, must be connected to the
coloured red.
Repa
This product does not contain any parts that can be repaired by
qualified specialist to have it checked and
– Neutral Brown
WARNING! Never connect live or neutral wires to the earth
Only fit an approved
If in doubt, consult a qualified electrician.
r
be connected to the terminal
Live
(continued)
13 Amp BS 1363 or BS 1363/A plug and the
order to avoid a safety hazard.
your plug, proceed as follows. The wire, which is
repaired.
, which is marked with N or coloured
accordance with the following code:
accordance with the following code:
manufacturer, its service
terminal of the plug.
terminal, which is marked L or
them with a suitable damp
below.
correctly rated fuse.
the consumer. Contact a
correspond with the
agent or
black.
–
i
19
Page 21

CLEANING AND MAINTENANCE
Storage
1. Clean the product as described above.
2. Store the product and its accessories in a dry, frost
3. Always store the product in a place that is inaccessible to
temperature is between 10 and 30°C.
4. We recommend using the original package for storage or
suitable cloth or enclosure to protect
Transportation
1. Switch the product off and disconnect it from power
anywhere.
2. Attach transportation guards, if applicable.
3. Always carry the product on its handles.
4. Protect the product from any heavy impact or strong vibrations
transportation in vehicles.
5. Secu
TECHNICAL DATA
Voltage
Power input
Rated no
Max. air volume
Max. air speed
Collection bag
Front handle v
Main handle vibration (under blower)
Front handle v
Main handle vibration (under vacuum)
Sound pressure level L
S
S
Guaranteed sound power level L
Protection class
Degree of protection
Machine weight
Voltage
Power input
Rated no
Max. air volume
Max. air speed
Collection bag
Front handle v
Main handle vibration (under blower)
Front handle v
Main handle vibration (under vacuum)
Sound pressure level L
S
ound power level L
S
ound power level L
Guaranteed sound power level L
Protection class
Degree of protection
Machine weight
re the product to prevent it from slipping or falling over.
-
load
load
power
ibration (under blower)
ibration (under vacuum)
speed
P
WA
WA
A
(blower)
(
vacuum
)
)
WA
it against dust.
-
free place.
supply
children. The ideal storage
covering the product with a
before transporting it
which may occur during
99.31dB(A) K=0.93dB(A)
98.48dB(A) K=1.66dB(A)
3.
3.734m/s
2.229m/s
2.219m/s
501
88dB(A)
2
m/s
2
0
160
-
240V~
15000
2
K=1.5m/s
2
K=1.5m/s
2
K=1.5m/s
2
K=1.5m/s
12m
-
270km/h
K=3dB(A)
100
2600
min
3
dB(A)
4.1
50
Hz
/min
40L
II
IP
X0
kg
W
-
1
2
2
2
2
20
Page 22

GURANTEE
1. This product has been manufactured to a high quality standard. It is guaranteed against
faulty materials and workmanship for warranted years from purchase, please retain your
till receipt as proof of purchase.
2. If the product is found to be defective within the relevant time period, we will either
replace all defective parts or, at our discretion, replace the unit free of charge with the
same item or items of a greater value and/or specification.
3. This guarantee does not cover defects caused by or resulting from:
• Misuse, abuse or neglect,
• Trade, professional or hire use,
• Repairs attempted by anyone other than our authorized repair centre (call 0345 077 8888);
4. In the unlikely event that this product does develop a fault please call the helpline on 0345
077 8888.
5. This guarantee does not affect your statutory rights.
21
Page 23

T
Suspected malfunctions are often due to causes that the users can
check the product using this section. In
WARNING! Only perform the steps described within these
maintenance and repair
similarly qualified spe
RECYCLING AND DISPOSAL
The product comes in a package that protects it against
package until you are sure that all parts
properly. Recycle
Old products are potentially recyclable under WEEE and do not,
ho
and protecting the
centre (if there is one available).
T
ROUBLESHOOTING
Suspected malfunctions are often due to causes that the users can
check the product using this section. In
WARNING! Only perform the steps described within these
maintenance and repair
similarly qualified spe
Problem
1.
2.
RECYCLING AND DISPOSAL
The product comes in a package that protects it against
package until you are sure that all parts
properly. Recycle
Old products are potentially recyclable under WEEE and do not,
ho
and protecting the
centre (if there is one available).
Product
does
not start
Product
does
not
reach
full
power
usehold rubbish. You are requested to
Possible Cause
1.1 Not connected to power supply
1.2 Power cord or plug is defective
1.3 Other electrical defect to the product
2.1 Power source (e.g. generator) has too
low voltage
2.2 Air
2.3 Collection bag full
2.4 Mode lever in incorrect position
the package afterwards.
environment by handing in this appliance at an equipped collection
cialist if you cannot solve the
vents are blocked
work
must be performed by an authoriz
most cases the problem can be solved quickly.
most cases the problem can be solved quickly.
have been delivered and the product is function
assist us and our contribution to saving resources
problem
damage
instructions! All further inspection,
yourself!
Solution
1.1 Connect to power supply
1.2
electrician
1.3 Check by a specialist
electrician
2.1 Connect to another power
source
2.2 Clean the air vents
2.3 Empty collection bag
2.4 Select different mode
ed ser
Check by a specialist
during shipping. Keep the
therefore, belong in your
fix themselves.
vice centre or
Therefore
a
22
Page 24

Page 25

 Loading...