


Ventris Dual Reverb User Guide
Welcome
Thank you for purchasing the Ventris Dual Reverb. This powerful stereo reverb pedal features over 12 meticulously crafted reverb engines, dual signal processors, full MIDI functionality, stereo inputs and outputs, external expression capabilities, and advanced effects editing and signal routing options via the Neuro Desktop and Mobile App Editors. The pedal features an exceptional collection of rich, spacious tones, including realistic analog reverbs like Spring and Plate, natural replications of large and small acoustic spaces, and an intriguing and highly musical selection of “unnatural” tones including Reverse, Swell and Shimmer.
The Ventris contains two completely independent reverb processors, essentially housing a matching pair of high-powered reverb pedals in a single box. Its dual reverb platform gives the pedal massive processing power as well as some additional features like unlimited Preset Spillover and the ability to combine two reverb effects with either parallel, cascading or independent channel signal routing.
The Quick Start guide will help you with the basics. For more in-depth information about the Ventris Reverb, move on to the following sections starting with Connections. Enjoy!
- The Source Audio Team
SA262 |
Ventris Dual Reverb Owner’s Manual |
1 |

Contents |
|
Welcome.................................................................................................................................................. |
1 |
Overview.................................................................................................................................................. |
3 |
Quick Start ............................................................................................................................................... |
5 |
Connections ............................................................................................................................................. |
7 |
Reverb Engines ...................................................................................................................................... |
10 |
Extended Reverb Engines ...................................................................................................................... |
18 |
Controls.................................................................................................................................................. |
20 |
Preset Storage and Recall ...................................................................................................................... |
26 |
Universal Bypass .................................................................................................................................... |
30 |
Stereo Operation & Signal Routing........................................................................................................ |
30 |
External Control..................................................................................................................................... |
43 |
Neuro Desktop and Mobile Editors ....................................................................................................... |
50 |
The Neuro Desktop Editor ..................................................................................................................... |
50 |
The Neuro Mobile App .......................................................................................................................... |
60 |
Neuro Hub.............................................................................................................................................. |
60 |
MIDI ....................................................................................................................................................... |
61 |
USB......................................................................................................................................................... |
62 |
Specifications......................................................................................................................................... |
62 |
Troubleshooting..................................................................................................................................... |
63 |
Frequently Asked Questions.................................................................................................................. |
64 |
Rubber Feet ........................................................................................................................................... |
65 |
Waste Disposal Notes ............................................................................................................................ |
65 |
Warranty................................................................................................................................................ |
65 |
Version History ...................................................................................................................................... |
67 |
SA262 |
Ventris Dual Reverb Owner’s Manual |
2 |

Overview
Over 20 Diverse Reverb Engines – Choose from vintage Spring, Plate, and Hall sounds, natural Room sounds, and unnatural Shimmer, Reverse, and Swell reverbs. 12 factory reverb engines are available out of the box with additional engines available via the Neuro Mobile App or Desktop Editor.
Flexible Stereo Routing – Ventris is equally at home in a mono or stereo rig. Every reverb effect engine works in True Stereo (stereo in > stereo out), Mono-to-Mono, Mono-to-Stereo, Mono-to- Mono plus dry signal to Output 2, and more. It is also possible to create an external effects loop.
Dual Reverb Processing – Features two completely independent reverb processors – essentially providing two high-powered reverb pedals in a single enclosure. Its dual reverb platform gives the pedal massive processing power as well as some highly advanced features like unlimited Preset Spillover and the ability to combine two reverb effects in either series or parallel.
Preset Spillover - Two individual signal processors make it possible to change from one preset to another without abruptly cutting off the reverb trail of the original preset. Seamless and unlimited “spillover” is an enormous advantage in live situations and there are no limitations to the duration of the transition. Note: Spillover is unavailable when changing between two dual reverb presets (A+B on the toggle switch).
Dual Reverb Presets (In Series or Parallel) - Select the A + B toggle switch position and create dual reverb effects, allowing you to simultaneously engage two different reverb effects with a parallel, cascaded, or left/right signal path.
Analog Dry Through – While engaged the incoming dry signal bypasses the effects processors entirely (for most engines), thereby maintaining a 100% pure dry signal without D/A conversions.
Universal Bypass – Select between true bypass, buffered bypass, or soft bypass with reverb trails. The Ventris features high-quality signal relays for true bypass and transparent buffers for analog bypass.
Compact Design – The extruded anodized aluminum housing, with its slim profile and small footprint, is built for the rigors of the road.
Presets – Save your favorite sounds with the touch of a button. Save up to 8 presets recallable with the pedal’s onboard controls, plus a total of 128 presets recallable with an external MIDI controller.
Deep Control Set – Beyond the six control knobs on the face of the Ventris are many additional, editable parameters. The Neuro Mobile App and Neuro Desktop Editor provide access to a vast collection of additional parameters for advanced users who want to create highly customized reverb effects.
Neuro Mobile App – The Neuro App is a free download for iOS and Android mobile devices. The App offers a powerful extension to the basic pedal functionality with a full set of deep editing parameters
SA262 |
Ventris Dual Reverb Owner’s Manual |
3 |

and additional reverb engines. Edit your presets and upload them directly to your pedal, save them in your private library of presets, or share them with the entire Neuro Community.
The Neuro Desktop Editor - Connect your Ventris Reverb to the USB port on your Mac or Windows
PC to create and save advanced presets with the Neuro Desktop’s sleek editing interface. The Neuro software is a free download for Mac or Windows based PCs. Two-way communication between the pedal and your computer also allows the Desktop Editor to see the parameter settings of every preset stored in your Ventris.
Interchangeable Effect Selector Engines – By default the Effect Selector knob features twelve onboard reverb engines, but our Neuro Mobile App and Desktop Editor provide a far deeper set of reverb engines and adjustable parameters for creating highly customized reverb effects. From the
Neuro Editor, it is easy to “burn” customized reverb engines directly to any position on the Effect
Selector knob.
Neuro Hub – The Source Audio Neuro Hub connects up to five compatible Source Audio pedals and stores the settings of multi-pedal “Scenes.” Up to 128 Scenes can be saved and recalled using the Neuro Hub, combining the power of a multi-effects system with the ease and flexibility of a traditional pedal board.
External Loop – Configure external loop mode to insert external effects within the Ventris’s signal chain.
Full MIDI Implementation – The Ventris’s parameters can be accessed and controlled using MIDI messages via its 5-pin DIN Input, a Neuro Hub connection, or USB port. Use MIDI messages to engage/disengage the pedal, change presets, move parameters with a MIDI expression controller, and more. Class compliant USB-MIDI allows the Ventris to work as a plug-and-play device with recording software running on Mac and Windows.
Assignable Footswitch – Use the Ventris’ second footswitch to control a variety of functions including Tap Tempo, Reverb Hold, and Preset Scrolling.
External Control – Easily configured the Ventris to work with a variety of expression pedals and footswitches for various external control options.
SA262 |
Ventris Dual Reverb Owner’s Manual |
4 |

Quick Start
Power
To power the unit, connect the included 9V DC power supply to the jack labeled DC 9V on the back panel.
Warning: Using a non-Source Audio supply, especially an unregulated supply, could damage the unit. A power supply with insufficient current levels may also cause noise or other unpredictable behavior. Please be very cautious when using 3rd-party power supplies and refer to the power supply requirements printed on the bottom of the Ventris housing.
Guitar/Audio Connections
Using standard ¼” mono cables, connect your guitar, bass, or other instrument to the INPUT 1 jack and your amp (or the next audio device in the signal chain) to the OUTPUT 1 jack. If you have a second amp, connect it to OUTPUT 2.
When the power and audio connections have been made, the Ventris is ready for use.
Brief Knob, Footswitch, and Button Descriptions
TIME: Controls the duration of the reverb. Turn the TIME knob counter-clockwise to shorten the circulation time of the reverb and clockwise to lengthen it. Setting the TIME knob fully clockwise will cause the reverb to circulate indefinitely.
SA262 |
Ventris Dual Reverb Owner’s Manual |
5 |

PRE-DELAY: Adjusts the amount of time between the dry signal and the beginning of the reverb. Turn the PRE-DELAY knob clockwise to create echo reflections similar to slapback or delay effects.
MIX: Controls the relative level between the dry input signal and the wet. When set at 3 o'clock, the wet and dry signals will be at equal volume. Fully counter-clockwise is 100% dry, and fully clockwise is 100% wet.
TREBLE: Controls the cut-off point of a low pass filter on the wet signal. Turn the knob clockwise for brighter reverb trails and counter-clockwise for darker trails.
CONTROL 1 & CONTROL 2: The functions of these knobs vary depending on the selected reverb engine. Check the Reverb Engines section of this manual for the parameter descriptions of each
CONTROL knob’s function.
ENGINE SELECTOR KNOB: Selects between the 12 main effect engines. To access the additional reverb engines, use the Neuro Mobile App or Desktop Editor.
ON/OFF FOOTSWITCH: Engages or bypasses the reverb effect. The corresponding ON/OFF LED will be lit when the reverb effect is engaged. In addition (while the pedal is engaged), pressing and holding the ON/OFF Footswitch scrolls to the next Preset.
OPTION FOOTSWITCH (FOOTSWITCH #2): This dual action footswitch comes preloaded with two independent control functions that vary depending on the selected engine. The footswitch responds to two actions: quickly tapping, or press & hold. Each of the two actions prompts a different function. See the Reverb Engines section for descriptions of each default control function. Option Footswitch commands include tap tempo for the Pre-Delay or modulation, Hold, Build, A/B reverb toggling, and more. It is also possible to program alternative control options with the Neuro App or Desktop Editor.
A/B REVERB SELECTOR TOGGLE SWITCH: Selects between reverbs A, B, or A+B. Save two independent reverb effects (one for each processor) in each of the Ventris’s 128 presets and use the
A/B Toggle Switch to select which is active. Selecting A + B will engage both reverbs simultaneously. Note: the initial engagement position of this switch can be saved as part of a preset. Go to the Editing and Saving Dual Engine Presets section for complete instructions on dual reverb presets.
PRESET SELECT/SAVE BUTTON: Scrolls through the four user presets (or eight in Preset Extension Mode) saved in the Ventris. To save a preset into the currently selected spot, press and hold this button.
AUTOMATIC STEREO DETECTION: The Ventris monitors its Input and Output connections and configures itself to the appropriate stereo routing mode. It is also possible to override this and choose a custom routing mode using the Neuro Editors.
SA262 |
Ventris Dual Reverb Owner’s Manual |
6 |

Connections
Input Side Connections
Input 1
INPUT 1 is the primary input for guitar, bass, or other instruments. It can also accept line-level inputs and will work in your amp’s effect loop. Connect it to your instrument or other audio source using a mono (TS) 1/4” cable. Details about the allowed signal levels are available in the Specifications section.
Input 2
INPUT 2 is the secondary audio input for stereo sources, external effects loop input, or as the data connection to your mobile device when using the Neuro App.
•Input 2 as an Audio Input: The tip contact on INPUT 2 acts as a secondary input for guitar, bass, or other instruments. Connect your instrument (or the previous effect in the signal chain) using a mono (TS) ¼” cable. The Ventris will automatically configure itself for stereo audio input. Other routing options are available using the Neuro App. For more information about stereo routing, refer to the Stereo Operation section.
•Input 2 as an External Loop Return: If the Ventris routing mode includes an external loop, OUTPUT 2 is the loop send and INPUT 2 is the loop return. Connect INPUT 2 to the output of the external effects loop using a mono (TS) ¼” cable.
•Input 2 as a Neuro App Data Input: The ring contact on INPUT 2 acts as a data connection for the Neuro Mobile App. The Neuro App sends data to the pedal using your mobile device’s headphone jack. Connect it to your mobile device using the included stereo (TRS) 1/8” to 1/4” cable. It can also accept daisy-chained Neuro data from another Neuro-compatible pedal in the chain, provided that a TRS cable is used. The audio signal (if applicable) will be on the tip contact
SA262 |
Ventris Dual Reverb Owner’s Manual |
7 |

of the plug, and the Neuro App data will be on the ring contact. This allows audio and Neuro data to flow on the same cable.
MIDI Input
This is a standard 5-pin DIN connector that accepts MIDI control messages from external devices, including program change (PC) and continuous controller (CC) messages. Please email contact@sourceaudio.net regarding any questions about the Ventris Dual Reverb’s MIDI implementation.
Output Side Connections
Output 1
This is the primary audio output. Connect it to your amplifier, recording interface, or the next device in your effects signal chain using a mono (TS) ¼” cable.
Output 2
OUTPUT 2 can act either as an audio output, external loop output, or as the daisy-chain data connection for the Neuro App.
•Output 2 as an Audio Output: The tip contact on OUTPUT 2 acts as the secondary audio output. It carries an audio signal when the Ventris is configured with a signal routing that uses stereo outputs. Connect it to your amplifier, recording interface, or the next device in your effects signal chain using a mono (TS) ¼” cable.
•Output 2 as an External Loop Send: If the Ventris is configured in a routing mode that includes an external loop, OUTPUT 2 is the loop send and INPUT 2 is the loop return. Connect OUTPUT 2 to the input of the external effects loop using a mono (TS) ¼” cable.
•Output 2 as a Neuro App Data Daisy-Chain Output: The ring contact on OUTPUT 2 acts as a data connection for the Neuro App, passing data from the Ventris to the next Source Audio effect in your signal chain. You can daisy-chain the Neuro App data regardless of whether OUTPUT 2 is configured to output audio or not. Connect OUTPUT 2 to the next device’s Neuro App Data input (usually INPUT 2) using a stereo (TRS) 1/4” cable. The audio signal (if applicable) will be on the tip
SA262 |
Ventris Dual Reverb Owner’s Manual |
8 |

contact of the plug, and the Neuro App data will be on the ring contact. This allows audio and Neuro data to flow on the same cable.
MIDI Thru
This is a standard 5-pin DIN connector that echoes MIDI messages from the MIDI INPUT jack and sends them to other devices. The Ventris does not generate any of its own MIDI data, but it will copy and output any data it receives.
Power and Control Connections
DC 9V (Power)
Connect to the included 9 Volt DC power supply. If you would like to use a 3rd-party supply, the power supply must be regulated at 9 Volts DC (direct current), able to source at least 280 mA (milliamps) of current, and the plug should have a tip-negative, barrel-positive polarity.
USB
Connect to your computer (Mac or Windows) to the Ventris’s USB port (denoted by the icon) using a standard mini USB cable. The Ventris is a class compliant USB device, meaning that it does not require any custom drivers. For more information about the Ventris’s USB capabilities, refer to the
USB Section of the User’s Guide.
Control Input
The 3.5 mm CONTROL INPUT port connects to external control devices such as the Source Audio Tap Tempo Switch, Source Audio Dual Expression Pedal, Reflex Universal Expression Pedal, Neuro Hub, and Hot Hand Motion Controller. For more information, refer to the Expression Pedal Input, Hot Hand Input, and Neuro Hub sections of the User’s Guide.
Expression/Switch Pedal Input
The PEDAL IN jack on the back panel connects to either an external passive expression pedal or footswitch. The PEDAL IN SWITCH allows the user to select which type of external controller is being used. Set to EXP for expression control or SWITCH for footswitch control. See the External Control
SA262 |
Ventris Dual Reverb Owner’s Manual |
9 |
section for details.
Reverb Engines
The Ventris includes twelve onboard reverb effect engines, with additional engines available via the Neuro Mobile App or the Neuro Desktop Editor. Because of the wide tonal possibilities of each reverb engine in the Ventris Dual Reverb, it was necessary to arm the pedal with two variable knobs labeled CONTROL 1 and CONTROL 2. When a new reverb engine is selected, two engine specific parameters are automatically assigned to the CONTROL knobs.
The OPTION Footswitch also performs different functions depending on the selected engine. The footswitch responds to two types contact: quickly tapping the switch, or pressing and holding the switch. Each of the two contact types prompts a different function.
Below are descriptions of each reverb engine and how the CONTROL knobs and OPTION footswitch are configured respectively. Please note that it is possible to reassign different parameters to the CONTROL knobs and functions to the OPTION footswitch. Go to the Neuro Sound Editor section for details on the alternate functions for the CONTROL knobs and OPTION footswitch.
ROOM (0)
The ROOM engines capture the ambient reverberations of a real acoustic space. In contrast with the E-DOME engine (which offers a massive, arena-sized reverb) the ROOM engine can summon a variety of room sizes from a warm and intimate household room to a larger theatre sized space. Use the TIME, PRE-DELAY, and MIX knobs to alter the size and feel of your room.
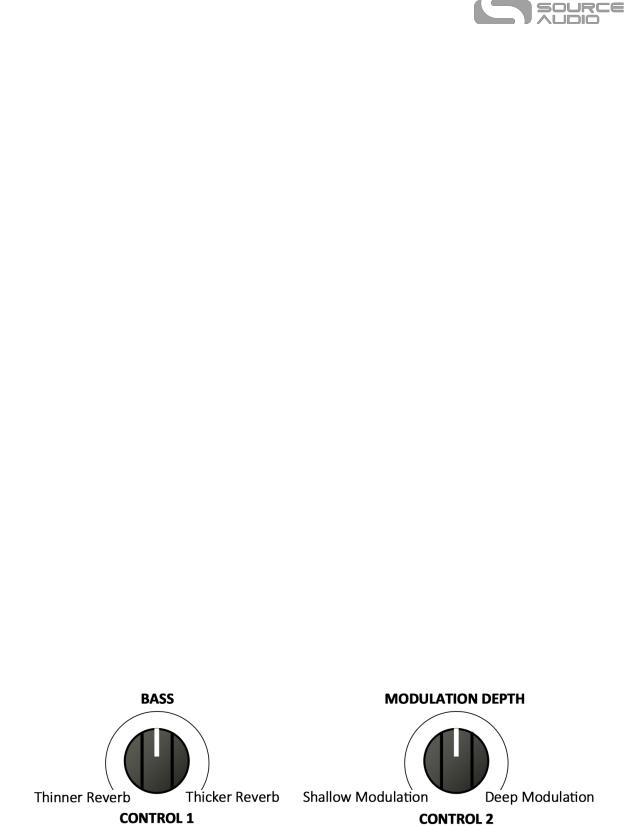
CONTROL 1: Bass – Adjusts the level of the low-end frequencies on the wet signal. Turn the knob counter clockwise for a lighter reverb or clockwise for thicker, more bass-heavy sound.
CONTROL 2: Mod Depth – Adds a pitch modulation to the wet signal. Turn the knob fully counter-clockwise for zero modulation and clockwise to gradually increase the pitch depth. Note: The rate of the modulation can be adjusted with the RATE control in the Neuro Editor, or by tapping the OPTION footswitch when it is assigned to Modulation Rate.
OPTION FOOTSWITCH (TAPPING): Modulation Rate – Works like a traditional tap tempo switch applied to the wet signal’s pitch modulation rate, meaning that tapping the OPTION footswitch in time with the band syncs the pedal’s pitch modulation rate to the music. Note: you must tap
SA262 |
Ventris Dual Reverb Owner’s Manual |
10 |
the switch a minimum of two times for the Ventris to change its modulation rate.
OPTION FOOTSWITCH (PRESS & HOLD): Reverb Hold – Sustains the reverb trail until the OPTION footswitch is released. This is a great way to sustain a chord and create a “pad,” as it is called in certain circles. While engaging the HOLD function, it is still possible to play on top of the sustained reverb trail with the reverb from the second processor (A or B) applied to the dry signal. Check the Neuro Sound Editor section for alternative HOLD configurations.
HALL (1)
Patterned after the lush sounds of studio rack units from the 80s, the Hall L engine is distinguished by its highly diffuse tones and glorious blooming characteristic. The Source Audio engineering time invested massive research time in perfectly capturing the complex sounds of these powerful effects units. It should be noted that though we place this grand effect engine among the classic reverbs, it has little resemblance to reverberations found in the natural or analog world, rather the Hall L replicates the extravagant wash of sound popular during the first wave of ambient music recordings.
CONTROL 1: Bass – See the description in the ROOM engine section.
CONTROL 2: Hall Size – Select between 5 different hall sizes. Turn the knob counter-clockwise for smaller, tighter hall sounds and clockwise to grander reverberations. Please note that this knob does not gradually increase the size of the hall, rather the knob is split into five regions. As you turn the knob you may hear the transition points where a new hall size is engaged.
OPTION FOOTSWITCH (TAPPING): Set Pre-Delay Time – Works like a traditional tap tempo switch on a delay pedal. Pre-Delay Time is the amount of time between the dry signal and the first wave of reverb reflections (sort of like moving the time of an echo). So tapping the OPTION footswitch in time with the band syncs the echo effect to the beat of the music. Note: you must tap the switch a minimum of two times for the pedal to change the Pre-Delay Time.
OPTION FOOTSWITCH (PRESS & HOLD): Reverb Hold – See the description in the ROOM engine section.
E-DOME (2)
The cavernous E-DOME (a.k.a. “Enormo-Dome”) produces long, lush reverb trails that linger for days. Invoke the sound of massive, arena settings with the Ventris Reverb’s largest room simulation. This one is huuuuge.
SA262 |
Ventris Dual Reverb Owner’s Manual |
11 |

CONTROL 1: Bass – See the description in the ROOM engine section.
CONTROL 2: Mod Depth – See the description in the ROOM engine section
OPTION FOOTSWITCH (TAPPING): Modulation Rate – See the description in the ROOM engine section.
OPTION FOOTSWITCH (PRESS & HOLD): Reverb Hold – See the description in the ROOM engine section.
TRUE SPRING (3)
Source Audio’s Chief Scientist, Bob Chidlaw, worked long and hard to perfectly capture the sweet idiosyncrasies of a vintage spring reverb tank. The result is an exceptionally realistic effect with the unmistakable “drip” heard in vintage spring reverb equipped amplifiers.
CONTROL 1: Bass – Find the description in the ROOM engine section.
CONTROL 2: Spring Length – selects between three different virtual spring lengths. The longer the springs in a reverb tank the more distinguishable the “echo” effect becomes as the incoming signal travels back and forth across the length of the springs. Please note that this knob does not gradually increase the size of the springs, rather the knob is split into three regions. As you turn the knob you may hear the transition points when a new spring length is engaged.
OPTION FOOTSWITCH (TAPPING): Set Pre-Delay Time – See the description in the HALL L engine section.
OPTION FOOTSWITCH (PRESS & HOLD): Reverb Hold – See the description in the ROOM engine section.
SA262 |
Ventris Dual Reverb Owner’s Manual |
12 |
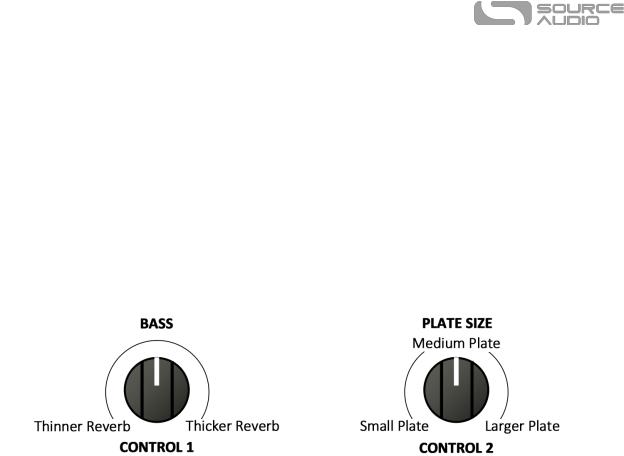
PLATE (4)
This authentic sounding reverb engine is a spot-on simulation of the highly diffuse effect synonymous with vintage plate reverb units of the 50s and 60s. Like the True Spring engine, Bob Chidlaw was relentless in crafting the perfect emulation of this beautiful and distinct sound. The critical component of a plate reverb is a large plate of suspended sheet metal. Blasting audio into the face of the sheet metal creates the beautifully lush and resonant tones found in countless classic recordings.
CONTROL 1: Bass – Find the description in the ROOM engine section.
CONTROL 2: Plate Size – Selects between three different plate sized: Small, Medium and Large. In general, as the plate size gets larger the reverberations will sustain longer and develop varying characteristics in the decay. Please note that this knob does not gradually increase the size of the plate, rather the knob is split into three regions. As you turn the knob you may hear the transition points when a new plate size is engaged.
OPTION FOOTSWITCH (TAPPING): Set Pre-Delay Time – See the description in the HALL L engine section.
OPTION FOOTSWITCH (PRESS & HOLD): Reverb Hold – See the description in the ROOM engine section.
LO-FI (5)
This reverb effect turns the lush and grandiose effect of reverb on its head and embraces destructive elements like distortion and oversaturation. Turn up the ugly and create unique effects that add a layer of nastiness to your sound.
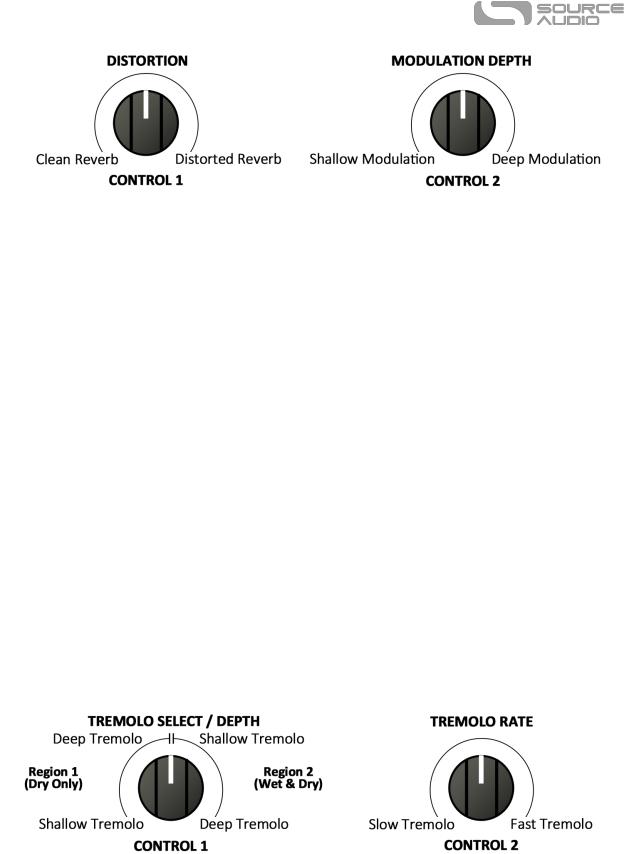
CONTROL 1: Distortion – Adjusts the amount of grit on the wet signal. Turn this knob clockwise to increase the amount of overdrive/fuzz added to the reverb tone. At the far right positions this knob begins to summon the qualities of a fuzz pedal.
CONTROL 2: Mod Noise Depth – Adjust the amount of sporadic modulation applied to the wet signal. Unlike the smooth and even Modulation found on many of the Ventris’s reverb engines, the Mod Noise Depth knob adds an irregular, non-symmetric pitch modulation. This style of modulation resembles the sound of a vintage tape delay that is possibly in need of repair.
SA262 |
Ventris Dual Reverb Owner’s Manual |
13 |
OPTION FOOTSWITCH (TAPPING): Modulation Rate – See the description in the ROOM engine section.
OPTION FOOTSWITCH (PRESS & HOLD): Oscillate – Unlike the normal Hold function that creates a constant reverb loop that doesn’t change in volume or tone, the Oscillate function continuously routes the reverb signal back through the processor creating a sound that builds in intensity for a dramatic self-oscillation effect.
MODVERB (6)
This marvelously animated reverb engine perfectly captures the sound of tremolo and spring reverb hardware found in many vintage guitar amplifiers. But unlike those vintage amps, the Modverb engine can change the order of the signal path. Use the CONTROL 1 knob to choose between inserting the tremolo circuit before or after the spring reverb tank. It is also possible with the Neuro Editor to apply a tremolo effect to only the wet signal and leave your dry signal unaffected.
CONTROL 1: 10 Tremolo Select/Depth – Adjusts the depth of the tremolo effect and selects between two available reverb/tremolo signal paths. The knob is split into two regions. To the left of 12 o’clock, turning the knob clockwise increases the depth of a tremolo circuit placed prior to the reverb tank in the signal chain. To the right of 12 o’clock, turning the knob clockwise increases the depth of a tremolo circuit placed after the reverb tank in the signal chain, essentially applying a tremolo effect to the entire output signal. Please note that as you turn the knob you may hear the transition point when the knob passes the 12 o’clock position and changes regions.
CONTROL 2: Tremolo Rate – Adjusts the speed (or rate) of the tremolo effect. Turn the knob clockwise to increase the rate of the tremolo.
OPTION FOOTSWITCH (TAPPING): Tremolo Rate – Functions like a traditional tap tempo switch to set the speed of the tremolo effect. Tapping the OPTION footswitch in time with the band will
SA262 |
Ventris Dual Reverb Owner’s Manual |
14 |
sync the tremolo to the music. Note: you must tap the switch a minimum of two times for the pedal to change the tremolo rate.
OPTION FOOTSWITCH (PRESS & HOLD): Reverb Hold – See the description in the ROOM engine section.
SHIMMER (7)
This pitch shifting reverb engine mixes traditional room sounds with octave-up reflections for an angelic reverb effect. Connect the Shimmer engine to the Neuro Desktop Editor and swap the octave-up for variety of additional pitch intervals.
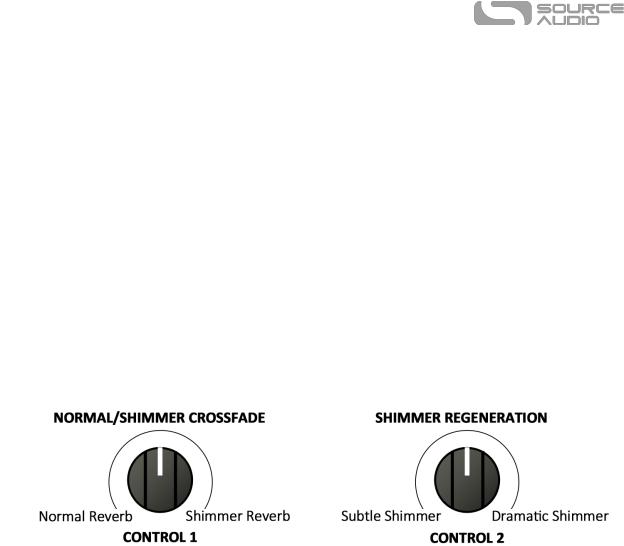
CONTROL 1: Normal/Shimmer Crossfade – Controls the mix ratio between the normal reverb effect and the pitch shifting reverb reflections. Turn the knob clockwise to gradually increase the pitch shifting reverb and decrease the normal reverb in the wet mix.
CONTROL 2: Shimmer Regeneration – Increases the amount of Shimmer signal that is fed back into the reverb processor. To the listener, the Shimmer effect becomes more pronounced as this knob is turned clockwise.
OPTION FOOTSWITCH (TAPPING): Modulation Rate – See the description in the ROOM engine section.
OPTION FOOTSWITCH (PRESS & HOLD): Pitch Ramp Down – Functions similar to the HOLD function except that as you press and hold the footswitch the Shimmer effect will slowly slip downward in pitch. It can be quite a haunting effect. Note: with the Neuro Editor it is also possible to send this pitch shift in an upward direction. Expert Tip: Try creating an A+B dual Shimmer preset with the OPTION footswitch on Reverb A set to a Pitch Ramp Down and Reverb B set to Pitch Ramp Up. Holding the OPTION footswitch yields a very interesting up/down pitch event. See the Neuro Sound Editor for instructions on reassigning the function of the OPTION Footswitch.
ECHOVERB (8)
This ambient combination of delay and reverb provides a sprawling echo effect with huge, reverberating repeats. The EchoVerb engine can also act as a classic delay pedal by turning the Delay/Reverb Crossfade knob to the full counter-clockwise position, thereby isolating the delay effect. The Echoverb engine has a maximum delay time of 2 seconds.
SA262 |
Ventris Dual Reverb Owner’s Manual |
15 |

CONTROL 1: Delay Feedback – Controls the amount of delay signal that is fed back into the delay effect, thereby increasing the number of repeats. At the full counter-clockwise position the effect will generate a single delay repeat - as the knob is turned clockwise the repeats increase.
CONTROL 2: Delay/Reverb Crossfade – Adjusts the mix ratio between the delay and reverb signals. Set this knob to the full counter-clockwise position to hear only the delay effect. Turn the knob clockwise to gradually increase the reverb signal and decrease the delay signal in the wet mix. It is important to note that even when the CONTROL 2 is turned fully clockwise and only the reverb is audible, the reverb is still responding to the inaudible delay signal, which comes before it in the signal chain.
OPTION FOOTSWITCH (TAPPING): Delay Time – Functions similar to a traditional tap tempo switch on a delay pedal - tapping the OPTION footswitch in time with the band will sync the repeats to the beat of the music. Note: you must tap the switch a minimum of two times before the pedal changes the Delay Time.
OPTION FOOTSWITCH (PRESS & HOLD): Delay Hold – Creates a constant loop of the delay signal. While holding down the OPTION Footswitch the delay signal will continuously circulate without any changes in volume or tone.
SWELL (9)
Creates smooth, amorphous volume swells. This engine applies a volume swell effect to your instrument’s dry signal, which is then fed into the reverb effect for super-long and ambient clouds of sound. This effect is great for creating soft, atmospheric chord pads. The Swell engine also sounds fantastic when it is placed first in a dual reverb preset set to Series Mode (A+B on the A/B Reverb Toggle Switch).
CONTROL 1: Envelope Gain – Controls the sensitivity of the envelope follower. Turn this knob down if you have low impedance pickups or you want to dig in with some hard picking, turn it up for high impedance pickups or soft picking.
CONTROL 2: Swell Time – Adjust the speed of the volume swell. Turn the control counterclockwise for quicker swells and clockwise for a longer, smooth effect.
SA262 |
Ventris Dual Reverb Owner’s Manual |
16 |

OPTION FOOTSWITCH (TAPPING): Modulation Rate – See the description in the ROOM engine section.
OPTION FOOTSWITCH (PRESS & HOLD): Reverb Hold – See the description in the ROOM engine section.
OFFSPRING (10)
Nothing else sounds like the Offspring reverb. This unique and dramatic effect falls somewhere between the sound of an angel’s harp and a retro-futuristic sci-fi soundtrack. In truth the Offspring engine uses all-pass filters to extract cascading frequency bands, creating an effect similar to an arpeggiator. It appears complicated, but it is really quite musical and sounds very nice with a variety of different playing styles.
CONTROL 1: Bass – Find the description in the ROOM engine section.
CONTROL 2: Modulation Depth – See the description in the ROOM engine section.
OPTION FOOTSWITCH (TAPPING): Repeat Time – Functions like a traditional tap tempo switch applied to the Offspring’s unique style of repeats.
OPTION FOOTSWITCH (PRESS & HOLD): Reverb Hold – See the description in the ROOM engine section.
REVERSE (11)
Create chilling and dramatic backwards effects with this haunting reverb engine. Set the MIX knob to 100% wet for a menacing sound surge or mix it with the dry signal for an unnerving shadow effect.
CONTROL 1: Diffusion – Use this knob to smooth (or “smear”) the surging reverse effect.
Turning the knob fully clockwise produces a smooth reverse effect, while turning the knob in the
SA262 |
Ventris Dual Reverb Owner’s Manual |
17 |
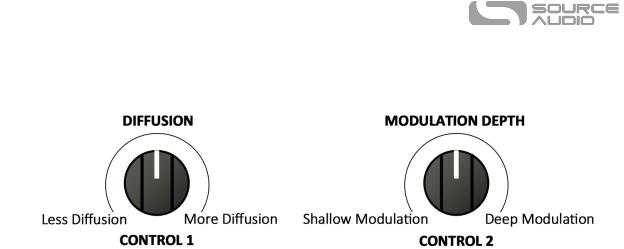
counter-clockwise direction creates an interesting granular effect with distinct attack transients.
CONTROL 2: Mod Depth – Find the description in the ROOM engine section.
OPTION FOOTSWITCH (TAPPING): Rise Time & Modulation Rate – Functions like a traditional tap tempo switch applied to the length of time it takes for the reverse effect to reach its point of attack and the rate of the pitch modulation.
OPTION FOOTSWITCH (PRESS & HOLD): Reverb Hold – See the description in the ROOM engine section.
Extended Reverb Engines
On top of the twelve reverb engines available on the front panel, the Neuro Mobile App and Desktop Editor include a dynamic collection of additional reverb engines. These engines offer a variety of tonal options and can be used to overwrite the default engines on the effect dial or stored as user presets. The following reverb engines are available in the Neuro Desktop Editor or Mobile App:
OUTBOARD SPRING (12)
Like the True Spring engine, Outboard Spring replicates the sound of a classic spring reverb. But Outboard Spring was inspired by the sound of intensely crafted outboard spring tanks, like the Fender 6G15 or the more contemporary SurfyBear Reverb. The most notable characteristic of outboard spring units is their intense “drip,” a distinct drippy sound heard in the early reflections of the physical springs. It is a sound sought after by surf rock guitarists from coast to coast.
CONTROL 1: Bass – Find the description in the ROOM engine section.
CONTROL 2: Drive (a.k.a. “Dwell”) – Increases the intensity at which the dry signal hits the virtual springs. Increasing the Drive causes the springs to reverberate a bit more dramatically and also intensifies the “drip.”
SA262 |
Ventris Dual Reverb Owner’s Manual |
18 |

OPTION FOOTSWITCH (TAPPING): Pre-Delay Time – Functions like a traditional tap tempo switch applied to the Pre-Delay Time, essentially creating a time synced echo effect.
OPTION FOOTSWITCH (PRESS & HOLD): Reverb Hold – See the description in the ROOM engine section.
METAL BOX (13)
Direct from the mind of Bob Chidlaw (Source Audio’s Chief Scientist of Sound), the Metal Box captures the reverberations of a very small space with extremely reflective walls – imagine your guitar amp in a metal cargo-shipping container. It’s wild to imagine, ever wilder to hear. Turn up the Modulation and turn down the reverb Time to create an interesting chorus effect.
CONTROL 1: Bass – Adjusts the level of the low-end frequencies on the wet signal. Turn the knob counter clockwise for a lighter reverb or clockwise for thicker, more bass-heavy sound.
CONTROL 2: Mod Depth – Adds a pitch modulation to the wet signal. Turn the knob fully counter-clockwise for zero modulation and clockwise to gradually increase the pitch depth. Note: The rate of the modulation can be adjusted with the RATE control in the Neuro Editor, or by tapping the OPTION footswitch when it is assigned to Modulation Rate.
OPTION FOOTSWITCH (TAPPING): Pre-Delay Time – Functions like a traditional tap tempo switch applied to the Pre-Delay Time, essentially creating a time synced echo effect.
OPTION FOOTSWITCH (PRESS & HOLD): Reverb Hold – Sustains the reverb trail until the OPTION footswitch is released.
SA262 |
Ventris Dual Reverb Owner’s Manual |
19 |

Controls
Time Knob
Sets the sustain time of the reverb trail. Turning the TIME knob to the fully clockwise position causes the reverb trail to sustain infinitely. However, unlike the HOLD function (which creates a steady reverb loop), setting the TIME knob set to infinite sustain will create a degenerating effect over time as the reverb continues to circulate and receive additional dry signal. The results can be a bit cacophonous, but it will create a very interesting effect.
Mix Knob
Sets the relative levels of dry signal and wet reverb signal. Fully counter-clockwise is 100% dry, fully clockwise is 100% wet. Roughly 3 o’clock on the MIX knob is where a 50/50 split between wet and dry occurs. Please note that Kill Dry Mode is also available as a global option (see Kill Dry Mode in the Neuro Hardware Options section of this manual).
50% Wet
100% Dry 100% Wet
50% Dry
Dry  Wet
Wet
Wet  Dry
Dry
SA262 |
Ventris Dual Reverb Owner’s Manual |
20 |
Please note that when the A/B Reverb Toggle Switch is set to the A+B position, the function of MIX and CONTROL 1 & 2 change. In A+B mode the CONTROL 1 knob adjusts the wet level of reverb A, CONTROL 2 adjusts the wet level of reverb B, and the MIX knobs adjusts the level of the dry signal.
Using the Mix Knob to Set Master Output Level
The overall output volume level is adjustable on the pedal hardware without needing to use Neuro Editing Software or MIDI. Press and hold the CONTROL INPUT button and then turn the MIX knob to set the master output level, which affects both the wet signal and the dry signal. A maximum of +6 dB of boost is possible. The following figure shows the range of output gains, in decibels (blue) and linear (red). Note that when the output level is adjusted, it will be maintained while changing effect engines using the effect dial. Loading a user preset will override the level set by the MIX knob.
|
0 dB |
|
1.0 |
-6 dB |
+3.5 dB |
0.5 |
1.5 |
-∞ dB |
+6 dB |
0 |
2.0 |
Pre-Delay Knob
Sets the amount of time between the dry signal and the initial reverb reflections. As the PRE-DELAY knob is turned clockwise the pre-delay time increases creating a sound similar to a natural echo or
“slapback” effect.
Treble Knob
Controls the amount of high frequency damping applied to the wet signal. Turn the knob clockwise for a brighter reverb trail and counter-clockwise for a darker reverb.
Control 1 and Control 2
Because of the wide tonal possibilities of each reverb engine in the Ventris Dual Reverb, it was necessary to arm the pedal with two “wildcard” knobs labeled CONTROL 1 and CONTROL 2. The function of the CONTROL knobs varies depending on the active reverb engine. Details on the function of each knob are available in the Reverb Engines section of this manual. It is also possible to assign alternate parameters to the CONTROL 1 & 2 knobs. CONTROL knob reassignments can be saved to individual presets or to any of the engines on the EFFECT SELECTOR knob. Go to the Neuro Sound Editor section for details on assigning alternate CONTROL knob parameters.
Please note that when the A/B Reverb Toggle Switch is set to the A+B position, both Reverbs A and B are running simultaneously and the function of the MIX and CONTROL 1 & 2 knobs change. When running the reverbs in Parallel, CONTROL 1 sets the wet level of Reverb A, CONTROL 2 sets the wet level of Reverb B, and MIX sets the level of the dry signal. When running the reverbs in Series (a.k.a. “Cascade”), CONTROL 1 sets the wet/dry mix of Reverb A, CONTROL 2 sets the wet/dry mix of Reverb B, and MIX sets the level of the dry signal. See the Editing and Saving Dual Engine Presets section for complete instructions on dual reverb presets.
SA262 |
Ventris Dual Reverb Owner’s Manual |
21 |
 Loading...