

Page 1

WARRANTY INFORMATION
Source Audio may, at its option, require proof of the original purchase date in the form
of a dated copy of original authorized dealer’s invoice or sales receipt. Service and
repairs of Source Audio products are to be performed only at the Source Audio factory
or a Source Audio authorized service center. Prior to service or repair under this Limited
Warranty, the purchaser must request from Source Audio a return authorization, which
is available at:
Source Audio LLC
120 Cummings Park, Woburn, MA 01801
(781) 932-8080 or at www.sourceaudio.net.
Unauthorized service, repair, or modification will void this Limited Warranty.
DISCLAIMER AND LIMITATION OF WARRANTY
DO NOT OPEN THE EFFECTS PEDAL UNDER ANY CIRCUMSTANCE. THIS WILL VOID THE WARRANTY.
THE FOREGOING LIMITED WARRANTY IS THE ONLY WARRANTY GIVEN BY SOURCE AUDIO AND IS
IN LIEU OF ALL OTHER WARRANTIES. ALL IMPLIED WARRANTIES, INCLUDING WARRANTIES OF
MERCHANTABILITY AND FITNESS FOR ANY PARTICULAR PURPOSE, EXCEEDING THE SPECIFIC PROVISIONS OF THIS LIMITED WARRANTY ARE HEREBY DISCLAIMED AND EXCLUDED FROM THIS LIMITED
WARRANTY. UPON EXPIRATION OF THE APPLICABLE EXPRESS WARRANTY PERIOD, SOURCE AUDIO
SHALL HAVE NO FURTHER WARRANTY OBLIGATION OF ANY KIND, EXPRESS OR IMPLIED. SOURCE
AUDIO SHALL IN NO EVENT BE LIABLE FOR ANY SPECIAL, INCIDENTAL OR CONSEQUENTIAL DAMAGES
SUFFERED BY THE PURCHASER OR ANY THIRD PARTY, INCLUDING WITHOUT LIMITATION, DAMAGES
FOR LOSS OF PROFITS OR BUSINESS OR DAMAGES RESULTING FROM USE OR PERFORMANCE OF
THE PRODUCT, WHETHER IN CONTRACT OR IN TORT. SOURCE AUDIO SHALL NOT BE LIABLE FOR ANY
EXPENSES, CLAIMS OR SUITS ARISING OUT OF OR RELATING TO ANY OF THE FOREGOING. Some
states do not allow the exclusion or limitation of implied warranties so some of the
above limitations and exclusions may not apply to you. This Limited Warranty gives you
specific legal rights, and you may also have other rights, which vary, from state to state.
This Limited Warranty only applies to products sold and used in the USA. Source Audio
shall not be liable for damages or loss resulting from the negligent or intentional acts of
the shipper or its contracted affiliates. You should contact the shipper for proper claims
procedures in the event of damage or loss resulting from shipment.
© SOURCE AUDIO LLC 120 CUMMINGS PARK, WOBURN, MA 01801 SOURCEAUDIO.NET
Page 2
USER’S GUIDE
SA226
Page 3

WELCOME
Thank you for purchasing the Soundblox 2 Orbital Modulator. This
powerful multi-effects unit features a dynamic collection of meticulously
crafted modulation effects, including classic renditions of phaser, flanger,
and chorus, plus an amazing set of contemporary modulation options.
With nine adjustable parameters, including TREMOLO, MIX, LoRetain,
and LFO Wave Shape, this pedal goes well beyond the sonic limitations of
traditional modulation effects pedals.
The Orbital Modulator lives in our durable, cast-aluminum Soundblox
2 housing, providing rack-mount power and flexibility in a compact,
easy-to-use stompbox. It also works with all of our Hot Hand© Effect
Controllers or the Source Audio Dual Expression Pedal.
The Quick Start guide will help you with the basics. For more in-depth
information about the Soundblox 2 Orbital Modulator, move on to the
following sections.
Enjoy!
-The Source Audio team
If possible, dispose of the device at a recycling center. Do not dispose of the
device with the household waste.
For full compliance with EN 61000-4-6 standard, input cable must be less
than 3 meters in length.
2 | Welcome
Page 4

OVERVIEW
DIVERSE SOUND PALETTE: Features 12 different flanger, phaser,
and chorus effects.
DEEP CONTROL SET: Access to control parameters typically found
on only professional rack systems.
FACTORY DEFAULT SETTINGS: Easily accessible control settings
personally selected by Source Audio’s chief scientist, Bob Chidlaw.
TREMOLO: Mix tremolo effects into any of the Orbital Modulator’s
effect types for the added dimension of amplitude modulation.
STATE-OF-THE-ART DSP: Our proprietary 56-bit Digital Signal
Processor, the SA601, and crystal clear 24-bit converters.
COMPACT DESIGN: A compact, rugged, cast-aluminum housing.
UNIVERSAL BYPASS™: Select either analog buffered or relay-based
True Bypass.
2 USER PRESETS: Easy-to-program user presets recallable via two
footswitches.
MULTI-FUNCTION INPUT: A multi-purpose control input for use with
Hot Hand, the Source Audio Dual Expression Pedal, or MIDI.
Overview | 3
Page 5
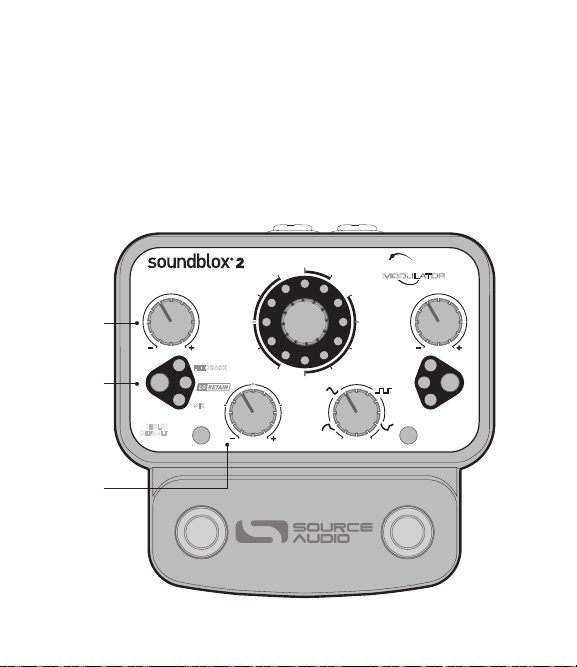
QUICK START
1. POWER
To power the unit, connect the included DC adapter power supply to
the 9V jack (A) on the back panel.
Note: Using a non-Source Audio supply could damage the unit.
Please be very cautious when using 3rd party power supplies.
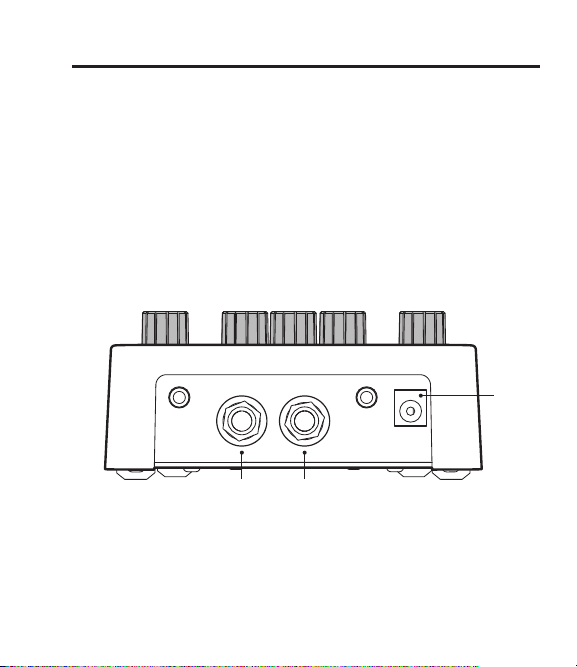
2. GUITAR/AUDIO CONNECTIONS
Using standard ¼" mono cables, plug your guitar, bass, or other
instrument into the GUITAR IN (B) jack and from the GUITAR OUT (C)
jack to your amp or other audio device.
GUITAR IN
GUITAR OUT
MULTI-
FUNCTION
IN
MULTI-
FUNCTION
OUT
9V DC
B C
3. BRIEF KNOB, FOOTSWITCH, AND BUTTON DESCRIPTIONS
(see Controls section for more details)
• EFFECT KNOB (A): Selects the effect type.
• DEPTH (B): Controls the modulation depth of the effect.
4 | Quick Start
A
Page 6
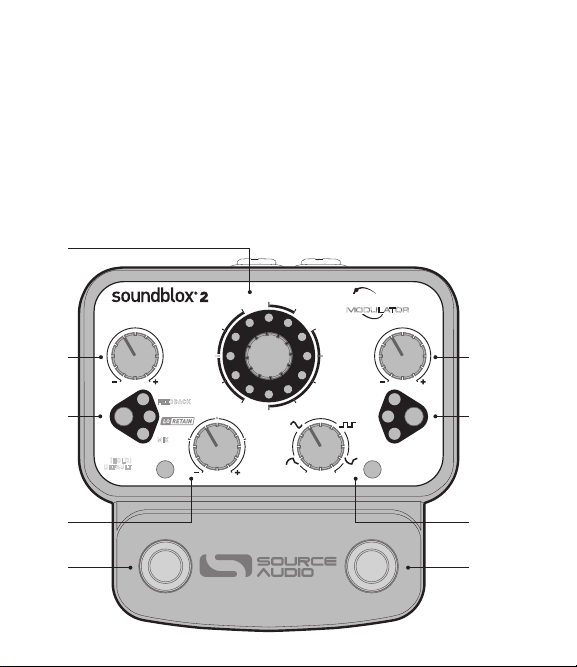
• OPTION (C): Adjusts the parameter selected by the OPTION SELECT
button.
• SPEED (D): Adjusts the rate of the LFO (Low Frequency Oscillator), the
attack/decay rate of the envelope follower, or the smoothing of Hot Hand.
• MOD SOURCE (E): Selects between sine LFO, square LFO, or envelope
follower.
• OPTION SELECT (F): Selects which parameter will be controlled by the
OPTION knob.
• CONTROL INPUT (G): Selects which external controller type will be used.
• FOOTSWITCHES (H): Enables/Disables presets. Press and hold either
footswitch to save an edited preset.
A
RES 1
RESONATOR
SHADOW
DEPTH
B
F
OPTION
SELECT
(HOLD)
DEFAULT
THRU
ZERO
FLANGER
CLASSIC
CHORUS
QUAD
DELAY/FREQ
FEEDBACK
VOLUME
TREMOLO
MIX
1 2
12 STAGE
OPTION
RES 2
VIBE
PHASER
4 STAGE
6 STAGE
8 STAGEDUAL
MOD SOURCE
ORBITA L
MODULATOR
SPEED
HH
MIDI
EXP
ENV-ENV+
CONTROL
INPUT
D
G
C
H
E
H
Quick Start | 5
Page 7
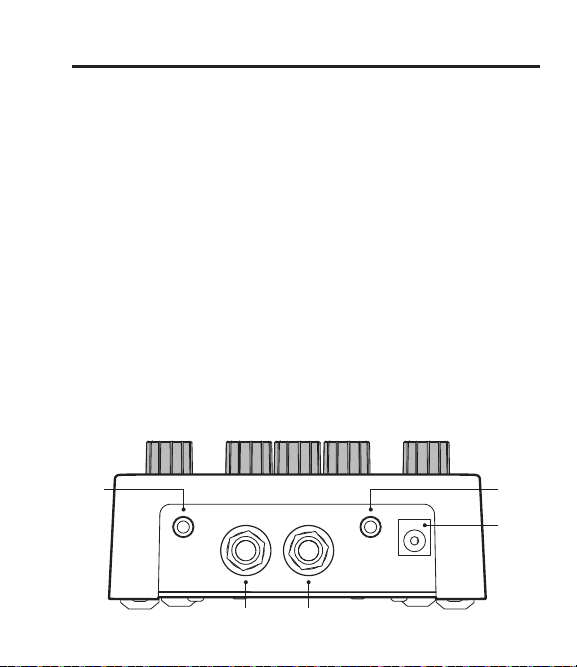
CONNECTIONS
GUITAR IN (A): Connect your guitar, bass, or other instrument via a
MONO ¼" cable.
GUITAR OUT (B): Connects to your amp, pedal, or other audio device via
a MONO ¼” cable.
MULTI-FUNCTION IN (C) (optional): The multi-function input is a flexible
control input for use with external controllers. It accepts digital or analog
signals which allow the Orbital Modulator to interface with the following
accessories:
• SA110/SA115 Hot Hand Wireless Adapter
• SA111 Hot Hand Wired Sensor
• SA161 Source Audio Dual Expression Pedal
• Source Audio Soundblox 2 MIDI Adapter
MULTI-FUNCTION OUT (D) (optional): Use a Source Audio daisy-chain
cable to connect this jack to the sensor/multi-function input of another
Soundblox pedal.
9V DC (D): Connects to the included 9 Volt DC power supply.
C
6 | Connections
MULTI-
FUNCTION
IN
GUITAR IN
A B
GUITAR OUT
MULTI-
FUNCTION
OUT
E
D
9V DC
Page 8

CONTROLS: KNOBS
EFFECT (A) (not labeled)
The EFFECT knob selects which effect type will be used. For information
on the individual settings, see the Effect Types section.
A
RES 1
RESONATOR
RES 2
VIBE
PHASER
4 STAGE
6 STAGE
8 STAGEDUAL
MOD SOURCE
ORBITA L
MODULATOR
SPEED
HH
MIDI
EXP
ENV-ENV+
Controls: Knobs | 7
CONTROL
INPUT
- Continued
SHADOW
THRU
ZERO
FLANGER
CLASSIC
CHORUS
QUAD
DELAY/FREQ
FEEDBACK
VOLUME
TREMOLO
MIX
1 2
12 STAGE
OPTION
OPTION
SELECT
(HOLD)
DEFAULT
DEPTH
Page 9
DEPTH Knob (A)
The DEPTH knob adjusts the range of the modulating signals.
OPTION Knob (B)
The OPTION knob controls six different parameters. Press the OPTION
SELECT button (C) (located just above the OPTION knob) to cycle through
all six choices. The selected parameter is indicated by the three red/
green LEDs. Green indicates the upper parameter (black print), and red
the lower parameter (white print).
RES 1
SHADOW
DEPTH
A
C
OPTION
SELECT
(HOLD)
DEFAULT
THRU
ZERO
FLANGER
CLASSIC
CHORUS
QUAD
DELAY/FREQ
FEEDBACK
VOLUME
TREMOLO
MIX
1 2
OPTION
RESONATOR
12 STAGE
RES 2
VIBE
PHASER
4 STAGE
6 STAGE
8 STAGEDUAL
MOD SOURCE
ORBITA L
MODULATOR
SPEED
HH
MIDI
EXP
ENV-ENV+
CONTROL
INPUT
B
8 | Contols: Knobs
Page 10

SELECT
DELAY/FREQ
DEFAULT
Press button to
select option
OPTION
(HOLD)
• DELAY/FREQUENCY (Green LED): When Flanger or Chorus
FEEDBACK
VOLUME
TREMOLO
MIX
effects are selected the DELAY knob adjusts the delay time
between the dry and modulating signals. Because of the
similarity between flangers and choruses, a flanger can easily
be adjusted to resemble a chorus and vice-versa. As a rule of
thumb, short delay times create flange effects while long delays
produce chorus effects. Set the DELAY knob between 7 and
11 o’clock for flange effects and between 3 and 5 o’clock for
chorus.
When phaser effects are selected, this knob adjusts the
frequency center point of the phase modulation. Turn the
FREQUENCY knob clock-wise to modulate the phaser over
higher frequencies and give the effect a brighter sound.
• FEEDBACK (Red LED): The FEEDBACK knob controls the amount
of wet signal fed back into the effect. Much like the harmonic
feedback created between a guitar pick-up and an amplifier,
increasing the FEEDBACK on the Orbital Modulator creates
a more resonant and ringing response, giving the effect more
prominence.
- Continued
Controls: Knobs | 9
Page 11

DELAY/FREQ
DEFAULT
Press button to
select option
OPTION
SELECT
(HOLD)
• VOLUME (Green LED): The VOLUME knob adjusts the output
FEEDBACK
VOLUME
TREMOLO
MIX
level, ranging from zero gain to +6dB. Unity gain is found at
roughly 12 o’clock.
• LoRETAIN (Red LED): The LoRETAIN function adjusts the
frequency below which the original signal remains unaffected.
This function is especially useful for bass players—increasing the
LoRETAIN insures a solid low-end foundation while maintaining
the characteristics of the chosen effect. Guitarists may also find
it useful—if the FEEDBACK control is cranked up, increasing
LoRETAIN will prevent excessive volume fluctuations in the
lower frequencies.
• TREMOLO (Green LED): The TREMOLO knob adjusts amplitude
modulation. Unlike traditional tremolo, the Orbital Modulator’s
amplitude modulation is embedded within the flanger, phaser,
and chorus effects, creating a wide range of very unique and
three-dimensional modulation effects. But the TREMOLO function, if dialed in correctly, will also create sounds reminiscent
of classic amplifier generated tremolo or replicate the sound
of a rotating speaker (see the EFFECT TYPES section for more
detail).
10 | Controls: Knobs
Page 12

• MIX (Red LED): The MIX knob controls the ratio between the wet
and dry signals. This knob is split into two regions: normal and
inverted wet signals. The 12 o’clock position produces a 100%
dry signal—as the knob is turned clockwise from 12 o’clock the
wet signal gradually increases as the dry signal decreases until
reaching a 100% wet mix at its right-most position. The process
is repeated with an inverted wet signal in the counter-clockwise
direction. The inverted wet signal interchanges the positions of
the peaks and valleys in the frequency response and tends to
reduce bottom end. The marks at approximately 10 and 2 o’clock
around the MIX knob indicate the point of a 50/50 wet/dry mix.
Set the MIX knob to a 50/50 ratio for the most prominent phase
or flange effects.
Factory Defaults: Given the number of different functions available on
the OPTION KNOB, it can be useful to “zero” all of the controls to a
default value. We pre-loaded the Orbital Modulator with unique default
settings that are a good starting point for each effect type (note: the
CLASSIC effect type defaults to a flanger setting). You can recall these
values at any time by pressing and holding the OPTION SELECT button
until its three LEDs blink two times.
Note: To learn the knob positions of the default settings, go to the
SB2 Orbital Modulator product page on our website and download the
PDF titled, SB2 Orbital Modulator Preset Suggestions.
- Continued
Controls: Knobs | 11
Page 13

MOD SOURCE Knob (A)
When Hot Hand, MIDI, or an expression pedal are not being used, the
Orbital Modulator features three different types of modulation control:
Envelope Follower, Sine Wave LFO, and Square Wave LFO. The MOD
SOURCE knob controls a gradual blend between them, so setting this
knob between two of the modulation graphics will create a sound with
elements of both modulation forms.
• Sine Wave LFO ( ): The sine wave LFO produces a very
smooth independently moving modulation. Use the sine wave
LFO for traditional flanger, chorus, and phaser effects.
• Square Wave LFO ( ): Unlike the smooth modulation of a
sine wave, the square wave LFO has a blockish sound similar
to a sequencer. We recommend using a square wave LFO for
dramatic, choppy sounding tremolo effects.
• Envelope Followers ( / ): An envelope follower responds
to the amplitude (or volume) of the incoming signal and creates
a control signal, which modulates the wet signal in the same
manner as an auto-wah. The MOD SOURCE knob can set the
modulation direction either forward ( ) or backward ( ).
SPEED Knob (B)
Depending on the modulation source, the SPEED knob controls either
the rate of the LFO, the attack and decay times of the envelope follower,
or the smoothing of Hot Hand.
When using LFO modulation, turning the SPEED knob clock-wise will
increase the modulation rate.
When using an envelope follower, turning the SPEED knob clock-wise
increases the envelope attack, which determines how quickly the envelope rises after the input level increases—the decay rate is the amount
12 | Controls: Knobs
Page 14

of time it takes for the envelope to drop back when the input signal
decreases. The decay is fixed to a rate twice as slow as the attack.
While Hot Hand is engaged, the SPEED knob controls the amount of
smoothing. Turning the SPEED knob clock-wise increases the smoothing
and makes Hot Hand less responsive and less jittery sounding.
RES 1
RESONATOR
SHADOW
THRU
ZERO
FLANGER
CLASSIC
CHORUS
QUAD
DELAY/FREQ
FEEDBACK
VOLUME
TREMOLO
MIX
1 2
12 STAGE
OPTION
OPTION
SELECT
(HOLD)
DEFAULT
DEPTH
RES 2
VIBE
PHASER
4 STAGE
6 STAGE
8 STAGEDUAL
MOD SOURCE
ORBITA L
MODULATOR
SPEED
HH
MIDI
EXP
ENV-ENV+
CONTROL
INPUT
B
A
Discovering Preset Knob Positions
Since the Orbital Modulator preset values can differ from the physical
knob positions, it may be useful to determine the positions of the preset
knob values. To start the process, put the pedal in bypass and set all
knobs to the full counter-clockwise position. Next, enable the preset
and slowly turn each knob up one at a time until the preset indicator
LED begins to blink rapidly. The rapid blinking indicates that the current
position of the knob matches the saved value.
Controls: Knobs | 13
Page 15

CONTROLS: FOOTSWITCHES
There are two footswitches on the Orbital Modulator. The left footswitch
corresponds to preset 1 and the right footswitch corresponds to preset
2. Pressing either of the footswitches will engage the respective preset.
Pressing the same footswitch again will put the effect back into bypass
mode. Pressing the other footswitch will engage the other preset without
going into bypass. The illumination of the LEDs labeled “1” and “2”
indicate which preset is currently enabled. While the effect is in bypass
mode both LEDs remain off.
When a preset is enabled and any sort of adjustment is made, the
indicator LED for that preset will begin to blink, showing that the preset
has been edited. After a preset has been edited, save it by pressing and
holding either footswitch. The corresponding LED will blink quickly to
indicate that the preset has been saved. Once changes are saved, the LED
will illuminate continuously. An edited preset can be saved to either of
the two preset locations. For example if preset 1 has been selected and
edited, it can be saved to preset location 2 by pressing and holding the
right footswitch.
Note: Changes made to a preset will be lost if you go into bypass or
switch to another preset without saving.
14 | Controls: Footswitches
Page 16

TAP TEMPO MODE
The Orbital Modulator’s LFO rate can also be adjusted on-the-fly via TAP
TEMPO. To enter TAP TEMPO mode put the pedal into bypass, then press
and hold the footswitch (and corresponding preset) to which you would
like TAP TEMPO applied. When the preset LED opposite the pressed footswitch begins to blink, the pedal is in TAP TEMPO mode. The footswitch
below the blinking LED now controls the LFO rate. Tap the footswitch at
least two times in rhythm to set a new LFO speed. The LFO rate is reflected in the blinking LED—the time between each blink represents one
cycle of the LFO. Follow the same procedure to disengage TAP TEMPO.
RES 1
RESONATOR
SHADOW
THRU
ZERO
FLANGER
CLASSIC
CHORUS
QUAD
DELAY/FREQ
FEEDBACK
VOLUME
TREMOLO
MIX
1 2
12 STAGE
OPTION
OPTION
SELECT
(HOLD)
DEFAULT
DEPTH
RES 2
VIBE
PHASER
4 STAGE
6 STAGE
8 STAGEDUAL
MOD SOURCE
ORBITA L
MODULATOR
SPEED
HH
MIDI
EXP
ENV-ENV+
CONTROL
INPUT
B
A
Effect Types | 15
Page 17

EFFECT TYPES
FLANGER
PHASER
RESONATOR
RES 1
12 STAGE
Here are some brief descriptions of the EFFECT SELECTOR knob settings
on the Soundblox 2 Orbital Modulator.
FLANGER & CHORUS
CLASSIC: Flanger and chorus effects are very similar—both combine
the original dry signal with additional modulating clone signals. For this
reason, we’ve positioned the CLASSIC effect type, which uses a single
modulating signal, in both the FLANGER and CHORUS effect categories.
As a rule, short delay times between the dry and modulated signals
create the traditional jet-engine “whoosh” associated with flangers while
longer delay times create lush chorus effects. When using CLASSIC, set
the DELAY knob between 7 and 11 o’clock for a flange effect and between
3 and 5 o’clock for chorus.
THRU
ZERO
SHADOW
RES 2
VIBE
16 | Effect Types
CHORUS
CLASSIC
QUAD
4 STAGE
6 STAGE
8 STAGEDUAL
Page 18

CHORUS
FLANGER
PHASER
RESONATOR
RES 1
12 STAGE
DUAL and QUAD: The DUAL and QUAD effect types are multi-voiced
choruses. Both produce a more animated and lavish chorus than the
CLASSIC effect type. The DUAL CHORUS has two modulating delay
signals and the QUAD has four.
THRU
CLASSIC
CHORUS
QUAD
SHADOW
ZERO
RES 2
VIBE
4 STAGE
6 STAGE
8 STAGEDUAL
FLANGER
THRU ZERO: The THRU ZERO effect type is our version of “through zero
flange” (a.k.a. tape flange). In the world of pre-recorded music this
dramatic effect is achieved when the modulating signal actually passes
through and moves ahead of the original signal—obviously, this is a
difficult feat to pull-off during a live performance (without the assistance
of a time machine). The OM achieves this effect with two delay lines.
The first is a very short, but stationary delay line, which functions as the
dry signal—the other signal modulates. As the modulating signal passes
through and moves ahead of the stationary tap we hear the classic
through zero twist (a split second of complete phase cancellation) as the
frequency response inverts.
Effect Types | 17
Page 19

SHADOW: The SHADOW flanger effect type features two modulating
FLANGER
PHASER
RESONATOR
RES 1
12 STAGE
FLANGER
PHASER
RESONATOR
RES 1
12 STAGE
signals. This set-up generates a more animated flange effect, with the
primary flange closely shadowed by a subtle, more resonant reflection.
THRU
ZERO
CLASSIC
SHADOW
RES 2
VIBE
4 STAGE
CHORUS
QUAD
6 STAGE
8 STAGEDUAL
RESONATOR
RES 1 and RES 2: The RESONATOR flangers, labeled RES 1 and RES 2,
both have four modulating signals. These highly resonant flangers create
a distinctly hollow sound with ringing overtones.
CHORUS
THRU
ZERO
CLASSIC
QUAD
SHADOW
RES 2
VIBE
4 STAGE
6 STAGE
8 STAGEDUAL
PHASER
The classic phaser is similar to a flanger, both require two identical
signals running in parallel, but while the flanger’s modulating frequency
peaks create the well-known “whoosh” sound, a phaser generates
18 | Effect Types
Page 20

modulating frequency notches, which create a subtle, undulating sound
FLANGER
PHASER
RESONATOR
RES 1
12 STAGE
similar to that found in a rotating Leslie speaker.
VIBE: The VIBE effect type was modeled after the Shin-Ei Univibe, the
original rotating speaker simulator (i.e. the original phaser pedal). This
effect contains 2 relatively wide frequency notches spaced farther from
one another than a typical phaser.
VARIABLE STAGE PHASERS: As a rule, every pair of phase shift stages
creates one notch in the frequency response, so the 4, 6, 8, and 12 STAGE
PHASERS produce 2, 3, 4, and 6 frequency notches, respectfully. As you
progress from the 4 to the 12 STAGE PHASERS, the effect will sound
more complex and pronounced.
THRU
ZERO
SHADOW
RES 2
VIBE
CLASSIC
CHORUS
QUAD
4 STAGE
6 STAGE
8 STAGEDUAL
TREMOLO
Though TREMOLO is not one of the effects listed around the EFFECT
SELECTOR knob, turning up the Orbital Modulator’s TREMOLO knob can
produce several traditional or non-traditional tremolo effects. For a basic
tremolo, set the MOD SOURCE to a standard sine wave, dial the EFFECT
SELECTOR to CLASSIC, turn the DEPTH and DELAY all the way down
and the MIX to 100% wet, then set the TREMOLO somewhere between 9
and 11 o’clock. For some more unique tremolo effects, try dialing in more
DEPTH and experiment with the different effect types.
Effect Types | 19
Page 21

EXTERNAL CONTROL
One of the Core Features of the Soundblox 2 line of effects is the MULTIFUNCTION Input. The MULTI-FUNCTION input is an intelligent control
input that accepts both digital and analog control signals. It replaces the
SENSOR input on previous Soundblox pedals. The MULTI-FUNCTION
input connects to wired or wireless Hot Hand accessories, the Source
Audio Expression Pedal, or a future Source Audio MIDI interface that will
enable full MIDI I/O access to the pedal.
RES 1
SHADOW
THRU
ZERO
FLANGER
CLASSIC
CHORUS
QUAD
DELAY/FREQ
FEEDBACK
VOLUME
TREMOLO
MIX
1 2
OPTION
OPTION
SELECT
(HOLD)
DEFAULT
DEPTH
RESONATOR
12 STAGE
Selecting an external control input:
Press the CONTROL INPUT button (A) to cycle between the external
control options. There are four possible settings:
• OFF (no illuminated LEDs): External control is disabled in this
mode and the MOD SOURCE knob remains active.
20 | External Control
RES 2
VIBE
PHASER
4 STAGE
6 STAGE
8 STAGEDUAL
MOD SOURCE
ORBITA L
MODULATOR
SPEED
HH
MIDI
EXP
ENV-ENV+
CONTROL
INPUT
B
A
Page 22

• EXP: Expression Pedal for use with the SA161 Source Audio
Dual Expression Pedal. By default, the expression pedal controls
modulation, but the expression pedal can also be assigned to
control any other knob parameter.
• MIDI: MIDI control mode. Select to enable MIDI I/O through the
Soundblox 2 MIDI Interface
• HH: Hot Hand mode. Select to enable Hot Hand control. Like
EXP mode, Hot Hand defaults to modulation or is assignable to
any knob parameter.
CONTROL ASSIGN
By default, the expression pedal and Hot Hand inputs control modulation.
This can easily be changed to control any of the adjustable knob parameters. To assign control to a knob parameter, follow the instructions below:
1. Select the desired external control option: EXP for expression
pedal, HH for Hot Hand.
2. Press and hold the CONTROL INPUT button (A) until the LED
begins to blink slowly.
3. Set the low position of the desired knob, for example SPEED (B),
to the lowest setting you would like to use.
4. Press the CONTROL INPUT button again, the LED will now blink
more rapidly.
5. Set the desired high position you would like to use.
6. Press the CONTROL INPUT button to complete the assignment.
The LED will blink 3 times to indicate the process is complete.
Note: Different control assignments can be programmed to a preset.
Don’t forget to save your settings!
External Control | 21
Page 23

Exiting control assign mode
In the event that you have saved a preset with external control assigned
to one of the knob parameters, but wish to return to the default, external
modulation control, follow the instructions below:
1. Engage the desired preset.
2. Deselect all the external control options with the CONTROL INPUT
button (A) (no CONTROL INPUT LEDs should be illuminated).
3. Press and hold the CONTROL INPUT button until all three LEDs blink
two times, then release the button.
4. Select the desired external control option (Expression pedal (EXP),
Hot Hand (HH), or MIDI).
5. Save the preset. The external controller will now control the effect’s
modulation.
RES 1
SHADOW
THRU
ZERO
FLANGER
CLASSIC
CHORUS
QUAD
DELAY/FREQ
FEEDBACK
VOLUME
TREMOLO
MIX
1 2
OPTION
OPTION
SELECT
(HOLD)
DEFAULT
DEPTH
RESONATOR
12 STAGE
RES 2
VIBE
PHASER
4 STAGE
6 STAGE
8 STAGEDUAL
MOD SOURCE
ORBITA L
MODULATOR
SPEED
HH
MIDI
EXP
ENV-ENV+
CONTROL
INPUT
A
22 | External Control
Page 24

MIDI CONTROL
The Orbital Modulator can be controlled via generic MIDI messages. To
access MIDI functionality, the unit requires a Source Audio Soundblox 2
MIDI Adapter. Please check www.sourceaudio.net for availability. The
adapter connects to the Multi-Function input and provides standard MIDI
IN and OUT 5-pin DIN connectors.
Using Soundblox 2 pedals with MIDI greatly extends the functionality of
the units. Having MIDI I/O allows for remote automation, external controllers, firmware updates and more. If you have more than one Soundblox 2
pedal, only one MIDI Adapter is necessary. The Multi-Function output
will act as a MIDI thru to pass the MIDI messages on the other pedals via
a Source Audio SA160 Daisy Chain cable.
For information on using your Soundblox 2 with MIDI and for MIDI
mappings, please visit our website at www.sourceaudio.net.
- Continued
External Control | 23
Page 25

USE WITH HOT HAND
All Soundblox pedals are compatible with our Hot Hand accessories. Hot
Hand units consist of a ring-mounted accelerometer that detects motion
and controls effect parameters. To enable Hot Hand functionality, connect
the Hot Hand receiver or base station to the MULTI-FUNCTION IN and
select HH mode with the CONTROL INPUT button. The pedal will now
accept input signals from Hot Hand and use them to control standard
modulation or the assigned parameter.
The Orbital Modulator can also be calibrated to change the midpoint of
the Hot Hand control range. To do this, follow the calibration procedure
below. Note that calibration is only used for Hot Hand mode and
calibration is NOT required before use.
To perform a calibration:
1. Select a preset by pressing a footswitch.
2. Enable Hot Hand control by selecting HH mode with the CONTROL
INPUT button.
3. Press and hold the CONTROL INPUT button until the HH red LED
begins to blink slowly (note: this is the same as the control assign
procedure).
4. Put the Hot Hand sensor into the desired calibration position.
5. Press the footswitch for the currently selected preset.
6. The HH LED will blink when the calibration is complete.
If you have trouble with calibration and need to get back to the default
setting, place the sensor on a flat, level surface with the blue LED facing
down and run the calibration procedure again.
24 | External Control
Page 26

UNIVERSAL BYPASS
Most effect pedals offer either true or buffered bypass. Soundblox 2
offers Universal Bypass, which allows you to select between the two.
We recommend that you choose between the Orbital Modulator’s active
analog (a.k.a. buffered bypass) and relay-based true bypass (a.k.a.
true bypass) based on what is needed in your pedalboard’s signal chain
(Ideally, the first pedal in a signal chain should be a buffered input
followed by true bypass in the rest of the signal chain).
By default, the Soundblox 2 Orbital Modulator is set to use the relaybased true bypass. To switch the pedal to buffered bypass press and hold
the right footswitch when powering up the pedal. Continue to hold the
footswitch until the corresponding LED blinks 3 times. The pedal is now
in buffered bypass. To switch back to true bypass, replicate this process
with the left footswitch.
Both bypass methods have pros and cons associated with them. Buffered
bypass provides a consistent input impedance so that if the input is
susceptible (like a guitar pickup) to variations in input impedance there
won’t be a noticeable change in tone. True bypass has the benefit of
providing a dedicated hardwire bypass signal path; however, it can cause
clicks/pops and typically requires a mechanically complex 3P3T (3-pole,
3-throw) switch. Soundblox 2’s special relay-based true bypass eliminates
the need for the 3P3T switch and thus the popping/clicking problem.
™
Universal Bypass | 25
Page 27

SPECIFICATIONS
Dimensions
• L: 4.5 inches
• W: 4.5 inches
• H: 2.25 inches (including knobs)
Weight
• 1.00 lbs
Power
• 140mA @ 9V DC (max 180mA with Hot
Hand Wireless Adapter)
• Negative tip power jack
Audio Performance
• Maximum input level: 2.0 Vrms (+6 dBV)
• Input impedance: 1 MOhm
• Output impedance: 1 kOhm
• 115dB DNR audio path
• 24-bit audio conversion
• 56-bit digital data path
• Universal Bypass™ (buffered or relaybased true bypass)
TROUBLESHOOTING
Noise:
Power Source Ensure that the proper power supply is being used.
Near noise source Move pedal away from power supplies and other equipment.
Other equipment Remove other effects from signal chain, see if noise persists.
Bad cables Swap out audio cables.
Hot Hand doesn’t work:
Low power Ensure that the proper power supply is being used.
Not calibrated properly Calibrate the Hot Hand — see page 24.
Not connected properly Check Hot Hand connections.
26 | Specifications
Page 28

Unit appears dead/no LEDs lit:
Wrong power supply Use correct power supply as defined on page 4.
Input plug not connected Ensure that input cable is connected to the GUITAR input.
Corroded input cable plug Check input cable plug for corrosion on sleeve, swap out
cable if necessary.
LIMITED WARRANTY
Source Audio, LLC (hereinafter “Source Audio”) warrants that your new Source Audio
Soundblox 2 Dimension Reverb, when purchased at an authorized Source Audio dealer
in the United States of America (“USA”), shall be free from defects in materials and
workmanship under normal use for a period of two (2) years from the date of purchase
by the original purchaser. This Limited Warranty does not extend to the batteries which
are purchased as is. Please contact your dealer for information on warranty and service
outside of the USA.
Under this Limited Warranty, Source Audio’s sole obligation and the purchaser’s sole
remedy shall be repair, replacement, or upgrade, at Source Audio’s sole discretion, of
any product that, if properly used and maintained, proves to be defective upon inspection
by Source Audio. Source Audio reserves the right to update any unit returned for repair
and to change or to improve the design of the product at any time without notice. Source
Audio reserves the right to use reconditioned parts and assemblies as warranty replacements for authorized repairs. Any product repaired, replaced, or upgraded pursuant to
this Limited Warranty will be warranted for the remainder of the original warranty period.
This Limited Warranty is extended to the original retail purchaser. This Limited Warranty
can be transferred to anyone who may subsequently purchase this product provided
that such transfer is made within the applicable warranty period and Source Audio is
provided with all of the following information: (i) all warranty registration information
(as set forth on the registration card) for the new owner, (ii) proof of the transfer, within
thirty (30) days of the transfer, and (iii) a photocopy of the original sales receipt. Warranty
coverage shall be determined by Source Audio in its sole discretion. This is your sole
warranty. Source Audio does not authorize any third party, including any dealer or sales
representative, to assume any liability on behalf of Source Audio or to make any warranty
on behalf of Source Audio.
Warranty | 27
 Loading...