

Page 1
CLASSIC DISTORTION
USERS GUIDE
SA142
Page 2

WELCOME
OVERVIEW
Thank you for purchasing the Soundblox Pro Classic
Distortion. The Pro Classic Distortion features a collection
of classic distortion, fuzz, and overdrive tones in a exible,
easy to use format. It offers a wide variety of boutique quality
sounds normally available only in expensive single effect
analog pedals. The Pro version offers extended features over
the Soundblox Classic Distortion such as 6 user presets
selectable via 3 footswitches, a 7-band graphic equalizer,
and much more. Like the other Soundblox effects pedals,
®
the Pro Classic Distortion is also “Hot Hand
Ready”.
The Quick Start guide will help you with the basics. For
more in-depth information about the Pro Classic Distortion
(Classic Pro), move on to the following sections.
Enjoy!
The Source Audio team
DIVERSE SOUND PALETTE
Featuring
BOOST/EQ
STATE-OF-THE-ART DSP
Featuring our
24-bit converters.
6 USER PRESETS
Easy to congure user presets in two banks selectable via
for quick access of your favorite sounds.
7-BAND EQUALIZER
Ultra-precise
EXTENDED CONTROL
An expression input
banks. A
MOTION CONTROL
All Soundblox and Soundblox Pro pedals are “Hot Hand Ready” and can
be used with any Hot Hand motion sensor to extend the capabilities of
the unit.
ACTIVE ANALOG BYPASS
Bypass is fully routed around the
signal degradation.
11 varieties of classic distortion sounds with an added CLEAN
mode.
56-bit Digital Signal Processor, the SA601, and crystal clear
3 footswitches
7-band equalizer for in-depth tone control saved per preset.
(EXP IN) allows morphing of sounds between preset
MIDI input allows external access to presets and parameters.
DSP and active input ensures zero
Page 3
QUICK START
SENSOR
IN
SENSOR
OUT
GUITAR IN GUITAR OUT
9V DC
EXP IN
MIDI IN
SENSOR
IN
SENSOR
OUT
GUITAR IN GUITAR OUT
9V DC
EXP IN
MIDI IN
125 250 500 1K 2K
(NG) (HG) (HS) (HA) (HR)
4K 8K
+12
-12
0
< >
+12
-12
0
DRIVE 1 MIDRANGE
CLEAN BOOST / EQ
DRIVE 2 OUTPUT
HH ENABLE
CALIBRATEPRESET BANK
4-61-3
BACKPAGE
MODE
BENDER
SMOOTH TUBE
POWER STAGE
CRUNCH TUBE
TS9000
BIG PI
EL RATON
FUZZ FAÇADE
METAL
OCTAVE FUZZTUBE DRIVE
0
CLASSIC DISTORTION
14
25
36
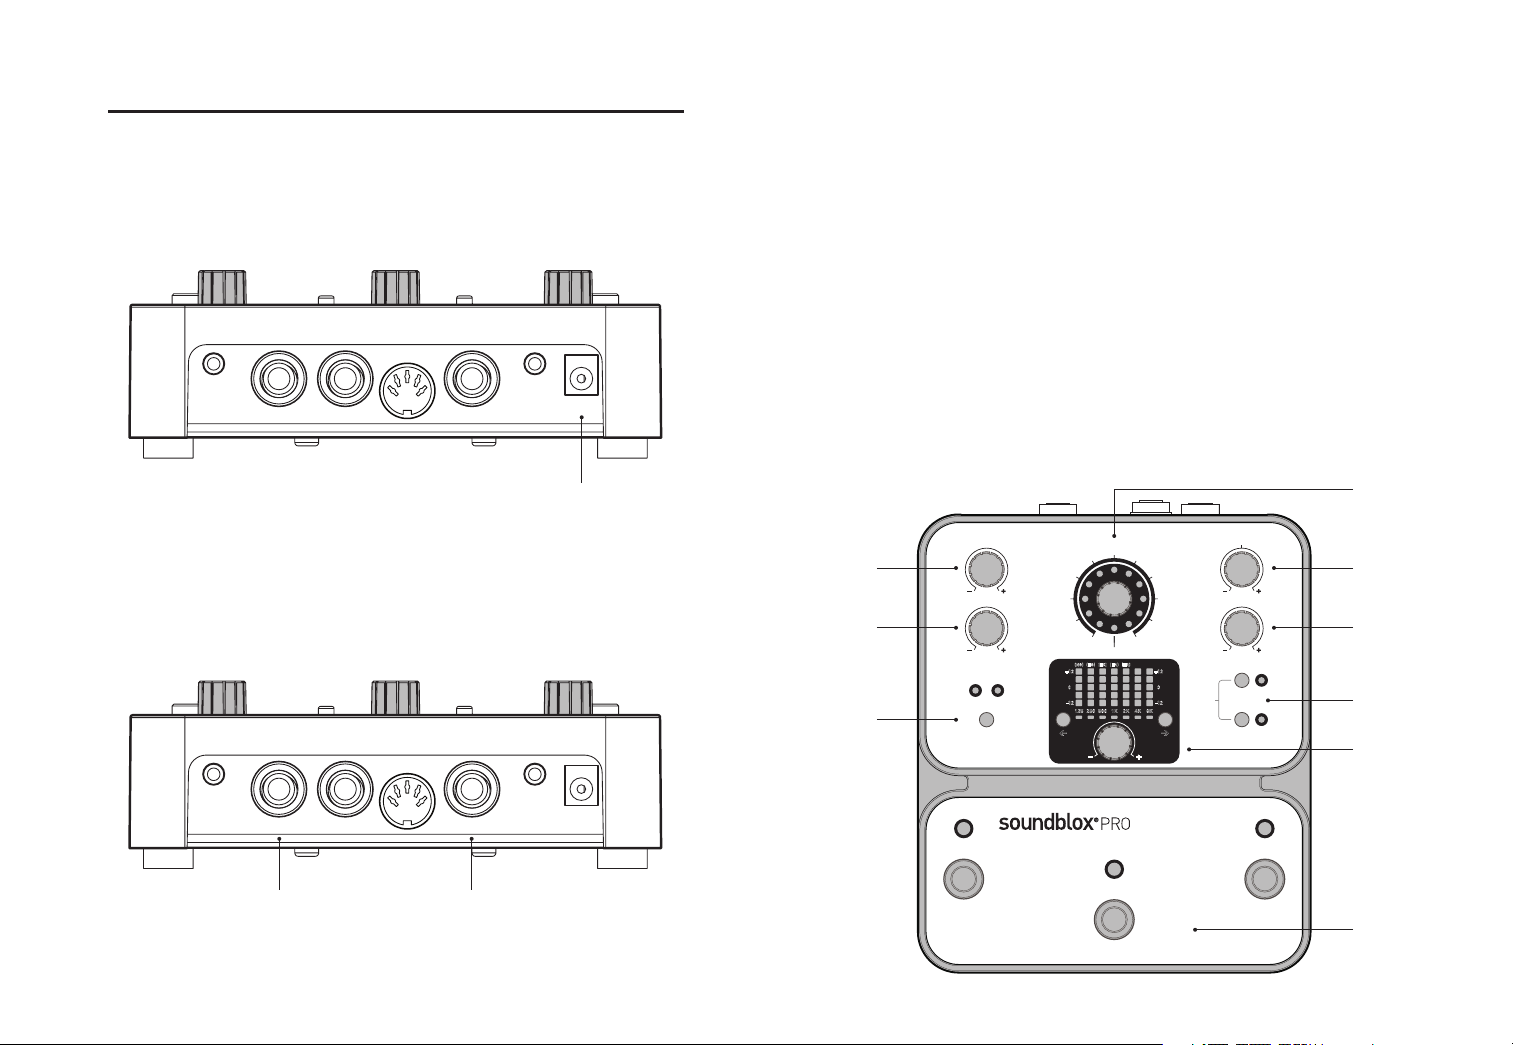
1. POWER
To power the unit, connect the included
the
9V DC jack (A) on the back panel. Note:Using a different supply
could damage the unit and void the warranty.
2. GUITAR/AUDIO CONNECTIONS
Next, plug your guitar (or other instrument) into the jack labeled
GUITAR IN via a standard ¼" cable. Connect your amp (or other audio
device) to the
input and output are mono signals.
GUITAR OUT jack, again with a standard ¼" cable. Both
DC adapter power supply to
3. BRIEF KNOB, FOOTSWITCH, AND BUTTON DESCRIPTIONS
See Controls section for more details.
A DRIVE1:adjusts the pre-drive for the selected effect.
B DRIVE2:adjusts the post-drive for the selected effect.
C PRESETBANKBUTTON: select preset bank A (presets 1, 2, and 3) or
B (presets
4, 5, and 6).
D EFFECTKNOB:selects the type of distortion.
E MIDRANGE:boosts or cuts the midrange frequencies between the
two drive controls.
F OUTPUT:adjusts the output level of the effect.
G HHENABLEandCALIBRATE:for Hot Hand use only.
H EQSECTION:the two buttons select the frequency band to edit and
the knob adjusts the value of the selected band.
I FOOTSWITCHES:Enables/Disables a selected preset depending
on the currently selected preset bank. Press and hold to save an
edited preset.
A
A E
B
C
D
F
G
H
CB
I
Quick Start | 54 | Quick Start
Page 4

THEORY OF OPERATION
The Classic Pro features distortion effects that are re-creations of popular pedal and amplier based distortions. We have chosen names for the
distortions that will be suggestive of the sounds you will get with all of
the controls in the central part of their range. We are not trying to imply
exact simulations of the various analog effects. Rather, this is a different
take on classic sounds based more upon evaluating the sounds by ear
and overall circuit function instead of attempting to do a mathematical
model or emulation (which, incidentally, we think is really not possible
for distortions).
The following list describes the major new features available in the
Classic Pro:
Architecture
Most analog fuzzes and distortions have multiple points where the signal
passes through a distortion circuit, an op-amp, a transistor, or a diode.
We provide two such cascaded distortion functions, each with a
control in front of it. The
tions. The graphic
MIDRANGE control sits between the two distor-
EQ is at very end of the chain.
DRIVE controls
The DRIVE knobs control the gain of the two distortion curves. You can
obtain the same amount of overall gain through the system with various
combinations of the two controls: one high and the other low, both in the
middle, etc. However, the resulting sound will be different. Distortion
from
DRIVE 1 has more EQ applied to it than the distortion from DRIVE 2.
Essentially, you just have to experiment and listen to the results.
DRIVE
MIDRANGE control
This control provides
12 dB of cut or boost to a midrange frequency band
which is approximately two octaves wide. The exact frequency is different
depending on which distortion has been selected.
Graphic EQ
The
7-band graphic equalizer can be adjusted in 1 dB steps. Moving
bands up or down
So don’t think that you have to make big adjustments with the
graphic
EQ is at the end of the processing, after the distortion.
1 dB can make a signicant change to the sound.
EQ. The
CLEAN BOOST / EQ
In this setting, the distortion curves are straight lines (meaning there is
no distortion). The graphic
control is also still active in this mode. The
set around
9 o’clock to ensure that the signal doesn’t clip. Although the
EQ can be adjusted to taste. The MIDRANGE
DRIVE controls will need to be
distortion curves are at, there still comes a point where the signal will
clip if the
If both
DRIVE is turned up too far.
DRIVES are turned up, there will be a raspy sound as the signal
peaks are hard clipped. In general, this doesn’t sound very good. However, if the
DRIVE controls are cranked, the resultant distortion is not bad
at all despite consisting only of digital hard clipping. Don’t believe that?
Give it a try. This distortion sound can be improved by rolling off the
RANGE
control and using the graphic EQ to further shape the sound.
MID-
If the
MIDRANGE control is increased, a hotter signal will be applied to
the second distortion curve and you might need to reduce
accordingly. Maxing out both
DRIVE controls will probably be excessive.
Most of the distortion avors sound better with more moderate
DRIVE 2
DRIVE
settings. DRIVE 1 and your guitar volume both directly control the signal
applied to the rst distortion curve. Using a higher setting of
DRIVE 1, you
can set your guitar volume quite low for a cleaner tone and increase your
guitar volume when you need more distortion.
Theory of Operation | 76 | Theory of Operation
Page 5

CONNECTIONS
CLEAN BOOST / EQ
BENDER
SMOOTH TUBE
POWER STAGE
CRUNCH TUBE
TS9000
BIG PI
EL RATON
FUZZ FAÇADE
METAL
OCTAVE FUZZTUBE DRIVE
DRIVE 1
SENSOR
IN
SENSOR
OUT
GUITAR IN GUITAR OUT
9V DC
EXP IN
MIDI IN
CONTROLS: KNOBS
GUITAR IN
Connect your guitar or other instrument here using a standard
MONO
¼" cable.
GUITAR OUT
Connect this to your amp, pedal, or other audio device.
EXPRESSION IN (optional)
Connect a passive expression pedal that uses a
TRS plug here. Allows
morphing of sounds between banks A and B.
SENSOR IN (optional)
Connect an optional Hot Hand sensor here, either wired or wireless.
SENSOR OUT (optional)
Use a Source Audio daisy-chain cable to connect this jack to the sensor
input of another pedal.
MIDI IN (optional)
MIDI program and continuous control input. Connect to a MIDI output
with a standard
MIDI cable
9V DC
Connect the included
9 Volt DC power supply here. Use of a non-Source
Audio power supply may cause damage and void the warranty.
EFFECT (not labeled)
The effect knob selects which distortion type will be used. There are
effect positions around the knob as well as a setting for
EQ
. In the CLEAN BOOST/EQ mode, the distortion effect is bypassed but
CLEAN BOOST/
the output, midrange, and equalizer still apply. For information on the
individual settings see the Effect Types section.
DRIVE 1
Adjust the amount of distortion before the
MIDRANGE control. See the
Theory of Operation section for more details.
11
- Continued
Controls: Knobs | 98 | Connections
Page 6

DRIVE 2
DRIVE 2
0
OUTPUT
62 125 250 500 1K 2K 4K
+12
-12
0
< >
+12
-12
0
(NG) (HG) (HS) (HA) (HR)
Adjust the amount of distortion after the
MIDRANGE control.
MIDRANGE
Provides boost or cut to pre-selected midrange frequency. The frequency
varies depending on the type of distortion selected with the
EFFECT knob.
OUTPUT
Adjusts the output level of the effect. This is useful for setting the level
of the effect compared to the bypass signal. Note that because the effect
compresses the signal, the dynamic range of the distorted signal will
be less compared to the dry signal. This should be accounted for when
setting levels.
CONTROLS: EQUALIZER
One of the key features of the Classic Pro is the 7-band graphic equalizer.
The Equalizer is post distortion. Each band can be adjusted up or down
in
1 dB steps from -12 dB to +12 dB and the setting is indicated by the dis-
play. The display shows
brightness. The equalizer section has three controls:
BAND SELECT LEFT and RIGHT
The two buttons on either side of the
to edit.
EQ KNOB
The equalizer knob changes the value of the selected band up or down in
1 dB steps.
You can quickly and easily zero the equalizer by pressing both left and
right band select buttons at the same time. The equalizer display will
reset to a default “at” setting.
1 dB steps by lighting adjacent LEDs with varying
EQ knob select the frequency band
BandSelectRightBandSelectLeft
EQKnob
Controls: Equalizer | 1110 | Controls: Knobs
Page 7

CONTROLS: OTHER BUTTONS
HH ENABLE
CALIBRATE
BACKPAGE
MODE
125 250 500 1K 2K
(NG) (HG) (HS) (HA) (HR)
4K 8K
+12
-12
0
< >
+12
-12
0
DRIVE 1 MIDRANGE
CLEAN BOOST / EQ
DRIVE 2 OUTPUT
HH ENABLE
CALIBRATEPRESET BANK
4-61-3
BACKPAGE
MODE
BENDER
SMOOTH TUBE
POWER STAGE
CRUNCH TUBE
TS9000
BIG PI
EL RATON
FUZZ FAÇADE
METAL
OCTAVE FUZZTUBE DRIVE
0
CLASSIC DISTORTION
14
25
36
PRESET BANK
4-61-3
CONTROLS: FOOTSWITCHES
PRESET BANK
There are six available user presets that are in two banks. The bank can
be switched by pressing the
PRESET BANK button. When preset bank A is
selected, pressing the corresponding footswitches will select presets
2, or 3. When preset bank B is selected, the footswitches select presets
4, 5, and 6. The indicator lights (LEDs) above each footswitch will be green
for bank A and red for bank B.
BankBBankA
HH ENABLE
The Hot Hand enable button enables or disables Hot Hand control for the
selected preset. This way, Hot Hand control can be set up for an individual
preset and can be left off otherwise.
CALIBRATE
Pressing this button when the pedal is engaged will turn on calibration
mode. Calibration mode allows you set a zero point for an attached Hot
Hand sensor. Calibration can only be enabled when
HH ENABLE is on.
1,
There are three footswitches on the Classic Pro. From left to right, the
footswitches correspond to presets
and
6 for bank B. Pressing any of the buttons will engage a given preset.
1, 2, and 3 for preset bank A and 4, 5,
Pressing the footswitch for the currently engaged effect will put the unit
into bypass mode. Pressing another switch will engage that effect without going into bypass.
The indicator lights above the three footswitches are bi-color and will
change depending on which bank is selected. Bank A presets are green
while bank B presets are red. When a preset is edited, the
LED will begin
to blink occasionally to show that the preset has been changed. When a
preset has been edited, pressing and holding any of the switches will save
the changes to the corresponding preset. The
indicate that the preset has been saved. Once changes are saved, the
LED will blink quickly to
LED
will be lit solidly. See the Preset Saving section for other saving options.
Note:Changes made to a preset will be lost if you go into bypass or
switch to another preset without saving!
Controls: Footswitches | 1312 | Controls: Other Buttons
Page 8

EFFECT TYPES
CLEAN BOOST / EQ
BENDER
SMOOTH TUBE
POWER STAGE
CRUNCH TUBE
TS9000
BIG PI
EL RATON
FUZZ FAÇADE
METAL
OCTAVE FUZZTUBE DRIVE
Here are some brief descriptions of the effects included in the Classic
Pro. Most of the effects are based on, but not exact copies of, a variety of
popular analog distortion pedals. Don’t expect the sounds to be exactly
like the corresponding analog effects. We tried to capture the spirit of
each sound rather than trying to copy the exact nuts and bolts.
TUBE DRIVE
An overdriven tube amp effect similar to a Marshall
®
sound. Try scaling
back the drive knob for a nice mild overdrive.
SMOOTH TUBE
Based on Mesa-Boogie
®
pre-amp distortion.
POWER STAGE
Inspired by the Fulltone Distortion Pro
®
.
CRUNCH TUBE
Our own distortion, not based on any particular sound. It’s a more
aggressive tube distortion.
CLEAN BOOST/EQ
A distortion effect bypass that still allows the gain and the graphic
to be used. Great for doing clean lead boosts or use strictly as a
graphic
EQ. Clipping the output is possible with this setting. If the levels
are boosted high enough, the hard clipping can actually sound pretty
good. See the Theory of Operation section for details.
EQ
7-band
TS9000
Based the Ibanez Tube Screamer
®
with a lot of mid boost.
BIG PI
Based on an Electro Harmonix Big Muff Pi
®
. Don’t ask which exact
model. That’s not the point.
EL RATON
Based on the ProCo Rat
®
.
FUZZ FAÇADE
Our version of the classic Dallas Arbiter Fuzz Face
®
sound.
BENDER
The Tone Bender
®
. We specically used an MK II, but don’t obsess over
the exact model number.
METAL
Our own metal distortion with plenty of highs and lows.
OCTAVE FUZZ
A full wave rectier, as everyone does, to mimic the classic Octavia
This tends to sound better with
DRIVE 1.
*Note: Product and brand names used are trademarks of their respective owners. No
afliation with Source Audio LLC is implied. The use of these names is intended solely as
a reference for the user.
DRIVE 2 turned up much higher than
®
Effect Types | 1514 | Effect Types
.
Page 9

PRESET SAVING
125 250 500 1K 2K
(NG) (HG) (HS) (HA) (HR)
4K 8K
+12
-12
0
< >
+12
-12
0
DRIVE 1 MIDRANGE
CLEAN BOOST / EQ
DRIVE 2 OUTPUT
HH ENABLE
CALIBRATEPRESET BANK
4-61-3
BACKPAGE
MODE
BENDER
SMOOTH TUBE
POWER STAGE
CRUNCH TUBE
TS9000
BIG PI
EL RATON
FUZZ FAÇADE
METAL
OCTAVE FUZZTUBE DRIVE
0
CLASSIC DISTORTION
14
25
36
MORPHING
An edited preset can be saved by pressing and holding a footswitch as
described in the Controls: Footswitches section. An edited preset can be
saved to any one of the
been selected and edited, it can be saved to preset location
and holding the
6 preset locations. For example if preset 1 has
3 by pressing
3/6 footswitch. Once the preset has been saved to that
location, the new location will be the selected preset.The unedited preset
will still be at location
Presets can be copied across preset banks by holding the
1.
PRESET BANK
button and then pressing and holding a footswitch. For example, if preset
2 has been selected and edited, holding the PRESET BANK button (A) and
then pressing and holding footswitch
to location
5. It could also be saved to locations 4 and 6 in the same man-
2/5 (B) will save the current settings
ner. Once the preset is saved to another bank, the preset in the current
bank will stay selected and
saved elsewhere as a new preset.
Saving between banks is especially useful when setting up parameters
for morphing between preset banks.
NOT be saved to its own location since it was
A
The expression input on the Classic Pro can be used to morph between
two presets. More specically, you can morph from between banks from
preset
1 to 4, 2 to 5, and 3 to 6.
There are
66 possible pair combinations of sounds and some will sound
better than others. Some obvious applications are morphing from clean
to distorted sounds, low drive settings to high drive settings, changes in
volume, or between dramatically different sounds.
The expression pedal can effectively be inverted by pressing the
BANK
button. This will toggle start and stop presets for the pedal. Keep
PRESET
in mind that adjusting knobs while using the expression pedal will only
control the preset in the currently selected bank, independent of the
expression pedal position. Also, while tweaking presets to get the desired
pair of sounds for morphing, don’t forget to save before switching banks
with the bank select button.
The expression pedal can also be used as a means of effectively switching between preset banks, allowing access to all
6 presets with foot
controls only.
The expression input is intended for use primarily with a passive expression pedal. It could potentially be used with a Control Voltage
but the input voltage range is limited to
before connecting any
age range (above
CV output to the Classic Psro. Exceeding the volt-
3.3V or below 0V) could damage the unit.
Expression pedals should have a three-conductor
0 to 3.3V. Take extra precaution
TRS (Tip, Ring, Sleeve)
(CV) output
plug. This type of plug is also referred to as a “stereo plug”. Most
expression pedals are this type. The resistance value of the pedal is not
important.
B
Morphing | 1716 | Preset Saving
Page 10

MIDI CONTROL
USE WITH HOT HAND
®
The Classic Pro can optionally be controlled by an external MIDI controller
such as the Hot Hand
the knob parameters as well as morphing can be controlled via
MIDI-Exp controller through the MIDI input. All of
MIDI
Continuous Controller messages. Individual presets can be selected by
MIDI Program Change messages. The Classic Pro can also be put into
bypass in this way. The following table describes the use of the
MIDI implementation:
Parameter MessageType DataValue
Enable Preset 1 Program Change 001
Enable Preset 2 Program Change 002
Enable Preset 3 Program Change 003
Enable Preset 4 Program Change 004
Enable Preset 5 Program Change 005
Enable Preset 6 Program Change 006
Disable Preset – Bypass Program Change 007
Parameter MessageType DataValue1 DataValue2
Drive 1 Continuous Controller 020 0–127
Midrange Continuous Controller 021 0–127
Drive 2 Continuous Controller 022 0–127
Output Continuous Controller 023 0 –127
Morph Continuous Controller 024 0–127
MIDI input.
The MIDI Channel is selectable as a Backpage parameter. Please see the
Backpage Parameter section for more details.
While the primary function of the Classic Pro is as a standalone effects
pedal you also have the option of exploring some additional functions
by plugging in a Hot Hand sensor. When a sensor is connected and
enabled, it will control the amount of
DRIVE. The maximum amount of
drive you can get by moving the sensor is determined by the position
of the
DRIVE knob.
Hot Hand Basics
The Hot Hand motion sensors are sold separately and come in either
wired or wireless versions. Both will work with the Classic Pro. Additionally, the
sensors. The
SENSOR IN jack will be compatible with any future Source Audio
SENSOR OUT jack duplicates the signals on the SENSOR IN
and can be used to daisy-chain multiple pedals together using the same
Hot Hand sensor.
The Hot Hand ring contains a two axis accelerometer that responds
to acceleration and is not based on any type of proximity to the guitar.
By moving your hand or by changing the position of your hand you can
modulate the effect. For a good description of Hot Hand Theory, download the Hot Hand Motion Controlled Wah Filters manual. It is available
at www.sourceaudio.net.
y
x
Continued
-
x
y
HotHandRingSensor
Sold Separately
Use with Hot Hand | 1918 | MIDI Control
Page 11

HH Enable
62 125 250 500 1K 2K 4K
+12
-12
0
< >
+12
-12
0
(NG) (HG) (HS) (HA) (HR)
HH ENABLE
CALIBRATE
BACKPAGE
MODE
The
HH ENABLE button will allow Hot Hand
®
control for an individual
preset so it can be used on one preset and not on another.
Calibration
The Classic Pro has a calibration feature which is only used in Hot Hand
mode. However, calibration is not required before use. The calibration
feature allows you to set the
MAXIMUM point of the DRIVE sweep for any
position of your hand. Depending on your playing style, you may nd it
useful to try some different calibration positions. The default and most
common use of calibration is to have your hand pointing straight up as
the maximum point of the
DRIVE sweep. Calibration can also be useful
if you are putting the sensor on a headband or other alternate locations.
Calibration mode can only be enabled when
HH ENABLE in ON. Calibra-
tion settings are saved per preset.
To perform a calibration:
1. Select a preset by pressing a footswitch.
2. Enable Hot Hand control by pressing the
3. Press the
CALIBRATE button to put the Classic Pro into
HH ENABLE button.
Calibrate Mode.
4. Put the Hot Hand sensor into the desired calibration position.
5. Press the footswitch for the currently selected preset.
6. The Calibrate
LED will blink to when the calibration is complete.
BACKPAGE PARAMETERS
The Classic Pro has some additional controls that can only be editing
in a special mode called Backpage mode. Backpage mode is enabled
by pressing the
indicated on the main control panel. Backpage mode can be exited by
pressing the two buttons simultaneously again.
In Backpage mode, the
functions and the displays will change to indicate the parameter values.
For the
EQ display, there are two letter abbreviations above some of the
columns that indicate the parameter controlled in Backpage mode. Select
the parameter to be edited with the left and right band select buttons
and adjust the value with the knob.
HH ENABLE and CALIBRATE buttons simultaneously, as
EQ controls and the Effect knob take on different
If you have trouble with calibration and need to get back to the default
setting, point the front of the sensor (the H logo) straight up towards the
ceiling and run the calibration procedure again.
- Continued
Backpage Parameters | 2120 | Use with Hot Hand
Page 12

Here is the list of parameters that can be edited in Backpage mode:
Noise Gate (NG)
This sets the threshold of the noise gate. Lower values lower the threshold, and result in less gating action. The default value is set to what
seems appropriate to the noise level in our box, which is rather low. You
might want to raise the threshold to deal with other noise in your system.
If you just don’t like gates, lower the threshold all the way to the bottom.
Hot Hand Gain (HG)
The gain or depth of the Hot Hand signals can be adjusted with this parameter. Increasing the value from the default will make Hot Hand have
more effect with less motion. Decreasing the gain will do the opposite.
Hot Hand Smoothing (HS)
This controls the amount of smoothing (ltering) on the Hot Hand signals.
Similar to the motion knobs on other Hot Hand products. Turning this up
will result in more smoothing on the signal.
Hot Hand Axis (HA)
Controls the Hot Hand axis used. The default value of this parameter
uses the X axis. Any other value will select the Y axis.
Hot Hand Range (HR)
Adjusts the overall range of the Hot Hand attenuation from a maximum
of
36 dB to a minimum of 18 dB. The bottom default value is 36 dB, 18 dB
is the top.
MIDI Channel (Effect Knob)
The label numbers around the effect knob correspond to
1 through 16. Channel 1 is the default. This is a global setting and not
MIDI Channels
saved for individual presets.
Don’t forget to save the preset after editing the Backpage parameters.
All of the Backpage parameters except the
MIDI Channel are saved per
preset. To reset values to the default, press both left and right column
select buttons at the same time.
SPECIFICATIONS
Dimensions
• L: 7 inches (18.1cm)
• W: 6 inches (18.1cm)
• H: 2 inches (including knobs)
Weight
• 1.75 lbs
Power
• 110mA @ 9 VDC (max 145mA w/ Hot Hand
Wireless Adapter)
• NEGATIVE tip power jack
AudioPerformance
• 115dB audio ADC
• 24 bit audio conversion
• 56 bit digital data path
• Analog bypass
TROUBLESHOOTING
Noise
Near noise source Move pedal away from power supplies and other equipment.
Other equipment Remove other effects from signal chain, see if noise persists.
Bad cables Swap out audio cables.
HotHanddoesn’twork
Not calibrated properly Calibrate the Hot Hand - see page
Not connected Check Hot Hand connections.
Knobsdon’twork/lightup
Wrong power supply Use correct power supply as dened on pages
For additional assistance, please visit www.sourceaudio.net.
20.
4 and 8.
If possible, dispose of the device at a recycling center. Do not dispose of the device
with the household waste.
For full compliance with EN 61000-4-6 standard, input cable must be less than
3 meters in length.
Specications and Troubleshooting | 2322 | Backpage Parameters
Page 13

LIMITED WARRANTY
Source Audio, LLC (hereinafter “Source Audio”) warrants
that your new Source Audio Soundblox Effects Pedal,
when purchased at an authorized Source Audio dealer
in the United States of America (“USA”), shall be free
from defects in materials and workmanship under
normal use for a period of one (1) year from the date
of purchase by the original purchaser. This Limited
Warranty does not extend to the batteries which are
purchased as is. Please contact your dealer for information on warranty and service outside of the USA.
Under this Limited Warranty, Source Audio’s sole
obligation and the purchaser’s sole remedy shall be
repair, replacement, or upgrade, at Source Audio’s
sole discretion, of any product that, if properly used and
maintained, proves to be defective upon inspection by
Source Audio. Source Audio reserves the right to update
any unit returned for repair and to change or to improve
the design of the product at any time without notice.
Source Audio reserves the right to use reconditioned
parts and assemblies as warranty replacements for
authorized repairs. Any product repaired, replaced, or
upgraded pursuant to this Limited Warranty will be warranted for the remainder of the original warranty period.
This Limited Warranty is extended to the original retail
purchaser. This Limited Warranty can be transferred to
anyone who may subsequently purchase this product
provided that such transfer is made within the applicable
warranty period and Source Audio is provided with all
of the following information: (i) all warranty registration
information (as set forth on the registration card) for the
new owner, (ii) proof of the transfer, within thirty (30)
days of the transfer, and (iii) a photocopy of the original
sales receipt. Warranty coverage shall be determined by
Source Audio in its sole discretion. This is your sole
warranty. Source Audio does not authorize any third
party, including any dealer or sales representative, to
assume any liability on behalf of Source Audio or to
make any warranty on behalf of Source Audio.
WARRANTYINFORMATION
Source Audio may, at its option, require proof of the
original purchase date in the form of a dated copy of
original authorized dealer’s invoice or sales receipt.
Service and repairs of Source Audio products are to
be performed only at the Source Audio factory or a
Source Audio authorized service center. Prior to service
or repair under this Limited Warranty, the purchaser
must request from Source Audio a return authorization,
which is available at:
Source Audio LLC
120 Cummings Park, Woburn, MA 01801
(781) 932-8080 or at www.sourceaudio.net.
Unauthorized service, repair, or modication will void
this Limited Warranty.
DISCLAIMERANDLIMITATIONOFWARRANTY
DO NOT OPEN THE EFFECTS PEDAL UNDER ANY CIRCUMSTANCE.
THIS WILL VOID THE WARRANTY.
THE FOREGOING LIMITED WARRANTY IS THE ONLY WARRANTY
GIVEN BY SOURCE AUDIO AND IS IN LIEU OF ALL OTHER WARRANTIES. ALL IMPLIED WARRANTIES, INCLUDING WARRANTIES
OF MERCHANTABILITY AND FITNESS FOR ANY PARTICULAR
PURPOSE, EXCEEDING THE SPECIFIC PROVISIONS OF THIS
LIMITED WARRANTY ARE HEREBY DISCLAIMED AND EXCLUDED
FROM THIS LIMITED WARRANTY. UPON EXPIRATION OF THE
APPLICABLE EXPRESS WARRANTY PERIOD, SOURCE AUDIO
SHALL HAVE NO FURTHER WARRANTY OBLIGATION OF ANY KIND,
EXPRESS OR IMPLIED. SOURCE AUDIO SHALL IN NO EVENT BE
LIABLE FOR ANY SPECIAL, INCIDENTAL OR CONSEQUENTIAL
DAMAGES SUFFERED BY THE PURCHASER OR ANY THIRD
PARTY, INCLUDING WITHOUT LIMITATION, DAMAGES FOR LOSS
OF PROFITS OR BUSINESS OR DAMAGES RESULTING FROM USE
OR PERFORMANCE OF THE PRODUCT, WHETHER IN CONTRACT
OR IN TORT. SOURCE AUDIO SHALL NOT BE LIABLE FOR ANY
EXPENSES, CLAIMS OR SUITS ARISING OUT OF OR RELATING
TO ANY OF THE FOREGOING. Some states do not allow the
exclusion or limitation of implied warranties so some
of the above limitations and exclusions may not apply
to you. This Limited Warranty gives you specic legal
rights, and you may also have other rights, which vary,
from state to state. This Limited Warranty only applies
to products sold and used in the USA. Source Audio
shall not be liable for damages or loss resulting from
the negligent or intentional acts of the shipper or its
contracted afliates. You should contact the shipper for
proper claims procedures in the event of damage or loss
resulting from shipment.
©SOURCEAUDIOLLC 120 CUMMI NGS PARK, WOB URN, MA 018 01 SOURCE AUDIO.NET
 Loading...