

Page 1
BASS ENVELOPE FILTER
USER’S GUIDE
SA14 3
Page 2

WELCOME
Thank you for purchasing the Soundblox Pro Bass Envelope Filter. The
effect unit specially optimized for the bass guitar. With
individual filter types, the
sounds, from traditional filter effects to advanced & unique
filter sounds.
BEF Pro offers a unique and useful variety of control
The
options. The unit functions as either an envelope follower or
LFO (Low Frequency Oscillator) driven filter, but is also
an
controllable with a standard expression pedal or our patented Hot Hand
The Quick Start guide will help you with the basics. For
more in-depth information about the
the following sections.
Enjoy!
The Source Audio team
BEF Pro is a highly flexible envelope filter
23
BEF Pro contains a wide range of
®
motion sensor ring,
BEF Pro, move on to
Page 3

OVERVIEW
DIVERSE SOUND PALETTE
Featuring
FLEXIBLE ENVELOPE CONTROL
A highly bass-optimized envelope follower with multiple sweep and
speed control options.
MODERN DESIGN
A thoughtfully designed box which features rugged construction and
sleek looks.
STATE-OF-THE-ART DSP
Our proprietary
clear
LO-RETAIN
Our unique mixing algorithm carefully preserves the lowest bass
frequencies.
6 USER PRESETS
Easy to configure user presets in two banks selectable via 3 footswitches
for quick access to your favorite sounds.
7-BAND EQUALIZER
Ultra-precise 7-band equalizer for in-depth tone control saved per preset.
23 types of envelope filter and phaser effects.
56-bit Digital Signal Processor, the SA601, and crystal
24-bit converters.
FILTER CONTROL
The filter effects can be modulated with an envelope follower, an
(low frequency oscillator), expression pedal, or our patented Hot Hand
Motion Control sensor ring.
BACKPAGE PARAMETERS
a second level of control functions, providing access to different
shapes,
ACTIVE ANALOG BYPASS
Bypass is fully routed around the
signal degradation.
Q levels, customized expression pedal routing.
DSP and active input ensures zero
LFO
LFO
Page 4
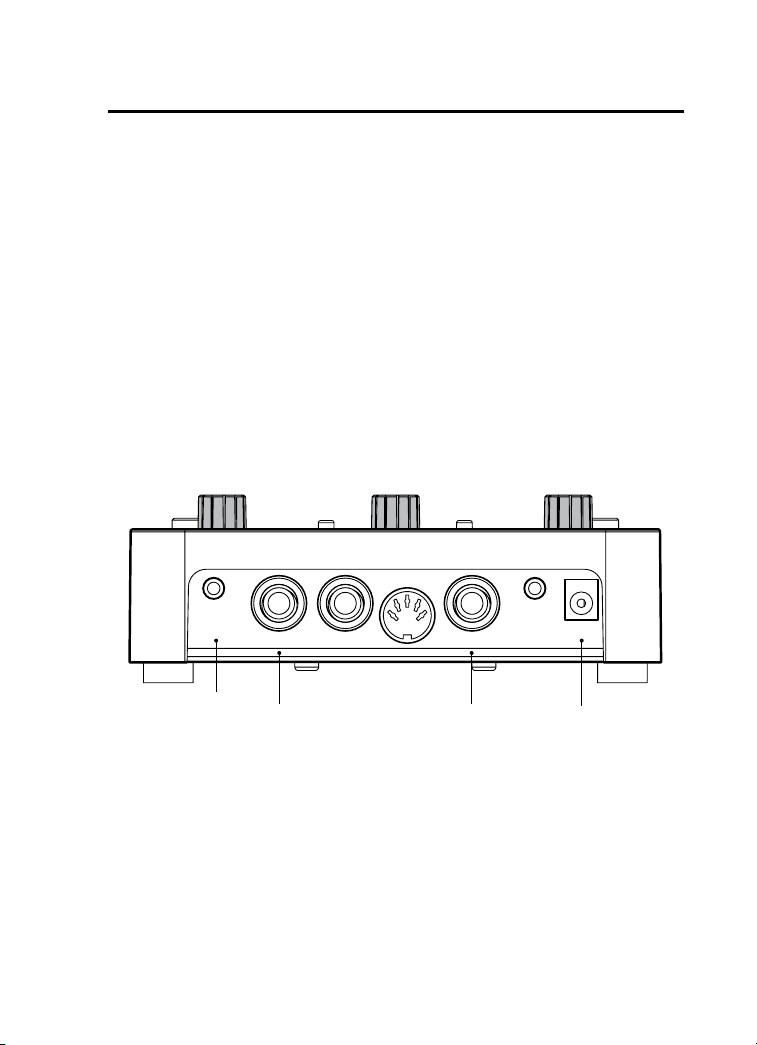
QUICK START
1. POWER
To power the unit, connect the included
the
9V DC jack (A) on the back panel. Note: Using a different supply
could damage the unit and void the warranty.
2. GUITAR/AUDIO CONNECTIONS
Next, plug your bass (or other instrument) into the jack labeled
IN (B)
via a standard ¼" cable. Connect your amp (or other audio device)
to the
GUITAR OUT jack (C), again with a standard ¼" cable. Both input
and output are mono signals.
3. SENSOR IN (optional)
To use your
SENSOR IN (D) jack and follow any instructions given with the sensor
BEF Pro with a Hot Hand sensor, connect the sensor to the
SENSOR
IN
GUITAR IN GUITAR OUT
EXP IN
DC adapter power supply to
MIDI IN
SENSOR
OUT
9V DC
GUITAR
D
CB
A
4. BRIEF KNOB AND PEDAL DESCRIPTIONS
See Controls section for more details.
A EFFECT: selects desired filter type
B SWEEP RANGE: adjusts the direction (up/down) and breadth of the
filter sweep or the depth of the
C FREQUENCY: adjusts the center frequency of the filter
4 | Quick Start
LFO and Hot Hand modulation.
Page 5

D SPEED: Controls the attack and decay speed of the envelope fol-
lower, the
LFO speed, or the motion-sensitivity of the Hot Hand.
E MIX: adjusts the ratio of clean to wet signals.
F PRESET BANK BUTTON: select preset bank A (presets 1, 2, and 3) or
B (presets 4, 5, and 6).
G MOD SOURCE: selects between ENVELOPE, LFO, and HOT HAND as
the modulation source for the filter effect.
H TAP TEMPO ENABLE: Enables a tap tempo function for use with the
LFO.
I EQ SECTION: the two buttons select the frequency band to edit and
the knob adjusts the value of the selected band.
J FOOTSWITCHES: Enables/Disables a selected preset depending
on the currently selected preset bank. Press and hold to save an
edited preset. The switch to the far right also sets the tap tempo.
A
SWEEP RANGE SPEED
MINMIN
DOWN UP
B D
MAX MAX
HOT
HAND
C
FREQUENCY MIX
F
PRESET BANK
14
4 POLE LOW PASS SINGLE PEAK
2 POLE LOW PASS
4-61-3
11
10
12
09
08
07
06
05
04
03
02
(XD) (XC) (OE) (VA) (Q) (EL) (LS)
+12
0
-12
62 125 250 500 1K
< >
13
14
00
EQ ONLY
20
21
PHASERS
22
2K 4K
01
15
19
BASS ENVELOPE FILTER
25
TRIPLE PEAK
16
17
18
PEAK & NOTCH
USER
ATTACK
& DECAY
Y-AXIS
SLOW SLOW
WET
BACKPAGE
MODE
FAST FAST
LFO
DRY
MOD
SOURCE
TAP TEMPO
ENABLE
DECAY
WET
3
(TAP TEMPO)
X-AXIS
ENVELOPE
LFO
HOT HAND
(HOLD)
CALIBRATE
6
Quick Start | 5
E
G
H
I
J
Page 6

FEATURES
The Soundblox Pro Bass Envelope Filter is a very flexible envelope filter
effect. The unit features multiple filter types ranging from simple to
complex, which can all be controlled by an Envelope Follower, an
(Low-Frequency Oscillator), the Hot Hand Motion Sensor or an Expression Pedal.
An Envelope Follower is an algorithm that responds to the amplitude (or
volume) of the incoming signal and creates a control signal based on the
input level. This control signal is used to modulate the filter to create an
auto-wah effect. (Note: The envelope follower signal can be reset to zero
between notes by a very brief moment of silence, allowing the next note
played to experience the full sweep of the filter effect all the way from its
starting point)
An LFO (low frequency oscillator) is an electronic signal that uses a
rhythmic pulse or sweep to create a control signal. This control signal
is used to modulate the filters of the
filter or sequencer-like effect. The
BEF Pro to create an oscillating
BEF Pro also features a variety of LFO
shapes including sine, square, saw, step and triangle, each of which can
dramatically change the sound of the effect.
The Hot Hand Motion Sensor uses data from an accelerometer placed
inside a wearable ring to modulate the filters of the
BEF Pro. Either a
wired or wireless sensor can be plugged into the sensor input on the
back panel. After the sensor is plugged in, use the
MOD SOURCE button
to select “Hot Hand Mode”. At this point the controls take on slightly different functions. Note that the calibrate feature is intended for use with
the “Hot Hand Mode” only.
LFO
An Expression Pedal can be used to control a variety of selectable parameters in the
BEF Pro including direct filter modulation like a standard
wah pedal.
The
BEF Pro features LO-RETAIN, an algorithm that alleviates the issue of
low-end “tone suck” commonly experienced with bass effects.
6 | Features
Page 7
CONNECTIONS
GUITAR IN
Connect your bass guitar or other instrument here using a standard
MONO ¼" cable.
GUITAR OUT
Connect this to your amp, pedal, or other audio device.
EXPRESSION IN (optional)
Connect a passive expression pedal that uses a
expression pedal is assignable to a variety of parameters.
SENSOR IN (optional)
Connect an optional Hot Hand sensor here, either wired or wireless.
SENSOR OUT (optional)
Use a Source Audio daisy-chain cable to connect this jack to the sensor
input of another pedal.
MIDI IN (optional)
MIDI program and continuous control input. Connect to a MIDI output
with a standard
MIDI cable. Can also be used to sync the LFO with a MIDI
clock.
9V DC
Connect the included 9 Volt
DC power supply here. Use of a non-Source
Audio power supply may cause damage and void the warranty.
TRS plug here. The
SENSOR
IN
MIDI IN
GUITAR IN GUITAR OUT
EXP IN
SENSOR
OUT
9V DC
Connections | 7
Page 8
CONTROLS: KNOBS
4 POLE LOW PASS SINGLE PEAK
SWEEP RANGE
EFFECT (not labeled)
The effect knob selects which filter type will be used. There are
positions (
In the
equalizer still applies. For information on the individual settings see the
Effect Types section.
SWEEP RANGE
In Envelope and Hot Hand modes, the sweep range knob controls the
direction and breadth of the filter sweep. The right side of the knob
(labeled
range as you turn the knob clockwise. The left side of the knob (labeled
DOWN) adjusts the breadth of the downward sweep, adding greater
range as you turn the knob counterclockwise. In
controls the depth of the upward and downward sweep, but keep in mind
that symmetric
random) will sound the same in either sweep direction. Conversely,
non-symmetrical
sound very different, depending on the direction of the sweep.
0 through 22) around the knob as well as a setting for EQ ONLY.
EQ ONLY mode, the envelope filter effect is bypassed but the
2 POLE LOW PASS
05
04
10
09
08
07
06
03
02
01
00
EQ ONLY
12
13
14
15
TRIPLE PEAK
16
17
18
PEAK & NOTCH
19
20
21
PHASERS
22
11
UP) adjusts the breadth of the upward sweep, adding greater
LFO mode the knob also
LFO shapes (i.e. sine, square, 6 and 8 step triangle, and
LFO shapes (i.e. rising saw and step sequences) will
23 effect
8 | Controls: Knobs
HOT
HAND
MINMIN
DOWN UP
MAX MAX
Page 9
FREQUENCY
SPEED
The Frequency knob sets the center frequency of the filter sweep in all
modulation modes. Turning the knob counterclockwise will result in the
filter moving over lower frequencies for a darker sound. Turning the knob
clockwise will result in the filter sweep moving over higher frequencies
for a brighter sound.
SPEED
FREQUENCY
The Speed knob controls the attack and decay time of the envelope
follower or the rate of the
control is divided into two parts. Turn the knob to the left of
LFO. In Envelope mode, the range of the speed
12 o’clock to
adjust both the attack and decay times—as the knob is turned counterclockwise both will slow down equally. Turn the knob to the right of
12 o'clock and the attack will stay fixed at its fastest setting while the
decay time gets slower. In Hot Hand mode, this knob controls the sensitivity of the motion sensor and selects which axis of the sensor will be used.
ATTACK
& DECAY
Y-AXIS
FAST FAST
DECAY
X-AXIS
SLOW SLOW
LFO
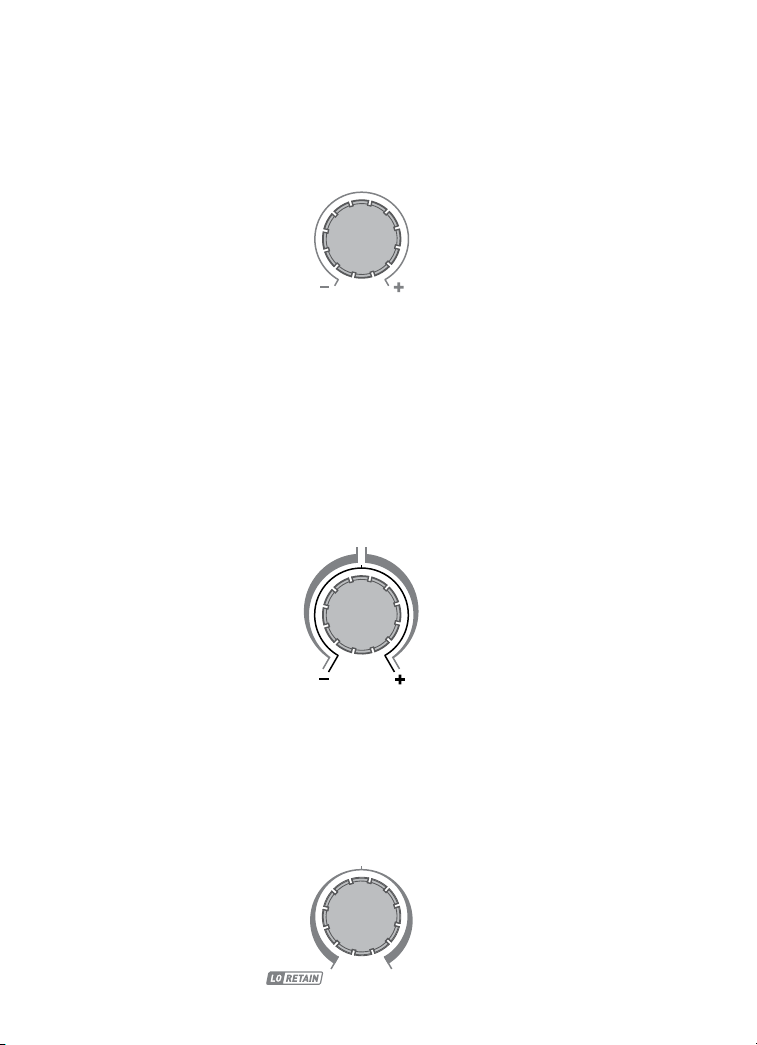
MIX
The Mix knob adjusts the ratio of dry to wet signal. This knob is also
divided into two halves. Setting the Mix knob to
100% dry signal. Turning the knob to the right of 12 o’clock increases the
12 o’clock results in a
amount of wet signal while decreasing the dry. The right most position
results in a 100% wet signal. Turning the Mix Knob left of 12 o’clock
increases the amount of wet signal using
of the low-end bass frequencies.
LO-RETAIN to preserve more
DRY
WET
WET
MIX
Controls: Knobs | 9
Page 10

CONTROLS: EQUALIZER
One of the key features of the BEF Pro is the 7-band graphic equalizer.
Each band can be adjusted up or down in 1 dB steps from -12 dB to +12
dB. The display shows 1 dB steps by lighting adjacent
brightness. The factory default places the
ing the
EQ to both the wet and dry signals. Alternatively, a special Back-
EQ after the MIX control apply-
page parameter (See Backpages instructions) offers the option of placing
the
EQ on just the wet signal. Another Backpage parameter extends the
EQ by an octave and allows access to the adjustment of one additional
high frequency band (
8K). The equalizer section has three controls:
BAND SELECT LEFT and RIGHT
The two buttons on either side of the
EQ knob select the frequency band
to edit.
EQ knob
The equalizer knob changes the value of the selected band up or down in
1 dB steps.
Tip: You can quickly and easily zero the equalizer by pressing both left
and right band select buttons at the same time. The equalizer display
will reset to a default “flat” setting.
LEDs with varying
10 | Controls: Equalizer
(XD) (XC) (OE) (VA) (Q) (EL) (LS)
+12
0
-12
62 125 250 500 1K
< >
EQ Knob
USER
2K 4K
Band Select RightBand Select Left
Page 11

CONTROLS: OTHER BUTTONS
PRESET BANK
There are six available user presets in two banks. Switch between banks
by pressing the
pressing the corresponding footswitches will select presets
When preset bank
6. The indicator lights above each footswitch alternate from green for
bank
A to red for bank B.
MOD SOURCE
Pressing this button selects between the three choices of modulation
source: Envelope,
modulation source, press and hold the
Hot Hand Calibration procedure. (See the Use with Hot Hand section for
calibration instructions).
TAP TEMPO ENABLE
When
LFO is selected as the modulation source, press this button to
enable Tap Tempo Mode. The rightmost footswitch will be converted to
a tap tempo control. Press the
tap tempo. Tap tempo only applies in
PRESET BANK button. When preset bank A is selected,
1, 2, or 3.
B is selected, the footswitches select presets 4, 5, and
Bank BBank A
4-61-3
PRESET BANK
LFO, and Hot Hand. When Hot Hand is selected as the
MOD SOURCE button to start the
TAP TEMPO MODE button again to disable
LFO mode.
BACKPAGE
MODE
MOD
SOURCE
TAP TEMPO
ENABLE
ENVELOPE
LFO
HOT HAND
(HOLD)
CALIBRATE
Controls: Other Buttons | 11
Page 12

17
02
03
04
05
06
07
08
09
10
11
12
13
14
15
16
18
19
21
20
01
EQ ONLY
2 POLE LOW PASS
4 POLE LOW PASS SINGLE PEAK
TRIPLE PEAK
PEAK & NOTCH
PHASERS
62 125 250 500 1K
(XD) (XC) (OE) (VA) (Q) (EL) (LS)
2K 4K
+12
-12
0
< >
MOD
SOURCE
TAP TEMPO
ENABLE
PRESET BANK
4-61-3
(HOLD)
CALIBRATE
BACKPAGE
MODE
ENVELOPE
LFO
HOT HAND
USER
00
22
SWEEP RANGE SPEED
FREQUENCY MIX
FAST FAST
SLOW SLOW
WET
DRY
WET
DECAY
X-AXIS
ATTACK
& DECAY
Y-AXIS
HOT
HAND
LFO
MINMIN
DOWN UP
MAX MAX
CONTROLS: FOOTSWITCHES
There are three footswitches on the BEF Pro. From left to right, the
footswitches correspond to presets
and
6 for bank B. Pressing any of the buttons will engage a given preset.
Pressing the footswitch for the currently engaged effect will put the unit
into bypass mode. Pressing another switch will engage the corresponding preset without going into bypass.
The indicator lights above the three footswitches are bi-color and will
change depending on which bank is selected. Bank
while bank
to blink, indicating that the preset has been changed. When a preset
has been edited, pressing and holding any of the switches will save
the changes to the corresponding preset. The
indicate that the preset has been saved. Once changes are saved, the
LED will be lit solidly. See the “Preset Saving” section for other saving
options.
Note: Changes made to a preset will be lost if you go into bypass or
switch to another preset without saving.
Tap Tempo
In Tap Tempo Mode, the rightmost footswitch can be used to change the
speed of the
new
B presets are red. When a preset is edited, the LED will begin
LFO speed. The tapped speed will be one cycle of the LFO. The new
LFO. Tap the footswitch at least two times in rhythm to set a
speed will also be reflected in the blinking
1, 2, and 3 for preset bank A and 4, 5,
A presets are green
LED will blink quickly to
LED above the footswitch.
14
BASS ENVELOPE FILTER
12 | Controls: Footswitches
25
3
(TAP TEMPO)
6
Page 13

EFFECT TYPES
4 POLE LOW PASS SINGLE PEAK
The following are brief technical descriptions of the filter effects included
in the
BEF Pro. Some of the filter types are intended to approximate, but
not exactly copy, some common and well-known bass envelope filter effects. These are marked below.
11
2 POLE LOW PASS
07
06
05
04
10
09
08
03
02
01
2 POLE FILTERS
00 Three two-pole resonant low-pass filters in parallel.
01 Resonant low pass. A flat response at low frequencies, rising to a
resonant peak, and then falling at
Q). This setting creates sounds similar to the 3leaf Groove Regulator
00
EQ ONLY
12
13
14
15
TRIPLE PEAK
16
17
18
PEAK & NOTCH
19
20
21
PHASERS
22
12 dB/octave. Low resonance (low
02 Resonant low pass. High resonance (high Q).
03 Notch, Resonant low pass. The frequency response begins flat, then
has a deep notch, then back to flat, and then a resonant peak followed by a
12 dB/octave fall. This setting creates sounds similar to the
Pigtronix EP-1.
04 Notch, Notch, Resonant low pass. Same as 03, but with two notches.
Continued
-
Effect Types | 13
Page 14

05 Peak, Notch, Resonant low pass. A resonant peak, followed by a
notch, followed by a resonant low pass.
06 Resonant low pass, Peak, Peak. As the response of the low pass
filter falls, the fall is interrupted by two peaks. The low pass resonant peak moves in the opposite direction from the additional higher
frequency peaks.
07 Two resonant low pass filters in parallel. This setting creates sounds
similar to the EHX Bass Balls.
4 POLE FILTERS
08 Resonant four pole low pass. Like the two pole low pass, but after
the resonant peak, the signal falls at
09 Four pole low pass with two resonant peaks. The resonant peaks are
separated by
10 Peak, Four pole low pass. A four pole low pass with an extra peak
1.3 octaves.
24 dB/octave.
at a lower frequency than the resonant peak.
11 Four pole low pass, Peak. A four pole low pass with an extra peak
at a higher frequency than the resonant peak.
SINGLE PEAK
12 Peak. The frequency response is flat, except in the region around the
peak. Moderate Q.
13 Peak. As above, with higher Q.
These two settings can be used to approximate the low and high Q sounds
of the
MXR Bass Envelope Filter.
14 | Effect Types
Page 15

TRIPLE PEAKS
14, 15 Three peaks moving together.
16, 17 Three peaks moving in opposing directions.
PEAKS AND NOTCHES
18 Peak, Notch, Peak.
19 Notch, Peak, Notch.
PHASERS
20 Notch, Notch. A pair of frequency response notches creates a
standard two notch phaser. There is a little feedback to boost the
non-notched frequencies.
21 Notch, Notch, Notch. A three notch phaser with some feedback.
22 Two notch phaser with high feedback
EQ ONLY – No Filter
23 EQ Only. Select this setting to bypass the filter to use the BEF Pro as
an equalizer only.
Effect Types | 15
Page 16

PRESET SAVING
17
02
03
04
05
06
07
08
09
10
11
12
13
14
15
16
18
19
21
20
01
EQ ONLY
2 POLE LOW PASS
4 POLE LOW PASS SINGLE PEAK
TRIPLE PEAK
PEAK & NOTCH
PHASERS
(XD) (XC) (OE) (VA) (Q) (EL) (LS)
+12
ENVELOPE
LFO
USER
00
22
SWEEP RANGE SPEED
FREQUENCY MIX
FAST FAST
SLOW SLOW
WET
DRY
WET
DECAY
X-AXIS
ATTACK
& DECAY
Y-AXIS
HOT
HAND
LFO
MINMIN
DOWN UP
MAX MAX
An edited preset can be saved by pressing and holding a footswitch as
described in the Controls: Footswitches section. But keep in mind that
an edited preset can be saved to any one of the
For example if preset
to preset location
1 has been selected and edited, it can be saved
3 by pressing and holding the 3/6 footswitch. Once the
preset has been saved to that location, the new location will be the
selected preset.
6 preset locations.
Presets can be copied across preset banks by holding the
button while pressing and holding a footswitch. For example, if preset
2 has been selected and edited, holding the PRESET BANK button while
pressing and holding footswitch
tion
5. Once the preset is saved to another bank, the preset in the current
bank will stay selected and
saved elsewhere as a new preset.
PRESET BANK
14
4-61-3
A
2/5 will save the current settings to loca-
NOT be saved to its own location since it was
0
-12
< >
62 125 250 500 1K
2K 4K
BASS ENVELOPE FILTER
25
B
BACKPAGE
PRESET BANK
MOD
SOURCE
MODE
TAP TEMPO
ENABLE
HOT HAND
CALIBRATE
3
(TAP TEMPO)
(HOLD)
6
16 | Preset Saving
Page 17

SYNCHRONIZING THE LFO:
The LFO will start from zero in its pattern every time the pedal is
switched on or a new tempo has been set using tap tempo. This facilitates the synchronization of the
tracks. Resynchronization will also happen when switching from one
preset to another.
LFO to other musicians or recorded
USE WITH AN EXPRESSION PEDAL:
A passive expression pedal can be connected via the BEF Pro’s expression
input. Use an expression pedal to control a variety of functions that can
be set in the Backpage mode (see Backpage Parameters section). For
example, use an expression pedal to manually modulate a filter effect
in the same fashion as a wah-wah pedal, control the
effect, switch quickly between effect types, or control the depth and
sweep range of a chosen effect.
LFO speed of an
Synchronizing the LFO, Use with an Expression Pedal | 17
Page 18

USE WITH HOT HAND
®
While the primary function of the BEF Pro is as a standalone effect pedal
you also have the option of exploring some additional functions by plugging in a Hot Hand sensor. After connecting the sensor, use the
SOURCE
button to select Hot Hand mode. In Hot Hand mode, some knobs
MOD
assume an alternate function (see below).
Hot Hand Basics:
The Hot Hand motion sensors are sold separately and come in either
wired or wireless versions. Both will work with the BEF Pro. Additionally, the
SENSOR IN jack will be compatible with any future Source Audio
sensors.
The Hot Hand ring contains an accelerometer that responds to
acceleration and is not based on any type of proximity to the guitar.
By moving your hand or by changing the position of your hand you
can modulate the effect. For a good description of Hot Hand Theory,
download the Hot Hand Motion Controlled Wah Filters manual. It is
available at www.sourceaudio.net.
In Hot Hand mode, the
SWEEP RANGE knob becomes the depth of the
effect based on the sensor input. It can alternatively be thought of as a
gain control for the Hot Hand signal. Increasing the depth will cause the
filter to move more based on smaller motions of the sensor. Decreasing
the depth will decrease the movement of the filter. In Hot Hand mode,
the depth increases by turning the knob to the left or right. In the “Up”
region the motion of the filter will be from low to high and in the “Down”
region the filter will move from high to low. This effectively inverts the
Hot Hand signals.
The
SPEED control adjusts the ring’s sensitivity in Hot Hand mode and
also selects which axis of the accelerometer will be used. The left side
of the knob selects and controls the response speed for the Y-axis of the
Hot Hand motion sensor while the right side selects and controls the
speed of the X-axis.
18 | Use with Hot Hand
Page 19

Select either the X or Y axes by turning the knob to the right or the left,
respectively. Once an axis is selected, turn the knob toward either extreme labeled
Turning the knob towards
SLOW to smooth out fast changes from the sensor signal.
SLOW provides the most amount of smoothing
causing the effect to react to only large, deliberate motions of the sensor.
Turning the knob all the way to
FAST sets the smoothing at a minimum.
This means that fast changes in the sensor signal will be applied to the
effect and the motions created from normal picking will be enough to
move the filter.
Calibration
The
BEF Pro has a calibration feature that is only used in Hot Hand
mode. However, calibration is not required before use. The calibration
feature allows you to set the midpoint of the filter sweep for any position of your hand. Depending on your playing style, you may find it useful
to try some different calibration positions. The most common use of
calibration is setting your resting hand position on the guitar to be the
midpoint of the filter sweep. Calibration can also be useful if you are putting the sensor on a headband or other alternate locations.
To perform a calibration:
1. Select a preset by pressing a footswitch.
2. Select Hot Hand mode with the
3. Press and hold the
MOD SOURCE button to put the BEF Pro into
Calibrate Mode. The Hot Hand
MOD SOURCE button.
LED will begin to blink slowly.
4. Put the Hot Hand sensor into the desired calibration position.
5. Press the footswitch for the currently selected preset.
6. The Calibrate
LED will blink until the calibration is complete.
Note: Calibration can be cancelled by pressing the
MOD SOURCE button
again.
If you have trouble with calibration and need to get back to the default
setting, place the sensor on a flat, level surface with the blue
LED facing
down and run the calibration procedure again.
Use with Hot Hand | 19
Page 20

MIDI CONTROL
The BEF Pro can optionally be controlled by an external MIDI controller,
such as the Hot Hand
the knob parameters as well as several other Backpage parameters are
controllable via
can also be selected by
also be put into bypass in this way. The following table describes the use
of the
MIDI input.
MIDI implementation
Parameter Message Type Data Value
Enable Preset 1 Program Change 001
Enable Preset 2 Program Change 002
Enable Preset 3 Program Change 003
Enable Preset 4 Program Change 004
Enable Preset 5 Program Change 005
Enable Preset 6 Program Change 006
Disable Preset – Bypass Program Change 007
Note: Presets can be remapped to alternate program change values.
Please visit the
details.
Parameter Message Type Data Value 1 Data Value2
Frequency Continuous Controller 020 0–127
Depth Continuous Controller 021 0–127
Wet/Dry Mix Continuous Controller 022 0–127
Speed Continuous Controller 023 0–127
MIDI-EXP controller, through the MIDI input. All of
MIDI Continuous Controller messages. Individual presets
MIDI Program Change messages. The unit can
BEF Pro product page at www.sourceaudio.net for
The
MIDI Channel is selectable as a Backpage parameter. Please see the
Backpage Parameters section for more details.
Note:
MIDI Channel is a global setting and will not be saved per preset.
20 | MIDI Control
Page 21

BACKPAGE PARAMETERS
The BEF Pro has some additional editable parameters accessible via
the special Backpage mode. Pressing the
ENABLE
buttons simultaneously enables the Backpage mode, as indicated on the main control panel. All Modulation Source
Tap Tempo Enable
LED will be lit to indicate that the unit is in Backpage
mode. The Backpage mode can be exited by pressing the two buttons
simultaneously again.
BACKPAGE
MODE
MOD
SOURCE
TAP TEMPO
ENABLE
MOD SOURCE and TAP TEMPO
LEDs and the
ENVELOPE
LFO
HOT HAND
(HOLD)
CALIBRATE
In Backpage mode, the
EQ controls and the Effect knob take on different
functions and the displays will change to indicate the parameter values.
For the
EQ display, there are two letter abbreviations above the columns
that indicate the parameter controlled in Backpage mode. Select the
parameter to be edited with the left and right Band Select buttons and
adjust the value with the knob.
(XD) (XC) (OE) (VA) (Q) (EL) (LS)
+12
0
-12
62 125 250 500 1K
< >
USER
2K 4K
To return to the default Backpage settings, press both Band Select buttons at the same time. All Backpage parameters will return to factory
default settings. Unless otherwise noted, all Backpage parameters are
save per preset.
-
Continued
Backpage Parameters | 21
Page 22

Below is the list of editable Backpage parameters.
Expression Pedal Depth (XD)
The ‘
XD’ parameter can be used to modify the range or depth of an
expression pedal connected to the
BEF Pro. Many of the available param-
eters assignable to the expression pedal input will sound best when the
depth is not set to its maximum range.
- A single light in the +12 position denotes the maximum
depth of positive value.
- A single light in the -12 position denotes the maximum
depth of negative value.
- A single light in the ‘0’ position is a neutral selection that
effectively disables the expression input.
Expression Pedal Control (XC)
The ‘
XC’ parameter can be used to select the input destination of an
expression pedal or the
LFO. Any of the four control knobs (Frequency,
Sweep Range, Speed, and Mix) may be a destination. Filter modulation
and the effect selector knob are also available destinations.
When controlling a knob parameter, the knobs remain active with the
expression pedal signal summed with the knob position. This sum value
is pinned to stay within the full control range of the knobs alone. To
enable control of the entire range of a knob with an expression pedal,
it is important to set the destination knob to the full counter-clockwise
position. Otherwise, the value will pin and some of the range of the
expression pedal will not have any effect.
It is important to note that the signal from the expression pedal is
identical to the action of turning each knob. The range and direction
of the expression pedal is dictated by the ‘
set to a parameter above the neutral ‘
XD’ parameter. When ‘XD’ is
0’ position (towards +12), moving
the expression pedal forward will be like turning the destination knob
clockwise. When ‘
(towards -
12), moving the expression pedal forward will be like turning
XD’ is set to a parameter below the neutral ‘0’ position
the destination knob counter-clockwise.
22 | Backpage Parameters
Page 23

For example, in the case of the Sweep Range knob, this means that
500 1K
(VA) (Q) (EL) (LS)
2K 4K
>
USER
rocking the expression pedal forward while the knob is set to its full
counter-clockwise position may pass the signal from maximum negative
sweep through zero modulation to maximum positive sweep.
For split function knobs such as Sweep Range, it is advisable to set
the destination knob to
of its maximum positive (+
12 o’clock and set the ‘XD’ parameter to half
6) or negative (-6) so that the full range of
the expression corresponds to the full range of one function.
For single function knobs such as Frequency, it is advisable to set the
destination knob to it’s full counter-clockwise position and set the ‘
parameter to its maximum positive (+
12) so that the full range of the
XD’
expression pedal corresponds to the full range of the knob.
There are
13 possible ‘XC’ selections. Starting from the bottom (-12),
they are:
1. EXPRESSION PEDAL to SPEED
2. EXPRESSION PEDAL to SWEEP RANGE
3. EXPRESSION PEDAL to WET/DRY MIX
4. EXPRESSION PEDAL to MODULATION
5. EXPRESSION PEDAL to FREQUENCY
6. EXPRESSION PEDAL to EFFECT
13.
10.
7. LFO to EFFECT SELECTOR
8. LFO to EFFECT SELECTOR and
9. LFO to FREQUENCY
10. LFO to FREQUENCY and EXPRESSION
11. LFO to MODULATION and EXPRESSION
12. LFO2 TO MODULATION and EXPRESSION
13. LFO2 to EFFECT SELECTOR and
Selections in bold are denoted by
a single LED.
The 13 possible ‘XC’
selections start from
the bottom (-12) on
7.
4.
1.
the EQ panel.
(XD) (XC) (OE)
+12
0
-12
62 125 250
<
SELECTOR
EXPRESSION PEDAL to LFO SPEED
PEDAL to LFO SPEED
PEDAL to LFO SPEED
PEDAL to LFO2 SPEED
EXPRESSION PEDAL to LFO2 SPEED
For a more detailed explanation of each setting and some tips on how
they can be used, download the Expression Control Supplement from the
BEF Pro product page at www.sourceaudio.net
- Continued
Backpage Parameters | 23
Page 24

Octave Extension (OE)
This Backpage parameter offers a choice between a seven or eight band
equalizer. The illumination of the bottom most
of the factory default 7-band
EQ. The illumination of the second LED
from the bottom signifies the selection of an 8-band
8th
EQ band is one octave above the highest band in the default setting
LED signifies the selection
EQ. The additional
(8 Kilohertz).
Once the 8-band
EQ has been selected and the Backpages mode
has been exited, the additional 8K band can be accessed by scrolling
the
EQ all the way to the right, then hitting the right arrow button one
additional time. Each frequency band setting will shift one position to
the left opening access to the
8K band in the right most column.
Note: This is a global setting and will not be saved per preset.
Volume (VA)
Adjusts the pedal’s final output signal level. It is possible to change the
factory default output level by +/-
12dB in steps of 1 dB.
Q (Q)
First, let’s define what
Q is. In the early days of radio, the sharper the
band-pass filter in the tuner section was, the better the radio could tune
in a desired station and reject other stations at nearby frequencies. So
the sharpness of the filter was termed “quality”, or
Adjusting the Q parameter in the
BEF Pro multiplies all the Q’s in the
Q.
filter definition. Increasing the Q’s of the filters results in narrower and
sometimes higher peaks in the frequency response. In general, it will
sound wetter, although it is certainly possible to overdo it—the highest
Q settings are extreme. Notches in the frequency response, however,
will become less evident with higher Q’s (because they will become narrower.). Decreasing Q will create a dryer, less effect driven tone.
The center position of the
LED display represents a value of 1.0, or no
change to Q. Going up to higher values can reach a factor of
values go to
.25. Higher Q’s may require a volume reduction on the
Backpage.
24 | Backpage Parameters
20. Lower
Page 25

EQ Location (EL)
There are two possible
lowest
LED in the EQ Location column signifies the factory default set-
ting, which places the
wet and dry signal. Selecting the other
EQ locations within the pedal’s signal chain. The
EQ after the mix control, thereby affecting both the
LED position applies the EQ only
to the wet signal, leaving the dry signal unaffected.
LFO Shape Control (LS)
The
BEF Pro offers nine different LFO shapes. Within the EQ box on the
pedal’s faceplate, a graphic of each
corresponding
LED selector position. The available LFO shapes are:
LFO shape has been placed next its
1. User Downloadable Step Sequence with Up to
USER
16 Steps (factory set to 6 Step Triangle).
2. Random Steps
3. 8 Step Triangle
4. 4 Step Triangle
5. 4 Step Saw
6. Square
7. Rectified Sine
8. Rising Saw
9. Sine
Except for the random steps, all waveforms complete their entire cycle in
the same amount of time. The random step waveform does four steps in
that time interval.
The User Downloadable Step Sequence can be customized and saved to
the pedal via an upcoming software tool that will be available on the
BEF
Pro product page at www.sourceaudio.net
- Continued
Backpage Parameters | 25
Page 26

MIDI Channel (Effect Knob)
The label numbers around the effect knob correspond to
MIDI Channels
1 through 16. Channel 1 is the default. This is a global setting and not
saved for individual presets.
Don’t forget to save the preset after editing the Backpage parameters.
All of the Backpage parameters except the
MIDI Channel are saved per
preset. To reset values to the default, press both left and right column
select buttons at the same time.
PRESS
(XD) (XC) (OE) (VA) (Q) (EL) (LS)
+12
0
-12
62 125 250 500 1K
USER
2K 4K
PRESS
< >
Press both left and right column select buttons at
the same time to reset values to the default.
Restoring Factory Settings
The following procedure can be used to restore the factory settings to the
BEF Pro:
Press and hold the Preset Bank butting while plugging in the
supply. Note that this will also delete all saved presets and
DC power
MIDI User
sequences.
4-61-3
PRESS
PRESET BANK
26 | Backpage Parameters
Page 27

SPECIFICATIONS
Dimensions
• L: 7 inches (18.1cm)
• W: 6 inches (18.1cm)
• H: 2 inches (including knobs)
Total including knobs:
• H: 2.125 inches (5.5cm)
Weight
• 1.75 lbs
Power
• 110mA @ 9 VDC (max 145mA w/ Hot Hand
Wireless Adapter)
• NEGATIVE tip power jack
Audio Performance
• 115dB DNR audio ADC
• 24-bit audio conversion
• 56-bit digital data path
• Analog bypass
TROUBLESHOOTING
Noise
Near noise source Move pedal away from power supplies and other equipment.
Other equipment Remove other effects from signal chain, see if noise persists.
Bad cables Swap out audio cables.
Hot Hand doesn’t work
Not calibrated properly Calibrate the Hot Hand - see page
Not connected Check Hot Hand connections.
Knobs don’t work /light up
Wrong power supply Use correct power supply as defined on pages
20.
4 and 8.
For additional assistance, please visit www.sourceaudio.net.
If possible, dispose of the device at a recycling center. Do not dispose of the device
with the household waste.
For full compliance with EN 61000-4-6 standard, input cable must be less than
3 meters in length.
Specifications and Troubleshooting | 27
Page 28

LIMITED WARRANTY
Source Audio, LLC (hereinafter “Source Audio”) warrants
that your new Source Audio Soundblox Effects Pedal,
when purchased at an authorized Source Audio dealer
in the United States of America (“USA”), shall be free
from defects in materials and workmanship under
normal use for a period of one (1) year from the date
of purchase by the original purchaser. This Limited
Warranty does not extend to the batteries which are
purchased as is. Please contact your dealer for information on warranty and service outside of the USA.
Under this Limited Warranty, Source Audio’s sole
obligation and the purchaser’s sole remedy shall be
repair, replacement, or upgrade, at Source Audio’s
sole discretion, of any product that, if properly used and
maintained, proves to be defective upon inspection by
Source Audio. Source Audio reserves the right to update
any unit returned for repair and to change or to improve
the design of the product at any time without notice.
Source Audio reserves the right to use reconditioned
parts and assemblies as warranty replacements for
authorized repairs. Any product repaired, replaced, or
upgraded pursuant to this Limited Warranty will be warranted for the remainder of the original warranty period.
This Limited Warranty is extended to the original retail
purchaser. This Limited Warranty can be transferred to
anyone who may subsequently purchase this product
provided that such transfer is made within the applicable
warranty period and Source Audio is provided with all
of the following information: (i) all warranty registration
information (as set forth on the registration card) for the
new owner, (ii) proof of the transfer, within thirty (30)
days of the transfer, and (iii) a photocopy of the original
sales receipt. Warranty coverage shall be determined by
Source Audio in its sole discretion. This is your sole
warranty. Source Audio does not authorize any third
party, including any dealer or sales representative, to
assume any liability on behalf of Source Audio or to
make any warranty on behalf of Source Audio.
WARRANTY INFORMATION
Source Audio may, at its option, require proof of the
original purchase date in the form of a dated copy of
original authorized dealer’s invoice or sales receipt.
Service and repairs of Source Audio products are to
be performed only at the Source Audio factory or a
Source Audio authorized service center. Prior to service
or repair under this Limited Warranty, the purchaser
must request from Source Audio a return authorization,
which is available at:
Source Audio LLC
120 Cummings Park, Woburn, MA 01801
(781) 932-8080 or at www.sourceaudio.net.
Unauthorized service, repair, or modification will void
this Limited Warranty.
DISCLAIMER AND LIMITATION OF WARRANTY
DO NOT OPEN THE EFFECTS PEDAL UNDER ANY CIRCUMSTANCE.
THIS WILL VOID THE WARRANTY.
THE FOREGOING LIMITED WARRANTY IS THE ONLY WARRANTY
GIVEN BY SOURCE AUDIO AND IS IN LIEU OF ALL OTHER WARRANTIES. ALL IMPLIED WARRANTIES, INCLUDING WARRANTIES
OF MERCHANTABILITY AND FITNESS FOR ANY PARTICULAR
PURPOSE, EXCEEDING THE SPECIFIC PROVISIONS OF THIS
LIMITED WARRANTY ARE HEREBY DISCLAIMED AND EXCLUDED
FROM THIS LIMITED WARRANTY. UPON EXPIRATION OF THE
APPLICABLE EXPRESS WARRANTY PERIOD, SOURCE AUDIO
SHALL HAVE NO FURTHER WARRANTY OBLIGATION OF ANY KIND,
EXPRESS OR IMPLIED. SOURCE AUDIO SHALL IN NO EVENT BE
LIABLE FOR ANY SPECIAL, INCIDENTAL OR CONSEQUENTIAL
DAMAGES SUFFERED BY THE PURCHASER OR ANY THIRD
PARTY, INCLUDING WITHOUT LIMITATION, DAMAGES FOR LOSS
OF PROFITS OR BUSINESS OR DAMAGES RESULTING FROM USE
OR PERFORMANCE OF THE PRODUCT, WHETHER IN CONTRACT
OR IN TORT. SOURCE AUDIO SHALL NOT BE LIABLE FOR ANY
EXPENSES, CLAIMS OR SUITS ARISING OUT OF OR RELATING
TO ANY OF THE FOREGOING. Some states do not allow the
exclusion or limitation of implied warranties so some
of the above limitations and exclusions may not apply
to you. This Limited Warranty gives you specific legal
rights, and you may also have other rights, which vary,
from state to state. This Limited Warranty only applies
to products sold and used in the USA. Source Audio
shall not be liable for damages or loss resulting from
the negligent or intentional acts of the shipper or its
contracted affiliates. You should contact the shipper for
proper claims procedures in the event of damage or loss
resulting from shipment.
© SOURCE AUDIO LLC 120 CUMMINGS PARK, WOBURN, MA 01801 SOURCEAUDIO.NET
 Loading...