

Owner’s manual & Installation manual
MARINE DIGITAL MEDIA BLACK BOX RECEIVER
WITH WATERTIGHT DISPLAY CONTROLLER

English
Owner’s Manual
CLARION PRODUCT REGISTRATION INFORMATION
For USA and Canada only
www.clarion.com
Dear Customer:
Congratulations on your purchase of a Clarion mobile electronic product. We are confident
that you’ll enjoy your Clarion experience.
There are many benefits to registering your Clarion product.We invite you to visit our website
at www.clarion.com to register your Clarion product.
We have made product registration simple with our easy to use website. The registration
form is short and easy to complete. Once you’re registered, we can keep you informed of
important product information.
Register at www.clarion.com- it’s easy to keep your Clarion product up to date.
Contents
1. FEATURES.......................................................................................................................3
2. PRECAUTIONS................................................................................................................3
3. CAUTIONS ON HANDLING.............................................................................................3
4. CONTROLS......................................................................................................................4
About the Registered Marks, etc......................................................................................4
Choosing Your Source Unit Configuration.......................................................................5
Names of Buttons and Their Functions............................................................................5
5. OPERATIONS..................................................................................................................7
Basic Operation................................................................................................................7
Settings............................................................................................................................8
Radio (AM/FM/Weather Band) Operation......................................................................10
SiriusXM Satellite Radio Operation................................................................................11
USB Mode Operation.....................................................................................................13
iPod/iPhone/iPad Mode Operation.................................................................................14
Bluetooth Operation.......................................................................................................15
Pandora Operation.........................................................................................................16
Aux Operation.................................................................................................................17
Camera Operation..........................................................................................................17
6. TROUBLESHOOTING...................................................................................................18
7. SPECIFICATIONS..........................................................................................................20
INSTALLATION AND WIRE CONNECTION......................................................................21
2
CMS4
1. FEATURES
SiriusXM-Ready Built-in Bluetooth with aptX 4 Zones / 4 Sources
AM/FM/WB Tuner 70Wx4 Built-In Amplifier Pandora
Watertight Remote Made for iPod/iPhone/iPad Camera connection
TM
2.1A
®
®
English
®
Owner’s Manual
2. PRECAUTIONS.
TURES
WARNING
For your safety, while boating, keep the volume to a level at which external sounds can be heard.
1. This unit
that trouble arises, never open the case, disassemble
the unit, or lubricate the parts.
2. FCC STATEMENT
2.1. This device complies with Part 15 of the FCC Rules.
Operation is subject to the following two conditions:
(1) This device may not cause harmful interference.
(2) This device must accept any interference
received, including interference that may cause
undesired operation.
2.2. Changes or modifications not expressly approved
by the party responsible for compliance could void
the user's authority to operate the equipment.
Note:
This quipment has been tested and found to comply
with the limits for a Class B digital device, pursuant to
Part 15 of the FCC Rules. These limits are designed
to provide reasonable protection against harmful
int er f er enc e in a r e si den tia l in s ta lla tio n.
This equipment generates uses and can radiate radio
frequency energy and, if not installed and used in
accordance with the instructions, may cause harmful
interference to radio communications. However, there
is no guarantee that interference will not occur in a
particular installation. If this equipment does cause
harmful interference to radio or television reception,
which can be determined by turning the equipment off
and on, the user is encouraged to try to correct the
interference by one or more of the following measures:
FCC Radiation Exposure Statement
This equipment complies with FCC radiation exposure
limits set forth for an uncontrolled environment. This
equipment should be installed and operated with
minimum distance 20cm between the radiator & your
body
has precision parts inside. Even in the event
Reorient or relocate the receiving antenna.
Increase the separation between the equipment
and receiver.
Connect the equipment into an outlet on a circuit
different from that to which the receiver is connected.
Consult the dealer or an experienced radio/TV
technician for help.
3. IC warning
3.1. This device complies with Industry Canada licence exempt RSS standard(s).
Operation is subject to the following two conditions:
(1) This device may not cause interference, and
(2) This device must accept any interference, including
interference that may cause undesired operation
of the device.
3.2. Changes or modifications not expressly approved by
the party responsible for compliance could void the
user's authority to operate the equipment.
3.3 Le présent appareil est conforme aux CNR d'Industrie
Canada applicables aux appareils radio exempts de
licence. L'exploitation est autorisée aux deux conditions
suivantes :
(1) l'appareil ne doit pas produire de brouillage, et
(2) l'utilisateur de l'appareil doit accepter tout brouillage
radioélectrique subi, même si le brouillage est
susceptible d'en compromettre le fonctionnement.”
CMS4
USA: AM530-1710kHz, FM 87.9-107.9MHz
EUROPE: AM531-1602kHz, FM87.5-108.0MHz
AUSTRALIA: AM531-1620kHz, FM87.5-108.0MHz
This device complies with Part 15 of the FCC Rules. Operation is subject to the
following two conditions: (1) This device may not cause harmful interfe rence, and
(2) This device must accept any interference received, including interference that
may cause undesired operation.
This d evice c ompli es with I ndust ry Cana da lice nce-exe mpt RS S stand ard(s ).
Oper ation i s subje ct to the fo llowi ng two co nditi ons: (1) th is dev ice may no t
caus e inter feren ce, and (2 ) this d evice mu st acce pt any in terfer ence,
incl uding i nterfe renc e that may ca use un desir ed oper ation o f the dev ice.
CLARION CORPORATION OF AMERICA
6200 GATEWAY DRIVE, CYPRESS, CA 90630, USA
MANUFACTURED:
SERIAL NO.
ASIA: AM531-1620kHz, FM87.5-108.0MHz
FCC ID: AB7S- CMS4
CANICE S-3(*)/NM B-3(*)
2
IC: 11888A -CMS4
0700
MADE IN CHINA
0700
3. CAUTIONS ON HANDLING
TURES
Exposure to extreme heat and direct sunlight may hinder the performance of your Clarion product.
In the event this happens, allow the unit to cool down before use.
CMS4
3
English
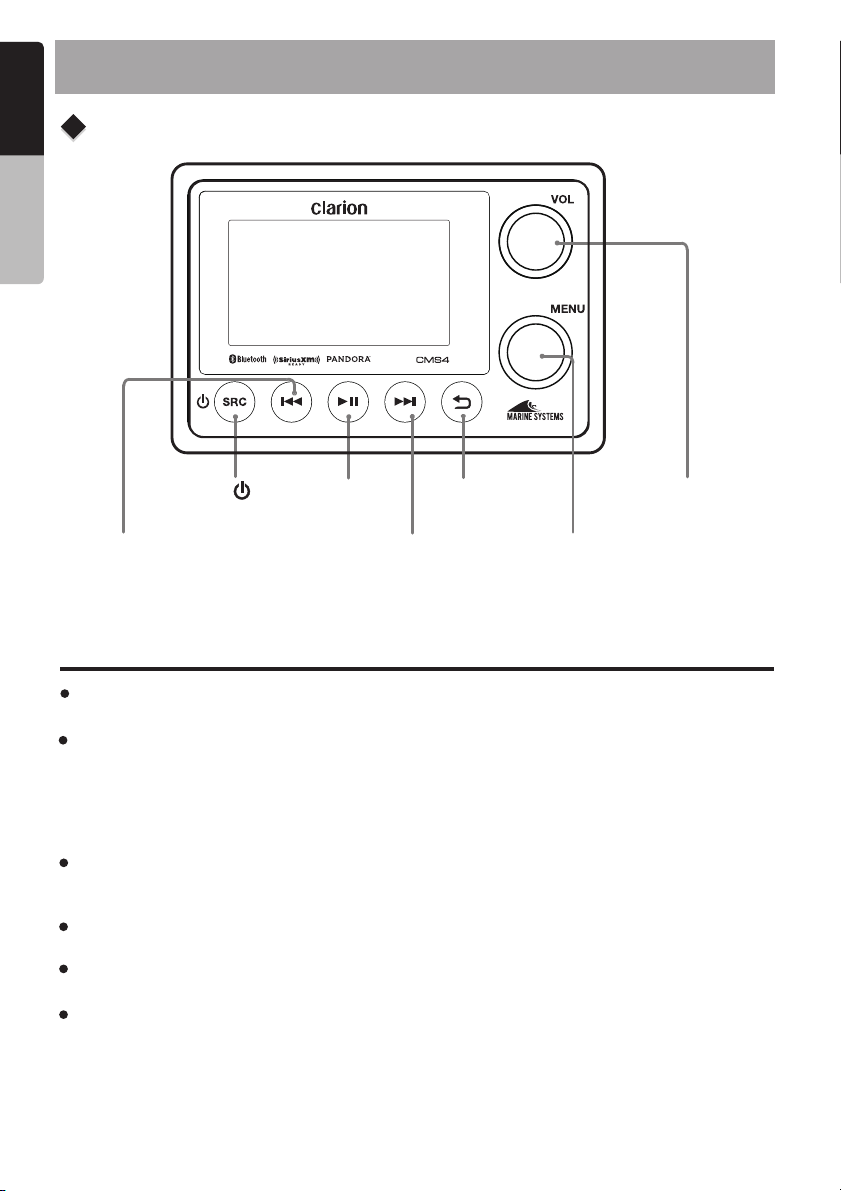
4. CONTROLS
Display Controller
Owner’s Manual
[SOURCE/ ]
[PLAY/PAUSE]
[BACK]
[VOLUME-MUTE
/MUTE ALL ZONES*]
[PREVIOUS
TRACK/REWIND]
[NEXT TRACK
/FAST FORWARD]
[MENU-ENTER/
SETTINGS MENU]
About the registered marks, etc.
Windows Media™ and the Windows logo are trademarks, or registered trademarks of
Microsoft Corporation in the United States and / or other countries.
"Made for iPod" and "Made for iPhone" mean that an electronic accessory has been designed
to connect specifically to iPod or iPhone, respectively, and has been certified by the developer
to meet Apple performance standards. Apple is not responsible for the operation of this device
or its compliance with safety and regulatory standards. Please note that the use of this accessory
with iPod or iPhone may affect wireless performance. iPhone and iPod are trademarks of Apple
Inc., registered in the U.S. and other countries.
The Bluetooth word mark and Logos are owned by the Bluetooth SIG, Inc. and any use of such
marks by Clarion Corporation of America is under license. Other trademarks and trade names
are those of their respective owners.
Sirius, XM and all related marks and logos are trademarks of SiriusXM Radio Inc. All rights
reserved.
Pandora, the Pandora logo and other Pandora marks are trademarks or registered trademarks
of Pandora Media Inc. , or its subsidiaries worldwide.
The first time Qualcomm® aptX™ appears in the text or major heading of a document, the
entire Qualcomm® aptX™ name should be used, and it should be followed by the word
“audio.” On first use, the Qualcomm mark should be followed by the ® symbol, and the aptX
mark should be followed by the ™ symbol. In “aptX,” the letter “X” must be capitalized. Never
abbreviate, shorten, or alter the mark. Do not pluralize it or make it possessive. The aptX
mark should never be used in domain names, except those owned by Qualcomm
Technologies International, Ltd. or its affiliated companies.
4
CMS4
®
Multi-Zone Mode only

Choosing Your Source Unit Configuration
Standard Mode
Standard mode is ideal for basic installations that utilize
a single audio source with speakers configuration.
Utilizing this configuration you can have Front and Rear
speakers with the ability to control fade, a secondary set
of speakers unaffected by fading and a fixed connection
at full output.
Multi-Zone Mode
Multi-Zone mode is ideal for installations that require
multiple sources to play simultaneously from different
speakers. Using this configuration you can control up
to 4 independent zones with 4 sources such as FM, BT,
USB, SiriusXM. All 4 zones are variable with independent
volumes, EQ, gain and other configurable zone settings.
Note:
When using Multi-Zone with multi-source, radio band sources are limited to a single band
(FM/AM/WB) across all zones utilizing radio. Example: If Zone 1 and Zone 2 are set to AM and
Zone 3 is set to FM, both Zone 1 and Zone 2 will now become FM and vice versa.
Name of Buttons and Their Functions
English
®
Owner’s Manual
Note: Be sure to read this chapter while referring
to the front diagram in chapter “ 4. CONTROLS ”
CAUTION
Lower the volume level before powering the
source unit off. The source unit stores the
last volume setting.
WARNING
EXPOSING THE UNIT TO WATER WITH
THE FRONT PANEL OPEN WILL CAUSE
DAMAGE OR UNIT MALFUNCTION!
[ / SRC] Button
Press the [ / SRC ] button to turn the power
on and press and hold it (2 sec.) to bring up the
Power off / Display off selection. Select Power
off to completely power down the CMS4 unit.
Select Display off to keep the CMS4 operating
with the display backlight off.
Press and release the button
switch between available sources: FM, AM,
Weather Band, USB/iPod, Aux, Bluetooth,
Pandora, SiriusXM and Camera.
Note: If the above equipment is not
connected, the corresponding mode may not
function. When using CMS4 in Mult-Zone
mode, only zones currently in control will
have their sources changed.
[ / SRC ] to
[ / ] Buttons
Pressing these buttons will perform the following
operations based on their current mode:
Menu Screen - No function in this mode
AM/FM/WB - Auto Seek Tuner Forwards
/ Backwards
SiriusXM - Skip Forward/Skip Backwards, Press
and hold Fast Forward/Rewind 5/10/30 seconds
USB/iPod - Next Track/Previous Track, Press
and hold Fast Forward/Rewind. When accessing
USB Browser, press the will function
as page down/page up.
AUX - No function in this mode
Bluetooth - Next Track/Previous Track, press
and hold Fast Forward/Rewind
Pandora - SkipTrack/Replay Track, press and
hold Thumbs Up/Thumbs Down
[ VOL ] Knob
Rotate the [ VOL ] knob clock-wise to increase
the volume.
Rotate the [ VOL ] knob
decrease the volume.
Standard mode - Press the [ VOL ] knob to
mute the audio. Press again to restore audio.
Multi-zone mode - Press the knob to
mute all zones currently being controlled.
Press and hold to mute all zones, regardless if
being controlled. Press again to restore audio.
[ / ]
counter-clock-wise to
[ VOL ]
CMS4
5

English
Name of Buttons and Their Functions
[ MENU ] Knob
Volume Screen - When in Standard mode and
while the volume level is still shown,rotate the
[MENU] knob clock-wise or counter clock-wise
Owner’s Manual
to adjust front/rear audio fading. When in
Multi-zone mode and while the volume levels
are still shown, rotate the [MENU] knob to
select individual zone audio controls.
Screen -
MENU Rotate clock-wise to select
menu item below current selection. Rotate
counter clock-wise to select menu item above
current selection. Press the [MENU] knob to
select current menu item.
AM/FM/Weather Band Rotate clock-wise/
counter clock-wise to manually seek stations
Up/Down. Press to access content menu.
USB Press to access content menu. iPod/iPhone/iPod
menu.
AUX In No function SiriusXM Rotate clock-wise to select Next
channel. Rotate counter clock-wise to select
previous channel.
SiriusXM Replay Press the button and select
Jump to Live to exit SiriusXM Replay mode
BT Audio - Press to access content menu.
Home Screen - When in the Standard mode
home screen, rotate the [MENU] knob to
highlight available sources. Press the [MENU]
knob to select the source. When in the
Multi-zone mode home screen, rotate the
[MENU] knob to highlight the Source and
Control boxes. Press the [MENU] knob to
execute the function. When selecting a source,
press and hold the [MENU] knob to
automatically set all zones to that source.
-
-
- Press to access content
-
[ ] Back Button
Pressing this button will perform the following
operations based on the current screen:
Home Screen - Launch source selection mode
Menu Screen - Return to previous screen/menu
[ ] Play/Pause Button
Press this button to Play / Pause current track.
SiriusXM Replay - Press to enter Replay mode.
Note: In any source, Press the [MENU] knob to
access current source settings. Press and hold
the [MENU] knob to access CMS4 device
settings.
6
CMS4
5. OPERATIONS
English
Basic Operation
Note: Be sure to read this chapter referring
chapter “ 4. CONTROLS ”
CAUTION
When the unit is turned on, starting and
stopping the engine with its volume raised to
the maximum level it may cause hearing
damage. Be careful about adjusting the
volume.
Turning on and off the power
Note:
Start the engine before using this unit.
Be careful about using this unit for a long time
without running the engine. If you drain the
vessel battery too far, you may not be able to
start the engine and this can reduce the service
life of the battery.
1. Start the engine.
Engine ON
position
2. If the CMS4 does not automatically turn on,
Press the [ /SRC] button to turn the power
on. Press and hold it (2 sec.) to bring up the
Power Off/Display Off selection. Select Power
Off to completely power down the CMS4 unit.
Select Display Off to keep the CMS4 operating
with the display backlight off.
to the
Adjusting the volume
1. Rotate [ VOL ] knob clock-wise to increase
the volume.
2. knob counter clock-wise to
Rotate [ VOL ]
decrease the volume.
CAUTION
While boating, please be aware of the
volume levels in residential, family areas
and local volume level ordinances.
Mute
Press the button to turn the Mute On and
Off.
[ VOL ]
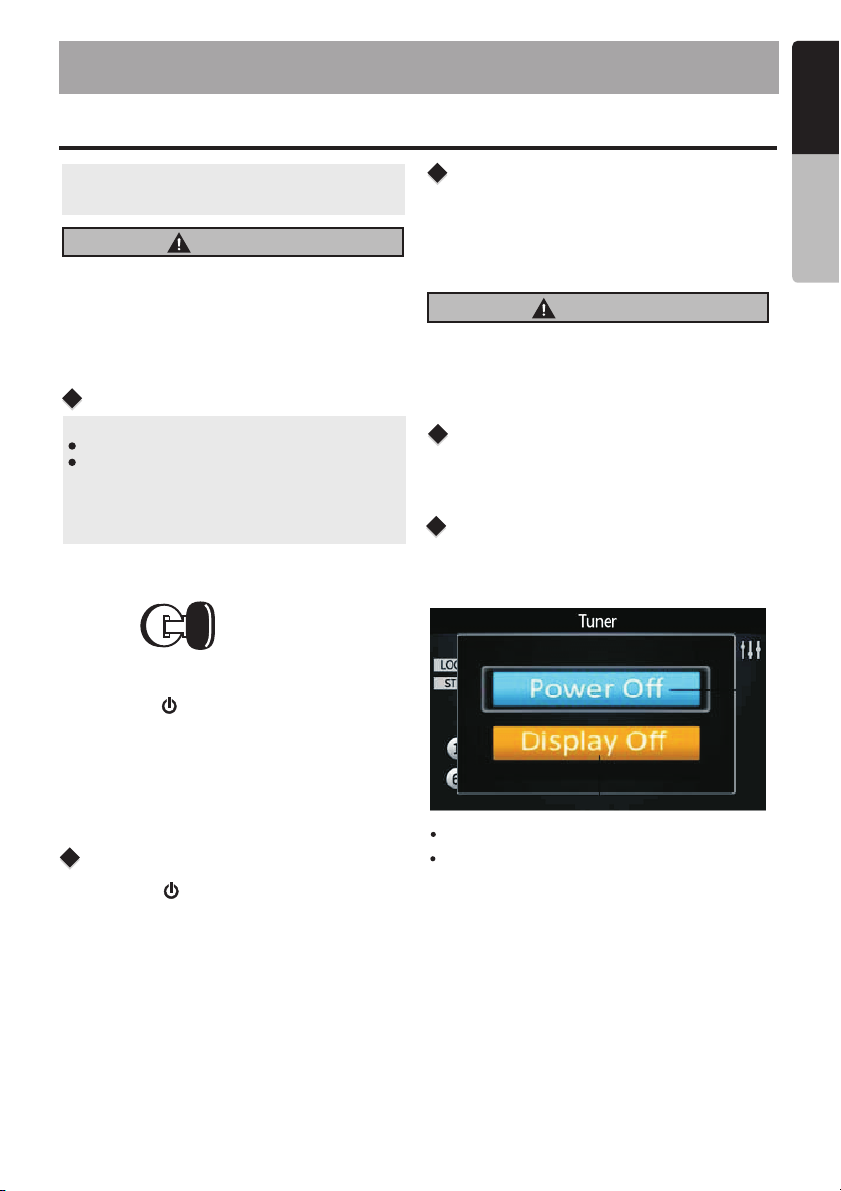
Power Off / Display Off
This feature will allow the user to Power Off the
unit or to turn the Display OFF in the event the
display is too bright for current lighting conditions.
®
Owner’s Manual
Selecting a mode
1. Press the button to change to
the next available source.
*
[ / SRC ]
If a Bluetooth device is not connected to
the CMS4, it is not displayed.
Power Off – Select to turn off the unit
Display Off – Select to turn off the backlight of
the display, but the button and knob illumination
will remain until a button or knob action occurs.�
7
CMS4
English
Settings
You can customize the various settings of this unit
from the Settings screen.
When in Standard mode, press the [ ] button
Owner’s Manual
to access the Home screen, rotate the [ MENU ]
knob to select the Settings option, then press the
[MENU] knob access into the Settings Mode. You
can rotate the [MENU] knob to select the options,
then press the [MENU] knob to confirm.
Settings
AUDIO
SYSTEM
BLUETOOTH
INFO
Note:
Press and hold the [MENU] knob to quickly
access the Settings menu. This is the only
way to access the Settings menu when using
the Multi-zone mode.
Audio Settings
Press and hold the
menu. Rotate the knob to select items to
be adjusted:
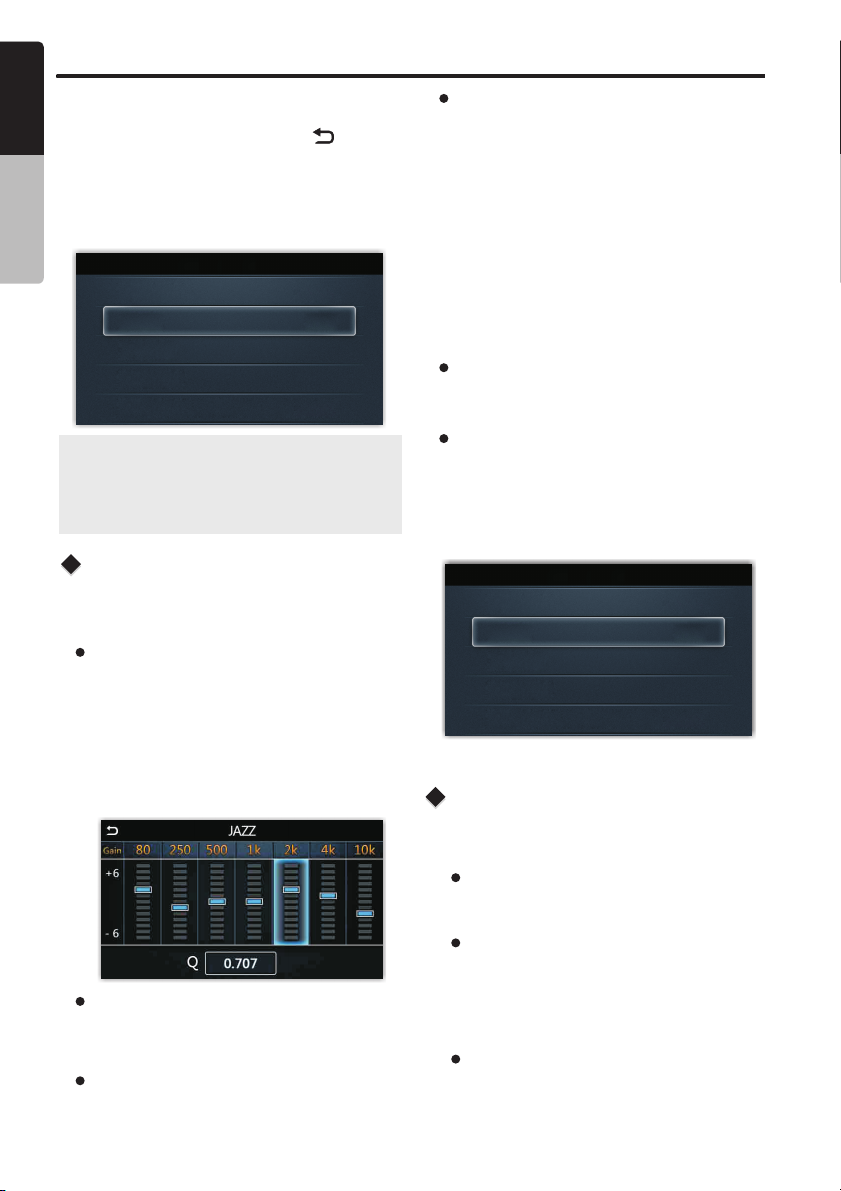
Preset EQ
1. Rotate the [MENU] knob to change the EQ:
FLAT->JAZZ->POP->CLASSIC->ROCK->
NEWS->URBAN->RAVE->MOVIE->
TECHNO->USER
2. When USER EQ is selected, press the
[MENU] knob to cycle through each of the 7
EQ bands and rotate the [MENU] knob to
adjust each band.
Balance
Rotate the knob to adjust the Balance
between the right and left speakers from R12
(full right) to L12 (full left).
Fader (Standard Mode Only)
Rotate the knob to adjust the Fader
between the front and rear speakers from R12
(full rear) to F12 (full front).
8
CMS4
[MENU] knob to enter Settings
[MENU]
[MENU]
[MENU]
Crossover
Press the [MENU] knob to turn On or Off the
1.
Crossover function.
Press the [MENU] knob to access the Front
2.
HPF menu, and rotate the [MENU] knob to
select the below items to adjust:
SLOPE - Press the [MENU] knob to change
the value: 12dB / 24dB
FREQUENCY - Press the [MENU] knob to
change the value: 60Hz/80Hz
/120Hz/ALL
LEVEL - Press the [MENU] knob to highlight
and rotate it to adjust the level
between 0 ~ 20.
Loudness
Press the [MENU] knob to set Loudness to ON
or OFF.
Source Gain
Press the [MENU] knob to
Gain menu, and rotate the [MENU] knob to
select the items, then press the [MENU] knob to
change the value:
FM TUNER->AM TUNER->WB TUNER->USB/iPod
->BLUETOOTH->PANDORA->SIRIUSXM->AUX
Source Gain
FM TUNER +3dB
AM TUNER -3dB
WB TUNER +3dB
USB/iPod +3dB
BLUETOOTH -2dB
access the Source
System Settings
Press and hold the
menu. Rotate the knob to select items to
be adjusted:
Dimmer
Press the [ MENU ] knob to adjust the LCD
display backlight level between High or Low.
Theme
This option allows the user to select theme for
the LCD display. Auto is the default setting and
is triggered through the dimmer wire on the
CMS4 black box unit. Press the [ MENU ] knob
to toggle between Day, Night or Auto
Screen Saver
Press the [MENU] knob the screen to toggle saver
mode: Clock/Slide Show/Off.
Screen saver will be enabled after [30/60/90/120]
seconds of no device operation
[MENU] knob to enter Settings
[MENU]
.
.

Settings
English
LED Color
This unit is equipped with user configurable
color LED. Once in the LED COLOR menu,
rotate the [MENU] knob to select the LED
Color. Press the [MENU] knob to complete the
LED COLOR selection. .
Beep
Press the [MENU] knob to select between
ON and OFF.
Time
Press the [MENU] knob to enter clock setting
mode. Use the [MENU] knob to set the clock,
then press the [ ] button to confirm.
Time Format
Press the [MENU] knob to choose a time
format: 12H or 24H.
Camera Audio
Press the [MENU] knob to enter Camera
Audio menu, rotate the [MENU] knob to
select:
YES - The Aux audio is played while the
Camera image is shown the display
controller's screen. This will cause the Aux
source to become unavailable as an audio
playback source.
NO - The auxiliary audio input is not utilized
while displaying the camera image on the
display controller's screen.
Bluetooth Settings
Press the
Settings menu. Use the knob to select the
items:
[MENU] knob to enter the Bluetooth
[MENU]
Auto Connect
Press the [ MENU ] knob
Bluetooth auto connect On or Off:
ON - If the paired device is within range, the
system reconnects automatically.
OFF-Bluetooth devices will need to be
reconnected manually.
to change the
Device Name
Press the [ MENU ] knob
paired device.
to View the name of
Info Settings
Press the
information.
[MENU] to view the system version knob
®
Owner’s Manual
.
Tuner Region
Press the [MENU] knob to enter the Tuner Region
menu, rotate the [MENU] knob to select the region:
“EUROPE", “USA", ASIA" or "AUSTRALIA"
Audio Mode
Press the [MENU] knob to enter the Audio
Mode screen, rotate the [MENU] knob to
select Standard or Multi-zone mode.
Factory Reset
Press the [MENU] knob to restore the factory
default settings.
CMS4
9

English
Radio (AM/FM/Weather Band) Operation
Tuner Settings
Press the [ MENU ] knob to access the Tuner
Owner’s Manual
World Tuner
This unit is initially set to USA frequency intervals
of 10 kHz for AM and 200 kHz for FM. When using
it outside the USA, the frequency reception range
can be switched to the intervals below.
AM
FM
Frequency
spacing
Frequency
range
Frequency
spacing
Frequency
range
U.S.A
standard
10kHz
530-1710
kHz
200 Hzk
87.9-107.9
MHz
Europe
standard
9 Hzk
531-1602
kHz
50 Hzk
87.5-108
MHz
Aisa
standard
9 Hzk
531-1620
kHz
50 Hzk
87.5-108
MHz
Australia
standard
9 Hzk
531-1620
kHz
100 Hzk
87.5-108
MHz
settings menu. Use the [ MENU ] knob to select
the below functions:
Presets
Rotate the [MENU] knob to select which preset
station to listen to, then press [MENU] knob to
confirm.
Save As Preset
Use the [ MENU ] knob to select the preset
position to save the current frequency.
Auto Store
Only stations with sufficient signal strength will
be detected and stored as a preset. Press the
[MENU] knob to automatically select ten strong
stations and store them into ten presets. The
new stations replace presets.
Local On/Off
To receive more radio stations or only stations
with strong signal, you can adjust the tuner
sensitivity.
Press the [ MENU ] knob to turn On or Off the
Local Seek Mode.
ON - Only stations with a strong signal can be
played back.
OFF - Stations with strong and weak signals can
be played back.
Auto Seek
Press the [ / ] buttons to automatically
search for the next radio station.
Manual Seek
Rotate the [MENU] knob to manually change
intervals step by step.
10
CMS4
RDS On/Off
Press the [ MENU ] knob to turn On or Off the
RDS Mode.
PTY
Use the [MENU] knob to select the desired PTY
mode.

SiriusXM Satellite Radio Operations
®
English
Only SiriusXM® brings you more of what you
love to listen to, all in one place. Get over 140
channels, including commercial-free music plus
the best sports, news, talk, comedy and
entertainment. Welcome to the world of satellite
ra dio . A Siriu sXM V ehicl e Tun er and
Subscription are required. For more information,
visit www.siriusxm.com
Displaying the Radio ID
Before you listen to satellite radio, you must
subscribe to the service using the SiriusXM Radio
ID number.
1. Press the [ / SRC ] button to enter SiriusXM
mode.
2. Press the [ ] or [ ] buttons select
channel “0”. The unit displays the Radio ID.
Note:
1. The Radio ID is located on the bottom of the
SiriusXM Connect Vehicle Tuner.
2. Please note that the SiriusXM Radio ID does
not include the letters I, O, S or F.
3. In the USA, to activate the SiriusXM Connect
Vehicle Tuner go online to
/activatenow or call 1-866-635-2349.
4. In Canada, to activate the SiriusXM Connect
Vehicle Tuner go online to
activatexm or call 1-877-438-9677.
www.siriusxm.com
www.siriusxm.ca/
Channel Tune
1. Press the [ ] button or rotate the [MENU]
knob clockwise to advance to the next channel.
2. Press the [ ] button or rotate the [MENU]
knob counter-clockwise to to go to the previous
channel.
SiriusXM Replay function
The Replay feature allows you to pause,rewind,
and replay live SiriusXM Satellite Radio.
1. While listening to a SiriusXM channel, press the
[ ] button to enter Replay mode. The display
will show “PAUSE” when entering this mode.
2. Press the button to resume playback of
the stored audio from the point at which it was
paused. During playback,the SiriusXM Tuner
will continue to store the channel audio until
you exit the Replay mode.
[ ]
TM
During REPLAY playback
Fast rewind: Press and hold [ ].
Fast forward: Press and hold [ ].
To return to the beginning of the current song:
Press [ ].
To advance to the beginning of the next song:
press [ ].
3. Press the [ ] button to end Replay mode.
Note:
If you continue to press the [ ] button until
the end,the Replay mode is canceled, and the
unit will change to live SiriusXM radio mode.
If you change channels while in Replay mode,
the unit will exit Replay mode to live Satellite
mode and clear the Replay memory.
Replay mode will not exit if you change to
another source and then back to SiriusXM.
SiriusXM Settings
Press the [MENU] button under SiriusXM mode to
access SiriusXM settings, rotate the [MENU] button
to select below functions:
Jump To Live
Press the [MENU] button to go to Live signal.
Note: Press the [ ] button to exit.
Preset
1. Press the [MENU] button to access the
SiriusXM Preset list.
2. Rotate the [MENU] knob to select the desired
Preset you wish to access.
3. Press the [MENU] button to confirm you want
to tune to that chaneel.
Save As Preset
1. Press the [MENU] button to access the
SiriusXM Save As Preset list.
2. Rotate the [MENU] knob to select the desired
Preset number you want to store the preset in.
3. Press the [MENU] button to store the current
channel into preset.
Channel Browse
Text information, such as the channel name,
artist name, song title and content is available
with each SiriusXM channel. The unit can display
this text information as explained below:
1. Press the [MENU] button to activate the Channel
Browse mode.
2. Press the [ ] or [ ] button to view:
Channel->Artist->Song->Info
11
CMS4
®
Owner’s Manual

English
SiriusXM Satellite Radio Operations
Category
Channel scan receives the channel (in the
Owner’s Manual
current category) in order. This function is
useful when searching for a desired channel
in the current category.
1. Press the [MENU] button to access the
SiriusXM Category broswer mode.
2. When a desired channel is tuned in, press
the [MENU] button to continue receiving
that channel.
Note:
If the current station does not have an
associated category, then Category Scan
mode can not be accessed.
Direct Tuning
1. Press the [MENU] button to access the
SiriusXM Direct Tuning mode.
2. Press the [MENU] button to change the digit
location or rotate the [MENU] knob to change
the number.
3. Press the [MENU] button to confirm channel
number selection.
Parental Controls
Parental Control allows you to prevent
unauthorized access to selected channels you
select. When enabled, the Parental Control
feature requires you to enter a passcode to
unlock any locked channels.
1. Press the [MENU] button to access the
SiriusXM Parental Controls mode.
2. Press the [MENU] button to turn On or Off
the Parental Controls.
3. Rotate the [MENU] knob to select the
default passcode is “1111”.
Lock Channels
1. Press the [MENU] button to access the
SiriusXM Parental Controls mode.
2. Rotate the [MENU] knob to select “LOCK
CHANNELS”, press the [MENU] knob to
access the enter code.
3. Rotate the [MENU] knob to enter the
passcode, then press the [MENU] button
to confirm.
Change Code
1. Press the [MENU] button to access the
SiriusXM Parental Controls mode.
2. Rotate the [MENU] knob to select
“CHANGE CODE”, press the [MENU] to
access the change code menu.
3. Enter Old / New passcode, press the
[MENU] button to change the digit location
and rotate the [MENU] knob to change the
number.
4. To confirm the New passcode, enter it a
second time.
12
Note: If the passcodes do not match , the
radio will display "CODE DID NO MATCH
PLEASE ENTER AGAIN " for 3 seconds
and then it will return to the Old Code
screen.
CMS4

USB Mode Operation
English
Connect
1. Insert a USB drive into the USB pigtail.
2. To remove the USB device, you should first
select another source or turn off the power,
in order to avoid damaging the USB device.
Then remove the USB device.
Black
Selecting a Track
1. Press the [ ] to go to the next track.
Press the [ ] button to go to previous track.
2. Press and hold the button to fast
forward through the track.
Press and hold the button to rewind
through the track.
button
[ ]
[ ]
Play / Pause
Press the [ ] button to pause the track is
currently playing.
Press the [ ] button to resume playing the
track that has been paused.
USB Settings
Press the [ MENU ] knob to access the USB
settings menu. Rotate the [MENU] knob to select
the following functions:
Browse
Use the [MENU] knob to browse folders or files
to play back. Press the [ ] button to navigate
back through the menu.
Note:
Pressing the [ / ] buttons will
allow you to quickly skip through pages
of folders when browsing.
Repeat
This function allows you to Repeat All track
(Default), Repeat the currently playing track,or
to Repeat the tracks in the current folder.
Press the [MENU] knob to select Repeat options:
“ALL” or “TRACK” or “FOLDER”.
Shuffle
This function allows you to play tracks in a
random order.
Press the [MENU] knob to turn On or Off the
shuffle function.
Note:
Enabling shuffle mode will change
Repeat to the default mode of ALL
tracks.
®
Owner’s Manual
CMS4
13

English
iPod/iPhone/iPad Mode Operation
Connect
Connect an iPod/iPhone/iPad to the USB pigtail
using aUSB Cable. When connecting a device,
Owner’s Manual
the unit will read the files automatically. The track
information displays on the screen once playback
starts.
Black
Compatible Apple Devices
You can connect the following devices:
iPod nano (6G)
iPod nano (7G)
iPod touch (3G)
iPod touch (4G)
iPod touch (5G)
iPhone 3GS
iPhone 4
Minimum iOS 5.0 or higher
iPhone 4S
iPhone 5
iPhone 5C
iPhone 5S
iPhone 6
iPhone 6S
iPhone 7
iPhone 7Plus
Slecting a Track
1. Press the [ ] to advance to the next
track.
Press the [ ] button to go to previous track.
2. Press and hold the button to fast forward
through the track.
Press and hold the button to rewind
through the track.
button
[ ]
[ ]
Play / Pause
Press the [ ] button to pause the track that
is currently playing.
Press the [ ] button to resume playing the
track that has been paused.
iPod
iPod Settings
Press the [MENU] knob to access the iPod settings
menu, rotate the [MENU] knob to select the following
functions:
Browse
1. Press the [MENU] knob to access the iPod
Browse mode.
Use the select a category:
2. [MENU] knob to
PLAYLIST ARTISTS ALBUMS GENRES
SONGS COMPOSERS AUDIOBOOKS
PODCASTS
Use
3. the [MENU] knob to select navigate the
menus and select options.
4. Press the [ ] button to navigate back
through the menu.
Note:
Pressing the [ / ] buttons will
allow you to quickly skip through pages
of folders when browsing.
Repeat
This function allows you to Repeat All tracks,
Repeat the currently playing track, or to turn
the Repeat feature OFF.
Press the [MENU] knob to select Repeat
options: “OFF” or “ONE” or “ALL”.
Shuffle
This function allows you to play tracks / songs
from the current album, songs or artists in a
random order.
Press the [ MENU ] knob to turn On or Off the
shuffle function.
Note:
Press the [ ] button to exit .
14
CMS4

Bluetooth Operation
English
Pairing a Bluetooth Device
1. From your Bluetooth enabled device, turn Bluetooth
ON and search for Bluetooth devices.
2. When a list of available Bluetooth devices appear,
select " ”.
3. "Connected OK” will appear on the CMS4 display.
4. The unit will automatically enter the BT Audio source
and you can now start streaming audio from your
Bluetooth enabled device.
Note:
If the mobile phone doesn't support the SSP
(Simple Secure Pairing) Profile, please enter
the pass code of "0000".
CMS4
What is audio streaming?
Audio streaming is a technique for transferring
audio data such that it can be processed as a
steady and continuous stream. Users can stream
music from their external audio player to their
audio system wirelessly and listen to the tracks
through the vehicle's speakers.
CAUTION
Please avoid operating your connected mobile
phone while audio streaming as this may cause
noise or choppiness during playback. Audio
streaming may or may not resume after
telephone interrupt as this is dependent on the
mobile phone.
Bluetooth Settings
Press the [MENU] knob to access the Bluetooth
settings menu, rotate the [MENU] knob to select
the following functions:
Browse
1. Press the [MENU] knob to access the BT
Audio Browse mode.
2. Rotate the [MENU] knob to make folder or
song selections. Press the [MENU] knob to
enter the folder list.
3. Rotate the [MENU] knob to select the desired
song and press the [MENU] knob to start
playing.
Note:
Pressing the buttons will allow
you to quickly skip through pages of folders
when browsing.
Repeat
This function allows you to Repeat All tracks,
Repeat the currently playing track, or to turn
the Repeat feature OFF.
Press the [MENU] knob to select the Repeat
options: “ALL” or “TRACK” or “FOLDER”.
Shuffle
This function allows you to play tracks in a
random order.
Press the [MENU] knob to turn On or Off the
shuffle function.
[ / ]
®
Owner’s Manual
Play / Pause
Press the [ ] button to pause the track currently
playing.
Press the [ ] button to resume playing the track
that has been paused.
Selecting a Track
1. Press the [ ] to go to the next song.
Press the [ ] button to go to previous track.
2. Press and hold the button to fast forward
through the track.
Press and hold the button to rewind
through the track.
button
[ ]
[ ]
Note:
Not all Bluetooth enabled devices will support
the fast forward and rewind function.
Playing order will depend on BT Audio player.
When the [ ] button is pressed, some
Bluetooth devices will restart the current track
depending on how long the track has been
playing. During music streaming playback,
“BT Audio” will be shown on the display.
When BT Audio device is disconnected,
“BT Disconnect” will be shown on the
display. Some Bluetooth audio players may
not have play/pause synchronized with this
unit. Please make sure both device and main
unit are in the same play/pause status in BT
Audio mode.
CMS4
15

English
Pandora Operation
Owner’s Manual
You can stream Pandora internet radio by
connecting an iOS or Android device that has
the Pandora mobile application already installed.
To start streaming, connect the with
Pandora already launched.
Press the [ /SRC] button to select the
Pandora source.
devices
Thumbs Up/Thumbs Down
1. Press and hold the [ ]
Giving a track the thumbs up will tell Pandora to
play more tracks like that one.
2. Press and hold the [ ]
down. Giving a track the thumbs down will skip
to the next track, and Pandora will remember
not to play that track on the station again.
Note:
You can personalize your stations by “thumbs
up” or “ thumbs down”.
If you give a track the thumbs down after the
skip limit has been exceeded, your feedback
will be saved but the current track will continue
to play.
Skip
Press the [ ] button for the next tracks in
station.
Note:
Pandora limits the number of skips allowed on
their service. If you attempt to skip tracks beyond
the limit, “SKIP LIMIT” is displayed.
button for thumbs up.
button for thumbs
Pandora Settings
Press the [MENU] knob to access the Pandora
setting menu, rotate the [MENU] knob to select
the following functions:
Stations
1. Press the [MENU] Stations
setting mode.
2.
Rotate the [MENU] knob to select the Stations
options.
3. Press the [MENU] to confirm the selection.knob
Bookmark
1. Press the [MENU] Bookmark
setting mode.
.
2.
Rotate the [MENU] knob to select the Track
or Artist.
3. Press the [MENU] to start the bookmark.
Stations Manage
1. Press the [MENU] Stations
Manage Settings menu.
2.
Rotate the [MENU] knob to select the Stations
Manage Settings options.
Create From Artist: Allows you to create a
station from the artist that you are currently
listening to.
Create From Track: Works similarly by
creating a station from the current track
being played.
Create From Genre: This will give you music
genres to select from to create your station.
Delete: Will delete the now playing station.
3. Press the [MENU] knob to confirm.
Note:
If the name of the station you wish to
create form a track title or an artist name
is the same as the station name currently
playing , “NOW PLAY” appears on the
display and the station will not be created .
knob to access the
knob to access the
knob
knob to access the
Replay
Press the [ ] button to replay the currently
playing track. This is a feature supported by a
Pandora Plus subscription.
16
CMS4

AUX Operation
The AUX RCA input is provided to allow audio playback from external devices.
Press the [ /SRC] button and select “AUX”.
Camera Operation
The unit features an optional Security Camera input function.
Press the [ /SRC] button and select “Camera”. The camera can be viewed on the unit’s TFT
screen plus the camera output can be viewed on the screen.
English
®
Owner’s Manual
CMS4
17

English
6. TROUBLESHOOTING
GENERAL
Owner’s Manual
Problem
The unit will
not power on
No sound
The remote is
responding
Auto seek function
can not find any
stations
not
USB
Problem
USB device cannot
be inserted.
USB device is not
recognized.
No sound heard with
the display “No File”
shown.
Sound skips or is
noisy.
Cause
The vehicle's accessory
switch is not on
Volume is set too low
Wiring is not properly
connected
The built-in internal processor
is not operating properly
The antenna cable is not
connected
The signals are too weak
Cause
The USB device has been
inserted with wrong
direction.
The USB connector is
broken.
The USB device is damaged.
Connectors are loose.
No MP3/WMA file is stored in
the USB device.
MP3/WMA files are not
encoded properly.
Measure
If the power supply is properly connected
to the accessory terminal, switch the
vehicle's
ignition key to “ACC”
Increase the volume to audible level
Correct wiring connections
Hold the Power / SRC button and select
Power Off. Press the Power / SRC button to
power back on and check if the remote is
functioning properly.
Insert the antenna cable securely
Select a station manually
Measure
Reversing the connection direction of the USB
device, try it again.
Replace with a new USB device.
Disconnect the USB device and reconnect. If
the device is still not recognized, try replacing
with a different USB device.
Store these files properly in the USB device.
Use MP3/WMA files encoded properly.
Bluetooth
Problem
Cannot pair the
Bluetooth enabled
device with the
audio system.
The audio quality is
poor after connection
with a Bluetoothenabled device.
18
CMS4
Cause
The device does not support
the profiles required for the
system.
The Bluetooth function of the
device is not enabled.
The Bluetooth reception is poor.
Measure
Use another device to connect.
Refer to the user manual of the device for how
to enable the function.
Move the device closer to the audio system or
remove any obstacle between the device and
the system.

6. TROUBLESHOOTING
SiriusXM Advisory Messages
Message
Chek Tuner
Check Antenna
No Signal
Channel Not
Subscribed
Channel Not
Available
Channel Locked
Subscription
Updated
Description
The radio is having difficulty communicating with the SiriusXM Connect
Vehicle Tuner. The tuner may be disconnected or damaged. Verify that the
SiriusXM Connect Vehicle Tuner cable is securely connected to the radio.
The radio has detected a fault with the SiriusXM antenna. The antenna
cable may be either disconnected or damaged. Verify that the antenna cable
is connected to the SiriusXM Connect Vehicle Tuner. Inspect the antenna
cable for damage and kinks. Replace the antenna if the cable is damaged.
SiriusXM products are available at your local car audio retailer or online at
www.shop.siriusxm.com.
The SiriusXM Connect Vehicle Tuner is having difficulty receiving the
SiriusXM satellite signal. Verify that your vehicle is outdoors with a clear
view of the sky. Verify that the SiriusXM magnetic mount antenna is
mounted on a metal surface on the outside the vehicle. Move the SiriusXM
antenna away from any obstructions. Inspect the antenna cable for damage
and kinks. Consult the SiriusXM Connect Vehicle tuner installation manual
for more information on antenna installation. Replace the antenna if the
cable is damaged. SiriusXM products are available at your local car audio
retailer or online at www.shop.siriusxm.com.
The channel that you have requested is not included in your SiriusXM
subscription package or the channel that you were listening to is no longer
included in your SiriusXM subscription package. Visit www.siriusxm.com or
call 866-635-2349 if you have questions about your subscription package or
would like to subscribe to this channel.
The channel that you have requested is not a valid SiriusXM channel or the
channel that you were listening to is no longer available. You may also see
this message briefly when first connecting a new SiriusXM Connect Vehicle
tuner. Visit www.siriusxm.com for more information about the SiriusXM
channel lineup.
The channel that you have requested is Locked by the radio Parental
Control feature. See the section on Parental Control, page 12 for more
information on the Parental Control feature and how to access locked
channels.
An update to your SiriusXM subscription has been received by the SiriusXM
tuner. Press any button to continue. Visit www.siriusxm.com or call 866-6352349 if you have questions about your
subscription.
English
Owner’s Manual
CMS4
19

English
7. SPECIFICATIONS
FM Tuner
Frequency Range: USA 87.9 - 107.9MHz
Owner’s Manual
Europe 87.5 - 108.0MHz
Asia 87.5 - 108.0MHz
Australia 87.5 - 108.0MHz
Usable Sensitivity: 4 V (S/N=30dB)
Image Rejection: >45dB
Stereo Separation: >25dB
AM Tuner
Frequency Range: USA 530 -1710KHz
Europe 531 - 1602KHz
Asia 531 - 1629KHz
Australia 531- 1629KHz
Usable Sensitivity: 40dB (S/N=20dB)
Weather Band Selection
CH.1 162.400MHz CH.2 162.425MHz
CH.3 162.450MHz CH.4 162.475MHz
CH.5 162.500MHz CH.6 162.525MHz
CH.7 162.550MHz
Audio
Maximum Power Output: 50W x 4
Speaker Impedance: 4~8Ω
USB
USB: 2.0 Full Speed
USB Port: 2.1A
USB Voltage: 5.0V
Maximum MP3/WMA Songs: 65535
Maximum MP3/WMA Folder: 255
Maximum Songs per Folder: 65535
Maximum USB Memory Size: 32G
USB Flash Drive and Hard FAT16/FAT32
Drive Compatible Format:
General
Power Supply Voltage: 14.4V DC (10.8 to 15.6V
allowable)
Grounding System: Negative Ground
Note: Specifications and design are subject to
change without notice for further improvement.
Power Output:
20W × 4 RMS (4 Ω @14.4V
≤ 1% THD+N)
Signal to Noise Ratio:
74dB (reference: LPF 1 W into 4
)
Bluetooth
Specification: Bluetooth Version. 3.0+EDR
(Enhanced Data Rate)
Supported Profiles: A2DP (Advanced Audio
Distribution Profile)
aptX (CD Quality audio
bandwidth matching and
reproduction)
AVRCP 1.4 (Audio/Video
Remote Control Profile)
SPP (Serial Port Profile)
SSP (Simple Secure Pairing)
Send/Receive Sensitivity: Class 2
20
CMS4

INSTALLATION AND
English
WIRE
CONNECTION
1. BEFORE STARTING
1. This set is exclusively for use in vessels with
a negative ground 12 V power supply.
2. Read these instructions carefully.
3. Be sure to disconnect the battery “ ” terminal
before starting. This is to prevent short circuits
during installation. (Figure 1)
Battery
Figure 1
2. INSTALLATION CAUTIONS
1. In order to avoid any interference, do not install the tuner module or control unit in the proximity of
the engine compartment.
2. The use of unauthorized parts can cause permanent damage to the unit.
3. Always check your wire connections to ensure proper installation before turning on the unit.
4. Consult with your nearest dealer for proper installation or if common parts need to be used.
Seek assistance if modifications or drilling holes to your vessel is needed.
5. Do not install the unit where it will be subjected to excessive moisture, dust, dirt, foreign particles
or vibration. Areas of high temperature from the engine, direct sunlight, heater or hot air should
also be avoided.
6. Do not install the unit in a location where it will interfere with the vessel operation, or it will injure the
passengers if there is a sudden or emergency stop.
3. OPTIONAL MARINE WIRED REMOTE INSTALLATION
The control unit should be mounted to a dry, clean and flat surface. Ensure the rear gasket is fully
sealed to the mounting surface without distorting the unit.
®
Owner’s Manual
Dashboard
Screw Hole
Trim Plate
Screw
Hole
Method 1
Screw Hole
Dashboard
Mounting Bracket
Method 2
Screw Hole
CMS4
21

English
4. BLACK BOX INSTALLAION
1. Select an area with sufficient ventilation for the mounting of the black box in order to prevent the
module from overheating. You may mount the black box in a horizontal or vertical position. If the
black box is mounted in a vertical position, do not mount the module with the harness exit points
directly facing up to prevent water collecting in these areas.
Owner’s Manual
2. Please refer to the diagram below for the mounting screw hole positions. Always use the shortest
length of screw possible.
3. During installation, use the 6 rubber mounting stoppers (included in the package) for the bottom of
the module. This provides clearance from surface moisture and provides sufficient ventilation for
the heat sink.
4. Extension wires/cables may be needed to route the harness and cable throughout the vessel.
Note: Retain some slack in the harness/ cables to prevent damage to the wires. It is recommended
relieve stress in all cables and harnesses.
5. Always read through the wiring diagram in this manual first, and follow all the wiring diagrams
carefully. The connections should be secured and insulated with crimp connectors or electrical
tape to ensure proper connections.
6. Once the wiring connections are completed, connect the negative terminal on the battery, turn the
vessel accessory ON and power on the unit to check if it is operating correctly. If abnormalities
occur, disconnect the battery negative terminal, recheck all wiring and try again. Please refer to the
troubleshooting section for assistance.
22
BLACK BOX MOUNTING
CMS4

5. WIRE CONNECTION
English
®
Owner’s Manual
Black
SWC
REAR/ZONE2
AUX IN
Black
Brown
Steering Wheel
Remote Control
Terminal
Black-Subwoofer
Red-Line Out Right
White-Line Out Left
White-Line Out Left
Red-Line Out Right
Black-Subwoofer
White-Line Out Left
Red-Line Out Right
Black-Subwoofer
White-Line Out Left
Red-Line Out Right
Black-Subwoofer
Red-Aux In Right
White-Aux In Left
Bluetooth Antenna
ANTENNA
FRONT/ZONE1
VARIABLE/ZONE3
FIXED/ZONE4
15 PIN MOLEX Connector
ORIENTATION
1 2 3
4 5 6
7 8 9
10
11 12
13
14
15
SECTION A-A SECTION B-B
PIN NO. WIRE DEFINTIONWIRE COLOR AWG
GREEN
1
GREEN/BLACK
2
3
RED
WHITE
4
WHITE/BLACK
5
YELLOW
6
GREY
7
GREY/BLACK
8
9
BLUE/WHITE
10
PURPLE
1
1
PURPLE/BLACK
2
1
BLACK
13
ORANGE/WHITE
14
PURPLE/WHITE
15
BLUE
3 2 1
6 5 4
9 8 7
10
12
11
15
14
13
SPEAKER REAR LEFT (+)
SPEAKER REAR LEFT (-)
ACCE SSORY /IGNI TION SW ITCHE D (+12V )
SPEAKER FRONT LEFT (+)
SPEAKER FRONT LEFT (-)
BATTERY (+12V)
SPEAKER FRONT RIGHT (+)
SPEAKER FRONT RIGHT (-)
AMPL IFIER R EMOTE T URN ON (+ )
SPEAKER REAR RIGHT (+)
SPEAKER REAR RIGHT (-)
GROUND (-)
(+12V)DIMMER
CAMERA TRIGGER (+)
POWER ANTENNA
FUSE
Grey
Black
Purple
Green
Red
15A
RED
20
20
20
20
20
20
20
20
20
20
20
16
20
20
20
Black
BLACK BOX
DISPLAY CONTROLLER UPDATE
CAMERA
Black
Black
Black
Black
Black
Black
DISPLAY CONTROLLER
BLUE
PURPLE/WHITE
ORANGE/WHITE
BLACK
PURPLE/BLACK
PURPLE
Female
YELLOW
USB 2.1A/BB UPDATE
WIRED REMOTE 1
WIRED REMOTE 2
WIRED REMOTE 3
WIRED REMOTE 4
SIRIUS XM
15 PIN MOLEX
Connector
Wire Code
RED
GREEN/BLACK
GREEN
YELLOW
WHITE/BLACK
WHITE
GREY/BLACK
BLUE/WHITE
GREY
3048mm (10 feet)
Extension Cable
Male
Female
DISPLAY CONTROLLER
CMS4
23

Clarion Corporation of America
10/2016
All Rights Reserved. Copyright © 2016:
Printed in China
Clarion Corporation of America
CMS4
 Loading...