

Page 1
DMX125DAB
DMX125BT
MONITOR WITH RECEIVER
Quick Start Guide
• For detailed operations and information, refer to the INSTRUCTION MANUAL
on the following website:
<https://www.kenwood.com/cs/ce/>
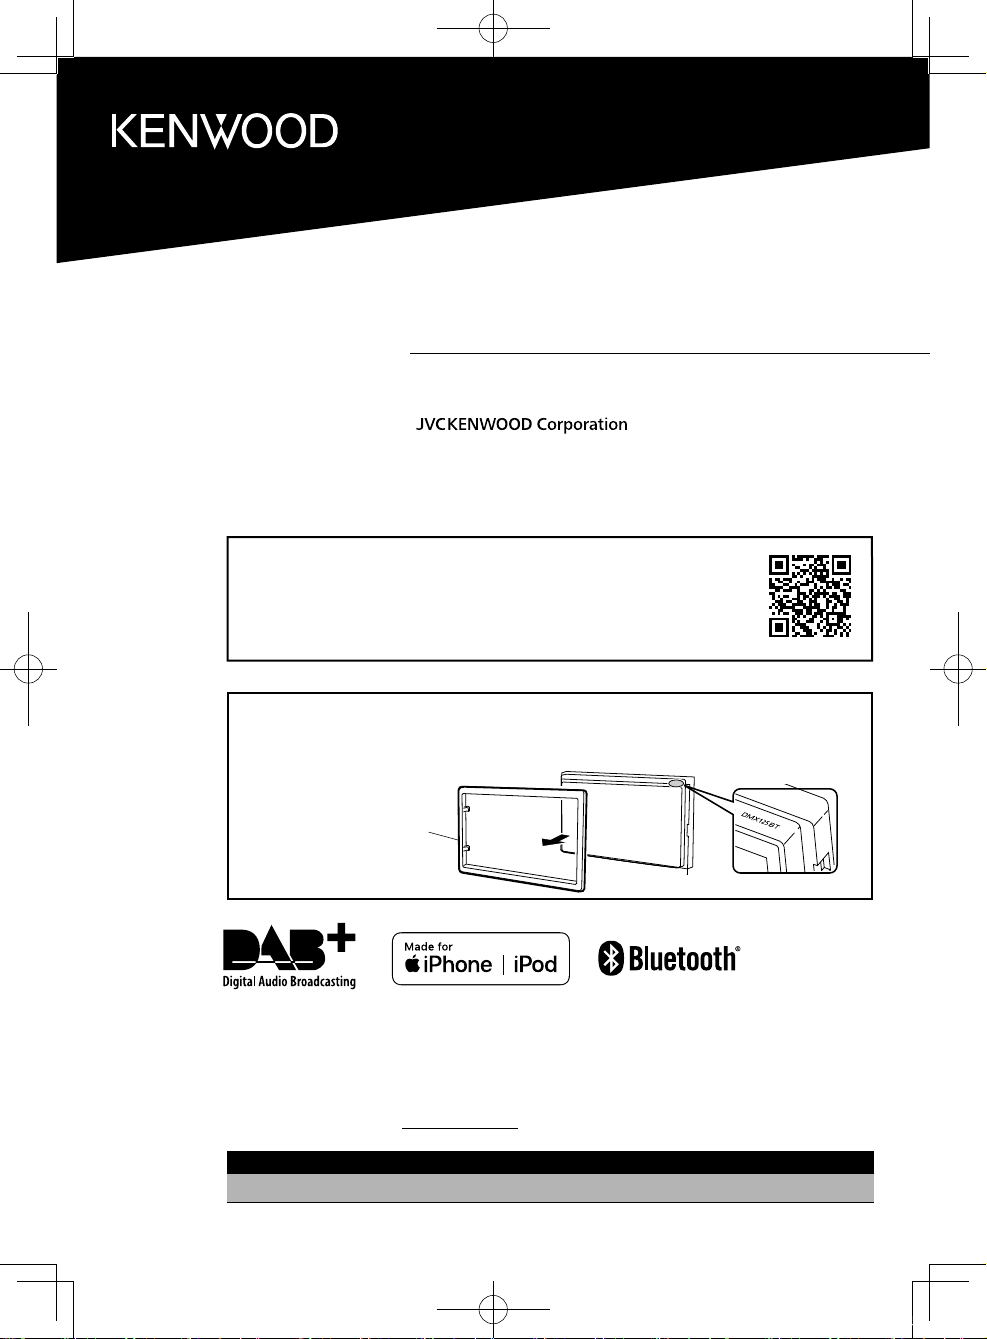
Model name indication position
See “Removing the trim plate” (P.13)
Plaque de garniture
Take the time to read through this instruction manual.
Familiarity with installation and operation procedures will help you obtain the best performance from your new
receiver.
For your records
Record the serial number, found on the back of the unit, in the spaces designated on the warranty card, and in the space
provided below. Refer to the model and serial numbers whenever you call upon your KENWOOD dealer for information or
service on the product.
Model DMX125BT Serial number
US Residence Only
Trim plate
Placa de montaje
Register Online
Register your KENWOOD product at www.kenwood.com/usa/
B5K-0673-01 (K)© 2019 JVC KENWOOD Corporation
!B5K-0673-01_K_EnFrEs.indb 1 2019/04/11 14:59
Page 2
Contents
Before use .................................................................................2
How to read this manual ................................................................................... 2
Precautions ................................................................................................................ 2
Getting Started ....................................................................... 3
Clock settings ........................................................................................................... 3
Basics .......................................................................................... 4
Functions of the Buttons on the Front Panel ...................................... 4
Common operations ...........................................................................................4
HOME screen ............................................................................................................ 4
Source control screen ......................................................................................... 4
Radio ........................................................................................... 5
Radio Basic Operation.........................................................................................5
Presetting stations ................................................................................................ 5
Radio Setup ................................................................................................................ 5
DAB ...............................................................................................6
DAB Basic Operation ......................................................................................... 6
Presetting stations ................................................................................................ 6
DAB Setup ................................................................................................................ 6
USB .............................................................................................. 7
Preparation ................................................................................................................. 7
Playback operations .............................................................................................7
iPod/iPhone ............................................................................. 8
Preparation ................................................................................................................. 8
Playback operations .............................................................................................8
External Components .......................................................... 9
Using external audio/video players ...........................................................9
Rear view camera ................................................................................................... 9
Bluetooth ..................................................................................10
Register your smartphone to the unit .....................................................10
Receive a phone call ............................................................................................10
Make a phone call ..................................................................................................10
Controlling Audio ................................................................ 11
Controlling General Audio ............................................................................. 11
Playing Bluetooth Audio Device ................................................................11
Installation .............................................................................. 12
Before Installation ................................................................................................12
Installing the unit .................................................................................................13
About this Unit ...................................................................... 17
More information ................................................................................................. 17
Note for specifications ......................................................................................17
Copyrights ................................................................................................................18
Before use
Precautions
WARNING
#
Ñ To prevent injury or re, take the
following precautions:
• To prevent a short circuit, never put or leave any
metallic objects (such as coins or metal tools)
inside the unit.
• Do not watch or fix your eyes on the unit’s display
when you are driving for any extended period.
• If you experience problems during installation,
consult your KENWOOD dealer.
Ñ Precautions on using this unit
• When you purchase optional accessories, check
with your KENWOOD dealer to make sure that
they work with your model and in your area.
• The Radio Data System or Radio Broadcast Data
System feature won’t work where the service is
not supported by any broadcasting station.
Ñ Protecting the monitor
• To protect the monitor from damage, do not
operate the monitor using a ballpoint pen or
similar tool with the sharp tip.
Ñ Cleaning the Unit
If the front panel of this unit is stained, wipe it with
a dry soft cloth such as a silicon cloth. If the front
panel is stained badly, wipe the stain off with a
cloth moistened with neutral cleaner, then wipe it
again with a clean soft dry cloth.
CAUTION
!
• Applaying spray cleaner directly to the unit may
affect its mechanical parts. Wiping the front panel
with a hard cloth or using a volatile liquid such as
thinner or alcohol may scratch the surface or erase
screened print.
Ñ How to reset your unit
If the unit or the connected unit fails to operate
properly, reset the unit.
How to read this manual
Reset button
• The panels shown in this guide are examples used to
provide clear explanations of the operations. For this
reason, they may be different from the actual panels.
• In operation procedures, bracket shape indicates the
key or button you should control.
< >: indicates the name of panel buttons.
[ ]: indicates the name of touch keys
2
!B5K-0673-01_K_EnFrEs.indb 2 2019/04/11 14:59
Page 3
Getting Started
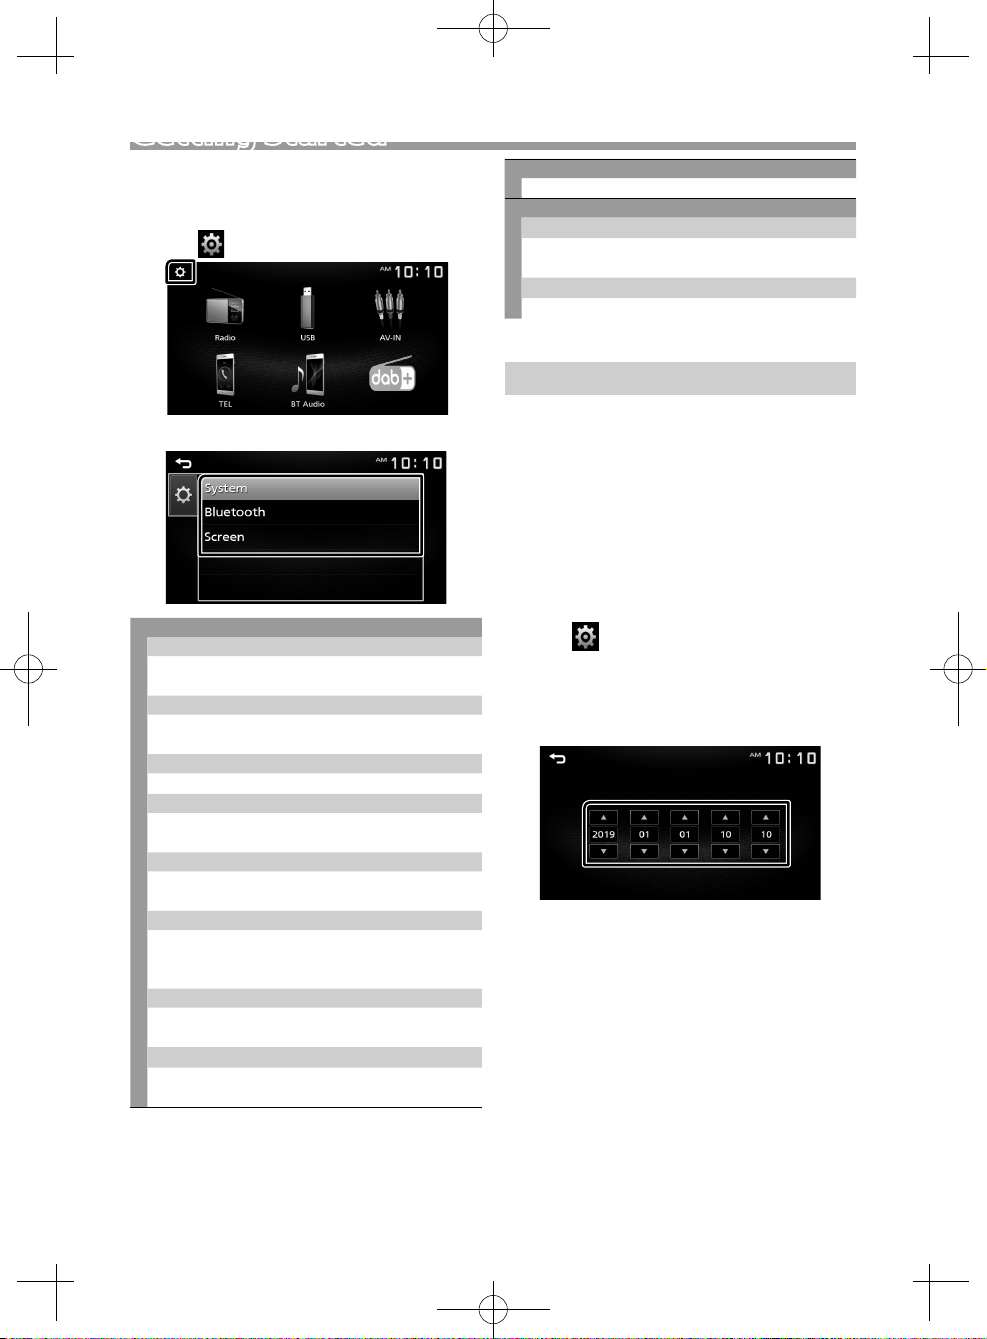
1
Turn the ignition key of your car to ACC.
The unit is turned on.
Press the <8MENU> button.
2
3
Tou ch [ ].
DAB
Touch the corresponding key and set the value.
4
[System]
[Beep Tone]
Activates or deactivates the key-touch tone.
“ON” (Default), “OFF”
[Language]
Select the language used for the control screen
and setting items. Default is “English”.
[Time/Date]
Adjust the clock time. ( P.3).
[Clock Mode]
Select the time display format.
[12hr] (Default) / [24hr]
[Steering Remote]
Sets the desired function in the steering remote
controller.
[Parking Guidelines]
You can display parking guidelines to enable
easier parking when you shift the gear to the
reverse (R) position. Default is “ON”.
[Guidelines SETUP]
If you select [ON] for [Parking Guidelines], you can
adjust the parking guidelines.
[System Reset]
Touch [System Reset] and then touch [YES] to set
all the settings to the initial default settings.
[Bluetooth]
Displays the Bluetooth Settings screen.
[Screen]
[Dimmer]
Select the dimmer mode.
“High” (Default) / “Mid” / “Low”
[Demo]
Select the demonstration mode. Default is “ON”.
5 Touc h [6].
Clock settings
Ñ Synchronizing the clock time with FM
RDS
Activate [RDS Clock Sync].
See Radio Setup (P.5).
Ñ Adjusting the clock manually
NOTE
✎
• Deactivate [RDS Clock Sync] before adjusting the
clock.
1 Press the <8MENU> button.
2
Tou ch [ ].
Touch [System].
3
4 Touch [Time/Date].
Clock screen appears.
5
Tou ch [R] or [S] to set the clock time.
Tou ch [6].
6
English |
!B5K-0673-01_K_EnFrEs.indb 3 2019/04/11 14:59
3
Page 4
BasicsBasics
Functions of the Buttons on the
Front Panel
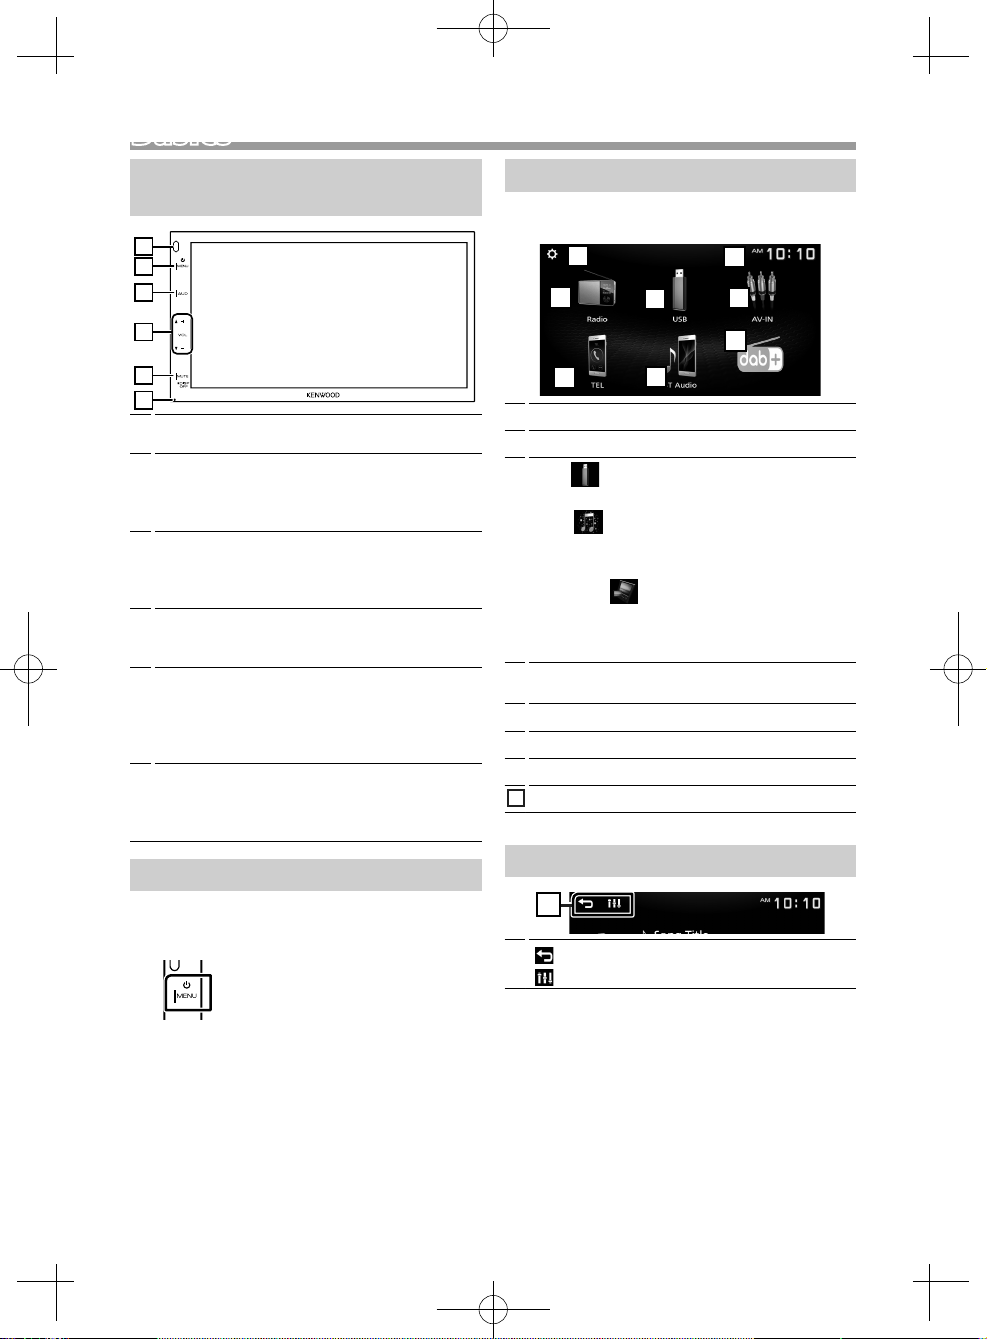
1
2
3
4
5
6
Remote Sensor
1
• Receives the remote control signal.
8MENU
2
• Displays the HOME screen. (P. 4)
• Pressing for 1 second turns the power off.
• When the power off, turns the power on.
AUD
3
• Displays the Audio screen.* (P.10)
* The Audio screen is not displayed during SETUP
screen or on the list screen etc,
+ , – (Volume)
4
• Adjusts volume. The volume will go up until 20
when you keep pressing [ + ].
MUTE/ DISP OFF (Display o )
5
• Mutes/restores the sound.
• Pressing for 1 second turns the screen off.
When the screen is off, touch the display to turn
on the screen.
Reset
6
• If the unit or the connected unit fails to operate
properly, the unit returns to factory settings
when this button is pressed.
Common operations
Ñ Turning on the power
1
Press the <8MENU> button.
HOME screen
Press the <8MENU> button.
1
HOME screen appears.
7
2
5
Clock display
1
Switches to the radio broadcast. (P. 5)
2
3
[USB]
Plays files on a USB device. (P.7)
[iPod]
Plays an iPod/iPhone. (P.8)
• When iPod/iPhone is connected.
[Mirroring]
Displays the Mirroring screen.
• When android device with “Mirroring OB for
KENWOOD” application installed is connected.
Switches to an external component connected to
4
the AV-IN input terminal. (P. 9)
Displays the Hands Free screen. (P.10)
5
Plays a Bluetooth audio player. (P.11)
6
Displays the SETUP screen. (P. 3)
7
8
Switches to the DAB radio broadcast.
3
6
1
4
8
DAB
(P.6)
Source control screen
1
1
] : Returns to previous screen.
[
] : Displays the Audio screen. (P.10)
[
Ñ Turning o the power
1 Press and hold the <8MENU> button.
4
!B5K-0673-01_K_EnFrEs.indb 4 2019/04/11 14:59
Page 5
Radio
213
Radio
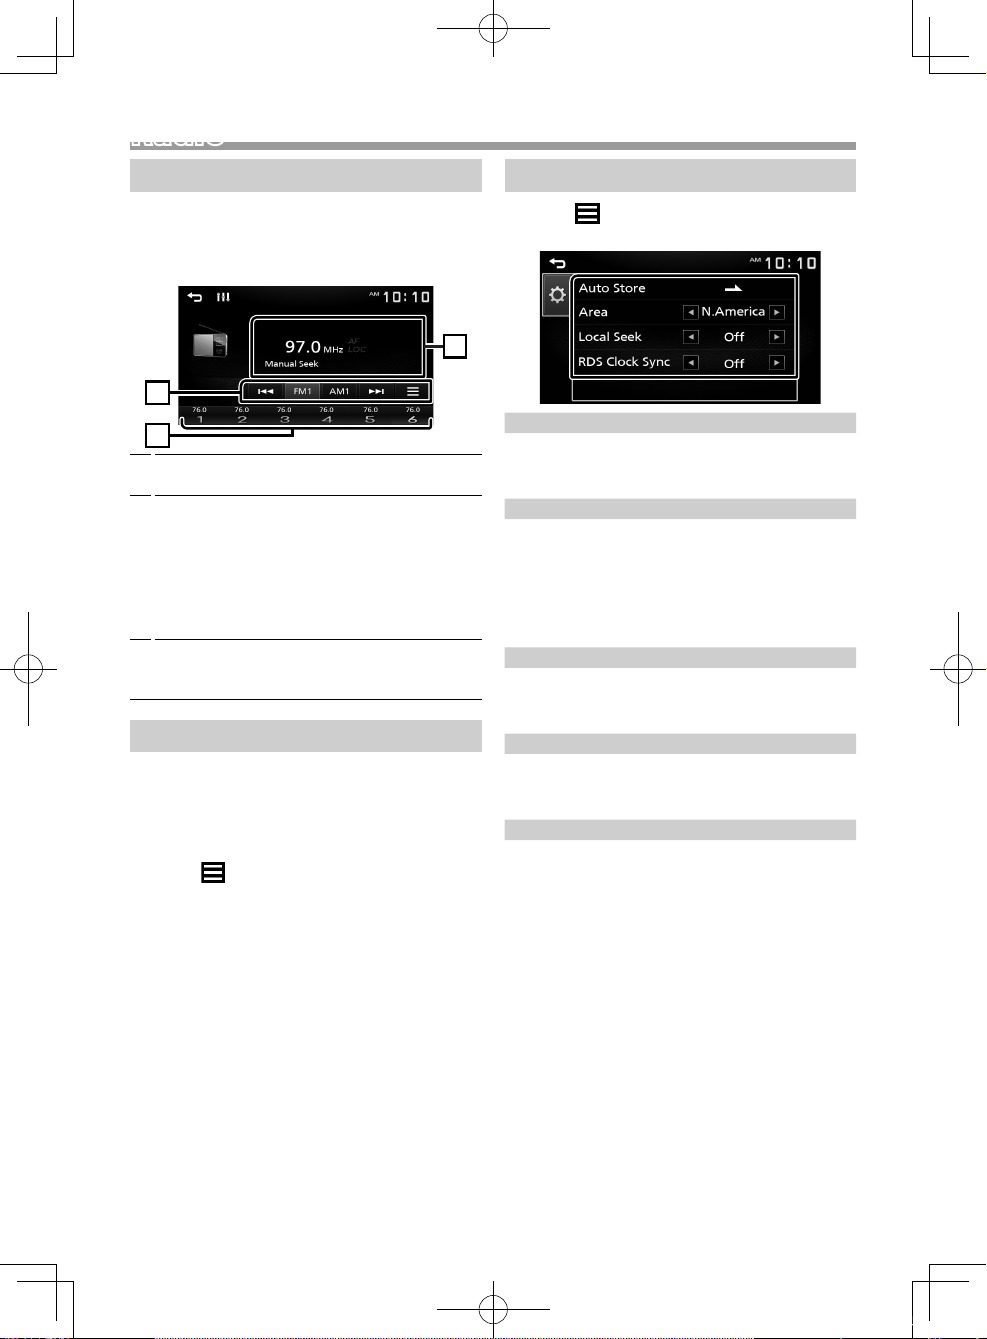
Radio Basic Operation
1 Press the <8MENU> button.
2 Touch [Radio].
Ñ Source control screen
Displays the information of the current station:
1
PS name, Frequency, PTY Genre, Indicator Items
[FM] : Switches the FM band.
2
“FM1”, “FM2”, “FM3”
[AM] : Switches the AM band.
“AM1”, “AM2 ”
[E] [F] : Tunes in a station with good
reception automatically.
[1] : Presets stations automatically. (P. 5)
Recalls the memorized station.
3
When touched for 2 seconds, stores the current
receiving station in memory.
Presetting stations
Ñ Auto memory
You can preset 6 stations for the current band (FM1/
FM2 /FM3/AM1/AM2).
1 Touch [FM] or [AM] to select the band.
2 Touch [ ].
3 Touch [Auto Store].
The local stations with the strongest signals are
found and stored automatically.
Ñ Manual memory
You can store the current receiving station in
memory.
1 Tune in to a station you want to preset.
2 Touch and hold [#] (#:1-6) in which you want to
store the station.
Ñ Recalling the preset station
1 Touch [#] (#:1-6).
Radio Setup
1 Touch [ ].
2 Set each item as follows.
[Auto Store]
Automatically searches and stores the 6 stations with
the strongest signals for the selected band.
“Auto Store” appears.
[Area]
“N.America” (Default): For North/Central/South
America, AM/FM intervals: 10 kHz/200 kHz.
“S.America”: For some South American countries,
AM/FM intervals: 10 kHz/50 kHz.
“Europe”: For Europe, AM/FM intervals: 9 kHz/50
kHz.
[Local Seek]
Tunes in only to the stations with sufficient signal
strength. (LOC indicator lights up.)
“ON”, “OFF” (Default)
[RDS Clock Sync] *
Synchronizing the Radio Data System station time
data and this unit’s clock.
“ON” (Default), “OFF”
2
[RDS] *
Displays the RDS Settings screen.
*1 To use the function, it is necessary to set [Area] to
[N.America]/[S.America].
*2 To use the function, it is necessary to set [Area]
to [Europe].
1
3 Touc h [6].
English |
!B5K-0673-01_K_EnFrEs.indb 5 2019/04/11 14:59
5
Page 6
DAB
DAB Basic Operation
Press the <8MENU> button.
1
2
Touch [DAB].
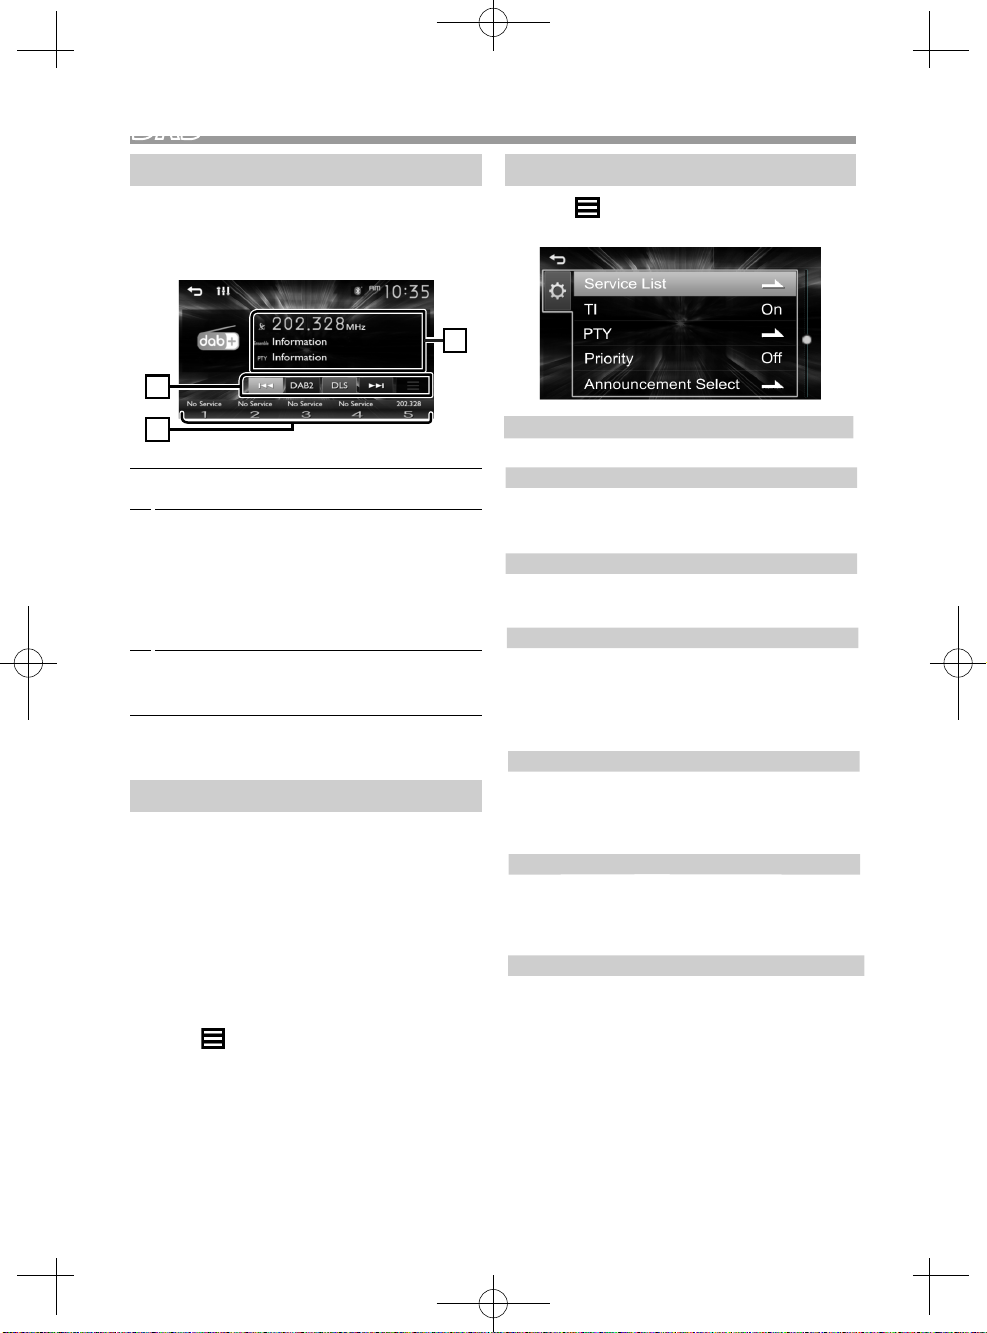
Ñ Source control screen
1
2
3
Displays the information of the current station:
1
Service Name
[DAB] : Switches the DAB band.
2
“DAB1”, “DAB2”, “DAB3”
[ ] :
[E] [F] : Tunes in a ensemble, service, and
component. The seek mode switching can be
changed.
[DLS] :
Display the Dynamic Label Segment
screen.
• Recalls the memorized service.
3
• When touched for 2 seconds, stores the
current service in memory.
Presetting stations
Ñ Auto seek
1 Press <E>/<F> to search for an ensemble
automatically.
“Auto Seek” appears.
Press and hold <E>/<F> repeatedly to
2
search for an ensemble manually.
“Manual Seek” appears.
Ñ Select a service
Touch [ ].
1
Touch [ ].
2
Service List
Select the desired content From the List.
DAB Setup
Touch [ ].
1
2
Set each item as follows.
[ ]
Service List
Displays the Service List screen.
[TI]
Switches to the traffic information
the traffic bulletin starts.
“ON”, “OFF” (Default)
[ ]
PTY
Searches for a program by program
type.
[ ]
Priority
If the same service is provided by
when reception of
Radio becomes poor, automatically
Digital
to Radio Data System.
“ON”, “OFF” (Default)
[Announcement Select]
Switches to the set Announcement service.
When the service for which ON is selected starts,
switches from any source to Announcement to
receive it.
Service
Related
[ ]
When you select ON, the unit switches
service (if exists) when a
available.
“ON”, “OFF” (Default)
[ ]
Antenna
Sets power supply to the Digital Radio antenna. Set
to “ON” when the Digital
equipped with a booster.
Default is “ON”.
Tou ch [6].
3
the service being provided by
DAB service network is not
Power
Radio antenna in use is
automatically when
Radio Data System
switches
to a related
6
!B5K-0673-01_K_EnFrEs.indb 5 2019/04/11 14:59
Page 7
USB
USB
Preparation
Ñ Connecting a USB device
1
Remove the cap of the USB terminal.
Connect the USB device with the USB cable.
2
The unit reads the device and playback starts.
Ñ To disconnect the USB device:
1 Press the <8MENU> button.
2
Touch a source other than [USB].
Detach the USB device.
3
Ñ Usable USB device
This unit can play MPEG1/ MPEG2/ MPEG4/ H.264/
MKV/ MP3/WMA/ AAC/ WAV/ FLAC/ OGG les stored
in a USB mass storage class device.
Playback operations
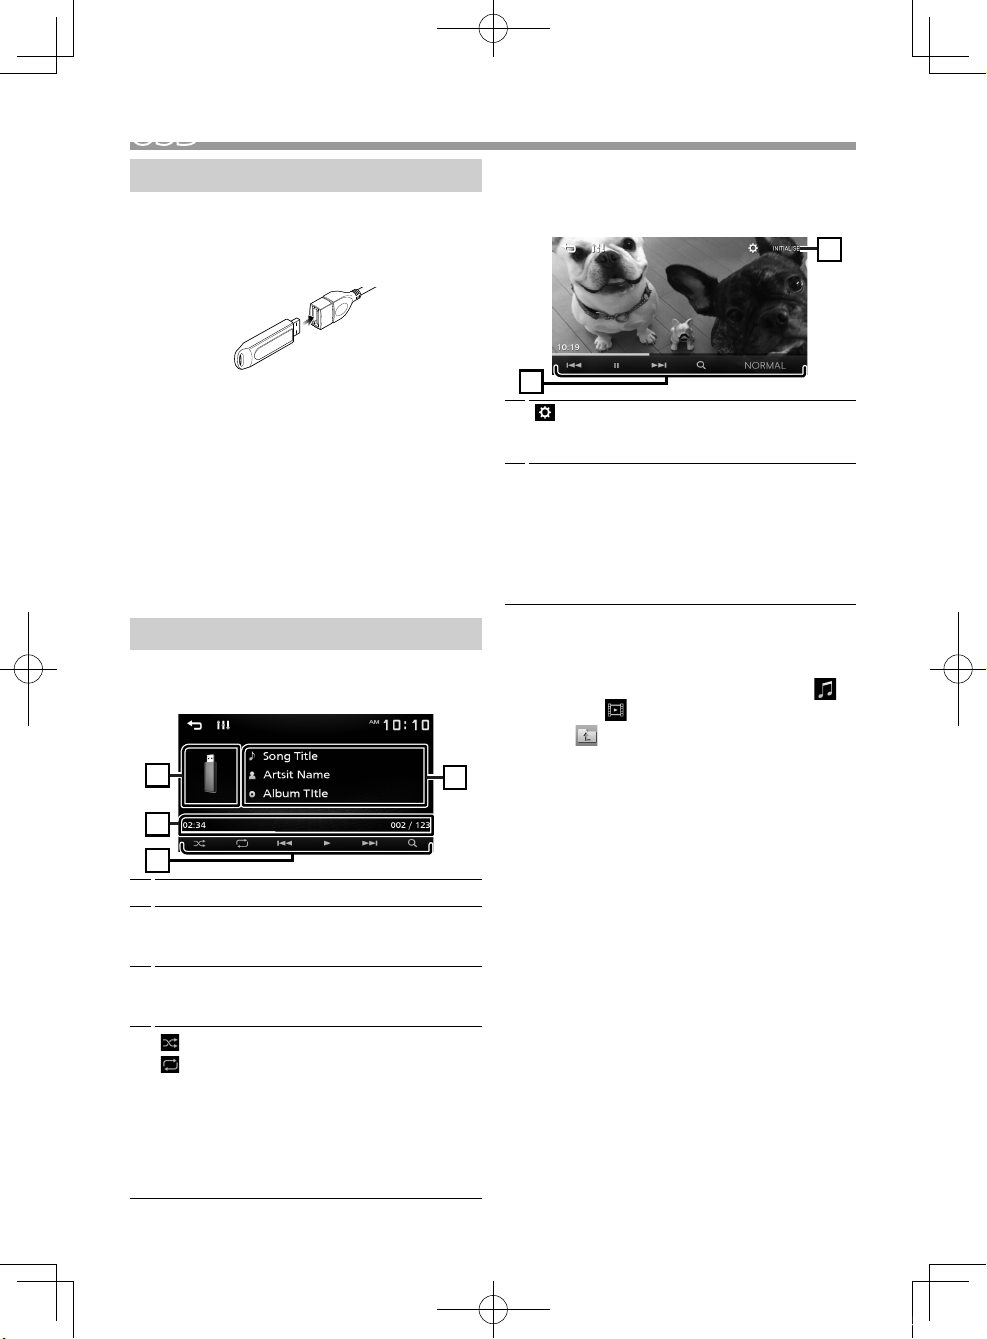
Ñ Control the music you are listening to on
the source control screen.
1
3
4
The jacket of the currently playing file is displayed.
1
Displays the information of the current file.
2
Only a file name is displayed if there is no tag
information.
Playing time/File number
3
Play time bar :For confirmation of current playing
position.
4
[
] : Selects Random playback mode.
] : Selects Repeat playback mode.
[
[U], [H] : Plays or pauses.
[E], [F] : Searches the previous/next
content.
Touch and hold to fast forward or fast
backward.
[1] : Searches file. (P.6)
2
Ñ For Video playback
1
When the operation buttons are not displayed
on the screen, touch the display.
6
7
[
] : You can adjust image quality in video
6
screen.
[INITIALIZE]: To clear the adjustment.
[U], [H] : Plays or pauses.
7
[E], [F] : Searches the previous/next
content.
Touch and hold to fast forward or fast
backward.
[1] : Searches file. (P.6)
[NORMAL]/[16:9]/[4:3] : Select a screen mode.
Ñ Selecting a track in a list (Searches le)
Tou ch [1].
1
2 Select whether you search by audio files [ ],
video files [ ].
Touch [ ] to moves to the upper hierarchy.
3
4
Touch the desired folder.
When you touch a folder its contents are displayed.
• Touch [6] to moves to the upper hierarchy.
5 Touch desired item from the content list.
Playback starts.
NOTE
✎
• The source control screen appears when you touch
[6] at the top hierarchy.
• When file types are switched, the Random/Repeat
playback setting is cancelled.
English |
!B5K-0673-01_K_EnFrEs.indb 6 2019/04/11 14:59
7
Page 8
iPod/iPhone
iPod/iPhone
Preparation
Ñ Connecting iPod/iPhone
• For Lightning connector models: Use USB Audio
cable for iPod/iPhone—KCA-iP103 (optional
accessory).
• For details about connecting iPod/iPhone, see
page 15 .
1
Remove the cap of the USB terminal.
Connect the iPod/iPhone.
2
The unit reads the device and playback starts.
Ñ To disconnect the iPod/iPhone
1
Press the <8MENU> button.
Touch a source other than [iPod].
2
Detach the iPod/iPhone.
3
Ñ Connectable iPod/iPhone
The following models can be connected to this unit.
Made for
• iPhone XS Max
• iPhone XS
• iPhone XR
• iPhone X
• iPhone 8 Plus
✎
NOTE
• If you start playback after connecting the iPod, the
music that has been played by the iPod is played
first.
• Cap the USB terminal whenever not using.
• iPhone 8
• iPhone 7 Plus
• iPhone 7
• iPhone SE
• iPhone 6s Plus
• iPhone 6s
• iPhone 6 Plus
• iPhone 6
• iPhone 5s
Playback operations
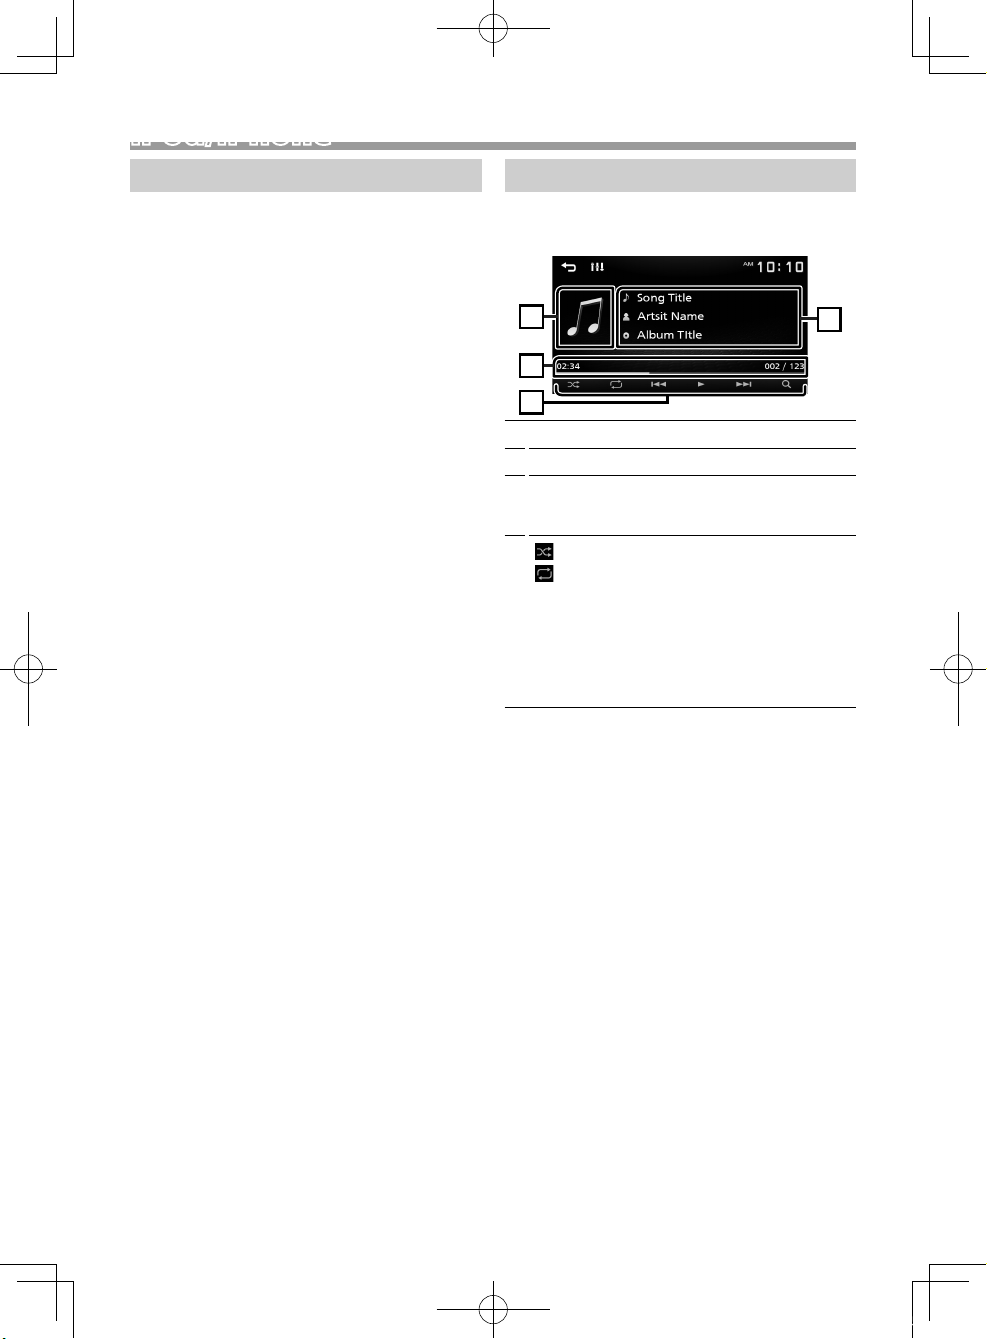
Ñ Control the music you are listening to on
the source control screen.
1
2
3
4
Artwork (Shown if the track contains artwork)
1
Displays the information of the current file.
2
Playing time/File number
3
Play time bar :For confirmation of current playing
position.
4
[
] : Selects Random playback mode.
] : Selects Repeat playback mode.
[
[U], [H] : Plays or pauses.
[E], [F] : Searches the previous/next
content.
Touch and hold to fast forward or fast
backward.
[1] : Searches content. ( P.7)
Ñ Selecting a content in a list
1
Tou ch [1].
Touch desired item.
2
When you touch a category its contents are
displayed.
3 Touch desired item from the content list.
Playback starts.
• Touch [6] to moves to the upper hierarchy.
✎
NOTE
• The source control screen appears when you touch
[6] at the top hierarchy.
8
!B5K-0673-01_K_EnFrEs.indb 7 2019/04/11 14:59
Page 9
External ComponentsExternal Components
Using external audio/video players
Ñ Starting playback
1
Connect an external component to the AV-IN
input terminal. (P.14)
Press the <8MENU> button.
2
Tou ch [AV-IN].
3
4
Turn on the connected component and start
playing the source.
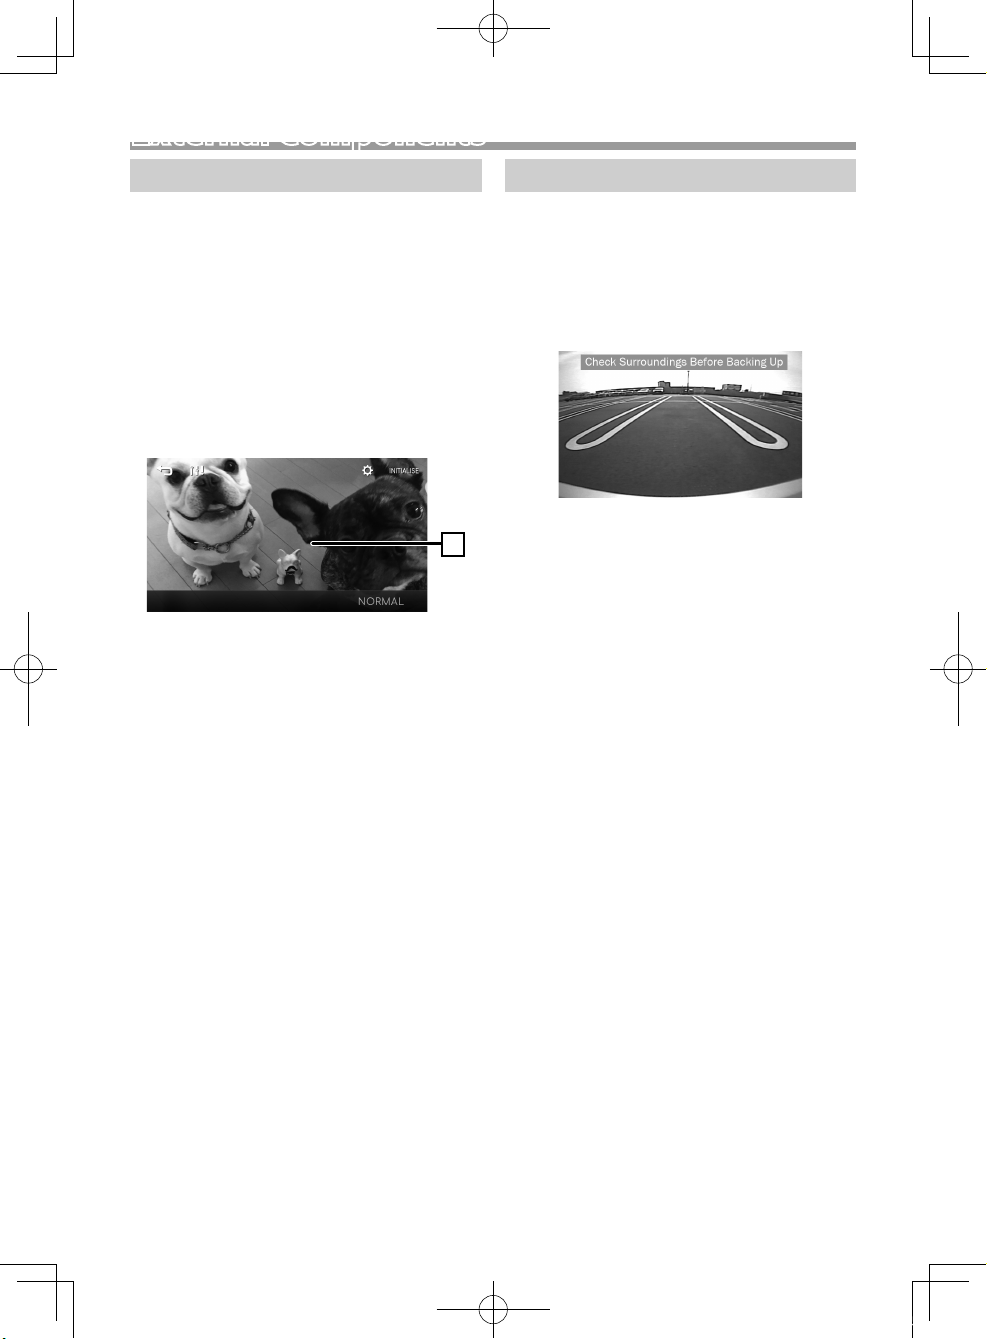
Ñ For Video playback
When the operation buttons are not displayed
1
on the screen, touch the display.
The operation buttons disappear when 1 is
touched or when no operation is done for about
5 seconds.
Rear view camera
To use a rear view camera, the REVERSE lead
connection is required. For connecting a rear view
camera. (P.14)
Ñ Displaying the picture from the rear
view camera
The rear view screen is displayed when you shift the
gear to the reverse (R) position.
• To erase the caution message, touch the screen.
1
English |
!B5K-0673-01_K_EnFrEs.indb 8 2019/04/11 14:59
9
Page 10
Bluetooth
Bluetooth
Register your smartphone to the
unit
You can use your Bluetooth smartphone when
paired to this unit.
Turn on the Bluetooth function on your
1
smartphone/cell-phone.
2
Search the unit (“DMX125BT”) from your
smartphone/cell-phone.
If a PIN code is required, enter the PIN code
(“0000”).
•
appears when the Bluetooth smartphone is
connected.
Ñ Disconnecting the device
• Turn off the Bluetooth function from your
smartphone/cell-phone.
• Turn off the ignition switch.
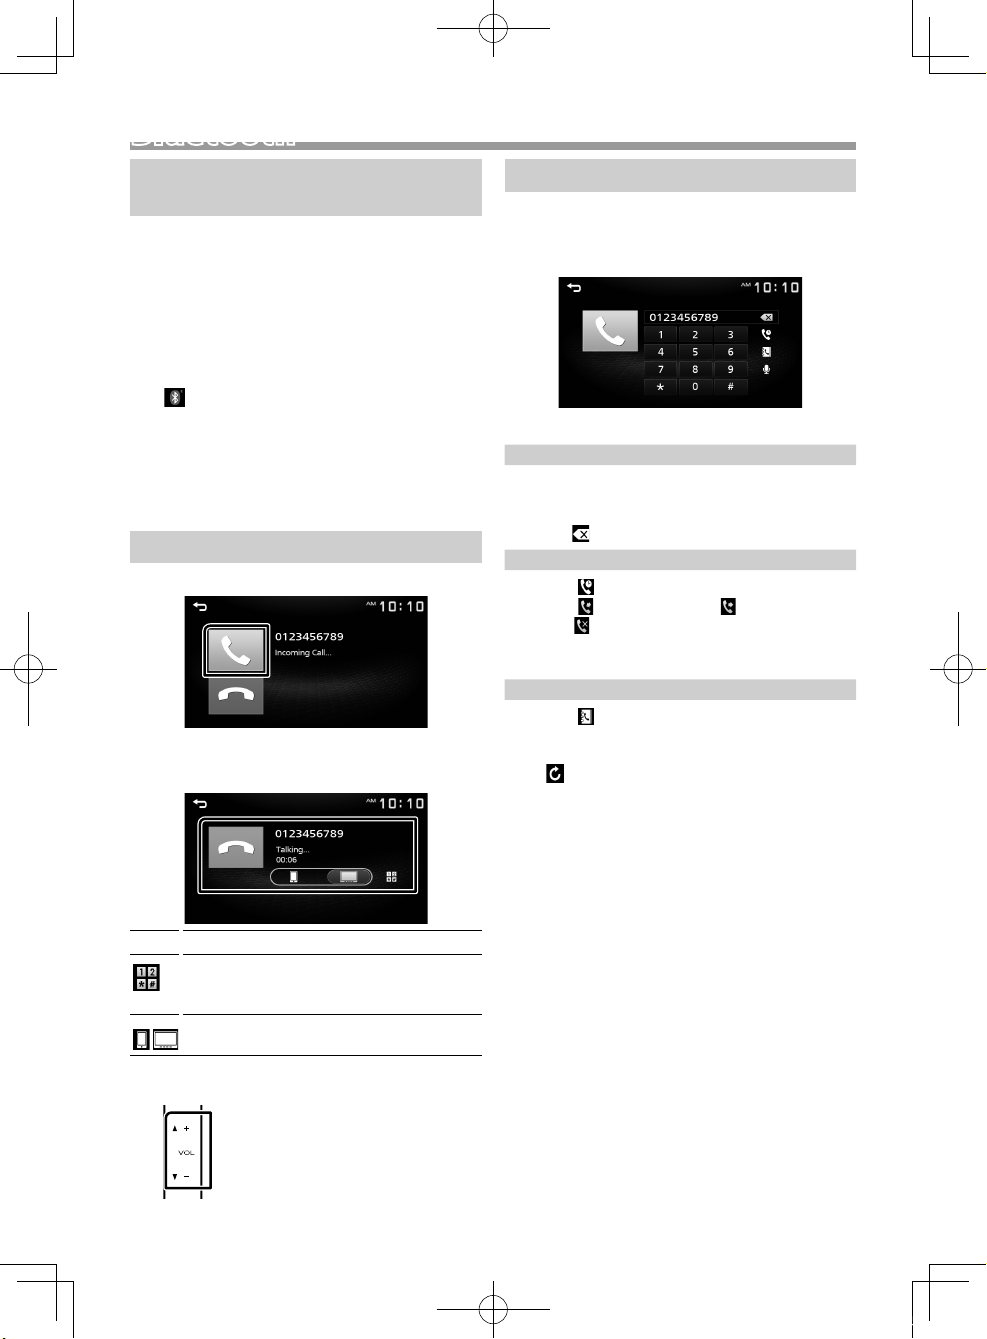
Receive a phone call
1
Tou ch [Û].
• [Ý] : Reject an incoming call.
Ñ Operations during a call
Make a phone call
Press the <8MENU> button.
1
2
Tou ch [TEL].
See the table below for each operation method.
3
Call by entering a phone number
1) Enter a phone number with number keys.
2) Touch [Û].
Make a call
• Touch [
Call using call records
1) Touch [
2) Touch [
Calls), [
3) Select the phone number from the list.
Call using the phonebook
1) Touch [
2) Select the name from the list.
• [
] to delete the last entry.
].
] (Incoming Calls), [ ] (Outgoing
] (Missed Calls).
Make a call
].
Make a call
] : Updates the phonebook. Touch this
button after you have made a change
to the phonebook of your smartphone/
cell-phone.
Ending a call
[Ý]
You can send tones by touching desired keys
on the screen.
• Touch [6] to close the window.
Switches the speaking voice output between
smartphone/cell-phone and speaker.
Adjust the receiver volume
Press the <+> or <–> button.
10
!B5K-0673-01_K_EnFrEs.indb 9 2019/04/11 14:59
Page 11
Controlling Audio
Playing Bluetooth Audio Device
Press the <8MENU> button.
1
2
Touch [BT Audio].
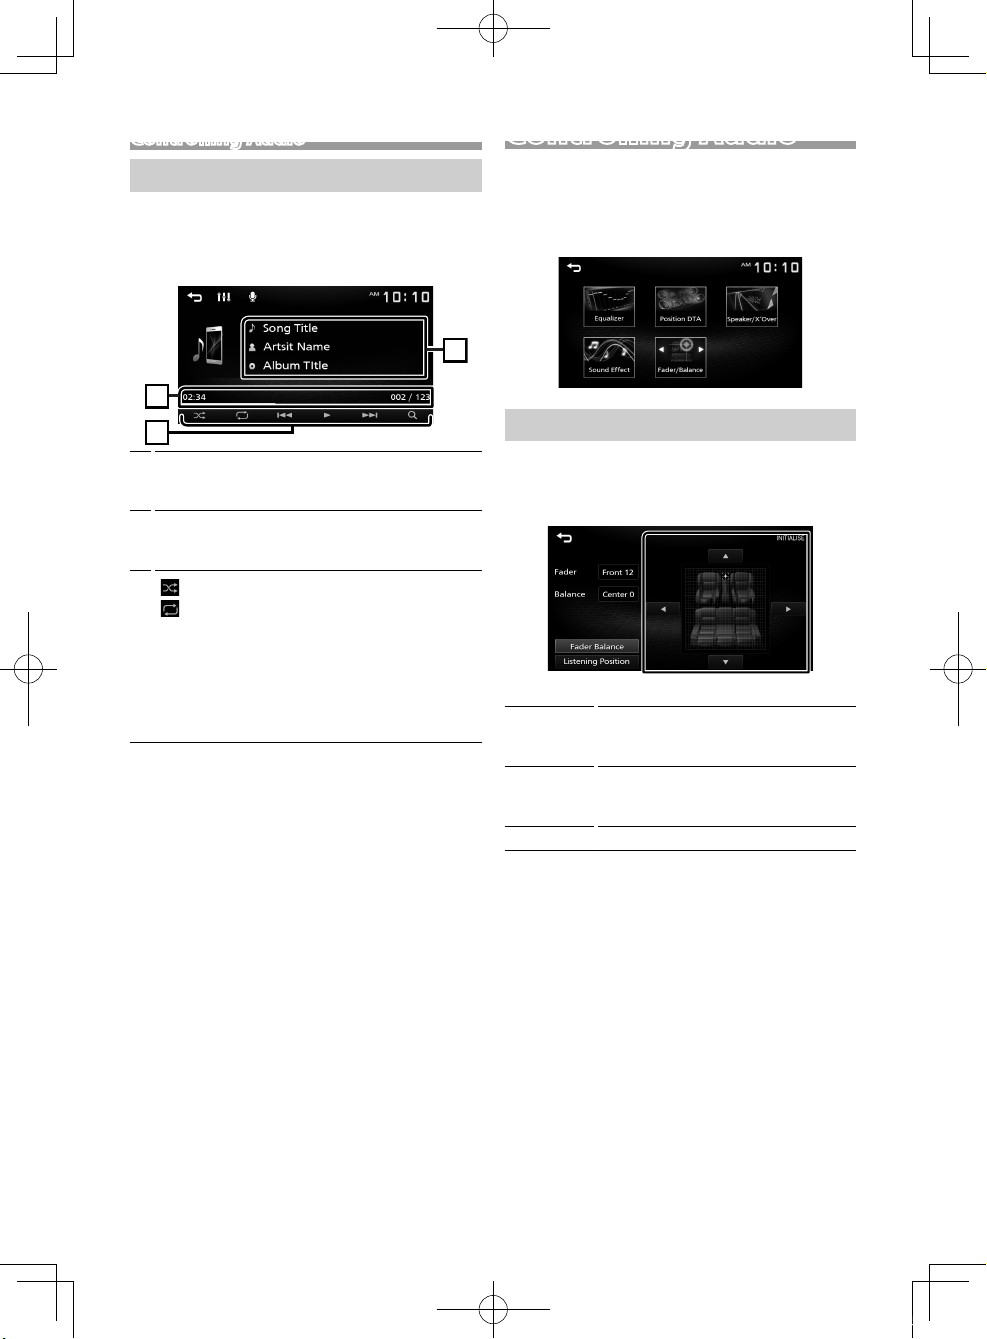
Ñ Source control screen
1
2
3
Displays the information of the current file.
1
Only a file name and a folder name are displayed
if there is no tag information.
Playing time/File number
2
Play time bar :For confirmation of current playing
position.
3
[
] : Selects Random playback mode.
] : Selects Repeat playback mode.
[
[U], [H] : Plays or pauses.
[E], [F] : Searches the previous/next
content.
Touch and hold to fast forward or fast
backward.
[1] : Searches file. (P.10)
NOTE
✎
• Operations and display indications may differ
according to their availability on the connected
device.
Ñ Selecting a content in a list
Tou ch [1].
1
2
Touch desired item.
When you touch a category its contents are
displayed.
3
Touch desired item from the content list.
Playback starts.
• Touch [6] to moves to the upper hierarchy.
NOTE
✎
• The source control screen appears when you touch
[6] at the top hierarchy.
Controlling Audio
You can adjust various settings such as audio
balance or subwoofer level.
Press the <AUD> button.
1
2
See the below for each operation method.
Controlling General Audio
1 Press the <AUD> button.
2
Touch [Fader / Balance].
Set each item as follows.
3
[Fader Balance]
Fader
[R] [S]
Balance
[U] [T]
[INITIALIZE]
Adjust the front and rear volume
balance.
12 (front) to -12 (rear)
Adjust the left and right volume
balance.
12 (right) to -12 (left)
To clear the adjustment.
English |
!B5K-0673-01_K_EnFrEs.indb 10 2019/04/11 14:59
11
Page 12
Installation
Installation
Before Installation
Before installation of this unit, please note the
following precautions.
#WARNINGS
• If you connect the ignition wire (red) and the battery
wire (yellow) to the car chassis (ground), you may
cause a short circuit, that in turn may start a fire.
Always connect those wires to the power source
running through the fuse box.
• Do not cut out the fuse from the ignition wire (red)
and the battery wire (yellow). The power supply
must be connected to the wires via the fuse.
#CAUTION
• Install this unit in the console of your vehicle.
Do not touch the metal part of this unit during and
shortly after the use of the unit. Metal part such as
the heat sink and enclosure become hot.
NOTE
✎
• Mounting and wiring this product requires skills and
experience. For best safety, leave the mounting and
wiring work to professionals.
• Make sure to ground the unit to a negative 12V DC
power supply.
• Do not install the unit in a spot exposed to direct
sunlight or excessive heat or humidity. Also avoid
places with too much dust or the possibility of water
splashing.
• Do not use your own screws. Use only the screws
provided. If you use the wrong screws, you could
damage the unit.
• If your car’s ignition does not have an ACC position,
connect the ignition wires to a power source that
can be turned on and off with the ignition key. If you
connect the ignition wire to a power source with a
constant voltage supply, such as with battery wires,
the battery may be drained.
• If the console has a lid, make sure to install the unit
so that the front panel will not hit the lid when
closing and opening.
• If the fuse blows, first make sure the wires aren’t
touching to cause a short circuit, then replace the
old fuse with one with the same rating.
• Insulate unconnected wires with vinyl tape or other
similar material. To prevent a short circuit, do not
remove the caps on the ends of the unconnected
wires or the terminals.
• Secure the wires with cable clamps and wrap vinyl
tape around the wires that comes into contact with
metal parts to protect the wires and to prevent short
circuit.
• Connect the speaker wires correctly to the terminals
to which they correspond. The unit may be
damaged or fail to work if you share the ¤ wires or
ground them to any metal part in the car.
• When only two speakers are being connected to
the system, connect the connectors either to both
the front output terminals or to both the rear output
terminals (do not mix front and rear). For example,
if you connect the ¢ connector of the left speaker
to a front output terminal, do not connect the ¤
connector to a rear output terminal.
• After the unit is installed, check whether the brake
lamps, blinkers, wipers, etc. on the car are working
properly.
• Mount the unit so that the mounting angle is 30°
or less.
• Do not press hard on the panel surface when installing
the unit to the vehicle. Otherwise scars, damage, or
failure may result.
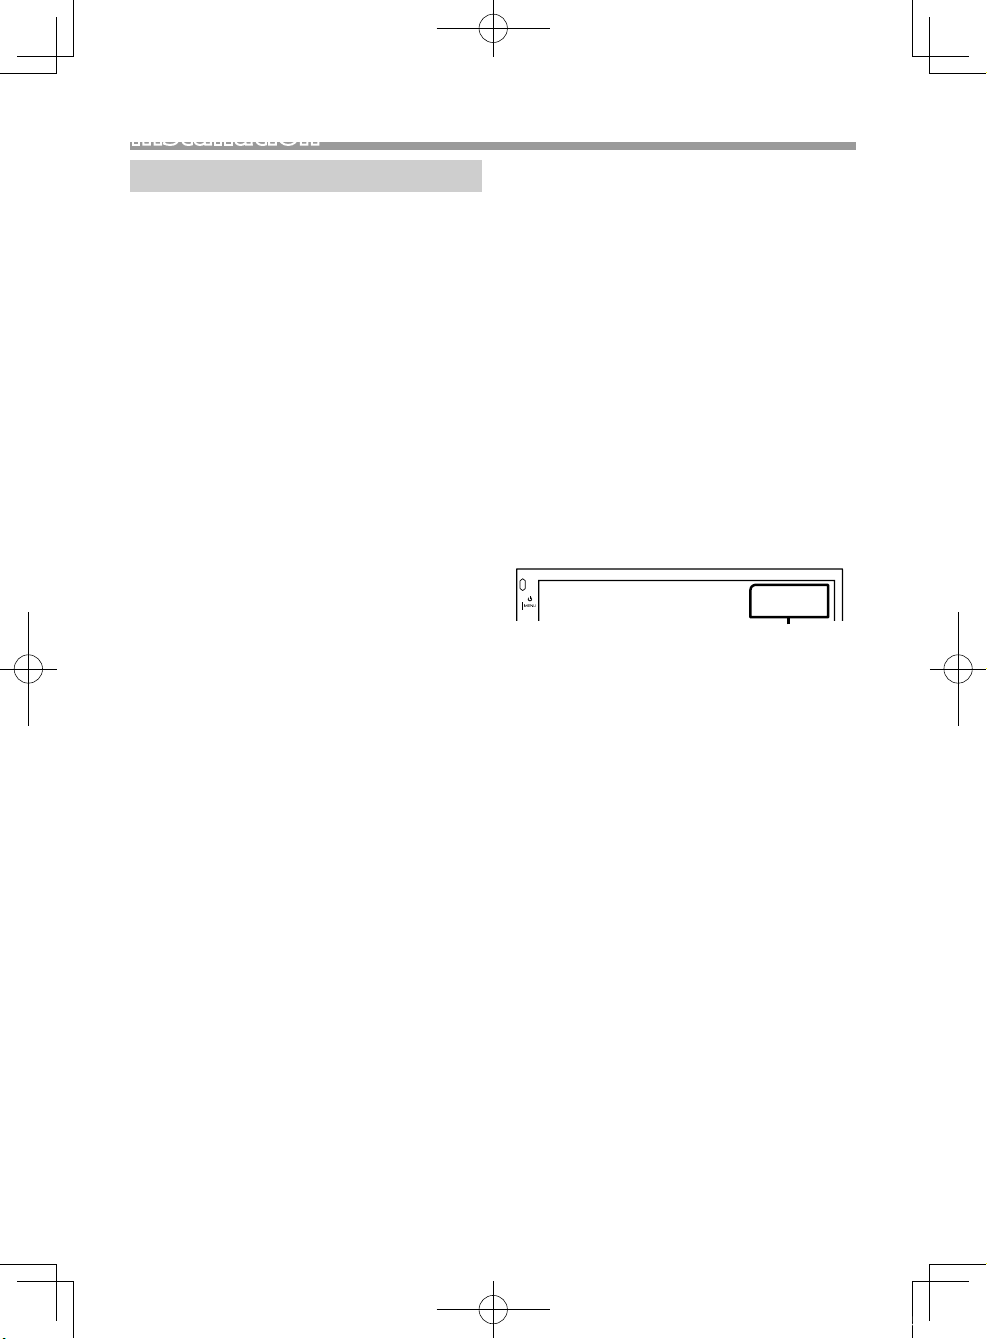
• Reception may drop if there are metal objects near
the Bluetooth antenna.
Bluetooth antenna unit
12
!B5K-0673-01_K_EnFrEs.indb 11 2019/04/11 14:59
Page 13
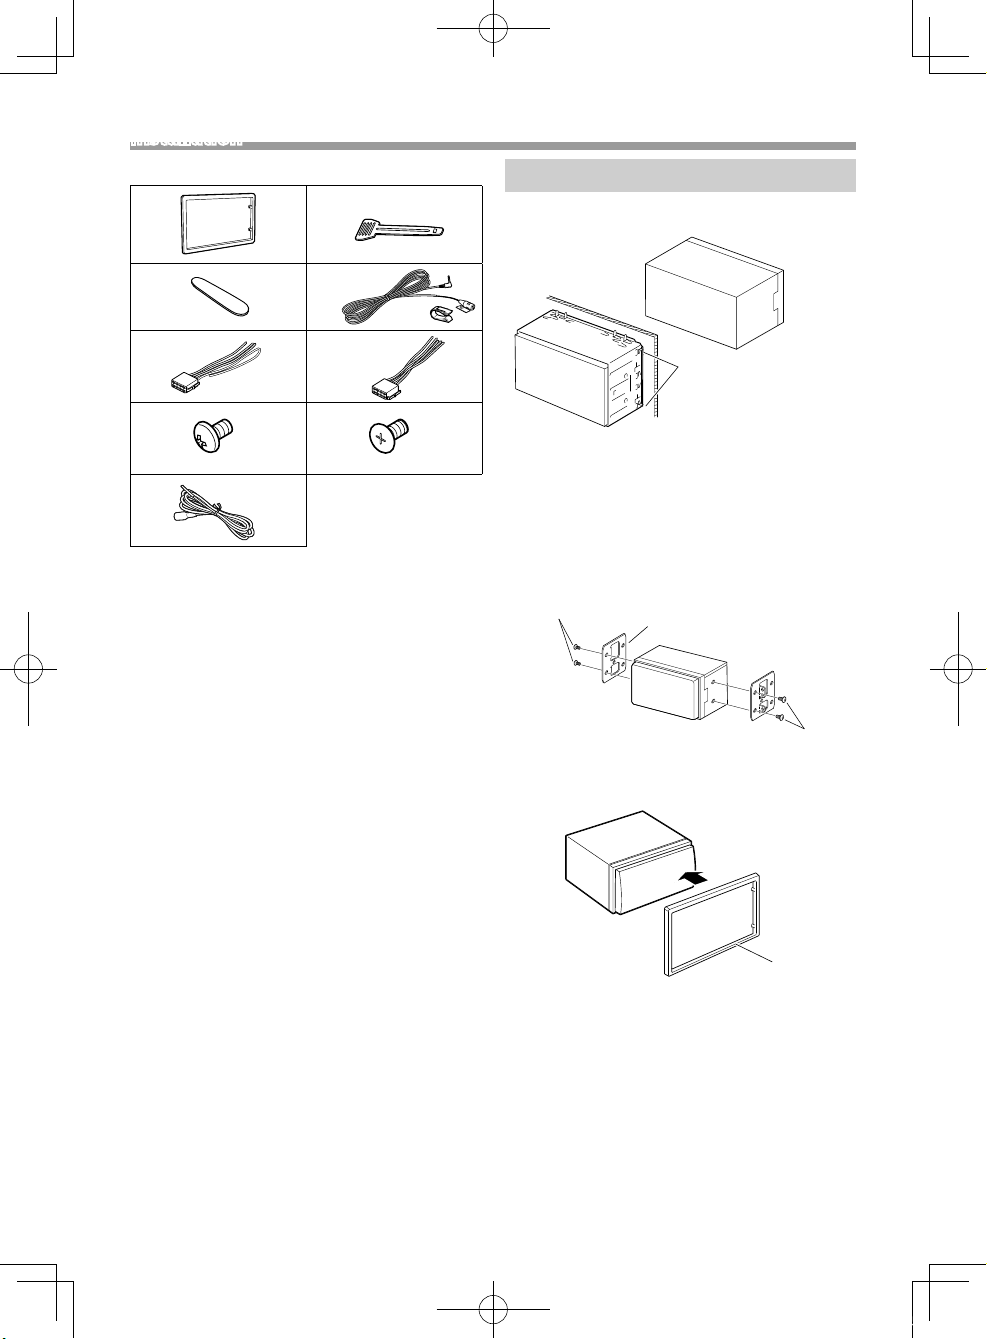
Installation
Ñ Supplied accessories for installation
1
3
5
7
9
(M5 × 6 mm)
(2 m)
x1
x1
x1
x6
x1
2
4
(3 m)
6
8
(M5 × 7 mm)
x2
x1
x6
Ñ Installation procedure
1) To prevent a short circuit, remove the key from
the ignition and disconnect the ¤ terminal of the
battery.
2) Make the proper input and output wire
connections for each unit.
3) Connect the wire on the wiring harness.
4) Take Connector B on the wiring harness and
connect it to the speaker connector in your vehicle.
5) Take Connector A on the wiring harness and
connect it to the external power connector on your
vehicle.
6) Connect the wiring harness connector to the unit.
7) Install the unit in your car.
8) Reconnect the ¤ terminal of the battery.
9) Press the reset button.
Installing the unit
Ñ Non-Japanese cars
x1
Bend the tabs of the
mounting sleeve with
a screwdriver or similar
utensil and attach it in
place.
✎
NOTE
• Make sure that the unit is installed securely in place.
If the unit is unstable, it may malfunction (eg, the
sound may skip).
Ñ Japanese cars (North America, South
America sales area only)
7 or 8
Ñ Trim plate
1) Attach accessory 1 to the unit.
Car Bracket
7 or 8
1
English |
!B5K-0673-01_K_EnFrEs.indb 12 2019/04/11 14:59
13
Page 14
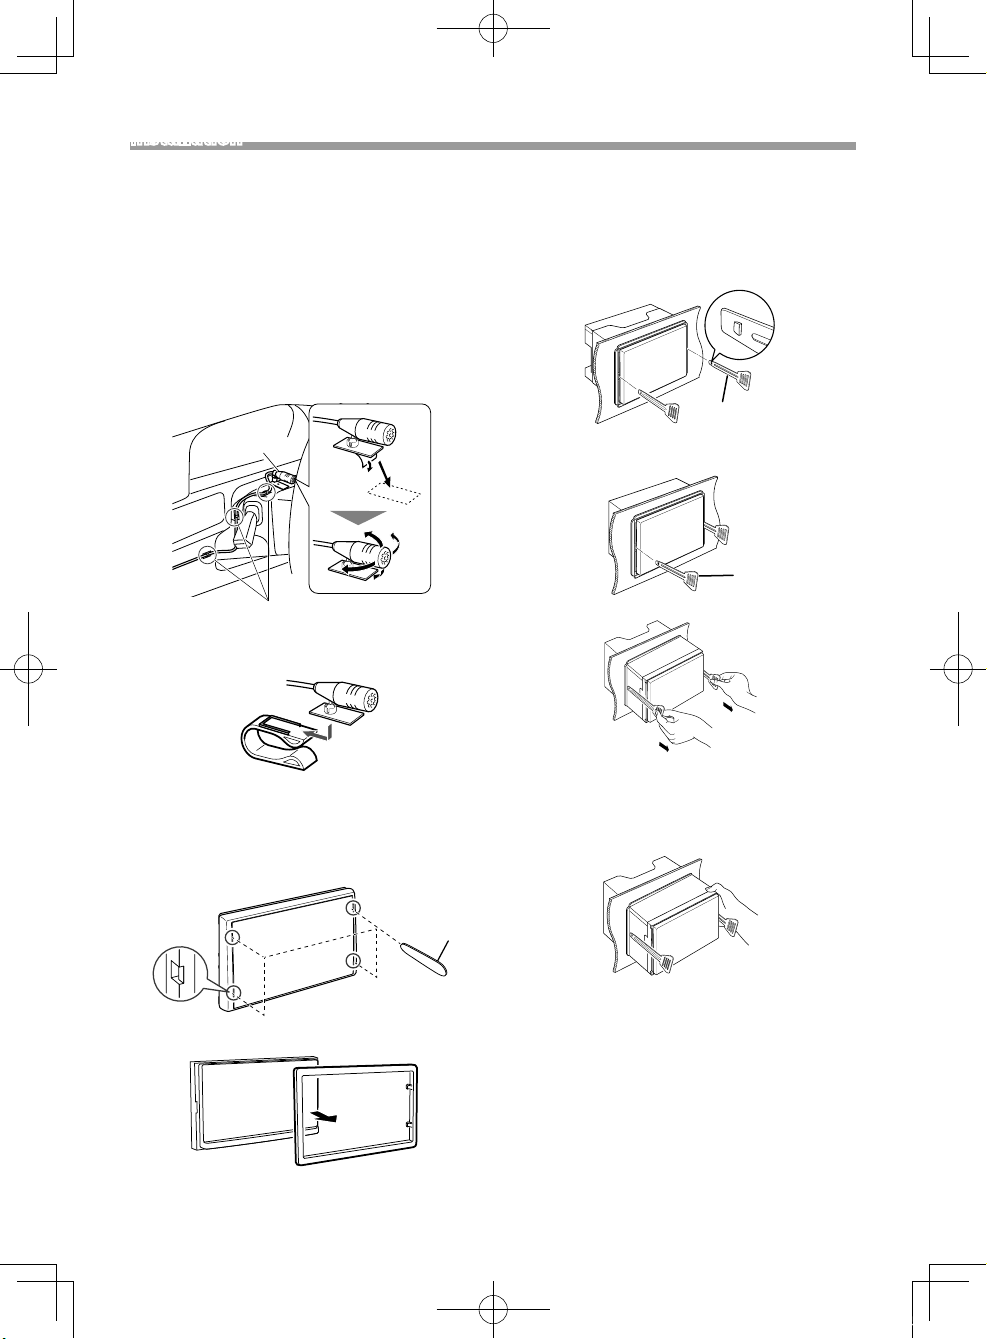
Installation
Ñ Microphone unit
1) Check the installation position of the microphone
(accessory 4).
2) Clean the installation surface.
3) Remove the separator of the microphone
(accessory 4), and stick the microphone to the
place shown below.
4) Wire the microphone cable up to the unit with it
secured at several positions using tape or other
desired method.
5) Adjust the direction of the microphone (accessory
4) to the driver.
4
Fix a cable with a commercial item of tape.
✎
NOTE
• Swap the clips if necessary.
Ñ Removing the unit
1) Remove the trim plate by referring to step 1 in
“Removing the trim plate”.
2) Insert the extraction key (accessory 2) deeply into
the slot as shown. (The protrusion at the tip of the
extraction key must face toward the unit.)
2
3) With the inserted extraction key secured, insert the
other extraction key into the slot.
2
4) Pull out the unit halfway.
✎
NOTE
• Be careful to avoid injury from the catch pins on
Ñ Removing the trim plate
1) Use the extraction key (accessory 3) to lever out
the four tabs (two on the left part, two on the right
part).
3
2) Pull the trim plate forward.
14
!B5K-0673-01_K_EnFrEs.indb 13 2019/04/11 14:59
the extraction key.
5) Pull the unit all the way out with your hands, being
careful not to drop it.
Page 15
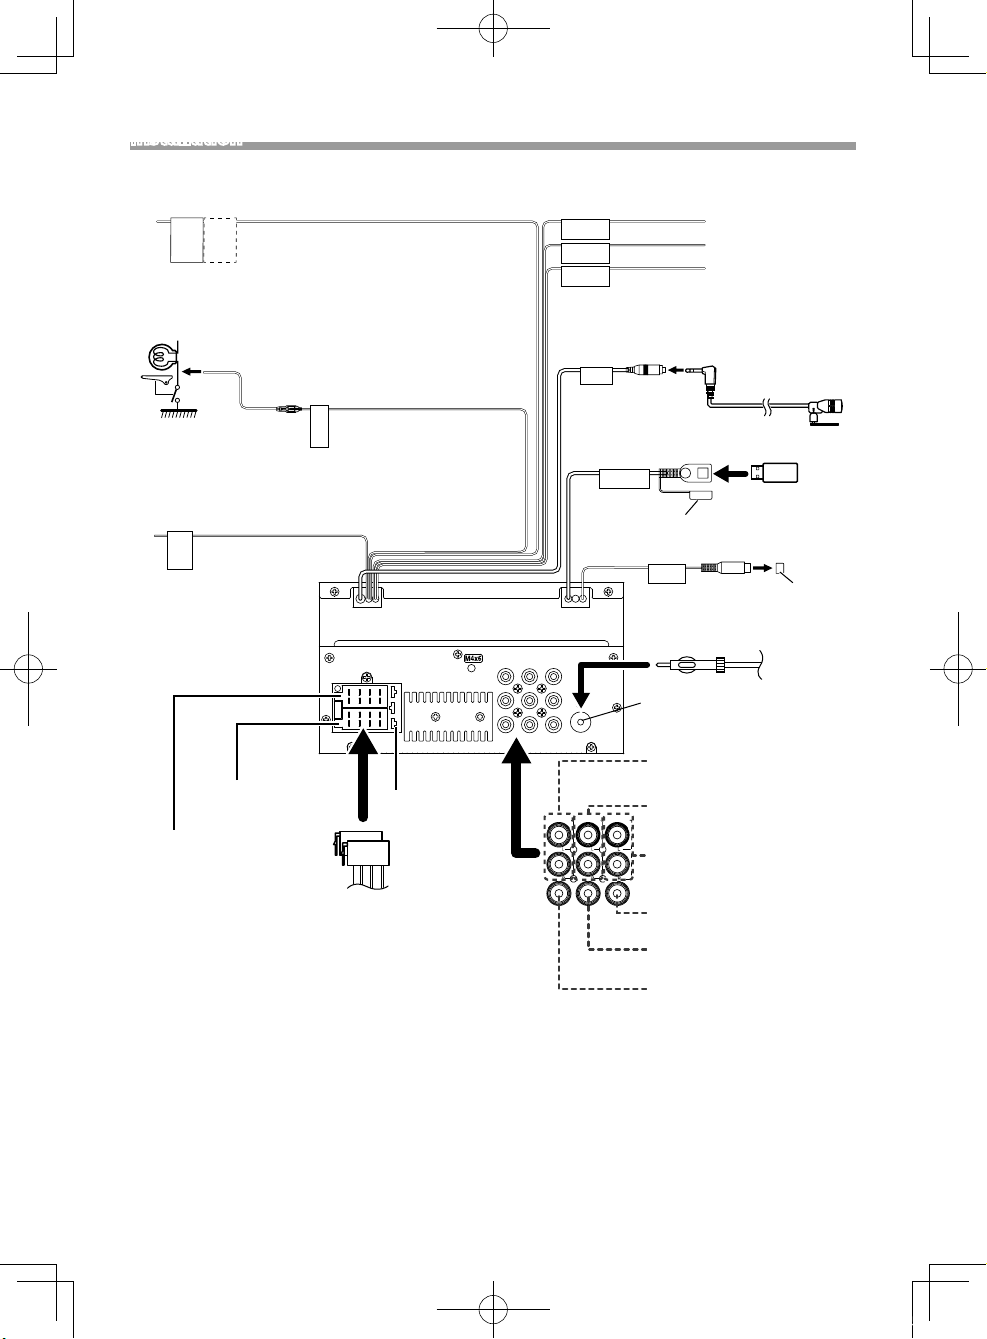
Installation
Ñ Connecting wires to terminals Ñ Connecting wires to terminals
Light Blue/ Yellow (Steering remote control wire)
To steering remote
To use the steering wheel remote control feature,
REMOTE
CONT
STEERING
WHEEL
REMOTE
INPUT
you need an exclusive remote adapter (not
supplied) matched to your car.
Light Green (Parking sensor wire)
Accessor y 9: Extension cable
Connect to the vehicle’s
parking brake detection
PRK SW
switch harness.
Purple/White (Reverse sensor wire)
REVERSE
Connect to vehicle’s reverse
lamp harness when using the
optional rear view camera.
Connector A
Connector B
For best safety, be sure to
connect the parking sensor.
M4x6
1 3 5 7
2 4 6 8
1 3 5 7
2 4 6 8
Fuse (15A)
Accessor y 5
Accessor y 6
FRONT OUTREAR OUT
AV IN
CAM IN VIDEO OUT VIDEO IN
Bright Green/Red
ST REMOTE
INPUT 1
Purple/Red
ST REMOTE
INPUT 2
Gray/Red
ST REMOTE
GND
Connect to vehicle’s steering remote
harness.
Contact your KENWOOD dealer for details.
MIC
USB terminal
5V=1.0A
[1]
(0.8 m)
Accessor y 4:
Bluetooth Microphone
Cap
Subwoofer Preout
SUB
WOOFER
L
R
ANT
FM/AM antenna input
Rear Audio Preout
(Left; White, Right; Red)
FRONT OUTREAR OUT
Front Audio Preout
AV IN
(Left; White, Right; Red)
AV-IN audio input
(Left; White, Right; Red)
USB device
Cap
FM/AM
antenna
[2]
VIDEO OUT VIDEO INCAM IN
AV-IN visual input (Yellow)
Visual Output (Yellow)
Rear view camera input (Yellow)
[1]
USB maximum power supply current :
DC 5 V = 1.0 A
[2]
Sold separately
[3]
Max. 150mA, 12V
English |
!B5K-0673-01_K_EnFrEs.indb 14 2019/04/11 14:59
15
Page 16
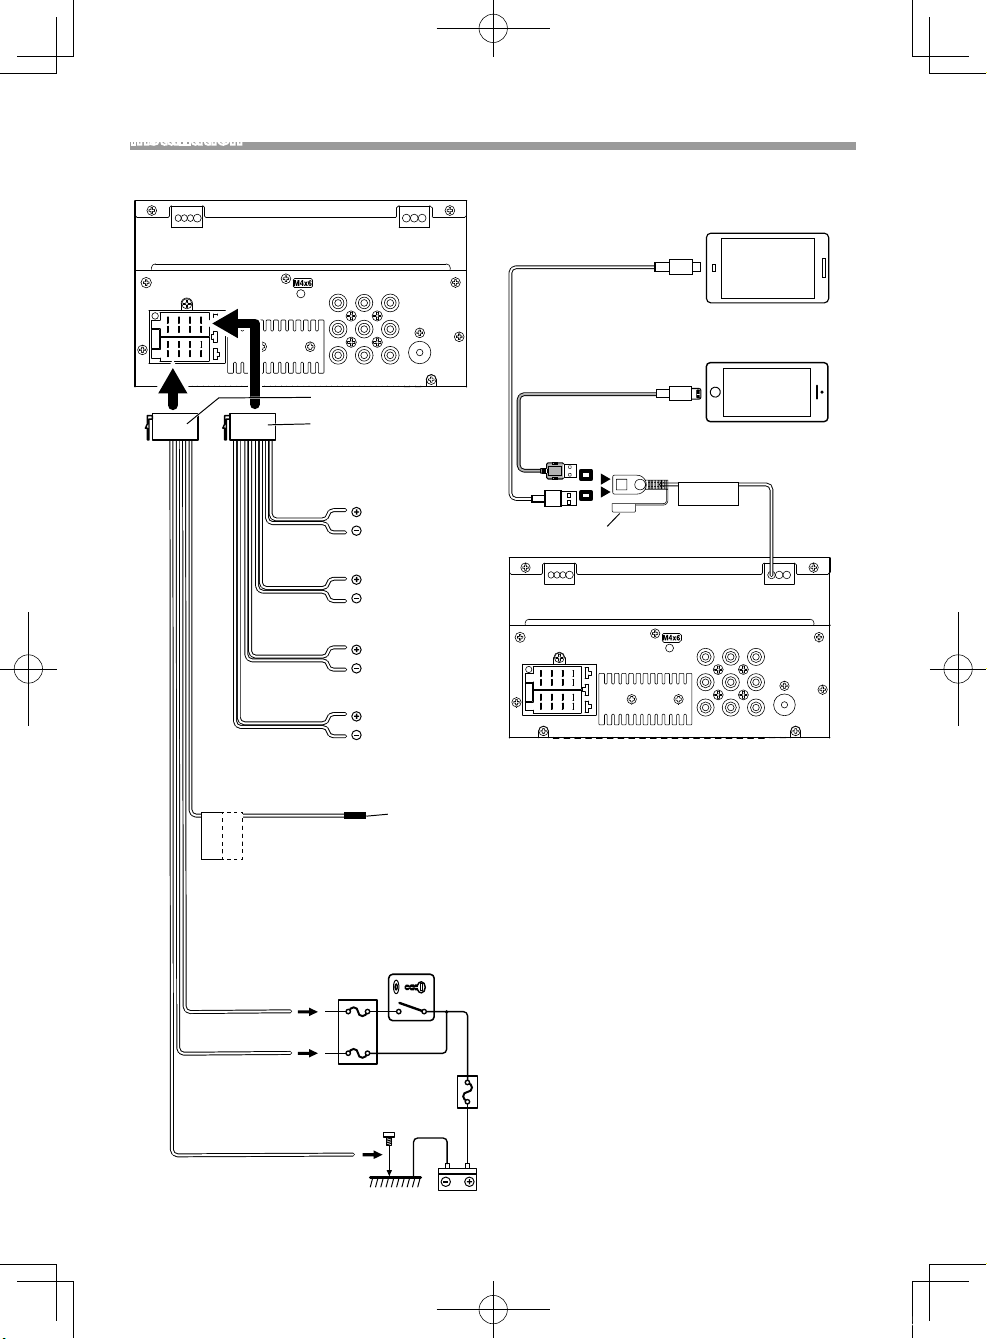
Installation
Ñ Connecting an iPod/iPhone/Android
M4x6
1 3 5 7
2 4 6 8
1 3 5 7
2 4 6 8
CAM IN VIDEO OUT VIDEO IN
Accessor y 5
Accessor y 6
Speaker impedance: 4-8 Ω
White
White/Black
Gray
Gray/Black
Green
Green/Black
Purple
Purple/Black
Blue
(Power control/ Antenna control wire)
Connect either to the power control
terminal when using the optional power
P.CONT
ANT.CONT
amplifier, or to the power terminal for
the booster amplifier of the film-type or
short pole type antenna.
(Max. 150mA, 12V)
FRONT OUTREAR OUT
AV IN
L
R
ANT
To front left speaker
To front right
speaker
To rear left speaker
To rear right
speaker
Cap
Android smartphone
Micro USB to USB cable
[2]
iPod/iPhone
Lightning connector
KCA-iP103 (0.8m)
[3]
USB terminal
5V=1.0A
Cap
M4x6
FRONT OUTREAR OUT
CAM IN VIDEO OUT VIDEO IN
[1]
USB maximum power supply current :
DC 5 V = 1.0 A
[2]
Sold separately
[3]
Optional accessory
[1]
(0.8 m)
AV IN
[2]
[2]
L
R
ANT
Ignition key switch
Red (Ignition wire)
ACC
Yellow (Battery wire)
Car fuse box
Black (Ground wire) ¤
(To car chassis)
Battery
16
!B5K-0673-01_K_EnFrEs.indb 15 2019/04/11 14:59
Page 17
About this Unit
About this Unit
More information
Ñ Usable USB device
This unit can play MPEG1/ MPEG2/ MPEG4/ H.264/
MKV/ MP3/WMA/ AAC/ WAV/ FLAC/ OGG les stored
in a USB mass storage class device.
• File system: FAT16/ FAT32
✎
NOTE
• When the USB device is connected to this unit, it can
be charged through the USB cable.
• Install the USB device in the place where it will not
affect safe driving.
• You cannot connect a USB device via a USB hub and
Multi Card Reader.
• Take backups of the audio files used with this unit.
The files may be erased depending on the operating
conditions of the USB device.
We shall have no compensation for any damage
arising from any erased data.
• No USB device comes with this unit. You need to
purchase a commercially available USB device.
• Cap the USB terminal whenever not using.
Ñ Playable Audio les
Audio format Extension
MP3 .mp3
WMA .wma
A AC- LC .m4a, .aac
Linear PCM (WAVE) .wav
FLAC .flac
Vorbis .ogg
• This unit can show ID3 Tag Version 1.0/1.1/2.2/2.3/2.4
(for MP3).
NOTE
✎
• WMA and AAC of which is covered with DRM cannot
be played.
• Although the audio files are complied with the
standards listed above, the play may be impossible
depending on the types or conditions of media or
device.
Ñ Acceptable Video les
Video format Extension
MPEG -1 .mpg, .mpeg
MPEG -2 .mpg, .mpeg
MPEG-4 .mp4, .avi
H.264/MPEG-4 AVC .mp4, mkv, avi, .flv, .f4v, .ts
MKV .mkv
Note for specications
Ñ Bluetooth section
Frequency
: 2.402 – 2.480 GHz
Output Power
: +8 dBm (AVE), Power Class1
Ñ General
Speaker Impedance
: 4 – 8 Ω
Operating Voltage
: 12 V DC car battery
■ FM tuner section
Frequency Range (step)
: 87.5 MHz – 108.0 MHz (50 kHz)
Usable Sensitivity (S/N : 26 dB)
: 13.2 dBf (1.3 μV/75 Ω)
Quieting Sensitivity (S/N : 46 dB)
: 19.2 dBf (2.5 μV/75 Ω)
Frequency Response
: 30 Hz – 15 kHz
S/N Ratio (dB)
: 70 dB (MONO)
Selectivity (± 400 kHz)
: Over 80 dB
Stereo Separation
: 37 dB (1 kHz)
■ AM tuner section
Frequency Range (step)
MW: 531 – 1611 kHz (9 kHz)
Usable Sensitivity
MW: 4 4.7μV
■ DAB section
Frequency Range
BAND III: 174.928 – 239.200 (MHz)
Sensitivity
: -98 dBm
S/N Ratio (dB)
: 82 dB
English |
!B5K-0673-01_K_EnFrEs.indb 16 2019/04/11 14:59
17
Page 18

About this Unit
Copyrights
• The Bluetooth word mark and logos are registered
trademarks owned by the Bluetooth SIG, Inc. and any
use of such marks by JVC KENWOOD Corporation is
under license. Other trademarks and trade names are
those of their respective owners.
• Use of the Made for Apple badge means that an
accessory has been designed to connect specifically
to the Apple product(s) identified in the badge, and
has been certified by the developer to meet Apple
performance standards. Apple is not responsible for
the operation of this device or its compliance with
safety and regulatory standards. Please note that the
use of this accessory with an Apple product may affect
wireless performance.
• Apple, iPhone, iPod, iPod touch, and Lightning are
trademarks of Apple Inc., registered in the U.S. and
other countries.
• Microsoft and Windows Media are either registered
trademarks or trademarks of Microsoft Corporation in
the United States and/or other countries.
• THIS PRODUCT IS LICENSED UNDER THE MPEG-4 VISUAL
PATENT PORTFOLIO LICENSE FOR THE PERSONAL
AND NON-COMMERCIAL USE OF A CONSUMER FOR (¡)
ENCODING VIDEO IN COMPLIANCE WITH THE MPEG4 VISUAL STANDARD (“MPEG-4 VIDEO”) AND/OR (¡¡)
DECODING MPEG-4 VIDEO THAT WAS ENCODED BY
A CONSUMER ENGAGED IN A PERSONAL AND NONCOMMERCIAL ACTIVITY AND/OR WAS OBTAINED
FROM A VIDEO PROVIDER LICENSED BY MPEG LA TO
PROVIDE MPEG-4 VIDEO. NO LICENSE IS GRANTED OR
SHALL BE IMPLIED FOR ANY OTHER USE. ADDITIONAL
INFORMATION INCLUDING THAT RELATING TO
PROMOTIONAL, INTERNAL AND COMMERCIAL USES
AND LICENSING MAY BE OBTAINED FROM MPEG LA, LLC.
SEE HTTP://WWW.MPEGLA.COM.
• THIS PRODUCT IS LICENSED UNDER THE AVC PATENT
PORTFOLIO LICENSE FOR THE PERSONAL USE OF A
CONSUMER OR OTHER USES IN WHICH IT DOES NOT
RECEIVE REMUNERATION TO (¡)ENCODE VIDEO IN
COMPLIANCE WITH THE AVC STANDARD (“AVC VIDEO”)
AND/OR (¡¡)DECODE AVC VIDEO THAT WAS ENCODED BY
A CONSUMER ENGAGED IN A PERSONAL ACTIVITY AND/
OR WAS OBTAINED FROM A VIDEO PROVIDER LICENSED
TO PROVIDE AVC VIDEO. NO LICENSE IS GRANTED OR
SHALL BE IMPLIED FOR ANY OTHER USE. ADDITIONAL
INFORMATION MAY BE OBTAINED FROM MPEG LA, L.L.C.
SEE HTTP://WWW.MPEGLA.COM
• libFLAC
Copyright (C) 2000-2009 Josh Coalson
Copyright (C) 2011-2013 Xiph.Org Foundation
– Redistribution and use in source and binary forms,
with or without modification, are permitted provided
that the following conditions are met:
– Redistributions of source code must retain the above
copyright notice, this list of conditions and the
following disclaimer.
18
– Redistributions in binary form must reproduce the
above copyright notice, this list of conditions and the
following disclaimer in the documentation and/or
other materials provided with the distribution.
Neither the name of the Xiph.org Foundation nor the
names of its contributors may be used to endorse or
promote products derived from this software without
specific prior written permission.
THIS SOFTWARE IS PROVIDED BY THE COPYRIGHT
HOLDERS AND CONTRIBUTORS ``AS IS’’ AND ANY
EXPRESS OR IMPLIED WARRANTIES, INCLUDING,
BUT NOT LIMITED TO, THE IMPLIED WARRANTIES OF
MERCHANTABILITY AND FITNESS FOR A PARTICULAR
PURPOSE ARE DISCLAIMED. IN NO EVENT SHALL THE
FOUNDATION OR CONTRIBUTORS BE LIABLE FOR ANY
DIRECT, INDIRECT, INCIDENTAL, SPECIAL, EXEMPLARY,
OR CONSEQUENTIAL DAMAGES (INCLUDING, BUT NOT
LIMITED TO, PROCUREMENT OF SUBSTITUTE GOODS
OR SERVICES; LOSS OF USE, DATA, OR PROFITS; OR
BUSINESS INTERRUPTION) HOWEVER CAUSED AND ON
ANY THEORY OF LIABILITY, WHETHER IN CONTRACT,
STRICT LIABILITY, OR TORT (INCLUDING NEGLIGENCE OR
OTHERWISE) ARISING IN ANY WAY OUT OF THE USE OF
THIS SOFTWARE, EVEN IF ADVISED OF THE POSSIBILITY
OF SUCH DAMAGE.
• libogg
Copyright (c) 2002, Xiph.org Foundation Redistribution
and use in source and binary forms, with or without
modification, are permitted provided that the following
conditions are met:
– Redistributions of source code must retain the above
copyright notice, this list of conditions and the
following disclaimer.
– Redistributions in binary form must reproduce the
above copyright notice, this list of conditions and the
following disclaimer in the documentation and/or
other materials provided with the distribution.
– Neither the name of the Xiph.org Foundation nor the
names of its contributors may be used to endorse or
promote products derived from this software without
specific prior written permission.
THIS SOFTWARE IS PROVIDED BY THE COPYRIGHT
HOLDERS AND CONTRIBUTORS ``AS IS’’ AND ANY
EXPRESS OR IMPLIED WARRANTIES, INCLUDING,
BUT NOT LIMITED TO, THE IMPLIED WARRANTIES OF
MERCHANTABILITY AND FITNESS FOR A PARTICULAR
PURPOSE ARE DISCLAIMED. IN NO EVENT SHALL THE
FOUNDATION OR CONTRIBUTORS BE LIABLE FOR ANY
DIRECT, INDIRECT, INCIDENTAL, SPECIAL, EXEMPLARY,
OR CONSEQUENTIAL DAMAGES (INCLUDING, BUT NOT
LIMITED TO, PROCUREMENT OF SUBSTITUTE GOODS
OR SERVICES; LOSS OF USE, DATA, OR PROFITS; OR
BUSINESS INTERRUPTION) HOWEVER CAUSED AND ON
ANY THEORY OF LIABILITY, WHETHER IN CONTRACT,
STRICT LIABILITY, OR TORT (INCLUDING NEGLIGENCE OR
OTHERWISE) ARISING IN ANY WAY OUT OF THE USE OF
THIS SOFTWARE, EVEN IF ADVISED OF THE POSSIBILITY
OF SUCH DAMAGE.
!B5K-0673-01_K_EnFrEs.indb 17 2019/04/11 14:59
Page 19

cerca de esta unidad
A
r USA
Fo
Ñ FCC WARNING
1. This device complies with Part 15 of the FCC
Rules. Operation is subject to the following
two conditions:
(1) This device may not cause harmful interference,
and
(2) This device must accept any interference received,
including interference that may cause undesired
operation.
2. any Changes or modifications not expressly
approved by the party responsible for compliance
could void the user's authority to operate the
equipment.
NOTE: This equipment has been tested and found
to comply with the limits for a Class B digital device,
pursuant to Part 15 of the FCC Rules. These limits
are designed to provide reasonable protection
against harmful interference in a residential
installation. This equipment generates uses and
can radiate radio frequency energy and, if not
installed and used in accordance with the
instructions, may cause harmful interference to
radio communications. However, there is no
guarantee that interference will not occur in a
particular installation. If this equipment does cause
harmful interference to radio or television reception,
which can be determined by turning the
equipment off and on, the user is encouraged to
try to correct the interference by one or more of
the following measures:
Reorient or relocate the receiving antenna.
Increase the separation between the equipment
and receiver.
Connect the equipment into an outlet on a circuit
different from that to which the receiver is connected.
Consult the dealer or an experienced radio/TV
technician for help.
For Canada
C (Industry Canada) Notice
Ñ I
This device contains licence‐exempt
transmitter(s)/receiver(s) that comply with
Innovation, Science and Economic Development
Canada’s licence‐exempt RSS(s). Operation is
subject to the following two conditions:
1) This device may not cause interference; and
(2) This device must accept any interference,
including interference that may cause
undesired operation of the device.
Pour le Canada
Ñ Note de ‘IC (Industrie Canada)
Cet appareil contient des émetteurs / récepteurs
exemptés de licence conformes aux RSS (RSS)
d'Innovation, Sciences et Développement
économique Canada. Le fonctionnement est
soumis aux deux conditions suivantes :
(1) l’appareil ne doit pas produire de brouillage, et
(2) l’utilisateur de l’appareil doit accepter tout
brouillage radioélectrique subi, même si le
brouillage est susceptible d’en compromettre le
fonctionnement.
F CC R a di a ti o n E x p o s u r e S t a t em e nt
This equipment complies with FCC radiation
exposure limits set forth for an uncontrolled
environment. This equipment should be installed
and operated with minimum distance 20cm
between the radiator & your body
English |
!B5K-0673-01_K_EnFrEs.indb 50 2019/04/11 14:59
19
Page 20
Acerca de esta unidad
Supplier’s Declaration of Conformity
Trade Name: KENWOOD
Products: DIGITAL MEDIA RECEIVER
Model Name: DMX125BT
Responsible Party: JVCKENWOOD USA
CORPORATION
2201 East Dominguez Street,
Long Beach, CA 90810, U.S.A.
PHONE: 310 639-9000
• Contains Transmitter Module
Contient un module émetteur
FCC ID: 2AB7S-YK5128K01
• Contains Transmitter Module
Contient un module émetteur
IC: 11888A-YK5128K01
For Argentina
Ñ Información acerca de la eliminación
de equipos eléctricos y electrónicos
al nal de la vida útil (aplicable a los
países que hayan adoptado sistemas
independientes de recogida de residuos)
Los productos con el símbolo de un contenedor
con ruedas tachado no podrán ser desechados
como residuos domésticos.
Los equipos eléctricos y electrónicos al final de la
vida útil, deberán ser reciclados en instalaciones
que puedan dar el tratamiento adecuado a
estos productos y a sus subproductos residuales
correspondientes. Póngase en contacto con su
administración local para obtener información sobre
el punto de recogida más cercano. Un tratamiento
correcto del reciclaje y la eliminación de residuos
ayuda a conservar los recursos y evita al mismo
tiempo efectos perjudiciales en la salud y el medio
ambiente.
For Mexico
Ñ Para cumplimiento de la IFT:
La operación de este equipo esta sujeta a las
siguientes dos condiciones:
(1) es posible que este equipo o dispositivo no cause
interferencia perjudicial y
(2) este equipo o dispositivo debe aceptar cualquier
interferencia,
incluyendo la que pueda causar su operación no
deseada.
20
!B5K-0673-01_K_EnFrEs.indb 51 2019/04/11 14:59
Page 21

!B5K-0673-01_K_EnFrEs.indb 52 2019/04/11 14:59
 Loading...