

Page 1
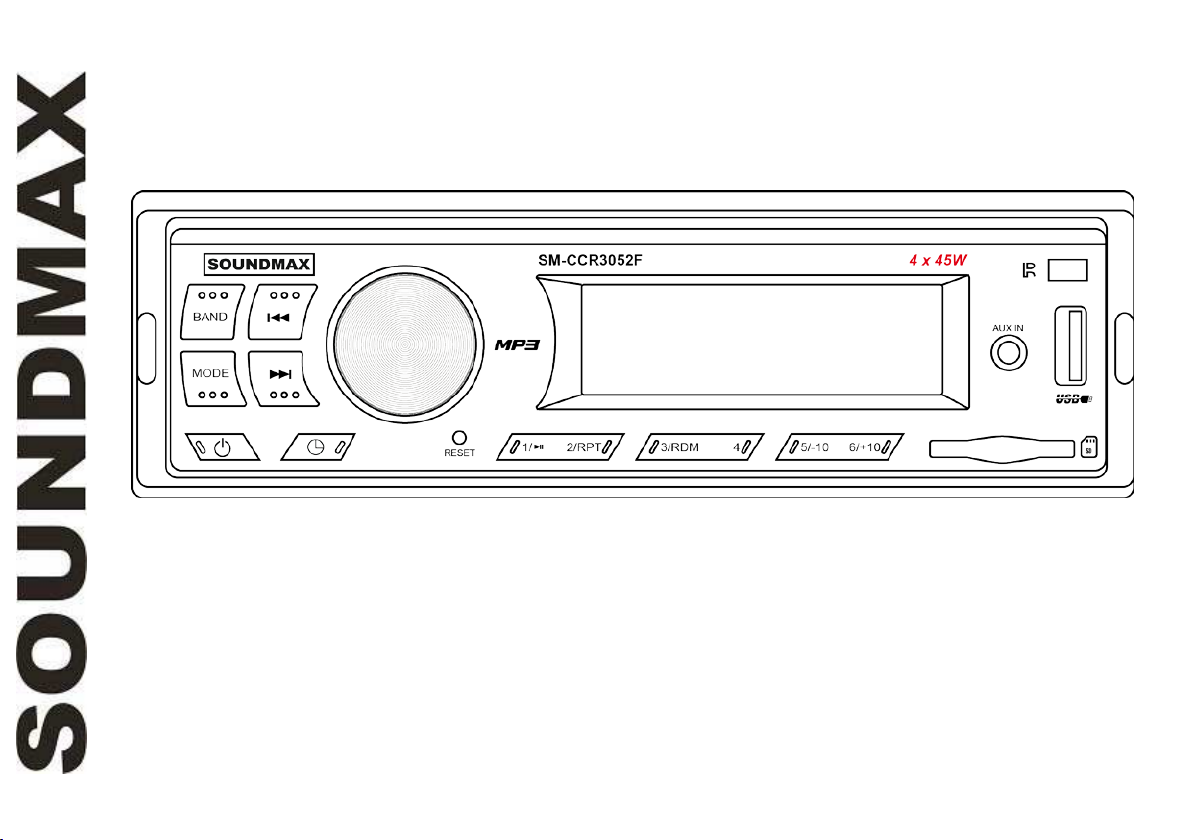
SM- CCR3 0 5 2 F
USB/ SD m e d ia pla yer USB/ SD -медиаплеер
I nstr uct io n m a nu al Руководство по эксплуатации
Page 2

De a r cu st om e r!
Thank y ou for pur chasi ng our product. For safety, it is st r ong ly r ecom m en ded t o r ead t his m anual car efu lly
befor e connect ing, oper at ing and / or adj ust ing the pr oduct and k eep t he m anual fo r refer en ce i n t he fut u r e.
Tab le of cont e nt s
TABLE OF CONTENTS ...................................................................................................................................................... 2
I MPORTANT SAFEGUARDS ............................................................................................................................................ 3
ACCESSORIES .................................................................................................................................................................... 4
I NSTALLATI ON/ CONNECTION ...................................................................................................................................... 5
CONTROL ELEMENTS ....................................................................................................................................................... 8
GENERAL OPERATI ONS .................................................................................................................................................. 9
RADI O OPERATIONS ........................................................................................................................................................ 11
USB/ SD OPERATI ONS ..................................................................................................................................................... 12
TROUBLESHOOTI NG GUI DE .......................................................................................................................................... 13
SPECI FI CATI ON ................................................................................................................................................................. 14
2
Page 3

I m p o r t a nt sa fe gu ar ds
• Read careful ly t h r ough t his m anu al t o fam il iarize yourself wit h t hi s high- quality sound sy st em .
• The beginn ing of oper ation is t he m oment of t he unit inst allat ion. Before use t he device in wint er it is
recom m ended t o heat up the passeng er com par t m ent dur ing 20 second s or t o the oper ation t em per atur e.
• Use t h e unit w ith t h e t em p erat ure t hat goes beyond t h e operat ion tem perat u r e greatly decr eases t h e
op er ation r esou r ce of t he screen and ot h er co m p onent s of device and can r esult an ou t age.
• Disconn ect the vehicle' s negat ive bat t ery t ermin al while m ount ing and conn ectin g the un it.
• When replacin g the fuse, be sure t o use one wit h an i dent ical am p er age rat ing . Using a fuse w it h a hi gher
am perage r at in g m ay cause ser iou s dam age t o t he un it.
• Make sure t h at pins or ot her for eign obj ect s do not get inside the un it; they m ay cause m alfun ct ion s, or
creat e safet y hazar ds such as elect r ical shock.
• Do n ot use the unit in places where it can be exposed to w at er , m oist ur e and du st .
• Do n ot open cov ers and do not repair y our self . Consult t he dealer or an ex per ienced technician for help.
• Make sure you disconnect t he power supply and aeri al if yo u w ill not be usi ng t h e sy st em for a long period
or dur ing a t hunder st or m .
• Mak e su r e y ou disconnect t h e pow er sup ply if t he syst em ap pear s t o be wo rkin g i ncorrect l y , is m ak ing an
un usual sound , has a st r ange sm ell, has sm oke em i t t ing from it or liquid s have got inside it . Hav e a
qu alified t echni cian check the syst em .
• The unit is desig ned for neg at iv e t ermin al of the bat t er y , which is con nect ed t o t he vehicle m et al. Please
con fir m it befor e installation.
• Do n ot allow t h e speaker wires t o be short ed toget h er when the un it is sw itched on. Ot h er w ise it may
ov er load or b urn out t h e pow er am plifier .
3
Page 4

Accessor ie s
1. Recei ver 1 p c
2. Moun t ing part s:
Hexagon nut 1 p c
Mountin g sleeve 1 p c
Release keys 2 p cs
Met al bar 1 p c
Plain w asher 1 p c
Spri ng w asher 1 p c
Sel f- t app ing scr ew 1 p c
Scr ew 4 p c
3. Сonn ector 1 p c
4. Co nsum er infor m at ion 1 p c
5. War r ant y car d 1 pc
6. Inst r uct i on m anu al 1 p c
4
Page 5
I nsta lla t ion/ Conn ect ion
Ge n e r a l not e s
• Choose t he mou ntin g l ocat ion wh ere t he un it w ill n ot inter fer e wit h t h e nor m al d riv ing funct ion of t he
dr i ver .
• Bef ore finally installing t he unit, connect t he w iri ng and m ak e sur e t hat t he unit wor k s pro per ly.
• Consult wit h your nearest d ealer if inst allation r eq uir es t he d r illing of holes or ot h er m o difications o f t h e
vehicle.
• I nst al l t h e unit w here it does not get in the dr iver 's way and cann ot inj ure t he passenger if t here is a
sudden st op, lik e an em erg en cy st op.
• Avoid inst alling t he unit where it w ould be subject t o h igh tem perat u r e, such as fr om dir ect sun light, or
fr om hot ai r, f r om the heat er, or w her e it would be subj ect to dust , d irt or ex cessiv e v ibr ation.
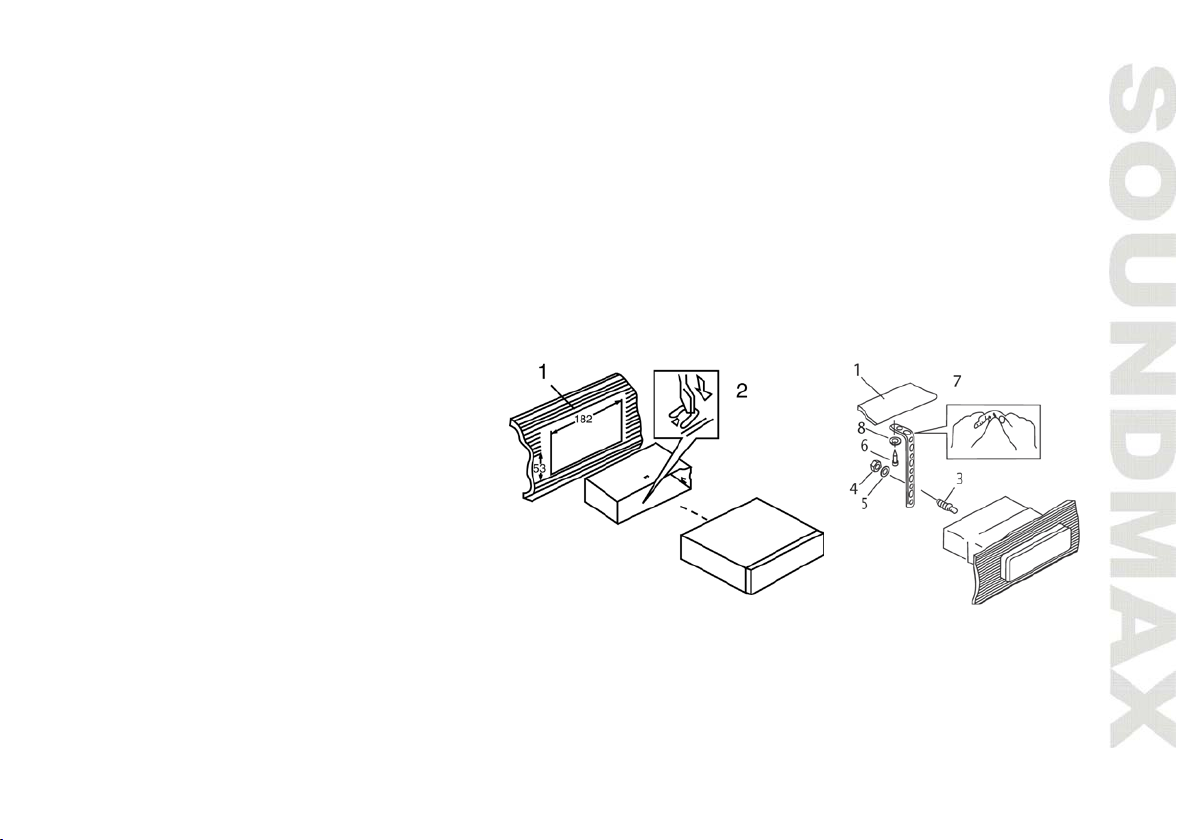
DI N FRO N T- M OUN T
1. Car dashb oar d
2. Sleeve
3. Bolt
4. Nut
5. Sprin g washer
6. Screw
7. Met al st r ap
8. Flat washer
1. I nst al l t h e sl eeve int o t he d ashboard; ensu re it is in st alled w it h t he cor r ect side an d there ar e no
obst acles (wir es, dashboard elem ent s, et c) for t he un it inst allat ion.
2. Aft er in st allin g t he sleeve in t o t he dashb oar d, bend t abs f ittin g t o the size of t he dashb oard t o fix t he
sleev e in p lace.
3. Use t he m etal strap t o fix t he rear side of t he unit . Determ ine a place f or fix ing and install t he st rap as
show n i n the pict u re. You can b end the st r ap t o t he need ed an gle w it h your h ands.
5
Page 6
4. Mak e t he necessary w i re connect io ns. Ensu r e t h e con nect ions ar e cor r ect .
5. I nst al l t h e u nit int o t he sleeve unt il t he side l ocks ar e fi xed .
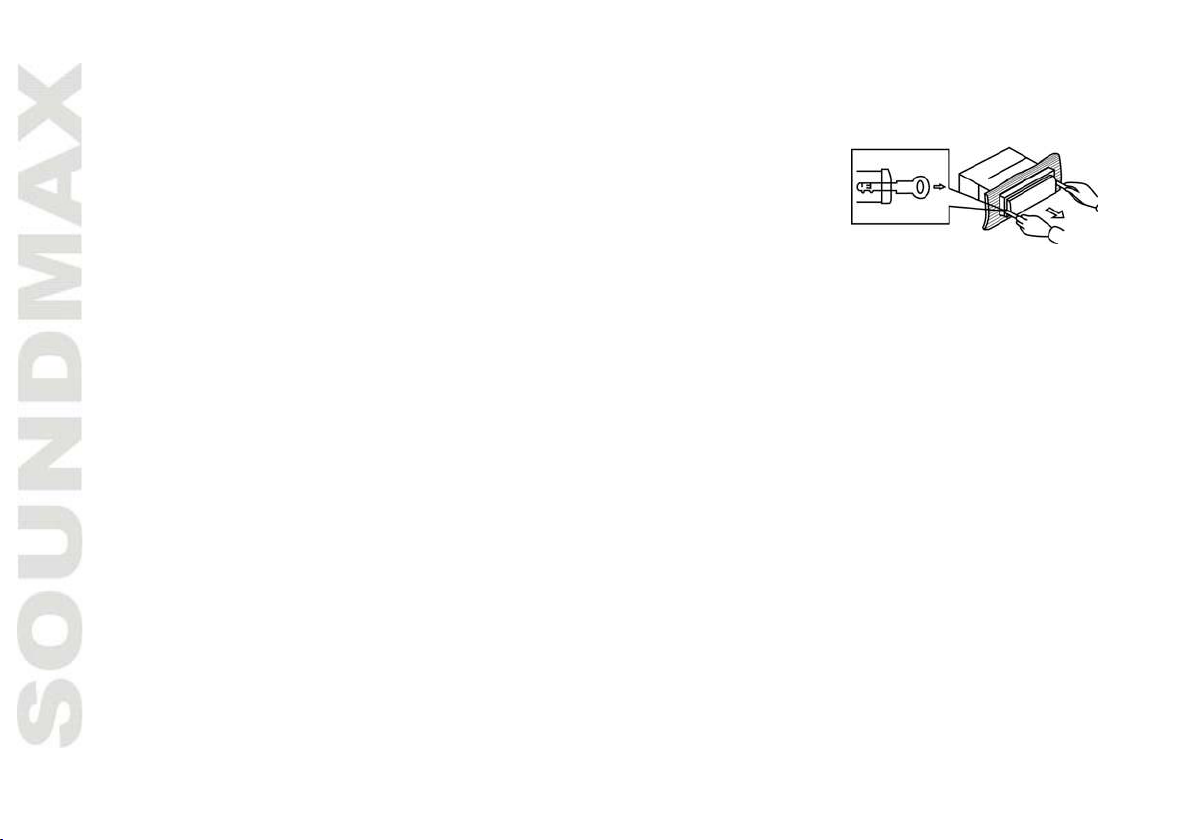
Dism a n t lin g t he unit
1. Make sur e the ignit ion is t u rned o ff, t hen disconn ect the cable fr om the
vehicle bat t er y’s n eg ativ e ( - ) t er m inal.
2. Rem ov e t h e m et al st rap att ached t h e back of t he unit ( if at t ached) .
3. I n sert b oth of t h e su ppl ied k ey s int o t he slot s at the m iddle lef t an d r igh t
sid es of t he unit , t hen p ull the un it o ut of the dashb oard.
6
Page 7
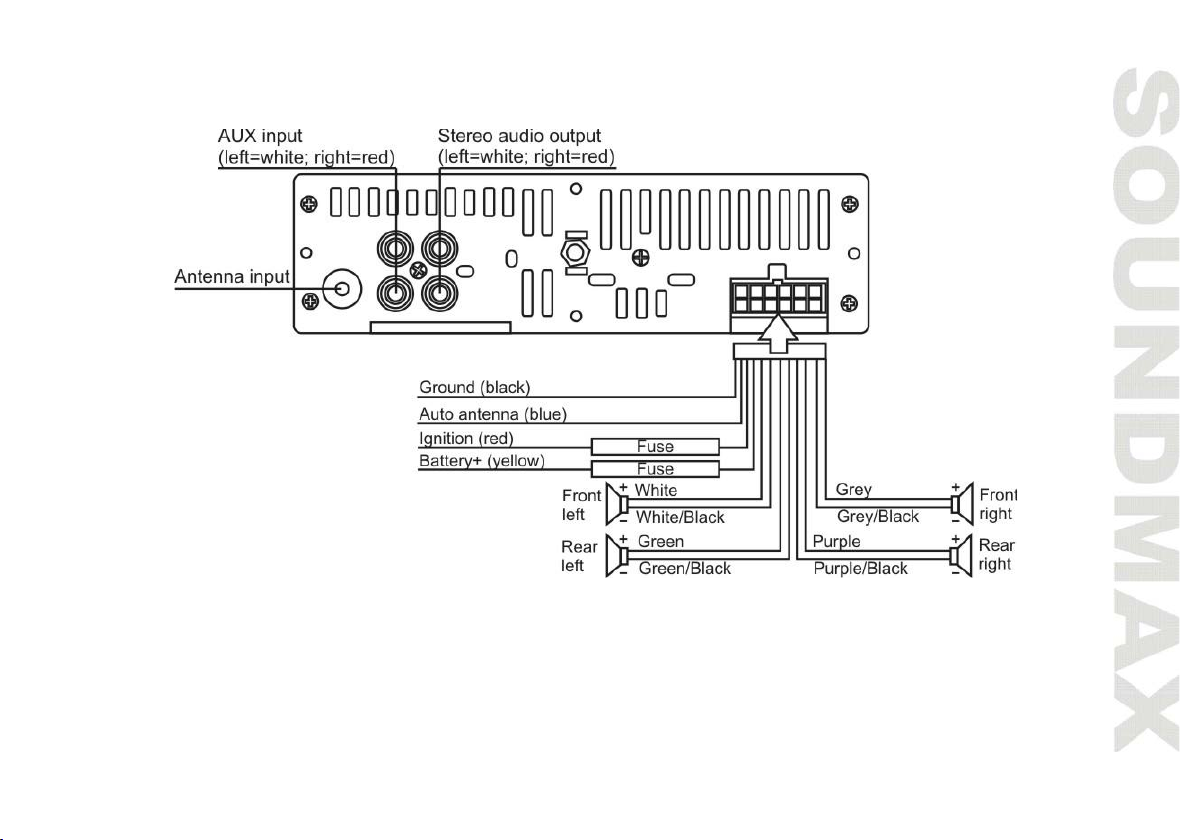
Conne ct ion d ia g r a m
N ot e : Aut o ant enn a w ire is i nt end ed f or p o w er su p ply of t he ant enn a a nd f or r em ote con t r ol of an
ad dit io nal am plifier .
7
Page 8
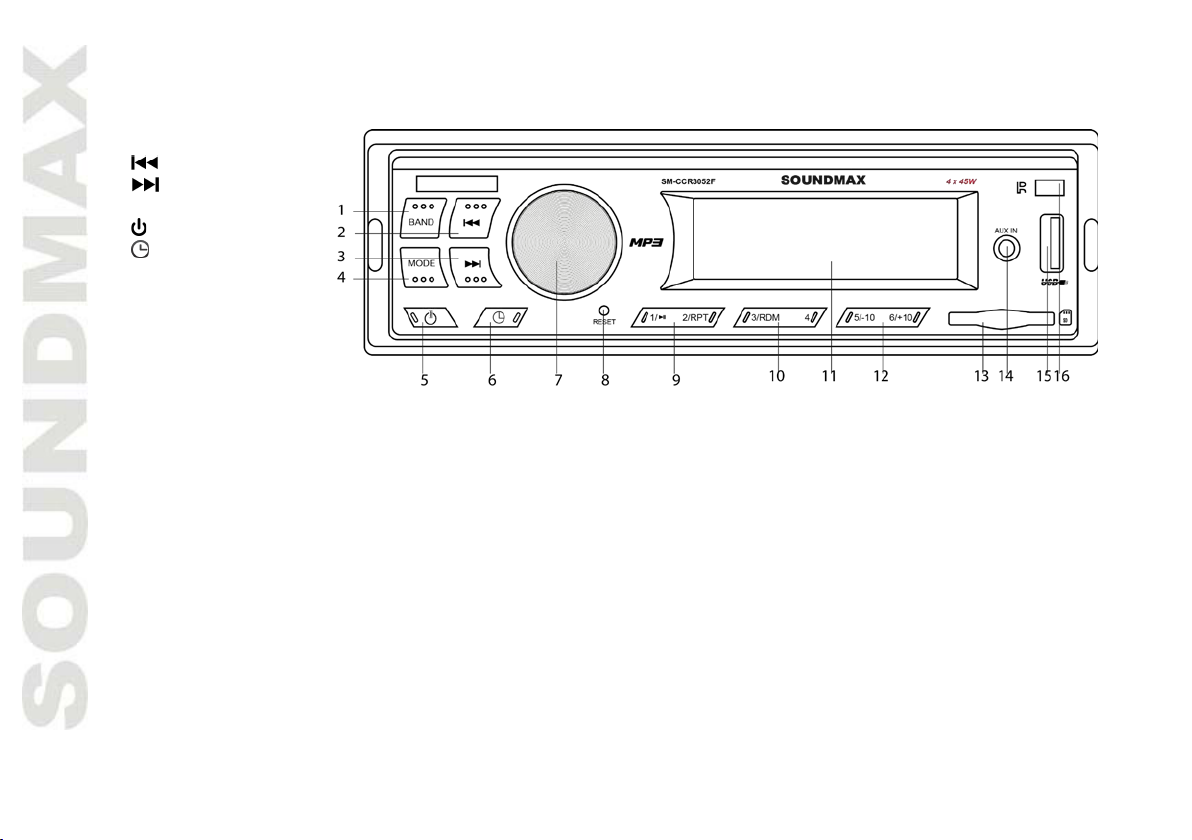
Cont r ol elem en t s
Fr o n t p a n e l
1. BAND butt on
2.
3.
4. MODE butt on
5.
6.
7. VOLUME k nob /
BASS/ TREBLE/ BALANCE
/ FADER/ LOUD/ EQ bu t t on
8. RESET but t on ( hol e)
9. 1 PLAY/ PAUSE
2/ RPT but t on s
10. 3/ RDM
4 butt ons
11. LCD
12. 5/ - 10
6/ + 10 butt ons
13. SD car d slo t
14. AUX i nput
15. USB p ort
bu t t o n
b ut t on
b ut t on
b ut t on
8
Page 9

Ge ne r al op e r a t ions
Turning t he unit on / off
Press the
Re se t t h e un it
Wh en f irst using the device or aft er r eplacing t h e car b at t er y , you m ust reset t he unit . Pr ess t he RESET
bu t t o n ( ho le) wit h a point ed obj ect (such as a ballpoin t pen) to set the un it to its init i al st at e.
When som e error s occur , you can also p ress t he RESET but ton t o r eturn t o f actor y set tin gs, b ut not e t hat
it w ill erase clock set t ing and som e m em ori zed funct ion s.
Mode se le ct ion
Press t he MODE bu t t on repeatedly t o select bet w een Rad io, AUX, MP3 m odes. Op erat io n m odes ar e
indicated on the display . MP3 m ode is no t av ailable unless a m em ory car d or a USB d evi ce is connect ed.
Clock
Press the
ad j u st ment .
Volu m e co n t r ol
Adj ust the volum e by r otat ing t he VOLUME k nob.
b ut t on t o tur n the un it on. Press t he but ton again t o t urn t h e u nit off .
b ut t on t o displ ay t im e. Press and hold t h is but t on t o set t h e clock , rot at e t h e v olum e k nob for
9
Page 10

Au d i o p a r a m et e r se t t i n g
Press the VOL k nob rep eat edly to select a p ar am et er : BAS ( bass) = > TRE ( t reb le) = > BAL ( balance) = >
FAD ( fader ) . Pr ess and hol d the bu t t on t o select LOUD ( lou dness), p r ess an d ho ld again t o select EQ
(eq ualizer). Rot at e t he knob t o adj ust each m ode.
• Bass/ Treb le: from -7 to + 7;
• Balance: - 1 0 ( left) t o + 10 ( rig ht) ;
• Fader: fr om - 1 0 ( r ear ) t o + 10 (fron t ) .
• Lo udn ess: see “ Lou dness” par agr aph below
• EQ: select POP/ CLASS/ ROCK or OFF equali zer mode.
When equali zer is in an y m ode excep t OFF, bass and t reb le ar e n ot adj ust able.
Loudn e ss
Act iv at ing t his f eat ure w ill en hance bass an d t r ebl e f r equencies w h en list eni ng t o m usic at low vol um e s.
AU X input
AUX- in j ack is intended for connectin g an ext ernal audio equipm ent to am plif y the so und . I f conn ection is
m ad e correctly , the audio sig nal from the exter nal sour ce will be t r ansm it t ed t h rough t he acoustics of t he head
un it . This enables to adj ust the v olum e and qualit y of t he so unding. For exam ple, you can connect an MP3player t o list en t o track s u sing t he car acoust ic system .
10
Page 11

Rad io o p er a t ions
Ba n d se lect
I n Radi o m od e p ress t he BAND b ut t on t o select a radio band : FM1 = > FM2 = > FM3.
Ma n u a l / a ut o m a t ic tu n ing
• Press sh ort ly
and clear sign al.
• Press and hold
repeatedly t o adjust the needed fr equ ency m anually.
St orin g a nd r e ca lli n g st a t i ons
• Press and hold t he BAND but t on for several seconds t o aut om at ical ly fin d and st ore 6 strongest st ations
in the current band correspon ding w it h the pr eset num ber bu t t on .
• Pr ess preset but t ons ( 1 - 6 ) t o select saved chan nels. I f y ou w an t t o save a new st ation in a preset posit ion ,
sel ect the cor r esponding st at io n n um ber wit h preset b ut t ons. Then tune t o t he need ed fr equ ency as d escribed
in “Man ual/ aut om atic t u ning“ abov e and pr ess an d h old a preset but t on. The new fr equen cy wil l b e saved i n
the selected p osit ion.
o r b ut t on. The radio w ill aut om atically sear ch for t he next fr equ en cy wit h a st ron g
o r but t on, t he unit will go t o m anual t uning m ode. Press / but t ons
11
Page 12

USB/ SD ope r a t io n s
SD ca r d slot
Car ef ully i nser t t he SD card in t o t he car d slo t on the f r on t panel. Un it star t s playback a utom at ical ly . To d iscon nect t he
m em ory card, pr ess it unt i l a click , an d t h en car efully pull it out from t he slot .
USB por t
Car ef ully connect a USB driv er t o t he USB j ack on t h e fr o nt p an el. Uni t st ar t s p la yback autom at ical ly .
US B/ SD n o t e s
USB for m at sup por t s 2.0. Capacit y: up t o 1 6 GB. SD cards ca pacity: up t o 1 6 GB. Supported f ile sy st em s are FAT/ FAT32.
N ot e : Beca use of the gr eat var ie t y o f p r od uct s w it h SD- card slot s and t heir som et i m es qu ite m an u fact u r er - specific
fun ct ion s t he producer can neit h er g uar an t ee that all de v ices w il l be reco gni zed nor that all op erat ing opt io ns that ar e
po ssi ble in t heory w il l act uall y wo rk. Befo r e disconnect ing a st orage, swit ch the un it t o a not h er m ode.
N ext / P revi ous t ra ck
Press
ba ck w ar d p lay back ; release the b u t t on t o r et u r n to no r m al play b ack.
Pl a y/ Pau se
Press PLAY/ PAUSE b utt on to pa use t he pl ay b ack, pr ess on e m ore tim e t o r esume no r m al pl ay b ack.
Re p e a t pl ayback
Wh en RPT bu t t on is p r essed , p lay back of the select ed t rack will be cont inu ally r epeat ed an d RPT i ndi cator will be displayed
un t il t he t r ack r ep ea t mod e is ca nceled b y p r essin g 3 RPT bu t t on ag ain.
Ra n d om
Wh en RDM bu t t o n is pr essed , each t r ack on t he st ora ge is playe d in r an dom i nst ea d of nor m a l or d er . RDM in dica t or w ill be
di sp layed. To cancel Rand om m ode, press 4 RDM b u t t on again.
Sk ipp ing t r a ck s
Press - 1 0 bu t t on t o go back 10 t r ack s. Press + 10 b ut t on to go fo rwar d 1 0 track s.
or but ton s t o cho ose next o r pr eviou s t r ack. Press an d h old thi s but t o n t o choose for w ar d pl ay b ack or
12
Page 13

Trou ble sh oot in g gu id e
Sy m pt om
Ca u se
So lut ion
No power
Wiring is connect ed incorrect l y.
Make correct wiring conn ection.
The car ignit ion is not on.
I f the power supply is pro perly conn ected t o
t he car accessor y, swit ch t he ig nit ion on.
The fuse is blown.
Replace t he fuse.
No sou n d
Volume is in m inim um .
Adjust vo lum e t o the desir ed level.
Wiring is not pr operly con nect ed.
Check w iring connect ion.
The radi o does no t
wor k
The an t en na cable is n ot
con nect ed.
I nser t t h e ant en na cable proper ly.
The radi o st at ion
not wor k
The sign al s are t oo weak.
Select st at ion s m anu ally .
Below is a t able describing sim ple m easur es that can help you elim inate m ost pr oblem s likely t o emer ge when
this unit is in use. I f below m easur es do not help, t urn t o a ser v ice cent er or t o the near est dealer .
aut omat i c t uni ng does
Clean ing t he unit bod y
Wipe w it h a sof t clot h . If t he cabin et is ver y dam pen (not dropping w et ) t he clo t h wi t h a weak solut ion of
soapy w at er , and t hen wi pe clean .
13
Page 14

Sp ecifica t ion
Ge n e r a l
Maximum power ou t put
4 x 45 W
Required speak er im pedance
4 Ohm
Fuse
5 A
Uni t dim ensions
178 x 50 x 97 m m
Net weig ht
0.3 6 kg
FM st e reo r a d io
Frequ en cy range
87. 5 - 10 8 .0 MHz
Preset st ations
18
St er eo separat ion
> 25 dB
Pl a y e r
Suppor t ed stor ages
USB/ SD
Line out
St er eo RCA out p ut (2 V)
Sp e cif ica t ion s a re su b j e ct t o ch a n g e w it h o u t n o t i ce . D i m en sio n s a r e a p p r o x im a t e .
14
Page 15

Уважаемый покупатель!
Благодарим Вас за покупку нашего изделия. Для обеспечения безопасности рекомендуется тщательно
изучить настоящее руководство перед подключением, эксплуатацией и/или регулировкой изделия, и
сохраняйте руководство для использования в будущем.
Содержание
СОДЕРЖАНИЕ .................................................................................................................................................................... 15
МЕРЫ ПРЕДОСТОРОЖНОСТИ ...................................................................................................................................... 16
КОМПЛЕКТ ПОСТАВКИ .................................................................................................................................................. 17
УСТАНОВКА/ПОДКЛЮЧЕНИЕ ...................................................................................................................................... 18
ЭЛЕМЕНТЫ УПРАВЛЕНИЯ ............................................................................................................................................. 21
ОБЩИЕ ОПЕРАЦИИ ......................................................................................................................................................... 22
ОПЕРАЦИИ С РАДИО ...................................................................................................................................................... 24
ОПЕРАЦИИ С USB/КАРТАМИ ПАМЯТИ SD ............................................................................................................. 25
РУКОВОДСТВО ПО УСТРАНЕНИЮ НЕИСПРАВНОСТЕЙ ..................................................................................... 27
ТЕХНИЧЕСКИЕ ХАРАКТЕРИСТИКИ ............................................................................................................................ 28
15
Page 16

Меры предосторожности
• Тщательно изучите настоящую инструкцию, чтобы ознакомиться с устройством.
• Началом эксплуатации устройства считается момент его установки в автомобиль. Перед началом
использования устройства в зимний период рекомендуется прогреть салон автомобиля в течение 20
минут или до достижения эксплуатационного диапазона температуры устройства.
• Использование устройства при температуре, выходящей за рамки эксплуатационного диапазона
температур, значительно снижает ресурс работы экрана и других компонентов устройства и может
привести к выходу устройства из строя.
• При установке и подключении устройства отключите отрицательную клемму аккумулятора
автомобиля.
• При замене предохранителя убедитесь, что вы устанавливаете предохранитель с тем же номиналом.
Используя предохранитель с повышенным значением тока, можно причинить значительные
повреждения устройству.
• Не используйте устройство в местах, где оно может подвергнуться воздействию воды, влаги и пыли.
• Убедитесь, что шпильки или другие посторонние предметы не попали внутрь устройства. Они могут
вызвать сбои в работе или стать причиной опасности или возгорания.
• Не открывайте крышки и не проводите ремонт устройства самостоятельно. Обратитесь к дилеру или
квалифицированному персоналу
• Убедитесь, вы отключили источник питания и антенну, если вы не будете пользоваться устройством
в течение длительного времени или во время грозы.
• Убедитесь, что вы отключили источник питания, если обнаружена неправильная работа системы,
система издает необычные звуки, запах, выделяет дым или внутрь ее попала жидкость. Проведите
квалифицированный технический осмотр системы.
• Устройство разработано таким образом, чтобы отрицательный вывод аккумулятора был подключен к
корпусу транспортного средства. Пожалуйста, убедитесь в этом перед установкой.
• Не позволяйте проводам динамиков касаться друг друга или корпуса автомобиля после включения
устройства. В противном случае может быть перегружен или выйти из строя усилитель.
16
Page 17

Комплект поставки
1. Ресивер 1 шт
2. Детали для установки:
Шестигранная гайка 1 шт
Монтажный кожух 1 шт
Ключи-съемники 2 шт
Металлическая пластина 1 шт
Пружинная шайба 1 шт
Плоская шайба 1 шт
Винт- саморез 1 шт
Винт 4 шт
3. Коннектор 1 шт
4. Информация для потребителя 1 шт
5. Гарантийный талон 1 шт
6. Руководство по эксплуатации 1 шт
17
Page 18

Установка/Подключение
Общая информация
• Перед окончательной установкой устройства временно подключите все провода и убедитесь, что все
соединения выполнены верно, а устройство и система работают правильно.
• Для обеспечения правильной установки устройства используйте только те детали, которые входят в
комплект. Использование других приспособлений может привести к появлению сбоев в его работе.
• Если для установки устройства необходимо сверлить отверстия в кузове автомобиля или вносить
какие- либо другие изменения в его конструкцию, проконсультируйтесь с продавцом.
• Устанавливайте устройство там, где оно не будет закрывать водителю обзор и отвлекать от
дорожной обстановки и не сможет нанести травм пассажирам в случае внезапной остановки
автомобиля, например, при экстренном торможении.
• Никогда не устанавливайте устройство в таких местах, где оно будет подвергаться воздействию
высокой температуры, например, в местах попадания прямых солнечных лучей, в местах выхода
горячего воздуха от отопителя автомобиля, в местах, где очень грязно или пыльно, или там, где
устройство будет подвергаться сильной вибрации.
• Перед установкой устройства обязательно снимите переднюю панель.
Установка устройства в приборную панель автомобиля «спереди»
Установка устройства
1. Приборная панель автомобиля
2. Монтажный кожух
3. Винт
4. Гайка
5. Пружинная шайба
6. Винт- саморез
7. Опорная пластина.
8. Плоская шайба
18
Page 19

1. Установите монтажный кожух в приборную панель автомобиля, убедитесь, что он установлен
правильной стороной и нет препятствий (провода, элементы приборной панели) для установки
магнитолы.
2. После установки монтажного кожуха в приборную панель отогните на нем металлические язычки,
соответствующие толщине приборной панели. Это позволит закрепить кожух на месте.
3. Обязательно используйте металлическую пластину для закрепления задней стороны проигрывателя.
Определите место крепления и установите ее согласно приведенному рисунку. Пластину можно
согнуть руками под нужным углом.
4. Подключите необходимые провода и разъемы. Убедитесь в правильности подключения.
5. Установите магнитолу в монтажный кожух до фиксации боковых защелок.
Снятие устройства
1. Убедитесь, что зажигание отключено, затем отсоедините провод от
отрицательной (-) клеммы аккумулятора.
2. Удалите металлическую пластину, с помощью которой корпус
устройства зафиксирован сзади.
3. Вставьте оба ключа-съемника в прорези на правой и левой сторонах
фронтальной части декоративной рамки устройства, затем, держась за
ключи, вытяните устройство на себя из приборной панели.
19
Page 20

Схема подключения
Примечания:
• Провод питания антенны предназначен для подачи питания на антенну и для удаленного
управления дополнительным усилителем.
20
Page 21

Элементы управления
Передняя панель
1. Кнопка BAND
2. Кнопка
3. Кнопка
4. Кнопка MODE
5. Кнопка
6. Кнопка
7. Регулятор VOLUME/
Кнопка BASS/ TREBLE/
BALANCE/ FADER/
LOUD/ EQ
8. Кнопка (отверстие)
RESET
9. Кнопки 1 PLAY/ PAUSE и
2/ RPT
10. Кнопки 3/ RDM и
4
11. Дисплей
12. Кнопки 5/ -10 и
6/ + 10
13. Разъем для карты памяти SD
14. Вход AUX
15. USB-порт
21
Page 22

Общие операции
Включение/ выключение устройства
Нажмите и удерживайте кнопку
выключить устройство.
Сброс настроек устройства
Включая устройство в первый раз или после замены батареи, Вы должны переустановить его. Нажмите
кнопку (отверстие) RESET на внутренней панели остроконечным предметом ( например, шариковой
ручкой) ; будут установлены заводские настройки.
При нарушении работы устройства Вы можете нажать кнопку RESET для сброса пользовательских
настроек.
Выбор режима работы
Нажимайте кнопку MODE, чтобы выбрать режим работы: Радио, AUX или MP3. Режим работы MP3
доступен только если к устройству подсоединен соответствующий носитель.
Часы
Нажмите кнопку
вращайте регулятор громкости, чтобы задать нужное время.
Регулирование громкости
Вы можете отрегулировать уровень громкости звука вращением регулятора VOL.
для отображения времени. Нажмите и удерживайте эту кнопку для настройки часов,
, чтобы включить устройство. Нажмите эту кнопку повторно, чтобы
22
Page 23

Настройка параметров аудио
Нажимайте на регулятор громкости для выбора параметра аудио: BAS ( b ass - низкие частоты) = > TRE
( t r ebl e - высокие частоты) = > BAL ( b al ance - баланс между правым и левым динамиками) = > FAD ( fader -
баланс между фронтальным и тыловым динамиками). Нажмите и удерживайте для выбора параметра
LOUD ( тонкомпенсация) = > EQ ( эквалайзер) . Вращайте регулятор, чтобы отрегулировать выбранный
параметр:
• Bass/ Treb le: от - 7 до + 7;
• Balance: от - 1 0 (левый) до + 10 ( правый);
• Fader: от - 1 0 ( тыл) до + 10 ( фронт) .
• Тонкомпенсация: см. главу “ Тонкомпенсация” ниже.
• Эквалайзер: выберите режим эквалайзера POP/ CLASS/ ROCK или OFF ( эквалайзер отключен) .
При любом режиме эквалайзера кроме OFF регулирование высоких и низких частот невозможно.
Тонкомпенсация
Данная функция позволяет прослушивать музыку при низком уровне громкости без потери качества
воспроизведения низких частот.
Вход A UX
Разъем AUX предназначен для подключения внешнего аудиоустройства с целью усиления звука. В
случае правильного подключения аудиосигнал от внешнего источника будет транслироваться через
акустику головного устройства. Это дает возможность регулировать громкость и качество звучания.
Например, Вы можете подключить MP3- проигрыватель для прослушивания записей через акустику
автомобиля.
23
Page 24

Операции с радио
Выбор диапазона
Нажимайте кнопку BAND , чтобы выбрать диапазон: FM1 = > FM2 = > FM3. В каждом диапазоне может
быть сохранено до 6 радиостанций.
Поиск радиостанций
• Нажмите кнопку
или
сигналом вниз или вверх по диапазону.
• Нажмите и удерживайте кнопку
Нажимайте кнопку
или многократно для пошаговой настройки текущей частоты вручную.
Сохранение и вызов станций
• Нажмите и удерживайте кнопку BAND для запуска автоматического поиска и сохранения 6 станций
с наиболее сильным сигналом в текущем диапазоне.
• Для выбора сохраненных станций нажимайте кнопки 1-6. Если вы хотите сохранить новую частоту в
позиции памяти, выберите с помощью кнопок 1- 6 сохраненную станцию, вместо которой будет сохранена
новая. Затем настройтесь на нужную частоту, как описано в параграфе “ Поиск радиостанций’’ выше.
Нажмите и удерживайте кнопку. Новая частота сохранится на данной позиции.
.
Приемник автоматически настроится на ближайшую станцию с сильным
или ; устройство перейдет в режим ручного поиска.
24
Page 25

Операции с USB/картами памяти SD
Загрузка карт памяти SD
Вставьте SD- карту в соответствующий слот, расположенный на передней панели. Начнется
воспроизведение первого трека. Для отсоединения карты памяти нажмите на нее до щелчка, затем
извлеките карту из слота.
USB- порт
Вставьте USB- носитель в USB порт, расположенный на передней панели. Автоматически начнется
воспроизведение первого трека.
Информация по USB/SD разъемам
USB: Поддержка формата USB 2.0. Емкость: до 16 ГБ. SD: Емкость: до 16 ГБ. Устройством
поддерживается файловые системы FAT/ FAT32.
Примечание: устройство может не воспроизводить некоторые модели USB- накопителей и карт памяти.
Используйте только лицензионные накопители известных брендов. Перед извлечением накопителя из
слота устройства переключите устройство в другой режим работы.
Выбор трека
Нажмите кнопку
эту кнопку, чтобы начать ускоренное воспроизведение трека вперед или назад; отпустите кнопку для
возврата к нормальному воспроизведению.
Пауза
Нажмите кнопку PLAY/ PAUSE, чтобы поставить воспроизведение на паузу; нажмите кнопку еще раз,
чтобы возобновить воспроизведение.
или , чтобы выбрать следующий или предыдущий трек. Нажмите и удерживайте
25
Page 26

Повтор
Нажмите кнопку RPT, активируется режим повтора воспроизведения текущего трека. На дисплее
отобразится индикатор повторного воспроизведения RPT. Нажмите эту кнопку еще раз, чтобы вернуться
в режим нормального воспроизведения.
Воспроизведение в произвольном порядке
Нажмите кнопку RDM, активируется режим воспроизведения треков в произвольном порядке. На
дисплее отобразится индикатор случайного воспроизведения RDM. Нажмите эту кнопку еще раз, чтобы
вернуться в режим нормального воспроизведения.
Переход на 10 треков
Во время воспроизведения нажимайте кнопки - 10 или + 10 для пролистывания списка треков на 10
вперед или назад.
26
Page 27

Руководство по устранению неисправностей
Неисправность
Причина
Решение
Нет питания
Неправильно подсоединены
провода.
Выполните подсоединение электропроводки
правильно.
Зажигание машины не
Если источник питания подключен надлежащим
ключ зажигания в положение “АСС”.
Предохранитель сгорел.
Замените предохранитель.
Нет звука
Громкость звука установлена
на минимум.
Отрегулируйте громкость звука до
необходимого уровня.
Неправильно подсоединены
провода.
Выполните подсоединение электропроводки
правильно.
Радиоприемник не
работает
Кабель антенны не
подключен к устройству.
Подключите к устройству кабель антенны.
Не работает
радиостанций
Радиостанции имеют
Настраивайтесь на станции вручную.
Ниже приводится таблица, в которой описаны простые проверки, способные помочь Вам устранить
большую часть проблем, могущих возникнуть при использовании данного устройства. Если
нижеуказанные меры не помогли, обратитесь в сервисный центр или к ближайшему дилеру.
включено.
автонастройка
слишком слабый сигнал.
Чистка корпуса устройства
Протирайте поверхности устройства мягкой тканью. Не мочите корпус. Если корпус очень загрязнен,
используйте ткань, слегка смоченную мыльным раствором, и затем вытрите корпус сухой тканью.
образом к выключателю машины, установите
27
Page 28

Технические характеристики
Общие
Максимальная выходная мощность
4 х 45 Вт
Требуемый импеданс динамика
4 Ом
Предохранитель
5 А
Размеры
178 x 50 x 97 мм
Вес нетто
0,36 кг
Стерео FM радио
Частотный диапазон
87, 5 – 108,0 МГц
Число сохраняемых станций
18
Разделение стерео
> 25 дБ
Проигрыватель
Поддерживаемые носители
USB/ SD
Линейный выход
Стереоаудиовыход RCA (2 В)
Произведено:
Произведено: Куианянг Трейдинг Компани Лимитед № 89 Юи Джин Роад, Джиангмен Гуангдонг, Китай
Под контролем «ТЕХНО ЭЛЕКТРИК ЛИМИТЕД»
Под контролем «ТЕХНО ЭЛЕКТРИК ЛИМИТЕД»
Сделано в Китае
SM- CCR3052F_I M_0 1
28
 Loading...