

Page 1

SM-2402
PORTABLE STEREO RADIO CASSETTE RECORDER WITH CD/MP3
Instruction manual
КАССЕТНАЯ СТЕРЕО МАГНИТОЛА С CD/MP3
Руководство по эксплуатации
Page 2
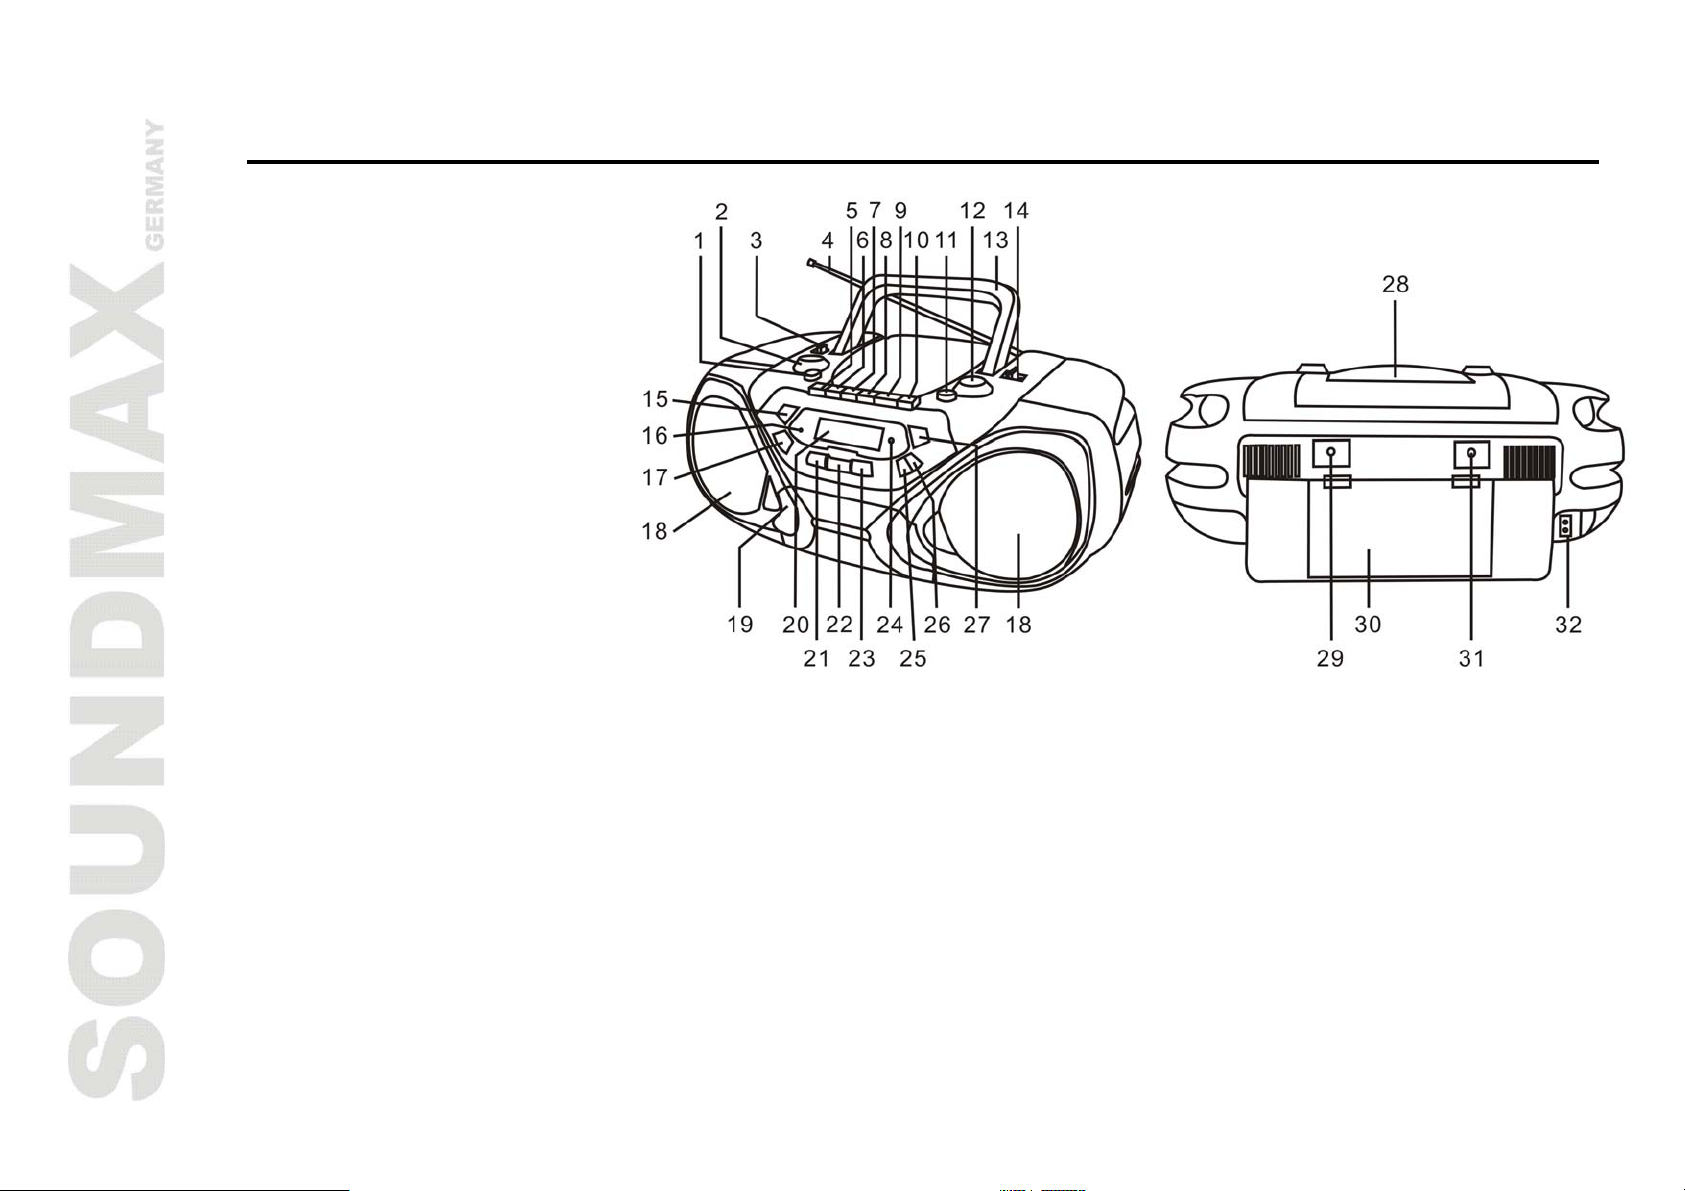
Description
1. Power button
2. VOLUME regulator
3. FUNCTION switch
4. Antenna
5. Cassette PAUSE button
6. Cassette STOP/ EJECT
button
7. Cassette FORWARD button
8. Cassette REWIND button
9. Cassette PLAY button
10. Cassette RECORD button
11. CD Door Open button
12. TUNING knob
13. Handle
14. Band switch
15. FOLDER UP button
16. FM Stereo indicator
17. FOLDER DOWN button
18. Speakers
19. Cassette compartment
20. LCD display
21. CD Skip/Search Backward button
22. CD PLAY/PAUSE button
23. CD Skip/Search Forward button
24. REMOTE Sensor
25. CD PROGRAM button
26. CD MODE button
27. CD STOP button
28. CD Door
29. Aux/ Line In
30. Battery compartment
2
Page 3
31. Headphones socket
32. Mains socket AC 220V~ 50 Hz
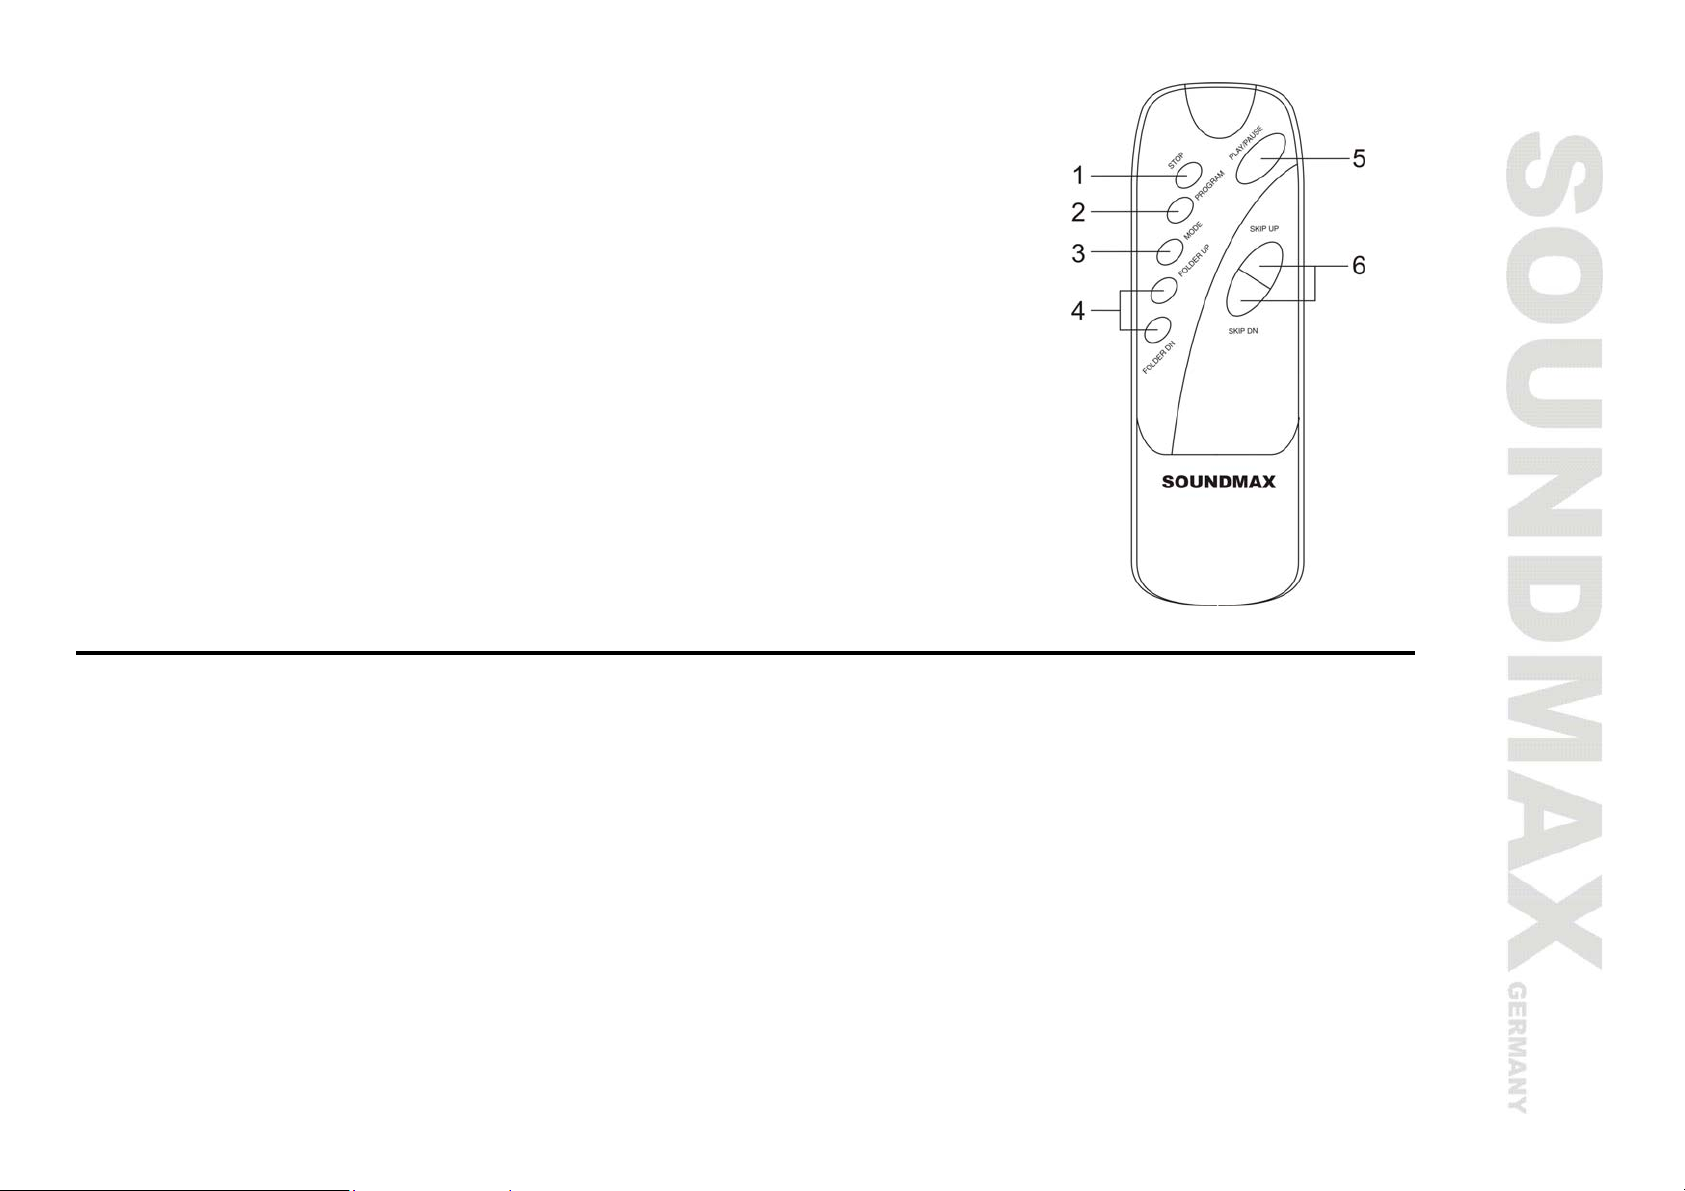
Remote control description
1. STOP button
2. PROGRAM button
3. MODE button
4. FOLDER UP/DN buttons
5. PLAY/PAUSE button
6. SKIP UP/DN buttons
Note: all the buttons functions are same as for the unit buttons.
Important safeguards
• Attention: The owner’s manual contains important operating and maintenance instructions. For your
safety, it is necessary to refer to the manual.
• Dangerous voltage: Uninsulated dangerous voltage that may be of sufficient magnitude to constitute a
risk of electrical shock to persons is present within this product enclosure.
• Caution: To reduce the risk of electric shock, do not remove cover (or back). Prefer servicing to qualified
service personnel.
3
Page 4

Power supply
Battery operation
• Open the battery compartment cover.
• Insert 8 x 1.5V UM-1 R14 “D” size batteries. Please observe correct battery polarities or the set will not
work (see the picture).
• Close the battery compartment cover.
AC operation
• Before the first connecting of the appliance check that voltage indicated on the rating label corresponds the
mains voltage in your home.
• Plug the corresponding end of cord into the AC socket on the rear of the set.
• Insert the plug into power supply.
Caution:
• When the set is only used with AC or is not used for 2 weeks or more, please remove the batteries, to
avoid damage to the set from leakage of batteries.
• Always switch off the unit when not in use.
• Always unplug the appliance from power supply, when no use long time.
Line in connection
You can connect an external device (like portable player) to the Line in jack of this unit and listen to the sound
through the unit's speakers.
• Insert the audio cable (requires 3.5mm stereo plug, not supplied) into the Line Out Jack or Phones Jack on
external device and into the corresponding Line in Jack on the unit.
• Turn on the unit and slide the Function Selector to AUX position.
• Make sure your AUX in component is turned on, and follow your component’s instruction.
• To stop this function, simply slide the Function Selector to Tape position.
4
Page 5

Stereo headphone connecting
• For private listening, insert 3.5 mm headphone into the stereo headphone jack.
• Adjust volume control to the appropriate level as desired.
• When the stereo headphone jack is plugged, speakers will disconnect automatically.
Radio operations
• Press the Power button to turn the unit on.
• Slide the function switch to radio position.
• Select the desired band with Band Selector.
• Adjust the Tuning Control to tune in a radio station.
FM and FM stereo reception
• In particular when stereo signal is weak and much noise are received, it is preferable to receive the
program in mono. Slide the band selector to switch between FM stereo and mono modes.
• If the program is received in FM stereo, "FM ST" indicator will light up.
Antenna
• For FM reception, adjust the telescopic antenna appropriately to obtain the best reception on the band
selected.
• The AM signal is picked up through the built-in ferrite antenna. The set should be placed to a position for
the best reception.
Cassette tape playback
• Slide the FUNCTION switch to TAPE position.
• Press the STOP/EJECT button to open the cassette compartment.
• Insert a cassette with the tape-side up into the proper Guide-rails on the inside of the cassette door.
• Gently push the cassette door forward (inwards) to close it.
• Press the PLAY button to start the playing.
• Adjust the level of sound with VOLUME knob.
Cassette controls
• Press the PAUSE button to pause the playing.
5
Page 6
• Press the STOP/EJECT button to stop the playing, press the button again to open the cassette door and you
can take out the tape.
• Press the "STOP" button followed by the REWIND or FORWARD button to rewind or forward the tape at
high speed.
Cassette tape recording
• Open the cassette door by pressing the "STOP/EJECT" cassette button.
• Insert a blank cassette with the tape-side up, into the proper Guide-rails on the inside of the cassette door.
• Gently push the cassette door forward (inwards) to close it.
• Make sure the tape is fully and properly inserted before doing so.
• The set is now ready to start recording, which can be done from either the radio or CD-player.
Recording from radio
• Set the FUNCTION switch to RADIO position.
• Tune to the desired station.
• Press the PLAY button and RECORD button on deck simultaneously to start recording.
• Press STOP/ EJECT button to end recording
Recording from CD
• Set FUNCTION switch to CD/MP3 position.
• Press RECORD and PLAY buttons on cassette deck simultaneously to start recording.
• Press the PAUSE button on deck.
• Start the CD-player and select the exact song to be recorded.
• Release the PAUSE button on deck to start recording.
• Press STOP/ EJECT button to end recording.
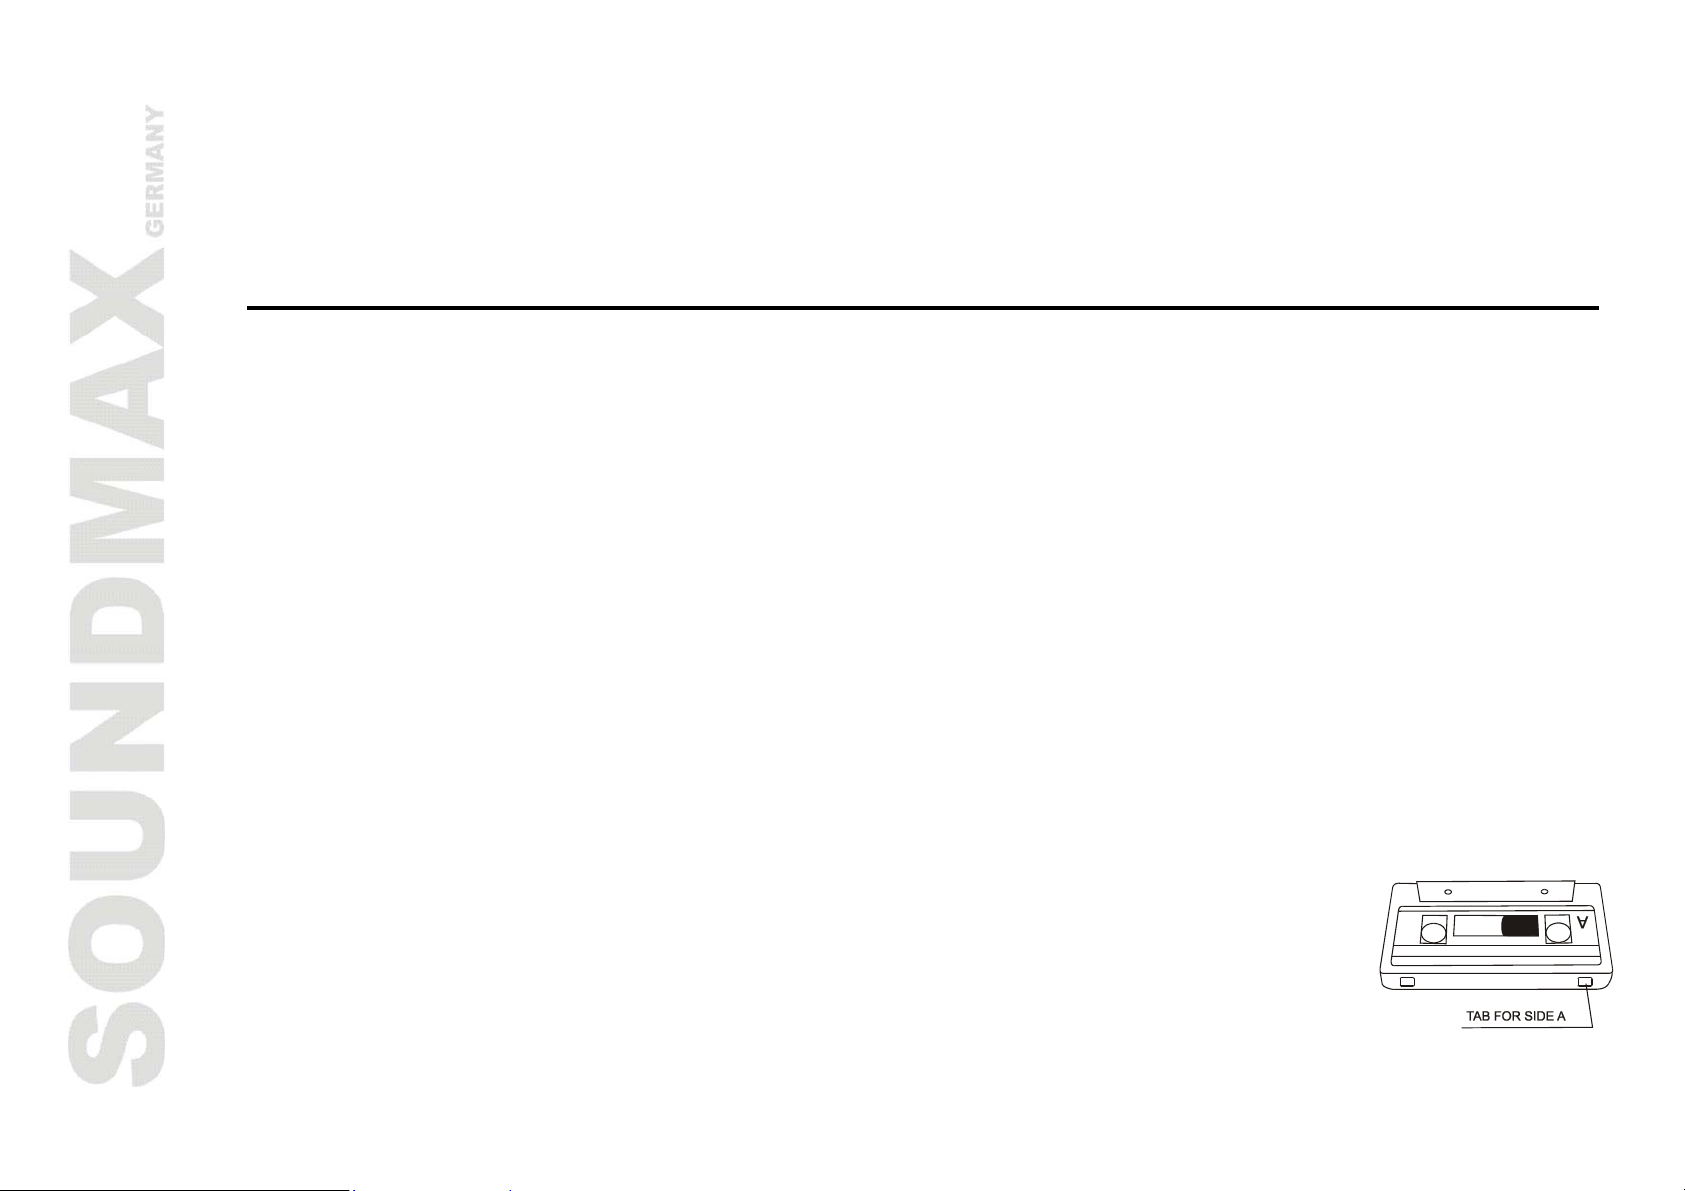
Erase protection
• To prevent accidental erasing of a cassette, simply break off the two plastic tabs located
on the cassette tape’s rear side.
• When a cassette with removed plastic tabs is inserted, the recording button cannot be
pressed.
• If a cassette is to be erased and re-recorded at a later stage, simply cover the holes on the
cassette where the tabs were removed, with a piece of strong adhesive tape.
6
Page 7

Compact disc operations
• Set FUNCTION switch to CD/MP3 position.
• Open the CD door by pressing CD door open button.
• Put a CD into the CD compartment with label side up and close the CD door by pushing it down gently.
Play/pause mode
• Press the PLAY/PAUSE button to start play.
• Press the PLAY/PAUSE button to pause at any track when playing.
• To stop the CD, press the STOP button.
• To remove the CD from the unit open the CD door by pressing CD door open button.
• Always press STOP button before opening the CD compartment.
Skip and search mode
• Press the CD Skip/Search Forward button once to skip to the next track. Press and hold this button to
search for a particular point at high speed forward. Release the button to resume normal play.
• Press CD Skip/Search Backward button once to skip back to the beginning of the current track, twice to
skip back to the beginning of the previous track. Press and hold this button to search for a particular point
at high speed backward. Release the button to resume normal play.
Playback modes
• Press CD mode button repeatedly to switch between different playback modes.
• During playing the mode will change as below:
- For CD playback: REPEAT 1 => REPEAT ALL => RANDOM => NORMAL.
- For MP3 playback: REPEAT 1 => REPEAT ALBUM => REPEAT ALL => RANDOM => NORMAL.
Program mode
• Up to 20 tracks can be programmed for disc play in any order or the same track can be repeated up to 20
times.
• Before use, be sure to stop the CD by pressing the CD STOP button.
• Press the CD PROGRAM button. The set is now in memory programming mode, at the first memory
position.
• Select a desired track by using CD Skip/Search Backward and CD Skip/Search Forward buttons.
• Press the CD PROGRAM button again to confirm.
• The set will advance to next memory position.
• Repeat steps described above to enter additional memories into the program if necessary.
7
Page 8

• After a maximum of 20 songs (or less) have been selected as described above, press the
CD PLAY/ PAUSE button to start playing the programmed tracks.
• The program memory will be cleared when you press CD STOP button or turn off the CD or power supply.
Note: In case of MP3 Disc all procedure is same as normal disc. If you have directory in your disc, you have to
select directory and track both. You can program up to 10 songs with above method.
Note: Good quality sound is guaranteed only when playing licensed CD-R/CD-RW discs.
MP3 operations
• In MP3 playback mode all functions are available as in CD operation mode.
• If your MP3-CD has folders, you can select the folder to playback. Press FOLDER UP or FOLDER DOWN key
to switch to the next or previous folder. The set will start playing the first song in the selected folder.
Note: Good quality sound is guaranteed only when playing licensed MP3 discs.
Maintenance and care
• Check your batteries regularly, old or discharged batteries should be replaced. If the
unit is not going to be used for some time or is being run exclusively on the alternative
power, remove the batteries to avoid leakage and damage.
• Electronic products of this kind should never be subjected to moisture or extreme
temperatures.
• If necessary, clean the unit with a piece of cloth dampened with water only (be sure the AC
power cord is disconnected from the power supply).
• The heads and capstan are in constant contact with the moving tape. Use a small cotton bud
with alcohol or special tape head cleaner to clean these parts. Never touch the heads with
anything metallic.
CD protection
• When pick up the CD disc, always hold the edge of the disc, never touch the surface of the
disc, it would scratch the disc surface and may occur sound distortion or raise reading
problem.
8
Page 9

Specification
CD playback format MP3
CD types CD/CD-R/CD-RW
Power supply 220 V, 50 Hz
Output power, RMS 3 W x 2
FM range 64-108 MHz
AM range 522 kHz - 1620 kHz
Net / Gross weight 3.5 kg / 3.8 kg
Unit dimension 430 x 250 x 175 mm
Gift box dimension 451 x 280 x 212 mm
Specifications and functions are subject to change without notice. It is caused by continual
improvement of the device.
9
Page 10

Описание
1. Кнопка включения/выключения
2. Регулятор громкости VOLUME
3. Переключатель режимов
FUNCTION
4. Телескопическая антенна
5. Кнопка PAUSE кассетной деки
6. Кнопка STOP/EJECT кассетной
деки
7. Кнопка FORWARD кассетной деки
8. Кнопка REWIND кассетной деки
9. Кнопка PLAY кассетной деки
10. Кнопка RECORD кассетной деки
11. Кнопка открытия отсека CD
12. Регулятор настройки радиоволн
TUNING
13. Ручка
14. Переключатель диапазона BAND
15. Кнопка FOLDER UP
16. Индикатор FM стерео
17. Кнопка FOLDER DOWN
18. Динамики
19. Отсек для кассет
20. LCD дисплей
21. Кнопка CD Skip/Search Backward
22. Кнопка CD PLAY/PAUSE
23. Кнопка CD Skip/Search Forward
24. Сенсор пульта дистанционного управления
25. Кнопка CD PROGRAM
26. Кнопка CD MODE
27. Кнопка CD STOP
10
Page 11

28. Крышка отсека для CD
29. Разъем AUX/Line in
30. Отсек для батарей
31. Разъем для наушников
32. Разъем питания 220 В ~ 50 Гц
Пульт дистанционного управления
1. Кнопка STOP
2. Кнопка PROGRAM
3. Кнопка MODE
4. Кнопка FOLDER UP/DN
5. PLAY/PAUSE
6. Кнопка SKIP UP/DN
Внимание: кнопки пульта дистанционного управления выполняют те же
функции, что и соответствующие кнопки стерео магнитолы.
Меры безопасности
• Внимание: В руководстве присутствуют важные указания по эксплуатации и уходу. Сохраните
руководство по эксплуатации для последующего использования.
• Высокое напряжение: В приборе находятся оголенные провода высокого напряжения.
Напряжение внутри прибора достаточно высокое, чтобы вызвать удар электрическим током.
• Предупреждение: Во избежание удара электрическим током не открывайте заднюю панель.
Доверяйте ремонт только квалифицированным специалистам.
Источники питания
Работа от батарей
• Откройте крышку отсека для батарей.
• Вставьте 8 батарей типа R-14 или UM-1 или D, соблюдая полярность, иначе прибор не будет
работать.
11
Page 12

• Закройте крышку отсека для батарей.
Питание от сети переменного тока
• Перед первым использованием прибора проверьте, соответствует ли электропитание Вашего прибора,
указанное в таблице с техническими характеристиками, электропитанию в Вашей локальной сети.
• Подсоедините соответствующий конец электрошнура к гнезду на задней панели прибора.
• Вставьте вилку электрошнура в розетку.
Внимание:
• Если прибор работает только от сети питания или не будет использоваться более двух недель,
удалите батареи из отсека. Невыполнение этого требования может привести к повреждению прибора.
• Всегда отключайте прибор от сети питания, если он не будет эксплуатироваться долгое время.
Подключение внешнего источника звукового сигнала
Вы можете подключить внешнее устройство (например портативный аудио-плеер) к разъему Line in
данной магнитолы и слушать музыку через ее динамики.
• Вставьте аудио кабель со штекером 3,5 мм в разъем Line out или разъем для наушников
подключаемого устройства-источника внешнего сигнала а другой его конец в разъем Line in
магнитолы.
• Включите магнитолу и переведите переключатель режимов в положение AUX.
• Включите воспроизведение на приборе-источнике внешнего сигнала.
• Чтобы отключить данный режим, переведите переключатель режимов в положение TAPE.
Подключение наушников
• Для частного прослушивания подключите к разъему для подключения наушников наушники с
диаметром штекера 3,5 мм.
• С помощью регулятора громкости установите желаемый уровень звука.
• При подключенных наушниках звук через динамики не воспроизводится.
12
Page 13

Использование радиоприемника
• Нажмите на кнопку POWER, чтобы включить устройство.
• Установите переключатель режимов в положение RADIO.
• Выберите нужный диапазон радиоволн с помощью переключателя диапазонов BAND.
• Вращайте регулятор настройки радиоволн, чтобы настроиться на волну радиостанции.
FM и FM stereo прием
• При слабом сигнале и посторонних шумах рекомендуется принимать радиостанции FM-диапазона в
моно режиме.
• Используйте переключатель диапазонов BAND для переключения между моно и стерео режимом.
• При приеме радиостанции в режиме FM загорается индикатор "FM ST".
Антенна
• Для достижения лучшего приема FM радиосигнала, вытяните телескопическую антенну, которая
расположена на задней панели прибора.
• Для приема AМ сигнала в приборе имеется встроенная антенна, для лучшего приема вращайте
магнитолу в различных направлениях.
Использование магнитофона
• Установите переключатель режимов работы в положение ТАРЕ.
• Чтобы открыть кассетный отсек, нажмите кнопку STOP/EJECT.
• Вставьте кассету в кассетный отсек пленкой вверх в специальные пазы на дверце.
• Плавно нажмите на дверцу для закрытия кассетного отсека
• Для начала воспроизведения нажмите кнопку PLAY
• С помощью регулятора громкости установите желаемый уровень громкости.
Клавиши управления
• Для временного прерывания воспроизведения нажмите кнопку PAUSE.
• Для остановки воспроизведения нажмите кнопку STOP/EJECT. Нажмите эту клавишу еще раз для
извлечения кассеты из кассетного отсека.
• Нажмите кнопку STOP, затем нажмите кнопки REWIND или FORWARD для перемотки кассеты назад
или вперед.
13
Page 14

Запись на кассету
• Откройте кассетный отсек, нажав кнопку STOP/EJECT.
• Вставьте чистую кассету пленкой вверх в специальные пазы на дверце.
• Плавно нажмите на дверцу для закрытия кассетного отсека
• Убедитесь, что кассета правильно вставлена в отсек.
• Теперь устройство готово к записи с радио или CD диска.
Запись с радиоприемника
• Установите переключатель режимов работы в позицию RADIO.
• Настройтесь на волну выбранной Вами радиостанции.
• Для начала записи одновременно нажмите кнопки RECORD и PLAY кассетной деки.
• Для остановки записи нажмите кнопку STOP/ EJECT.
Запись с CD
• Установите переключатель режимов работы в положение CD (MP3).
• Для начала записи одновременно нажмите кнопки PLAY и RECORD кассетной деки.
• Нажмите кнопку PAUSE кассетной деки.
• Включите компакт-диск проигрыватель, установите композицию, которую Вы желаете записать на
кассету.
• Для начала записи отожмите кнопку PAUSE.
• Для остановки записи нажмите кнопку STOP/ EJECT.
Защита кассет
• Во избежание случайного стирания записи удалите предохранители с кассеты.
• Вы не сможете нажать клавишу записи, если у кассеты удалены предохранители.
• Для записи на кассету, с которой были удалены предохранители, заклейте
отверстия, оставшиеся на месте предохранителей, липкой лентой.
ПРЕДОХРАНИТЕЛЬ ДЛЯ СТОРОНЫ А
14
Page 15

Использование CD проигрывателя
• Установите переключатель режимов FUNCTION в положение CD/MP3.
• Откройте отсек для компакт-диска, нажав на кнопку открытия отсека CD.
• Вставьте компакт-диск в отсек надписями вверх и, нажав на крышку, закройте ее.
Pежим воспроизведения/ паузы
• Для начала воспроизведения нажмите кнопку PLAY/PAUSE.
• Для временного прерывания прослушивания (паузы) еще раз нажмите на кнопку PLAY/PAUSE.
• Чтобы остановить воспроизведение, нажмите кнопку STOP.
• Для удаления компакт диска из отсека откройте крышку отсека для компакт-диска c помощью
нажатия соответствующей кнопки.
• Всегда нажимайте кнопку STOP перед открытием отсека для дисков.
Переход и поиск композиций
• Для перехода на следующую композицию нажмите один раз на кнопку CD Skip/Search Forward. Для
поиска нужного отрывка внутри трека удерживайте нажатой кнопку CD Skip/Search Forward – трек
будет проигрываться в ускоренном темпе. Отпустите кнопку CD Skip/Search Forward для возвращения
в нормальный режим работы.
• Для перехода в начало текущей композиции нажмите один раз на кнопку CD Skip/Search Backward,
нажмите два раза для перехода к предыдущему треку. Для поиска нужного отрывка внутри трека
удерживайте нажатой кнопку CD Skip/Search Backward – трек будет проигрываться в обратном
направлении в ускоренном темпе. Для возвращения в нормальный режим работы отпустите кнопку
CD Skip/Search Backward.
Выбор режима воспроизведения
• Для выбора различных режимов воспроизведения последовательно нажимайте на кнопку CD mode.
• Во время воспроизведения компакт-диска режимы будут меняться следующим образом:
- Для CD диска: REPEAT 1 (Повтор текущего трека) => REPEAT ALL (Повтор всех треков) =>
RANDOM (Случайное воспроизведение треков) => NORMAL (Нормальное воспроизведение).
- Для MP3 диска: REPEAT 1 (Повтор текущего трека) => REPEAT ALBUM (Повтор альбома) =>
REPEAT ALL (Повтор всех треков) => RANDOM (Случайное воспроизведение треков) => NORMAL
(Нормальное воспроизведение).
15
Page 16

Режим программирования порядка воспроизведения композиций
• Используя функцию программирования, Вы можете установить любую последовательность
воспроизведения композиций. Вы можете задать воспроизведение до 20 разных композиций или
повтор одной любой композиции до 20 раз.
• Перед началом программирования, убедитесь в том, что воспроизведение остановлено. Для остановки
нажмите кнопку CD STOP.
• Нажмите один раз на кнопку CD PROGRAM. Прибор перешел в режим программирования и идет выбор
первой композиции.
• С помощью кнопок CD Skip/Search Backward и CD Skip/Search Forward выберите желаемую
композицию.
• Для сохранения выбранной композиции нажмите на кнопку CD PROGRAM еще раз.
• Теперь Вы перешли к выбору второй композиции списка.
• Для того, чтобы внести в память другие композиции, повторите вышеперечисленные действия.
• После программирования 20 (или менее) композиций нажмите кнопку CD PLAY/PAUSE. Начнется
воспроизведение программы.
• Все запрограммированные в память композиции будут удалены при нажатии на кнопку CD STOP,
открытии отсека для компакт-дисков, выключении компакт-диск проигрывателя или питания
магнитолы.
Примечание:
В режиме MP3 процедура та же самая как и с обычным диском. Если на диске есть папки, то нужно
последовательно выбрать номер папки и номер трека. Вы можете запрограммировать до 10 треков
вышеуказанным способом.
Примечание: Качественное звучание без помех и сбоев гарантируется только при воспроизведении
лицензионных CD-R/CD-RW дисков.
Использование MP3 проигрывателя
• В режиме проигрывания MP3-дисков доступны те же функции, что и при проигрывании CD-дисков.
• Если на диске есть папки, то Вы можете выбрать папку. Нажимайте на клавиши FOLDER UP и FOLDER
DOWN для перехода к следующей или предыдущей папке
Примечание: Качественное звучание без помех и сбоев гарантируется только при воспроизведении
лицензионных МР3 дисков.
16
Page 17

Чистка и уход
• Проверяйте батареи регулярно. Удалите батареи, если они разрядились, прибор не
будет использоваться на протяжении продолжительного времени или работает от сети
питания.
• Предохраняйте Ваш прибор от попадания влаги или воздействия высокой
температуры.
• Если необходимо, протрите корпус прибора при помощи чуть влажной тряпочки, при
этом убедитесь, что прибор отключен от сети питания.
• Для обеспечения нормальной бесперебойной работы Вашего прибора периодически очищайте
магнитную головку и вал ЛПМ. Увлажните кусочек ваты спиртом или специальной жидкостью для
чистки магнитных головок и осторожно протрите поверхность головок и вала ЛПМ. Не прикасайтесь
к головкам металлическими предметами.
Защита компакт-диска
• Извлекая компакт-диск, держите его только за края. Не дотрагивайтесь до лазерной поверхности
компакт-диска, т.к. Вы можете поцарапать его поверхность, что приведет к искажению звука или
другим проблемам.
Технические характеристики
Формат воспроизводимых файлов МР3
Типы воспроизводимых дисков CD/CD-R/CD-RW
Электропитание 220 В, 50 Гц
Выходная мощность 3 Вт х 2
Частотный диапазон FM 64-108 МГц
Частотный диапазон АM 522 КГц - 1620 КГц
Вес нетто / брутто 3.5 кг / 3.8 кг
Размеры устройства 430 x 250 x 175 мм
Размеры коробки 451 x 280 x 212 мм
Технические характеристики и функции могут быть изменены заводом-изготовителем без предварительного
уведомления в связи с постоянным усовершенствованием и улучшением данного устройства.
17
 Loading...