

Page 1
Deutsch РусскFrançais ItalianoEnglish Español
operation manual
Manuel D’Utilisation
Bedienungshandbuch
Manual de operación
Manuale d’Uso Operativo
Руководство пользователя
Use the SLIMstage
Set-Up Guide/Connection Poster
to connect your new soundmatters system
soundmatters international, inc.
reno, nevada, USA
worldwide tel 775.981.1460
toll-free (usa) 800.698.SOMA (7662)
fax 775.981.1465
email support@soundmatters.com
web www.soundmatters.com
in europe contact:
Dahl Audio Electronic GmbH
10707 Berlin, Germany
tel 0049 (0) 30 – 88628017
email info@dahlaudio.com
©2008 soundmatters international, inc. – 07.08-p1
Guide de Mise En Route / Poster de connexion
pour raccorder votre nouveau système
SLIMstage Einrichtungs- / Anschlussposter,
um Ihr neues Soundmatters System
Guía de configuración/Póster de conexión
para conectar tu nuevo sistema soundmatters
il vostro nuovo sistema soundmatter
SLIMstage для установки и подключения
p2 p20 p38 p56 p92p74
Utilisez votre
soundmatters SLIMstage.
Verwenden Sie das
anzuschließen
Use el SLIMstage
Usare il Poster SLIMstage
Guida alla Configurazione/
Connessione per connettere
Используйте постер
Руководство по установке
вашей soundmatters системы
Page 2

2
3
English
Important Safety Precautions
CAUTION – Risk of electric shock – Do not open
1. Read instructions – All the safety and operating instructions should be read before the product is operated.
2. Keep these instructions – The safety and operating instructions should be retained for future reference.
3. Heed all warnings – All warnings on the product and the Users Guide should be adhered to.
4. Follow all instructions – All operating and use instructions should be followed.
5. To reduce the risk of fire or electric shock, do not expose this apparatus to rain or moisture – The product
should not be used near water – for example, near a bathtub, washbowl, kitchen sink, laundry tub, in a wet basement, or
near a swimming pool and the like. The apparatus shall not be exposed to dripping or splashing and that no objects filled
with liquids, such as vases, shall be placed on the apparatus.
6. Clean only with a dry cloth.
7. Do not block any ventilation openings. Install in accordance with the manufacturer’s instructions. Slots or openings
in the cabinet are provided for ventilation and to ensure reliable operation of the product and to protect it from overheating,
and these openings must not be blocked or covered. Placing the product on a bed, sofa, rug or similar surface should never
block the openings. The product should not be placed in a built-in installation such as a bookcase or rack unless proper
ventilation is provided or the manufacturer’s instructions have been adhered to.
8. Do not install near any heat sources such as radiators, heat registers, stoves, or other apparatus (including
amplifiers) that produce heat.
9. Do not defeat the safety purpose of the polarized or grounding-type plug. A polarized plug has two blades with
one wider than the other. A grounding type plug has two blades and a third grounding prong. The wide blade or the third
prong are provided for your safety. If the provided plug does not fit into your outlet, consult an electrician for replacement
of the obsolete outlet.
10. Power cords and power adapters – Use only the power cords and power adapters supplied by the product
manufacturer.
Never wrap a power cord around the power adapter or other object. Doing so can stress the cord in ways that can cause the
cord to fray or crack. This can present a safety hazard.
Always route power cords so that they will not be walked on, tripped over, or pinched by objects.
Protect the cord and power adapters from liquids. For instance, do not leave the cord or power adapter near sinks, tubs,
toilets, or on floors that are cleaned with liquid cleaners. Liquids can cause a short circuit, particularly if the cord or power
adapter has been stressed by misuse. Liquids can also cause gradual corrosion of the power cord terminals and/or the
connector terminals on the adapter which can eventually result in overheating.
Always ensure that all power cords connectors are securely and completely plugged into receptacles.
Do not use any power adapter that shows corrosion at the ac input pins and/or shows signs of overheating (such as
deformed plastic) at the ac input or anywhere on the power adapter.
Do not use any power cords where the electrical contacts on either end show signs of corrosion or overheating or where the
power cord appears to have been damaged in any way.
11. Only use attachments/accessories specified by the manufacturer.
12. Use only with the cart, stand, tripod, bracket, or table specified by the manufacturer,
or sold with the apparatus. When a cart is used, use caution when moving the cart/apparatus
combination to avoid injury from tip-over. Placing the product in an unstable location such as an
unstable cart, bracket or table, may cause the product to fall, causing serious injury to a child or an
adult, and serious damage to the product.
13. Unplug this apparatus during lightning storms or when unused for long periods of time. A surge-filter can
also prevent damage and is recommended.
14. Refer all servicing to qualified service personnel. Servicing is required when the apparatus has been damaged in
any way, such as power-supply cord or plug is damaged, liquid has been spilled or objects have fallen into the apparatus,
the apparatus has been exposed to rain or moisture, does not operate normally, or has been dropped.
15. This product should be operated only from the type of power source indicated on the marketing label. If
you are not sure of the type of power supply in your home, consult your product dealer or local power company. For products
intended to operate from battery power or other sources, refer to the operating instructions.
16. Overloading – Do not overload wall outlets, extension cords, or integral convenience receptacles, as this can result
in risk of fire or electric shock.
17. Objec t and liquid entry – Never push objects of any kind into this product through openings, as they may touch
dangerous voltage points or short-out parts that could result in a fire or electric shock. Never spill liquid of any kind on
the product. Adjust only those controls that are covered by the operating instructions, as an improper adjustment of other
controls may result in damage and will often require extensive work by a qualified technician to restore this product to its
normal operation.
18. Replacement par ts – When replacement parts are required, be sure the service technician has used replacement
parts specified by the manufacturer or have the same characteristics as the original part. Unauthorized substitutions may
result in fire, electric shock or other hazards.
19. Upon completion of any service or repairs to this product, ask the service technician to perform safety checks to
determine that the product is in proper operating condition.
20. Do not attempt to service this product yourself, opening or removing covers may expose you to dangerous
voltage or other hazards. Refer all servicing to qualified service personnel.
21. Wall Bracket Mounting – Refer to the mounting bracket manufacturer for instructions; confirm that bracket securely
mounted to the SLIMstage and into the wall studs in a manner which will not shake loose during product operation.
WARNING To reduce the risk of fire or electric shock, do not expose this apparatus to rain or moisture.
Page 3
4
5
English
Connections & Placement
IMPORTANT NOTE: Prior to using this Operation Manual, please follow the instructions in the
Setup Guide for making all connections and proper positioning of your SLIMstage.
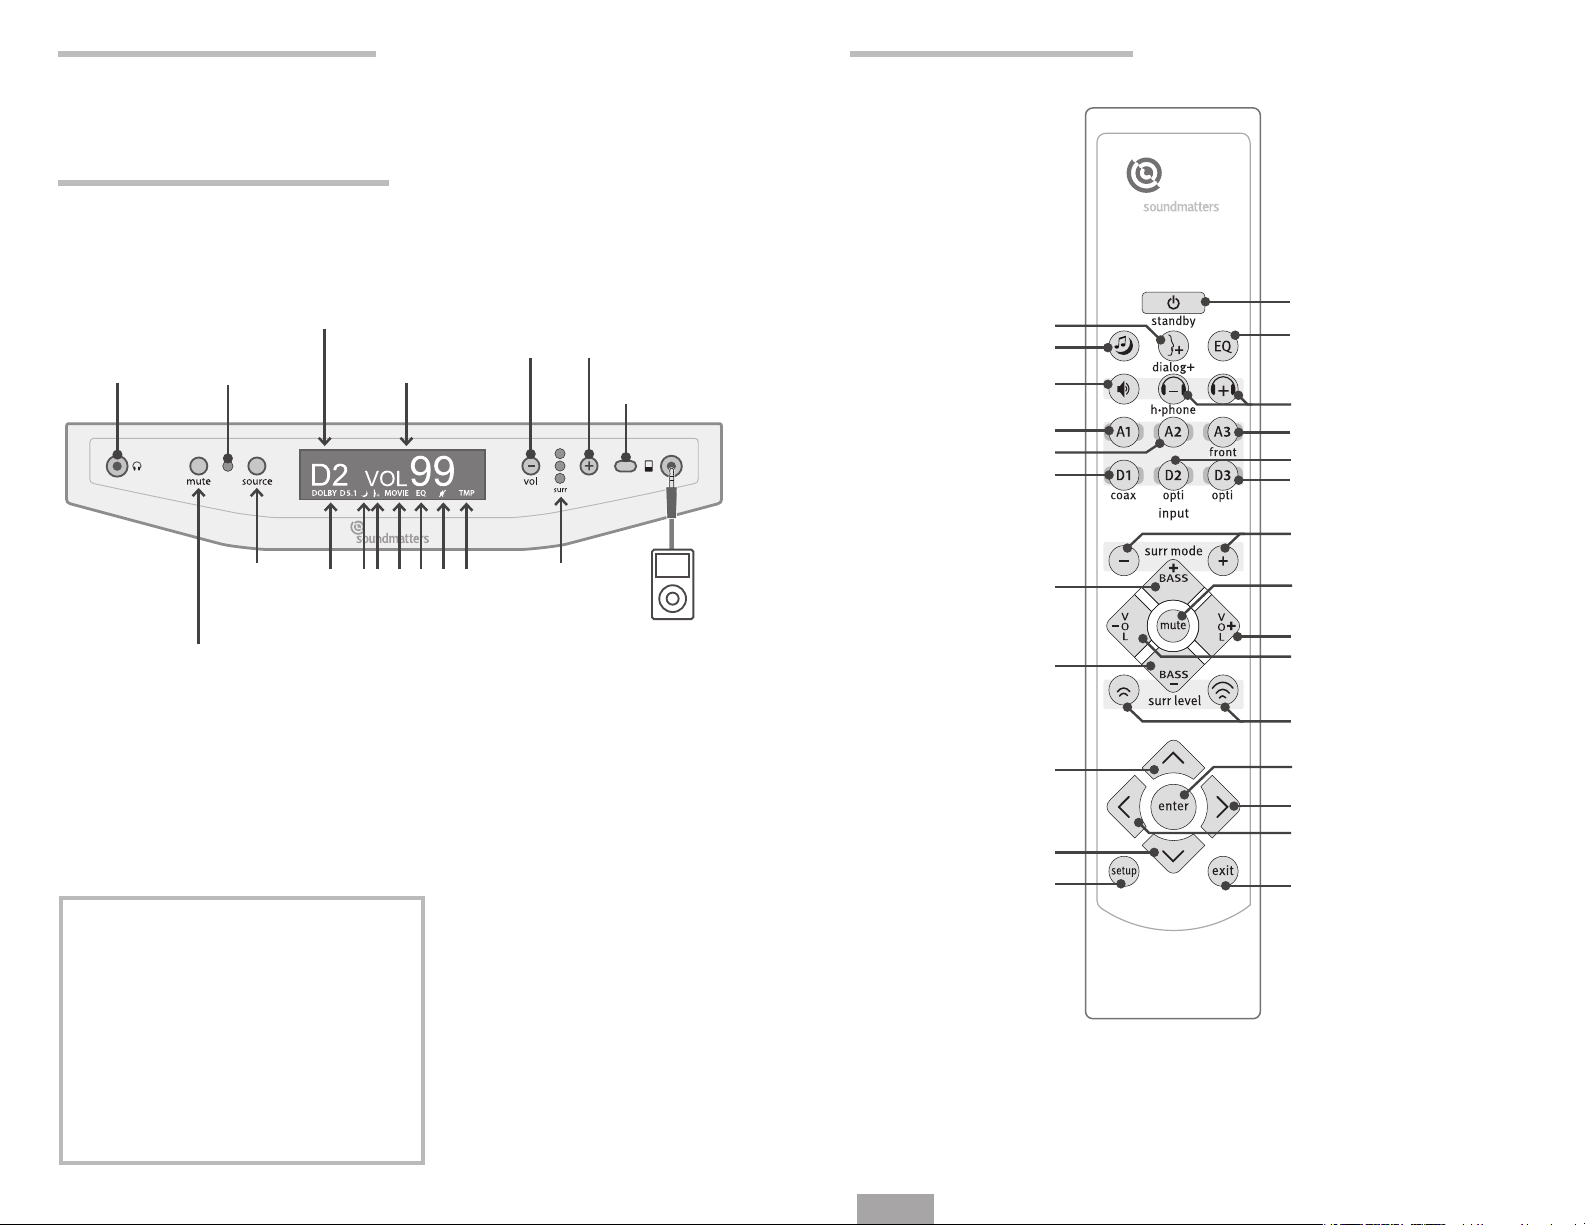
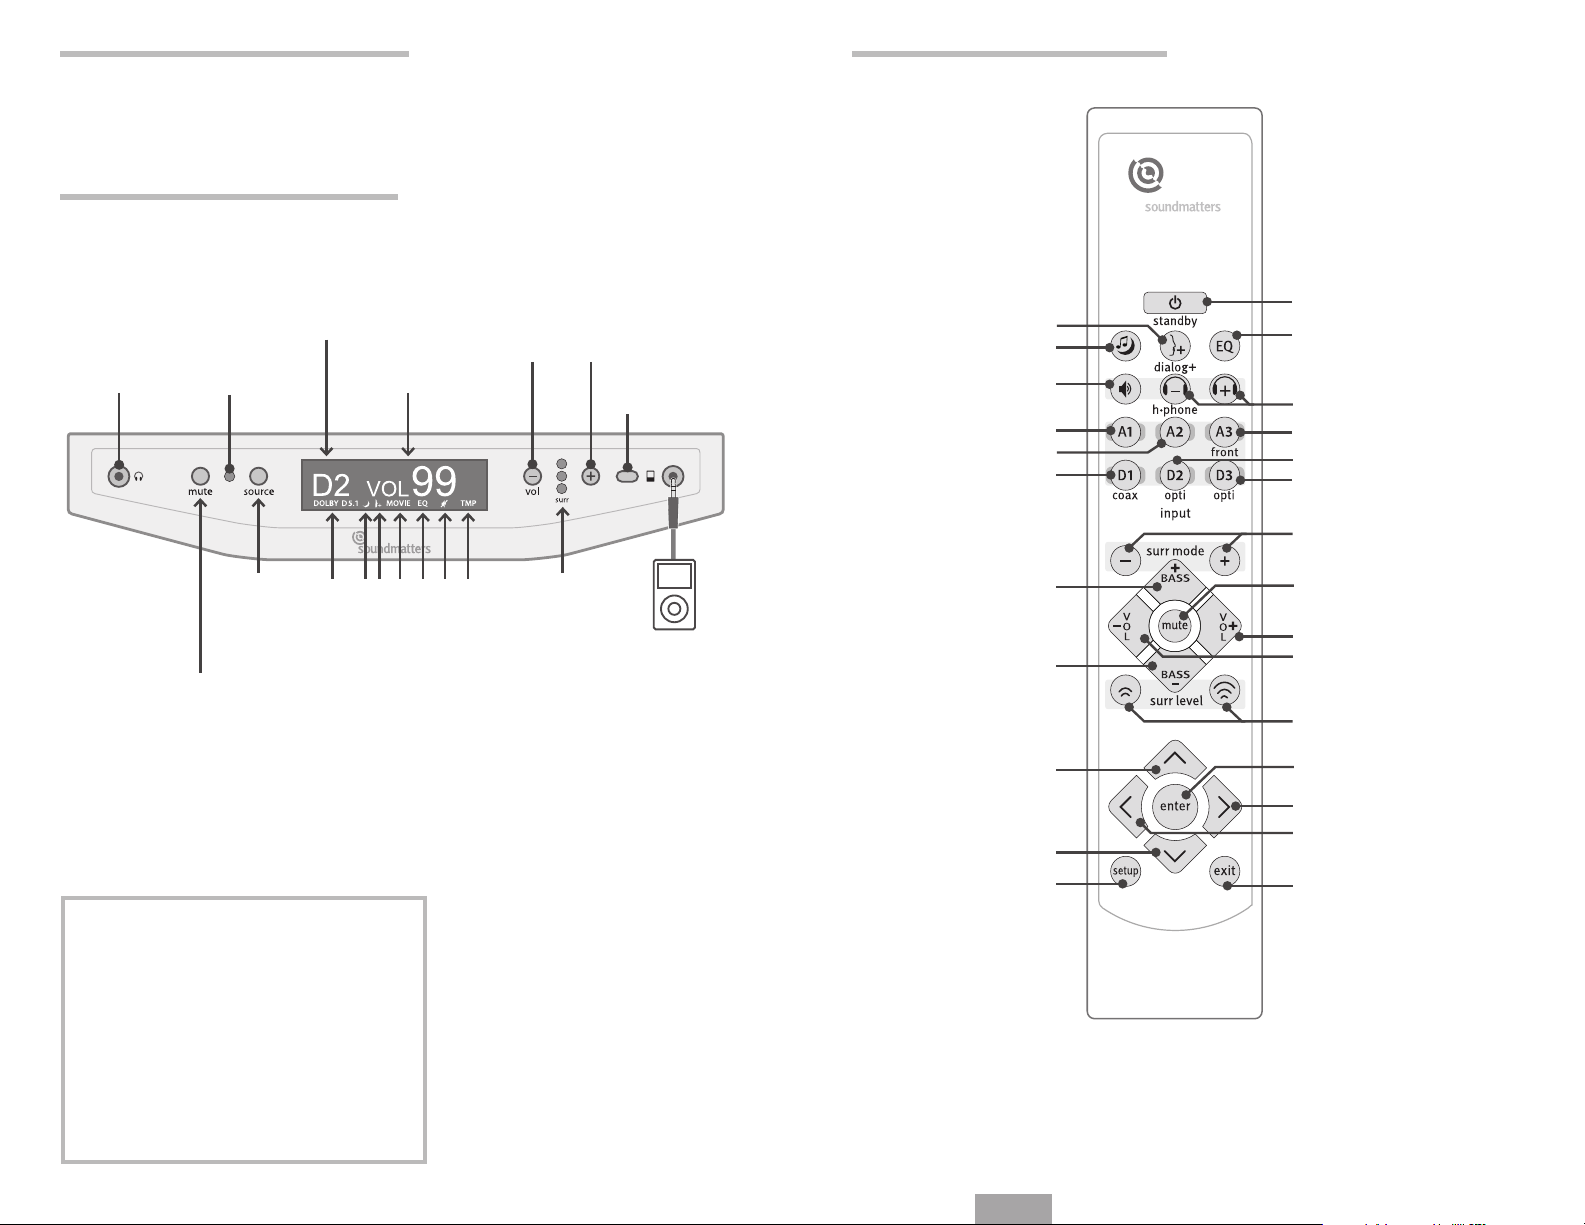
Remote Control Layout
Front Control Panel Layout
A.
Headphone
EuphonyHD
Surround
Technology
(via 1/8” 3.5mm
connector)
(also unmute via any
remote or front panel
B.
Power
Indicator
(sequence
H.
Mute/Unmute
button)
I.
Source
Select
through
inputs)
C.
Input/Source
J K L M N O
J. Dolby D2.0, Dolby D5.1,
DTS, PCM, Analog
detected
K. Night / Dynamic
Compression On
L. Dialog+ On
M. STEREO, MUSIC, LIVE,
MOVIE mode
N. EQ Preset
O. Speakers O
using headphones)
P. Thermal Overload
Protection Warning
D.
Volume
Status
(when
headphone
P
E.
Master
Volume
Down
(controls
volume
when
speakers
are o)
2 LED = Live/TV
1 LED = Music
0 LED = Stereo/
Volume
(controls
headphone
speakers
Q.
Surround
Mode
Indicator
3 LED = Movie
Bypass
F.
Master
Up
volume
when
are o)
IR Remote
G.
Sensor
R.
“iPod”/Analog
Input
(auto-switching
via 1/8” 3.5mm
connector –
overrides all
rear inputs)
1. Vocals EQ (on & o)
2. Night / Dynamic
Compression
3. Speakers on & o
(with headphones connected)
7. Select input: Analog 1
8. Select input: Analog 2
10. Select input: Digital 1
(including external sub)
15. Bass Level Down
(including external sub)
21. Menu Previous/Down
25. Enter Setup Mode
(on & o)
14. Bass Level Up
20. Menu Next/Up
4. On / O / Standby Mode
5. Preset EQ On & O
6. Headphone Volume Down & Up
9. Select input: Analog 3 (front)
11. Select input: Digital 2
12. Select input: Digital 3
13. Surround Down & Up
(through 4 positions)
16. Mute
(unmute via any remote or
front panel command)
17. Master Volume Up
18. Master Volume Down
19. Surround Level Down & Up
(or rear level if set for external rears)
22. Set/Enter
23. Menu Next/Right
24. Menu Previous/Left
26. Exit to Previous Menu
Contents page
• Safety . . . . . . . . . . . . . . . . . . . . . . . 2
• Connections & Placement . . . . . . . . . . 4
• Front Panel & Remote Control . . . . . . . . 4-5
1. Operation. . . . . . . . . . . . . . . . . . . . . 6
2. Adjustments . . . . . . . . . . . . . . . . . . . 6
3. Headphones . . . . . . . . . . . . . . . . . . . 7
4. Advanced. . . . . . . . . . . . . . . . . . . . . 7
5. Setup . . . . . . . . . . . . . . . . . . . . . . . 8
6. FAQ. . . . . . . . . . . . . . . . . . . . . . . . . 14
7. Troubleshooting . . . . . . . . . . . . . . . . 15
8. Specifications . . . . . . . . . . . . . . . . . . 16
9. Warranty/Service . . . . . . . . . . . . . . . . 17
Page 4

6
7
English
1. Operation
Turn-on/turn-off
Turn on the SLIMstage by pressing any button on the front panel or remote control. Turn off by
pressing the remote Off/standby button.
OFF/standby – Powers down all components except the IR sensor. Power consumption is less
than 2.0W
Input/Source selection
To select the source, press the desired input button on the remote control (A1, A2, A3, D1, D2,
D3), or sequence inputs via front panel button The display will indicate the source selected.
Repeated front button presses will toggle the unit through the source inputs sequentially.
Auto Signal Detection and Conversion
SLIMstage surround processing technology Euphony HD can handle virtually all types of signals
including analog, Dolby Digital 2.0, 5.1, DTS Digital Surround, DTS 96/24 or PCM.
The display will indicate whether the signal being received by the SLIMstage is Dolby Digital 2.0,
5.1, DTS, PCM, or Analog.
In MUSIC, LIVE, and MOVIE modes, SLIMstage’s EuphonyHD technology automatically converts
all 2-channel sources (such as Stereo, Dolby 2.0, or stereo PCM) into surround.
Surround Mode
SLIMstage’s EuphonyHD provides stereo and three different surround modes which can be
selected via the remote control’s “surr” mode – and + buttons. The selected mode will be
momen tarily highlighted in the LCD display and continue to be displayed on the vertical blue
LED bar.
No LED ..... SURR OFF ...... Stereo / Bypass
1 LED .....MUSIC Mode .....Mild surround effect, ideal for music
2 LED ......... LIVE .........Ideal surround for most TV shows
3 LED ........MOVIE ........Maximum surround – great for Action Movies
Unless changed in the Set-up Menu (see Advanced Settings – INPUT PARAMETERS>SURR MODE),
SLIMstage will turn-on and retain your last selected surr mode setting until you select another
mode or source.
Mute
To mute the sound, press the mute button on the remote. MUTE will be indicated in the display.
Select any button to un-mute.
Night / Dynamic Compression
Utilize the remote’s night music button to engage/disengage the night / dynamic compression
circuit which reduces the dynamic range (difference between the loudest and quietest sounds)
to make it easier to avoid disturbing the neighbors or sleeping loved ones. Shows NIGHT in
display.
Dialog+ voice clarity circuit
Using the remote Dialog + button to engage/disengage circuit which provides additional
output and clarity at typical vocal frequencies. Shows in display when active.
2. Adjustments
Volume
To adjust the volume level, use the remote volume + and –, or use the front panel buttons
( + and –).
Note: If headphones are connected with speakers off, front panel controls headphone level.
Bass level
Use the remote control to adjust the bass + or –. The relative Bass level will be shown in the
front panel display. Adjusting the bass from the remote will also adjust the level of an external
subwoofer, such as a soundmatters SUBstage, if one is connected.
Surround Level
Use the remote control surr level buttons to increase or decrease the level of the surround. The
Surround Level will be shown in front panel display.
EQ
Utilize the remote’s EQ button to add a preset equalization curve (see SETUP > REMOTE EQ)
providing an alterative tonal balance. EQ curve in display.
Input Sensitivity
It is possible to have a mis-match between the output of an analog source unit and the input
of an AV component (like SLIMstage). This causes either low level /excess hiss, or premature
overloading/distortion. See Advanced Settings: INPUT PARAMETERS > SENSITIVITY.
3. Headphones
Using Headphones
SLIMstage EuphonyHD Headphone technology delivers a personal theater experience from
conven tional headphones. Connect headphones via the left side front panel 1/8” (3.5mm)
receptacle. This will turn-off the speakers. Pressing the remote’s
eous playing of speakers with the headphones (stereo playback). Utilize the H-phone vol –/+
buttons on the remote to adjust headphone level separately from the speaker output.
button allows simultan-
Adding An External Subwoofer
Refer to the SLIMstage Setup Guide, Menu Section C, and your subwoofers instruction Manual
to optimize subwoofer integration and performance.
Adding External Rear Speakers
Rear external speakers may be added to supplement the SLIMstage’s surround sound. (see
ADVANCED SETUP> REAR SURROUND). For additional information contact your local dealer or
soundmatters technical support department.
4. Advanced
RS-232 Control Port
SLIMstage provides an RJ-11 receptacle to allow RS-232 control via a computer or external
automation device. Two of the pins are available to connect a rear IR sensor.
For more information visit www.soundmatters.com/support/downloads, contact your dealer
or soundmatters customer service.
Overheat Shutdown Protection
The SLIMstage uses state-of-the-art digital amplifiers which allow significantly higher music
peaks to be heard cleanly. If the system is played at levels that are overheating the system
the display will indicate TMP. If temperatures are reached that may damage the SLIMstage,
the amplifiers will shut down to protect the system and speakers from damage – PT will be
displayed. When the protection system is activated, you will hear the system repeatedly mute
and unmute. To deactivate the protection system, simply turn down the volume.
DB-15 Service Port
SLIMstage provides a 15-pin receptacle to allow for servicing. For more information contact
soundmatters customer service.
Page 5
8
English
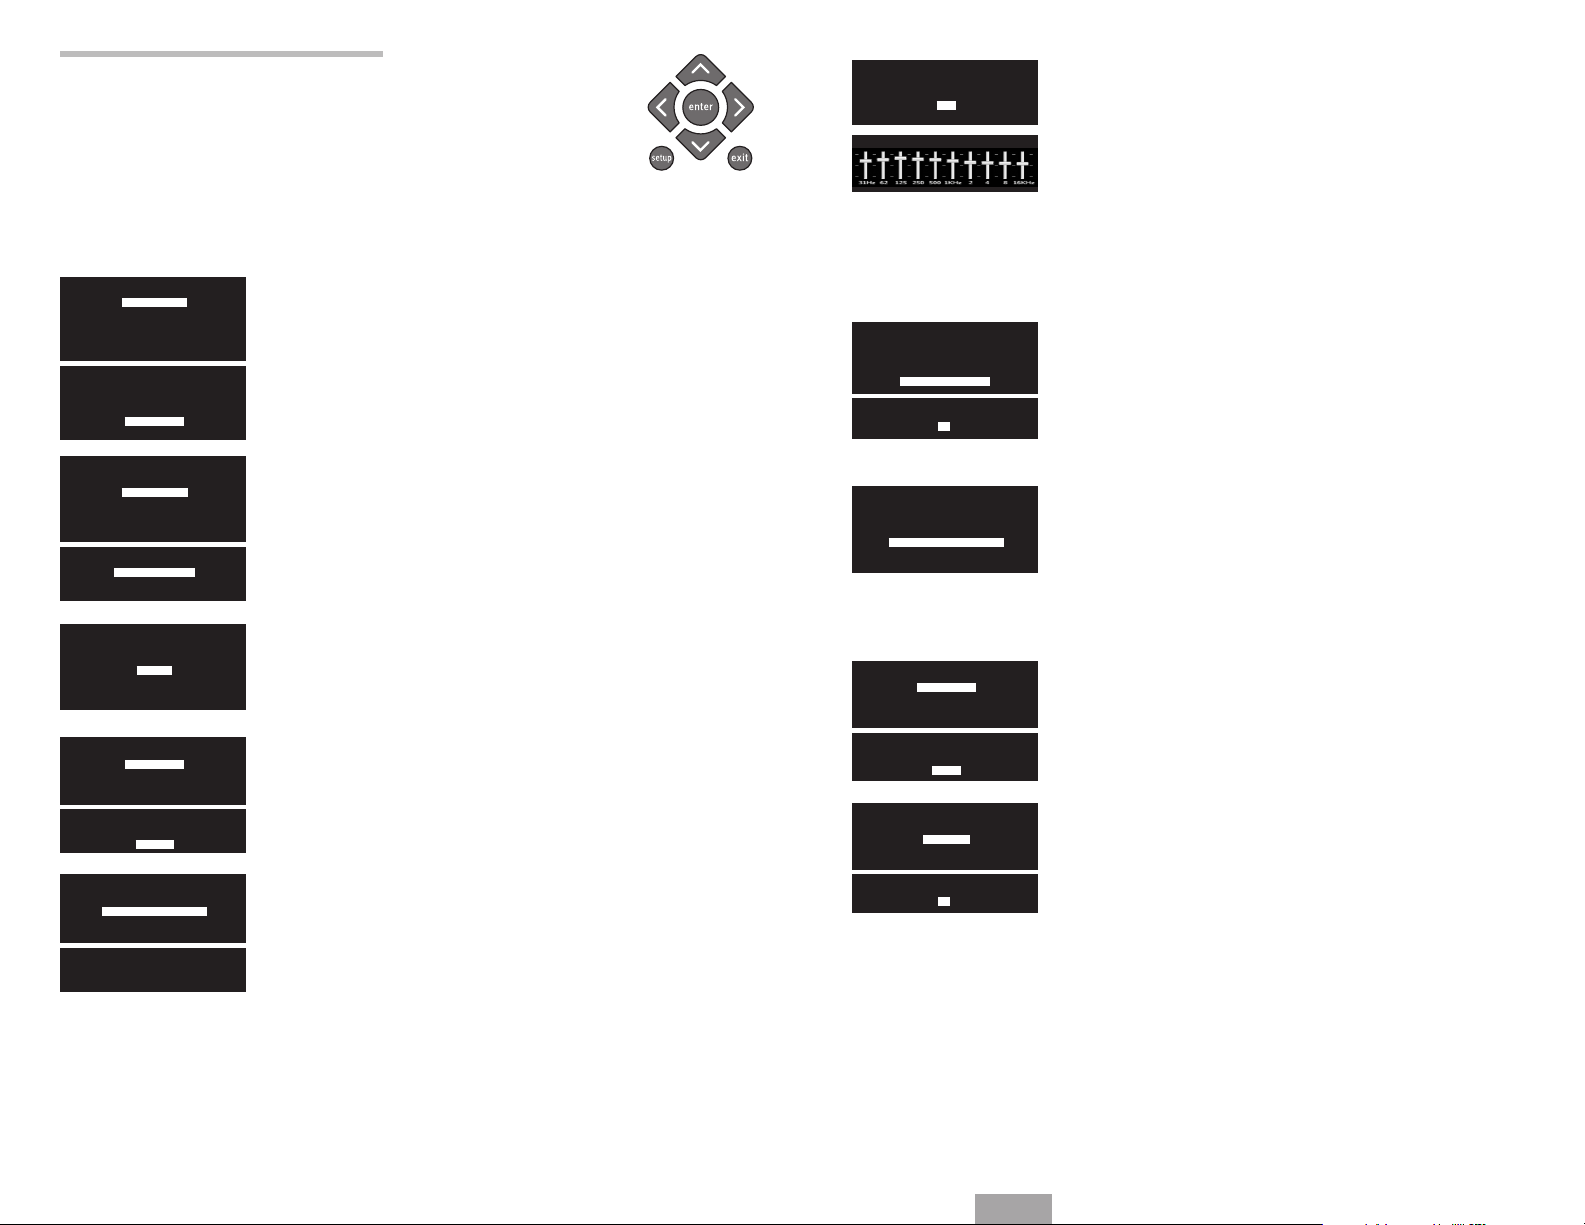
5. Setup Menus
While SLIMstage is plug and play ready, setup menus allows you to both
sonically and functionally “fine-tune” SLIMstage for your specific application.
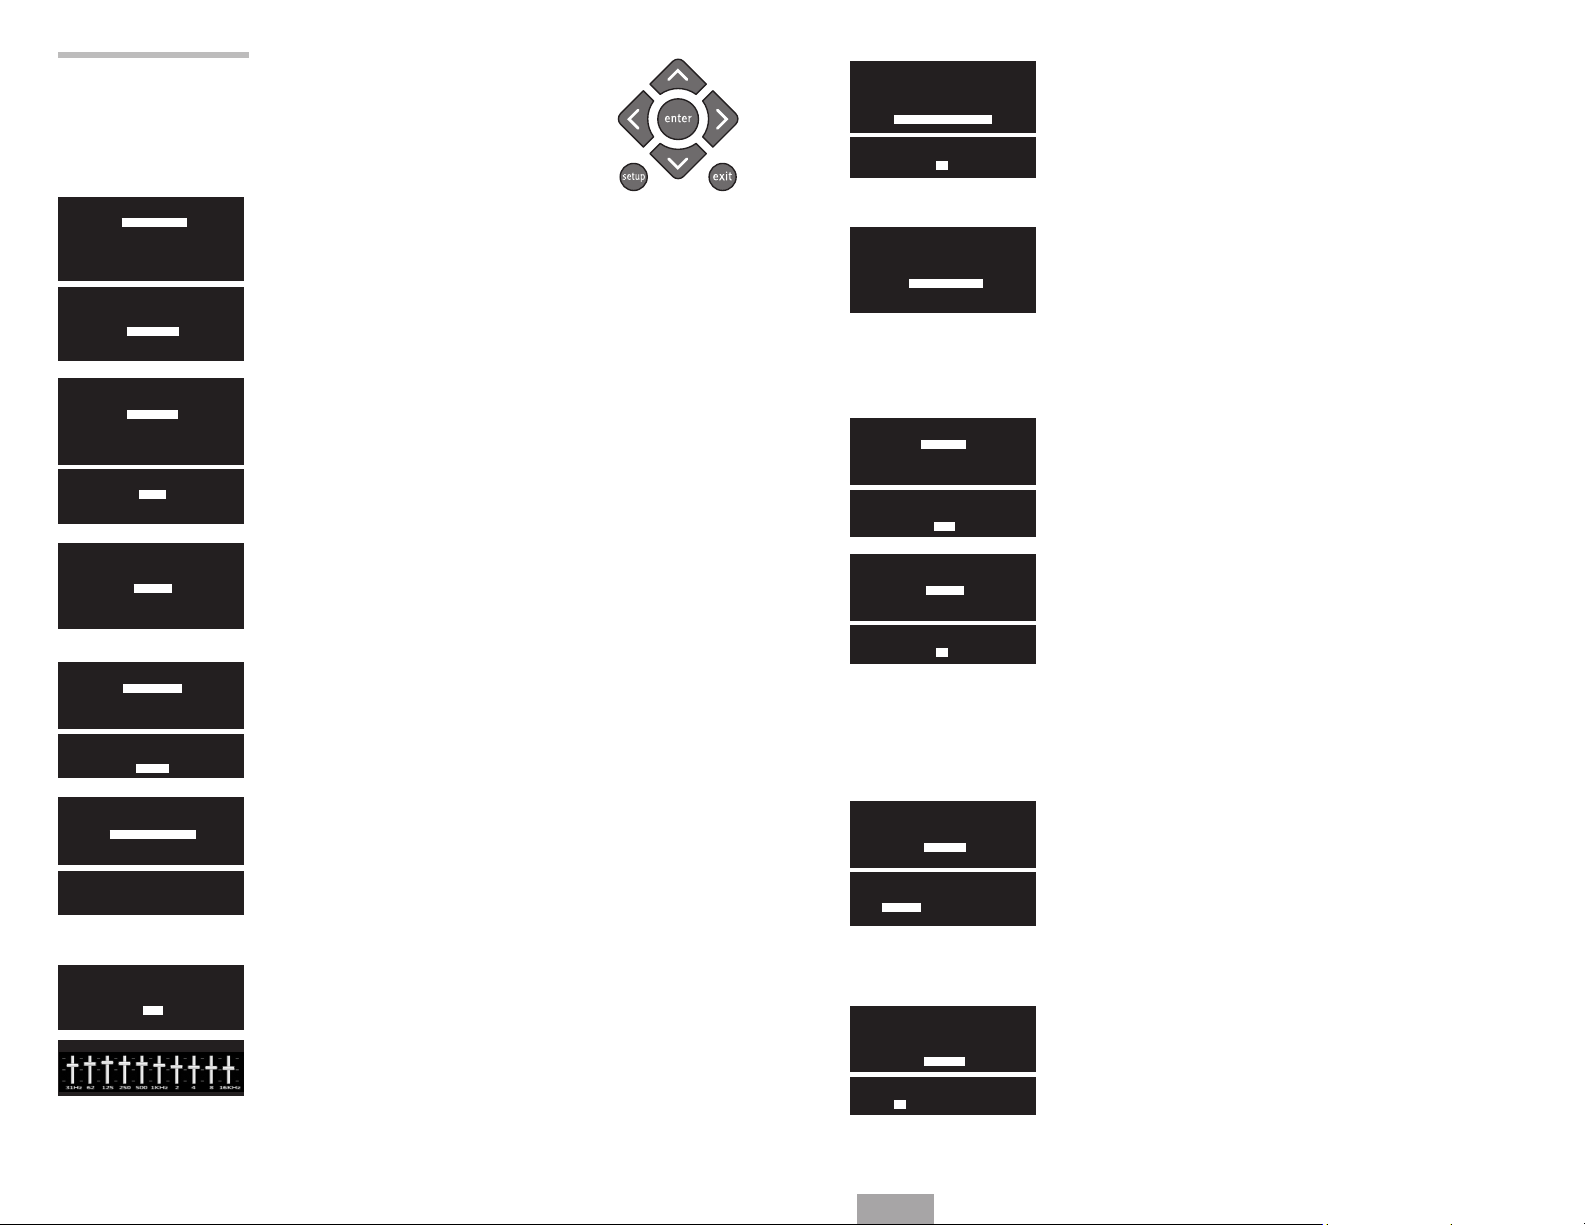
1. Push SETUP button to access SETUP MENUS (or get out of SETUP MODE).
2. Use remote navigation cluster to navigate through and select Menu items.
3. Push EXIT button at any time to revert to the previous menu.
SETUP
LANGUAGE
DIS PLAY
ROOM
SUBWOOFER
EQ REMOTE
ADVANCED
LANGUAGE
DEUTSCH
ESPANOL
ENGLISH
FRANCAIS
ITALIANO
SETUP
LANGUAG E
DI SP LAY
ROOM
SUBWOOFER
EQ REMOTE
ADVANCED
DIS PLAY
DIM
OFF
ON
SETUP
LANGUAG E
DIS PLAY
RO OM
SUBWOOFER
EQ REMOTE
ADVANCED
ROOM
DI STA NCE
SURR BALAN CE
EQ
CENTER CHANNEL
DIS TANCE
< 2 M
> 2 M
ROOM
DISTANCE
SURR BALA NCE
EQ
CENTER CHANNEL
SURR BALA NCE
L R
10 ……... ! ……… 10
ROOM
DISTANCE
SURR BALAN CE
EQ
CENTER CHANNEL
EQ RESET
A. LANGUAGES
}Action: Select LANGUAGE, then select desired Language and
push ENTER
Result: SETUP is now shown in selected language.
B. DISPLAY OPTIONS
The SLIMstage display will auto-dim after about 10 seconds as the
factory default, auto-off and always-on are also options.
}Action: Select DISPLAY, then select Auto DIM, Auto OFF or
Always ON, then press Enter
Result: Display setting are saved.
C. ROOM SETUP
Adjusts basic parameters for ROOM setup
for best performance
}Action: Select ROOM and push ENTER
Result: Shows selected Setup Menu Options
Adjust for LISTENING DISTANCE
}}Action: Select listening DISTANCE and press ENTER
}}}Action: Select desired distance and press ENTER
Result: Listening distance is saved and display revert
to ROOM Setup Menu
Set Left/Right SURROUND BALANCE
}}Action: Navigate to SURR BALANCE and press ENTER.
Result: SURR BALANCE displayed
}}Action: Select desired setting and press ENTER
Result: Revised balance will be set.
Tip: If one side of the listening area (L or R) is acoustically more “live” (say,
glass or hard reflective surfaces), you may want to set the balance slightly
to the more “dead” (i.e., curtains, open to another room) side of the area.
Set Default SLIMstage ROOM EQ Parameters
Changes frequency balance of SLIMstage for placement, room
acoustics, and listening taste
}}Action: Navigate to room EQ, press ENTER.
Result: 10 frequency equalizer will be displayed
}}}Action: Move each slider to desired level and press ENTER
Result: Frequency settings will be the default EQ response.
Tips: The Room EQ adjusts the EQ for all inputs. In Advanced Settings the
EQ for each input can be created. To reset the input EQ back to the Room EQ
settings. Reset the input to factory default.
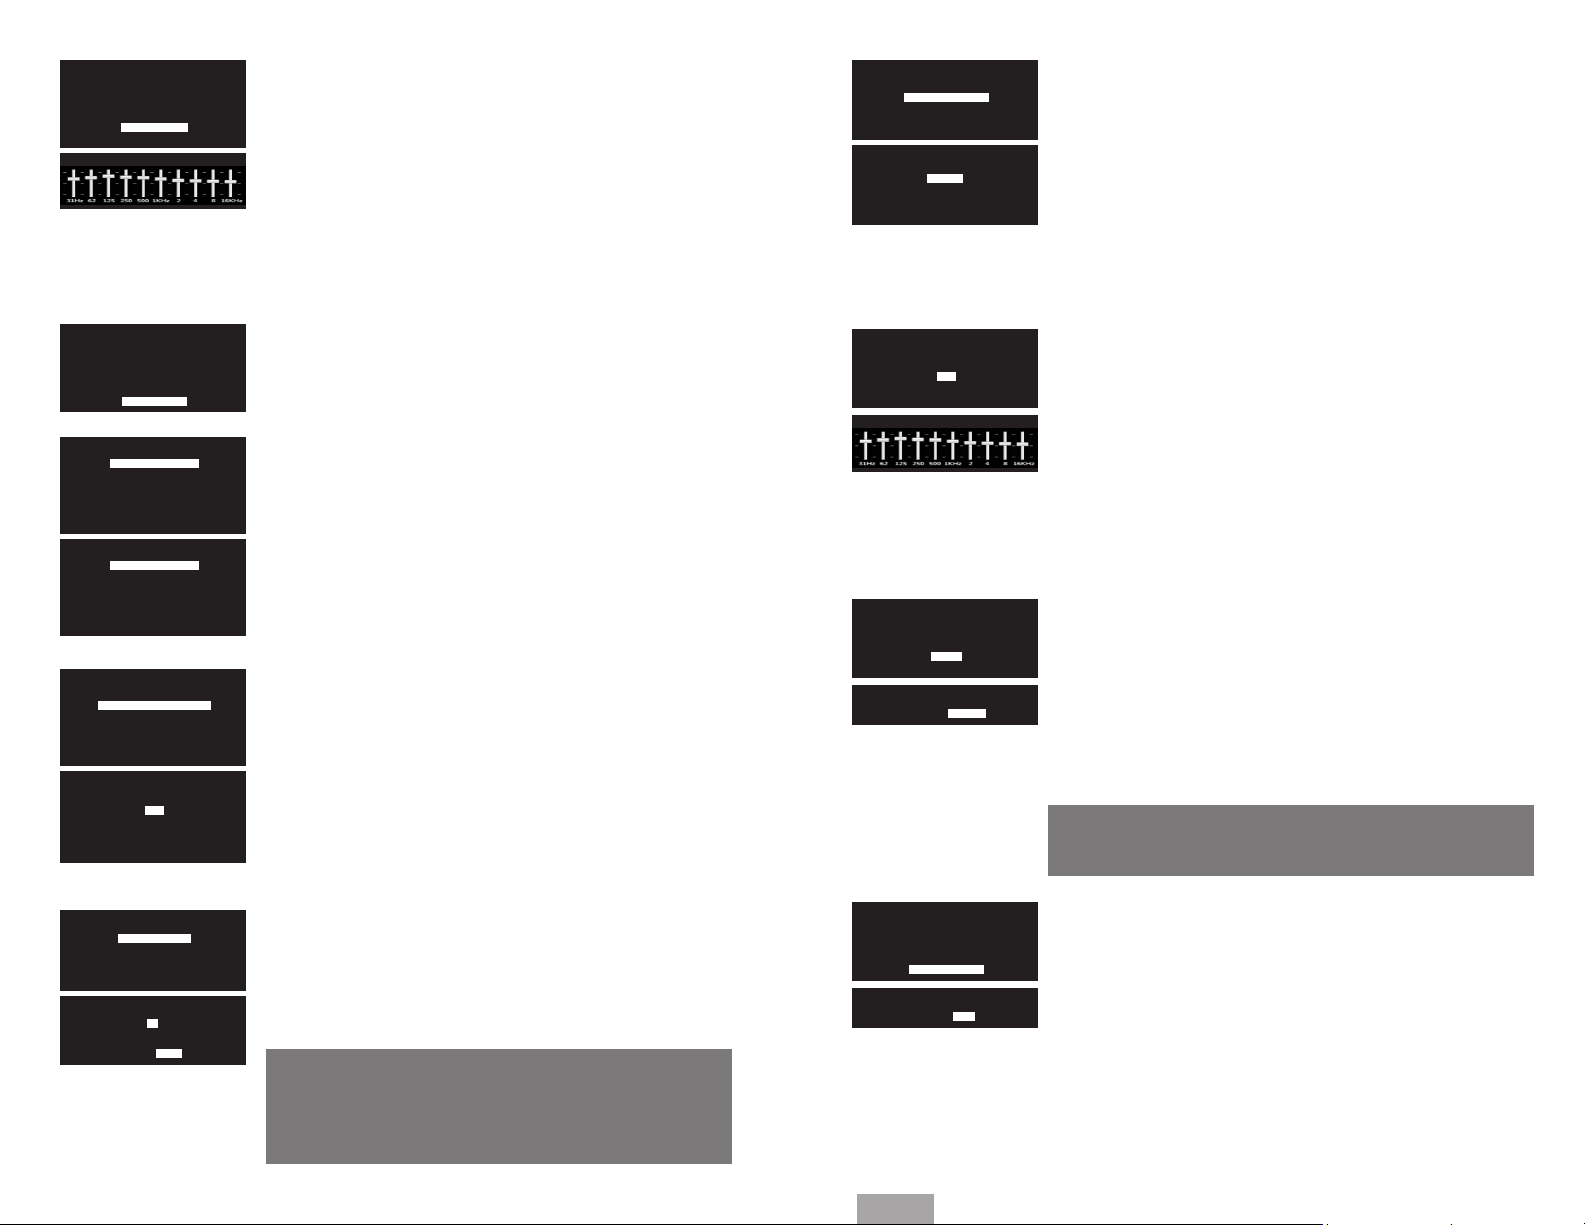
ROOM
DISTANCE
SURR BALAN CE
EQ
CENTER C HANNEL
LEVEL
–10 ……... 0 ……… 10+
SETUP
LANGUAG E
DIS PLAY
ROOM
SUBWOOFER
EQ REMOTE
ADVANCED
SUBWOOFER
YES / NO
LEVEL
XOVER
PHASE
SUBWOOFER
YE S
NO
SUBWOOFER
YES / NO
LE VE L
XOVER
PHASE
LEVEL
–10 ……... 0 ……… 10+
SUBWOOFER
YES / NO
LEVEL
XOVER
PHASE
XOVER
250HZ 190HZ 143HZ
110HZ 82HZ 62HZ
43HZ
SUBWOOFER
SUBWOOFER
LEVEL
XOVER
PH ASE
PHA SE
0 ........ 90 ........ 180
Set CENTER CHANNEL Level
Adjust the Center Channel level to optimize vocals
}Action: 1. Push ENTER
Result: 1. Center LEVEL range shows
2. DEFAULT OUTPUT LEVEL will be displayed
}}Action: Select desired CENTER level and press ENTER
Result: Level will be saved.
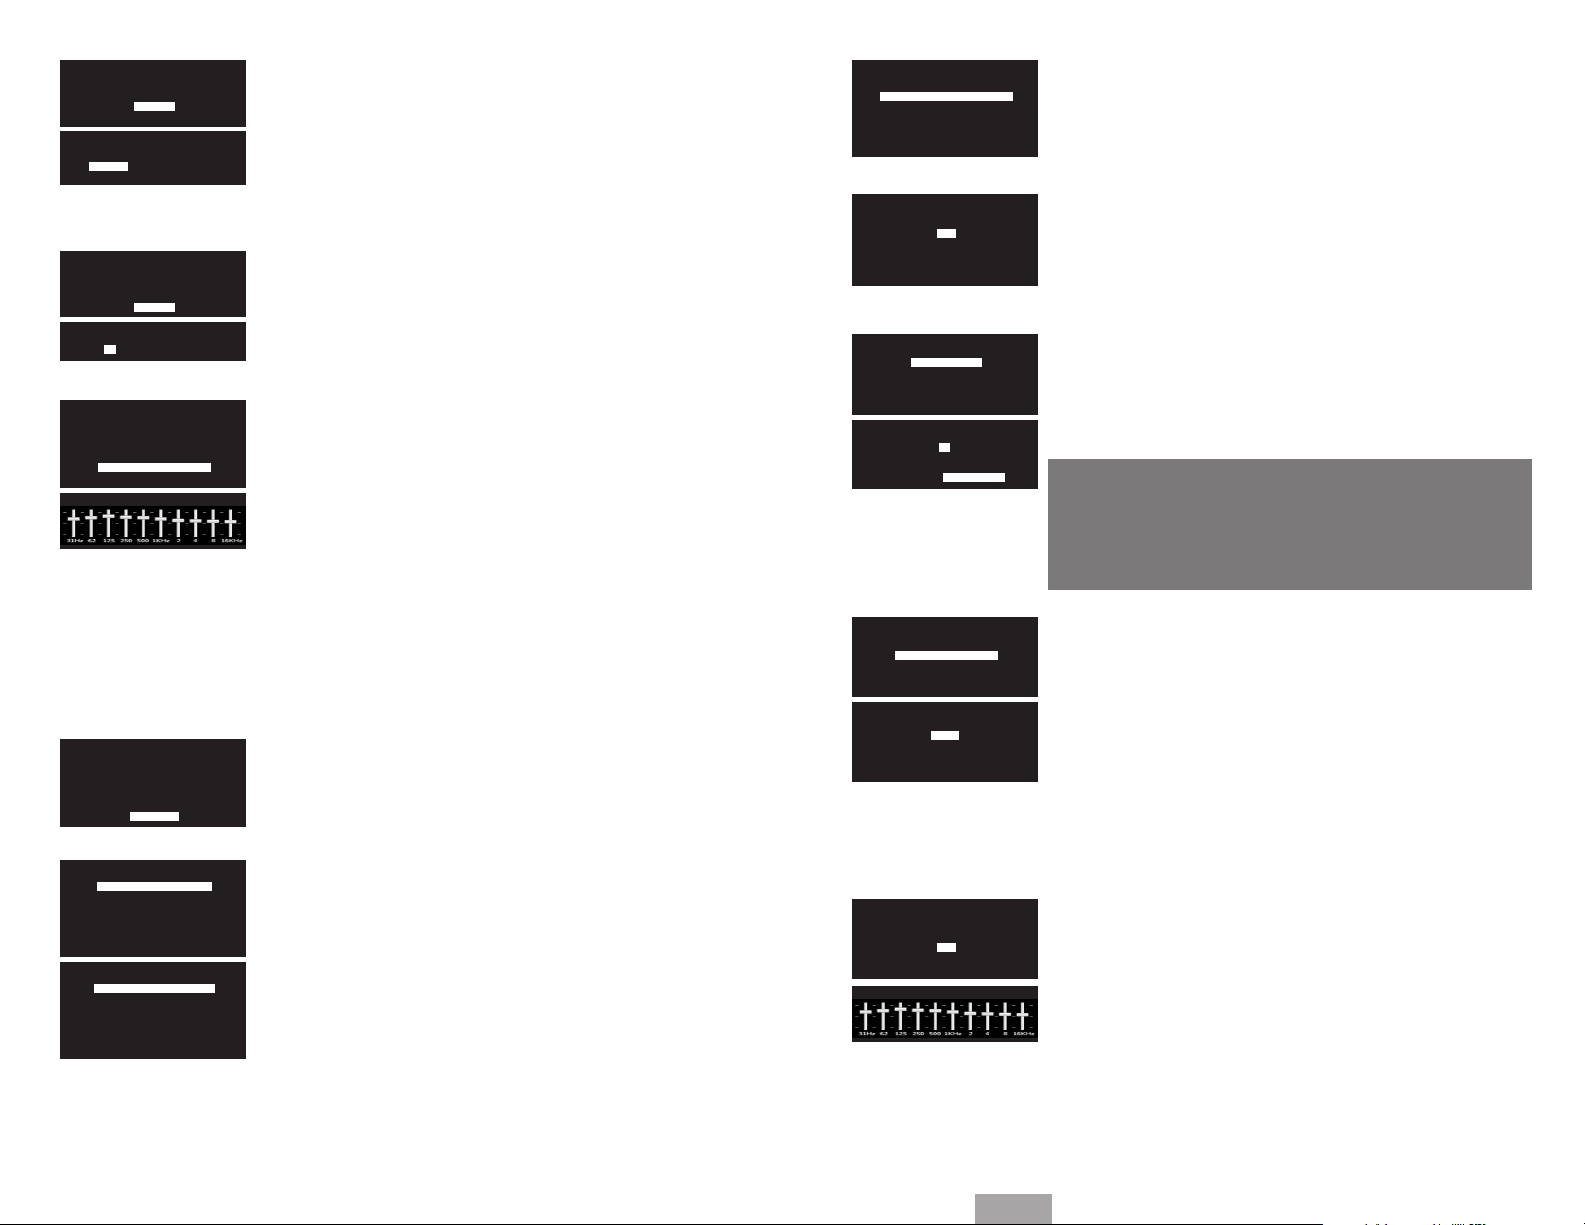
D. EXTERNAL SUBWOOFER
Set SUBWOOFER Output Parameters
Replaces the controls normally found on your external subwoofer.
}Action: Set volume to max and crossover to the maximum
frequency and the phase to zero on your External Subwoofer.
Tip: Sonically integrating an external sub with any main system
typically requires some back and forth tweaking between the
crossover and level.
SUBWOOFER YES / NO
}}Action: Select YES and press ENTER for best sound when an
external subwoofer is used.
Subwoofer Output Level
Adjust the Subwoofer output level to match the Subwoofer output
of the internal woofers for a smooth transition.
}}Action: 1. Push ENTER
Result: 1. Subwoofer LEVEL range shows
2. Default output LEVEL will be displayed
}}}Action: Select desired SUBWOOFER level and press
ENTER
Result: Level will be saved.
Tip: The BASS +/– on the Remote Control adjusts both the Woofer and
Subwoofer level.
Subwoofer Crossover
The crossover has been preset to provide a smooth transition to the
woofer.
}}Action: Select desired crossover frequency setting and press
ENTER
Result: Selected crossover will be saved.
Tip: Set the Crossover point as low as possible without creating a hole in
the musical range.
Select Subwoofer PHASE
Adjusts subwoofers phasing to match location.
}}Action: Select desired degree of phase and press ENTER
Result: Subwoofer phase will be saved.
Tip: If your subwoofer has a phase adjustment, switch it to 0° so as
o
not to interfere with the SLIMstage phase setting.
Page 6
10
English
SETUP
LANGUAG E
DIS PLAY
ROOM
SUBWOOFER
EQ REMOTE
ADVANCED
EQ RESET
SETUP
LANGUAG E
DIS PLAY
ROOM
SUBWOOFER
EQ REMOTE
ADVANCED
ADVANCED
DEFAULT INPUT
INPUT PARAM ETERS
REAR
IR
LOCK
VERSION
RESET
DE FAULT
LAST SEL ECTED
A1
A2
A3
D1
D2
D3
ADVANCED
DEFAULT INPUT
INPUT PARA METERS
REAR
IR
LOCK
VERSION
RESET
INPUT
A1
A2
A3
D1
D2
D3
A2
SENSITIVITY
SURR DEFAULT
EQ
HIDE
RESET INP UT
A2
–5……… 0 ………5+
ATTEN: –20DB
ON O FF
E. EQ REMOTE for Remote Control
Set Equalizer for EQ Button on REMOTE Control
Design an EQ especially for a favorite activity, perhaps action movies,
news or classical music. Then with the press of the EQ button on the
Remote Control you can activate this special EQ.
}}Action: Navigate to EQ REMOTE and press ENTER.
Result: 10 frequency equalizer will be displayed
Tip: EQ adjustment is real-time so make sure you play
the favorite activity while making the adjustment.
}}}Action: Move each slider to desired level, press ENTER
Result: Sets the EQ button response and display will
revert to main SETUP menu.
}}Action: Press EXIT
Result: Exits SETUP menu
– OR –
}}Action: Navigate to ADVANCED setup and press ENTER.
Result: Displays ADVANCED setup setup options
F. ADVANCED SETUP
Set DEFAULT INPUT
SLIMstage always returns to DEFAULT INPUT from standby/off
}}Action: Navigate to DEFAULT INPUT and push ENTER
Result: Shows all available inputs and last selected.
Tip: LAST SELECTED is the normal factory setting.
}}}Action: Navigate to desired DEFAULT INPUT and push
ENTER
Result: Shows new Default Input and reverts to
ADVANCED setup menu
Set PARAMETERS for Each Input
Individually fine-tune the characteristics of each of your inputs.
}}Action: Navigate to INPUT PARAMETERS, press ENTER
Result: Display shows available inputs for INPUT PARAMETERS
selection
Select INPUT to be Updated
}}Action: Navigate to desired input and push ENTER
Result: Displays input setup options
Note: Modifying the active input and playing music or movies allows
for real-time adjustment of the Sensitivity and Input EQ.
Input SENSITIVITY Adjustment
The input sensitivity level of Analog Input A1, A2, A3 can be adjusted.
In addition, Analog A2 has a –20dB attenuator that can be switched
for use with speaker level output.
}}Action: Select SENSITIVITY
Result: SENSITIVITY options display
Create Speaker Level Input
A2 Input only, can accept a speaker level signal if connecting
speaker level ON is selected for A2 SENSITIVITY.
Note: You will need to adapt connection from speaker wires to
a stereo mini-jack. Contact Customer Support for questions
A2
SENSITIVITY
SURR DEFAU LT
EQ
HIDE
RESET INP UT
A2
LIVE
MOVIE
LAST SELE CTED
STEREO
MUSIC
A2
SENSITIVITY
SURR DEFAULT
EQ
HIDE
RESET INP UT
A2 RESET
A2
SENSITIVITY
SURR DEFAULT
EQ
HI DE
RESET INP UT
A2
HIDE SHOW
A2
SENSITIVITY
SURR DEFAULT
EQ
HIDE
RESET IN PUT
A2
YES N O
Select SURROUND MODE (Stereo, Music, Live, or
Movie) as the default surround playback processing
}}Action: Navigate to SURR DEFAULT and press ENTER
Result: Surround options displayed
}}}Action: Select desired default surround mode and press
ENTER
Result: SLIMstage will always select your input default mode
at turn-on.
Tips:
1. Of the surround modes, Music is the most subtle, and Movie,
the most enveloping.
2. Regardless of the default, you can select any mode via the remote.
Set INPUT EQ
While not recommended for most applications, individual default
input EQ can be set for each source. If you select to use Input EQ,
the Room EQ function will be disabled and EQ will need to be set
for each input individually.
}}Action: Navigate to input EQ and press ENTER
Result: 10 frequency equalizer will be displayed
}}}Action: Move each slider to desired level, press ENTER
Result: Sets the EQ for the selected Input, this EQ will be
active when ever the modified Input is selected.
Note: To disable the Input EQ’s and restore the Room EQ, select Reset
Input or RESET ALL TO FACTORY is required
HIDE INPUT
Hiding an Input means that if you sequence through the sources on the
Source front panel source button, the “hidden” input will be skipped.
Similarly, there will be no response if that source is selected on the
remote.
}}Action: Navigate to HIDE input and press ENTER
Result: HIDE input options will be display
}}}Action: Select HIDE or SHOW and press ENTER
Result: If HIDE is selected, the Input will be disabled and can
not be selected by the Remote Control.
CAUTION: Careful with this one… if you hide an input, its ability
to be seen virtually disappears unless you “un-hide” it in the Setup
Input Preferences or reset all setup functions to Factory Default
RESET INPUT to Factory Default Settings
Resetting to Factory Default will un-do any set-up adjustments you’ve
made for that input.
}}Action: Select RESET INPUT (to factory default) and press ENTER
Result: RESET INPUT options will display
}}}Select YES or NO
Result: If YES, factory default settings for this input will be
reinstated.
Page 7
12
13
English
ADVANCED
DEFAULT INPUT
INPUT PARAM ETERS
RE AR
IR
LOCK
VERSION
RESET
REAR
T YPE
LEVEL
TYPE
SL IMS TAGE
MAINSTAGE HD
L & R SPEAKER
REAR
TY PE
LE VE L
LEVEL
–10 ……... 0 ……… 10+
External Rear Channel Output
SLIMstage makes it possible to add external Rear Speakers to enhance
the surround effect. The Rear Output is disabled while headphones
are connected.
Tip: To add a MAINstageHD as external rear channel, connect a 3.5mm
stereo audio cable from the Rear Output to the Analog 1 input of the
rear MAINstageHD.
Select REAR SPEAKER TYPE
}}Action: Navigate to REAR channel menu and select
desired item and press ENTER.
Result: Rear Channel Output will be optimized to support the
connected Rear Speaker Type.
External Surround LEVEL
Adjusts output level to external rear surround speakers.
}}Action: Navigate to LEVEL and press ENTER. Utilizing
familiar surround source adjust rear level and press ENTER
Result: Selected rear level becomes default
ADVANCED
DEFAULT INPUT
INPUT PARAM ETERS
REAR
IR
LOCK
VERSION
RESET
VERSION
MODEL: 4 0
ELECTRO: 1.00
SW: 1.0.0/1.0.0
SERIAL #: S103500 0025
ADVANCED
DEFAULT INPUT
INPUT PARAM ETERS
REAR
IR
LOCK
VERSION
RE SE T
MASTER RE SET TO FACTORY DEFAULT?
RESET
YES N O
VERSION
VERSION displays important information about your SLIMstage
including model, serial number, electronic version and software
version.
}}Action: Navigate to VERSION and press ENTER.
RESET all settings to Factory Default
This resets all setup options back to their original factory default
position.
}}Action: Navigate to RESET all to factory and press ENTER.
Result: RESET options will be displayed
}}}Action: Select YES or NO and press ENTER
Result: If YES, all Settings will be reset to the factory default
condition.
Press EXIT to revert to previous menu
Press EXIT again to exit SETUP MENU.
ADVANCED
DEFAULT INPUT
INPUT PARAM ETERS
REAR
IR
LOCK
VERSION
RESET
IR
FRONT REA R
IR SENSO R
RECOVERY PRES S MUTE AND
SOURCE BUT TON AT THE SAME TIME
FOR 2 SECONDS
CONFIRM CAN CEL
ADVANCED
DEFAULT INPUT
INPUT PARAM ETERS
REAR
IR
LO CK
VERSION
RESET
LOCK
TO UNLOCK PRE SS SETUP,
SPEAKER , EXIT BUTTON
CANCEL LO CK
Select IR SENSOR
SLIMstage can be controlled via the normal FRONT IR Sensor, an
optional REAR IR sensor, and the RS-232 port.
Normal is FRONT. Select REAR if controlling via the RS-232 port
(including if connecting an RF remote control adapter) or, if using
another SLIMstage as an external rear channel (to prevent your
IR remote from inadvertently adjusting both SLIMstages).
}}Action: Navigate to IR SENSOR and press ENTER.
Result: IR SENSOR options will be displayed
}}}Action: Select FRONT or REAR and press ENTER
Result: If REAR is selected, confirming menu will display.
IMPORTANT: To re-activate the FRONT IR SENSOR, press MUTE and
SOURCE buttons at the same time for 2 seconds.
}}Action: Select CONFIRM or CANCEL.
Result: The IR sensor will be switched to REAR. Front sensor
will stop working immediately.
Tip: For connectivity information and programming instruction
check the Soundmatters website.
SETUP LOCK
Prevents accidental setup changes
}}Action: 1. Navigate to LOCK setup
}}Action: 2. Select LOCK setup and press ENTER.
Result: LOCK setup menu is displayed
}}Action: Select CANCEL or LOCK and press ENTER
Result: Setting will highlight
Result: The Setup will be locked from accidental changes
To unlock SETUP, sequentially press SETUP, , EXIT buttons
on remote
Page 8

14
English
6. Frequently Asked Questions
For the latest FAQs visit our website at www.soundmattters.com
Q1. Any tips on how to locate/position SLIMstage in the room for the best performance?
While SLIMstage performs well in virtually any application, like all loudspeakers, best
performance will be achieved if one takes a bit of care in its placement.
Best Hi-Fidelity: The system should always be centered in front of the listener(s) using the
tilt-able feet or wall bracket to point the SLIMstage’s front grille directly at the listener(s). If in a
cabinet, move as far forward as possible to allow widest dispersion.
Best Surround: All surround systems have a “sweet spot” the place where the surround effect is
maximized , this is an areas size varies depending on your distance from the SLIMstage…if your
main listening is closer than 9 feet, be sure and re-set the DISTANCE position in the setup menu.
Best Bass: Placing any speaker against a heavy hard surface will reinforce (increase) its bass.
The more surfaces SLIMstage sits against, the more bass. Least bass would be floating in the
middle of the room. Most bass would be in a corner at the floor or ceiling. Also, since the builtin woofers fire down, there must be adequate space left below the unit (about 3/4 inch) for the
bass to vent into the room.
Q2. The bass is surprisingly good for such a small all-in-one box… but I want more!
Can I add an external subwoofer?
Yes, SLIMstage has a subwoofer output jack for connecting to the acoustically-matched
soundmatters SUBstage™, or virtually any good-quality hi-fi powered subwoofer. SLIMstage’s
sub out is a space-saving 1/8” mini-jack, so if you’re not using our SUBstage; you’ll need an
1/8”stereo mini to RCA adapter for most subwoofers (included with the SUBstage).
Q3. I love the SLIMstage, but want more volume?
Here are some options –add an external subwoofer such as a SUBstage (or two) and/or add an
additional SLIMstage in the back for the rear channels and/or upgrade to a larger SLIMstage. If
the problem occurs only when using a specific source you may be able to increase sensitivity
of the connected input (see ADVANCED> INPUT PARAMETERS> SENSITIVITY).
Q4. How do I control the SLIMstage and my TV from a single remote control?
The SLIMstage’s remote control functions are easily captured by most “third party” learning
remote controls. The SLIMstage’s volume can also be controlled by many TV and cable/satellite
remotes by inputting a Denon® audio code. Refer to the instructions provided with the TV
remote.
Q5. In order to properly integrate the SLIMstage into my advanced learning remote or home
automation system I need to have “discrete codes”, how do I find them?
The SLIMstage’s discrete IR codes are available in the Download section at www.soundmatters.
com.
Q6. Can I use SLIMstage when I travel overseas?
SLIMstages utilizes a very high power version of a notebook computer power supply, designed
to operate reliably on most any worldwide household voltage: 95–240Vac, 50/60Hz. Just
replace the cord connecting the external power module to the wall with one that meets local
outlet requirements.
Q7. Do you recommend plugging SLIMstage into a surge protector?
SLIMstage, like all electronic appliances, may benefit from surge protectors.
Q8. Does SLIMstage go into energy-saving mode by itself or do I need to switch it?
Slimstage should be turned off by pressing the OFF/standby button on the remote control.
System enters Energy-Saving mode after 2 minutes of no signal on active input automatically.
Q9. When switching between normal and Dialog+ modes, sometimes I hear a big difference
and sometimes none at all. Why?
There are a number of possible reasons. When you have the bass level set to maximum, it may
overshadow the dialog boost. Obviously, some program material has no vocals in it, so when
that’s the case, you will hear little or no difference.
7. Troubleshooting
1. Problem: No sound from anything
Solutions:
a. Check that source unit is on and playing (i.e., DVD or TV)
b. If the headphones are connected, confirm speakers aren’t off.
c. Is AC cord connected to live AC and securely inserted into the SLIMstage power supply
module… and is the module also connect to the back of SLIMstage?
d. Is volume up on SLIMstage?
e. Push source button on SLIMstage or remote to select an active input
2. Problem: I select an input on the remote but it doesn’t show-up in the Display
Solution:
a. The input is “hidden”… See Input Parameters> Hide Input? In the Setup Menu.
3. Problem: Not enough bass
Solutions:
a. Raise bass level via remote
b. Raise the bass level in the setup menu
c. See FAQ, Q1 on how placement affects bass
d. Add a SUBstage subwoofer!
4. Problem: I don’t hear any or enough surround
Solutions:
a. Make sure you are in Music, Live or Movie (not Stereo) mode. Movie mode has the most
surround.
b. Confirm you are listening within 45 degrees from the center of the SLIMstage, called the
“sweet spot”
c. Confirm that all EQ & surround modes built into the DVD player or other source
component are turned-off!
d. See faq/tips #1 on placement
e. Add powered speakers to the rear of the room.
5. Problem: Erratic or no remote operation
Solutions:
a. Confirm that the batteries are fresh
b. To re-activate the FRONT IR SENSOR, press MUTE and SOURCE buttons at the same time
for 2 seconds.
6. Problem: Fuzzy sound
Solution:
a. Confirm that all DSP/surround/sound enhancement modes are off on all sources
connected to the SLIMstage
b. Confirm sensitivity setting isn’t to high, overloading the input, in the SENSITIVITY
ADJUSTMENT section.
7. Problem: System seems to have locked up
Solution:
a. SLIMstages circuitry includes a powerful microprocessor. Should the unit appear to
operate erratically, simply unplug it from the wall outlet for 15 seconds and plug it back
in to reset the internal computer to normal operation.
Page 9

16
17
English
8. Problem: TMP or PT indicates in display and units cuts in/out.
Solution:
a. Overheat Protection Circuitry is working...turn down the volume.
9. Problem: Not enough volume
Solutions:
a. If available, increase the output on the source you are using.
b. Increase the sensitivity of the input, see Sensitivity Adjustment in Advanced Setup section.
10. Problem: Connected from Cable box but there is no sound
Solutions:
a. Unfortunately some cable boxes have digital out or even analog audio (red/white RCA)
audio connections that are dummies (not internally connected in the box). Check with your
cable provider to confirm the output capabilities of your box.
b. If using the digital output of your cable box, you may find that it only works when you are
on an HDTV channel, to access the audio for other channels you will also need to connect
to the analog audio output and switch to the correct input on the SLIMstage.
11. Problem: Optical cable won’t fit
Solutions:
a. Makes sure clear protective covers are removed from cable ends
b. Some aftermarket cables have overly large connector “jackets” and may not be able to be
accommodated.
12. Problem: I can’t access the SETUP menu
Solution:
a. SETUP access is locked. Sequentially press SETUP,
, EXIT on the remote.
8. Specifications
SLIMstage 5.1 Surround Sound Console
• Surround Algorithms: Euphony™HD decodes Analog, PCM, Dolby Digital 2.0/5.1,
DTS Digital Surround, DTS 96/24
• Decoding 5.1 channel: Dolby Digital, DTS Digital Surround, DTS 96/24
• Decoding 2.0 channel: Dolby Digital, PCM
• 2-channel to 5-channel conversion: Euphony™HD
• Power: Class-D Amplifiers (RMS at < 0.8%THD)
SLIMstage 30 – Satellites 80W, Woofers 60W
SLIMstage 40 – Satellites 80W, Woofers 90W
SLIMstage 50 – Satellites 80W, Woofers 130W
• Maximum SPL@1m:
SLIMstage 30 – 103dB
SLIMstage 40 – 106dB
SLIMstage 50 – 109dB
• Main Speakers:
SLIMstage 30 – 4 each 50x50mm with patented LMD Neo-sandwich magnets
SLIMstage 40 – 4 each 50x50mm with patented LMD Neo-sandwich magnets
SLIMstage 50 – 4 each 50x50mm with patented LMD Neo-sandwich magnets
• Woofer Arrays:
SLIMstage 30 – 2 woofer arrays*
SLIMstage 40 – 3 woofer arrays*
SLIMstage 50 – 4 woofer arrays*
* Each array includes one Active High-Energy 3˝ patented LMD Neo-sandwich magnet woofer
plus two 3” bass radiators
• Power Supply: Digital, 95–265Vac, 50/60Hz, 36V
• Inputs (6)
Analog 1 –stereo 1/8” (3.5mm)
Analog 2 – stereo 1/8” (3.5mm) Available 20dB attenuation for speaker level in
Analog 3 – stereo 1/8” (3.5mm) Front Panel, with priority selection
Digital 1 – SP/DIF coax
Digital 2 – Optical / TosLink
Digital 3 – Optical / TosLink
• Outputs (3)
Analog: Subwoofer out – stereo 1/8” (3.5mm)
Analog: Headphone (Euphony Virtual Surround) –stereo 1/8” (3.5mm)
Rear Channel Outputs
• Accessories
IR remote control
Power supply with cables
EZ-tilt™ leveling feet with height insert
Wall-Mount Bracket with mounting hardware
1 each – 3m optical cable
1 each – 3m 1/8˝ mini phone jack cable
1 each – 3m 1/8˝ mini phone jack to male stereo RCA cable
1 each – 3m digital coax RCA cable
• Controls
Master, Headphone Volume (IR and front panel)
Subwoofer level (IR only)
Source select, mute (IR and front panel)
Surround/stereo (IR only)
• Modes: On, Mute, Off/Standby
• Off/Standby Power: 2W or less
• Weight:
SLIMstage 30 – 16.5 lbs (7.5 kg)
SLIMstage 40 – 19 lbs (8.5 kg)
SLIMstage 50 – 21 lbs (9.5 kg)
• Dimensions:
SLIMstage 30 (WxHxD) – 31.1” x 3.5” x 3.7” (790 x 88 x 93mm)
SLIMstage 40 (WxHxD) – 39” x 3.5” x 3.7” (990 x 88 x 93mm)
SLIMstage 50 (WxHxD) – 47.5” x 3.5” x 3.7” (1206 x 88 x 93mm)
Height with EZ-tilt leveling feet, any model (H) – 4.4” (112mm)
Height with feet+height insert, any model (H) – 5.2” (132mm)
Depth with wall-mount bracket, any model (D) – 5” (127mm)
soundmatters® believes in a policy of continuous product improvement,
therefore specifications are subject to change without prior notice.
9. Warranty/Service
There are two things you must do to ensure trouble free service in the event you need warranty
repairs.
1. Keep your original sales receipt in a safe place. A copy of the receipt will be required to obtain
warranty service.
2. Be sure your retail dealer has written the date, the model number, and the serial number (if
applicable) of the Product on the receipt. To give yourself an extra measure of protection,
make a separate record of the purchase information and keep it in a safe place. In the event
you misplace the sales receipt, your dealer may be able to provide a copy.
Take a moment now to read the terms of your warranty.
When shipping a product in for service:
• Email or call soundmatters for the proper ship-to address for servicing and an RMA (return
merchandise copy of your original sales receipt that has the date, the Product model number
and serial number (if applicable) written on it. You must place your RMA number on the
shipping label of any unit returned to soundmatters for service.
(Warranty/Service continues next page)
Page 10

18
19
English
• Always ship Products in the complete original packing material.
• Avoid shipping Products via the Postal service. If you must use the Postal service, be sure to
register and insure the package.
soundmatters Limited Warranty
• soundmatters international, inc. (soundmatters) warrants to the original consumer purchaser
of the soundmatters Products described in this manual, that the Product will be free from
defects in materials and workmanship for a period of two (2) years after the date of purchase.
• soundmatters’ sole obligation under this warranty shall be to provide, without charge, parts
and labor necessary to remedy the defects, if any, that appear during the warranty period. This
warranty is the sole and exclusive express warranty given with respect to the Product. All other
warranties are hereby excluded.
• Neither soundmatters nor the authorized dealer who sells the Product is responsible for
indirect, incidental, or consequential damages. Some states do not allow the exclusion or
limitation of incidental or consequential damages, so the above limitation or exclusion may not
apply to you. This warranty gives you specific legal rights and you may also have other rights,
which vary from state to state.
This warranty is limited to:
• Products purchased from authorized soundmatters retail dealers. soundmatters will supply a
list of authorized dealers on request.
In order to obtain service you must:
• Return the Product, freight prepaid, to the soundmatters dealer from which it was purchased,
an authorized soundmatters independent service agency, an authorized soundmatters
international distributor, or to soundmatters. If necessary you may call soundmatters Customer
Service Department for the names and addresses of authorized independent service agencies
in your area.
• Provide proof of purchase in the form of a copy of your original sales receipt, the date, model
number, and serial number (if applicable) of the Product must be written on the sales receipt.
This warranty does not cover:
• Damage that is the result of misuse, abuse, accident (including but not limited to damage
by water), faulty hookup, defective or maladjusted associated equipment, or the use of the
Product with equipment for which it was not intended.
• Cosmetic defects that appear more than thirty (30) days after the date of purchase. Cosmetic
damage caused by improper handling is also excluded.
• Products that are used for commercial purposes.
• The cost of removing or reinstalling the Product.
• Damage that occurs while the Product is being shipped to whoever will service it. See the
information above regarding shipping procedures.
This warranty is void if:
• The Product identification or serial number label is removed or defaced in any way.
• The Product is serviced or repaired by anyone other than soundmatters or an authorized
soundmatters dealer or service agency.
For warranty information contact:
soundmatters international, inc
reno, nv 89501
phone: 775 981 1460
in the usa 800-698 SOMA (7662)
email: service@soundmatters.com
web: www.soundmatters.com
Dolby and the double-D symbol are trademarks
of Dolby Laboratories.
Manufactured under license under U.S. Patent #’s:
5,451,942; 5,956,674; 5,974,380; 5,978,762; 6,487,535
& other U.S. and worldwide patents issued & pending.
DTS and DTS Digital Surround are registered trademarks
and the DTS logos and Symbol are trademarks of DTS, Inc.
© 1996-2007 DTS, Inc. All Rights Reserved.
EUPHONY HD is a trademark of DiMAGIC Co. Ltd
Soundmatters is a registered trademark of Soundmatters
International Inc.
Page 11

20
21
Français
Précautions de sécurité importantes
Attention – Risque de choc électrique - ne pas ouvrir
1. Lisez les instructions – Toutes les instructions de sécurité et d’utilisation doivent être lues avant l’utilisation du
produit.
2. Gardez ces instructions - les instructions de sécurité et d’utilisation doivent être gardées en lieu sûr pour les utiliser
comme référence au futur.
3. Respectez tous les avertissements – Tous les avertissements trouvés sur le produit et dans le guide d’utilisation
doivent être suivis.
4. Suivez les instructions - Toutes les instructions de fonc tion et d’utilisation fournies doivent être suivies.
5. Pour réduire le risque d’incendie ou de décharge électrique évitez l’exposition de cet appareil à la pluie ou
l’humidité – Ce produit ne peut être utilisé à proximité d’eau – par exemple, à coté d’un bain, lavabo, potager, lavabo à
linge, dans un sous-sol humide, ou près d’une piscine. L’appareil ne peut être exposé à des goûtes d’eau ou éclaboussures
et aucun objet contenant des liquides tels que les vases ne peuvent être placés au dessus de l’appareil.
6. Nettoyez avec chiffon sec seulement.
7. Ne pas bloquez les ouvertures de ventilation. Installez le système suivant les instructions du fabricant. Les fentes
et ouvertures dans le boîtier ont pour tâche de garantir la ventilation et le fonctionnement convenable du produit et pour
le protéger contre l’accumulation de chaleur. Ces ouvertures ne peuvent pas être obstruées ou recouvertes. L’emplacement
du produit sur un lit, un divan, ou un tapis ne doit jamais bloquer les ouvertures. Le produit ne peut être encastré dans un
meuble tel qu’une étagère ou une armoire sans présence d’une ventilation adéquate ou que les instructions du fabricant
sont respectées.
8. Ne pas installer près d’une source de chaleur telles que radiateurs, cuisinières, sortie d’air chaud ou tout autre
appareil qui produit de la chaleur, même les amplificateurs.
9. N’invalidez pas les caractéristiques de sécurité de la fiche polarisée ou fiche avec prise à terre. Une fiche
polarisée possède deux lames dont une est plue large que l’autre. Une fiche avec mise à terre possède deux lames plus une
troisième lame pour la mise à terre. La lame large ou la lame de mise à terre sont conçues pour des raisons de sécurité. Si
la fiche qui vous est fournie ne peut pas être branchée à votre prise secteur, consultez votre électricien pour faire remplacer
la prise obsolète.
10. Cordons et adaptateurs d’alimentation. Utilisez uniquement les accessoires fournis par le fabricant du produit.
N’enroulez jamais le cordon d’alimentation autour de l’adaptateur d’alimentation ou tout autre objet. Ça peut causer un
dénudement ou une cassure du cordon et peut présenter un danger.
Les cordons d’alimentation doivent être acheminés de façon à ce q’ils ne soient pas pincés par des objets ou qu’ils causent
des personnes à marcher dessus ou à trébucher ou à être pincés par des objets. Protégez les cordons et adaptateurs
d’alimentation des liquides. Par exemple, ne laissez jamais le cordon d’alimentation à proximité de lavabos, bassin,
toilettes, ou sur les planchers qui sont nettoyés avec des produits liquides. Les liquides peuvent causer un court- circuit
surtout si le cordon d’alimentation est écorché ou endommagé par maltraitance. Les liquides peuvent causer une corrosion
graduelle de la fiche d’alimentation ou des bornes de connexion de l’adaptateur d’alimentation menant éventuellement
à une surchauffe.
Vérifiez toujours que toutes les bornes de la fiche d’alimentation sont introduites dans la prise d’alimentation complètement
et avec sécurité. N’utilisez jamais de cordon d’alimentation sur lequel les contacts électriques à l’une des extrémités
montrent des signes de corrosion ou de surchauffe ou que le cordon d’alimentation apparaît endommagé.
11. Utilisez seulement des accessoires et attaches spécifiés par le fabricant.
12. Utilisez le produit seulement avec le chariot, support, tripode, adaptateur, ou table
spécifiés par le fabric ant, ou bien vendu avec l’appareil. Quant vous utilisez un chariot, soyez
prudent pendant le déplacement de l’ensemble appareil/chariot pour éviter des blessures corporelles
résultant d’un renversement. L’emplacement de l’appareil sur un support instable comme un chariot,
table ou adaptateur instable, peut permettre au produit de tomber, causant des blessures sérieuses à
un enfant ou un adulte et un dommage sérieux à l’appareil.
13. Débranchez l’appareil quand il y’a un orage avec éclair et quand il n’est pas utilisé pendant une période
de temps prolongée. Il est aussi suggéré d’utiliser un filtre de sur voltage, qui peut protéger votre appareil.
14. Confiez toutes les réparations à des personnes qualifiées - Les réparations sont obligatoires quelque soit
le type d’endommagement de l’appareil : si le cordon ou la fiche d’alimentation ont été endommagés, un liquide a été
renversé sur l’appareil, un objet est tombé dans l’appareil, l’appareil a été exposé à la pluie ou l’humidité, l’appareil ne
fonctionne pas normalement, ou l’appareil est tombé.
15. Ce produit est conçu pour branchement à un type de prise d’alimentation comme il est indiqué sur
l’étiquette de vente. Si vous n’êtes pas sûr(e) quel type de prise vous avez dans votre maison, consultez votre revendeur
ou votre compagnie de distribution électrique. Se référer aux instructions d’utilisation pour utiliser les produits destinés à
être utilisés avec batteries ou autres source d’alimentation.
16. Surcharge - Ne pas surcharger les prises d’alimentation, les rallonges, ou les prises intégrales car ça peut poser des
risques d’incendie ou de chocs électriques.
17. Entrée d’objet ou de liquide dans l’appareil - Il ne faut jamais pousser des objets de n’importe quelle sorte
dans les ouvertures de ce produit car ils peuvent toucher des points ayant une haute tension ou court-circuiter des pièces
pouvant ainsi causer un incendie ou un choc électrique. Ne renverser jamais un liquide sur l’appareil. Réglez seulement
les contrôles qui sont expliqués dans les instructions d’utilisation car le réglage inappropriés des autres contrôles peut
endommager l’appareil et nécessitera souvent une réparation extensive par un technicien qualifié pour le retourner à sa
fonction normale.
18. Pièces de rechange – Pour les pièces qui doivent être remplacées s’assurer que le technicien utilise seulement des
pièces de rechange qui sont spécifiées par le fabricant ou ont les mêmes caractéristiques que les pièces d’origine. Toute
substitution non autorisée peut causer un incendie, un choc électrique ou autres dangers.
19. Après toute réparation ou service de ce produit, demandez au technicien d’accomplir des tests de sécurité pour
démontrer qu’il fonctionne correctement.
20. N’essayez pas de réparer ce produit vous-même, l’ouverture des couvercles ou leur enlèvement peut vous
exposer à une tension dangereuse ou à autres dangers. Confiez tout service technique à des personnes qualifiées.
21. Support de Fixation au Mur – Consultez les instructions du fabricant du support de fixation au mur. Confirmez
que le support est attaché au SLIMstage et dans les cloisons du mur avec sécurité de façon à ce qu’il ne se desserre pas
pendant l’utilisation.
Avertissement : Pour éviter le risque d’incendie et de choc électrique, ne pas exposer cet appareil à la
pluie ou l’humidité.
Page 12
22
23
Français
Connexions et Emplacement
NOTE IMPORTANTE : Avant d’utiliser ce manuel d’utilisation, veuillez suivre les instructions
trouvées dans le guide de mise route pour toutes les connexions et pour le positionnement
convenable de votre SLIMstage.
Plan de la Télécommande
Plan de la l’Afficheur Avant
A.
Casque EuphonyHD
Surround Virtuel
(par connecteur
1/8” 3.5mm)
Sourdine en-marche/
hors-marche
B.
Indicateur “En
Marche”
I.
Séléction
de source
(séquence
à travers
les entrées)
H.
Contenu page
• Sécurité . . . . . . . . . . . . . . . . . . . . . . 20
• Connexions et Emplacement . . . . . . . . 22
• Afficheur Avant et Télécommande . . . . 22-23
1. Utilisation. . . . . . . . . . . . . . . . . . . . . 24
2. Réglages . . . . . . . . . . . . . . . . . . . . . 24
3. Casques . . . . . . . . . . . . . . . . . . . . . . 25
4. Avancé. . . . . . . . . . . . . . . . . . . . . . . 25
5. Menus de Configuration . . . . . . . . . . . 26
6. FAQ. . . . . . . . . . . . . . . . . . . . . . . . . 32
7. Dépannage. . . . . . . . . . . . . . . . . . . . 33
8. Spécifications . . . . . . . . . . . . . . . . . . 35
9. Garantie/Service . . . . . . . . . . . . . . . . 36
C.
Entrée/Source
J K L M N O
J. Dolby D2.0, Dolby D5.1,
DTS, PCM, Analogues
detectés
K.
Compression de Musique
du nuit activée
L. Dialogue+ activé
M. mode STÉRÉO, MUSIQUE,
ON-DIRECT, CINEMA
N. EQ préréglé
O. Hauts Parleurs désactivés
P. Avertissement de la
Protection de surcharge
thermale
D.
Status du
Volume
E.
Volume
Master Bas
(contrôle le
volume du
casque quant
les hauts
parleurs sont
désactivés)
P
F.
Volume
Master Haut
(contrôle le
volume du
casque quant
les hauts
parleurs sont
désactivés)
Capteur à
distance IR
Q.
Indicateur
de Mode
Surround
3
DEL = Cinéma
2 DEL = En Direct/TV
1 DEL = Musique
0 DEL = Stéréo/
Chemin
court
G.
R.
Entrée “iPod”/
Analogue
(changement
automatique
à l’aide d’un
connecteur
1/8” 3.5mm –
désactive toutes
les entrées
arrières)
1. Vocals EQ (marche et arrêt)
2. Compression de Musique du
3. Hauts parleurs (marche et arrêt)
7. Séléction entrée: Analogue 1.
8. Séléction entrée: Analogue 2.
10. Séléction entrée: numérique 1.
14. Niveau de Bass Haut
15. Niveau de Bass Bas
20. Menu Prochain/haut
21. Menu Précédent/Bas
25. entrée mode réglage
nuit activée
(avec casque connécté)
(SUB externe inclu)
(SUB externe inclu)
4. Arrêt /Mode en instance
5. Préréglage EQ marche et arrêt
6. Volume du casque Bas et Haut
9. Séléction entrée: Analogue 3 (avant)
11. Séléction entrée: numérique 2.
12. Séléction entrée: numérique 3.
13. Surround Haut et Bas
(4 positions)
16. Sourdine
17. Volume Master Haut
18. Volume Master Bas
19. Niveau du Surround Bas et Haut
(ou niveau du parleur arrière et règle
pour parleurs arrières externes)
22. Réglage/entrée
23. Menu Prochain/droite
24. Menu Précédent /gauche
26. Sortie vers Menu Précédent
Page 13

24
25
Français
1. Utilisation
Mise en Marche / Arrêt
Lancez le SLIMstage en appuyant sur n’importe quel bouton situé sur la face de la télécommande.
Pour l’Arrêter, appuyez sur le bouton ARRET/VEILLE:
OFF/VEILLE Stoppe l’alimentation de toutes les composantes sauf le capteur IR. La consommation
en électricité est de moins de 2.0Watt.
Entrée/Sélection Source
Pour choisir une source préférée, appuyez sur le bouton correspondant sur la télécommande (A1, A2,
A3, D1, D2, D3) ou faîtes une séquence d’entrées en utilisant le les boutons sur le panneau de contrôle.
La source choisie s’affichera sur le panneau d’affichage. Une répétition de pressions sur les boutons du
panneau avant donnera un défilé séquentiel des sources d’entrées.
Détection et Conversion automatique de Signal
La Technologie Euphony HD de processing du surround SLIMstage peut virtuellement manipuler tout
type de signal même le signal analogue, Dolby Digital 2.0, 5.1, DTS Surround numérique, DTS 96/24
ou PCM
L’afficheur montrera si le signal reçu par le est Dolby Digital 2.0, 5.1, DTS, PCM, ou analogue.
Dans les modes Musique, Live, et Cinéma la Technologie EuphonyHD de SLIMstage convertit toutes
les sources à 2 canaux (stéréo, Dolby 2.0, ou stéréo PCM) vers des sources surround automatiquement.
Le Mode Surround
L’Euphony HD de SLIMstage fournit un ,ode stéréo et 3 modes Surround différents qui peuvent être
sélectionnés a travers les boutons - et + du mode SURR de la télécommande. Le mode sélectionné
sera affiché momentanément sur l’afficheur LCD et continuera son affichage sur la barre LED verticale
bleue.
No LED. . . . . . SURR OFF. . . . . . Stéréo / court-chemin
1 LED. . . . . Mode MUSIQUE. . . . . . effet surround moyen, idéal pour musique
2 LED. . . . . . . LIVE. . . . . . . . Surround idéal pour la plupart des programmes de télévision
3 LED. . . . . . . . . Cinéma. . . . . . . Surround Maximum – le meilleur pour les films d’action
Sauf s’il était changé dans le menu de réglage initial 9(voir Réglages Avancés ) PARAMÈTRES
D’ENTRÉE>SURR MODE), SLIMstage se fait en marche et gardera votre dernier réglage SURR jusqu’à
ce qu’au point où vous sélectionnez un autre mode ou source.
Sourdine
Pour activer la sourdine appuyez sur le bouton Mute sur la télécommande. MUTE sera montré sur
l’afficheur. Appuyez sur l’un des autres boutons pour désactiver la sourdine.
Compression de Musique du nuit activée
Pour engager / désengager le circuit de musique nocturne qui reduit la portée dynamique (différence
entre le son le plus haut et le son le plus bas) utilisez le bouton de musique nocturne situé sur votre
télécommande. Cette option vous évitera d’ennuyer vos voisins et de déranger vos plus chers qui
dorment dans la maison. Le mot NUIT s’affichera sur l’afficheur.
Circuit de clarté de voix Dialogue+ .
Utilisez le bouton Dialogue+ sur la télécommande pour engager / désengager le circuit qui fournit un
sortie et une clarté à des fréquences vocales typiques. Ce sera affiché sur l’afficheur quand il est actif.
2. Réglages
Volume
Pour régler le niveau du volume utilisez les boutons Volume + et – sur la télécommande ou les boutons
(+ et –) situés sur le panneau avant.
Note : Dans le cas ou un casque est connecté mais le le haut parleur en Arrêt, le volume du casque est
contrôle a partir du panneau avant.
Niveau du Bass (haut parleur de Notes graves)
Utilisez la télécommande pour régler le Bass + ou – . Le niveau de Bass relatif sera affiché sur le panneau
avant. Le Réglage du Bass a partir de télécommande réglera aussi le niveau d’un caisson externe, tel que
Soundmatters SUBstage, s’il est connecté au système.
Niveau du Surround
Pour augmenter ou diminuer le niveau des hauts parleurs Surround, utilisez les boutons de Réglage
SURR de la télécommande. Le niveau du Surround sera affiché sur le panneau avant.
EQ
Utilisez le bouton EQ de la télécommande pour ajouter une courbe Egalisation pré-réglée (voir
RÉGLAGE>EQ TÉLÉCOMMANDE) fournissant ainsi une alternative au balance de la tonalite. La courbe
EQ sera affichée.
Sensitivité de l’Entrée (input)
C’est possible qu’il n’y est pas de correspondance entre la sortie d’une unité source et l’Entrée d’une
composante AV (comme SLIMstage). Ca peut causer soit un niveau bas / un parasite sonore excessif,
ou une surcharge/distorsion prématurée. Voir Réglages Avancés : PARAMÈTRES ENTRÉE > SENSITIVITÉ.
3. Casques
Utilisation des casques
SLIMstage offre un sentiment de Cinéma personnel a travers un casque conventionnel grâce a sa
technologie électronique spéciale pour casques. Branchez le casque a la borne 1/8 (3.5mm) gauche
du panneau avant. Les hauts parleurs seront désactivés. Les hauts parleurs et le casques peuvent être
utilises simultanément en appuyant sur le sur la télécommande (une écoute stéréo). Utilisez les
boutons H-phone + et – sur la télécommande pour régler le volume du casque séparément du volume
des hauts parleurs.
Addition D’un Caisson Externe
Pour avoir une performance et une intégration optimales de votre caisson referez–vous a la section C
du menu du guide d’installation de votre SLIMstage et au manuel d’instructions de vos caissons.
Addition d’enceintes externes arrière
Des hauts parleurs externes arrière peuvent être ajoutés comme composantes supplémentaires au
son Surround du SLIMstage. (voir RÉGLAGE AVANCÉ > SURROUND ARRIÈRE). Pour des renseignements
supplémentaires veuillez consulter votre revendeur local ou le département de support technique de
Soundmatters.
4. Avancé
Port de contrôle RS-232
SLIMstage comprend une entrée RJ-11 pour permettre un contrôle RS-232 via un microordinateur ou
autre système d’automation externe. Deux bornes sont disponibles pour connexion de capteurs IR.
Pour des renseignements supplémentaires veuillez rendre visite au site web www.soundmatters.com/
downloads, consulter votre revendeur ou le service de support de Soundmatters.
Protection contre un Arrêt cause par surchauffe
Le SLIMstage utilise des amplificateurs numériques avancés, qui permettent une écoute claire des
sommets musicaux élevés. Quand le système est utilisé à des niveaux qui causent une surchauffe il
affichera les lettres TMP. Si le système enregistre un niveau de température tellement élevé qu’il peut
endommager le SLIMstage, les amplificateurs se désactivent pour protéger le système et les hauts
parleurs – PT sera affiché. Quand le système de protection est activé, on peut entendre la sourdine
s’activer et se désactiver répétitivement. Pour désactiver le système de protection, simplement diminuez
le volume.
Port de service DB-15
SLIMstage met a votre disposition une connexion a 15 bornes aider le service technique quand il y a un
Problème. Pour obtenir plus d’information, veuillez contacter le Service Technique de Soundmatters.
Page 14
26
27
Français
5. Menus de Configuration
En plus de sa qualité Plug and Play, SLIMstage comprend des Menus de Configuration
qui vous permettent de faire des réglages affines de son et de fonctions pour satisfaire
votre application spécifique.
1. Appuyez sur la touche SETUP pour accéder aux menus de configuration (ou pour
sortir de ce menu).
2. Utilisez le groupe de boutons de navigation sur votre télécommande pour naviguer dans les menus
et sélectionner les éléments.
3. Appuyez sur le bouton « EXIT » a n’importe quel moment pour retourner vers le menu précédent.
INSTALLATION
LANGUAGE
AFFICHEUR
PIÈCE
CAISSON DE G RAVES
EQ TÉLÈCOMMANDE
AVANCÉ
LANGUAGE
DEUTSCH
ESPANOL
ENGLISH
FRANÇAIS
ITALIANO
INSTALLATION
LANGUAG E
AFFICHEUR
PIÈCE
CAISSON DE G RAVES
EQ TÉLÈCOMMANDE
AVANCÉ
AFFICHEUR
PROGRESSIVE
DÉSACTIVATION
ACTIVÉ
INSTALLATION
LANGUAG E
AFFICHEUR
PI ÈCE
CAISSON DE G RAVES
EQ TÉLÈCOMMANDE
AVANCÉ
PIÈCE
DI STA NCE
BALANCE DU SU RR
EQ
CANAL CENTRAL
DIS TANCE
< 2 M
> 2 M
PIÈCE
DISTANCE
BALANCE D U SURR
EQ
CANAL CENTRAL
BALANCE D U SURR
G D
10……... ! ……… 10
A. LANGUES
}Action : sélectionnez LANGUE , puis sélectionnez la langue désiré et
puis appuyez sur « ENTER ».
Résultat : Tout les réglages sont maintenant affichés dans la Langue
choisie.
B. OPTIONS D’AFFICHAGE
La luminosité d’affichage de SLIMstage diminuera automatiquement
après 10 secondes (réglage d’origine). Les options lumière Éteinte
Automatiquement et Toujours Allumée sont aussi possibles.
}Action : sélectionnez AFFICHAGE puis sélectionnez Auto Dim, Éteinte Auto,
ou Toujours Allumé, puis appuyez sur ENTER.
Résultat : la configuration affichage est sauvegardée.
C. CONFIGURATION DE LA PIÈCE :
Permet le réglage des paramètres de base pour la Configuration De La Pièce
pour obtenir la meilleure performance.
}Action: Sélectionnez CONFIGURATION PIÈCE puis appuyez sur « ENTER ».
Résultat : montre les Options du Menu de Configuration sélectionné.
Réglage de Distance D’écoute :
}}Action : Sélectionnez la DISTANCE D’ÉCOUTE puis appuyez sur « ENTER ».
}}}Action : Sélectionnez la distance désirée puis appuyez sur « ENTER ».
Résultat : la Distance D’écoute est sauvegardée et l’affichage
retourne au Menu de Configuration de Pièce.
Réglage de Balance de Surround gauche/droite
}}Action : naviguez jusqu’à SURROUND BALANCE puis appuyez sur
« ENTER ».
Résultat : SURROUND BALANCE est affiché
}}Action : sélectionnez la configuration désirée puis appuyez sur
« ENTER ».
Résultat : Le Balance désiré sera saisi.
Truc : si un coté de l’espace d’écoute (G ou D) est acoustiquement plus
« vivant « que l’autre (vitre ou surface réflective) vous pouvez régler le
balance un peu vers le coté « mort » de la pièce (rideau, ouverture vers
une autre pièce).
PIÈCE
DISTANCE
BALANCE DU SU RR
EQ
CANAL CENTRAL
EQ REMIS E
PIÈCE
DISTANCE
BALANCE DU SU RR
PIECE
CANAL CEN TRAL
NIVEAU
–10 ……... 0 ……… 10+
INSTALLATION
LANGUAG E
AFFICHEUR
PIÈCE
CAISSON D E GRAVES
EQ TÉLÈCOMMANDE
AVANCÉ
CAISSON D E GRAVES
OUI / NON
NIVEAU
FILT RE
PHASE
CAISSON D E GRAVES
OUI
NO N
CAISSON D E GRAVES
OUI / NON
NI VE AU
FILT RE
PHASE
NIVEAU
–10 ……... 0 ……… 10+
Réglage des Paramètres SLIMstage Par Défaut d’EQ Pièce :
Change le balance de fréquence de SLIMstage pour emplacement,
l’acoustique de la pièce et la préférence d’écoute.
}}Action : Naviguez jusqu’à EQ PIÈCE puis appuyez sur « ENTER ».
Résultat : 10 égalisateur de fréquence sera affiché.
}}}Action : Bougez chaque glissière jusqu’à la position désirée puis
appuyez sur « ENTER ».
Résultat : Les valeurs de fréquence seront la réponse EQ par
défaut.
Trucs : L’EQ de la pièce réglera l’EQ pour toutes les entrées. L’EQ de chaque
entrée peut être créé dans la partie : Réglages Avancés. Pour retourner un
réglage EQ aux réglages EQ pièce, réglez l’entrée au réglage d’origine.
NIVEAU DU CANAL CENTRAL
Réglez le niveau du canal central pour obtenir une optimisation vocale.
}}Action : 1. appuyez sur « ENTER »
Résultat : 1. La plage du niveau central sera affichée,
2. LE NIVEAU DESORTIE “PAR DEFAUT” sera affiché
}}}Action : sélectionnez LE NIVEAU CENTRAL et appuyez sur « ENTER »
Résultat : Le niveau sera sauvegardé.
D. CAISSON DE GRAVE
Réglez les Paramètres de Sortie du caisson de grave
Remplace les contrôles normalement trouvés sur votre parleur externe.
}Action : Réglez le volume au maximum et le crossover à la fréquence
maximale et la phase a zéro sur votre parleur externe.
Truc : En général l’intégration sonique d’un haut parleur externe avec
un système principal nécessite des essais de réglages répétitifs entre le
crossover et le niveau
CAISSON DE GRAVE OUI/NON
}}Action : Sélectionnez “OUI” et appuyez sur « ENTER » pour obtenir le
meilleur son quand un caisson de grave externe est utilisé.
Niveau de sortie du caisson de grave
Réglage du niveau de la sortie du caisson pour le faire correspondre à la
sortie caisson du woofer pour avoir une transition régulière.
}}Action : 1. appuyez sur « ENTER »
Résultat : L’étendue du Niveau de Caisson s’affichera.
2. NIVEAU DE SORTIE DÉFAUT sera affiché.
}}}Action : Sélectionnez le niveau du caisson désiré puis appuyez sur
« ENTER ».
Résultat : le niveau sera sauvegardé.
Truc : Basse + /– sur la télécommande règle le caisson de graves et le
haut parleur.
Page 15
28
29
Français
CAISSON D E GRAVES
OUI / NON
NIVEAU
FI LTR E
PHASE
FILTRE DU CAI SSON
250HZ 190HZ 143HZ
110HZ 82HZ 62HZ
43HZ
CAISSON D E GRAVES
OUI / NON
NIVEAU
FILT RE
PH ASE
PHA SE
0 ........ 90 ........ 180
INSTALLATION
LANGUAG E
AFFICHEUR
PIÈCE
CAISSON DE G RAVES
EQ TÉLÈCOM MANDE
AVANCÉ
EQ REMIS E
INSTALLATION
LANGUAG E
AFFICHEUR
PIÈCE
CAISSON DE G RAVES
EQ TÉLÈCOMMANDE
AVA NCÉ
AVANCÉ E
ENTRÉE PAR D ÉFAUT
PARAMÈTRES D’ENTRÉE
ARRIÈRE
IR
VÉROUILLER
VERSION
D’USINE
PAR DÉFAUT
DERNI ÈRE SÉLECTIO N
A1
A2
A3
D1
D2
D3
o
Crossover du Caisson De Grave
Sélectionne les fréquences les plus élevées que votre caisson peut
reproduire dans votre système.
}}Action : sélectionnez la fréquence de crossover désirée puis appuyez
sur « ENTER ».
Résultat : L’élément sélectionné sera souligné et l’affichage se
déplace vers l’option suivante, PHASE.
Truc : Réglez le point de crossover aussi bas que possible mais sans créer
un trou dans l’étendue musicale.
Sélection de la Phase du Caisson De Grave
Règle la phase des caissons pour correspondre à l’endroit
}}Action : sélectionnez le degré de désiré puis appuyez sur « ENTER ».
Résultat : la phase du caisson sera sauvegardée.
Truc : Si le caisson a une phase réglable, ajustez-la à 0° pour ne gêne
pas le réglage de Phase de SLIMstage
E. EQ TÉLÉCOMMANDE pour la Télécommande
Réglez Egalisateur pour le bouton EQ sur la
télécommande
Concevez un EQ spécialement pour une activité favorite, peut-être pour
les films d’action, les bulletins d’information ou la musique classique.
Puis vous pouvez activer ce EQ spécial en appuyant sur EQ sur la
télécommande.
}}Action : Naviguez vers EQ TÉLÉCOMMANDE puis appuyez sur «
ENTER ».
Résultat : l’égalisateur a 10 fréquences sera affiché.
Truc : Le réglage EQ est temps-réel, alors il est conseille de jouer votre
activite favori pendant ce réglage.
}}}Action : Bouger chaque glissière jusqu’à la position désirée puis
appuyez sur « ENTER ».
Résultat : la réponse du bouton EQ est réglée et l’affichage
retourne au MENU DE RÉGLAGE PRINCIPAL.
}}Action : appuyez sur « EXIT »
Résultat : sortie de menu de RÉGLAGE
– OU –
}}Action : Naviguez vers AVANCÉ puis appuyez sur « ENTER ».
Résultat : les options de réglage AVANCÉ seront affichées.
F. RÉGLAGE AVANCÉ
Règle l’ENTRÉE PAR DÉFAUT
SLIMstage retourne toujours aux réglages d’origine quand on part de
veille/Arrêt.
}}Action : Naviguez vers ENTRÉES PAR DÉFAUT puis appuyez sur
« ENTER ».
Résultat : Affichera toutes les Entrées par Défaut disponibles et la
dernière Entrée sélectionnée.
Truc : DERNIÈRE SÉLECTION est l’Entrée d’origine (par Défaut).
}}}Action : Naviguez vers ENTRÉES PAR DÉFAUT puis appuyez sur «
ENTER ».
Résultat : Affichera la nouvelle Entrée par Défaut et retournera au
menu réglage AVANCÉ.
AVANCÉ E
ENTRÉE PAR DÉ FAUT
PARAMÈTR ES D’ENTRÉE
ARRIÈRE
IR
VERROUILLER
VERSION
D’USINE
D’ENTRÉE
A1
A2
A3
D1
D2
D3
A2
SENSIBILITÉ
SURR PAR DÉFAUT
EQ
CACHER
REMISE
A2
–5……… 0 ………5+
ATTÉN: –20DB
ACTIVÉ DÉSACTIVÉ
A2
SENSIBILITÉ
SURR PAR DÉFAUT
EQ
CACHER
REMISE
A2
LIVE
FILM
DERNIÈRE SÉLECTION
STÉRÉO
MUSIQUE
A2
SENSIBILITÉ
SURR PAR DÉFAUT
EQ
CACHER
REMISE
A2 REMI SE
Réglage de PARAMÈTRES pour chaque Entrée
Réglez les caractéristiques de chacune des Entrées individuellement.
}}Action : Naviguez vers PARAMÈTRES D’ENTRÉE, puis appuyez sur
« ENTER ».
Résultat : Affichera les Entrées disponibles pour chaque sélection de
PARAMÈTRES D’ENTRÉE.
Sélectionnez l’Entrée qui doit être renouvelée.
}}Action : Naviguez vers l’entrée desirée puis appuyez sur « ENTER ».
Résultat : Affichera les options de réglage d’Entrées.
Nota : La modification de l’Entrée activée en jouant de la musique ou en
regardant un film permet le réglage en temps-réel du EQ de la Sensitivité
et de l’Entrée.
Réglage De La SENSITIVITÉ D’Entrée
Le niveau de Sensitivité d’Entrée pour les Entrées Analogue 1, 2, 3 peut être
réglé. EN plus, Analogue A2 comprend un atténuateur de –20dB qui peut
être activé pour compensation des différences de sorties des sources.
}}Action : Sélectionnez SENSITIVITÉ
Résultat : Affichera les options de SENSITIVITÉ.
Création d’Entrée du Niveau de L’enceinte
Entrée A2 seulement, peut accépter un signal du niveau de
l’enceinte si le niveau de l’enceinte ACTIVÉ est sélectionné pour
SENSITIVITÉ A2.
Nota : Vous aurez besoin d’adaptateurs pour connecter les fils de
l’enceinte au cordon mini-jack stéréo. Pour toutes questions, veuillez
contacter le Service Support Clients.
Sélection du MODE SURROUND (Stéréo, Music, live,
ou Cinéma)
}}Action : naviguez jusqu’à SURROUND MODE puis appuyez sur « ENTER ».
Résultat : Les options de Surround seront affichées.
}}}Action : sélectionnez le surround par Défaut désiré puis appuyez sur
« ENTER ».
Résultat : Au démarrage SLIMstage choisira toujours le mode
d’Entrée de Défaut.
Trucs :
1. Parmi les modes de Surround, Musique est la plus subtile, Cinéma est
le plus enveloppant.
2. Quelque soit le mode Défaut, vous pouvez toujours sélectionner
n’importe quel mode a l’aide de la télécommande.
Réglage EQ D’ENTRÉE
Bien qu’il ne soit pas recommendé pour la plupart des functions, le EQ
d’Entrée par défaut individuelle peut être réglé pour chaque source. Si vous
choisissez l’utilisation de l’EQ d’Entrée, la function EQ Pièce sera disactivée et
l’EQ devra être réglé pour chaque entrée individuellement.
}}Action : Naviguez vers EQ D’ENTRÉE puis appuyez sur « ENTER ».
Résultat : L’égalisateur a 10 fréquences sera affiché.
}}}Action : Bouger chaque glissière jusqu’à la position désiré puis
appuyez sur « ENTER ».
Résultat : réglera le EQ pour l’Entrée sélectionnée. Cet EQ sera activé
chaque fois que l’entrée modifiée est sélectionnée.
Nota : Pour désactiver l’Entrée EQ et restaurer le réglage EQ pièce, le
RÉGLAGE D’ORIGINE TOTAL est obligatoire.
Page 16
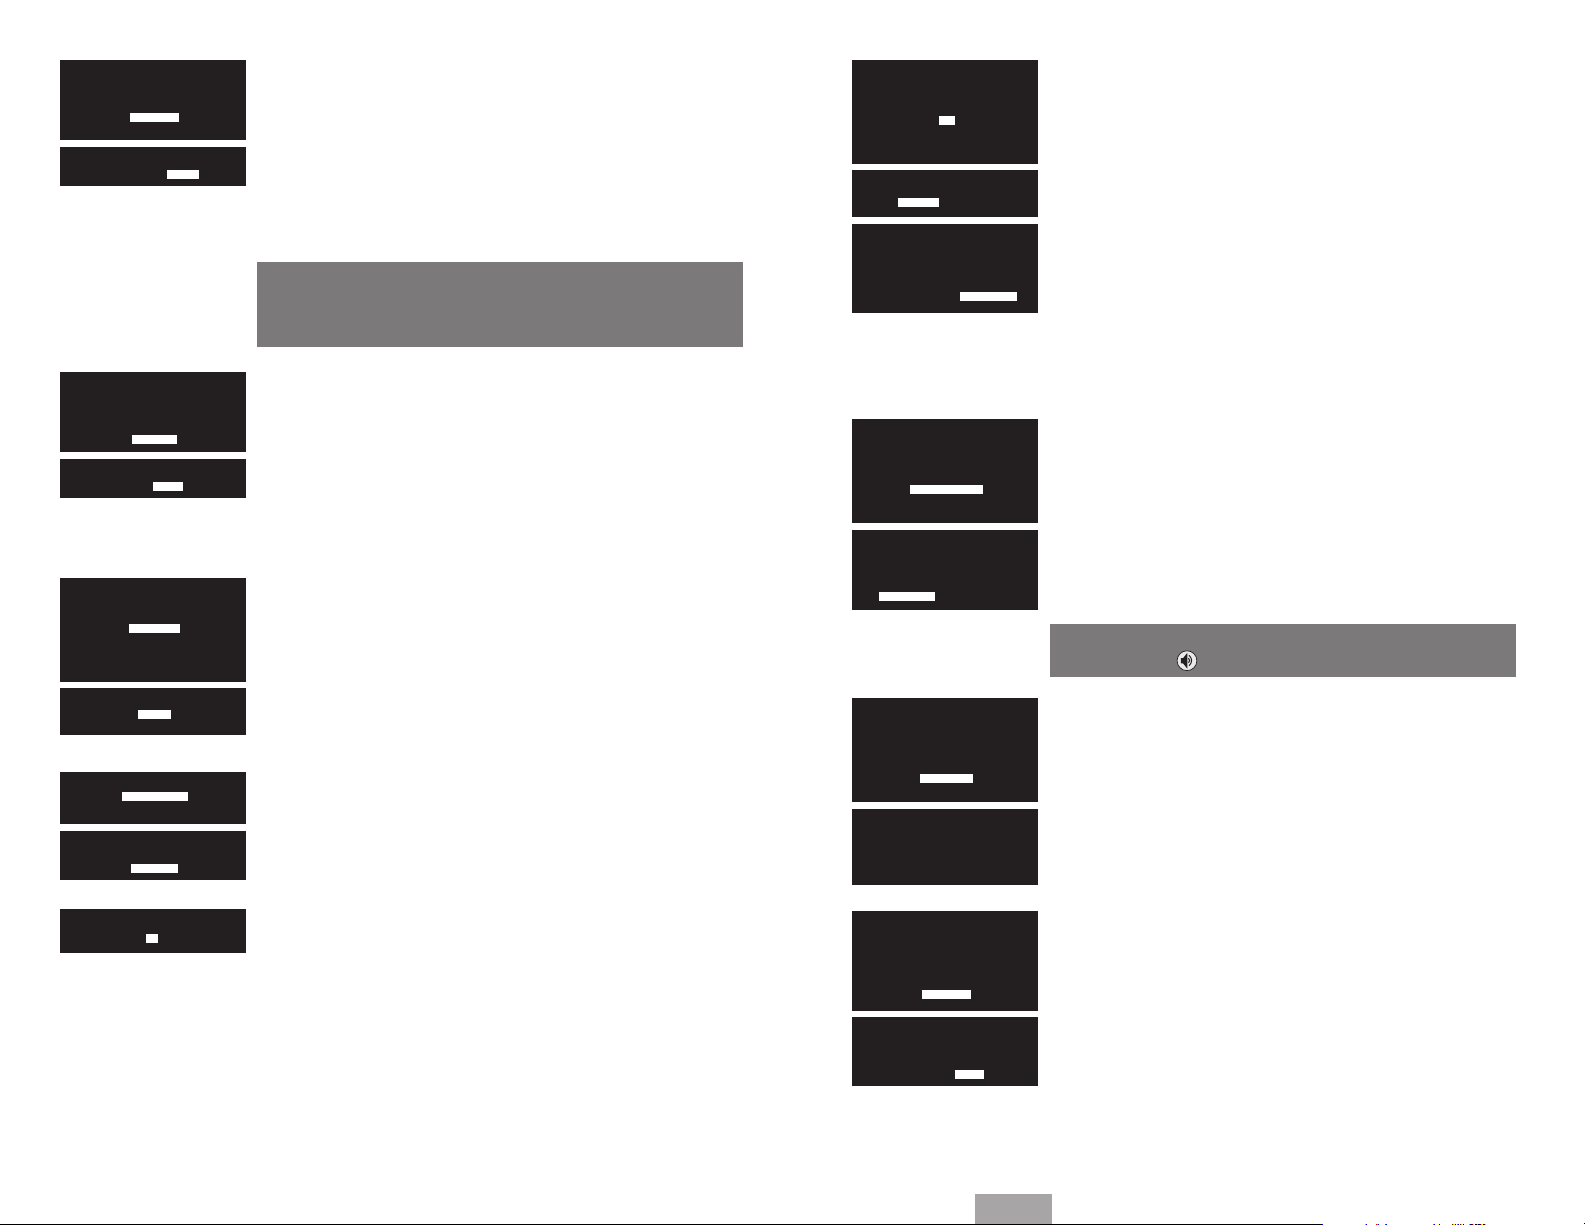
30
31
Français
A2
SENSIBILITÉ
SURR PAR DÉFAUT
EQ
CA CHE R
REMISE
A2
CACHER VOIR
A2
SENSIBILITÉ
SURR PAR DÉFAUT
EQ
CACHER
REMISE
A2
OUI N ON
AVANCÉ E
ENTRÉE PAR DÉ FAUT
PARAMÈTRES D’ENTRÉE
ARRIÈRE
IR
VÉROUILLER
VERSION
D’USINE
ARRIÈRE
T YPE
NIVEAU
TY PE
SL IM STAG E
MAINSTAGE HD
ENCEINT E G & D
ARRIÈRE
TY PE
NI VE AU
ENTRÉE CACHEE
Cacher une entrée veut dire que si vous faites une rotation des sources
situées sur le panneau avant de Source, vous manquerez une Entrée qui
est cachee. Aussi, si cette source est sélectionnée sur la télécommande, il
n’y aura pas de réaction.
}}Action : Naviguez vers ENTRÉE CACHEE puis appuyez sur « ENTER ».
Résultat : Les options d’ENTRÉE CACHEE seront affichées.
}}}Action : Sélectionnez CACHER ou MONTRER puis appuyez sur
« ENTER ».
Résultat : Si CACHER est sélectionné.
Attention : Prudence avec celui-ci…Si vous cachez une entrée, sa capabilité
d’être vue disparait virtuellement sauf si le paramètre MONTRER est activé
dans Préférences de Réglages d’Entrées ou bien le Réglage de Toutes les
Functions est retourné aux Réglages d’Origine.
RÉINITIALISATION DE L’ENTRÉE AUX RÉGLAGES
D’ORIGINE
La réinitialisation de l’Entrée aux réglages d’origine (ou réglages par
Défaut) déféra tous les réglages que vous avez faits pour cette Entrée.
}}Action : Naviguez vers REINITALISATION ENTRÉE (Au réglage d’origine)
puis appuyez sur « ENTER ».
Résultat : affichera les options de REINITALISATION ENTRÉE.
Truc : DERNIÈRE SÉLECTION est l’Entrée d’origine (par Défaut).
}}}Action : Sélectionnez OUI ou NON.
Sortie Canal Arrière Externe
Des hauts parleurs externes arrière peuvent être ajoutés au SLIMstage
pour améliorer l’effet Surround. La sortie arrière du SLIMstage sera
désactivée quand un casque est raccorde.
Truc : Pour ajouter SLIMstage ou MAINstageHD comme un canal
externe arrier, raccordez un câble audible stéréo 3.5mm entre la sortie
arrière et l’Entrée Analogue 1 située dans l’arrière de SLIMstage ou
Mainstage.
Sélection Type d’Enceinte ARRIÈRE
}}Action : Naviguez vers MENU CANAL ARRIÈRE et sélectionnez
l’élément desire puis appuyez sur « ENTER ».
Résultat : Sortie Canal Arrière deviendra optimal pour supporter le
Type d’Enceinte Arrière.
AVANCÉ E
ENTRÉE PAR DÉ FAUT
PARAMÈTRES D’ENTRÉE
ARRIÈRE
IR
VÉROUILLER
VERSION
D’USINE
IR
AVANT ARRIÈRE
CAPTEU R IR
POUR LA RÉ ACTIVER APPUYE R SUR
LE BOUTON MU TE ET SOURCE EN
MÊME TEMP S PENDANT 2 SECONDES
CONFIRMER ANN UL ER
AVANCÉ E
ENTRÉE PAR DÉ FAUT
PARAMÈTRES D’ENTRÉE
ARRIÈRE
IR
VÉROUILLER
VERSION
D’USINE
VÉROUILLER
POUR DÉVÉ ROUILLER LES RÉ GLAGES
APPUYER SUR L ES BOUTONS SETU P,
SPEAKER E T EXIT
ANNULE R VEROUILLER
ADVANCED SE TUP
DEFAULT INPUT
INPUT PARAM ETERS
REAR
IR
LOCK
VERSION
RESET
VERSION
MODÈLE: 4 0
ÉLECTRO: 1.00
LOGICIEL: 1.0.0/1.0.0
SÉRIE: #S1035000025
Sélection Capteur IR
Le contrôle de SLIMstage peut être fait a l’aide du Capteur IR AVANT
normal, un Capteur IR ARRIÈRE optionnel, et la prise RS-232.
Le normal est AVANT. Sélectionnez ARRIÈRE si le contrôle est fait a l’aide
de la prise arrière RS-232 (même avec raccordement d’un adaptateur de
contrôle a distance RF) ou si un autre SLIMstage est utilise comme un canal
externe arrière (pour éviter le réglage inattendu des deux SLIMstages par
le IR).
}}Action : Naviguez vers CAPTEUR IR puis appuyez sur « ENTER ».
Résultat : Les options de CAPTEUR IR seront affichées.
}}}Action : Sélectionnez AVANT ou ARRIÈRE puis appuyez sur « ENTER ».
Résultat : Si ARRIÈRE est sélectionne le menu de confirmation sera
affiché.
IMPORTANT: Pour activer le Capteur IR Avant, appuyez sur les boutons
MUTE et SOURCE en même temps pour 2 secondes.
Truc : Pour plus de renseignements sur la connectivité et d’instructions
de programmation, visitez le site web de soundmatters.
INITIALISATION VERROUILLAGE
Evite les changement s de réglages accidentels.
}}Action : 1. Naviguez vers INITIALISATION VERROUILLAGE.
}}Action : 2. Sélectionnez INITIALISATION VERROUILLAGE puis appuyez
sur « ENTER ».
Résultat : Le menu INITIALISATION VERROUILLAGE sera affiché.
}}Action : Sélectionnez ANNULER ou VERROUILLAGE puis appuyez sur
« ENTER ».
Résultat : Initialisation est sélectionnée. Le réglage sera verrouille
contre les changements accidentels.
Pour déverrouiller le réglage, appuyez successivement sur les
boutons SETUP,
, EXIT sur la télécommande.
VERSION
VERSION affiche des renseignements important concernant votre
SLIMstage tels que modèle, numéro de série, version électronique et
version du logiciel.
}}Action : Naviguez vers VERSION et appuyez sur « ENTER ».
NI VEA U
–10 ……... 0 ……… 10+
Niveau de Surround Externe
Règle le niveau de sortie à l’enceinte surround arrière externe.
}}Action : Naviguez vers NIVEAU puis appuyez sur « ENTER ». En utilisant
la source surround normale, Réglez le niveau de Surround et appuyez
sur « ENTER ».
Résultat : Le niveau arrière sélectionne devient le niveau par Défaut.
AVANCÉ E
ENTRÉE PAR DÉ FAUT
PARAMÈTRES D’ENTRÉE
ARRIÈRE
IR
VERSION
D’USINE
D’USINE
APPLIQUER TO US
LES PARAMÈT RES D’USINE?
OUI N ON
RÉINITIALISATION DE TOUT AUX RÉGLAGES
D’ORIGINE
La réinitialisation de toutes les options réglables aux positions d’origine
(ou réglages par Défaut) est faite ici.
}}Action : Naviguez vers RÉGLAGE D’ORIGINE COMPLET puis appuyez
sur « ENTER ».
Résultat : affichera les options de RÉGLAGE D’ORIGINE COMPLET.
}}}Action : Sélectionnez OUI ou NON et appuyez sur « ENTER ».
Résultat : Tous les réglages seront changées vers les positons
d’origine .
Appuyez sur « EXIT » pour retourner au menu précédent.
Appuyez sur « EXIT » de nouveau pour quitter le MENU DE RÉGLAGE.
Page 17

32
33
Français
6. Foire aux Questions, FAQ
Pour voir la FAQ les plus récente veuillez consulter notre site web a www.soundmatters.com.
Q1. Des trucs pour l’emplacement/la position de SLIMstage dans la pièce pour permettre la
meilleure performance?
SLIMstage, qui performe bien dans toute situation comme tous autres hauts parleurs externes, il
donne la meilleure performance quand il est bien place.
La meilleure Hi-Fi: le système doit être toujours oriente vers les auditeurs. L’orientation est faite
avec l’utilisation des adaptateurs muraux et les pieds orientable qui visent la façade avant de
SLIMstage vers les auditeurs directement. Quand il est places dans un boiter, le SLIMstage doit
être place vers l’avant autant que possible pour donner une grande dispersion.
Le meilleur surround: Tout les systèmes surround ont un “ point précieux”, l’endroit ou l’effet
surround est maximal. L’endroit et la surface dépendent de la distance qui vous séparé
due système SLIMstage … Si vous position d’audition normale est a moins de 9 pieds
(approximativement 3 mètres) refaites les Réglages de DISTANCE dans le menu de configuration
initiale.
Meilleur Caisson de Graves: Quand un haut parleur est places contre une surface dure et
lourde son effet caisson de graves sera renforce. Le plus de surfaces dures qui touchent le
SLIMstage, le plus de Bass il émettra. L’effet Bass sera minimum quelques part au milieu de la
pièce. Le maximum de Bass sera dans un coin due plancher ou due plafond. En plus, puisque les
caissons de SLIMstage tirent vers le bas, il faut laisser assez d’espace soue l’unité (3/4 de pouces
ou 20 mm) pour que le caisson puisse décharger dans la pièce.
Q2. Le caisson de notes gaves est curieusement bon, pour une boite aussi petite … mais je
veux plus! Puis-je ajoutes un caisson externe?
Oui, SLIMstage comprend une prise de sortie pours caisson de graves pour faciliter la connexion
du caisson Soundmatters SUB stage qui est acoustiquement appaire au SLIMstage, ou l’addition
de n’importe quelle autre caisson hi-fi de bonne qualité ou qu’il est électriquement alimenté
séparément du SLIMstage.
La prise de sortie pour caisson de SLIMstage est le tout petit mini-jack de 1/8 pouce. Si votre
caisson externe n’est pas notre SUBstage, vous aurez besoin d’un adaptateur mini-jack stéréo
1/8 pouce ver RCA pour brancher Presque tous les caissons d’autres fabrications (pour notre
SUBstage l’adaptateur est fourni).
Q3. J’aime beaucoup le SLIMstage, mais je veux plus de volume?
Voici des possibilités: Ajoutez un caisson externe tel que SUBstage (un ou deux) et/ou ajouter
un SLIMstage supplémentaire vers l’arrière pour les canaux arrières et/ou remplacez notre
SLIMstage par un système SLIMstage plus grand. Si le Problème se présente seulement quand
vous utilisez une source spécifique vous peuvent augmenter la Sensitivité de l’entrée qui est
connectée (voir AVANCÉS> PARAMÈTRES D’ENTRÉE> SENSITIVITÉ).
Q4. Comment puis-je contrôler le SLIMstage et mon téléviseur avec une seule télécommande?
Les fonctions de la télécommande de SLIMstage sont captures facilement par toutes les autres
télécommandes programmables. Le volume de SLIMstage peut aussi être contrôle par les
télécommandes de plusieurs marques de téléviseurs et de câble/satellite après l’entrée du code
audit Denon consultez les instructions fournies avec la télécommande du téléviseur.
Q5. Pour me permettre d’intégrer convenablement ma télécommande avancée
programmable et mon système d’automation de maison j’ai besoin de “codes discrets”, je les
trouvent ou?
Les codes discrets IR de SLIMstage sont dans la section DOWNLOAD au site web www.
soundmatters.com
Q6. Puis-je utiliser SLIMstage dans d’autres pays?
SLIMstage utilise une version plus puissante d l’adaptateur d’alimentation de haute puissance
due microordinateur portable. Il est conçu pour fonctionner avec confiance dans la plupart
des pays ayant une tension du secteur résidentiel de 95-240 V~, 50/60 HZ.
Q7. Suggérez-vous l’utilisation d’un protecteur de survoltage avec STIM stage?
Comme tout autre appareil électronique, SLIMstage peut bénéficier d’un P.S.
Q8. SLIMstage passe au mode Economiseur d’énergie “tout seul ou avec l’appuis sur un
bouton?
La fermeture de SLIMstage se fait a l’aide d’appuis sur le bouton Arrêt/Veille situé sur la
télécommande. Après 2 minutes d’absence de signal en mode d’entrée le système
entre en mode veille.
Q9. Quand on se déplace entre les modes Normale et Dialogue+ on entend une des fois mais
pas d’autres. Pourquoi?
Il y a un nombre de raisons qui sont possibles. Quand le niveau des graves est poussé à fond, il
peut couvrir le boost du dialogue. Evidemment, il y a des programmes qui ne contiennent pas
de vocales. Donc dans ces cas vous entendez très peu ou même aucune différence.
7. Dépannage
1. Problème: pas de son du tout
Solutions:
a. Vérifiez que l’unité source est allumée et en marche (c’est-a-dire le DVD ou téléviseur).
b. Si les écouteur sont connectés, vérifiez que les hauts parleurs soit en marche.
c. S’assurer que le cordon d’alimentation est branché a une prise de CA est qu’il est bien
connecté au module d’alimentation de SLIMstage … vérifiez aussi que le module lui même
est bien connecté au système SLIMstage.
d. Le volume de SLIMstage est-il assez élevé?
e. Appuyez sur le bouton “source” situé sur le SLIMstage ou sur la télécommande pour
sélectionner une entrée activée.
2. Problème: Je sélectionne une entrée sur la télécommande mais elle n’apparaît pas
sur la Solution d’Affichage.
Solution:
a. L’entrée est cachée… voir paramètres d’entrée> cacher entrée? Dans le menu de
configuration
3. Problème: pas assez de notes graves
Solution:
a. Elevez le niveau des notes graves avec la télécommande.
b. Elevez le niveau des notes graves dans le menu de configuration
c. Voir FAQ, Q1 qui explique comment l’emplacement affecte les graves
d. Ajoutez un caisson SUBstage!
Page 18

34
35
Français
4. Problème: Je n’entend pas ou presque pas de surround.
Solution:
a. Vérifiez que vous êtes en mode Musique, Live ou Cinéma (pas stéréo). Le mode Cinéma
a le plus de surround.
b. Vérifiez que vous êtes place dans un angle de 45 degrés a partir due centre du
SLIMstage, l’endroit appelé “sweet spot”.
c. S’assurez que toute les mondes EQ et surround faisant parti l’appareil DVD ou autre
source sont en Arrêt.
d. Voir FAQ/Trucs #1 concernant l’emplacement
e. Ajouter des hauts parleur alimentes a l’arrière de la pièce.
5. Problème: fonctionnement par télécommande erratique ou manquant
Solutions:
a. Vérifiez que les piles sont bonnes
b. Pour activer le Capteur IR Avant, appuyez sur les boutons MUTE et SOURCE en même
temps pour 2 secondes.
6. Problème: son trouble
Solution:
a. Vérifiez que tous les modes d’amélioration DSP/surround son sont éteint dans toutes les
sources branchées au SLIMstage
b. Vérifiez que la Sensitivité n’est pas réglée a un niveau élevée dans la section RÉGLAGE
DE SENSITIVITÉ cousant une surcharge sur l’entrée.
7. Problème : le système apparaît verrouillé
Solution:
a. Les circuits électroniques de SLIMstage contiennent un microprocesseur puissant.
Si l’unité commence a fonctionner avec erreurs, simplement débranchez la prise
d’alimentation pour 5 seconds et rebranchez la pour remettre le micro interne à son
opération normale.
8. Problème: TMP ou PT affiché et présence de coupures de fonctionnement de l’appareil.
Solution:
a. Le circuit électronique de la protection de surchauffe fonctionne…réduisez le volume.
9. Problème: pas assez de volume
Solution:
a. si possible, augmenter la sortie de la source que vous utilisez
b. Augmentez la Sensitivité de la sortie, voir Réglage de Sensitivité dans la section
Réglages Avancés
10. Problème: Branché à un coffret de câble mais pas de son
Solutions:
a. Malheureusement certain boite de câble sont dotes de connexions audio, qui sont sorte
numérique ou même audio analogue (RCA Rouge/blanc) qui sont factices (pas connectées
a la boite a l’intérieur.
b. Si vous utilisez la sortie numérique de votre boit de câble, il se peut que vous trouvez
qu’elle fonctionne seulement sur un canal HDTV. Pour avoir accès a l’audio des autres
canaux vous devez connecter a la sortie d’audio analogue et changer vers l’entrée correcte
sur votre SLIMstage.
11. Problème: Le câble optique ne correspond pas a la prise de SLIMstage.
Solution:
a. S’assurer que le protecteur transparent est enlevé des extrémités du câble.
b. Certains câbles fabriqués comme pièces de rechange ont des gaines de connexion qui
sont trop grandes et ne peuvent être accepté par SLIMstage.
12. Problème: Je ne peux accéder au menu de RÉGLAGE
Solution:
a. L’accès au RÉGLAGE est verrouillé. Appuyez successivement sur les boutons SETUP,
EXIT sur la télécommande.
,
8. Spécifications
Console Surround Sound SLIMstage 5.1
• Algorithmes Surround: Euphony™HD décode Analogique, PCM, Dolby Digital 2.0/5.1, DTS
Digital Surround, DTS 96/24
• Canal Décodeur 5.1 : Dolby Numérique, DTS Numérique Surround, DTS 96/24
• Canal Décodeur 2.0 : Dolby Numérique, PCM
• Conversion 2 canaux à 5 canaux: Euphony™HD
• Puissance: Amplificateurs Classe-D (RMS à < 0.8%THD)
SLIMstage 30 – Satellites 80W, Woofers 60W
SLIMstage 40 – Satellites 80W, Woofers 90W
SLIMstage 50 – Satellites 80W, Woofers 130W
• Maximum SPL à 1m:
SLIMstage 30 – 103dB; SLIMstage 40 – 106dB; SLIMstage 50 – 109dB
• Hauts Parleurs Principaux :
SLIMstage 30 – 4 pièces de 50x50mm avec aimants LMD Neo-sandwich (avec brevet)
SLIMstage 40 – 4 pièces de 50x50mm avec aimants LMD Neo-sandwich (avec brevet)
SLIMstage 50 – 4 pièces de 50x50mm avec aimants LMD Neo-sandwich (avec brevet)
• Woofer Arrays:
SLIMstage 30 – 2 woofer arrays*
SLIMstage 40 – 3 woofer arrays*
SLIMstage 50 – 4 woofer arrays*
* Chaque matrice contient parleur LMD Neo-sandwich à aimant de Haute Energie de 3 po
(avec brevet) et deux radiateurs de Basse de 3 po.
• Alimentation Electrique: Numérique, 95–265V, 50/60Hz, 36V
• Entrées (6)
Analogique 1 – stéréo 3.5mm
Analogique 2 – stéréo 3.5mm Disponible atténuation de 20dB pour niveau d’entée du haut
parleur
Analogue 3 – stéréo 3.5mm Panneau Avant, avec sélection de priorité
Numérique 1 – SP/DIF coax
Numérique 2 – Optique / TosLink
Numérique 3 – Optique / TosLink
• Sorties (3)
Analogique: Sortie pour Caisson de Graves– stéréo 3.5mm
Analogique: Casque (Euphony Virtual Surround) – stéréo 3.5mm
Sorties du Canal Arrière
• Accessoires
Télécommande IR
Module d’Alimentation avec câbles
Pieds de nivelage EZ-tilt™ avec adaptateur de l’hauteur
Support mural et accessoires
1 chacun – 3m de câble optique
1 chacun – 3m de câble téléphone 3.5mm mini-jack
1 chacun – 3m de câble stéréo mini-jack vers RCA mâle
1 chacun – 3m de câble numérique coax RCA
• Contrôles
Master, Volume Casque (IR et Panneau Avant)
Niveau Caisson (Graves) (IR seulement)
Sélection Source, Fonction Sourdine (IR et Panneau Avant)
Surround/stéréo (IR seulement)
• Modes: En Marche, Sourdine, Arrêt/Veille
• Consommation Arrêt/Veille: 2W ou moins
• Poids (approximativement):
SLIMstage 30 – 7.5 kg (16.5 lbs); SLIMstage 40 – 8.5 kg (19 lbs); SLIMstage 50 – 9.5 kg (21 lbs)
• Dimensions:
SLIMstage 30 (LxHxP): – 790mm x 88mm x 93mm
SLIMstage 40 (LxHxP): – 990mm x 88mm x 93mm
Page 19

36
37
Français
SLIMstage 50 (LxHxP): – 1206mm x 88mm x 93mm
Hauteur avec Pieds de nivelage EZ-tilt™ avec adaptateur de l’hauteur,
tous les modèles (H) – 112mm
Hauteur avec Pieds + adaptateur de l’hauteur, tous les modèles (H) – 132mm
Profondeur avec support de fixation mural, tous les modèles (P) – 127mm
soundmatters® améliore ses produits régulièrement.
les spécifications peuvent changer sans notification.
9. Garantie/Service:
Il y a deux choses que vous devez faire pour assurer un service sans Problèmes quand vous aurez
besoin de réparations couvertes par la garantie.
1. Gardez votre quittance d’achats dans un lieu sur une photocopie de la quittance est nécessaire
pour garantir le service technique.
2. Vérifiez que votre revendeur ait écrit la date, le mode, et le numéro de série (si applicable)
de votre produit sur la quittance. Pour avoir plus de protection, faites une entrée séparée de
votre achat et gardez-le en un bien sur. Dans le case ou vote quittance d’achat est perdue,
vous pouvez en obtenir une copie auprès de votre revendeur.
Prenez un moment maintenant pour lire les termes de votre garantie.
Si jamais vous envoyez un produit pour service technique:
-Téléphonez a Soundmatters ou leurs envoyez un e-mail pour leurs demande l’adresse exacte
du centre de réparation du produit et une ARM (Autorisation de retourner le matériel). Un ARM,
une copy de votre quittance d’origine contenant la date d’achat, le modèle et le numéro de série
(si applicable). Le ARM doit être visible sur l’étiquette de l’emballage de toute unité envoyée a
Soundmatters pour réparation.
-Envoyez le produit toujours dans son emballage d’origine.
-Evitez tout envoi du produit avec le Service Postal. Si vous devez utiliser le Service Postal,
l’emballage doit être enregistré et assuré.
Garantie Limitée de soundmatters
soundmatters International Inc. (soundmatters) garantit, à l’acheteur original du Produit
soundmatters décri dans ce manuel, que le produit ne porte aucun défaut matériel et de
main d’oeuvre, pour une période de deux (2) ans aprés la date d’achat. La seule obligation de
soundmatters sous cette garantie est de fournir sans payement les pièces et la main d’oeuvre
nécessaries pour corriger le défaut, s’il existe, pendant la période de validité de la garantie. Cette
garantie est une garantie expresse seule et exclusive de ce produit. Toutes autres garanties sont
exclues. Ni soundmatters ni le revendeur autorisé qui vent le Produit n’est responsable des
dommages indirects, incidentiels ou de conséquence. Certains Etats n’autorisent pas l’exclusion
et limitation des dommages incidentiels et des dommages de conséquence. Donc il est possible
que les limitations et exclusions mentionnées ci-dessus ne soient pas applicables à vous. Cette
garantie vous donne des droits légaux spécifiques et il est possible que vous ayez aussi d’autres
droits qui varient d’un Etat à l’autre.
Limitations
- Produits achetés d’un revendeur de détail autorisé par soundmatters. Suite a une demande du
client, soundmatters peut fournir une liste de revendeurs de ses produits.
Pour obtenir le service vous devez :
- Retourner le produit au revendeur soundmatters ou il a été acheté, à une agence indépendante
de service de soundmatters ou à soundmatters. S’il est nécessaire vous pouvez appeler le
Département de Service Clients de soundmatters pour vous octroyer les noms et adresses des
agences de service indépendantes autorisées dans votre région.
- Fournir la preuve d’achat sous forme d’une photocopie de la facture d’achat originale, la date, le
numéro du model, et le numéro de série (si applicable) de votre produit visibles sur la facture.
Exclusions
-Dommages résultants d’une utilisation incorrecte, d’un usage abusif, d’un accident (incluant mais
pas limité à un dommage par l’eau), d’une installation incorrecte, d’un équipement associé défectif
ou incorrectement réglé, ou de l’utilisation du produit avec un équipement incompatible.
- Défauts cosmétiques qui apparaissent plus de trente (30) jours après la date d’achat. Les défauts
cosmétiques causés par maltraitance sont aussi exclus.
- Les produits utilisés à des fins commerciales.
- Les dépenses résultant du débranchement du produit et de son réinstallation.
- Les dommages résultant du transport du produit vers le lieu de réparation.
Voir les renseignements ci-dessus concernant les methodes de transportation.
Cette garantie est invalide si :
- L’étiquette montrant l’identification du Produit ou le numéro de série est effacée de n’importe
quelle manière.
- La réparation ou le service du Produit sont fournis par quelqu’un autre que soundmatters ou un
revendeur ou agence de service autorisés par soundmatters.
Pour tous renseignements concernait la garantie veuillez consulter :
soundmatters international
Reno, nv 89501
Telephone : 775 9811460
Aux USA 800-689 SOMA (7662)
email support@soundmatters.com
web www.soundmatters.com
Le terme « Dolby » et le sigle double D sont des marques
commerciales de Dolby Laboratories.
Fabriqué sous license et sous Brevés U.S. numéros:
5,451,942; 5,956,674; 5,974,380; 5,978,762; 6,487,535 et sous
autres numéros de Brevés U.S. et internationaux enregistrés et
demandés.
DTS and DTS Digital Surround sont des marques déposées
de DTS, Inc. et les logos et symboles DTS sont des marques
de commerce de DTS, Inc.
© 1996-2007 DTS, Inc. Tous droits Reservés.
EUPHONY HD EST UNE marque de commerce de DiMAGIC Co. Ltd.
Soundmatters est une marque déposée de Soundmatters
International Inc.
Page 20

38
39
Deutsch
Wichtige Sicherheitsvorkehrungen
ACHTUNG – Gefahr eines elektrischen Schlags – nicht öffnen
1. Anweisungen lesen – Alle Sicherheits- und Bedienungsanweisungen sollten vor Inbetriebnahme des Gerätes gelesen
werden.
2. Anweisungen aufbewahren – Die Sicherheits- und Bedienungsanweisungen müssen zum späteren Nachschlagen
aufbewahrt werden.
3. Warnhinweise beachten – Alle Warnhinweise auf dem Gerät und im Benutzerhandbuch müssen beachtet werden.
4. Alle Anweisungen befolgen – Alle Anweisungen zur Bedienung und zur Verwendung des Geräts müssen befolgt
werden.
5. Das Gerät darf weder Regen noch Feuchtigkeit ausgesetzt werden, um die Gefahr eines Brandes oder eines
elektrischen Schlags zu vermindern – Das Gerät darf nicht in der Nähe von Wasser verwendet werden – z.B. in der
Nähe einer Badewanne, eines Waschbeckens, einer Küchenspüle, eines Waschzubers, in einem nassen Keller oder in der
Nähe eines Schwimmbecken usw.
6. Nur mit einem trockenen Tuch reinigen.
7. Keine Lüftungsöffnungen blockieren – Gemäß den Anweisungen des Herstellers installieren. Schlitze und
Öffnungen im Gehäuse dienen der Belüftung und sollen einen zuverlässigen Betrieb des Gerätes gewährleisten sowie das
Gerät vor Überhitzung bewahren. Diese Öffnungen dürfen keinesfalls blockiert oder bedeckt werden. Das Gerät niemals auf
einem Bett, Sofa, Teppich oder auf einer ähnlichen Ober fläche platzieren, dass die Öffnungen blockiert werden. Das Gerät
darf nur dann in einen Bücherschrank, ein Regal usw. eingebaut werden, wenn für ausreichende Luftzirkulation gesorgt ist
bzw. die Anweisungen des Herstellers befolgt werden.
8. Wärme – Nicht in der Nähe von Wärmequellen wie Radiatoren, Heizkörpern, Öfen oder anderen Wärme erzeugenden
Geräten (wie Verstärkern usw.) installieren.
9. Beeinträchtigen Sie in keiner Weise die Schutzfunktion von gepolten Steckern oder Schutzkontaktsteckern.
Ein gepolter Stecker besitzt zwei flache Steckerstifte (Blätter), von denen einer breiter als der andere ist. Ein
Schutzkontaktstecker besitzt zwei flache Steckerstifte und einen dritten Erdungsstift. Das breite Steckerblatt oder der
dritte Stift sind zu Ihrer Sicherheit angebracht. Falls der mitgelieferte Stecker nicht in Ihre Steckdose passt, wenden Sie sich
zwecks Austauschs der veralteten Steckdose an einen Elektriker.
10. Netzkabel und Netzteile – Verwenden Sie nur vom Hersteller mitgelieferte Netzkabel und Netzteile.
Wickeln Sie ein Netzkabel niemals um das Netzteil oder um ein anderes Objekt. Dadurch kann das Kabel derart beansprucht
werden, dass es beschädigt wird oder bricht. Dies kann ein Sicherheitsrisiko darstellen.
Netzkabel immer so verlegen, dass sie keine Stolpergefahr darstellen und ein Darüberlaufen sowie ein Einklemmen durch
Gegenstände verhindert wird.
Schützen Sie Netzkabel und Netzteile vor Flüssigkeiten. Legen Sie das Kabel oder das Netzteil beispielsweise nicht in der
Nähe von Waschbecken, Badewannen, Toiletten oder auf Böden ab, die mit Flüssigkeiten gereinigt werden. Flüssigkeiten
können Kurzschlüsse verursachen, insbesondere dann, wenn das Kabel oder das Netzteil durch nicht sachgerechte
Verwendung beschädigt wurde. Flüssigkeiten können außerdem eine allmähliche Korrosion der Netzkabelanschlüsse und/
oder der Anschlussenden am Netzteil verursachen, was schließlich zu Überhitzung führen kann.
Stellen Sie sicher, dass alle Netzkabelanschlüsse fest und vollständig in die dafür vorgesehenen Buchsen/Steckdosen
eingesteckt sind.
Verwenden Sie kein Netzteil, das Anzeichen von Korrosion an den Netzeingangsstiften und/oder Anzeichen von Überhitzung
(wie z.B. verformter Kunststoff) am Netzeingang oder an einer anderen Stelle des Netzteils aufweist.
Verwenden Sie keine Netzkabel, bei denen die elektrischen Kontakte an den Enden Anzeichen von Korrosion oder
Überhitzung aufweisen oder wenn das Netzkabel auf irgendeine Weise beschädigt zu sein scheint.
11. Nur vom Hersteller empfohlene/s Zubehör/Zusatzgeräte verwenden.
12. Gerät nur mit vom Hersteller empfohlenem oder im Lieferumfang enthaltenem
Wagen, Ständer, Stativ, Träger oder Tisch verwenden. Wenn ein Wagen verwendet wird, die
Kombination aus Wagen und Gerät mit Vorsicht bewegen, um Verletzungen durch Umkippen zu
vermeiden. Bei Positionierung des Gerätes auf einer instabilen Standfläche wie z.B. auf instabilen
Wagen, Halterungen oder Tischen kann das Gerät herunterfallen, was zu ernsthaften Verletzungen
von Kindern und Erwachsenen und zu schweren Beschädigungen des Gerätes führen kann.
13. Ziehen Sie bei Gewitter oder bei Nichtbenutzung über längere Zeiträume den Netzstecker des Geräts aus.
Ein Überspannungsschutz kann ebenfalls helfen, Schäden zu vermeiden, und wird ausdrücklich empfohlen.
14. Überlassen Sie sämtliche Wartungs- und Reparaturarbeiten qualifizierten Servicemitarbeitern.
Reparaturen sind er forderlich, wenn das Gerät in irgendeiner Weise beschädigt wurde, z.B. wenn das Netzkabel oder der
Netzstecker beschädigt sind, wenn Flüssigkeiten oder Gegenstände in das Gerät gelangt sind, wenn das Gerät Regen oder
Feuchtigkeit ausgesetzt wurde, wenn es nicht wie gewohnt funktioniert oder wenn es fallen gelassen wurde.
15. Dieses Produkt darf nur mit der auf dem Geräteschild angegebenen Netzspannung betrieben werden.
Wenn Sie nicht sicher sind, welche Netzspannung bei Ihnen vorliegt, wenden Sie sich an Ihren Fachhändler oder Ihr
örtliches Elektrizitätswerk. Hinweise zu Produkten, die mit Batterien oder anderen Stromquellen betrieben werden, können
Sie dem Bedienungshandbuch entnehmen.
16. Überlast – Wandsteckdosen, Verlängerungskabel oder integrierte Gerätesteckdosen nicht überlasten, da dadurch die
Gefahr eines Brandes oder elektrischen Schlages entstehen kann.
17. Eindringen von Fremdkörpern oder Flüssigkeiten – Führen Sie niemals irgendwelche Fremdkörper durch
Öffnungen in das Gerät ein, da diese gefährliche Spannungspunkte berühren oder Teile kurzschließen könnten, was einen
Brand oder elektrischen Schlag verursachen kann. Schütten Sie niemals Flüssigkeiten irgendwelcher Art auf das Gerät.
Verstellen Sie nur die Regler, die im Bedienungshandbuch beschrieben werden. Das unsachgemäße Verstellen von anderen
Reglern kann Schäden verursachen und aufwendige Reparaturen durch einen qualifizierten Techniker erfordern, um das
Gerät wieder in seinen normalen Betriebszustand zu versetzen.
18. Ersatzteile - Wenn Ersatzteile erforderlich sind, sollten Sie sich vergewissern, dass der Servicetechniker nur vom
Hersteller angegebene Ersatzteile oder Ersatzteile, die die gleichen Eigenschaften wie die Originalteile aufweisen,
verwendet. Unzulässige Ersatzteile können Brände, elektrischen Schlag oder andere Gefahren verursachen.
19. Bitten Sie den Ser vicetechniker, im Anschluss an Wartungs- oder Reparaturarbeiten Sicherheitskontrollen
durchzuführen, um den ordnungsgemäßen Betriebszustand des Gerätes zu bestätigen.
20. Versuchen Sie nicht, das Gerät selbst zu reparieren, da Sie sich durch das Öffnen oder Entfernen der
Geräteverkleidung Hochspannung oder anderen Gefahren aussetzen würden. Überlassen Sie alle Wartungs- und
Reparaturarbeiten qualifiziertem Servicepersonal.
21. Wandmontage mittels Wandhalterung – Halten Sie sich bei der Wandmontage an die Anweisungen des
Herstellers der Wandhalterung. Stellen Sie sicher, dass die Halterung fest an der SLIMstage und in der Wand befestigt ist, so
dass diese sich bei Benutzung des Gerätes nicht lockert.
WARNUNG Setzen Sie das Gerät weder Regen noch Feuchtigkeit aus, um eine Brandgefahr und die Gefahr
von elektrischen Schlägen zu mindern.
Page 21

40
41
Deutsch
Verbindungen & Platzierung
WICHTIGER HINWEIS: Bitte folgen Sie in Bezug auf die gesamte Verkabelung und die korrekte
Positionierung Ihrer SLIMstage vor der Benutzung dieses Bedienungshandbuchs zunächst den
Anweisungen im Einrichtungshandbuch.
Bedienungselemente und Funktionen
E. Lautstärke + (kontrolliert den Kopfhörerpegel
A.
Kopfhörer mit
EuphonyHD Raumklang
Schaltung
(3.5mm
Klinkenstecker)
Stummschaltung
(Ein / Aus)
B.
Einschalt
Anzeige
Eingangswahl
(Sequentiell)
H.
I.
C.
Eingang Wahl
Lautstärken
Anzeige
J K L M N O
J. Dolby Digital 2.0,
Dolby Digital 5.1,
DTS Digital Surround,
PCM, Analog Erkennung
K. Dynamische Klang
Reduktion Ein
L. Sprachtone
Verbesserung Ein
M. STEREO, MUSIC, LIVE, MOVIE Modus
N. EQ Ein
O. Lautsprecher Stumm (wenn Kopfhörer
angeschlossen sind)
P. Übertemperatur Warnung, Überlast Warnung
Inhaltsverzeichnis Seite
• Sicherheit . . . . . . . . . . . . . . . . . . . . . . . . . . 38
• Verbindungen & Platzierung. . . . . . . . . . . . . . 40
• Bedienungselemente und Fernbedienung . . . . 40-41
1. Bedienung . . . . . . . . . . . . . . . . . . . . . . . . . 42
2. Einstellungen . . . . . . . . . . . . . . . . . . . . . . . 42
3. Kopfhörer. . . . . . . . . . . . . . . . . . . . . . . . . . 43
4. Erweitert . . . . . . . . . . . . . . . . . . . . . . . . . . 43
5. Setup-Menüs. . . . . . . . . . . . . . . . . . . . . . . . 44
6. FAQ. . . . . . . . . . . . . . . . . . . . . . . . . . . . . . 50
7. Problemlösung . . . . . . . . . . . . . . . . . . . . . . 51
8. Technische Daten. . . . . . . . . . . . . . . . . . . . . 52
9. Garantie / Service. . . . . . . . . . . . . . . . . . . . . 54
wenn die Lautsprecher stumm geschaltet sind)
F. Lautstärke – (kontrolliert den Kopfhörerpegel
wenn die Lautsprecher stumm geschaltet sind)
D.
P
(Nacht Modus)
E F
Q.
Raumklang
Modus Anzeige
3
LED = Spiellm
2 LED = Live / TV
1 LED = Musik
0 LED
= Stereo
G.
Infrarot
Sensor
“iPOD” / Analog
Eingang
(Mit
automatischem
Eingangswechsel)
R.
Fernbedienung
1. Sprachverbesserung
2. Dynamische Klang Reduzierung,
( nur wenn Kopfhorer angeschlossen sind)
Nacht Modus
3. Lautsprecher Ein & Aus
7. Eingang: Analog 1
8. Eingang Analog 2
10. Eingang Digital 1
(inklusive externer Subwoofer
(inklusive externer Subwoofer)
20. Menü Nächstes / Herauf
21. Menü Vorher / Herunter
(Ein & Aus)
(Ein & Aus)
14. Bass Pegel +
15. Bass Pegel –
25. Bestätigung
4. Aus / Schlaf Mode
5. EQ Ein & Ausschalten
örer Pegel + & –
6. Kopfh
9. Eingang Analog 3 (Vorderseite)
11. Eingang Digital 2
12. Eingang Digital 3
13. Raumklang + & –
(4 Einstellungen)
16. Stummschaltung
17. Lautstärke Erhöhung
18. Lautstärke Reduzieren
19. Raumklang Pegel + & –
(oder Pegel der externen
Raumklang Lautsprecher)
22. Bestätigung / Eingabe
23. Menü Nächstes / Rechts
24. Menü Vorher / Links
26. Ausgang zum vorherigen
Menü
Page 22

42
43
Deutsch
1. Bedienung
Einschalten/Ausschalten
Um die SLIMstage einzuschalten, drücken Sie eine beliebige Taste an der Frontblende oder der
Fernbedienung. Drücken Sie die Taste „Aus/Standby“, um sie auszuschalten, .
Aus/Standby - Schaltet alle SLIMstage-Komponenten aus, mit Ausnahme des IR-Sensors, der zusammen
mit dem Netzteil weniger als 2.0W verbraucht.
Eingangs-/Tonquellenwahl
Drücken Sie zur Auswahl der Quelle die Taste für die gewünschte Eingangsquelle auf der Fernbedienung
(A1, A2, A3, D1, D2, D3). oder drücken Sie die „Source“-Taste an der Frontblende. In der Anzeige wird die
ausgewählte Quelle angezeigt. Ein wiederholtes Drücken der SOURCE Taste schaltet sequenziell von
einer Quelle zur anderen um.
Automatische Signalerkennung und -umwandlung
Die Surround-Verarbeitungs-Technik Euphony HD der SLIMstage kann praktisch alle Arten von Signalen
wie z.B. Analog, Dolby Digital 2.0, Dolby Digital 5.1, DTS Digital Surround, DTS 96/24 oder PCM erkennen
und verarbeiten.
In der Anzeige wird angezeigt, ob es sich bei dem Signal, das die SLIMstage empfängt, um Dolby Digital
2.0, Dolby Digital 5.1, DTS Digital Surround, PCM oder Analog handelt.
Im Modus MUSIC, LIVE und MOVIE erweitert die EuphonyHD-Technologie der SLIMstage automatisch alle
2-Kanal-Eingangssignale (wie z.B. Stereo, Dolby Digital 2.0 oder PCM Stereo) auf 5.1-Kanal-Signale und
erzeugt daraus dann Surround-Klang.
Surround-Modus
Durch die EuphonyHD-Technik der SLIMstage stehen ein Stereomodus sowie drei verschiedene
Surround-Modi zur Verfügung. Der Surround-Modus kann über die Tasten „Surr” - und + auf der
Fernbedienung gewählt werden. Der gewählte Modus leuchtet kurzzeitig in der LCD-Anzeige auf und
wird danach in der vertikalen blauen Led-Leiste angezeigt.
0 LED . . . . . .Surround AUS .....Stereo / Bypass
1 LED . . . . . .MUSIC-Modus ..... leichter Surround-Effekt, ideal für Musik
2 LED . . . . . . . LIVE-Modus ......ideal für die meisten Fernsehsendungen
3 LED . . . . . .MOVIE-Modus ..... maximaler Surround, ideal für Actionfilme
Sofern im Setup-Menü (siehe ERWEITERT, EINGANGS-EINSTELLUNGEN, SURROUND) keine Änderungen
vorgenommen werden, aktiviert und behält die SLIMstage automatisch den letzten gewählten SurroundModus bei, bis ein anderer Modus oder eine andere Quelle gewählt wird.
Stummschaltung
Drücken Sie die Mute-Taste auf der Fernbedienung, um den Ton auszuschalten. MUTE wird in der
Anzeige
angezeigt. Wählen Sie eine beliebige Taste, um den Ton wieder einzuschalten.
Dynamische Klang Reduzierung, Nacht Modus
Mit der Taste „Night“ auf der Fernbedienung können Sie den Nacht-Modus einschalten. Im Nacht-Modus
wird der Dynamikumfang (die Differenz zwischen den lautesten und den leisesten Tönen) der SLIMstage
reduziert, um eine Störung von Nachbarn und Familienangehörigen zu vermeiden. Bei aktiviertem
Nacht-Modus wird im Display „Night“ angezeigt.
Verbesserung der Sprachverständlichkeit mit Dialog +
Mit der Taste Dialog + auf der Fernbedienung aktivieren Sie die Sprachverständlichkeits-Verbesserung.
Diese Schaltung verbessert die Verständlichkeit und Klarheit von Sprache. In der Anzeige wird das
Zeichen Dialog+ angezeigt.
2. Einstellungen
Lautstärke
Verwenden Sie zum Einstellen der Lautstärke VOL + / - auf der Fernbedienung, oder betätigen Sie die
Tasten + / – an der Frontplatte.
Hinweis: Die Lautstärke des Kopfhörers kann an der Frontplatte geregelt werden, wenn die
Lautsprecher ausgeschaltet sind.
Bass-Pegel
Stellen Sie den Bass-Pegels über die Tasten + / - auf der Fernbedienung ein. Der Bass-Pegel wird in der
Anzeige angezeigt. Die Einstellung des Bass-Pegels der internen Lautsprecher mittels der Fernbedienung
reguliert zugleich den Pegel eines externen Subwoofers, sofern ein solcher angeschlossen ist.
Surround-Pegel
Verwenden Sie die Tasten Surr Pegel + / - auf der Fernbedienung, um den Pegel des Surround-Klangs zu
verändern. Der Surround-Pegel wird in der Anzeige angezeigt.
EQ
Betätigen Sie die EQ-Taste auf der Fernbedienung, um eine voreingestellte Equalizer-Kurve zu aktivieren,
die eine alternative Klangbalance erzeugt. Die EQ-Kurve lässt sich unter SETUP -> EQ FERNBEDIENUNG
auswählen. Die Anzeige zeigt EQ an, wenn der EQ aktiviert ist.
Eingangsempfindlichkeit
Es kann vorkommen, dass der analoge Ausgang der Quelle und der Eingang einer AV-Komponente,
wie z.B. der SLIMstage, aufeinander abgestimmt werden müssen. Sollte der Signalpegel zu niedrig sein,
ein übermäßiges Zischen auftreten oder es zu einer vorzeitigen Überlastung der Lautsprecher kommt,
können Sie im SETUP unter, ERWEITERT, EINGANGS-EINSTELLUNGEN, EMPFINDLICHKEIT die analogen
Eingänge individuell abstimmen.
3. Kopfhörer
Verwenden von Kopfhörern
Die EuphonyHD-Kopfhörer-Technologie der SLIMstage sorgt für einen Surround-Klang und ein ganz
persönliches Kinoerlebnis direkt auf Ihrem konventionellen Kopfhörer. Schließen Sie den Kopfhörer
an der linken Minibuchse (3,5 mm) auf der Frontplatte an. Der Eingang wechselt automatisch und die
Lautsprecher werden abgeschaltet. Drücken Sie die
Kopfhörer (Stereo) zu verwenden. Die Lautstärke des Kopfhörers können über die Tasten „h-phone“ +/auf der Fernbedienung eingestellt werden.
, um die Lautsprecher gleichzeitig mit dem
Das Hinzufügen eines externen Tiefbasslautsprechers (Subwoofer)
Konsultieren Sie zur optimalen Einbindung und Leistung eines Tiefbasslautsprechers das SLIMstageEinrichtungshandbuch, Schritt 3, Anschließen eines zusätzlichen externen Subwoofers, sowie die
Bedienungsanleitung Ihres Tiefbasslautsprechers.
Hinzufügen von externen Surround-Lautsprechern
Externe Surround-Lautsprecher können zur Ergänzung des Surround-Klanges zur SLIMstage hinzugefügt
werden. (siehe Setup Menü: ERWEITERT, SURROUND-KANAL). Für weitere Informationen wenden Sie sich
bitte an Ihren örtlichen Fachhändler oder an die technische Support-Abteilung von Soundmatters.
4. Erweitert
RS-232-Schnittstelle
Die SLIMstage verfügt über einen RJ-11-Anschluss (Telefonstecker), durch den über eine RS-232Schnittstelle die Steuerung der SLIMstage mittels eines Computers oder eines externen Gerätes möglich
ist. Zusätzlich bietet der Anschluss über zwei entsprechende Pins auch die Möglichkeit, einen externen
IR-Sensor anzuschließen.
Weitere Informationen erhalten Sie unter www.soundmatters.com/support/downloads, oder wenden
Sie sich an Ihren Fachhändler oder Soundmatters-Kundenservice.
Sicherheitsabschaltung bei Überhitzung
Bei den digitalen Verstärkern der SLIMstage kommt die modernste Technologie zum EInsatz, die eine
klare Wiedergabe deutlich höherer Musikspitzen ermöglicht. Sollte das System bei sehr hoher Lautstärke
betrieben werden, die zu einer Überhitzung des Systems führen, wird in der Anzeige die Warnmeldung
„TMP“ angezeigt. Sobald Temperaturen erreicht werden, die zu Beschädigungen der SLIMstage führen
könnten, schalten sich die Verstärker automatisch ein und aus und in der Anzeige erscheint „PT“. Das
Ein- und Ausschalten kann sehr schnell hintereinander erfolgen und als Stottern empfunden werden.
Reduzieren Sie zur Deaktivierung des Überhitzungsschutzes einfach die Lautstärke.
DB-15-Service-Port
An der SLIMstage steht eine 15-Pin-Buchse z.B. für Wartungs- und Instandhaltungszwecke zur
Verfügung. Wenden Sie sich für nähere Informationen bitte an den Soundmatters-Kundenservice.
Page 23

44
45
Deutsch
5. Setup-Menüs
Die SLIMstage ist Plug-und-Play-bereit, darüber hinaus ermöglichen Ihnen
Setup-Menüs, akustische und funktionale Feinabstimmungen für
Ihre spezifische Anwendung vorzunehmen.
1. Drücken Sie für den Zugriff auf das Setup-Menü (oder um das Setup-Menü
zu verlassen) die SETUP-Taste.
2. Verwenden Sie die Richtungs-Tasten, um durch die Menüpunkte zu navigieren.
3. Durch Drücken der EXIT-Taste können Sie jederzeit in das vorherige Menü zurückspringen.
SETUP
LANGUAGE
ANZEIGE
RAUM
SUBWOOFER
EQ FERNBEDIENUNG
ERWEITERT
LANGUAGE
DE UT SCH
ESPANOL
ENGLISH
FRANCAIS
ITALIANO
SETUP
LANGUAG E
AN ZE IGE
RAUM
SUBWOOFER
EQ FERNBEDIENUNG
ERWEITERT
ANZEIGE
ABBLENDUNG
AUS
EIN
SETUP
LANGUAG E
ANZEIGE
R AUM
SUBWOOFER
EQ FERNBEDIENUNG
ERWEITERT
RAUM
HÖRDISTANZ
SURR BALAN CE
EQ
MITTENLAUTSPRECHER
HÖRDISTANZ
< 2 M
> 2 M
RAUM
HÖRDISTANZ
SURR BALA NCE
EQ
MITTENLAUTSPRECHER
SURR BALA NCE
L R
10……... ! ……… 10
A. Sprachen
}Eingabe: Wählen Sie LANGUAGE, dann die gewünschte Sprache und
drücken Sie danach die Eingabetaste(ENTER).
Ergebnis: Das gesammte SETUP-Menü wird nun in der ausgewählten
Sprache angezeigt.
B. Anzeige-Optionen
Das Anzeige der SLIMstage verringert standardmäßig automatisch nach
ca. 10 Sekunden die Helligkeit. Weitere Optionen sind die Funktionen Auto
Aus (automatische Abschaltung) und EIN(Dauerbetrieb).
}Eingabe: Wählen Sie ANZEIGE, dann ABBLENDUNG, AUS oder EIN und
drücken Sie danach die Eingabetaste(ENTER)
Ergebnis: Die Anzeige-Einstellungen werden gespeichert.
C. Raum-Einstellungen
Anpassung der Basisparameter der SLIMstage an Ihre
Raumverhältnisse für optimale Leistung
}Eingabe: Wählen Sie RAUM und drücken Sie die Eingabetaste
Ergebnis: Das Untermenü mit den ausgewählten Setup-Optionen wird
angezeigt
Einstellung der Hördistanz
}}Eingabe: Wählen Sie HÖRDISTANZ und drücken Sie die Eingabetaste
}}}Eingabe: Wählen Sie den gewünschten Abstand und drücken Sie
die Eingabetaste
Ergebnis: Die Hördistanz wird gespeichert und die Anzeige springt
zurück auf das Raum-Einstellungs-Menü
Einstellen der Surround-Balance
}}Eingabe: Wählen Sie SURR BALANCE und drücken Sie die Eingabetaste.
Ergebnis: SURR BALANCE wird angezeigt
}}Eingabe: Wählen Sie die gewünschte Einstellung und drücken Sie die
Eingabetaste
Ergebnis: Die neue Surround-Balance wird gespeichert
Tipp: Wenn die eine Seite des Hörbereiches (L oder R) ist akustisch aktive (zum
Beispiel, Glas oder hart reflektierende Wände), setzen Sie die Surround Balance
etwas zur Seite die den Ton absorbiert (zum Beispiel, Vorhänge, oder eine
Öffnung in einen andern Raum).
RAUM
HÖRDISTANZ
SURR BALAN CE
EQ
MITTENLAUTSPRECHER
EQ RESET
RAUM
HÖRDISTANZ
SURR BALAN CE
EQ
MITTENLAUTSPRECHER
PEGEL
-10 ……... 0 ……… 10+
SETUP
LANGUAG E
ANZEIGE
RAUM
SUBWOOFER
EQ FERNBEDIENUNG
ERWEITERT
SUBWOOFER
JA / NEIN
PEGEL
XOVER
PHASE
SUBWOOFER
JA
NE IN
SUBWOOFER
JA / NEIN
PE GE L
XOVER
PHASE
PEGEL
–10 ……... 0 ……… 10+
Setzen der Raum EQ Parameter
SLIMstage hat einen Equalizer der es möglich macht den Ton nach
Platzierung, Raumakustik und Ihrem Geschmack anzupassen
}}Eingabe: Navigieren Sie auf EQ, drücken Sie die Eingabetaste.
Ergebnis: Ein 10 Band Equalizer wird Angezeigt
}}}Eingabe: Schieben sie jeden Regler zum gewünschten Niveau und
drücken Sie die Eingabetaste
Ergebnis: Die EQ Einstellungen werden gespeichert und benützt
für alle Eingänge
Tipps: Der Raum EQ wird benutzt mit allen Eingängen. Unter erweiterten
Einstellungen der EQ für jeden Eingang kann individual eingestellt werden. Um
einen individuellen Eingang EQ wieder auf den Raum EQ umzuschalten wählen
Sie „EINGANG ZURUECKSETZEN“. Damit setzten Sie den Eingang wieder zurück
auf die Werkseinstellung.
Mittenlautsprecher Pegel:
Der Mittenlautsprecher Pegel kann um Platzierung und Raumakustik zu
kompensieren angepasst werden..
}}Eingabe: Wählen Sie MITTENLAUTSPRECHER, dann drücken Sie die
Eingabetaste
Ergebnis: Der Mittenlautsprecher Pegel wird angezeigt
}}}Eingabe: Wählen die den gewünschten Pegel, dann drücken Sie
die Eingabetaste
Ergebnis: Der Mittenlautsprecher Pegel wird gespeichert
D. Externer Tiefbasslautsprecher (Subwoofer)
Setzen der Tiefbasslautsprecher Ausgangsparameter
Diese Funktion ersetzt die Regler, die sich standardmäßig am
Tiefbasslautsprecher befinden.
An Ihrem externen Tiefbass Lautsprecher, setzen Sie das Volumen
auf Maximum, den Crossover (Übergangsfrequenz) auf die maximale
Frequenz und die Phase auf Null
Tipp: Die akustische Integration eines Tiefbasslautsprechers innerhalb eines
Audiosystems verlangt in der Regel ein gewisses Hin und Her zwischen der
Pegel Feinabstimmung und Crossover Frequenz.
Tiefbasslautsprecher (Subwoofer) Ja / Nein
}}Eingabe: Sollten Sie einen externen Tiefbasslautsprecher
angeschlossen haben, wählen Sie für das optimale Klangbild
SUBWOOFER, JA/NEIN, wählen Sie dann JA und drücken Sie die
Eingabetaste
Ergebnis: Die SLIMstage ändert die Übergangsfrequenz der
internen Basslautsprecher für einen optimalen Übergang zum
Tiefbasslautsprecher.
Tiefbasslautsprecher (Subwoofer) Ausgangspegel
Passen Sie den Tiefbasslautsprecher Ausgangs Pegel an für einen
reibungslosen Übergang zum eingebauten Basslautsprecher.
}}Eingabe: Wählen Sie PEGEL und drücken Sie die Eingabetaste
Ergebnis: Der Ausgangspegel des Tiefbasslautsprechers wird
angezeigt.
}}}Eingabe: Wählen Sie den gewünschten Subwoofer-Pegel und
drücken Sie die Eingabetaste
Ergebnis: Der Pegel wird gespeichert.
Tipp: Die BASS + / – Tasten auf der Fernbedienung ändern die Bass- und die
Tiefbasslautstärke
Page 24

46
47
Deutsch
SUBWOOFER
JA / NEIN
PEGEL
XOVER
PHASE
XOVER
250HZ 190HZ 143HZ
110HZ 82HZ 62HZ
43HZ
SUBWOOFER
JA / NEIN
PEGEL
XOVER
PH ASE
PHA SE
0 ........ 90 ........ 180
SETUP
LANGUAG E
ANZEIGE
RAUM
SUBWOOFE
EQ FE RNB ED IEN UN G
ERWEITERT
EQ RESET
SETUP
LANGUAG E
ANZEIGE
RAUM
SUBWOOFE
EQ FERNBEDIENUNG
ERWEITERT
o
Externer Tiefbasslautsprecher Crossover
Die Übergangsfrequenz (Crossover) ist voreingestellt für einen
reibungslosen Übergang zu den internen Basslautsprechern.
}}Eingabe: Wählen Sie die gewünschte Übergangsfrequenz dann drücken
Sie die Eingabetaste.
Ergebnis: Die Übergangsfrequenz wird gespeichert.
Tipp: Die Übergangsfrequenz sollte so niedrig wie möglich eingestellt werden,
ohne das ein Loch im musikalischen Spektrum entsteht
Externer Tiefbasslautsprecher Phase
Passt die Phase des Externen Tiefbasslautsprechers an für optimale Raum
integration
}}Eingabe: Wählen Sie den gewünschten Grad der Phase, und drücken Sie
die Eingabetaste
Ergebnis: Phase Einstellung wird gespeichert.
Tipp: Sollte Ihr Tiefbasslautsprecher eine Phase Anpassung haben, schalten Sie
diese auf 0°
E. EQ FERNBEDIENUNG
Einstellung eines speziellen EQ für die EQ Taste.
Design ein EQ speziell für Ihre beliebte Aktivität, zum Beispiel: Nachrichten,
klassische Musik oder Filme. Dann mit dem Druck der EQ-Taste auf der
Fernbedienung können Sie diesen speziellen EQ ein und ausschalten.
}}Eingabe: Navigieren Sie auf EQ Fernbedienung und drücken Sie die
Eingabetaste.
Ergebnis: 10 Band Equalizer wird angezeigt
Tipp: EQ-Anpassung ist in Echtzeit, so stellen Sie sicher, dass Sie Ihre bevorzugte
Aktivität einschalten bevor Sie die EQ Einstellung vornehmen.
}}}Eingabe: Bewegen Sie alle Schieberegler in die gewünschte Position,
drücken Sie die Eingabetaste
Ergebnis: Der gesetzte EQ wird gespeichert und Anzeige springt
zum Hauptmenu
}}Eingabe: Drücken Sie die EXIT Taste
Ergebnis: Das Menü System wird geschlossen
– ODER –
}}Eingabe: Navigieren Sie auf “ERWEITERT” und drücken Sie die
Eingabetaste.
Ergebnis: Erweiterte Setup-Optionen werden angezeigt
ERWEITERT
PRÄFEREN Z EINGANG
EINGAN GS EINSTELLUN GEN
SURROUND
IR
VERSCHLIESSEN
VERSION
RÜCKSTELLUNG
EINGANG
A1
A2
A3
D1
D2
D3
A2
EMPFINDLICHKEIT
SURR PRÄFE RENZ
EQ
ABSCHALTEN
ZURÜCKSETZEN
A2
–5……… 0 ………5+
ATTEN: –20DB
EIN A US
A2
EMPFINDLICHKEIT
SURR PRÄ FERENZ
EQ
ABSCHALTEN
ZURÜCKSETZEN
A2
LIV E
FI LM
LETZTE WAH L
STEREO
MUSIK
Setzen der Parameter für jeden Eingang
Individuelle Feinabstimmung der Charakteristika der einzelnen Eingänge.
}}Eingabe: Navigieren Sie zu EINGANGS EINSTELLUNGEN, drücken Sie die
Eingabetaste
Ergebnis: Die zur Verfügung stehenden Eingänge werden angezeigt
Hinweis: Ändern des aktiven Eingangs und Abspielen von Musik oder Filmen
ermöglicht echtzeit Anpassung der Empfindlichkeit und des Eingang EQ.
Eingangsempfindlichkeit Anpassung
Das Eingangs Empfindlichkeit Niveau der Analogeingäng A1, A2, A3 kann
individuell angepasst werden. Außerdem, Analog A2 verfügt über ein - 20dB
Abschwächer.
}}Eingabe: Wählen Sie EMPFINDLICHKEIT
Ergebnis: EMPFINDLICHKEIT Anpassung und Attenuator für -20db wird
angezeigt
Erstellen Sie Lautsprecherpegel-Eingang
Nur am A2 Eingang, können Sie ein Lautsprecher Ausgang
anschliessen. Wählen Sie A2 Attenuator –20db EIN.
Hinweis: Sie benötigen zur Anpassung ein Verbindungkabel vom
Lautsprecher Ausgang zu einer Stereo Mini Buchsen Stecker. Wenden
Sie sich bei Fragen bitte an den Kundendienst.
Wählen Sie die Surround-Modus Präferenz (Stereo, Music,
Live oder Movie) für jeden Eingang
}}Eingabe: Navigieren Sie zu SURR PRÄFERENZ und drücken Sie die
Eingabetaste
Ergebnis: Surround-Modus-Optionen werden angezeigt
}}}Eingabe: Wählen Sie den gewünschten Präferenz-Surround-Modus
und drücken Sie die Eingabetaste
Ergebnis: SLIMstage wird immer den gewählten Surround Präferenz
Modus benützen wenn der Eingang gewählt wird.
Tipp: Unabhängig von Ihrer Präferenz können Sie den Surround-Modus jederzeit
über die Fernbedienung verändern.
ERWEITERTE
PRÄFER ENZ EINGANG
EINGANGS EINSTELLUNGEN
SURROUND
IR
VERSCHLIESSEN
VERSION
RÜCKSTELLUNG
PRÄFERENZ
LETZTE WAH L
A1
A2
A3
D1
D2
D3
F. ERWEITERTE EINSTELLUNGEN
Setzen des PRÄFERENZ EINGANGES
Wenn Sie die SLIMstage einschalten, benutzt Sie immer den PRÄFERENZ
EINGANG
}}Eingabe: Navigieren Sie zu PRÄFERENZ EINGANG und drücken Sie die
Eingabetaste.
Ergebnis: Zeigt alle Eingänge und Letzte Wahl
Tipp: LETZTE WAHL ist die standardmäßige Werkseinstellung.
}}}Eingabe: Navigieren Sie zum gewünschten präferenz Eingang und
drücken Sie die Eingabetaste
Ergebnis: Der gewählte präferenz Eingang wird gespeichert und
setup spring zurück zum Erweiterten Setup Menü
A2
EMPFINDLICHKEIT
SURR PRÄFE RENZ
EQ
ABSCHALTEN
ZURÜCKSETZEN
A2 RESET
Setzen des Eingangs EQ
Für die meisten Anwendungen empfehlen wir, keinen Eingang EQ zu setzen.
Wenn Sie einen Eingang EQ setzen wird der Raum EQ abgeschaltet für den
Eingang
}}Eingabe: Navigieren Sie zu EQ und drücken Sie die Eingabetaste
Ergebnis: 10 Band Equalizer wird angezeigt
}}}Eingabe: Bewegen Sie jeden Schieberegler an die gewünschte
Position, dann drücken Sie die Eingabetaste
Ergebnis: Setzt den EQ für den gewünschten Eingang, dieser EQ wird
aktiv, jedesmal wenn der Eingang gewählt wird.
Hinweis: Um den Eingangs-EQ zu deaktivieren und den Raum EQ wieder
einzuschalten, wählen Sie ZURÜCKSETZEN oder RÜCKSTELLUNG.
Page 25

48
49
Deutsch
A2
EMPFINDLICHKEIT
SURR PRÄFE RENZ
EQ
ABSCHALTEN
ZURÜCKSETZEN
A2
AUS EI N
A2
EMPFINDLICHKEIT
SURR PRÄFE RENZ
EQ
ABSCHALTEN
ZURÜCKSETZEN
A2
JA NE IN
ERWEITERTE
PRÄFEREN Z EINGANG
EINGANGS EINSTELLUNGEN
SURROUND
IR
VERSCHLIESSEN
VERSION
RÜCKSTELLUNG
SURROUND
T YPE
PEGEL
EINGANG ABSCHALTEN
Eingang Abschalten bedeutet, dass der abgeschaltete Eingang
übersprungen wird, wenn Sie die SOURCE Taste auf der Frontblende drücken,
ebenso sollten Sie den Eingang auf der Fernbedienung wählen, antwortet
die SLIMstage nicht.
}}Eingabe: Navigieren Sie zu ABSCHALTEN und drücken Sie die
Eingabetaste
Ergebnis: Eingang ABSCHALTEN Optionen werden angezeigt
}}}Eingabe: Wählen Sie AUS oder EIN und drücken Sie die Eingabetaste
Ergebnis: Wenn AUS gewählt wird schaltet der Ausgang ab.
ACHTUNG: Vorsicht mit dieser Funktion… Wenn der Eingang
Abgeschaltet ist, verschwindet er, es sei denn, Sie schalten den Eingang
wieder EIN im Setup Menü order setzen alle Funktionen zurück auf die
Werkseinstellung.
Eingang ZURÜCKSETZEN auf die Werkseinstellung
Das Zurücksetzen auf Werkseinstellungen setzt alle Funktion zurück auf die
Werkseinstellungen und alle Feinabstimmungen die Sie gemacht haben für
den Eingang werden gelöscht.
}}Eingabe: Wählen Sie ZURÜCKSETZEN auf Werkseinstellungen und
drücken Sie die Eingabetaste
Ergebnis: Optionen werden angezeigt
}}}Eingabe: Wählen Sie JA oder NEIN und drücken Sie die Eingabe Taste
Ergebnis: Wählen sie JA werden alle Eingangseinstellungen auf die
Werkseinstellungen zurückgesetzt.
Externer Surround Kanal Ausgang
SLIMstage macht es möglich, einen externen hinteren Lautsprecher
zur Verbesserung des Surround-Effekts anzuschließen. Der Ausgang ist
abgeschaltet wenn die Kopfhörer angeschlossen sind.
Tipp: Um SLIMstage oder MAINstageHD als externen hinteren Lautsprecher
anzuschließen, brauchen Sie ein 3,5mm Stereo Audio Kabel. Verbinden Sie den
Rear Channel Ausgang mit dem Analog Eingang 1 der hinteren SLIMstage oder
MAINstageHD.
ERWEITERT
PRÄFEREN Z EINGANG
EINGANGS EINSTELLUNGEN
SURROUND
IR
VERSCHLIESSEN
VERSION
RÜCKSTELLUNG
IR
INTERN E XTERN
IR SENSO R
ZUM EINSCHA LTEN DES INT ERNEN
IR SENSOR S MUTE UND SOURCE KNO PF
FÜR 2 SEKUND EN DRÜCKEN
BESTÄTIGEN C AN CEL N
ERWEITERTE
PRÄFEREN Z EINGANG
EINGANGS EINSTELLUNGEN
SURROUND
IR
VERSCHLIESSEN
VERSION
RÜCKSTELLUNG
VERSCHLIESSEN
ZUM ÖFFNEN DI E TASTE SET UP,
LAUTSPREC HER, EXIT DRÜCKE N
CANCEL N VERRIEGELN
ERWEITERTE
PRÄFEREN Z EINGANG
EINGANGS EINSTELLUNGEN
SURROUND
IR
VERSCHLIESSEN
VERSION
RÜCKSTELLUNG
IR Sensor
SLIMstage kann über den Internen IR-Sensor, den optionalen Externen
IR-Sensor, oder über den RS-232 Port kontrolliert werden.
Normal ist INTERN. Wählen Sie EXTERN, wenn Sie die SLIMstage über
die RS-232 Schnittstelle kontrollieren (eingeschlossen wenn ein RF
Fernbedienungsadapter angeschlossen wird) oder, wenn Sie die SLIMstage
als Surround Lautsprecher benützen (um zu vermeiden, dass Ihre
IR-Fernbedienung aus Versehen die Einstellungen ändert).
}}Eingabe: Gehen Sie zu IR und drücken Sie die Eingabetaste.
Ergebnis: IR Sensor Optionen werden angezeigt
}}}Eingabe: Wählen Sie INTERN oder EXTERN, und drücken Sie die
Eingabetaste
Ergebnis: Wenn EXTERN ausgewählt wurde, wird ein
Bestätigungsmenü angezeigt.
WICHTIG: Drücken Sie die MUTE und SOURCE Tasten gleichzeitig für 2 Sekunden
um den Internen IR Sensor einzuschalten.
}}Eingabe: Wählen Sie BESTÄTIGEN oder CANCELN.
Ergebnis: Wählen Sie BESTÄTIGEN, schaltet der Interne Sensor
unverzüglich ab.
Tipp: Verbindung und Programmier Anweisungen, finden Sie auf der
Soundmatters Website.
VERSCHLIESSEN des Setup Menü
Verhindert versehentliche Setup-Änderungen
}}Eingabe: Navigieren Sie zu ERWEITERT, VERSCHLIESSEN und drücken
Sie die Eingabetaste.
Ergebnis: Das Menu verschließen wird angezeigt
}}Eingabe: Wählen Sie CANCELN oder VERRIEGELN und drücken Sie die
Eingabetaste
Ergebnis: Wählen Sie VERRIEGELN wird das Setup Menü gesperrt.
Zum Öffnen des Setup Menü drücken Sie in Sequenz die Tasten SETUP,
, EXIT auf der Fernbedienung
VERSION
Version zeigt Ihnen wichtige Informationen über Ihre SLIMstage
einschließlich Modell, Electronic Version, Software Version und
Seriennummer.
}}Eingabe: Navigieren Sie zu VERSION und drücken Sie die Eingabetaste.
TYPE
SL IM STAG E
MAINSTAGE HD
L & R LAUTSPREC HER
SURROUND
TYPE
PE GE L
PEGEL
–10 ……... 0 ……… 10+
Wählen Sie den Surround Lautsprecher Typ
}}Eingabe: Navigieren Sie im Setup Menü zu ERWEITERT, SURROUND,
TYPE wählen Sie den gewünschten Surround Lautsprecher und drücken
Sie die Eingabetaste.
Ergebnis: Der Surround Lautsprecher Ausgang wird optimiert für den
angeschlossenen hinteren Lautsprecher Typ.
Surround Lautsprecher Ausgangspegel
Anpassung des Ausgangspegels an einen externen Surround-Lautsprecher.
}}Eingabe: Wechseln Sie zu Pegel und drücken Sie die Eingabetaste.
Benützen Sie einen Film den Sie gut kennen und passen Sie den Pegel
an.
VERSION
MODEL: 4 0
ELECTRO: 1.00
SW: 1.0.0/1.0.0
SERIE #: S103500 0025
ERWEITERT
PRÄFEREN Z EINGANG
EINGANGS EINSTELLUNGEN
SURROUND
IR
VERSCHLIESSEN
VERSION
RÜ CK STE LLU NG
RÜCKSTELLUNG
AUF WERKS E INSTELLUNGEN
ZURÜCKSETZEN?
JA NE IN
Alle Einstellungen auf die Werkseinstellung
zurückstellen - RÜCKSTELLUNG
Das Zurücksetzen auf Werkseinstellungen setzt alle Funktion zurück auf die
Werkseinstellungen und alle Feinabstimmungen die Sie gemacht haben
werden gelöscht.
}}Eingabe: Wählen Sie RÜCKSTELLUNG und drücken Sie die Eingabetaste
Ergebnis: Optionen werden angezeigt
}}Eingabe: Wählen Sie JA oder NEIN und drücken Sie die Eingabe Taste
Ergebnis: Wählen sie JA werden alle Einstellungen auf die
Werkseinstellungen zurückgesetzt.
Drücken Sie EXIT, um zum vorherigen Menü zu wechseln
Drücken Sie EXIT nochmals um das Setup-Menü zu verlassen
Page 26

50
51
Deutsch
6. Häufig gestellte Fragen (FAQ)
Die aktuellsten FAQs finden Sie auf unserer Website unter www.soundmattters.com
Q1. Wie soll die SLIMstage aufgestellt und positioniert werden für beste Leistung?
SLIMstage funktioniert gut in nahezu allen Anwendungen, wie für alle Lautsprecher, kann mit ein
wenig Sorgfalt in der Platzierung die beste Leistung erreicht werden.
Beste Hi-Fidelity: Das System sollte auf den Hörer ausgerichtet sein, mit Hilfe der Neigungsfüße
oder der Wandhalter richten Sie die SLIMstage so aus dass Sie direkt auf den Hörer zeigt.
Wenn die SLIMstage in einem Wandregal sitzt, sollte das Gerät so weit wie möglich nach vorn
geschoben werden um den größten Abstrahlwinkel zu erzielen.
Bester Surround: Alle Surround-Systeme haben einen “Sweet Spot” einen Ort wo der SurroundEffekt maximiert ist. Die Größe dieses Gebietes variiert je nach Ihrer Entfernung von der
SLIMstage… wenn Sie näher als 2m von der SLIMstage sitzen, ändern Sie im Setup Menü, RAUM,
HÖRDISTANZ auf <2m.
Bester Bass: Platzierung eines Lautsprechers gegen eine schwere harte Oberfläche verstärken
den Bass. Je mehr Flächen gegen die SLIMstage sitzt, desto mehr Bass. Am wenigsten Bass wäre
schwimmend in der Mitte des Raumes. Der beste Bass wäre in einer Ecke auf dem Boden. Die
eingebauten Tieftöner sind auf der Unterseite der SLIMstage, deshalb muss ausreichend Platz
unterhalb der Einheit bleiben (ca. 2cm).
Q2. Der Bass ist überraschend gut für ein so kleines Geräte… aber ich will mehr! Kann
ich ein externer Subwoofer anschließen?
Ja, SLIMstage verfügt über eine Subwoofer Ausgang Buchse für den Anschluss an die akustisch
abgestimmten soundmatters SUBstage ™ Tieftöner oder praktisch jeden Hi-Fi Subwoofer
mit eingebautem Verstärker. SLIMstage’s Subwoofer Ausgang ist eine platzsparender 3.5mm
Mini-Klinkenstecker, wenn Sie nicht unsere SUBstage benützen, benötigen Sie ein 3.5mm MiniKlinkenstecker zu Cinch Adapter Kabel, für SUBstage ist das Kabel im Lieferumfang enthalten.
Q3. Ich liebe die SLIMstage, will aber mehr Lautstärke?
Hier sind einige Optionen – schließen Sie einen externer Subwoofer wie die SUBstage (oder zwei
SUBstage) an und / oder eine zusätzliche SLIMstage auf der Rückseite für die hinteren Kanäle und
/ oder ein Upgrade auf eine größere SLIMstage. Tritt das Problem nur bei der Verwendung einer
bestimmten Quelle auf, können Sie die Empfindlichkeit des Eingangs erhöhen (siehe “ERWEITERT,
EINGANGS EINSTELLUNGEN, EMPFINDLICHKEIT).
Q4. Wie kann ich die SLIMstage und meinen Fernseher von der gleichen Fernbedienung
kontrollieren?
Die SLIMstage Fernbedienungsfunktionen können einfach gelernt werden bei Universal
Fernbedienungen mit Lernfunktion. Die Lautstärke kann bei viele Fernseher, Kabel oder Satelliten
Fernbedienungen durch Eingabe eines Denon ® Verstärker Audio Code kontrolliert werden.
Wenden Sie sich an die Anweisungen Ihrer Fernseher Fernbedienung.
Q5. Um die SLIMstage mit meiner fortgeschrittenen Fernbedienung oder Home
Automation System zu integrieren brauche ich die IR-Codes der Fernsteuerung, wo finde
ich diese?
Die SLIMstage diskreten IR-Codes finden Sie im Download-Bereich auf www.soundmatters.com.
Q6. Kann ich die SLIMstage auch dann nutzen, wenn ich auf Übersee Reisen bin?
SLIMstages nutzt eine Hochleistungsnetzteil das für den Betrieb in fast jedem Haushalt weltweit
funktioniert. Spannung: 95-240VAC, 50/60Hz. Ersetzen Sie einfach das Netzkabel des externen
Netzteil-Modul.
Q7. Ist es empfehlenswert die SLIMstage gegen Überspannung zu schützen?
SLIMstage, wie alle elektronischen Geräte sollten gegen Überspannung geschützt werden.
Q8. Geht die SLIMstage von selbst in den energiesparenden Modus, oder muss ich
diesen aktivieren?
Die SLIMstage sollte durch Drücken der OFF / Standby-Taste auf der Fernbedienung ausgeschaltet
werden.
Darüber hinaus schaltet die SLIMstage nach 2 Minuten ohne Audio Eingangssignal automatisch
in den Energie-Spar Modus.
Q9. Beim Umschalten zwischen dem Normalmodus und dem Dialog+ Modus höre ich
manchmal einen großen Unterschied und manchmal gar keinen. Warum?
Es gibt eine Reihe von Gründen. Wenn der Basspegel aufs Maximum eingestellt ist, kann er den
Dialog+ überschatten. Wenn Sie Musik oder anderes Material hören das keine Stimmen hat, ist
der Unterschied klein.
7. Problemlösung
1. Problem: Das System liefert keinen Ton
Lösungen:
a. Überprüfen Sie, ob das gewünschte Quellgerät (d.h. DVD oder TV) eingeschaltet ist und
sich im Wiedergabemodus befindet
b. Sollten die Kopfhörer angeschlossen sein, stellen Sie sicher, dass die Lautsprecher nicht
ausgeschaltet sind.
c. Ist das Netzkabel an eine stromführende Steckdose angeschlossen und fest in das
SLIMstage-Netzteil eingesteckt, und ist das Netzteil an der Rückseite der SLIMstage
angeschlossen?
d. Ist der Lautstärkeregler an der SLIMstage ausreichend hoch eingestellt
e. Drücken Sie die Taste „Source“ auf der SLIMstage oder der Fernbedienung, um eine
aktive Eingangsquelle auszuwählen
2. Problem: Ich wähle eine Eingabequelle auf der Fernbedienung, aber diese wird nicht
angezeigt
Lösung:
a. Die Eingangsquelle ist “abgeschaltet”… Siehe ERWEITERT, EINGANGS EINSTELLUNGEN,
ABSCHALTEN? im Setup-Menü.
3. Problem: Nicht genügend Bässe
Lösungen:
a. Erhöhen Sie den Basspegel über die Fernbedienung
b. Erhöhen Sie den Basspegel im Setup-Menü
c. Siehe auch FAQ / Q1 zum Einfluss der Platzierung auf die Basswiedergabe
d Schließen Sie zusätzlich einen SUBstage-Subwoofer an!
4. Problem: Ich höre keinen oder nur unzureichenden Surround-Sound
Lösungen:
a. Stellen Sie sicher, dass Sie sich im Musik-, Live- oder Movie- (und nicht im Stereo-) Modus
befinden. Der Movie-Modus bietet den meisten Surround-Sound.
b. Stellen Sie sicher, dass Sie sich in einer Hörposition innerhalb eines 45-Grad-Winkels von
der Mitte der SLIMstage aus befinden, dem sogenannten “Sweet Spot”
c. Stellen Sie sicher, dass alle EQ- & Surround-Modi, die in den DVD-Player oder andere
Quellkomponenten integriert sind, deaktiviert wurden!
d. Siehe auch unter FAQ / Q1 zur richtigen Platzierung
e. Schließen Sie zusätzlich Aktivlautsprecher an, die Sie im hinteren Bereich des Raumes
positionieren.
5. Problem: Instabile oder keine Funktion der Fernbedienung
Lösungen:
a. Stellen Sie sicher, dass die Batterien neu sind
b. Drücken Sie die MUTE und SOURCE Tasten gleichzeitig für 2 Sekunden um den Internen
IR Sensor einzuschalten.
6. Problem: Diffuses Klangbild
Lösungen:
a. Stellen Sie sicher, dass bei allen an die SLIMstage angeschlossenen Quellen sämtliche
DSP-/Surround-/Klangverbesserungs-Modi deaktiviert sind
Page 27

52
53
Deutsch
b. Überprüfen Sie im Abschnitt Eingangs Empfindlichkeit, dass die Empfindlichkeit nicht zu
hoch gesetzt ist, da dies zu einer Überlastung des Audioeingangs führen kann.
7. Problem: Das System scheint zu „hängen“ bzw. reagiert nicht mehr
Lösung:
a. Die Elektronik der SLIMstage umfasst einen leistungsfähigen Mikroprozessor. Sollte das
Gerät instabil laufen, ziehen Sie den Netzstecker einfach für 15 Sekunden aus der Steckdose
und stecken ihn dann wieder ein, um den internen Computer wieder auf Normalbetrieb
zurückzusetzen.
8. Problem: In der Anzeige erscheint „TMP“ oder „PT“ und die Lautsprecher schalten ein
und aus
Lösung:
a. Der Überhitzungsschutz wurde aktiviert ... Reduzieren Sie die Lautstärke.
9. Problem: Die Lautstärke ist zu gering
Lösungen:
a. Erhöhen Sie, wenn möglich, die Ausgangsleistung am verwendeten Quellgerät.
b. Erhöhen Sie die Eingangsempfindlichkeit, siehe ERWEITERT, EINGANGS EINSTELLUNG,
EMPFINDLICHKEIT.
10. Problem: Anschluss an Kabel-TV-Box besteht, es gibt aber keinen Ton
Lösungen:
a. Leider besitzen einige Kabel-TV-Boxen digitale oder sogar analoge (Cinch rot/weiß) AudioScheinausgänge (die im Inneren der Box nicht verkabelt sind). Wenden Sie sich an Ihren
Kabel-TV-Anbieter, um die Ausgabemöglichkeiten Ihrer Box zu überpüfen.
b. Wenn Sie den digitalen Audioausgang Ihrer Kabel-TV-Box benutzen, kann es vorkommen,
dass dieser nur auf einem HDTV-Kanal funktioniert. Um die Ausgabe der Audiosignale auf
anderen Kanälen zu ermöglichen, müssen Sie auch eine Verbindung zum analogen AudioAusgang herstellen und auf der SLIMstage auf die korrekte Eingabequelle umschalten.
11. Problem: Optisches Kabel passt nicht
Lösungen:
a. Stellen Sie sicher, dass die transparenten Schutzkappen von den Kabelenden entfernt
wurden
b. Einige Ersatzkabel von Fremdherstellern haben zu große Stecker- “Mäntel” und passen
möglicherweise nicht.
12. Problem: Ich habe keinen Zugriff auf das SETUP-Menü
Lösung:
a. Der SETUP-Zugriff ist gesperrt. Drücken Sie auf der Fernbedienung nacheinander die Tasten
SETUP,
, EXIT.
8. Technische Daten
SLIMstage 5.1 Surround-Sound-Konsole
• Surround-Algorithmen: Euphony™ HD dekodiert Analog, PCM, Dolby Digital 2.0/5.1, DTS Digital
Surround, DTS 96/24
• 5.1-Kanal-Dekodierung: Dolby Digital, DTS Digital Surround, DTS 96/24
• 2.0-Kanal-Dekodierung: Dolby Digital, PCM
• 2-Kanal-bis 5-Kanal-Konvertierung: Euphony ™ HD
• Leistung: Klasse-D-Verstärker (RMS-Leistung mit Klirrfaktor von <0,8%)
SLIMstage 30 - Satelliten 80W, Woofers 60W
SLIMstage 40 - Satelliten 80W, Woofers 90W
SLIMstage 50 - Satelliten 80W, Woofers 130W
• Maximaler SPL @ 1m: •
SLIMstage 30 - 103dB
SLIMstage 40 - 106dB
SLIMstage 50 - 109dB
• Hauptlautsprecher:
SLIMstage 30 - je 4, 50x50mm, mit patentierten LMD Neo-Sandwich-Magneten
SLIMstage 40 - je 4, 50x50mm, mit patentierten LMD Neo-Sandwich-Magneten
SLIMstage 50 - je 4, 50x50mm, mit patentierten LMD Neo-Sandwich-Magneten
• Woofer-Reihen:
SLIMstage 30 - 2 Woofer-Reihen *
SLIMstage 40 - 3 Woofer-Reihen *
SLIMstage 50 - 4 Woofer-Reihen *
* Jede Lautsprecherreihe umfasst einen aktiven Hochleistungs-Woofer, 75mm, mit
patentierten LMD Neo-Sandwich- Magneten, und-zwei Bassradiatoren, 75mm
• Stromversorgung: Digital, 95-265Vac, 50/60 Hz, 36V
• Eingänge (6)
Analog 1 - Stereo 3,5 mm
Analog 2 - Stereo 3,5 mm mit 20dB Dämpfung für Lautsprecher-Eingangspegel
Analog 3 - Stereo 3,5 mm Frontblende, mit automatischer Umschaltung
Digital 1 - SP/DIF Koax
Digital 2 - Optisch / TosLink
Digital 3 - Optisch / TosLink
• Ausgänge (3)
Analog: Subwoofer-Ausgang - Stereo 3,5 mm
Analog: Kopfhörer (Euphony Virtual Surround)-Stereo 3,5 mm
Hintere Kanal-Ausgänge
• Lieferumfang
IR-Fernbedienung
Netzteil mit Kabel
EZ-Tilt™-Stellfüße mit Erhöhungseinsatz
Wandhalterung für Wandmontage inklusive Montagezubehör
je 1 - optisches Kabel, 3m
je 1 - 3,5 mm Miniklinken-Kabel, 3m
je 1 - 3,5 mm Miniklinke auf Cinch-Stereo-Kabel (männl.)
je 1 - digitales Koax-Cinch-Kabel, 3m
• Regler
Master, Kopfhörer-Lautstärke (Fernbedienung und Frontblende)
Subwoofer-Pegel (nur Fernbedienung)
Quelle auswählen, Stumm (Fernbedienung und Frontblende)
Surround/Stereo (nur Fernbedienung)
• Modi: Ein, Mute, Aus / Standby
• Aus / Standby-Leistungsaufnahme: 2W oder weniger
• Gewicht (ca.):
SLIMstage 30 - 7,5 kg
SLIMstage 40 - 8,5 kg
SLIMstage 50 - 9,5 kg
• Abmessungen:
SLIMstage 30 (BxHxT) - 790 x 88 x 93mm
SLIMstage 40 (BxHxT) - 990 x 88 x 93mm
SLIMstage 50 (BxHxT) - 1206 x 88 x 93mm
Höhe mit EZ-tilt-Stellfüßen, alle Modelle (H) - 112mm
Höhe mit Füßen + Erhöhungseinsatz, alle Modelle (H) - 132mm
Tiefe inklusive Wandhalterung, alle Modelle (T) - 127mm
soundmatters ® hat sich dem Grundsatz der kontinuierlichen Produktverbesserung verschrieben,
weshalb Änderungen bezüglich der technischen Spezifikationen auch ohne vorherige Ankündigung
vorbehalten sind.
Page 28

54
55
Deutsch
9. Garantie / Service
Zwei Dinge sind nötig, um eine problemlose Abwicklung des Services für den Fall sicherzustellen,
dass Reparaturen im Rahmen Ihres Garantieanspruchs erforderlich sind.
1. Bewahren Sie Ihren Original-Kaufbeleg an einem sicheren Ort auf. Eine Kopie der Quittung wird
benötigt, um Garantieleistungen in Anspruch nehmen zu können.
2. Stellen Sie sicher, dass Ihr Einzelhändler das Datum, die Modell-Nummer und die Seriennummer
(sofern zutreffend) des Gerätes auf dem Kaufbeleg notiert hat. Um sich noch zusätzlich
abzusichern, sollten Sie sich die detaillierten Informationen zu Ihrem Kauf gesondert notieren
und an einem sicheren Ort aufbewahren. Für den Fall, dass Sie den Kaufbeleg verlegen, kann
Ihnen Ihr Händler möglicherweise eine Kopie zur Verfügung stellen.
Nehmen Sie sich einen Moment Zeit, die für Sie geltenden Garantiebestimmungen durchzulesen.
Bei Einsendung eines Produktes für Servicezwecke gilt:
• Senden Sie eine E-Mail an Soundmatters oder nehmen Sie telefonisch Kontakt auf, um die korrekte
Lieferadresse für Wartungs- und Reparaturarbeiten und eine Rücksendung Autorisation Nummer
zu erhalten. Notieren Sie diese Nummer unbedingt auf der Versandettikette und legen Sie eine
Kopie Ihres Original Kaufbelegs mit Kaufdatum, Modell Nummer und der Serien Nummer des
Gerätes bei.
• Versenden Sie Geräte immer in der vollständigen Originalverpackung.
• Vermeiden Sie den Versand von Geräten per Post. Sollte dies zwingend nötig sein, sollten Sie das
Paket per Einschreiben und versichert verschicken.
soundmatters limitierte Garantie
• soundmatters International, Inc. (soundmatters) gewährt dem ursprünglichen Kunden/Käufer eine
Garantie dass, das soundmatters Produkt in diesem Handbuch beschrieben, frei von Defekten in
Material und Verarbeitung ist, für einen Zeitraum von zwei (2) Jahre vom Datum des Kaufes.
• soundmatters alleinige Verpflichtung im Rahmen dieser Garantie besteht darin, kostenfrei Teile
und Arbeit zur Verfügung zustellen zur Behebung der Mängel, falls vorhanden, während der
Garantiezeit.
• Diese Garantie ist die einzige und ausschließliche Garantie in Bezug auf das Produkt.
• Alle anderen Gewährleistungen sind hiermit ausgeschlossen.
• Weder soundmatters noch der autorisierte Händler der das Produkt verkauft, ist verantwortlich
für Indirekte, Zufällige oder Folgeschäden. Einige Staaten erlauben keinen Ausschluss oder
Einschränkung von Zufälligen oder Folgeschäden, so dass die obige Einschränkung oder
Ausschluss möglicherweise nicht auf Sie zutreffen. Diese Garantie gibt Ihnen bestimmte
gesetzliche Rechte und Sie haben auch andere Rechte, die sich von Staat zu Staat unterscheiden.
Diese Garantie ist beschränkt auf:
• Produkte, die von autorisierten soundmatters Händlern gekauft werden. Auf Anfrage liefert
soundmatters eine Liste der autorisierten Händler.
Um Service zu erhalten, müssen Sie:
• Das Produkt mit Fracht bezahlt im Voraus und versichert versenden, zu Ihrem soundmatters
Händler von dem Sie das Produkt erworben haben, eine soundmatters autorisierte Service
Agentur, ein soundmatters autorisierter Distributor oder zu Soundmatters International. Bei
Bedarf können Sie vom soundmatters Kunden Service eine Liste der Anschriften der zugelassenen
unabhängigen Service-Agenturen in Ihrer Nähe bekommen.
• Den Kaufnachweis in Form einer Kopie des Original Kaufbeleges mit Datum, Modell-Nummer und
Seriennummer (sofern vorhanden) des Produktes beilegen.
Diese Garantie schliesst aus:
• Schäden die das Ergebnis von Missbrauch, Misshandlung, Unfall (einschließlich, aber nicht
beschränkt auf Schäden durch Wasser) sind, Anschluss fehlerhafter oder falsch eingestellter
Geräte, oder die Verwendung des Produktes mit Geräten, für die es nicht beabsichtigt war.
• Kosmetische Mängel, die über dreißig (30) Tage nach dem Datum des Kaufs auftreten. Kosmetische
Schäden die durch unsachgemäße Handhabung entstehen sind ebenfalls ausgeschlossen.
• Produkte, die für kommerzielle Zwecke genutzt werden.
• Die Kosten für die Entfernung oder Neuinstallation des Produktes.
• Schäden, die entstehen wenn das Produkt zum Service versand wird. Siehe oben die Versand
Informationen.
Diese Garantie ist nichtig, wenn:
• Die Produkt Identifizierung oder Seriennummernaufkleber entfernt ist oder unleserlich ist in
irgendeiner Weise.
• Das Produkt repariert oder gewartet wird bei nicht soundmatters autorisierten Händlern oder
Service-Agenturen.
Für Garantie Informationen kontaktieren Sie bitte:
soundmatters international, inc
reno, nv 89501
phone: 775 981 1460
in the usa 800-698 SOMA (7662)
email: service@soundmatters.com
web: www.soundmatters.com
Dolby und das Doppel-D symbol sind Warenzeichen von
Dolby Laboratories.
Hergestellte unter der Lizenz nach U.S. Patent #’s: 5,451,942;
5,956,674; 5,974,380; 5,978,762; 6,487,535 & andere U.S. und
weltweite Patente ausgestellt & anhängig. DTS und DTS Digital
Surround sind eingetragene Warenzeichen un das DTS logo
und Symbol sind Warenzeichen von DTS, Inc.
© 1996-2007 DTS, Inc. Alle Rechte vorbehalten.
EUPHONY HD ist ein Warenzeichen von DiMAGIC Co. Ltd
Soundmatters ist ein Warenzeichen von Soundmatters
International Inc.
Page 29

56
57
Español
Precauciones importantes de seguridad
PRECAUCIÓN – Riesgo de descarga eléctrica – No abra
1. Lea las instrucciones – todas las instrucciones de seguridad y operación deben ser leídas antes de operar el
producto.
2. Mantenga estas instrucciones – las instrucciones de seguridad y operación deben ser retenidas para una referencia
futura.
3. Tome en cuenta todas las advertencias – todas las advertencias en el producto y la guía del usuario deben ser
consideradas.
4. Siga todas las instrucciones – todas las instrucciones de operación y uso deben ser seguidas.
5. Para reducir el riesgo de incendio o descarga eléctrica, no exponga este aparato a la lluvia o humedad – el
producto no debe ser usado cerca del agua – por ejemplo, cerca de la tina de baño, lavabo, fregadero, tina de lavandería, en
el sótano, o cerca de una alberca y algo parecido. El aparato no deberá ser expuesto al agua goteando o salpicando y objetos
que estén llenos con líquidos, como jarrones, no deberán ser colocados sobre el aparato.
6. Limpiar solamente con un paño seco.
7. No bloquee ninguna abertura de ventilación. Instale de acuerdo con las instrucciones del fabricante. Las aberturas
en el gabinete son proporcionadas para ventilación y para asegurar una operación fiable del producto y para protegerlo de
sobrecalentamiento, y estas aber turas no deben ser bloqueadas o cubiertas. Al colocar el producto sobre una cama, sofá,
alfombra o una superficie similar nunca deberá bloquear las aberturas. El producto no deberá colocarse en una instalación
construida como un librero o estante al menos que una ventilación apropiada sea proporcionada o las instrucciones del
fabricante han sido consideradas.
8. No instale cerca de una fuente de calor como radiadores registros de calor, estufas, u otros aparatos (incluyendo
amplificadores) que produzcan calor.
9. No ignore el propósito de seguridad de la clavija polarizada o aterrizada. Una clavija polarizada tiene dos
láminas, una mas ancha que la otra. Una clavija aterrizada tiene dos láminas y una tercera para aterrizamiento. La
lámina mas ancha o el tercer lamina es proporcionada para su seguridad. Si la clavija proporcionada no coincide con su
tomacorriente, consulte aun electricista para el reemplazo del tomacorriente obsoleto.
10. Cordones Eléctricos y Adaptadores Eléctricos – utilice solamente los cordones eléctricos y adaptadores eléc tricos
proporcionados por el fabricante del producto.
Nunca enrede un cordón eléctrico alrededor del adaptador eléctrico o de otro objeto. Si lo hace puede tensionar el cordón
eléctrico y causar grietas o quemaduras. Esto puede presentar un riesgo de seguridad.
Siempre dirija los cordones de manera que no camine sobre ellos, se tropiece o los pinche con otros objetos.
Proteja el cordón y adaptador eléctrico de líquidos por ejemplo, no los deje cerca de un fregadero, tina, inodoro o sobre
pisos que sean limpiados con líquido limpiador. Los líquidos pueden causar un corto circuito, particularmente si el
cordón y el adaptador han sido tensionados por mal uso. Los líquidos también pueden causar una corrección gradual de
las terminales del cordón y/o de las terminales del conector en el adaptador, donde puede eventualmente resultar un
sobrecalentamiento.
Siempre asegúrese que todos los conectores de los cordones estén asegurados y completamente conectados en los
tomacorrientes.
No use una adaptador que muestre corrosión en los pines de entrada CA y/o muestre signos de calentamiento (como
plástico deformado) en la entrada CA o en cualquier parte del adaptador.
No use ningún cordón donde los contactos eléctricos o cualquier Terminal muestre signos de corrosión o sobrecalentamiento
o donde el cordón muestre que ha tenido algún daño.
11. Solo use accesorios especific ados por el fabricante.
12. Utilice solo el carro, estrado, tripie, soporte o mesa especificada por el fabricante,
o vendidos con el aparato. Cuando el carro sea usado, tenga precaución cuando mueva la
combinación carro/aparato para evitar una lesión al voltearse. Al colocar el producto en una
lugar inestable como un carro inestable, soporte o mesa, pueden causar que el producto se caiga,
causando lesiones serias a un niño o a un adulto, y danos serios al producto.
13. Desconecte el aparato durante tormentas eléctricas o cuando no este en uso por un periodo de tiempo
largo. Un filtro de sobrecarga también puede prevenir el daño y es recomendado.
14. Dirija todos los ser vicios al personal calificado de servicios. El servicio es requerido cuando el aparato ha
sido dañado de alguna forma, como cuando el cordón de la fuente de alimentación o clavija sean dañadas, liquido ha
sido derramado o algún objeto se ha caído sobre el aparato, el aparato ha sido expuesto a la lluvia o humedad, no opere
normalmente o se ha caído.
15. Este producto debe ser operado solamente con el tipo de fuente de energía indicada en la etiqueta de
mercadeo. Si no esta seguro del tipo de fuente de energía en su casa, consulte su proveedor del producto o la compañía
local de energía. Para productos diseñados para operar con baterías u otras fuentes, diríjase a las instrucciones de
operación.
16. Sobrecarga – no sobrecargue los tomacorrientes de pared, extensiones o tomacorrientes integrales, si lo hace puede
causar un riesgo de incendio o descarga electrica.
17. Entrada de un objeto y un liquido – nunca presione objetos de cualquier tipo en el producto a través de las
aberturas, porque pudieran tocar puntos con voltajes peligrosos o pueden poner en corto partes que pueden resultar en un
incendio o descarga eléctrica. Nunca derrame algún liquido sobre el producto. Ajuste solo los controles que estén cubiertos
en las instrucciones de operación, un ajuste impropio de otros controles pudiera dañar y a menudo requerirá un trabajo
extensivo por un técnico calificado para restaurar este producto a su operación normal.
18. Reemplazo de partes – cuando se requiera un reemplazo de par tes asegúrese que el técnico de servicio ha usado
partes del reemplazo especificadas por el fabricante o tiene las mismas características que las partes originales.
Sustituciones no autorizadas pudieran causar un incendio, descarga electrica o algún otro peligro.
19. Cuando se complete cualquier servicio o reparación de este producto, pida al técnico de servicio que realice
revisiones de seguridad para determinar que el producto esta en condiciones apropiadas de operación.
20. No intente dar servicio a este producto usted mismo, abriendo o removiendo cubiertas pudiera exponerse a
voltajes peligrosos u otros peligros. Dirija todos los ser vicios al personal calificado de servicios.
21. Montaje del soporte de pared – diríjase al fabricante del soporte de montaje para instrucciones, confirme que el
soporte esta seguramente montado al SLIMstage y a la pared de una manera que no se aflojara durante la operación del
producto.
ADVERTENCIA Para reducir el riesgo de incendio o descarga eléctrica, no exponga este aparato a la lluvia o
humedad.
Page 30

58
59
Español
Conexiones y Colocación
NOTA IMPORTANTE: Antes de utilizar este manual de operación, por favor sigua las
instrucciones en la guía de configuración para hacer todas las conexiones y la posición
apropiada del SLIMstage.
Diseno del control del panel frontal
F.
Volumen
maestro
subir
(controla
volumen
de audífonos
cuando
bocinas están
apagadas)
remoto IR
Q.
Bypass
G.
Sensor
Entrada
“iPod”/
análoga
(cambio
automático
vía conector
1/8” 3.5mm –
anula todas
las entradas
traseras)
A.
EuphonyHD
Surround
Virtual Eufónico
para Audífonos
(vía conector 1/8”,
3.5mm)
Indicador de
encendido
H.
Mudo /
No-Mudo
Entrada / fuente
B.
I.
Seleccionar
fuente
(secuencia
a través de
entradas)
C.
D.
Estatus del
volumen
J K L M N O
J. Dolby D2.0, Dolby D5.1,
DTS, PCM, Análogo
seleccionado
K. Escuchando de noche
L. Dialogo + encendido
M. Modo ESTEREO, MÚSICA,
EN VIVO, PELICULA
N. Preajustar EQ
O. Bocinas apagadas
se usan audífonos)
P. Aviso protección de
sobrecarga térmica
P
(cuando
E.
Volumen
maestro
bajar
(controla
volumen
de audífonos
cuando
bocinas están
apagadas)
Indicador
de Modo
Surround
3 LED = Película
2 LED = En Vivo/TV
1 LED = Música
0 LED = Estereo/
R.
Diseno del control remoto
1. Encender & Apagar EQ Vocales
2. Escuchando de noche
(Encender & Apagar)
3. Encender & Apagar Bocinas
(con audífonos conectados)
7. Seleccionar entrada: Análoga 1
8. Seleccionar entrada: Análoga 2
10. Seleccionar entrada: Digital 1
14. Subir nivel de bajos
(incluyendo el sub externo)
15. Bajar nivel de Bajos
(incluyendo el sub externo)
20. Menú Siguiente/Subir
21. Menú Anterior/Bajar
25. Entrar modo de ajuste
4. Apagar / Modo de espera
5. Encender & Apagar EQ
preajustado
6. Volumen de audífonos Bajar & Subir
9. Seleccionar entrada: Análoga 3 (frontal)
11. Seleccionar entrada: Digital 2
12. Seleccionar entrada: Digital 3
13. Bajar y Subir Surround
(a través de 4 posiciones)
16. Mudo
17. Subir volumen maestro
18. Bajar volumen maestro
19. Subir & Bajar nivel del surround
(o nivel trasero si esta ajustado
para traseros externos)
22. Ajustar/Entrar
23. Menú Siguiente/Derecho
24. Menú Anterior/Izquierdo
26. Salir al Menú anterior
Contenido página
• Seguridad. . . . . . . . . . . . . . . . . . . . . 56
• Conexiones y Colocación . . . . . . . . . . . 58
• Panel frontal y control remoto. . . . . . . 58-59
1. Operación . . . . . . . . . . . . . . . . . . . . 60
2. Ajustes . . . . . . . . . . . . . . . . . . . . . . 60
3. Audífonos. . . . . . . . . . . . . . . . . . . . . 61
4. Avanzado . . . . . . . . . . . . . . . . . . . . . 61
5. Menús de Configuración . . . . . . . . . . . 62
6. FAQ. . . . . . . . . . . . . . . . . . . . . . . . . 68
7. Solución de problemas . . . . . . . . . . . . 69
8. Especificaciones. . . . . . . . . . . . . . . . . 70
9. Garantía/Servicio . . . . . . . . . . . . . . . . 72
Page 31

60
61
Español
1. Operación
Encender/Apagar
Encienda el SLIMstage presionando cualquier botón sobre el panel frontal o control remoto.
Apague presionando el botón apagar/espera del control remoto.
APAGAR/ESPERA – Desenergiza todos los componentes excepto el sensor IR. El consumo de
energía es menos de 2.0W
Selección de Entrada/Fuente
Para seleccionar la fuente presione el botón de entrada deseado en el control remoto (A1,
A2, A3, D1, D2,D3), o secuencie las entradas vía botón del panel frontal. La pantalla indicara la
fuente seleccionada. Presionando repetidamente el botón frontal cambiara la unidad a través de
las entradas de la fuente secuencialemente.
Detección y Conversión Automática de la Señal
La tecnología EuphonyHD de procesamiento surround del SLIMstage puede manejar
virtualmente todo tipo de señales incluyendo análogas, Dolby Digital 2.0, 5.1, DTS Digital
Surround, DTS 96/24 o PCM.
La pantalla indicara si la señal recibida por el SLIMstage es Dolby Digital 2.0, 5.1, DTS, PCM o
análoga.
En los modos MÚSICA, EN VIVO, y PELÍCULA, la tecnología EuphonyHD del SLIMstage
automáticamente convierte las 2 fuentes del canal ( como Estereo, Dolby 2.0, o estereo PCM) a
surround.
Modo Surround
El EuphonyHD del SLIMstage provee de estereo y tres modos diferentes surround los cuales
pueden ser seleccionados con los botones – + del modo “surr” del control remoto. El modo
seleccionado se remarcara momentáneamente en la pantalla LCD y continuara desplegada en la
barra LED azul vertical.
No LED . . SURR APAGADO ...Estereo/Bypass
1 LED ....... MUSICA .......Efecto surround suave, ideal para música de sala
2 LED ....... EN VIVO .......Surround ideal para la mayoría de los shows de TV
3 LED .......PELÍCULA ......Surround máximo – lo mejor para películas de acción
Al menos que este cambiado en el menú de configuración (vea ajustes avanzados-PARÁMETROS
DE ENTRADA > MODO SURR), el SLIMstage se encendra y retendrá el ultimo modo sur
seleccionado hasta que usted seleccione otro modo o fuente.
Mudo
Para enmudece el sonido presione el botón mudo. MUDO estará indicado en la pantalla.
Seleccione cualquier botón para desenmudecer.
Escuchando de noche
Utilice el botón música de noche del control remoto para enganchar/desenganchar el circuito
de música de noche el cual reduce el alcance dinámico (diferencia entre los sonidos mas fuertes
y mas débiles) para hacer mas fácil el evitar molestar vecinos o los amados durmiendo. Muestra
NOCHE en la pantalla.
Circuito de claridad de voz Dialog+
Usando el botón Dialog+ del control remoto para enganchar/desenganchar el circuito el cual
provee una salida adicional y claridad a las frecuencias vocales típicas. Se muestra en la pantalla
cuando esta activo.
2. Ajustes
Volumen
Para ajustar el nivel de volumen use el botón + y – del control remoto, o use los botones del
panel frontal (+ y –).
Nota: si los audífonos están conectados con las bocinas apagadas el panel frontal controlara el
nivel de los audífonos..
Nivel del Bajo
Use el control remoto para ajustar el bajo + o -. El nivel relativo del bajo será mostrado en la
pantalla del panel frontal. Ajustando el bajo desde el control remoto también ajustara el nivel
de un subwoofer externo, como el soundmatter SUBstage, si es conectado.
Nivel surround
Use el botón nivel surr del control remoto para incrementar o desincrementar el nivel de las
bocinas surround. El nivel surround será mostrado en la pantalla del panel frontal.
EQ
Utilice el botón EQ del control remoto para adherir una curva de ecualización preajustada
(vea CONFIGURAR > EQ REMOTO) proveyendo un balance de tono alterativo. Curva EQ en la
pantalla.
Sensibilidad de la entrada
Es posible tener una desigualdad entre la salida de la fuente y la entrada de un componente
AV (como el SLIMstage) esto causa un bajo nivel/exceso de silbido, o sobrecarga/distorsión
prematura. Vea ajustes avanzados: PARÁMETROS DE ENTRADA > SENSIBILIDAD.
3. Audífonos
Usando los audífonos
Con su circuito de audífonos, el SLIMstage entrega una experiencia de teatro personal desde
unos audífonos convencionales. Conecte los audífonos vía lado izquierdo del panel frontal en
el receptáculo 1/8” (3.5mm). Esto apagara las bocinas. Presionando el botón
remoto permitirá oírse las bocinas y los audífonos simultáneamente (estereo playback).
Utilice los botones H-phone vol -/+ en el control remoto para ajustar el nivel de los audífonos
separadamente de la salida de las bocinas.
en el control
Agregando un Subwoofer Externo
Diríjase a la guía de configuración del SLIMstage, sección C del menú y al manual de
instrucciones del subwoofer para optimizar el funcionamiento y la integración del subwoofer.
Agregando Bocinas Traseras Externas
Las bocinas traseras externas pueden ser agregadas para suplementar el sonido surround
del SLIMstage. (vea CONFIGURACIÓN AVANZADA > SURROUND TRASERO). Para información
adicional contacte su distribuidor local o el departamento de soporte técnico de
soundmatters.
4. Avanzado
Puerto de control RS-232
El SLIMstage provee un receptáculo RJ-11 para permitir un control RS-232 vía una
computadora o un dispositivo de automatización externo. Dos de los pines están disponibles
para conectar un sensor IR.
Para mas información visite www.soundmatters/support/downloads, contacte su distribuidor
o el servicio al cliente de soundmatters.
Protección de apagado por sobrecalentamiento
El SLIMstage utiliza amplificadores digitales avanzados los cuales permiten significativamente
picos de música más altos que son oídos limpiamente. Si el sistema esta tocando a niveles que
lo están sobrecalentando la pantalla indicara TMP. Si las temperaturas alcanzadas pudieran
dañar el SLIMstage, los amplificadores se apagaran para proteger el sistema y las bocinas de
algún daño – PT será desplegado. Cuando la protección del sistema es activada, usted oirá
que el sistema se enmudece y desenmudece repetidamente. Para desactivar la protección del
sistema, simplemente baje el volumen.
Puerto de servicio DB – 15
El SLIMstage provee un receptáculo de 15 pines para permitir el servicio. Para mas información
contacte el servicio al cliente de soundmatters.
Page 32

62
63
Español
5. Menús de Configuración
Mientras el SLIMstage esta listo para conectarse y tocar, los menús de configuración te permiten sonicalmente y funcionalmente una “sintonización fina”
del SLIMstage para tu aplicación especifica.
1. Presione el botón SETUP para acceder los MENÚS DE CONFIGURACIÓN
(o salir del MODO DE CONFIGURACIÓN).
2. Utilice el cluster de navegación remota para navegar a través del menú y seleccionar las opciones.
3. Presione el botón EXIT en cualquier momento para regresar el menú anterior.
CONFIGURACIÓN
LANGUAGE
PANTELLA
SALA
SUBWOOFER
EQ REMOTO
AVANZADO
LANGUAGE
DEUTSCH
ESPANOL
ENGLISH
FRANCAIS
ITALIANO
CONFIGURACIÓN
LANGUAG E
PANTELLA
SALA
SUBWOOFER
EQ REMOTO
AVANZADO
PANTELLA
ATE NUA R
APAGADO
ENCENDIO
CONFIGURACIÓN
LANGUAG E
PANTELLA
SALA
SUBWOOFER
EQ REMOTO
AVANZADO
SALA
DIS TANCIA
BALANCE SUR R
EQ
CANAL CENTRAL
DIS TANCIA
< 2 M
> 2 M
SALA
DISTANCIA
BALANCE S URR
EQ
CANAL CENTRAL
BALANCE S URR
L R
10 ……... ! ……… 10
A. LENGUAJES
}Accion: Seleccione LENGUAJES. entonces seleccione el lenguaje
deseado y presione ENTER
Resultado: Toda la configuracion es mostrada en el lenguaje
seleccionado.
B. OPCIONES DE PANTALLA
La pantalla del SLIMstage se auto atenuara después de 10 segundos a
los valores de fabrica, el apagado automático y siempre encendido son
también opciones.
}Acción: Seleccionar PANTALLA, después seleccionar Auto Atenuar,
Apagado Automático o Siempre Encendido, entonces presionar Entrar
Resultado: El ajuste de la pantalla es salvado.
C.CONFIGURACIÓN DE SALA
Ajustes de los parámetros básicos para la
CONFIGURACIÓN de sala para el mejor
funcionamiento
}Acción: Seleccione CONFIGURACIÓN DE SALA y oprima ENTRAR
Resultado: Mostrara las opciones seleccionadas del Menú de
Configuración
Ajustes para la distancia de escuchar
}}Acción: Seleccionar DISTANCIA de ESCUCHAR y presionar ENTRAR
}}}Acción: Seleccione la distancia deseada y presione ENTRAR
Resultado: La distancia de escuchar es salvada y la pantalla
regresa al menú de configuración de sala
Ajuste el Balance Surround Izquierdo/Derecho
}}Acción: Navegue a BALANCE SURROUND y presione ENTRAR.
Resultado: BALANCE SURROUND desplegado
}}Acción: Seleccionar el ajuste deseado y presionar ENTRAR
Resultado: El balance revisado será ajustado.
Tip: si un lado del área de escuchar (I o de D) es acústicamente mas “viva”
(digamos, vidrio o una superficie reflectora dura), usted pudiera querer
ajustar el balance un poco mas “muerto” (ejemplo: cortinas, abertura a
otra sala) de ese lado del área.
SALA
DISTANCIA
BALANCE SUR R
EQ
CANAL CENTRAL
EQ RESET
SALA
DISTANCIA
BALANCE SUR R
EQ
CANAL CENTRAL
NI VEL
–10 ……... 0 ……… 10+
CONFIGURACIÓN
LANGUAG E
PANTELLA
SALA
SUBWOOFER
EQ REMOTO
AVANZADO
SUBWOOFER
SI / NO
NIVEL
XOVER
FASE
SUBWOOFER
SI
NO
SUBWOOFER
SI / NO
NIVEL
CROSSOVER
FASE
NIVEL
–10 ……... 0 ……… 10+
SUBWOOFER
SI / NO
NIVEL
XOVER
FASE
XOVER
250HZ 190HZ 143HZ
110HZ 82HZ 62HZ
43HZ
Ajustar parámetros predeterminados del
SLIMstage del EQ de sala
Los cambios del balance de la frecuencia del SLIMstage por colocación,
acústica de la sala y el gusto de escuchar
}}Acción: Navegue al EQ de SALA, presione ENTRAR.
Resultado: El ecualizador de 10 frecuencias será desplegado
}}}Acción: Mueva cada deslizador al nivel deseado y oprima ENTRAR
Resultado: Los ajustes de la frecuencia serán el resultado
predeterminado del EQ.
Tips: El EQ de sala ajusta el EQ de todas las entradas. En los ajustes
avanzados el EQ para cada entrada puede ser creado. Para reajustar
y regresar el EQ a los ajustes EQ de sala. Reajuste la entrada al valor
predeterminado de fabrica.
NIVEL DEL CANAL CENTRAL
Ajuste el nivel del canal central para optimizar las voces
}}Accion: presione ENTER
Resultado: 1. Rango del NIVEL Central muestra
2. NIVEL DE SALIDA PREDETERMINADO sera mostrado
}}}Accion: Seleccione el nivel CENTRAL deseado y presione ENTER
Resultado: El Nivel sera salvado
D. SUBWOOFER EXTERNO
AJUSTE LOS PARÁMETROS DE SALIDA DEL
SUBWOOFER EXTERNO
Reemplaza los controles normalmente encontrados en el subwoofer
externo.
}Acción: Ajuste el volumen al máximo y el crossover a la frecuencia
máxima y la fase a 0 en el subwoofer externo.
Tip: Sonicamente integrando un sub externo con cualquier sistema
principal típicamente requiere algún retoque hacia delante o hacia
atrás entre el crossover y el nivel
Subwoofer Externo Si/No
}Acción:Para el mejor sonido, Seleccione SI en el menu de
configuracion del SUBWOOFER EXTERNO
Nivel de Salida del Subwoofer
Ajuste el nivel de salida del subwoofer para que coincida la salida del
subwoofer con la de los woofers internos para suavizar la transición.
}}Acción: 1.Presione ENTRAR Resultado: 1.El NIVEL de alcance del
Subwoofer muestra
2.EL NIVEL DE SALIDA PREDETERMINADO será desplegado
}}}Acción: Seleccione nivel del SUBWOOFER deseado y presione
ENTRAR Resultado: El nivel será salvado.
Tip: El BAJO +/– en el Control Remoto ajusta el nivel del Woofer y
Subwoofer.
Crossover del Subwoofer
Seleccione las frecuencias más altas que el subwoofer reproducirá en
su sistema.
}}Acción: Seleccione el ajuste deseado de la frecuencia del crossover
y presione ENTER Resultado: La opción seleccionada será remarcada
y la pantalla se moverá a la siguiente opción, FASE.
Tip: Ajuste el Crossover tan bajo como sea posible sin crear algun
agujero en el alcance de la música.
Page 33

64
65
Español
SUBWOOFER
SI / NO
NIVEL
XOVER
FA SE
FASE
0 ........ 90 ........ 180
CONFIGURACIÓN
LANGUAG E
PANTELLA
SALA
SUBWOOFER
EQ REMOTO
AVANZADO
EQ RESET
CONFIGURACIÓN
LANGUAG E
PANTELLA
SALA
SUBWOOFER
EQ REMOTO
AVANZADO
AVANZADA
ENTRADAS PREDETERMINADAS
PARÁMETRO S DE ENTRADA
TRASERO
IR
PROTEGER
VERSIÓN
REAJUSTE
PREDETERMINADAS
ÚLTIMA SE LECCIÓN
A1
A2
A3
D1
D2
D3
AVANZADA
ENTRADAS PREDETERMINADAS
PARÁMETR OS DE ENTRADA
TRASERO
IR
PROTEGER
VERSIÓN
REAJUSTE
ENTRADA
A1
A2
A3
D1
D2
D3
o
Selección de la Fase del Subwoofer
Ajuste la fase del subwoofer que coincida con el lugar.
}}Acción: Seleccione el grado deseado de fase y presione ENTRAR
Resultado: La fase del Subwoofer será salvada.
Tip: Si el subwoofer tiene ajuste de fase, cámbielo a 0° para que no
interfiera con la fase del SLIMstage.
E. EQ REMOTO para el control remoto
Ajuste el ecualizador con al botón EQ en el control
remoto
Diseñe un EQ especial para una actividad favorita, quizás películas de
acción, noticias o música clásica. Y con la presión del botón EQ en el
control remoto usted puede activar este EQ especial.
}}Acción: Navegue a EQ REMOTO y presione ENTRAR.
Resultado: El ecualizador de 10 frecuencias será desplegado
Tip: Los ajustes del EQ están en tiempo real así que asegúrese de
tocar la actividad favorita mientras hace los ajustes.
}}}Acción: Mueva cada deslizador al nivel deseado, presione
ENTRAR
Resultado: Ajuste el resultado del botón EQ y la pantalla
regresara al MENÚ de CONFIGURACIÓN PRINCIPAL
}}Acción: Presionar SALIR Sale del menú CONFIGURACIÓN
– o –
}}Acción: Navegue a AVANZADO y presione ENTRAR.
Resultado: Muestra las opciones de configuración AVANZADA
F.CONFIGURACIÓN AVANZADA
Ajustar ENTRADA PREDETERMINADA
SLIMstage siempre regresara a la ENTRADA DETERMINADA desde
espera/apagado
}}Acción: Navegue a ENTRADAS PREDETERMINADAS y presione
ENTRAR Resultado: Muestra todas las entradas disponibles y la
ultima seleccionada.
Tip: ULTIMA SELECCIONADA es el ajuste normal de fábrica.
}}}Acción: Navegue a la ENTRADA PREDETERMINADA deseada y
presione ENTRAR
Resultado: Muestra la nueva entrada predeterminada y
regresa al menú de configuración AVANZADA
Ajuste de los parámetros para cada entrada
Individualmente sintonice las características de cada una de las
entradas.
}}Acción: Navegue a PARÁMETROS DE ENTRADA, presione ENTRAR
Resultado: La pantalla muestra las entradas disponibles para la
selección PARÁMETROS DE ENTRADA
Seleccionar entrada para ser actualizada
}}Acción: Navegue a la entrada deseada y presione ENTRADA
Resultado: Muestra las opciones de configuración de entrada
Nota: Modificando la actividad de entrada y tocando música o
películas permite el ajuste en tiempo real de la sensibilidad y la
entrada EQ.
A2
SENSIBILIDAD
SURR PREDETERMINADO
EQ
OCU LTAR
REAJUSTE
A2
–5……… 0 ………5+
ATEN: –20DB
ENCENDI DO APAGADO
A2
SENSIBILIDAD
SURR PRE DETERMINAD O
EQ
OCU LTAR
REAJUSTE
A2
EN VIVO
CI NE
ÚLTIMA SELECCIÓ N
ESTEREO
MUSICA
A2
SENSIBILIDAD
SURR PREDETERMINADO
EQ
OCU LTAR
REAJUSTE
A2 RESET
A2
SENSIBILIDAD
SURR PREDETERMINADO
EQ
OCULTAR
REAJUSTE
A2
OCULTAR MOSTRAR
Ajuste de la sensibilidad de entrada
El nivel de sensibilidad de entrada de la entrada análoga A1, A2, A3
puede ser ajustada. En adición, análoga A2 tiene el atenuador a –20
dB que puede ser cambiado para compensar las diferencias de salida
de la fuente.
}}Acción: Seleccionar SENSIBILIDAD
Resultado: Muestra la opciones de SENSIBILIDAD
Crear nivel de salida de las bocinas
Solamente la salida A2, puede aceptar un nivel de senal de salida
si el nivel ENCENDIDO de la bocina conectada es seleccionado
para la SENSIBILIDAD A2
Nota: Usted necesitara adaptar las conexiones del los alambres de las
bocinas al mini-jack estereo. Contacte sopor te al cliente para preguntas.
Selección del modo surround (estereo, música,
en vivo o película) como el tocador surround
predeterminado.
}}Acción: Navegue a MODO SURROUND y presione ENTER
Resultado: Opciones surround desplegadas
}}Acción: Seleccione el modo surround predeterminado deseado y
presione ENTRAR
Resultado: El SLIMstage siempre seleccionara el modo
predeterminado al encender
Tips: 1. De los modos surround, música es el mas sutil, y Película,
el mas envolvente.
2. Sin importar los valores predeterminados, usted puede
seleccionar cualquier modo vía control remoto.
Ajustar ENTRADA EQ
Mientras no es recomendado para la mayor parte de las aplicaciones,
ENTRADAS EQ predeterminadas individuales pueden ser ajustadas
para cada fuente. Si usted selecciona usar Entrada EQ, la función EQ
de Sala será deshabilitada y el EQ necesitara ser ajustado para cada
entrada individualmente.
}}Acción: Navegue a ENTRADA EQ y presione ENTRAR
Resultado: El ecualizador de 10 frecuencias será desplegado
}}}Acción: Mueva cada deslizador al nivel deseado, presione
ENTRAR
Resultado: Ajusta el EQ para la entrada seleccionada, este EQ
será activado cuando la entrada modificada sea seleccionada.
Nota: Para deshabilitar las entradas EQ’s y restaurar el EQ de Sala, un
REAJUSTE LOS VALORES PREDETERMINADOS será requerido.
OCULTAR ENTRADA
Ocultar una entrada significa que si haces una secuencia a través de la
fuente en el panel frontal de la fuente con el botón fuente, la entrada
“ocultar” será saltada. Similarmente, no habrá respuesta si la fuente es
seleccionada con el control remoto.
}}Acción: Navegue a OCULTAR ENTRADA y presione ENTRAR
Resultado: Las opciones OCULTAR ENTRADA serán desplegadas
}}}Acción: Seleccione OCULTAR o MOSTRAR y presione ENTRAR
Resultado: Si OCULTAR es seleccionado.
PRECAUCION: Cuidado con esto.... si usted esconde una entrada, su capacidad
para ser vista desaparecera virtualmente al menos que la “des-esconda” en la
configuracion de las preferencias de entrada o reset todas las funciones de la
configuracion a los valores predeterminados de fabrica.
Page 34

66
67
Español
A2
SENSIBILIDAD
SURR PREDETERMINADO
EQ
OCU LTAR
REAJUSTE
A2
SÍ N O
AVANZADA
ENTRADAS PREDETERMINADAS
PARÁMETRO S DE ENTRADA
TR AS ERO
IR
PROTEGER
VERSIÓN
REAJUSTE
TRASERO
TI PO
NIVEL
TI PO
SL IM STAG E
MAINSTAGE HD
BOCINA I & D
TRASERO
TIPO
NI VE L
NIVEL
–10 ……... 0 ……… 10+
AVANZADA
ENTRADAS PREDETERMINADAS
PARÁMETRO S DE ENTRADA
TRASERO
IR
PROTEGER
VERSIÓN
REAJUSTE
IR
FRONTAL TRA SERO
SENSOR I R
PARA REESTABLEC ERLA PRESIONAR
MUTE Y EL BOTÓ N DE SOURCE.
AL MISMO TIE MPO DURANTE
2 SEGUNDOS .
CONFIRMAR C ANCELAR
REAJUSTAR ENTRADA AL AJUSTE
PREDETERMINADO DE FÁBRICA
Reajustando a valores predeterminados de fabrica deshará cualquier
ajuste que haya hecho para esa entrada.
}}Acción: Seleccione REAJUSTAR ENTRADA (a los valores
predeterminados) y presione ENTRAR
Resultado: Las opciones de REAJUSTAR ENTRADA serán
desplegadas.
}}}Acción: Seleccione SI o NO
Salida del Canal Trasero Externo
SLIMstage ha hecho posible adherir bocinas traseras externas para
mejorar el efecto surround. La salida trasera es deshabilitada mientras
los audífonos están conectados.
Tip: para adherir el SLIMstage o el MAINstageHD como un canal
trasero externo conecte un cable de audio estereo 3.5mm desde la
salida trasera a la entrada Análogo 1 en la parte trasera del SLIMstage
o MAINstageHD
SELECCIONAR TIPO DE BOCINA TRASERA
}}Acción: Navegue a MENÚ DEL CANAL TRASERO y seleccione la
opción deseada y presione ENTRAR.
Resultado: La salida del canal trasero será optimizada para
soportar el tipo de bocina trasera conectada.
Nivel Surround Externo
Ajusta el nivel de salida para las bocinas surround traseras externas.
}}Acción: Navegue a NIVEL y presione ENTRAR. Utilizando una
fuente surround familiar ajuste el nivel trasero y presione ENTRAR
Resultado: El nivel trasero seleccionado se convierte en el
predeterminado.
Seleccionar Sensor IR
El SLIMstage puede ser controlado vía sensor IR FRONTAL, un sensor IR
TRASERO opcional y el puerto RS-232.
Lo normal es el FRONTAL. Seleccione el TRASERO si es controlado
vía el puerto RS-232 (incluyendo si es conectado a un adaptador
de control remoto RF) o, si es usado con otro SLIMstage como
un canal trasero externo (para prevenir que el control remoto IR
inadvertidamente ajuste ambos SLIMstages)
}}Acción: Navegue a SENSOR IR y presione ENTRAR.
Resultado: Las opciones del SENSOR IR serán desplegadas.
}}}Acción: Seleccione FRONTAL o TRASERO y presione ENTRAR
Resultado: Si TRASERO es seleccionado, se mostrara el menú
de confirmación.
IMPORTANTE: Para reactivar el Sensor IR Frontal, presione MUTE
del botón SOURCE al mismo tiempo por 2 segundos.
Tip: Para información de conectividad e instrucción de programación
revise el sitio Web de Soundmatters.
AVANZADA
ENTRADAS PREDETERMINADAS
PARÁMETRO S DE ENTRADA
TRASERO
IR
PROTEGER
VERSIÓN
REAJUSTE
PROTEGER
PARA DESPROT EGER LA
CONFIGURACION PRESIONE LOS
BOTONES SE TUP, SPEAKE R Y EXIT
CANCEL AR PROTEGER
AVANZADA
ENTRADAS PREDETERMINADAS
PARÁMETRO S DE ENTRADA
TRASERO
IR
PROTEGER
VERSIÓN
REAJUSTE
VERSIÓN
MODELO: 4 0
ELECTRO: 1.00
SW: 1.0.0/1.0.0
SERIE #: S103500 0025
AVANZADA
ENTRADAS PREDETERMINADAS
PARÁMETRO S DE ENTRADA
TRASERO
IR
VERSIÓN
REAJUSTE
REAJUSTE
MASTER RE SET A LOS VALORES
PREDETERMINADOS?
SI N O
PROTEGER CONFIGURACIÓN
Previene cambios accidentales en la configuración
}}Acción: 1. Navegue a PROTEGER CONFIGURACIÓN
}}Acción: 2. Seleccione PROTEGER CONFIGURACIÓN y presione
ENTER.
Resultado: El menú PROTEGER CONFIGURACIÓN es desplegado
}}Acción: Seleccione CANCELAR o ASEGURAR y presione ENTRAR
Resultado: El ajuste se remarcara y la pantalla CONFIRMAR se
desplegara
}}Acción: Seleccione CONFIRMAR o CANCELAR y presione ENTRAR
Resultado: La configuración será asegurada contra cambios
accidentales
Para desproteger SETUP, presione sequencialmente los botones
SETUP,
, EXIT en el control remoto
VERSIÓN
La VERSIÓN despliega información importante acerca del SLIMstage
incluyendo el modelo, numero de serie, versión electrónica y versión
de software.
}}Acción: Navegue a VERSIÓN y presione ENTRAR.
REAJUSTE TODOS LOS AJUSTES A LOS VALORES
PREDETERMINADOS
Esto reajusta todas las opciones de configuración a su posición
predeterminada original de fábrica.
}}Acción: Navegue a REAJUSTE VALORES PREDETERMINADOS y
presione ENTRAR.
Resultado: Las opciones REAJUSTAR TODOS serán desplegadas
}}}Acción: Seleccione SI o NO y presione ENTRAR
Resultado: : El menú de confirmación será desplegado.
Resultado: Todos los ajustes serán reajustados a la condicion
predeterminada de fábrica.
Presione SALIR para regresar al menú anterior
Presione SALIR nuevamente para salir al MENÚ DE CONFIGURACIÓN
Page 35

68
69
Español
6. Preguntas más Frecuentes (FAQ)
Para las más actualizadas FAQs visite nuestro sitio de Internet www.soundmatters.com
Q1. algún tip para como colocar/posicionar el SLIMstage en la sala para el mejor
funcionamiento?
Mientras el SLIMstage funciona bien virtualmente en cualquier aplicación, como todas las
bocinas, el mejor funcionamiento será logrado si uno toma un poco de cuidado en su lugar de
colocación.
Mejor alta fidelidad: el sistema debe siempre estar centrado frente de los escuchas usando
la base de inclinado o el soporte de pared para apuntar la parrilla frontal del SLIMstage
directamente a los escuchas. Si esta en un gabinete muévalo lo más posible hacia delante para
permitir una dispersión más amplia.
Mejor Surround: todos los sistemas surrounds tienen un “lugar adecuado” para colocarlo
donde el efecto surround es maximizado, estos tamaños de área varían dependiendo en tu
distancia del SLIMstage . . . si tu escucha principal esta mas cerca de 9 pies, asegura y reajusta
la posición DISTANCIA en el menú de configuración.
Mejor Bajo: colocando cualquier bocina contra una superficie dura y pesada reforzara
(incrementara) sus bajos. Cuanto mayor sea la superficie donde el SLIMstage se coloca, mayor
será el bajo. Los menos bajos estarán flotando en el medio de la sala. El mayor bajo estará en
una esquina por el piso o el techo. También, desde que los woofers construidos apuntan hacia
abajo deberá haber espacio adecuado debajo de la unidad (cerca de ¾ “) para que el bajo
respire en el cuarto.
Q2. El bajo es sorprendentemente bueno para tal caja pequeña todo en uno . . . pero yo
quiero mas! puedo agregar un subwoofer externo?
Si, el SLIMstage tiene un jack de salida para el subwoofer para conectarlo a un soundmatters
SUBstage™ acústicamente igual o virtualmente cualquier subwoofer hi-fi de buena calidad.
La salida para el sub del SLIMstage es un mini jack 1/8” ahorrador de espacio, entonces si
usted no esta usando nuestro SUBstage; usted necesitara un cable estereo mini de 1/8” a un
adaptador RCA para la mayoría de los subwoofers (incluido con el substage).
Q3. Yo amo el SLIMstage, pero quiero más volumen?
Aquí están algunas opciones – agregue un subwoofer externo como un substage (o dos)
y/o agregue un SLIMstage adicional detrás para los canales traseros y/o actualícese con un
SLIMstage más grande. Si el problema ocurre solamente cuando esta utilizando una fuente
especifica usted pudiera incrementar la sensibilidad de la entrada conectada (vea AVANZADA
< PARÁMETROS DE ENTRADA < SENSIBILIDAD).
Q4. Como controlo el SLIMstage y la TV con solo un control remoto?
Las funciones del control remoto del SLIMstage son fácilmente capturadas por la mayoría de
los controles remotos programables. El volumen del SLIMstage puede también ser controlado
por muchos controles remotos de TVs y cables/satélites introduciendo el código de audio
Denon®. Diríjase a las instrucciones dadas del control remoto de la TV.
Q5. Para poder integrar propiamente el SLIMstage en mi control remoto programable
avanzado o el sistema automatizado de casa necesito tener “los códigos discretos”, como
puedo encontrarlos?
Los códigos IR discretos del SLIMstage están disponibles en la sección downloads en www.
soundmatters.com
Q6. Puedo usar el SLIMstage cuando viajo fuera de Estados Unidos?
El SLIMstage utiliza una versión de alta energía de una fuente de energía de una computadora
personal, diseñada para operar confiadamente en la mayoría de las casas alrededor del
mundo: 95-240 Vca, 50/60 Hz. Solo reemplace el cordón que conecta el modulo de energía
externa a la pared con uno que cumpla los requerimientos locales.
Q7. Usted recomienda conectar el SLIMstage a un protector de voltaje?
El SLIMstage, como cualquier aparato eléctrico, pudiera beneficiarse de cualquier protector de
voltaje.
Q8. El SLIMstage va al modo de espera ahorro de energía por si solo o necesito cambiarlo?
El SLIMstage debe apagarse presionando el botón APAGADO/ESPERA en el control remoto.
El sistema entra en modo salvar energía después de 2 minutos sin señal.
Q9. Cuando cambio entre el modo normal y Dialog+, algunas veces escucho una gran
diferencia y algunas veces no. Porque?
Existe un número posible de razones. Cuando tienes el nivel de bajo ajustado al máximo,
pudiera eclipsar el alza del dialogo. Obviamente, algún material del programa no tiene vocales,
entonces cuando ese es el caso usted escuchara una pequeña diferencia o no diferencia.
7. Solución de problemas
1. Problema: no hay sonido en ninguna parte
Soluciones:
a. Revise que la fuente esta encendida y tocando (ej. DVD o TV)
b. Si los audífonos están conectados, confirme que las bocinas no estén apagadas.
c. Esta el cordón CA conectado a un tomacorriente energizado e insertado seguramente
al modulo de fuente de energía del SLIMstage…y esta el modulo también conectado al
SLIMstage?
d. Esta el volumen arriba en el SLIMstage?
e. Presione el botón source en el SLIMstage o en el control remoto para seleccionar una
entrada activa.
2. Problema: selecciono una entrada en el control remoto pero no la muestra en la
pantalla
Solución:
a. La entrada esta “oculta” . . . vea parámetros de entrada < ocultar entrada? en el menú de
configuración.
3. Problema: no hay suficiente bajo
Soluciones:
a. Eleve el nivel del bajo vía control remoto
b. Eleve el nivel del bajo en el menú de configuración
c. Vea FAQ, Q1 para saber como colocar los efectos del bajo
d. Agregue un subwoofer SUBstage!
4. Problema: no se escucha o no hay suficiente surround
Soluciones:
a. Asegúrese que usted esta en modo Música, En Vivo o Película (no estereo). El modo
película tiene el surround máximo
b. Confirme que usted esta escuchando dentro de 45 grados del centro del SLIMstage
c. Confirme que los modos EQ y surround construidos en el tocador de DVD u otro
componente estén apagados
d. Vea faq/tip #1 para la colocación
e. Encienda la salida trasera en el SLIMstage. Agregue bocinas a la parte trasera de la sala
5. Problema: el control remoto esta errático o no opera
Soluciones:
a. Confirme que las baterías estén cargadas
b. Para reactivar el Sensor IR Frontal, presione MUTE del botón SOURCE al mismo tiempo
por 2 segundos.
6. Problema: sonido borroso
Soluciones:
Page 36

70
71
Español
a. Confirme que todos los modos DSP/surround/sonido mejorado estén apagados en todas las
fuentes conectadas al SLIMstage
b. Confirme que el ajuste de la sensibilidad no esta muy alto, sobrecargando la entrada, en la
sección AJUSTE DE SENSIBILIDAD
7. Problema: el sistema parece haberse protegido
Solución:
a. Los circuitos del SLIMstage incluyen un microprocesador poderoso. Si la unidad parece
operar erráticamente, simplemente desconéctelo del tomacorriente por 15 segundos y
conéctelo nuevamente para reajustar la computadora interna a la operación normal.
8. Problema: la pantalla indica TMP o PT y las unidades se cortan
Solución:
a. El circuito de protección por sobrecalentamiento esta trabajando . . . baje el volumen
9. Problema: no hay suficiente volumen
Soluciones:
a. Si es disponible, incremente la salida en la fuente que usted esta usando.
b. Incremente la sensibilidad de la entrada, vea ajuste de sensibilidad en la sección
configuración avanzada
10. Problema: conectado de una caja de cable pero no hay sonido
Soluciones:
a. Desafortunadamente algunas cajas de cable tienen alguna salida digital o conexiones de
audio análoga (rojo/blanco RCA) que son dummies (no estén internamente conectadas en la
caja). Cheque con el proveedor de cable para confirmar las capacidades de salida de la caja
b. Si esta usando la salida digital de la caja de cable, usted pudiera encontrar que solo trabaja
cuando esta en un canal HDTV, para accesar el audio para otros canales usted también
necesitara conectar a la salida de audio análoga y cambiarse a la entrada correcta en el
SLIMstage
11. Problema: el cable óptico no entra
Soluciones:
a. Asegúrese que los protectores claros son removidos de las terminales
b. Algunos cables encontrados en el mercado tienen conectores excesivamente largos y
pudieran no quedar
12. Problema: no puedo acceder al menú CONFIGURACIÓN
Solución:
a. El acceso a configuración esta protegido. Secuencialmente presione en el control remoto
SETUP,
, EXIT.
8. Especificaciones
Consola SLIMstage 5.1 Surround Sound
• Algoritmos Surround: Euphony™HD decodificadores Análoga, PCM, Dolby Digital 2.0/5.1,
DTS Surround Digital, DTS 96/24
• Canal 5.1 Decodificando: Dolby Digital, DTS Surround Digital, DTS 96/24
• Canal 2.0 Decodificando: Dolby Digital, PCM
• Conversión de 2-canales a 5-canales: Euphony™HD
• Potencia: Amplificadores Clase-D (RMS a < 0.8%THD)
SLIMstage 30 – Satélites 80W, Woofers 60W
SLIMstage 40 – Satellites 80W, Woofers 90W
SLIMstage 50 – Satellites 80W, Woofers 130W
• SPL Máximo @ 1m:
SLIMstage 30 – 103dB
SLIMstage 40 – 106dB
SLIMstage 50 – 109dB
• Bocinas Principales:
SLIMstage 30 – 4 50x50mm con Magnetos LMD Neo-sandwich patentados
SLIMstage 40 – 4 50x50mm con Magnetos LMD Neo-sandwich patentados
SLIMstage 50 – 4 50x50mm con Magnetos LMD Neo-sandwich patentados
• Arreglos del Woofer:
SLIMstage 30 – 2 arreglos de woofer*
SLIMstage 40 – 3 arreglos de woofer *
SLIMstage 50 – 4 arreglos de woofer *
* Cada arreglo incluye un woofer de magneto activo High-Energy 3˝ LMD Neo-sandwich
patentado mas dos radiadores de bajos de 3”
• Fuente de Energía: Digital, 95–265Vac, 50/60Hz, 36V
• Entradas (6)
Análoga 1 –estereo 3.5mm
Análoga 2 – estereo 3.5mm Disponible con 20dB de atenuación para el nivel de entrada de
la bocina
Análoga 3 – estereo 3.5mm Panel Frontal, con selección de prioridad
Digital 1 – SP/DIF coax
Digital 2 – Optical / TosLink
Digital 3 – Optical / TosLink
• Salidas (2)
Análoga: Salida del Subwoofer – estereo 3.5mm
Análoga: Audífonos (Euphony Virtual Surround) –estereo 3.5mm
• Salida del Canal Trasero (normal/Apagado Predeterminado)
• Accesorios
Control Remoto IR
Fuente de Energía con cables y correa de montaje
EZ-tilt™ base niveladora con insertos de altura
Soporte de pared con tortillería
1 – 3m cable optical
1 – 3m 3.5mm cable mini jack
1 – 3m 3.5mm cable estéreo RCA a estéreo mini-jack
1 – 3m cable digital coax a RCA
• Controles
Volumen Maestro de audífonos (IR y panel frontal)
Nivel del Subwoofer (solamente IR)
Selección de Fuente en Mudo (IR y panel frontal)
Surround/estereo (solamente IR)
• Modos: Encendido, Mudo, Apagado/Espera
• Potencia de Apagado/Espera: 2W o menos
• Peso (aprox):
SLIMstage 30 – 16.5 lbs (7.5 kg)
SLIMstage 40 – 19 lbs (8.5 kg)
SLIMstage 50 – 21 lbs (9.5 kg)
• Dimensiones (WxHxD):
SLIMstage 30 (WxHxD) – 790 x 88 x 93mm
SLIMstage 40 (WxHxD) – 990 x 88 x 93mm
SLIMstage 50 (WxHxD) – 1206 x 88 x 93mm
Altura con el EZ-tilt base niveladora, cualquier modelo (H) – 112mm
Altura con base + inserto, cualquier modelo (H) – 132mm
Profundidad con soporte de pared, cualquier modelo (D) – 127mm
so Soundmatters cree en una poliza de mejora continua al producto,
por lo tanto las especificaciones son sujetas a cambio sin previo aviso.
Page 37

72
73
Español
9. Garantía/Servicio
Existen dos cosas que usted debe hacer para asegurar un servicio libre de problemas en caso de
que usted necesite reparaciones por garantía.
1. Mantenga su recibo original de compra en un lugar seguro. Una copia del recibo será
requerido para obtener el servicio de garantía.
2. Asegúrese de que el vendedor ha escrito la fecha, el numero de modelo y el numero de serie
(si aplica) de el producto en el recibo. Para que tome una medida de protección extra, haga un
archivo por separado de la información de compra y manténgalo en un lugar seguro. En caso
de que usted pierda el recibo, el vendedor debiera proveer una copia.
Tome un momento ahora para leer los términos de la garantía.
Cuando embarque un producto para servicio
• Llame o mande un correo electrónico a Soundmatters para tener la dirección correcta del
servicio y un RMA con la copia del recibo original de compra con fecha, el modelo del producto
y numero de serie (si aplica) escrita en el. Usted debe colocar el numero RMA en la etiqueta de
embarque de cualquier unidad regresada a soundmatters para el servicio.
• Siempre embarque el producto en el empaque original completo.
• Evite embarcar productos vía servicio postal. Si usted debe utilizar el servicio postal, asegúrese
de registrar y asegurar el paquete
Garantía limitada Soundmatters.
Soundmatter Internacional, Inc. (soundmatters) garantiza al comprador y consumidor original
del producto soundmatters descrito en este manual, que el producto estará libre de defectos
de fabricación y materiales por un periodo de 2 (dos) anos después de la fecha de compra.
La única obligación de soundmatters bajo esta garantía es la de proveer, sin cargo, partes
y trabajo necesario para remediar los defectos, si existe alguno que aparezca durante el
periodo de garantía. Esta garantía es la única y exclusiva garantía express dada con respecto
al producto. Todas las demás garantías son excluidas aquí. Ni soundmatters ni el distribuidor
autorizado que vende el producto son responsables de los danos indirectos, incidentales
o consecuenciales. Algunos estados no permiten la exclusión o limitación de los danos
incidentales o consecuenciales por lo tanto la limitación o exclusión de arriba puede no aplicar
a tu caso. Esta garantía te da derechos específicos legales y tú pudieras tener también otros
derechos, los cuales varían de estado a estado.
Esta garantía es limitada a:
• Los productos comprados de un distribuidor autorizado soundmatters. Soundmatters
suministrara una lista de distribuidores autorizados si es requerida.
Para obtener un servicio usted debe:
• Regresar el producto, envió prepagado, por el distribuidor soundmatters del cual el producto
fue comprado, una agencia de servicio independiente autorizada soundmatters, un distribuidor
internacional autorizado soundmatters o a soundmatters. Si es necesario usted pudiera llamar
al departamento de servicio al cliente soundmatters por los nombres y direcciones de las
agencias de servicios independientes autorizadas en su área.
• Provea la prueba de compra en forma de copia del recibo de compra original, la fecha el modelo
y el numero de serie (si aplica) del producto deben de estar escritos en el recibo de compra.
Esta garantía no cubre:
• Danos que son el resultado del mal uso, abuso, accidente (incluyendo pero no limitado a danos
hechos por agua), conexión defectuosa, equipo asociado defectuoso o mal ajustado, o el uso
del producto con equipo para el cual no fue diseñado.
• Defectos cosméticos que aparecen después de treinta (30) días después de la fecha de compra.
Danos cosméticos causados por un manejo impropio son también excluidos.
• Productos que son usados para propósitos comerciales.
• El costo de remover o reinstalar el producto.
• Danos que ocurren mientas el producto esta siendo enviado a quien sea que le dará el servicio.
Vea la información de arriba acerca de los procedimientos de envió.
Esta garantía no será válida si:
La identificación del producto o la etiqueta del número de serie es removida o dañada en
cualquier forma.
El producto es revisado o reparado por alguien diferente a soundmatters o un distribuidor
autorizado o una agencia de servicios.
Para información de la garantía contactar:
Soundmatters International, Inc
Reno, Nv 89501
Teléfono: 775 981 1460
En los EU 800-698 SOMA (7662)
Email: service@soundmatters.com
Web: www.soundmatters.com
“Dolby” y el símbolo de la doble D son marcas comerciales de
Dolby Laboratories.
Fabricado bajo licencia y bajo la patente de E.U. #’s
5,451,942; 5,956,674; 5,974,380; 5,978,762; 6,487,535
& otras patentes emitidas y pendientes en los E.U y
alrededor del mundo.
DTS y DTS Digital Surround son marcas registradas y el logo
DTS y símbolo son marcas registradas de DTS, Inc.
© 1996-2007 DTS, Inc. Todos los derechos reservados.
EUPHONY HD es una marca registrada de DiMAGIC Co. Ltd
Soundmatters es una marca registrada
de Soundmatters International Inc.
Page 38

74
75
Italiano
Importanti precauzioni di sicurezza
CAUTELA – Rischio di shock elettrico – Non aprire
1. Leggere le istruzioni – Tutte le istruzioni relative alla sicurezza ed all’uso debbono essere lette prima di usare il
prodotto.
2. Tenere queste istruzioni – Queste istruzioni sulla sicurezza e sull’uso debbono essere tenute per future necessità.
3. Tenere conto delle avvertenze – Tutte le avvertenze sul prodotto e la guida all’uso debbono essere seguite
coscenziosamente.
4. Seguire tutte le istruzioni – Tutte le istruzioni operative e di uso debbono essere seguite.
5. Per ridurre il rischio di shock elettrico, non esporre questo apparato ad acqua, pioggia od umidità – Il
prodotto non può essere usato vicino ad acqua – per esempio vicino a vasca da bagno, lavandino, lavello, vasca per lavare
panni, in un seminterrato umido, o vicino ad una piscina e simili altri posti. L’apparato non deve essere esposto a gocce o
schizzi d’acqua e contenitori d’acqua quali vasi, non debbono esservi posti sopra. In pratica l’apparato non deve estrare in
contatto con umidità od acqua.
6. Pulire solo con panni asciutti
7. Non bloccare le grate di ventilazione. Installare secondo le istruzioni, Ogni apertura presente sul cabinet è fatta
per assicurare una appropriata ventilazione ed assicurare un’affidabile operatività del prodotto ed una giusta protezione
al sovraccarico termico. Pertanto ogni apertura deve essere libera., non bloccata o coperta. Porre il prodotto sul divano, sul
letto, su un tappeto o su superfici simili bloccherà le aperture. Non farlo mai. L’apparecchio non deve essere posto all’interno
di spazi chiusi come una libreria od altro mobile, a meno che non si fornisca una appropriata ventilazione.
8. Non porre vicino a qualsiasi fonte di calore come potrebbe per esempio essere un calorifero, ma anche un altro
apparato come un amplificatore che produce calore
9. Usare una corretta rete elettrica con messa a terra appropriata.
10. Cavi di rete elettrica ed adattatori – Usare solo cavi ed adattatori forniti dal fabbricante. Non arrotolare il cavo
di alimentazione attorno ad oggetti. Ciò potrebbe sottoporre il cavo a stress meccanico che potrebbe danneggiarlo. Ciò
porterebbe ad un rischi sulla sicurezza. Porre i cavi in modo da evitare che vengano schiacciati o calpestati. Proteggere dalla
presenza di liquidi. Per esempio evitate di porli vicini a contenitori di acqua, vasche da bagno o sopra a pavimento bagnato.
I liquidi possono causare corto circuiti, in particolare in presenza anche di cavi stressati meccanicamente. I liquidi possono
inoltre causare corrosione graduale dei terminali e/o dei connettori terminali negli adattatori generando sovraccarichi
termici. Assicurarsi che i connettori dei cavi di alimentazione elettrica siano sempre ben inseriti. Non usare adattatori
che presentino segni di corrosione sui pins e/o che abbiano segni di sovraccarico termico (come per esempio plastica
deformata). I cavi e gli adattatori debbono sempre essere nuovi e corretti.
11. Usare accessori specificati o suggeriti dal costruttore
12. Usare solo con supporti, tripodi, tavoli, od altro specificati dal costruttore o
venduti con l’apparato. Quando si usasse un carrello, fate attenzione nel muoverlo con sopra
l’apparato per evitare danni da caduta dello stesso. Porre il prodotto in una locazione stabile per
essere sicuri che non cada o che non possa essere fatto cadere causando danni a persone, bambini
ed all’unità stessa.
13. Scollegare dalla presa elettrica durante temporali con fulmini e lampi o quando non usate l’unità
per lungo periodo. Poiché un filtro da sovraccarico può prevenire danni, lo raccomndiamo. Rivolgetevi ad un buon
elettricista.
14. In caso di servizio rivolgetevi al rivenditore dove avete effettuato l’acquisto che a sua volta si dovrà
rivolgere a personale qualificato. Un servizio si rende necessario se l’unità si danneggiasse in qualsiasi modo , come
danni al cavo od al connettore di alimentazione, liquido che potesse essere entarto nell’apparato, l’apparato è stato esposto
ad umidità o pioggia, oggetti sono entrati nell’apparata, l’apparato non opera normalmente od è caduto.
15. Questa unità deve operare solo con la sorgente di alimentazione indicata sull’etichetta. Se non sapate quale
essa sia, consultate la società elettrica che utlizzate. Se l’unità opera con batterie od altre sorgenti, riferitevi al manuale di
istruzioni.
16. Sovraccarico – non sovraccaricate la spina elettrica, il cavo di estensione, la ciabatta o quant’altro usate per alimentare
questa unità. Un sovraccarico potrebbe portare a rischi di fuoco o di shock elettrico.
17. Entrata di oggetti o liquidi – Non inserire mai oggetti all’interno attraverso le aperture, potrebbero infatti esservi
punti che toccati provocano scariche elettriche o cortocircuiti con rischi di fuoco o shock elettrico, Non fate entrare mai
liquidi nel prodotto. Le regolazioni che dovrete fare sono fattibili solo usando i controlli discussi nelle istruzioni. Improprie
regolazioni di altri controlli possono provocare danni che potrebbero non essere riparabili.
18. Parti di ricambio – Quando fossero richieste parti di ricambio, assicuratevi che il tecnico usi parti specificate dal
cotruttore o che abbiano caratteristiche esattamente simili alle parti originali. Sostituzioni non autorizzate possono
provocare danni come fuoco, shock elettrico ad altro genere di danni.
19. Una volta completate le riparazioni di questo prodotto, chiedete al tecnico di essere sicuro in modo assoluto che
abbia effettuato tutte le verifiche che hanno ripor tato il prodotto alle condizioni operative.
20. Non tentate di riparare il prodotto da voi stessi, l’apertura o la rimozione dei coperchi possono esporvi a pericolosi
voltaggi od azzardi. Solo personale tecnico qualificato deve poter riparare l’unità.
21. Montaggio a parete – Usate le istruzioni del fabbricante delle staffe di montaggio a parete; assicuratevi che lo
SLIMstage venga montato sulla parete in modo da evitare che possa vibrare e che le viti possano rilasciarsi durante
l’operatività.
AVVERTENZA Per ridurre il rischio di fuoco o di shock elettrico, non esporre questo apparato ad umidità o
pioggia.
Page 39

76
77
Italiano
Connessioni & Posizionamento
NOTA IMPORTANTE: Prima di usare questo manuale , seguite le istruzioni nella Guida alla
Configurazione per effettuare tutte le connessioni e per posizionare in modo appropriato il
vostro SLIMstage.
Disposizione Pannello Controllo Frontale
F.
Volume
Master Sù
(controlla
volume
cua
quando
altoparlanti
sono
disattivi)
Sensore IR Del
Telecomando
G.
A.
EuphonyHD
Uscita Virtual
Surround Cua
(via connettore
da 3.5mm)
B.
Indicatore
Acceso/Spento
C.
Ingresso/Sorgente
Stato Volume
D.
Indicatore
E.
Volume
Master Giù
(controlla
volume
cua
quando
altoparlanti
sono
disattivi)
Disposizione Telecomando
1. EQ Vocale (attivo & disattivo
2. Musica di Notte/Compressione
Dinamica (attivo & disattivo)
3. Diusori attivo & disattivo
(con cua collegata)
7. Seleziona Ingresso: Analogico 1
8. Seleziona Ingresso: Analogico 2
10. Seleziona ingresso: Digitale 1
4. Modo Attivo / Disattivo / Standby
5. EQ prestabilito Attivo & Disattivo
6. Volume Cua Giù & Sù
9. Seleziona Ingresso: Analogico 3 (frontale)
11. Seleziona ingresso: Digitale 2
12. Seleziona ingresso: Digitale 3
13. Surround Giù & Sù
(attraverso 4 posizioni)
Seleziona
Sorgente
(in sequenza
tra gli ingressi)
H.
Silenzia/De-silenzia
(Possibile de-silenziare
da telecomando o da
pannello frontale)
J K L M N O
J. Rilevazione Dolby 2.0,
Dolby 5.1, DTS, PCM,
Analogico
K. Musica di Notte/
Compressione
L. Dialog+ Attivo
M. Modo STEREO,
MUSICA, LIVE, FILM
N. Preselezione EQ
O. Diusori disattivi
(quando è usata cua)
P. Avvertenza Protezione
Sovraccarico Termico
Contenuto pagina
• Sicurezza . . . . . . . . . . . . . . . . . . . . . 74
• Connessioni & Posizionamento . . . . . . . 76
• Pannello Frontale & Telecomando . . . . 76-77
1. Operazioni . . . . . . . . . . . . . . . . . . . . 78
2. Regolazioni . . . . . . . . . . . . . . . . . . . 78
3. Cuffia. . . . . . . . . . . . . . . . . . . . . . . . 79
4. Avanzato . . . . . . . . . . . . . . . . . . . . . 79
5. Menu di Configurazione . . . . . . . . . . . 80
6. FAQ. . . . . . . . . . . . . . . . . . . . . . . . . 86
7. Soluzione ai problemi . . . . . . . . . . . . . 87
8. Caratteristiche . . . . . . . . . . . . . . . . . . 88
9. Garanzia / Service. . . . . . . . . . . . . . . . 90
P
Dinamica
Q.
Indicatore
Modo
Surround
3 LED = Film
2 LED = Live/TV
1 LED = Musica
0 LED = Stereo/
Bypass
R.
Ingresso
“iPod”/
Analogico
(auto-switching
via connettore
3.5mm – annulla
tutti gli ingressi
posteriori)
14. Bass Level Up
(including external sub)
15. Livello Bassi Sù
(incluso sub esterno)
20. Menu Successivo/Su
21. Menu Precedente/Giù
25. Confermare Modo
Impostazione
16. Silenzia
(desilenzia via ogni comando da
telecomando o su frontale)
17. Volume Master sù
18. Volume Master Giù
19. Livello Surround Su & Giù
(o livello posteriore se regolato
per posteriori esterni)
22. Impostare/Confermare
23. Menu Successivo/Destro
24. Menu Precedente/Sinistro
26. Uscire e tornare al
Menu Precedente
Page 40

78
79
Italiano
1. Operazioni
Accendere/Spegnere
Accendere lo SLIMstage premendo un qualsiasi tasto sul frontale e sul telecomando. Spegnere
premendo il tasto del telecomando Off/standby.
OFF/standby – Spegne tutti i componenti ad eccezione del sensore infrarosso (IR). Il consumo è
meno di 2 W
Selezione Ingresso/Sorgente
Per selezionare la sorgente, premere il tasto dell’ingresso desiderato sul telecomando (A1, A2, A3,
D1, D2, D3), o la sequenza di ingressi via tasto sul pannello frontale. Il display indicherà la sorgente
selezionata.
La pressione ripetuta del tasto sul frontale farà passare sequenzialmente gli ingressi sorgente.
Rilevamento Automatico Segnale e Conversione
La tecnologia Euphony HD, usata su SLIMstage, di elaborazione surround può gestire virtualmente
tutti i tipi di segnale incluso l’analogico, Dolby 2.0, 5.1, DTS Digital Surround, DTS 96/24 o PCM.
Il display mostrerà se il segnale che lo SLIMstage stà ricevendo è Dolby 2.0, 5.1, DTS, PCM, o
Analogico.
Nei modi MUSICA, LIVE, e FILM, la tecnologia Euphony HD dello SLIMstage automaticamente
converte tutte le sorgenti 2-canali (come Stereo, Dolby 2.0, o stereo PCM) in surround.
Modo Surround
L’ EuphonyHD di SLIMstage fornisce stereo e tre diversi modi surrounds che possono essere
selezionati via i controlli del telecomando “surr” mode – ed i tasti +. Il modo selezionato verrà
momentaneamente evidenziato sul display LCD e continuerà ad essere mostrato sulla barra blue
di LED.
No LED. . . . . . NO SURR. . . . . . Stereo / Bypass
1 LED. . . . . Modo MUSICA . . . . . . Lieve effetto surround, ideale per musicale
2 LED. . . . . . . . . . LIVE. . . . . . . . Surround ideale per molti TV shows
3 LED. . . . . . . FILM. . . . . . . . . Massimo surround – ottimo per Action Movies
A meno che non sia stato modificato nel Menu Configurazione (vedere Configurazioni Avanzate
– PARAMETRI INGRESSO >MODO SURR), SLIMstage si ricorderà dell’ultima configurazione modo
surround selezionato sino a che non ne sceglierete un altro od altra sorgente.
Silenziamento
Per silenziare il suono, premere il tasto mute sul telecomando. MUTE sarà indicato sul display. La
selezione di qualsiasi testo disattiverà questa funzione.
Musica di Notte / Compresione Dinamica
L’utilizzo del tasto su telecomando night music attiva/disattiva il circuito di ascolto notturno che
riduce la gamma dinamica (la differenza tra i suoni più forti e quelli più tranquilli) per rendere più
facile il non disturbare i vicini o chi dorme dei nostri cari. Mostra NIGHT sul display.
Dialog+ circuito di intellegibilità della voce
Usando il tasto Dialog + si attiva/disattiva il circuito che permette una maggiore uscita e chiarezza
alle frequenze tipiche vocali rendendole più intellegibili. Mostrata sul display quando si attiva.
2. Regolazioni
Volume
Per regolare il livello del volume, usare il volume remoto + e –, o usare i tasti sul pannello
frontale ( + e –).
Nota: Se è collegata una cuffie con diffusori spenti, il pannello frontale controlla il livello della cuffia
Livello Bassi
Usare il telecomando per regolare il basso + o –. Il livello relativo del Basso verrà mostrato sul
display. Regolare il basso da telecomando regola il livello anche di un eventuale subwoofer esterno
come il soundmatter SUBstage per esempio.
Livello Surround
Utilizzare i tasti del telecomando surr level per aumentare o diminuire il livello degli altoparlanti
surround. Il Livello Surround viene mostrato su display frontale.
EQ
Usare il tasto del telecomando EQ per aggiungere una curva di equalizzazione prestabilita
(vedere MESSA A PUNTO > EQ REMOTO) fornendo un bilanciamento tonale alternativo. La curva
EQ vine mostrata.
Sensibilità Ingresso
E’ generalmente possibile che vi sia un disaccoppiamento tra l’uscita di una sorgente e l’Ingresso
di un componente AV (come SLIMstage). Questo porta a livelli più bassi / eccesso di hiss oppure a
sovraccarico / distorsione. Vedere Messa a punto Avanzata: PARAMETRI INGRESSO > SENSIBILITA’.
3. Cuffia
Usare una cuffia
Con la sua circuitazione per cuffia, SLIMstage permette di avere una esperienza personal theater
da una cuffia convenzionale. Connettere la cuffia usando il ricettacolo per jack, posto sul frontale
a sinistra, da 3.5mm.
L’inserimento del jack scollegherà i diffisori. Premendo il tasto
simultaneamente ascoltare i diffusori con la cuffia (in solo stereo). Utilizzando i tasti di controllo
volume posti sul telecomando H-phone vol –/+ buttons si potrà regolare il livello della cuffia
separatamente da quello dei diffusori.
sul telecomando, si potranno
Aggiungere un subwoofer esterno
Fate riferimento alla Guida Configurazione dello SLIMstage, Menu Sezione C, ed il manuale delle
istruzioni del vostro subwoofer per ottimizzare l’integrazione del suvbwoofer e la performance.
Aggiungere diffusori posteriori esterni
Diffusori esterni posteriori potrebbero essere aggiunti per integrare il surround sound dello
SLIMstage (vedere IMPOSTAZIONI AVANZATE>SURROUND POSTERIORE. Per ulteriori informazioni
avvaletevi del suppporto del vostro rivenditore.
4. Avanzato
Porta di controllo RS-232
Lo SLIMstage possiede un ricettacolo per permettere un controllo RS-232 via computer
o dispositivo esterno. Due dei pins sono disponibili per collegare un sensore infrarosso IR
posteriore. Per maggiori informazioni contattare il vostro rivenditore o visitate il sito HYPERLINK
http://www.soundmatters.com/support/downloads www.soundmatters.com/support/
downloads
Protezione da sovraccarico termico
Lo SLIMstage usa amplificatori digitali allo stato dell’arte che permettono di sentire in modo
chiaro picchi musicali significativivamente più elevati. Se il sistema viene usato a livelli che
generano sovraccarichi termici, sul diplay comparirà l’indicazione TMP. Se temperature pericolose
per lo SLIMstage venissero raggiunte, gli amplificatori si spegneranno per proteggere il sistema
ed i diffusori da danni . In questo caso sul display comparirà la scritta di intervento della
protezione PT. Quando si attiverà la protezione, sentirete che il sistema si silenzia e de-silenzia
ripetutamente. Per disattivare il sistema di protezione basta abbassare il volume.
Porta di servizio DB-15
SLIMstage possiede un ricettacolo a 15-pin per permetterne il servizio. Per maggiori informazioni
contattare il soundmatters customer service.
Page 41

80
81
Italiano
5. Menu di Configurazione
Pur essendo lo SLIMstage plug-and-play-ready, i menus di configurazione
permettono di “accordare” sia sonicamente che funzionalmente lo SLIMstage
per vostre specifiche applicazioni.
1. Premere il tasto SETUP per accedere ai vari MENUS DI CONFIGURAZIONE
(o per uscire dal modo CONFIGURAZIONE).
2. Usare la navigazione remota dei gruppi per poi navigarvi dentro e selezionare l’oggetto
del Menu.
3. Premere il tasto EXIT in qualsiasi momento si voglia ritornare al precedente menu.
MESSA A PUN TO
LANGUAGE
DIS PLAY
STAN ZA
SUBWOOFER
EQ REMOTO
AVAN ZATO
LANGUAGE
DEUTSCH
ESPANOL
EN GLI SH
FRANCAIS
ITALIANO
MESSA A PUN TO
LANGUAG E
DI SP LAY
STAN ZA
SUBWOOFER
EQ REMOTO
AVAN ZATO
DIS PLAY
OSCURAMENTO
DISATTIVO
ATTIVO
MESSA A PUN TO
LANGUAG E
DIS PLAY
ST ANZ A
SUBWOOFER
EQ REMOTO
AVAN ZATO
STAN ZA
DISTANZA
BILANCIAMENTO SURR
EQ
CANALE CENTRALE
DISTANZA
< 2 M
> 2 M
STAN ZA
DIS TANZA
BILANC IAMENTO SURR
EQ
CANALE CENTRALE
BILANC IAMENTO SURR
S D
10 ……... ! ……… 10
A. LANGUAGE
}Azione: Selezionare Language e premere ENTER
B. OPZIONI DISPLAY
Il display dello SLIMstage si oscura dopo circa 10 secondi come
da impostazione di fabbrica, ma vi sono anche le opzioni autooscuramento e sempre acceso nelle opzioni .
}Azione: SELEZIONE DISPLAY Selezione Display, quindi selezionare
Auto Oscuramento, Auto Spegnimento o Sempre Acceso, quindi
premere Enter
Risultato: l’impostazione display viene salvata.
C. CONFIGURAZIONE STANZA
Regolare i parametri base per la CONFIGURAZIONE
della stanza per la miglior performance
}Azione: Selezionare CONFIGURAZIONE STANZA e premere ENTER
Resultato: Mostra le Opzioni Menu Configurazione
Regolare per Distanza di Ascolto
}}Azione: Selezionare DISTANZA ASCOLTO e premere ENTER
}}}Azione: Selezionare la distanza desiderata e premere ENTER
Resultato: La distanza di ascolto viene salvata ed il display torna su
Menu Configurazione Stanza.
Regolare Bilanciamento Surround Sinistro/Destro
}}Azione: Portarsi su BILANCIAMENTO SURROUND e premere ENTER.
Resultato: Viene mostrato BILANCIAMENTO SURROUND
}}Azione: Selezionare la regolazione desiderata e premere ENTER
Resultato: Il Bilanciamento rivisto viene fissato.
Suggerimento: Se un lato dell’area di ascolto (Sinistra o Destra) è
acusticamente più “viva” (vetro o superfici riflettenti dure) potreste volere
un bilanciamento regolato leggermente più verso il lato dell’area più
“spento” (es.: tendaggi, aperture verso altra stanza).
STAN ZA
DIS TANZA
BILANCIAMENTO SURR
EQ
CANALE CENTRALE
EQ AZZE RARE
STAN ZA
DIS TANZA
BILANCIAMENTO SURR
EQ
CANALE CE NTRALE
LIVELLO
-10 ……... 0 ……… 10+
MESSA A PUN TO
LANGUAG E
DIS PLAY
STAN ZA
SUBWOOFER
EQ REMOTO
AVAN ZATO
SUBWOOFER
SI / NO
LIVELLO
XOVER
FASE
SUBWOOFER
SI
NO
SUBWOOFER
SI / NO
LIVELLO
CROSSOVER
FASE
LIVELLO
–10 ……... 0 ……… 10+
SUBWOOFER
SI / NO
LIVELLO
XOVER
FASE
XOVER
250HZ 190HZ 143HZ
110HZ 82HZ 62HZ
43HZ
Regolare i parametri predefiniti SLIMstage EQ
STANZA (EQ=EQUALIZZAZIONE)
Cambia il bilanciamento della frequenza dello SLIMstage per
disposizione, acustica della stanza e gusto d’ascolto.
}}Azione: Navigare sino a EQ STANZA, premere ENTER.
Resultato: viene mostrato un equalizzatore a 10 frequenze
}}}Azione: muovere ogni cursore al livello desiderato e premere ENTER
Resultato: Le frequenze regolate diventeranno la frequenza EQ
predefinite.
Suggerimento: L’EQ della stanza regola l’EQ per tutti gli ingressi. In
Parametri Avanzati l’EQ per ogni ingresso può essere creato. Per azzerare
ed EQ ingresso, indietro ai settaggi EQ Stanza. Azzerare l’ingresso al valore
predefinito di fabbrica .
LIVELLO CANALE CENTRALE
Regolare il LIVELLO CANALE CENTRALE
}}Azione: 1. Premere ENTER
Resultato: 1. Viene mostrata la gamma del LIVELLO Canale Centrale
2. Viene mostrato il LIVELLO PREDEFINITO
}}}Azione: Selezionare il livello di canale centrale desiderato e premere
ENTER
Resultato: Il livello viene salvato.
D. SUBWOOFER ESTERNO
Stabilire I Parametri Di Uscita Subwoofer Esterno
Sostituisce i controlli normalmente presenti sul vostro subwoofer
esterno
}Azione: Porre sul vostro Subwoofer esterno il volume al massimo ed il
crossover alla frequenza massima e la fase a zero.
Suggerimento: Per integrare sonicamente un sub esterno ad ogni
sistema principale tipicamente richiede una messa a punto per tentativi
agendo tra crossover e livelli.
}}Azione: Per miglior suono, selezionare SI’ nel menu di messa a punto
SUBWOOFER ESTERNO
Livello Uscita Subwoofer
Regolare il livello di uscita Subwoofer per adattarsi all’uscita Subwoofer
dei woofers interni per ottenere una transizione armoniosa.
}}Azione: 1. Premere ENTER
Risultato: 1. Viene mostrata la gamma del LIVELLO Subwoofer
2. Viene mostrato il LIVELLO USCITA PREDEFINITO
}}}Azione: Selezionare il livello di uscita SUBWOOFER desiderato e
premere ENTER
Risultato: Il livello viene salvato.
Suggerimento: Sul telecomando il BASS +/– regola il livello di ambedue
il Woofer ed il Subwoofer.
Crossover Subwoofer
Seleziona le frequenze le più alte che il vostro subwoofer può
riprodurre nel vostro sistema.
}}Azione: Selezionare il valore della frequenza di crossover desiderata
e premere ENTER
Risultato: Quanto selezionato viene evidenziato ed il display si
sposterà alla prossima opzione, FASE
Suggerimento: Porre il punto di Crossover il più basso possibile senza
creare un buco nella gamma musicale.
Page 42

82
83
Italiano
SUBWOOFER
SI / NO
LIVELLO
XOVER
FA SE
FAS E
0 ........ 90 ........ 180
MESSA A PUN TO
LANGUAG E
DIS PLAY
STAN ZA
SUBWOOFER
EQ REMOTO
AVAN ZATO
EQ AZZE RARE
MESSA A PUN TO
LANGUAG E
DIS PLAY
STAN ZA
SUBWOOFER
EQ REMOTO
AVA NZ ATO
AVAN ZATA
INGR ESSO PREDETE RMINATO
PARAMETR I INGRESSO
POSTERIORE
IR
CHIUDERE
VERSIONE
AZZERARE
PREDETERMINATO
ULTIMA SELE ZIONE
A1
A2
A3
D1
D2
D3
AVAN ZATA
INGRESSO PREDETERMINATO
PARAMETR I D’INGRESSO
POSTERIORE
IR
CHIUDERE
VERSIONE
AZZERARE
INGRESSO
A1
A2
A3
D1
D2
D3
o
Selezionare la Fase Subwoofer
Regolare la fase dei subwoofers per accordarsi con la dislocazione.
Risultato: La fase del Subwoofer verrà salvata.
Suggerimento: Se il vostro subwoofer ha una fase regolabile, porla
a 0° per evitare che interferisca con la regolazione della fase dello
SLIMstage.
E. EQUALIZZAZIONE REMOTA per Telecomando
Stabilire quale equalizzazione richiamare con il
tasto EQ sul Telecomando
Progetta una EQ speciale per una attività favorita , come per un’
action movies, news o musica classica. Quindi con la pressione del
tasto EQ sul telecomando potrete attivare questa EQ speciale.
}}Azione: Navigate a REMOTE EQ e premere ENTER.
Risultato: Un equalizzatore a 10 frequenze viene mostrato
Suggerimento: la regolazione dell’EQ avviene in tempo reale per cui
assicuratevi di riprodurre il tipo di attività favorita mentre fate la
regolazione.
}}}Azione: Spostare ogni cursore al livello desiderato e poi premere
ENTER
Risultato: Stabilisce la risposta al tasto EQ e poi il display ritorna
su MENU PRINCIPALE CONFIGURAZIONE
}}Azione: Premere EXIT
Risultato: Si esce dal menu CONFIGURAZIONE
– O –
}}Azione: Navigare ad AVANZATA e premere ENTER
Risultato: Mostra le opzioni di configurazione AVANZATA
F. CONFIGURAZIONE AVANZATA
Stabilre l’ingresso PREDEFINITO
SLIMstage ritorna sempre all’INGRESSO PREDEFINITO dalla posizione
di standby/spento
}}Azione: Navigare sino a INGRESSO PREDEFINITO e premere ENTER
Risultato: Mostra tutti gli ingressi disponibili e l’ultimo
selezionato.
Suggerimento: ULTIMO SELEZIONATO è il settaggio di fabbrica.
}}}Azione: Navigare al desiderato INGRESSO PREDEFINITO e
premere ENTER
Risultato: Mostra il nuovo ingresso Predefinito e ritorna al menu
di CONFIGURAZIONE AVANZATA
Stabilire i Parametri per ogni ingresso
Rifinisce individualmente le caratteristiche di ogniuno dei vostri
ingressi.
}}Azione: Navigare a PARAMETRI INGRESSO, premere poi ENTER
Risultato: Mostra gli ingressi disponibili per la selezione di
PARAMETRI INGRESSO
Selezionare l’Ingresso che deve essere aggiornato
}}Azione: Navigare al desiderato ingresso e premere ENTER
Risultato: Mostra le opzioni di regolazione dell’ingresso
Nota: Il modificare l’ingresso attivo e suonare musica o film
permette una regolazione in tempo reale della Sensbilità e dell’EQ
dell’ingresso.
A2
SENSIBILITA
SURR PREDE TERMINATO
EQ
NASCONDI
AZZERARE
A2
–5……… 0 ………5+
ATTEN: –20DB
ACCESO S PEN TO
A2
SENSIBILITA’
SURR PRE DETERMINATO
EQ
NASCONDI
AZZERARE
A2
FILM
ULTIMA SELE ZIONE
STEREO
MUSICA
LIVE
A2
SENSIBILITA’
SURR PREDE TERMINATO
EQ
NASCONDI
AZZERARE
A2 AZZE RARE
A2
SENSIBILITA
SURROUND PREDETERMINATO
EQ
NASCONDI
AZZERARE
A2
NASCONDI MOSTRA
Regolazione della sensibilità Ingresso
Il livello di sensibilità degli ingressi Analogici A1, A2, A3 può essere
regolata. Inoltre, l’ingresso Analogico A2 ha un attenuatore a –20dB che
può essere attivato per compensare differenze di uscita tra sorgenti.
}}Azione: Selezionare SENSIBILITA
Risultato: L’opzione SENSIBILITA’ viene mostrata
Creare Livello Ingresso Diffusore
Solamente l’ingresso A2 può accettare un segnale a livello
diffusore se il connesso livello diffusore è selezionato su ON per la
SENSIBILITA’ dell’ingresso A2.
Nota: Necessiterete di adattare un cavo di connessione da
diffusori a mini-jack stereo- Contattate il vostro rivenditore per
avere supporto a come fare.
Selezionare il Modo Surround (Stereo, Musica, Live,
o Film) come processo di riproduzione predefinito
}}Azione: Navigare a MODO SURROUND e premere ENTER
Risultato: Vengono mostrate le Opzioni Surround
}}}Azione: Selezionare il modo surround predefinito che desiderate e
premere ENTER
Risultato: SLIMstage selezionerà sempreall’accensione il modo
surround che avete definito come predefinito.
Suggerimento :
1. Di tutti i modi surround, Musica è il più delicato e Film il più
coinvolgente.
2. Indipendentemente dalla scelta che avete fatto, potrete poi
selezionare ogni altro modo surround via telecomando.
Stabilire EQ INGRESSO
Pur se non raccomandato per la maggior parte delle applicazioni,
EQ INGRESSO individuale predefinito può essere applicato per ogni
sorgente. Se selezionate di usare EQ INGRESSO, la funzione EQ STANZA
verrà disabilitata ed EQ necessita di essere stabilito per ogni individuale
ingresso.
}}Azione: Navigate a EQ INGRESSO e premete ENTER
Risultato: un equalizzatore a 10 frequenze viene mostrato
}}}Azione: Spostare ogni cursore al livello desiderato, premere ENTER
Risultato: Porre l’EQ per l’ingresso selezionato. Questo EQ diverrà
attivo quando si seleziona l’ingresso modificato.
Nota: Per disabilitare l’EQ INGRESSO e riportare quello dell’EQ STANZA,
dovrete andare alla funzione AZZERARE TUTTO AI VALORI DI FABBRICA.
NASCONDERE INGRESSO
Nascondere un ingresso significa che passando in sequenza tra le
sorgenti premendo consecutivamente il tasto Sorgente sul pannello
frontale, l’ingresso “nascosto” verrà saltato. Similarmente non vi sarà
risposta se questa sorgente viene scelta da telecomando.
}}Azione: Portarsi su NASCONDERE INGRESSO e premere ENTER
Risultato: Le opzioni di NASCONDERE INGRESSO vengono mostrate
}}}Azione: Selezionare NASCONDERE o MOSTRA e premere ENTER
Risultato: Se si sceglie NASCONDERE.
PRECAUZIONE: Fare attenzione a questo passo...se nascondete un
ingresso, la sua capacità di essere visto virtualmente scompare
a meno che non lo “rendiate visibile” nuovamente attraverso le
Preferenze Configurazione Ingresso o riportando tutte le funzioni
di configurazione a quelle Tipiche di Fabbrica.
Page 43

84
85
Italiano
A2
SENSIBILITA
SURROUND PREDETERMINATO
INGRESSO PREDETERMINATO
EQ
NASCONDI
AZZERARE
A2
SI N O
AVAN ZATA
PARAMETRI D’INGRESSO
POSTERIORE
IR
CHIUDERE
VERSIONE
AZZERARE
POSTERIORE
TI PO
LIVELLO
TIPO
SL IM STAG E
MAINSTAGE HD
DIFFUSORE S + D
POSTERIORE
TIPO
LIVELLO
Azzerare Ingresso alle Impostazioni Predefinite
di Fabbrica
Resettare ai valori predefiniti di fabbrica cancella le regolazioni che
avete fatto per questo ingresso .
}}Azione: Selezionare AZZERA INGRESSO (a predefino da fabbrica) e
premere ENTER
Risultato: Le opzioni AZZERA INGRESSO verranno mostrate
}}}Azione: Selezionare SI o NO
Uscita Esterna Canale Posteriore
SLIMstage permette di aggiungere Diffusori Esterni Posteriori per
incrementare l’effetto surround. L’Uscita Posteriore è disabilitata
quando viene connessa una cuffia.
Suggerimento : Per aggiungere allo SLIMstage od al MAINstageHD
un canale posteriore esterno, collegare un cavo audio dotato di jack
da 3.5 mm dall’Uscita Posteriore all’ingresso Analogico 1 del retro
SLIMstage o MAINstageHD.
Selezionare il Tipo di diffusore POSTERIORE
}}Azione: Navigare a MENU CANALE POSTERIORE e selezionare
l’oggetto e premere ENTER.
Risultato: L’Uscita Canale Posteriore verrà ottimizzata per
supportare il tipo di Diffusore Posteriore collegato.
AVAN ZATA
INGRESSO PREDETERMINATO
PARAMETRI D’INGRESSO
POSTERIORE
IR
CH IU DER E
VERSIONE
AZZERARE
CHIUDERE
PER APRIRE L A MESSA A PUNTO
PREMERE I L TASTO SET UP, IL
TASTO SPEAKER , IL TASTO EXIT
CANCEL LA CHIUDI
AVAN ZATA
INGRESSO PREDETERMINATO
PARAMETRI D’INGRESSO
POSTERIORE
IR
CHIUDERE
VERSIONE
AZZERARE
VERSIONE
MODELLO: 4 0
ELETTRO: 1.00
SW: 1.0.0/1.0.0
SERIE #: S103500 0025
BLOCCAGGIO CONFIGURAZIONE
Previene accidentali cambiamenti della configurazione
}}Azione: 1. Navigate a BLOCCA CONFIGURAZIONE
}}Azione: 2. Selezionate BLOCCA CONFIGURAZIONE e premere
ENTER.
Risultato: Il menu di BLOCCA CONFIGURAZIONE viene mostarto
}}Azione: Selezionare CANCELLA o BLOCCA e premere ENTER
Risultato: La scelta verrà evidenziata.
Risultato: La configurazione verrà bloccata da accidentali
cambiamenti
Per sbloccare CONFIGURAZIONE, premere sequenzialmente
i tasti SETUP,
, EXIT sul telecomando
VERSIONE
VERSIONE mostra importanti informazioni sul vostro SLIMstage incluso
il modello, il numero di serie, la versione dell’elettronica e del software
}}Azione: Portarsi su VERSIONE e premere ENTER.
LIVELLO
–10 ……... 0 ……… 10+
AVAN ZATA
INGRESSO PREDETERMINATO
PARAMETRI D’INGRESSO
POSTERIORE
IR
CHIUDERE
VERSIONE
AZZERARE
FRONTALE POST ERIORE
PER RECUPER ARE PREMERE MU TE
E SOURCE ALLO S TESSO TEMPO
CONFERMA CAN CE LLA
IR
RICEVI TORE IR
PER 2 SECONDI
Livello Surround Esterno
Regolare il livello di uscita ai diffusori posteriori surround esterni.
}}Azione: Navigare a LIVELLO e premere ENTER. Utilizzando
sorgenti surround familiari e che conoscete , regolare il livello
posteriore e premere ENTER
Risultato: Il livello posteriore selezionato diverrà quello
predefinito
Selezionare SENSORE IR
SLIMstage può essere controllato via un sensore IR FRONTALE, via un
opzionale sensore IR POSTERIORE e via porta RS-232. La condizione
normale è FRONTALE . Selezionare POSTERIORE se si volesse
controllarlo via RS-232 (incluso se collegato un adattatore controllo
remoto RF) o, se si usa un altro SLIMstage come un canale posteriore
esterno (per prevenire che l’IR remoto possa regolare ambedue gli
SLIMstages).
}}Azione: Portarsi su SENSORE IR e premere ENTER.
Risultato: Le opzioni SENSORE IR verranno mostrate
}}}Selezionare FRONTALE o POSTERIORE e premere ENTER
Risultato: Se è selezionato POSTERIORE.
IMPORTANTE : Per ri-attivare il Sensore IR Frontale, premere i tasti
MUTE e SOURCE nello stesso momento per 2 secondi.
Suggerimento: per informazioni sulla connettività e sulle istruzioni di
programmazione verificate il sito web Soundmatters.
AVAN ZATA
INGRESSO PREDETERMINATO
PARAMETRI D’INGRESSO
POSTERIORE
IR
VERSIONE
AZZERARE
AZZERARE
AZZER AMENTO MASTER AI VALOR I
DI FABBRICA?
SI N O
Azzerare Tutte Le Regolazioni i Valori Predefiniti di
Fabbrica
Questo azzera tutte le opzioni di configurazione che potreste aver
voluto modificare, ai valori originali di fabbrica.
}}Azione: Navigare a AZZERA TUTTO AI VALORI DI FABBRICA e
premere ENTER
Risultato: Le opzioni di AZZERA TUTTO vengono mostrate
}}} Selezionare SI o NO e quindi premere ENTER
Risultato: Tutte le regolazioni verranno riportate ai valori iniziali
di fabbrica.
Premere EXIT per ritornare al menu precedente
Premere EXIT ancora per uscire dal MENU REGOLAZIONE.
Page 44

86
87
Italiano
6. Domande Frequenti (FAQ)
Per le ultime FAQ visitare il sito www.soundmattters.com
Q1. Nessun suggerimento sul dove porre lo SLIMstage nella stanza per la migliore
performance?
Pur performando lo SLIMstage bene in virtualmente ogni applicazione, come tutti i diffsori, la
miglior performance verrà raggiunta se si pone un poco di attenzione al suo collocamenento.
La migliore Hi-Fidelity: il sistema deve essere sempre ben centrato davanti all’ascoltatore(i) usando
i piedini o il braccetto da parete per puntare il frontale della griglia direttamente all’ascoltatore(i). Se
inserito in un cabinet, porlo il più avanti possibile per permettere la maggiore dispersione.
Il miglior Surround: tutti i sistemi surround hanno uno “sweet spot” , l’area dove l’effetto surround
è massimizzato, che è un’area la cui ampiezza varia in funzione della distanza dallo SLIMstage…se
il vostro punto di ascolto è più vicino a 2.7-3 metri, assicuratevi di ri-regolare la posizione DISTANZA
nel menu di configurazione.
Il miglior Basso: Porre qualsiasi diffusore contro una superficie dura permette un rinforzo dei bassi.
Più sono le superfici vicine al SLIMstage, maggiori sono i bassi. Il minor rinforzo dei bassi lo si ha
quando l’unità è in mezzo alla stanza. Il maggiore quando in un angolo, vicino al pavimento od al
soffitto. Inoltre, poiché i woofers puntano verso il basso, ci deve essere un adeguato spazio (circa
due centimetri) perché i bassi vengano ventilati nella stanza.
Q2. I bassi sono sorprendentemente buoni per questo tipo di piccolo all-in-one box… ma ne
voglio di più ! Posso aggiungere un subwoofer esterno?
Si , lo SLIMstage ha una uscita a jack per il subwoofer acusticamente accoppiato soundmatters
SUBstage™, o per virtualmente ogni altro subwoofer amplificato di buona qualità. L’uscita sub dello
SLIMstage è costituita da un mini-jack da 1/8”, quindi se non usate il nostro SUBstage, dovrete usare
un adattatore da 1/8”stereo mini ad RCA per la maggior parte degli altri subwoofers (incluso con il
SUBstage).
Q3. Io amo lo SLIMstage, ma vorrei più volume. Come fare?
Di seguito alcune opzioni. Aggiungere un subwoofer esterno come il nostro SUBstage (o due) e/o
aggiungere un addizionale SLIMstage nella parte posteriore per canali posteriori, oppure passare ad
un modello maggiore di SLIMstage. Se il problema capita solo con una specifica sorgente, potreste
essere in grado di incrementare la sensibilità dell’ingresso a cui è connessa (vedere AVANZATA >
PARAMETRI INGRESSO > SENSIBILITA’).
Q4. Come posso controllare il mio SLIMstage ed il mio TV con un solo telecomando ?
Le funzioni del telecoamndo dello SLIMstage sono facilmente catturate da telecomandi di terze
parti con la speciale funzione di “imparare” (learning). Il volume dello SLIMstage può essere poi
controllato dal telecomando di molti apparecchi TV e cable/satellite inserendo uno speciale Denon®
audio code. Rifererirsi alle istruzioni del telecomando del TV per verificare se sono possibili queste
funzioni.
Q5. Per poter integrare appropriatamente lo SLIMstage all’interno del mio telecomando con
funzioni avanzate di “imparare” (learning) o dentro al mio sistema home automation, necessito
dei “codici discreti“ (discrete codes). Dove li posso trovare?
I codici discreti IR dello SLIMstage sono disponibili sul sito HYPERLINK http://www.soundmatters.
com www.soundmatters.com.
Q6. Posso usare lo SLIMstage quando viaggio?
SLIMstages usa una versione di una alimentazione di notebook computer, quindi può operare con
tensione : 95–240Vac, 50/60Hz. Occorre solamente sostituire il cavo in modo che il plug sia quello
usato localmente.
Q7. Raccomandate di utilizzare lo SLIMstage con una protettore di sovraccarico?
SLIMstage, come tutti gli apparecchi elettrici domestici, può trarre beneficio dalle protezioni da
sovracacrico.
Q8. Lo SLIMstage va in stand-by da solo o debbo farlo io?
Slimstage dovrebbe essere spento premendo il tasto SPENTO/standbay (OFF/standby) sul
telecomando. Il sistema attiva il modo Risparmio Energia dopo circa 2 minuti di assenza di
segnale.
Q9. Quando passo dai modi normale a Dialog+ a volte avverto una grande differenza, altre
volte nessuna del tutto. Perché?
Vi sono un numero di ragioni diverse. Quando si ha il livello dei bassi al massimo, questo potrebbe
offuscare la funzione di incremento intellegibilità del dialogo. Ovviamente poi, alcuni programmi
non contengono voce, e questo può non far sentire alcuna differenza.
7. Soluzione ai problemi
1. Problema: Nessun suono
Soluzioni:
a. Verificare che la sorgente sia accesa ed in riproduzione (es., DVD o TV)
b. Se è collegata la cuffia, confermate che i diffusori non siano disattivi
c. Verificare che il cavo di alimentazione sia ben inserito nel modulo dell’alimentazione dello
SLIMstage e che questo sia ben collegato sul retro del SLIMstage.
d. Verificare il volume
e. Verificare che la sorgente sia selezionata sullo SLIMstage o che il telecomando abbia
selezionato l’ingresso attivo.
2. Problema: Ho selezionato un ingresso sul telecomando, ma non è mostrato ul display
Soluzione:
a. L’ingresso è “nascosto”… Vedere Parametri Ingresso > Nascondere ingresso nel Menu
Configurazione.
3. Problema: Non ci sono abbastanza bassi
Soluzioni:
a. Alzare il livello bassi via telecomando
b. Alzare il livello bassi nel menu di configurazione
c. Ve dere le informazioni sul dove porre per maggiori bassi
d. Aggiungere un subwoofer attivo SUBstage!
4. Problema: Non sento alcun od abbastanza surround
Soluzioni:
a. Assicuratevi di essere in modo Musica, Live o Film (non Stereo). Modo Film ha il surround
più evidente
b. Confirmare che state ascoltando entro 45 gradi dal centro dello SLIMstage, chiamato
“sweet spot”
c. Confirmare che i modi EQ e Surround presenti nel DVD player od altra sorgente siano stati
disattivati !
d. Vedere le informazioni sul dove porre l’unità
e. Accendere l’uscita posteriore dello SLIMstage. Aggiungere diffusori attivi sul retro della
stanza.
5. Problema: Il telecomando funziona a volte o non funziona
Soluzioni:
a. Confermare che le batterie siano nuove
b. Per ri-attivare il Sensore IR Frontale, premere i tasti MUTE e SOURCE nello stesso momento
per 2 secondi.
6. Problema : Suono fuzzy
Soluzione:
a. Confermare che i modi DSP/surround/sound enhancement siano stati disattivati su tutte
Page 45

88
89
Italiano
le sorgenti collegate allo SLIMstage
b. Confermare che la sensibilità regolata non sia trioppo alta, sovraccaricando l’ingresso, nella
sezione REGOLAZIONE SENSIBILITA.
7. Problema: Il sistema sembra essere entrato in blocco
Soluzione:
a. La circuitazione dello SLIMstages include un potente microprocessore. Se l’unità operasse
in strano modo, staccare la spina di rete dalla presa sul muro per 15 secondi e rimetterla per
resettare l’operazione normale del computer.
8. Problema: TMP o PT compaiono sul display e l’unità si accende /spegne.
Soluzione:
La protezione da sovraccarico termico è intervenuta e stà lavorando…abbassare il volume.
9. Problema: Non c’è abbastanza volume
Soluzioni:
a. Se disponibile, alzare l’uscita della sorgente che state usando.
b, Incrementare la sensibilità dell’ingresso, vedere nella sezione Configurazione Avanzata la
Regolazione Sensbilita.
10. Problema: Sono Collegato ad un ricevitore via cavo (non disponibile in Italia),
ma non c’è suono
Soluzioni:
a. Sfortunatamente alcuni ricevitori via cavo hanno una uscita digitale ed anche analogica
finte (non collegate internamente nel box). Verificate con il fornitore per avere conferma della
capacità di uscita.
b. Se si usa l’uscita digitale del vostro ricevitore via cavo, potreste scoprire che questa lavora
solo quando siete su un canale HDTV, per accedere all’uso da altri canali necessitate di
collegare l’uscita audio analogica al corretto ingresso sullo SLIMstage.
11. Problema: Il cavo ottico non si inserisce.
Soluzioni:
a. Assicurarsi che la protezione che copre il connettore sia rimossa da amdedue le estremità.
b. Alcuni cavi hanno una guaina pià larga al connettore e potrebbe non essere possibile usarli.
12. Problema: Non riesco ad accedere al menu di CONFIGURAZIONE
Soluzione:
a. L’accesso alla CONFIGURAZIONE potrebbe essere blocato. Premete sequenzialmente SETUP,
, EXIT sul telecomando
8. Caratteristiche
SLIMstage 5.1 Surround Sound Console
• Algoritmi Surround: Euphony™HD decodifica Analogico, PCM, Dolby Digital 2.0/5.1, DTS Digital
Surround, DTS 96/24
• Decodifica 5.1 channel: Dolby Digital, DTS Digital Surround, DTS 96/24
• Decodifica 2.0 channel: Dolby Digital, PCM
• Conversione 2-canali a 5-canali: Euphony™HD
• Potenza: Amplificatori Class-D (RMS a < 0.8%THD)
SLIMstage 30 – Satelliti 80W, Woofers 60W
SLIMstage 40 – Satelliti 80W, Woofers 90W
SLIMstage 50 – Satelliti 80W, Woofers 130W
• Max. SPL@1m:
SLIMstage 30 – 103dB
SLIMstage 40 – 106dB
SLIMstage 50 – 109dB
• Altoparlanti principali:
SLIMstage 30 – 4 cadauno 50x50mm con magneti brevettati LMD Neo-sandwich
SLIMstage 40 – 4 cadauno 50x50mm con magneti brevettati LMD Neo-sandwich
SLIMstage 50 – 4 cadauno 50x50mm con magneti brevettati LMD Neo-sandwich
• Woofer Arrays:
SLIMstage 30 – 2 woofer arrays*
SLIMstage 40 – 3 woofer arrays*
SLIMstage 50 – 4 woofer arrays*
* Ogni array include un woofer Active High-Energy 3˝ brevettato LMD Neo-sandwich
magnet più due 3” radiatori per basso
• Alimentazione: Digitale, 95–265Vac, 50/60Hz, 36V
• Ingressi (6)
Analogico 1 –stereo 3.5mm
Analogico 2 – stereo 3.5mm. Disponibile attenuazione 20dB per livello diffusore in
Analogico 3 – stereo 3.5mm. Pannello Frontale, con selezione prioritaria
Digitale 1 – SP/DIF coax
Digitale 2 – Optical / TosLink
Digitale 3 – Optical / TosLink
• Uscite (2)
Analogica: Subwoofer out – stereo 3.5mm
Analogica: Cuffia (Euphony Virtual Surround) –stereo 3.5mm
• Uscite canale posteriore (normale/default disattivo )
• Accessori
Telecomando ad infrarossi (IR)
Alimentatore con cavo e cinghia
Piedini di livellamento EZ-tilt™ con inserto altezza
Supporto per montaggio a parete con accessorio
1 cadauno – 3m cavo ottico
1 cadauno – 3m 1/8˝ cavo con mini jack
1 cadauno – 3m 1/8˝ cavo da mini jack a maschio stereo RCA
1 cadauno – 3m cavo digitale coax RCA
• Controlli
Volume Master, cuffia (telec. IR e pannello frontale)
Livello Subwoofer (solo telec. IR)
Selezione sorgente, silenziamento (telec. IR e pannello frontale)
Surround/stereo (solo telec. IR)
• Modi: Acceso, Silenziamento, Spento/Standby
• Consumo Spento/Standby: 2W o meno
• Peso (appross.):
SLIMstage 30 – 7.5 kg
SLIMstage 40 – 8.5 kg
SLIMstage 50 – 9.5 kg
• Dimensioni (LxAxP):
SLIMstage 30 (LxAxP) – 790 x 88 x 93mm
SLIMstage 40 (LxAxP) – 990 x 88 x 93mm
SLIMstage 50 (LxAxP) – 1206 x 88 x 93mm
Altezza con piedini di livellamento EZ-tilt, tutti i modelli (A) –112mm
Altezza con piedini + inserti altezza, tutti i modelli (A) –132mm
Profondità con supporto per montaggo a parete, tutti i modelli (P) –127mm
soundmatters® crede nella politica di un miglioramento continuo del prodotto,
quindi le specifiche sono soggette a cambiamento senza preavviso.
Page 46

90
91
Italiano
9. Garanzia / Service
In caso di necessità di riparazione, dovete fare due cose.
1. Tenete con voi lo scontrino fiscale originale in un posto sicuro. Questo dovrà sempre
accompagnare il prodotto quando lo farete aver al punto vendita presso cui avete effettuato
l’acquisto richiiedendo un intervento. La garanzia viene data dal rivenditore e verrà applicata
solo secondo le direttive che regolano la garanzia legale (Dlgs N. 24 del 2-2-2002), solo
per utenti domestici e verso il primo acquirente. Qualora si verifichi un vizio di conformità
nei primi sei mesi di vita del prodotto, il venditore è tenuto a far ripristinare (da centro
assistenza autorizzato) la conformità del prodotto. Nel caso di non provati vizi di conformità
che si verifichino dopo il sesto mese dall’acquisto del prodotto, l’acquirente sosterrà il costo
della riparazione versando il relativo importo al venditore. Il punto vendita presso cui avete
effettuato l’acquisto deve essere stato fornito dal Distributore ufficiale del vostro Paese (
elenco sul sito www.soundmatters.com). Ricordate: senza lo scontrino fiscale la garanzia,
anche se applicabile, non verrà attivata.
2. Assicuratevi sempre che il punto vendita Vi abbia consegnato lo scontrino fiscale.
Quando portate l’unità per assistenza:
• Recatevi al punto vendita presso cui avete fatto l’acquisto con l’apparecchio perfettamente
imballato, lo scontrino fiscale ed una descrizione del difetto .
• Se dovete spedire, imballate perfettamente l’unità ed eventualmente assicuratela contro danni
da trasporto. I danni da trasporto non sono coperti da garanzia.
“Dolby” e il simbolo della doppia D sono marchi dei Dolby
Laboratories.
Manufactured under license under U.S. Patent #’s:
5,451,942; 5,956,674; 5,974,380; 5,978,762; 6,487,535
& other U.S. and worldwide patents issued & pending.
DTS and DTS Digital Surround are registered trademarks
and the DTS logos and Symbol are trademarks of DTS, Inc.
© 1996-2007 DTS, Inc. All Rights Reserved.
EUPHONY HD is a trademark of DiMAGIC Co. Ltd
Soundmatters is a registered trademark of Soundmatters
International Inc.
Page 47

92
93
Русск
Важные меры безопасности
ОСТОРОЖНО – Риск электрического удара – Не открывать корпус
1. Прочитайте инструкции – Перед использованием устройства обязательно прочитайте о мерах безопасности и
ознакомьтесь с руководством пользователя.
2. Сохраните инструкции – Сохраните руководство пользователя и инструкции по мерам безопасности д ля
использования в будущем
3. Обращайте внимание на предупредительные надписи – Строго придерживайтесь всех предостережений
указанных, как на самом устройстве, так и в настоящем руководстве пользователя.
4. Следуйте всем инструкциям – Строго следуйте всем инструкциям по настройке и эксплуатации
5. Д ля уменьшения риска воспламенения или электрического удара не подвергайте данный аппарат
воздействию дождя или влаги – Изделие не должно быть использовано возле источников воды – например,
возле ванн и душевых кабин, баков с мокрым бельем, кухонных раковин, стиральных машин, в сырых подвалах или
возле бассейнов и водоемов. Аппарат должен находиться вдали от возможных источников утечки или просачивания
жидкостей, изолирован от брызг и конденсата. Не устанавливайте на аппарате резервуары, наполненные водой или
любой другой жидкостью (типа косметики, лекарств, ваз с цветами, растений в горшках, чашек и т.п.).
6. Протирайте только сухой тряпкой
7. Не блокируйте вентиляционные отверстия – Устанавливайте аппарат в соответствии с инструкциями
производителя. Щели и отверстия в корпусе предназначены для вентиляции, для обеспечения надежной работы
изделия и для предотвращения его перегрева; эти отверстия не должны быть заблокированы или закрыты
сторонними предметами. Размещение продукта на кровати, софе, ковре или аналогичных поверхностях не должно
блокировать отверстия. Продукт не должен быть размещен во встроенных сооружениях, таких к ак книжный шкаф,
стенд или полка, если они не предоставляют необходимую вентиляцию или если нет возможности следовать
инструкциям производителя.
8. Не устанавливайте возле горячих или воспламеняющихся источников таких как радиаторы,
нагревательные приборы, плиты или другие устройства (вк лючая усилители) которые производят тепло.
9. В целях безопаснос ти не пренебрегайте вилкой поляризованного или заземленного типа.
Поляризованная вилка имеет два контакта, один из которых шире другого. Вилка заземленного типа имеет два
контакта и третий заземляющий штырек. Широкий контакт или третий штырек предусмотрены для обеспечения
безопасности. В том с лучае, если прилагаемая вилк а не подходит к розетке, проконсультируйтесь с электриком для
замены устаревшей розетки.
10. Кабеля и блоки питания - Используйте только те кабели и блоки питания, которые предоставляются фирмой
производителем. Никогда не наматывайте шнур питания на блок питания или любой другой объект. Выполнение
подобных операций может привести к изнашиванию или повреждению кабеля, что может в свою очередь быть
не безопасным. Всегда прокладывайте шнур питания таким образом, чтобы нельзя было на него наступить либо
придавить его установленными сверху или сбоку предметами. Защищайте кабель и блоки питания от попадания
ни них жидкостей. Например, не оставляйте шнур или блок питания возле раковин, баков, туалетов, или на полу,
который обрабатывается жидкими моющими средствами. Жидкости могут вызывать короткое замыкание, в
частности, если шнур или блок питания подверглись действию влаги. Жидкости также могут вызывать постепенную
коррозию зажимов кабеля и/или клем разъемов блоков питания, что может привести к перегреву. Всегда
совмещайте широкую пластину штепсельной вилки с широкой прорезью розетки и вставляйте вилку до упора.
Никогда не используйте блок питания, который подвергся коррозии на контактах переменного тока и/или имеет
признаки перегрева (как например, деформация пластмассы) на входе переменного тока или в любом другом месте
адаптера. Не используйте кабель, электрические контакты которого на любом его конце имеют признаки коррозии
или перегрева или же если кабель поврежден к аким-либо образом.
11. Используйте только дополнительные компоненты или аксессуары, указанные фирмой
производителем.
12. Используйте только тележку, подставку, штатив, кронштейн или стол, указанный фирмой
производителем, или же приспособление, приобретенное вместе с аппаратом. Если вы
используете подставку на колесиках, будьте внимательны, перемещая одновременно тележку
и аппарат, чтобы не вызвать опрокидывание. Размещение изделия на неустойчивом предмете,
таком как передвигающаяся тележка, шатающийся стул или балансирующий кронштейн, может
привести к падению изделия и серьезным травмам, как ребенка, так и взрослого, а также
серьезным повреждениям самого аппарата.
13. Отк лючайте аппарат от источника питания во время штормов и гроз или когда вы не пользуетесь
прибором долгий период времени. Рекомендуется использование сетевого фильтра, который может
предотвратить повреждение.
14. По всем вопросам технического обслуживания обращайтесь только к квалифицированному
сервисному персоналу. Техническое обслуживание требуется, если аппарат был каким-либо образом поврежден,
например, повреждены шнур питания или штепсельная вилка, на аппарат была пролита жидкость, или в него попал
какой-либо сторонний предмет, аппарат был подвержен дейс твию дождя или влаги, не работает в нормальном
режиме или его уронили.
15. Аппарат должен подключаться к ис точнику питания только того типа, который указан в данном
руководстве или на ярлыке самого устройства. Если вы не уверены в типе источника питания в вашем доме,
проконсультируйтесь с вашим дилером или местной компанией электроснабжения. Для изделий, предназначенных
работать от энергии батарей или других источников, ознакомьтесь с их инструкцией по эксплуатации.
16. Перегрузка - Не перегружайте стенные розетки, удлинительные шнуры или розетки, встроенные в
аппаратуру, поскольку это создает опасность возгорания или поражения электрическим током.
17. Попадание внутрь жидкостей и предметов – Никогда не пытайтесь просунуть сторонние предметы в
отверстия аппарата, так как вы можете коснуться опасных деталей находящихся под напряжением и способных
вызвать короткое замыкание, что может привести к возгоранию или поражению электрическим током. Следите
за тем, чтобы не пролить на аппарат сторонние жидкости. Регулируйте только те настройки, которые описаны
в нас тоящем руководстве пользователя, так как неправильная эксплуатация аппарата может привес ти к его
неисправности и выходу из строя и, как с ледствие, потребует расширенной работы квалифицированного технического
персонала по восстановлению изделия до нормального режима работы
18. Замена деталей - Если необходима замена деталей, убедитесь, что специалист сервисного центра располагает
запчастями, указанными производителем или имеющими те же характеристики, что и оригинальные. Установка
других запчастей может привести к возгоранию, поражению электрическим током или иным неблагоприятным
последствиям.
19. По завершении каких бы то ни было работ по техническому обслуживанию или ремонту данного
изделия , попросите специалис та сервисного центра выполнить необходимые проверки функционирования,
подтверждающие, что изделие находится в надлежащем рабочем состоянии.
20. Не пытайтесь ремонтировать изделие самостоятельно, открытие или снятие корпуса может привести к
поражению электрическим током или иным неблагоприятным последствиям. По вопросам ремонта и обслуживания
обращайтесь к квалифицированному сервисному персоналу
21. Крепление к стене с помощью кронштейна – Ознакомьтесь с инструкцией к стенному кронштейну от фирмы
изготовителя; убедитесь, что кронштейн имеет прочное соединение с SLIMstage и прочно закреплен в стенном
перекрытии, что исключает любого вида вибрацию или шатание во время эксплуатации изделия
ПРЕДУПРЕЖДЕНИЕ Для снижения риска воспламенения или повреждения электрическим током, не
подвергайте этот аппарат действию дождя или влаги.
Page 48

94
95
Русск
Подключение и Расположение
ВАЖНОЕ ПРИМЕЧАНИЕ: Перед использованием настоящего Руководства Пользователя,
пожалуйста, следуйте инструкциям Руководства по установке для выполнения всех
подключений и правильного расположения SLIMstage
Макет передней панели управления
E. Уменьшение общего уровня громкости
(контролирует также громкость наушников
при отключенных громкоговорителях)
A.
Наушники Eupho-
ny виртуального
окружения
(через 1/8” 3.5mm
разъем)
Вкл/Выкл. звука
B.
Индикатор
питания
I.
Выбор источника
(последовательный
выбор входов)
H.
C.
Вход/источник
J K L M N O
J. Определен Dolby 2.0,
Dolby 5.1, DTS, PCM, Analog
K. Включена компрессия
звука в ночное время
L. Включен Dialog+
M. Режимы СТЕРЕО, МУЗЫКА,
ЖИВОЙ ЗВУК, КИНО
N. Предустановленный
эквалайзер
O. Громкоговорители
отключены
используются наушники)
P. Индикатор перегрева
Содержание страница
• Меры безопасности . . . . . . . . . . . . . . . . . 92
• Подключение и распо ложение . . . . . . . . . . 94
• Передняя панель и
дистанционное управление . . . . . . . . . . . 94
1. Управление . . . . . . . . . . . . . . . . . . . . . . 96
2. Настройка . . . . . . . . . . . . . . . . . . . . . . . 97
3. Наушники . . . . . . . . . . . . . . . . . . . . . . . 97
4. Дополнительные функции . . . . . . . . . . . . . 98
5. Установка. . . . . . . . . . . . . . . . . . . . . . . . 98
6. Часто задаваемые вопросы . . . . . . . . . . . . 106
7. Возможные неисправнос ти и их устранение . . 107
8. Спецификации. . . . . . . . . . . . . . . . . . . . . 109
9. Гарантия и сервис. . . . . . . . . . . . . . . . . . . 110
-95
Уровень
громкости
F. Увеличение общего уровня громкости
(контролирует также громкость наушников
при отключенных громкоговорителях)
D.
P
(если
E
F
ИК сенсор
Q.
Индикатор
режимов
окружения
3 СИД = Кино
2 СИД = ЖИВОЙ
ЗВУК
1 СИД = МУЗЫКА
0 СИД = Стерео/
Без обработки
G.
R.
“iPod”/Analog
вход
(автоподключение
через via 1/8”
3.5mm разъем
– игнорирует
все тыловые
каналы)
Панель пульта дистанционного управления
1. Вкл/Выкл звуковой
2. Вкл/Выкл ночной/динамич
диапазон компрессии
3. Вкл/Выкл громкоговорители
(связано с наушниками)
7. Выбрать вход: Analog 1
8. Выбрать вход: Analog 2
10. Выбрать вход: Digital 1
(включая внешний сабвуфер)
(включая внешний сабвуфер)
20. Следующий пункт меню
или выбор пункта выше
21. Предыдущий пункт меню
или выбор пункта ниже
эквалайзер
14. Увелич. уровня
громкости бассов
15. Уменьш. уровня
громкости бассов
25. Вход в режим
редактирования
4. Вкл/Выкл устройство
без отключения питания
5. Вкл/Выкл предустановленный
эквалайзер
6. Регулировка уровня
громкости в наушниках
9. Выбрать вход: Analog 3
(фронтальный)
11. Выбрать вход: Digital 2
12. Выбрать вход: Digital 3
13. Выбор режима прослушивания
(всего 4 позиции)
16. Вкл./Выкл звук
17. Увелич. общего
уровня громкости
18. Уменьш. общего
уровня громкости
19. Увелич./уменьш. уровня
громкости громкоговорителей
бокового окружения
(или тыловых громкоговорителей,
если такие установлены)
22. Выбор меню или
установка параметра
23. Следующий пункт меню
или выбор пункта справа
24. Предыдущий пункт меню или
выбор пункта слева
26. Возврат в предыдущее меню
Page 49

96
97
Русск
1. Управление
Включение/Выключение
Включите SLIMstage, нажав любую кнопку на передней панели прибора или на пульте
дистанционного управления. Выключите, нажав на пульте управления кнопку Off/standby
OFF/standby – Снижает питание на всех компонентах устройства за исключением ИК
сенсора. Потребление энергии меньше, чем 2.0Вт
Выбор входа/источника
Чтобы выбрать источник звука, нажмите кнопку желаемого входа на пульте
дистанционного управления (A1, A2, A3, D1, D2, D3) или последовательно нажимайте
кнопку Source на фронтальной панели устройства. Экран покажет выбранный источник.
Каждый раз нажимая кнопку на фронтальной панели, вы будете последовательно
переходить на следующий доступный канал.
Автоматическое распознавание сигнала и преобразование
SLIMstage технология Euphony HD обработки звукового окружения может обрабатывать
практически все типы сигналов, включая аналоговый, Dolby 2.0, 5.1, DTS Digital Surround,
DTS 96/24 или PCM.
Экран устройства покажет какой сигнал принимает SLIMstage - Dolby 2.0, 5.1, DTS, PCM,
или Analog.
В режимах МУЗЫКА, ЖИВОЙ ЗВУК и КИНО SLIMstage технология EuphonyHD
автоматически конвертирует все 2-х-канальные источники (такие как Стерео, Dolby 2.0,
или стерео PCM) в звук окружения.
Режим окружения
SLIMstage EuphonyHD предоставляет стерео режим и три разных режима окружения
звуком, которые могут быть выбраны с помощью кнопок «–» и «+» «surr mode» на пульте
дистанционного управления. Выбранный режим будет моментально отображен на ЖК
экране и будет всегда показываться на вертикальном синем светодиодном индикаторе
(СИД)
НЕ ГОРИТ СИД ...... SURR OFF .... Стерео/Без обработки
1 СИД ..............MUSIC Mode ... Средний эффект окружения звуком, идеален для
музыкальных произведений
2 СИД .................. LIVE ....... Идеальное окружения для большинства ТВ
передач и шоу
3 СИД .................MOVIE ...... Максимальный эффект окружения – наиболее
подходит для игровых фильмов
В случае, если вы не изменили настройки в установочном меню (см. Дополнительные
установки – ПАРАМЕТРЫ ВХОДА – РЕЖИМ ОКРУЖЕНИЯ), то SLIMstage будет включать и
сохранять последний выбранный вами режим окружения до тех пор пока вы не выберите
другой режим или источник.
Отключение звука
Чтобы отключить звук, нажмите кнопку MUTE на пульте дистанционного управления.
Индикатор MUTE также отобразится на экране. Нажмите любую кнопку, чтобы снова
включить звук.
Прослушивание в ночное время
Воспользуйтесь кнопкой ночной музыки (Dynamic Range) на пульте дистанционного
управления, чтобы активизировать/деактивизировать специальную ночную схему
прослушивания, которая уменьшает динамический диапазон (разницу между самым
громким и тихим звуком), и таким образом музыка не будет сильно мешать вашим
соседям или спящим родным. Индикатор NIGHT (НОЧЬ) будет в это время отображаться
на экране.
Схема Dialog+ для чистоты голоса
Воспользуйтесь кнопкой Dialog+ на пульте дистанционного управления, чтобы
активизировать или деактивизировать схему дополнительной обработки типичных
голосовых звуков. Если функция активизирована, соответствующий индикатор будет
отображен на экране.
2. Настройка
Звук
Чтобы настроить уровень громкости звука, воспользуйтесь кнопками «+» и «-» на пульте
дистанционного управления или используйте кнопки «+» и «-» на передней панели
устройства.
Примечание: если подключены наушники при отключенных динамиках, передняя
панель устройства контролирует уровень звука в наушниках
Уровень басов
Для настройки уровня басов используйте кнопки «bass+» и «bass -» на пульте
дистанционного управления. Относительный уровень громкости басов будет показан
на экране передней панели устройства. Изменение уровня громкости басов с помощью
пульта дистанционного управления так же изменит уровень громкости внешних
сабвуферов, таких как SUBstage, если такие подключены.
Уровень окружения
Используйте кнопки surr level на пульте дистанционного управления, чтобы увеличить
или уменьшить уровень громкости громкоговорителей окружения. Уровень динамиков
окружения будет показан на экране передней панели устройства.
Эквалайзер
Воспользуйтесь кнопкой EQ на пульте дистанционного управления, чтобы
активизировать предустановленные настройки эквалайзера (см. УСТАНОВКИ ДИСТАНЦИОННЫЙ EQ), обеспечивающие альтернативный тональный баланс. Индикатор
эквалайзера отобразится на экране устройства.
Чувствительность входа
Может такое быть, что между выходом аналогового источника и входом AV
компонента (такого как SLIMstage) существует несоответствие. Оно может вызвать или
низкоуровневый/излишний свист, или перегрузку/искажение звука. Обратитесь к разделу
ДОПОЛНИТЕЛЬНЫЕ УСТАНОВКИ > ЧУВСТВИТЕЛЬНОСТЬ.
3. Наушники
Использование наушников
Со своей встроенной схемой для наушников, SLIMstage предоставляет ощущения
домашнего кинотеатра при использовании обычных традиционных наушников.
Подключите наушники к разъему 1/8” (3.5мм) на левой стороне передней панели
устройства. При этом будут отключены динамики. Нажатие кнопки
дистанционного управления позволит одновременно проигрывать звук с динамиков
и в наушниках (стерео проигрывание). Воспользуйтесь кнопками H-phone “+” и “-” на
пульте дистанционного управления, чтобы изменить уровень громкости в наушниках
независимо от громкости звука в динамиках.
Добавление внешнего сабвуфера
Ознакомьтесь с Руководством по установке SLIMstage, разделом меню D и инструкцией
ко внешнему сабвуферу для оптимизации интеграции и производительности сабвуфера.
на пульте
Page 50

98
99
Русск
Добавление внешних тыловых громкоговорителей
Можно добавить внешние тыловые динамики, чтобы дополнить звуковое окружение
от SLIMstage (см. ДОПОЛНИТЕЛЬНЫЕ УСТАНОВКИ > ТЫЛОВОЙ КАНАЛ). Для получения
дополнительной информации свяжитесь с вашим местным дилером или с отделом
технической поддержки soundmatters
4. Дополнительные функции
Порт RS-232 контроля
SLIMstage предоставляет RJ-11 разъем для возможности RS-232 контроля с помощью
компьютера или внешнего автоматического устройства. Имеются два контакта для
подключения тылового ИК сенсора.
Для получения дополнительной информации посетите наш сайт по адресу www.
soundmatters.com/support/downloads, свяжитесь с вашим дилером или обратитесь в
отдел поддержки soundmatters
Защитное отключение в случае перегрева
В SLIMstage используются современные цифровые усилители, которые позволяют четко
передавать значительно высокие звуковые тона. Если система проигрывает звук на
уровне, который ведет к перегреву системы, экран устройства отображает индикатор
TMP. Если температура достигает уровня, при котором возможно повреждение
SLIMstage, усилители будут отключены, чтобы защитить систему и громкоговорители
от повреждений – на экране будет при этом отображаться индикатор PT. Когда система
защиты активизируется, вы услышите, как система неоднократно отключит и снова
включит звук. Чтобы деактивизировать систему защиты, просто уменьшите громкость
звука.
DB-15 сервисный порт
SLIMstage предоставляет 15-штырьковый разъем для возможности обслуживания. Для
получения информации свяжитесь с отделом поддержки soundmatters
5. Меню установок
Несмотря на то, что SLIMstage являестя устройством готовым к
эксплуатации сразу же после его подключения, установочное меню
позволит вам особенно точно акустически и функционально настроить
SLIMstage согласно вашим предпочтениям.
1. Нажмите кнопку SETUP на пульте дистанционного управления, чтобы
войти в меню установок (или выйти из него)
2. Используйте блок навигации пульта дистанционного управления для выбора пунктов
меню и навигации по ним.
3. Нажимайте кнопку EXIT всякий раз, когда вы хотите вернуться к предыдущему меню.
УСТАНОВКА
ЯЗЫК
ЭКРАН
КОМ НАТА
САБВУФЕР
ДИСТАНЦИОННЫЙ EQ
ДОПОЛН
ЯЗЫК
简简简简
简简简简
DEUTSCH
ESPANOL
ENGLISH
FRANCAIS
ITALIANO
简简简
РУССКИЙ
A. ЯЗЫК
}Действие: Выберите пункт меню ЯЗЫК, затем выберите из
имеющегося списка желаемый вариант и нажмите кнопку ENTER.
Результат: Меню теперь отображается на выбранном вами
языке.
УСТАНОВКА
ЯЗЫК
ЭК РАН
КОМ НАТА
САБВУФЕР
ДИСТАНЦИОННЫЙ EQ
ДОПОЛН
ЭКРАН
ЭКОНОМ
ВЫКЛ
ВКЛ
УСТАНОВКА
ЯЗЫК
ЭКРАН
КО МНАТ А
САБВУФЕР
ДИСТАНЦИОННЫЙ EQ
ДОПОЛН
КОМН АТА
РАССТОЯНИЕ
БАЛАНС ОКРУЖЕНИЯ
EQ
ЦЕНТРАЛЬНЫЙ КАНАЛ
РАССТОЯНИЕ
< 2 M
> 2 M
КОМН АТА
РАССТОЯНИЕ
БАЛАНС ОК РУЖЕНИЯ
EQ
ЦЕНТРАЛЬНЫЙ КАНАЛ
БАЛАНС ОК РУЖЕНИЯ
ЛЕВО ПРАВО
10 ……... ! ……… 10
КОМН АТА
РАССТОЯНИЕ
БАЛАНС ОКРУЖЕНИЯ
EQ
ЦЕНТРАЛЬНЫЙ КАНАЛ
EQ СБРОС
B. ПАРАМЕТРЫ ЭКРАНА
Согласно заводским установкам по умолчанию экран SLIMstage
переходит в экономный режим работы (с затуханием) через 10
секунд. Доступны так же режимы автоматического выключения
экрана и постоянной работы в обычном режиме.
}Действие: Выберите пункт меню ЭКРАН, затем выберите один из
предложенных вариантов ЭКОНОМ.РЕЖИМ, ВЫКЛ, ВКЛ и нажмите
ENTER на пульте дистанционного управления
Результат: Установки экрана будут сохранены.
C. УСТАНОВКА КОМНАТЫ
Изменение базовых параметров УСТАНОВОК
КОМНАТЫ для получения лучшей
производительности
}Действие: Выберите пункт меню КОМНАТА и нажмите
ENTER на пульте дистанционного управления
Результат: Отображаются опции выбранного меню
Изменение расстояния прослушивания
}}Действие: Выберите опцию РАССТОЯНИЕ и нажмите ENTER
}}}Action: Выберите желаемое расстояние и нажмите
ENTER
Результат: Расстояние прослушивания будет
сохранено, экран вернется к меню установки комнаты
Установка баланса между громкоговорителями
левого и правого окружения
}}Действие: Выберите опцию БАЛАНС ОКРУЖЕНИЯ и нажмите
ENTER
Результат: Будет показана шкала БАЛАНС ОКРУЖЕНИЯ
}}Действие: Выберите желаемые установки и нажмите ENTER.
Результат: Новые настройки баланса будут сохранены
Совет: если одна сторона в зоне прослушивания (левая или правая)
акустически более «живая» (скажем, имеются стеклянные или
сильно отражающие поверхности), вы можете попробовать слегка
сместить баланс в сторону более «мертвой» (например, занавес,
выход в другую комнату) зоны
Установка параметров эквалайзера комнаты по
умолчанию
Позволяет изменить частотный баланс SLIMstage согласно
расположению, акустике комнаты и вашим предпочтениям и
вкусам
}}Действие: Выберите пункт меню EQ КОМНАТЫ, нажмите
кнопку ENTER на пульте дистанционного управления.
Результат: будет отображен эквалайзер 10-ти частот
}}}Действие: Переместите каждый движок эквалайзера в
желаемое положение и нажмите ENTER
Результат: Новые установки частот будут представлять
собой новые характеристики эквалайзера по умолчанию
Page 51

100
101
Русск
КОМН АТА
РАССТОЯНИЕ
БАЛАНС ОКРУЖЕНИЯ
EQ
ЦЕНТРАЛЬ НЫЙ КАНАЛ
УРОВЕНЬ
–10 ……... 0 ……… 10+
УСТАНОВКА
ЯЗЫК
ЭКРАН
КОМ НАТА
САБВУФЕР
ДИСТАНЦИОННЫЙ EQ
ДОПОЛН
САБВУФЕР
ДА / НЕТ
УРОВЕНЬ
КРОССОВЕ Р
ФАЗА
САБВУФЕР
ДА
НЕ Т
САБВУФЕР
ДА / НЕТ
УРОВЕНЬ
КРОССОВЕ Р
ФАЗА
УРОВЕНЬ
–10 ……... 0 ……… 10+
Совет: Изменения параметров эквалайзера для комнаты
распространяются на все входы. Параметры эквалайзера для
каждого входа могут быть заданы в меню Дополнительных
установок. Чтобы сбросить параметры эквалайзера входа до
установок эквалайзера заданных для всей комнаты воспользуйтесь
опцией меню сброса параметров входа до заводских установок.
Установка уровня ЦЕНТРАЛЬНОГО КАНАЛА
Изменение уровня Центрального Канала для оптимизации
вокальных звуков
}Действие: 1. Выберите пункт ЦЕНТРАЛЬНЫЙ КАНАЛ и нажмите
ENTER
Результат: 1. На экране отображается диапазон уровней звука
Центрального Канала
2. Показывается уровень звука выхода, заданный по
умолчанию
}}Действие: Выберите желаемый уровень и нажмите ENTER
Результат: Уровень сохранен.
D. ВНЕШНИЙ САБВУФЕР
Установка параметров выхода для внешнего
сабвуфера
Заменяет средства управления, которые обычно вы можете найти
на вашем внешнем сабвуфере.
}Действие: Установите уровень на максимум, кроссовер на
максимальную частоту и фазу на ноль для вашего внешнего
сабвуфера
Совет: Для лучшей интеграции внешнего сабвуфера с
системой вам потребуется время для собственного подбора
оптимальных параметров кроссовера и уровня.
САБВУФЕР ДА/НЕТ
}}Действие: Выберите ДА и нажмите ENTER для получения
лучшего звука в случае использования внешнего сабвуфера.
УРОВЕНЬ ВЫХОДА САБВУФЕРА
Позволяет настроить уровень выхода сабвуфера для соответствия
его выходу сабвуфера от внутренних динамиков для получения
гладкого перехода
}}Действие: 1. Выберите пункт меню УРОВЕНЬ и нажмите
ENTER на пульте дистанционного управления
Результат: 1. Отображается диапазон уровней сабвуфера
}}}Действие: Выберите желаемый уровень в диапазоне и
Совет: Кнопки BASS +/- на пульте дистанционного управления
изменяют одновременно уровень громкости сабвуфера и динамика.
2. Показывается уровень выхода сабвуфера по
умолчанию
нажмите ENTER
Результат: Уровень будет сохранен.
САБВУФЕР
ДА / НЕТ
УРОВЕНЬ
КРОССОВЕР
ФАЗА
КРОССОВЕР
250HZ 190HZ 143HZ
110HZ 82HZ 62HZ
43HZ
САБВУФЕР
ДА / НЕТ
УРОВЕНЬ
КРОССОВЕ Р
ФА ЗА
ФАЗ А
0 ........ 90 ........ 180
УСТАНОВКА
ЯЗЫК
ЭКРАН
КОМ НАТА
САБВУФЕР
ДИСТАНЦИОННЫЙ EQ
ДОПОЛН
EQ СБРОС
УСТАНОВКА
ЯЗЫК
ЭКРАН
КОМ НАТА
САБВУФЕР
ДИСТАНЦИОННЫЙ EQ
ДОПОЛН
ДОПОЛН
ВХОД ПО УМОЛЧАН ИЮ
ПАРАМЕТРЫ ВХОДА
ТЫЛОВОЙ
ИК
БЛОКИРОВКА
ВЕРСИЯ
СБРОС
o
Кроссовер внешнего сабвуфера
Установка параметра кроссовера для обеспечения плавного
перехода к динамикам
}}Действие: Выберите желаемую частоту кроссовера и
нажмите кнопку ENTER на пульте дистанционного управления
Результат: Выбранный вами пункт будет подсвечен, и экран
перейдет к следующей опции, ФАЗА.
Совет: Устанавливайте порог кроссовера как можно ниже, чтобы не
создавать пробел в музыкальном диапазоне.
Установка фазы внешнего сабвуфера
Изменение фазы сабвуфера в зависимости от расположения
}}Действие: Выберите желаемый уровень фазы и нажмите
ENTER на пульте дистанционного управления
Результат: Фаза сабвуфера будет сохранена.
Совет: Если ваш сабвуфер имеет возможность изменения фазы,
установите ее на 0°, чтобы не противоречить установкам фазы,
заданным в SLIMstage.
E. Дистанционный эквалайзер для
дистанционного управления
Установка эквалайзера для EQ кнопки на пульте
дистанционного управления
Создайте эквалайзер специально для ваших любимых видов
развлечения, например фильмов-боевиков, новостей, или
классической музыки. В этом случае, нажав на кнопку EQ на пульте
дистанционного управления, вы можете активизировать заданный
вами эквалайзер.
}}Действие: Выберите опцию меню ДИСТАНЦИОННЫЙ EQ и
нажмите ENTER на пульте дистанционного управления.
Результат: Будет отображен эквалайзер на 10 частот
Совет: Изменения настроек эквалайзера происходят в
реальном времени, поэтому убедитесь, что во время
настройки вы проигрываете желаемую музыку или
смотрите определенный жанр фильма.
}}}Действие: Переместите каждый движок частоты в
желаемое положение и нажмите ENTER
Результат: Заданные параметры эквалайзер
присваиваются кнопке EQ пульта дистанционного
управления, и экран возвращается в главное меню
установок.
}}Действие: Нажмите EXIT
Результат: Выход из меню установок
– ИЛИ –
}}Действие: Выберите меню ДОПОЛН. УСТАНОВКИ и нажмите
ENTER.
Результат: На экране отображаются пункты меню
дополнительных установок.
F. ДОПОЛНИТЕЛЬНЫЕ УСТАНОВКИ
Установка ВХОДА ПО УМОЛЧАНИЮ
Из режима standby/off SLIMstage всегда возвращается к входу,
который был задан как ВХОД ПО УМОЛЧАНИЮ
Page 52

102
103
Русск
ВХОД ПО УМОЛЧАН ИЮ
ПОСЛЕД НИЙ ВЫБОР
A1
A2
A3
D1
D2
D3
ДОП ОЛН
ВХОД ПО УМОЛЧАНИЮ
ПАРАМЕТРЫ ВХОД А
ТЫЛОВОЙ
ИК
БЛОКИРОВКА
ВЕРСИЯ
СБРОС
ВХОД
A1
A2
A3
D1
D2
D3
A2
ЧУВСТВИТЕЛЬНОСТЬ
ОКРУЖЕНИЕ ПО УМОЛЧАНИЮ
EQ
СКРЫТЬ
СБРОС ВХОДА
A2
–5……… 0 ………5 +
ОСЛАБЛЕНИЕ: –20DB
ВКЛ В ЫК Л
}}Действие: Выберите пункт меню ВХОД ПО УМОЛЧАНИЮ и
нажмите ENTER.
Результат: Отображаются последний выбранный и все
доступные входы.
Совет: ПОСЛЕДНИЙ ВЫБОР это обычная установка фирмыпроизводителя
}}}Действие: Выберите желаемый ВХОД ПО УМОЛЧАНИЮ
из предложенного списка и нажмите ENTER.
Результат: Отображается новый выход по умолчанию,
и экран возвращается в меню ДОПОЛНИТЕЛЬНЫХ
УСТАНОВОК
Установка параметров для каждого входа
Индивидуальная настройка характеристик каждого вашего входа.
}}Действие: Выберите пункт меню ПАРАМЕТРЫ ВХОДА и
нажмите ENTER на пульте дистанционного управления.
Результат: На экране отображаются все доступные входы
для выбора и настройки их характеристик
Выбор входа для редактирования
}}Действие: Выберите желаемый вход и нажмите ENTER.
Результат: На экране отображаются параметры входа для
их редактирования
Примечание: Если изменяя параметры активного входа вы
проигрываете в это же время музыку или фильм, то вы можете
в реальном режиме настроить ЧУВСТВИТЕЛЬНОСТЬ и EQ.
Ввод параметра ЧУВСТВИТЕЛЬНОСТИ
Вы можете изменить параметр чувствительности для аналоговых
входов A1, A2, A3. В дополнение к этому аналоговый вход A2 имеет
затухание –20dB, которое может быть включено для компенсации
погрешностей возникающих на выходе источника звука.
}}Действие: Выберите пункт меню ЧУВСТВИТЕЛЬНОСТЬ
Результат: На экране будут показаны опции
ЧУВСТВИТЕЛЬНОСТИ
Создание входа для уровня динамика
Только А2 вход, может принимать уровень сигнала динамика
если при подключении динамика выбрана опция ВКЛ в
чувствительности А2.
Примечание: Вам понадобится настроить подключение от
проводов динамика к стерео mini-jack. Свяжитесь с отделом
технической поддержки для получения информации.
A2
ЧУВСТВИТЕЛЬНОСТЬ
ОКРУЖЕНИЕ ПО УМОЛЧАНИЮ
A2 СБРОС
ОКРУЖЕНИЕ ПО УМОЛЧАНИЮ
СКРЫТЬ ПОКАЭАТЬ
EQ
СКРЫТЬ
СБРОС ВХОДА
A2
ЧУВСТВИТЕЛЬНОСТЬ
EQ
СК РЫТ Ь
СБРОС ВХОДА
A2
}}}Действие: Выберите желаемый по умолчанию режим
окружения и нажмите ENTER.
Результат: SLIMstage всегда будет выбирать данный
режим при включении системы.
Советы:
1. Из представленных режимов, режим МУЗЫКА имеет наиболее
слабый окружающий эффект, а КИНО наиболее охватывающий
и окружающий.
2. Независимо от установленного режима по умолчанию вы
всегда можете выбрать любой другой с помощью пульта
дистанционного управления.
Установка Эквалайзера входа
Несмотря на то, что для большинства случаев применения
системы это не рекомендуется, и в этом нет необходимости, тем
не менее, вы можете настроить индивидуальный эквалайзер для
каждого входа. Если вы решили все-таки использовать эквалайзер
для входа, EQ комнаты будет отключен, и вы должны будете
устанавливать параметры эквалайзера для каждого вашего входа
}}Действие: Выберите пункт меню EQ и нажмите ENTER.
Результат: На экране появится эквалайзер на 10 частот.
}}}Действие: Передвигайте каждый движок эквалайзера
на нужный вам уровень, нажмите ENTER.
Результат: Устанавливается эквалайзер для
выбранного входа. Эти параметры EQ будет
активизироваться всегда, когда будет выбран данный
вход.
Примечание: Чтобы отключить эквалайзер входа и
восстановить эквалайзер комнаты, выберите пункт СБРОС
ВХОДА
СКРЫТЬ ВХОД
Скрытие входа означает, что если вы проходите по списку
источников звука c помощью кнопки Source на передней панели
устройства, скрытый вход будет пропущен. Аналогично, если
на пульте дистанционного управления вы нажмете на кнопку
скрытого входа, то не получите никакого ответа.
}}Действие: Выберите пункт меню СКРЫТЬ и нажмите кнопку
ENTER на пульте управления.
Результат: Будут показаны опции меню СКРЫТЬ ВХОД
}}}Действие: Выберите опцию СКРЫТЬ или ПОКАЗАТЬ и
нажмите ENTER.
Результат: Если выбрана опция СКРЫТЬ, последует
меню подтверждения вашего выбора.
A2
ЧУВСТВИТЕЛЬНОСТЬ
ОКРУЖ ЕНИЕ ПО УМОЛЧАНИЮ
EQ
СКРЫТЬ
СБРОС ВХОДА
A2
ЖИВ ЗВУК
КИНО
ПОСЛЕДНИЙ ВЫБОР
СТЕРЕО
МУЗЫКА
Выбор РЕЖИМА ОКРУЖЕНИЯ (Стерео, Музыка,
Живой звук, Кино) как режима обработки звука
по умолчанию
}}Действие: Выберите пункт меню ОКРУЖЕНИЕ ПО
УМОЛЧАНИЮ и нажмите ENTER на пульте дистанционного
управления.
Результат: На экране отображаются опции окружения.
Внимание: Будьте внимательны с данной функцией. Если вы
скрываете вход, он перестанет быть видимым виртуально в
системе до тех пор, пока вы не вернете снова его видимость
в установочном меню ПАРАМЕТРЫ ВХОДА или не сбросите все
параметры до заводских установок.
Page 53

104
105
Русск
A2
ЧУВСТВИТЕЛЬНОСТЬ
ОКРУЖЕНИЕ ПО УМОЛЧАНИЮ
ЛЕВЫЕ И ПРАВЫЕ КОЛОНК И
EQ
СКРЫТЬ
СБРОС ВХОДА
A2
Да Н ЕТ
ДОПОЛН
ВХОД ПО УМОЛЧАНИЮ
ПАРАМЕТРЫ ВХОДА
ТЫЛОВОЙ
ИК
БЛОКИРОВКА
ВЕРСИЯ
СБР ОС
ТЫЛОВОЙ
ТИ П
УРОВЕНЬ
ТИП
SL IMS TAGE
MAINSTAGE HD
ТЫЛОВОЙ
ТИП
УРОВЕНЬ
СБРОС НАСТРОЕК ВХОДА ДО ЗАВОДСКИХ
УСТАНОВОК
Позволяет сбросить все ваши настройки входа и установить
заводские параметры по умолчанию.
}}Действие: Выберите пункт меню СБРОС ВХОДА и нажмите
ENTER на пульте управления.
Результат: Будут показаны опции выбранного меню.
}}}Выберите ДА или НЕТ
Результат: Если ДА, данный вход примет установки
заданные по умолчанию заводом изготовителем.
Выход внешнего тылового канала
SLIMstage позволяет добавлять внешние тыловые
громкоговорители для усиления эффекта окружения звуком. При
подключенных наушниках тыловой выход недоступен.
Совет: Чтобы подключить SLIMstage или MAINstageHD как
внешний тыловой канал, подсоедините 3.5мм стерео аудио
кабель от тылового выхода к входу Analog 1 тыловых SLIMstage
или MAINstageHD.
Выбор типа тылового громкоговорителя
}}Действие: Зайдите в пункт меню ТЫЛОВОЙ > ТИП тылового
канала, выберите желаемый тип из предложенных и нажмите
ENTER.
Результат: Выход тылового канала будет оптимизирован
для поддержания соответствующего типа подключенного
тылового динамика.
ДОП ОЛН
ВХОД ПО УМОЛЧАНИЮ
ПАРАМЕТРЫ ВХОДА
ТЫЛОВОЙ
ИК
БЛОКИРОВКА
ВЕРСИЯ
СБРОС
БЛОКИРОВКА
ЧТОБЫ РАЗБЛОКИРОВАТЬ
УСТАНОВКИ НАЖМИТЕ КНОПКИ
SETUP, SPEAKER И E XIT
ОТМЕНА ВК ЛЮЧИТЬ
}}}Действие: Выберите ФРОНТ или ТЫЛ и нажмите ENTER.
Результат: Если выбрана опция ТЫЛ, на экране будет
показано меню подтверждения
ВАЖНО: Чтобы снова активизировать фронтальный ИК
приемник, нажмите MUTE и SOURCE кнопки одновременно и
удерживайте их в течение 2-х секунд.
}}Действие: Выберите пункт ПОДТВЕРЖДЕНИЕ или ОТМЕНА
Результат: ИК сенсор будет переключен на тыл.
Фронтальный сенсор будет немедленно отключен.
Совет: Для дополнительной информации по вопросам
подключения и для получения инструкций по программированию
устройства обратитесь к веб-сайту Soundmatters
БЛОКИРОВКА
Предотвращает случайное изменение установок
}}Действие: 1. Перейдите к пункту меню БЛОКИРОВКА
}}Action: 2. Выберите пункт меню БЛОКИРОВКА и нажмите
ENTER.
Результат: На экране появятся опции выбранного меню.
}}Действие: Выберите ВКЛЮЧИТЬ или ОТМЕНА и нажмите
ENTER.
Результат: Установочное меню будет заблокировано от
случайных нежелательных изменений.
Чтобы разблокировать меню установок, последовательно
нажмите кнопки SETUP,
управления
, EXIT на пульте дистанционного
УРОВЕНЬ
–10 ……... 0 ……… 10+
ДОП ОЛН
ВХОД ПО УМОЛЧАНИЮ
ПАРАМЕТРЫ ВХОДА
ТЫЛОВОЙ
ИК
БЛОКИРОВКА
ВЕРСИЯ
СБРОС
ИК
ФРОНТ ТЫЛ
ИК ПРИЕМНИК
ДЛЯ ВОЗВРАТА НАЖМИТ Е И
УДЕРЖИВАЙТЕ MU TE И SOURCE
КНОПКИ 2 СЕК УНДЫ
ПОДТВЕРЖД ЕНИЕ ОТМ ЕНА
Уровень внешнего окружения
Позволяет изменить, согласовать уровень выхода с внешними
тыловыми громкоговорителями окружения.
}}Действие: Выберите пункт меню УРОВЕНЬ и нажмите
ENTER на пульте управления. Используя знакомый источник
окружения, измените уровень и нажмите кнопку ENTER.
Результат: Выбранный уровень тылового канала станет
уровнем по умолчанию.
Выбор ИК сенсора
Системой SLIMstage можно управлять с помощью фронтального
ИК приемника/сенсора, опционального тылового ИК сенсора и
через RS-232 порт.
Стандартным является ФРОНТАЛЬНЫЙ ИК сенсор. Выбирайте
ТЫЛ в том случае, если контроль осуществляется по RS-232 порту
(включая случаи, когда подключен RF адаптер дистанционного
управления) или если используется еще одна установка SLIMstage
как внешний тыловой канал (чтобы предотвратить случайное
управление с помощью ИК сенсора обеих установок SLIMstage).
}}Действие: Выберите пункт меню ИК и нажмите ENTER
Результат: Будут показаны опции меню ИК ПРИЕМНИК.
ДОП ОЛН
ВХОД ПО УМОЛЧАНИЮ
ПАРАМЕТРЫ ВХОДА
ТЫЛОВОЙ
ИК
БЛОКИРОВКА
ВЕ РСИ Я
СБРОС
ВЕРСИЯ
МОДЕЛЬ: 40
ЭЛЕКТРО НИКА: 1.00
ПРОГРАМ: 1.0.0/1.0.0
СЕРИЙНЫЙ #: S103500 0025
ДОП ОЛН
ВХОД ПО УМОЛЧАНИЮ
ПАРАМЕТРЫ ВХОДА
ТЫЛОВОЙ
ИК
БЛОКИРОВКА
ВЕРСИЯ
СБ РОС
СБРОС
ВЫ ДЕЙСТВИ ТЕЛЬНО ХОТИТЕ
ВЫПОЛНИТЬ СБР ОС ВСЕХ УСТАНОВОК
ДО ЗАВОДСКИХ ПО УМ ОЛЧАНИЮ?
Да Н ЕТ
ВЕРСИЯ
Меню ВЕРСИЯ показывает важную информацию о вашей системе
SLIMstage, включая модель, серийный номер, версию электроники
и версию программного обеспечения.
}}Действие: Выберите пункт меню ВЕРСИЯ и нажмите ENTER
на пульте управления.
СБРОС ВСЕХ УСТАНОВОК ДО ЗАВОДСКИХ
Эта функция сбрасывает все ваши установки до оригинальных,
заданных заводом изготовителем.
}}Действие: Выберите пункт меню СБРОС и нажмите ENTER на
пульте управления.
Результат: Будут показаны опции данного меню.
}}}Действие: Выберите ДА или НЕТ и нажмите ENTER.
Результат: Если ДА, все ваши настройки примут
значения по умолчанию, заданные заводом
изготовителем.
Нажмите EXIT для возврата в предыдущее меню.
Нажмите EXIT еще раз для выхода из установочного меню.
Page 54

106
107
Русск
6. Часто Задаваемые Вопросы
Чтобы ознакомиться с самыми последними вопросами и ответами на них, посетите наш вебсайт
по адресу www.soundmattters.com
В1. Какие будут ваши советы по поводу того, как лучше разместить и позиционировать
SLIMstage в комнате для обеспечения лучшей производительности?
Так как SLIMstage функционирует хорошо практически со всеми устройствами, как например,
всеми громкоговоритеями, чтобы добиться лучшей производительности нужно обратить
внимание главным образом на расположение установки
Лучшее качество воспроизведения: Система всегда должна располагаться по центру
напротив слушателя(лей) с помощью настраиваемых ножек или же стенного кронштейна
и позиционирована таким образом, чтобы передняя панель SLIMstage была направлена к
слушателю(лям). Если установка располагается в шкафу, то выдвиньте ее вперед насколько это
возможно, чтобы получить прохождение и рассеивание звука на более широкое расстояние.
Лучшее охватывание: Все системы охватывания (окружения) имеют так называемый “sweet
spot”, оптимальную область, внутри которой наблюдается максимальный эффект окружения
звуком (3D). Размер данной области варьируется в зависимости от вашего расстояния до
SLIMstage… если ваша основная зона прослушивания находится ближе чем 9 футов (примерно 2.7
метров), убедитесь в этом и переустановите параметр РАССТОЯНИЕ в установочном меню.
Лучшие басы: Установка любого динамика напротив тяжелой прочной поверхности усилит
(увеличит) нижние тона звука. Чем больше поверхностей располагается вокруг SLIMstage,
тем мощнее будут нижние тона. Наименьшие басы отмечаются в данном случае посредине
помещения. Наибольшие басы будут в углах у пола или потолка. Кроме того, так как встроенные
спикеры направлены вниз, необходимо обеспечить достаточное расстояние снизу установки
(около ¾ дюйма, примерно 1.9 см) для прохождения нижних тонов в комнату.
В2. Нижние тона звука на удивление очень хороши для такого небольшого устройства…
но я хочу получить больше! Могу я добавить внешний сабвуфер?
Да, SLIMstage имеет гнездовой выход сабвуфера для подсоединения его к акустически
подходящему SUBstage™ от фирмы soundmatters, или фактически любому другому
высококачественному высокочастотному сабвуферу. Выход сабвуфера SLIMstage является мини
разъемом 1/8”, так что если вы не используете наш SUBstage, вам понадобится 1/8” стерео мини к
RCA адаптер при использовании большинства внешних сабвуферов (включен в пакет SUBstage)
В3. Мне нравится SLIMstage, но я хотел бы большей громкости звука.
Есть несколько вариантов – добавить внешний сабвуфер такой как SUBstage (или два) и/
или добавить дополнительный SUBstage назад для тыловых каналов и/или установить
большую по размеру установку SLIMstage. Если проблема появляется только, когда вы
используете определенный источник звука, вы можете увеличить чувствительность входа (см.
ДОПОЛНИТЕЛЬНЫЕ УСТАНОВКИ > ПАРАМЕТРЫ ВХОДА > ЧУВСТВИТЕЛЬНОСТЬ)
В4. Как я могу контролировать SLIMstage и мой телевизор используя один пульт
дистанционного управления?
Функции пульта дистанционного управления SLIMstage легко охватываются большинством
обучаемых пультов дистанционного управления. Уровнем громкости SLIMstage можно так
же управлять с помощью пультов многих TВ, кабельного и спутникового телевидения, если
ввести аудио код Denon®. Ознакомьтесь с инструкцией к вашему телевизионному пульту
дистанционного управления.
В5. Для правильной интеграции SLIMstage с моим расширенным программируемым
пультом управления или домашней автоматической системой мне нужны «discrete
codes», как мне их найти?
Дискретные ИК коды SLIMstage доступны в секции Download на нашем сайте
www.soundmatters.com.
В6. Могу я использовать SLIMstage во время путешествий?
В SLIMstage используется очень высоко мощная версия источника электропитания ноутбуков
и портативных компьютеров, созданная для надежной работы при большинстве известных
и используемых во всем мире напряжений 95–240Vac, 50/60Hz. Просто замените шнур
соединяющий внешний модуль питания со стенной розеткой на тот, который соответствует
требованиям местной сетевой розетки.
В7. Рекомендуете ли вы подключать SLIMstage к источнику бесперебойного питания?
SLIMstage, как любой другой электронный прибор, рекомендуется подключать к источнику
бесперебойного питания
В8. SLIMstage переходит в энергосберегающий режим Standby сам или я должен его
переключить в этот режим?
SLIMstage должен быть выключен нажатием кнопки OFF/Standby на пульте дистанционного
управления. Система переходит в режим пониженного энергопотребления при отсутствии
сигнала на активном входе в течение 2-х минут.
В9. При переключении между нормальным и Dialog+ режимами, иногда я слышу
большую разницу, а иногда никакой. Почему?
Существует большое количество возможных причин. Если вы установили уровень басов
на максимум, они могут затенять усилитель диалогов. Очевидно, что некоторые звуковые
программы и источники не имеют голосовых звуков, в таком случае вы отметите очень
небольшую разницу или вообще никакой.
7. Возможные неисправности и их устранение
1. Проблема: Нет звука
Решения:
a. Проверьте, что источник звука подключен и проигрывается (например DVD или ТВ)
b. Если подключены наушники, проверьте, что спикеры не отключены
c. Проверьте, подключен ли шнур питания к стенной розетке и хорошо ли он вставлен
в гнездо блока питания SLIMstage... и подключен ли блок питания к задней панели
SLIMstage?
d. Проверьте уровень громкости SLIMstage?
e. Нажмите кнопку Source источника звука на SLIMstage или пульте дистанционного
управления, чтобы выбрать активный канал
2. Проблема: Я выбрал вход на пульте дистанционного управления, но он не
отображается на экране
Решение:
a. Вход был «спрятан»... Обратитесь к пункту меню ПАРАМЕТРЫ ВХОДА > СКРЫТЬ ВХОД в
установочном меню.
3. Проблема: Не достаточно слышны низкие тона
Решения:
a. Увеличьте уровень басов с помощью пульта дистанционного управления
b. Увеличьте уровень басов в меню установок
c. Обратитесь к В1 секции «Часто Задаваемые Вопросы» о влиянии расположения на
низкие тона.
d. Добавьте SUBstage сабвуфер!
4. Проблема: Я не слышу окружения звуком или эффект недостаточен
Решения:
a. Убедитесь, что вы находитесь в одном из режимов Музыка, Живой звук, Кино (не Стерео).
Режим Кино имеет наибольшие эффекты окружения звуком.
b. Убедитесь, что вы слушаете в пределах 45 градусов от центра SLIMstage, называемых
также “sweet spot” ( это та оптимальная область, внутри которой вы можете слышать все
звуковые эффекты окружения)
Page 55

108
109
Русск
c. Убедитесь, что все эквалайзеры и режимы окружения, встроенные в DVD плейер
или любой другой источник звука отключены!
d. Ознакомьтесь с пунктом №1 секции «Часто Задаваемые Вопросы» по вопросам
расположения
e. Добавьте динамики в тыловую часть комнаты.
5. Проблема: Неправильное функционирование или отсутствие функционирования
пульта дистанционного управления
Решения:
a. Убедитесь, что в пульте работоспособные батареи
b. Чтобы активизировать фронтальный ИК сенсор, нажмите и удерживайте кнопки
MUTE и SOURCE.
6. Проблема: Неопределенный звук
Решение:
a. Убедитесь, что все расширенные DSP/внешние/звуковые режимы отключены на
всех подключенных к SLIMstage источниках звука
b. Убедитесь, в установочном меню ЧУВСТВИТЕЛЬНОСТЬ для входа, что установки
чувствительности не слишком высоки и не перегружают канал.
7. Проблема: Кажется, что система зависла или перестала работать
Решение:
a. Схема SLIMstage включает мощный микропроцессор. В случае если установка
начинает функционировать с перебоями или ошибочно, просто отключите ее от
питания (вытащите шнур питания из розетки) на 15 секунд и подключите опять,
чтобы запустить внутренний компьютер в нормальный режим работы.
8. Проблема: На экране отображается индикатор перегрева (TMP) или индикатор
защиты от короткого замыкания и полного отключения установки (PT) и установка
включается и выключается
Решение:
a. Работает схема защиты от перегрева... уменьшите громкость звука.
9. Проблема: Не достаточная громкость звука
Решения:
a. Если возможно, увеличьте громкость выхода на источнике звука, который вы
используете.
b. Увеличьте чувствительность входа, ознакомьтесь с описанием как изменить
ЧУВСТВИТЕЛЬНОСТЬ в меню дополнительных установок.
10. Проблема: Подключена кабельная коробка, но звука нет
Решения:
a. К сожалению, некоторые кабельные коробки имеют цифровой выход или
даже аналоговое аудио (красный/белый RCA) соединения, которые являются
фиктивными (внутренне не подсоединены в кабельной коробке). Свяжитесь с
вашим провайдером кабельной коробки, чтобы убедиться в функциональных
возможностях ее выходов.
b. Если вы используете цифровой выход вашей кабельной коробки, вы можете
заметить, что он работает только, когда вы подключены на HDTV канал. Чтобы
получить доступ к аудио для других каналов, вам нужно подключиться к выходу
аналогового аудио и переключиться на нужный вход в SLIMstage.
11. Проблема: Оптический кабель не подходит
Решения:
a. Убедитесь, что прозрачный защитный слой удален с обоих концов кабеля
b. Некоторые приобретенные в магазинах электротоваров кабели имеют чрезмерно
большой разъем «jackets» и не могу быть использованы.
12. Проблема: Я не могу войти в меню установок
Решение:
a. Доступ в меню заблокирован. Последовательно нажмите на пульте дистанционного
управления кнопки SETUP,
, EXIT.
8. Спецификации
Консоль звукового окружения SLIMstage 5.1
• Алгоритмы звукового окружения: Euphony™HD декодирует Аналог, PCM, Dolby Digital
2.0/5.1, DTS Digital Surround, DTS 96/24
• Декодируемый 5.1 канал: Dolby Digital, DTS Digital Surround, DTS 96/24
• Декодируемый 2.0 канал: Dolby Digital, PCM
• 2-канальная в 5-канальная конверсия: Euphony™HD
• Питание: Усилители Class-D (RMS < 0.8%КНИ)
SLIMstage 30 – Сателиты 80Вт, Вуферы 60Вт
SLIMstage 40 – Сателиты 80Вт, Вуферы 90Вт
SLIMstage 50 – Сателиты 80Вт, Вуферы 130Вт
• Максимум SPL@1m:
SLIMstage 30 – 103dB; SLIMstage 40 – 106dB; SLIMstage 50 – 109dB
• Главные громкоговорители:
SLIMstage 30 – 4 каждый 50x50мм с запатентованными LMD Neo-sandwich магнитами
SLIMstage 40 – 4 каждый 50x50мм с запатентованными LMD Neo-sandwich магнитами
SLIMstage 50 – 4 каждый 50x50мм с запатентованными LMD Neo-sandwich магнитами
• Матрицы вуфера:
SLIMstage 30 – 2 матрицы*; SLIMstage 40 – 3 матрицы*; SLIMstage 50 – 4 матрицы*
*Каждая матрица включает один Active High-Energy 3˝ запатентованный LMD Neosandwich магнитный вуфер плюс 3” bass излучателя
• Блок питания: Digital, 95–265Vac, 36В, 50/60Гц
• Входы (6)
Analog 1 –stereo 3.5мм
Analog 2 – stereo 3.5мм Доступно 20dB ослабление для уровня громкоговорителя
Analog 3 – stereo 3.5мм Фронтальная панель, с выбором приоритета
Digital 1 – SP/DIF coax
Digital 2 – Optical / TosLink
Digital 3 – Optical / TosLink
• Выходы (3)
Analog: Выход сабвуфера – stereo 3.5мм
Analog: Наушники (Euphony Virtual Surround) –stereo 3.5мм
Выходы тылового канала (по умолчанию отключены)
• Аксессуары
ИК пульт дистанционного управления
Блок питания с кабелями и крепежными ремнями
Легко настраиваемые уровневые EZ-tilt™ ножки со вставками для высоты
Стенной кронштейн с крепежным материалом
1 – 3м оптического кабеля
1 – 3м 3.5мм mini phone jack кабель
1 - 3м 3.5мм mini phone jack к male stereo RCA кабель
1 – 3м digital coax RCA кабель
• Средства управления
Общий уровень громкости и громкость наушников (ИК и фронтальная панель)
Уровень громкости сабвуфера (только ИК)
Выбор источника, отключение звука (ИК и фронтальная панель)
Окружение/стерео (только ИК)
• Режимы: Включено, Без звука, Без отключения питания
• Питание в режиме Off/Standby: 2Вт или меньше
• Вес: SLIMstage 30 – 16.5 lbs (7.5 кг); SLIMstage 40 – 19 lbs (8.5 кг); SLIMstage 50 – 21 lbs (9.5
кг)
• Размеры:
SLIMstage 30 (ШxВxГ) – 790 x 88 x 93мм
SLIMstage 40 (ШxВxГ) – 990 x 88 x 93мм
SLIMstage 50 (ШxВxГ) – 1206 x 88 x 93мм
Page 56

110
111
Русск
Высота с EZ-tilt настраиваемыми ножками, любая модель (В) – 112мм
Высота с ножками+ вставками, любая модель (В) – 132мм
Глубина со стенным кронштейном, любая модель (Г) – 127мм
soundmatters® работает согласно политике постоянного улучшения своей продукции,
следовательно спецификация на продукт может меняться без предварительного уведомления.
9. Гарантия и Сервис
Для того чтобы получить бесплатное обслуживание в случае, если ваше изделие нуждается
в гарантийном ремонте, вы должны выполнить следующие два пункта.
1. Храните вашу оригинальную квитанцию покупки изделия в надежном месте. Для
получения гарантийного обслуживания вам понадобится копия квитанции.
2. Убедитесь, что ваш розничный дилер написал на квитанции дату, номер модели и
серийный номер (если такой имеется) изделия. Чтобы обезопасить себя, запишите
отдельно еще раз полную информацию о вашей покупке и храните ее в надежном месте. В
случае если вы потеряли вашу оригинальную квитанцию, ваш дилер может предоставить
копию.
Внимательно ознакомьтесь с условиями вашей гарантии.
Когда отправляете изделие на сервисное обслуживание:
• Отправьте электронное письмо или позвоните в soundmatters для получения точного
адреса отправки изделия на сервисное обслуживание и RMA (Return Merchandise
Authorization - копии вашей оригинальной квитанции покупки, которая имеет дату, номер
модели и серийный номер (если таковой имеется) ). Вы должны поместить номер RMA на
отправной талон для каждой единицы изделия возвращаемой в отдел soundmatters для
сервисного обслуживания.
• Всегда перевозите изделие в оригинальной коробке и упаковке.
• Избегайте отправки изделия посредством почтовой связи. Если вы вынуждены использовать
почтовый сервис, убедитесь, что ваша посылка зарегистрирована и застрахована.
Ограниченная гарантия soundmatters
• soundmatters international, inc. (soundmatters) гарантирует настоящему конечному
покупателю-пользователю soundmatters изделия, описанного в настоящем руководстве,
что данное изделие не содержит дефектов в составляемых его материалах и будет
соответствовать высокому качеству изготовления в течение двух (2) лет после даты
оригинальной покупки.
• В рамках данной гарантии единственным обязательством soundmatters является бесплатно
обеспечить детали или выполнить работы необходимые для исправления дефектов, если
такие обнаружатся в течение гарантийного периода. Эта гарантия является единственной
и исключительной гарантией предоставляемой в отношении данного изделия. Все другие
гарантии настоящим исключаются.
• Ни soundmatters, ни авторизованный дилер, который продает изделие, не несут
ответственности за косвенные, случайные убытки и причиненный ущерб или несчастный
случай при использовании данного продукта. Некоторые государства не исключают
и не ограничивают гарантию на изделия потребления в случае случайных или чемлибо обоснованных повреждений, поэтому выше описанные ограничения могут вас не
касаться. Эта гарантия дает вам конкретные юридические права, но вы можете также иметь
дополнительные другие права, которые варьируются в зависимости от страны вашего
проживания.
Данная гарантия распространяется только на:
• Изделия, купленные у авторизованных компанией soundmatters розничных дилеров.
soundmatters может по запросу предоставить список своих авторизованных дилеров.
Для получения сервисного обслуживания вы должны:
• Возвратить изделие, оплатив предварительно стоимость его перевозки, дилеру
soundmatters, у которого вы покупали продукт, уполномоченному soundmatters
независимому сервисному центру, уполномоченному soundmatters международному
дистрибьютору или собственно компании-изготовителю soundmatters. Если необходимо,
вы можете позвонить в отдел технической поддержки soundmatters для получения
информации и адресов авторизованных независимых сервисных центров в вашем
регионе.
• Предоставить доказательство покупки в виде копии вашей оригинальной квитанции
на покупку изделия, на квитанции так же должны быть написаны дата, номер модели и
серийный номер (если такой имеется) изделия.
Эта гарантия не покрывает и не распространяется на:
• Ущерб причиненный в результате неправильного использования, халатного и небрежного
обращения, аварийного повреждения (включая, но не ограничивая, повреждения водой),
ошибочного подключения, дефектного, некорректного или неправильно настроенного
совместно используемого оборудования, или использования данного изделия с
оборудованием, для которого оно не было предназначено.
• Косметические дефекты, которые обнаружились через более чем тридцать (30) дней
после даты покупки. Исключаются так же косметические повреждения, причиненные
неправильным и халатным обращением.
• Изделия, используемые в коммерческих целях.
• Стоимость демонтажа и переустановки.
• Ущерб, который произошел во время транспортировки изделия кому-либо для сервисного
обслуживания. Ознакомьтесь с информацией выше по поводу процедуры отправки.
Данная гарантия становится недействительной, если:
• Ярлык с серийным или идентификационным номером удален или поврежден каким-либо
образом..
• Изделие ремонтировалось или прошло сервисное обслуживание в любом другом
сервисном центре (не в soundmatters или не у авторизованного soundmatters дилера или
сервисного агента).
Для дальнейшей информации по поводу гарантии свяжитесь с:
soundmatters international, inc.
Рено, Невада, США 89501
международный тел. 775.981.1460
бесплатный тел. (США) 800.698.SOMA (7662)
email: service@soundmatters.com
web: www.soundmatters.com
«Долби» и знак в виде двойной буквы D являются
товарными знаками компании Dolby Laboratories
Изготовлено по лицензии согласно U.S. Patent #’s:
5,451,942; 5,956,674; 5,974,380; 5,978,762; 6,487,535 и
другим U.S. и международным патентам
выпущеным и находящимся на рассмотрении.
DTS и DTS Digital Surround являются
зарегистрированными торговыми марками, DTS
логотипы и знаки являются товарными знаками DTS, Inc.
© 1996-2007 DTS, Inc. Все права защищены.
EUPHONY HD является торговым знаком DiMAGIC Co. Ltd
Soundmatters является торговой маркой Soundmatters
International Inc.
 Loading...