

Page 1
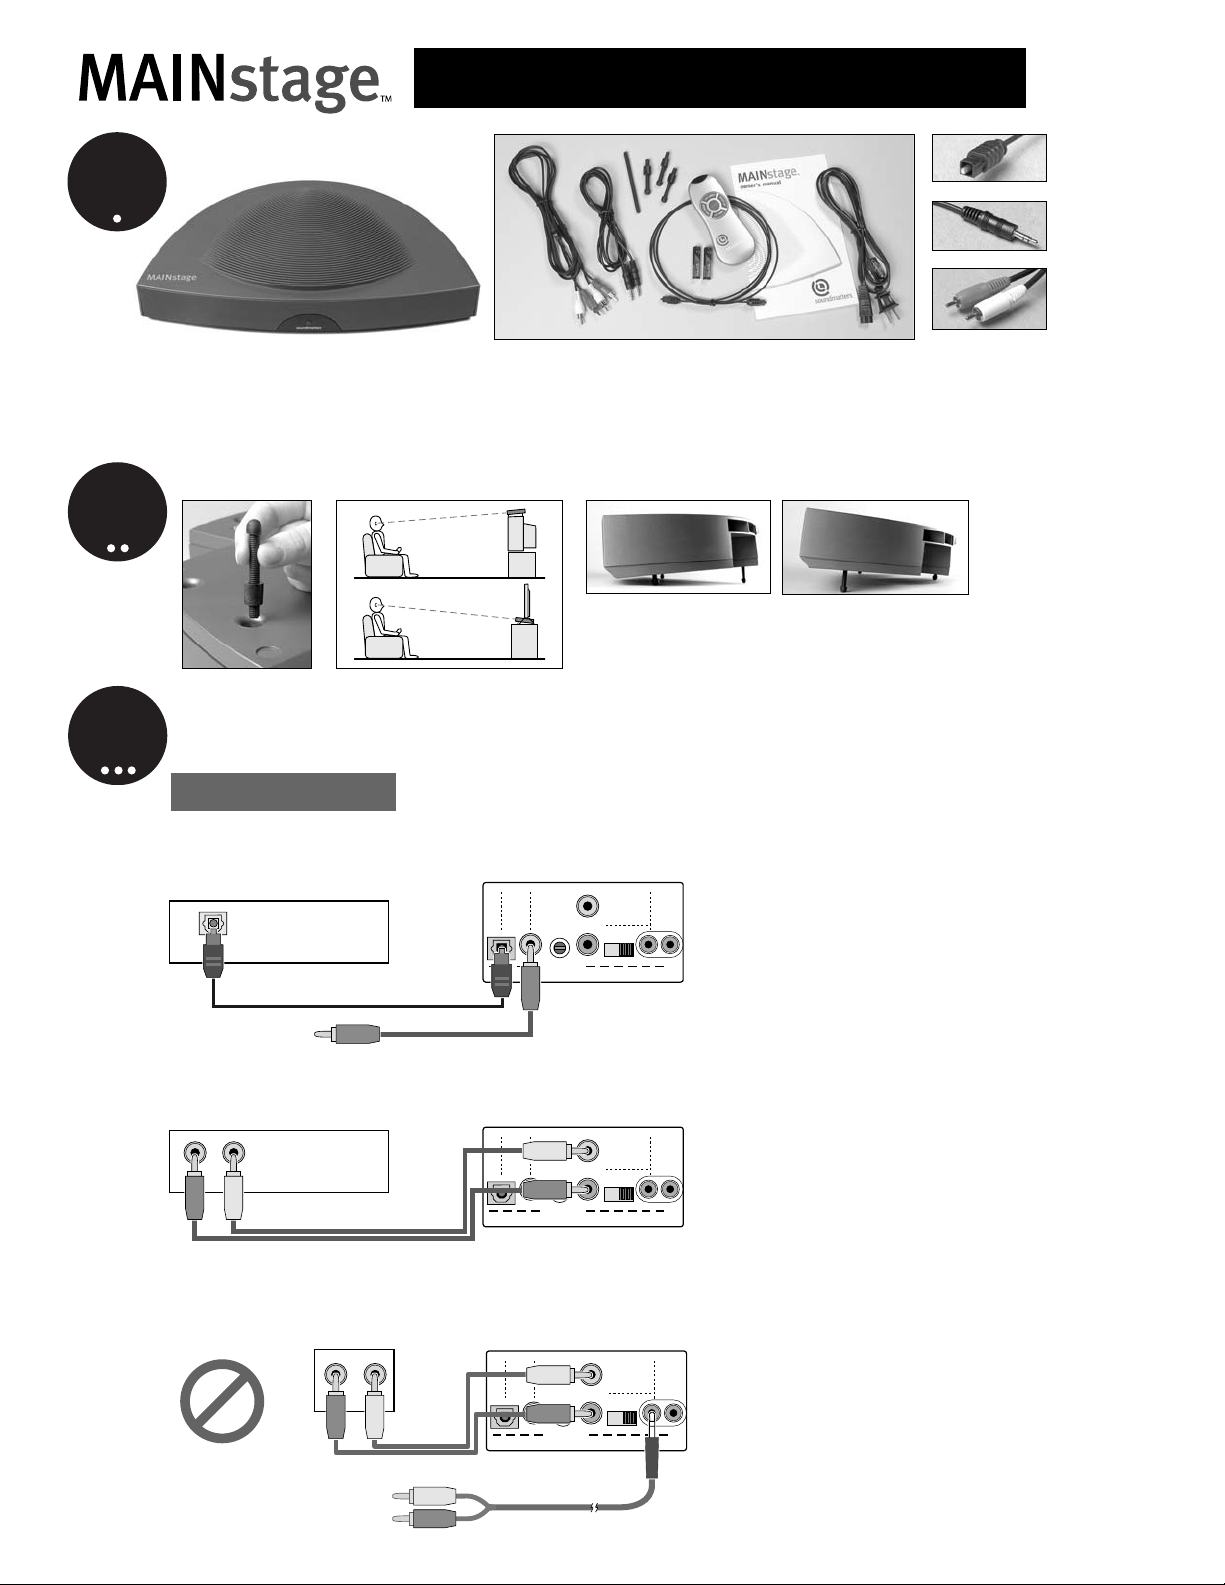
start here – quick set-up guide
You should have a MAINstage unit, owner’s manual, remote control, batteries, optical cable, stereo 1/8” mini-jack cable,
stereo RCA cable, three Angle-Ease™ feet + one extra-long threaded post, and a power cord.
NOTE: We have supplied three commonly needed connecting cables. For some applications you may need to acquire additional
cables/adapters (i.e., a digital RCA coax cable or a mini-to-RCA adapter. See steps below for details.).
Place one “foot” in the rear and two “feet” in the front (using the widest
possible spacing). If mounting on a TV with a steep sloping back, use the
4" screw provided, adding the sleeve and rubber foot from a shorter screw.
TV Sound
n From Cable TV
If there’s a digital audio out, connect either the RCA or the
optical cable (remove optical input dust cover) to one of the
digital inputs of the MAINstage. Note: The digital audio output
of some HDTV Cable Boxes only works when an HDTV channel
is being watched. This means you will need to connect both
the Digital (Best) and Analog Direct (Good) connections.
If no digital audio out, connect the analog left and right RCA
output to the Analog 2 RCA inputs on the MAINstage.
Alternately, if your cable signal runs into your stereo VCR, and
then to your TV, connecting your VCR audio to the MAINstage
will allow both your cable and VCR signals to be accessed from
a single MAINstage input. (see VCR Connection instructions) Note: this hookup
does not allow for watching one channel while recording another on your VCR.
If your cable connects directly to your TV with no cable box (and
you have no stereo VCR in the system), you will need to connect
the audio out from your TV (RCA pair) to one of the two audio
inputs on the MAINstage. (Analog 2 uses RCA pair. For Analog 1
use RCA pair to 1/8” mini-jack Y-adapter such as Radio Shack
catalog #42-2550 or longer 6-ft #42-2551.) If available, use
the fixed (not variable) audio connection. It may need to be
selected via TV’s set up menu
p
Cable
Box
Best – Digital 5.1 Direct
Good – Analog Direct
Basic – Analog via TV
STEP
Unbox and check contents
Adjust Angle-Ease
™
feet
Connect inputs
The MAINstage has 4 inputs for connecting 4 different sound sources.
Use the following guide to optimize your connections.
RCA cable
Mini 1/8” cable
Optical cable
one
STEP
two
STEP
three
Use AngleEase™ feet
to aim MAINstage
at your ears
Cable Box
Digital Audio Out
(optical)
OR Digital Audio Out (RCA)
R L
Cable Box
Analog L+R Audio Out Analog RCA In
Optical In
OR RCA In
MAINstage
digital 2
digital 1 analog 2
L
sub
sens
level
R
low hi
digital analog
digital 2
digital 1 analog 2
L
sub
sens
level
R
low hi
digital analog
analog 1
analog 1
sub
out
sub
out
LR
Cable
Cable
Box
Box
TV
Analog
L+R Audio Out
digital 2
digital analog
Analog RCA In
digital 1 analog 2
L
sub
level
R
OR Stereo 1/8" Mini-jack In
using Y-ada
sens
low hi
ter
analog 1
sub
out
Page 2
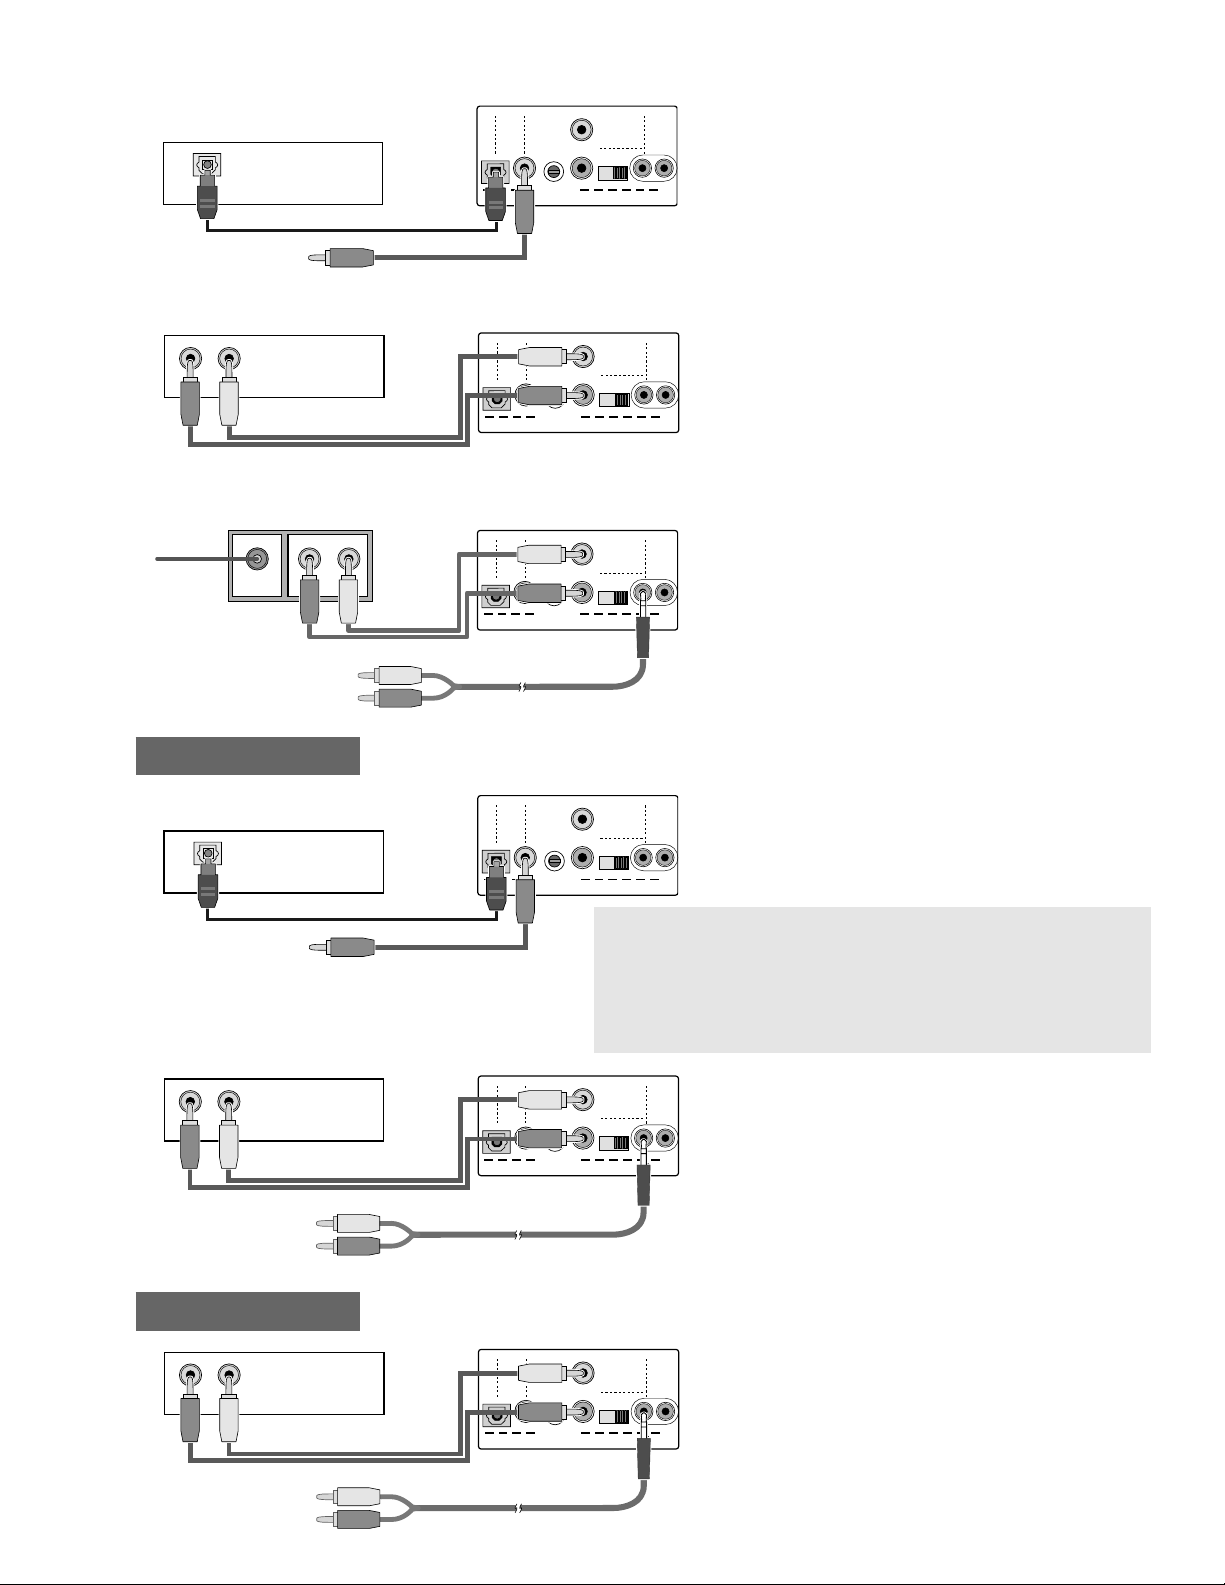
g
Use either the single Digital “coax” RCA or the optical output
(optical cable included) to the appropriate digital input of the
MAINstage. (If you use the Digital 2 optical jack, be sure
to remove dust cover.)
Best – Digital 5.1 Direct
If no digital audio out, connect the analog left and right
RCA output to the Analog 2 RCA inputs on the MAINstage
Basic – Analog Direct
Connect the audio out from your TV (RCA pair) to one of the
two audio inputs on the MAINstage. (Analog 2 uses RCA
pair. For Analog 1 use RCA pair to 1/8” mini-jack Y-adapter.
(i.e., Radio Shack #42-2550 or longer 6-ft version #42-2551)
If available, use the fixed (not variable) audio connection.
It may need to be selected via TV’s set up menu
Use either the single Digital “coax” RCA or the optical
output (optical cable included) to the appropriate digital
input of the MAINstage. (Be sure to remove Digital 2 optical
jack dust cover)
Important DVD notes:
See your DVD Player Owner’s Manual for details.
1. Your DVD player cannot play 5.1 surround unless a digital output is used
and Dolby
®
Digital 5.1/Surround is selected in the menu (NOT 2.0)
2. If you get no sound out of the digital outputs, you may need to activate
the digital output circuit in the setup menu of your DVD player.
n From Satellite TV Box
n From TV Antenna
Best –
Digital 5.1 Direct
p
If your DVD player has no digital audio output, we highly
suggest that you upgrade to one that does. Otherwise,
connect the analog left and right RCA output to the Analog
2 RCA inputs on the MAINstage. If that input is in use,
connect to Analog 1 using stereo 1/8” mini-jack to RCA pair
Y-adapter. (i.e., Radio Shack #42-2550 or longer
6-ft version #42-2551.)
Basic – Analog Direct
DVD Player
p
Connect the audio out from your VCR (RCA pair) to one of the
two audio inputs on the MAINstage. (Analog 2 uses RCA
pair. For Analog 1 use RCA pair to 1/8” mini-jack Y-adapter.
(i.e., Radio Shack #42-2550 or longer 6-ft version #42-2551.)
VCR
Satellite Box
MAINstage
digital 2
digital 1 analog 2
L
sub
level
R
digital analog
sens
low hi
analog 1
sub
out
Digital Audio Out
(optical)
OR Di
ital Audio Out (RCA)
R L
Satellite Box
Analog L+R Audio Out Analog RCA In
LR
From TV
Antenna
ANTENNA
INPUT
Analog
L+R Audio Out
TV
DVD Player
Optical In
OR RCA In
digital 2
digital analog
digital 2
digital 1 analog 2
digital analog
Analog RCA In
OR Stereo 1/8" Mini-jack In
using Y-adapter
digital 2
digital 1 analog 2
digital analog
digital 1 analog 2
L
sub
level
R
L
sub
level
R
L
sub
level
R
sens
low hi
sens
low hi
sens
low hi
analog 1
analog 1
analog 1
sub
out
sub
out
sub
out
Digital Audio Out
(optical)
OR Digital Audio Out (RCA)
R L
DVD Player
Analog L+R Audio Out Analog RCA In
R L
VCR
Analog L+R Audio Out Analog RCA In
Optical In
OR RCA In
digital 2
digital 1 analog 2
L
sub
level
R
digital analog
OR Stereo 1/8" Mini-jack In
using Y-ada
digital 2
digital 1 analog 2
L
sub
level
R
digital analog
sens
low hi
ter
sens
low hi
analog 1
analog 1
sub
out
sub
out
OR Stereo 1/8" Mini-jack In
using Y-ada
ter
Page 3

Use either the single Digital “coax” RCA or the optical
output (optical cable included) to the appropriate digital
input of the MAINstage. (If you use the Digital 2 optical
jack, be sure to remove dust cover.)
Important note: DVR won’t playback 5.1 digital
surround unless a digital output is used.
Best – Digital 5.1 Direct
Digital Video Recorder
(i.e., TiVo®, replaytv®)
digital 2
digital analog
digital 1 analog 2
sub
level
L
R
sens
low hi
sub
out
analog 1
Computer
(optical)
OR Digital Audio Out (RCA)
Optical In
OR RCA In
If your Mac or PC has a digital audio out use either the
single Digital “coax” RCA or the optical output (optical cable
included) to the appropriate digital input of the MAINstage.
(Be sure to remove optical jack dust cover)
Important note:
Playback in 5.1 digital surround
requires digital output to be used.
Best – Digital 5.1 Direct
Using a digital portable? Connect with either digital optical
or RCA “coax,” if available. (If you use the Digital 2 optical
jack, be sure to remove dust cover.)
Best – Digital Direct
Connect headphone or audio out to Analog 1 using
stereo 1/8” mini-jack cable provided. Use Analog 1
Low/Hi Sensitivity switch for best volume matching
with source.
Basic – Analog Direct
Computer
Connect “headphone” output to Analog 1 using stereo 1/8”
mini-jack cable provided. Use Analog 1 Low/Hi Sensitivity
switch for best volume matching with source.
MAINstage is not recommended for use with AM radio band.
Basic – Analog Direct
Portables & Radios
p
Connect the audio out from your TV (RCA pair) to one of the
two audio inputs on the MAINstage. (Analog 2 uses RCA
pair. For Analog 1 use RCA pair to 1/8” mini-jack Y-adapter
(i.e., Radio Shack #42-2550 or longer 6-ft version #42-2551.)
Basic – Analog Direct
DVR
Digital Audio Out
(optical)
OR Digital Audio Out (RCA)
R L
DVR
Analog L+R Audio Out Analog RCA In
MAINstage
digital 2
digital 1 analog 2
L
sub
level
R
digital analog
Optical In
OR RCA In
digital 2
digital analog
OR Stereo 1/8" Mini-jack In
using Y-ada
digital 1 analog 2
L
sub
level
R
sub
out
sens
low hi
analog 1
sens
low hi
analog 1
sub
out
ter
Digital Audio Out
(optical)
Computer
Analog L+R Audio out
or Headphone out
(Stereo 1/8" Mini-jack)
Headphone out
(Stereo 1/8" Mini-jack)
OR Digital Audio Out (RCA)
digital 2
digital 1 analog 2
sub
level
digital analog
Stereo 1/8" Mini-jack In
digital 2
digital 1 analog 2
sub
level
digital analog
Stereo 1/8" Mini-jack In
digital 2
digital 1 analog 2
digital analog
sub
level
Optical In
OR RCA In
sens
low hi
sens
low hi
sens
low hi
analog 1
analog 1
analog 1
L
R
L
R
L
R
sub
out
sens
low hi
sub
out
sens
low hi
sub
out
Page 4

Connecting optional subwoofer
n Select source and enjoy
soundmatters, inc. san francisco, california
tel 415.255.1960 toll-free (usa) 800.698SOMA (7662)
fax 415.255.1965
email support@soundmatters.com www.soundmatters.com
©2004 soundmatters, inc. – rev 01.04-n8-8.5x11
A
To adjust subwoofer output level
while standing in front of the
MAINstage, turn the knob counterclockwise to increase, and clockwise to reduce.
Note: this adjustment affects
internal subwoofer even when an
external unit is been connected.
n Connect power cord
n Load batteries into remote
n Confirm that master
power switch is on
n Set bass level for internal subwoofer
Important note: Connect only the RIGHT RCA connector (typically RED) from the adapter out of the MAINstage
to the MONO input of your subwoofer.
Additional Hook-up/Operation Tips
a) When the MAINstage “turns-on” it always starts
up in SURROUND mode.
b) Master power switch should normally be left on.
c) If you need to convert one of your digital sources
to either Coax or Optical out to match MAINstage’s
available input, Digital Signal Converters are
available, i.e., RadioShack #15-1228.
Option A
Subwoofer
Audio Input
Analog RCA In,
use MONO channel
Option B
Subwoofer
Audio Input
Analog RCA In,
use MONO channel
Option C
Subwoofer
Audio Input
Analog RCA In,
use MONO channel
Don't use
LEFT (white) RCA
Subwoofer
Connection Panel
MONO
Male-to-male RCA
Subwoofer
Connection Panel
MONO
Subwoofer
Connection Panel
MONO
extension cable
Male-to-female RCA
extension cable
Long Y-adapter – Stereo 1/8" Mini-jack
to RCA pair , use RIGHT (Red) channel only
MAINstage Connection Panel
digital 2
digital 1 analog 2
L
sub
level
R
digital analog
Female-to-female
RCA barrel coupling
analog 1
sens
low hi
Don't use LEFT (white)
MAINstage Connection Panel
digital 2
digital 1 analog 2
L
sub
level
R
digital analog
analog 1
sens
low hi
Don't use LEFT (white)
MAINstage Connection Panel
digital 2
digital 1 analog 2
L
sub
level
R
digital analog
sens
low hi
analog 1
sub
out
MAINstage “Sub Out”
1/8" Mini-jack Out
Y-adapter – Stereo 1/8" Mini-jack
to RCA pair, use RIGHT (Red)
channel only
sub
out
MAINstage “Sub Out”
1/8" Mini-jack Out
Y-adapter – Stereo 1/8" Mini-jack
to RCA pair, use RIGHT (Red)
channel only
sub
out
MAINstage “Sub Out”
1/8" Mini-jack Out
STEP
four
djust subwoofer output
(view from back shown here)
sub
level
Full
Off
maximum
 Loading...