


Tragbarer CD/MP3 Radio
mit USB Anschluss
MMooddeellll SSCCDD--22665500 UUSSBB
B E D I E N U N G S A N L E I T U N G
Bitte lesen Sie die Bedienungsanleitung vor Inbetriebnahme sorgfältig
durch und heben Sie diese für einen eventuell notwendigen späteren
Gebrauch gut auf.
English - 1
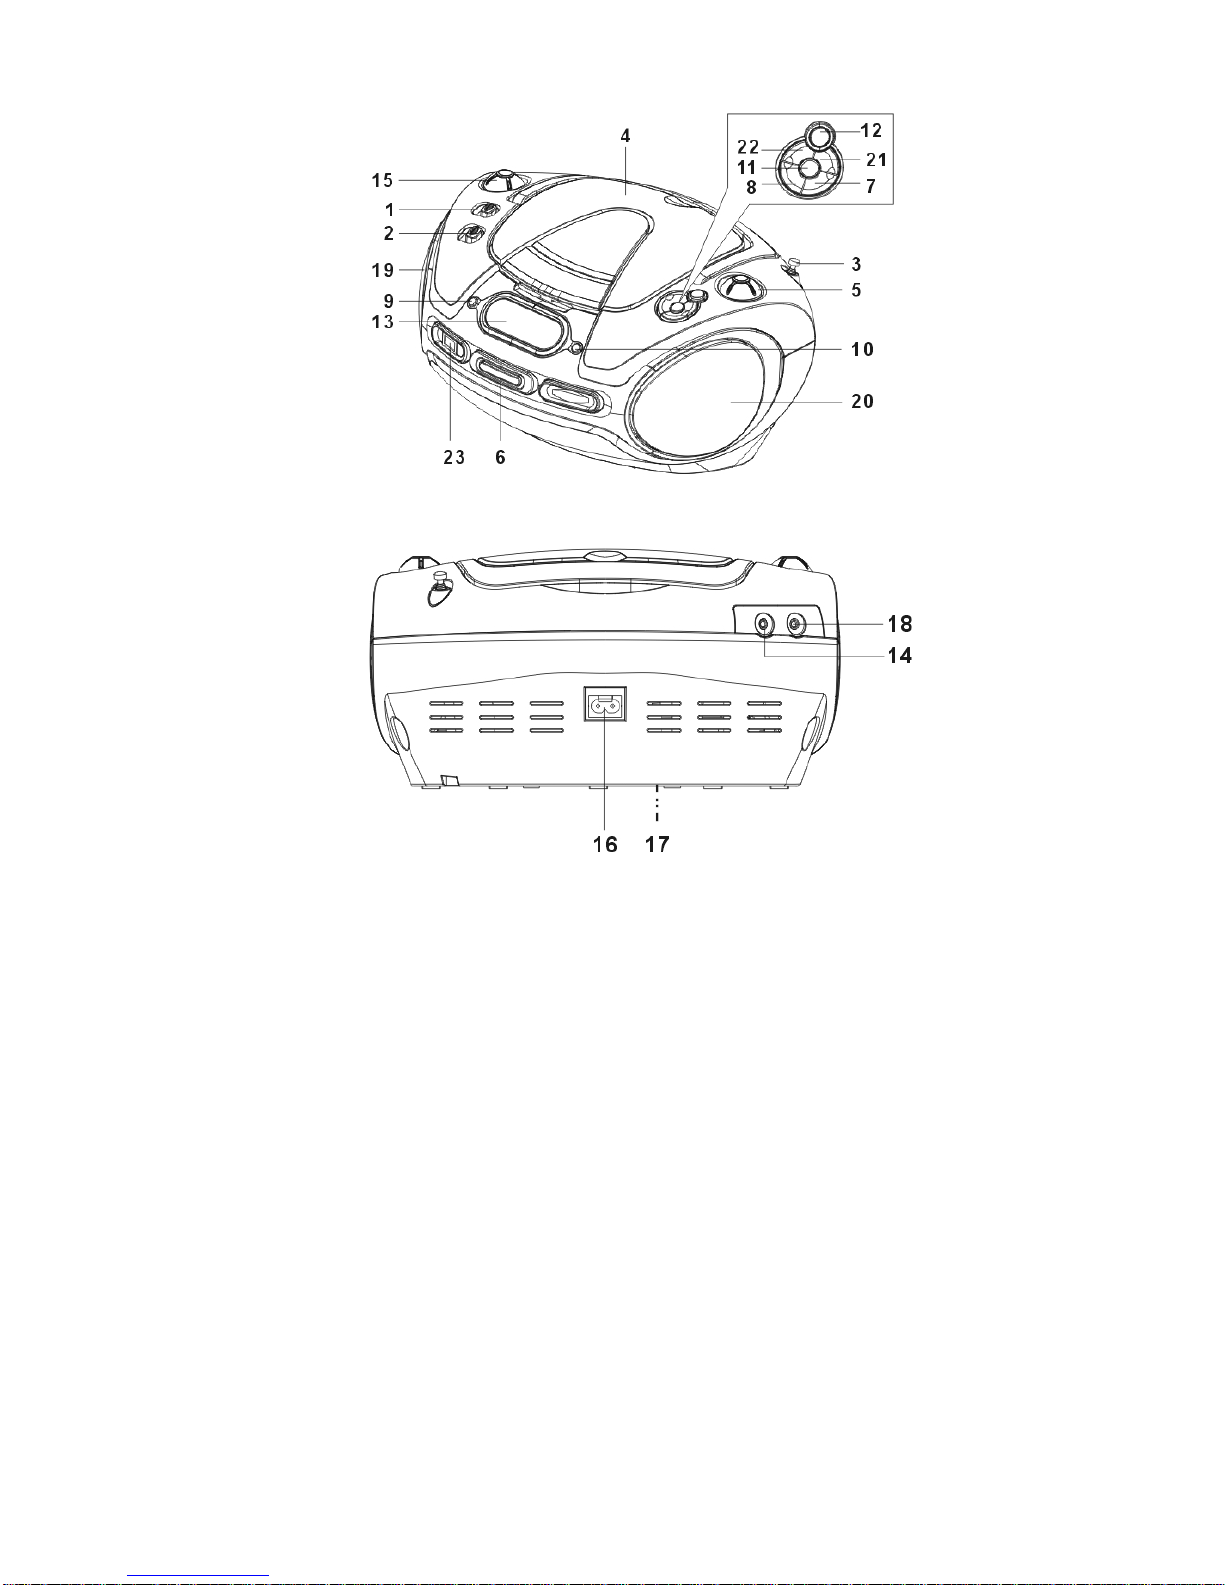
1. FUNCTION SWITCH
AUX/CD/OFF/RADIO
2. BAND SWITCH
3. FM ANTENNA
4. CD DOOR
5. TUNING KNOB
6. BASS BOOST BUTTON
7. CD SKIP/SEARCH FORWARD
BUTTON
8. CD SKIP/SEARCH BACKWARD
BUTTON
9. CD PROGRAM BUTTON
10. CD MODE BUTTON
11. CD STOP BUTTON
12. CD PLAY/PAUSE BUTTON
13. LCD DISPLAY
14. STEREO HEADPHONE JACK
15. VOLUME CONTROL KNOB
16. AC SOCKET
17. BATTERY DOOR
18. AUX IN JACK
19. SPEAKER LEFT
20. SPEAKER RIGHT
21. FOLDER BUTTON
22. CD/USB BUTTON
23. USB PORT

English - 2
AC OPERATION
Before operation please be sure that the voltage on the set corresponds to
the voltage of your local area. Unravel the AC Line Cord, insert one end into
the AC jack on the set, and the other end into a standard AC outlet.
Remarks : 1) In case of malfunction due to electrostatic discharge (ESD), reset the unit
by reconnecting the AC cord again to resume to normal operation.
2) When not in use – Unplug the AC power cord completely from the AC
power socket.
BATTERY OPERATION
Disconnect the AC Cord Set completely. Open the BATTERY DOOR and insert
UM-2/ “C” size x 8 batteries (not supplied) making sure that the indicated
battery polarity is observed.
When not in use – Remove all the batteries if the unit will not be used for
several months or more.
RADIO OPERATION
Slide the FUNCTION SWITCH to the “RADIO” position. Slide the BAND
SWITCH to the desired waveband. Turn the TUNING KNOB to your desired
radio station. Adjust the sound level by rotating the VOLUME CONTROL KNOB.
To turn off the radio, simply slide the FUNCTION SWITCH to “OFF” position.
Note: Radio frequency is shown on the LCD DISPLAY.
FM STEREO INDICATOR
When tuned to a FM Stereo broadcast the FM
stereo indicator will light up. In weak
signal areas the FM Stereo signal may not be
strong enough and can cause excessive
background noise. In this case, slide the BAND SWITCH to “FM” position.
ANTENNAS
For best reception, fully extend the FM ANTENNA to receive FM stations. For
AM reception, the unit has a built-in antenna, turn the whole unit for best
reception.
BASS BOOST
For increased bass at all volume levels, push the BASS BOOST BUTTON to
“ON” position to boost the low frequency tone for an emphasized bass sound.
To release the super bass, simply push the button again.

English - 3
AUXILIARY (AUX) MODE
1. Slide the FUNCTION SWITCH to the “AUX” position.
2. Connect the earphone socket from the Auxiliary unit (e.g. MP3 player or
MD player) into AUX-IN jack on the rear of this product via an Audio Line
Cord (3.5mm plug on both ends; not supplied).
3. Play the Auxiliary unit. Music from the Auxiliary unit can be listened
through the speaker of this product.
STEREO HEADPHONE JACK
For private listening, insert the plug of a Stereo Headphone into the STEREO
HEADPHONE JACK and adjust the VOLUME CONTROL KNOB accordingly.
During the use of a headphone, the Speakers are automatically disconnected.
CD OPERATION
PLAYING COMPACT DISC (CD-R/RW PLAYBACK COMPATIBLE)
Getting Started
Note: Should skipping of tracks occur during CD playing try reduce the
volume.
When CD is playing do not open the CD DOOR.
1. Open the CD DOOR by pulling up the CD DOOR. Put a CD disc into the
CD Compartment and close the CD DOOR. Set the FUNCTION SWITCH to
“CD” position.
Note : Ensure the CD DOOR is closed properly and locked in place.
2. When the CD DOOR is closed with a CD inside, total
number of the tracks in the disc will be shown on the
CD LCD DISPLAY and will go to stop mode. (ex. Total
17 tracks inside the disc). The “DISC” indicator will
always be shown on the LCD DISPLAY.
3. If there is no disc inside, the LCD DISPLAY will show
“
” and go to stop mode.
4. If the CD DOOR is not closed, the DISPLAY will show
“
”.
Play/Pause Mode
1. When the PLAY/PAUSE BUTTON is pressed during CD stop mode, the first
track will be played. The Play Indicator “
” will be
shown on the LCD DISPLAY. The CD LCD DISPLAY
will show the specific number of track being played.
 Loading...