

Page 1
V 2.0
Version 9 PC
Setup Guide
Setup Guide
Setup GuideSetup Guide
Revised: 06-12-00
Page 2

Contents
1111Introduction 2
2222 Configuring Cakewalk 4
Digital 328 v2 and
Digital 328 v2 and
Digital 328 v2 andDigital 328 v2 and
Cakewalk Version 9 PC
Cakewalk Version 9 PC
Cakewalk Version 9 PCCakewalk Version 9 PC
3333 328 Instrument Definition 6
4444 328 Automation Setup 8
5555 Automation Tutorial 10
Cakewalk Version 9 Setup Guide
1
Page 3

Introduction
Introduction
IntroductionIntroduction
1
328 Automation
328 Automation
328 Automation328 Automation
The Digital 328 mixing console offers full dynamic automation. What this means is that any
encoder/fader movement, button press, in-fact any control surface setting can be recorded in
realtime via MIDI to Cakewalk, for playback at a later time.
The 328 allows not only every control surface audio parameter to be automated, but also full
automation of both Dynamic Processors and both FX Processors.
This means that a fully automated mix track can be integrated into a recording session,
containing any fades, mutes, snapshot recalls etc. that occur at certain points through your song.
As the automation data is recorded using MIDI messages, any automation event may be isolated
and edited/moved/deleted from within the sequencer track, or even new automation events can
be created from within the sequencer itself.
How Does The 328 Achieve Dynamic Automation?
How Does The 328 Achieve Dynamic Automation?
How Does The 328 Achieve Dynamic Automation?How Does The 328 Achieve Dynamic Automation?
The 328 achieves automation via standard MIDI messages, the same MIDI messages which are
usually associated with MIDI keyboards, drum machines etc. The only difference when it comes
to automating the 328, is in the way that the console responds to these MIDI messages: a MIDI
synthesizer’s response to a certain MIDI message may be to increase the resonance of a filter,
the 328’s response to that same message may be to move channel fader 9 to +5dB!
Continuous Controller And NRPN Messages
Continuous Controller And NRPN Messages
Continuous Controller And NRPN MessagesContinuous Controller And NRPN Messages
Many other automated devices utilize MIDI Continuous Controllers (Control Changes) to
accomplish their automation. A MIDI Continuous Controller message, of which there are 128,
consists of two parts (bytes): an Event ID byte describes to a receiving device which parameter
to change, and an Event value data byte tells the instrument by how much to change that
parameter.
IntroductionIntroduction
Introduction
Introduction
2
The message format of a Continuous Controller message is as follows:
Event ID = Event value
(0-127) (0-127)
Parameter to be
set
This gives 128 different controllers, each with a resolution of 128 values.
Spirit Digital 328 v2
Value to Which
Parameter Is Set
Page 4

However, in the designing of the 328, it was decided that limiting the amount of automatable
functions to 128 would be somewhat restrictive, when in-fact there are almost 1,500 functions on
the 328 which could (and do!) fall under automatable operation.
To access the ‘extra’ Event ID’s needed to automate every parameter on the 328, the 128
Continuous Controllers of all 16 MIDI channels are used (see the MIDI Specifications in the
Appendix Version 2 Software Manual). Consequently you should ensure that the 328 is
connected to a dedicated MIDI In and a dedicated MIDI Out port on the computer.
Snapshot Automation
Snapshot Automation
Snapshot AutomationSnapshot Automation
The 328 also offers Snapshot automation: any Snapshot (or User Setup) can be recalled within
an automation track. This is done with standard MIDI Program Changes.
You may already have used Program Change commands with a MIDI synthesizer as a means to
select voices – there are 128 Program Change commands (0-127), each one corresponding to a
different voice on the synthesizer: Sending Program Change 52 to the synthesizer would recall
voice 52. Snapshot automation operates in the same fashion.
The following table indicates the Program Change message value required to recall each
individual Snapshot and User Setup.
Program
Program
ProgramProgram
Change
Change
ChangeChange
00 Snapshot 001
01 Snapshot 002
--- --98 Snapshot 099
99 Snapshot 100
100 User Setup 01
101 User Setup 02
--- --124 User Setup 25
125 User Setup 26
Recalled
Recalled
RecalledRecalled
So, to recall Snapshot #1, Program Change 0 should be sent to the 328. To recall Snapshot #69,
Program Change 68 should be sent to the 328, and so on.
Note that within Cakewalk it is possible to view MIDI Program Changes within the range 1-128,
to avoid confusion.
However, there is one other thing to bear in mind - every individual Snapshot has a ‘MIDI Recall’
selection that can be enabled/disabled. If ‘MIDI Recall’ is turned ‘OFF’ for a particular Snapshot,
then it cannot be recalled via a Program Change command. Therefore, any Snapshot you wish to
recall from within an automation track must have ‘MIDI Recall’ turned ‘ON’, else the Snapshot will
not recall. When the Global ‘MIDI Recall’ of Snapshots is switched to ‘ON’, any Snapshot
subsequently created will automatically have ‘MIDI Recall’ switched to ‘ON’. To do this, enter the
‘Snapshot Setup’ menu and toggle ‘MIDI Recall’ to ‘ON’.
Cakewalk Version 9 Setup Guide
3
Page 5
Configuring Cakewalk
Configuring Cakewalk
Configuring CakewalkConfiguring Cakewalk
2
MIDI Connections
MIDI Connections
MIDI ConnectionsMIDI Connections
It is essential that a 2-way MIDI communication configuration is used between the 328 and
Cakewalk.
Using standard MIDI cables, connect the 328 MIDI Out to the PC MIDI In, and connect the 328
MIDI In to the PC MIDI Out.
PC Midi Out 328 Midi In
PC Midi In
328 Midi Out
This 2-way communication configuration now allows full automation recording and playback.
Cakewalk Setup
Cakewalk Setup
Cakewalk SetupCakewalk Setup
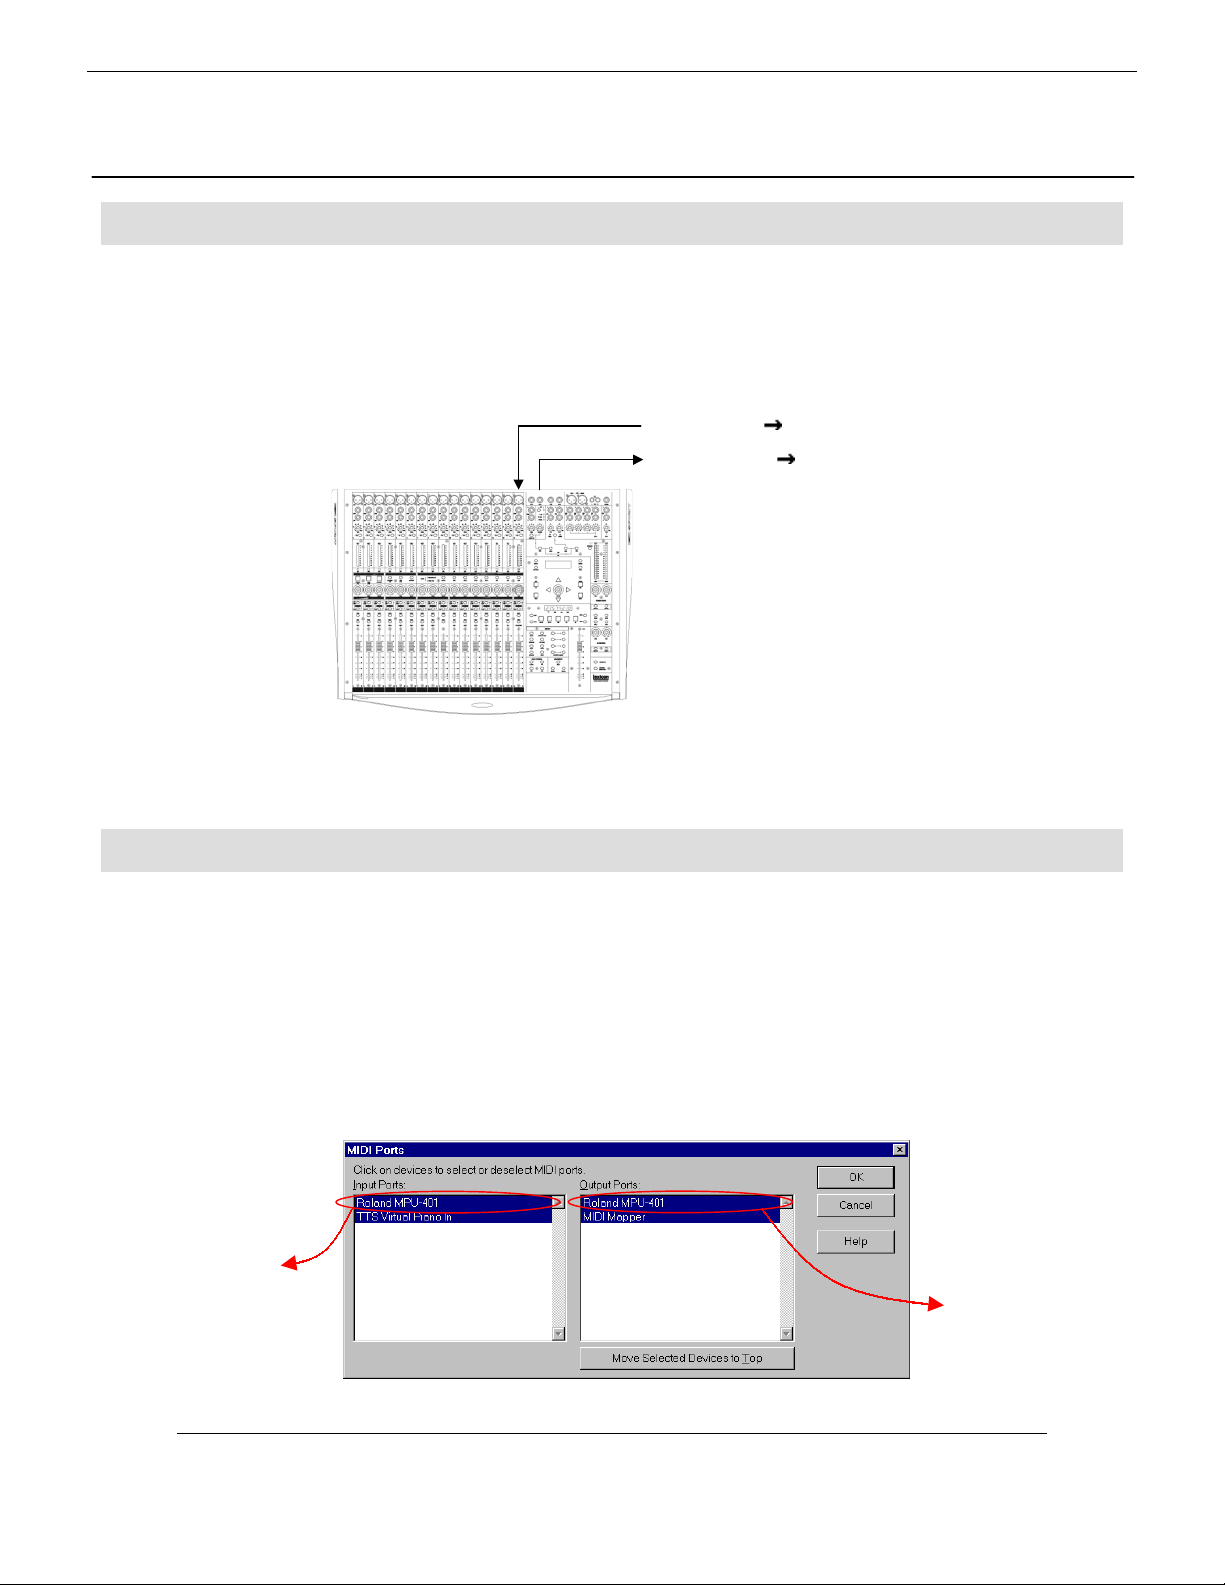
Start Cakewalk, and enter ‘MIDI Devices…’ on the ‘Tools’ pull-down menu.
Now, in the ‘Output Ports’ selection select the MIDI Out port you are using the 328 with. Click on
‘Move Selected Devices to Top’ so that it moves to the top of the list.
Ensure that both the MIDI In and MIDI Out ports are enabled (highlighted) for the MIDI interface
you are using the 328 with, as well as for any other devices on any other MIDI Ports.
Here, the MIDI Port being used with the 328 is ‘Roland MPU401’, and hence both the Input (MIDI
In) and Output (MIDI Out) are selected. The other ports are selected as they are used by other
MIDI devices.
Ensure that
the MIDI In
port being
used with
the 328 is
selected
Ensure that
the MIDI
Out port
being used
with the
328 is top
of the list,
and
selected
4
Spirit Digital 328 v2
Page 6

Click on ‘OK’ to confirm these settings.
When writing from the 328 with Cakewalk (and with any sequencer in fact), MIDI Echo must be
disabled on the MIDI port being used by the 328. If MIDI Echo is left enabled, a MIDI feedback
loop will be created, and the 328 will behave erratically.
Now enter ‘Project Options…’ on the ‘Tools’ pull-down menu, and click on the ‘MIDI Input’ tab.
If you have no other instruments on other MIDI ports requiring MIDI Echo, simply set Echo mode
to ‘None’ and click on ‘OK’:
If, however, you are using any other instruments that do require MIDI Echo, you must configure
Cakewalk to disable MIDI Echo for the 328’s MIDI port only:
Select ‘Manual’ Echo mode. Now set the ‘Local On Port’ to the 1 and click on ‘OK’.
Note: If only one MIDI port is available on the PC, Global MIDI Echo must be
disabled.
You have now created a blank environment which is ‘328 ready’. You are advised at this point to
save the song as a .wrk file, and use this as a default blank song every time you start Cakewalk.
Otherwise you will have to repeat the above procedure every time you start work on a new song.
Cakewalk Version 9 Setup Guide
5
Page 7

3
328 Instrument Definition
Installation Procedure
Installation Procedure
Installation ProcedureInstallation Procedure
The 328 Instrument Definition comes in the format of a text based file,
be downloaded from the Spirit website
www.digital328.com
As described earlier, the 328 Instrument Definition essentially ‘labels’ the Continuous Controller
values relevant to the 328’s automation, meaning that any automation recorded or edited within
Cakewalk will be presented as a description, i.e. ‘Ch7 Level’, instead of a numerical Continuous
Controller value.
The 328 Instrument Definition file also ‘labels’ Patch Change values relevant to the 328, meaning
that any Snapshots or User Setups recalled within a song will be relevantly labeled.
Go to the ‘Tools’ pull-down menu, select ‘Instruments…’, and then click on ‘Define…’. A window
should open presenting the current instrument definitions available. Click on ‘Import…’, then
locate the ‘Dig328v2.ins’ file and click on ‘Open’.
.
www.spiritbysoundcraft.com
Spirit328.ins
or the Digital 328 webiste,
, which can
6
Now select ‘Spirit Digital 328’ and click on ‘OK’. ‘Spirit Digital 328’ should now appear as an
instrument selection in the ‘Define Instruments and Names’ window.
Spirit Digital 328 v2
Page 8

Now click on ‘Close’. The ‘Assign Instruments’ window should now be displayed.
On the left hand of the screen select MIDI Channel 1 for the MIDI Port to which the 328 is
connected.
Now ‘connect’ the selected port to the ‘Spirit Digital 328 channel 1’ instrument selection on the
right hand of the screen. Repeat this for MIDI Channels 1-16 on the selected Port. Ensure that
the MIDI Port MIDI Channels are linked to the appropriate 328 MIDI Channels.
It is suggested that the ‘Save Changes for Next Session’ box is ticked, otherwise this procedure
must be repeated every time a new session is started.
Click on OK to finalize the settings. Now, any automation data recorded from the 328 into
Cakewalk will be labeled with a relevant description, i.e. ‘Ch5 Pan’ or ‘’STE1 Mute’, instead of
being presented simply as a numerical Continuous Controller value.
Cakewalk Version 9 Setup Guide
7
Page 9

<Aut
t>
<Aut
t>
<Aut
t>
328 Automation
4
Automation Settings On The 328
Automation Settings On The 328
Automation Settings On The 328Automation Settings On The 328
The first thing to set on the 328 is which MIDI Channel on which you wish to transmit/receive
Snapshot automation data. Press <MENU> then scroll up to ‘User Options’ and press
<ENTER>. Here you can configure on which MIDI Channel the transmits/receives
Snapshot/User Setup MIDI Program Changes (note that if User Options|Omni Mode is enabled
then the 328 will receive and respond to Snapshot MIDI Program Changes on all 16 MIDI
Channels).
< User Options >
MIDI Channel: 1
To make use of any automation facilities on the 328, ‘MIDI Dynauto’ must be enabled in the
‘Automation Setup’ menu. Press <MENU> then scroll to ‘Automation Setup’ and press
<ENTER>. Here ‘MIDI Dynauto’ must be enabled otherwise the 328 will neither transmit nor
respond to any received automation data.
omation Se
MIDI Dynauto: ON
Scroll down one page to the automation ‘Mode’ page. Four automation modes are available on
the 328: Read Only, Write Only, Read/Write, Update. Each mode determines how the 328 will
transmit/respond to automation data, and each has its own applications.
Automation Modes On The 328
Automation Modes On The 328
Automation Modes On The 328Automation Modes On The 328
Read Only Mode
omation Se
Mode: READ ONLY
When the 328 is in Read Only mode, it only responds to automation data received and does not
transmit any automation data. This mode may be useful when a final automation performance
had been completed in Cakewalk, and no more automation data was to be recorded. In this case
the desk could be set to Read Only as a ‘safe’ mode, to ensure that no further automation data
was recorded over the final automation performance.
Write Only Mode
omation Se
Mode: WRITE ONLY
8
Spirit Digital 328 v2
Page 10

When the 328 is in Write Only mode, it only transmits automation data, and ignores any
incoming automation data received at its MIDI IN port. This mode is useful for quickly recording
several versions of an automation take into Cakewalk, where on each recording pass the
previously recorded take is ignored by the 328. Each take can then later be previewed in turn (in
Read mode), and the preferred take kept as a performance.
Read/Write Mode
<Automation Set>
Mode: READ/WRITE
Read/Write mode is simply an amalgamation of Read Only mode and Write Only mode. In this
mode the 328 transmits automation data and responds to any automation data received at its
MIDI IN port. Read/Write is the most commonly used automation mode – a single automation
take can be recorded into a sequencer, then instantly previewed on playback.
Update Mode
<Automation Set>
Mode: UPDATE
The final automation mode is Update mode. This mode allows live changes to be made to any
individual automation parameter within a previously recorded automation take. For example, say
a complex automated mix had been recorded containing many automation parameters, which
would be the perfect mix if it weren’t for that inaccurate FX2 fade-out just before the end of the
track! Update mode could be used here to ‘punch-in’ record a new FX2 fade-out at the desired
point whilst preserving all other automation data.
Essentially, Update mode is identical to Read mode, only that the automation data received by
the 328 is re-transmitted back to the sequencer. However, the moment a parameter change is
made on the 328, that parameter only enters Write mode, whilst all other parameters continue to
be passed through into the 328.
This may seem a bit complex in theory, but in practice it is a very simple concept – Update mode
essentially lets you punch-in parameter specific edits into an existing automation mix.
Note: If you wish to update an automated fader movement that you must not
attempt to ‘take over’ the moving fader when you wish to punch-in your change –
always use the rotary encoder equivalent on the meter controls. This is simply due to
the motorized nature of the 328’s faders.
Note: Once an automatable 328 object has been adjusted in Update mode, it will not
enter Read mode again until READ ONLY or READ/WRITE is selected in the 328
Automation Setup menu.
Cakewalk Version 9 Setup Guide
9
Page 11

5
Automation
Getting Started
Getting Started
Getting StartedGetting Started
Before you continue, it is strongly suggested that you save your current desk settings as a User
Setup, as you are about recall the factory defaults. You will then be able to recall this User Setup
once you are finished with the guide, and return to your personal desk configuration.
To store your current settings as a User Setup, press
then press
then press
name with the Master Encoder, then press
return back to the main menu.
Now to recall the factory defaults: Press
<ENTER> to display the User Setup list, then scroll down to ’27:Factory Defaults’. Press
<RECALL> (in Snapshot panel), and the desk should reset to its factory defaults.
Press
setting is set to the channel you have chosen to use the 328 on, i.e. the channel that you
reserved as a ‘MIDI Thru = Off’ channel (see ‘Cakewalk Setup’ section). Press
return to the main menu.
Now to enable automation on the 328: Scroll down to ‘Automation Setup’ and press
Set ‘MIDI Dynauto’ to ‘ON’. Press
<ENTER> and set ‘MIDI Recall’ to ‘ON’.
When using automation on the 328, it is strongly advised that before the start of your song you
recall a Snapshot which initializes all automation settings to their desired state at the beginning
of the song. This is easily achieved by inserting a Program Change just before the start of your
song which recalls the ‘initial state’ snapshot. Otherwise, stopping the track mid-way through an
automated sequence, then starting playback right from the beginning will cause undesired
settings.
<ENTER>. A list of User Setups should now be displayed. Find an empty location and
<STORE> (in Snapshot panel). Now press <ENTER>, give the User Setup a relevant
<ENTER> once more to confirm. Press <MENU> to
<MENU>, then scroll down to ‘User Setups’. Press
<MENU>, scroll up to ‘User Options’, and press <ENTER>. Ensure that the ‘MIDI Channel’
<MENU>, and scroll up to the ‘Snapshot Setup’ menu. Press
<MENU>, scroll down to ‘User Setups’ and
<MENU> to
<ENTER>.
10
For this reason, you must ready a ‘blank’ snapshot for recall just before the beginning of the
tutorial song.
On the 328, select the Mic/Line fader bank. Move all of the faders down to - dB. Press
<SNAPSHOT> to enter the snapshot list. Scroll up to slot 1, then press <STORE> (on snapshot
panel). Press enter, then scroll down two pages and set ‘MIDI Recall’ to ‘ON’ – otherwise the
snapshot will not recall via Program Change.
8
Spirit Digital 328 v2
Page 12

Manually Recording Information
Manually Recording Information
Manually Recording InformationManually Recording Information
On the 328, press <MENU>, scroll to ‘Automation Setup’, locate ‘Mode’, and set it to
‘Read/Write’ mode. The 328 is now ready to write our new automation take to a new Track in
Cakewalk whilst performing the automation data already present in Cakewalk.
You are about to record some automation data onto Track 1. To achieve this you must first
prepare Track 1 within Cakewalk to record (and later on, playback) the automation data on the
328’s MIDI Port and MIDI Channel.
In Cakewalk, right-click on Track 1’s ‘Name’ box, and select ‘Track Properties…’:
Set ‘Channel’ to 1, set ‘Port’ to ‘ 1-Spirit Digital 328’, and click on ‘OK’ to confirm.
We are now ready to record to Track 1.
Get your fingers ready to record some movements on Mic/Line Ch1 and Ch2 Faders.
You may wish to play through the sequence a few times, to practice mimicking the movements.
When you are ready to record, make sure that Track 1 is selected in Cakewalk, so that your new
automation take is recorded to this track.
Click on Rewind to ensure that recording begins at the beginning of the sequence.
Now click on Record to begin recording, and perform your automation take.
Every move you make to the faders will be recorded as NRPN messages into Cakewalk.
Once the end of the sequence has been reached, click on Stop to cease recording.
Your automation movements should now be present on Track 1. You can name the sequence if
you wish, by right-clicking on the sequence and choosing ‘Properties…’:
Cakewalk Version 9 Setup Guide
11
Page 13

Now click on Rewind then click on Play
Both the original and the new automation should playback on the 328. If you are not happy with
the results, simply delete your automation take, and try again!
To record additional tracks, create further Digital 328 tracks within Cakewalk and repeat the
processes above.
Now It’s Your Turn…
Now It’s Your Turn…
Now It’s Your Turn…Now It’s Your Turn…
This should give you an idea of how easy it is to automate the 328 from Cakewalk. Don’t forget
that all control surface settings are automatable – even the Lexicon FX units and the Dynamic
Processing units!
This short tutorial simply shows how to automate the 328 alone from Cakewalk, using simple
fader movements to present the automation capabilities.
Now, when developing compositions the 328 is completely integrated into your Cakewalk setup.
A song can now be constructed using automation techniques alongside traditional sequencing
techniques – you may wish to use an automated EQ sweep on a riff instead of a filter sweep, or
maybe automate the delay FX send on a vocal take throughout a song – the possibilities are
endless! And of course, anything you don’t like, you can move/edit/delete just as with any other
MIDI information.
12
Spirit Digital 328 v2
Page 14

Spirit by Soundcraft
Harman International Industries Ltd., Cranborne House,
Cranborne Road, Potters Bar, Herts EN6 3JN, England.
Tel: +44 (0)1707 665000 Fax: +44 (0)1707 665461
web: http://www.spiritbysoundcraft.com
e-mail: spiritsupport@soundcraft.com
spiritdig@harman.com (US)
Cakewalk Version 9 Setup Guide
13
 Loading...