

Page 1
SOREX wireless Solutions GmbH
Technologie- und Forschungszentrum
Viktor-Kaplan-Straße 2,B
2700 Wiener Neustadt, Österreich
UID ATU57865279
Bank Raiffeisenbank Pittental
IBAN AT223264700000052324
BIC RLNWATW1647
T +43 2622 320130
F +43 2622 3201315
@
w³ www.sorex-schliesssystem.com
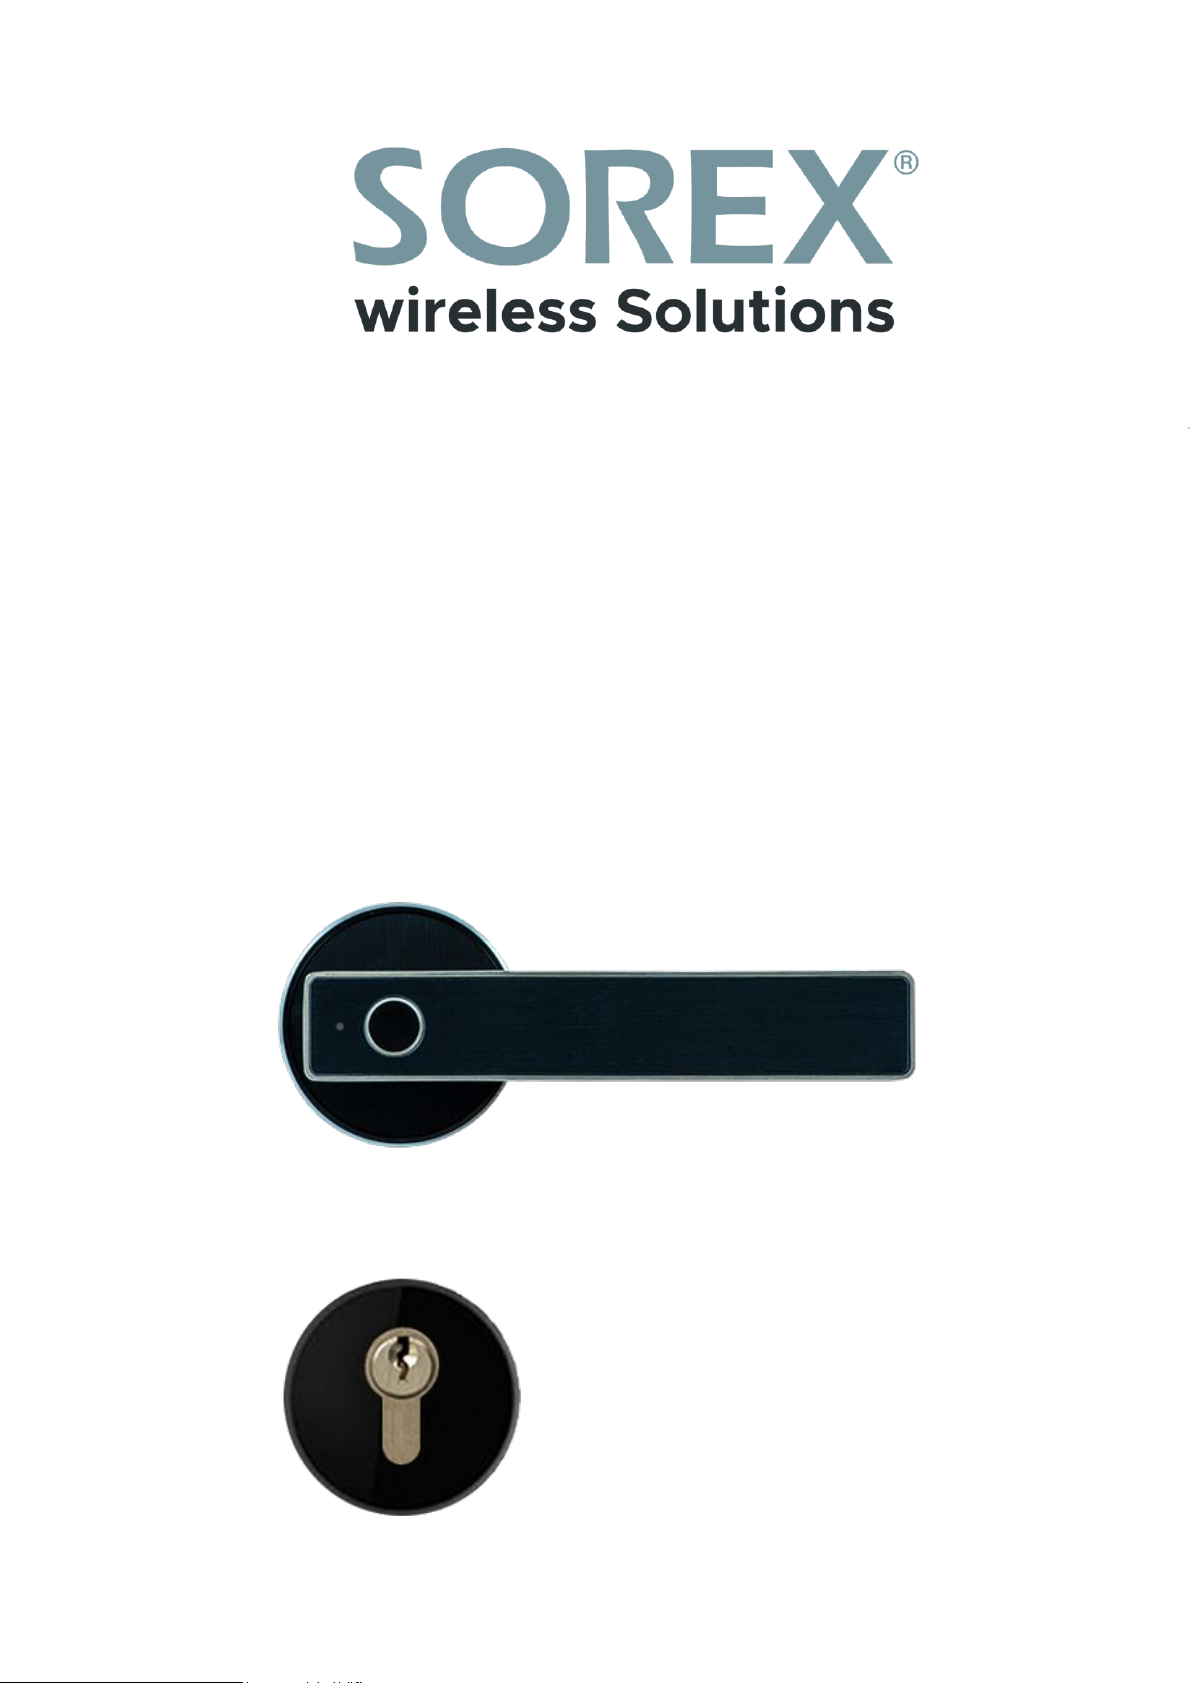
SOREX FLEX Bluetooth
Türgriff / Door Handle
Bedienungsanleitung / User Manual
Page 2

SOREX wireless Solutions GmbH
Technologie- und Forschungszentrum
Viktor-Kaplan-Straße 2,B
2700 Wiener Neustadt, Österreich
UID ATU57865279
Bank Raiffeisenbank Pittental
IBAN AT223264700000052324
BIC RLNWATW1647
T +43 2622 320130
F +43 2622 3201315
@
w³ www.sorex-schliesssystem.com
Impressum
Version 1.0
© Copyright: Jänner 2020
SOREX wireless Solutions GmbH
Technologie- und Forschungszentrum WN
Viktor-Kaplan-Straße 2B
A-2700 Wiener Neustadt
Österreich
T +43 2622 320130
F +43 2622 3201315
@ [email protected]
w³ www.sorex.eu
Page 3

SOREX wireless Solutions GmbH
Technologie- und Forschungszentrum
Viktor-Kaplan-Straße 2,B
2700 Wiener Neustadt, Österreich
UID ATU57865279
Bank Raiffeisenbank Pittental
IBAN AT223264700000052324
BIC RLNWATW1647
T +43 2622 320130
F +43 2622 3201315
@
w³ www.sorex-schliesssystem.com
Inhaltsverzeichnis
Deutsch
1. Lieferumfang ................................................................................................................................................. 1
2. Inbetriebnahme/Installation .................................................................................................................. 2
2.1 Batterien einlegen: .................................................................................................................................... 2
2.2 Installation ................................................................................................................................................... 3
2.3. Installation Türrosette ........................................................................................................................... 7
3. Smartphone App .......................................................................................................................................... 9
3.1. Installation .................................................................................................................................................. 9
3.2. Registrierung ............................................................................................................................................. 9
3.3. Ersteinrichtung ....................................................................................................................................... 10
3.4. Funktionen ................................................................................................................................................ 11
3.4.1. Öffnung via Bluetooth .................................................................................................................. 11
3.4.2. Benutzer einladen .......................................................................................................................... 11
3.4.3. Benutzer entfernen ....................................................................................................................... 12
3.4.4. Fingerabdruck anlernen .............................................................................................................. 12
3.4.5. Fingerabdruck löschen ................................................................................................................ 13
3.4.6. Protokolle auslesen ....................................................................................................................... 13
3.5. Gateway ...................................................................................................................................................... 13
3.5.1. Schloss vorbereiten ....................................................................................................................... 13
3.5.2. Gateway hinzufügen ..................................................................................................................... 14
3.5.3. Gateway löschen ............................................................................................................................. 14
3.5.4. Öffnung via Gateway ..................................................................................................................... 15
Page 4
SOREX wireless Solutions GmbH
Technologie- und Forschungszentrum
Viktor-Kaplan-Straße 2,B
2700 Wiener Neustadt, Österreich
UID ATU57865279
Bank Raiffeisenbank Pittental
IBAN AT223264700000052324
BIC RLNWATW1647
T +43 2622 320130
F +43 2622 3201315
@
w³ www.sorex-schliesssystem.com
SOREX wireless Solutions GmbH
Technologie- und Forschungszentrum
Viktor-Kaplan-Straße 2,B
2700 Wiener Neustadt, Österreich
UID ATU57865279
Bank Raiffeisenbank Pittental
IBAN AT223264700000052324
BIC RLNWATW1647
T +43 2622 320130
F +43 2622 3201315
@
w³ www.sorex-schliesssystem.com
Deutsch
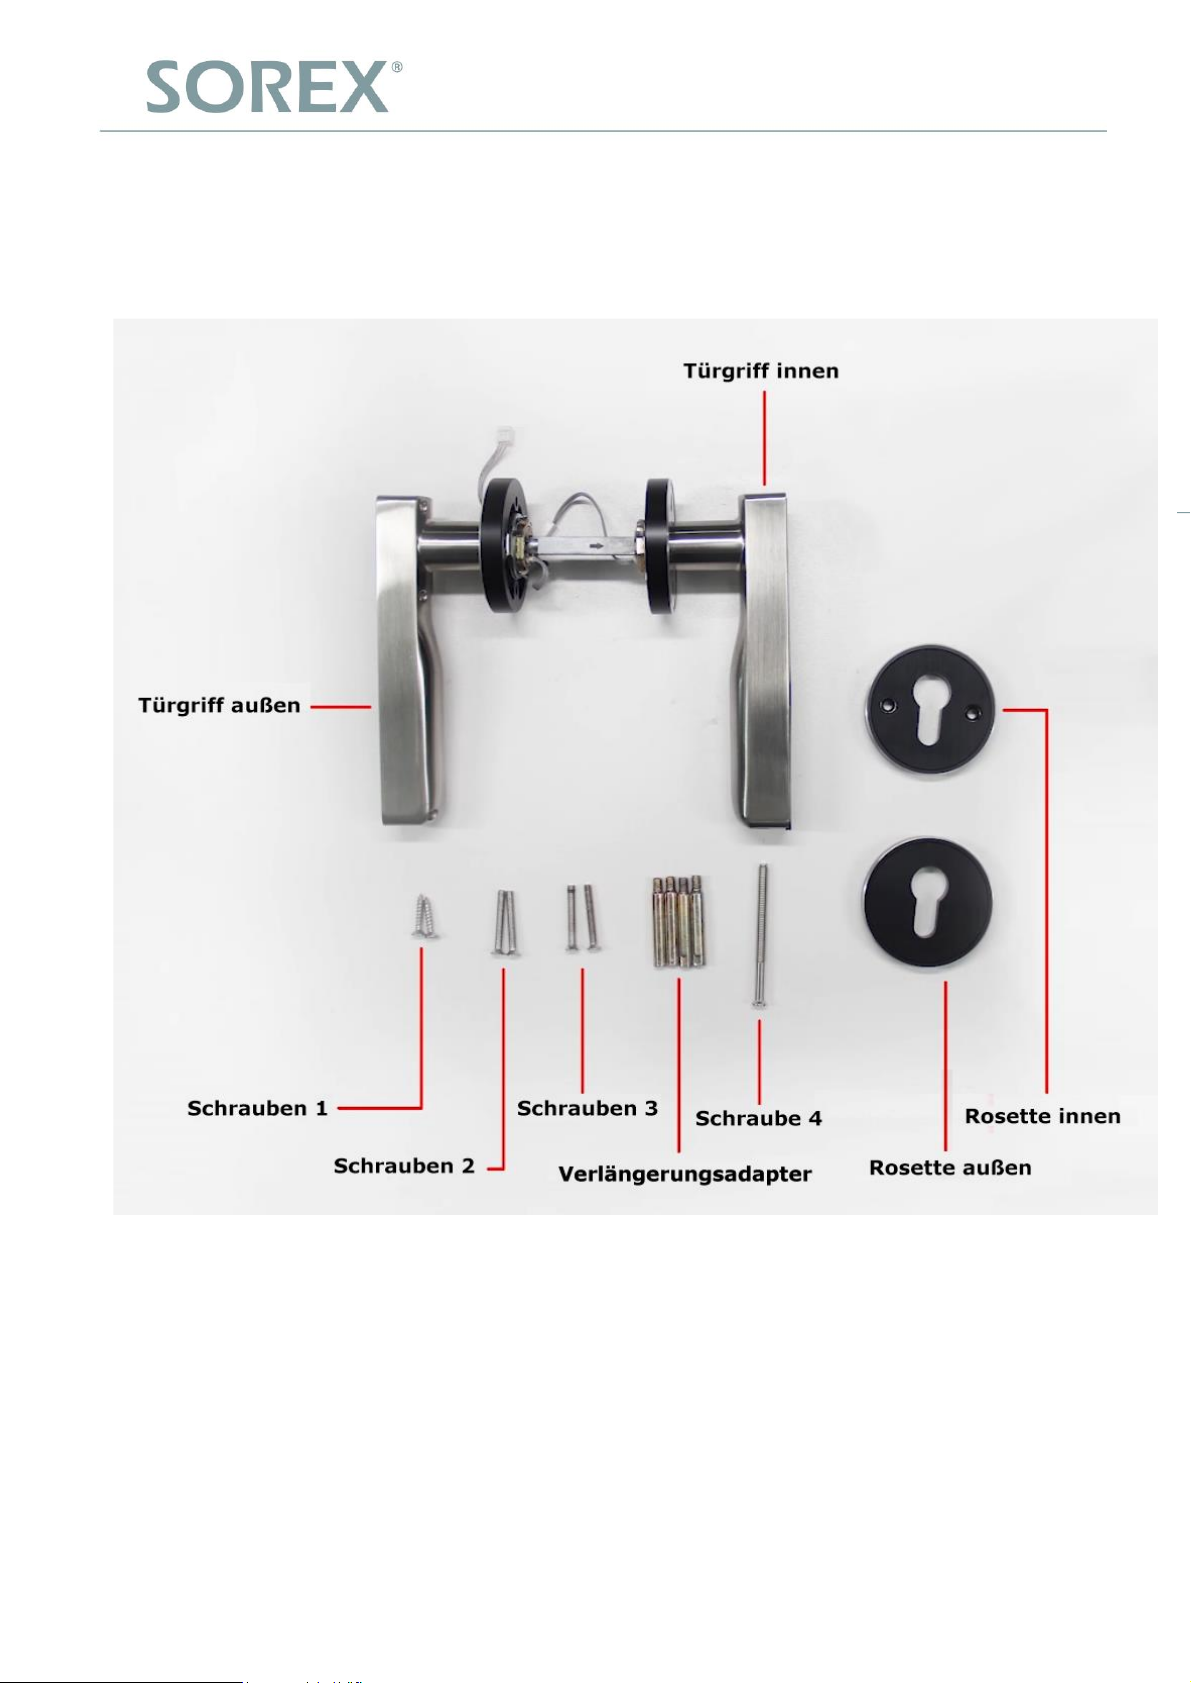
1. Lieferumfang
Folgende Bestandteile sind enthalten:
1
Page 5
SOREX wireless Solutions GmbH
Technologie- und Forschungszentrum
Viktor-Kaplan-Straße 2,B
2700 Wiener Neustadt, Österreich
UID ATU57865279
Bank Raiffeisenbank Pittental
IBAN AT223264700000052324
BIC RLNWATW1647
T +43 2622 320130
F +43 2622 3201315
@
w³ www.sorex-schliesssystem.com
SOREX wireless Solutions GmbH
Technologie- und Forschungszentrum
Viktor-Kaplan-Straße 2,B
2700 Wiener Neustadt, Österreich
UID ATU57865279
Bank Raiffeisenbank Pittental
IBAN AT223264700000052324
BIC RLNWATW1647
T +43 2622 320130
F +43 2622 3201315
@
w³ www.sorex-schliesssystem.com
Deutsch
Inbetriebnahme/Installation
2.
2.1 Batterien einlegen:
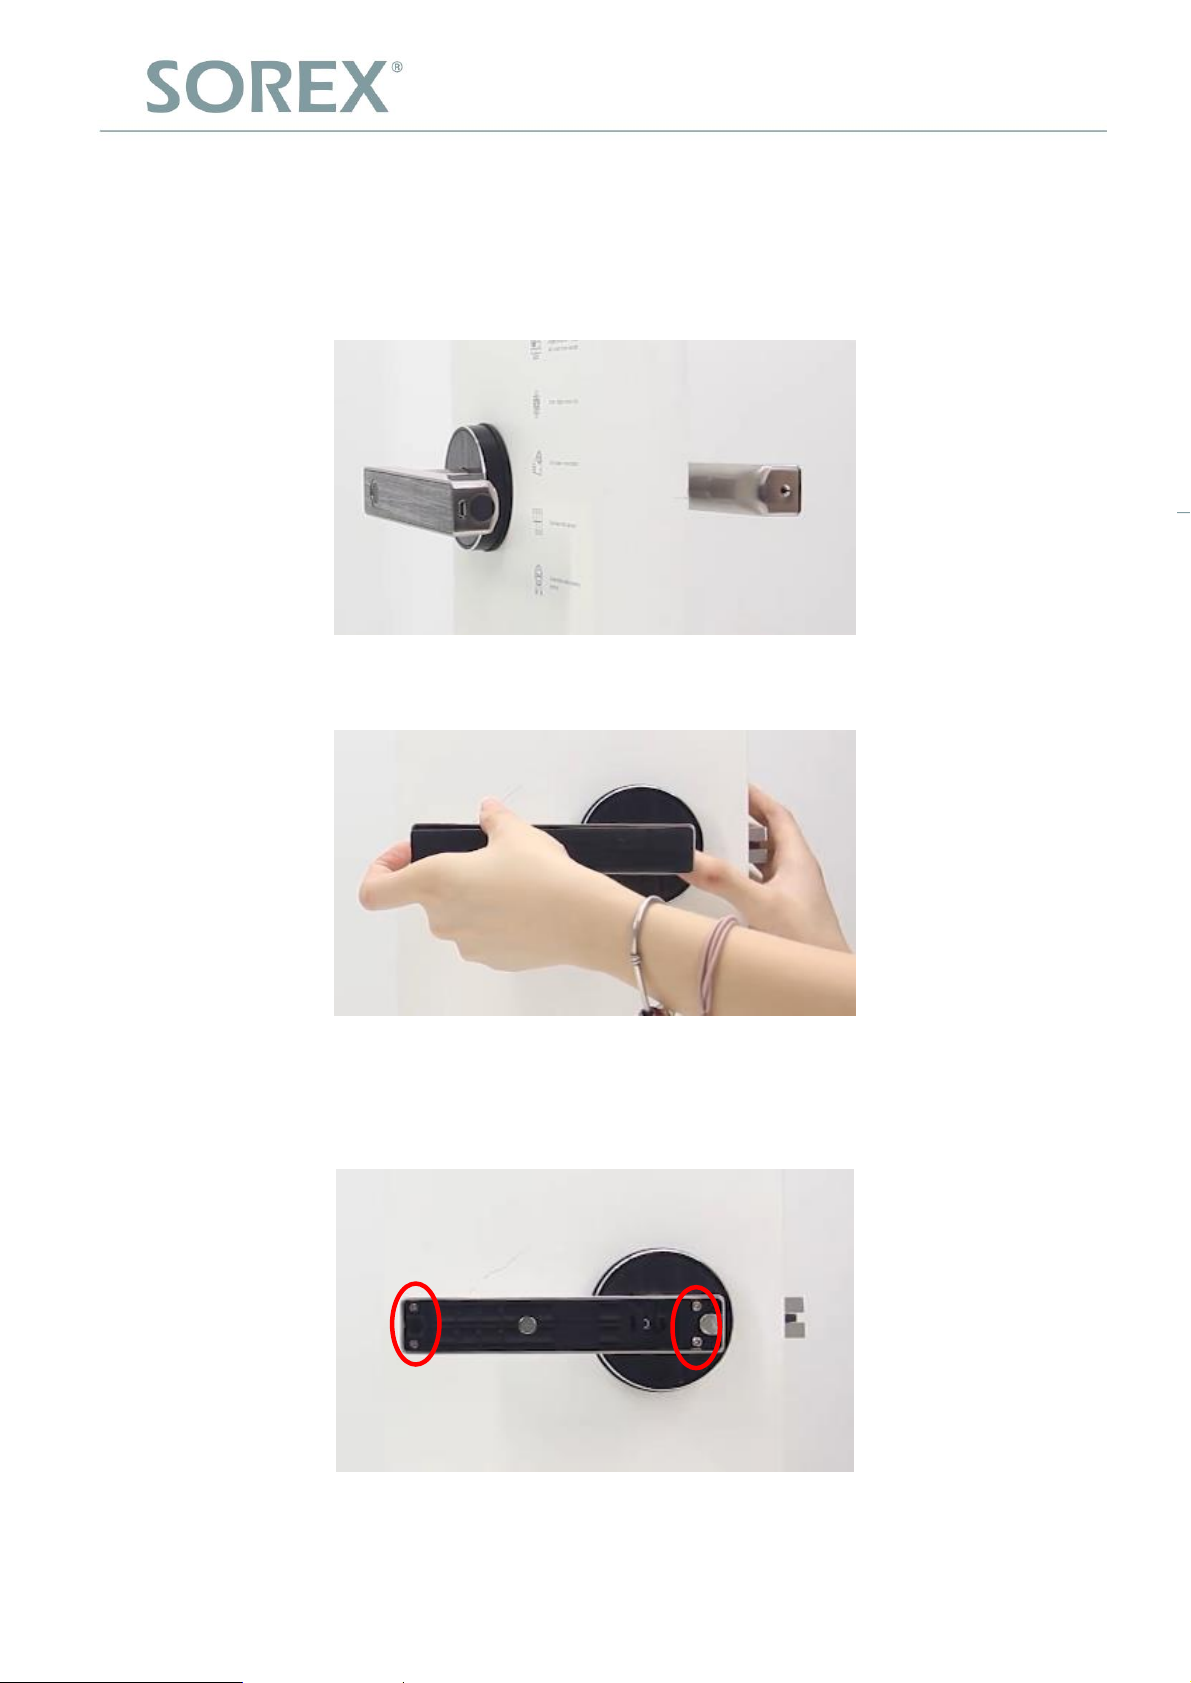
Öffnen Sie die Schraube am Ende der Schnalle auf der Innenseite:
Entfernen Sie die Abdeckung:
Öffnen Sie die 4 Schrauben auf der Innenseite:
2
Page 6
SOREX wireless Solutions GmbH
Technologie- und Forschungszentrum
Viktor-Kaplan-Straße 2,B
2700 Wiener Neustadt, Österreich
UID ATU57865279
Bank Raiffeisenbank Pittental
IBAN AT223264700000052324
BIC RLNWATW1647
T +43 2622 320130
F +43 2622 3201315
@
w³ www.sorex-schliesssystem.com
SOREX wireless Solutions GmbH
Technologie- und Forschungszentrum
Viktor-Kaplan-Straße 2,B
2700 Wiener Neustadt, Österreich
UID ATU57865279
Bank Raiffeisenbank Pittental
IBAN AT223264700000052324
BIC RLNWATW1647
T +43 2622 320130
F +43 2622 3201315
@
w³ www.sorex-schliesssystem.com
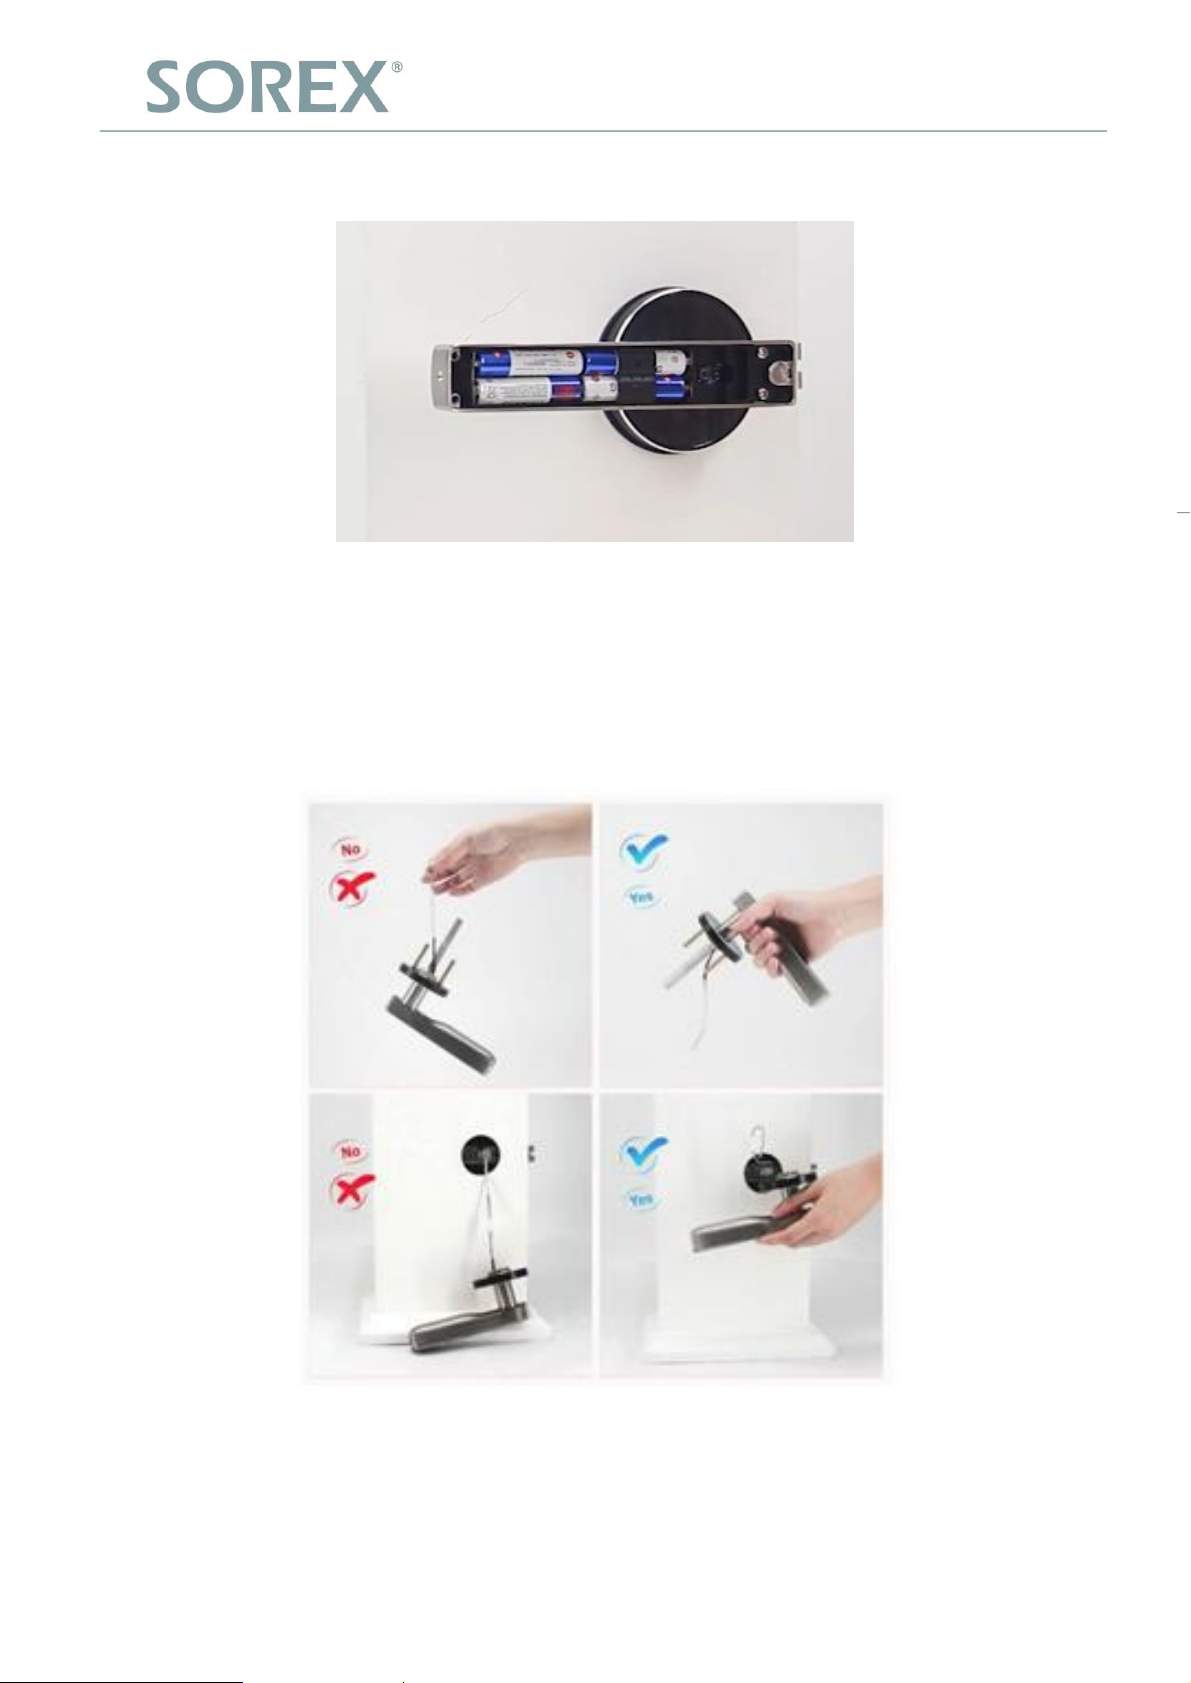
Legen Sie 4 AAA Batterien ein (bitte beachten Sie + -):
Legen Sie einen Finger auf den Sensor und prüfen Sie ob ein Signal ertönt
Deutsch
2.2 Installation
Achtung! Beschädigen Sie das Verbindungskabel nicht durch unsachgemäße Handhabung,
um einen einwandfreien Betrieb zu gewährleisten!
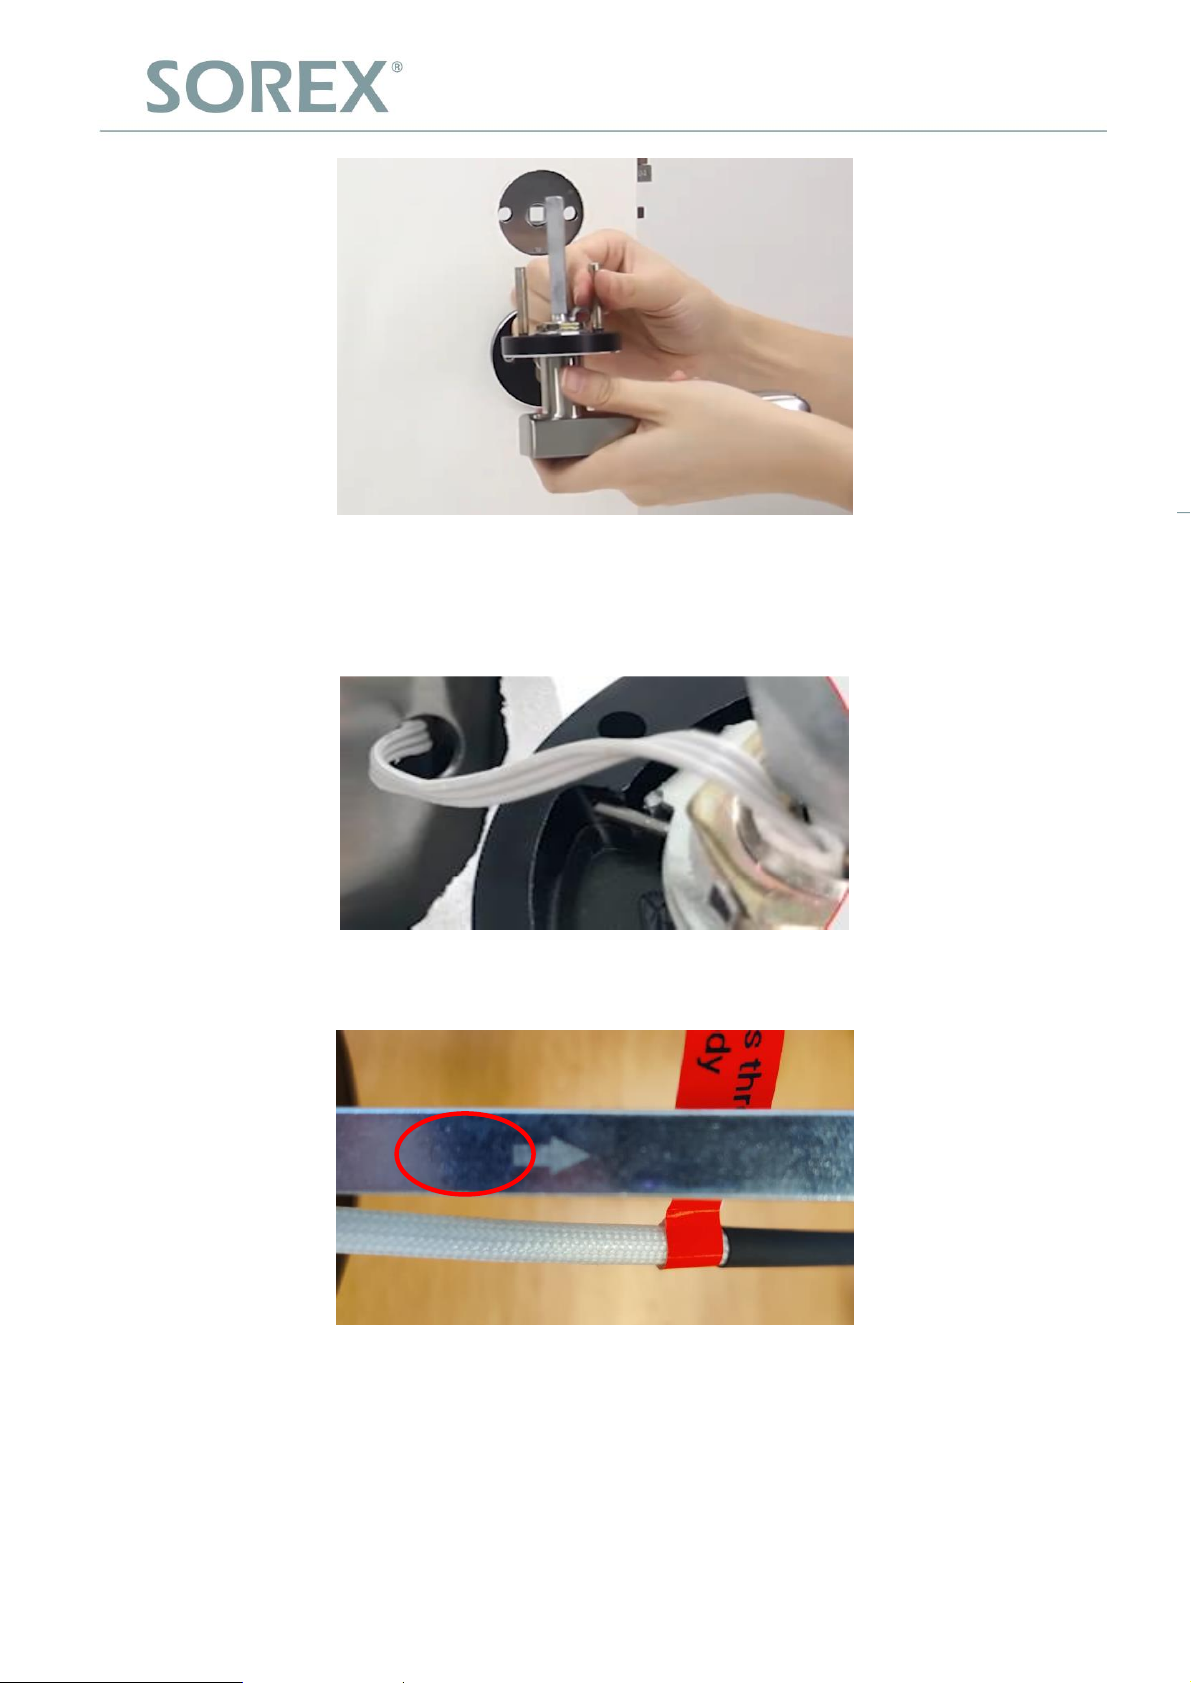
Schrauben Sie 2 Verlängerungsadapter in den äußeren Türgriff
3
Page 7
SOREX wireless Solutions GmbH
Technologie- und Forschungszentrum
Viktor-Kaplan-Straße 2,B
2700 Wiener Neustadt, Österreich
UID ATU57865279
Bank Raiffeisenbank Pittental
IBAN AT223264700000052324
BIC RLNWATW1647
T +43 2622 320130
F +43 2622 3201315
@
w³ www.sorex-schliesssystem.com
SOREX wireless Solutions GmbH
Technologie- und Forschungszentrum
Viktor-Kaplan-Straße 2,B
2700 Wiener Neustadt, Österreich
UID ATU57865279
Bank Raiffeisenbank Pittental
IBAN AT223264700000052324
BIC RLNWATW1647
T +43 2622 320130
F +43 2622 3201315
@
w³ www.sorex-schliesssystem.com
Fädeln Sie das Verbindungskabel durch eines der Schraubenlöcher
ACHTUNG! Falls die Bohrung zu klein ist müssen Sie diese eventuell mit einer
Bohrmaschine erweitern!
Deutsch
ACHTUNG! Der Pfeil auf dem Vierkant muss immer oben sein!
4
Page 8
SOREX wireless Solutions GmbH
Technologie- und Forschungszentrum
Viktor-Kaplan-Straße 2,B
2700 Wiener Neustadt, Österreich
UID ATU57865279
Bank Raiffeisenbank Pittental
IBAN AT223264700000052324
BIC RLNWATW1647
T +43 2622 320130
F +43 2622 3201315
@
w³ www.sorex-schliesssystem.com
SOREX wireless Solutions GmbH
Technologie- und Forschungszentrum
Viktor-Kaplan-Straße 2,B
2700 Wiener Neustadt, Österreich
UID ATU57865279
Bank Raiffeisenbank Pittental
IBAN AT223264700000052324
BIC RLNWATW1647
T +43 2622 320130
F +43 2622 3201315
@
w³ www.sorex-schliesssystem.com
Deutsch
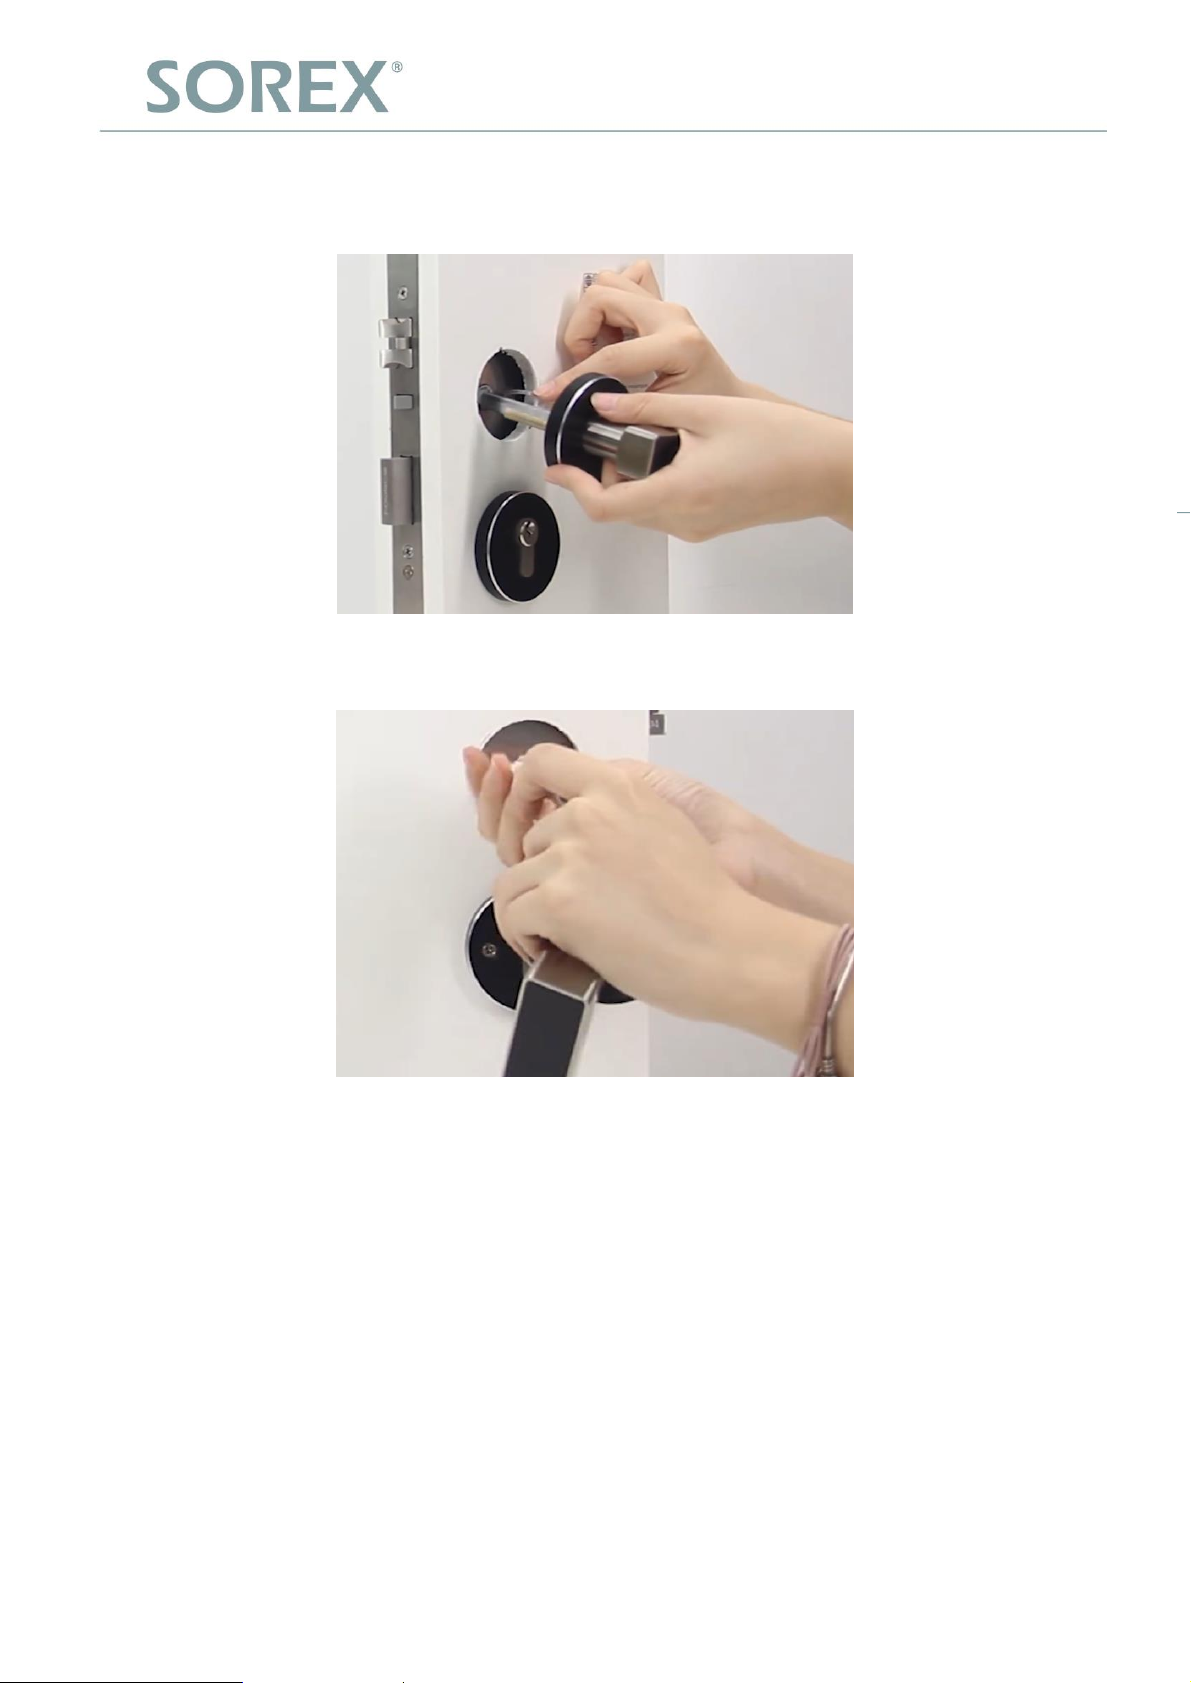
Stecken Sie den Verlängerungsadapter, den Vierkant und das Verbindungskabel in die
jeweiligen Bohrungen:
Verbinden Sie das Kabel mit dem Stecker am inneren Türgriff
5
Page 9
SOREX wireless Solutions GmbH
Technologie- und Forschungszentrum
Viktor-Kaplan-Straße 2,B
2700 Wiener Neustadt, Österreich
UID ATU57865279
Bank Raiffeisenbank Pittental
IBAN AT223264700000052324
BIC RLNWATW1647
T +43 2622 320130
F +43 2622 3201315
@
w³ www.sorex-schliesssystem.com
SOREX wireless Solutions GmbH
Technologie- und Forschungszentrum
Viktor-Kaplan-Straße 2,B
2700 Wiener Neustadt, Österreich
UID ATU57865279
Bank Raiffeisenbank Pittental
IBAN AT223264700000052324
BIC RLNWATW1647
T +43 2622 320130
F +43 2622 3201315
@
w³ www.sorex-schliesssystem.com
Deutsch
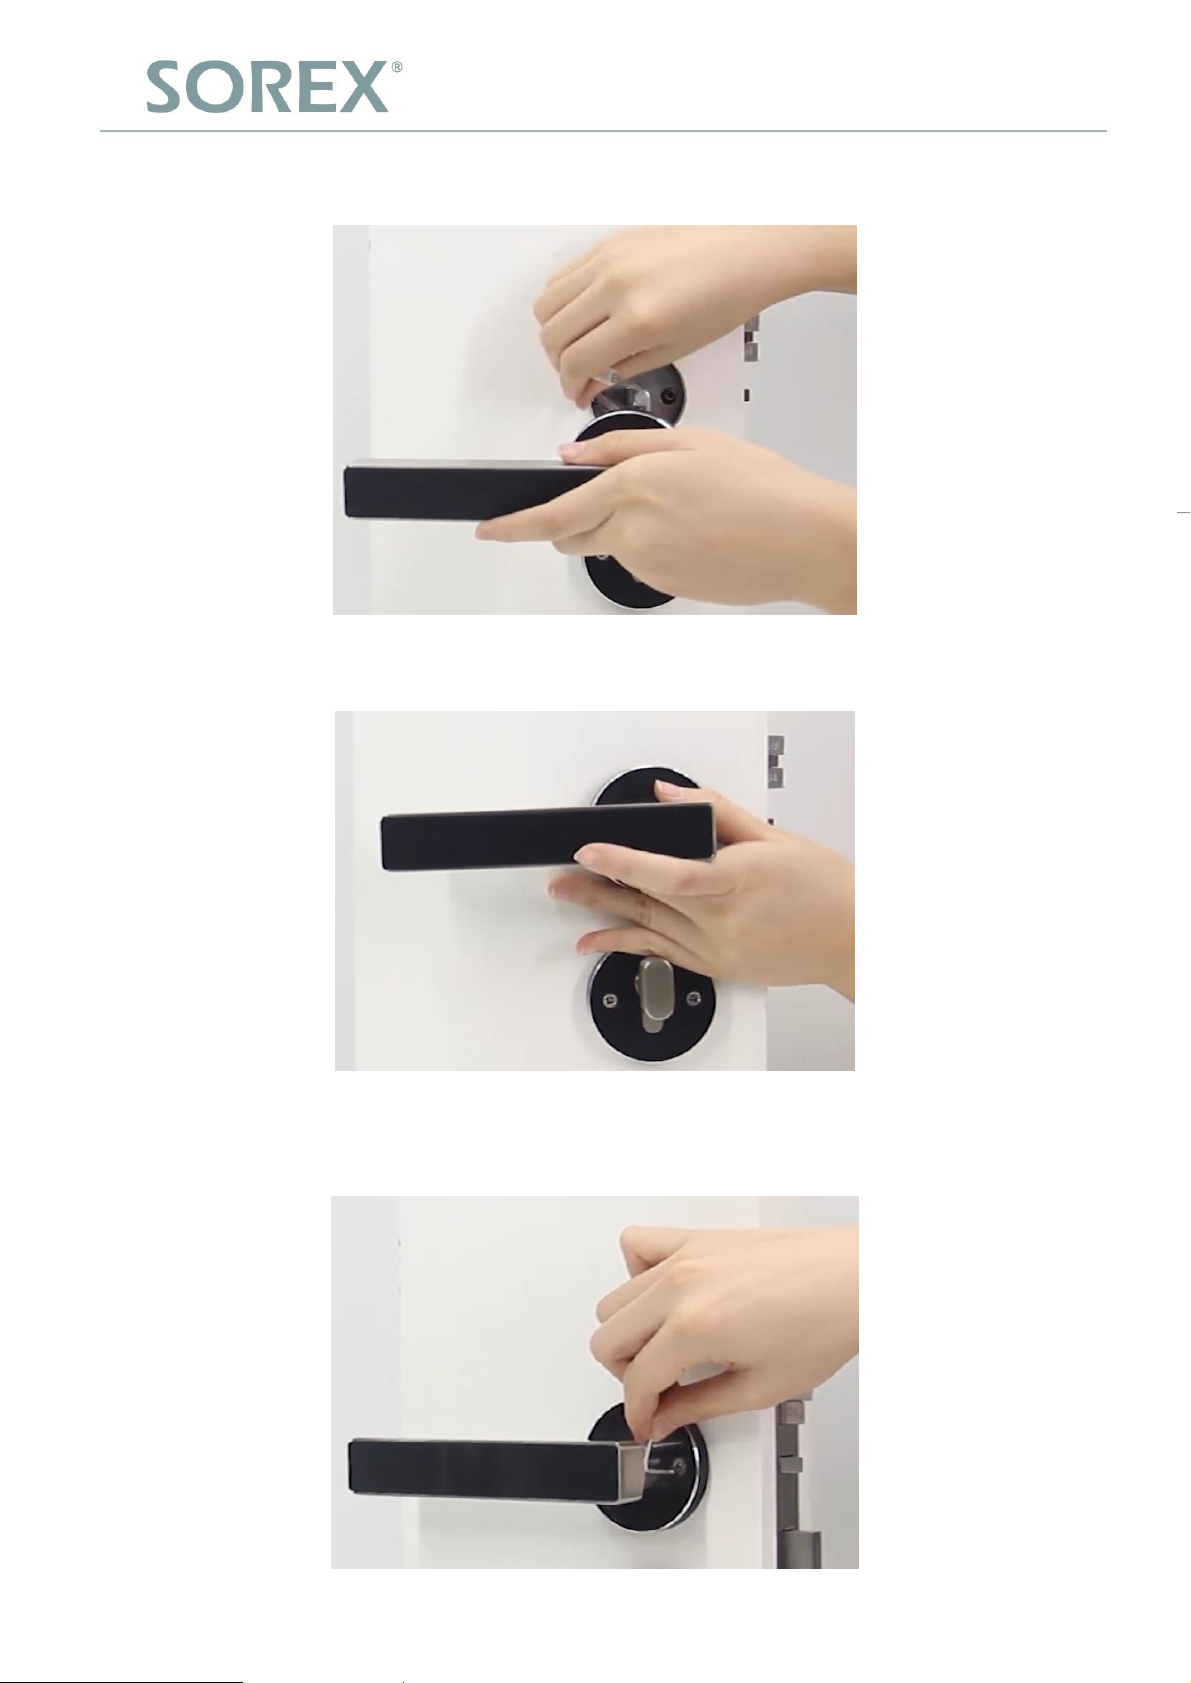
Wickeln Sie das Verbindungskabel vorsichtig um den Vierkant und versenken es in der
Ausfräsung:
Stecken Sie den inneren Türgriff auf den Vierkant:
Befestigen Sie den inneren Türgriff mit den Schrauben Nr. 3 auf dem Vierkant:
6
Page 10
SOREX wireless Solutions GmbH
Technologie- und Forschungszentrum
Viktor-Kaplan-Straße 2,B
2700 Wiener Neustadt, Österreich
UID ATU57865279
Bank Raiffeisenbank Pittental
IBAN AT223264700000052324
BIC RLNWATW1647
T +43 2622 320130
F +43 2622 3201315
@
w³ www.sorex-schliesssystem.com
SOREX wireless Solutions GmbH
Technologie- und Forschungszentrum
Viktor-Kaplan-Straße 2,B
2700 Wiener Neustadt, Österreich
UID ATU57865279
Bank Raiffeisenbank Pittental
IBAN AT223264700000052324
BIC RLNWATW1647
T +43 2622 320130
F +43 2622 3201315
@
w³ www.sorex-schliesssystem.com
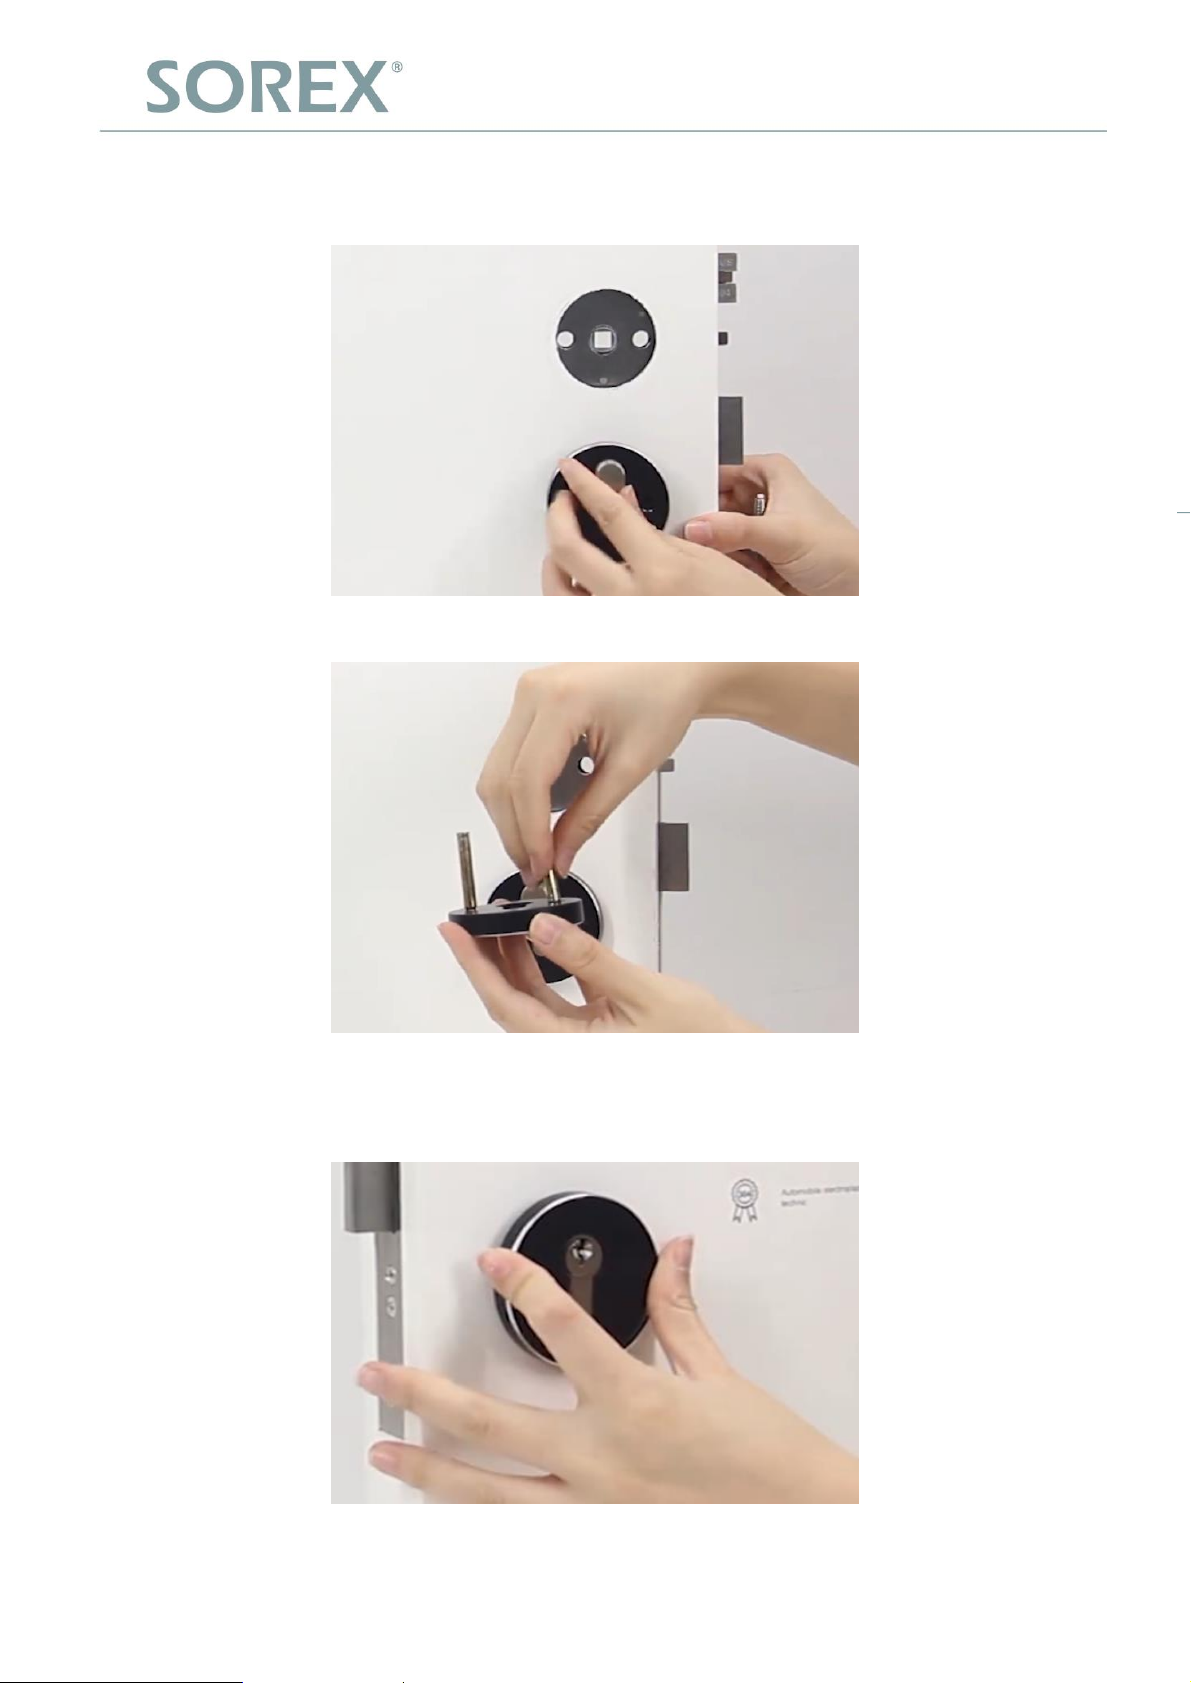
2.3. Installation Türrosette
Stecken Sie die innere Rosette auf den Zylinder:
Deutsch
Schrauben Sie 2 Verlängerungsadapter in die äußere Türrosette:
Stecken die äußere Türrosette auf den Zylinder:
7
Page 11
SOREX wireless Solutions GmbH
Technologie- und Forschungszentrum
Viktor-Kaplan-Straße 2,B
2700 Wiener Neustadt, Österreich
UID ATU57865279
Bank Raiffeisenbank Pittental
IBAN AT223264700000052324
BIC RLNWATW1647
T +43 2622 320130
F +43 2622 3201315
@
w³ www.sorex-schliesssystem.com
SOREX wireless Solutions GmbH
Technologie- und Forschungszentrum
Viktor-Kaplan-Straße 2,B
2700 Wiener Neustadt, Österreich
UID ATU57865279
Bank Raiffeisenbank Pittental
IBAN AT223264700000052324
BIC RLNWATW1647
T +43 2622 320130
F +43 2622 3201315
@
w³ www.sorex-schliesssystem.com
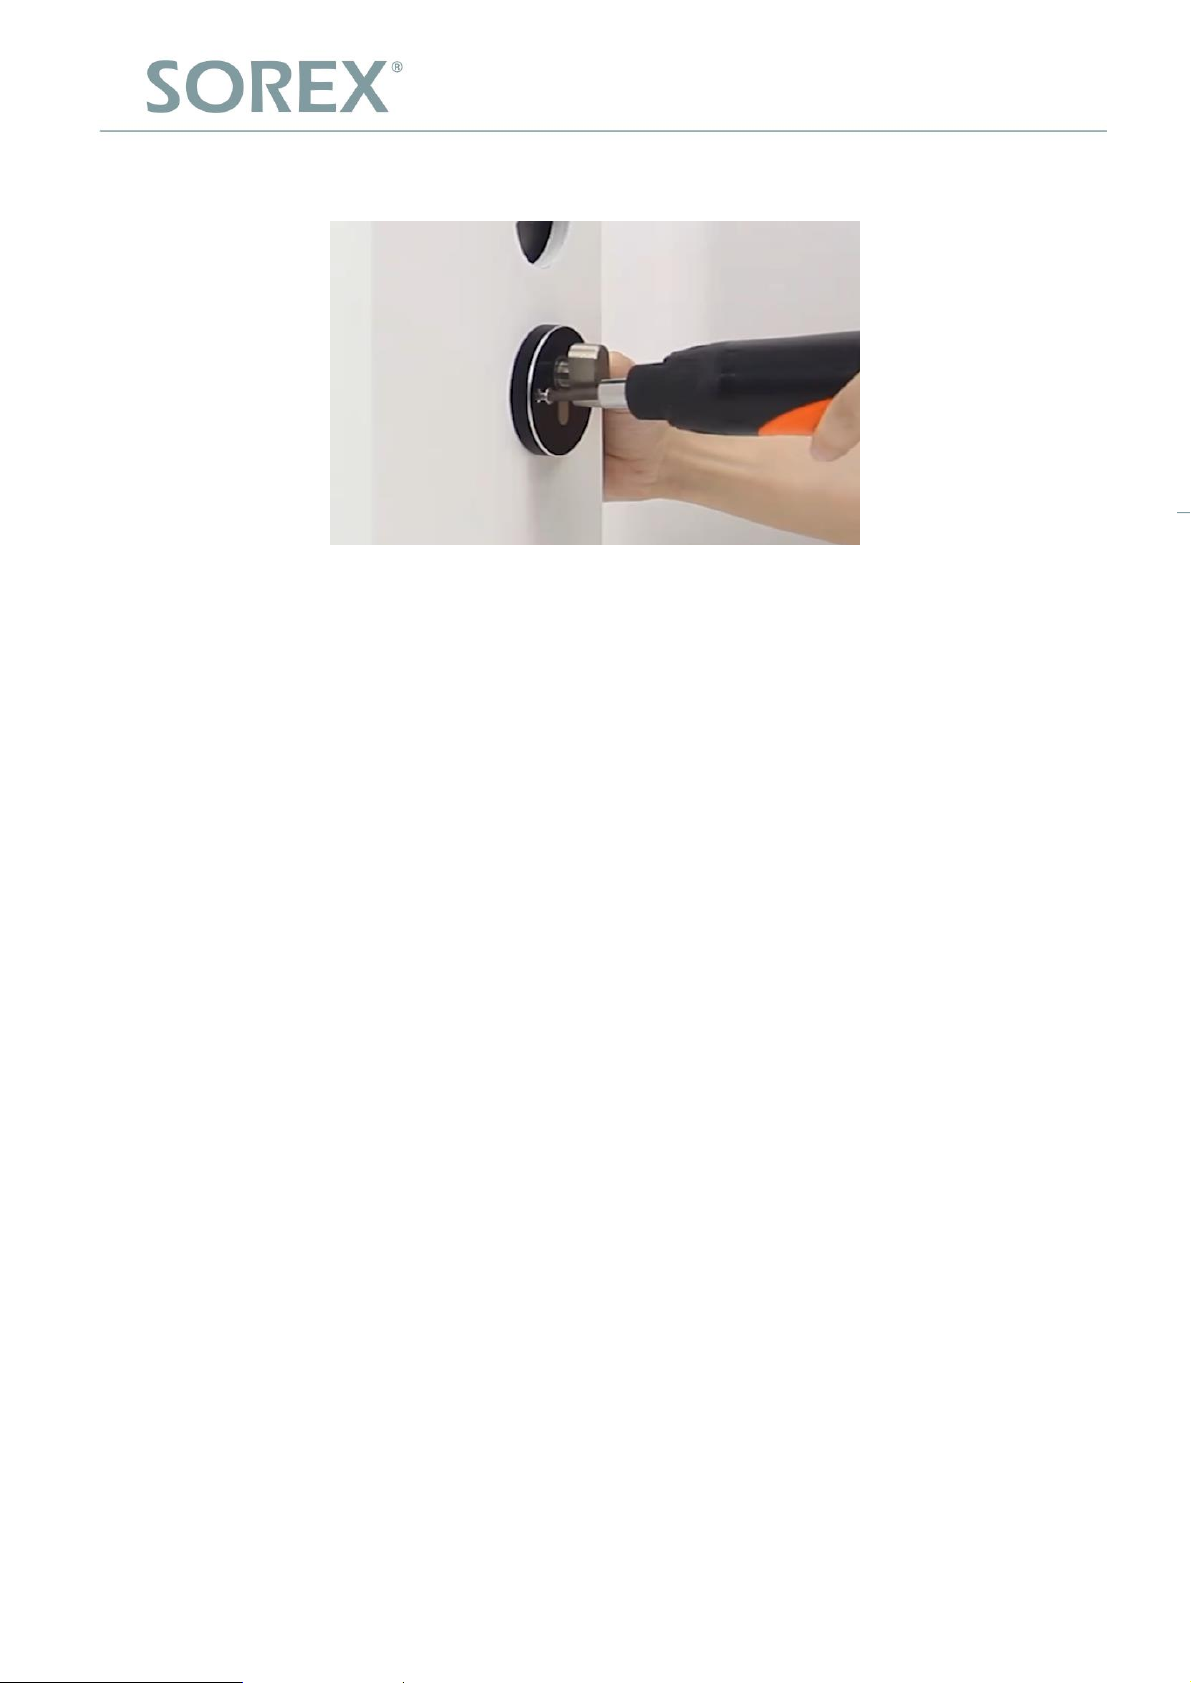
Schrauben Sie die äußere Türrosette mit 2 Schrauben Nr. 2 an:
Deutsch
8
Page 12
SOREX wireless Solutions GmbH
Technologie- und Forschungszentrum
Viktor-Kaplan-Straße 2,B
2700 Wiener Neustadt, Österreich
UID ATU57865279
Bank Raiffeisenbank Pittental
IBAN AT223264700000052324
BIC RLNWATW1647
T +43 2622 320130
F +43 2622 3201315
@
w³ www.sorex-schliesssystem.com
SOREX wireless Solutions GmbH
Technologie- und Forschungszentrum
Viktor-Kaplan-Straße 2,B
2700 Wiener Neustadt, Österreich
UID ATU57865279
Bank Raiffeisenbank Pittental
IBAN AT223264700000052324
BIC RLNWATW1647
T +43 2622 320130
F +43 2622 3201315
@
w³ www.sorex-schliesssystem.com
Deutsch
Smartphone App
3.
3.1. Installation
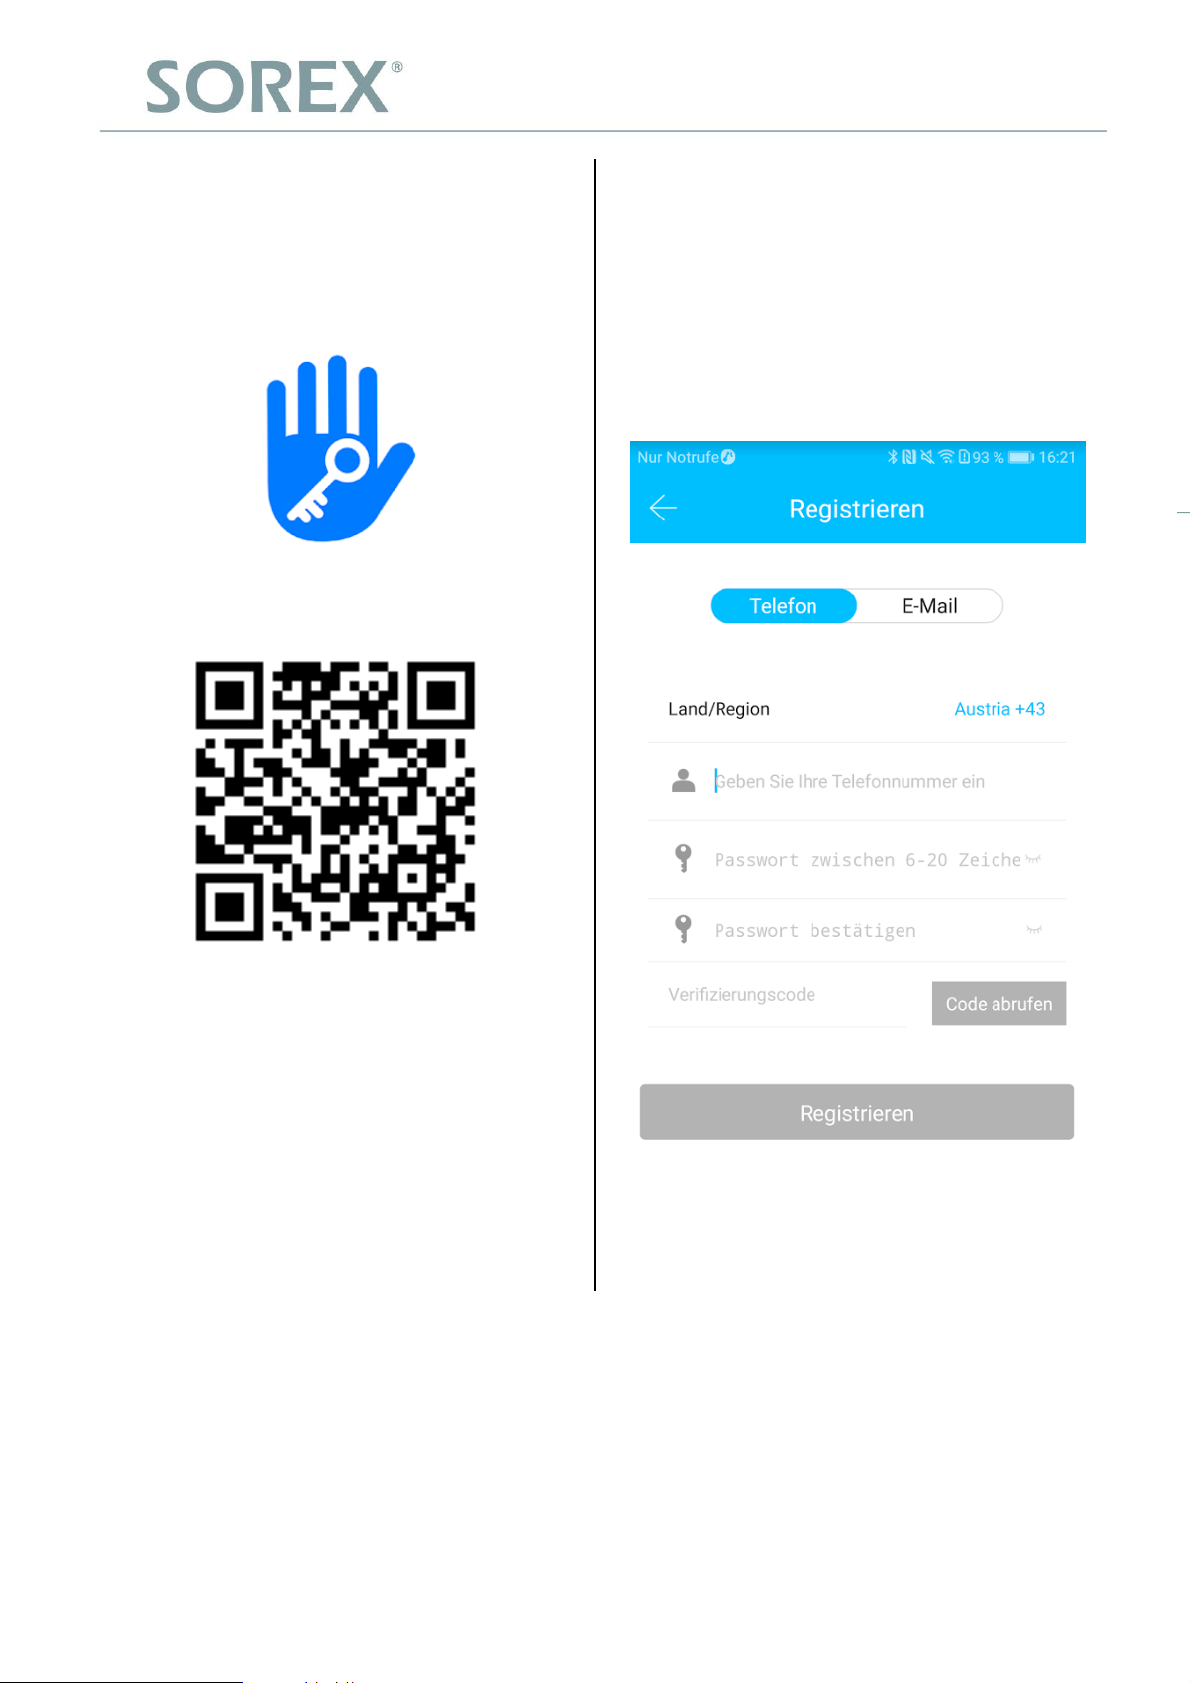
Suchen Sie im Google Play Store oder
Apple Store nach der App „TTLock“.
Oder scannen Sie folgenden QR-Code:
3.2. Registrierung
Registrieren Sie sich mit Ihrer E-Mail
Adresse oder Telefonnummer. Dies ist
wichtig, damit Sie bei Verlust Ihres
Smartphones oder Passwortes den Zugriff
auf den SOREX FLEX Bluetooth Türgriff
wieder herstellen können.
9
Page 13
SOREX wireless Solutions GmbH
Technologie- und Forschungszentrum
Viktor-Kaplan-Straße 2,B
2700 Wiener Neustadt, Österreich
UID ATU57865279
Bank Raiffeisenbank Pittental
IBAN AT223264700000052324
BIC RLNWATW1647
T +43 2622 320130
F +43 2622 3201315
@
w³ www.sorex-schliesssystem.com
SOREX wireless Solutions GmbH
Technologie- und Forschungszentrum
Viktor-Kaplan-Straße 2,B
2700 Wiener Neustadt, Österreich
UID ATU57865279
Bank Raiffeisenbank Pittental
IBAN AT223264700000052324
BIC RLNWATW1647
T +43 2622 320130
F +43 2622 3201315
@
w³ www.sorex-schliesssystem.com
Deutsch
3.3. Ersteinrichtung
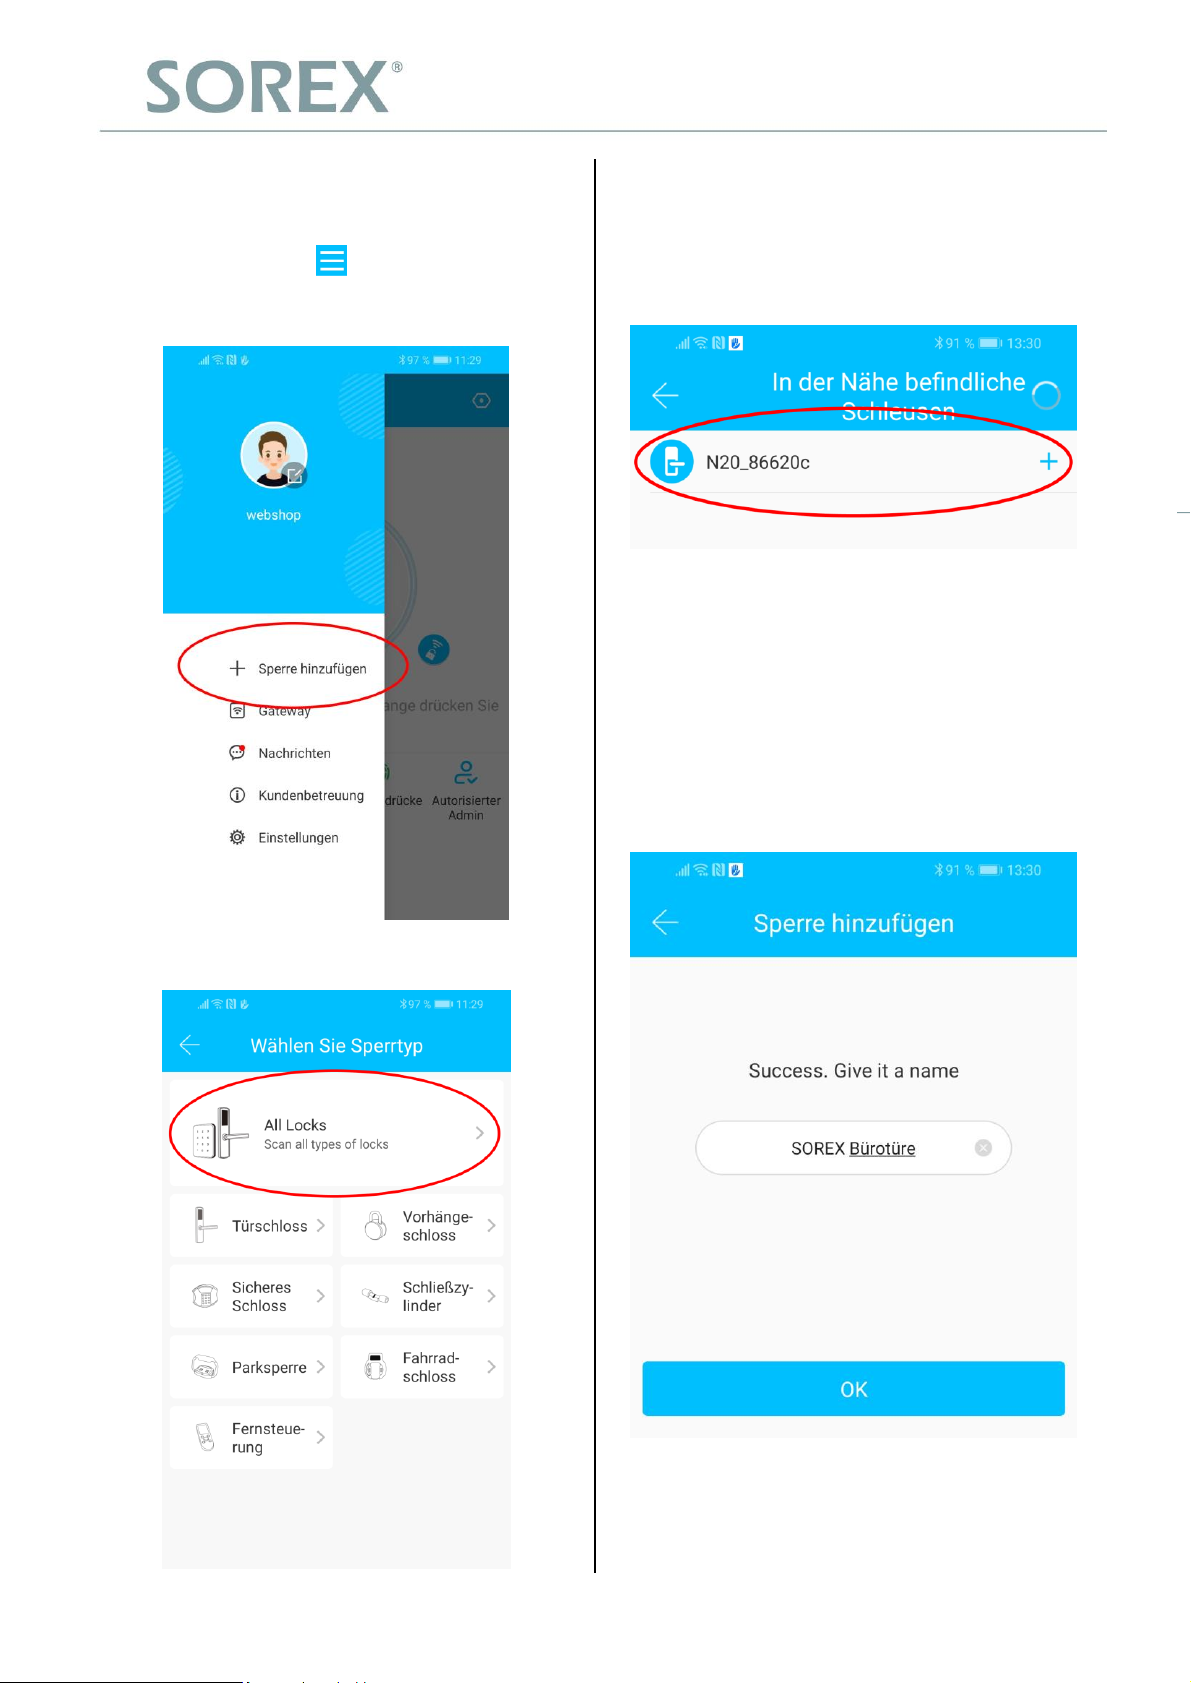
Drücken Sie auf der Hauptseite zunächst
links oben auf . Im sich öffnenden
Menü drücken Sie bitte auf "Sperre
hinzufügen".
Es wird nun nach in der Nähe
befindlichen Schlössern gesucht.
Drücken Sie bitte auf das gefundene
Schloss.
Achtung: Damit das Schloss gefunden
werden kann, müssen Sie dieses
aufwecken, indem Sie einen Finger an
den Fingerprintsensor halten.
Nun können Sie für Ihr Schloss einen
sprechenden Namen vergeben und die
Einrichtung mit "OK" abschließen.
Es öffnet sich eine Seite auf welcher Sie
bitte "All Locks" auswählen.
10
Page 14
SOREX wireless Solutions GmbH
Technologie- und Forschungszentrum
Viktor-Kaplan-Straße 2,B
2700 Wiener Neustadt, Österreich
UID ATU57865279
Bank Raiffeisenbank Pittental
IBAN AT223264700000052324
BIC RLNWATW1647
T +43 2622 320130
F +43 2622 3201315
@
w³ www.sorex-schliesssystem.com
SOREX wireless Solutions GmbH
Technologie- und Forschungszentrum
Viktor-Kaplan-Straße 2,B
2700 Wiener Neustadt, Österreich
UID ATU57865279
Bank Raiffeisenbank Pittental
IBAN AT223264700000052324
BIC RLNWATW1647
T +43 2622 320130
F +43 2622 3201315
@
w³ www.sorex-schliesssystem.com
Deutsch
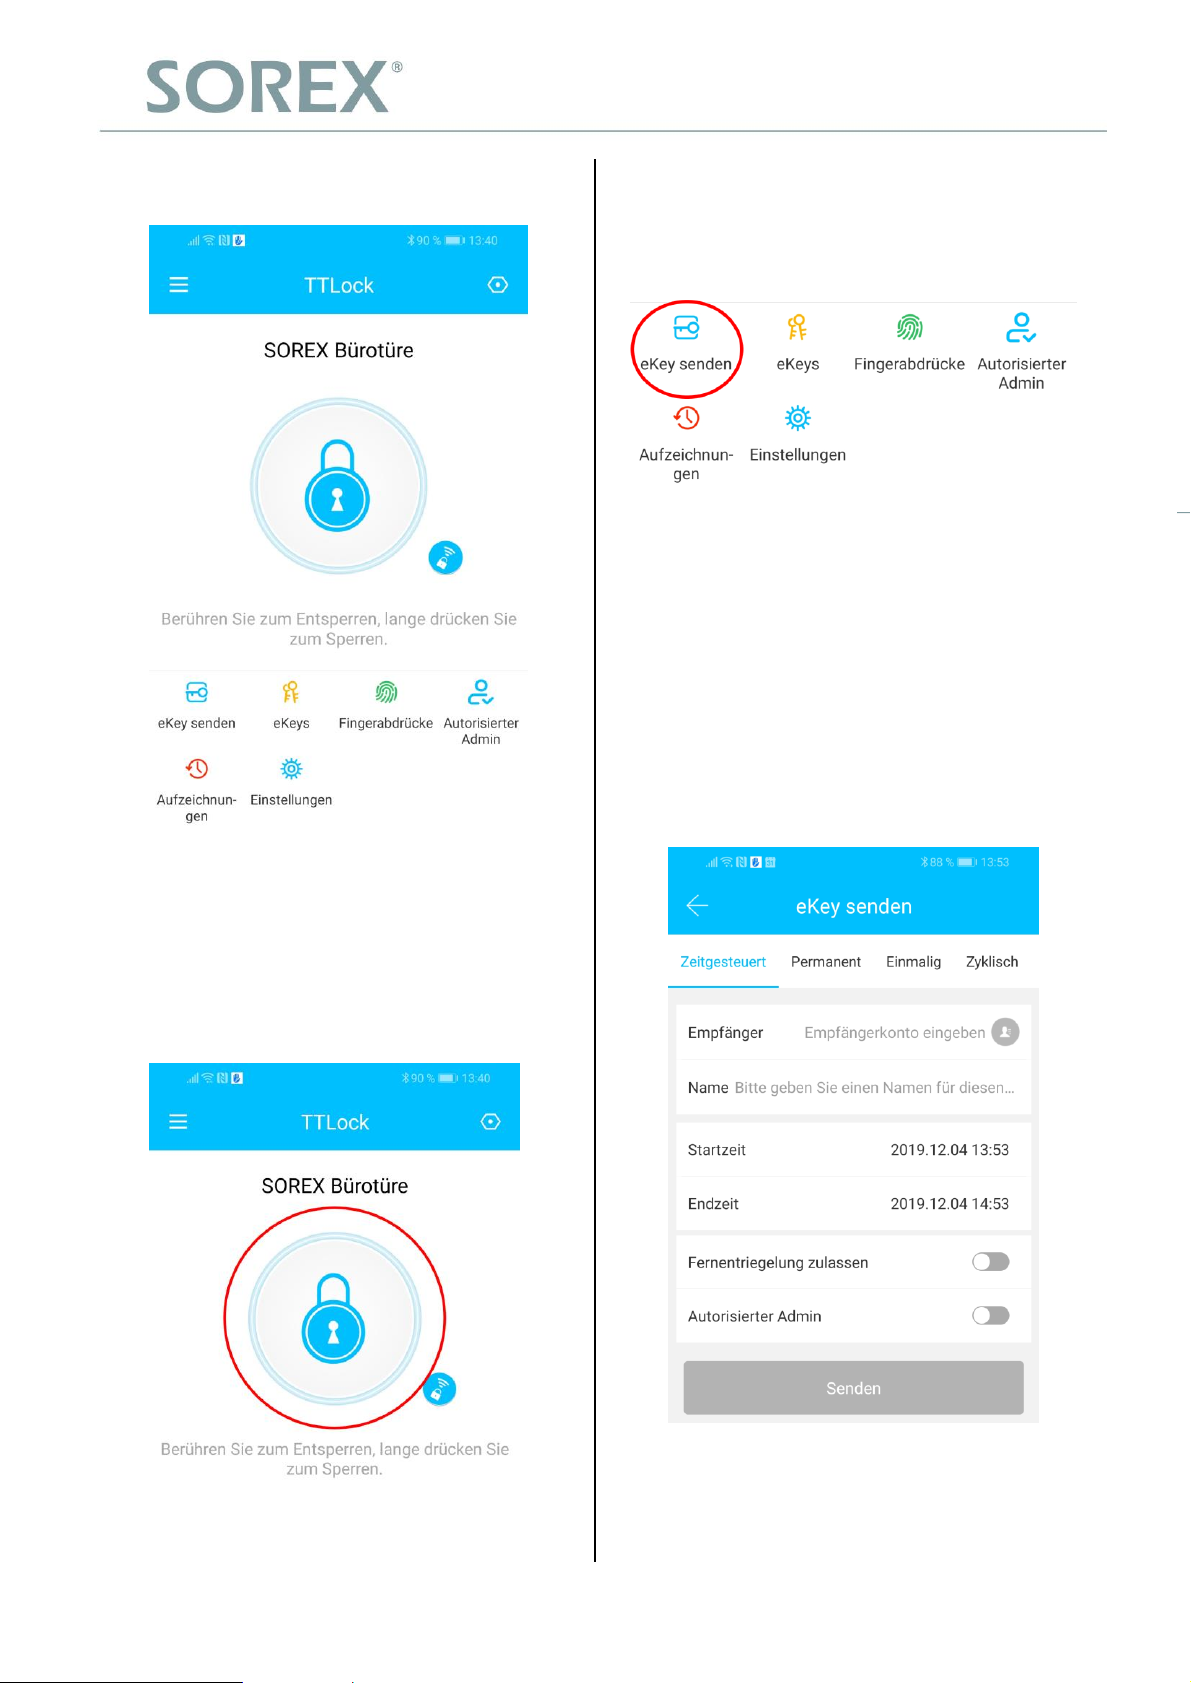
Sie sehen nun Ihr Schloss auf der
Hauptseite.
3.4.2. Benutzer einladen
Um Benutzer zur App einzuladen, drücken
Sie bitte zunächst auf der Startseite auf
"eKey senden".
Es erscheint ein Fenster in dem Sie 4
verschiedene Optionen haben, um Zutritt
zu gewähren:
o
Zeitgesteuert: Von-Bis Zeitraum
o
Permanent: Permanenter Zutritt
o
Einmalig: Zutritt gilt für einmalige
Öffnung
o
Zyklisch: Wiederkehrender Zutritt,
z.B. jede Woche Mo-Fr
3.4. Funktionen
3.4.1. Öffnung via Bluetooth
Über den großen Schlossbutton können
Sie ihr Schloss innerhalb von Bluetooth
Reichweite entsperren.
Sie müssen hierbei immer das
Empfängerkonto (Telefonnummer oder
E-Mail) und den Namen angeben.
11
Page 15
SOREX wireless Solutions GmbH
Technologie- und Forschungszentrum
Viktor-Kaplan-Straße 2,B
2700 Wiener Neustadt, Österreich
UID ATU57865279
Bank Raiffeisenbank Pittental
IBAN AT223264700000052324
BIC RLNWATW1647
T +43 2622 320130
F +43 2622 3201315
@
w³ www.sorex-schliesssystem.com
SOREX wireless Solutions GmbH
Technologie- und Forschungszentrum
Viktor-Kaplan-Straße 2,B
2700 Wiener Neustadt, Österreich
UID ATU57865279
Bank Raiffeisenbank Pittental
IBAN AT223264700000052324
BIC RLNWATW1647
T +43 2622 320130
F +43 2622 3201315
@
w³ www.sorex-schliesssystem.com
Deutsch
Zusätzlich können Sie weitere
Informationen angeben wie z.B. die
Zeitspanne, in welcher der Zutritt gültig
sein soll. Abschließend drücken Sie auf
"Senden" um die Einladung zu versenden.
Anmerkung: Über die Option
"Fernentriegelung zulassen" können Sie
festlegen, ob der Nutzer auch via
Gateway öffnen darf. Mehr dazu unter
3.5. Gateway.
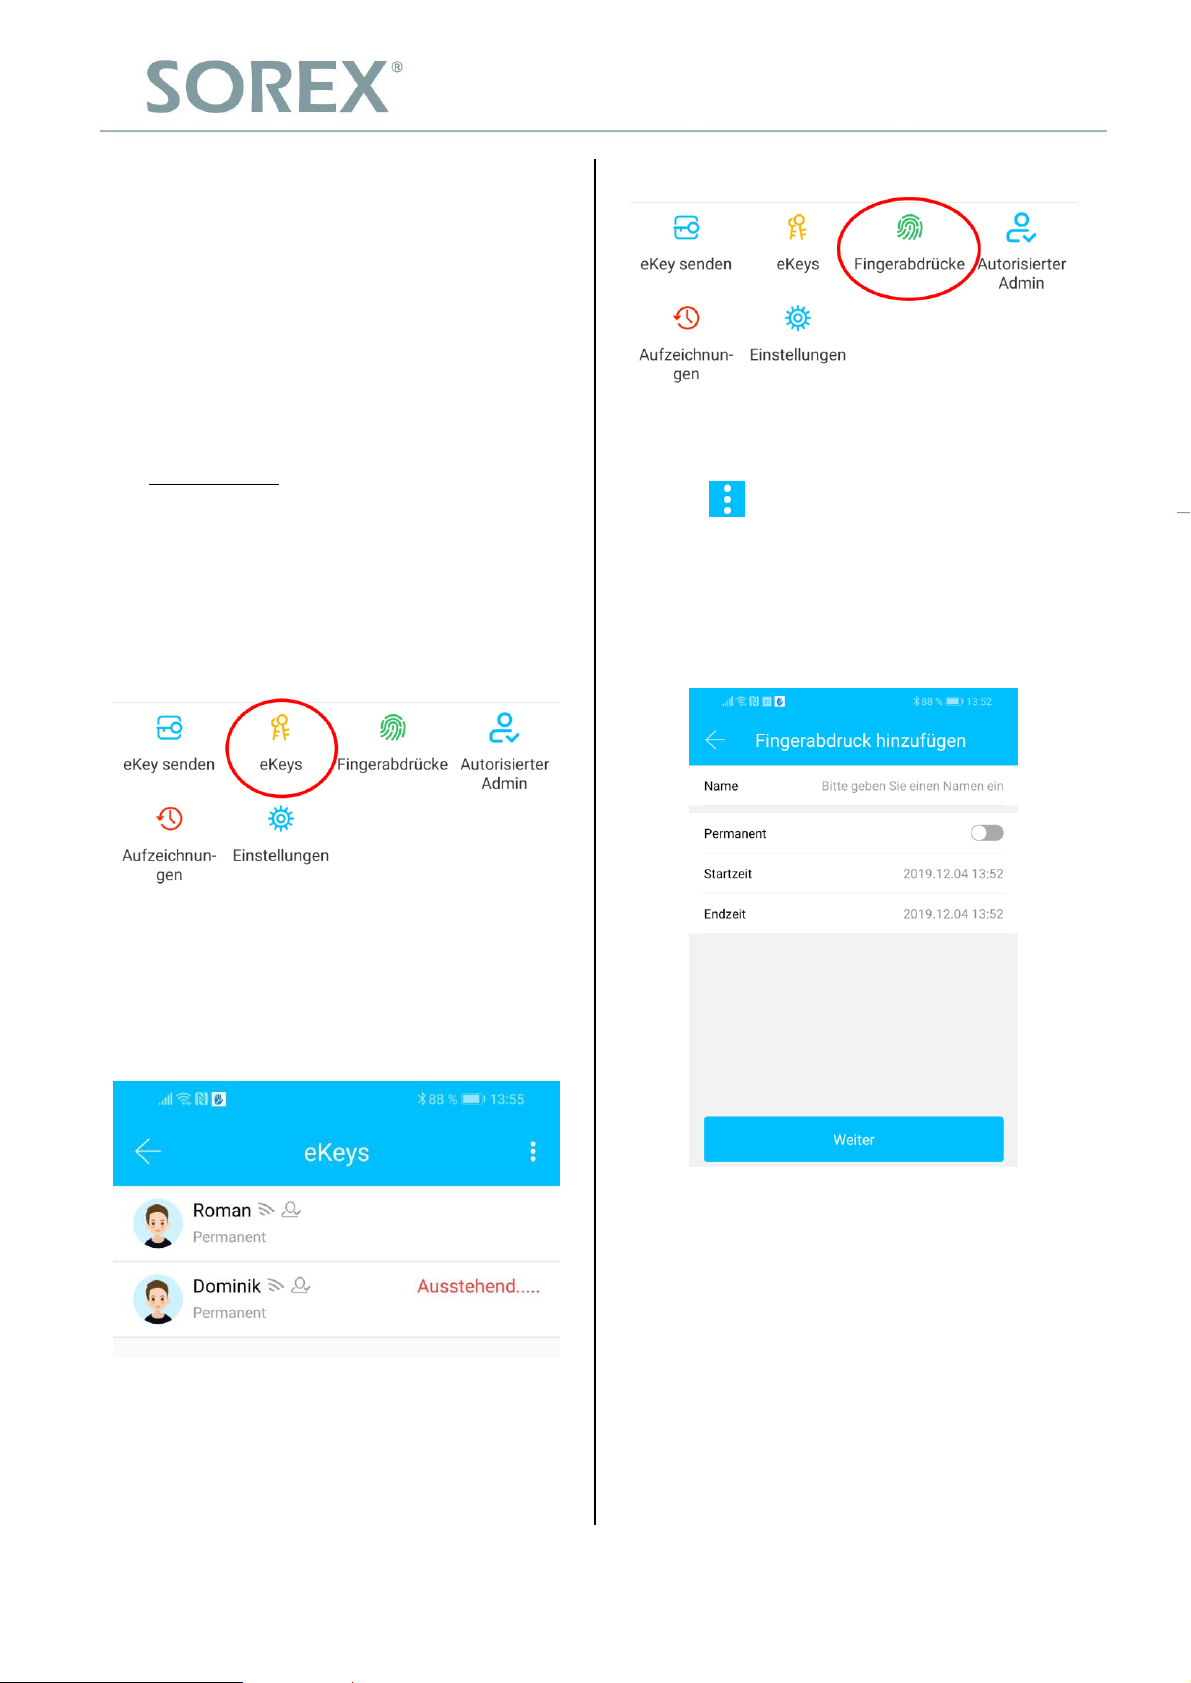
3.4.3. Benutzer entfernen
Um Benutzer wieder zu entfernen, rufen
Sie zunächst über "eKeys" die
Benutzerliste auf.
3.4.4. Fingerabdruck anlernen
Drücken Sie zunächst auf der Startseite
auf "Fingerabdrücke" und anschließend
auf und "Fingerabdruck hinzufügen".
Nun können Sie einen Namen eingeben
und auswählen ob der Benutzer
permanenten oder zeitlich begrenzten
Zutritt hat.
Anschließend drücken Sie auf den
entsprechenden Benutzer, um diesen
auszuwählen.
Es öffnet sich ein Fenster mit
Benutzerinformationen. Um den Benutzer
zu löschen, drücken Sie den roten
"Löschen"-Button.
Nach einem Klick auf "Weiter" folgen Sie
bitte den Anweisungen in der App um den
Finger anzulernen.
12
Page 16
SOREX wireless Solutions GmbH
Technologie- und Forschungszentrum
Viktor-Kaplan-Straße 2,B
2700 Wiener Neustadt, Österreich
UID ATU57865279
Bank Raiffeisenbank Pittental
IBAN AT223264700000052324
BIC RLNWATW1647
T +43 2622 320130
F +43 2622 3201315
@
w³ www.sorex-schliesssystem.com
SOREX wireless Solutions GmbH
Technologie- und Forschungszentrum
Viktor-Kaplan-Straße 2,B
2700 Wiener Neustadt, Österreich
UID ATU57865279
Bank Raiffeisenbank Pittental
IBAN AT223264700000052324
BIC RLNWATW1647
T +43 2622 320130
F +43 2622 3201315
@
w³ www.sorex-schliesssystem.com
Deutsch
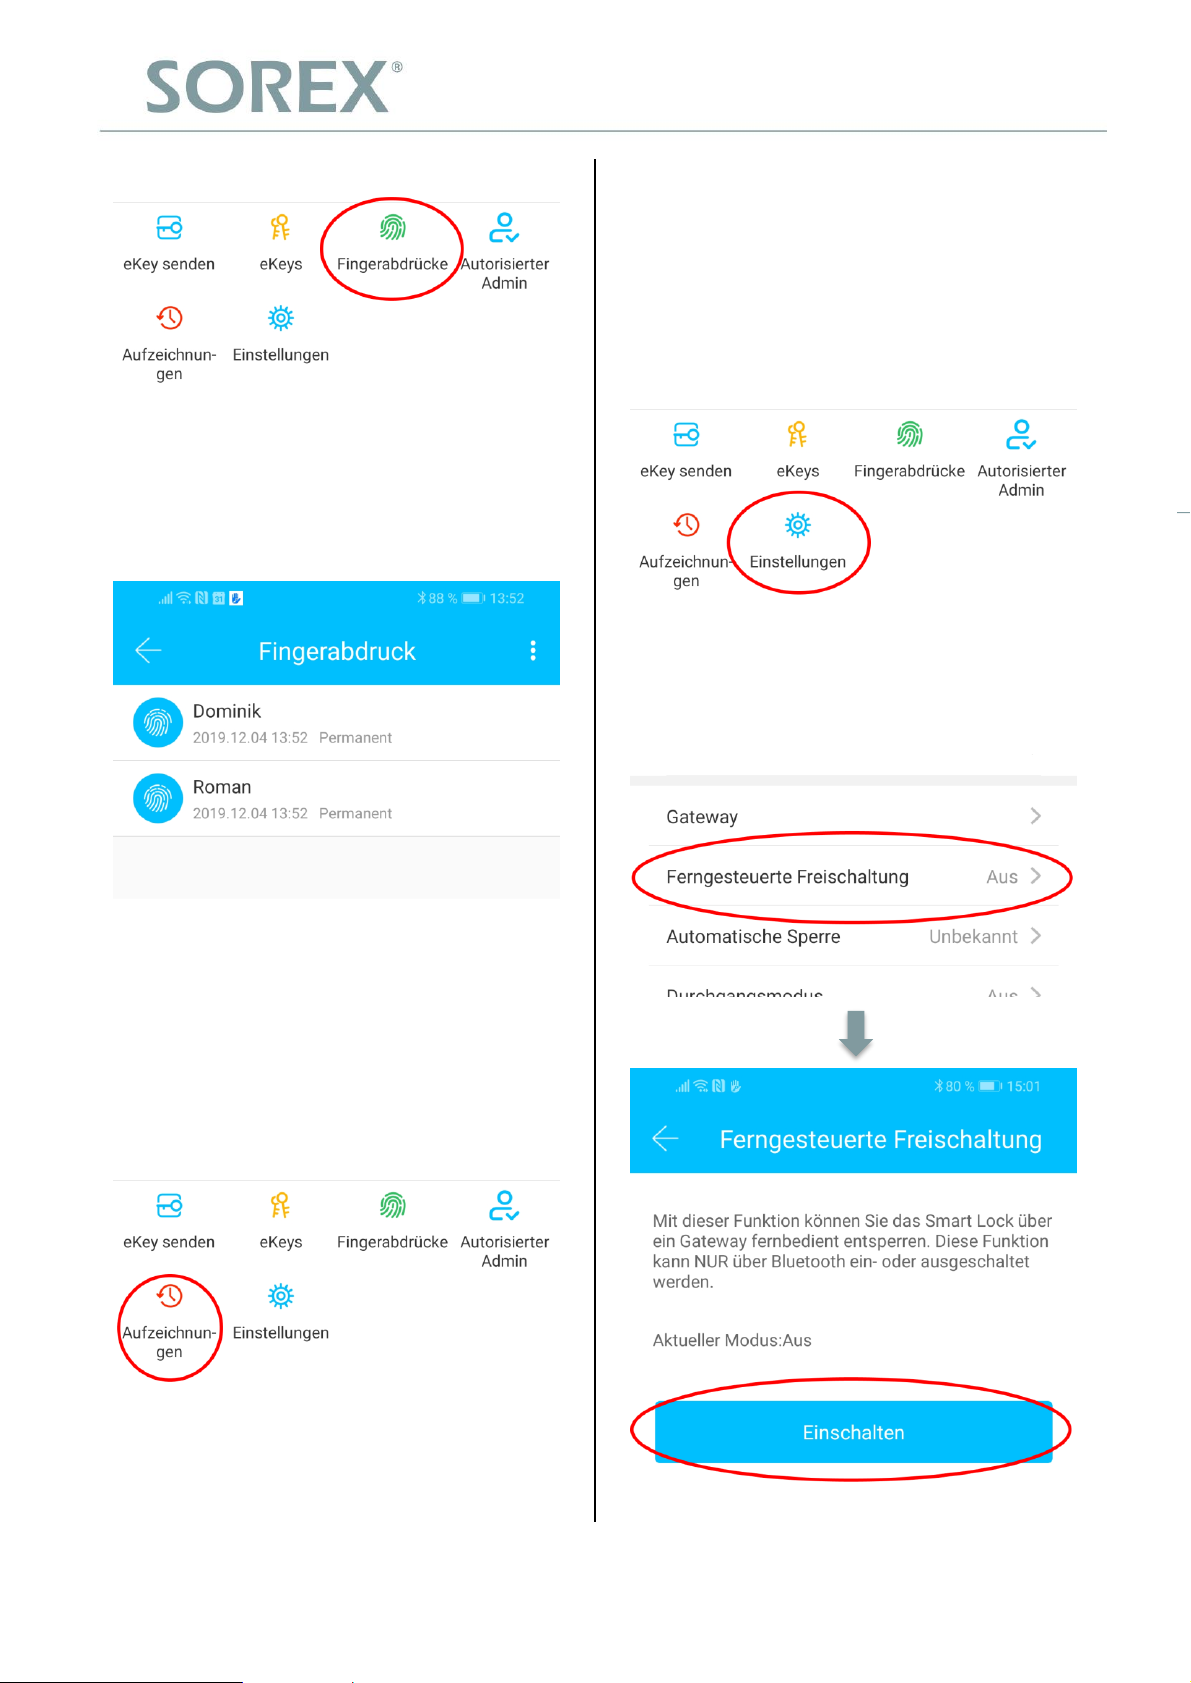
3.4.5. Fingerabdruck löschen
Drücken Sie zunächst auf der Startseite
auf "Fingerabdrücke" und anschließend
auf den zu löschenden Benutzer.
3.5. Gateway
(separat erhältlich)
3.5.1. Schloss vorbereiten
Sie müssen zunächst die ferngesteuerte
Öffnung für Ihr Schloss aktivieren. Hierzu
drücken Sie zunächst "Einstellungen" auf
der Startseite.
Danach wählen Sie "Ferngesteuerte
Freischaltung" aus und drücken auf
"Einschalten".
Im darauffolgenden Fenster drücken Sie
auf "Löschen" um den ausgewählten
Benutzer zu entfernen.
3.4.6. Protokolle auslesen
Um die Protokolle auszulesen drücken
Sie auf der Startseite auf
"Aufzeichnungen".
13
Page 17
SOREX wireless Solutions GmbH
Technologie- und Forschungszentrum
Viktor-Kaplan-Straße 2,B
2700 Wiener Neustadt, Österreich
UID ATU57865279
Bank Raiffeisenbank Pittental
IBAN AT223264700000052324
BIC RLNWATW1647
T +43 2622 320130
F +43 2622 3201315
@
w³ www.sorex-schliesssystem.com
SOREX wireless Solutions GmbH
Technologie- und Forschungszentrum
Viktor-Kaplan-Straße 2,B
2700 Wiener Neustadt, Österreich
UID ATU57865279
Bank Raiffeisenbank Pittental
IBAN AT223264700000052324
BIC RLNWATW1647
T +43 2622 320130
F +43 2622 3201315
@
w³ www.sorex-schliesssystem.com
Deutsch
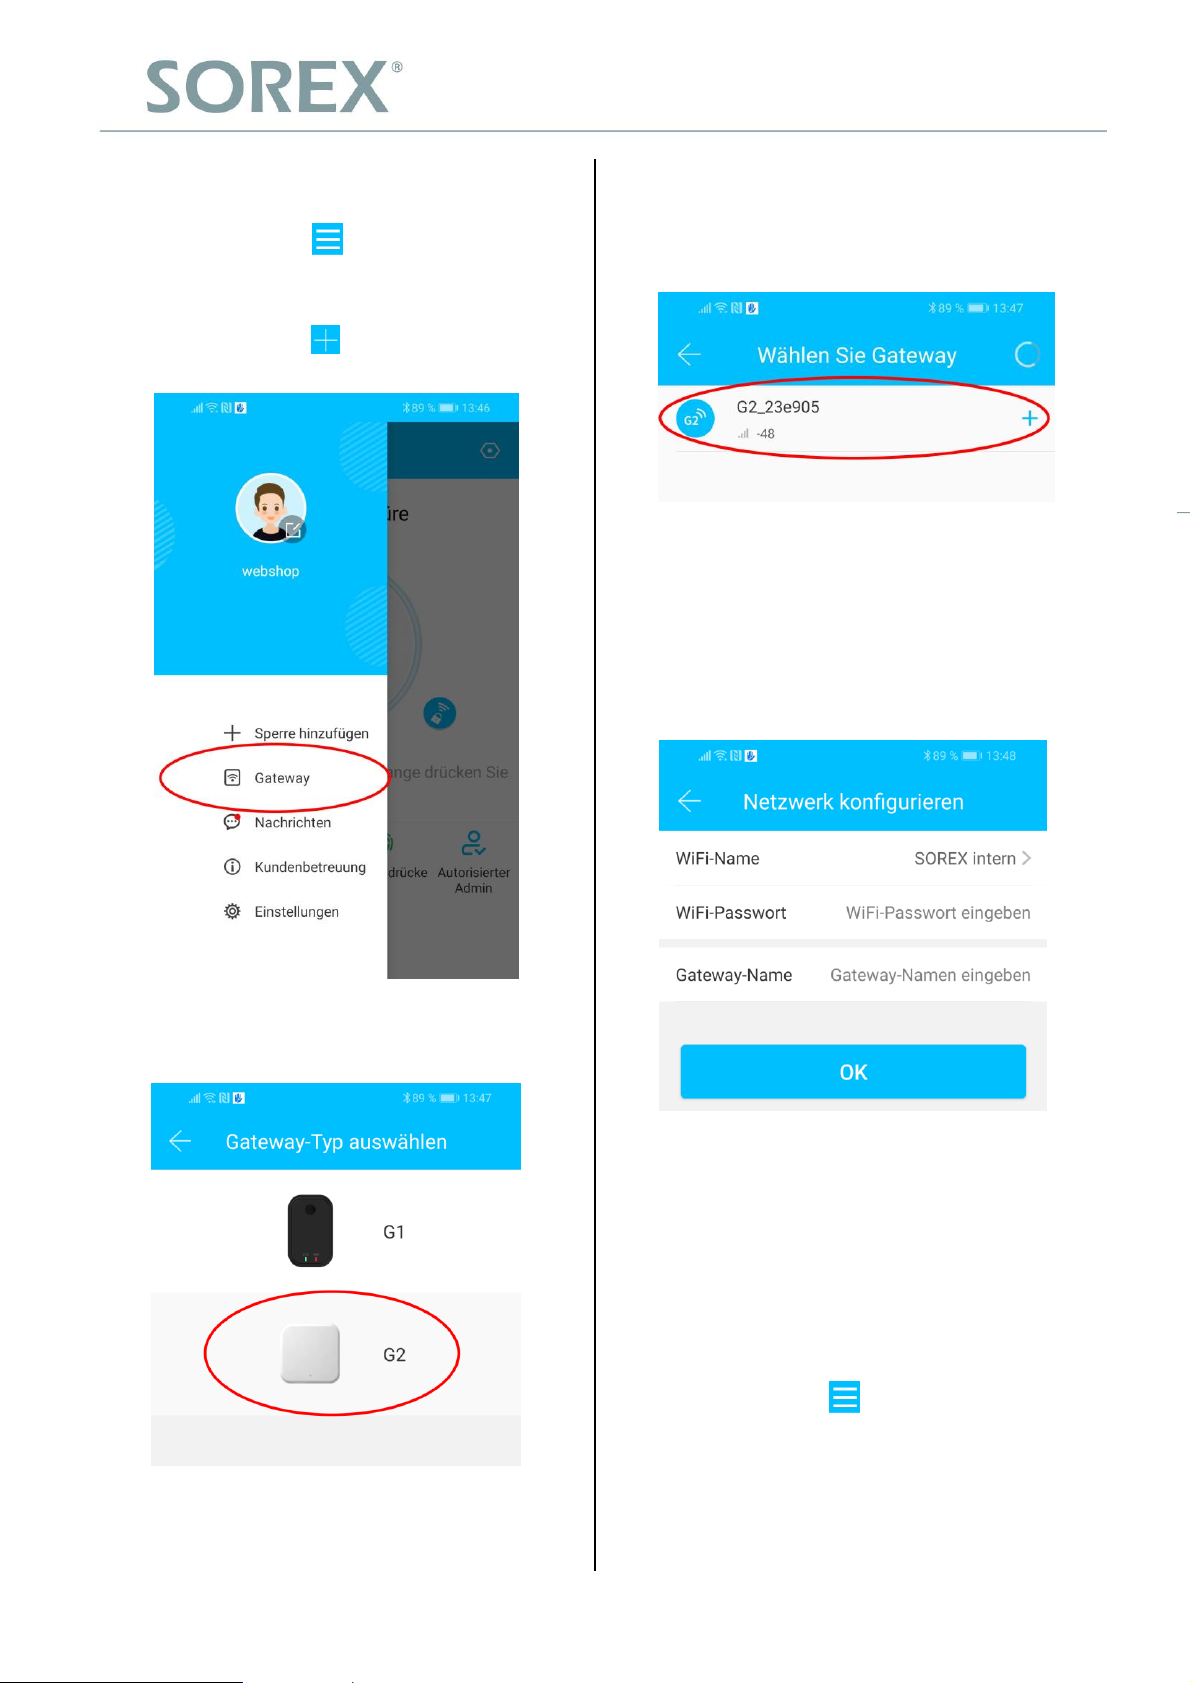
3.5.2. Gateway hinzufügen
Drücken Sie auf der Hauptseite zunächst
links oben auf . Im sich öffnenden
Menü drücken Sie bitte auf "Gateway". Im
anschließenden Fenster drücken Sie
rechts oben auf .
Dies erreichen Sie indem Sie das Gateway
von der Stromversorgung nehmen und
wieder anstecken.
Konfigurieren Sie nun Ihr Gateway indem
Sie das richtige WLAN auswählen, das
dazugehörige WLAN-Passwort eingeben
und dem Gateway einen Namen
zuweisen. Bestätigen Sie den Vorgang
mit "OK".
Wählen Sie im nächsten Fenster "G2" als
Gateway-Typ aus.
Stellen Sie sicher dass die Lampe am
Gateway abwechselnd blau und rot blinkt.
Das Gateway sucht danach automatisch
nach in der Nähe befindlichen Schlössern
und fügt diese zur Fernöffnung hinzu.
Dieser Vorgang kann ein paar Minuten
dauern.
3.5.3. Gateway löschen
Drücken Sie auf der Hauptseite zunächst
links oben auf . Im sich öffnenden
Menü drücken Sie bitte auf "Gateway". Im
anschließenden Fenster wählen Sie das
Gateway aus, welches Sie löschen
möchten.
14
Page 18
SOREX wireless Solutions GmbH
Technologie- und Forschungszentrum
Viktor-Kaplan-Straße 2,B
2700 Wiener Neustadt, Österreich
UID ATU57865279
Bank Raiffeisenbank Pittental
IBAN AT223264700000052324
BIC RLNWATW1647
T +43 2622 320130
F +43 2622 3201315
@
w³ www.sorex-schliesssystem.com
SOREX wireless Solutions GmbH
Technologie- und Forschungszentrum
Viktor-Kaplan-Straße 2,B
2700 Wiener Neustadt, Österreich
UID ATU57865279
Bank Raiffeisenbank Pittental
IBAN AT223264700000052324
BIC RLNWATW1647
T +43 2622 320130
F +43 2622 3201315
@
w³ www.sorex-schliesssystem.com
Deutsch
Nachdem Sie das Gateway ausgewählt
haben, können Sie dieses über den
"Löschen"-Button entfernen.
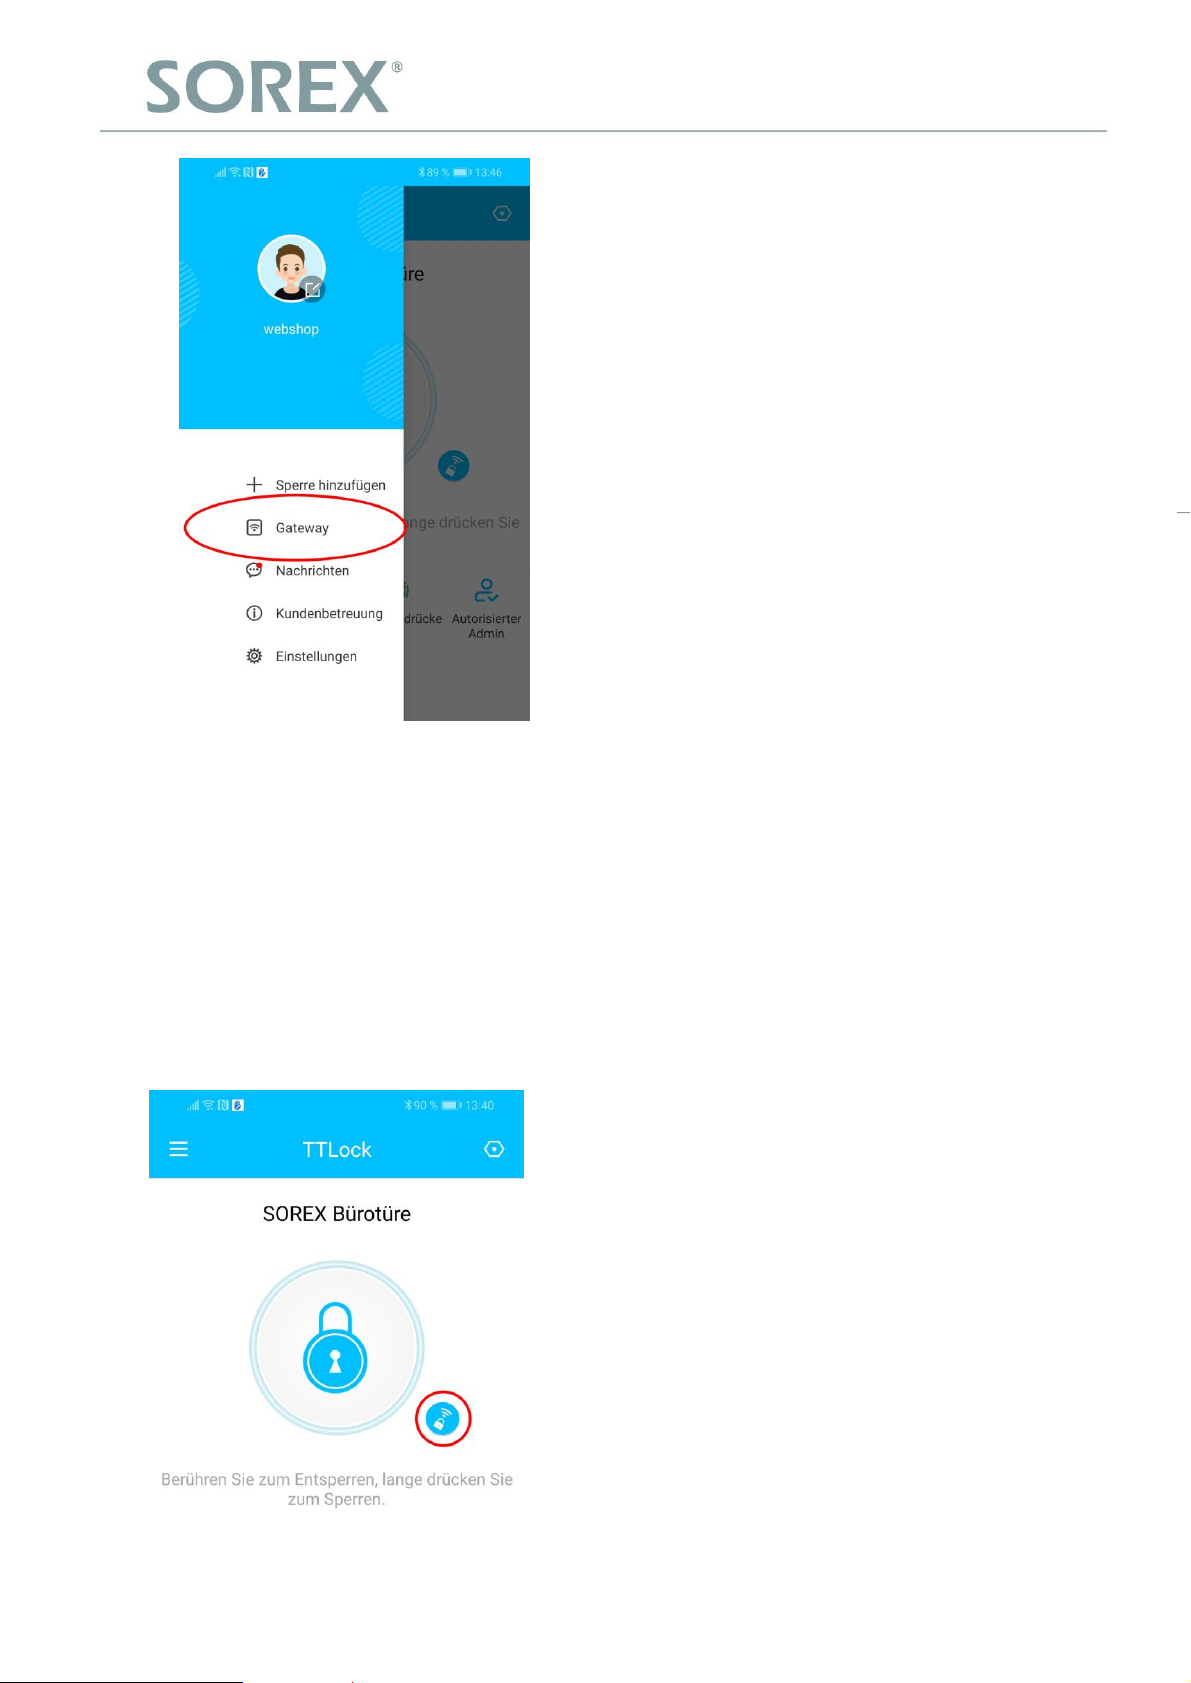
3.5.4. Öffnung via Gateway
Sie können nun auf der Startseite von überall
unterwegs Ihr Schloss öffnen. Sie sind dabei
nicht mehr auf die Bluetooth-Reichweite
begrenzt.
15
Page 19

SOREX wireless Solutions GmbH
Technologie- und Forschungszentrum
Viktor-Kaplan-Straße 2,B
2700 Wiener Neustadt, Österreich
UID ATU57865279
Bank Raiffeisenbank Pittental
IBAN AT223264700000052324
BIC RLNWATW1647
T +43 2622 320130
F +43 2622 3201315
@
w³ www.sorex-schliesssystem.com
SOREX wireless Solutions GmbH
Technologie- und Forschungszentrum
Viktor-Kaplan-Straße 2,B
2700 Wiener Neustadt, Österreich
UID ATU57865279
Bank Raiffeisenbank Pittental
IBAN AT223264700000052324
BIC RLNWATW1647
T +43 2622 320130
F +43 2622 3201315
@
w³ www.sorex-schliesssystem.com
Impressum
Version 1.0
© Copyright: Jänner 2020
SOREX wireless Solutions GmbH
Technologie- und Forschungszentrum WN
Viktor-Kaplan-Straße 2B
A-2700 Wiener Neustadt
Österreich
T +43 2622 320130
F +43 2622 3201315
@ [email protected]
w³ www.sorex.eu
Page 20

SOREX wireless Solutions GmbH
Technologie- und Forschungszentrum
Viktor-Kaplan-Straße 2,B
2700 Wiener Neustadt, Österreich
UID ATU57865279
Bank Raiffeisenbank Pittental
IBAN AT223264700000052324
BIC RLNWATW1647
T +43 2622 320130
F +43 2622 3201315
@
w³ www.sorex-schliesssystem.com
SOREX wireless Solutions GmbH
Technologie- und Forschungszentrum
Viktor-Kaplan-Straße 2,B
2700 Wiener Neustadt, Österreich
UID ATU57865279
Bank Raiffeisenbank Pittental
IBAN AT223264700000052324
BIC RLNWATW1647
T +43 2622 320130
F +43 2622 3201315
@
w³ www.sorex-schliesssystem.com
© 2019 SOREX wireless Solutions
 Loading...