

Page 1
Wir möchten Ihnen Türen öffnen
V1.0
21.04.2017
SOREX FLEX - Keypad & RFID cylinder
Instruction manual
This document is addressed to users of the SOREX FLEX - Keypad & RFID cylinder, and helps them with the initial installation and usage of the
product.
Product properties
Voltage supply
3xAAA Batteries
Operating temp.
-40°C–80°C
User memory
10 keypad codes &
20 RFID devices
Lifetime Keypad
10 mil. operations
Lifetime Battery
1 year
Weight
500g
Minimum length
Outside: 40 mm
Inside: 30 mm
Maximum length
Outside: 60 mm
Inside:65 mm
Items delivered
Qty.
Name
Image
1
SOREX FLEX
digital cylinder
1
Screwdriver
Product description
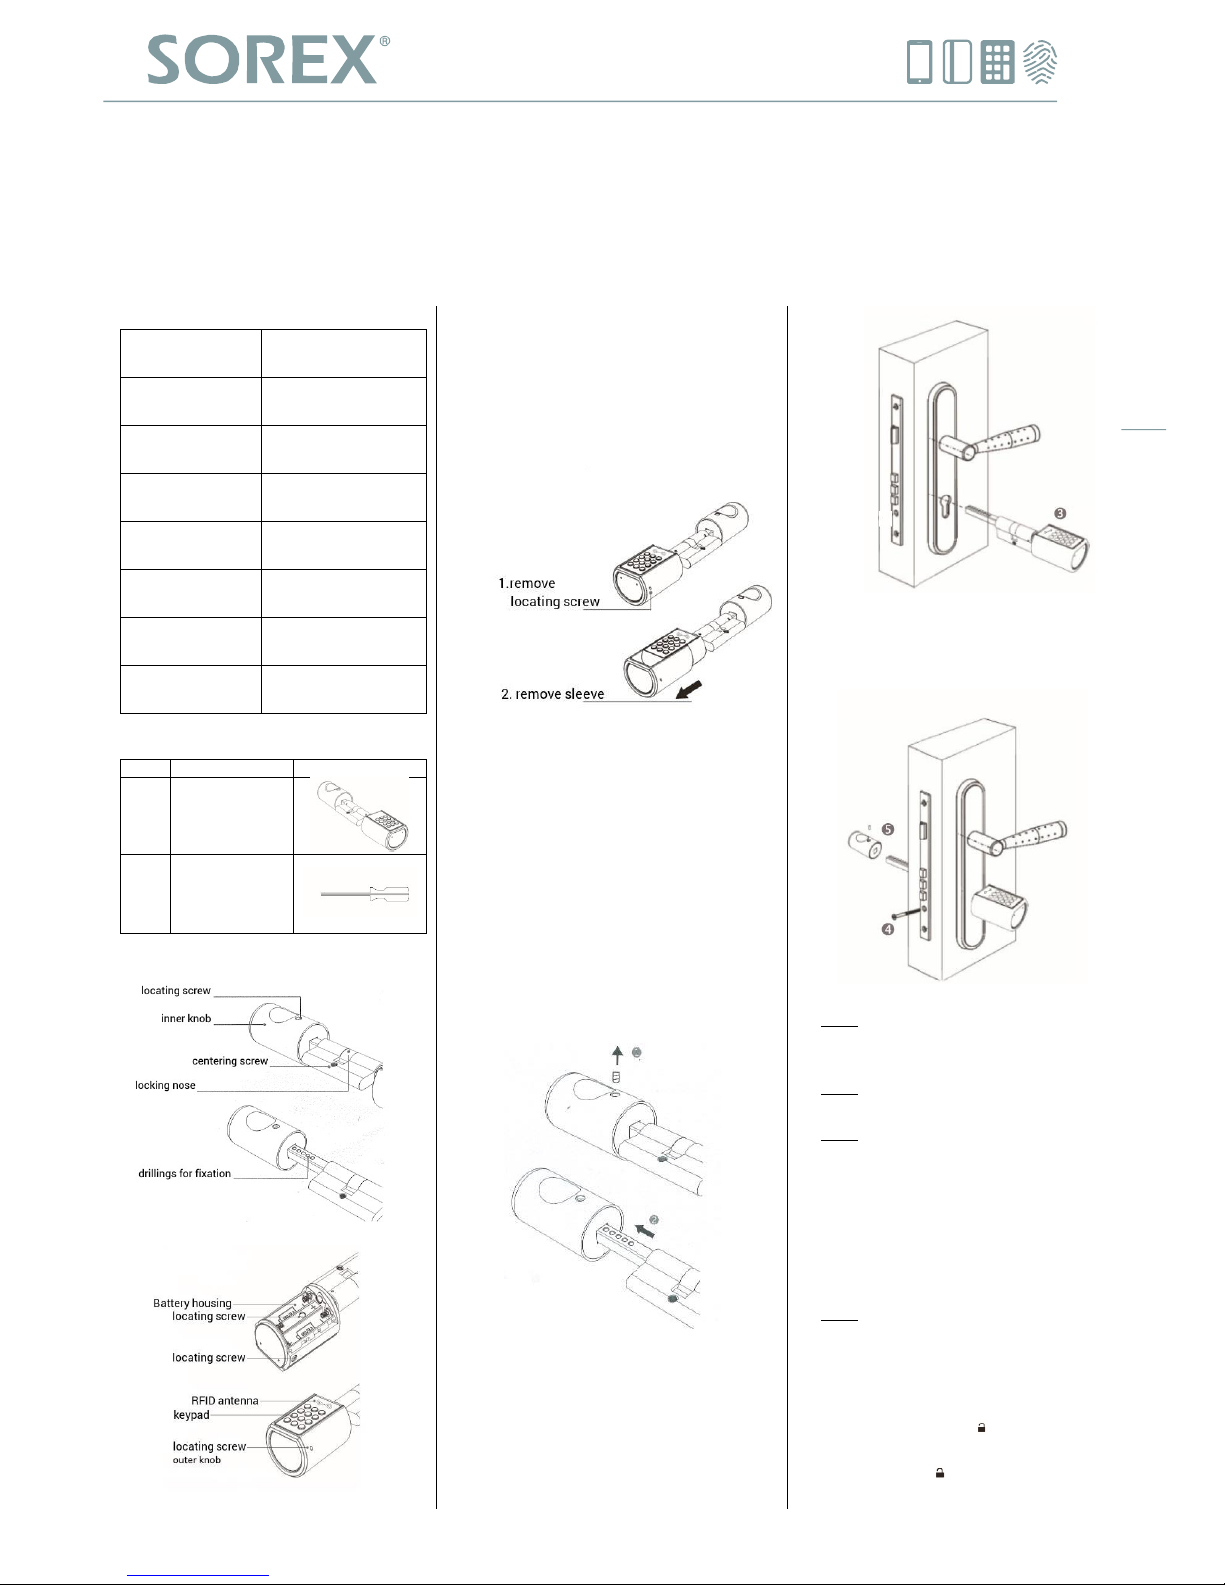
Installation of battery
1. Remove locating screw from outer
knob.
2. Remove sleeve and open the
housing for the batteries. Insert 3 x
AAA batteries. The cylinder is
reassembled in reversed order.
Adjusting the outer knob
1. Open the battery housing as
described above.
2. Remove screw in the middle of the
battery housing.
3. Fit the outer kno b on the spindle at
your desired position. The cylinder is
reassembled in reversed order.
Installation
1. Remove screw on inner knob.
2. Remove inner knob.
3. Insert cylinder into the lock. The
position of the cylinder in the lock is
correct when the latch can be
operated via the spindle of the
cylinder.
4. Fixate cylinder in the lock with a
centering screw.
5. Fit the inner knob on the spindle at
your desired position.
Operation
Note: There can be up to 10 codes and 20
RFID devices linked to the digital cylinder.
There can only be one administrator code.
Note: Keypad codes have to be at least 6
digits long.
Note: Before an administrator code has
been configured, the cylinder is in delivery
condition. While in delivery condition, it is
always possible to cause an op ening
action with the combination 123456 or
any RFID medium.
1. Configure administrator code
Note: The cylinder has to be in delivery
condition, before an administrator code
can be configured
Press any key on the keypad. The
keypad lights up.
Press the key and enter the
combination 123456. Confirm your
entry with . The keypad flashes
seven times.
Page 2
Enter your desired code and confirm
with . Repeat your code and
confirm your entry again with .
2. Configure user code
Note: Before a user code can be
configured, an administrator code has to
be existent
Press any key on the keypad. The
keypad lights up.
Enter the combination +
<administrator code> + + 1. The
keypad flashes once.
Enter your desired code and confirm
with . Enter your code again and
confirm with .
3. Delete user code
Press any key on the keypad. The
keypad lights up.
Enter the combination +
<administrator code> + + 2. The
keypad flashes twice.
Enter the code that should be
deleted and confirm with .
4. Configure RFID medium
Note: Write down the order in which the
RFID media are configured! The media are
assigned internally with an ID number,
according to the order they are
configured. E.g.: the second medium that
is configured, is assigned with the ID
number 2.
Note: Before a RFID medium can be
configured, an administrator code has to
be existent
Press any key on the keypad. The
keypad lights up.
Enter the combination +
<administrator code> + + 3. The
keypad flashes three times.
Hold a RFID medium near to the
antenna.
Leave the configuration mode with
Note: Multiple RFID mediums can be
configured, until the configuration mode
is left, by the pressing , or until the
memory is full.
5. Delete RFID media
Press any key on the keypad. The
keypad lights up.
Enter the combination +
<administrator code> + + 4. The
keypad flashes four times.
Enter the ID number of the RFID
medium that should be deleted, and
confirm with .
Note: The ID number of the RFID medium
corresponds to the order it was
configured. E.g.: the second RFID medium
that has been configured is assigned with
the ID number 2.
6. Delete all RFID media
Press any key on the keypad. The
keypad lights up.
Enter the combination +
<administrator code> + + 5. The
keypad flashes five times.
Confirm the deletion with .
7. Delivery condition reset
Note: Through this action all keypad user
and RFID media will be deleted.
Press any key on the keypad. The
keypad lights up.
Enter the combination +
<administrator code> + + 6. The
keypad flashes six times.
Confirm the deletion with .
8. Change locktime
Press any key on the keypad. The
keypad lights up.
Enter the combination +
<administrator code> + + 7. The
keypad flashes seven times.
Enter a digit. The new locktime
equals 5 seconds + the digit you
entered. For example: if you entered
3, the new locktime will be 8
seconds.
9. Opening through code
Press any key on the keypad. The
keypad lights up.
Enter a valid code and confirm with
.
10. Opening through RFID media
Press any key on the keypad. The
keypad lights up.
Hold a valid RFID medium near the
RFID antenna.
11. Battery warnings
There are two different battery warnings:
At low battery level, the red LED near
the RFID antenna flashes.
At critically low battery level, the
beeper additionally rings.
Replace the batteries as soon as
possible. Depending on your installation,
it may be possible that no entry is
possible when the batteries are empty.
12. Lock-out state
To avoid brute force attacks, the cylinder
refuses all user input, after a few
unsuccessful entry attempts. In this
state, the red LED flashes 10 times and
for 3 minutes no entries are possible.
 Loading...