

Page 1

Ultrasonic Two-Wire
Point Level Control
General Instructions
The Ultrasonic Point Level Control indicates liquid presence/absence within a sensor cavity.
Two piezoelectric crystals face each other across the sensor cavity. One crystal transmits
an ultrasonic signal; the other crystal receives the signal.
When the sensor cavity is empty, the receiver detects a weak signal because air is a poor
conductor of ultrasonic waves. The yellow LED is lit, indicating 8 mA current output.
When process liquid fills the sensor cavity, the receiver detects a strong signal because
liquids are good conductors of ultrasonic waves. The red LED is lit, indicating 16 mA
current output.
The Ultrasonic Point Level Control constantly monitors sensor integrity and changes the
current output in the unlikely event of a sensor failure. The Failure Mode Switch located
inside the control housing can be field selected to either 5 mA or 19 mA to indicate
sensor failure.
Remote Self-Test is provided with non-intrinsically safe units only. Units equipped with
two terminal blocks feature the remote self-test. A dry contact may be used up to 50
feet/15 meters from the control to simulate a sensor failure.
Standard 316SS and Te on Notch-Type sensors, epoxy tip-sensitive, and 316SS viscous
sensors are available for use with the point level control. Extreme care must be taken when
®
installing units with Teflon
NOTE: If you suspect that a product is defective, contact the factory or the SOR® Representative
in your area for a return authorization number (RMA). This product should only be installed by
trained and competent personnel.
sensors. See installation instructions beginning on page 2.
Table of Contents
Installation .......................................3
Remote Cable Connection .....................4
Design and
specifications are
subject to change
without notice.
For latest revision,
go to sorinc.com
Remote Electrical Connection ................4
Electrical Connection ...........................5
Calibration and Function Test .................8
Sensor Replacement ...........................9
Circuit Board Replacement ....................9
CE Marked Units .............................. 10
Control Drawings ............................. 11
Troubleshooting ............................... 16
Dimensions ................................ 17-19
Form 771 (08.13) ©SOR Inc.
Registered Quality System to ISO 9001
1/20
Page 2

Installation
Notch-Type and Epoxy Sensors (Series 371-N and 371-E)
Ultrasonic Level Sensors can be mounted by inserting the sensor through a fitting in a vessel,
®
or over an open sump or basin. Special care must be taken when installing Teflon
Irreparable damage may be done to Te on sensors by turning metal hex
and Te on hex separately. Always rotate metal hex and Te on hex
simultaneously. Do not apply more than 10 in. lbs. of torque to either
hex during installation.
Keep the sensor cavity out of the direct flow of liquid fill to prevent false readings.
sensors.
Avoid installation of sensor in turbulent areas
such as pump discharge or suction. Air pockets
may be present in these areas which may cause
Always turn Teflon hex & metal hex
together when installing
sensor into process.
false indication.
DO NOT weld any part of
this instrument
Sensor
Tank or Vessel
Base Hub
No Obstructions
Make sure that the sensor can be fully inserted and
tightened without interference from obstructions
inside the tank or vessel. (See
)
Apply thread sealant
Apply suitable sealant to the process connection to prevent process leakage. (See )
Use an open end wrench to tighten the sensor into the process connection.
Do not use the sensor base as a handle to tighten the process connection.
Horizontal Mounting
Horizontal mounting is recommended for use in highly viscous liquids, or liquids
containing sludge and debris. When tightened securely, the sensor cavity must face
sideways for optimum drainage when process liquid level drops below the sensor cavity.
An alignment mark X stamped on a wrench flat (or on
the dry face of a flange below the housing) shows sensor
cavity orientation. (See
)
Notch Type Sensors – Optimum drainage occurs when the
X mark is located at 3 or 9 o’clock.
The sensor must project through a tank fitting so that the
sensor cavity is at least 1” (25.4mm) beyond the inner
wall of the tank. (See
2/20
)
Notch Sensor
Alignment mark shown
at 3 o’clock
Alternate position: 9 o’clock
1
inch minimum
Form 771 (08.13) ©SOR Inc.
Page 3

Open Sump or Basin
Do not suspend the unit by rigid conduit installed
in the electrical hub. When installing the unit over
an open sump or basin, use a suitable bracket to
Open Sump
Locally
Supplied
Bracket
support the instrument.
NOTE: The instrument must be positioned so that
over ow does not ood electrical housing. (See
)
CE Marking Sensor Installation (notch type sensors only, Series 371-N)
Shield Beads
Three beads are included with your CE marked unit.
Two of the beads are 5/8” dia x 1/2” long. The other
bead is 3/8” dia x 3/4” long (save this bead for the
electrical connection beginning on page 5).
Disconnect the sensor leads from the circuit board.
Slide one 5/8” dia. bead onto each lead.
Reinstall the sensor leads into the circuit board.
Push the beads to the bottom of the housing. (See )
Shield
Beads
Electronics
Housing
Sensor
Wires
Sensor
Viscous Sensor Installation (Series 371-V)
Vertical or horizontal (flange only) mounting is supported for the viscous sensor. A 3”
(76.2mm) minimum opening is required for insertion.
76.2
minimum opening required (typ.)
An alignment mark X stamped on
the dry face of the flange below
the housing shows sensor cavity orientation. (See
) When
mounting the viscous
sensor horizontally, optimum
drainage occurs when the X mark
is located in the 6 o’clock position.
Take care during installation to
prevent damage to the sensor
62.1
2.44
(typ.)
Bottom View Viscous
Sensor with 4-Hole Flange
3.00
5.9
0.23
of fl ange
Alignment mark, (other side)
position at 6 o’clock (typ.)
Bottom View Viscous
Sensor with 8-Hole Flange
5.9
0.23
C
L
end. Slight bending of the sensor may result in loss of sensitivity due to misalignment of
the ultrasonic crystals.
Form 771 (08.13) ©SOR Inc.
3/20
Page 4

Remote Cable Connection
Conduit must be installed between the sensor base and the electronics housing to provide
a raceway for sensor extension cables. (See
housing are suitable for use in Class I Group C & D; Class II Groups E, F & G; Division 1
& 2 Hazardous Locations. All conduit and fittings used for the installation must equal or
exceed this rating to maintain the explosion proof integrity of the assembly.
) The sensor base and the electronics
Ensure that wiring conforms to
all applicable local and national
electrical codes and install unit(s)
according to relevant national and
local safety codes.
Fishing the Sensor Extension
Cables Two sensor extension cables
are supplied. Both ends of the cables
are terminated and labeled at the
Electronics
Housing
Control Board
See Figures 12 and 14
Remote
Interconnect
Board
See Figure 8
Protect factory
installed
plugs
factory.
Use care to avoid damaging the
factory installed mini-phono
Conduit must meet
Class I Group C & D;
Class II Groups E, F & G;
Division 1 & 2
Sensor Base
connectors while fishing the sensor
extension cables through the conduit. Pull cables from the sensor base so that the free
ends follow the fish through the conduit. (See
)
Remote Electrical Connection
Electrical power must be disconnected from explosion proof models before
the cover is removed. Failure to do so could result in severe personal injury
or substantial property damage.
Sensor Coax Connections Inside Sensor Base
Inside the sensor base, a remote interconnect board rests in a plastic holder. Slide the
interconnect board up. Attach the sensor coax connectors to the interconnect board as follows:
Connect the long sensor* (A) cable to IN 1.
Connect the short sensor (T) cable to IN 2.
*Viscous probe sensor cables are the same length. Refer to the cable markings to make correct
electrical connections.
Attach the extension cables to the interconnect board as follows:
Connect cable A to OUT 1. (See )
Connect cable T to OUT 2.
4/20
Form 771 (08.13) ©SOR Inc.
Page 5

Connect extension
lead T to OUT 2
Remote Interconnect Board
located inside sensor base
Connect extension lead A to OUT 1
OUT connections are located
on the opposite side of the
board from the IN connections.
Do not use positions 3 & 4 to
connect wires.
Connect
long sensor lead (A) to IN 1
Connect short sensor lead
(T) to IN 2
Discharge the Sensor
Temperature changes which occur during shipment may result in a small electrical charge
inside the sensor crystals. This charge is harmless to humans, but may result in damage to
the electronics if the sensor is plugged in before it is discharged. To discharge the sensor,
touch a wire to each sensor connector so that the center conductor
and outside shell make contact. (See
)
Plug in Connections Inside Electronics Housing
Plug sensor extension cables onto the PC board as follows:
Short each center
Connect cable A to J1.
Connect cable T to J2. (See to locate J1 and J2.)
conductor to the
shell to discharge
sensor crystals.
Electrical Connection
Explosion Proof and Non-Agency Listed model
Electrical power must be disconnected from explosion proof models before
the cover is removed. Failure to do so could result in severe personal injury
or substantial property damage.
Ensure that wiring comforms to
all applicable local and national
electrical codes and install unit(s)
according to relevant national and
local safety codes.
Make sure the power source
is turned off.
Remove the housing cover.
Pull power and signal wires
Loop Power
Terminal Block
(Non-Intrinsically Safe Units Only)
TB1
Remote Self-Test Terminal Block
through the conduit connection and into the control housing.
Locate TB1 on the control board. (See )Terminals are labeled “+” and “-”. Connect
power leads to the proper terminals.
- Terminal
+ Terminal
TB2
Do not exceed the maximum loop resistance for the circuit. (See )
Form 771 (08.13) ©SOR Inc.
5/20
Page 6

Loop Resistance vs. Power Supply Voltage
1800
1700
1600
1500
1400
1300
1200
1100
1000
900
800
700
600
500
400
(including Barrier Resistance)
Maximum Loop Resistance (Ohms)
300
200
100
0
5 10 15 20 25 30 35 40
650 Ohms
at 24 VDC
1 Ohm at
11 VDC
Power Supply Voltage (Volts)
1450 Ohms
at 40 VDC
950 Ohms
at 30 VDC
850 Ohms
at 28 VDC
Electrical Connection (Remote Self-Test)
Explosion Proof and Non-Agency Listed models:
Electrical power must be disconnected from explosion proof models before
the cover is removed. Failure to do so could result in severe personal injury
or substantial property damage.
Ensure that wiring comforms to all
applicable local and national
electrical codes and install unit(s)
Loop Power Terminal Block
according to relevant national and
local safety codes.
Make sure the power source is
turned off.
Remove the housing cover.
Pull twisted pair cable through the conduit connection and into the control housing.
Connect dry contact wires to TB2 on the control board. (See ) Terminals are
Remote Dry Contact Ground Twisted Pair Shield
labeled “RMT COM” and “RMT TST*”. Attach the twisted pair shield to the ground
screw inside the housing. Ground only one end of the twisted pair shield.
TB2 Remote Self-Test Terminal Block
(Non-Intrinsically Safe Units Only)
TB1
to Housing Ground Screw
Do not apply power to the remote test terminals.
Connect the open end of the wires to a dry (unpowered) contact designed for small
loads. There is no polarity required for this connection.
6/20
Form 771 (08.13) ©SOR Inc.
Page 7
Electrical Connection (Intrinsically Safe)
Intrinsically Safe Models (does not apply to viscous or epoxy controls and sensors):
Any model numbers containing the designators “AI”, “CI” or “FI” are listed Intrinsically
Safe with CSA (AI), CENELEC (CI) or FM (FI). Please note the housing nameplate to determine the Agency Approval of your instrument. Connections must be as shown on the SOR
Control Drawings shown on pages 8-12.
AI CSA Intrinsically Safe... ................ Class I, Div. 1, Groups C, & D; Class II, III, Div. 1,
Groups E, F, & G; Class I, Div. 2, Groups A, B, C, D; Class II, III, Div. 2, Groups F, G;
Type 4X; T4
Connections must be as shown on the SOR Control Drawing 9065-136.
CI CENELEC Intrinsically Safe...... .................................................... EEx ia IIB T4, IP65
Connections must be as shown on the SOR Control Drawing 9065-146.
FI FM Intrinsically Safe....... ............................................Class I, Div. 1, Groups C, & D;
Class II, III, Div. 1, Groups E, F, & G; Class I, Div. 2, Groups A, B, C, D;
Class II, III, Div. 2, Groups F, G; NEMA 4X; T4
Connections must be as shown on the SOR Control Drawing 9065-135.
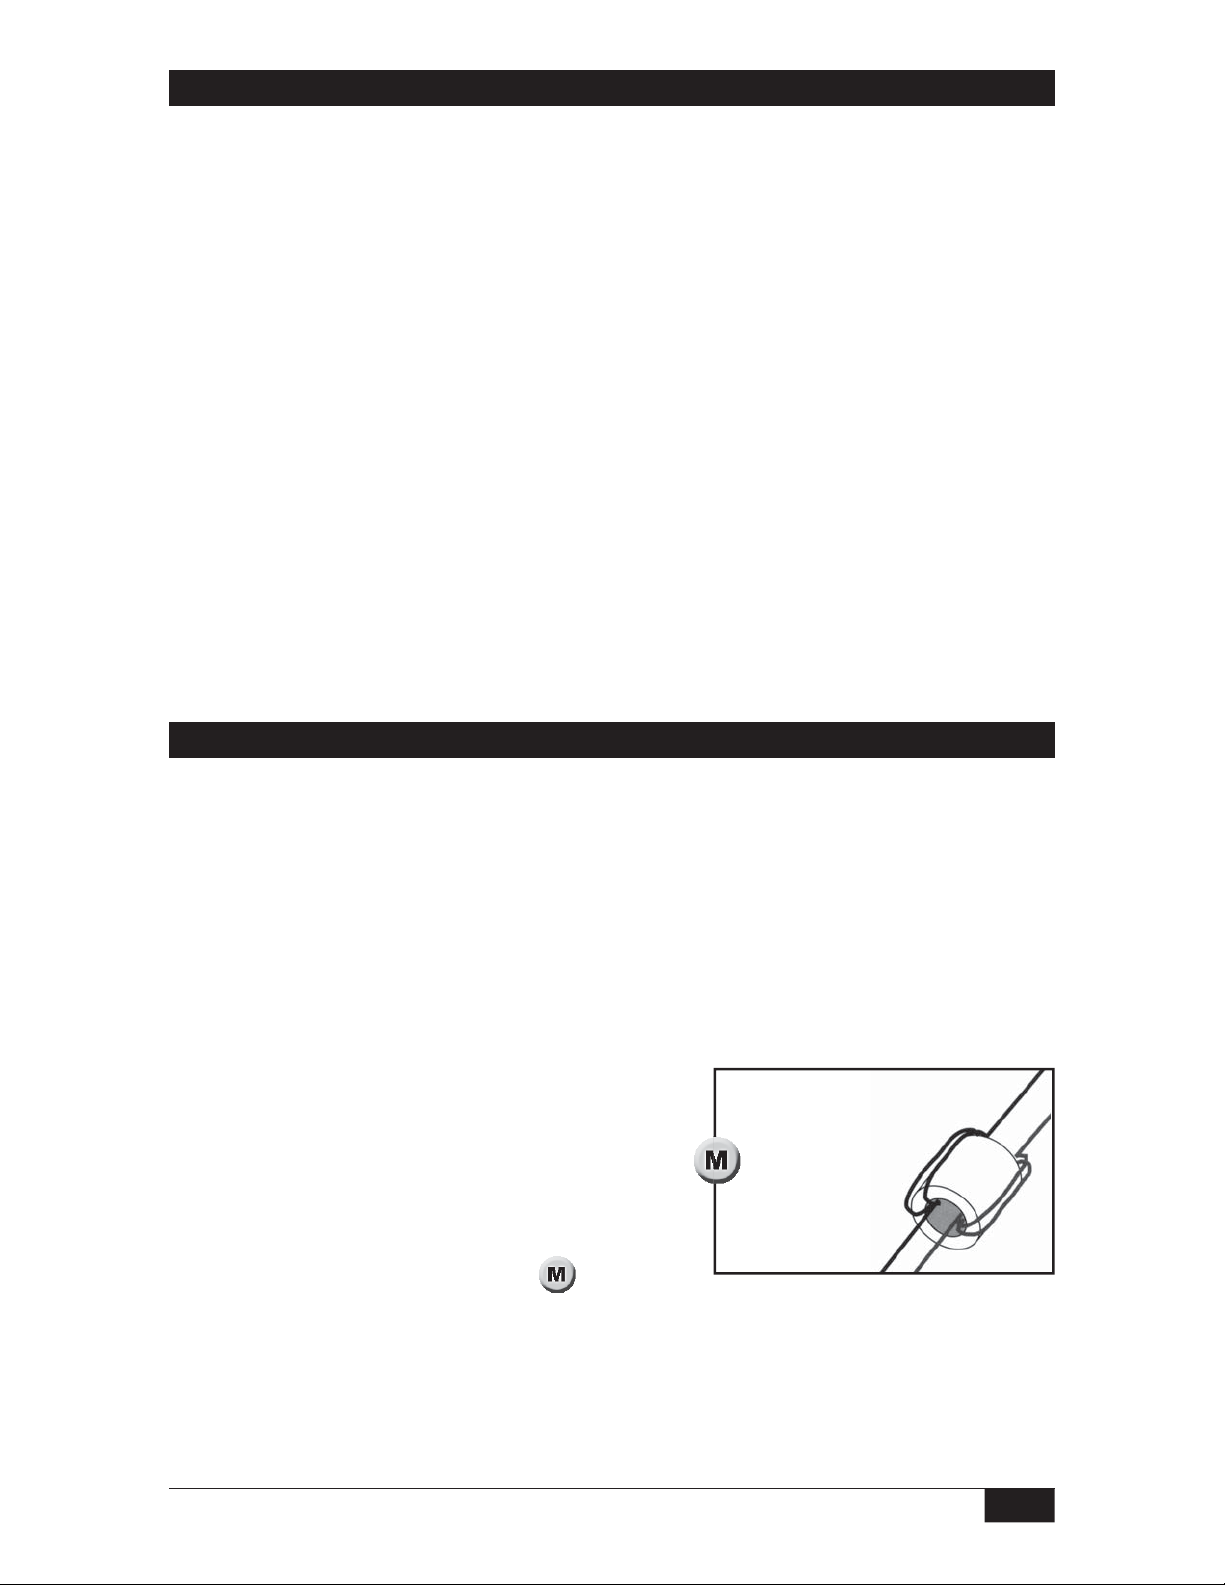
Electrical Connection (CE Marking)
Shield Beads
Three beads are included with your CE marked unit. Two of the beads are 5/8” dia. x 1/2”
long; they are used in the sensor installation. (See page 3.) The other bead is 3/8” dia. x
3/4” long. Use this bead for the following electrical connection.
In order to achieve the stated accuracy of ±1mA, a customer supplied shielded cable and
cable gland are used with the furnished 3/8” dia. x 3/4” bead. SOR recommends using a
shielded cable made of PVC insulation around a tinned copper braid shield (Olflex CY or
equivalent). Install the bead as close as possible to the cable gland.
Strip outer cable insulation and shield approx.
10 inches.
Separate the positive and negative wires.
Slide the bead over both wires.
Wrap each wire around opposite sides of the bead
to make two complete loops. (See
Make internal power connections as shown on page 4.
)
Install bead as close as
possible to cable gland
Install the cable gland per manufacturer’s instructions. The cable gland will provide
necessary grounding for the cable shield.
Form 771 (08.13) ©SOR Inc.
7/20
Page 8

Calibration and Function Test
No calibration is needed. Units are calibrated at the factory. No user adjustments are
required.
TB2 Remote
Self-Test
Electrical power
must be
disconnected
from explosion
proof models
before the cover is
removed. Failure to
do so could result
in severe personal
injury or substantial
property damage.
Terminal Block
(Optional)
Yellow LED (Dry)
Red LED (Wet)
TB1 Loop Power
Terminal Block
SW1 Failure
Mode Switch
J1 Receive Jack
J2 Transmit Jack
Functional test can be done with or without a current meter. See for wiring
configuration. See
Connect power to the circuit board as shown in . If the sensor is dry, the yellow LED
for component location.
will light. If using a current meter, the display should read 8 mA (± 1 mA).
Apply process liquid to the sensor. The yellow LED will turn off, and the red LED will
light. Current meter will read 16 mA (±1 mA).
With Failure Mode Switch (SW1) in the 5 mA position, disconnect one probe lead wire (J1
or J2). Both LED’s will turn off and the current meter will read 5 mA (±1 mA). Reconnect
the probe lead wire.
With Failure Mode Switch (SW1) in the 19 mA position, disconnect one probe lead wire
(J1 or J2). Both LEDs will light and the current meter will read 19 mA (±1 mA).
Reconnect the probe lead wire.
To test Remote Self-Test switch connections (non-intrinsically safe units only), use the
dry contact to simulate a probe failure for steps 3 and 4 instead of disconnecting the
probe lead wire.
8/20
Form 771 (08.13) ©SOR Inc.
Page 9

Current Output Chart
LED on
LED off
Yellow LED
(Dry)
Red LED
(Wet)
Current Meter
(+ 1mA)
8 mA Dry
16 mA Wet
5 mA
19 mA
Sensor
Status
__
__
Failure Mode
__
__
5 mA
19 mA
Sensor Replacement
Disconnect power to the unit.
Remove the housing cover.
Remove two mounting screws and slide out PC board to expose the sensor connections
J1 and J2. (See
Disconnect the sensor wires from J1 and J2.
)
Unscrew the sensor from the housing.
Apply thread sealant to the male threads of the new sensor.
Thread the new sensor into the bottom of the housing.
Discharge the sensor. Connect the center conductor and shell of sensor wire end as
shown on page 4. (See
Connect the sensor wire (T) into the J2 mini-phono jack on the circuit board. (See )
Connect the sensor wire (A) into the J1 miniphono jack on the circuit board.
)
Slide the PC board into the grooves in the plastic ring inside the housing.
Replace the two mounting screws into the plastic ring: these screws are self-tapping.
Do not overtighten.
Reconnect power and replace the housing cover.
Replacement Sensors
See Form #973, Ultrasonic Catalog for replacement sensor model numbers.
Circuit Board Replacement
Disconnect power to the unit.
Remove the housing cover.
Remove two mounting screws and slide out PC board.
Disconnect sensor plugs J1 and J2. (See )
Slide the new board into the control housing.
Form 771 (08.13) ©SOR Inc.
9/20
Page 10

Discharge the sensor. Connect the center conductor and shell of sensor wire end as
shown on page 5. (See
Connect the sensor plugs to the new board. The sensor wire (T) plugs into J2
)
(transmit). The sensor wire (A) plugs into J1 (receive).
Replace the two mounting screws into the plastic ring. These screws are self-tapping.
Do not overtighten.
Replacement Circuit Boards Match the characters of your model number with those
shown below to select the proper replacement board part number. Accessory
designators are located at the end of the model number in no particular order.
Accessory Designator
Model Number
I.S. CI, FI or AI Expf FM or CS
Non-Agency (no match)
721 2-N-P9-G
721 2-N-P9-C
721 2-V-P9-C
721 2-E-P9-C
NOTE: When ordering replacements for remote units (R in the 4th position of the model
number), supply cable length information and serial number. Circuit boards are tuned
to remote cable length for optimum circuit performance.
5003-009 5003-010 5003-010
5003-011 5003-012 5003-012
__ __ 5003-028
__ __ 5003-042
CE Marked Units
In order to achieve the stated accuracy of +/-1mA, a shielded cable, cable gland and shield
beads must be used. SOR recommends using a shielded cable made of PVC insulation
around a tinned copper braid shield. (Olflex CY cable or equivalent.) Refer to illustrations
below for installation of shield beads.
Probe Wire Shield Bead
Probe Wire Shield Bead
10/20
Short/Fat Bead
Install end of bead as close
to cable gland as possible
2 Loops
Positive
Negative
Form 771 (08.13) ©SOR Inc.
2 Loops
Long/Slender
Bead
Page 11

Control Drawing
Form 771 (08.13) ©SOR Inc.
11/20
Page 12

Control Drawing
12/20
Form 771 (08.13) ©SOR Inc.
Page 13

Control Drawing
Form 771 (08.13) ©SOR Inc.
13/20
Page 14

Control Drawing
14/20
Form 771 (08.13) ©SOR Inc.
Page 15

Control Drawing
Form 771 (08.13) ©SOR Inc.
15/20
Page 16

Troubleshooting
Symptom/Problem
No current in the loop
No LEDs lit.
Current 5 or 19 mA.
No LEDs lit or both
LEDs lit.
Current stays at 8 mA
when liquid is in the
gap.
Yellow LED remains lit.
Current stays at 16 mA
when the gap is empty
Red LED remains lit.
Current is greater than
20 mA.
Possible Cause Corrective Action
1. Power supply turned off.
2. Improperly wired terminal block TB1.
3. Broken power supply wire.
1. Sensor lead unplugged.
2. Sensor integrity is compromised.
3. Remote Self-Test activated.
1. Process is highly aerated liquid.
2. There is no liquid in the gap.
3. Remote cable length has been changed*.
4. Circuit integrity is compromised.
1. Process is clogging the sensor.
2. There is liquid in the gap.
3. Remote cable length has been changed*.
4. Circuit integrity is compromised.
1. Incorrectly wired circuit.
2. Circuit integrity is compromised.
1. Check power supply source.
Check terminal block wiring per
2.
(page 5)
3. Check loop wire integrity.
1. Check sensor cable connections.
2. Replace the sensor.
3. Check dry contact & TB2 wiring.
1. Install baffle or stilling well, or use
a 651K9 RF Point Level Control.
2. Unit is operting properly.
3. Replace circuit board.
4. Replace circuit board.
1. Clean the sensor.
2. Unit is operating properly.
3. Replace circuit board.
4. Replace circuit board.
1. Check current loop wiring per
(page 5)
2. Replace circuit board.
Remote Self-Test does
not switch to 5 or 19 mA.
Current intermittently
switching to 5 or 19 mA.
1. Open signal wire.
2. Wires hooked to the wrong terminal block.
1. Improperly grounded shield of TB2
twisted pair.
1. Check twisted pair wire integrity.
2. Verify dry contact wired to TB2.
1. Ground one end only of the twisted
pair shield.
*Circuit boards for remote units are tuned at the factory for optimum performance with specified
cable length. If the remote cable length is changed, circuit operation will be adversely affected.
NOTE: Agency certi ed units, (FM, CSA, IEC) must be returned to SOR for repairs.
16/20
Form 771 (08.13) ©SOR Inc.
Page 17

Dimensions
Metal Sensor
ELECTRICAL
CONNECTION
3/4 NPTF STD
1/2 NPTF OPT
95.3
3.75
50.8
2.00
ADD FOR
K2 HSG
K1 HSG
210.8 *
8.30
93.3 *
3.67
A
15.9
0.63
116.7
4.59
96.0
3.78
SENSOR
CAVITY
15/16 WRENCH
FLATS
PROCESS
CONNECTION
SEE CHART
Linear = mm/inches
Drawing 0390000
Dimensions are for reference only.
Contact the factory for certified drawings
for a particular model number.
20.6
0.81
CONNECTION
SIZE
3/4 NPT(M) SHOWN
1 NPT(M)
1-1/2 NPT(M)
2 NPT(M)
PROBE LENGTH
A
* LENGTH
ADD
ADD
ADD
8.0
0.31
9.5
0.38
9.5
0.38
22.2
0.88
Form 771 (08.13) ©SOR Inc.
17/20
Page 18

Te on Sensor
Linear = mm/inches
Drawing 0390002
18/20
Dimensions are for reference only.
Contact the factory for certified drawings
for a particular model number.
Form 771 (08.13) ©SOR Inc.
Page 19

Viscous Sensor
Linear = mm/inches
Drawing 0390439
Dimensions are for
reference only.
Contact the factory for
certified drawings
for a particular model
number.
Form 771 (08.13) ©SOR Inc.
19/20
Page 20

Printed in USA sorinc.com
14685 West 105th Street, Lenexa, KS 66215 913-888-2630 800-676-6794 USA Fax 913-888-0767
20/20
Registered Quality System to ISO 9001
Form 771 (08.13) ©SOR Inc.
 Loading...