

Page 1

Opposed Piston
Differential Pressure Switches
General Instructions
These instructions provide information for installation, electrical connection, process
®
connection and calibration of SOR
NOTE: If you suspect that a product is defective, contact the factory or the
SOR Representative in your area for a return authorization number (RMA).
This product should only be installed by trained and competent personnel.
Principles of Operation
Opposed Piston Differential Pressure Switches.
A = Hi Pressure Piston
B = Lo Pressure Piston
Fh = Force, Hi Pressure
Fl = Force, Lo Pressure
Fs = Force, Range Spring
Fd = Force Resultant Differential (Hi–Lo)
Basic construction is opposing diaphragm sealed pistons connected by a common shaft. Hi
side system pressure acts on Piston A to produce force Fh. It is counteracted by adjustable
range spring force Fs. Lo side system pressure acts on Piston B to produce force Fl. The
resultant force corresponds to the difference in pressure between the Hi and Lo system
pressures plus the force of the adjustable range spring, and moves the trip lever to actuate
and deactuate the SPDT electrical switching element.
Table of Contents
Design and
specifications are
subject to change
without notice.
For latest revision, go to
www.sorinc.com
Principles of Operation ....................... 1
Installation ...................................... 2
SIL Installation ................................. 2
Process Connection ........................... 3
Electrical Connection .......................... 3
Calibration ...................................... 3
Dimensions ..................................... 4
ATEX Marking Information ................... 10
Declaration of Conformity ................... 11
Form 279 (02.13) ©SOR Inc.
Registered Quality System to ISO 9001
1/12
Page 2

There are only three wetted parts on the Hi and Lo process connections: pressure port,
diaphragm and o-ring. A metal diaphragm may be welded to the pressure port for certain
applications, thereby eliminating the o-ring.
This force-balance system virtually eliminates friction and resultant wear while yielding
excellent repeatability.
These differential pressure switches are well suited for a variety of process applications.
They are not intended for high pressure, fluid power (hydraulic) applications where high
shock pressures and high cycle rates are expected.
Installation
This type of differential pressure switch can be installed in any position.
If a breather drain is installed, the device should be mounted with the
breather drain pointing downward (6 o’clock) so condensation will drain
from the housing.
WEATHERTIGHT HOUSING
Attach the device to a suitable surface or pipe stanchion bracket with two 1/4-inch diameter
bolts. Line mounting by either process or electrical connection is not recommended.
EXPLOSION PROOF HOUSING
Attach the device to a suitable surface or pipe stanchion bracket with two 1/4-inch diameter
bolts. The TA housing must be attached with 2-inch U-bolts over the housing hubs or
two 1/4 in. diameter bolts. Line mounting by either process or electrical connection is not
recommended.
NOTE: When mounting to an irregular or uneven surface, install rubber washers on the bolts
between the housing and the mounting surface to prevent housing deformation.
Failure to mount the housing on a at mounting surface may result in
torsional forces on the housing that could cause false trips or render the
pressure switch inoperative.
Safety Integrity Level (SIL) Installation Requirements
The SOR pressure switches have been evaluated as Type-A safety related hardware.
To meet the necessary installation requirements for the SIL system, the following
information must be utilized:
Proof Test Interval shall be one year.
Units may only be installed for use in Low Demand Mode.
Products have a HFT (Hardware Fault Tolerance) of 0, and were evaluated in a
1oo1 (one out of one) configuration.
2/12
Form 1538 (03.12) ©2012 SOR Inc.
Form 279 (02.13) ©SOR Inc.
Page 3
Process Connection
Pressure ports are marked Hi and Lo to indicate the high and low process pressure connections. Connect process piping accordingly. Use two wrenches-one to hold the hex pressure
port to prevent it from moving, the other to tighten the process pipe or tube fitting.
Care should be taken not to loosen the pressure port from the body or the
body from the housing.
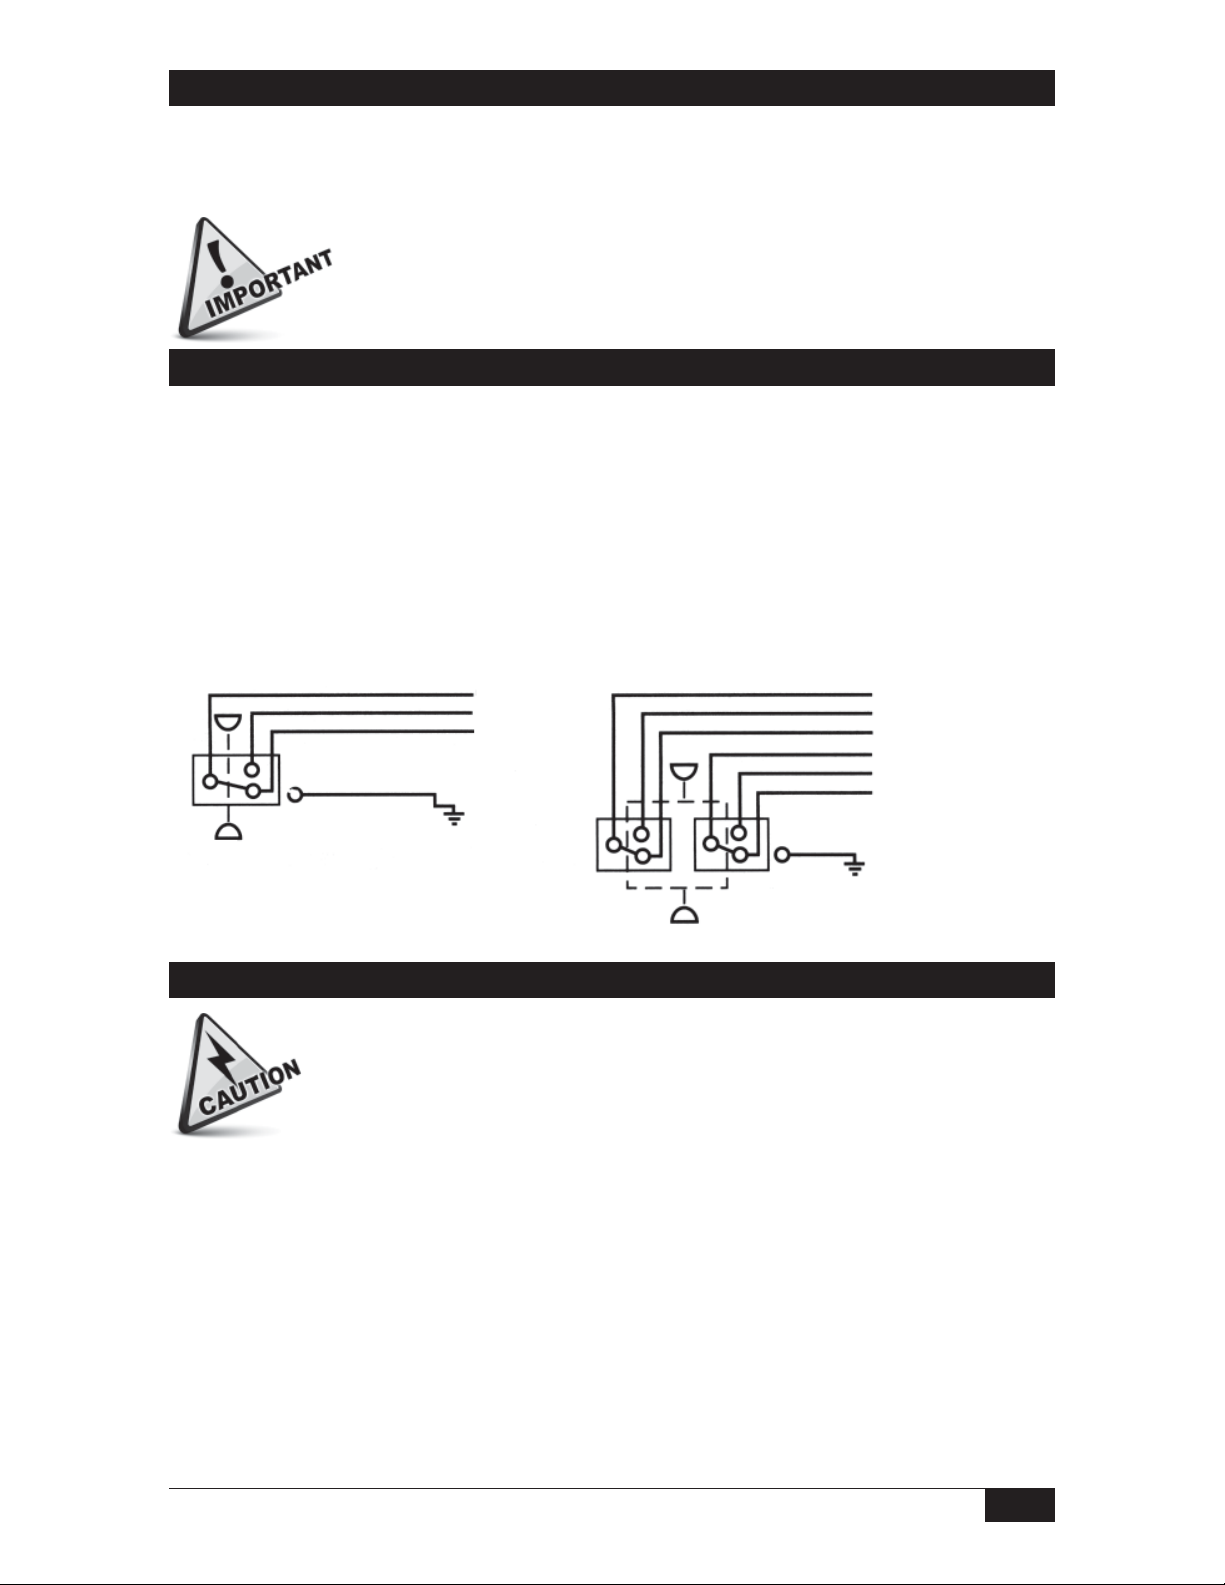
Electrical Connection
Ensure that wiring conforms to all applicable local and national electrical codes and install
unit(s) according to relevant national and local safety codes.
SOR Opposed Piston Differential Pressure Switches in RB and RH housings have terminal
blocks as standard. All other Opposed Piston Differential Pressure Switches have 18-inch
18 AWG color-coded wire leads. Storing excess wire or making wire lead splices inside the
switch housing will interfere with switch operation.
SPDT
Lo
Differential Pressure
Hi
Blue (C)
Black (NO)
Red (NC)
Green (GND)
No.1
2-SPDT
Lo
No.2
Differential Pressure
Hi
Blue (C)
Black (NO)
Red (NC)
Yellow (C2)
Brown (NO2)
Orange (NC2)
Green (GND)
Calibration
Units in Hazardous Locations – Prior to calibration, make sure that the work
area is declassi ed before removing the explosion proof cover to calibrate
the unit. Failure to do so could result in severe personal injury or substantial
property damage.
Remove housing cover. First, calibrate the device as a gauge pressure switch, i.e. Lo
side vented to atmosphere. Turn the set point adjusting nut located on the Hi side piston
clockwise to increase the set point, or counterclockwise to decrease the set point.
Calibrate to simulated system operating pressure conditions for optimum performance,
i.e.: connect Hi and Lo sides to suitable pressure sources and raise pressures
simultaneously to expected system operating pressure at desired set point. Vary Lo
side pressure and fine tune the set point adjustment for actuation (deactuation) of the
electrical switching element on increasing or decreasing differential pressure at
simulated system operating pressure.
Replace the cover.
Form 279 (02.13) ©SOR Inc.
3/12
Page 4

Dimensions
Weathertight-NEMA 4, 4X, IP65
Linear = mm/inches
Drawing 0090262
Housing Designator: RB, RH, RE
Piston Number: 18
Dimensions are for reference only. Contact the factory for certified drawings for a particular model number.
Conventional Explosion Proof
Linear = mm/inches
Drawing 0090152
Housing Designator: S
Piston Number: 18
4/12
Form 279 (02.13) ©SOR Inc.
Page 5

G
O
W
7
7
9
A
1
Z
Weathertight-NEMA 4, 4X, IP65
Linear = mm/inches
Drawing 0090265
*230.6
9.08
Housing Designator: RB, RH, RE
107.3
4.22
52.0
2.05
69.9
2.75
33.3
1.31
A
CLEARANCE SLOTS
FOR
*57.4
2.26
A
1/4 OR 1/2 NPTM
PROCESS CONNECTION
OPTIONAL: HI, LO, OR BOTH
WITH
TO
MOUNTING CENTERS
76.2
3.00
6.4
0.25
63.5
2.50
MAX
PROCESS
CONNECTION
ELECTRICAL
CONNECTION
SEE CHART
HARDWARE
MIN
CONNECTION
LO
PROCESS
65.6
2.58
28.6
1.12
26.2
1.03
HI
Piston Number: 15, 17
DETAIL 1 NPTM
PROCESS CONNECTION
SCALE 0.38
40.5
1.59
PROCESS
* LEN
1/4 NPTM
1/2 NPTM
1 NPTM4ADD
LENGTH A
1/4 NPTM
SHOWN
1/2 NPTM
PER P
SHO
1
29.
1.1
38.
7.1
0.28
CONN SIZE
Dimensions are for reference only. Contact the factory for certified drawings for a particular model number.
Conventional Explosion Proof
Linear = mm/inches
Drawing 0090151
142.3
5.60
*230.6
9.08
*115.3
4.54
*74.9
2.95
A
1/4 OR 1/2 NPTM
PROCESS CONNECTION
OPTIONAL: HI, LO OR BOTH
Form 279 (02.13) ©SOR Inc.
71.1
2.80
OR PLUGGED OPT
40.4
1.59
TYP
7.9
4X
0.31
MOUNTING
HOLES
ELECTRICAL
CONNECTION
3/4 NPTF STD
1/2 NPTF OPT
2 PLACES
80.8
3.18
TYP
CONNECTION
PROCESS
CONNECTION
PROCESS
HI
79.4
3.12
LO
20.6
0.81
Housing Designator: S
Piston Number: 15, 17
6.7
0.26
322.3
12.69
161.1
6.34
120.7
4.75
PROCESS CONNECTION
6.4
0.25
PROCESS
CONN SIZE
1/4 NPTM
1/2 NPTM
1 NPTM
1/4 NPTM
SHOWN
1/2 NPTM
LENGTH A
* LENGTH
SHOWN
46.0
ADD
1.81
29.7
1.17
38.9
14685 W 105TH ST LENEXA, KS 66215 US
ISO-9001
PRODUCT CERTIFICATION DRAWING
ALL DIMENSIONS ARE ±1/16 IN
UNLESS OTHERWISE SPECIFIED
LINEAR =
THIS DRAWING IS THE EXCLUSIVE PROPERTY OF SOR.
NO USE WHATSOEVER OF THE INFORMATION CONTAINED
HEREON, NOR REPRODUCTION IN WHOLE OR PART MAY BE
MADE WITHOUT THE EXPRESS WRITTEN PERMISSION OF SOR.
TITLE
DIM DWG 15 & 17 S DP
EO NUMBER: 5090
SCALE: 0.75
DETAIL
1 NPTM
SCALE 0.38
913-888-2630
SORINC.COM
DRAWN BY
K MITCHELL
CHECKED BY
M SMITH
MM
IN
ENGINEER APPROVAL
S BOAL
DATE
28 MAR 201
DRAWING NUMBER REV
0090151 6
SHEET 1 OF 1
5/12
DWG SI
Page 6

Weathertight-NEMA 4, 4X, IP65
N
S
Z
D
L
N
O
R
D
S
&
M
R
N
4
2
4
Linear = mm/inches
Drawing 0090263
225.3
8.87
*54.7
2.15
A
107.3
4.22
69.9
2.75
33.3
1.31
52.0
2.05
CONNECTION
ELECTRICAL
CONNECTION
SEE CHART
CLEARANCE SLOTS
6.4
FOR
HARDWARE
0.25
63.5
WITH
MIN
2.5
76.2
TO
MAX
3.00
MOUNTING HOLES
1/4 OR 1/2 NPTM
PROCESS CONNECTION
OPTIONAL: HI, LO OR BOTH
PROCESS
LO
CONNECTION
Housing Designator: RB, RH, RE
Piston Number: 13, 14, 16
64.9
2.56
28.6
1.12
26.2
1.03
40.5
1.59
7.1
0.28
CON
1
PROCESS
HI
PROCES
CONN SI
1
Dimensions are for reference only. Contact the factory for certified drawings for a particular model number.
Conventional Explosion Proof
Linear = mm/inches
Drawing 0090150
*225.3
8.87
*112.6
4.43
*72.2
2.84
142.3
5.60
71.1
2.80
80.8
3.18
TYP
40.4
1.59
TYP
4X
MOUNTING
HOLES
7.9
0.31
PROCESS
CONNECTION
Housing Designator: S
Piston Number: 13, 14, 16
79.4
3.12
20.6
LO
0.81
2X ELECTRICAL
CONNECTION
3/4 NPTF STD
1/2 NPTF OPT
OR PLUGGED OPT
6.4
0.25
P
CO
1/
1/
3/
PRO
AL
U
6/12
A
1/4 OR 1/2 NPTM
PROCESS CONNECTION
OPTIONAL: HI, LO OR BOTH
PROCESS
CONNECTION
HI
Form 279 (02.13) ©SOR Inc.
TITLE
DIMEN
13, 14
EO NU
N
HE
MA
Page 7

Conventional Explosion Proof
Linear = mm/inches
Drawing 0090109
*240.2
9.46
*121.7
4.79
*67.7
2.67
A
108.0
4.25
(TYP)
147.1
5.79
73.7
2.90
54.0
2.13
(TYP)
HOLE (TYP 4)
1/4 OR 1/2 NPT
MALE PROCESS CONNECTION
(OPTIONAL: HI, LO OR BOTH)
MOUNTING
7.1
0.28
PROCESS
CONNECTION
(LOW)
ELECTRICAL
CONNECTION
3/4 NPT(F)(STD)
1/2 NPT(OPT)
OR PLUGGED(OPT)
(TYP 2)
PROCESS
CONNECTION
(HIGH)
Housing Designator: SC
Piston Number: 18
119.6
4.71
34.0
1.34
8.7
0.34
LENGTH A
1/4 NPT(M) = (SHOWN)
1/2 NPT(M) =
13.2
0.52
29.7
1.17
38.9
1.53
Dimensions are for reference only. Contact the factory for certified drawings for a particular model number.
Conventional Explosion Proof
Linear = mm/inches
Drawing 0090248
Housing Designator: TA
Piston Number: 18
Form 279 (02.13) ©SOR Inc.
7/12
Page 8

Conventional Explosion Proof
Linear = mm/inches
Drawing 0090111
*240.2
9.46
*121.7
4.79
*67.7
2.67
Housing Designator: SC
142.9
5.63
108.0
4.25
(TYP)
A
71.4
2.81
54.0
2.13
(TYP)
7.1
0.28
HOLE (TYP 4)
1/4 OR 1/2 NPT
MALE PROCESS CONNECTION
(OPTIONAL: HI, LO OR BOTH)
3/4 NPT(F)(STD)
1/2 NPT(F)(OPT)
OR PLUGGED(OPT)
MOUNTING
PROCESS
CONNECTION
(LOW)
ELECTRICAL
CONNECTION
(TYP 2)
CONNECTION
Piston Number: 15, 17
106.4
4.19
34.0
1.34
8.7
0.34
PROCESS
(HIGH)
LENGTH A
1/4 NPT(M) = (SHOWN)
1/2 NPT(M) =
29.7
1.17
38.9
1.53
Dimensions are for reference only. Contact the factory for certified drawings for a particular model number.
Conventional Explosion Proof
Linear = mm/inches
Drawing 0090157
Housing Designator: TA
Piston Number: 15, 17
8/12
Form 279 (02.13) ©SOR Inc.
Page 9

Conventional Explosion Proof
Linear = mm/inches
Drawing 0090112
LENGTH A
1/4 NPT(M) = (SHOWN)
1/2 NPT(M) =
29.7
1.17
38.9
1.53
*234.8
9.24
*119.0
4.68
*65.0
2.56
Housing Designator: SC
142.9
5.63
108.0
4.25
(TYP)
A
71.4
2.81
54.0
2.13
(TYP)
HOLE (TYP 4)
1/4 OR 1/2 NPT
MALE PROCESS CONNECTION
(OPTIONAL: HI, LO OR BOTH)
MOUNTING
7.1
0.28
CONNECTION
ELECTRICAL
CONNECTION
3/4 NPT(F)(STD)
1/2 NPT(F)(OPT)
OR PLUGGED(OPT)
Piston Number: 13, 14, 16
106.4
4.19
34.0
PROCESS
(LOW)
(TYP 2)
PROCESS
CONNECTION
(HIGH)
1.34
8.7
0.34
Dimensions are for reference only. Contact the factory for certified drawings for a particular model number.
Conventional Explosion Proof
Linear = mm/inches
Drawing 0090156
Housing Designator: TA
Piston Number: 13, 14, 16
Form 279 (02.13) ©SOR Inc.
9/12
Page 10

ATEX Marking Information
Sample Nameplate
Manufacturer’s
Registered
Drawing 072004x
ATEX Listing
Information
Trademark
Serial Number
Product
Model
Identification
NOTE: The unit conforms to the requirements of clause 6.3.12, EN 60079-11: 2007. The unit
is capable of withstanding a 500 Vrms isolation test between circuit and enclosure.
Numbers Indicate
Year of Manufacture)
(First Two
10/12
Form 279 (02.13) ©SOR Inc.
Page 11

Declaration of Conformity
R Series Pressure Switches
SOR Inc.
14685 West 105
th
Street
Lenexa, Kansas 66215-2003
United States of America
November 12, 2012
ATEX Directive (94/9/EC) Equipment Intended for use
in Potentially Explosive Atmospheres
EN 60079-0: 2009
EN 60079-11: 2007
II 2 G Ex ia IIC T6...T4 Gb
T6
(-40°CTa 75°C)
T5
(-40°CTa 90°C)
T4
(-40°CTa 125°C)
EC-Type Examination Certificate
Baseefa11ATEX0125
Issued February 16, 2012
Baseefa Ltd. (Notified Body No. 1180)
Rockhead Business Park, Staden Lane,
Buxton, Derbyshire SK17 9RZ
United Kingdom
Baseefa Customer Reference No. 1021
John J. Fortino (VP of Engineering)
Form 1539 (11.12) SOR Inc.
Product
Manufacturer
Date of Issue
We declare that the above
products conform to
the following specifications
and directives
Carries the marking
Reference document
ATEX Notified Body
Person responsible
John J. Fortino
EC Declaration
of Conformity
14685 West 105th Street, Lenexa, KS 66215-2003
s53!s&!8
Engineered to Order with Off-the-Shelf Speed
For ATEX Certi ed Models
Form 279 (02.13) ©SOR Inc.
11/12
Page 12

Printed in USA sorinc.com
14685 West 105th Street, Lenexa, KS 66215 913-888-2630 800-676-6794 USA Fax 913-888-0767
12/12
Registered Quality System to ISO 9001
Form 279 (02.13) ©SOR Inc.
 Loading...