

Page 1

Test Instruction, Electrical
Test Instruction - Electrical
Applicable Z770i
Abstract..........................................................................................................................2
1
2 Test Procedure .............................................................................................................2
3 Test flow.........................................................................................................................2
3.1 Software Update.............................................................................................2
3.1.1 Verify Software Version.................................................................................2
3.1.2 Update Software Version...............................................................................2
3.2 Go/No-Go Test................................................................................................3
3.2.1 RF Test Fixture (Conducted Test Method).................................................3
3.2.2 RF Coupler (Radiated Test Method)............................................................4
3.2.3 SERP GNG......................................................................................................5
4 Calibration......................................................................................................................5
4.1 Flashing the Test Program (ITP) into the Mobile.......................................5
4.2 Calibration Instructions ..................................................................................6
4.3 Updating the Commercial Software into the Mobile after Calibration.....6
5 Service Tests.................................................................................................................7
5.1.1 Main Display Test .............................................................................................7
5.1.2 External Display Test .......................................................................................7
5.1.3 LED/Illumination Test.......................................................................................7
5.1.4 Keyboard Test ...................................................................................................7
5.1.5 Speaker Test ......................................................................................................8
5.1.6 Earphone Test....................................................................................................8
5.1.7 Microphone Test................................................................................................8
5. 1.8 Vibrating alert Test............................................................................................8
5. 1.9
Camera Test.......................................................................................................8
5. 1.10
5. 1.11
5. 1.12 Real Time Clock Test........................................................................................9
5. 1.13 Total call Time Test...........................................................................................9
5. 1.14 Security Test.....................................................................................................9
5.2 Manual Tests.................................................................................................10
5.2.1 On The Air Call To Mobile...........................................................................10
5.2.2 Bluetooth Test...............................................................................................10
5.2.3 System Connector Test...............................................................................10
6 Revision History.........................................................................................................12
Memory card test...............................................................................................9
FM Radio Test...................................................................................................9
1208-5034 REV 3
Company Internal
© Sony Ericsson Mobile Communications
Page 2

Test Instruction, Electrical
1 Abstract
This document describes the test procedure for the Electrical repair package.
2 Test Procedure
To verify all components within the Electrical repair package, all tests must be
performed.
3 Test flow
If the phone passes these tests without any failures, it is OK to return it to the
customer.
If there are any failures, the phone must be repaired according to the troubleshooting
guide or sent to a higher repair level.
3.1 Software Update
Update to latest signalling software and run the service activities software from
EMMA III.
3.1.1 Verify Software Version
NOTE! Remove the SIM-card before testing.
To verify if the phone needs new software, you have to check the Software Version in
the phone. Current Software Versions are checked through the following steps:
1. Start up the phone.
2. Enter the Service Tests Menu by pressing the sequence ¨Ï§§Ï§Ï with the
navigate buttons and the Ï on the keypad.
3. Select Service info.
4. Select SW Information.
5. Check the file revisions on the display.
6. Press “central navi” key to return to the Service info menu.
3.1.2 Update Software Version
Update the software in the phone by doing the following steps:
1. Make sure that the phone’s battery is fully charged or use a battery eliminator.
Connect correct flash cable and interface according to the Installation instruction.
2. Logon to the EMMA III server, and follow the instructions
1208-5034 REV 3
Company Internal
© Sony Ericsson Mobile Communications
2(12)
Page 3
Test Instruction, Electrical
3.2 Go/No-Go Test
This test verifies that the radio parameters of a mobile fulfil the GSM / WCDMA
specifications. A mobile is considered good if all measurements pass. All results will
be presented on the screen and can be printed out if a printer is available.
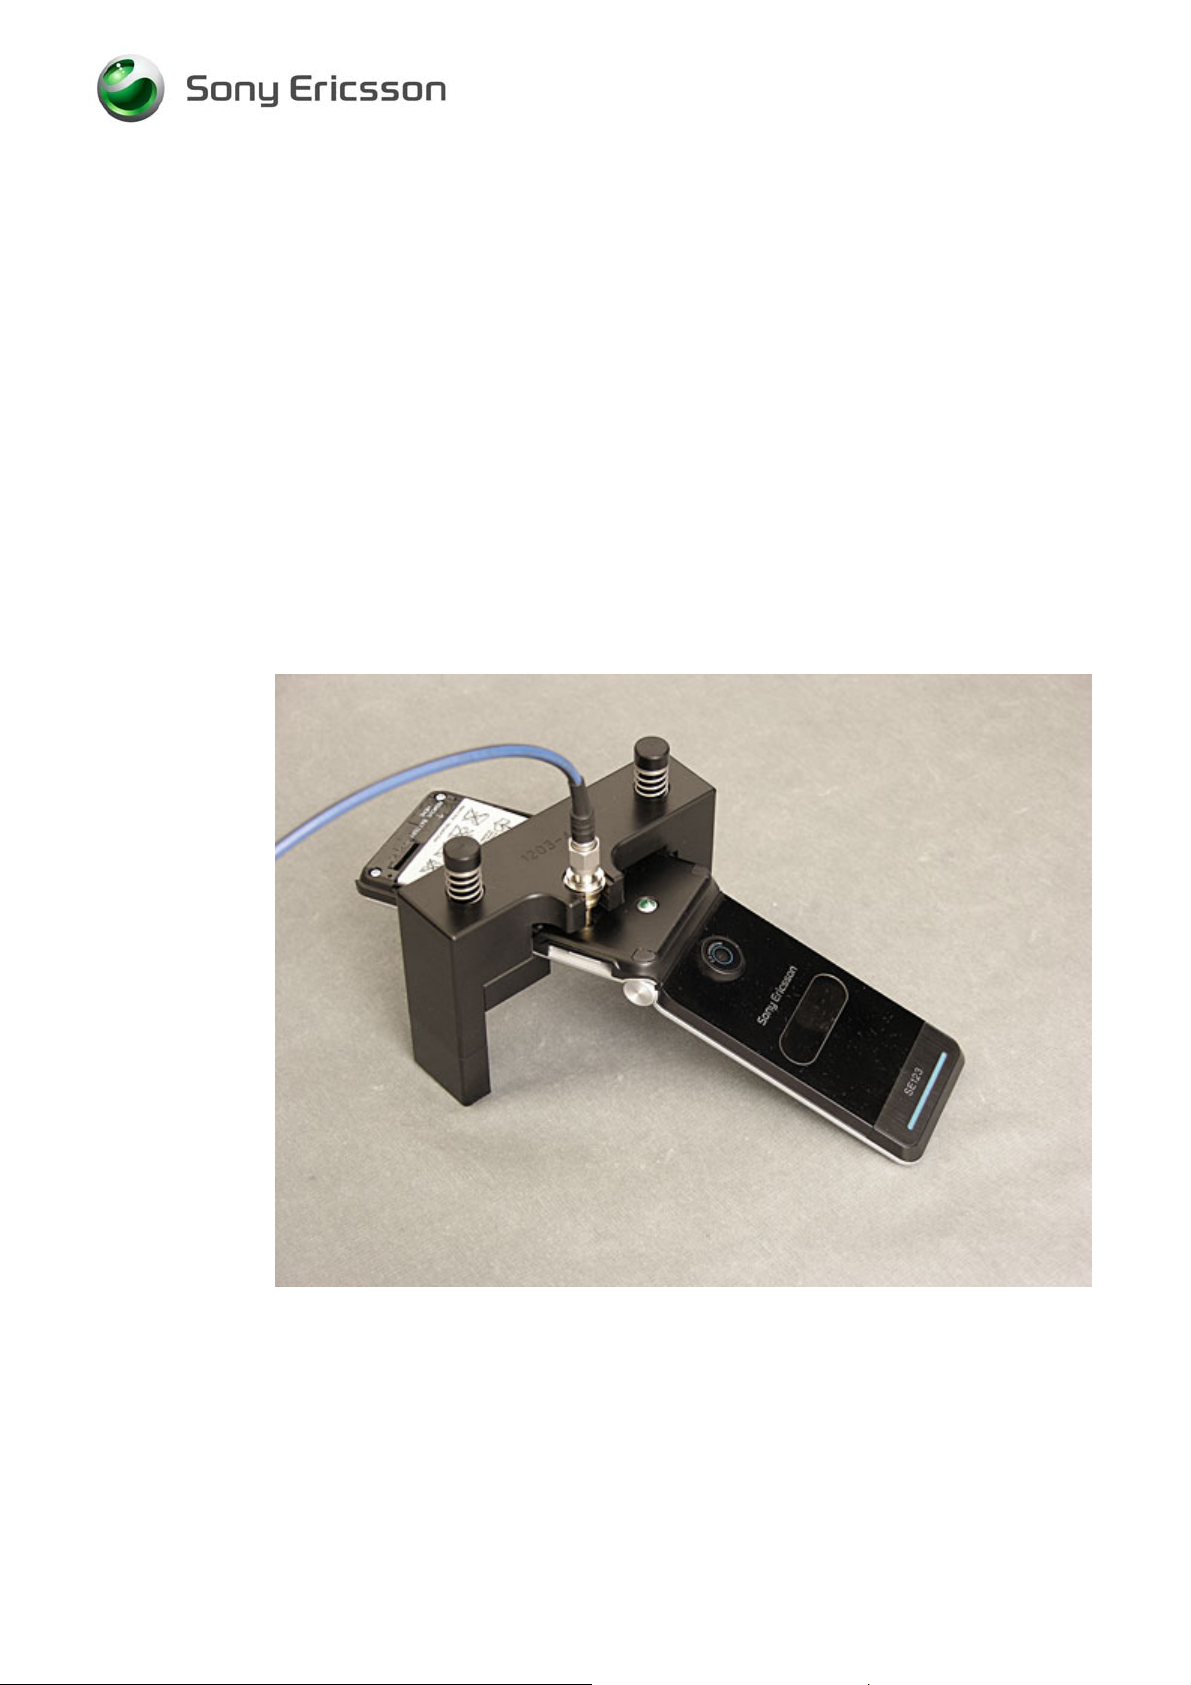
3.2.1 RF Test Fixture (Conducted Test Method)
1. Remove the SE cover according to Working Instructions, Mechanical.
2. Insert a test USIM that is compatible with your Test Instrument and install a fully
charged standard battery to the mobile.
NOTE! A Battery Eliminator (Dummy Battery) may be used in place of a
standard fully charged battery if you use a power supply that meets the
requirements that are documented in the Electrical Equipment List.
3. Attach the RF Probe/RF Holder to the mobile according to the pictures.
4. Install the RF Cable to the RF Probe.
1208-5034 REV 3
Company Internal
3(12)
© Sony Ericsson Mobile Communications
Page 4
Test Instruction, Electrical
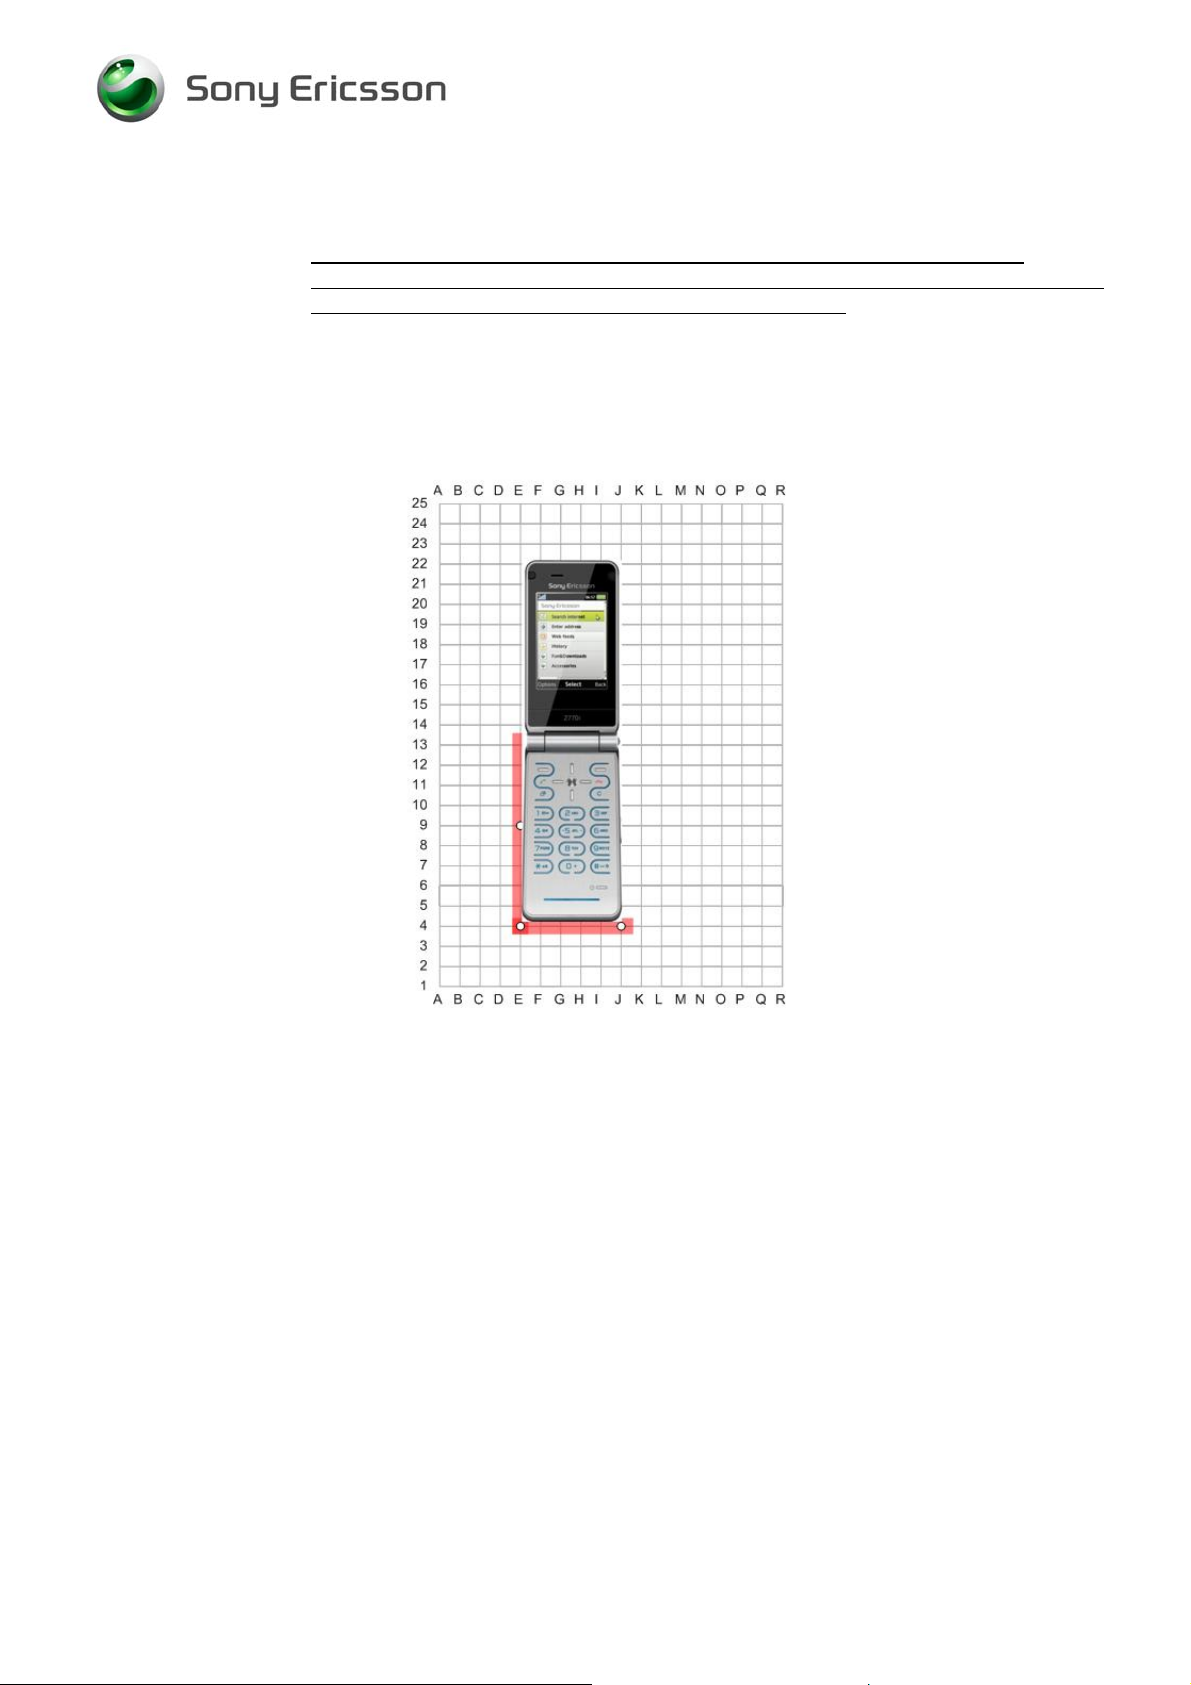
3.2.2 RF Coupler (Radiated Test Method)
1. Insert a test USIM that is compatible with your Test Instrument and a fully
charged standard battery. It is very important that a standard fully charged battery
is used; otherwise, there is a risk for wrong test results.
2. Position the phone in the coupler according to the picture.
1208-5034 REV 3
Company Internal
Rohde & Schwarz Shield Box and Coupler (E4)
4(12)
© Sony Ericsson Mobile Communications
Page 5

Test Instruction, Electrical
3.2.3 SERP GNG
NOTE! For complete and detailed user instructions, see the SERP Users
Manual located in the SERPINFO.htm that gets placed on the Desktop
after SERP is installed.
1. On a PC with SERP installed, start the SERP program by double clicking on the
“RepairManager.exe” icon on the desktop.
2. Click on “Settings” in the SERP Window and verify that the test instrument and
the GPIB address correspond.
3. Click on the “Station Setup” tab and verify that the “cable” (or the coupler)
settings are selected under the “RF Connection-GoNogo” Drop down window.
Click on “Apply” and then the “OK” button.
4. Enter (or scan) the IMEI number of the mobile to be tested into the “Enter IMEI”
box in the SERP Window and click on the “Load” button. The appropriate phone
model will be displayed.
5. In the SERP window, check the “Final GoNogo Test” box only. Click on the
“Start Test” button and follow the instructions. (Power on the phone when the
“Call Connection” dialog box appears.)
4 Calibration
NOTE! A Test Program must be loaded in the handset before performing the
calibration routine. After calibration the handsets must be re-customized
with signalling SW.
4.1 Flashing the Test Program (ITP) into the Mobile
1208-5034 REV 3
Company Internal
NOTE! Flashing instructions may vary depending on the interface used.
Flash the Test Program software into the mobile by doing the following:
1. Attach a fully charged battery to the mobile.
2. Open the EMMA III application and log in.
3. Ensure the mobile is powered off.
4. While holding the “C” button, connect the mobile to the USB Flash cable. (Once
the USB symbol appears in the lower left corner of the EMMA III window you may
release the “C” button.)
5. Select the “Z770i ITP protocol and follow the on screen instructions.
5(12)
© Sony Ericsson Mobile Communications
Page 6

Test Instruction, Electrical
NOTE! Under most circumstances the display on the mobile will be blank when
the Test Program is installed.
4.2 Calibration Instructions
NOTE! For complete and detailed user instructions, see the SERP Users
Manual that gets placed on the Desktop after SERP is installed.
1. On a PC with SERP installed, start the SERP program by double clicking on the
“RepairManager.exe” icon on the desktop.
2. Click on the “Settings” button in the SERP Window to verify the test instrument,
GPIB address and the COM Port matches the SERP settings. Click on “Apply”
and then the “OK” button.
3. Enter (or scan) the IMEI number of the mobile to be calibrated into the “Enter
IMEI” box of the SERP Window and click on the “Load” button.
4. In the SERP window, check the “Calibration” box only.
5. Connect the mobile to the test instrument using the RF fixture (refer to section
6.1.1).
6. Connect the Sony Ericsson Programming Interface Cable to the mobile’s system
connector.
7. Click on the “Start Test” button in the SERP window to start the Calibration
routine (mobile will automatically turn on).
8. Monitor the progress of the calibration routine by viewing the information
presented in the “Test Manager” window.
9. If a calibration routine fails, troubleshoot according to the Z770i Electrical
Troubleshooting Guide.
10. After successful calibration, reinstall the antenna cover plug. Refer to the Working
Instruction, Mechanical.
4.3 Updating the Commercial Software into the Mobile
after Calibration
To be able to use the handset after calibration requires going through the
Customization process which reloads the appropriate signalling code for the desired
operator. Refer to the Z770i Build Swap Customization Instruction document for
further details on the Customization process.
1208-5034 REV 3
Company Internal
6(12)
© Sony Ericsson Mobile Communications
Page 7

Test Instruction, Electrical
5 Service Tests
Power up the phone.
NOTE! Remove the SIM-card before testing.
Enter the Service Tests menu by pressing the sequence ¨Ï§§Ï§Ï with the
navigate buttons and the Ï on the keypad.
Select “Service Tests”.
5.1.1 Main Display Test
To verify the display:
1. Select “Main Display” from the “Service Tests” menu.
2. The display toggles between four different test patterns.
Make sure that there are no dots missing and that the colours and contrast is OK.
3. Press the “central navi” key to go back to the service tests menu.
5.1.2 External display Test
To verify the display:
1. Select “External Display” from the “Service Tests” menu, then Close flip.
2. The display toggles between two different test patterns.
Make sure that there are no dots missing and that the colours and contrast is OK.
3. Open flip to go back to the service tests menu.
5.1.3 LED/Illumination Test
To verify that the backlight and the LEDS are OK:
1. Select “LED/illumination” from the “Service Tests” menu.
2. Check that the backlight in the display and the keyboard is toggle between on
and off.
3. Press the “central navi” key to go back to the service tests menu.
5.1.4 Keyboard Test
To verify that all the keys are working:
1. Select “Keyboard” from the “Service Tests”.
1208-5034 REV 3
Company Internal
© Sony Ericsson Mobile Communications
7(12)
Page 8

Test Instruction, Electrical
2. Press all keys on the keypads and the ”Side Up” and “Side Down” keys on the
right side and close Flip . If they are ok a text feedback is displayed showing the
information which key was pressed. All keys should be tested.
3. If you stop pressing keys the phone will return to the service test menu.
5.1.5 Speaker Test
Warning! Do NOT hold the phone to your ear while performing this test.
To verify the Speaker function:
1. Select “Speaker” from the “Service Tests” menu.
2. Adjust the volume and make sure that the Speaker is working properly.
3. Press the “central navi” key to go back to the service tests menu.
5.1.6 Earphone Test
To verify the Earphone function:
1. Select “Earphone” from the “Service Tests” menu.
2. Adjust the volume and make sure that the Earphone is working properly.
3. Press the “central navi” key to go back to the service tests menu.
5.1.7 Microphone Test
This test is intended to test the microphone. Therefore, the earphone should be
tested before this test is entered.
1. Select “Microphone” from the “Service Tests” menu.
2. The phone will start to record and after that the sound is played in the speaker.
Make sure that the record sounds have a load and clear sound.
3. The phone will automatically return to the service tests menu when
“Microphone Playing” is completed.
5.1.8 Vibrator Test
To verify the vibrator function:
1. Select “Vibrator” from the “Service Tests” menu.
2. Press any key and the vibrator will vibrate 3 times.
3. Press the “central navi” key to go back to the service tests menu.
5.1.9 Camera Test
To verify the camera functionality:
1208-5034 REV 3
Company Internal
© Sony Ericsson Mobile Communications
8(12)
Page 9

Test Instruction, Electrical
1. Select Camera from the “Service Tests” menu.
2. The camera function will now start and are visible in the display. Make sure that
the contrast is OK.
3. Press the “right soft-Back” key to go back to the service tests menu
5.1.10 Memory card test
This test is to verify if the communication to the memory card is working.
1. Insert a memory card into the memory card holder located on the
lower right side of the phone.
2. Select “Memory Card” from the “Service tests” menu.
3. Make sure that the phone will detect the memory card.
4. Remove the memory card from the holder.
5. Press the “central navi” key to go back to the service tests menu.
5.1.11 FM Radio Test
To verify the function of the FM radio:
1. Install a Portable Hands-Free (PHF) to the system connector.
2. Select “FM radio” from the “Service Tests” menu and press the “Select” key.
3. Using the keypad set the frequency to a known good FM station.
4. While listening to the FM station with the PHF ensure that the sound quality
compares to a known good handset.
5. Remove the PHF and press the “central navi” key to end the test.
5.1.12 Real Time Clock Test
This test will check if the built in real time clock works.
1. Select “Real time clock” from the “Service Tests” menu.
After approximately 5 seconds you will get information whether the clock is ok or
not.
2. Press the “central navi” key to go back to the service tests menu.
5.1.13 Total call Time
This test will show you the Total Call Time of the phone.
1. Select “Total Call Time” from the “Service Tests” menu
and you will get information regarding the “Total Call Time” of this phone.
2. Press the “central navi” key to go back to the service tests menu.
1208-5034 REV 3
Company Internal
© Sony Ericsson Mobile Communications
9(12)
Page 10

Test Instruction, Electrical
5.1.14 Security Test
To verify that the Device Key test is working:
1. Select “Security “from the “Service Tests” menu.
2. Select “Device Key test “from the menu, and you will get information regarding
Device Key test, make sure the status is “Key ok”.
3. Press the “central navi” key and then press “right soft-back” key to go back to the
service tests menu.
5.2 Manual Tests
5.2.1 On The Air Call To Mobile
To verify the function of the speaker, microphone, polyphonic ring signal and
volumes button.
1. Insert an operator SIM card and start the phone.
2. Set up a call from another phone to the mobile phone.
3. Answer the phone call.
4. Check that the polyphonic ring signal is working and that the backlight switches
on OK.
5. Also check that the quality of the sound both in the mobile phone and the other
phone are OK.
6. Press the volume key up and down and check that the volume in the phone is
altered.
7. End the call.
8. Check that the ending procedure is OK and that the speech time is displayed.
5.2.2 Bluetooth Test
To verify that the Bluetooth communication is working:
1. Insert a SIM card, connect a battery and start the unit.
2. Activate the Bluetooth function by entering Connectivity/Bluetooth and turn it on.
3. Set up a link between the phone and another Bluetooth compatible device. If a
connection can be established the Bluetooth module is considered working.
5.2.3 System Connector Test
Hands free equipment and a charger are used in this test, to check the functionality
of the System Connector.
1208-5034 REV 3
Company Internal
© Sony Ericsson Mobile Communications
10(12)
Page 11

Test Instruction, Electrical
1. Insert a SIM card, connect a battery and start the unit.
2. Connect the Hands free equipment to the system connector and set up a call and
listen if you can speak/hear in the hands free set.
3. Connect the charger to the system connector and see if the phone starts to
charge and if the charging is indicated in the display.
1208-5034 REV 3
Company Internal
11(12)
© Sony Ericsson Mobile Communications
Page 12

Test Instruction, Electrical
6 Revision History
Rev. Date Changes / Comments
1 2008-03-20 First release
2 2008-04-03 Update RF holder photo on page 3.
3 2008-04-17 Add phone position photo on page 4
1208-5034 REV 3
Company Internal
12(12)
© Sony Ericsson Mobile Communications
 Loading...