

Page 1

Test Instruction, Mechanical
Test Instruction, Mechanical
Applicable for W710 and Z710
Contents
General............................................................................................................... 2
1
2 Test Procedure .................................................................................................. 2
2.1 Test flow. ............................................................................................... 2
3 Pre-Test Preparations ....................................................................................... 2
3.1 Liquid Damage Inspection..................................................................... 2
3.2 Software Update.................................................................................... 3
3.3 Phone Lock View................................................................................... 4
4 Service Tests ..................................................................................................... 4
4.1 Main Display Test.................................................................................. 4
4.2 External Display Test ............................................................................ 5
4.3 LED/Illumination Test ............................................................................ 5
4.4 Keyboard Test ....................................................................................... 5
4.5 Speaker Test ......................................................................................... 6
4.6 Earphone Test....................................................................................... 6
4.7 Microphone Test.................................................................................... 6
4.8 Vibrator Test.......................................................................................... 6
4.9 Camera Test.......................................................................................... 7
4.10 Accelerometer Test ............................................................................... 7
4.11 Memory Stick Test................................................................................. 7
4.12 FM Radio Test....................................................................................... 8
4.13 Real Time Clock Test ............................................................................ 8
4.14 Total Call Time Test .............................................................................. 8
4.15 Security Test ......................................................................................... 8
5 Manual Tests...................................................................................................... 9
5.1 SIM Test ................................................................................................ 9
5.2 Infrared Test .......................................................................................... 9
5.3 Bluetooth ............................................................................................... 9
5.4 System Connector............................................................................... 10
5.5 On The Air Call to Mobile .................................................................... 11
6 Revision History.............................................................................................. 11
2/000 21-1/FEA 209 544/601 B
© Sony Ericsson Mobile Communications AB
Page 2
Test Instruction, Mechanical
1 General
This document describes the process used for software upgrades and how to
functionally test the mobile phone.
If there are any failures, the mobile must be repaired according to the troubleshooting
guide or sent to a higher repair level.
2 Test Procedure
To verify all components within the Mechanical repair package all tests must be
performed
2.1 Test flow
It’s OK to return the phone to the customer if the unit is passing these steps of testing
without any failures. If there are any failures, the phone must be repaired according
to the troubleshooting guide or sent to a higher repair level.
3 Pre-Test Preparations
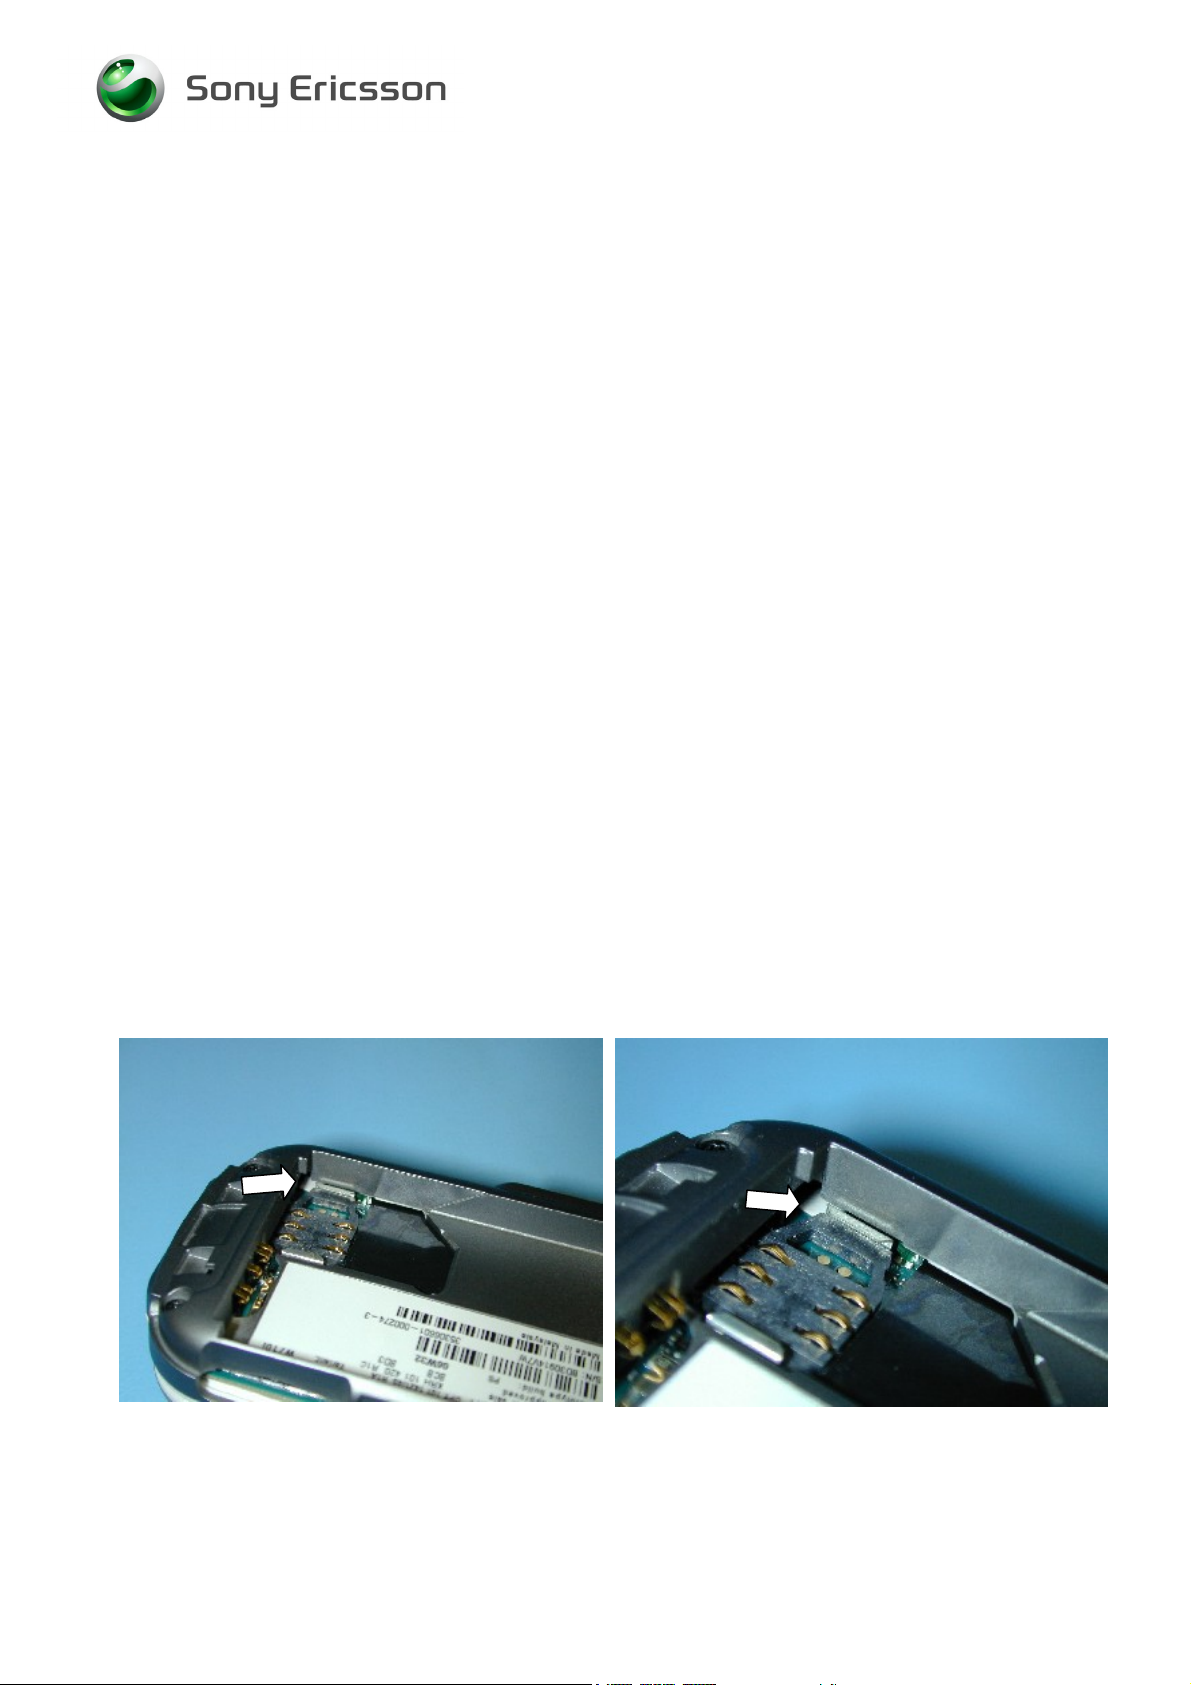
3.1 Liquid Damage Inspection
Before any tests are performed, an inspection of the liquid intrusion indicator should
be made at the location shown. If the liquid intrusion indicator is red this is an
indication of possible liquid exposure. If the liquid intrusion indicator suggests liquid
exposure please consult your local company for additional handling instructions.
The following images show the location of the liquid intrusion indicator.
Location of the Liquid Intrusion Indicator.
(Remove battery cover and battery)
2/000 21-1/FEA 209 544/601 B
© Sony Ericsson Mobile Communications AB
2(11)
Page 3

Test Instruction, Mechanical
3.2 Software Update
Update the handset with the latest signalling software using EMMA III.
3.2.1 Verify Software Version
To verify if the mobile needs new software, you have to check the Software Version
in the mobile. Current Software Versions are checked using the following steps:
1. Start the phone.
2. Press the following Navigation key and keypad sequence: → ∗ ← ← ∗ ← ∗
3. Select “Service Info”.
4. Select “Software info”.
5. Check the software file revisions on the display. (Contact your line supervisor to
determine what the latest SW revision is.)
6. Press “OK” to return to the “Service Info” menu.
3.2.2 Update Software Version
Update the software in the mobile by doing the following:
1. Attach a fully charged battery to the mobile.
2. Open the EMMA III application and log in.
3. Ensure the mobile is powered off.
4. While holding the “C” button, connect the mobile to the USB Flash Cable. (Once
the USB Icon appears in the EMMA III window you may release the “C” button.)
5. Select the appropriate protocol and follow the instructions.
NOTE! If the protocol has not been previously downloaded (Available locally)
select “Server search” for a complete list of script’s available.
2/000 21-1/FEA 209 544/601 B
© Sony Ericsson Mobile Communications AB
3(11)
Page 4

Test Instruction, Mechanical
3.3 Phone Lock View
If the phone lock is on for these models, you must use the Phone Lock View tool in
EMMA III to retrieve the 4 digit phone lock code which will then need to be reset
manually.
1. Attach a fully charged battery to the mobile.
2. Open the EMMA III application and log in.
3. Ensure the mobile is powered off.
4. While holding the “C” button, connect the mobile to the USB Flash Cable.
(Once the USB Icon appears in the EMMA III window you may release the “C”
button.).
5. When prompted, select “Phone Lock View”.
6. The program will display the current phone lock code.
7. To reset the phone lock code to “0000” enter the phone’s Menu and select
Settings/General/Locks/Phone Lock/Change Code (test SIM must be installed
in handset).
8. When prompted, enter the current phone lock code and then enter “0000” for
the new phone lock code.
9. Exit Menu.
4 Service Tests
NOTE! It is not necessary to have a SIM card inserted for the Service Tests.
1. Press the “On/Off” button to start the mobile.
2. The Service menu is entered using the following Navigation key and keypad
sequence: → ∗ ← ← ∗ ← ∗
3. Select “Service Tests” then press the “Select” key.
4.1 Main Display Test
NOTE! Minor variations in display brightness and color may occur between
phones. There may be tiny bright dots on the display. These are called
defective pixels and occur when individual dots have malfunctioned and
can not be adjusted. Two defective pixels are deemed acceptable.
To verify the display:
1. Select “Main Display” from the “Service Tests” menu and press the “Select” key.
2. The words “Main Display” will be splashed in the center of the screen and then
the display toggles between different test patterns. Make sure that there are no
missing segments and the colors/contrast are OK.
3. Press the “Back” key to return to the Service Tests menu.
2/000 21-1/FEA 209 544/601 B
© Sony Ericsson Mobile Communications AB
4(11)
Page 5

Test Instruction, Mechanical
4.2 External Display Test
NOTE! Minor variations in display brightness may occur between phones.
There may be tiny bright dots on the display. These are called defective
pixels and occur when individual dots have malfunctioned and can not
be adjusted. Two defective pixels are deemed acceptable.
To verify the external display:
1. Select “External Display” from the “Service Tests” menu and press the
“Select” key.
2. Close the flip and the words “External Display” will be splashed in the center
of the external screen and then the display toggles between different test
patterns. Make sure there are no missing segments and the contrast is OK.
3. Open the flip to return to the Service Tests menu.
NOTE! If the external display is all dark or very bright it may be due to the
contrast, go to the Service Menu and select the Service Settings then
select External Contrast, close the flip and adjust the contrast using the
up and down volume keys.
4.3 LED/Illumination Test
To verify that the backlighting of the display and the keypad are OK:
1. Select “LED/illumination” from the “Service Tests” menu and press the “Select”
key.
2. The words “LED/illumination” will be splashed on the screen.
3. Check that the backlight and the LED’s under the keypad change in intensity from
bright to dim.
4. Press the “OK” key to end the test and return to the Service Tests menu.
4.4 Keyboard Test
To verify that the keyboard, the Navigation key and side keys are OK:
1. Select “Keyboard” from the “Service Tests” menu and press the “Select” key.
2. The phrase “Keyboard Test. Press any key.” will be splashed on the screen.
3. Press all keys on the keypad and the side volume keys. If they are ok a text
message will be displayed corresponding to the key pressed. All keys should be
tested.
4. If you stop pressing keys the phone will return to the Service Tests menu after a
few seconds.
2/000 21-1/FEA 209 544/601 B
© Sony Ericsson Mobile Communications AB
5(11)
Page 6

Test Instruction, Mechanical
4.5 Speaker Test
WARNING! DO NOT HOLD THE PHONE TO YOUR EAR WHILE PERFORMING
THIS TEST.
To verify the Speaker functions:
1. Select “Speaker” from the “Service Tests” menu and press the “Select key.
2. Adjust the volume with the navigation or side volume keys and make sure that the
speaker is working properly.
3. Press the “OK” key to go back to the Service Tests menu.
4.6 Earphone Test
To verify the Earphone functions:
1. Select “Earphone” from the “Service Tests” menu and press the “Select” key.
2. Adjust the volume with the navigation or side volume keys and make sure that the
speaker is working properly.
3. Press the “OK” key to go back to the Service Tests menu.
4.7 Microphone Test
This test is intended to test the microphone. Therefore, the speaker should be tested
before this test is entered.
1. Select “Microphone” from the “Service Tests” menu and press the “Select” key.
2. The phrase “Microphone Recording.” will be displayed on the screen. Speak into
the phone and then wait until the phrase “Microphone Playing” is displayed. The
message that you just recorded will be played back. Ensure that the recorded
sound is clear.
3. After playing the recording the phone will return to the Service Tests menu.
4.8 Vibrator Test
To verify that the vibrator functions:
1. Select “Vibrator” from the “Service Tests” menu and press the “Select” key.
2. The words “Vibrator test Press any key.” will be displayed on the screen.
3. Press any key and verify that the mobile vibrates multiple times.
4. Press the “OK” key to end the test and return to the Service Tests menu.
2/000 21-1/FEA 209 544/601 B
© Sony Ericsson Mobile Communications AB
6(11)
Page 7

Test Instruction, Mechanical
4.9 Camera Test
NOTE! Minor variations in image appearance may occur between phones. This
is nothing uncommon and is not regarded as a defective camera
module.
To verify that the camera is OK:
1. Select “Camera” from the “Service Tests” menu and press the “Select” key.
2. Focus on an object as to take a picture. Check that the image quality is OK.
NOTE! Picture cannot be taken during this test.
3. Press the “Back” key to return to the Service Tests menu.
4.10 Accelerometer Test
NOTE! The Accelerometer Test is only applicable for the W710
To verify that the Accelerometer is OK:
1. Select “Accelerometer” from the “Service Tests” menu and press the “Select” key.
2. Tilt the phone from side to side. When tilting to the left, the X-coordinate should
decrement. When tilting to the right, the X-coordinate should increment.
NOTE! The X-coordinate should be 125 +/- 25
3. Tilt the display of the phone down and the Y-coordinate should decrement. Tilting
the display of the phone up and the Y-coordinate should increment.
NOTE! The Y-coordinate should be 125 +/- 25
4. Press the “OK” key to return to the Service Tests menu.
4.11 Memory Stick Test
NOTE! A memory stick should be inserted in handset before the start of this
test. To insert the memory stick the back cover must be removed.
To verify the communication between the phone and memory stick is working:
1. Select “Memory Stick” from the “Service Test” menu and press the “Select” key.
2. Verify the handset detects the memory stick is inserted.
3. Press the “OK” key to end the test and return to the Service Tests menu.
2/000 21-1/FEA 209 544/601 B
© Sony Ericsson Mobile Communications AB
7(11)
Page 8

Test Instruction, Mechanical
4.12 FM Radio Test
This test will check that the FM Radio is working.
1. Install a Portable Hands-Free (PHF) to the system connector.
2. Select “FM Radio” from the “Service Tests” menu and press the “Select” key.
3. Using the keypad set the frequency to a known good FM station.
4. While listening to the FM station with the PHF ensure that the sound quality
compares to a known good handset.
5. Remove the PHF and press the “OK” key to end the test.
4.13 Real Time Clock Test
This test will check if the built-in real time clock works.
1. Select “Real Time Clock” from the “Service Tests” menu and press the “Select”
key.
2. The words “Real Time Clock Please wait….” will be displayed on the screen.
After a few seconds you will get information whether the clock is ok or not.
3. After the test results are displayed the test will end and return to the Service
Tests menu.
4.14 Total Call Time Test
The “Total Call Time” option in Service Tests is not applicable.
4.15 Security Test
The “Security” option in Service Tests is not applicable.
2/000 21-1/FEA 209 544/601 B
© Sony Ericsson Mobile Communications AB
8(11)
Page 9

Test Instruction, Mechanical
5 Manual Tests
5.1 SIM Test
To verify that the phone can detect a SIM:
1. Insert a SIM card, connect a battery and start the unit.
2. After the Start-up Menu appears, select “Normal”.
3. If the SIM is detected the phone will start “Searching” for a signal. If the SIM is not
detected the phone will ask you to “Insert SIM card”.
5.2 Infrared Test
To verify that the Infrared (IR) communication is working:
1. Insert a SIM card, connect a battery and start the unit.
2. Activate the IR function by entering the menu and selecting:
Settings/Connectivity/Infrared port/10 Minutes.
3. Set up an infrared link between an IR test device and the mobile. If a link can be
established, the IR module is considered functional.
4. Press and hold the “!” key to get back to the main screen.
5.3 Bluetooth
To verify that the Bluetooth communication is functioning properly:
NOTE! When testing, the distance between the phone being tested and the
other Bluetooth device must be 1.5 to 5 meters.
1. Insert a SIM card, connect a battery and start the unit.
2. Activate the Bluetooth function by entering the menu and selecting: Settings/
Connectivity/Bluetooth/Turn On.
3. Set up a Bluetooth link between the mobile and another device. If a link can be
established, the Bluetooth module is considered functional.
4. When test is completed, turn off the Bluetooth function and press/hold the “!” to
return to the main screen.
2/000 21-1/FEA 209 544/601 B
© Sony Ericsson Mobile Communications AB
9(11)
Page 10

Test Instruction, Mechanical
5.4 System Connector
5.4.1 Battery Charger
To verify if the charging of the phone is properly working:
1. Connect a battery.
2. Connect the Wall Charger to the system connector.
3. Verify that the main and external displays show that the phone is being charged.
4. Remove the Wall Charger from the system connector and verify that the main
display no longer shows the phone being charged.
5.4.2 USB Charging
To verify the phone can charge the battery via a USB Port.
NOTE! Ensure that no USB application is active on the Computer such as
PC Suite or EMMA III
1. Install a battery into the phone.
2. Connect a USB Cable from a Computer to the system connector.
3. Verify that a charging icon appears in the upper right corner of the main display.
4. Remove the USB Cable and verify that the charging icon is no longer displayed.
NOTE! If the charging icon is not displayed, check to make sure the USB
Charging option is turned on. To turn on the USB Charging, go to the
Service Menu and select Service Settings then select “Charging On”.
5.4.3 Portable Hands Free (PHF)
1. Insert a SIM card, connect a battery and start phone.
2. Enter the Service menu using the following Navigation key and keypad
sequence: → ∗ ← ← ∗ ← ∗
3. Select “Service Tests” then press the “Select” key.
4. Install the PHF to the system connector.
5. Select “Microphone” from the “Service Tests” menu and press the “Select” key.
6. The phrase “Microphone Recording.” Will be displayed on the screen. Speak into
the PHF and then wait until the phrase “Microphone Playing” is displayed. The
message that you just recorded will be played back through the PHF earpiece.
Ensure that the recorded sound is clear.
7. Press and hold the “Back” key to get out of the “Service Tests” menu and remove
the PHF form the system connector.
2/000 21-1/FEA 209 544/601 B
© Sony Ericsson Mobile Communications AB
10(11)
Page 11

Test Instruction, Mechanical
5.5 On The Air Call to Mobile
NOTE! An “On the Air” test can only be performed if the mobile has an
activated SIM card properly installed in the mobile and a network signal
is available. This test cannot be performed with a Test SIM.
To verify the radio functions in the phone do the following:
1. Insert an operator SIM card and start phone.
2. Set up a call from a landline phone (PSTN) to the mobile.
3. Answer the phone call.
4. Check that the ringer is working and that the backlight switches on OK.
5. Check that the quality of sound both in the mobile and the landline phone (PSTN)
are OK.
6. Adjust the volume up and down using the side volume key and check that the
volume in the mobile is altered.
7. End the call. Check that the ending procedure is OK and that the talk time is
displayed.
6 Revision History
Rev. Date Changes / Comments
A 2006-08-29 Initial Release
B 2006-09-29
• Update Bluetooth test specification.
• Changed liquid intrusion pictures
• Added external display contrast note to external display
• Added note to USB charging section
test section
2/000 21-1/FEA 209 544/601 B
© Sony Ericsson Mobile Communications AB
11(11)
 Loading...