

Page 1

User guide
™
Xperia
C6902/C6903/C6906
Z1
Page 2

Contents
Getting started...............................................................................6
Overview.............................................................................................6
Assembly............................................................................................7
Starting your device for the first time...................................................8
Why do I need a Google™ account?...................................................9
Charging your device........................................................................10
Learning the basics......................................................................11
Using the touchscreen......................................................................11
Locking and unlocking the screen.....................................................13
Home screen....................................................................................13
Application screen.............................................................................15
Navigating applications.....................................................................16
Small apps........................................................................................16
Widgets............................................................................................17
Lock screen......................................................................................18
Shortcuts and folders........................................................................18
Background and themes...................................................................19
Status and notifications.....................................................................20
Icons in the status bar.......................................................................21
Application overview.........................................................................22
Downloading applications............................................................24
Downloading applications from Google Play™..................................24
Downloading applications from other sources...................................24
Internet and networks..................................................................25
Browsing the web.............................................................................25
Internet and messaging settings........................................................25
Wi-Fi®..............................................................................................26
Sharing your mobile data connection................................................27
Controlling data usage......................................................................28
Selecting cellular networks................................................................29
Virtual private networks (VPNs)..........................................................30
Basic settings...............................................................................31
Accessing settings............................................................................31
Sound, ringtone, and volume............................................................31
Date and time...................................................................................32
X-Reality™ for Mobile........................................................................32
Screen settings.................................................................................33
Language settings.............................................................................33
Airplane mode...................................................................................33
2
This is an Internet version of this publication. © Print only for private use.
Page 3

Enhancing the sound output.............................................................34
Typing text...................................................................................35
On-screen keyboard.........................................................................35
Phonepad.........................................................................................36
Entering text using voice input...........................................................37
Editing text........................................................................................37
Personalizing the Xperia keyboard.....................................................38
Calling..........................................................................................39
Making calls......................................................................................39
Receiving calls..................................................................................40
Ongoing calls....................................................................................41
Using the call log...............................................................................41
Forwarding calls................................................................................42
Restricting calls.................................................................................42
Multiple calls.....................................................................................42
Conference calls...............................................................................43
Voicemail..........................................................................................43
Emergency calls................................................................................43
Contacts ......................................................................................45
Transferring contacts........................................................................45
Searching and viewing contacts........................................................46
Adding and editing contacts..............................................................47
Favorites and groups........................................................................48
Sending contact information..............................................................48
Avoiding duplicate entries in the Contacts application.......................48
Backing up contacts.........................................................................49
Messaging and chat.....................................................................50
Reading and sending messages.......................................................50
Organizing your messages................................................................51
Calling from a message.....................................................................52
Messaging settings...........................................................................52
Instant messaging and video chat.....................................................52
Email.............................................................................................54
Setting up email................................................................................54
Sending and receiving email messages.............................................54
Email preview pane...........................................................................56
Organizing your email messages.......................................................56
Email account settings......................................................................57
Gmail™.............................................................................................57
Socialife™....................................................................................59
Using the Socialife™ application.......................................................59
3
This is an Internet version of this publication. © Print only for private use.
Page 4

Music ...........................................................................................60
Transferring music to your device .....................................................60
Listening to music.............................................................................60
WALKMAN home screen .................................................................61
Playlists.............................................................................................62
Sharing music...................................................................................63
Enhancing the sound........................................................................64
Visualizer ..........................................................................................64
Recognizing music with TrackID™....................................................64
Music Unlimited online service...........................................................65
FM radio.......................................................................................66
Listening to the radio.........................................................................66
Favorite radio channels.....................................................................67
Sound settings..................................................................................67
Camera.........................................................................................68
Taking photos and recording videos..................................................68
Face detection..................................................................................69
Using Smile Shutter™ to capture smiling faces.................................69
Adding the geographical position to your photos...............................70
General camera settings...................................................................70
Still camera settings..........................................................................71
Video camera settings.......................................................................74
Album...........................................................................................77
Viewing photos and videos................................................................77
Sharing and managing photos and videos.........................................78
Editing photos with the Photo editor application................................79
Photo albums....................................................................................80
Viewing your photos on a map..........................................................81
Videos..........................................................................................83
Watching videos in the Movies application........................................83
Transferring video content to your device .........................................84
Managing video content....................................................................85
Video Unlimited service.....................................................................85
Connectivity.................................................................................86
Sharing content with DLNA Certified™ devices.................................86
NFC..................................................................................................88
Bluetooth® wireless technology........................................................90
Connecting your device to a computer..............................................93
Connecting your device to a TV set using a cable.............................95
Screen mirroring................................................................................96
Using a headset ...............................................................................96
Smart Connect..................................................................................97
4
This is an Internet version of this publication. © Print only for private use.
Page 5

Synchronizing data on your device..............................................99
About synchronizing data on your device..........................................99
Synchronizing with Google™ services...............................................99
Synchronizing with Microsoft® Exchange ActiveSync®...................100
Synchronizing with Facebook™......................................................100
Maps and locations....................................................................102
Location services and sources........................................................102
Using GPS......................................................................................102
Google Maps™...............................................................................103
Getting directions............................................................................103
Calendar and alarm clock..........................................................105
Calendar.........................................................................................105
Alarm clock.....................................................................................105
Locking and protecting your device...........................................108
IMEI number...................................................................................108
SIM card protection .......................................................................108
Setting a screen lock.......................................................................109
Support and maintenance..........................................................111
Updating your device......................................................................111
Finding your device.........................................................................112
Memory..........................................................................................112
Backup and restore application.......................................................113
Resetting and restarting..................................................................115
Battery and power management.....................................................115
Support application.........................................................................117
Usage info.......................................................................................117
Recycling your device.....................................................................117
Important information.................................................................118
Important information leaflet............................................................118
Limitations to services and features.................................................118
Protecting your device from water and dust....................................118
Legal information.............................................................................120
Index...........................................................................................121
5
This is an Internet version of this publication. © Print only for private use.
Page 6

Getting started
Overview
1 Headset jack
2 Proximity sensor/Light sensor
3 Ear receiver/Charging light/Notification light
4 Front camera lens
5 Micro SIM card slot cover
6 Power key
7 Volume/Zoom key
8 Camera key
9 Strap hole
10 Main speaker and microphone
6
This is an Internet version of this publication. © Print only for private use.
Page 7

11 Main camera lens
12 Camera light
13 Second microphone
14 NFC™ detection area
15 Memory card slot cover
16 Charger/USB cable port cover
17 Charging dock connector
Do not insert fingers or other objects into the opening for the second microphone (illustrated in
item 13 above) to avoid damaging your device.
Assembly
A protective plastic sheet is attached to the screen. You should peel off this sheet before
using the touchscreen. Otherwise, the touchscreen might not function properly.
To insert the micro SIM card
Do not insert a memory card into the micro SIM card slot.
1 Insert a fingernail into the gap between the micro SIM card slot cover and the
device, then detach the cover.
2 Using a fingernail, pull out the micro SIM card holder.
3 Place the micro SIM card on the holder, with the gold-colored contacts on the
micro SIM card facing up.
4 Insert the micro SIM card holder back into the device.
5 Re-attach the micro SIM card slot cover.
Inserting the micro SIM card into the device without the SIM card holder could damage your
micro SIM card or your device, and Sony Mobile does not warrant and will not be responsible
for any damage caused by such action.
To insert the memory card
Do not insert the memory card into the micro SIM card slot.
7
This is an Internet version of this publication. © Print only for private use.
Page 8

1 Insert a fingernail into the gap between the memory card cover and the device,
then detach the memory card cover.
2 Place the memory card in the memory card slot, with the gold-colored contacts
facing towards you, then push the memory card all the way into the slot until you
hear a locking sound.
3 Re-attach the memory card cover.
A memory card may not be included at purchase in all markets.
To remove the micro SIM card
1 Remove the cover of the micro SIM card slot cover.
2 Pull out the micro SIM card holder.
3 Remove the micro SIM card.
4 Insert the micro SIM card holder back into its slot.
5 Re-attach the micro SIM card slot cover.
To remove the memory card
1 Turn off the device, or unmount the memory card from Settings > Storage >
Unmount SD card.
2 Remove the cover of the memory card slot, then press against the edge of the
memory card and release it.
3 Draw the card outwards to remove it fully.
Starting your device for the first time
The first time you start your device, a setup guide opens to help you configure basic
settings, sign in to some accounts, and personalize your device. For example, if you have
a Sony Entertainment Network account, you can sign in to it here and get set up
straightaway. And you can download Internet and Wi-Fi® settings.
You can also access the setup guide later from the Settings menu.
To turn on the device
Make sure that the battery is charged for at least 30 minutes before you turn on the device for
the first time.
8
This is an Internet version of this publication. © Print only for private use.
Page 9

1 Press and hold down the power key until the device vibrates.
2 If your screen goes dark, briefly press the power key to activate the screen.
3 Enter your SIM card PIN when requested, then tap .
4 If your screen is locked, place a finger on the screen and swipe up or down to
unlock it.
5 Wait a while for the device to start.
Your SIM card PIN is initially supplied by your network operator, but you can change it later
from the Settings menu. To correct a mistake made while entering your SIM card PIN, tap .
To turn off the device
1 Press and hold down the power key until the options menu opens.
2 In the options menu, tap Power off.
3 Tap OK.
It may take a while for the device to shut down.
Why do I need a Google™ account?
Your Xperia™ device from Sony runs on the Android™ platform developed by Google™.
A range of Google™ applications and services are available on your device when you
purchase it, for example, Gmail™, Google Maps™, YouTube™, and Google Play™—the
online store for downloading Android™ applications. To get the most out of these
services, you need a Google™ account. For example, a Google™ account is mandatory
if you want to:
• Download and install applications from Google Play™.
• Synchronize email, contacts, and the calendar.
• Chat with friends using the Hangouts™ application.
• Synchronize your browsing history and bookmarks.
For more information about Android™ and Google™, go to
www.sonymobile.com/support.
To set up a Google™ account on your device
1 From your Home screen, tap .
2 Find and tap Settings > Add account > Google.
3 Follow the registration wizard to create a Google™ account, or sign in if you
already have an account.
You can also sign in to or create a Google™ account from the setup guide the first time you
start your device. Or you can go online and create an account at www.google.com/accounts.
9
This is an Internet version of this publication. © Print only for private use.
Page 10

Charging your device
The battery is partly charged when you buy the device. You can still use your device
while it is charging. Read more about the battery and how to improve the performance in
Battery and power management on page 115.
To charge your device
1 Plug the charger into a power outlet.
2 Plug one end of the USB cable into the charger (or into the USB port of a
computer).
3 Plug the other end of the cable into the micro USB port on your device, with the
USB symbol facing up. The notification light illuminates when charging begins.
4 When the device is fully charged, disconnect the cable from your device by pulling
it straight outward. Make sure not to bend the connector.
If the battery is completely discharged, it may take a few minutes before the notification light
illuminates and the charging icon appears.
Battery notification light status
Green The battery charge level is greater than 90%
Flashing red The battery level is low
Orange The battery is charging and the battery charge level is less than 90%
10
This is an Internet version of this publication. © Print only for private use.
Page 11

Learning the basics
Using the touchscreen
Tapping
• Open or select an item.
• Mark or unmark a checkbox or option.
• Enter text using the on-screen keyboard.
Touching and holding
• Move an item.
• Activate an item-specific menu.
• Activate selection mode, for example, to select several items from a list.
11
This is an Internet version of this publication. © Print only for private use.
Page 12

Pinching and spreading
• Zoom in or out on a web page, a photo, or a map.
Swiping
• Scroll up or down a list.
• Scroll left or right, for example, between Home screen panes.
12
This is an Internet version of this publication. © Print only for private use.
Page 13

Flicking
• Scroll quickly, for example, in a list or on a web page. You can stop the scrolling
movement by tapping the screen.
Locking and unlocking the screen
When your device is on and left idle for a set period of time, the screen darkens to save
battery power, and locks automatically. This lock prevents unwanted actions on the
touch screen when you are not using it.
To activate the screen
• Briefly press the power key .
To unlock the screen
• Place a finger on the screen and swipe up or down.
There are several ways to unlock the screen. For more information, see Setting a screen lock
on page 109.
To lock the screen manually
• When the screen is active, briefly press the power key .
Home screen
The Home screen is the starting point for using your device. It's similar to the desktop
on a computer screen. Your Home screen can have up to seven panes, which extend
13
This is an Internet version of this publication. © Print only for private use.
Page 14

beyond the regular screen display width. The number of Home screen panes is
represented by a series of dots at the top of the Home screen. The highlighted dot
shows the pane that you are currently in.
To go to the Home screen
• Press .
To browse the Home screen
Home screen panes
You can add new panes to your Home screen (up to a maximum of seven panes) and
delete panes. You can also set the pane that you want to use as the main Home screen
pane.
To set a pane as the main Home screen pane
1 Touch and hold an empty area on your Home screen until the device vibrates.
2 Flick left or right to browse to the pane that you want to set as your main Home
screen pane, then tap .
To add a pane to your Home screen
1 Touch and hold an empty area on your Home screen until the device vibrates.
2 Flick left or right to browse the panes, then tap .
14
This is an Internet version of this publication. © Print only for private use.
Page 15

To delete a pane from your Home screen
1 Touch and hold an empty area on your Home screen until the device vibrates.
2 Flick left or right to browse to the pane that you want to delete, then tap .
Application screen
The Application screen, which you open from the Home screen, contains the
applications that come pre-installed on your device as well as applications that you
download.
To view all applications on the Application screen
1 From your Home screen, tap .
2 Flick left or right on the Application screen.
To open an application from the Application screen
• Flick left or right to find the application, then tap the application.
To open the Application screen menu
• When the Application screen is open, drag the left edge of the screen to the right.
To move an application on the Application screen
1 Open the Application screen menu and make sure that Own order is selected
under CATEGORIES.
2 Touch and hold the application until it magnifies and the device vibrates, then drag
it to the new location.
To add an application shortcut to the Home screen
1 From the Application screen, touch and hold an application icon until the screen
vibrates, then drag the icon to the top of the screen. The Home screen opens.
2 Drag the icon to the desired location on the Home screen, then release your
finger.
To arrange applications on the Application screen
1 To open the Application screen menu, drag the left edge of the Application screen
to the right.
2 Select the desired option under CATEGORIES.
To uninstall an application from the Application screen
1 To open the Application screen menu, drag the left edge of the Application screen
to the right.
2 Tap Uninstall. All uninstallable applications are indicated by .
3 Tap the application that you want to uninstall, then tap Uninstall.
15
This is an Internet version of this publication. © Print only for private use.
Page 16

Navigating applications
You can navigate between applications using the navigation keys, the small apps bar,
and the recently used applications window, which lets you switch easily between all
recently used applications. Some applications are closed when you press to exit while
others continue to run in the background or pause. If the application is paused or runs in
the background, you can continue where you left off the next time you open the
application.
1 Recently used applications window – Open a recently used application
2 Small apps bar – Open a small app
3 Task navigation key – Open the recently used applications window and the small apps bar
4 Home navigation key – Exit an application and go back to the Home screen
5 Back navigation key – Go back to the previous screen within an application or close the application
To open the recently used applications window
• Press .
To open a menu in an application
• While using the application, press .
A menu is not available in all applications.
Small apps
You can get quick access to several small apps at any time using the small apps bar. A
small app only takes up a small area of your screen, so you can interact with a small app
and another application at the same time on the same screen. For example, you can
have a web page open and then open the Calculator small app on top of it and perform
calculations. You can download more small apps from Google Play™.
To open a small app
1 To make the small apps bar appear, press .
2 Tap the small app that you want to open.
You can open several small apps at the same time.
16
This is an Internet version of this publication. © Print only for private use.
Page 17

To close a small app
• Tap on the small app window.
To download a small app
1 From the small apps bar, tap , then tap and tap .
2 Search for the small app that you want to download, then follow the instructions
to download it and complete the installation.
To move a small app
• When the small app is open, touch and hold the top left corner of the small app,
then move it to the desired location.
To minimize a small app
• When the small app is open, touch and hold the top left corner of the small app,
then drag it to the right edge or to the bottom edge of the screen.
To rearrange the small apps in the small apps bar
• Touch and hold a small app and drag it to the desired position.
To remove a small app from the small apps bar
• Touch and hold a small app, then drag it outside of the small apps bar.
To restore a previously removed small app
1 Open the small apps bar, then tap .
2 Touch and hold the small app you want to restore, then drag it into the small apps
bar.
To add a widget as a small app
1 To make the small apps bar appear, press .
2 Tap > > .
3 Select a widget.
4 Enter a name for the widget, if desired, then tap OK.
Widgets
Widgets are small applications that you can use directly on your Home screen. They also
function as shortcuts. For example, the Weather widget allows you to see basic weather
information directly on your Home screen. But when you tap the widget, the full Weather
application opens. You can download additional widgets from Google Play™.
To add a widget to the Home screen
1 Touch and hold an empty area on your Home screen until the device vibrates,
then tap Widgets.
2 Find and tap the widget that you want to add.
17
This is an Internet version of this publication. © Print only for private use.
Page 18

To resize a widget
1 Touch and hold a widget until it magnifies and the device vibrates, then release
the widget. If the widget can be resized, for example, the Calendar widget, then a
highlighted frame and resizing dots appear.
2 Drag the dots inward or outward to shrink or expand the widget.
3 To confirm the new size of the widget, tap anywhere on the Home screen.
To move a widget on the Home screen
• Touch and hold the widget until it magnifies and the device vibrates, then drag it
to the new location.
To delete a widget from the Home screen
• Touch and hold the widget until it magnifies and the device vibrates, then drag it
to .
Lock screen
The lock screen is the screen that you see when the device is locked but the screen is
active. The lock screen can have up to five panes and you can add one widget to each
pane. You can then access these widgets from the lock screen. For example, you can
add the Calendar widget and an email widget so that you can gain quicker access to
these applications.
The Clock widget is located by default in the middle pane of the lock screen.
To add a widget to the lock screen
1 To activate the screen, briefly press the power key .
2 Swipe inward from the top-left area of the screen until appears, then tap it.
3 If required, enter your PIN code, pattern, or password to unlock the screen.
4 Find and tap the widget that you want to add.
5 Follow the on-screen instructions, if necessary, to finish adding the widget.
To move a widget on the lock screen
1 To activate the screen, briefly press the power key .
2 Touch and hold the widget that you want to move, then drag it to the new
location.
To remove a widget from the lock screen
1 To activate the screen, briefly press the power key .
2 Touch and hold the widget that you want to remove, then drag it to .
Shortcuts and folders
Use shortcuts and folders to manage your applications and keep your Home screen tidy.
18
This is an Internet version of this publication. © Print only for private use.
Page 19

1 Access a folder containing applications
2 Access an application using a shortcut
To add a shortcut to your Home screen
1 Touch and hold an empty area on your Home screen until the device vibrates and
the customization menu appears.
2 In the customization menu, tap Apps.
3 Scroll through the list of applications and select an application. The selected
application gets added to the Home screen.
In step 3, alternatively, you can tap Shortcuts and then select an application from the list
available. If you use this method to add shortcuts, some of the applications available allow
you to add specific functionality to the shortcut.
To move an item on the Home screen
• Touch and hold the item until it magnifies and the device vibrates, then drag the
item to the new location.
To delete an item from the Home screen
• Touch and hold an item until it magnifies and the device vibrates, then drag the
item to .
To create a folder on the Home screen
• Touch and hold an application icon or a shortcut until it magnifies and the device
vibrates, then drag and drop it on top of another application icon or shortcut.
To add items to a folder on the Home screen
• Touch and hold an item until it magnifies and the device vibrates, then drag the
item to the folder.
To rename a folder on the Home screen
1 Tap the folder to open it.
2 Tap the folder's title bar to show the Folder name field.
3 Enter the new folder name and tap Done.
Background and themes
You can adapt the Home screen to your own style using wallpapers and different
themes. You can also change the wallpaper on the lock screen.
19
This is an Internet version of this publication. © Print only for private use.
Page 20

To change your Home screen wallpaper
1 Touch and hold an empty area on your Home screen until the device vibrates.
2 Tap Wallpapers and select an option.
To set a Home screen theme
1 Touch and hold an empty area on your Home screen until the device vibrates.
2 Tap Themes, then select a theme.
When you change a theme, the background also changes in some applications.
To change the wallpaper for the lock screen
1 Drag the status bar downward, then tap .
2 Tap Personalization > Lock screen.
3 Select an option, then follow the instructions to change your wallpaper.
Status and notifications
The icons in the status bar inform you of events such as new messages and calendar
notifications, activities in progress such as file downloads, and status information such as
battery level and signal strength. You can drag down the status bar to open the
Notification panel and handle your notifications.
To open or close the Notification panel
To take action on a notification
• Tap the notification.
This is an Internet version of this publication. © Print only for private use.
20
Page 21

To dismiss a notification from the Notification panel
• Place your finger on a notification and flick left or right.
To clear all notifications from the Notification panel
• Tap Clear.
Notification light
A notification light informs you about battery status and some other events. For example,
a flashing blue light means there is a new message or a missed call.
Icons in the status bar
Status icons
The following status icons may appear on your screen:
Signal strength
No signal
Roaming
GPRS is available
EDGE is available
LTE is available
NFC is activated
3G is available
Sending and downloading GPRS data
Sending and downloading EDGE data
Sending and downloading 3G data
Network is available
Sending and downloading data
STAMINA mode is activated
Battery status
The battery is charging
GPS is activated
Airplane mode is activated
The Bluetooth® function is activated
The SIM card is not inserted
The microphone is muted
The speakerphone is on
Silent mode
Vibrate mode
21
This is an Internet version of this publication. © Print only for private use.
Page 22

An alarm is set
Synchronization is ongoing
Problem with sign in or synchronization
A Wi-Fi® connection is enabled and wireless networks are available
Depending on your service provider, network and/or region, the functions or services
represented by some icons in this list may not be available.
Notification icons
The following notification icons may appear on your screen:
New email message
New text message or multimedia message
New voicemail
Upcoming calendar event
A song is playing
The device is connected to a computer via a USB cable
Warning message
Error message
Missed call
Call ongoing
Call on hold
Call forwarding is turned on
Software updates are available
Downloading data
Uploading data
More (undisplayed) notifications
Application overview
Use the Alarm and Clock application to set various kinds of alarms.
Use your web browser to navigate and view web pages, manage bookmarks,
and manage text and images.
Use the Calculator application to perform basic calculations.
Use the Calendar application to keep track of your events and manage your
appointments.
Use the camera to take photos and record video clips.
Use the Contacts application to manage phone numbers, email addresses and
other information related to your contacts.
Access your downloaded applications.
22
This is an Internet version of this publication. © Print only for private use.
Page 23

Use the Email application to send and receive emails through both private and
corporate accounts.
Use the Facebook application to engage in social networking with friends, family
members, and colleagues around the world.
Browse and listen to FM radio stations.
Use the Album application to view and to work with your photos and videos.
Use the Gmail™ application to read, write, and organize email messages.
Search for information in your device and on the web.
View your current location, find other locations, and calculate routes using
Google Maps™.
Go to Google Play™ to download free and paid applications for your device.
Use the Messaging application to send and receive text and multimedia
messages.
Use the Movies application to play movies and other video content saved or
downloaded to your device. Or play your movies on other devices connected to
the same network.
Use the "WALKMAN" application to organize and play music, audio books and
podcasts.
Navigate your way using spoken, turn-by-turn instructions.
View news stories and weather forecasts.
Make phone calls by dialing the number manually or by using the smart dial
function.
Search for places, for example, restaurants and cafés.
Use the Video Unlimited application to rent and purchase videos.
Use the subscription-based Music Unlimited application to access millions of
songs over a mobile data connection or Wi-Fi® connection.
Optimize settings to suit your own requirements.
Use the Hangouts™ application to chat with friends online.
Identify music tracks that you hear playing in your surroundings, and get artist,
album, and other info.
Use the Help application to access user support in your device. For example,
you can access a User guide, troubleshooting information, plus tips and tricks.
Use YouTube™ to share and view videos from around the world.
Download and install new applications and updates.
Some applications are not supported by all networks and/or service providers in all areas.
23
This is an Internet version of this publication. © Print only for private use.
Page 24

Downloading applications
Downloading applications from Google Play™
Google Play™ is the official online Google store for downloading applications, games,
music, movies, and books. It includes both free and paid applications. Before you start
downloading from Google Play™, make sure that you have a working Internet
connection, preferably over Wi-Fi® to limit data traffic charges.
To use Google Play™, you need to have a Google™ account. Google Play™ may not be
available in all countries or regions.
To download an application from Google Play™
1 From the Home screen, tap .
2 Find and tap Play Store.
3 Find an item you wish to download by browsing categories, or by using the search
function.
4 Tap the item to view its details, and follow the instructions to complete the
installation.
Some applications may need to access data, settings, and various functions on your device in
order to work properly. Only install and give permissions to applications you trust.
You can view the permissions granted to a downloaded application by tapping the application
under Settings > Apps.
Downloading applications from other sources
When your device is set to allow downloads from sources other than Google Play™, you
can download applications directly from other websites by following the relevant
download instructions.
Installing applications of unknown or unreliable origin can damage your device. Only download
applications from reliable sources. Contact the application provider if you have any questions
or concerns.
To allow the download of applications from other sources
1 From your Home screen, tap .
2 Find and tap Settings > Security.
3 Mark the Unknown sources checkbox.
4 Tap OK.
Some applications may need to access data, settings, and various functions on your device in
order to work properly. Only install and give permissions to applications you trust.
You can view the permissions granted to a downloaded application by tapping the application
under Settings > Apps.
24
This is an Internet version of this publication. © Print only for private use.
Page 25

Internet and networks
Browsing the web
The Google Chrome™ web browser for Android™ devices comes pre-installed in most
markets. Go to http://support.google.com/chrome and click the "Chrome for Mobile" link
to get more detailed information about how to use this web browser.
To browse with Google Chrome™
1 From your Home screen, tap .
2 Find and tap .
3 Enter a search term or web address in the search and address field, then tap Go
on the keyboard.
1 Search and address field
2 Refresh the page
3 Access browser tabs
4 View help and options
5 Go back a page in the browser history
Internet and messaging settings
To access the Internet and to send multimedia messages, you must have a mobile data
connection and the correct settings, also known as APN (Access Point Name) settings.
The APN identifies the network that a mobile device can connect to.
You can usually download Internet and messaging settings when you set up your device
for the first time with a SIM card inserted. In other cases, the settings may be preinstalled. If not, you can download or add the settings manually. Contact your network
operator for detailed information about Internet and messaging settings.
If you cannot access the Internet, have no data connection, or cannot send or receive
multimedia messages, try deleting all Internet and messaging settings and then add them
again.
To download Internet and messaging settings
1 Drag the status bar downward, then tap .
2 Tap More… > Internet settings.
3 Tap Accept.
25
This is an Internet version of this publication. © Print only for private use.
Page 26

To add Internet settings manually
1 From the Home screen, tap .
2 Find and tap Settings > More… > Mobile networks > Access Point Names.
3 Tap .
4 Tap New APN.
5 Tap Name and enter the name of the network profile that you want to create.
6 Tap APN and enter the access point name.
7 Enter all other information required by your network operator.
8 Tap , then tap Save.
To view the current APN
1 From your Home screen, tap .
2 Find and tap Settings > More… > Mobile networks.
3 Tap Access Point Names.
If you have several available connections, the active network connection is indicated by a
marked button.
To delete all Internet and messaging settings
1 Drag the status bar downward, then tap .
2 Tap More… > Mobile networks > Access Point Names.
3 Tap .
4 Tap Reset to default. All Internet and messaging settings are deleted.
Wi-Fi®
Use Wi-Fi® connections to surf the Internet, download applications, or send and receive
emails. Once you have connected to a Wi-Fi® network, your device remembers the
network and automatically connects to it the next time you come within range.
Some Wi-Fi® networks require you to log in to a web page before you can get access.
Contact the relevant Wi-Fi® network administrator for more information.
The signal strength of Wi-Fi® networks can differ. Moving closer to the Wi-Fi® access
point increases the signal strength.
Available Wi-Fi® networks may be open or secured:
• Open networks are indicated by next to the Wi-Fi® network name.
• Secured networks are indicated by next to the Wi-Fi® network name.
Some Wi-Fi® networks do not show up in the list of available networks because they do not
broadcast their network name (SSID). If you know the network name, you can add it manually
to your list of available Wi-Fi® networks.
To turn on Wi-Fi®
1 From your Home screen, tap .
2 Find and tap Settings.
3 Drag the slider beside Wi-Fi to the right to turn on the Wi-Fi® function.
It may take a few seconds before Wi-Fi® is enabled.
To connect to a Wi-Fi® network automatically
1 Make sure the Wi-Fi® function is turned on.
2 Drag the status bar downward, then tap .
3 Tap Wi-Fi . All available Wi-Fi® networks are displayed.
4 Tap a Wi-Fi® network to connect to it. For secured networks, enter the relevant
password. is displayed in the status bar once you are connected.
Tap and then tap Scan to search for new available networks.
26
This is an Internet version of this publication. © Print only for private use.
Page 27

To add a Wi-Fi® network manually
1 Make sure the Wi-Fi® function is turned on.
2 Drag the status bar downward, then tap .
3 Tap Wi-Fi .
4 Tap .
5 Enter the Network SSID information.
6 To select a security type, tap the Security field.
7 If required, enter a password.
8 Tap Save.
Contact your Wi-Fi® network administrator to get the Network SSID and password.
Wi-Fi® settings
When you are connected to a Wi-Fi® network or when there are Wi-Fi® networks
available in your vicinity, it is possible to view the status of these networks. You can also
enable your device to notify you whenever an open Wi-Fi® network is detected.
If you are not connected to a Wi-Fi® network, your device uses a cellular data
connection to access the Internet (if you have set up and enabled a cellular data
connection on your device). By adding a Wi-Fi® sleep policy, you can specify when to
switch from Wi-Fi® to cellular data.
To enable Wi-Fi® network notifications
1 Turn on Wi-Fi®, if it is not already on.
2 From your Home screen, tap .
3 Find and tap Settings > Wi-Fi.
4 Press .
5 Tap Advanced.
6 Mark the Network notification checkbox.
To view detailed information about a connected Wi-Fi® network
1 From the Home screen, tap .
2 Find and tap Settings > Wi-Fi.
3 Tap the Wi-Fi® network that you are currently connected to. Detailed network
information is displayed.
To add a Wi-Fi® sleep policy
1 From the Home screen, tap .
2 Find and tap Settings > Wi-Fi.
3 Press .
4 Tap Advanced.
5 Tap Keep Wi-Fi on during sleep.
6 Select an option.
Sharing your mobile data connection
You can share your device's mobile data connection with a single computer using a USB
cable. This process is called USB tethering. You can also share your device's data
connection with up to eight other devices at once by turning your device into a portable
Wi-Fi® hotspot. When your device's mobile data connection is successfully shared, the
sharing devices can use your device's data connection, for example, to surf the Internet,
download applications, or send and receive emails.
You may need to prepare your computer to establish a network connection via USB cable. Go
to www.android.com/tether to get the most current information.
27
This is an Internet version of this publication. © Print only for private use.
Page 28

To share your data connection using a USB cable
1 Deactivate all USB cable connections to your device.
2 Using the USB cable that came with your device, connect your device to a
computer.
3 Drag the status bar downward, then tap .
4 Tap More… > Tethering & portable hotspot.
5 Mark the USB tethering checkbox. is displayed in the status bar once you are
connected.
6 To stop sharing your data connection, unmark the USB tethering checkbox or
disconnect the USB cable.
You cannot share your device's data connection and SD card over a USB cable at the same
time.
To use your device as a portable Wi-Fi® hotspot
1 Drag the status bar downward, then tap .
2 Tap More… > Tethering & portable hotspot.
3 Tap Portable Wi-Fi hotspot settings > Configure Wi-Fi hotspot.
4 Enter the Network SSID information.
5 To select a security type, tap the Security field. If required, enter a password.
6 Tap Save.
7 Mark the Portable Wi-Fi hotspot checkbox. is displayed in the status bar once
you are connected.
8 To stop sharing your data connection via Wi-Fi®, unmark the Portable Wi-Fi
hotspot checkbox.
To rename or secure your portable hotspot
1 From the Home screen, tap .
2 Find and tap Settings > More… > Tethering & portable hotspot.
3 Tap Portable Wi-Fi hotspot settings > Configure Wi-Fi hotspot.
4 Enter the Network SSID for the network.
5 To select a security type, tap the Security field.
6 If required, enter a password.
7 Tap Save.
Controlling data usage
You can keep track of the amount of data transferred to and from your device over your
mobile data or Wi-Fi® connection during a given period. For example, you can view the
amount of data used by individual applications. For data transferred over your mobile
data connection, you can also set data usage warnings and limits to avoid additional
charges.
Adjusting data usage settings can help you keep greater control over data usage but cannot
guarantee the prevention of additional charges.
To turn data traffic on or off
1 Drag the status bar downwards, then tap .
2 Tap Data usage.
3 Drag the slider beside Mobile data traffic to turn data traffic on or off.
When data traffic is turned off, your device can still establish Wi-Fi® and Bluetooth®
connections.
To set a data usage warning
1 Make sure that data traffic is turned on.
2 Drag the status bar downwards, then tap .
3 Find and tap Data usage.
4 To set the warning level, drag the warning line to the desired value. You receive a
warning notification when the amount of data traffic approaches the level you set.
28
This is an Internet version of this publication. © Print only for private use.
Page 29

To set a data usage limit
1 Make sure that data traffic is turned on.
2 Drag the status bar downwards, then tap .
3 Find and tap Data usage.
4 Mark the Set mobile data limit checkbox if it is not marked, then tap OK.
5 To set the data usage limit, drag the corresponding line to the desired value.
Once your data usage reaches the set limit, data traffic on your device will be turned off
automatically.
To control the data usage of individual applications
1 Drag the status bar downwards, then tap .
2 Find and tap Data usage.
3 Find and tap the desired application.
4 Mark the Restrict background data checkbox.
5 To access more specific settings for the application (if available), tap View app
settings and make the desired changes.
The performance of individual applications may be affected if you change the related data
usage settings.
To view data transferred via Wi-Fi®
1 From your Home screen, tap .
2 Find and tap Settings > Data usage.
3 Tap , then mark the Show Wi-Fi usage checkbox if it is not marked.
4 Tap the Wi-Fi tab.
Data roaming
Some service providers allow you to send and receive mobile data when you are
roaming outside of your home network. It's recommended to check the relevant data
transmission rates in advance.
To activate or deactivate data roaming
1 Drag the status bar downward, then tap .
2 Tap More… > Mobile networks.
3 Mark or unmark the Data roaming checkbox.
You can’t activate data roaming when mobile data has been turned off.
Selecting cellular networks
Your device automatically switches between cellular networks depending on which
cellular networks are available in different areas. You can also manually set your device to
use a particular cellular network mode, for example, WCDMA or GSM.
To select a network mode
1 From your Home screen, tap .
2 Find and tap Settings > More… > Mobile networks.
3 Tap Network Mode.
4 Select a network mode.
To select another network manually
1 From the Home screen, tap .
2 Find and tap Settings > More… > Mobile networks > Service providers.
3 Tap Search mode > Manual.
4 Select a network.
If you select a network manually, your device will not search for other networks, even if you
move out of range of the manually selected network.
29
This is an Internet version of this publication. © Print only for private use.
Page 30

To activate automatic network selection
1 Drag the status bar downwards, then tap .
2 Find and tap More… > Mobile networks > Service providers.
3 Tap Search mode > Automatic.
Virtual private networks (VPNs)
Use your device to connect to virtual private networks (VPNs), which allow you to access
resources inside a secured local network from a public network. For example, VPN
connections are commonly used by corporations and educational institutions for users
who need to access intranets and other internal services when they are outside of the
internal network, for example, when they are traveling.
VPN connections can be set up in many ways, depending on the network. Some
networks may require you to transfer and install a security certificate on your device. For
detailed information on how to set up a connection to your virtual private network, please
contact the network administrator of your company or organization.
To add a virtual private network
1 From your Home screen, tap .
2 Find and tap Settings > More… > VPN.
3 Tap .
4 Select the type of VPN to add.
5 Enter your VPN settings.
6 Tap Save.
To connect to a virtual private network
1 From your Home screen, tap .
2 Find and tap Settings > More… > VPN.
3 In the list of available networks, tap the VPN you want to connect to.
4 Enter the required information.
5 Tap Connect.
To disconnect from a virtual private network
1 Drag the status bar downwards.
2 Tap the notification for the VPN connection to turn it off.
30
This is an Internet version of this publication. © Print only for private use.
Page 31

Basic settings
Accessing settings
View and change settings for your device from the Settings menu. The Settings menu is
accessible from both the Notification panel and the Application screen.
To open the device settings menu from the Notification panel
1 Drag the status bar downward.
2 Tap .
To open the device settings menu from the Application screen
1 From your Home screen, tap .
2 Tap Settings.
Setting your device from the Notification panel
1 Vibrate mode or Silent mode on/off
2 Bluetooth® on/off
3 Wi-Fi® on/off
4 Adjust brightness level
5 Settings menu
To select quick settings from the Notification panel
1 Drag the status bar downward, then tap .
2 Find and tap Personalization > Quick settings.
3 Select the quick settings you want.
To rearrange the quick settings from the Notification panel
1 Drag the status bar downward, then tap .
2 Find and tap Personalization > Quick settings.
3 Touch and hold beside a quick setting, then move it to the desired position.
Sound, ringtone, and volume
You can adjust the ringtone volume for incoming calls and notifications as well as for
music and video playback. You can also set your device to silent mode so that it doesn't
ring when you're in a meeting.
To adjust the ringtone volume with the volume key
• Press the volume key up or down.
To adjust the media playing volume with the volume key
• When playing music or watching video, press the volume key up or down.
To set your device to vibrate mode
• Press the volume key down until appears in the status bar.
To set your device to silent mode
1 Press the volume key down until the device vibrates and appears in the status
bar.
2 Press the volume key down again. appears in the status bar.
31
This is an Internet version of this publication. © Print only for private use.
Page 32

To set your device to vibrate and ring mode
1 From your Home screen, tap .
2 Find and tap Settings > Sound.
3 Mark the Vibrate when ringing checkbox.
To set a ringtone
1 From your Home screen, tap .
2 Find and tap Settings > Sound > Phone ringtone.
3 Select a ringtone.
4 Tap Done.
To select the notification sound
1 From your Home screen, tap .
2 Find and tap Settings > Sound > Notification sound.
3 Select the sound to be played when notifications arrive.
4 Tap Done.
To enable touch tones
1 From your Home screen, tap .
2 Find and tap Settings > Sound.
3 Mark the Dial pad touch tones and Touch sounds checkboxes.
Date and time
You can change the date and time on your device.
To set the date manually
1 From the Home screen, tap .
2 Find and tap Settings > Date & time.
3 Unmark the Automatic date & time checkbox, if it is marked.
4 Tap Set date.
5 Adjust the date by scrolling up and down.
6 Tap Set.
To set the time manually
1 From your Home screen, tap .
2 Find and tap Settings > Date & time.
3 Unmark the Automatic date & time checkbox if it is marked.
4 Tap Set time.
5 Scroll up or down to adjust the hour and minute.
6 If applicable, scroll up to change AM to PM, or vice versa.
7 Tap Set.
To set the time zone
1 From your Home screen, tap .
2 Find and tap Settings > Date & time.
3 Unmark the Automatic time zone checkbox, if it is marked.
4 Tap Select time zone.
5 Select an option.
X-Reality™ for Mobile
Sony's X-Reality for Mobile technology improves the viewing quality of photos and videos
after you take them, giving you clearer, sharper, and more natural images. X-Reality for
Mobile is turned on by default, but you can turn it off if you want to reduce battery
consumption.
32
This is an Internet version of this publication. © Print only for private use.
Page 33

To turn on X-Reality for Mobile
1 Drag the status bar downward, then tap .
2 Find and tap Display.
3 Mark the X-Reality for Mobile checkbox if it is not marked.
Screen settings
To adjust the screen brightness
1 Drag the status bar downward, then tap > Display > Brightness.
2 Drag the slider to adjust the brightness.
3 Tap OK.
Lower the brightness level to increase battery performance.
To set the screen to vibrate on touch
1 Drag the status bar downward, then tap > Sound.
2 Mark the Vibrate on touch checkbox. The screen now vibrates when you tap soft
keys and certain applications.
To adjust the idle time before the screen turns off
1 From your Home screen, tap .
2 Find and tap Settings > Display > Sleep.
3 Select an option.
To turn off the screen quickly, briefly press the power key .
Language settings
You can select a default language for your device and change it again at a later time. You
can also change the writing language for text input. See Personalizing the Xperia
keyboard on page 38.
To change the language
1 From the Home screen, tap .
2 Find and tap Settings > Language & input > Language.
3 Select an option.
4 Tap OK.
If you select the wrong language and cannot read the menu texts, find and tap . Then select
the text beside and select the first entry in the menu that opens. You can then select the
language you want.
Airplane mode
In Airplane mode, the network and radio transceivers are turned off to prevent
disturbance to sensitive equipment. However, you can still play games, listen to music,
watch videos and other content, as long as all this content is saved on your memory
card or internal storage. You can also be notified by alarms, if alarms are activated.
Turning on Airplane mode reduces battery consumption.
To turn on Airplane mode
1 From your Home screen, tap .
2 Find and tap Settings > More….
3 Mark the Airplane mode checkbox.
You can also press and hold down the power key and then select Airplane mode in the
menu that opens.
33
This is an Internet version of this publication. © Print only for private use.
Page 34

Enhancing the sound output
You can enhance the sound of your device by manually enabling individual sound
settings such as Clear Phase™ and xLOUD™, or you can let ClearAudio+ technology
adjust the sound automatically. You can also enable the Dynamic normalizer so that
differences in volume between different media files are minimized.
To enhance the sound output automatically
1 Drag the status bar downward, then tap .
2 Find and tap Sound > Sound effects.
3 Mark the ClearAudio+ checkbox.
To adjust the sound settings manually
1 Drag the status bar downward, then tap .
2 Find and tap Sound > Sound effects.
3 Unmark the ClearAudio+ checkbox if it is marked.
4 Tap Sound enhancements > Settings.
5 Mark or unmark the relevant checkboxes.
The manual adjustment of sound output settings has no effect on voice communication
applications. For example, there is no change in the voice call sound quality.
To minimize volume differences using the Dynamic normalizer
1 Drag the status bar downward, then tap .
2 Find and tap Sound > Sound effects.
3 Mark the Dynamic normalizer checkbox.
34
This is an Internet version of this publication. © Print only for private use.
Page 35

Typing text
On-screen keyboard
You can enter text with the on-screen QWERTY keyboard by tapping each letter
individually, or you can use the Gesture input feature and slide your finger from letter to
letter to form words. You can type in up to three Latin languages without switching
keyboards. The Xperia™ international keyboard detects the language and predicts the
words as you type. Some applications open the on-screen keyboard automatically, for
example, email and text messaging applications.
1 Delete a character before the cursor.
2 Enter a carriage return or confirm text input.
3 Enter a space.
4 Personalize your keyboard. This key disappears after the keyboard is personalized.
5
Display numbers and symbols. For even more symbols, tap .
6 Close the on-screen keyboard view. Note that this icon does not appear in portrait mode.
7
Switch between lower-case , upper-case , and caps . For some languages, this key is used to
access extra characters in the language.
To display the on-screen keyboard to enter text
• Tap a text entry field.
To use the on-screen keyboard in landscape orientation
• When the on-screen keyboard is displayed, turn the device sideways.
You may need to adjust the settings in some applications to enable landscape orientation.
To enter text character by character
1 To enter a character visible on the keyboard, tap the character.
2 To enter a character variant, touch and hold a regular keyboard character to get a
list of available options, then select from the list. For example, to enter "é," touch
and hold "e" until other options appear, then, while keeping your finger pressed on
the keyboard, drag to and select "é."
To enter a period
• After you enter a word, double-tap the space bar.
35
This is an Internet version of this publication. © Print only for private use.
Page 36

To enter text using the Gesture input function
1 When the on-screen keyboard is displayed, slide your finger from letter to letter to
trace the word that you want to write.
2 Lift up your finger when you’ve finished entering a word. A word is suggested
based on the letters you have traced. If necessary, select the correct word in the
candidate bar.
3 To view more options, scroll right or left in the word candidate bar. If you cannot
find the desired word, tap once to delete the entire word, then try again to
trace the word, or tap each letter to enter the word.
4 If the Automatic space setting is activated, trace the next word you want to enter.
If not, tap the space bar and then trace the next word that you want to enter.
To change the Gesture input settings
1 When the on-screen keyboard is displayed, tap .
2 Tap , then tap Keyboard settings> Text input settings.
3 To activate or deactivate the Gesture input function, mark or unmark the Gesture
input checkbox.
Phonepad
The Phonepad is similar to a standard 12-key telephone keypad. It gives you predictive
text and multi-tap input options. You can activate the Phonepad text input method via
the keyboard settings. The Phonepad is only available in portrait orientation.
1 Choose a text input option. You can tap each character once and use word suggestions, or keep tapping
the key until the desired character is selected.
2 Delete a character before the cursor.
3 Enter a carriage return or confirm text input.
4 Enter a space.
5 Display symbols and smileys.
6 Display numbers.
7 Change the character case and turn on the caps lock.
To open the Phonepad for the first time
1 Tap a text entry field, then tap .
2 Tap , then tap Keyboard settings.
3 Tap Keyboard appearance > Keyboard layout.
4 Select the Phonepad.
To enter text using the Phonepad
• When appears in the Phonepad, tap each character key only once, even if the
letter you want is not the first letter on the key. Tap the word that appears or tap
to view more word suggestions and select a word from the list.
• When appears in the Phonepad, tap the on-screen key for the character you
want to enter. Keep pressing this key until the desired character is selected. Then
do the same for the next character you want to enter, and so on.
36
This is an Internet version of this publication. © Print only for private use.
Page 37

To enter numbers using the Phonepad
• When the Phonepad is displayed, tap . A Phonepad with numbers appears.
To insert symbols and smileys using the Phonepad
1 When the Phonepad is displayed, tap . A grid with symbols and smileys
appears.
2 Scroll up or down to view more options. Tap a symbol or smiley to select it.
Entering text using voice input
When you enter text, you can use the voice input function instead of typing the words.
Just speak the words that you want to enter. Voice input is an experimental technology
from Google™, and is available for a number of languages and regions.
To enable voice input
1 When you enter text using the on-screen keyboard or the Phonepad, tap or
.
2 Tap , then tap Keyboard settings.
3 Mark the Google voice typing key checkbox.
4 Press to save your settings. A microphone icon appears on your on-screen
keyboard or Phonepad.
To enter text using voice input
1 Open the on-screen keyboard or the Phonepad.
2 Tap . When appears, speak to enter text. When you're done, tap again.
The suggested text appears.
3 Edit the text manually if necessary.
Editing text
You can select, cut, copy, and paste text as you write in both portrait and landscape
orientation by double-tapping the entered text. In portrait orientation, the necessary
editing tools are available via an application bar. In landscape orientation, an Edit button
provides the same tools.
Application bar
1 Close the application bar
2 Select all text
3 Cut text
4 Copy text
5 Paste text
only appears when you have text saved on the clipboard.
To select text
1 Enter some text, then double-tap the text. The word you tap gets highlighted by
tabs on both sides.
2 Drag the tabs to the left or right to select more text.
37
This is an Internet version of this publication. © Print only for private use.
Page 38

To edit text in portrait orientation
1 Enter some text, then double-tap the entered text to make the application bar
appear.
2 Select the text you want to edit, then use the application bar to make your desired
changes.
To edit text in landscape orientation
1 Enter some text, then double-tap the entered text.
2 Select the text you want to work with, then tap Edit and select an option.
Personalizing the Xperia keyboard
When entering text using the on-screen keyboard or the Phonepad, you can access a
keyboard settings and other text input settings that help you set options for writing
languages, text prediction, automatic spacing, and quick period insertion. For example,
you can decide how word options are presented and how words get corrected as you
type. And you can get your message data scanned so that word predictions fit your
writing style. You can also set the text input application to remember new words that you
write.
To access the on-screen keyboard and Phonepad settings
1 When you enter text using the on-screen keyboard or Phonepad, tap or .
2 Tap , then tap Keyboard settings, and change the settings as you desired.
3 To add a writing language for text input, tap Writing languages and mark the
relevant checkboxes.
4 Tap OK to confirm.
To change the text input settings
1 When you enter text using the on-screen keyboard or the Phonepad, tap or
.
2 Tap , then tap Keyboard settings > Text input settings and select the relevant
settings.
To display the Smiley key
1 When you enter text using the on-screen keyboard, tap .
2 Tap , then tap Keyboard settings > Keyboard appearance > Additional
keys.
3 Mark the Smiley key checkbox.
To scan data for your writing style
1 When you enter text using the on-screen keyboard or Phonepad, tap or .
2 Tap , then tap Keyboard settings > Use my writing style and select a source
that you want to scan.
To select a keyboard layout variant
Layout variants are only available for the on-screen keyboard when you select two or three
writing languages and may not be available in all writing languages.
1 When you enter text using the on-screen keyboard, tap .
2 Tap , then tap Keyboard settings.
3 Tap Writing languages, then tap .
4 Select a keyboard layout variant.
5 Tap OK to confirm.
38
This is an Internet version of this publication. © Print only for private use.
Page 39

Calling
Making calls
You can make a call by manually dialing a phone number, by tapping a number saved in
your contact list, or by tapping the phone number in your call log view. You can also use
the smart dial feature to quickly find numbers from your contact list and call logs.
1 Open your contacts list
2 View your call log entries
3 View your favorite contacts
4 View all contact groups saved to your device
5 Delete number
6 Dial pad
7 Hide or clear the call log
8 Call button
9 Hide or show the dialer
To make a call by dialing
1 From your Home screen, tap .
2 Find and tap Phone.
3 Enter the number of the recipient and tap .
To make a call using smart dial
1 From your Home screen, tap .
2 Find and tap Phone.
3 Use the dialpad to enter letters or numbers that correspond to the contact you
want to call. As you enter each letter or number, a list of possible matches
appears.
4 Tap the contact you want to call.
39
This is an Internet version of this publication. © Print only for private use.
Page 40

To make an international call
1 From your Home screen, tap .
2 Find and tap Phone.
3 Touch and hold 0 until a “+” sign appears.
4 Enter the country code, area code (without the first 0) and phone number, then
tap .
Showing or hiding your phone number
You can select to show or hide your phone number on call recipients' devices when you
call them.
To show or hide your phone number
1 From your Home screen, tap .
2 Find and tap Settings > Call settings > Additional settings > Caller ID.
Receiving calls
To answer a call
To decline a call
To mute the ringtone for an incoming call
• When you receive the call, press the volume key.
Rejecting a call with a message
You can reject a call with a predefined message. When you reject a call with such a
message, the message is automatically sent to the caller and saved on your device.
Six messages are predefined on your device. You can select from these predefined
messages, which can also be edited if necessary.
To reject a call with a predefined message
• Drag Reject with message upward, then select a message.
To reject a second call with a predefined message
• When you hear repeated beeps during a call, drag Reject with message upward,
then select a message.
To edit the message used to reject a call
1 From your Home screen, tap .
2 Find and tap Settings > Call settings > Reject call with message.
3 Tap the message you want to edit, then make the necessary changes.
4 When you're done, tap OK.
40
This is an Internet version of this publication. © Print only for private use.
Page 41

Ongoing calls
1 Open your contacts list
2 Turn on the loudspeaker during a call
3 Mute the microphone during a call
4 Enter numbers during a call
5 End a call
To change the ear speaker volume during a call
• Press the volume key up or down.
To activate the screen during a call
• Briefly press .
Using the call log
In the call log, you can view missed calls , received calls and dialed calls .
To view your missed calls
1 When you have missed a call, appears in the status bar. Drag the status bar
downwards.
2 Tap Missed call.
To call a number from your call log
1 From your Home screen, tap .
2 Find and tap Phone.The call log view appears on the upper part of the screen.
3 To call a number directly, tap the number. To edit a number before calling, touch
and hold the number, then tap Edit number before call.
You can also call a number by tapping > Call back.
To add a number from the call log to your contacts
1 From your Home screen, tap .
2 Find and tap Phone.The call log view appears on the upper part of the screen.
3 Touch and hold the number, then tap Add to Contacts.
4 Tap the desired contact, or tap Create new contact.
5 Edit the contact details and tap Done.
To hide the call log
1 From your Home screen, tap .
2 Find and tap > .
3 Tap Hide call log.
This is an Internet version of this publication. © Print only for private use.
41
Page 42

Forwarding calls
You can forward calls, for example, to another phone number, or to an answering
service.
To forward calls
1 From your Home screen, tap .
2 Find and tap Settings > Call settings > Call forwarding.
3 Select an option.
4 Enter the number you want to forward the calls to, then tap Enable.
To turn off call forwarding
1 From your Home screen, tap .
2 Find and tap Settings > Call settings > Call forwarding.
3 Select an option, then tap Disable.
Restricting calls
You can block all or certain categories of incoming and outgoing calls. If you have
received a PIN2 code from your service provider, you can also use a list of Fixed Dialing
Numbers (FDNs) to restrict outgoing calls.
To block incoming or outgoing calls
1 Drag the status bar downwards, then tap > Call settings.
2 Tap Call blocking.
3 Select an option.
4 Enter the password and tap Enable.
When you set up call blocking for the first time, you need to enter a password to activate the
call blocking function. You must use this same password later if you want to edit call blocking
settings.
To enable or disable fixed dialing
1 From your Home screen, tap .
2 Find and tap Settings > Call settings > Fixed dialing numbers.
3 Tap Activate fixed dialing or Disable FDN.
4 Enter your PIN2 and tap OK.
To access the list of accepted call recipients
1 From your Home screen, tap .
2 Find and tap Settings > Call settings > Fixed dialing numbers > Fixed dialing
numbers.
Multiple calls
If you have activated call waiting, you can handle multiple calls at the same time. When it
is activated, you will be notified by a beep if you receive another call.
To activate or deactivate call waiting
1 From the Home screen, tap .
2 Find and tap Settings > Call settings > Additional settings.
3 To activate or deactivate call waiting, tap Call waiting.
To answer a second call and put the ongoing call on hold
• When you hear repeated beeps during a call, drag to the right.
To reject a second call
• When you hear repeated beeps during a call, drag to the left.
42
This is an Internet version of this publication. © Print only for private use.
Page 43

To make a second call
1 During an ongoing call, tap Dialpad.
2 Enter the number of the recipient and tap . The first call is put on hold.
To switch between multiple calls
• To switch to another call and put the current call on hold, tap Switch to this call.
Conference calls
With a conference or multiparty call, you can have a joint conversation with two or more
people.
For details about the number of participants that you can add to a conference call, contact
your network operator.
To make a conference call
1 During an ongoing call, tap .
2 Dial the number of the second participant and tap Call. After the second
participant answers, the first participant is put on hold.
3 Tap to add the second participant to the conference call.
4 Repeat steps 1 to 3 to add more call participants.
To have a private conversation with a conference call participant
1 During an ongoing conference call, tap {0} participants.
2 Tap the telephone number of the participant with whom you want to talk privately.
3 To end the private conversation and return to the conference call, tap .
To release a participant from a conference call
1 During an ongoing conference call, tap the button showing the number of
participants. For example, tap 3 participants if there are three participants.
2 Tap next to the participant you want to release.
To end a conference call
• During the conference call, tap End conference call.
Voicemail
If your subscription includes a voicemail service, callers can leave voice messages for
you when you can't answer calls. Your voicemail service number is normally saved on
your SIM card. If not, you can get the number from your service provider and enter it
manually.
To enter your voicemail number
1 From the Home screen, tap .
2 Find and tap Settings > Call settings > Voicemail >Voicemail settings >
Voicemail number.
3 Enter your voicemail number.
4 Tap OK.
To call your voicemail service
1 From your Home screen, tap .
2 Find and tap Phone.
3 Touch and hold 1.
Emergency calls
Your device supports international emergency numbers, for example, 112 or 911. You
can normally use these numbers to make emergency calls in any country, with or without
a SIM card inserted if you are within range of a network.
43
This is an Internet version of this publication. © Print only for private use.
Page 44

To make an emergency call
1 From your Home screen, tap .
2 Find and Tap Phone.
3 Enter the emergency number and tap . To delete a number, tap .
You can make emergency calls when no SIM card is inserted or when outgoing calls are
barred.
To make an emergency call while the SIM card is locked
1 From the lock screen, tap Emergency call.
2 Enter the emergency number and tap .
44
This is an Internet version of this publication. © Print only for private use.
Page 45

Contacts
Transferring contacts
There are several ways to transfer contacts to your new device. Find out more about
choosing a transfer method at www.sonymobile.com/support.
Transferring contacts using a computer
Contacts Setup is an application within PC Companion and within Sony™ Bridge for
Mac that helps you to collect the contacts from your old device and transfer them to your
new device. Contacts Setup supports several device brands, including iPhone,
Samsung, HTC, and Nokia.
You need:
• An Internet-connected computer.
• A USB cable for your old device.
• A USB cable for your new Android™ device.
• Your old device.
• Your new Android™ device.
To transfer contacts to your new device using a computer
1 Make sure that PC Companion is installed on your PC or that
Sony™ Bridge for Mac is installed on your Apple® Mac® computer.
2 Open the PC Companion application or the Sony™ Bridge for Mac application,
then click Contacts Setup and follow the instructions to transfer your contacts.
Transferring contacts using an online account
If you sync the contacts in your old device or your computer with an online account, for
example, Google Sync™, Facebook™, or Microsoft® Exchange ActiveSync®, you can
transfer your contacts to your new device using that account.
To synchronize contacts to your new device using a synchronization account
1 From your Home screen, tap , then tap .
2 Tap , then tap Settings > Accounts & sync.
3 Select the account that you want to sync your contacts with, then tap > Sync
now.
You need to be signed in to the relevant sync account before you can sync your contacts with
it.
Other methods for transferring contacts
There are several other ways to transfer contacts from your old device to your new
device. For example, you can copy contacts to a memory card, save contacts to a SIM
card, or use Bluetooth® technology. For more specific information about transferring the
contacts from your old device, refer to the relevant User guide.
To import contacts from a memory card
1 From your Home screen, tap , then tap .
2 Press , then tap Import contacts > SD card.
3 Select where to store your contacts.
4 Select the file that you want to import.
45
This is an Internet version of this publication. © Print only for private use.
Page 46

To import contacts using Bluetooth® technology
1
Make sure you have the Bluetooth® function turned on and that your device is set
to visible.
2 When you are notified of an incoming file to your device, drag the status bar
downward and tap the notification to accept the file transfer.
3 Tap Accept to start the file transfer.
4 Drag the status bar downward. When the transfer is complete, tap the notification.
5 Tap the received file and select where to store your contacts.
To import contacts from a SIM card
You may lose information or get multiple contact entries if you transfer contacts using a SIM
card.
1 From your Home screen, tap , then tap .
2 Tap , then tap Import contacts > SIM card.
3 Select where to store your contacts.
4 To import an individual contact, find and tap the contact. To import all contacts,
tap Import all.
Searching and viewing contacts
1 Contacts, Calling, Favorites, and Groups tabs
2 View contact details
3 Jump to contacts starting with the selected letter
4 Access communication options for the contact
5 Search for contacts
6 Add a contact
7 View more options
To search for a contact
1 From your Home screen, tap , then tap .
2 Tap and enter the first few letters of the contact name in the Search contacts
field. All contacts beginning with those letters appear.
46
This is an Internet version of this publication. © Print only for private use.
Page 47

To select which contacts to display in the Contacts application
1 From your Home screen, tap , then tap .
2 Press , then tap Filter.
3 In the list that appears, mark and unmark the desired options. If you have
synchronized your contacts with a synchronization account, that account appears
in the list. To further expand the list of options, tap the account.
4 When you are finished, tap OK.
Adding and editing contacts
To add a contact
1 From your Home screen, tap , then tap .
2 Tap .
3 If you have synchronized your contacts with one or more accounts and you are
adding a contact for the first time, you must select the account you want to add
this contact to. Alternatively, tap Phone contact if you only want to use and save
this contact on your device.
4 Enter or select the desired information for the contact.
5 When you are finished, tap Done.
After you select a synchronization account in step 3, that account will show as the default
account offered the next time you add a contact, but you can change the account by editing
the contact after it is saved.
If you add a plus sign and the country code before a contact's phone number, you do not
have to edit the number again when you make calls from other countries.
To edit a contact
1 From your Home screen, tap , then tap .
2 Tap the contact that you want to edit, then tap .
3 Edit the desired information.
4 When you are done, tap Done.
Some synchronization services do not allow you to edit contact details.
To associate a picture with a contact
1 From your Home screen, tap , then tap .
2 Tap the contact you want to edit, then tap .
3 Tap and select the desired method for adding the contact picture.
4 When you have added the picture, tap Done.
You can also add a picture to a contact directly from the Album application.
To personalize the ringtone for a contact
1 From your Home screen, tap , then tap .
2 Tap the contact that you want to edit, then tap .
3 Tap > Set ringtone.
4 Select an option, then tap Done.
5 Tap Done.
To delete contacts
1 From your Home screen, tap , then tap .
2 Touch and hold the contact that you want to delete.
3 To delete all contacts, tap the downward arrow to open the drop-down menu,
then select Mark all.
4 Tap , then tap Delete.
47
This is an Internet version of this publication. © Print only for private use.
Page 48

To edit contact information about yourself
1 From your Home screen, tap , then tap .
2 Tap Myself, then tap .
3 Enter the new information or make the changes you want.
4 When you are done, tap Done.
To create a new contact from a text message
1 From your Home screen, tap , then find and tap .
2 Tap > Save.
3 Select an existing contact, or tap Create new contact.
4 Edit the contact information and tap Done.
Favorites and groups
You can mark contacts as favorites so that you can get quick access to them from the
Contacts application. You can also assign contacts to groups, to get quicker access to
them from within the Contacts application.
To mark or unmark a contact as a favorite
1 From the Home screen, tap , then tap .
2 Tap the contact you want to add to or remove from your favorites.
3 Tap .
To view your favorite contacts
1 From your Home screen, tap , then tap .
2 Tap .
To assign a contact to a group
1 In the Contacts application, tap the contact that you want to assign to a group.
2 Tap , then tap the bar directly under Groups.
3 Mark the checkboxes for the groups you want to add the contact to.
4 Tap Done.
Sending contact information
To send your business card
1 From your Home screen, tap , then tap .
2 Tap Myself.
3 Press , then tap Send contact > OK.
4 Select an available transfer method and follow the on-screen instructions.
To send a contact
1 From your Home screen, tap , then tap .
2 Tap the contact whose details you want to send.
3 Press , then tap Send contact > OK.
4 Select an available transfer method and follow the on-screen instructions.
To send several contacts at once
1 From your Home screen, tap , then tap .
2 Press , then tap Mark several.
3 Mark the contacts you want to send, or select all if you want to send all contacts.
4 Tap , then select an available transfer method and follow the on-screen
instructions.
Avoiding duplicate entries in the Contacts application
If you synchronize your contacts with a new account or import contact information in
other ways, you could end up with duplicate entries in the Contacts application. If this
48
This is an Internet version of this publication. © Print only for private use.
Page 49

happens, you can join such duplicates to create a single entry. And if you join entries by
mistake, you can separate them again later.
To link contacts
1 From your Home screen, tap , then tap .
2 Tap the contact that you want to link with another contact.
3 Press , then tap Link contact.
4 Tap the contact whose information you want to join with the first contact, then tap
OK to confirm. The information from the first contact is merged with the second
contact, and the linked contacts are displayed as one contact in the Contacts list.
To separate linked contacts
1 From your Home screen, tap , then tap .
2 Tap the linked contact that you want to edit, then tap .
3 Tap > Separate > OK.
Backing up contacts
You can use a memory card or a SIM card to back up contacts.
To export all contacts to a memory card
1 From your Home screen, tap , then tap .
2 Press , then tap Export contacts > SD card.
3 Tap OK.
To export contacts to a SIM card
1 From your Home screen, tap , then tap .
2 Press , then tap Export contacts > SIM card.
3 Mark the contacts you want to export, or tap Mark all if you want to export all
your contacts.
4 Tap Export.
5 Select Add contacts if you want to add the contacts to existing contacts on your
SIM card, or select Replace all contacts if you want to replace the existing
contacts on your SIM card.
When you export contacts to a SIM card, not all information may get exported. This is due to
memory limitations on SIM cards.
49
This is an Internet version of this publication. © Print only for private use.
Page 50

Messaging and chat
Reading and sending messages
The Messaging application shows your messages as conversations, which means that all
messages to and from a particular person are grouped together. To send multimedia
messages, you need the correct MMS settings on your device. See Internet and
messaging settings on page 25.
1 Go back to the list of conversations
2 View options
3 Sent and received messages
4 Send button
5 Attach a file
6 Attach a location
7 Attach a handwritten note or image
8 Take a photo and attach it
9 Attach a photo saved on your device
10 Text field
To create and send a message
1 From your Home screen, tap , then find and tap .
2 Tap .
3 Tap , then tap Add recipient, and select a contact from the Contacts list. If the
recipient is not listed as a contact, enter the recipient's number manually and tap
.
4 When you are finished adding recipients, tap Done.
5 Tap Write message and enter your message text.
6 If you want to add a media file, tap and select an option.
7 To send the message, tap Send.
If you exit a message before sending, it gets saved as a draft. The conversation gets tagged
with the word Draft:.
To read a received message
1 From your Home screen, tap , then find and tap .
2 Tap the desired conversation.
3 If the message is not yet downloaded, tap and hold the message, then tap
Download message.
50
This is an Internet version of this publication. © Print only for private use.
Page 51

To reply to a message
1 From your Home screen, tap , then find and tap .
2 Tap the conversation containing the message.
3 Enter your reply and tap Send.
To forward a message
1 From your Home screen, tap , then find and tap .
2 Tap the conversation containing the message that you want to forward.
3 Touch and hold the message that you want to forward, then tap Forward
message.
4 Tap , then tap Add recipient, and select a contact from the Contacts list. If the
recipient is not listed as a contact, enter the contact's number manually and tap
.
5 When you are finished adding recipients, tap Done.
6 Edit the message, if necessary, then tap Send.
In step 4, you can also tap To and enter the recipient's phone number manually.
To save a file contained in a message you receive
1 From your Home screen, tap , then find and tap .
2 Tap the conversation you want to open.
3 If the message has not been downloaded yet, tap and hold the message, then tap
Download message.
4 Touch and hold the file you want to save, then select the desired option.
Organizing your messages
To delete a message
1 From your Home screen, tap , then find and tap .
2 Tap the conversation containing the message you want to delete.
3 Touch and hold the message you want to delete, then tap Delete message >
Delete.
To delete conversations
1 From your Home screen, tap , then find and tap .
2 Tap , then tap Delete conversations.
3 Mark the checkboxes for the conversations that you want to delete, then tap >
Delete.
To star a message
1 From your Home screen, tap , then find and tap .
2 Tap the conversation you want to open.
3 In the message you want to star, tap .
4 To unstar a message, tap .
To view starred messages
1 From your Home screen, tap , then find and tap .
2 Tap , then tap Starred messages.
3 All starred messages appear in a list.
To search for messages
1 From your Home screen, tap , then find and tap .
2 Tap , then tap Search.
3 Enter your search keywords. The search results appear in a list.
51
This is an Internet version of this publication. © Print only for private use.
Page 52

Calling from a message
To call a message sender
1 From your Home screen, tap , then find and tap .
2 Tap a conversation.
3 Tap the recipient name or number at the top of the screen, then select the
recipient name or number from the list that appears.
4 If the recipient is saved in your contacts, tap the phone number that you want to
call. If you have not saved the recipient in your contacts, tap .
To save a sender's number as a contact
1 From your Home screen, tap , then find and tap .
2 Tap > Save.
3 Select an existing contact, or tap Create new contact.
4 Edit the contact information and tap Done.
Messaging settings
To change your message notification settings
1 From your Home screen, tap , then find and tap .
2 Tap , then tap Settings.
3 To set a notification sound, tap Notification tone and select an option.
4 For other notification settings, check or uncheck the relevant checkboxes.
To change the delivery report settings for outgoing messages
1 From your Home screen, tap , then find and tap .
2 Tap , then tap Settings.
3 Tap Delivery report to activate or deactivate delivery reports.
Instant messaging and video chat
You can use the Hangouts™ instant messaging and video chat application on your
device to chat with friends who also use the application on computers, Android™
devices, and other devices. You can turn any conversation into a video call with several
friends, and you can send messages to friends even when they are offline. You can also
view and share photos easily.
The video call function only works on devices with a front camera.
1 Start a new chat or video call
2 Options
3 List of contacts
52
This is an Internet version of this publication. © Print only for private use.
Page 53

To start a chat
1 From your Home screen, tap .
2 Find and tap Hangouts.
3 Tap , then enter a contact name, email address, phone number, or circle name
and select the relevant entry from the suggested list.
4 To start an instant messaging session, tap .
5 To start a video call, tap .
To reply to a chat message or join a video call
1 When someone contacts you on Hangouts, , or appears in the status bar.
2 Drag the status bar downward, then tap the message or video call and begin to
chat.
To learn more about Hangouts™
• When the Hangouts™ application is open, tap , then tap Help.
53
This is an Internet version of this publication. © Print only for private use.
Page 54

Setting up email
Use the email application in your device to send and receive email messages through
your email accounts. You can have one or several email accounts at the same time,
including corporate Microsoft Exchange ActiveSync accounts.
To set up an email account
1 From your Home screen, tap .
2 Find and tap Email.
3 Follow the instructions that appear on the screen to complete the setup.
For some email services, you may need to contact your email service provider for information
on detailed settings for the email account.
To add an extra email account
1 From your Home screen, tap .
2 Find and tap Email.
3 Tap at the top of the screen, then tap Add account.
4 Enter the email address and password, then tap Next. If the settings for the email
account cannot be downloaded automatically, complete the setup manually.
5 When prompted, enter a name for your email account so that it is easily
identifiable. The same name shows in the emails you send from this account.
6 When you are finished, tap Next.
To set an email account as your default account
1 From your Home screen, tap .
2 Find and tap Email.
3 Press , then tap Settings.
4 Select the account you want to use as the default account for composing and
sending email messages.
5 Mark the Default account checkbox. The inbox of the default account appears
every time you open the email application.
If you only have one email account, this account is automatically the default account.
Sending and receiving email messages
1 View a list of all email accounts and recent folders
2 List of email messages
54
This is an Internet version of this publication. © Print only for private use.
Page 55

3 Options
4 Search for email messages
5 View folders
6 Download new email messages
7 Write a new email message
To download new email messages
1 From your Home screen, tap .
2 Find and tap Email.
3 If you are using several email accounts, tap at the top of the screen and select
the account that you want to check.
4 To download new messages, tap .
To read your email messages
1 From your Home screen, tap .
2 Find and tap Email.
3 If you are using several email accounts, tap at the top of the screen and select
the account that you want to check. If you want to check all your email accounts
at once, tap Combined view.
4 In the email inbox, scroll up or down and tap the email message that you want to
read.
To create and send an email message
1 From your Home screen, tap , then find and tap Email.
2 If you are using several email accounts, tap at the top of the screen and select
the account you want to use.
3 Tap , then tap To and start typing the recipient's name or email address, or tap
and select one or more recipients from your Contacts list.
4 Enter the email subject and message text, then tap .
To reply to an email message
1 From your Home screen, tap .
2 Find and tap Email.
3 In your email inbox, find and tap the message that you want to reply to, then tap
Reply or Reply all.
4 Enter your reply, then tap .
To forward an email message
1 From your Home screen, tap .
2 Find and tap Email.
3 In your email inbox, find and tap the message that you want to forward, then tap
Forward.
4 Tap To and enter the recipient's email address manually, or tap and select a
recipient from your Contacts list.
5 Enter your message text, then tap .
To view an email message attachment
1 From your Home screen, tap .
2 Find and tap Email.
3 Find and tap the email message containing the attachment that you want to view.
Email messages with attachments are indicated by .
4 After the email message opens, tap View.
55
This is an Internet version of this publication. © Print only for private use.
Page 56

To save a sender's email address to your contacts
1 From your Home screen, tap .
2 Find and tap Email.
3 Find and tap a message in your email inbox.
4 Tap the name of the sender, then tap OK.
5 Select an existing contact, or tap Create new contact.
6 Edit the contact information, if desired, then tap Done.
Email preview pane
A preview pane is available for viewing and reading your email messages in landscape
orientation. Once activated, you can use it to view both the email message list and one
selected email message at the same time.
To activate the preview pane
1 From your Home screen, tap , then find and tap Email.
2 Press , then tap Settings.
3 Tap General > Preview pane > Landscape.
To read email messages using the preview pane
1 Make sure the preview pane has been activated for landscape orientation.
2 Open your email inbox, then hold your device in landscape orientation.
3 Scroll up or down and tap the email message that you want to read.
4 To view the email message in full-screen format, tap the split bar (located between
the email list and the email body). To return to the regular inbox view, tap the split
bar again.
Organizing your email messages
To sort your emails
1 From your Home screen, tap .
2 Find and tap Email.
3 If you are using several email accounts, tap at the top of the screen and select
the account that you want to check. If you want to check all your email accounts
at once, tap Combined view.
4 Press , then tap Sort.
5 Select a sorting option.
To search for emails
1 From your Home screen, tap , then find and tap Email.
2 Tap at the top of the screen and select the account that you want to search. If
you want to search all your email accounts at once, tap Combined view
3 Hold your device in portrait orientation, then tap .
4 Enter your search text, then tap on the keyboard.
5 The search result appears in a list sorted by date. Tap the email message that you
want to open.
To change search options, tap and select a different option.
56
This is an Internet version of this publication. © Print only for private use.
Page 57

To view all folders for one email account
1 From your Home screen, tap . Then find and tap Email.
2 Tap at the top of the screen and select the account you want to check, then
tap again, and select Show all folders to view all the folders in this account.
To delete an email message
1 From your Home screen, tap .
2 Find and tap Email.
3 In your email inbox, find and tap the message that you want to delete, then tap .
4 Tap Delete.
In your email inbox, you can also flick a message to the left or right to delete it.
Email account settings
To remove an email account from your device
1 From your Home screen, tap .
2 Find and tap Email.
3 Press , then tap Settings.
4 Select the account you want to remove.
5 Tap Delete account > OK.
To change the inbox check frequency
1 From your Home screen, tap .
2 Find and tap Email.
3 Press , then tap Settings.
4 Select the account you want to change the inbox check frequency for.
5 Tap Inbox check frequency > Inbox check frequency and select an option.
To set an Out of Office auto-reply in an Exchange Active Sync account
1 From your Home screen, tap , then find and tap Email.
2 Press , then tap Settings.
3 Select the EAS (Exchange Active Sync) account for which you want to set an Out
of Office auto-reply.
4 Tap Out of office.
5 Tap beside Out of office so that changes to .
6 If needed, mark the Set time range checkbox and set the time range for the auto
reply.
7 Enter your Out of Office message in the body text field.
8 Tap OK to confirm.
Gmail™
If you have a Google™ account, you can use the Gmail™ application to read and write
email messages.
57
This is an Internet version of this publication. © Print only for private use.
Page 58

1 View a list of all Gmail accounts and recent folders
2 List of email messages
3 Options
4 Download new email messages
5 View all folders
6 Search for email messages
7 Write a new email message
To learn more about Gmail™
• When the Gmail application is open, tap , then tap Help.
58
This is an Internet version of this publication. © Print only for private use.
Page 59

Socialife™
Using the Socialife™ application
Use the Socialife™ application from Sony to get your favorite news, videos, and social
networking feeds in one place. The Socialife™ home screen gives a clear overview of
friends’ Facebook and Twitter™ activity, plus news feeds that you have subscribed to. It
color-codes and sizes articles for easy reading, adding photos and cropping images of
your friends’ faces to illustrate each story.
The Socialife™ application is not available in all markets.
To open the Socialife™ application
1 From your Home screen, tap .
2 Find and tap .
59
This is an Internet version of this publication. © Print only for private use.
Page 60

Music
Transferring music to your device
There are different ways to get music from a computer to your device:
• Connect the device and computer using a USB cable and drag and drop music files
directly into the file manager application on the computer. See Connecting your device
to a computer on page 93.
• If the computer is a PC, you can use the Media Go™ application from Sony and organize
your music files, create playlists, subscribe to podcasts, and more. To learn more and
download the Media Go™ application, go to http://mediago.sony.com/enu/features.
• If the computer is an Apple® Mac®, you can use the Sony™ Bridge for Mac application
to transfer your media files from iTunes to your device. To learn more and download
Sony™ Bridge for Mac, go to www.sonymobile.com/global-en/tools/bridge-for-mac/.
Listening to music
Use the "WALKMAN" application to listen to your favorite music and audio books.
1 Browse your music
2 Search songs on Music Unlimited and all songs saved to your device
3 View the current play queue
4 Album art (if available)
5 Tap to go to the previous song in the play queue
Touch and hold to rewind within the current song
6 Play or pause a song
7 Tap to go to the next song in the play queue
Touch and hold to fast forward within the current song
8 Shuffle songs in the current play queue
9 Repeat all songs in the current play queue
10 Progress indicator – Drag the indicator or tap along the line to fast forward or rewind
11 Total length of current song
12 Elapsed time of current song
60
This is an Internet version of this publication. © Print only for private use.
Page 61

To play a song
1 From your Home screen, tap , then find and tap .
2 If the WALKMAN home screen is not displayed, tap .
3 Select a music category, for example, under Artists, Albums, or Songs, then
browse to the song that you want to open.
4 Tap a song to play it.
You might not be able to play copyright-protected items. Please verify that you have
necessary rights in material that you intend to share.
To find song-related information online
• While a song is playing in the "WALKMAN" application, tap the album art to
display the infinite button , then tap .
The infinite button gives you access to several sources of information including videos on
YouTube™, lyrics, and artist info on Wikipedia.
To adjust the audio volume
• Press the volume key.
To minimize the "WALKMAN" application
• When a song is playing, tap to go to the Home screen. The "WALKMAN"
application stays playing in the background.
To open the "WALKMAN" application when it is playing in the background
1 While a song is playing in the background, tap the to open the recently used
applications window.
2 Tap the "WALKMAN" application.
WALKMAN home screen
The WALKMAN home screen gives you an overview of all the songs on your device as
well as the songs available on Music Unlimited. From here you can manage your albums
and playlists, create shortcuts, and organize your music by mood and tempo using
SensMe™ channels.
1 Open the Music Unlimited service
2 Browse your music by artist
3 Browse your music by song
4 Browse your music by album
5 Browse all playlists
6 Collect links to music and related content that you and friends have shared using online services
7 Manage and edit your music using Music Unlimited channels
61
This is an Internet version of this publication. © Print only for private use.
Page 62

8 Open the "WALKMAN" music player
Sony Entertainment Network with Video Unlimited and Music Unlimited is not available in every
market. Separate subscription required. Additional terms and conditions apply.
To display the WALKMAN home screen
1 From the Home screen, tap > .
2 If the WALKMAN home screen is not displayed, tap .
To add a shortcut to a song
1 From the WALKMAN home screen, browse to the song you want to create a
shortcut for.
2 Touch and hold the song title.
3 Tap Add as shortcut. The shortcut now appears in the WALKMAN home screen.
You cannot add shortcuts to songs from Music Unlimited.
To rearrange shortcuts
• From the WALKMAN home screen, touch and hold a shortcut until it magnifies
and your device vibrates, then drag the item to a new location.
To delete a shortcut
• From the WALKMAN home screen, touch and hold a shortcut until it magnifies
and your device vibrates, then drag the item to .
You can only delete shortcuts that you create yourself.
You can also drag default shortcuts to but they only get hidden, not deleted.
To update your music with the latest information
1 From the WALKMAN home screen, tap .
2 Tap Download music info > Start. Your device searches online and downloads
the latest available album art and song information for your music.
The SensMe™ channels application is activated when you download music information.
To enable the SensMe™ channels application
• From the WALKMAN home screen, tap , then tap Download music info > Start.
This application requires a cellular or Wi-Fi® network connection.
To delete a song
1 Open the WALKMAN home screen, then browse to the song you want to delete.
2 Touch and hold the song title, then tap Delete.
You can also delete albums this way.
Playlists
On the WALKMAN home screen, you can create your own playlists from the music that
is saved on your device.
To create your own playlists
1 Open the WALKMAN home screen.
2 To add an artist, album, or a song to a playlist, touch and hold the name of the
artist or the title of the album or song.
3 In the menu that opens, tap Add to > Create new playlist.
4 Enter a name for the playlist and tap OK.
You can also tap the album art and then tap to create a new playlist.
62
This is an Internet version of this publication. © Print only for private use.
Page 63

To add songs to a playlist
1 Open the WALKMAN home screen.
2 Browse to the song or album that you want to add to a playlist, then touch and
hold the song or the album title.
3 Tap Add to.
4 Tap the name of the playlist you want to add the album or song to. The album or
song is added to the playlist.
To play your own playlists
1 Open the WALKMAN home screen, then tap Playlists.
2 Under Playlists, tap a playlist.
3 Tap a song to play it.
To remove a song from a playlist
1 In a playlist, touch and hold the title of the song you want to delete.
2 Tap Delete from playlist from the list that appears.
To delete a playlist
1 Open the WALKMAN home screen, then tap Playlists.
2 Touch and hold the playlist that you want to delete.
3 Tap Delete.
4 Tap Delete again to confirm.
You cannot delete default playlists.
Sharing music
To send a song
1 Open the WALKMAN home screen.
2 Browse to the song or album that you want to send, then touch and hold the song
title.
3 Tap Share.
4 Select an application from the list, then follow the on-screen instructions.
You can also send albums and playlists in the same way.
Sharing music on Facebook™
The Friends’ music function collects links to music and music-related content that you
and your friends have shared using Facebook™.
To "Like" a song on Facebook™
1 While the song is playing in the "WALKMAN" application, tap the album art.
2 Tap to show that you "Like" the song on Facebook™. If desired, add a
comment in the comments field.
3 Tap Share to send the song to Facebook™. If the song is received successfully,
you will get a confirmation message from Facebook™.
To manage music from your friends
1 Open the WALKMAN home screen, then tap Friends' music > Recent.
2 Tap an item to open it, then work on it as desired.
3 Tap to show that you "Like" the song on Facebook™. If desired, add a
comment in the comments field.
To view your shared music
1 Open the WALKMAN home screen, then tap Friends' music > My shares.
2 Scroll to an item that you want to open, then tap it. All comments about the item,
if any, are displayed.
63
This is an Internet version of this publication. © Print only for private use.
Page 64

Enhancing the sound
To improve the sound quality using the Equalizer
1 When a song is playing in the "WALKMAN" application, tap .
2 Tap Settings > Sound effects > Sound enhancements.
3 Select a setting, then tap OK to confirm.
To turn on the surround sound
1 When the "WALKMAN" application is open, tap .
2 Tap Settings > Sound effects > Sound enhancements > Settings > Surround
sound (VPT).
3 Select a setting, then tap OK to confirm.
Visualizer
The Visualizer adds visual effects to your songs as you play them. The effects for each
song are based on the characteristics of the music. They change, for example, in
response to changes in the music’s volume, rhythm, and frequency level. You can also
change the background theme.
To turn on the Visualizer
1 In the "WALKMAN" application, tap .
2 Tap Visualizer.
Tap the screen to switch to full-screen view.
To change the background theme
1 In the "WALKMAN" application, tap .
2 Tap Visualizer.
3 Tap > Theme and select a theme.
Recognizing music with TrackID™
Use the TrackID™ music recognition service to identify a music track you hear playing in
your surroundings. Just record a short sample of the song and you’ll get artist, title, and
album info within seconds. You can purchase tracks identified by TrackID™ and you can
view TrackID™ charts to see what TrackID™ users around the globe are searching for.
For best results, use TrackID™ technology in a quiet area.
1 View TrackID options
2 View current music charts
3 View the search result history
This is an Internet version of this publication. © Print only for private use.
64
Page 65

4 Record and identify music
The TrackID™ application and the TrackID™ service are not supported in all countries/regions,
or by all networks and/or service providers in all areas.
To identify music using TrackID™ technology
1 From your Home screen, tap
2 Find and tap TrackID™, then hold your device towards the music source.
3 Tap . If the track is recognized by the TrackID™ service, the results appear on
the screen.
To return to the TrackID™ start screen, press .
To view TrackID™ charts
• Open the TrackID™ application, then tap Charts. A chart from your own region is
shown.
To view TrackID™ charts from another region
1 Open the TrackID™ application, then tap Charts.
2 Tap > Regions, then select a country or region.
To buy a track recognized by the TrackID™ application
1 After a track has been recognized by the TrackID™ application, tap Download.
2 Follow the instructions in your device to complete your purchase.
You can also select a track to buy by opening the History or Charts tabs from the TrackID™
start screen.
To share a track
1 After a track has been recognized by the TrackID™ application, tap Share, then
select a sharing method.
2 Follow the instructions on your device to complete the procedure.
To view artist information for a track
• After a track has been recognized by the TrackID™ application, tap Artist info.
To delete a track from the track history
1 Open the TrackID™ application, then tap History.
2 Tap a track title, then tap Delete.
3 Tap Yes to confirm.
Music Unlimited online service
Music Unlimited is a subscription-based service that offers access to millions of songs
over a mobile network or Wi-Fi® connection. You can manage and edit your personal
music library in the cloud from a variety of devices, or sync your playlists and music using
a PC that runs the Windows® operating system. Go to
www.sonyentertainmentnetwork.com for more information.
Sony Entertainment Network with Video Unlimited and Music Unlimited is not available in every
market. Separate subscription required. Additional terms and conditions apply.
To get started with Music Unlimited
1 Open the WALKMAN home screen.
2 Tap Music Unlimited, then follow the on-screen instructions to get started with
the Music Unlimited service.
65
This is an Internet version of this publication. © Print only for private use.
Page 66

FM radio
Listening to the radio
The FM radio in your device works like any FM radio. For example, you can browse and
listen to FM radio stations and save them as favorites. You must connect a wired
headset or headphones to your device before you can use the radio. This is because the
headset or headphones act as an antenna. After one of these devices is connected, you
can then switch the radio sound to the speaker, if desired.
1 Favorites list
2 Radio on/off button
3 View menu options
4 Tuned frequency
5 Save or remove a channel as a favorite
6 Tuning dial
7 Move down the frequency band to search for a channel
8 Move up the frequency band to search for a channel
9 A saved favorite channel
To listen to the FM radio
1 Connect a headset or a set of headphones to your device.
2 From your Home screen, tap .
3 Find and tap FM radio . The available channels appear as you scroll through
the frequency band.
When you start the FM radio, available channels appear automatically. If a channel has RDS
information, it appears a few seconds after you start listening to the channel.
To move between radio channels
• Flick your finger up or down along the frequency band.
To start a new search for radio channels
1 When the radio is open, press .
2 Tap Search for channels. The radio scans the whole frequency band, and all
available channels are displayed.
66
This is an Internet version of this publication. © Print only for private use.
Page 67

To switch the radio sound to the speaker
1 When the radio is open, press .
2 Tap Play in speaker.
To switch the sound back to the wired headset or headphones, press and tap Play in
headphones.
To identify a song on the FM radio using TrackID™
1 While the song is playing on your device's FM radio, press , then select
TrackID™.
2 A progress indicator appears while the TrackID™ application samples the song. If
successful, you are presented with a track result, or a list of possible tracks.
3 Press to return the FM Radio.
The TrackID™ application and the TrackID™ service are not supported in all countries/regions,
or by all networks and/or service providers in all areas.
Favorite radio channels
To save a channel as a favorite
1 When the radio is open, navigate to the channel that you want to save as a
favorite.
2 Tap .
3 Enter a name and select a color for the channel, then press Save.
To listen to a favorite radio channel
1 Tap .
2 Select an option.
To remove a channel as a favorite
1 When the radio is open, navigate to the channel that you want to remove.
2 Tap , then tap Delete.
Sound settings
To switch between mono and stereo sound mode
1 When the radio is open, press .
2 Tap Enable stereo sound.
3 To listen to the radio in mono sound mode again, press and tap Force mono
sound.
To select the radio region
1 When the radio is open, press .
2 Tap Set radio region.
3 Select an option.
To adjust the Visualizer
1 When the radio is open, tap .
2 Tap Visualizer.
3 Select an option.
67
This is an Internet version of this publication. © Print only for private use.
Page 68

Camera
Taking photos and recording videos
1 Zoom in or out
2 Main camera screen
3 Camera key – Activate the camera/Take photos/Record videos
4 View photos and videos
5 Take photos or record video clips
6 Go back a step or exit the camera
7 Capturing mode settings icon
8 Camera settings icon and shortcut icons
9 Front camera
To take a photo from the lock screen
1 To activate the screen, briefly press the power key .
2 To activate the camera, swipe to the left in the upper part of the screen.
3 After the camera opens, tap .
To take a photo using the camera key
1 Activate the camera.
2 Press the camera key fully down.
To take a photo by tapping the on-screen camera button
1 Activate the camera.
2 Point the camera toward the subject.
3 Tap the on-screen camera button . The photo is taken as soon as you release
your finger.
To take a self-portrait using the front camera
1 Activate the camera.
2 Tap .
3 To take the photo, press the camera key. The photo is taken as soon as you
release your finger.
To use the still camera flash
1 When the camera is open, tap .
2 Select your desired flash setting.
3 Take the photo.
68
This is an Internet version of this publication. © Print only for private use.
Page 69

To record a video using the camera key
1 Activate the camera.
2 Tap , and select .
3 If the video camera is not selected, tap .
4 To start recording a video, press the camera key.
5 To stop recording, press the camera key again.
To record a video by tapping the screen
1 Activate the camera.
2 Point the camera toward the subject.
3 Tap to start recording.
4 Tap to stop recording.
This function is only available in Superior auto capturing mode.
To view your photos and videos
1 Activate the camera, then tap a thumbnail to open a photo or video.
2 Flick left or right to view your photos and videos.
To delete a photo or recorded video
1 Browse to the photo or video that you want to delete.
2 Tap the screen to make appear.
3 Tap .
4 Tap Delete to confirm.
Face detection
You can use face detection to bring an off-center face into focus. The camera
automatically detects up to five faces, indicated by white frames. A yellow frame shows
which face has been selected for focus. Focus is set to the face closest to the camera.
You can also tap one of the frames to select which face should be in focus.
To turn on face detection
1 Activate the camera.
2 Tap , then select .
3 Tap , then tap .
4 Tap Focus mode > Face detection.
To take a photo using face detection
1 When the camera is open and Face detection turned on, point the camera at
your subject. Up to five faces can be detected, and each detected face is framed.
2 Press the camera key halfway down. A yellow frame shows which face is in focus.
3 To take the photo, press the camera key fully down.
Using Smile Shutter™ to capture smiling faces
Use Smile Shutter™ technology to photograph a face just as it smiles. The camera
detects up to five faces and selects one face for smile detection and auto focus. When
the selected face smiles, the camera automatically takes a photo.
To turn on Smile Shutter™
1 Activate the camera.
2 Tap , then tap
3 Tap Smile Shutter and select a smile level.
69
This is an Internet version of this publication. © Print only for private use.
Page 70

To take a photo using Smile Shutter™
1 When the camera is open and Smile Shutter™ is turned on, point the camera at
your subject. The camera selects which face to focus on.
2 The face selected appears inside a colored frame and the photo is taken
automatically.
3 If no smile is detected, press the camera key to take the photo manually.
Adding the geographical position to your photos
Turn on geotagging to add the approximate geographical location (a geotag) to photos
when you take them. The geographical location is determined either by wireless
networks (mobile or Wi-Fi® networks) or GPS technology.
When appears on the camera screen, geotagging is turned on but the geographical
position has not been found. When appears, geotagging is turned on and the
geographical location is available, so your photo can get geotagged. When neither of
these two symbols appear, geotagging is turned off.
To turn on geotagging
1 From your Home screen, tap .
2 Tap Settings > Location services.
3 Drag the slider beside Access to my location to the right.
4 Activate the camera.
5 Tap , then tap .
6 Drag the slider beside Geotagging to the right.
7 Tap OK.
General camera settings
Capturing mode settings overview
Superior auto
Optimize your settings to suit any scene.
Manual
Adjust camera settings manually.
Timeshift burst
Shift back and forth in time to enjoy and share your favorite moments.
Picture effect
Apply effects to photos.
AR effect
Take photos with virtual scenes and characters.
Info-eye™
Find more information about what you see in the viewfinder.
Social live
Broadcast live video to Facebook™.
Sweep Panorama
Use this setting to take wide-angle, panoramic photos. Just press the camera key and move the camera
steadily from one side to the other.
Quick launch
Use Quick launch settings to launch the camera when the screen is locked.
Launch only
When this setting is activated, you can launch the camera when the screen is locked by pressing and holding
down the camera key.
Launch and capture
When this setting is activated, you can launch the camera and capture a photo automatically when the
screen is locked by pressing and holding down the camera key.
70
This is an Internet version of this publication. © Print only for private use.
Page 71

Launch and record video
When this setting is activated, you can launch the camera and start capturing video when the screen is
locked by pressing and holding down the camera key.
Off
Geotagging
Tag photos with details of where you took them.
Touch capture
Identify a particular focus area by touching the camera screen with your finger. The
photo is taken as soon as you release your finger. This setting is only available when
focus mode is set to touch focus.
Shutter sound
Choose whether to turn on or turn off the shutter sound when you record a video.
Data storage
You can choose to save your data either to a removable SD card or to your device's
internal storage.
Internal storage
Photos or videos are saved on the device memory.
SD card
Photos or videos are saved on the SD card.
White balance
This function adjusts the color balance according to the lighting conditions. The white
balance setting icon is available on the camera screen.
Auto
Adjusts the color balance automatically to suit the lighting conditions.
Incandescent
Adjusts the color balance for warm lighting conditions, such as under light bulbs.
Fluorescent
Adjusts the color balance for fluorescent lighting.
Daylight
Adjusts the color balance for sunny outdoor conditions.
Cloudy
Adjusts the color balance for a cloudy sky.
This setting is only available in Manual capturing mode.
Still camera settings
To adjust the still camera settings
1 Activate the camera.
2 To display all settings, tap .
3 Select the setting you want to adjust, then edit as desired.
Still camera settings overview
Resolution
Choose between several resolutions and aspect ratios before taking a photo. A photo
with a higher resolution requires more memory.
71
This is an Internet version of this publication. © Print only for private use.
Page 72

20MP
5248×3936(4:3)
20-megapixel resolution with 4:3 aspect ratio. Suitable for photos you want to view on non-widescreen
displays or print in high resolution.
8MP
3264×2448(4:3)
8-megapixel resolution with 4:3 aspect ratio. Suitable for photos you want to view on non-widescreen
displays or print in high resolution.
8MP
3840×2160(16:9)
8-megapixel resolution with 16:9 aspect ratio. Suitable for photos you want to view on widescreen displays.
3MP
2048×1536(4:3)
3-megapixel resolution with 4:3 aspect ratio. Suitable for photos you want to view on non-widescreen
displays or print in high resolution.
2MP
1920×1080(16:9)
2-megapixel resolution with 16:9 aspect ratio. Suitable for photos you want to view on widescreen displays.
This setting is only available in Manual capturing mode.
Self timer
With the self-timer you can take a photo without holding the device. Use this function to
take self-portraits, or group photos where everyone can be in the photo. You can also
use the self-timer to avoid shaking the camera when taking photos.
On (10 sec.)
Set a 10-second delay from when you tap the camera screen until the photo is taken.
On (2 sec.)
Set a 2-second delay from when you tap the camera screen until the photo is taken.
Off
The photo is taken as soon as you tap the camera screen.
Smile Shutter™
Use the Smile Shutter™ function to determine what kind of smile the camera reacts to
before taking a photo.
Focus mode
The focus function controls which part of a photo should be sharp. When continuous
autofocus is on, the camera keeps adjusting focus so that the area within the yellow
focus frame stays sharp.
Single autofocus
The camera automatically focuses on the selected subject. Continuous autofocus is on. Touch and hold the
camera screen until the yellow focus frame turns blue, indicating that the focus is set. The photo is taken
when you release your finger.
Multi autofocus
The focus is automatically set on several areas of the image. Touch and hold the camera screen until the
yellow focus frame turns blue, indicating that the focus is set. The photo is taken when you release your
finger. Continuous autofocus is off.
Face detection
The camera automatically detects up to five human faces, indicated by frames on the screen. The camera
automatically focuses on the nearest face. You can also select which face to focus on by tapping it on the
screen. When you tap the camera screen, a blue frame shows which face is selected and in focus. Face
detection cannot be used for all scene types. Continuous autofocus is on.
Touch focus
Touch a specific area on the camera screen to set the area of focus. Continuous autofocus is off. Touch and
hold the camera screen until the yellow focus frame turns blue, indicating that the focus is set. The photo is
taken when you release your finger.
Object tracking
72
This is an Internet version of this publication. © Print only for private use.
Page 73

When you select an object by touching it in the viewfinder, the camera tracks it for you.
This setting is only available in Manual capturing mode.
HDR
Use the HDR (High Dynamic Range) setting to take a photo against strong backlight or in
conditions where the contrast is sharp. HDR compensates for the loss of detail and
produces a picture that is representative of both dark and bright areas.
This setting is only available in Manual capturing mode.
ISO
You can reduce image blurring caused by dark conditions or moving subjects by
increasing the ISO sensitivity.
Auto
Sets the ISO sensitivity automatically.
50
Sets the ISO sensitivity to 50.
100
Sets the ISO sensitivity to 100.
200
Sets the ISO sensitivity to 200.
400
Sets the ISO sensitivity to 400.
800
Sets the ISO sensitivity to 800.
1600
Sets the ISO sensitivity to 1600.
3200
Sets the ISO sensitivity to 3200.
This setting is only available in Manual capturing mode.
Metering
This function automatically determines a well-balanced exposure by measuring the
amount of light striking the image you want to capture.
Center
Adjusts the exposure to the center of the image.
Average
Calculates the exposure based on the amount of light striking the whole image.
Spot
Adjusts the exposure in a very small part of the image that you want to capture.
This setting is only available in Manual capturing mode.
Image stabilizer
When taking a photo, it can be difficult to hold the device steady. The stabilizer helps you
by compensating for small movements of the hand.
This setting is only available in Manual capturing mode.
Preview
You can choose to preview photos or videos just after you shoot them.
73
This is an Internet version of this publication. © Print only for private use.
Page 74

Unlimited
The preview of the photo or video appears after you shoot it.
5 seconds
The preview of the photo or video appears for 5 seconds after you shoot it.
3 seconds
The preview of the photo or video appears for 3 seconds after you shoot it.
Edit
The photo or video opens for editing after you shoot it.
Off
The photo or video is saved after you shoot it, and no preview appears.
Face registration
You can register faces with the Camera application so that the viewfinder automatically
focuses on these faces when they appear in the viewfinder.
Flash
Use the flash to take photos when lighting conditions are poor or when there is a
backlight. The following options are available when you tap the flash icon in the
camera screen:
Auto
The camera automatically determines if the lighting conditions require the use of a flash.
Fill flash
Use this setting when the background is brighter than the subject. This removes unwanted dark
shadows.
Red-eye reduction
Reduces the red color of eyes when taking a photo.
Off
The flash is turned off. Sometimes photo quality can be better without the flash, even if lighting
conditions are poor. Taking a good photo without using the flash requires a steady hand. Use the selftimer to avoid blurred photos.
Torch
A torch or camera light is turned on when you take photos.
Video camera settings
To adjust the video camera settings
1 Activate the camera.
2 Tap one of the settings icons on the screen.
3 To display all settings, tap .
4 Select the setting that you want to adjust, then make your changes.
Video camera settings overview
Video resolution
Adjust the video resolution for different formats.
Full HD
1920×1080(16:9)
Full HD (Full High Definition) format with 16:9 aspect ratio. 1980×1080 pixels.
HD
1280×720(16:9)
HD (High Definition) format with 16:9 aspect ratio. 1280×720 pixels.
MMS
74
This is an Internet version of this publication. © Print only for private use.
Page 75

Record videos suitable for sending in multimedia messages. The recording time of this video format is limited
to fit in a multimedia message.
This setting is only available in Manual capturing mode.
Self timer
With the self-timer you can record a video without holding the device. Use it to record
group videos where everyone can be in the video. You can also use the self-timer to
avoid shaking the camera when recording videos.
On (10 sec.)
Set a 10-second delay from when you tap the camera screen until the video begins to record.
On (2 sec.)
Set a 2-second delay from when you tap the camera screen until the video begins to record.
Off
The video begins to record as soon as you tap the camera screen.
Smile Shutter™(video)
Use the Smile Shutter™ function to determine what kind of smile the camera reacts to
before recording a video.
Focus mode
The focus setting controls which part of a video should be sharp. When continuous
autofocus is on, the camera keeps adjusting focus so that the area within the white focus
frame stays sharp.
Single autofocus
The camera automatically focuses on the selected subject. Continuous autofocus is on.
Face detection
The camera automatically detects up to five human faces, indicated by frames on the screen. The camera
automatically focuses on the nearest face. You can also select which face to focus on by tapping it on the
screen. When you tap the camera screen, a yellow frame shows which face is selected and in focus. Face
detection cannot be used for all scene types. Continuous autofocus is on.
Object tracking
When you select an object by touching it in the viewfinder, the camera tracks it for you.
This setting is only available in Manual capturing mode.
HDR video
Use the video HDR (High-Dynamic Range) setting to record a video against strong
backlight or in conditions where the contrast is sharp. Video HDR compensates for the
loss of detail and produces a picture that is representative of both dark and bright areas.
This setting is only available in Manual capturing mode.
Metering
This function automatically determines a well-balanced exposure by measuring the
amount of light striking the image you want to capture.
Center
Adjusts the exposure to the center of the image.
Average
Calculates the exposure based on the amount of light striking the whole image.
Spot
Adjusts the exposure in a very small part of the image that you want to capture.
This setting is only available in Manual capturing mode.
75
This is an Internet version of this publication. © Print only for private use.
Page 76

SteadyShot™
When recording a video, it can be difficult to hold the device steady. The stabilizer helps
you by compensating for small movements of the hand.
Microphone
Select whether to pick up the surrounding sound when recording videos.
Flash
Use the flash light to record videos when lighting conditions are poor or when there is a
backlight. The video flash icon is only available on the video camera screen. Note that
the video quality can sometimes be better without a light even if lighting conditions are
poor.
On
Off
76
This is an Internet version of this publication. © Print only for private use.
Page 77
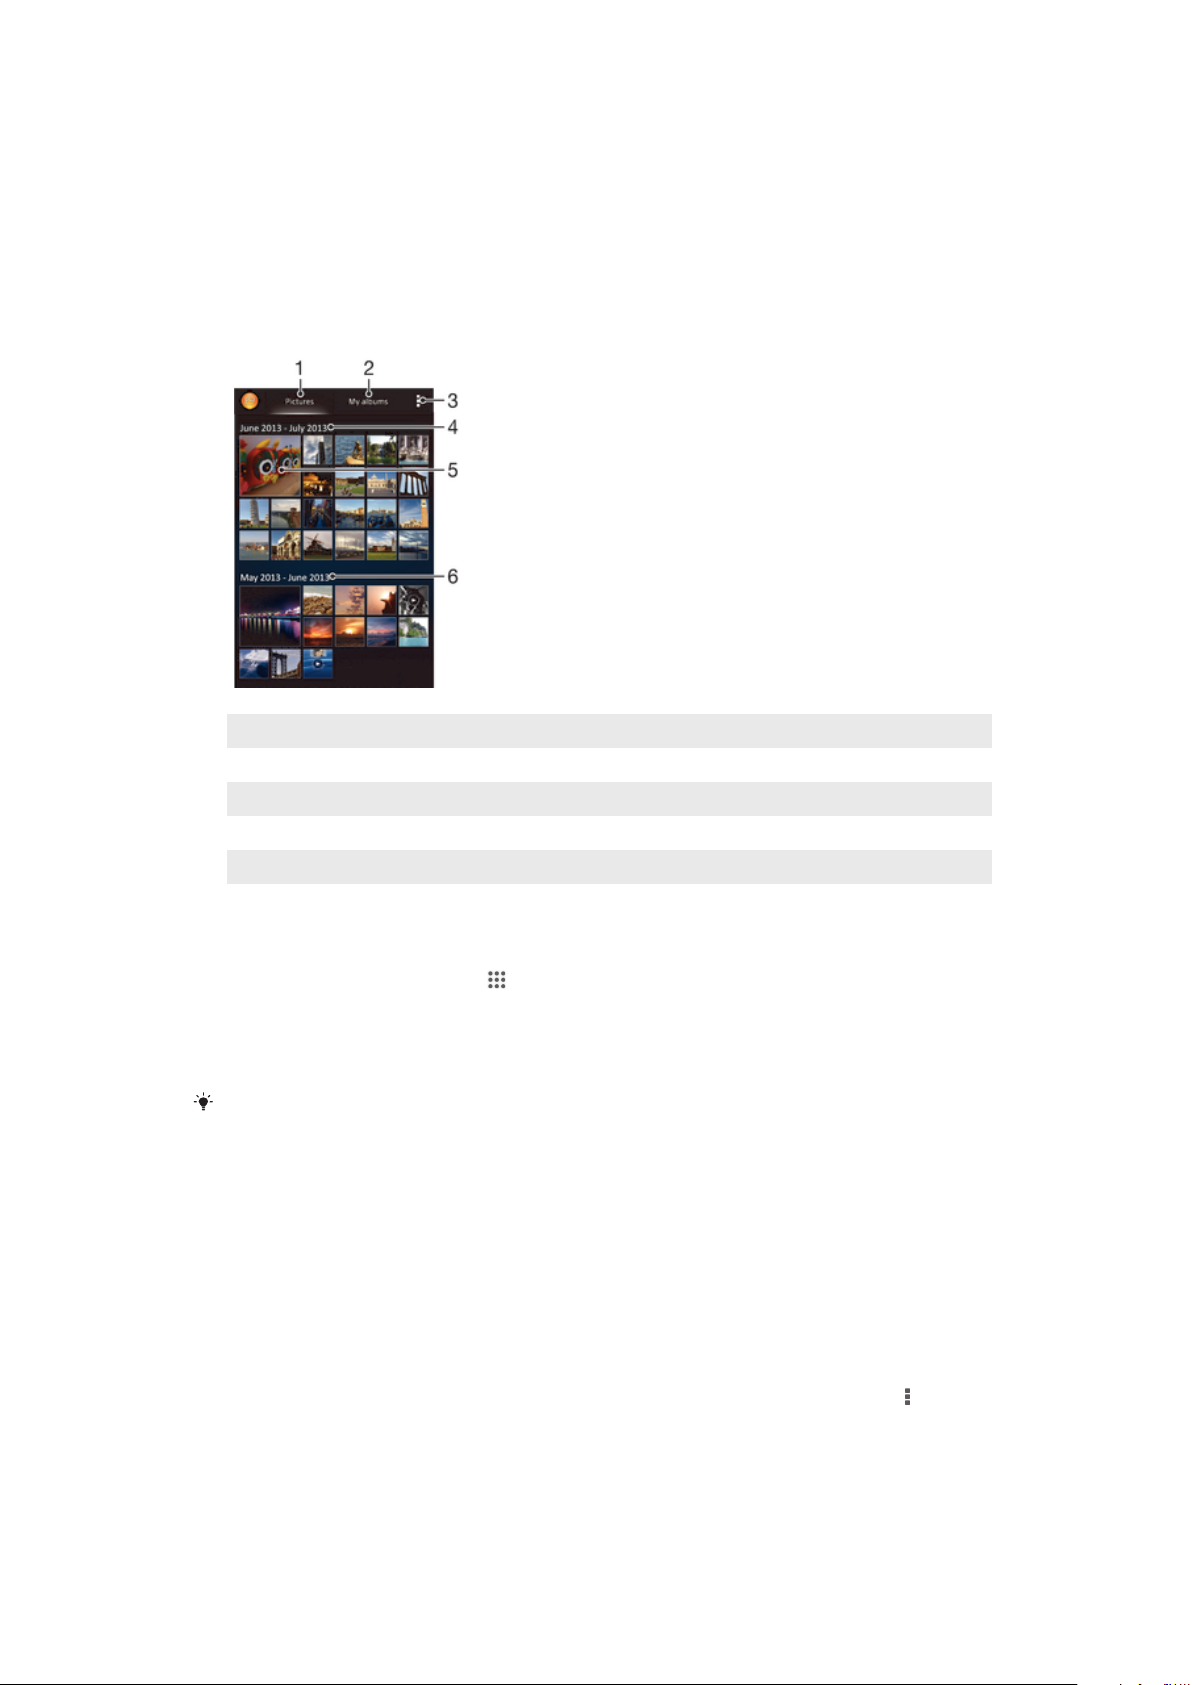
Album
Viewing photos and videos
Use the Pictures tab in the Album application to view photos and play videos that you’ve
taken with your camera, or to view similar content that you've saved to your device. All
photos and videos are displayed in a chronologically ordered grid.
1 View photos and videos in the Pictures tab
2 View photos and videos in the My albums tab
3 View menu options
4 The date of items in the group
5 Tap a photo or video to view it
6 Scroll up or down to view content
To view photos and videos
1 From your Home screen, tap .
2 Find and tap Album.
3 Tap a photo or video to view it.
4 Flick left to view the next photo or video. Flick right to view the previous photo or
video.
If the screen orientation does not change automatically when you turn your device sideways,
mark the Auto-rotate screen checkbox under Settings > Display.
To change the size of the thumbnails
• When viewing thumbnails of photos and videos in Album, spread two fingers apart
to zoom in, or pinch two fingers together to zoom out.
To zoom a photo
• When you are viewing a photo, spread two fingers apart to zoom in, or pinch two fingers
together to zoom out.
To watch a slideshow of your photos
1 When you are viewing a photo, tap the screen to display the toolbars, then tap >
Slideshow to start playing all the photos in an album.
2 Tap a photo to end the slideshow.
77
This is an Internet version of this publication. © Print only for private use.
Page 78

To watch a slideshow of your photos with music
1 When you are viewing a photo, tap the screen to display the toolbars, then tap >
SensMe™ slideshow.
2 Select the music and theme that you want to use for the slideshow, then tap .
The Album application analyses your photos and uses SensMe™ music data to
play a slideshow.
3 To pause playing, tap the screen to display the controls, then tap .
To play a video
1 Open the Pictures tab or the My albums tab in Album.
2 Using grid view or list view, locate the video that you want to open.
3 Tap the video to play it.
4 If the playback controls are not displayed, tap the screen to display them. To hide
the controls, tap the screen again.
To pause a video
1 When a video is playing, tap the screen to display the controls.
2 Tap .
To fast forward and rewind a video
1 When a video is playing, tap the screen to display the controls.
2 Drag the progress bar marker left to rewind, or right to fast forward.
To adjust the volume of a video
• Press the volume key.
Sharing and managing photos and videos
You can share photos and videos that you’ve stored on your device. You can also
manage them in different ways. For example, you can work with photos in batches,
delete photos and link them to contacts.
You might not be able to copy, send, or transfer copyright-protected items. Also, some items
may not send if the file size is too large.
To share a photo or video
1 In Album, find and tap the photo or video that you want to share.
2 Tap the screen to display the toolbars, then tap .
3 Tap the application that you want to use to share the photo, then follow the steps
to send it.
To use a photo as a contact picture
1 When you are viewing a photo, tap the screen to display the toolbars, then tap >
Use as > Contact picture.
2 If asked, select Contacts > Just once, then select a contact.
To use a photo as wallpaper
1 When you are viewing a photo, tap the screen to display the toolbars, then tap >
Use as > Wallpaper.
2 Follow the instructions on the screen.
To rotate a photo
1 When you are viewing a photo, tap the screen to display the toolbars, then tap .
2 Select Rotate. The photo is saved in the new orientation.
To delete a photo or video
1 When you are viewing a photo, tap the screen to display the toolbars, then tap .
2 Tap Delete.
78
This is an Internet version of this publication. © Print only for private use.
Page 79

To work with batches of photos or videos in Album
1 When viewing thumbnails of photos and videos in Album, tap , then tap Select
items.
2 Tap the items that you want to work with. Selected items are indicated by a blue
frame.
3 Use the tools in the toolbars to work with your selected items.
To activate selection mode, you can also touch and hold an item until its frame turns blue.
Then you can tap other items to select them.
Analyzing photos with faces in Album
You can analyze any photos on your device that feature people's faces. Once activated,
the photo analysis feature stays on, and new photos get analyzed as they are added.
After running an analysis, you can then group all photos of the same person in one
folder.
To turn on the photo analysis feature
1 From your Home screen, tap .
2 Find and tap Album > My albums > Faces.
3 All photos on your device get analyzed and grouped in the Unnamed faces folder
accordingly.
To name a face
1 In the Faces tile, tap the Unnamed faces folder, then browse to the Other faces
folder and choose the face that you want to name.
2 Tap Add name.
3 Type a name, then tap Done > Add as new person.
To edit a face name
1 When you are viewing a face in full-screen view, tap the screen to display the
toolbars, then tap > Edit name tags.
2 Tap OK.
3 Tap the name of the face that you want to edit.
4 Edit the name, then tap Done >Add as new person.
Editing photos with the Photo editor application
You can edit and apply effects to original photos that you’ve taken with your camera. For
example, you can change the light effects. After you save the edited photo, the original
unchanged version of the photo remains on your device.
To edit a photo
• When you are viewing a photo, tap the screen to display the toolbars, then tap .
To crop a photo
1 When you are viewing a photo, tap the screen to display the toolbars, then tap .
2 If prompted, select Photo editor > Just once.
3 Tap > Crop.
4 Tap to select an option.
5 To adjust the crop frame, touch and hold the edge of the crop frame. When the
squares at the edges disappear, drag inward or outward to resize the frame.
6 To resize all sides of the crop frame at the same time, touch and hold one of the
four corners to make the squares at the edges disappear, then drag the corner
accordingly.
7 To move the crop frame to another area of the photo, touch and hold inside the
frame, then drag it to the desired position.
8 Tap Apply Crop.
9 To save a copy of the photo as you cropped it, tap Save.
79
This is an Internet version of this publication. © Print only for private use.
Page 80

To apply special effects to a photo
1 When you are viewing a photo, tap the screen to display the toolbars, then tap .
2 If prompted, select Photo editor > Just once.
3 Tap , then select an option.
4 To save a copy of the edited photo, tap Save.
To improve a photo using advanced settings
1 When you are viewing a photo, tap the screen to display the toolbars, then tap .
2 If prompted, select Photo editor > Just once.
3 Tap , then select an option.
4 To save a copy of the edited photo, tap Save.
To adjust the light settings for a photo
1 When you are viewing a photo, tap the screen to display the toolbars, then tap .
2 If prompted, select Photo editor > Just once.
3 Tap , then select an option.
4 To save a copy of the edited photo, tap Save.
To set the saturation level of colors in a photo
1 When you are viewing a photo, tap the screen to display the toolbars, then tap .
2 If prompted, select Photo editor > Just once.
3 Tap , then select an option.
4 To save a copy of the edited photo, tap Save.
Photo albums
The My albums tab in the Album application gathers together all your photo albums,
including albums of photos and videos taken with the camera as well as content that you
share online via services such as PlayMemories, Picasa, and Facebook. Once you are
logged in to such services, you can manage content, comment on photos and videos,
and view comments from friends. From the Album application, you can also add geotags
to photos, perform basic editing tasks, and use methods such as Bluetooth® wireless
technology, email, and messaging to share content.
1 View photos and videos using the PlayMemories online service
2 View photos and videos on Facebook™
3 View photos and videos in Picasa™
4 View photos using the Flickr™ online service
5 View all photos and videos taken with your device’s camera
6 View all photos and videos saved to your device's internal storage
7 View your photos in globe mode
8 View your photos on a map
This is an Internet version of this publication. © Print only for private use.
80
Page 81

9 View all photos and videos saved to the removable memory card
10 View all photos with faces
The PlayMemories online service is not available in all countries or regions.
To view photos from online services in Album
1 From your Home screen, tap .
2 Find and tap Album > My albums.
3 Tap the desired online service.
4 Tap Connect. All available online albums that you have uploaded to the service
are displayed.
5 Tap any album to view its content, then tap a photo in the album.
6 Flick left to view the next photo or video. Flick right to view the previous photo or
video.
To view and add comments to online album content
1 When viewing a photo from an online album, tap the screen to display the
toolbars, then tap to view the comments.
2 Enter your comments in the input field, then tap Post.
To "Like" a photo or video on Facebook™
• While viewing a photo or video from one of your Facebook™ albums, tap the
screen to display the toolbars, then tap to show that you "Like" the item on
Facebook™.
Viewing your photos on a map
Adding location information to photos is referred to as geotagging. You can view and tag
your photos on a map and show friends and family where you were when you took a
particular photo. See Adding the geographical position to your photos on page 70 for
more information.
If you have turned on location detection and activated geotagging in the camera, you can tag
your photos directly for map viewing at a later stage.
1 Search a location on the map.
2 View menu options.
3 A group of photos and/or videos geotagged with the same location.
4 Double tap to zoom in. Pinch to zoom out. Drag to view different parts of the map.
81
This is an Internet version of this publication. © Print only for private use.
Page 82

5 Thumbnails of the selected group of photos and/or videos. Tap an item to view it in full screen.
If several photos were taken at the same location, only one of them appears on the map. The
total number of photos appears in the top right corner, for example, . To view all photos in
the group, tap the cover photo and then tap one of the thumbnails at the bottom of the
screen.
To add a geotag to a photo
1 When you are viewing a photo, tap the screen to display the toolbars, then tap
Tap to set location to open the map screen.
2 Find and tap the desired location to put the photo on the map.
3 To adjust the location of the photo, tap the location on the map where you want to
move the photo to.
4 When you are done, tap OK to save the geotag and return to the photo viewer.
To view geotagged photos on a map
1 From your Home screen, tap .
2 Find and tap Album > My albums > Maps.
3 Tap a photo to view it in full screen.
To view geotagged photos on a globe
1 From your Home screen, tap .
2 Find and tap Album > My albums > Globe.
3 Tap a photo to view it in full screen.
To change the geotag of a photo
1 When viewing a photo on the map in Album, touch and hold the photo until its
frame turns blue, then tap the desired location on the map.
2 Tap OK.
To change the map view
• When viewing the map in Album, tap , then select Classic view or Satellite view.
82
This is an Internet version of this publication. © Print only for private use.
Page 83

Videos
Watching videos in the Movies application
Use the Movies application to play movies and other video content that you’ve saved or
downloaded to your device. The Movies application also helps you get poster art, plot
summaries, genre info, and director details for each movie. You can also play your
movies on other devices that are connected to the same network.
Videos taken with your device's camera are displayed in the Album application, not in the
Movies application.
Some video files may not be playable in the Movies application.
1 Open the Video Unlimited application
2 View menu options
3 Tap to play your most recently watched video
4 Browse all videos downloaded or saved to your device
5 Tap to play saved or downloaded video files
6 Tap to view all videos in Video Unlimited
7 Tap to view details of a video in Video Unlimited
Sony Entertainment Network with Video Unlimited and Music Unlimited is not available in every
market. Separate subscription required. Additional terms and conditions apply.
To play a video in Movies
1 From your Home screen, tap , then find and tap Movies.
2 Find and tap the video that you want to play. If the video is not displayed on the
screen, tap All in the My Collection tab, then find and tap the video that you want
to play.
3 To display or hide the controls, tap the screen.
4 To pause playing, tap . To resume playing, tap .
5 To rewind, drag the progress bar marker to the left. To fast forward, drag the
progress bar marker to the right.
83
This is an Internet version of this publication. © Print only for private use.
Page 84

To play a video in full screen mode
1 When a video is playing, tap the screen to display the controls.
2 Tap .
You can only switch to full screen mode if the video is not playing in full screen mode already.
To play the video in its original size, tap .
To play a video on an external device
1 When the video is playing, tap the screen to display all the controls.
2 Tap > Throw.
3 Select an external device on which to play the video. If there is no external device
available, follow the on-screen instructions to add one.
To change settings in Movies
1 From your Home screen, tap , then find and tap Movies.
2 Tap , then change the settings as desired.
To change the sound settings while a video is playing
1 While a video is playing, tap the screen to display the controls.
2 Tap , then tap Sound settings.
3 Mark the checkboxes for the sound settings that you want to activate.
4 When you're finished, tap OK.
To share a video
1 When a video is playing, tap , then tap Share.
2 In the menu that opens, tap the application that you want to use to share the
selected video, then follow the relevant steps to send it.
Transferring video content to your device
Before you start using the Movies application, it’s a good idea to transfer movies, TV
shows, and other video content to your device from other devices, such as a computer.
There are several ways to transfer your content:
• Connect your device to a computer using a USB cable and drag and drop the video files
directly using the file manager application on the computer. See Connecting your device
to a computer on page 93.
• If you have a PC, use the Media Go™ application from Sony™ to organize content and
transfer video files to your device via the PC. To learn more and download the Media
Go™ application, go to http://mediago.sony.com/enu/features.
• If your computer is an Apple® Mac®, you can use Sony™ Bridge for Mac to transfer
video files from iTunes to your device. To learn more and download Sony™ Bridge for
Mac, go to www.sonymobile.com/global-en/tools/bridge-for-mac/.
84
This is an Internet version of this publication. © Print only for private use.
Page 85

Managing video content
To get movie information manually
1 Make sure your device has an active data connection.
2 From your Home screen, tap , then find and tap Movies.
3 Tap All in the My Collection tab to browse to the thumbnail of a file that you want
to get information about.
4 Touch and hold the thumbnail for the video, then tap Search for info.
5 If prompted, allow your device to download video details using your mobile data
connection.
6 In the search field, enter keywords for the video, then tap the confirm key on the
keyboard. All matches are displayed in a list.
7 Select a search result, then tap Done. The download of the information begins.
You can get information about newly added videos automatically every time the Movies
application opens if you mark the Get video details checkbox under Settings. Data
transmission charges may apply.
If the downloaded information is not correct, search again using different keywords.
To clear information about a video
1 From your Home screen, tap , then find and tap Movies.
2 Tap All in the My Collection tab to browse to the video that you want to edit.
3 Touch and hold the video thumbnail, then tap Clear info.
To delete a video
1 From your Home screen, tap , then find and tap Movies.
2 Tap All in the My Collection tab to browse to the video that you want to delete.
3 Touch and hold the video thumbnail, then tap Delete from the list that appears.
4 Tap Delete again to confirm.
Video Unlimited service
Use the Video Unlimited service to rent and buy movies or TV shows that you can view
not only on your Android™ device, but also on a PC, PlayStation® Portable (PSP®),
PlayStation® 3 or PlayStation® Vita. Select your pick from the latest Hollywood releases,
action movies, comedies, classics, and a range of other categories.
You need to create a Video Unlimited account if you want to buy or rent movies through
the Video Unlimited service. If you already have a PlayStation® network account or a
Sony Entertainment Network account, then you can use that account instead.
Sony Entertainment Network with Video Unlimited and Music Unlimited is not available in every
market. Separate subscription required. Additional terms and conditions apply.
To get started with Video Unlimited
1 From your Home screen, tap .
2 Find and tap .
3 If you are starting Video Unlimited for the first time, tap Continue in the Welcome
screen and enter your birth date if required, then tap Continue again to go to the
main screen of Video Unlimited.
4 Tap > Sign In, then follow the on-screen instructions to sign in to your account,
or create a new account, to buy or rent movies.
85
This is an Internet version of this publication. © Print only for private use.
Page 86

Connectivity
Sharing content with DLNA Certified™ devices
You can view or play media content saved to your device on other devices such as, for
example, a TV, or a computer. Such devices must be DLNA Certified™ by the Digital
Living Network Alliance and all devices must be connected to the same Wi-Fi® network
in order for content to be shared. You can also view or play content from other DLNA
Certified™ devices on your device.
After you set up the sharing of content between devices, you can, for example, listen to
music files stored on your home computer from your device, or view photos taken with
your device's camera on a large-screen TV.
Playing files from DLNA Certified™ devices on your device
When you play files from another DLNA Certified™ device on your device, this other
device acts as a server. In other words, it shares content over a network. The server
device must have its content sharing function enabled and give access permission to
your device. It also must be connected to the same Wi-Fi® network as your device.
To play a shared track on your device
1 Make sure the devices that you want to share files with are connected to the same
Wi-Fi® network as your device.
2 From your Home screen, tap , then find and tap WALKMAN.
3 Select a device from the list of connected devices.
4 Browse the folders of the connected device and select the track that you want to
play. The track starts playing automatically.
To play a shared video on your device
1 Make sure the devices that you want to share files with are connected to the same
Wi-Fi® network as your device.
2 From your Home screen, tap , then find and tap Movies.
3 Select a device from the list of connected devices.
4 Browse the folders of the connected device and select the video that you want to
play.
To view a shared photo on your device
1 Make sure the devices that you want to share files with are connected to the same
Wi-Fi® network as your device.
2 From your Home screen, tap .
3 Find and tap Album > My albums. All your available online albums and
connected devices are displayed.
4 Select a device from the list of connected devices.
5 Browse the folders of the connected device and select a photo to view it.
Preparing to play content from your device on DLNA Certified™
devices
Before you can view or play media files from your device on other DLNA Certified™
devices, you must set up file sharing on your device. The devices that you share content
with are called client devices. For example, a TV, computer or tablet can act as client
devices. Your device works as a media server when it makes content available to client
devices. When you set up file sharing on your device, you must also give access
permission to client devices. After you do so, such devices appear as registered devices.
Devices that are waiting for access permission are listed as pending devices.
86
This is an Internet version of this publication. © Print only for private use.
Page 87

To set up file sharing with other DLNA Certified™ devices
1 Connect your device to a Wi-Fi® network.
2 From your Home screen, tap , then find and tap .
3 Tap , then tap Media server.
4 To turn on the Share media function, drag the slider. appears in the status bar.
Your device can now work as a media server.
5 Connect your computer or other devices to the same Wi-Fi® network as your
device.
6 A notification appears in the status bar of your device. Open the notification and
set the relevant access permissions for other devices.
The instructions described above may differ depending on the client devices used. Refer to
your client device User guide for more information. If the device cannot connect, check that
your Wi-Fi® network is working.
You can also access the Media server menu under Settings > Xperia™ Connectivity > Media
server settings. If you close the Media server view, the file sharing function stays running in
the background.
To stop sharing files with other DLNA Certified™ devices
1 From your Home screen, tap , then find and tap .
2 Tap , then tap Media server.
3 Drag the slider to turn off the Share media function.
To set access permissions for a pending device
1 From your Home screen, tap , then find and tap .
2 Tap , then tap Media server.
3 Select a device from the Pending devices list.
4 Select an access permission level.
To change the name of a registered device
1 From your Home screen, tap , then find and tap .
2 Tap , then tap Media server.
3 Select a device from the Registered devices list, then select Change name.
4 Enter a new name for the device.
To change the access level of a registered device
1 From your Home screen, tap , then find and tap .
2 Tap , then tap Media server.
3 Select a device from the Registered devices list.
4 Tap Change access level and select an option.
To get help about sharing content with other DLNA Certified™ devices
1 From your Home screen, tap , then find and tap .
2 Tap , then tap Media server.
3 Tap .
Playing files on a Digital Media Renderer device
Using DLNA™ technology, you can push media content saved on your device to another
device connected to the same Wi-Fi® network. The other device must be able to
function as a Digital Media Renderer (DMR) device, which means that it can render, or
play, content received from your device. A DMR device can be, for example, a TV with
DLNA function, or a PC running Windows® 7 or higher.
The settings for enabling the Digital Media Renderer may vary depending on the device used.
Refer to the user guide for the respective device for more detailed information.
Content with Digital Rights Management (DRM) cannot be played on a Digital Media Renderer
device using DLNA™ technology.
87
This is an Internet version of this publication. © Print only for private use.
Page 88

To view photos or videos from your device on a DMR device
1 Ensure you have correctly set up the DMR device and that it is connected to the
same Wi-Fi® network as your device.
2 From your Home screen, tap .
3 Find and tap Album.
4 Browse to and open the file that you want to view.
5 Tap the screen to display the toolbars, then tap and select a DMR device to
share your content with. The selected files start playing in chronological order on
the device that you select.
6 To disconnect from the DMR device, tap and select your device. The file stops
playing on the DMR device but continues playing on your device.
You can also share a video from the Movies application on your device by tapping the video
and then tapping .
To play a music track from your device on a DMR device
1 Make sure that you have correctly set up the DMR device and that it is connected
to the same Wi-Fi® network as your device.
2 From your Home screen, tap , then find and tap WALKMAN.
3 Select a music category and browse to the track that you want to share, then tap
the track.
4 Tap and select a DMR device to share your content with. The track plays
automatically on the device that you select.
5 To disconnect from the DMR device, tap and select your device. The track
stops playing on the DMR device but continues playing on your device.
NFC
Use Near Field Communications (NFC) to share data with other devices, such as a video,
photo, web page address, music file, or contact. You can also use NFC to scan tags
that give you more information about a product or service as well as tags that activate
certain functions on your device.
NFC is a wireless technology with a maximum range of one centimeter, so the devices
sharing data must be held close to each other. Before you can use NFC, you must first
turn on the NFC function, and the screen of your device must be active.
NFC may not be available in all countries and/or regions.
To turn on the NFC function
1 From your Home screen, tap .
2 Find and tap Settings > More….
3 Mark the NFC checkbox.
88
This is an Internet version of this publication. © Print only for private use.
Page 89

NFC detection area
The location of the NFC detection area is not the same on all devices. When sharing data with
another device using NFC, refer to the User guide of the other device for more information.
To share a contact with another device using NFC
1 Make sure that both devices have the NFC function turned on, and that both
screens are active.
2 To view contacts, go to your Home screen, tap , then tap .
3 Tap the contact that you want to share.
4 Hold your device and the receiving device back to back so that the NFC detection
areas of each device touch each other. When the devices connect, they vibrate
and play a short sound. A thumbnail of the contact appears.
5 Tap the thumbnail to start the transfer.
6 When the transfer is done, the contact information is displayed on the screen of
the receiving device and is also saved on the receiving device.
To share a music file with another device using NFC
1 Make sure that both your device and the receiving device have the NFC function
turned on, and that both screens are active.
2 To open the "WALKMAN™" application, tap , then find and tap .
3 Select a music category and browse to the track you want to share.
4 Tap the track to play it. You can then tap to pause the track. The transfer works
whether the track is playing or paused.
5 Hold your device and the receiving device back to back so that the NFC detection
areas of each device touch each other. When the devices connect, they vibrate
and play a short sound. A thumbnail of the track appears.
6 Tap the thumbnail to start the transfer.
7 When the transfer is done, the music file plays immediately on the receiving
device. At the same time, the file is saved on the receiving device.
You might not be able to copy, send, or transfer copyright-protected items.
89
This is an Internet version of this publication. © Print only for private use.
Page 90

To share a photo or video with another device using NFC
1 Make sure that both devices have the NFC function turned on, and that both
screens are active.
2 To view photos and videos in your device, go to your Home screen, tap , then
find and tap Album.
3 Tap the photo or video that you want to share.
4 Hold your device and the receiving device back to back so that the NFC detection
areas touch each other. When the devices connect, they vibrate and play a short
sound. A thumbnail of the photo or video appears.
5 Tap the thumbnail to start the transfer.
6 When the transfer is done, the photo or video is displayed on the screen of the
receiving device. At the same time, the item is saved on the receiving device.
You can also use NFC to share a video from the Movies application.
To share a web address with another device using NFC
1 Make sure that both devices have the NFC function turned on, and that both
screens are active.
2 From your Home screen, tap .
3 To open the web browser, find and tap .
4 Load the web page that you want to share.
5 Hold your device and the receiving device back to back so that the NFC detection
areas touch each other. When the devices connect, they vibrate and play a short
sound. A thumbnail of the web page appears.
6 Tap the thumbnail to start the transfer.
7 When the transfer is done, the web page is displayed on the screen of the
receiving device.
Scanning NFC tags
Your device can scan various kinds of NFC tags. For example, it can scan embedded
tags on a poster, on a billboard advertisement, or beside a product in a retail store. You
can receive additional information, such as a web address.
To scan an NFC tag
1 Make sure that your device has the NFC function turned on and that the screen is
active.
2 Place your device over the tag so that the NFC detection area touches it. Your
device scans the tag and displays the content collected. Tap the content of the
tag to open it.
3 To open the tag, tap it.
Connecting to an NFC compatible device
You can connect your device to other NFC compatible devices produced by Sony, such
as a speaker or a headphone. When establishing this kind of connection, refer to the
User guide of the compatible device for more information.
You may need to have Wi-Fi® or Bluetooth® activated on both devices for the connection to
work.
Bluetooth® wireless technology
Use the Bluetooth® function to send files to other Bluetooth® compatible devices, or to
connect to hands-free accessories. Turn on the Bluetooth® function in your device and
create wireless connections to other Bluetooth® compatible devices such as computers,
hands-free accessories, and phones. Bluetooth® connections work better within 33 feet
(10 meters), with no solid objects in between. In some cases you have to manually pair
your device with other Bluetooth® devices.
Interoperability and compatibility among Bluetooth® devices can vary.
90
This is an Internet version of this publication. © Print only for private use.
Page 91

To turn on the Bluetooth® function and make your device visible
1 Drag the status bar downward, then tap .
2
Tap the on-off switch beside Bluetooth to turn on the Bluetooth® function.
3
Tap Bluetooth. Your device and a list of available Bluetooth® devices appear.
4
Tap your device name to make your device visible to other Bluetooth® devices.
To adjust your device's visibility time to other Bluetooth® devices
1 Drag the status bar downward, then tap .
2 Find and tap Bluetooth.
3 Press and select Visibility timeout.
4 Select an option.
Naming your device
You can give your device a name. This name is shown to other devices after you have
turned on the Bluetooth® function and your device is set to visible.
To give your device a name
1
Make sure the Bluetooth® function is turned on.
2 Drag the status bar downward, then tap
3 Find and tap Bluetooth.
4 Tap and select Rename phone.
5 Enter a name for your device.
6 Tap Rename.
.
Pairing with another Bluetooth® device
When you pair your device with another device, you can, for example, connect your
device to a Bluetooth® headset or a Bluetooth® car kit and use these other devices to
share music.
Once you pair your device with another Bluetooth® device, your device remembers this
pairing. When pairing your device with a Bluetooth® device, you may need to enter a
passcode. Your device will automatically try the generic passcode 0000. If this does not
work, refer to the user guide for your Bluetooth® device to get the device passcode. You
do not need to re-enter the passcode the next time you connect to a previously paired
Bluetooth® device.
Some Bluetooth® devices, for example, most Bluetooth® headsets, require you to both pair
and connect with the other device.
You can pair your device with several Bluetooth® devices, but you can only connect to one
Bluetooth® profile at the same time.
To pair your device with another Bluetooth® device
1
Make sure the device you want to pair your device with has the Bluetooth
function activated and is visible to other Bluetooth® devices.
2 Drag the status bar downward, then tap .
3
Find and tap Bluetooth. All available Bluetooth® devices appear in a list.
4
Tap the Bluetooth® device that you want to pair with your device.
5 Enter a passcode, if required, or confirm the same passcode on both devices.
Your device and the Bluetooth® device are now paired.
®
91
This is an Internet version of this publication. © Print only for private use.
Page 92

To connect your device to another Bluetooth® device
1
If you are connecting to a Bluetooth® device that requires you to first pair your
device before connecting, follow the relevant steps to pair your device with that
device.
2 Drag the status bar downward, then tap .
3 Find and tap Bluetooth.
4
Tap the Bluetooth® device you want to connect your device to.
To unpair a Bluetooth® device
1 Drag the status bar downward, then tap
.
2 Find and tap Bluetooth.
3 Under Paired devices, tap
beside the name of the device you want to unpair.
4 Tap Unpair.
Sending and receiving items using Bluetooth® technology
Share items with other Bluetooth® compatible devices such as phones or computers.
You can send and receive several kinds of items using the Bluetooth® function, such as:
• Photos and videos
• Music and other audio files
• Contacts
• Web pages
To send items using Bluetooth
1
Receiving device: Make sure the Bluetooth® function is turned on and that the
®
device is visible to other Bluetooth® devices.
2 Sending device: Open the application which contains the item that you want to
send, and scroll to the item.
3 Depending on the application and on the item that you want to send, you may
need to, for example, touch and hold the item, open the item, and press . Other
ways to send an item may exist.
4 Select Bluetooth.
5
Turn on Bluetooth® if you are asked to do so.
6 Tap the name of the receiving device.
7 Receiving device: If asked, accept the connection.
8 Sending device: If asked, confirm the transfer to the receiving device.
9 Receiving device: Accept the incoming item.
To receive items using Bluetooth
1
Make sure that the Bluetooth® function is on and is visible to other Bluetooth
®
®
devices.
2 The sending device now starts sending data to your device.
3 If prompted, enter the same passcode on both devices, or confirm the suggested
passcode.
4 When you are notified of an incoming file to your device, drag the status bar
downward and tap the notification to accept the file transfer.
5 Tap Accept to start the file transfer.
6 To view the progress of the transfer, drag the status bar downward.
7 To open a received item, drag the status bar downward and tap the relevant
notification.
To view files you have received using Bluetooth
1 Drag the status bar downward, then tap .
2 Find and tap Bluetooth.
3 Press and select Show received files.
92
This is an Internet version of this publication. © Print only for private use.
®
Page 93

Connecting your device to a computer
Connect your device to a computer and start transferring pictures, music, and other
types of files. The easiest ways to connect are using a USB cable or Bluetooth® wireless
technology.
When you connect your device to the computer using a USB cable, you are prompted to
install software on the computer, for example, the PC Companion application on a PC or
the Sony™ Bridge for Mac application on an Apple® Mac® computer. PC Companion
and Sony™ Bridge for Mac help you access additional computer applications to transfer
and organize media files, update your device, synchronize device content, and more.
You might not be able to transfer some copyright-protected material between your device and
a computer.
Transferring and handling content using a USB cable
Use a USB cable connection between a computer and your device for easy transfer and
management of your files. Once the two devices are connected, you can drag and drop
content between your device and the computer, or between your device's internal
storage and SD card, using the computer's file explorer.
If you're transferring music, video, pictures or other media files to your device, it's best to
use the Media Go™ application on your computer. Media Go™ converts media files so
that you can use them on your device.
To transfer content between your device and computer using a USB cable
1 Connect your device to a computer using a USB cable. Internal storage & SD
card connected appears in the status bar on the screen of your device.
2 Computer: Open Microsoft® Windows® Explorer from the desktop and wait until
your device's internal storage and your SD card appear as external disks in
Microsoft® Windows® Explorer.
3 Computer: Drag and drop the desired files between your device and the
computer.
To transfer content between internal storage and an SD card via USB
1 Connect your device to a computer using a USB cable. Internal storage & SD
card connected appears in the status bar on the screen of your device.
2 Computer: Open Microsoft® Windows® Explorer from the desktop and wait until
your device's internal storage and your SD card appear as external disks in
Microsoft® Windows® Explorer.
3 Computer: Drag and drop the desired files between the device's internal storage
and the SD card.
To transfer files directly from internal storage to an SD card in the device
1 From your Home screen, tap .
2 Find and tap Settings > Storage > Transfer data to SD card.
3 Mark the file types you want to transfer to the SD card.
4 Tap Transfer.
The direct transfer method means that a USB cable connection to a computer is not
necessary.
Transferring files using Media transfer mode via Wi-Fi
®
You can transfer files between your device and other MTP compatible devices, such as a
computer, using a Wi-Fi® connection. Before connecting, you first need to pair the two
devices. If you're transferring music, video, pictures or other media files between your
device and a computer, it's best to use the Media Go™ application on the computer.
Media Go™ converts media files so that you can use them on your device.
In order to use this feature, you need a Wi-Fi® enabled device that supports Media transfer,
for example, a computer running Microsoft® Windows Vista® or Windows® 7.
93
This is an Internet version of this publication. © Print only for private use.
Page 94

To pair your device wirelessly with a computer using Media transfer mode
1 Make sure Media transfer mode is enabled on your device. It is normally enabled
by default.
2 Connect your device to the computer using a USB cable.
3 Computer: Once the name of your device appears on the screen, click Network
configuration and follow the instructions to pair the computer.
4 When you are finished pairing, disconnect the USB cable from both devices.
The above instructions only work if Windows® 7 is installed on your computer and the
computer is connected to a Wi-Fi® Access Point via a network cable.
To connect paired devices wirelessly in Media transfer mode
1 Make sure Media transfer mode is enabled on your device. It is normally enabled
by default.
2 Drag the status bar downward, then tap .
3 Tap Xperia™ Connectivity > USB Connectivity.
4 Tap the paired device that you want to connect to under Trusted devices.
5 Tap Connect.
Make sure the Wi-Fi® function is turned on.
To disconnect a wirelessly paired device in Media transfer mode
1 Drag the status bar downward, then tap .
2 Tap Settings > Xperia™ Connectivity > USB Connectivity.
3 Tap the paired device that you want to disconnect from under Trusted devices.
4 Tap Disconnect.
To remove a pairing with another device
1 Drag the status bar downward, then tap .
2 Tap Settings > Xperia™ Connectivity > USB Connectivity.
3 Tap the paired device that you want to remove.
4 Tap Forget.
PC Companion
PC Companion is a computer application that gives you access to additional features
and services which help you transfer music, video, and pictures to and from your device.
You can also use PC Companion to update your device and get the latest software
version available. The installation files for PC Companion are saved on your device and
the installation is launched from the device when you connect it to a computer via USB
cable.
You need an internet connected computer running one of the following operating
systems to use the PC Companion application:
• Microsoft® Windows® 7
• Microsoft® Windows® 8
• Microsoft® Windows Vista®
• Microsoft® Windows® XP (Service Pack 3 or higher)
To install PC Companion on a PC
1 Make sure the Install software checkbox under Settings > Xperia™
Connectivity > USB Connectivity is marked.
2 Connect your device to a PC using a USB cable.
3 Device: Tap Install.
4 Computer: The PC Companion installer starts automatically after a few seconds.
Follow the on-screen instructions to install PC Companion.
To start PC Companion
1 Make sure that PC Companion is installed on your PC.
2 Open the PC Companion application on the PC, then click Start to open one of
the features you want to use.
94
This is an Internet version of this publication. © Print only for private use.
Page 95

Media Go™
The Media Go™ computer application helps you transfer and manage media content in
your device and computer. You can install and access Media Go™ from within the PC
Companion application.
You need one of these operating systems to use the Media Go™ application:
• Microsoft® Windows® 7
• Microsoft® Windows Vista®
• Microsoft® Windows® XP, Service Pack 3 or higher
To transfer content using the Media Go™ application
1 Connect your device to a computer using a supported USB cable.
2 Device: In the status bar, Internal storage connected appears.
3 Computer: Open the PC Companion application on the PC first. In
PC Companion, click Media Go to start the Media Go™ application. In some
cases, you may have to wait for Media Go™ to install.
4 Using Media Go™, drag and drop files between your computer and device.
Sony™ Bridge for Mac
The Sony™ Bridge for Mac application helps you transfer music, video, picture or other
kinds of media files between your device and an Apple® Mac® computer. You can also
use the Sony™ Bridge for Mac application to manage files through a file browser, update
your device software, and back up and restore content on your device.
To use the Sony™ Bridge for Mac application, you must have an Internet-connected
Apple® Mac® computer that runs MacOS version 10.6 or later.
To install Sony™ Bridge for Mac on an Apple® Mac® computer
1 Make sure the Install software checkbox under Settings > Xperia™
Connectivity > USB Connectivity is marked.
2
Connect your device to an Apple® Mac® computer using a USB cable.
3 Device: Tap Install.
4 Computer: The Sony™ Bridge for Mac installer starts automatically after a few
seconds. Follow the on-screen instructions to complete the installation.
To open the Sony™ Bridge for Mac application
1
Make sure that the Sony™ Bridge for Mac application is installed on the Apple
Mac® computer.
2 Computer: Double-click the Sony™ Bridge for Mac application icon in the
Applications folder.
To transfer content using Sony™ Bridge for Mac
1
Using a USB cable, connect your device to an Apple® Mac® computer.
2 Computer: Open the Sony™ Bridge for Mac application. After a few moments,
The Sony™ Bridge for Mac application detects your device.
3
Computer: Drag and drop the desired files between your device and the Apple
Mac® computer.
Connecting your device to a TV set using a cable
Connect your device to a TV set and start viewing content saved in your device on a
larger screen. When you connect your device to the TV set, the TV launcher application
opens. This application helps you to play media files from your device on TVs and other
devices.
®
®
You may have to purchase an MHL cable separately.
95
This is an Internet version of this publication. © Print only for private use.
Page 96

To view content from your device on a TV which supports MHL input
1
Connect your device to the TV using an MHL cable.
appears in your device's
status bar after a connection is established.
2 The TV launcher application starts automatically. Follow the instructions to view
your media files on the TV.
To view content from your device on a TV which supports HDMI™ input
1 Connect your device to an MHL adaptor and connect the adaptor to a USB power
supply.
2
Connect the adaptor to a TV using a HDMI™ cable. appears in your device's
status bar after a connection is established.
3 The TV launcher application starts automatically. Follow the instructions to view
your media files on the TV.
To view help about using the TV remote control
1 While your device is connected to the TV set, drag the status bar downward to
open the Notification panel.
2 Tap MHL connected.
You can also press the yellow button on the TV remote control to open the Notification panel.
To disconnect your device from the TV set
• Disconnect the MHL™ cable or the MHL adaptor from your device.
Screen mirroring
Use Screen mirroring to show the screen of your device on a TV or other large display
without using a cable connection. Wi-Fi Direct™ technology creates a wireless
connection between the two devices, so you can sit back and enjoy your favorite photos
from the comfort of your couch. You can also use this feature to listen to music from
your device via the TV's speakers.
Your TV must support screen mirroring based on Wi-Fi CERTIFIED Miracast™ for the
functionality described above to work. If your TV does not support screen mirroring, you need
to purchase a wireless display adapter separately.
When using screen mirroring, the image quality may sometimes be negatively impacted if there
is interference from other Wi-Fi® networks.
To mirror the screen of your device on a TV screen
1 TV: Follow the instructions in the User guide for your TV to turn on the screen
mirroring function.
2 Your device: Drag the status bar downward, then tap .
3 Find and tap Xperia™ Connectivity > Screen mirroring.
4 Tap Turn on Screen mirroring and select a device.
When using screen mirroring, do not cover the Wi-Fi antenna area of your device.
Using a headset
Use the accessories provided with your device, or other compatible accessories, for optimal
performance.
96
This is an Internet version of this publication. © Print only for private use.
Page 97

To use a headset
1 Connect the headset to your device.
2 To answer a call, press the call handling key.
3 To end the call, press the call handling key.
If a headset is not included with the device, you may purchase one separately.
If you are listening to music, the music stops when you answer a call and resumes after you
end the call.
Smart Connect
Use the Smart Connect application to set what happens in your device when you
connect or disconnect an accessory. You can also use Smart Connect to set a specific
action or a group of actions to launch on your device at certain times of the day.
For example, when you connect your headset, you can create an event so that the
following actions are launched on your device:
• Between 7am and 9am, when you commute to work, the "WALKMAN" application
starts, and the web browser opens the morning paper. The ring volume is set to vibrate.
• On the way back from work, the FM radio starts, and a notes app opens showing your
shopping list.
To start the Smart Connect application
1 From your Home screen, tap .
2 Find and tap Smart Connect.
To create a Smart Connect event
1 Start the Smart Connection application. If you are opening Smart Connect for the
first time, tap OK to close the introduction screen.
2 On the Events tab, tap .
3 Give the event a name, then tap Create.
4 Under When, add either an accessory or a time interval, or both.
5 Under Do this, add what you want to happen in your device.
6 Under At the end, add what you want to happen when you disconnect the
accessory or when the time interval comes to an end. If both these conditions are
set, the actions start either when you disconnect the accessory, or when the time
interval comes to an end.
7 To save the event, press .
To add a Bluetooth® accessory, you have to first pair it with your device.
To edit a Smart Connect event
1 Start the Smart Connection application.
2 On the Events tab, tap an event.
3 If the event is switched off, drag the slider to the right.
4 Adjust the settings as desired.
5 To save the event, tap .
To delete an incorrect entry, touch and hold the entry, then tap > Delete event and tap
Delete to confirm.
Managing devices
Use the Smart Connect application to manage a range of smart accessories that you
can connect to your device, including SmartTags, SmartWatch, and Smart Wireless
Headset pro from Sony. Smart Connect downloads any necessary applications and also
finds third-party applications, when available. Previously connected devices show in a list
that allows you to get more information about the features of each device.
97
This is an Internet version of this publication. © Print only for private use.
Page 98

To pair and connect an accessory
1 Start the Smart Connection application. If you are opening Smart Connect for the
first time, tap OK to close the introduction screen.
2 Tap Devices, then tap .
3 Tap OK to start searching for devices.
4 In the search result list, tap the name of the device that you want to add.
To adjust the settings for a connected accessory
1 Pair and connect the accessory with your device.
2 Start the Smart Connection application.
3 Tap Devices, then tap the name of the connected accessory.
4 Adjust the desired settings.
98
This is an Internet version of this publication. © Print only for private use.
Page 99

Synchronizing data on your device
About synchronizing data on your device
You can sync contacts, email, calendar events, and other information with your device
from multiple email accounts, synchronization services, and other kinds of accounts,
depending on the applications installed on your device. Synchronizing your device with
other information sources is an easy and practical way to stay up to date. You can
synchronize data automatically by activating the auto-sync function.
To activate the auto-sync function
1 Drag the status bar downward, then tap .
2 Drag the slider beside Auto-sync to the right.
Synchronizing with Google™ services
Synchronize your device with different Google™ services to keep your information up to
date, regardless of which device you're using your Google™ account from. For example,
you can synchronize your contacts, Gmail™, and calendar data.
To set up a Google™ account for synchronization
1 From your Home screen, tap .
2 Tap Settings > Add account > Google.
3 Follow the registration wizard to create a Google™ account, or sign in if you
already have an account.
4 Tap your newly created Google™ account, then tap the items that you want to
synchronize.
To synchronize manually with your Google™ account
1 From the Home screen, tap .
2 Tap Settings > Google.
3 Tap the Google™ account that you want to synchronize.
4 Press , then tap Sync now.
To synchronize an application with a Google™ account
1 From your Home screen, tap .
2 Tap Settings > Google.
3 Tap the Google™ account that you want to synchronize with. A list appears of
applications that can be synchronized with the Google account.
4 Tap the application that you want to synchronize with the selected Google
account.
To synchronize the web browser data
1 From your Home screen, tap .
2 Tap Settings > Google.
3 Tap the Google™ account that you want to synchronize with, then tap Sync
Browser.
To remove a Google™ account
1 From your Home screen, tap .
2 Tap Settings > Google.
3 Tap the Google™ account you want to remove from the accounts list.
4 Press , then tap Remove account.
5 Tap Remove account again to confirm.
99
This is an Internet version of this publication. © Print only for private use.
Page 100

Synchronizing with Microsoft® Exchange ActiveSync®
Using a Microsoft Exchange ActiveSync account, you can access your corporate email
messages, calendar appointments, and contacts directly on your device. After setup,
you can find your information in the Email, Calendar, and Contacts applications.
To set up corporate email, calendar, and contacts for synchronization
1 From your Home screen, tap .
2 Tap Settings > Add account > Exchange ActiveSync.
3 Enter your corporate email address and password.
4 Tap Next. Your device begins to retrieve your account information. If a failure
occurs, contact your corporate network administrator for more information, then
enter the domain and server details for your account manually.
5 Tap OK to allow your corporate server to control your device.
6 Select what data you want to sync with your device, such as contacts and
calendar entries.
7 If desired, activate the device administrator to allow your corporate server to
control certain security features on your device. For example, you can allow your
corporate server to set password rules and set storage encryption.
8 When the setup is done, enter a name for the corporate account.
To edit the setup of corporate email, calendar, and contacts
1 From your Home screen, tap .
2 Tap Email, then tap .
3 Tap Settings and select a corporate account.
4 Change the desired settings.
To set a synchronization interval for a corporate account
1 From your Home screen, tap .
2 Tap Email, then tap .
3 Tap Settings and select a corporate account.
4 Tap Check frequency and select an interval option.
To remove a corporate account
1 From your Home screen, tap .
2 Tap Settings > Exchange ActiveSync, then select the corporate account.
3 Tap , then tap Remove account.
4 Tap Remove account again to confirm.
Synchronizing with Facebook™
There are two ways to use Facebook™ on your device. You can use the standard
Facebook application to access your online Facebook account, or you can synchronize
your Facebook account with your device and share content between Facebook™ and a
range of other applications. For example, you can share music in the "WALKMAN"
application on your device via Facebook. To synchronize your device with Facebook, you
must first set up an "Xperia™ with Facebook" account.
To set up an "Xperia™ with Facebook" account on your device
1 From your Home screen, tap .
2 Tap Settings > Add account > Xperia™ with Facebook.
3 Follow the on-screen instructions to sign in to your Facebook™ account, or create
a new account.
To synchronize manually with an "Xperia™ with Facebook" account
1 From your Home screen, tap .
2 Tap Settings > Xperia™ with Facebook.
3 Select the account that you want to synchronize.
4 Press , then tap Sync now.
100
This is an Internet version of this publication. © Print only for private use.
 Loading...