

Sony Ericsson Xperia Acro User Guide
BasicManual
Illustrationsand
Screenshotsin
ThisManual
Noteson
CellPhoneUse
Contents
GettingReady
LearningtheBasics
Makingand
AnsweringCalls
GlobalFunction
CharacterInput
Contacts
Mail
Camera
WebBrowser
TV(1Seg)
Applications
Viewingthe
SettingMenu
Troubleshooting
Index

Introduction
Thank you for purchasing the IS11S. Before using your IS11S, be sure to read the IS11S Basic Manual (this PDF manual) to
ensure correct usage. After you have finished reading this manual, store this PDF manual and the printed manuals in safe
places so you can retrieve them whenever you need them.
Manuals for the IS11S
There are three manuals for the IS11S: the Basic Manual, printed スタートガイド (Start guide) (Japanese) and full
Instruction Manual (Japanese).
● For learning the basics:
Read the IS11S Basic Manual (this manual) or printed IS11S スタートガイド (Start guide) (Japanese).
● Instruction Manual (Japanese) application:
IS11S provides you with preinstalled "Instruction Manual" (Japanese) application for detailed descriptions.
● Downloading Manuals:
You can download following PDF manuals (Japanese), "スタートガイド (Start guide)", "設定ガイド (Setting guide)", "au
oneメール設定ガイド (au one mail setting guide)" and "取扱説明書詳細版 (full Instruction Manual)" from au homepage.
http://www.au.kddi.com/torisetsu/index.html
To ensure proper usage of the IS11S, be sure to read the Safety Precautions "安全上のご注意" in the Instruction Manual.
The keyword searchable au Online Manual is also available on the au homepage:
http://www.au.kddi.com/manual/index.html
Illustrations and Screenshots in This Manual
Note on Illustrations
■
The illustrations in this manual may look different from the actual cell phone in shape, color and typeface. The key
illustrations are also simplified as shown below.
p
m
k
xyt
Note on Screenshots
■
The screenshots in this manual are simplified and may look different from the actual cell phone screens.
Illustrations and Screenshots in This Manual
1
Notes on Cell Phone Use
Cell Phone Etiquette
The cell phone always emits weak radio waves when power
Notes on Cell Phone Use
is on.
Use the cell phone in an enjoyable and safe manner without
forgetting to be considerate of others around you.
●
Use of cell phones is not allowed in some places.
•
Do not use the cell phone while you are driving. Doing
so is both dangerous and prohibited by law.
•
Using a cell phone in an aircraft is prohibited by law.
Set Airplane Mode to on and turn the cell phone power
off.
●
Radio waves from cell phones may interfere with
medical electrical equipment.
•
Some people close to you in crowded places such
as packed trains may be using a cardiac pacemaker.
Turn the cell phone off in such places.
•
Abide by the rules of hospitals and other medical
institutions where it is forbidden to use or carry cell phones.
●
Be considerate of where you use the cell phone and
how loudly you talk.
•
Do not make calls in theaters, museums, libraries, and
other similar places. Turn power off or turn on silent
mode not to disturb others around you by ringtones.
Do not use the cell phone on a street where you might
•
interrupt the flow of pedestrians.
Move to areas where you will not inconvenience others
•
on trains or in hotel lobbies.
Refrain from talking in a loud voice.
•
2
•
Obtain the permission of other people before you take
their photos with the cell phone's camera.
•
Do not record information with the cell phone's camera
in bookstores and other locations where taking photos
is not permitted.
Do Not Use the Cell Phone While Driving!
Turn off your cell phone while driving.
Do not use the cell phone while driving a car/motorcycle
or riding a bicycle. It may result in a traffic accident. Using
a cell phone while driving is prohibited by law. Using a
cell phone while riding a bicycle may also be punishable
by law.
Prohibited!
Looking at a cell phone display
•
Talking on a cell phone while holding it
•
Security Code and Passwords
You can use a security code and other passwords
described below.
Take care not to forget your security code and passwords,
because they are required for performing various
operations and using subscription services.
Security Code
■
①Using the Answering Service (Voice
Mail) and Call Transfer remotely from a
Usage
Example
Initial Setting
Set up screen lock
■
Usage
Default value None
■
PIN code
Usage
Default value
fixed-line phone
②Making inquiries, applications, and
changes while using au Customer
Service Center voice guidance, au web
pages
The four-digit number you wrote on your
subscription form
Setting/canceling screen lock
Preventing unauthorized use of au ICCard
1234
Notes on Cell Phone Use
3

Contents
Introduction ii
Illustrations and Screenshots in This Manual
Notes on Cell Phone Use 2
Contents
Cell Phone Etiquette ..................................................... 2
Do Not Use the Cell Phone While Driving! ................... 2
Security Code and Passwords ..................................... 3
Contents 4
Getting Ready 6
Checking the Contents of the Box ................................ 6
Names of Parts ............................................................. 7
Charging the Battery Pack............................................ 9
Turning On Power ....................................................... 10
Initial Setup ................................................................. 11
Setting Google Account .............................................. 11
Checking Your Phone Number.................................... 11
Inserting/Removing microSD Memory Card ............... 12
Learning the Basics 13
Operating the Touch Panel ......................................... 13
Operation While Using Functions ............................... 14
Viewing the Home Screen .......................................... 15
Using the Status Bar .................................................. 15
Using the Notification Panel ....................................... 17
Using the Home Screen ............................................. 17
Using the Applications Screen ................................... 18
4
Making and Answering Calls 21
Making a Call .............................................................. 21
Making an International Call ....................................... 21
1
Answering a Call ........................................................ 22
Returning a Call
(Outgoing History/Incoming History) .......................... 22
Setting the Silent Mode .............................................. 22
Setting a Ringtone ...................................................... 23
Enabling Touch Tones ................................................. 23
Adjusting the Sound Volume ...................................... 23
Global Function 24
Setting the Area .......................................................... 24
Switching Network Manually ...................................... 24
Obtaining the Latest PRL (Preferred Roaming List) ... 24
Making a Call to Outside Country You Stay
(Including Japan) ........................................................ 25
Character Input 26
Selecting Input Method ............................................... 26
Software Keyboard ..................................................... 26
Switching the Keyboard .............................................. 26
Entering Characters on the QWERTY Keyboard........ 26
Entering Characters on the 12 key Keyboard ............. 28
Entering Characters on the Japanese Syllabary
Keyboard .................................................................... 30

Contacts 31
Saving a Contact ........................................................ 31
Dialing from the Contacts ........................................... 31
Editing Contacts ......................................................... 31
Mail 32
Using C-mail ............................................................... 32
Creating and Sending C-mail Messages .................... 32
Reading Received C-mail Messages ......................... 33
Using PC-mail ............................................................ 33
Using Gmail ................................................................ 34
Camera 35
Photo Taking Tips ....................................................... 35
Setting Image Size for Photo ...................................... 35
Taking a Photo ............................................................ 36
Viewing Photos (Gallery) ............................................ 36
Web Browser 37
Viewing Sites with Web Browser ................................ 37
Displaying a Web Page............................................... 37
Moving to a Web Page ............................................... 37
Using Windows ........................................................... 37
Using Bookmarks/History ........................................... 38
TV (1Seg) 39
Initial Setup of the TV (1Seg) ..................................... 39
Watching TV (1Seg) ................................................... 39
Basic Operations ........................................................ 40
Applications 41
Using Android Market ................................................. 41
Managing Applications ............................................... 41
Viewing the Setting Menu 43
Starting the Setting Menu ........................................... 43
Troubleshooting 44
Index 46
Radio Wave Exposure and Specific
Absorption Rate (SAR) Information 49
Radio Frequency (RF) exposure and Specific Absorption
Rate (SAR) ................................................................. 50
Guidelines for Safe and Efficient Use ......................... 51
FCC Statement for the USA ....................................... 54
Industry Canada Statement ....................................... 55
Declaration of Conformity for CDMA SOI11 ............... 56
End User Licence Agreement 57
About Open Source Software 58
Contents
5
Getting Ready
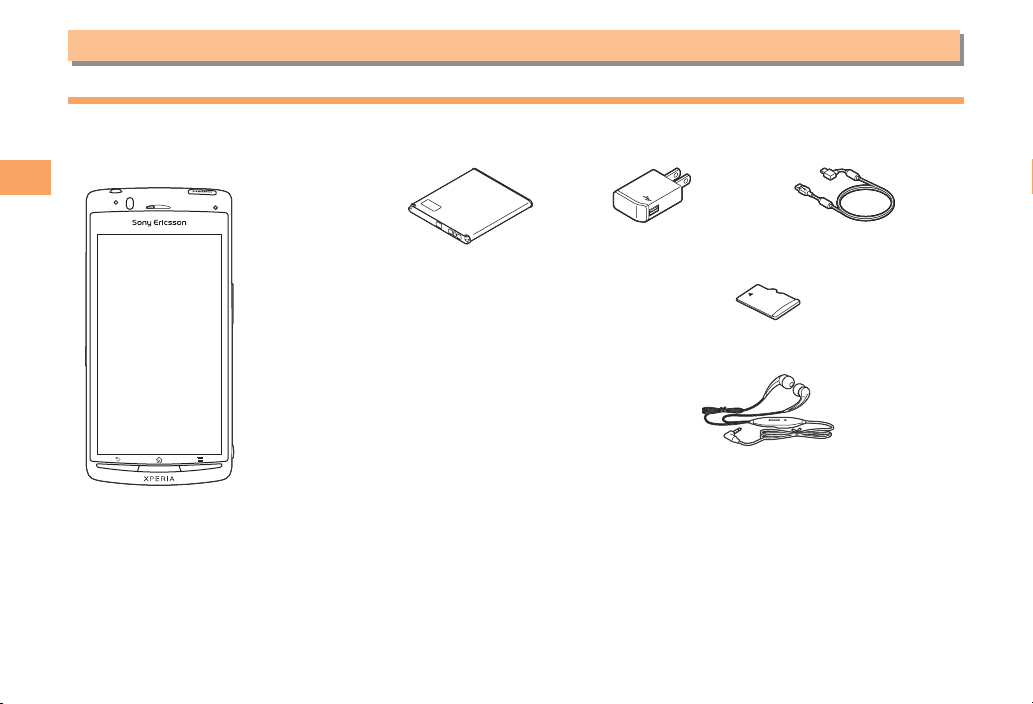
Checking the Contents of the Box
The box contains the cell phone and accessories.
IS11S (with warranty and battery pack
• Battery Pack BA750• AC Adapter EP800 (with warranty)
cover)
Getting Ready
スタートガイド (Start guide) (Japanese)
•
IS11Sのご利用にあたっての注意事項 (Cautions on using IS11S)
•
(Japanese)
携帯電話の比吸収率などについて (Specific Absorption Rate of
•
Mobile Phone, etc.)
設定ガイド (Setting guide) (Japanese)
•
au oneメール設定ガイド (au one mail setting guide) (Japanese)
•
•
<AC adapter> <microUSB cable (Sample)><AC adapter> <microUSB cable (Sample)>
•
microSDHC card (32GB)* (Sample)
* Inserted in the IS11S when purchased.
•
Stereo Headset with Microphone (Sample)
6
Names of Parts
③
③
④
④
From the Front■
⑤⑥⑦
⑤⑥⑦
⑧
⑧
From the Back■ From the Sides■
⑪
⑨⑩①②
⑪
⑫
⑫
⑬
⑬
⑨⑩①②
GPS/Bluetooth®/Wi-Fi antenna
GPS/Bluetooth®/Wi-Fi antenna
Built in antenna
Built in antenna
*1
*1
⑲
⑲
⑭
⑭
㉒
㉒
⑮
⑮
⑯
⑯
⑰
⑰
⑱
⑱
*2
*2
*1 Do not cover the antenna area with your hand when
using Wi-Fi, Bluetooth
*2 Do not cover the antenna area with your hand during a
call or when using the browser.
㉓
㉓
au IC-Card
au IC-Card
⑳
⑳
㉔㉕㉖
㉔㉕㉖
®
or retrieve GPS information.
㉑
㉑
Getting Ready
7

① Proximity sensor
Turns on or off the touch screen to prevent erroneous
operation during a call.
② Ear speaker
Allows you to hear the other party's voice etc. during a
call.
③ Light sensor
Adjusts screen brightness. Do not cover it with your
Getting Ready
fingers etc.
④ Display (Touch panel)
⑤ x Back key
Returns to the previous screen.
⑥ y Home key
Displays home screen.
⑦ t Menu key
Displays menu according to the operating conditions.
⑧ Notification LED
Notifies charging condition, missed call or unread mail.
⑨ Flash/Photo light
Lights to brighten an object when taking a photograph.
⑩ Camera lens
⑪ FeliCa™ mark
Hold it over card reader/writer when using Osaifu-
⑫ Infrared port
Sends and receives data via infrared communication.
⑬ Whip antenna
Extend it when watching TV (1Seg). It has no influence
®
Keitai
.
on calls or data communication if you extend the whip
antenna when calling or using browser.
⑭ Second Microphone
Reduces noise to make easy to listen.
⑮ microSD memory card slot
⑯ Battery pack cover
⑰ Battery pack
⑱ Speaker
⑲ microUSB connecting terminal
⑳ m Volume key/Zoom key
㉑ k Camera key
Hold it down for at least one second to activate Camera.
Use it as a shutter to take photos or movies.
㉒ Headset connector
㉓ p Power key/Screen lock key
Turns on/off power. Also, turns off the backlight and sets
key lock.
㉔ HDMI connector (type D)
㉕ Strap hole
㉖ Microphone
Transmits your voice to the other caller.
8
Charging the Battery Pack
The battery pack is not fully charged at the time of purchase.
Be sure to charge the battery pack before using the cell
phone for the first time.
Use the included AC adapter cable when charging.
•
When you start charging the battery with the IS11S
•
powered off, the power turns on. However, you cannot
operate the au phone. Do not charge the battery in a
place where the use is prohibited such as in airplane
or hospital.
Charging the Battery Pack with the AC
■
Adapter
Included AC adapter cable is necessary.
Insert the microUSB cable horizontally with the
microUSB plug
into the connector for microUSB cable of the
IS11S.
Insert the microUSB cable horizontally with
the USB plug
the connector for USB of the AC Adapter, and
insert the AC Adapter plug to the power outlet.
Notification LED of IS11S turns on and appears.
•
When the charging is completed, remove the
microUSB plug of the microUSB cable from the
IS11S.
engraved side facing down
engraved side facing up into
Remove the AC Adapter from the power outlet.
Charging the Battery Pack with a PC
■
Included microUSB cable is necessary. Check the
connecting direction to connect correctly. Wrong
connection may cause damage.
Insert the microUSB cable horizontally with the
microUSB plug
into the connector for microUSB cable of the
IS11S.
engraved side facing down
Insert the USB plug of the microUSB cable into
the USB port of a PC.
Notification LED of IS11S turns on and appears.
•
When a confirmation screen for installation of PC
•
Companion software appears on the IS11S, tap Skip.
When a screen for new hardware detection etc.
•
appears on the PC, select Cancel.
When the charging is completed, remove the
microUSB plug of the microUSB cable from the
IS11S.
Getting Ready
9
Remove the USB plug of the microUSB cable
from the USB port of the PC.
microUSB plug
microUSB plug
Notification LED
Notification LED
Getting Ready
AC Adapter
AC Adapter
USB plug
USB plug
microUSB cable
microUSB cable
Turning On Power
p (hold down for at least one second)
The key unlock screen appears. Deactivate the key
•
lock.
Turning Off Power
■
p (hold down for at least one second)
Power Off →OK
Setting Key Lock
■
If the key lock is set, the screen light turns off to avoid
erroneous operations of touch screen or buttons. The IS11S
keys are locked with turning the screen light off after the
specified time duration.
While the screen is displayed, p.
There is no function to deactivate the key lock.
•
Unlocking Key Lock
■
A key unlock screen appears when turning the power on or
the backlight on by pressing p/y.
Drag to .
10

Initial Setup
The first time IS11S turns ON, the initial setting screen
appears automatically. After setting the display language,
"Setup guide" appears. Follow the onscreen instructions to
set each function.
English (United States) →
You can check the operations of main functions and
•
initial settings.
Next
Ta p Change to change Date & time.
•
Next
Ta p Vie w to check how to use the keyboard.
•
Next
Ta p Vie w to check how to use the application
•
Timescape™.
Next
Ta p Set up to set up services you want to use.
•
You can set up the services afterward in the following
•
procedure: From the Home screen, tap
guide or from the settings screen, select each item.
Next →Finish
次へ
(Next)
→ Setup
Setting Google Account
You can create a Google account on the IS11S and use
Google services. Google account setup screen appears
such as when launching a software that requires a Google
account for the first time. You can also display it from Setup
guide.
Google account setup screen → Next
Create/Sign in
If you already have a Google account, tap login, enter
•
user name and password and tap login. If you have no
Google account, tap Create and register an account
following the onscreen instructions.
Checking Your Phone Number
Your phone number appears at the top of the contact list.
You can edit your contact information such as a name, mail
address, etc.
From the Home screen, → Contacts
Tap [XXX-XXXX-XXXX] (Myself) at the top of the
contact list.
Edit
Done
Getting Ready
11

Inserting/Removing microSD Memory Card
You can save, move or copy data by inserting micoSD
memory card (including microSDHC) into the IS11S. And
you can copy contacts etc. to microSD memory card.
A microSDHC memory card (32GB) (sample) is
•
Getting Ready
inserted in the IS11S when purchased.
When a microSD card is not inserted, camera
•
functions, playing, downloading music or videos or
infrared communication are not available.
Installing microSD Memory Card
■
Turn the IS11S off, put your tip of thumb (nail)
into the groove, and hold the battery pack
cover up to remove.
Check the orientation of microSD memory
card, and insert it slowly straight until it clicks.
Insert a microSD memory card, with the metal contact
•
side facing up. Make sure that you hear it click and
lock in place. Note that microSD memory card may
pop up if you release your finger before locked.
Check the direction of the battery pack cover
and attach to the cell phone body, press each
tab to close it firmly.
Removing microSD Memory Card
■
When removing the microSD memory card, be sure to
unmount first.
From the Home screen, t → Settings →
Storage → Unmount SD card
appears in the status bar when unmounted.
•
Turn the IS11S off, put your tip of thumb (nail)
into the groove, and hold the battery pack
cover up to remove.
Insert the microSD memory card straight into
the slot all the way until it clicks.
If you hear a click, pull your finger back while touching
•
the microSD memory card. Keep touching the
microSD memory card because it pops out a little. Be
careful that it may pop out strongly if you press it hard
and release your finger.
Pull out microSD memory card slowly.
Slowly pull it out straight.
•
If the microSD memory card does not pop out, gently
•
draw it out with your fingers to remove.
Do not pull out microSD memory card forcibly. May
•
cause data loss or malfunction.
Check the direction of the battery pack cover
and attach to the cell phone body, press each
tab to close it firmly.
12
Learning the Basics
Operating the Touch Panel
The display of the IS11S is a touch panel. You can operate
the IS11S by directly touching the screen.
Touch panel is designed for being touched lightly with
•
fingers. Do not push it forcibly with a finger or press it with
sharp objects (nail, ballpoint pen, pin, etc.).
Touching the touch panel may not work in the following
•
cases. Note that it may cause malfunction.
- Operation with gloved hands
- Operation with a fingernail or foreign object on the
screen
- Operation with protective sheet or seal on the screen
- Operation with wet hands
- Operation when waterdrop attached on the touch panel
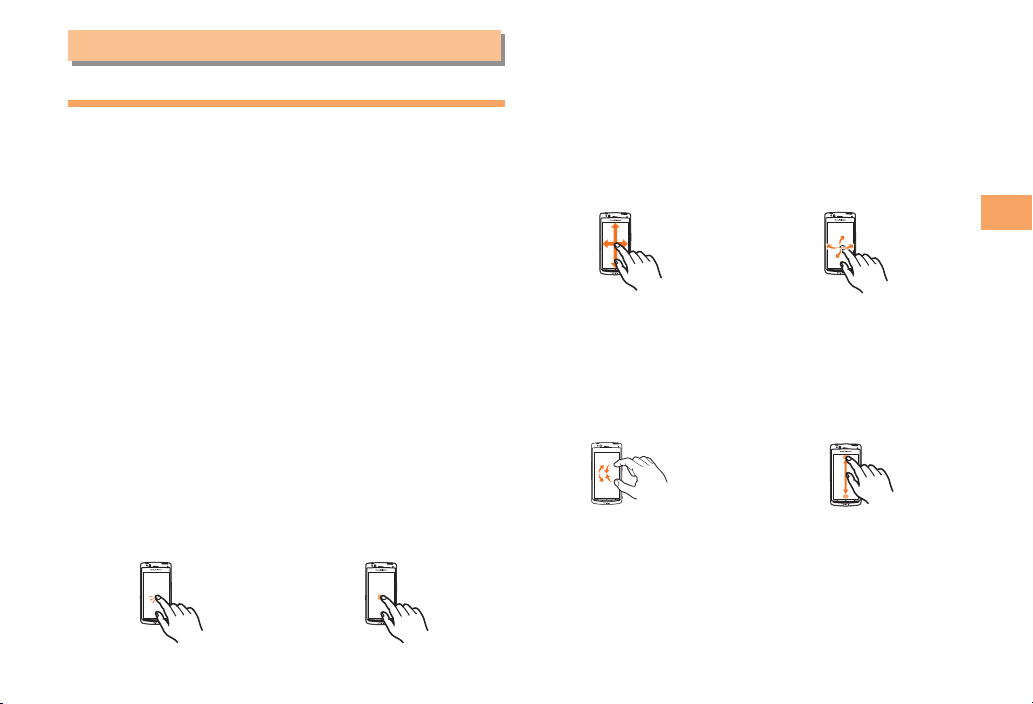
Basic Operations
■
Tap/Double Tap
Tap: Gently touch a screen
and then immediately
release your finger.
Double tap: Tap the same
position twice.
Long Touch
Keep touching an item of
key.
Slide
While your finger is gently
touching the screen, trace
it to the desired direction to
move over.
Pinch
Touch the screen with two
fingers and widen (pinchout) or narrow (pinch-in) the
fingers' distance.
Flick
Operate the screen by
quickly moving (flicking)
your finger up, down, right,
or left.
Move the finger slowly
•
in the beginning, then
flick away in the end.
Drag
Keep touching an item or
icon, trace it to the desired
direction to move.
Learning the Basics
13
Operation While Using Functions
Frequently used operations for IS11S are described in this
section.
Selecting an Item
■
You can directly tap the screen to select a displayed item
or icon.
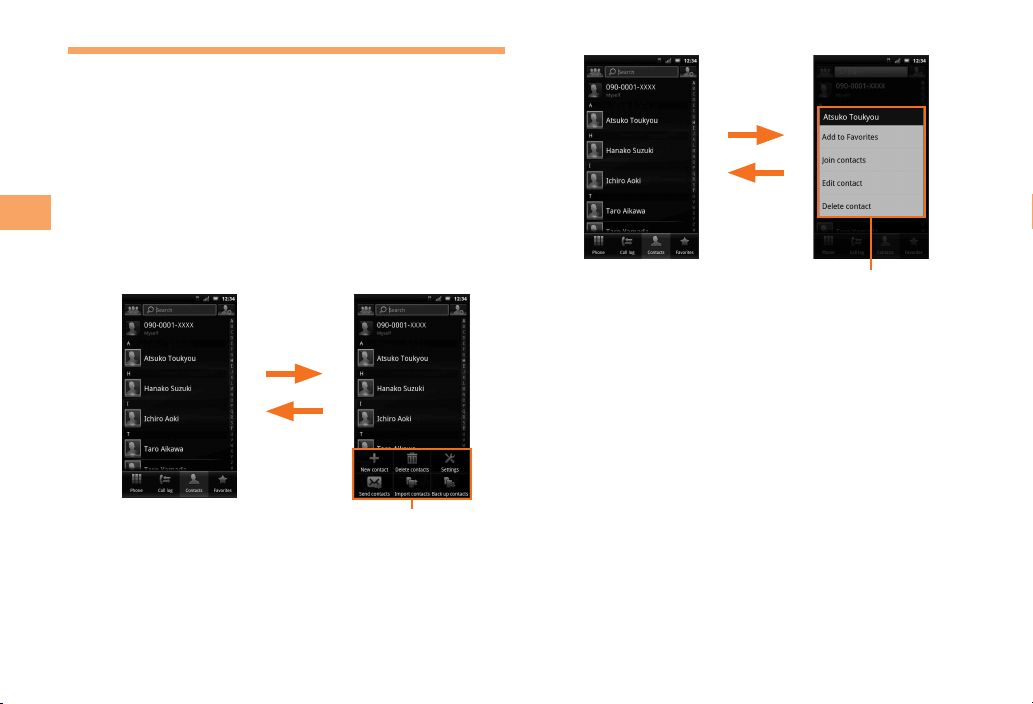
Displaying the Menu
■
Learning the Basics
Menu options can be displayed by pressing the menu key
(t), or long-touching an entry field or item.
Example: Pressing t in the contact list screen
t
x
Example: Long-touching a contact in the contact list screen
Long-touch
a contact
x
<Contact list screen>
Menu
14
<Contact list screen>
Menu
Viewing the Home Screen
Display indicators inform you of mail arrival, current
settings, etc.
The Home screen consists of five screens, the center
screen and two for each side. The center screen is the
default screen to operate the cell phone. Pressing y
returns to the Home screen at any time.
A B C D F G KE
H I G J G
① Widget: Music player
② Widget: Photos and videos
③ Widget: Search
④ Current position of the Home screen
Indicates which screen of the five Home screens you are
in.
⑤ Widget: Timescape™
⑥ Wallpaper
⑦ Shortcuts (applications)
⑧ Media folders (Music, Gallery, FM radio and 1Seg)
⑨ Widget: Media shortcuts
⑩ Application keys
⑪ Widget: Digital clock
Using the Status Bar
The status bar is located at the top of the IS11S screen.
Notification icons which inform missed calls, new arrival
mail, operations in progress, etc. appear on the left of the
status bar, and status icons which indicate the status of the
IS11S appear on the right.
Main Notification Icons
■
Icon Overview
Missed call
Calling
New PC mail message
New Gmail message
New C-mail/Answering memo for Answering
Service (Voice Mail)
Problem with C-mail message delivery
Receiving/Downloading data
Sending/uploading data
Learning the Basics
15
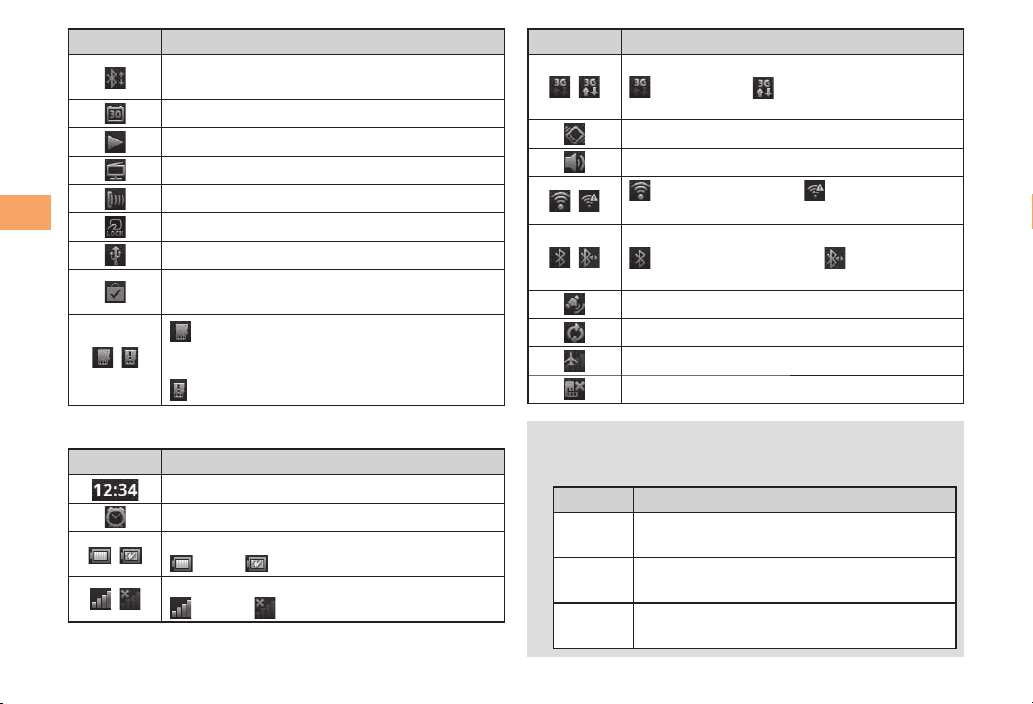
Icon Overview
Learning the Basics
/
Main Status Icons
■
Icon Overview
/
/
Bluetooth® function connection request
notification
Upcoming calendar event
Playing a track
1Seg activated
Infrared communication in progress
Osaifu-Keitai® is locked.
USB is connected.
Software update notification or updating
software
microSD memory card unmounted, ready
to be removed (reading and writing
unavailable)/
microSD memory card removed
Time
Alarm set
Battery level
100%/ Charging
Strength of radio wave
Level 4/ No signal
Icon Overview
3G data communication status
/
/
/
•
Notification LED informs charging prompt, battery
level while charging, missed calls, mail arrival, etc. by
turning on or flashing.
Status Description
Red
Orange
Green
3G available/ Sending and
downloading 3G data
Silent Mode (Vibration) set
During a call using hands-free (speaker on)
Connecting to Wi-Fi/
Wi-Fi using AutoIP function
Using Bluetooth
Bluetooth® function on/ Connecting to
Bluetooth
GPS positioning in progress
During Data synchronization
Airplane mode is activated.
au IC card is locked or not inserted.
The battery is charging when the
remaining battery level is less than 10 %.
The battery is charging when the
remaining battery level is 10 %-90 %.
The battery is charging when the
remaining battery level is 90 % or more.
®
®
compatible device
Connecting to
16
Status Description
Flashing
red
Flashing
green
Flashing
white
The battery level is not enough for
activating the cell phone for turning on.
While backlight is off, missed calls/New
email messages exist.
A call is received.
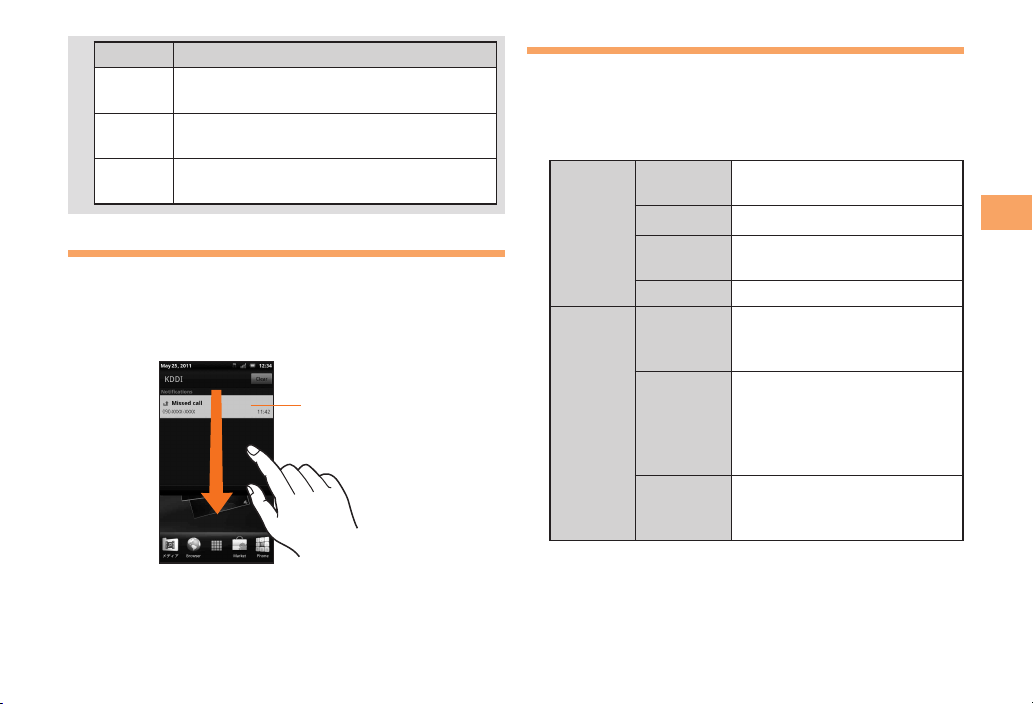
Using the Notification Panel
Notification icons are displayed in the Notification panel.
You can check details of notification icons or start
corresponding applications.
Slide the status bar downward.
Notification panel
Ta p Dismiss all to delete notifications.•
Using the Home Screen
You can change the wallpaper, add, delete, or move
application shortcuts, widgets, folders from the Home
screen.
From the Home screen, t
Add
Wallpaper
Shortcuts
Widgets
Folder
Wallpapers
Gallery
Live
wallpapers
Sony
Ericsson
wallpapers
Add shortcuts of applications
or bookmarks.
Add widgets.
Add folders. Folder names
can be changed.
Change wallpaper of IS11S.
Select an image from an
album in the Gallery to set
wallpaper.
Select a preinstalled live
wallpaper to set wallpaper.
•
You can also download and
add live wallpapers from a
website.
Select a preinstalled image
to set wallpaper.
Learning the Basics
17
 Loading...