

Page 1

Sony Ericsson
txt
Extended User guide
Page 2

Contents
Important information..................................................................4
Experience more. Discover how.................................................5
Getting started..............................................................................6
Standby..............................................................................................7
Starting your phone for the first time....................................................7
Getting to know your phone........................................................8
Phone overview...................................................................................8
Charging the battery...........................................................................8
Screen icons.....................................................................................10
Menu overview..................................................................................11
Navigation.........................................................................................12
Friends application ....................................................................13
Instant messaging......................................................................14
Entering text...............................................................................15
Messaging...................................................................................16
Text messages..................................................................................16
Multimedia messages........................................................................16
Conversations...................................................................................16
Email.................................................................................................16
Calling..........................................................................................18
Call list..............................................................................................18
Emergency calls................................................................................18
Contacts......................................................................................20
Calling contacts................................................................................20
Music...........................................................................................21
TrackID™....................................................................................22
PlayNow™...................................................................................23
Camera........................................................................................24
Camera controls...............................................................................24
Connecting your phone to a computer....................................25
Transferring and handling content using a USB cable........................25
Wi-Fi®..........................................................................................26
Bluetooth™ wireless technology..............................................27
Internet........................................................................................28
More features.............................................................................29
Alarms..............................................................................................29
2
This is an Internet version of this publication. © Print only for private use.
Page 3

Ringtones and wallpapers.................................................................29
Keypad lock......................................................................................29
SIM card lock....................................................................................29
Phone lock........................................................................................30
Troubleshooting.........................................................................31
My phone is not working as expected...............................................31
Master reset .....................................................................................31
No battery charging icon appears when phone starts charging.........31
No network coverage........................................................................31
Emergency calls only.........................................................................31
SIM locked .......................................................................................31
PUK blocked. Contact service provider. ...........................................32
Legal information.......................................................................33
Index............................................................................................34
3
This is an Internet version of this publication. © Print only for private use.
Page 4

Important information
Please read the Important information leaflet before you use your mobile phone.
Some of the services and features described in this User guide are not supported in all countries/
regions or by all networks and/or service providers in all areas. Without limitation, this applies to
the GSM International Emergency Number 112. Please contact your network operator or service
provider to determine availability of any specific service or feature and whether additional access
or usage fees apply.
4
This is an Internet version of this publication. © Print only for private use.
Page 5

Experience more. Discover how.
Visit www.sonyericsson.com/support to get the most from your phone.
5
This is an Internet version of this publication. © Print only for private use.
Page 6
Getting started
Some basic getting started instructions are printed on the box supplied with your phone.
Below you will also find information to help get you started.
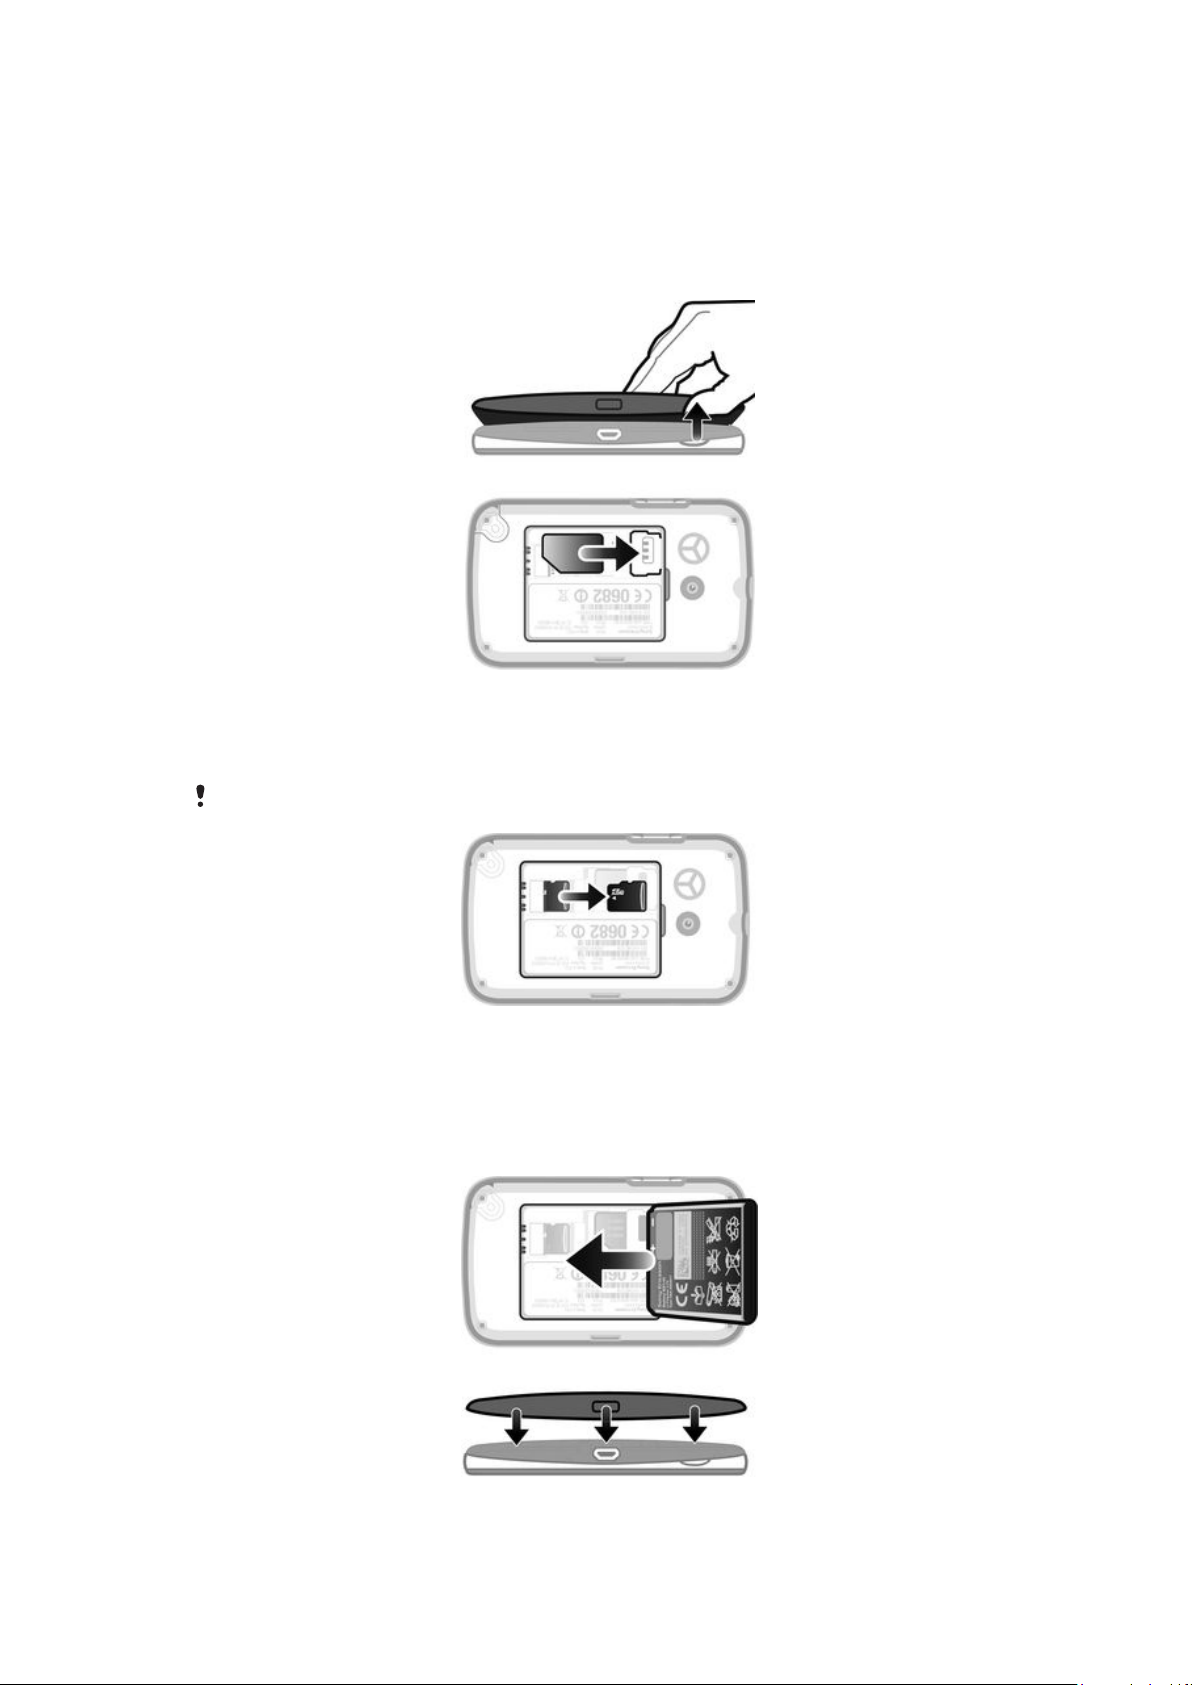
To insert the SIM card
•
Open the cover and insert the SIM card with the gold-colored contacts facing
down.
To insert or remove a memory card
You may have to purchase a memory card separately.
1
Remove the battery cover and insert the memory card with the gold-colored
contacts facing down.
2
To remove the memory card, first remove the battery cover, then press the hook
and draw the memory card outward.
To insert the battery
1
Insert the battery with the label side up and the connectors facing each other.
2
Put the battery cover into place.
6
This is an Internet version of this publication. © Print only for private use.
Page 7

To turn on the phone
1
Press and hold down the key.
2
Enter your PIN, if requested.
3
Select OK.
4
Select a language.
5
Select Yes to start the setup wizard.
If you make a mistake when you enter your PIN, you can press to delete numbers.
Standby
After you have turned on the phone and entered your PIN, the name of the network operator
appears. This view is called standby. Your phone is now ready for use.
To turn off the phone
•
Press and hold down .
Before turning off the phone, you must return to standby.
Starting your phone for the first time
The first time you start your phone, a setup guide helps you enter essential phone settings
and import contacts. You can also access the setup guide later from the phone settings.
To set the phone language on startup
•
When you start your phone for the first time, a list of languages appears. Scroll
through the list and select a language.
To set the time and date at startup
1
When the setup guide prompts you to set the time and date at startup, select Yes.
2
Enter the hour and minute fields to adjust the time.
3
When you're done, select Save.
4
Enter the year, month, and day fields to adjust the date.
5
When you're done, select Save.
To import contacts from a SIM card
•
When you start your phone for the first time with a SIM card inserted, the setup guide
prompts you to import your SIM contacts. Select Yes.
7
This is an Internet version of this publication. © Print only for private use.
Page 8
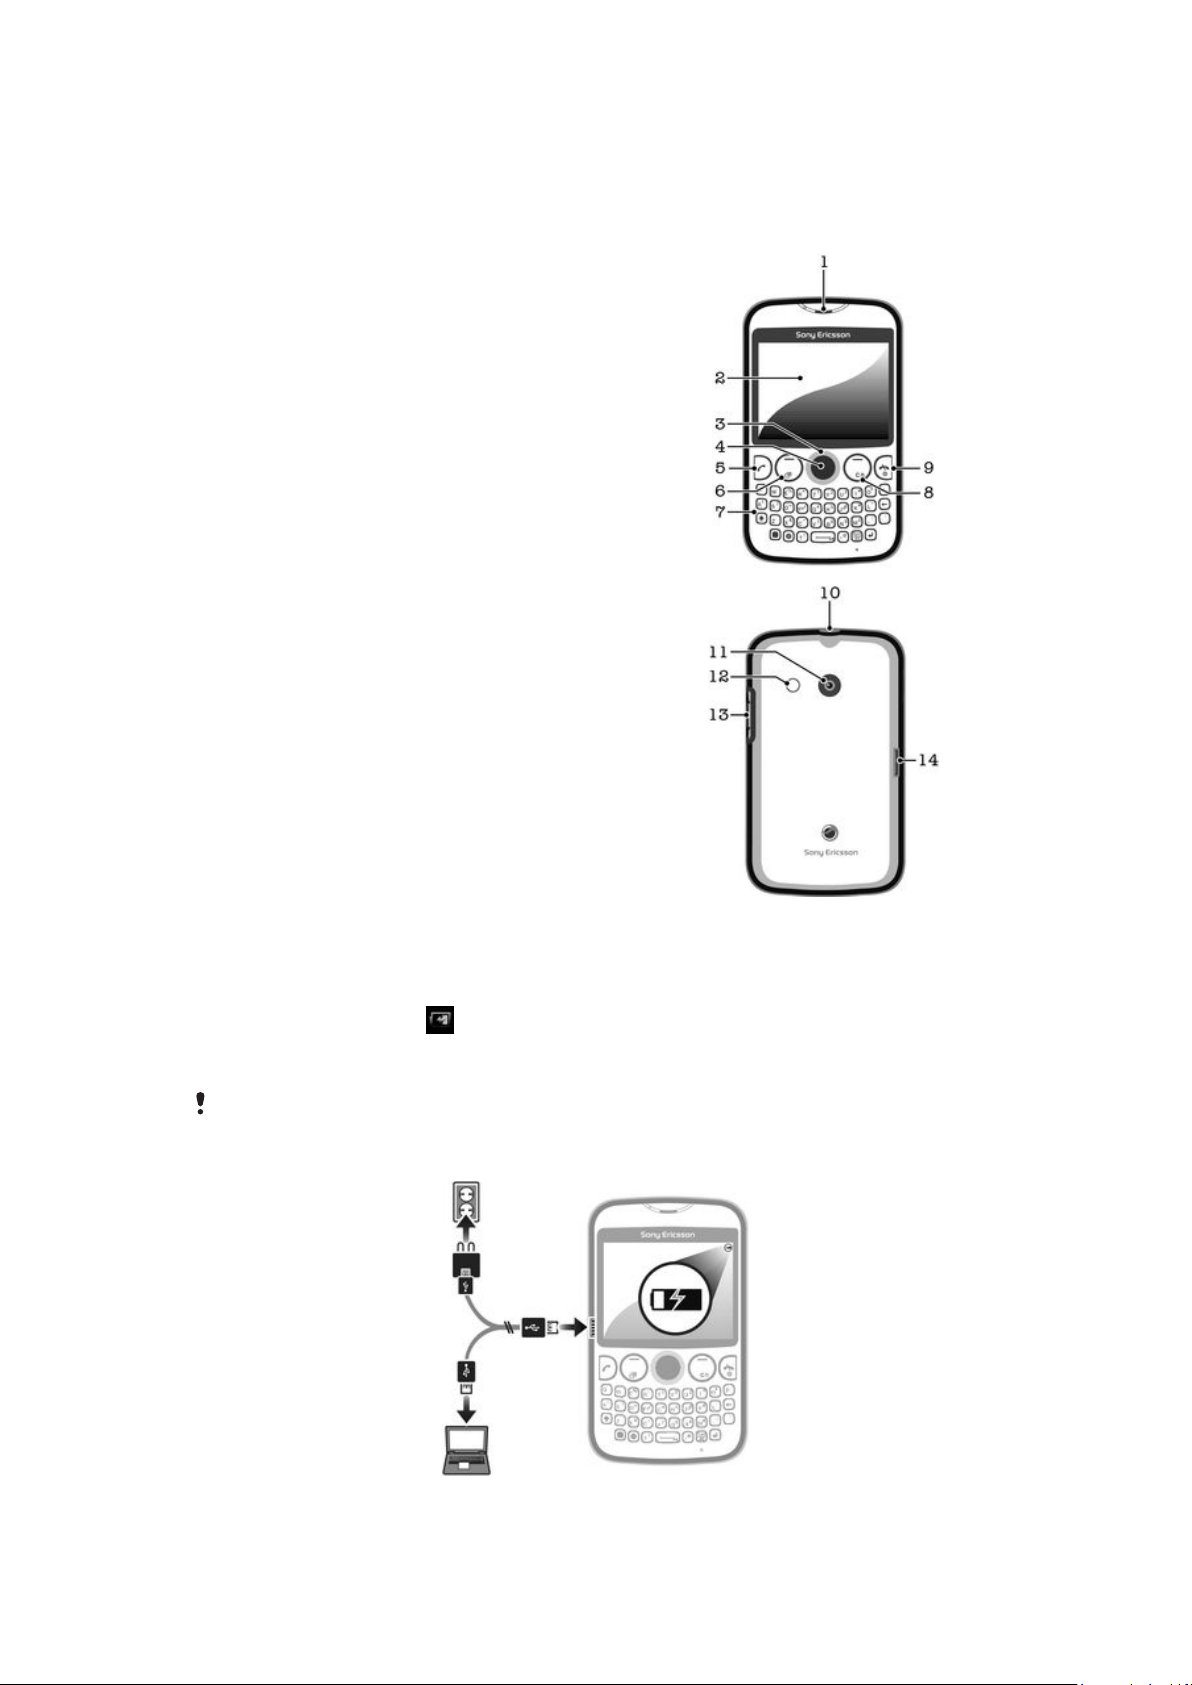
Getting to know your phone
Phone overview
1 Ear speaker
2 Screen
3 Navigation key
4 Selection key
5 Call key
6 Shortcut key
7 Keypad
8 Clear key
9 End key, On/off key
10 Handset connector
11 Camera lens
12 Speaker
13 Volume key
14 Connector for charger and USB cable
Charging the battery
Your phone battery is partly charged when you buy the phone. It may take a few minutes
before the battery icon appears on the screen when you connect the phone charger
cable to a power source, such as a USB port or a phone charger. You can still use your
phone while it is charging.
The battery will start to discharge a little after it is fully charged and then it charges again after a
certain time when the phone charger is connected. This is to extend battery life and may result
in the charge status showing a level below 100 percent.
8
This is an Internet version of this publication. © Print only for private use.
Page 9

To charge the phone using the power adapter
•
Connect the phone to a power outlet using the USB cable and the power adapter.
9
This is an Internet version of this publication. © Print only for private use.
Page 10

Screen icons
The following icons may appear on the screen:
Icon Description
Missed call
Handsfree connected
Ongoing call
Text message received
Multimedia message received
Phone set to silent
Radio playing
Alarm activated
Bluetooth™ function activated
Key lock
10
This is an Internet version of this publication. © Print only for private use.
Page 11

Menu overview
Media
Facebook
Contacts
Opera Mini
Messaging
Write new
Inbox/Conversations
Messages
Email
Call voicemail
Applications**
Orkut
Twitter
Yahoo! mail
Gmail
YouTube
Opera Mini
Facebook
Picasa™
Google Talk™
TrackID™
Entertainment
Online services*
PlayNow™
Internet
Radio
Games
TrackID™
Record sound
Multiple IM
Organizer
File manager**
Calendar
Alarms
Tasks
Notes
Timer
Stopwatch
Calculator
GreenHeart™
Camera
Friends
Settings**
General
Sounds & alerts
Display
Calls
Connectivity
* Some menus are operator-,
network-, and subscriptiondependent.
** You can use the navigation
key to scroll between tabs in
submenus.
11
This is an Internet version of this publication. © Print only for private use.
Page 12
Navigation
The main menus are shown as icons. Some submenus include tabs.
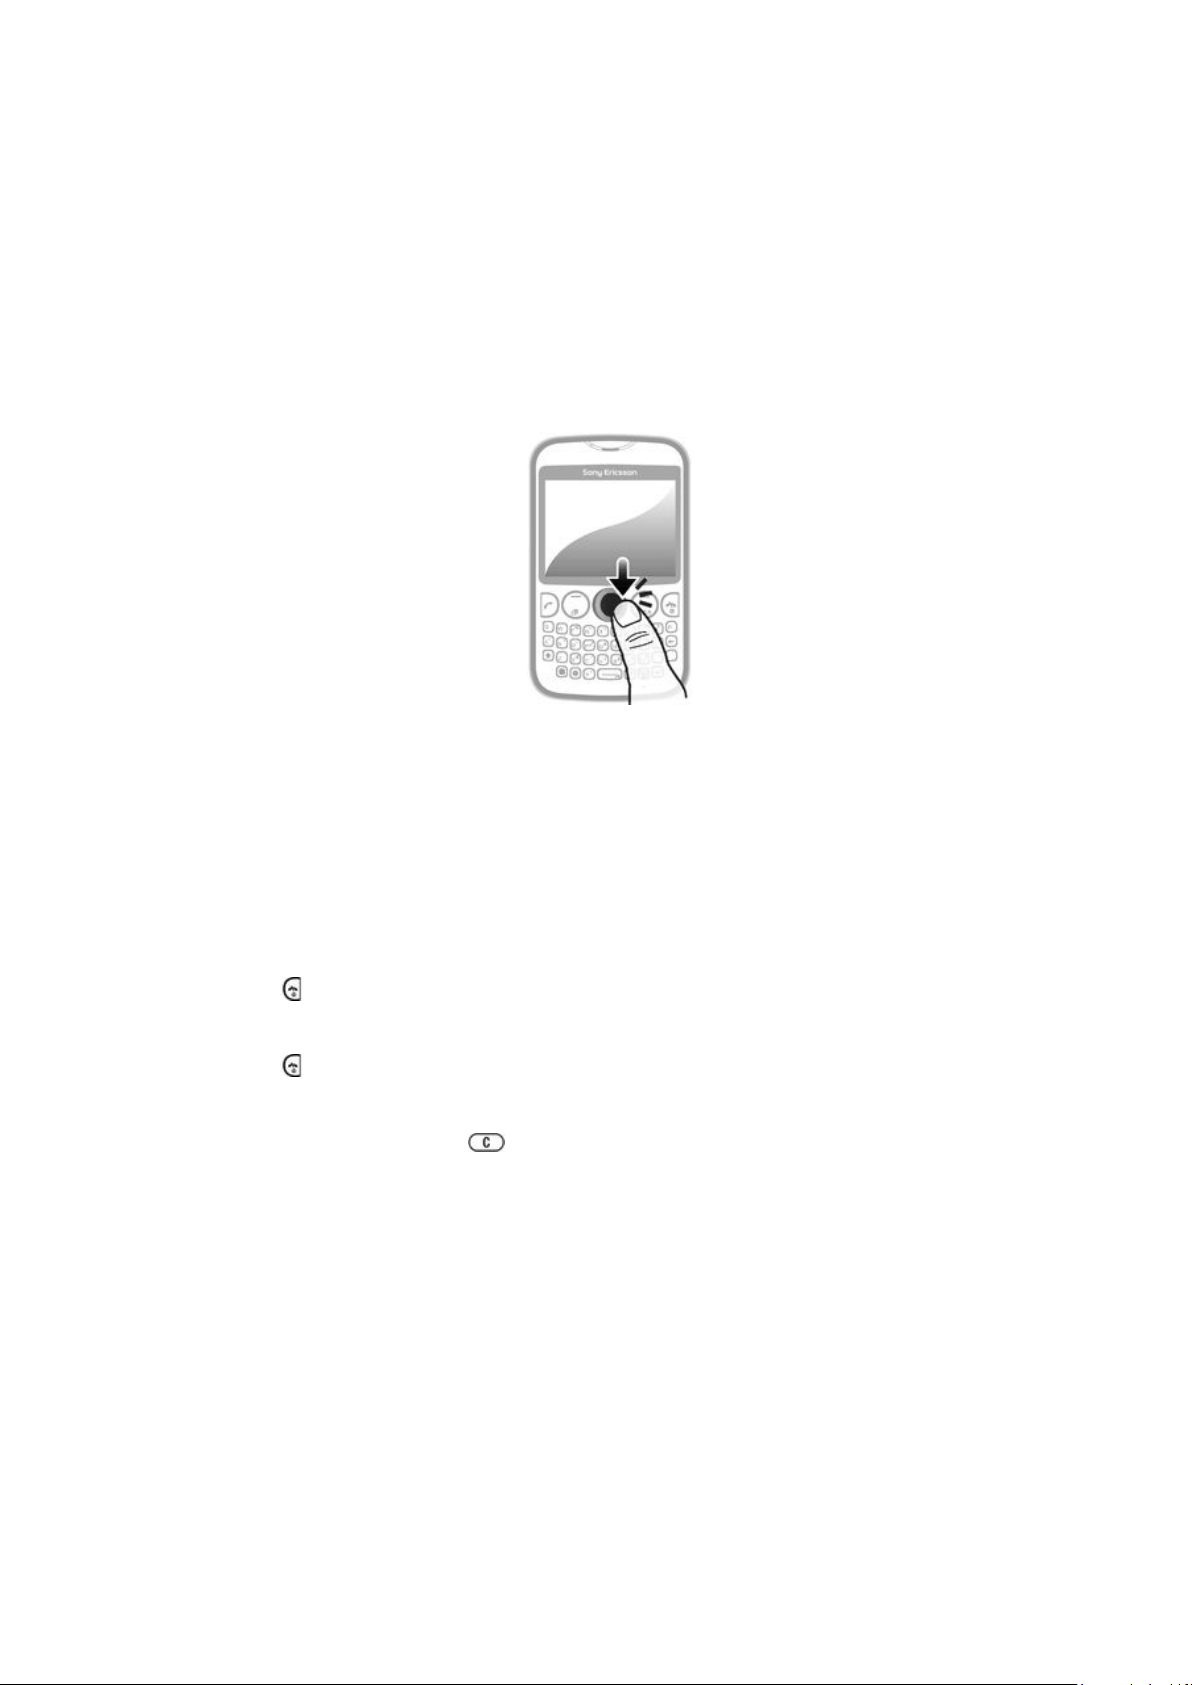
To access the main menu
•
When Menu appears on the screen, press the center selection key.
•
When Menu does not appear on the screen, press the End key, then press the center
selection key.
To navigate the phone menus
1
Press the center selection key to select Menu.
2
Press the navigation key upwards, downwards, left or right to move through the
menus.
To select an item
•
Scroll to the item and press the center selection key
To scroll between tabs
•
Press the navigation key left or right.
To go back one step in a menu
•
Select Back.
To end a function
•
Press
To return to standby
•
Press
To delete an item
•
Scroll to the item and press .
.
.
12
This is an Internet version of this publication. © Print only for private use.
Page 13

Friends application
The Friends application collects communications with your top five friends into one view.
All communications – Facebook™ or Twitter™ updates, text, and multimedia messages,
missed calls – appear in standby.
This application may not be available in all countries or regions.
To add a friend to the Friends application
1
From standby, select Friends.
2
Select Add.
3
All contacts in your phone are displayed. Select a contact to add it as one of your
five closest friends. You can add one friend at a time.
4
To add another friend, press the navigation key left or right to scroll to another
icon.
5
Select Add and press the navigation key up or down to select a contact.
To call a friend from the Friends application
1
From standby, select Friends.
2
Press the navigation key left or right to select a friend.
3
Scroll to
To view a received message in the Friends application
1
When a messaging notification appears, select Friends.
2
Press the navigation key left or right to select the friend who sent the message.
3
Scroll to
and select Call.
, then select Open > View.
To reply to a message using the Friends application
1
From standby, select Friends.
2
Press the navigation key left or right to select a friend.
3
Scroll to
4
Select Open > View and scroll to the message you want to reply to.
5
Select Reply to reply to the message.
To access Facebook via the Friends application
1
From standby, select Friends.
2
Press the navigation key left or right to select a friend.
3
Scroll to
You can also manage Twitter™ events in a similar way.
To adjust the Friends update frequency
1
From standby, select Friends.
2
Select Options > My settings > Update frequency.
3
Select an option.
To remove a friend from the Friends application
1
From standby, select Friends.
2
Press the navigation key left or right to select a friend.
3
Select Options > Contact settings > Delete friend.
.
and select Open.
13
This is an Internet version of this publication. © Print only for private use.
Page 14

Instant messaging
Use the IM (Instant Messaging) application to chat with other people and participate in IM
groups to discuss topics that interest you. IM service providers can vary in the features they
offer users.
Before you can use Instant messaging, you need to have the proper settings on your phone.
In some cases, the settings may be already configured on your phone. Or you may receive
the settings in the form of a configuration message from an IM service provider.
To set up Google Talk™
1
From standby, select Menu > Applications.
2
Follow the registration wizard to create a Google™ account, or sign in if you already
have an account. Your phone is now ready to use with Gmail™ and Google Talk™.
To start Google Talk™
•
From standby, select Menu > Applications.
14
This is an Internet version of this publication. © Print only for private use.
Page 15

Entering text
You can enter letters, numbers, and special characters using the QWERTY keyboard. The
input mode is Multitap.
To enter an upper-case letter
•
Press and hold down , then type the desired letter. The keyboard reverts to lowercase input after you release the key.
To turn on the caps lock
•
Before you enter text, press
To enter a character using the mode toggle key
•
Press to activate the mode toggle key, then press a key featuring associated
characters of the same color. For example, press once and then press the "T"
key to enter "1".
To lock and unlock the mode toggle key
1
Press
keys featuring characters of the same color.
2
To unlock the mode toggle key, press it again.
To insert symbols
1
When you enter text, press . A keypad with symbols appears.
2
Select the symbol or symbols you want to insert.
twice to lock the mode toggle key, then enter text by pressing associated
until appears on the screen.
To change the writing language
1
When you enter text, press
2
Select an option.
To enter text
1
To enter a word, you can either input each letter individually, or select from a list of
predicted words when
2
If the word you want is not in the list, select Options > Spell word, then type the
word and press Save.
.
appears by pressing the navigation key downward.
15
This is an Internet version of this publication. © Print only for private use.
Page 16

Messaging
Text messages
You must have a valid service center number in your phone. This is supplied by your service
provider and saved on the SIM card. You may have to enter the number yourself.
To write and send a text message
1
Select Menu > Messaging > Write new > Message.
2
Write the message and select Continue. Select Enter email address, Contacts
look-up, or Enter phone number.
3
Select a recipient and then select Send.
To view a received text message
•
Text message received appears. Select Yes.
To view messages from the Inbox
1
Select Menu > Messaging > Inbox.
2
Scroll to a message and select View.
Multimedia messages
Multimedia messages can contain text, pictures, sound, and other attachments. They are
sent using MMS (Multimedia Messaging Service) to a mobile phone. You need the correct
Internet settings in your phone to use multimedia messaging. See Internet on page 28.
To write and send a multimedia message
1
Select Menu > Messaging > Write new > Message.
2
Enter text, if desired. To add items to the message, press the navigation key
downward, then scroll left or right, and select an item.
3
To preview the multimedia message before sending it, select Options > Preview.
4
When the message is ready, select Continue.
5
Add a recipient by selecting a send option.
6
When you're done, select Send.
Conversations
You can choose whether to view your messages in Conversations or the Inbox. A
messaging conversation shows all messaging communication between you and one of
your contacts.
To send a message from Conversations
1
Select Menu > Messaging.
2
Select Conversations, or select Inbox and then select the Conversations tab.
3
Select a conversation.
4
Write a message and select Send.
To view messages in Conversations
•
Select Menu > Messaging > Inbox > the Conversations tab and select a conversation.
•
Select Menu > Messaging > Conversations and select a conversation.
Use your phone to send and receive emails through your regular email account. Before you
get started, you need the correct Internet settings in your phone. See Internet on
page 28.
For more information on entering text, see Entering text on page 15.
16
This is an Internet version of this publication. © Print only for private use.
Page 17

To set up an email account in your phone
1
From standby, select Menu > Messaging > Email.
2
Select an email account. If the account you want to use is not in the list, select
Other.
3
Enter the relevant information under the Display name and Username fields, then
select Continue.
4
Enter a password, then select Continue.
5
Select POP3 or IMAP4, then select Continue.
6
Enter the details for the incoming server and the outgoing server, then select
Continue.
To create and send an email message
1
From standby, select Menu > Messaging > Email.
2
Select Write new.
3
To add a recipient, scroll to the To: field and select Enter email address.
4
Enter the email address and select OK.
5
To enter a subject, scroll to the Subject: field, then enter the subject, and select
OK.
6
To enter your message text, scroll to the Text: field, enter the text, and select OK.
7
Select Continue > Send.
17
This is an Internet version of this publication. © Print only for private use.
Page 18

Calling
You must turn on the phone and be within range of a network.
To make a call
1
Enter a phone number (with international country code and area code, if applicable).
2
Press .
You can call numbers from the Contacts application and from the call list.
To end a call
•
Press .
To answer a call
•
Press
To reject a call
•
Press .
To change the ear speaker volume during a call
•
Press the volume key up or down.
To turn off the ringtone without answering a call
•
Press the volume key up or down.
.
To turn on the loudspeaker during a call
•
Select Spkr on.
Do not hold the phone to your ear when using the loudspeaker. This could damage your hearing.
To make an international call
1
From standby, press to make a "+" symbol appear.
2
Enter the country code, area code (without the first zero) and phone number.
3
Press
.
Call list
You can view information about recent calls.
To call a number from the call list
1
Press .
2
Scroll to a name or a number and press .
To clear the call list
1
Press
2
In the All tab, select Options > Delete all.
3
To confirm, select Yes.
.
Emergency calls
Your phone supports international emergency numbers, for example, 112 or 911. You can
normally use these numbers to make emergency calls in any country, with or without the
SIM card inserted, if you are within range of a network.
18
This is an Internet version of this publication. © Print only for private use.
Page 19

To make an emergency call
•
Enter 112 (the international emergency number) and press .
In some countries, other local emergency numbers may also be promoted. Your network operator
may have saved these numbers on the SIM card.
19
This is an Internet version of this publication. © Print only for private use.
Page 20

Contacts
You can save names, phone numbers and personal information in Contacts. Information
can be saved in the phone memory or on the SIM card.
To add a phone contact
1
Select Menu > Contacts.
2
Scroll to New contact and select Add.
3
Enter the contact's name and select OK.
4
Scroll to New number: and select Add.
5
Enter the number and select OK.
6
Select a number option.
7
Scroll between the tabs and add other information, if desired, in the relevant fields.
8
Select Save.
To edit a phone contact
1
Select Contacts.
2
Scroll to a contact and select Options > Edit contact.
3
Scroll between the tabs, edit information and select Save.
Calling contacts
To make a call using the Smart search feature
1
Using the keypad, enter a series of digits or letters. All entries that match the
sequence of digits or corresponding letters are shown in a list.
2
Scroll to a contact or a phone number in the list and press the Call key.
To turn the Smart search feature on or off
1
Select Menu > Settings > the Calls tab > Smart search.
2
Select an option.
20
This is an Internet version of this publication. © Print only for private use.
Page 21

Music
Get the most out of your music player. Listen to and organize music, audio books and
podcasts you have transferred to your memory card from a computer, or purchased and
downloaded from online stores.
Install the Media Go™ application on your computer and transfer content to and from the
memory card in your phone. Media Go™ can be downloaded from
www.sonyericsson.com/support. For more information, see Connecting your phone to a
computer on page 25.
To play a track
1
Select Menu > Media > Music.
2
Browse by artist, album, track or my playlists. Scroll to an option and press Select
to open it.
3
Scroll to a track and select Play.
To pause a track
•
When a track is playing, press .
To change tracks
•
When a track is playing, select
To fast forward and rewind music
•
When a track is playing, press and hold
or .
or .
To adjust the audio volume
•
When the music player is playing a track, press the volume key.
21
This is an Internet version of this publication. © Print only for private use.
Page 22

TrackID™
TrackID™ is a music recognition service. You can search the title, artist and album name
for a track you hear playing through a loudspeaker or on the radio.
You need the correct Java™ software and Internet settings in your phone to use this function.
See Internet on page 28. For cost information contact your service provider.
To search for track information
•
When you hear a track through a loudspeaker, select Menu > Entertainment >
TrackID™ > Select.
•
When you hear a track through the radio on your phone, from the radio view select
Options > TrackID™.
22
This is an Internet version of this publication. © Print only for private use.
Page 23

PlayNow™
When you open PlayNow™, you enter PlayNow™, where you can download music,
games, ringtones, themes, and wallpapers. You can preview or listen to content before you
purchase and download it to your phone.
This service is not available in all countries.
For extended functionality, you can also access the PlayNow™ web shop on a computer
from www.sonyericsson.com/playnow. For more information, go to
www.sonyericsson.com/support to read the PlayNow™ Feature guide.
To access the PlayNow™ service:
•
From standby, select Menu > Entertainment > PlayNow™.
•
Go to www.sonyericsson.com/playnow.
23
This is an Internet version of this publication. © Print only for private use.
Page 24
Camera
Take photos, record videos, view albums and share your favorite clips and pictures with
friends – all with your camera application.
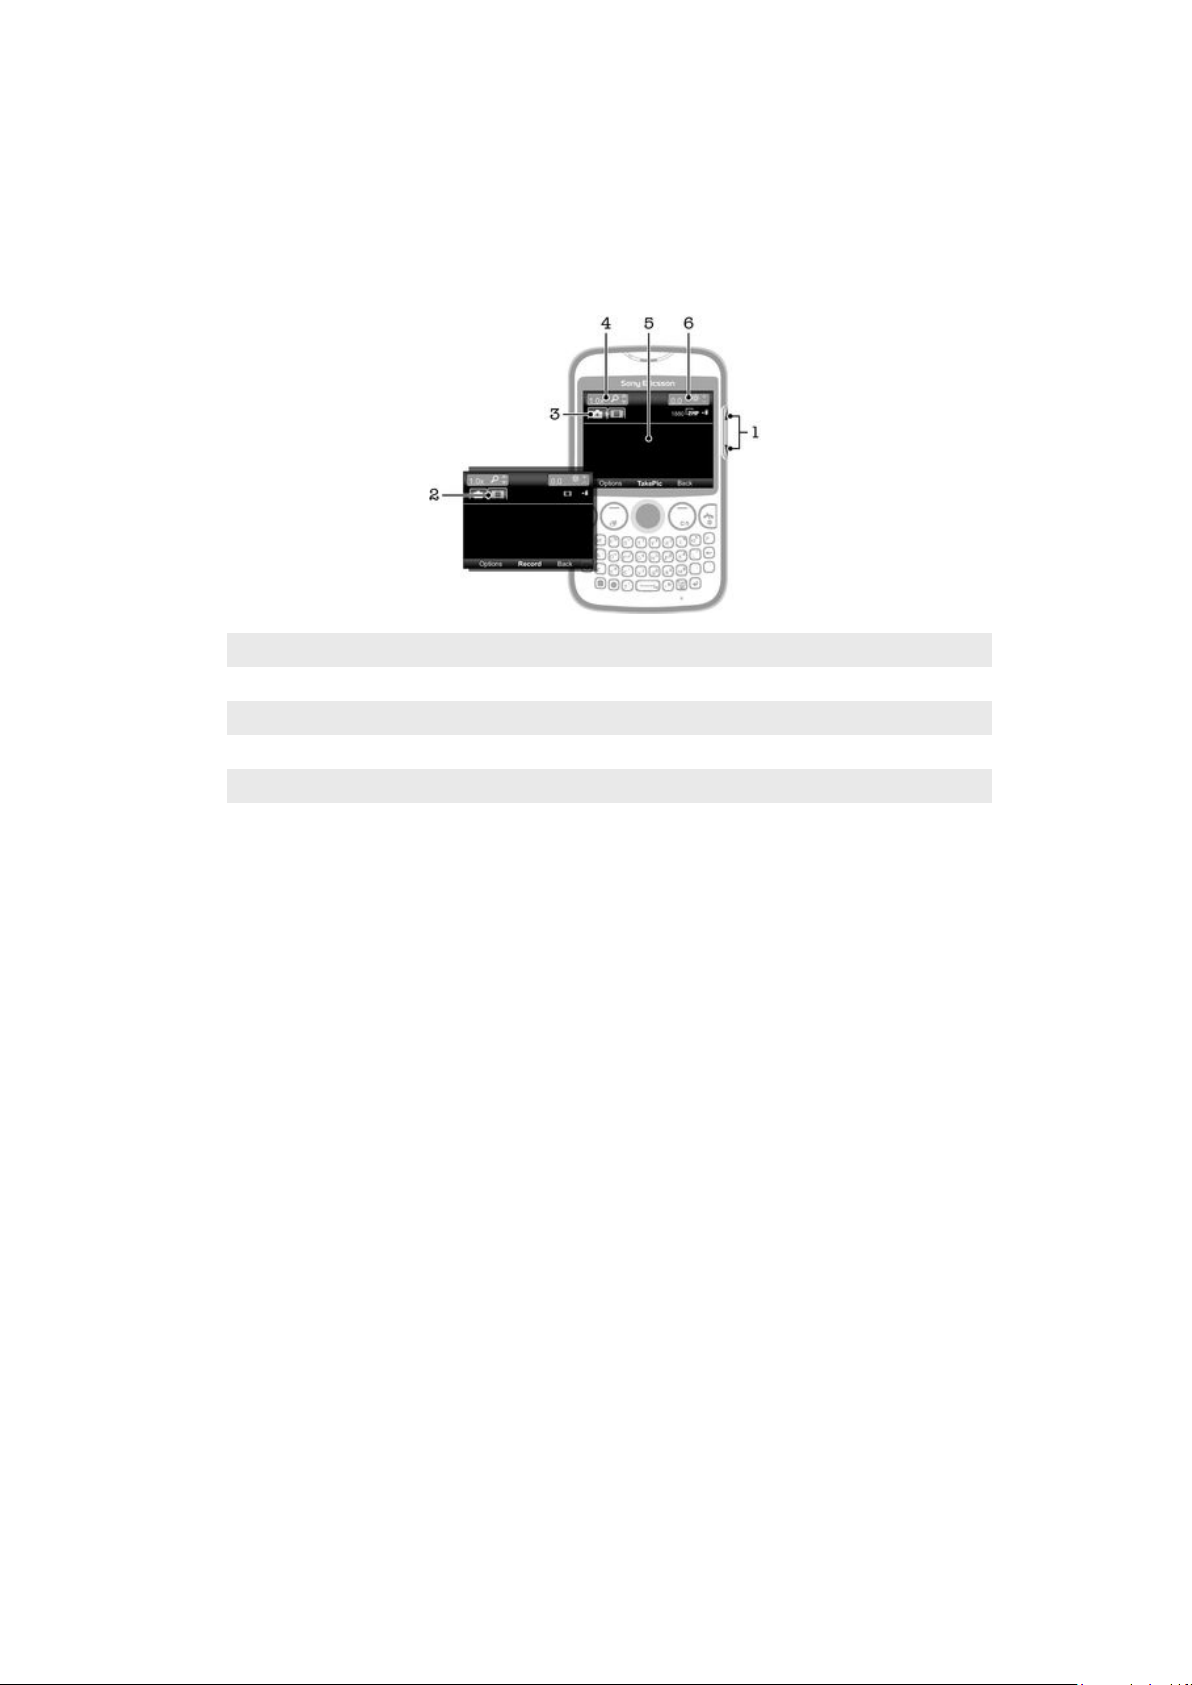
Camera controls
1 Adjust the brightness level
2 Activate the video function
3 Activate the still camera function
4 Zoom in and out (zoom is not available when a large picture size is selected)
5 Camera viewfinder
6 Exposure value
24
This is an Internet version of this publication. © Print only for private use.
Page 25

Connecting your phone to a computer
Connect your phone to a computer and start transferring pictures, music and other file
types.
You might not be able to transfer some copyright-protected material between your phone and
computer.
Transferring and handling content using a USB cable
The most common way to transfer files between your phone and a computer is using a
USB cable. Once the phone and computer are connected, you can drag and drop content
from one to the other using your computer’s file explorer.
Make sure you place files in the corresponding folder types. For example, put your music files in
the Music folder. Java application files are an exception. You should place them in the Other
folder.
To drag and drop content between your phone and a computer
1
Connect the USB cable to the phone and the computer.
2
Phone: Select Yes to confirm the mass storage connection.
3
Computer: Wait until the phone memory and memory card appear as external disks
in the file explorer application.
4
Computer: On the computer desktop, double-click the My Computer icon.
5
Computer: To view the phone memory and memory card folders, double-click the
icon representing your phone.
6
Computer: Copy and paste your file (or drag and drop it) into a corresponding folder
on the computer, in your phone memory, or on the memory card.
You cannot use your phone while transferring files.
To disconnect the USB cable safely
Do not disconnect the USB cable while you are transferring content as this may corrupt the
content.
1
Computer: Use the Safely Remove Hardware function to select the device you want
to unplug, then click Stop.
2
Disconnect the USB cable.
Computer instructions may vary depending on your operating system. See the documentation
of your computer's operating system for more information.
25
This is an Internet version of this publication. © Print only for private use.
Page 26

Wi-Fi®
Using Wi-Fi® technology you can access the Internet wirelessly with your phone. To access
the Internet using a Wi-Fi® connection, you first need to search for and connect to an
available Wi-Fi® network. The signal strength of the Wi-Fi® network may differ depending
on your phone's location. Moving closer to the Wi-Fi® access point may increase the signal
strength.
To turn on Wi-Fi®
•
Select Menu > Settings > Connectivity > Wi-Fi > Turn on.
It may take a few seconds before Wi-Fi® is enabled.
To connect to a Wi-Fi® network
1
Make sure Wi-Fi® is turned on.
2
Select Menu > Settings > Connectivity > Wi-Fi. Available Wi-Fi® networks are
displayed on the screen.
3
Tap a Wi-Fi® network to connect to it. If you are trying to connect to a secured WiFi® network, you are asked to enter a password.
Your phone remembers Wi-Fi® networks you connect to. The next time you come within reach
of a previously connected Wi-Fi® network, your phone automatically connects to it.
In some locations, open Wi-Fi® networks require you to log in to a web page before you can
get access to the network. Contact the relevant Wi-Fi® network administrator for more
information.
26
This is an Internet version of this publication. © Print only for private use.
Page 27

Bluetooth™ wireless technology
Bluetooth™ wireless technology facilitates wireless connections to other Bluetooth™
devices, for example, a Bluetooth™ headset. You can connect to several devices at the
same time or exchange items.
A range within 10 meters (33 feet), with no solid objects in between, is recommended for
Bluetooth™ communication.
To turn on the Bluetooth™ function
•
Select Menu > Settings > Connectivity > Bluetooth > Turn on.
Some countries do not allow you to use Bluetooth™ wireless technology.
To show or hide your phone
•
Select Menu > Settings > Connectivity > Bluetooth > Visibility > Show phone
or Hide phone.
If you select Hide phone, other devices will not be able to identify your phone using Bluetooth™
wireless technology.
To pair the phone with a device
1
To search for available devices, select Menu > Settings > Connectivity >
Bluetooth > My devices > New device.
2
Select a device from the list.
3
Enter a passcode, if required.
Make sure that the device you want to pair your phone with has the Bluetooth™ function activated
and Bluetooth™ visibility set to Show phone.
To pair the phone with a Bluetooth™ handsfree
1
Select Menu > Settings.
2
Press the navigation key right to scroll to the Connectivity tab and select
Bluetooth > Handsfree > My handsfree > New handsfree.
To receive an item
1
Turn on the Bluetooth™ function and set the Visibility to Show phone.
2
When you receive an item, follow the instructions that appear.
To send an item using the Bluetooth™ function
1
Select, for example, Menu > Organizer > File manager > Camera album.
2
Scroll to an item and select Options > Send > Via Bluetooth.
27
This is an Internet version of this publication. © Print only for private use.
Page 28

Internet
You need the correct Internet settings in your phone. If the settings are not in your phone,
you can go to www.sonyericsson.com/support or ask your service provider for more
information.
Make sure you have a phone subscription that supports data transmission.
To select an Internet profile
1
Select Menu > Settings > Connectivity > Internet settings > Internet profiles >
Connect using:.
2
Select an account.
To use the browser
1
Select Menu > Entertainment > Internet > Options > Go to.
2
Select an option.
To exit the browser
•
When you are browsing, press .
28
This is an Internet version of this publication. © Print only for private use.
Page 29

More features
Alarms
You can set a sound or the radio as an alarm signal. The alarm sounds even if the phone
is turned off.
To set an alarm
1
Select Menu > Organizer > Alarms.
2
Scroll to an alarm and select Edit.
3
Switch among the tabs and set the time, the alarm signal and other information, if
desired.
4
Select Save.
If you select the radio as your alarm signal, remember to keep a handsfree device attached to
the phone. The radio uses the handsfree as an antenna.
Ringtones and wallpapers
Wallpapers are used to change the appearance of the screen.
To set the ringtone volume
1
Select Menu > Settings > Sounds & alerts > Ring volume.
2
Press the navigation key left or right to change the volume.
3
Select Save.
To set a ringtone
1
Select Menu > Settings > Sounds & alerts > Ringtone.
2
Find and select a ringtone.
To set the vibrating alert
1
Select Menu > Settings > Sounds & alerts > Vibrating alert.
2
Select an option.
To use a photo as wallpaper
1
Select Menu > Organizer > File manager > Camera album.
2
Scroll to the photo and select Options > Use as > Wallpaper.
Keypad lock
You can use the keypad lock to avoid accidental dialling. Incoming calls can be answered
without unlocking the keypad.
Calls to the international emergency number 112 can still be made.
To activate the automatic keylock
1
Select Menu > Settings > General > Security > Automatic keylock.
2
Select an option.
SIM card lock
This lock only protects your subscription. Your phone will work with a new SIM card. If the
SIM card lock is on, you have to enter a PIN when the phone starts up. If you enter your
PIN incorrectly three times in a row, the SIM card is blocked and you need to enter your
PUK (Personal Unblocking Key). Your PIN and PUK are supplied by your service provider.
29
This is an Internet version of this publication. © Print only for private use.
Page 30

To activate the SIM card lock
1
Select Menu > Settings > General > Security > SIM protection > Protection >
On.
2
Enter your PIN and select OK.
To edit the SIM card PIN
1
Select Menu > Settings > General > Security > SIM protection > Change PIN.
2
Enter your PIN and select OK.
3
Enter a new PIN and select OK.
4
To confirm, re-enter the new PIN and select OK.
Phone lock
The phone lock protects the phone against unauthorized use if it is stolen and the SIM card
is exchanged. You can change the phone lock code (which is 0000 by default) to any fourto-eight-digit personal code. If the phone lock is set to Automatic, you do not need to enter
your phone lock code until a different SIM card is inserted in the phone.
If the phone lock is on and the keylock is also active, you will be asked to input the phone
lock code before you can use the phone. If the phone lock is off, you only need to unlock
the keylock to use the phone.
To set the phone lock
1
Select Menu > Settings > General > Security > Phone protection > Protection.
2
Select an option.
3
Enter the phone lock code and select OK.
To change the phone lock code
1
Select Menu > Settings > General > Security > Phone protection > Change
code.
2
Enter the old code and select OK.
3
Enter the new code and select OK.
4
Enter the new code again and select OK.
To turn off the phone lock
1
Select Menu > Settings > General > Security > Phone protection > Protection
> Off.
2
Enter your phone lock code and select OK.
30
This is an Internet version of this publication. © Print only for private use.
Page 31

Troubleshooting
Some problems require you to call your network operator, but you can correct most
problems yourself. Remove the SIM card before handing your phone in for repair. For more
support, go to www.sonyericsson.com/support.
Restart your phone every day to free memory. Do a Master reset if you are having problems with
memory capacity or if the phone is working slowly.
My phone is not working as expected
If you experience problems with your phone, check these tips before you try anything else:
•
Restart your phone.
•
Remove and re-insert the SIM card. Then restart your phone.
•
Force a restart of the phone if the phone hangs and can't be restarted normally.
•
Update your phone software. Updating your phone ensures optimal performance and
provides the latest enhancements.
•
Reset your phone.
Be patient while resetting your phone. Restarting the phone during a reset procedure may
damage the phone permanently.
Master reset
If you experience problems with your phone, such as screen flickering, screen freezing or
navigation problems, you should reset the phone.
To reset the phone
•
Select Menu > Settings > General > Master reset and select an option.
Reset settings
all user data such as contacts, messages, pictures and sounds in your phone.
resets all changes that you have made in your phone to default. Reset all deletes
No battery charging icon appears when phone starts charging
It may take a few minutes before the battery icon appears on the screen.
No network coverage
•
Your phone is in Flight mode. Make sure Flight mode is turned off.
•
Your phone is not receiving any network signal, or the received signal is too weak. Contact
your network operator and make sure that the network has coverage where you are.
•
The SIM card is not working properly. Insert your SIM card in another phone. If this works,
it is probably your phone that is causing the problem. In this case, contact the nearest
Sony Ericsson service center.
Emergency calls only
You are within range of a network, but you are not allowed to use it. However, in an
emergency, some network operators allow you to call the international emergency number
112. See Emergency calls on page 18 for more information.
SIM locked
You have entered your PIN incorrectly three times in a row. To unlock the phone, you need
the PUK (Personal Unblocking Key) provided by your operator.
31
This is an Internet version of this publication. © Print only for private use.
Page 32

PUK blocked. Contact service provider.
You have entered your PUK code incorrectly 10 times in a row. Please contact your service
provider.
32
This is an Internet version of this publication. © Print only for private use.
Page 33

Legal information
Sony Ericsson txt CK13i
This User guide is published by Sony Ericsson Mobile Communications AB or its local affiliated company, without any
warranty. Improvements and changes to this User guide necessitated by typographical errors, inaccuracies of current
information, or improvements to programs and/or equipment, may be made by Sony Ericsson Mobile Communications
AB at any time and without notice. Such changes will, however, be incorporated into new editions of this User guide.
All rights reserved.
©Sony Ericsson Mobile Communications AB, 2011
Publication number: 1253-3561.1
Attention: Some of the services and features described in this User guide are not supported by all networks
and/or service providers in all areas. Without limitation, this applies to the GSM International Emergency
Number 112. Please contact your network operator or service provider to determine availability of any specific
service or feature and whether additional access or usage fees apply.
Your mobile phone has the capability to download, store and forward additional content, e.g. ringtones. The use of
such content may be restricted or prohibited by rights of third parties, including but not limited to restriction under
applicable copyright laws. You, and not Sony Ericsson, are entirely responsible for additional content that you
download to or forward from your mobile phone. Prior to your use of any additional content, please verify that your
intended use is properly licensed or is otherwise authorized. Sony Ericsson does not guarantee the accuracy, integrity
or quality of any additional content or any other third party content. Under no circumstances will Sony Ericsson be
liable in any way for your improper use of additional content or other third party content.
All product and company names mentioned herein are the trademarks or registered trademarks of their respective
owners.
This User guide may reference services or applications provided by third parties. Use of such programming or services
may require separate registration with the third party provider and may be subject to additional terms of use. For
applications accessed on or through a third-party website, please review such websites’ terms of use and applicable
privacy policy in advance. Sony Ericsson does not warrant or guarantee the availability or performance of any thirdparty websites or offered services.
This product is protected by certain intellectual property rights of Microsoft. Use or distribution of such technology
outside of this product is prohibited without a license from Microsoft.
Other product and company names mentioned herein may be the trademarks of their respective owners. Any rights
not expressly granted herein are reserved. All other trademarks are property of their respective owners.
All illustrations are for illustration only and may not accurately depict the actual phone.
Microsoft, Windows and Vista are registered trademarks or trademarks of Microsoft Corporation in the United States
and/or other countries.
"Export Regulations: This product, including any software or technical data contained in or accompanying the product,
may be subject to import and export regulations of the European Union, the United States and other countries. The
user and any possessor of the product agrees to comply strictly with all such regulations and acknowledges that it is
their responsibility to obtain any required licenses to export, re-export, or import this product. Without limiting the
foregoing, and as an example, the user and any possessor of the product: (1) must not knowingly export or re-export
Products to destinations identified pursuant to Articles in Chapter II of European Council Regulation (EC) 428/2009;
(2), must comply with U.S. government Export Administration Regulations (“EAR”, 15 C.F.R. §§ 730-774, http://
www.bis.doc.gov/ ) administered by Department of Commerce, Bureau of Industry and Security; and (3) must comply
with economic sanctions regulations (30 C.F.R. §§ 500 et. seq.,., http://www.treas.gov/offices/enforcement/ofac/)
administered by the U.S. Department of Treasury, Office of Foreign Assets Control. The user and any possessor of
the product may not transport or deliver the product, its accessories or separate software to any country, region,
entity or person prohibited by these regulations."
33
This is an Internet version of this publication. © Print only for private use.
Page 34

Index
A
adjusting volume .....................................................21
audio
adjusting volume .............................................21
audio books .............................................................21
B
battery .......................................................................8
inserting .............................................................6
C
changing music tracks ............................................21
charging .....................................................................8
contacts
adding phone contacts ...................................20
Smart search ...................................................20
conversations ..........................................................16
M
music .......................................................................21
adjusting volume .............................................21
audio books .....................................................21
changing music tracks ....................................21
podcasts ..........................................................21
P
PlayNow™ ...............................................................23
S
setup guide ................................................................7
SIM card
inserting .............................................................6
U
USB connection ......................................................25
W
Wi-Fi® .....................................................................26
34
This is an Internet version of this publication. © Print only for private use.
 Loading...