

Page 1

Trouble shooting guide SP/ Mechanical
Trouble shooting guide SP/ Mechanical
Applicable for T100/T102/T105/T106
Contents:
Explanations ....................................................................................................................2
1
1.1 Service functions in the software.......................................................................2
1.2 Liquid damage ...................................................................................................2
1.2.1 Water damage indicator..................................................................................... 2
1.2.2 Action ................................................................................................................ 3
2 Appearance Problems..................................................................................................... 4
3 Network Problems ..........................................................................................................5
4 On/Off Problems ............................................................................................................. 6
5 Audio Problems...............................................................................................................7
6 Display/Illumination Problems ......................................................................................8
7 Capacity/Charging Problems......................................................................................... 9
8 Key Problems ................................................................................................................10
9 Alert Problems ..............................................................................................................11
10 Data Communication Problems................................................................................... 12
11 SIM-Problems ...............................................................................................................13
12 Software Problems ........................................................................................................ 14
13 Revision History............................................................................................................ 15
4/00021-1/FEA 209 544/78 C
Ericsson Mobile Communications AB
Approved according to 1776-1/FEA 209 544
Page 2

Trouble shooting guide SP/ Mechanical
1 Explanations
1.1 Service functions in the software
The service menu will be accessed with the following key combination.
⇒*⇐⇐*⇐*
They are as follows:
1. Service info
2. Service settings
3. Service test
4. Text labels
In the software of the phone there is a built in service functionality that allows you to test
some of the functions of the phone. (See point 3 above) This is how it looks:
1. Display
2. LED/Illumination
3. Keyboard
4. Buzzer
5. Vibrator
6. Earphone
7. Microphone
8. Real Time Clock
1.2 Liquid damage
1.2.1 Water damage indicator
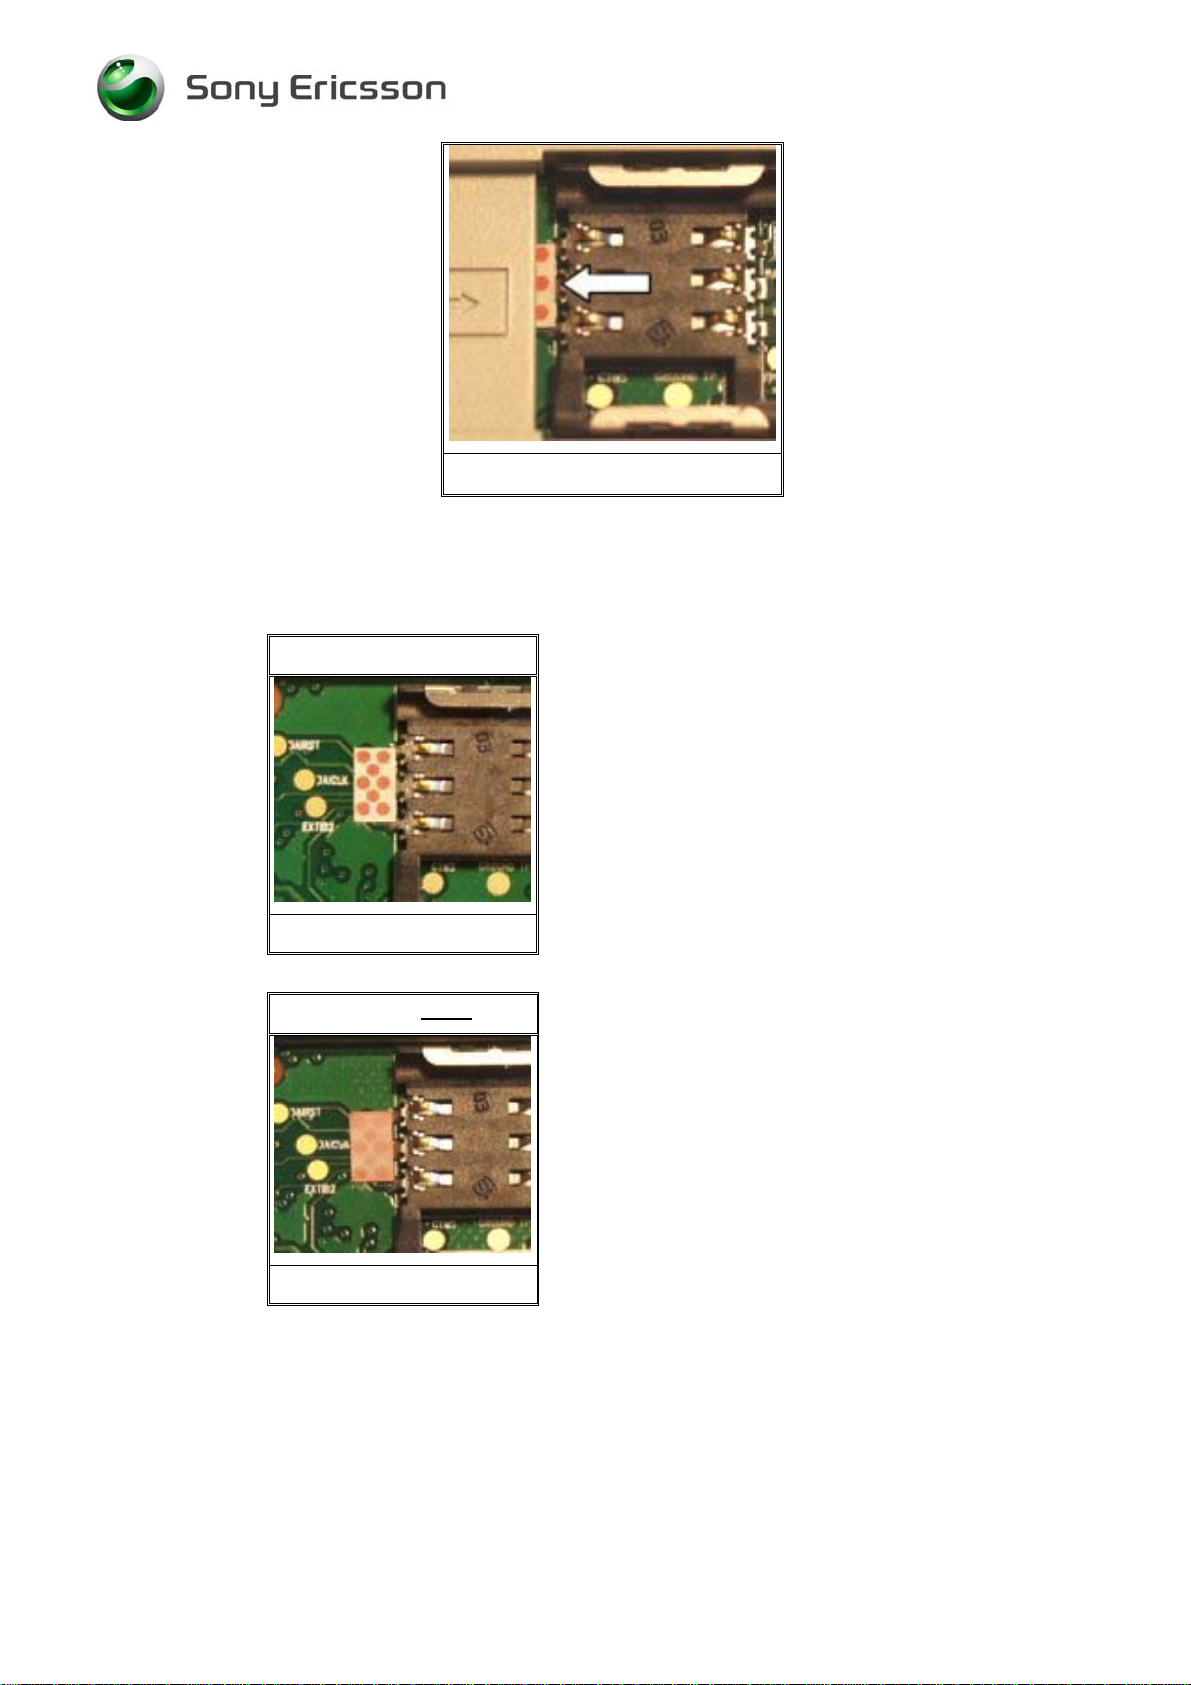
In the phone there is placed a sticker that can give you a hint to see if the phone is damage by
liquid or not. This sticker is located near the SIM reader (Fig. 1.1) and it is possible to see it
without disassemble the phone.
4/00021-1/FEA 209 544/78 C
Ericsson Mobile Communications AB
2(15)
Page 3
Trouble shooting guide SP/ Mechanical
Fig. 1.1
On the pictures below you will see the difference between a sticker that has been in contact
with liquid (Fig. 1.3) and one that has not been exposed to liquid (Fig. 1.2).
This sticker is ok
Fig. 1.2
This sticker is not
ok
This sticker has not been in contact with liquid.
This sticker has been in contact with liquid. As you can
see the red dots has turn into pink dots. In this case you
should check the phone for liquid damage
(See point 1.2.2).
Fig. 1.3
1.2.2 Action
Make a general visual inspection for corrosion or oxidation from liquid damage. No further
action should be taken for a liquid damaged phone. Handle the unit according to local
company or GSP directives.
4/00021-1/FEA 209 544/78 C
Ericsson Mobile Communications AB
3(15)
Page 4

Trouble shooting guide SP/ Mechanical
2 Appearance Problems
• Make a general visual inspection for corrosion or oxidation from liquid damage according
to point 1.2
• Check the front cover (Fig. 2.1) and the rear cover (Fig. 2.2) for damage and that the parts
fit correct. Replace faulty components if necessary.
Fig. 2.1 Fig. 2.2
• Check the keypad (Fig. 2.3) for damage, scratches and that no keys occur more than ones.
Replace it if necessary.
If the failure still occurs, handle the unit according to the local company or the GSP directives.
4/00021-1/FEA 209 544/78 C
Ericsson Mobile Communications AB
Fig. 2.3
4(15)
Page 5
Trouble shooting guide SP/ Mechanical
3 Network Problems
• Make a general visual inspection for corrosion or oxidation from liquid damage according
to point 1.2
• Insert a correct SIM-card and switch the phone on. Check that the phone gets service and
that the signal strength indicator shows a correct value at the display. Compare with a
properly working phone.
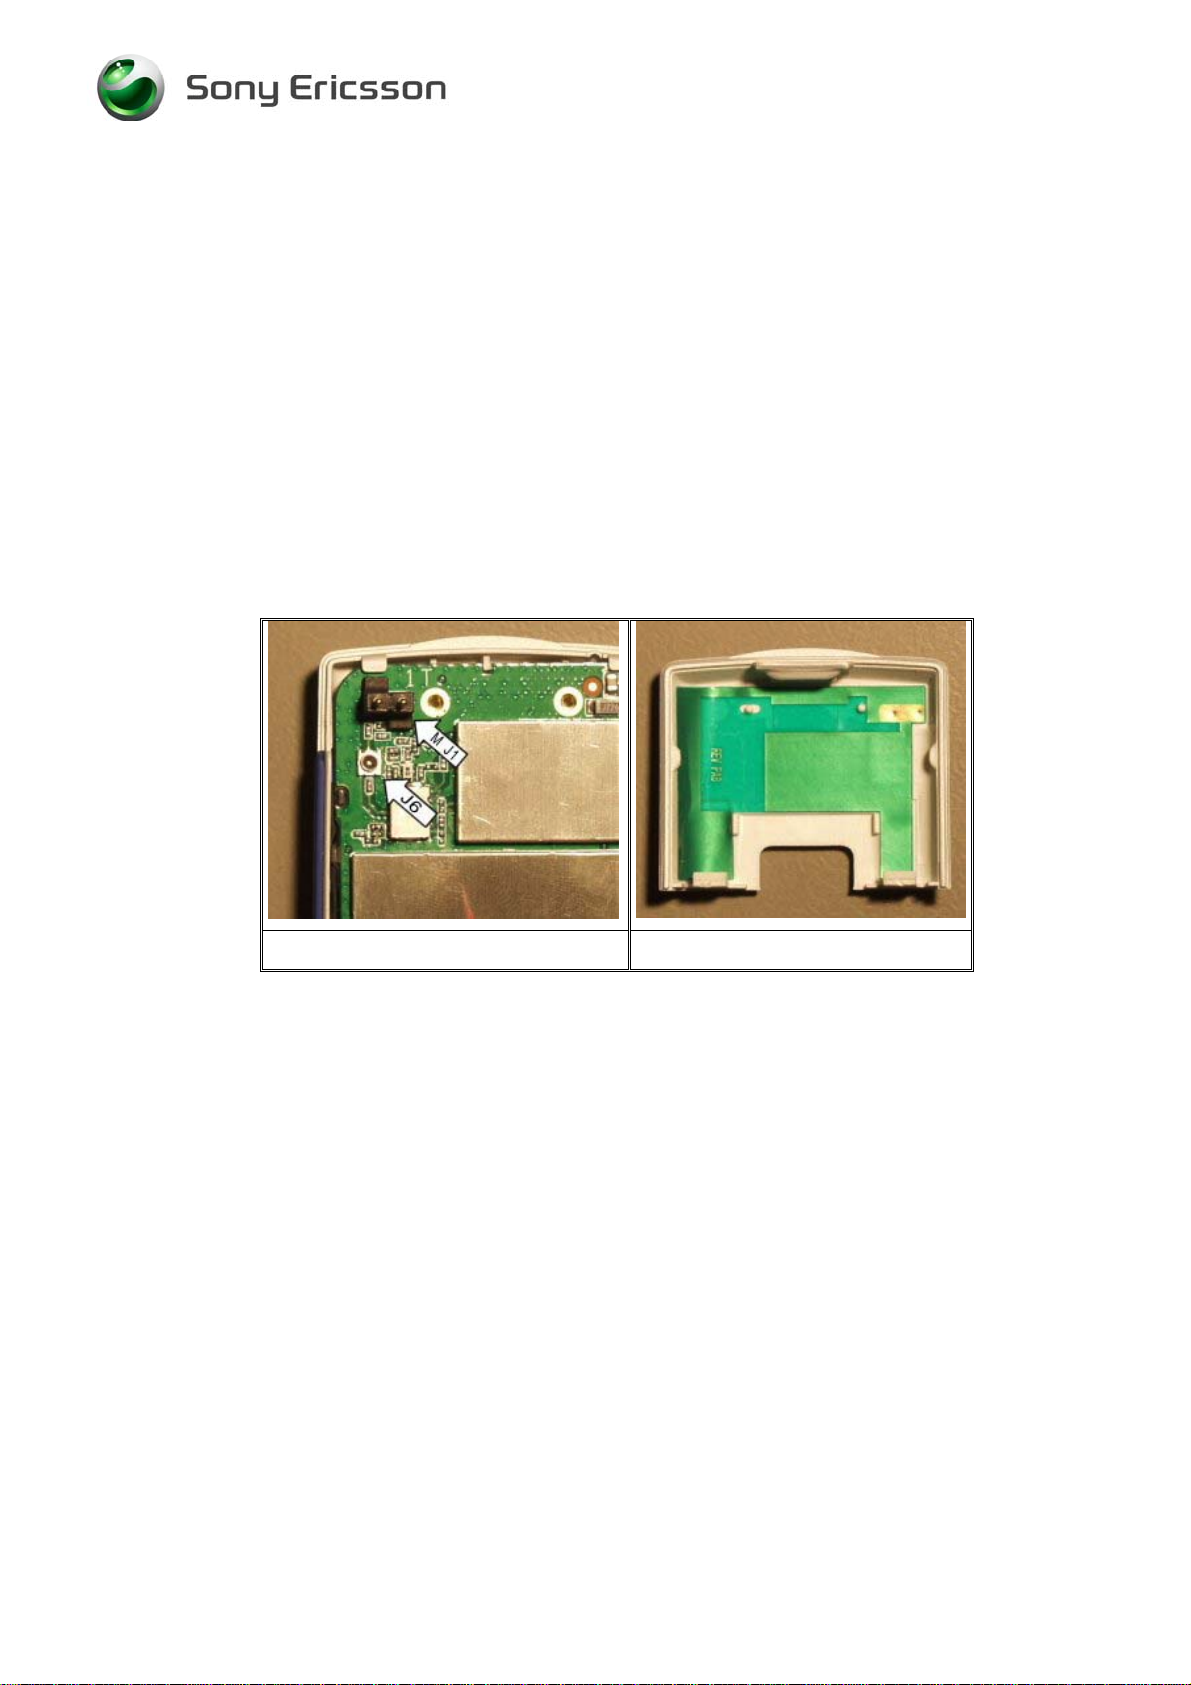
• Check that the antenna connector M_J1 (Fig. 3.1) is not dirty or oxidized. Clean it if
necessary.
• Check that the antenna cover assembly (Fig. 3.2) is not mechanical damaged, dirty or
oxidized. Replace it if necessary.
If the failure still occurs, handle the unit according to the local company or the GSP directives.
Fig. 3.1 Fig. 3.2
4/00021-1/FEA 209 544/78 C
Ericsson Mobile Communications AB
5(15)
Page 6

Trouble shooting guide SP/ Mechanical
4 On/Off Problems
• Make a general visual inspection for corrosion or oxidation from liquid damage according
to point 1.2
• Check that the battery pads (Fig. 4.1) are not mechanical damaged, dirty or oxidized. If
necessary replace the battery.
• Check that the battery connector (Fig. 4.2) are not are not mechanical damaged, dirty or
oxidized in any way. Replace them both if necessary.
Note: Always replace the battery connectors if there is an on/off problem.
The battery connectors are the most common fault when an ON/OFF problem appears.
Fig. 4.1 Fig. 4.2
• Check that the dome on the backside of the keypad (Fig. 4.3) is not mechanical damaged,
dirty or oxidized. Replace it if necessary.
If the failure still occurs, handle the unit according to the local company or the GSP
directives.
4/00021-1/FEA 209 544/78 C
Ericsson Mobile Communications AB
Fig.4.3
6(15)
Page 7

Trouble shooting guide SP/ Mechanical
5 Audio Problems
• Make a general visual inspection for corrosion or oxidation from liquid damage according
to point 1.2
• Turn on the phone. Go to the service test menu; choose “6.Earphone” press any key to
check that the speaker is working properly.
• Check that the speaker pads (Fig. 5.1) are not dirty or oxidized. Clean it if necessary.
• Check that the speaker (Fig. 5.2) is not mechanical damaged, dirty or oxidized. Replace it
if necessary.
Note! Do not reuse removed speaker due to conductivity problems
Fig.5.1 Fig.5.2
• Turn on the phone. Go to the service test menu; choose “7.Microphone” (an audio loop is
activated) check that the microphone is working properly.
• Check that the microphone pads (Fig. 5.3) are not dirty or oxidized. Clean it if necessary.
• Check that the microphone (Fig. 5.4) is not mechanical damaged, dirty or oxidized.
Replace it if necessary.
If the failure still occurs, handle the unit according to the local company or the GSP directives.
Fig.5.3 Fig.5.4
4/00021-1/FEA 209 544/78 C
Ericsson Mobile Communications AB
7(15)
Page 8

Trouble shooting guide SP/ Mechanical
6 Display/Illumination Problems
• Make a general visual inspection for corrosion or oxidation from liquid damage according
to point 1.2
• Turn the phone on. Check the LCD and the illumination. The illumination is lightened
when the phone starts and will continue for approximately 20 seconds if the
Settings/Display/Light/Auto is selected.
• Turn the phone on. Go to the service test menu; choose “1.Display”. You should see a
pattern. Check that no lines or pixels are missing and that there are no miss colours.
• Check that the ZIF-contact is closed and that the LCD cable is properly connected (Fig.
6.1). If necessary replace the LCD assy.
If the failure still occurs, handle the unit according to the local company or the GSP
directives.
Fig.6.1
Note: When replacing the LCD assy the contrast should be checked. If necessary, adjust the
contrast in the service settings menu. Remember to store the setting with “YES”.
4/00021-1/FEA 209 544/78 C
Ericsson Mobile Communications AB
8(15)
Page 9

Trouble shooting guide SP/ Mechanical
7 Capacity/Charging Problems
• Make a general visual inspection for corrosion or oxidation from liquid damage according
to point 1.2
• Check that the system connector (Fig. 7.1) is not dirty or oxidized. Clean it if necessary.
If the failure still occurs, handle the unit according to the local company or the GSP directives.
Fig.7.1
4/00021-1/FEA 209 544/78 C
Ericsson Mobile Communications AB
9(15)
Page 10

Trouble shooting guide SP/ Mechanical
8 Key Problems
• Make a general visual inspection for corrosion or oxidation from liquid damage according
to point 1.2
• Turn the phone on. Go to the service test menu; choose “3.Keyboard”. Press all the
buttons. The pressed key will be shown in the LCD and a click is heard.
• Check that the mechanical response feels normal and that all the keys have been showed in
the LCD.
• Check that the keypad (Fig. 8.1) is not mechanical damaged, dirty or oxidized. If
necessary replace the keypad.
• Check that the keypads on the PCB (Fig. 8.2) are not dirty or oxidized. If necessary clean
the PCB.
• Turn the phone on. Go to the service test menu; choose “3.Keyboard”. Check the volume
key (no click should be heard).
• Check that the mechanical response feels normal. If necessary replace the volume key
(Fig. 8.3).
Note: If replacing the keypad remember to remove the protection film before mounting it.
If the failure still occurs, handle the unit according to the local company or the GSP directives.
Fig. 8.1 Fig. 8.2 Fig. 8.3
4/00021-1/FEA 209 544/78 C
Ericsson Mobile Communications AB
10(15)
Page 11

Trouble shooting guide SP/ Mechanical
9 Alert Problems
• Make a general visual inspection for corrosion or oxidation from liquid damage according
to point 1.2
• Turn on the phone. Go to the service test menu; choose “4.Buzzer”. Press any key to check
that the buzzer is working properly.
• Check that the buzzer protection rubber (Fig. 9.1) is not mechanical damaged. Replace it if
necessary.
Note: The exit on the Buzzer protection rubber must be free from dust and dirt.
Make sure that the exit on the Buzzer protection rubber is pointed at the right direction.
• Turn on the phone. Go to the service test menu; choose “5.Vibrator”. Press any key to
check that the vibrator is working properly.
• Check that the vibrator pads (Fig. 9.2) are not dirty or oxidized. Clean them if necessary.
• Check that the vibrator (Fig. 9.3) is not mechanical damaged, dirty or oxidized. Replace it
if necessary.
If the fault still occurs, handle the unit according to the local company or the GSP directives.
Fig.9.1
Fig.9.2 Fig.9.3
4/00021-1/FEA 209 544/78 C
Ericsson Mobile Communications AB
11(15)
Page 12

Trouble shooting guide SP/ Mechanical
10 Data Communication Problems
• Make a general visual inspection for corrosion or oxidation from liquid damage according
to point 1.2
• If no communication is accomplished with the system connector.
• Check that the system connector (Fig. 10.1) is not dirty or oxidized. Clean it if necessary.
If the failure still occurs, handle the unit according to the local company or the GSP directives.
Fig.10.1
4/00021-1/FEA 209 544/78 C
Ericsson Mobile Communications AB
12(15)
Page 13

Trouble shooting guide SP/ Mechanical
11 SIM-Problems
• Make a general visual inspection for corrosion or oxidation from liquid damage according
to point 1.2
• Insert a SIM card with known function. If the display shows “Insert card” there is a SIM
problem. If it shows “Insert correct card” the phone might be SIM locked in this case, use
a test SIM card.
• Check that the SIM-reader (Fig. 11.1) is not dirty or oxidized. Clean it if necessary.
If the failure still occurs, handle the unit according to the local company or the GSP directives.
Fig.11.1
4/00021-1/FEA 209 544/78 C
Ericsson Mobile Communications AB
13(15)
Page 14

Trouble shooting guide SP/ Mechanical
12 Software Problems
• If there are problems with the response of the keypad commands, or spelling errors in the
menu, if they are not related to mechanical damage, make a master reset and flash the
phone with the latest software from EMMA II.
• Checking the software revision can be done in the Service info, see chapter Service
functions in the software.
Chose: Service info / SW information.
The Software revision and date will be shown in the display.
If the failure still occurs, handle the unit according to the local company or the GSP directives.
4/00021-1/FEA 209 544/78 C
Ericsson Mobile Communications AB
14(15)
Page 15

Trouble shooting guide SP/ Mechanical
13 Revision History
Rev. Date Changes / Comments
A 2002-11-15 First release
B 2003-02-28 T106 added
C 2003-07-24 T105 added
4/00021-1/FEA 209 544/78 C
Ericsson Mobile Communications AB
15(15)
 Loading...