

Page 1

This is the Internet version of the user’s guide. © Print only for private use.
P800
User’s Guide
Page 2
This is the Internet version of the user’s guide. © Print only for private use.
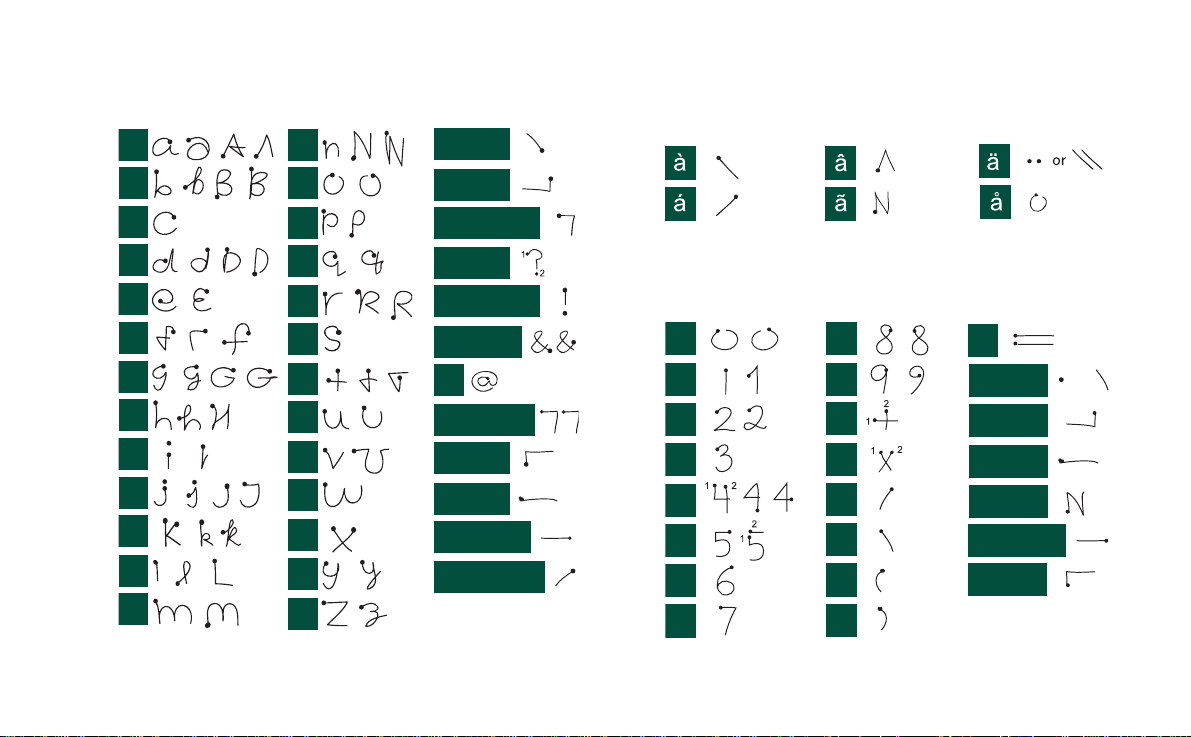
Letters
Lower case letters are written below the arrow and purchase
letters in line with the arrow.
a
b
c
d
e
f
2
g
h
2
1
i
2
2
1
1
j
1
2
k
l
m
Note Start each stroke at the dotted end.
n
o
p
q
r
1
s
1
t
2
u
v
w
1
x
2
y
z
full stop
comma
apostrophe
question
exclamation
ampersand
at
double quote
tab
space
backspace
carriage return
Accented letters
Writ e th e character as described abov e, then write th e ac c ent
above the arrow. Other such characters, for example, ö and ü,
follow the same principle.
Note Start each stroke at the dotted end.
1
2
Numbers
Numbers are written above the arrow.
0
1
2
3
4
5
6
7
Note Start each stroke at the dotted end.
8
9
+
*
/
\
(
)
=
full stop
comma
dash
tilde
backspace
tab
or
*
Page 3

This is the Internet version of the user’s guide. © Print only for priv ate use.
Contents
OVERVIEW
Introduction............................................... ...... ..... ....... 9
Getting to know your P800....................................... 10
P800 package.................................... ... .......................... ... 10
P800 overview................................................ .................. 11
SIM card........................................................................... 12
Battery .............................................................................. 12
Care instructions............................................................... 13
First time start-up.............................................................. 14
Turning your P800 on and off.......................................... 14
Importing phone book entries........................................... 14
Operational modes............................................................ 15
Flip closed mode ............................. ... .... ......................... 16
Flip open mode................................................................. 17
Flip removed..................................................................... 19
Jog Dial ............................................................................ 22
Keypad functions........................................................... ... 23
Indicators and status bar icons.......................................... 24
Memory Stick® Duo®..................................................... 25
Connecting the accessories............................................... 28
Services............................................................................. 28
Applications - overview.................................................... 29
General functions.............................................................. 31
Entering text .................. .... .... ......................... .................. 35
P800 locks............... .... ......................... ............................. 39
TELEPHONY
Phone........................................................ ...... ............ 41
Call handling with the flip closed.................................... 41
Call handling with the flip open ...................................... 44
Handling two or more calls.............................................. 46
Call list and call log......................................................... 48
Hints and smart functions................................. ............... 49
Preferences....................................................................... 51
MEDIA
CommuniCam and Pictures..................................... 58
Camera settings................................................................ 58
Taking pictures ............ .... ......................... ....................... 59
Managing pictures............................................................ 60
Video player .............................................................. 63
Video clips....................................................................... 63
Streaming......................................................................... 65
Audio player.............................................................. 66
Playing sound files........................................................... 66
Managing sound files....................................................... 67
Internet ..................................................................... . 70
Using the browser view ................................................... 72
Using the bookmark view................................................ 75
Preferences....................................................................... 77
3
Page 4

This is the Internet version of the user’s guide. © Print only for private use.
Games......................................................................... 79
Chess................................................................................. 79
Solitaire............................................................................. 79
BUSINESS
Messages..................................................................... 81
Folders in Messages.......................................................... 82
The accounts in Messages ................................................ 83
Handling text messages .................................................... 83
Handling multimedia messages........................................ 84
Handling e-mails............................................................... 87
Contacts...................................................................... 92
Using Contacts with the flip closed................................. . 92
Using contacts with the flip op en.................................... . 94
Creating and managing cont acts........................ ... .... ........ 95
Managing the SIM phone book........................................ 96
Making an owner card...................................................... 96
Sending and receiving contact details............................... 97
Preferences........................................................................ 97
Calendar..................................................................... 98
Creating calendar entries .................................................. 98
Managing calendar entries................................................ 99
Sending and receiving calendar entries.......................... 100
Preferences...................................................................... 100
Tasks ........................................................................ 102
Creating task entries................... ... .... .......................... ... 102
Managing task entries.................................................... 103
Moving task entries........................... .......................... ... 103
Sending and receiving task entries........... ...................... 104
Preferences.............................................................. ....... 104
Jotter........................................................................ 105
Creating and editing notes ............................................. 105
Drawing pictures............................................................ 106
Managing notes.............................................................. 106
Sending and receiving notes.......................................... 106
TOOLS
Voice memo ............................................................. 107
Making sound recordings............................................... 107
Using sound recordings as ring signals.......................... 108
Sending Voice memo recordings................................... 108
Calculator................................................................ 109
Time.......................................................................... 110
Setting time and date...................................................... 110
Specifying workdays...................................................... 111
Setting locations......................... ... .... ............................. 112
Setting number formats......................... ... .... .................. 112
Setting alarms.............. .... .... ........................................... 113
4
Page 5

This is the Internet version of the user’s guide. © Print only for priv ate use.
Viewer....................................................................... 114
Common viewer functions.............................................. 114
Viewing Word documents.............................................. 115
Viewing Excel spreadsheets........................................... 115
Viewing PowerPoint presentations and PDFs................ 116
Online services......................................................... 117
A
DVANCED FUNCTIONS
PC Suite and multimedia for P800 ........................ 118
PC Suite for P800........................................................... 118
Multimedia for P800....................................................... 119
Installing applications............................................. 120
Installing applications on your P800.............................. 120
Removing applications from your P800......................... 122
Connecting to other devices.................................... 123
Connection via SyncStation............................................ 123
Connection via infrared port........................................... 124
Connection via Bluetooth wireless technology.............. 125
Synchronization and backup.................................. 128
Local synchronization..................................................... 128
Remote synchronization............................. .... .... ............ 129
Backing up data.............................................................. 130
Restoring data................................................................. 131
SETTINGS
Personalizing your P800......................................... 132
Changing your application shortc u ts............................. 132
Setting a background pictur e......................................... 132
Setting a Screen Saver.............................. ..................... 132
Adding images to your Contacts.................................... 133
Ring signals.................................................................... 133
Alarm tones and sound notification............................... 134
Control panel........................................................... 135
The Device tab
Certificate manager........................................................ 135
Display......................... .... ... .......................... ................. 136
Flip closed shortcuts...................................................... 137
Flip removed.................................................................. 137
Format Memory Stick Duo............................................ 138
Language selection.......... ......................... ..................... 138
Master reset.................................................................... 138
Storage manager............................................................ 138
System sounds................................................................ 139
Text input.................. ... .......................... ........................ 139
User greeting............................... ................................... 140
WIM PIN settings.............................. .... ........................ 140
5
Page 6

This is the Internet version of the user’s guide. © Print only for private use.
The Connections tab
Bluetooth......................................................................... 141
Cable............................................................................... 142
Infrared ........................................................................... 143
Internet accounts................................. .......................... .. 143
IP security manager........................................................ 148
Messaging accounts........................................................ 148
Secure tokens................ .... .... ......................... ................. 155
WAP accounts ................................................................ 155
The General tab
International.................................................................... 156
Time & date.................................................................... 157
Getting started with Internet and Messages......... 158
Introduction..................................................................... 158
Automatically set up service provider and messaging ... 159
Manually set up service provider.................................... 159
Manually set up Messages.............................................. 160
Setting up WAP accounts....................... ........................ 161
Using your P800 as a modem......................................... 161
GPRS - connection information...................................... 163
REFERENCE
Troubleshooting....................................................... 165
Start-up problems............................................................ 165
SIM card related problems.............................................. 165
Lock problems.................................... .... ........................ 166
Emergency calls only...................................................... 166
Fax calls..................................... ... .... .......................... ... 166
Indicator light...................................................... ........... 167
Memory full................................................................... 167
No network..................................................................... 168
System failure................................................................ 168
Guidelines for safe and efficient use...................... 169
Limited warranty.......................................... .... .............. 173
Environmental informatio n.......................... .... .............. 175
Declaration of Conformity........................... .... .............. 176
FCC Statement............................................................... 176
Terms and definitions............................................. 177
Technical data......................................................... 185
Index......................................................................... 189
6
Page 7

This is the Internet version of the user’s guide. © Print only for private use.
Sony Ericsson P800
User's Guide
First edition (November 2002)
This User’s Guide is published by Sony Ericsson Mobile Communications AB, without any warranty. Improvements and
changes to this User’s Guide necessitated by typographical
errors, inaccuracies of current information, or improvements to
programs and/or eq uipment, may be made by Sony Ericsson
Mobile Communications AB at any time and withou t notice.
Such changes will, however, be incorporated into new editions
of this User’s Guide.
Sony Ericsson Mobile Communications AB, 2002. All rights
reserved.
Publication number: EN/LZT 108 6040 R1A
The Bluetooth trademarks are owned by Bl ue to oth SIG, Inc.
This product contain QuickView Plus and Outside In which are
© 1992-2002 Stellent Chicago Inc. All rights reser ved.
QuickView Plus and Outside In are trademarks or registered
trademarks of Stellent Chicago Inc.
Symbian and all Symbian-based marks and logos are trademarks
of Symbian Limited.
Memory Stick Duo is a trademark of So ny, its parent and/or
its affiliates.
Beatnik is a trademark of Beatnik, Inc.
Java and all Java based tradema rk s and logos are trademarks
or registered trademarks of Sun Microsystems, Inc. in the U.S.
and other countries.
Other product and company names mentioned herein may be the
trademarks of their respective owners.
Copyright SyncML initiative Ltd. (1999-2002). All rights
reserved.
Men In Black II and MIB II are trademarks of Colombia
Pictures Industries, Inc.
Part of the game Men In Black II included in this product is
(2002) Columbia Pictures Industries, Inc. All rights reserved.
Portions of software © PacketVideo Corporation (USA) 1999,
2002. PacketVideo, pvPlayer and the PacketVideo logo are
trademarks of PacketVideo Corporation. All rights reserved.
This product contai ns software copyright Beatnik, Inc.
1996-2002.
End-user license agreement for Sun Java J2ME:
1. Restrictions: Software is confidential copy righted information
of Sun and title to all copies is retained by Sun and/or its licensors. Customer shall not modify, decompile, disassemble,
decrypt, extract, or otherwise reverse en gineer Software. Software may not be leas ed, assi gne d, or su blice nse d, in w hole or in
part.
7
Page 8

This is the Internet version of the user’s guide. © Print only for private use.
2. Export Regulations: Software, including technical data, is
subject to U.S. export control laws, including the U.S. Export
Administration Act and its associated regulations, and may be
subject to export or import regulations in other countries. Customer agrees to comply strictly with all such regulations and
acknowledges that it has the responsibility to obtain licenses to
export, re-export, or import Software. Software may not be
downloaded, or ot herwise exported or re-exported (i) into, or to
a national or resident of, Cuba, Iraq, Iran, North Korea, Libya,
Sudan, Syria (as such listing may be revised from time to time)
or any country to which the U.S. has embar goed goo ds; or (ii) t o
anyone on the U.S. Treasury Department's list of Speciall y Designated Nations or the U.S. Commerce Department's Table of
Denial Orders.
3. Restricted Rights: Use, duplication or disclosure by the
United States governme nt is subject to the restrictions as set
forth in the Rights in Technical Data and Computer Software
Clauses in DFARS 252.227-7013(c) (1) (ii) and FAR 52.22719(c) (2) as applicable.
Any rights not expressly granted herein are reserved.
Note Some of the services in this User’s Guide are not
supported by all networks. This also applies to the GSM
International Emergency Number 112. Please contact your
network operato r or ser v ic e provider if you are in doubt
whether you can use a particular service or not .
Important
Your mobile phone has the capability to load, store and forward
additional content, e.g. ring tone melodies. The use of such content may be restricted or prohibited by rights of third parties,
including but not limited to restriction under applicable copyright laws. You, and not Sony Ericsson, are entirel y responsible
for additional content that you download to or forward from
your mobile phone. Prior to your use of any additional content,
please verify that your intended use is properly licensed or is
otherwise authorised. Sony E r icsson does not guarantee the
accuracy, integrity or quality of any additional content or any
other third party cont ent. Under no circumstanc es will Sony
Ericsson be liable i n any way for your improper use of additional content or other third party content.
8
Page 9

This is the Internet version of the user’s guide. © Print only for private use.
OVERVIEW
Introduction
About this user’s guide
For ease of reference the “Getting to know your P800” chapter
gives a quick overview of the main functions of the phone,
shortcuts and general information.
Your P800 combines advanced business and entertainment
features in one intuitive device.
Its integrated camer a lets yo u to ta ke and s end pi cture s where ver
you are and use them in a wide range of applications such as the
Picture Phone book, where they can be used to identify callers.
MMS (Multimedia Messaging Service) al lows you to send and
receive messages that include pictures, sound, text and voice
notes.
The P800 features advanced entertainment functionality that
offers high quality MP3 music and widescreen format video
clips and 3D games. New content is quickly and easily
downloaded from Internet sites or can be tr ansferred to the
phone via Bluetooth Wireless Technology, an infrared port or
a cable. Extra memory is ava ilable through Memory Stick
Duo, which also serves as a convenient way to exchange
content and applica tions such as Java games.
Introduction 9
The P800 also contains an
organizer which includ es contacts,
a calendar, notes and e-mail, all of
which can be quickl y and
efficiently synchronized with a PC.
The e-mail application sup ports
attachments. Viewers let you read
documents in various formats such
as Microsoft® Word, Excel and
PowerPoint.
The complete P800 documentation
consists of the following parts:
•Quick Guide
•User’s Guide
• Help texts in the P800
• Complementary information on the Internet, refer to
www.SonyEricsson.com
• Interactive learning on the
PC Suite for P800
CD.
Page 10
This is the Internet version of the user’s guide. © Print only for private use.
P
8
0
0
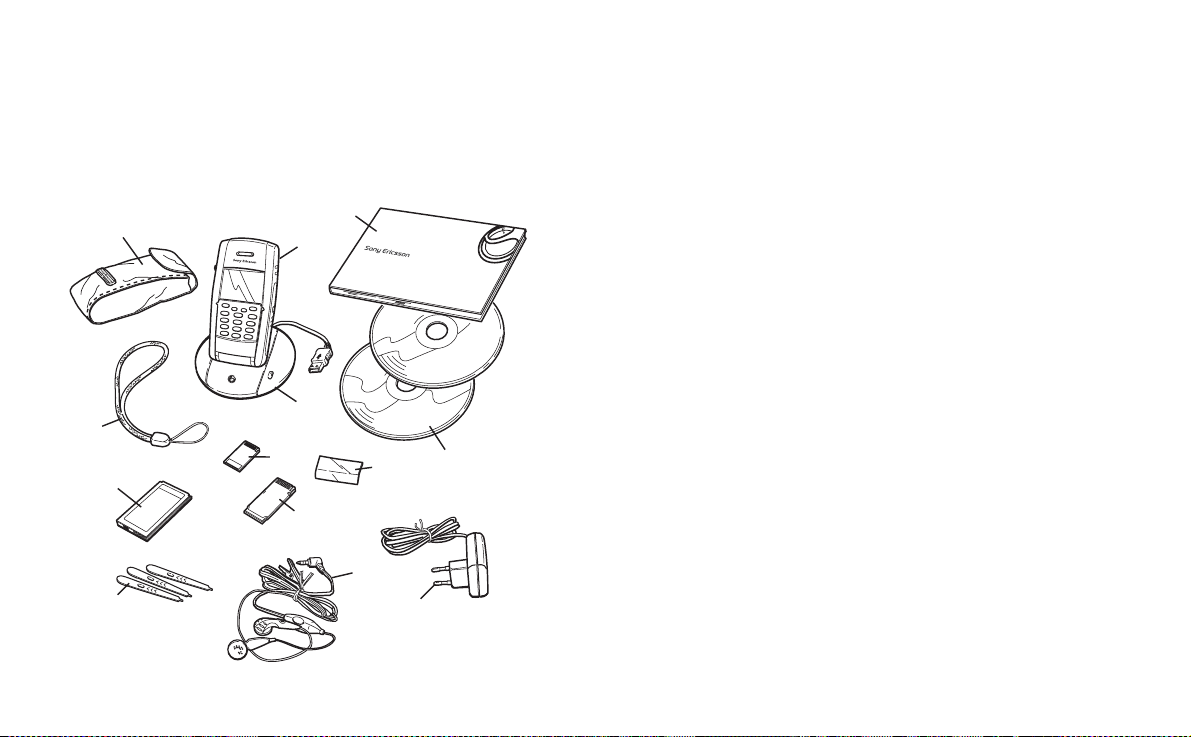
Getting to know your P800
P800 package
L
F
A
D
F
J
B
H
M
K
E
G
C
A P800 with stylus
B Battery
C Travel charger
D SyncStation
E Stereo headset
F Protective bag and strap
G 3 extra styli
H Cover - flip repl ac ement
J Memory Stick Duo
K Memory Stick Duo adaptor
L U s er documentation pack age
M 2 CDs, PC Suite for P800 and Multimedia for P800
Note If your package does not include all the listed items above,
please contact your retailer.
Note Before you can use your P800 you need to insert the SIM
card, and insert and charge the battery. Always detach the
charger before you insert or remove the SIM card.
10 Getting to know your P80 0
Page 11
This is the Internet version of the user’s guide. © Print only for private use.
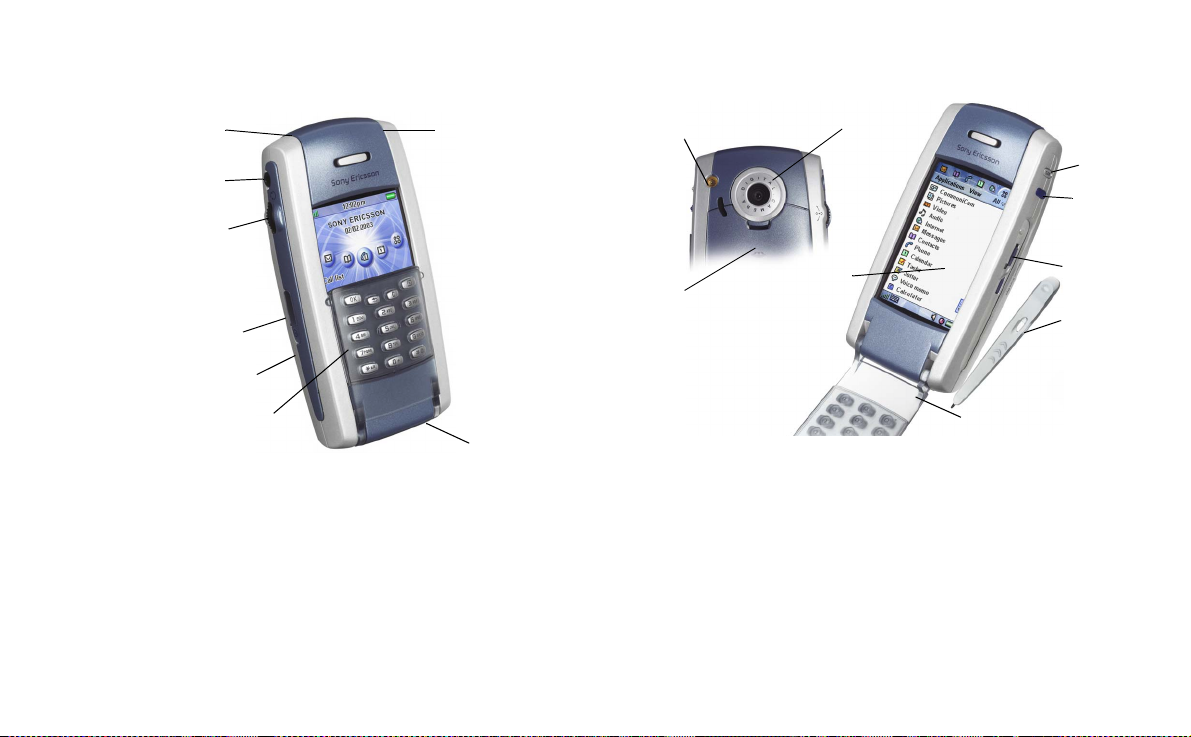
P800 overview
A
B
C
D
E
F
A Indicator light for Bluetoo th wireless technology (blue)
B Connector for stereo head phone
C Jog Dial
D Infrared port
E On/Off button
F Flip with Keypad (in close d posi ti on)
G Connector for accessories and charger
H Indicator ligh t for network and battery (green/red)
H
G
A
B
A External antenna connector
B Battery comp artment
C CommuniCam
D Touchscreen
E Flip (in ope n positi on)
F Stylus
G Slot for Sony Memory Stick Duo (under the stylus)
H Internet button for activation of the browser
I CommuniCam activation and shutter release
C
D
E
I
H
G
F
Getting to know your P800 11
Page 12
This is the Internet version of the user’s guide. © Print only for private use.
SIM card
When you register as a subscriber
with a network operator, you receive a
SIM (Subscriber Identity Module)
card. The SIM card contains a
computer chip that keeps track of your
phone number, the services included
in your subscrip tion, and your phone
book information , amo ng ot her thi ng s.
A PIN (Personal Identity Number)
code is supplied with the SIM card
from your operator and must be
entered when switching on your P800.
Insert the SIM card as shown in the
picture.
For more information. see “Managing
the SIM phone book” on page 96.
Battery
Before you use your P800 for the first time, charge the battery
provided for at least 4 hours. Use the supplied charger. See
“Charging the battery” on page 13.
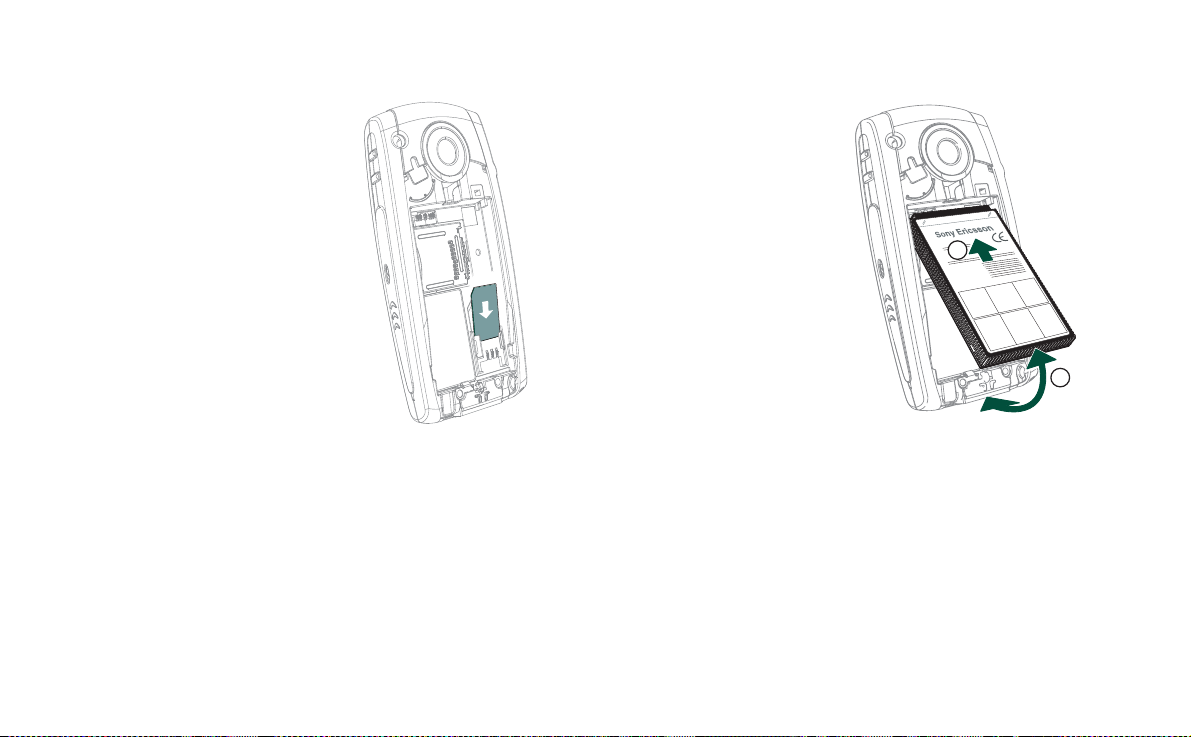
Insertion and removal
To insert the battery
1. Ensure that the flip is
closed.
2. Place the battery in the
battery compartment and
close the lid.
1
To remove the battery
1. Ensure that your P800 is
turned off.
Note It is important that you
always turn off your P800
before removing the battery.
Failure to do so can result in
loss of information.
2. Remove the battery lid by pulling down the release catch
below the CommuniCam.
3. Use your fingernail at the lower left-hand edge of the battery
to gently lift the lower edge of the battery outwards.
4. Take out the batt e ry.
2
12 Getting to know your P80 0
Page 13

This is the Internet version of the user’s guide. © Print only for private use.
Charging the battery
• Wh en the battery needs to be charged, a beep is heard. The
indicator light ( on the top of your P800) blinks red and a
battery low message appears on the screen.
• The battery can be charged whenever you want. The P800
performance is not affected. However, using your P800 while
charging increases the charging ti me.
To charge the battery
The P800 can be charged eit her when it is switched on or off.
1. Make sure the battery is inserted in your P800 and the lid is
closed.
2. Connect the char ger to
the P800 at the base of
the phone by the flash
symbol. The charger
plug flash symbol must
face upwards.
3. Connect the char ger to
the mains.
Charging is indicated by the battery meter on the screen pulsing
continuously, and the indicator at the top of the P800 showing a
steady red light (or green, if the P800 is switched on).
See also “Battery Information” on page 172.
Tip You can also use other battery chargers that have been
supplied with other Sony Ericsson mobile phones using the same
connector plug, for example, T68i or T300.
Note When the battery is completely discharged, or new, it may
take up to 30 minutes before the battery charging icon appears
on the screen.
4. Wait approximately 4 hours or until the battery meter on the
screen is full and the indicator on the top of the P800 shows a
steady green light.
5. Remove the charger by tilting
the plug upwards.
Care instructions
Your P800 is a highly sophisticated electronic device. T o get the
most out of it, please make sure that you follow this advice:
• Keep the P800 in its protective bag when not using it.
• Use a commercial glass screen cleaner sprayed on a cloth,
when you clean the screen.
• Use only stylus provided to tap on the screen.
Getting to know your P800 13
Page 14

This is the Internet version of the user’s guide. © Print only for private use.
First time start-up
Please read “Guidelines for safe and effic i e nt use ” on pa ge 169
before you sta rt using your P800.
When you start your P800 the first time
1. Press the On/
closed. The languag e selection dialogue ope ns.
2. Select one of the languages from the list. Read more about
selecting a language in “Language selection” on page 138.
3. When you have selected a language, the phone powers down.
4. Open the flip. Press the
starts automatically and guides you through the essential
settings. These include time and date settings, and
information on the Jog Dial, text entry, and status bar. Follow
the instructions on the screen.
5. The
6. Enter your PIN when the dialogue bo x appears and press
Off
button to turn on your P800, keeping the flip
On/Off
button again. The
Power menu
. Press to delete a digit.
opens. Select
Phone on.
Setup Wizard
Turning your P800 on and off
By default the
operation or
These settings can be turned off. See “To use the power menu”
on page 50. In
switched off, but you can still use the other functions. Set your
P800 in
Power menu
Flight mode
Flight mode
Flight mode
prompts you to choo s e normal
each time you press the On/
the phone and Bluetooth functions are
where use of mobile phones is not allowed.
Off
button.
Importing phone book entries
You may want to import existing contact information from
another mobile phone to your P800. You can do this in several
ways:
• Beam the phone book entries from the other phone by
infrared or Bluetooth wireless tec hnolo g y and save th e set to
Contacts
. See “Sending and receiving contact details” on
page 97.
• Synchronize the SIM and the internal memory on the other
phone with one of the PC PIM applications supported by
your P800. Then you can synchronize this information with
Contacts
.
Note When you synchronize
application the SIM information is not synchronized. You might
get two versions of the same co n t act. Se e “Sy nc h ronization and
backup” on page 128 .
Contacts
with your PC PIM
14 Getting to know your P80 0
Page 15

This is the Internet version of the user’s guide. © Print only for private use.
• Phone book entries stored on your SIM card are acc essible
Contacts
. Select
through
to the right in the menu bar to see the list of entries in your SIM
phone book. These entries can be imported to
“Managing t he SIM phone book” on page 96
SIM phone book
in the folders me nu
Contacts
. See
.
Operational modes
The P800 works in different operational mo des:
Flip closed
With the keypad flip closed, the P800 can be used like a
conventional mobile phone using the keypad to dial and the Jog
Dial to navigate. For more information please see “Jog Dial” on
page 22 and “Keypad functions” on page 23.
You can open the flip at any time to continue working. Many
more functions are availab l e when the flip is open.
Flip open
When the flip is opened, the larg e tou ch-sc reen is revea led. You
use the stylus to tap the screen to navigat e and ente r data. The re
is also a handwriting recogn ition fea ture, so that yo u ca n use the
stylus to write on the screen.
The Jog Dial provides further navigation and selection
capability. Closing the flip generally ends an activity and saves
the data. Multimedia. phone calls and data sessions will
however cont inue.
Flip removed
The flip can also be removed which makes the organizer
applications easier to access. A virtual flip is then available,
making it possible to work in both flip open and flip closed
operational modes.
Getting to know your P800 15
Page 16
This is the Internet version of the user’s guide. © Print only for private use.
A
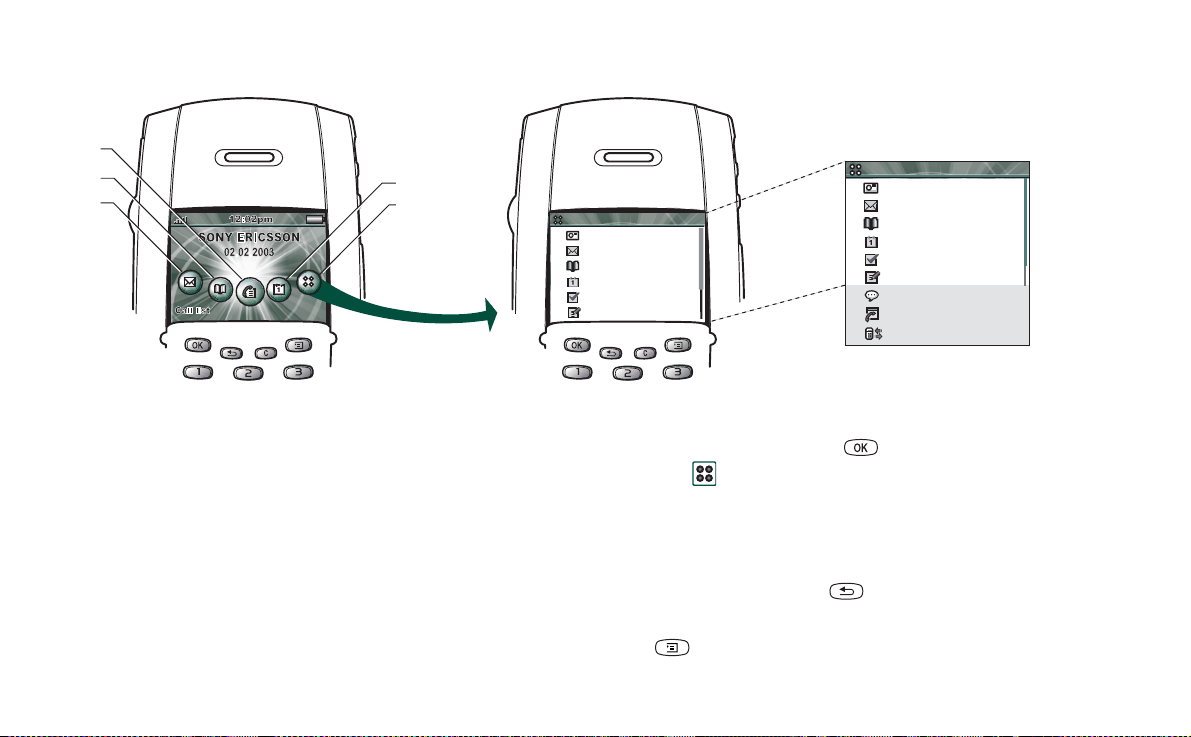
Flip closed mode
C
B
D
E
A Shortcut to the Messages application
B Shortcut to the Contacts a pp lication
C Shortcut to the Call list application
D Shortcut to the Calendar application
E Shows all applications available in flip closed mode
Applications
1
2
3
4
5
6
CommuniCam
Messages
Contacts
Calendar
Tas ks
Jotter
Selecting and starting applications
Rotate the Jog Dial to select an ap plication. When the desired application
is highlighted, press t he Jog Dial o r to start the application .
Tip
When view is selected it is also possible to start an
application by pressing its specific number .
Applications
1
CommuniCam
2
Messages
3
Contacts
4
Calendar
5
Tasks
6
Jotter
7
Voice Memo
8
Online services
9
Connections
Closing applications
Standby view
The standby view sho ws sh ortcut s to th e m ost com m on ly used
The current application automatically closes and the data is saved when
you return to the standby view or switch to another application. To
return to standby, press and hold or press the Jog Dial backward.
applications. Choose which shortcuts you want to use in standby.
“Personalizing your P800”
See
on page 132.
Options menu
Press or press the Jog Dial forward to open the standby options
menu to get access to keylock, battery status, missed calls and more.
16 Getting to know your P80 0
Page 17
This is the Internet version of the user’s guide. © Print only for private use.
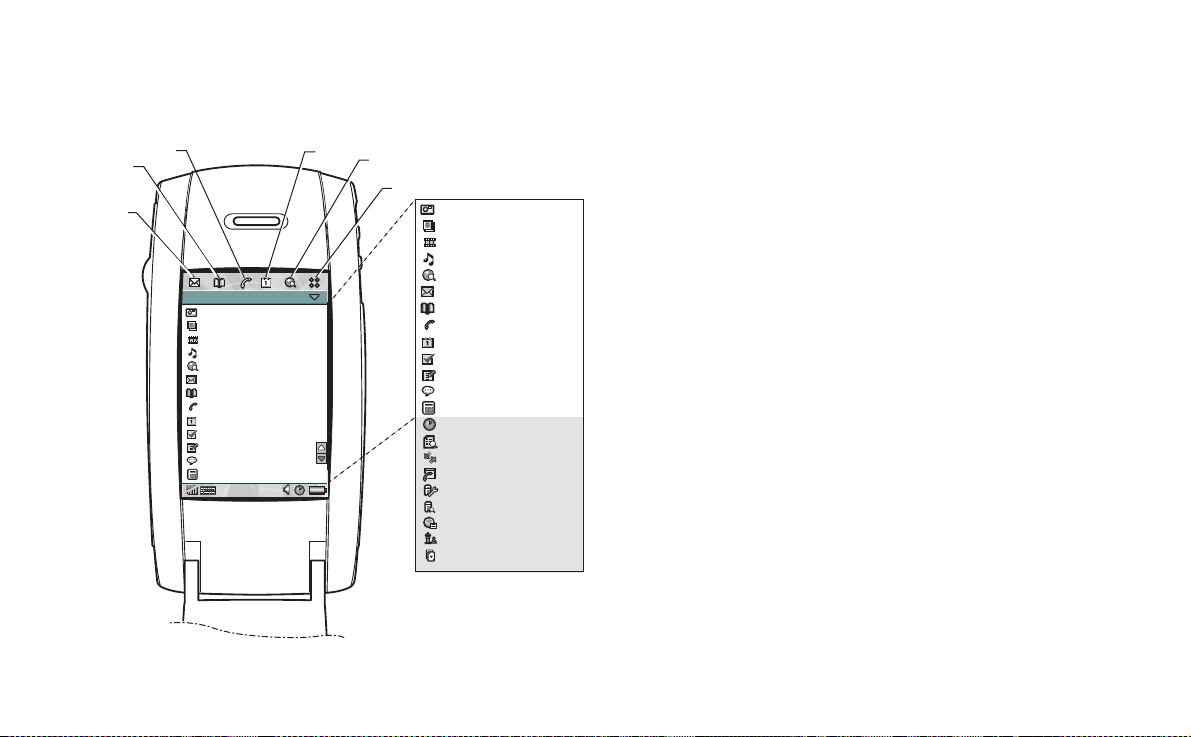
A
Flip open mode
A Shortcut to the Messages application
B Shortcut to the Contacts appli ca t ion
C
B
D
E
F
CommuniCam
Pictures
Video
Audio
Internet
Applications View All
CommuniCam
Pictures
Video
Audio
Internet
Messages
Contacts
Phone
Calendar
Tas ks
Jotter
Voice Memo
Calculator
Messages
Contacts
Phone
Calendar
Tas ks
Jotter
Voice Memo
Calculator
Time
Viewer
Remote Sync
Online services
Control panel
Demo
GPRS data log
Chess
Solitaire
C Shortcut to the Phone appl ic at ion
D Shortcut to the Calend ar a ppl ic ation
E Shor tc ut to the Int ernet application
F Shows all applications available in flip
open mode
You can change the shortcuts A-E. See “Changing your
application shortcuts” on page 132.
Navigation
When the flip is open, the application shortcut icons shown in
the flip closed mode move to th e top ro w in the flip open screen.
You navigate by using the stylus and tapping selected items and
by using the Jog Dial, see “Jog Dial” on page 22.
Getting to know your P800 17
Page 18
This is the Internet version of the user’s guide. © Print only for private use.
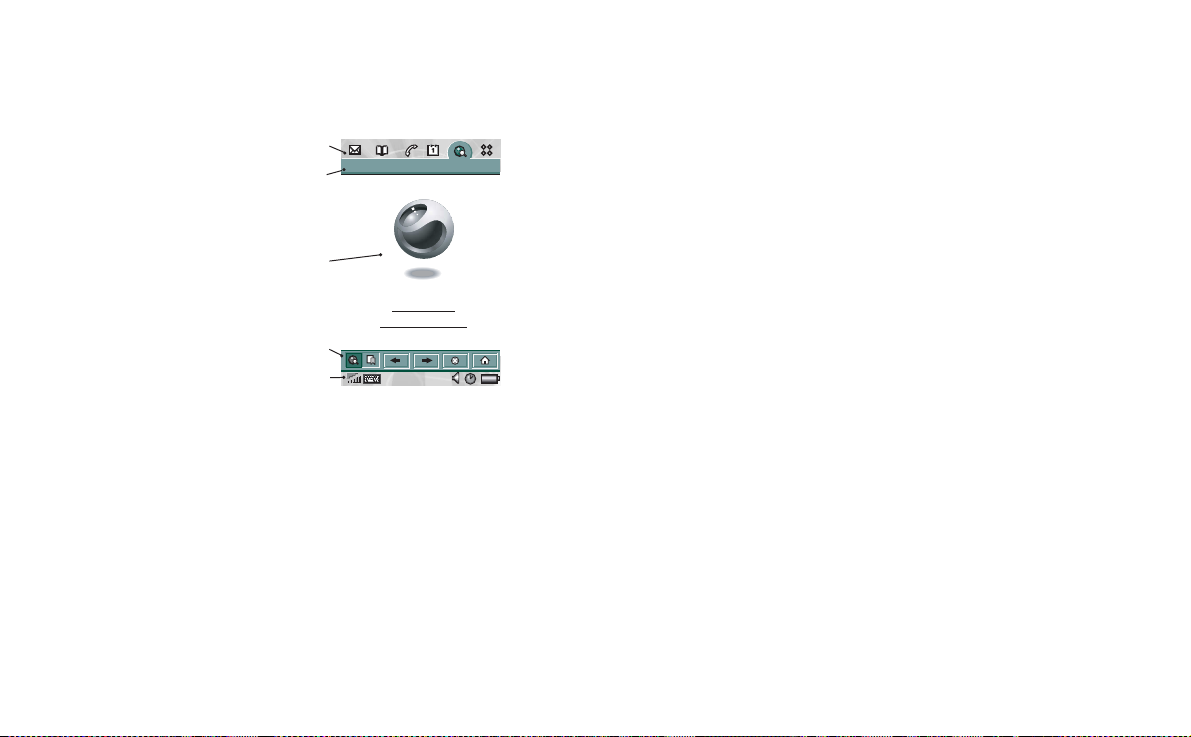
A
Screen areas
When the flip is open the screen is to uch se nsitive. T he screen is
divided into a number of areas, see the figure and table below.
Internet Edit
B
C
Sony Ericsson
Sony Ericsson P800
D
E
C Application ar ea Applications use this central area of the screen
to display the essential information.
Many of the built-in applicati ons are based on
two standard view layout s: a list view and a
detail view.
D Button bar An application view displa ys a button bar that
contains useful controls and shortcuts. Not all
application views req uire a button bar.
E Status bar Displays device status information such as:
signal strength, battery and device information,
settings for sounds and time, on-screen
keyboard, temporary indic at ors suc h as m isse d
calls and unread messages.
Calibration
The screen is pre-calibrated using factory settin gs. Calibration is
Item Description
A Application picker Displays six icons for quick and easy access to
B Menu bar Usually contains two menus on the left, and a
the most common applications. These are
customizable.
folder menu on the right. The two left-hand
menus contain:
• the applicati on menu, whose name is always
the same as the application. It contains the
system services used by most applications,
Find, Send as
such as
•the edit menus contain editing items such as
Cut, Copy, Paste, Zoom, Preferences
, and
Delete
.
and
Help.
calculated by the average stylus tap speed and the location of the
stylus tap on selection. If you want to change the setting,
recalibrate the screen.
To recalibrate the screen
1. Select
2. Tap
Applications > Con tr ol panel > Device > Display.
Calibrate
and the calibrat e screen appears.
3. Tap once at the centre of each of the th ree calibration points
in numerical order.
4. Tap
Yes or No
to accept or reject the new settings.
18 Getting to know your P80 0
Page 19
This is the Internet version of the user’s guide. © Print only for private use.
To restore the factory settings
1. Select
2. Tap
3. Press the Jog Dial - the text “Factory settings restored” is
Applications > Control pan el > Device > Display.
Calibrate
and the calibrate screen appears.
shown.
Flip removed
You can use your P800 without the physical flip. Remove the
flip keypad and activate the virtual flip, which gives you the
same functionality as when using the keypad on the real flip.
Enter numbers and cha r acters using your stylus.
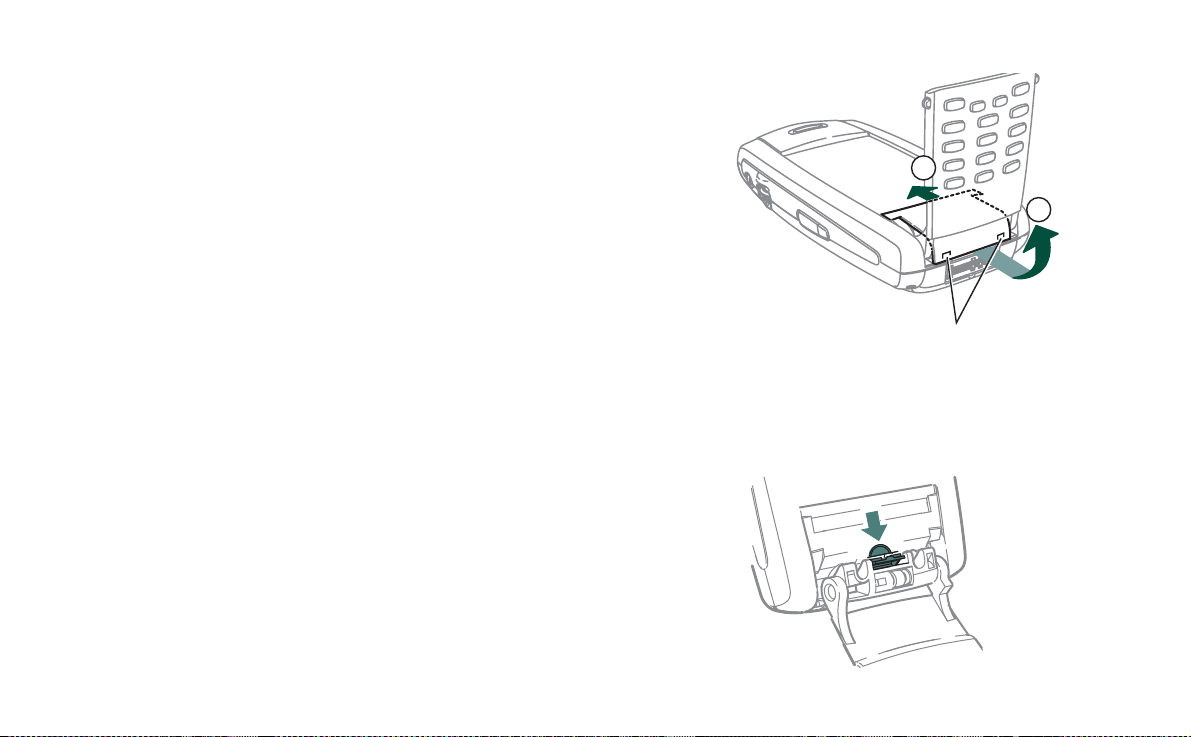
Removing and attaching the flip keypad
To remove the keypad
1. To remove the key pad you f irst have to remove the cover
plate beneath it. Use your fingernails or the back end of the
stylus to gently prize the cover plate off its catches (See
figure). Put your nail or the end of the stylus in the hollow
right below one of the catches and prize the edge of the cover
plate upwards. A distinct click will let you know that the
catch has released. Continue wit h t he second catch.
Note Be careful with the touch-sensitive screen. Never use a
sharp object like a screwdriver
.
2
1
P
RIZE HERE
2. Fold th e keypad out and lift away the loose cover p late from
under the keypad.
3. Use your nails or the back end of the stylus to gently pull the
release catch in the same direction as the arrow. The key pad
is now loose and may be lifted off.
Getting to know your P800 19
Page 20
This is the Internet version of the user’s guide. © Print only for private use.
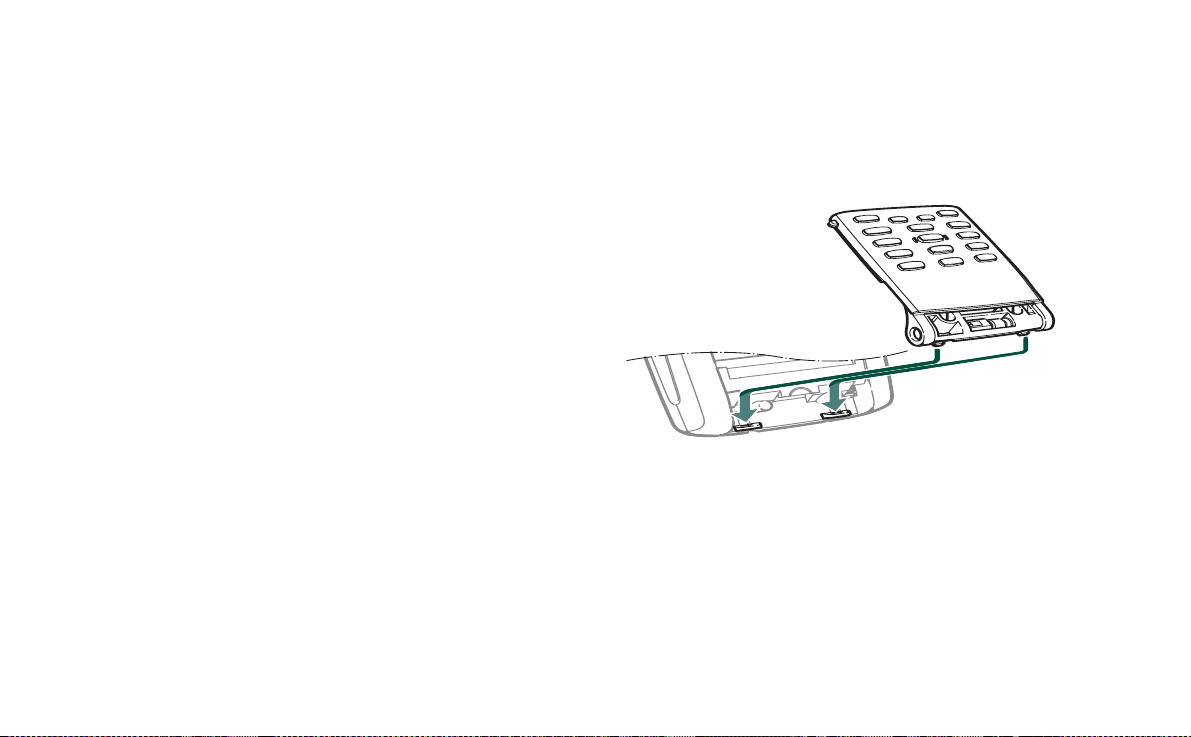
To attach the flip replacement
1. The flip replacement has two hooks at th e bottom edge. These
hooks will fit into the two recesse s at the, no w opened , bottom
of the P800. Align the flip replacement until it is almost in
place, then gently push it upwards towards the screen. A
distinct click will let you now that it is in correct place.
To remove the flip replacement
1. Put your nail or the end of the stylus in the hollow right
below one of the catches and prise the edge of the cover plate
upwards. A distinct click will let you know that the catch has
released. Continue with the second catch.
To attach the keypad
1. To attach the key pad you have first have to remove the flip
replacement (if mounted). Place the key pad so that its
release catch is facing the arrow on th e now opened bottom
of the P800. The key pad will be in a more or less horizontal
angle at this time..
Note At the end of the flip key pad there is a hinge, which is
adjustable in three positions. Make sure the hinge is in its
middle position when you attach it.
20 Getting to know your P80 0
Page 21
This is the Internet version of the user’s guide. © Print only for private use.
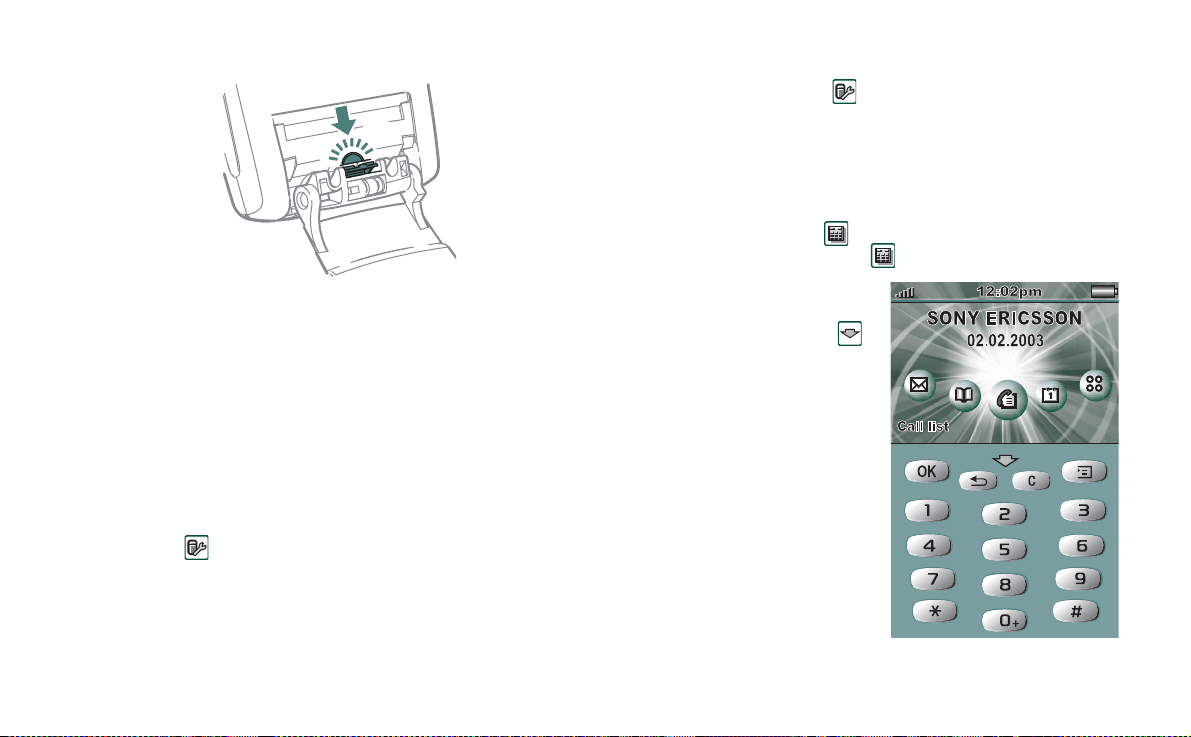
2. Push the release catch against the rounded edge bel ow t he
Click
arrow. A distinct click will let you know that the key pad is
now attached correctly
3. Let the key pad stay fully opened. Place the cover plate in
position (see “To attach the flip replacement” on page 20).
Activating the virtual flip
You must activate the virtual flip, when you have removed the
flip keypad, to be ab le to open and close the virtual flip.
To activate the virtual flip
• Select
1. Tap the
2. Tap
Control Panel > Device > Flip removed.
Enable virtual fli p
Done
.
checkbox.
To de-activate the virtual flip
• Cancel the selection
1. Clear the
2. Tap
Enable virtual flip
Done
.
Control Panel > Device > Flip removed.
checkbox.
Virt ual f lip
When the flip is open, is shown on the status bar when the
virtual flip is enabled. Select to “close” the virtual flip.
When the virtual flip is
“closed”, the virtual flip
keypad is shown. Sel ect
to open the virtual flip. You
can then continue working in
another applicatio n with the
flip open.
Getting to know your P800 21
Page 22
This is the Internet version of the user’s guide. © Print only for private use.
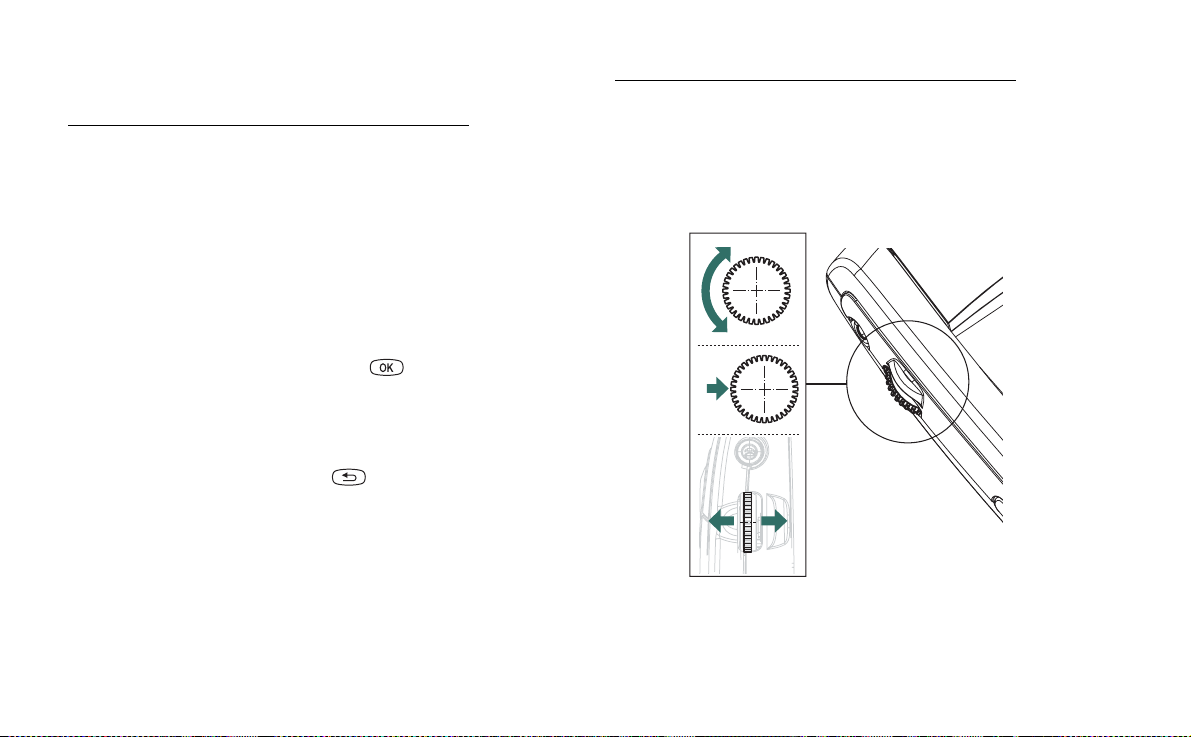
Jog Dial
Action Function
Rotate the Jog Dial (up) Scrolls up items in a list:
Rotate the Jog Dial (down) Scrolls down items in a list:
Press the Jog Dial (inward) Flip closed: Generally the
Press the Jog Dial
(backward)
increases volume during a
call, moves back a page when
playing a multimedia
message.
decreases volume during a
call, moves forward a page
when playing a multimedia
message.
same action as .
Flip open: Selects a
highlighted item, dials
selected phone number.
Flip closed: Always th e s ame
action as . Goes back to
the previous screen, dismisses
dialogues, and sends a busy
signal to the calling party
when you receive a c al l. I t
will not end a call.
Flip open: S crolls to the left
across the Applica tion picker
icons at the top.
Action Function
Press the Jog Dial (forward) Flip closed: Brings up the
Options menu.
Flip open: Scrolls to the right
across the Application picker
icons at the to p .
Up
Down
Inward
ForwardBackward
22 Getting to know your P80 0
Page 23
This is the Internet version of the user’s guide. © Print only for private use.
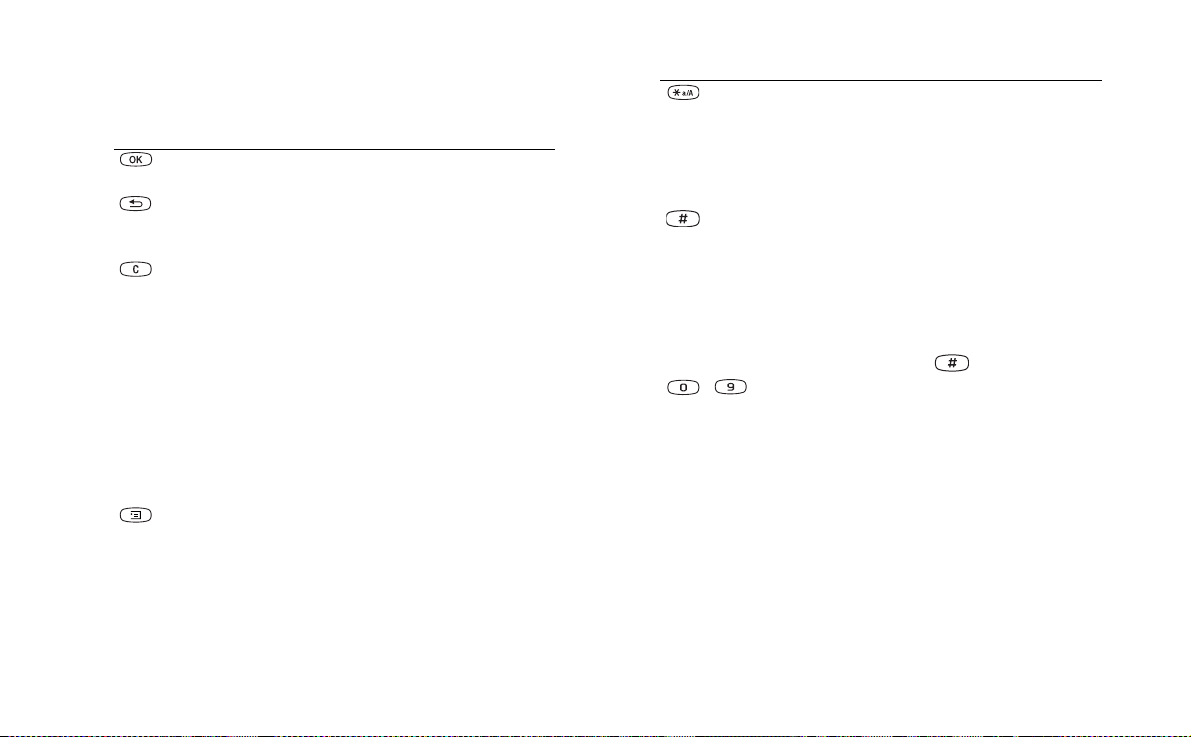
Keypad functions
Key Function
OK Enter selected function, indicated on the
display above the key.
ACK
B
• Return to previous menu.
• Press and hold to return to Standby.
LEAR
C
• Delete entered characters/digits from the screen
one by one.
• Press and hold to delete an en tire row of ente red
characters/digits.
• Delete an entry from Contacts, Ca le nda r, Tasks,
Voice memo, and Messaging.
• Press and hold to disconnect the microphone
(mute function) when a call is in progress.
• Mute the ring signal during an incoming call.
• Press and hold to put the P800 into silent mode,
when in the standby view.
PTIONS
O
• Open the menu with different options for
different applications.
• Press and hold to open Applications.
Key Function
STA R
• Enter the char acter *.
• Press and hold to enter a
• Press to switch between different input mo des
(Abc, 123 ... ). This is useful when writing SMS
or similar texts.
ASH
H
• Enter the char acter #.
• Press and hold to see a list with special
characters.
• Terminate the input of P I N an d security codes.
• Retrieve a ph one number from the SIM card
phone book Enter the number of the memory
position and then press .
- N
UMERIC KEYS
• Enter the digits 0 to 9.
• Enter asso ci ate d c hara ct ers or p erf orm ass oci ate d
functions. See
p (pause) character.
“Short cuts” on page 43
.
Getting to know your P800 23
Page 24
This is the Internet version of the user’s guide. © Print only for private use.
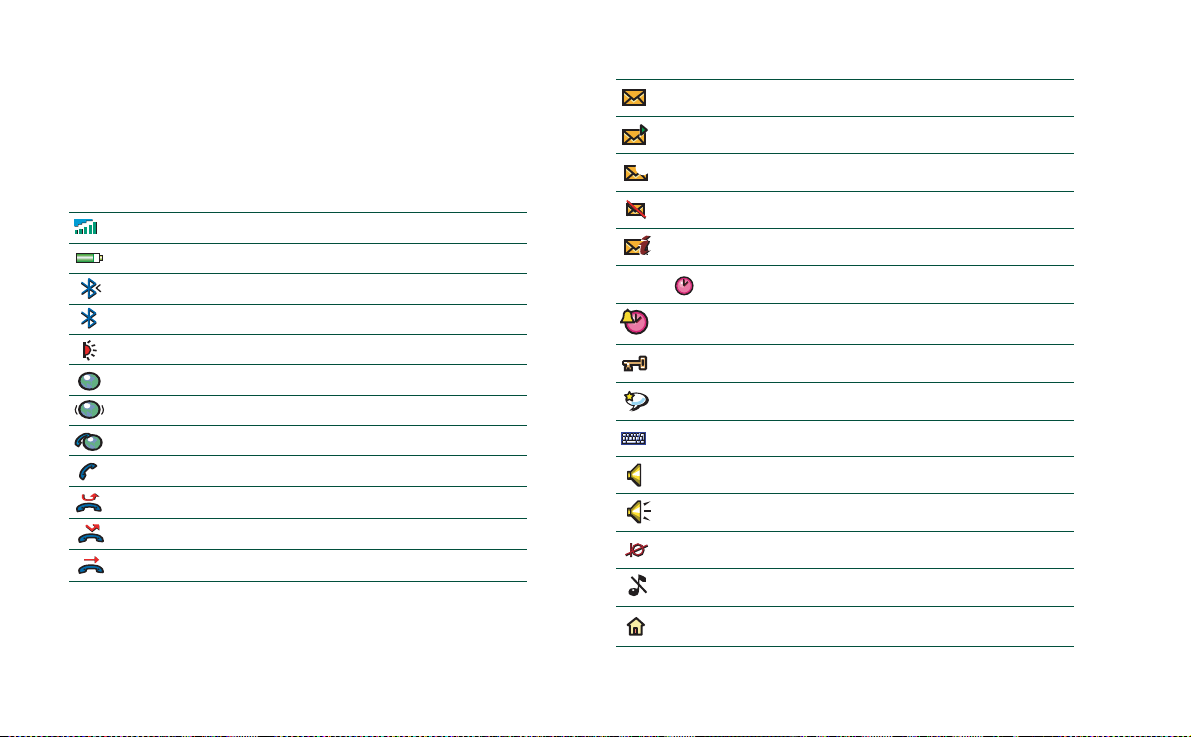
Indicators and status bar icons
These icons appear in the flip closed standby screen or in the
status bar when the fl ip is open. When the flip is open, you can
often tap the icons to get more detailed information or start an
application.
Signal strength, GPRS status
Battery strength
Bluetooth discoverable
Bluetooth on
Infrared on
GPRS is active
GPRS datatransfer in progress
Ongoing data call
Ongoing call
Missed call
Divert all calls notification
Calls screened
SMS notification
MMS notification
@
E-mail notification
SMS overflow
Area info
18:20 /
Time, alarm set
Key lock
Magic word
Keyboard
Multimedia volume
Speaker phone
Muted microphone
Silent mode
Home zone
Time, activated alarms
24 Getting to know your P80 0
Page 25

This is the Internet version of the user’s guide. © Print only for private use.
LOCK
Memory Stick® Duo®
The Memory Sti ck Duo prov ides a conve nient way of in creasing
the storage space in your P800. Memory Stic k Duo is
approximatel y a th ird of t he si ze an d half th e wei gh t of a reg ular
sized Memory Stick. You can save still images, video clips,
music, and voice recordings as well as computer data and
applications on a Memory Stick Duo and use it to store or
transfer the contents for many different purposes. Such as:
• Store pictures taken with the CommuniCam
• Store data from the P800, for example backup copies of
important files
• Store media for personalizing your P800, for example ring
signals, alarm sou nds and pictures of contacts
• Store media for use when composing MMS messages
• Store installation files for new applications
• Transfer data between the P800 and a PC or Mac
• Transfer data over SyncStation b etween a Memory Stic k Duo
in the P800 and a connected PC
• Provide storage for third-party applications
To insert the Memor y
Stick Duo
1. Remove the stylus
by pushing it
upwards.
2. Insert the Memory
Stick Duo in the
K
C
O
L
slot, with the
connector side
facing you (see
picture).
Make sure it is
securely inserted. A
click should be
heard.
Note Insert the Memory Stick Duo correctly to avoid damages
to your P800 or the Memory Stick Duo.
To lock the Memory Stick Duo
• Use the stylus to move the erasure prevent switch (
A) to the
lock position. The switch shows red when the Mem ory S tick
Duo is locked.
A
Getting to know your P800 25
Page 26

This is the Internet version of the user’s guide. © Print only for private use.
To remove the Memory Stick Duo
1. Remove the stylus.
2. Press the edge of the Memory Stick Duo using your
fingernail or the stylus to release it. You hear a click as it
jumps out of the slot.
Note Be careful when removing the Memory Stick Duo to avoid
dropping it.
Renaming a Memory Stick Duo
You can rename a Memory Stick Duo to give it a name that is
meaningful to you. Select
and tap
Rename
to set a name to the disk. The name you set will
be shown in the divider between internal and external storage in
the folder menu. See “Folders” on page 31. Renaming will not
erase any data.
Control Panel > Device > Format disk
Copying and moving data
For information on how to copy and move data to and from the
Memory Stick Duo, refer to “Folders” on page 31.
Formatting a Memory Stick Duo
If you need to re-format a Memory Stick Duo, select
Panel > Device > Format disk.
all the information on it, including any applications that you
may have installed.
When you format a disk, you delete
Control
Sharing data with other devices
Your P800 uses the shorter memory stick variant, Memory Stick
Duo.
Memory Stick Duo Adapter
Use the Memory Stick Duo Adaptor when using your Memory
Stick Duo in a device equipped with a regular sized Memory
Stick, for example a personal computer. Insert your Memory
Stick Duo according to the picture on the adapter.
Warning! Do not insert a Memory Stick Duo adapte r without a
Memory Stick Duo into a Memory Stick slot. This may damage
the product. Always insert the adapter in the slot with the
connector end (marked with a triangle) first.
26 Getting to know your P80 0
Page 27

This is the Internet version of the user’s guide. © Print only for private use.
Compatibility
The P800 defines its own folder structure on a Memory Stick.
Each application has its own set of folders. A folder created in
one application is not visible in another.
Other devices must access the same folder structure to interact
with the P800 files. If you are using a PC this is easily done by
browsing to the required folder on the Memory Stick. Memory
Stick enabled devices where you cannot browse and manage a
folder structure may not be able to share da ta directly with your
P800. For example, it may not be possible for your P800 to read
images taken on a M emory S tick ena bled di gital came ra withou t
first using a PC to copy them to the images folder in the P800
folder structure. When your P800 is connected to your PC, you
have access to the P800 folder structure and the Memory Stick
My P800
Duo content in
Personal computer support
Both PCs and Apple Macs, may be enabl ed for Memory Stick
use via built-in Memory Stick slots, Floppy Disk adaptors, PC
card adaptors and even a Memory Stick enabled mouse.
(Memory Stick Duo Adapter required.)
For more information about Sony Memory Stick, visit the site
www.memorystick.com
.
.
Getting to know your P800 27
Page 28
This is the Internet version of the user’s guide. © Print only for private use.
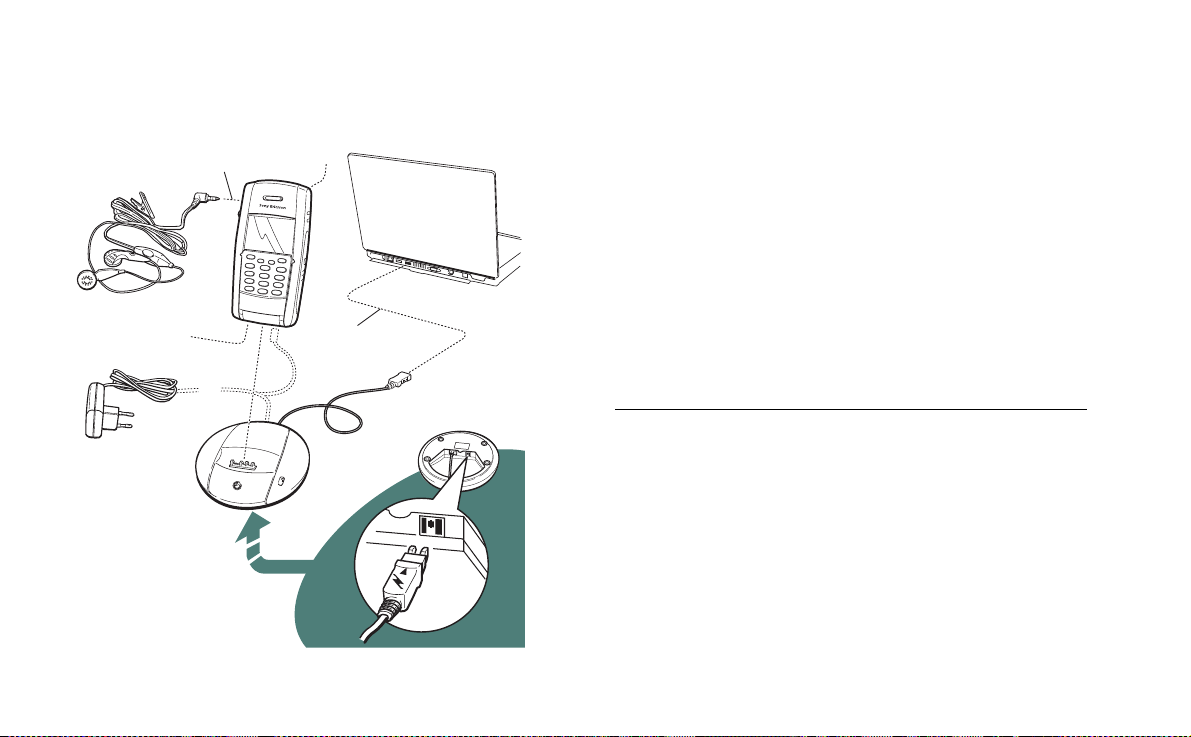
Connecting the accessories
A The travel charger is connected to the desk stand or to th e P 800.
B The USB connector from the desk stand is connected to a PC.
C
E
C The headset is connected to the P800.
D Other accessories can be connected to the connector at the base of
the P800.
E A ca r ho lder can be connected to the antenna connector at the rear.
The wrist strap is hoo ked over the holder below the battery and
carefully placed in the slot in the battery compartment lid.
D
B
A
28 Getting to know your P80 0
Services
You need the following services to use the P800 functions:
To use. .. You need...
telephony GSM subscription
text messaging (SMS) GSM subscription
multimedia messaging (MMS) MMS account, GSM data subscription
e-mail e-mail account, GSM dat a subsc r ipti on
Internet Internet account, WAP account (only
for WAP 1.x services), GSM data
subscription
data communication GSM data subscription
Please consult your network operator and Int e r net service
provider for more information about the services that are
available to you.
Page 29
This is the Internet version of the user’s guide. © Print only for private use.
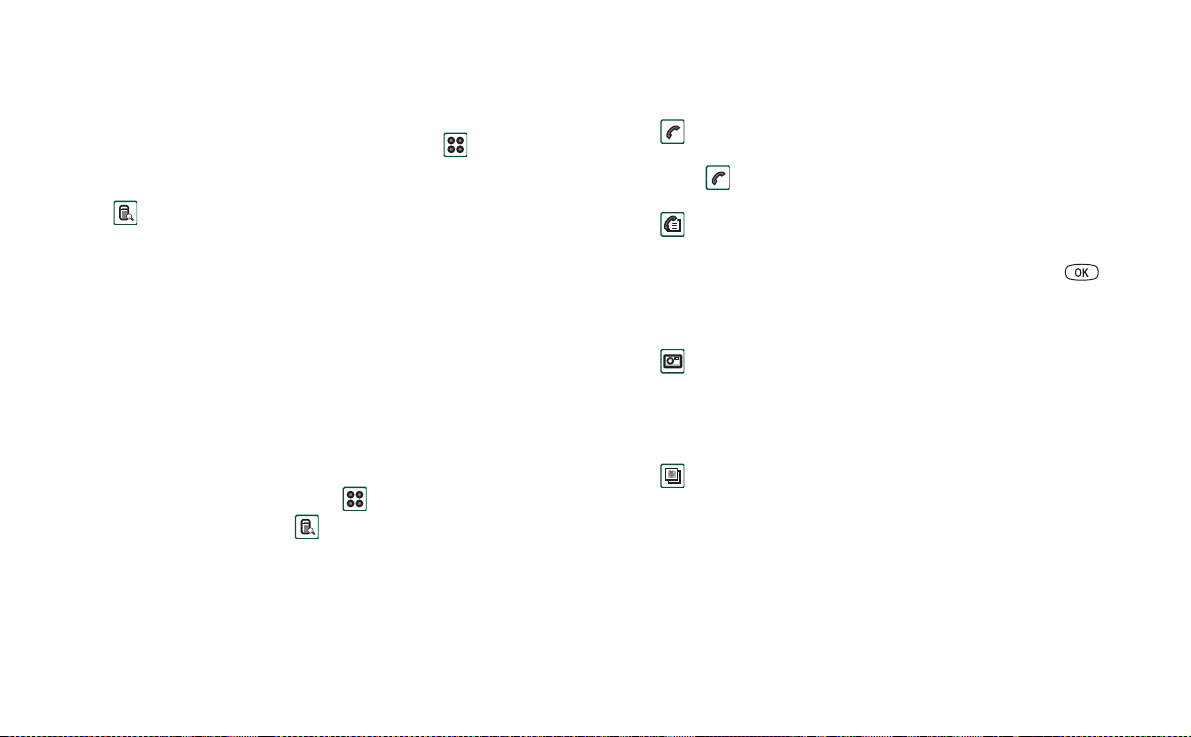
Applications - overview
You can start applications in different ways. Select icons in the
standby view (flip closed) and in the application picker (flip
open) to start the most important ones. Select to list all
applications.
Demo application
The Demo application shows some of the most common
functions in your P800.
You can uninstall the demo application a nd also reinstall it from
the
Multimedia for P800
your P800” on page 122 for how to uninstal l the de m o
application and “Installing applications on your P800” on
page 120 for how to reinstall it.
To start the Demo
1. Turn on the light (ta p
Display > Light > On
2. Select the Applications icon .
3. Select the Demo icon .
The demo starts.
To stop the Demo
• Tap the screen or rotate the Jog Dial to stop the demo.
The demo also stops when any other dialogue is opened.
CD. See “Removing applications from
Applications > Control panel > Device >
).
Note When the flip is open, an incoming text or MMS message
will not stop the demo.
Phone
This is the mobile phone application. When the flip is opened,
select to start it.
Call list
The call list displays the most recent calls, either outgoing,
incoming or missed. In flip closed, press the Jog Dial or to
call the selected entry . To view the call list when the flip is open,
open
Phone
and select the call list view by tapping the icon.
CommuniCam
In CommuniCam view, the screen becomes a viewfinder. Press
the CommuniCam button or the Jog Dial to take a photo.
Alternatively tap the red button at the bottom of the screen.
Pictures (flip open only)
Manages your pictu r es. You can take pictures with
CommuniCam, or receive them via e-mail, Bluetooth wireless
technology, infrared communication. Download via the Internet
browser, or transfer them from your PC.
Getting to know your P800 29
Page 30
This is the Internet version of the user’s guide. © Print only for private use.
Video (flip open only)
Plays video clips. You can download these from Internet or
transfer them from your PC. You can stream video and audio
from Internet.
Audio
Plays music tracks and other audio files. Yo u can download
these from Internet or transfer them from you r PC. Th e pl ayer
supports the most comm on sound formats. You can save music
tracks on the Memory Stick Duo.
Internet (flip open only)
The Internet browser can access both Web and WAP pages. It
can also download images, video clips, audio files, and Java
applications.
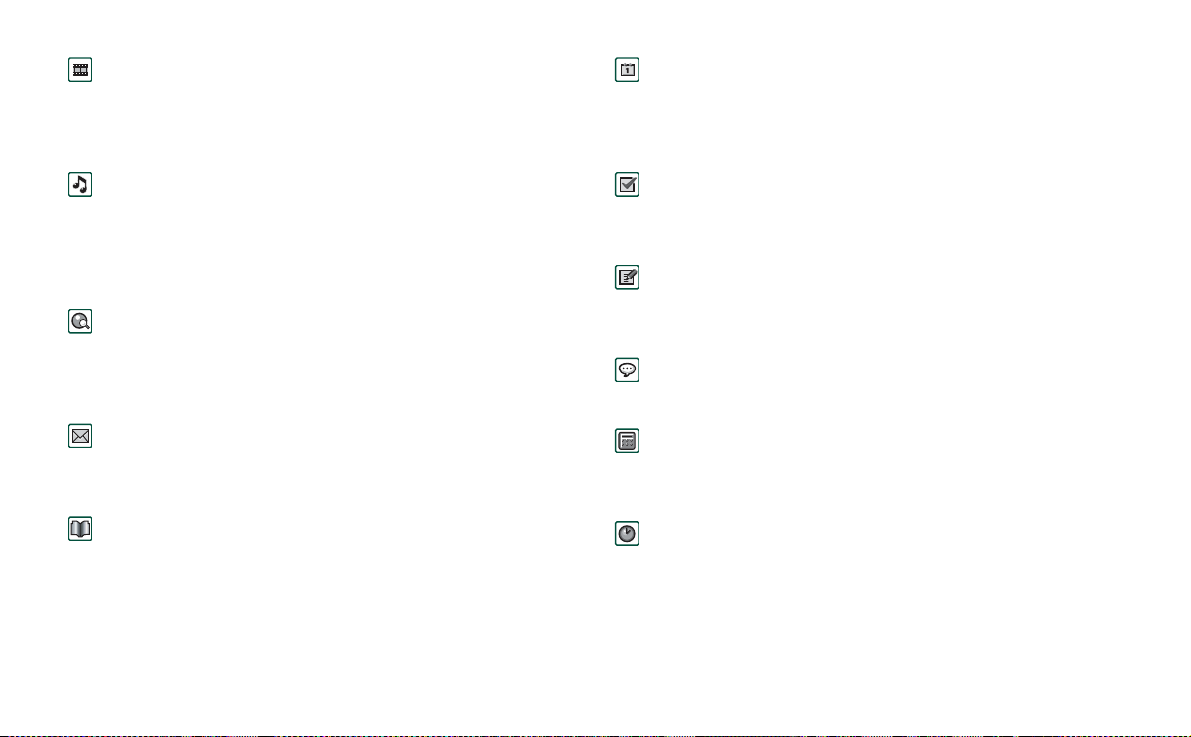
Messages
You can read, create, send and delete text (SMS), multimedia
(MMS) and e-mail messages in this view.
Contacts
Displays a list of your contacts. Select a contact to view
associated contact data.
Calendar
The Calendar view displays entries for the current day. Use the
Jog Dial to get more information about a selected entry or to
change days.
Tasks
Keeps track of your tasks. Set due date, alarm, priority, and so
on, for all your t a sks and let your P800 remind you in time.
Jotter
Displays a list of stored entries. In detailed view, the complete
entry is displayed.
Voice Memo
You can use your P800 as a sound recorder.
Calculator (flip open only)
A standard 10-digit calculator. You can add, subtract, multiply,
divide, calculate square root and percentage.
Time (flip open only)
Shows time and date. You can set your current location and
another. You can also set different alarms.
30 Getting to know your P80 0
Page 31

This is the Internet version of the user’s guide. © Print only for private use.
Viewer (flip open only)
Use it to view various type of documents: For example
Microsoft® Word, Excel, Power Point, Adobe® Acrobat®
(PDF files).
Online services
Your service provider may offer different services, for example,
weather forecasts, financial information or newsletters. Contact
your service provider for more information.
Control panel (flip open only)
Contains all settings that are system-wide and affect more than
one application. This is the main view to go use to initially set
up your P800.
Note Settings for Flight mode and P800 locks are located under
Phone > Edit > Preferences
Connections
Set the way you communicate with your PC or other device.
Select between infrared, Bluetooth wireless technology and
cable. In the cable menu, you also select whether the P800
synchronises with a PC or acts as a wireless modem.
Remote Sync (flip open only)
Performs synchronization over the air. Using GPRS, the P800
can be continuously connected to the remote synchronization
server. Remote Sync works equally well over CSD or HSCSD.
GPRS data log (flip open only)
A list of GPRS Internet accounts. Open an account to view your
logged GPRS traffic, and by those means also your cost. The
P800 creates a new data log when a connection to an account is
created.
General functions
Application launcher views
In flip open, the P800 can present the applications in two ways:
• List view (small icons app ear in one column)
• Icon view (large icons appear in two columns)
Folders
Folders are used to organize information, for example contacts,
jotter entries, or task lists. Yo u might want to organize your
contacts in business and personal folders.
Getting to know your P800 31
Page 32

This is the Internet version of the user’s guide. © Print only for private use.
Folders are also used when managi ng files of different types on
your P800 and Memory Stick Duo. You might want to move or
copy sound files into a sound t r ack folder to store on a Memory
Stick Duo.
As you may notice if y ou connect your P800 to a PC and view
My P800
the contents of your P800 in
, it is easier to get an
overview of a folder and file structure on a large screen than on
a hand-held device. If you make it a habit to set up specific
folders to suit your needs and us e th em to categorize all your
information, working with it becomes easy.
Each application has its own set of folders. A folder created in
one application is not visible in another.
For each application there is a default
is no way of seeing on your P800, if a file in a n
Unfiled
folder. Since there
Unfiled
folder is
located on your P800 or on a Memory Stick Duo, we
recommend that you move files to your own folders as soon as
possible.
Every item created in an appli cation is always assigned to a
single folder, by default the same folder as displayed in the list
view.
In list view, the folder menu is used to organize your entries. In
detail view, the folder menu allows you to change the folder of
the current item.
Using the Folder Menu
In the applications that use folders you can see the folders menu
to the right in the menu bar.
When a Memory Stick Duo is available in the P800, the folders
on it are shown in the folders menu under the divider. If you
rename the disk (see“Renaming a Memory Stick Duo” on
page 26) the divider will show the new name.
All,
In list view, there is a super-folder called
selected, displays items from all folde rs (in
folder does not display the entries in the SIM phone book ).
which, when
Contacts
, the
All
All
is
the default value in list views and when an application is first
launched.
Use the
Edit Folders
menu item to:
• Rename a folder, or move a folder to or from Memory Stick
Duo. Select the folder you want to move or rename, tap
type the name of the new folder, and ch o ose a
Done
the list. Tap
Add
•To
a
Location
•To
Delete
Delete
a new folder. Tap
. A folder can only be deleted if it is empty. Not all
.
Add
, enter a folder
from the list. Tap
Done
.
a folder . Select the fold er you want to dele te and tap
Location
Name
Edit
from
and choose
folders can be deleted.
,
32 Getting to know your P80 0
Page 33

This is the Internet version of the user’s guide. © Print only for private use.
To copy all the files in a folder to another folder
1. Open the folder in list view, and select
application menu; for example
Folder
2. Select the destination
from the list and select
Audio
Copy to
or
Pictures
in the main
.
Copy.
To move a file from one folder to another
• Open the file in detail view. In the folder menu, select the
destination folder.
To copy a file to another folder
1. Open the file in detail vi ew. In the folder menu, select the
destination folder. Select
menu; for example
2. Select the destination
Audio
Folder
Copy to
in the main application
or
Pictures
.
from the list and tap
Copy.
Tip To delete multiple files in application you can use Storage
Manager. See“Removing or copying general files” on
page 139.
Zooming
You can change the size of the screen fonts. Choose between
Small, Medium or Large. From the menu bar, tap
Edit > Zoom.
Automatic saving
When you work in an application and leave it, your work is
automatically saved.
Find
The Find function searches through all the items stored in an
application. The standard
edit box with two buttons,
Cancel
the search,
closes the
Find
dialogue contains a single text
Find
and
Cancel
. Selecting
Find
dialogue.
Find
starts
In some applications, for example Messaging, Find may be
more complicated:
• The size of each message is so large that you may want to
restrict the search to the current message only .
• Folders are potentially more significant, so you may want to
restrict the search to the current folder only.
Sorting your files
You can sort the files you ha ve stored in your P800. By sorting
your files, you choose in which order you want the files to be
displayed on the screen . You can ch oose between sorting by
type, size, date or name.
Note Sort is not included in all applications.
Sending and receiving items
From many applications it is possible to exchange items like
appointments, contact s and images.
Getting to know your P800 33
Page 34

This is the Internet version of the user’s guide. © Print only for private use.
T o send an item using Send as
1. Enter the
Send as
menu in the specific application.
2. Depending on the application and item, you can choose
between the following transfer methods:
• Text message (using SMS), P800 will create a new SMS.
Add the mobile number of the recipient and tap
Send
.
• E-mail, P800 will create a new message with the item
Send
included as an attachment . Complete and tap
.
• Multimedia message (using MMS), P800 will create a new
message with the item included as an attachment. Complete
and tap
Send
.
• Infrared, align the infrared port of the P800 with the infrared
port of the other device. Select
Send.
Progress messages on
screen will tell you when the information in transferred.
• Bluetooth wireless technology, the P800 will search the local
area for paired devices. These will be presented in a list.
Select a device to which the item is to be sent and select
Send
. Progress messages will tell you when the information is
transferred.
Tip The other devices mu s t hav e Blue to oth wireless technology
enabled. You can select
Refresh
to perform a new search if, for
example, a destination device was not enabled at first.
To handle items received in e-mail and multimedia messages
1. Open
Messages
and select MMS or an e-mail inbox.
2. Open the message.
3. Select the attachments tab.
4. Select the required attachment. The attachment or a summary
of the attachment will be displayed.
5. Select
Save
to save the item. You may optionally display the
received item within the related application.
Refer to “Messages” on page 81 for more information.
To receive beamed items
1. Ensure that infrared or Bluetooth wireless technology is
activated.
2. For infrared, ensure that the infrared ports are aligned.
3. The received item will be notified by a dialogue box listing
the item(s) received.
4. Select
View
to view and save the item to the related
Done
application. Select
and any unsaved items will be
automatically saved for you in the
Beamed
inbox in
Messages.
Methods for storing data
Your P800 can store data in three di ffer e nt ways:
• Internal memory. Up to 12 MB of capacity for storing
pictures, messages, musi c, applications, and so on.
• Memory Stick Duo (expansion memory).
34 Getting to know your P80 0
Page 35

This is the Internet version of the user’s guide. © Print only for private use.
• Several other expansion-memory alternatives on the market.
• Pictures on Sony Image Station on the Web:
– For Europe: http://www.sonystyle-imaging.com
– For Japan: http://www.imagestation.jp
– For USA: http://www.imagestation.com
• SIM card, for phone numbers and associated names. See
“Managing the SIM phone book” on page 96.
Getting help
From the menu bar tap
help system. The help system uses two views:
•The Topics view shows all available topics, for e x ample both
specific application topics and general topics.
•The Detail view presents the title and text of a single topic.
The Topics view allows you to select a topic, which opens the
detail view/text view and displays the selected topic. You can
also set the zoom level and exit the Help system.
In many dialogue boxes you can select the Help icon in the
upper right corner.
Edit > Help
or
View > Help
to get to the P800
?
Settings
For settings that are application-specific, tap
the application menu bar. For generic settings, go to
Edit > Preferences
Control Panel
in
Entering text
Entering text with the flip closed
With the flip closed, you use the keypad keys to enter te xt, for
example, when writing a text message. When you press a key, a
pre-edit box with the different characters on that key is shown in
the title area:
If the same key is pressed again, the next character in the preedit box will be selected.
The key deletes the character to the left of the cursor. If
continuously pr essed, the key deletes sev e ral characters
and then whole words.
Types of text input
There are four text input types:
• Abc – initial upper case letter , the rest lower ca se. Default for
each new text edit field
• 123 – numeric entry only
• ABC – upper case entry
• abc – lower case entry
When you are editing text you can:
• Press and select
.
input type.
• Press to switch between the input types in text edit mode.
wxyz9
Text options > Input type
to select text
Getting to know your P800 35
Page 36

This is the Internet version of the user’s guide. © Print only for private use.
Inserting symbols
When you are editing text you can press and choose
Options > Add symbol
to select an item from the symbol selector
table. Use the Jog Dial to select the row and press . Then
scroll within the row to select a symbol and press .
Text
Calendar Edit Unfiled
Weekly meeting
Entering text with the flip open
There are two ways of entering text with the flip open:
• Use the on-screen keyboard located at the bottom of th e
screen.
Type Appointment
Date 08/01/2002
Description
The agenda for...
Done
• Write directly on the screen using the stylus.
1234567890
On-screen keyboard
When you need to edit text, tap the keyboard icon in the status
Done
bar and then select characters. Tap
when ready.
qwer tyuiop
cap
a
sdfghjkl
zxcvbnm.
abc 123aeo
,
?
@
At the bottom left of the keyboard you can choose between three
keyboard layouts with diffe rent cha racter sets.
abc
- standard characters
àëó
- international characters
123
- numeric characters and currencies
36 Getting to know your P80 0
Page 37

This is the Internet version of the user’s guide. © Print only for private use.
The current input field is shown to the left in the top bar of the
keyboard. Tap the arrows or rotate the Jog Dial to change input
field. The keyboard top bar also contains a drop-down menu
Cut, Copy
with
be selected first.
Handwriting recognition
Handwriting recognition translates stylus gestures into letters,
digits or other characters, and displays these characters as text.
Handwriting recognition is only active in places where text can
be input.
The text mode screen is split into an upper and a lower part, by
an arrow in the middle of the rig ht edge . W r ite lower case letters
below the arrow and upper case letters in line with it. Write
digits above th e arrow.
Mark text by putting the stylus on the text, wait a moment, and
drag the stylus over the text .
and
Paste.
When copying or cutting, the text must
Contacts Edit Unfiled
Job title
Web
Jane
Jones
Graphic Desig
First name
Last name
Phone (w)
Phone (h)
Mobile (w)
Ring tone Default Melody
Email (w)
Fax (w)
Note Most letters can be written using different stroke styles.
See the tables below. The style does not determine case. The
position on the screen decides case.
Getting to know your P800 37
Page 38

This is the Internet version of the user’s guide. © Print only for private use.
Letters
Lower case letters are written below the arrow and upper case
letters in line with the arrow.
a
b
c
d
e
f
2
g
h
2
1
i
2
2
1
1
j
1
2
k
l
m
Note Start each stroke at the dotted end.
n
o
p
q
r
1
s
1
t
2
u
v
w
1
x
2
y
z
full stop
comma
apostrophe
question
exclamation
ampersand
at
double quote
tab
space
backspace
carriage return
Accented letters
Write the character as described above, then write the accent
above the arrow. Other such characters, for example, ö and ü,
follow the same principle.
Note Start each stroke at the dotted end.
1
2
Numbers
Numbers are written above the arrow.
0
1
2
3
4
5
6
7
Note Start each stroke at the dotted end.
8
9
+
*
/
\
(
)
=
full stop
comma
dash
tilde
backspace
tab
or
*
38 Getting to know your P80 0
Page 39

This is the Internet version of the user’s guide. © Print only for private use.
Extended characters
To write symbols and characters that are not shown in these
tables, please consult the Extended characters section of the
Handwriting recognition help topic in your ph on e .
P800 locks
Use the SIM card lock and the device lock to protect your SIM
card and your P800 from unauthorized use. Use the key lock to
prevent the keys from being accidentally pressed.
Note Yo u can usually make an emergency call wi thout
unlocking the P800.
SIM card lock
The SIM card lock protects your SIM card, not the P800, against
unauthorized use. It is unlocked by the PIN and PUK codes
which you receive from your service provider.
Y ou can choose to have the SIM card locked every time you turn
the P800 on, or to have the SIM card unlo c ked.
Y our PIN (Pe rsonal Identificatio n Number) code consists of fo ur
to eight digits. If you activate the SIM card lock, the P800 will
ask for the PIN code when you start it.
To activate the SIM card lock
1. Select
Phone > Edit > Preferences > Locks
2. Select a lock option.
3. Select
An error message informs you if a wrong PIN code has been
entered. Usually after three wrong attempts (SIM card
dependent) the SIM card will be blocked and you need to enter
the PUK code to unblock i t.
The PUK code consists of eight digits. When you have entered
the right PUK code you must ent e r a new PIN code. You have
ten attempts to enter the PUK code. If all ten attempts fail, the
SIM card will be disable d and yo u need to contact y our ne twork
operator.
You cannot change the PUK code.
PIN2
Some functions on the SIM card can be protected by a
secondary code feature.
The PIN2 lock cannot be deactivated. The code can be c hanged
by a user wh o knows the old code. Some SIM cards do not have
a PIN2 lock.
Done
.
Getting to know your P800 39
Page 40

This is the Internet version of the user’s guide. © Print only for private use.
Device lock
The device lock protects your P800 and the data in it against
unauthorized use. If the device lock is set to
means that normally the P800 is not locked. However, if the
SIM is changed, the P800 ask s you to enter the code to unlock
the P800 before you can use it. Thus, if someone steals your
P800 and puts another SIM card into it, th ey will not be able to
use it.
The device lock is not on when you buy your P800. You can
change the device lock code to any four to eight digit personal
code.
To activate the device lock
1. Select
Phone > Edit > Preferences > Locks
2. Select a lock option.
Done
3. Select
.
You can choose to have the P800 locked every time you turn it
on, locked when the SIM ca rd has been changed, or unlocked.
It is also possible to use the d evic e lo c k in c omb ina ti on with th e
screen saver. Just mark the checkbox
Display > Screen saver device lock
to have the devi ce loc k activ ate d
when the screen saver goes on.
When using the screen saving device lock, make sure you have
set the device lock to activate at Power on. Otherwise your P800
is unprotected, after Power on, until the screen saver goes on.
When SIM changed
Control panel > Device >
, it
Change code
To change a code
1. Select
Phone> Edit> Preferences> Locks.
2. Select Change Codes.
3. Select the code you want to change.
4. First enter the old code, then the new one. (To ensure that
you have typed the new code correctly you have to enter it
twice.)
Automatic key lock
This option locks the keys on your P800. This is to protect the
device if the keys are acciden tally pressed. When this setting is
active, the flip closed keypad will become automatically locked
after a period of inactivity.
To activate or change the key lock
• Select
To unlock the keys
• Select
Phone > Edit > Preferences > Locks.
> .
40 Getting to know your P80 0
Page 41

This is the Internet version of the user’s guide. © Print only for private use.
TELEPHONY
Phone
The P800 is a full-featured mobile phone having full integration
with the other functions of the device, including third party
applications.
The phone includes useful features such as:
• Personalised ringtones.
• Picture Phone Book
• Quick access back to the entry in Contacts, making it easy to
try an alternative number or send an E-Mail if the contact is
unavailable or busy.
• Voice dialling – make a call by speaking the contact’s name.
• Voice answer – an incoming call may be answered or sent
busy signal, using the words recorded for ‘answer’ and
‘busy’.
• Access to most other applications whilst talking on the
phone.
• Office handsfree (speakerphone) which is enabled when the
flip is open, making it easy to access applications such as
Calendar and Jotter whilst talking.
• Flight mode which enables the P800 to be us ed a s a PD A in
situations where radio transmitters may not be used. The GSM
and Bluetooth transmitters (and receivers) are switched off.
Phone 41
With the flip closed you can access most of the functions using
the Jog Dial and the keypad. More advanced tasks such as
handling conference call s or using other applications durin g a
call are best handled with the flip open.
Call handling with the flip closed
With the flip closed, you c an use either the keypad or the Jog
Dial to handle calls.
Outgoing calls
To make a call
• Enter the telephone number on the keypad and press the Jog
Dial or press .
– Press to delete a typed character. Press and hold
to delete all characters
– Press and hold to insert the international call
+
.
prefix
+
.
Page 42

This is the Internet version of the user’s guide. © Print only for private use.
If a call is not successfully connected, the P800 can be set to
automatically retry to connect the call. When a retry is
successful, t he P80 0 ale r ts yo u with a single ring signal.
To make an emergency call
• Enter the emergency number on the keypad and press the Jog
Dial or press .
Usually , but no t alway s, no SIM card or PIN code is require d for
emergency calls and you will be able to make the call as long as
the available network allows and you have cove rage from a
GSM network. Check with your local provider to find out if
emergency calls are possible without SIM card, and which
emergency call number that is supp orted.
To make a call using Speed Dial
Speed Dial is a fast way to call one of your special speed dial
numbers. See“Set-up speed dial numbers” on page 49.
1. Select the key corresponding to the desired number.
2. Press .
To make a call using the Call list
1. Sele ct on the standby screen.
2. Press the Jog Dial or .
3. Scroll the list by rotating the Jog Dial and select an entry.
4. Press the Jog Dial or .
To make a call using the Contact list
1. Select on the st andby screen.
2. Press t he Jog Dial or .
3. Scroll the list by rotating the Jog Dial and select a contact.
4. Scroll by rotating the Jog Dial and select the desired number.
5. Press t he Jog Dial or .
Fore more information, see “Contacts” on page 92.
To make a call using voice control
1. When the voice recognition is activa ted, the Magic wo rd icon
appears in the upper corner of the screen. There are
three ways to use the voice recognition function.
• Press and hold the Jog Dial
• Say the “Magic word”
• Press the call button on the head set
2. When you hear a short tone, say the voice command
connected to the numb er you want to call. See“To record a
voice command” on page 53. The P800 will connect you
with the matching contact.
You can use voice control when the P800 is handheld or used
with a handsfree set (car or portable). It is not needed together
with a Bluetooth wireless technology headset.
For more information, see “Voice control” on page 52.
42 Phone
Page 43

This is the Internet version of the user’s guide. © Print only for private use.
To end a call
• Pre ss , or press the Jog Dial.
Short cuts
• Press and hold to dial your voice mail. With the flip
open, select
Phone > Call voice mail
.
See “Voice mail” on page55 on how to set up voic e mail.
• Press and hold any of the keys from to to open
your Contact list. Press again to reach the next letter.
Additional key presses will add letters to you search.
• Press any digit followed by to reach a phone number in
the SIM phone book.
• Press for the last dialled number.
Incoming calls
When you receive a call, if the calling party is found in contacts,
the name of the caller will be displayed. If there is an associated
picture it will also be shown in a small or large version. See
“Incoming call picture” on page 52.
To handle an incoming call
You can press to answer the ca ll or answer by voice
control, see “Voice control” on page 52.
You can press to reject a call and press to silence the
ring signal.
An incoming call will bring up the following options:
•
1 Answer
– Answer the call.
•
2 Send Busy
– Reject the call. The calling party will hear a
busy tone and the call will be logged as a rejected call.
•
3 Mute
– Silence the ring signal. The calling party will not
notice that you have silenced the call. Th e call will be logged
as a missed cal l.
If a large picture of the caller fills the screen, you can use the
Jog Dial to get the menu with the options above.
Options during or after a call
Use the Jog Dial to change the phone volume during a c all.
Press to get a list of call handling options. The list will
vary depending on the situation. Options that concern two or
more active calls are describe d in “Handling two or more calls”
on page 46.
End call
•
•
•
– End the active call.
Hold call/retrieve call
– Put the active call on hold /retrieve the
held call. This is useful if yo u want to make a new call dur ing
a call.
Add to contacts
– Create a new Contacts entry if the phone
number of the active call is known, and not already stored in
Contacts.
Phone 43
Page 44

This is the Internet version of the user’s guide. © Print only for private use.
•
Show contact
corresponds to the phone number of the active call.
Transfer sound
•
technology headset.
•
Turn On/Off tones
keypad, “Controlling t one based services” on page 50.
Microphone mute On/Off
•
Copy nu mbe r
•
text fields or applications.
Paste number
•
Speakerphone On/Off
•
speakerphone. See “Speakerphone” on page 49.
Applications
•
paste a copied phone number into a Jotter entry.
Press and hold to mute th e microphone. Press and ho ld
again to reactivate the microphone.
– Display the entry in Contacts, if any, that
– Transfer the call to a Bluetooth wireless
– You can send DTMF tones with the
– Turn the microphone on or off.
– Copy a phone number for exchange with other
– Paste a copi ed nu m ber into a fiel d
– You can use the P800 as a
– Open another application, and, for example,
Call handling with the flip open
You use the stylus and the virtual keypad to handle calls with
the flip open.
Outgoing calls
To make a call
1. Select in the application picker. The Speed Dial view is
opened.
2. Tap on the button bar.
3. Enter the digits with the virtual keypad and tap on the
right of the ke ypad.
To remove a typ e d character - select .
If a call is not successfully connected, the P800 can be set to
automatically retry to connect the call. When a retry is
successful, the P800 alerts you wit h a si ngle ring signal.
44 Phone
Page 45

This is the Internet version of the user’s guide. © Print only for private use.
To make a call using
Speed Dial
Speed Dial is a fast way to
Phone Edit
call one of your special
speed dial numbers. See
“Set-up speed dial
numbers” on page 49. This
is the default telephone
John
Sandra
Susan
view.
1. Select on the button
Mike
Julia
Robert
bar.
2. Use the Jog Dial or tap
with the stylus to select
Elizabeth
Empty
Empty
an entry.
To make a call using the
Call list
1. Select from the button bar.
2. Scroll by rotati ng the Jog Dial and select an entry. You can
also tap the entry using the stylus.
3. Select .
To make a call using the Contact list
1. Select in the applicat ion picker.
2. Scroll by rotating the Jog Dial and select a contact.
3. Scroll by rotating the Jog Dial and select a phone number.
You can also tap the contact and/or number using the stylus.
To make a call using voice control
1. When the voice recognition is activa ted, the Magic wo rd icon
appears in the status bar. There are three ways to use
the voice recognition function.
• Press and hold the Jog Dial
• Say the “Magic word”
• Press the call button on the head set
2. When you hear a short tone, say the voice command
connected to the numb er you want to call. See“To record a
voice command” on page 53. The P800 will conn ect you
with the matching contact.
You can use voice control when the P800 is handheld or used
with a handsfree set (car or portable). It is not needed together
with a Bluetooth wireless technology headset.
For more information, see “Voice control” on page 52.
To end a call
End call
• Select
, or press the Jog Dial.
Phone 45
Page 46

This is the Internet version of the user’s guide. © Print only for private use.
Incoming calls
When you receive a call, if the calling party is found in contacts,
the name of the caller will be displayed. If there is a picture it
will also be shown in a small or large version. See “Incoming
call picture” on page 52.
To handle an incoming call
Use the screen buttons to select what to do.
•
Answer
– Answer the call.
Send Busy
•
– Reject the call. The callin g party will he ar a bu sy
tone and the call will be logged as a rejected call.
Mute
– Silence the ring signal. The calling party will not
•
notice that you have silenced the ca ll. The c all will be logg ed
as a missed call.
You can also answer by voice control, see “Voice control” on
page 52.
Options during or after a call
There are several options available, depending on the situation.
You access some of them by the screen butto ns, by tapping the
field with the calling party d etails, o r on the m enus. Op tions t hat
concern two or more active calls are described in “Handling two
or more calls” on page 46.
•
End call
– End the active call.
Hold call/retrieve call
•
– Put the active ca ll on hold / R etriev e the
held call.
Add to contacts
•
– Create a new Contacts entry. This option
appears automatically after a call if the phone number of th e
call is known, and n ot already stored in Contacts.
•
Show contact
– Display the entry in Contacts, if any, that
corresponds to the phone number of the active call.
•
Zoom in/out
•
Copy number
– Enlarge/reduce the view.
– Copy a phone number for exchange with other
text fields or applications.
•
Paste number
– Paste a copied number into a field
Tap to make the following adjustments:
•
Call volume
– Adjust the volume in the phone, but this is
easier to do with the Jog Dial.
Silent mode
•
Speaker phone
•
Mute microphone
•
– All sound ring signals are turned off.
– Activate the P800 as a speaker phone.
– Turn the microphone on or off.
Handling two or more calls
During a call, you can make a second call, or answer an
incoming call. The ongoing call is put on hold and the new call
becomes active. The held call is shown with a grey background.
46 Phone
Page 47

This is the Internet version of the user’s guide. © Print only for private use.
If someone calls when a call is on hold, you will be asked if you
want to release the held call an d answer the incoming call.
When an active call is ended, you are asked to retrieve the held
call. If you do not respond within a few seconds, the held call
will also be ended.
T o make and handle a new call during a call
1. During a call, ma ke a
second call, or answer an
incoming call.
2. Press to get a list of
call handling options with
Phone Edit
John Smith
+4613244500
11:03
(w)
the flip closed. With the
flip open choose options
by tapping the screen
buttons, by tapping the
field with the calling part y
details, or selecting from
the menus.
End active call
–
– End the
Ann Jones
(h)
End active call
Switch calls
Join calls
active call, the held ca ll
becomes active.
–
Switch calls
– Switch
between the active and held call.
–
Join calls
– Join the two calls into a conference call.
–
Transfer calls
– Connect the held call to the active call and
disconnect yourself from the call.
Release all
–
–
Show contact
– End both calls.
– Display the entry in Contacts, if any, that
corresponds to the phone number of the active call.
Conference calls
A conference call can be
started when you ha v e an
active call and a held call.
The conference call view is
automatically displayed
whenever a party has been
added to the conference.
If an incoming call is
answered during a conference
call, the conference call will
be put on hold.
Note Conference calls are
only available if they are
supported by your subscription.
To start a conference call
• With one active call and one held call, tap the
button, or select
Phone > Join calls
Phone Edit
1
John Smith
2
Tom Clark
3
Ann Jones
End conference
Hold conference
Hide parties
from the menu.
(w)
(w)
(h)
Join calls
11:03
Phone 47
Page 48

This is the Internet version of the user’s guide. © Print only for private use.
To add a new conference party
1. During a conference call, tap on the button bar and make
a new call.
2. Select
Join call s
.
To manage a conference call
• Use the screen buttons:
End conference
–
–
Hold conference
– End the conference for all parties.
– Put the conference on hold. The other
parties can still talk to each other.
Show / Hide parties
–
– Switch between the standard call
control view and conference call view.
To speak privately to a specific conference party
• Tap a party in the list to get the following options:
Extract
–
– Make the selected party th e active call, the rest of
the parties will be put on hold.
–
Release
– End the conference call for the select ed party.
Call list and call log
The call list shows calls made, received, rejected, or missed.
The log keeps track of date, time, length, and cost information
(if available) for each call.
The List view of the call log shows the calls in order with the
most recent call at the top.
To view the call list with the flip closed:
1. Press and sele ct
2. Select
Missed calls
or
1. Select on the standby screen to open Call list.
2. Press and select which calls in the list you want to
display.
The currently selected view is not shown in the options menu.
Tip With the flip closed you can press once to view the
call list. Press twice to call the last number used in the P800.
To view the call list with the flip open:
1. In the Ph one application, select from the button bar.
2. Select a listed call to see more detailed information about it.
or
Calls
Call list
.
.
48 Phone
Page 49

This is the Internet version of the user’s guide. © Print only for private use.
Hints and smart functions
Speakerphone
If you open the flip during a call, the speaker phone function is
activated and the volume will increase. This lets you continue
the conversation while using other functions of the P800.
Close the flip or tap to switch off the speakerphone.
Warning! The volume may be uncomfortably loud at the
higher volume levels i f the phone is close to your ear. Exposure
to excessive volume may damage hearing.
Silent mode
In silent mode all sound ring signals and sound alarm signals are
turned off. When the flip is closed, press and select
to put the phone in silent mode. Press and select
silent
to turn off silent mode. When the flip is open, tap the
off silent
sounds icon in the status bar to open a dialogue where you can
switch silent mode on or off.
The vibrating alert still works in silent mode if not deact ivate d.
Turn on
Turn
Set-up speed dial numbers
Speed dial is a fast way to call one of nine selected phone
numbers. The view contains nine speed dial positions. Each
speed dial entry consists of a picture or an ic on, and a name o r a
number. The names, numbers and pictures shown in the Speed
dial view are derived from the Contacts application, see
“Contacts” on page 92. If the contact has a picture stored then
this picture is u sed. A defa ult ic on is used if the c onta ct do es no t
have a stored picture.
To set a speed dial number
1. Select from the button ba r.
2. Select an empty position.
3. Select the desire d contact.
Done
4. Select
To remove a speed dial number
1. Select , on the button bar.
2. Select
3. Select the contact to remove.
4. Select
.
Edit > Remove speed dial
Done
.
.
Phone 49
Page 50

This is the Internet version of the user’s guide. © Print only for private use.
Flight mode
In flight mode the radio function is turned off so that it does not
disturb sensitive equipment, for instance in an aeroplane o r in a
hospital. You cannot make and receive calls, but most of the
other functions in the P800 are available .
Note The phone an d other comm unica tion functi ons must ne ver
be used in an aircraft unless otherwise instructed by the aircraft
personnel. If the use of equipment without a radio transmitter is
permitted, you can turn on the fli ght mode o n the pr odu ct. Doing
so turns off the radio function.
You can set a “Power menu” to ask you if you want to start the
P800 in normal mode or flight mode each time you turn on the
P800. See “Flight mode” on page 53 on how to activate this
function.
To use the power menu
The power menu has the f ollowing options:
Phone on
•
Flight mode
•
•
Power off
To set flight mode on and off when Power menu is selected
1. Press the On/Off button.
2. On the Powe r menu, select the opti on you want.
3. Press the Jog Dial, , or tap
– Start the P800 in the normal way.
– Start the P800 in flight mode.
– Turn the P800 off.
Done
.
To set flight mode on or off
1. Select
2. Select
3. Select
4. Tap
Phone > Edit > Preferences.
Flight mode
Flight mode now / Phone on now
Done
.
.
.
Controlling tone based services
You can use your P800 to control telephone banking services or
other tone based services that use DTMF (Dual Tone Multi
Frequency).
The P800 provides different ways of sending tones during a call:
• Pressing keypad keys during an active call.
• Including a tone sequence in the call set up. After the phone
number, but b efore th e dig its, p re ss and h o ld to insert a
p
pause, represented by the character
Finally make the call by pressing .
. Then press your digits.
50 Phone
Page 51

This is the Internet version of the user’s guide. © Print only for private use.
• Program digit
sequences into a
Contact card for the
service. Each digit
sequence to be sent
as tones must begin
p
.
with a
Once your call to
the service has been
Contacts Edit Unfiled
Bank
+4613244500 p1#1234567890
p10#0#34#56789 (w)
p30#1234#56 (w)
p10#1#567890123 (w)
p20#123456789 (w)
established and yo u
want to send one of
your preprogrammed digit
sequences, choose
Show contact
on the
Phone menu to get
to the Contact card
with the tone
sequences.
Note It is not advisable to program any personal codes into
your P800, in case your phone is stolen or lost.
Preferences
In this menu you can change the settings for the telephony
options. (Settings on your P800 that are system-wide and affect
more than one application are made from the Control panel, see
“Control panel” on page 135).
To set the telephony preferences
1. Select
2. Select the item to set up.
Sounds and alerts
Use these settings to control how your P80 0 should alert you of an
incoming call. You can choose to use any sou nd r e co rding or
audio file. For more information see “Ring signals” on page 133.
You may personalize the ring melodies further for individual
contacts, see “To change the details of a contact” on page 96.
•
•
•
Phone > Edit > Preferences.
Ring volume
– Set the preferred sound level for handheld,
handsfree and car use.
Increasing ring
– Select the checkbox to use in creasing ring
signals. This disables the other volume settings.
Ring (voice)
– Select a ring signal for incoming voice calls.
Tap the trumpet to listen to the signal. Tap again to stop
playback.
Phone 51
Page 52

This is the Internet version of the user’s guide. © Print only for private use.
•
Ring (data)
the trumpet to listen to the signal. Tap again to stop playback.
•
Vibrating alert
•
Silent mode
signals.
To change the default ring tone
1. Tap the Ring (voice) or Ring (data) drop-down menu.
2. Select Default Melo dy for the P800 default or Find Melody
to select a new one.
3. If required, change folder.
4. Select the required sound
5. Tap and to preview the sound.
6. Tap
You can select ring signals that are stored on your local storage
or on Memory Stick. If the selected file is later deleted or
moved, the Default Melody will be played instead.
Warning! The volume may be uncomfortably loud at the
higher volume levels i f t he phone is close to your ear. Exposure
to excessive volume may damage hearing.
– Select a ring signal for incoming data calls. Tap
– Select the option you want.
– Select the checkbox to turn off all sound ring
Select
to set this sound.
Incoming call picture
If an incoming caller has a picture stored in contacts it will be
shown on the screen. Select th e checkbox to show a large
version of the picture over the whole screen.
Voice control
The voice control option lets you manage calls using your voice.
With Voice answer you can use words recorded for ‘answer’ and
‘busy’ to answer or send a busy signal to an incoming call. With
Voice dialling you can make a call by speaking the contact’s
name.
Say a “magic word” and then the name of the person you want
to call, and the P800 will try to call the person. Instead of the
magic word you can also press and hold the Jog Dial or press the
handsfree set call button.
The magic word ensures that the P800 will not call somebody
whose name has just been mentioned by chance.
Voice dialling
•
Magic word
•
magic word when you use voice dialling. You must,
however, record a magic word before you can select to use it.
Using Magic Word will increase battery drain.
Voice answer
•
or reject incoming calls by vo ice commands. You must first
record voice commands for Answer and Busy.
– Select On or
Off
.
– Select the cases where you want to use t he
– Select On or
Off
. Tap On if you want to answer
52 Phone
Page 53

This is the Internet version of the user’s guide. © Print only for private use.
•
Play caller name
Contacts, the P800 will tell you the person’s name when he
or she calls you. Thi s is useful when using your P800
together with a handsfree.
Voice commands
•
means that a voice command is recorded for the command.
To record a voice command
1. Select one of the options ,
Record
2. Say the magic word, the answer command or the busy
command after the tone.
If you are recording a magic word, make sure that you
choose a long unusual word, which can easily be
distinguished from ordi nary background speech.
3. Select
4. Select
You are advised to record voice commands in a quiet
environment to maxim ise recognition.
To record voice tags for individual contacts, see “Creating and
managing contacts ” on page 95.
– If you have recorded a name for a person in
– A list of the voice commands. A balloon
Magic word, Answer
.
Play
to check the quality of your recording.
Done
to exit.
, or
Busy
and tap
Flight mode
In flight mode the radio function is turned off. Y o u cannot make
and receive calls but most of the other functions in the P800 are
available.
Use these settings to turn the flight mode on or off and also to
activate the
Power menu. When activated, the Power menu will
ask you if you want to start the P800 in normal mode or flight
mode each time you turn on the P800. Also, when you press the
On/Off button when your P800 is on, the Power menu will ask
you if you want to tur n off the P800, or switch to another mode.
To activate the Power menu
• Select the
Prompt me...
check box and tap
Done
.
To cancel the selection of Power menu
• Clear the
Prompt me...
check box and tap
Done
.
Locks
Locks contains options for activating the locks on the device,
the SIM card and the keys on the keypad, and for changing the
lock codes, see “P800 locks” on page 39.
Phone 53
Page 54

This is the Internet version of the user’s guide. © Print only for private use.
Add to contacts
This is a function for adding called and calling parties to
Contacts
. After a call has ended, if the telephone number is not
Contacts
already stored in the
, you are asked if you would like to
add it.
On
or
Off
Set the function
.
Handsfree
Specify how to mana ge calls when the P800 is used with a
handsfree kit connected.
•
Answering mode
–
Normal
–
Any key
keypad to answer.
After 5 seconds
–
seconds.
You can al so select to use a Bluetooth headset as the preferred
sound device.
Bluetooth: Preferre d sound device
•
Phone
–
calls.
Headset
–
incoming and outgoing calls.
– Select the option you want.
– Answer calls as normal.
– Press any key (except or ) on the
– P800 answers automatically after five
– Select the optio n you want.
– Use the keypad to manage incoming and outgoing
– Use the headset or the keypad to manage
Divert calls
You can divert incoming call s to another number if for any
reason you are unable to answer them.
To divert calls
1. Select the type of call you want to divert.
2. Specify the telephone number you want to divert to.
Done
3. Select
The settings are stored in the netwo rk. Tap
.
Refresh
to receive the
current settings.
Tip Normally the data /fax options should not be changed.
Accepted callers
You can specify who should be able to call yo u. All other c allers
will be rejected. Your options are:
•
All callers
Listed callers only
•
phone you.
•
No one
– Everybody can phone you.
– Only people o n the
– No one can phone you.
Accepted callers
list can
54 Phone
Page 55

This is the Internet version of the user’s guide. © Print only for private use.
To add a contact to the Accepted caller list.
1. Select
2. Select
Add new.
Lookup
and chose a contact, or write the name and
number of the contact.
Done
3. Select
.
Call waiting
Use these setting to control how P800 handles incoming calls
during an already ongoing call.
On
– You will be alerted by incoming calls.
•
Off
– The P800 sends a busy tone to the calling party.
•
Restrict calls
You can set restrictions for calls made from or to your P800.
You can, for example, protect it from being used for long
distance ca l l s .
To restrict incoming calls
Incoming
Outgoing
tab.
tab.
1. Select the
2. Set restrictions for:
– All incoming calls.
– Incoming calls when roaming. Use this to avoid c o sts for
incoming calls when travelling abroad.
To restrict outgoing calls
1. Select the
2. Set restrictions for:
– All outgoing calls.
– Outgoing internationa l calls.
– Outgoing international calls except to your home country.
Voice mail
For easy voice mail access, enter the number to the voice mail of
your operator.
With the flip closed, press and hold to call this number.
With the flip op en, sele c t
Phone > Call voice mail
.
GSM Networks
This option lets you choose what net to use when you are
outside your operator’s area. Choose if you want to search for a
new network or use a preferred one. You can also make a list of
preferred networks.
•
Search mode
a network.
Select network
•
New search
•
Preferre d l i st
•
for when you are outside your home network.
Note Your operator may not allow you to access all available
networks.
– Select between automatic or manual search for
– T ap th e button t o get a list o f availabl e networks.
– Tap the butto n to searc h for availa ble networks.
– Show the networks that your P800 will search
Phone 55
Page 56

This is the Internet version of the user’s guide. © Print only for private use.
To add a network to the preferred list
1. Tap
Add network
.
2. Select a network from the displayed list.
Done
3. Select a position in the Preferred list and tap
.
Calling cards
Calling cards are used together with some telephony services.
These settings specify how P800 handles calling cards.
–
Calling card mode
–
Calling cards
–
Active card
to use.
Please consult your calling card operator for more details.
To create a new calling card account
1. Select
New
and enter the account information.
–
Name
– Enter a name for the calling card account.
Access number
–
card server.
Delay
– Set a time delay between the moment the calling
–
card answers the call and the P800 starts sending tones.
Verification code
–
no verificatio n code, you may enter the dummy code
– Select how to use calling cards.
– A list of your calling cards.
– Select which of your calling cards you want
– Enter the phone number to the calling
– Enter the verification code. If you have
P
–
Sending order
–
Number then code
means that the P800 first
sends the phone number you have started to call, and then
sends the verification number.
Code then number
means the
opposite order.
Some international calling card services instruct their users to
select a language by pressing a digit. When using the P800
calling card feature, you can insert a digit in one of these places:
• Immediately after the access number, but preceded by a
pause sign,
p
.
• In the verification code.
• In the phone number that is dialled.
AoC - Call meter settings
Advice of charge allows you to keep track of the cost of calls
and to stop the P800 from making chargea bl e calls when a
certain credit limit has been exceeded. The Advice of charge
option only appears in the list if it is supported by your current
subscription.
If the credit is limited, a warning
Low credit
there is approximately thirty seconds of credit left.
When the credit runs out,
Credit expired
chargeable calls are stopped.
Please refer to the onboard help for detailed information about
the Call meter settings.
is displayed, when
is displayed and ongo ing,
56 Phone
Page 57

This is the Internet version of the user’s guide. © Print only for private use.
Note PIN2 is required from your network operator for storing
any changes you make to the Call met er settings.
Not all networks provide charging info rmation to the phon e
during a call . If your network provides this servi ce and your
subscription is for Advice of Charge Charging, you cannot make
or receive any chargeable calls if you are roaming in a network
that does not provide charging information. This restriction does
not apply when your subscription is for Advice of Charge
Information. You cannot change the type of subscription from
your phone settings. Please consult your operator for more
details.
Phone 57
Page 58

This is the Internet version of the user’s guide. © Print only for private use.
MEDIA
CommuniCam and Pictures
With the built-in camera CommuniCam you can take pictures,
view them on your phone screen and send th em directly to
friends or colleagues via multimedia messaging. You can also
send the pictures you have saved in your P800 via messaging,
infrared communication or Bluetoot h wireless technolog y to, for
example, a PC. It is also possible to exchange pictures between
the P800 and the web.
The pictures in your P800 can be set as background pictures or
they can be added to the contacts in your phone book.
See “Personalizing your P800” on page 132 to find out more
about using pictures.
Camera settings
You may want to change some of these settings if, for example
you are taking a pic tur e in d aylig ht or in d ark surro und ing s. You
can also choose what re solution, size and quality, you want for
the pictures you take .
To change preferences for the camera
>
1. Select
2. Tap
58 CommuniCam and Pictures
.
CommuniCam > Preferences
.
3. Select the setting you want to change:
Move the slider to chan ge the brightness of the picture.
Move the slider to change the contrast.
Turn the backlight On when the light behind the subject is
brighter than the light in front of the subject.
Turn the flicker free function On to red uce the effects of
flicker from, for example, fluo resc ent light.
Choose white balanc e according to the lighting co ndi ti ons
you are in when taki ng th e picture.
Choose quality and size for the picture. Larger size and higher
quality use more memory per picture. The picture sizes,
640x480, 320x240 an d 160x120, are displayed in pixels.
To rest ore default camera preferences
1. Tap
CommuniCam > Restore defaults
Yes
2. Tap
.
.
Page 59

This is the Internet version of the user’s guide. © Print only for private use.
Taking pictures
You can take a picture with the flip open as well as closed.
To take a picture
1. Press the camera bu tton (
CommuniCam application.
2. Press again to capture the image on the screen. The picture is
automatically saved in
Y ou can also press the Jog Dial, or , when the flip is open, tap the
red button at the bottom of t he screen to take a picture.
By default the pictures you take are stored internally in the
Unfiled
folder. Tap the folder menu to the right in the menu bar to
change the location to another location , for ex amp le , on a
Memory Stick Duo. See “Folders” on page 31 for more
information on using folders.
To send a picture you have just taken in flip closed, select
from the flip closed context menu.
as MMS
Open the flip to access the full range of CommuniCam settings.
With the flip open, the CommuniCam is activated by selecting
>
. T o s e nd a p i ct ure y ou h a ve ju s t taken in flip op e n, ta p
CommuniCam > Send as MMS.
CAM) to activate the
Pictures
.
Send
To vie w or send th e pi cture, tap to go directly to
Pictures
.
This takes you directly to the folder wher e the pict ure was stor ed.
All
(The command
lets you view all pictures in the P800, including
those on the Memory Stick Duo, if you ha ve inserted it.)
Delay timer
CommuniCam has a self -timer with 15 seconds delay.
To take a pi ct ure with self-timer
1. Select
2. Tap
>
.
CommuniCam > Delay Timer
.
3. Press the camera button. The timer beeps for 15 seconds and
a timer icon is shown before the picture is taken.
CommuniCam > Delay Timer
Tap
again to deactivate the self-timer.
Pictures remaining
Below the viewfinder you find a indication of how many
pictures you have left. The calculatio n is based on the current
settings plus available space on the storage location you have
selected, internal or the Memory Stick Duo.
CommuniCam and Pictures 59
Page 60

This is the Internet version of the user’s guide. © Print only for private use.
Managing pictures
In Pictures you can manage all pictures saved in your P800. The
pictures can be taken using the CommuniCam, received via email, Bluetooth w ir eless t ech nolo gy o r inf rare d co mmun icati on,
downloaded via the browser or transferred from your PC via a
cable. Your P800 supports JPEG, GIF, PNG, WBPM and BMP
picture formats. The pictures can be sent in multimedia
messages, added to the contacts in your pho ne book, or used as
background image and screensaver.
Thumbnail view
The thumbnail view give s
an overview of all the
pictures in your P800. You
can search for specific
pictures and sort your
pictures by name, da te, size
or type.
Change between a
thumbnail view and a list
view of the pictures by
tapping or .
At the bottom of the screen
you can see how many
pictures you have saved in
your P800.
Tip To ta ke a new picture,
tap to go directly to the
To sort the pictures
Edit
•Tap
to choose how to sort the pictures in your folders.
Pictures Edit Photos
Brioney Mer de glace
Mont Blanc
CommuniCam
4 pictures
.
Wakeboard
60 CommuniCam and Pictures
Page 61

This is the Internet version of the user’s guide. © Print only for private use.
Detail view
In the detail view, you can
rename you r pict ures a nd s ort
them into folders. This makes
it easier for you to keep track
of the pictures in your P800.
To rename a picture
1. Select
2. Enter a picture name
Pictures > Rename
picture
.
Done
.
>
Note Two or more pictures
cannot have the same name.
Tip Us e the
Folder
function to
organize your pictures. Read
more about organizing files
in “Folders” on pa ge 31.
At the bottom of the screen you can see the picture information,
for example, the size of the picture and the date the picture was
taken. To change between a picture size which fits to the screen,
and the actual size of the picture, tap and .
“Actual size” means each pixel of the image is displayed on one
pixel of the screen, so a 640x480 image will be displayed with
scroll bars as it is larger than the display area.
Pictures Edit Photos
Mont Blanc
11:30 02-06-21 JPG(39 Kb)
Use and to move bet w een the pictures in the current
folder. takes you back to the thumbnail or list view.
Sending and receiving pictures
You can send pictures to other phones or to a PC via multimedia
messaging. You can also save pictures that you have received
via e-mail and in multimedia messages. To send pictures use
Send as
. Refer to “Sending and receiving items” on page 33. To
save a picture from a message refer to “To store a received
MMS object, for example a picture” on page 86 and “Receiving
attachments” on page 88 for further details .
Deleting, moving, and copying
From the detail view of the picture you can:
• Select
• Select
• Select
• Use the folders menu to move a picture to another folder
Pictures > Delete picture
Edit > Copy picture
to delete it.
to copy the picture to a clipboard so
that you can paste it into an item in another application.
Pictures > Copy to
to copy the picture to another folder
(internal or on a Memory Stick Duo). Refer to “Folders” on
page 31 for more information.
(internal or on a Memory Stick Duo). Refer to “Folders” on
page 31 for more information.
CommuniCam and Pictures 61
Page 62

This is the Internet version of the user’s guide. © Print only for private use.
To delete multiple pictures
• Use the Storage manager found in the Control panel. For
more information, refer to “Folders” on page 31.
Sony Image Station
You can exchange pictures between your P800 and Son y I m age
Station on the Web. Use the browser in your P80 0 to go to the
relevant Internet site and sign up:
• For Europe: http://www.sonystyle-imaging.com
• For Japan: http://www.imagestation.jp
•For USA: http://www.imagestation.com
62 CommuniCam and Pictures
Page 63

This is the Internet version of the user’s guide. © Print only for private use.
Video player
You can play video cont ent that is stored in your P800 or
streamed. You can also play audio-only material which is
encapsulated within an MPEG file or streamed. You can
download video clips from an Internet site or transfer from a PC
via cable, or from a Memory Stick Duo. You can also send these
video clips to other phones or PCs via infrared communication,
Bluetooth wire less technology or multimedia messaging.
You do not have to download a comple te vi deo clip to be able to
view it. You can use the streaming function and view the video
clip from the website where it is located. The video clip is
played with only a s hort time delay.
The video player supports files in the MPEG-4 file format, for
example name.mp4.
Y o u can store video clip s both in ternally an d extern ally. You can
also copy them between the internal memory and the Memory
Stick Duo. See “Folders” on page 31.
To adjust the volume
• R otate the Jog Dial up to increase the volume, and down to
decrease t he volume.
Video clips
A video clip is a rather short, limited, video sequence.
Playing video clips
The Video player opens in the list view. In this view, you get an
overview of all the MPEG-4 video clip s in your P800. You can
search for specific vi deo clips, zoom the video cli p names and
sort them by name, date, size or type. At the bottom of the
screen you can see how many vi deo clips you have saved in
your P800.
To view a video clip
>
1. Select
2. Select a video clip in the list.
Warning! The volume may be uncomfortably loud at the
higher volume levels if the ph one is close to your ear, or if you
are using the stereo headset. Exposure to excessive volume
levels may damage heari ng.
To sort the video clips
• Select
the current folder.
.
Edit
and choose how you want to sort the video clips in
Video player 63
Page 64

This is the Internet version of the user’s guide. © Print only for private use.
Managing video clips
This detail view is intended
for managing one clip at a
time. You can play and
pause the clip by tapping
and .
In this view you can send,
rename, delete or move your
video clips. Only the vi de o
clips saved in yo ur P800 or
on the Memory Stick Duo
(that is not streamed) can be
handled in the detail view.
To rename a video clip
clip
.
Video > Rename
1. Select
2. Enter a video clip name
Done
.
Two or more video clips cannot have the same na me.
Tip Use the
Folder
function to organize all your video clips.
To copy the current video clip to another folder, select
, then select a folder from the list.
Copy to
Video Edit Trailers
Diving in the Ocean...
Playing 1:49/2:24
>
Video >
To view the video clip information
• Select
Video > Clip info
.
To delete a video clip
1. Select the video clip you want to delete.
2. Select
Video > Delete clip
.
Saving video clips
When you play video clips that you have received via e-mail or
multimedia messaging, or that you have downloaded to your
P800 from the web, the viewer detail view is automatically
launched. From the viewer detail view you can then save the
video clip to your P800.
To save a video clip from another applicati on
1. Sel e ct the video clip you want to save.
2. Select
Video > Save clip
3. Select what folder you want to save the video clip in
.
> Save
Sending and receiving video clips
You can send and receive video clips using
“Sending and receiving items” on page 33.
Send as
. Refer to
.
64 Vide o pla yer
Page 65

This is the Internet version of the user’s guide. © Print only for private use.
Preferences
When you download a video cli p to your P800 , it is save d in the
download cache memory. When this memory is full, you hav e to
empty it to be able to download new video clips to your P800.
To clear the download ca che
1. Select
2. Select
When you view a video clip from a website, using the streaming
function, a media buffer is used to provide a steady flow of data.
Increasing the size of the media buffer may improve the playback of the video clip.
To change the media buffer size
1. Select
2. Select
Edit > Preferences
Clear cache > Done
Edit > Preferences
Custom setting
.
.
.
and move the slider left or right.
Streaming
Streaming is a data transfer method making multimedia
available in real-time, that is you can , for example, listen to
audio and watch video almost at the same time as it is sent.
The data in the file is bro k en into small packets that ar e sent in a
continuous flow, a stream.You can then begin viewing the file
from the beginning as the rest of the packets are sent. The short
delay at the start is to enable a small a mount o f data to b e buf f ered.
Your P800 can receive streaming multimedia.
Applications
Streaming applications can be classified into on-demand and
live applications.
Examples of on-demand appl ications are:
• Streaming of music
• Streaming of news (video and audio)
• Streaming of movie trailers
• Streaming and down load of video
• Live streamin g of mu s i c or video (broadcast)
How to connect to a streaming service
1. Open Internet and browse to the site where the service is.
2. Sel e ct the item you want to play, for example a video.
The site server will download a part of the video to the P800
buffer memory. This will take a short while. When the buffer
memory is filled, the Video player will open the detail view,
described above, and pl ay the video seamlessly.
Video player 65
Page 66

This is the Internet version of the user’s guide. © Print only for private use.
Audio player
Your P800 has mobile music in the form of an stereo audio
player. With the audio player you can listen to single music
tracks or entire folders with tracks. You can download tracks to
your P800 from a PC, the Inte rnet or Memory Stick D uo , and
create different folders with tracks. Your P800 supports a
number of different sound files, includi ng the popular MP3
format. See “T echnical data” on page 185 for more information
on supported file types.
Y ou c an store sound files bo th internally and e xternally. Y ou can
also copy them between the internal memory and the Memory
Stick Duo. See “Folders” on page 31.
When you receive a phone call while listening, you will hear a
beep sound mixed with the music, the music sound level will
decrease, and the incoming call screen will display on top of the
audio player . When you en d the call, the screen will re turn to the
play view.
Tip To listen to more music you can store music on several
Memory Stick Duos and carry them with you.
Playing sound files
Though you start to play music in flip open, you can still listen
to MP3 files when you cl ose the flip. To stop the music, you
must open the flip and the Audio pl ayer.
To adjust the volume
• Rotate the Jog Dial up to increase the volume, and down to
decrease the volume. You can only adjust the volume in
track-folder view.
Warning! The volume may be uncomfortably loud at the higher
volume levels if the phone is close to your ear, or if you are
using the stereo headset. Exposure to excessive volume levels
may damage hearing.
66 Audio player
Page 67

This is the Internet version of the user’s guide. © Print only for private use.
Track-folder view
This view is intended for
playing entire folders. In the
track-folder view you can
Play, Pause,
Stop
the playback of the
and
current folder, and see the
duration of the track.
Selecting a track and tapping
will play the selected
track and all the following
tracks in the folder. Tap
to move directly to the
file list view.
Audio Edit All
Sony Ericsson theme
MP3 1:40
Various
Aeroplane
Beautiful Night
Rooster
Song for you
Sony Ericsson theme
Standing Still
Stuck with You...
Walk on
Loop
With the loop function you can decide if you want to listen to
the tracks in the current folder only once, or if you want to loop
them until you manually stop the play-back.
To loop a list
• Select
Audio > Loop
.
Managing sound files
File list view
In the file list view you can
see how many tracks you
have in the current folder.
T appi ng a file name wi ll open
the detail view, and allow you
to play and manage that file.
Tap to move directly to
the track-folder view.
Detail view
The detail view is intended
for managing one file at a time. Tap a file name to open the
detail view. You can also play and pause the file by tapping
and .
In the detail view you can move tracks between your different
folders using th e folder function, or rename or delete them.
Audio Edit All
Aeroplane
Beautiful Night
Rooster
Song for you
Sony Ericsson theme
Standing Still
Stuck with You...
Walk on
8 tracks
Audio player 67
Page 68

This is the Internet version of the user’s guide. © Print only for private use.
The detail view displays
the name of the track, the
artist’s name, the album
title, the track number, the
copyright year, the sound
file type and the duration
of the track.
Note The amount of
information displayed
depends on how much
information is availab le on
the sound file.
Move between the tracks
in the current folder using
and buttons.
the
Audio Edit Unfiled
Sony Ericsson theme
Artist: Various
Album: Autumn 2002
Track: 01
Copyright: Sony Ericsson
Filename: SEM.MP3
MP3 1:34/1:40
To rename a track
1. Select
2. Enter a track name and tap
Audio > Rename track
.
Done
.
T w o or mor e tra cks cann ot ha v e the sam e nam e .
To delete a track f rom the P800
1. Select
2. Select
Audio > Delete track
Yes
.
.
Managing track folders
The Audio player plays the cont ents of a specific folder. (With
one exception, the
All
folder. If you select this folder, all sound
files in all audio folders will be played.) Using the folder
function you can create new folders for sound tracks. You can
create folders on the Memory Stick Duo. You can also use
several Memory Stick Duos for your music, for example.
In any Audio player view, you can create a new folder using the
Edit Folders
command in the
Folder Menu
. Then you move or copy
your sound files to the new folder. You can add more folders
with sounds as long as there is memory available. You can also
Edit
sort the files using commands in the
menu.
Preferences
You can choose if you want all types of sound files to be
displayed and played in the folders, or if you want to display and
play only a certain t ype of sound file.
To select sound file types for the track folders
1. Select
Edit > Preferences
2. Check the boxes next to the sound f iles you want to include
in the track folders and tap
.
Done
.
68 Audio player
Page 69

This is the Internet version of the user’s guide. © Print only for private use.
Saving sound files
When you receive sound files in other applications, such as
e-mail and multimedia messages, you activate the viewer in
your P800. From the viewer you can then save the sound file
to your P800.
To save a track from another application
1. Tap Sa ve or select
2. Select what folder you want to save the track in and tap
Sending and receiving sound files
You can send and receive sound files using
“Sending and receiving items” on page 33.
Note You can send WAV and AMR sound files in multimedia
messages, and MP3 and AU sound files as attachments to
multimedia messages.
Audio
and tap
Save
.
Send as
. Refer to
Save
.
Audio player 69
Page 70

This is the Internet version of the user’s guide. © Print only for private use.
Internet
You use
• Connect to the Internet to view and access Web and WAP
pages.
• Receive and view Push messages from your WAP service
provider.
• D ownload Java applications, images and audio.
The browser can open web pages that do not use Java script or
frames.
You c an save bookmarks to viewed pages, to be able to access
them easily . You can also save pages in the P800 for off-line
viewing.
The browser uses folders for categorizing the information. The
folders used are bookmarks, saved pages, signed documents,
and Push messages.
Push messages is a service that gives you notifications about, for
example, weather forecasts, sport results, and stock quotes. The
notification is sent to you as a messages that contains a WAP
link to the site with the information you subscribe to.
Internet
, the P800 browser, to:
Before you can use Internet, you need to set up an Internet
account in the
services it might be necessary to set up a WAP account i n t he
Control panel
Messages” on page 158.
To start the browser
• Start the browser by:
– pressing the browser button (the home
– selecting in the application picker
– selecting in the application launcher
– selecting a URL in another application.
Note If required, you have to enter your username and
password to log in to your Internet accou nt .
While opening a page the P 800 might not answer to incoming
calls. However, when the page is properly opened you can
receive a call and the page will still be open.
Control panel
as well. See“Getting started with Internet and
page is shown).
(the start page is shown).
(the start page is shown).
. If you intend to use certa in WAP
70 Internet
Page 71

This is the Internet version of the user’s guide. © Print only for private use.
The application has two views:
Browser
view
Bookmarks
view
The base view of the app li cation, where you
can view Web and WAP pages
A list view where you can save shor tcuts:
• to Web and WAP sites on the Internet
• to locally stored pages
• to documents digitally si gned by you.
.
Internet 71
Page 72

This is the Internet version of the user’s guide. © Print only for private use.
0:03
A
Using the brows er vie w
Screen
Internet Edit
B
J
K
E See the bookm a rks view.
F Close or get information abou t th e connection.
G Go to the home page.
H Stop loading the page .
J A secure connection is establishe d.
K Progress bar, shows the loading progress.
Browser view options
• Internet menu
–
Open page
– Enter the URL, or select from the drop-down
list.
Add to bookmarks
C
D
Sony Ericsson
Sony Ericsson P800
E
H
G
–
select the folder to save it in.
Save page
–
folder to save it in.
Send as
–
– Send the current URL via text or multimedia
– Enter the name of the bookmark and
– Enter the name of the page and select the
message, e-mail, Infrared, or Bluetooth wireless
technology.
–
Find
– Enter text and search for the text in the page.
–
Find next
F
A Internet menu.
B Edit menu.
C Go to the next pa ge.
D Go to the previous page.
–
–
–
– Search for the next occurrence of the search
text.
Reload page
Load all images
Page information
– Reload the page.
– Load all images of the page.
– Show the page information.
72 Internet
Page 73

This is the Internet version of the user’s guide. © Print only for private use.
•Edit menu
–
Cut
– Cut out the marked information from an input field.
–
Copy
– Copy the marked information.
–
Copy all
– Copy all information on the page.
–
Paste
– Paste the copied text into the sel ected field.
–
Zoom
– Select zoom le vel: Small, Medium or Large.
–
Preferences
–
Help
– Set the preferences of the browser.
– View help on Internet
Context sensitive menus
The context sensitive menu is opened when you keep the stylus
pressed on a link or a picture.
• Text link and pict ure link
–
Open link
–
Link information
–
Add to bookmarks
– Open the active link.
– Show information on the link.
– Add the active link URL to the
bookmark list.
• Loaded picture (with or without link)
–
Save image
–
View image
– Save the picture in t he P800.
– View the picture adapted to the screen
(enlarged or r educ e d).
Copy image
–
–
Send image as
– Copy the picture to the clipboard.
– Send the picture as text or multimedia
message, e-mail, infra red, or Bluetooth wireless
technology.
• Not loaded picture (with or without link)
–
Load image
• Voice call link
–
Call
New SMS
–
–
New MMS
–
New contact
• Mail to link
–
New e-mail
–
New MMS
–
New contact
– Load the picture.
– Place a call according to the link.
– Send an SMS message according to the link.
– Send an MMS message according to the li nk .
– Create a contact with the link inform ation.
– Send an e-mail according to the link.
– Send an MMS message according to the li nk .
– Create a contact with the link inform ation.
Icons within a page
Picture not loaded (can be loaded manually).
Damaged picture (not possible to load).
Note If images are not loaded, select the pict ure icons
or select
Internet > Load all images.
To open a specific web page
1. Select
Internet > Open page.
2. Enter the page URL or selec t a p r eviously viewed page f rom
the drop-down list.
3. Select
Open.
Internet 73
Page 74

This is the Internet version of the user’s guide. © Print only for private use.
To navigate through recently opened pages
1. Sele ct to move back to previously vi ewed pages.
2. Select to move forward again.
To save a page for off-line browsing
1. Select
Internet > Save page
.
2. Change the page name, if required, and select a folder to save
it in.
3. Select
Done.
To create a bookmark to the open page
1. Select
Internet > Add to bookmarks.
2. Change the bookmark name, if re quired, and select a folder
to save it in.
3. Select
Done.
To download and upload files, for example, applications
• Wh en you select a link to a downloadable file, for example,
applications, images and so on, in formation on the file is
displayed.
Yes
Select
to start the download.
• When you select a link for uploading a file, a form for
submitting the file is displayed.
Select the file and select
Yes
to start the upload.
To view information on the open page
1. Select
2. Select the
3. Select the
Internet > Page inform a ti o n
Content
tab to view the page information.
Connection
tab to view information on the
.
connection.
4. Select the Certificates button to view the information on:
–Server
–User
To disconnect from the Internet
1. Select the connection icon (HSCSD/CSD or GPRS )
in the status bar.
2. Select
Disconnect
3. Th e dialogue
4. Select
Yes
from the pop-up men u
Do you want to disconnect, Yes/No
.
appears.
WIM Access
When the browser requires access to the WIM card, for
example, when establishi ng a secure connection, you have t o
enter the correct PIN. For more information, please contact your
service provider or IT department.
Signing documents
You have to enter the signing PIN each time a signing operation
is going to be performed.
74 Internet
Page 75

This is the Internet version of the user’s guide. © Print only for private use.
A
User auth entication request
Whenever a user authenticati on is requested, you have the
possibility either to select a certificate and confirm the user
Using the bookmark view
B
authentication, to select to continue anonym ou sly or to can cel
the connect i on .
Always connect anonymous
If
has been set, the browser will
instead au tomatically try to connect anonymously.
Internet Edit All
Search Internet
C
D
My home page
SonyEricsson
News
Webmail
Project home
711 time table
CSS fonts
G
E
H
F
A Interne t m en u.
B Edit menu.
C Select an icon to view information on th e bookmark.
D Che cke d bookmarks can be deleted from the Internet menu.
E Select the bookmark text to view the page.
F S elect to see the browser view.
G Folder menu.
H Select to go to the home page.
Internet 75
Page 76

This is the Internet version of the user’s guide. © Print only for private use.
Bookmark view options
• Internet menu
–
Open page
– Enter the URL, or select from the drop-down
list.
New bookmark
–
– Enter the URL, the nam e of t he b ookm ark
and select the folder to save it in.
Delete
–
•Edit menu
–
–
–
–
• Fol der s m e nu
–
–
–
–
–
– Remove the selected bookmark.
Edit
– Edit the selecte d bookmark.
Zoom
– Select zoom le vel: Small, Medium or Large.
Help
– Open the help for Internet.
Preferences
All
– Show all contacts in the list.
Bookmarks
Saved pages
Unfiled
Edit folders
– Set the preferences of the browser.
– Show all bookmarks.
– Show all saved pages.
– Show the bookmarks that a r e not in a folder.
– Categorize your contacts in folders (business,
personal and so on).
Icons
Bookmark
Push message from the WAP service provider
Signed document
To open a bookmark
• Select the bookmark text.
The bookmarked item is opened.
To view bookmark information
• Select the bookmark icon.
Information on the bookmark is shown. From the
information screen you can:
– Edit the bookmark.
– Delete the bookmark.
– Send the bookmark as e-mail, SMS message, Bluetooth
wireless technology, infrared, or MMS message.
To delete several bookmarks
1. Sel e ct the check box of the bookmarks to delete.
2. Select
3. Select
Internet > Delete.
Yes
to confirm.
Saved page
76 Internet
Page 77

This is the Internet version of the user’s guide. © Print only for private use.
Preferences
The browser is initially set up to work, but you have to set up
your own account. A simple way of setting up an Internet
account is to use the web confi gurator on
www.SonyEricsson.com. See also “Internet accounts” on
page 143 for more information.
The easiest way to set up Internet and WAP accounts is to ask
your Internet serv ice provid er to send yo u an auto setu p message
containing the required setup information. The accounts will
then be set up automatically on your P800. To guarantee the
integrity of the settings, a PIN may be used.
For security reasons, some WAP pages and services, for
example on-line b anki ng, can only be a ccess ed from a pa rticu lar
WAP account. See “WAP accounts” on page 155 for more
information.
Note Proxy settings for MMS message and for a WAP gateway
should be set in the WAP account. Other proxy settings should
be set in the Internet account.
To set up the browser
1. Select
2. Perform the setup according to the following:
Edit > Preferences
.
Basic settings
– Enter the URL for the page to be shown wh en the browser
is started from the applicatio n p ic ker; e ith er a pa ge sto r ed
in the P800 or a page on the Internet.
– Select the WAP account to be used when the home page is
loaded. The accounts are set up in the control panel.
– Select if images should be loaded. If images are not
loaded, the page will be loaded faster. Non-loaded images
can be loaded manually whe n viewing the page.
– Select if sounds should be played when the page is
opened.
– Select if animations should be played when the page is
opened.
Security settings
– Select if you want to save signed documents .
– Select if you want to connect without giving away your
identity.
– Select if you want to connect using the WIM card.
– Select if you want to allow coo ki e s.
Advanced settings
– Select if you want to be able to receive messages from
your WAP service provider.
– Select if you want to automatica lly open the URL in WAP
Push messages.
Internet 77
Page 78

This is the Internet version of the user’s guide. © Print only for private use.
– Select if you want to remove out-of-date messages
automatically.
– Set the size of memory where vi ewed pages are stored.
Stored pages will load faster when you visit them again.
– Select
– Select
Clear history
Clear cache
to empty the list of pages visited.
to empty the cache memory.
78 Internet
Page 79

This is the Internet version of the user’s guide. © Print only for private use.
Games
There are two pre-installed games in your P800. Traditional
Chess and the card game Solitaire.
More games are available on the
original P800 box. You can also install games from other
developers, see “Installing applications” on page 120.
Multimedia for P800
CD in your
Chess
You can play Chess against the P800, o r ag ainst another P800
user via SMS.
Please read the help texts for detailed informa tio n o n how to se t
up and play Chess.
To start a new game
1. Select
2. Enter details as desired in the
Chess > New game
return to these details later.
–
Name
– Give the game a name so you can return to it late r
if you have to interrupt it.
–
Notes
– Write a note about the game.
–
You play
– Choose to play white or black.
–
Against
– Select the level of your opponent.
to initiate a game.
New game
dialogue. You can
Played
–
3. Tap
To play Chess
1. Sele ct the piece you want to move.
The square where it is standing will now be highlighted.
2. Select the square to which you want to move the piece.
The square will flash and the selected piece will move to it.
Closing the flip closes the game temporarily and saves the
session status. Your opponent will be sent an end- of-game text
message.
– Select if you want to play locally against your
P800 or against another P800 user.
Play
to start the game.
Solitaire
Solitaire is a card game played with a standard deck of 52 cards
and up to 4 Jokers.
The purpose of Solitaire is to remove all the cards fro m the p iles
to the layout card whilst scoring as many points as possible.
Points are awarded for playing pile cards and bonus points are
awarded for unbroke n, ascending or descending runs of four or
more rank cards.
Games 79
Page 80

This is the Internet version of the user’s guide. © Print only for private use.
When you cannot play any more cards and cards still r emain in
the piles, the game is over. If all the pile cards are removed,
bonus points are awarded and the hand is won. You are then
challenged to pl ay a H i/Low game to acqu ire more bonu s points .
After the challenge, the game continues and a new hand is dealt
with one less Joker.
Rules
When the game starts, 35 cards are deal t from the deck into
7 piles of 5 cards. A further card is then dealt face up from the
layout card.
• Cards can only be played from the bottom of the piles.
• To play a pile card it must have a face val ue of one more or
one less than the layout card.
• Aces are low and may not be played onto Kings. Jokers can
be played onto any car d and any card can be played on to a
Joker.
Settings
To restart the game during a game
• Select
To undo/redo a move
• Select Edit > Undo move / Redo move.
Solitaire > New game.
To change card backs and playing background
• Select Edit >Preferences.
Play Solitaire
Solitaire is only available with the flip open.
1. Select the icon for Solitaire.
The game will either start with a new gam e or with the layout
for an earlier, interrupted game. (The game data is saved on
return to desktop, when the flip is closed or when the bat tery
is low.)
2. Select the card you want to move and it will be higlighted.
3. Select the card to which you would like to move the
higlighted card.
80 Games
Page 81

This is the Internet version of the user’s guide. © Print only for private use.
BUSINESS
Messages
With
types of messages:
Messages
you can create, send, and receive different
SMS (Short Message Service) messages are text
messages sent and received via the network operator's
message centre. When a text message has pic t ure s ,
sounds, melodies and animations inserted, it becomes
an EMS (Enhanced Message Service).
MMS (Multimedia Message Service) messages.
A multimedia message can c ont ain text, graphics,
animations, photograp hic im a ges, audio clips and ring
melodies.
E-mail messages. Your P800 ’s mail client supports
POP3 and IMAP4 mail servers, MIME attachments and
SMTP for sending mail.
– E-mail notifications.
– Files for exchanging electronic business cards (vCard)
and calendar information (vCal).
• Auto setup files for OTA (Over The Air) configuration.
• Beamed messages. These are files received via Infrared or
Bluetooth wireless technology.
The different types of messages, e-mail, text messages, and
multimedia messages are handled by separate messaging
accounts. Select
to see the details of the messaging accounts on your
accounts
Control panel > Connections > Messaging
P800.
You can have any number of e- mail accounts - a typica l
configuration will be one business and one personal account.
You also use
Messages
• Area Information messages.These are text messages
broadcast to all subscribers in a networ k area for example
local road reports or local taxi phon e numbers (Area
Information services are not availa ble from all operators).
to receive:
When you set up a synchronization with your PC, an account for
synchronized e-mails is automatically created on your P800.
With the flip closed, text and multimedia messages can be sent
and received using the Jog Dial and the keypad. More advanced
tasks are, however, best handled with the flip open.
• BIO (Bearer Independent Object) messages. There are
different types of messages:
– Setup (e-mail, Internet , WAP accounts)
Messages 81
Page 82

This is the Internet version of the user’s guide. © Print only for private use.
Before using Messages
Before you can send and rec eive any me ssages (e xcept for SM S)
you need to set up the necessary accounts.
A simple way of setting up an Internet or e-mail account is to
ask your service provider to send you a message that contains
the required information to create an account automatically on
your P800. You can also use the web configurator on
www.SonyEricsson.com. Received auto configuration messages
are stored in the
Auto setup
account
Inbox
.
See “Getting started with Internet and Messages” on page 158.
Folders in Messages
Messaging accounts can have the following folders:
Outbox, Draft
and
Sent
.
Inbox
Inbox contains received messages. You can reply to, forward,
and delete messages, but not edit them.
Outbox
Outbox contains messag es th at are ready to be sent. If you are
creating several e-mails, and not using GPRS, you can reduce
Outbox
connection time by saving them to
send them all at the same time.
and then connect and
Inbox
,
To save an e-mail message to Outbox
1. After composing your message, select
2. Select
Save to outbox.
Send.
Messages that yo u send fro m an e-m ail sy nch ron izat ion a cco unt
Outbox
are always saved to
and sent from your PC af ter your
next synchronization.
Draft
Draft contains messages that are no t ready to be sent.
To store a new message in Draft
Send
• Create the message and exit without selecting
.
To move a message from Outbox to Draft
• Open the Outbox message list and select
Draft
.
Message > Move to
Sent
Sent contains messages you have sent from your P800.
Tip To avoid running out of storage space on your P800, make
Sent
it a habit to regularly clear old messages from your
especially those with attachments.
folder,
82 Messages
Page 83

This is the Internet version of the user’s guide. © Print only for private use.
To
The accounts in Messages
When you open Messages, a list of your accounts appears.
The top item in the list,
creating a new text message (SMS or E MS ) .
An asterisk next to an accou nt indicates that a message has
arrived since you last opened the accounts inbox.
Create SMS,
is a shortcut for directly
2. Ente r th e recipient’s number or select
or recipients from your contact l ist and select
3. Write your message and tap
Send.
To add an EMS object to your text message
1. Tap
Edit > Insert Object.
2. Sele ct the type of object you wish t o add and select
3. Select the item you want to insert and tap
and select recipient
Done.
Done
Select.
Handling text messages
A text message is sent via SMS (Short Message Servic e). It can
contain up to 160 characters (70 characters if you use non latin
characters). If you create a longer message it will be sent as two
(or more) separate messages (concatenated), but received (if the
receiving mobile phone supports this) as one message. If you
add pictures, anima tions, melodies and sounds to your message
it becomes an EMS (Enhanced Message Service) message.
To format the text in the message using EMS features
1. Hig hlight the text you want to format.
Edit > Format text.
2. Tap
3. Tap
General
4. Tap
tab to change the
Style
tab to check the character style check boxes: bold,
Alignment
and
Font
.
italic, underli ne, or strike-through.
5. Select
Done
.
Text messages can be sent to one or more person.
If you leave the message before sending it, it will automatically
Draft
be stored in the
folder (unless you edit a message which
already was located in Outbox).
To write and send a text message
1. In
Messages 83
Messages
tap
Message > New
select
.)
Create SMS.
(You can al so select
SMS >
Page 84

This is the Internet version of the user’s guide. © Print only for private use.
Handling multimedia messages
MMS (Multimedia Messaging Serv ice) messages can include
real pictures, animations and sound, organized like a slide
presentation with time-based con trol of the pla yba ck.
Composing a multimedia message is like building a small slide
presentation. A typical page will consist of a picture, some text
and sound. Refer to Technical data for supported file ty pes that
you can add.
You can take a picture with the Co mmuniCam and send it as a
Send as
multimedia message using the
viewer. Multimedia messages can be sent to a mobile phone or
an e-mail account.
How the recipients receives an MMS you send depends on your
MMS service and how the receiving phone complies to MMS
specifications:
• Compliant and conformant phones can receive pictures of
size 160x120 pixel s
• Compliant and non conformant phones can receive pictures
of almost any size
• Partly compliant phones can read the message on the
Internet, using WAP
• Non compliant phones will get an SMS notification.
command from the
To create a new multimedia message
1. Sele ct your MMS account and then sel e ct
open an existing message and select
2. From the
Select templa te
template you want and tap
dialogue, tap th e name of the
Select
Message > New
. The
Blank
open a blank message.
3. Th e first page of the new
message is now displayed.
To add a picture, text,
audio, voice or scribble
select
When
.
Add scribble
is
Message Edit Draft
1/1 2
selected the Image editor
presents a white
background onto which
manual graphics ca n be
added. This includes
controls for pen, crop,
colour, scale, rotate and
pen width.
Message > New
.
template will
Add image
Add scribble
Add text
Add audio
Add voice
Paste
Send
or
84 Messages
Page 85

This is the Internet version of the user’s guide. © Print only for private use.
Here you can see the first
page with an in serted pict ure.
To delete, replace or edit an
Message Edit Draft
1/1 5
inserted item
• Select the inserted item
and choose an action.
To edit an inserted picture
1. Select the picture so that it
is highlighted.
2. Select
Edit image.
While editing your picture
Add text above
New image
Edit image
Edit time
Delete
Copy
you can add scribble,
resize, crop or rotate your
Send
picture. To undo your
changes, select
all.
Edit > Undo
Note If you have accepted changes by selecting Done, you will
not be able to undo them.
To edit item time
For each item in a page, i t is po ssible to set t he time at which the
item appears and for how long it is displayed or played.
1. Select the item so it is highlighted
2. Select
Edit time
3. Set the
Start time
, which is the number of seconds after the
start of the page before the item is displayed or played. The
default is 0, meaning show or play immediately
Duration
4. Th e default
is for the item to continue for the
remaining duration of the page. To change this, un-check
Page time
and change the duration to the required value in
seconds.
To add a new page to your multimedia message
• Select .You now have a
completely new page in
Message Edit Draft
which you can inser t i tems
.
2/2 5
To enter the recipie nts phone
number
1. Select the address tab.
2. Select
To
and select the
recipient from Contacts.
3. Or, select the line beside
To
and enter the recipients
mobile number or e-mail
address.
Add text
Add audio
Add voice
Send
Messages 85
Page 86

This is the Internet version of the user’s guide. © Print only for private use.
To insert an attachment
1. While creating your multimedia message, select the tab with
Add
the attachment icon, Select
.
2. Select the type of attachment you want to add.
3. Select the attachment.
To play a received multimedia message
• Th e fi rst time a multimedia message is opened it plays
automatically. The next time you open the message you can
play it by pressing the Play Button (flip open) or by choosing
Play
from the menu (flip closed).
To set the download method for receiving multimedia
messages, manual or automatic
•In
Control panel,
MMS > Automatic.
–
Off
means that only headers will be downloaded and can
select
Connections > Messaging account s >
be viewed.
–
Home only
means the same as for On below, but only valid
in your home country.
–
On
means that the multimedia message is do wnloaded and
can be read like any other message. There is no
intermediate step.
To add or delete a template
• To make a template from a message, select
give the template a name, and tap
Done
Save as template,
.
• To delete a template, tap the name of the template you want
in the
Select templa te
dialogue and tap
Delete
.
To forward an MMS
1. Open the message.
2. From the
Message
3. On the address tab, select
menu, select
Forward
.
To
and enter the recipients
mobile number or e-mail address.
4. Select
Send
.
To store a received MMS objec t, for example a picture
1. Open the message.
2. Select the picture you want to save.
3. From the
menu, select
Save image
.
Edit
4. Select the storage location.
Save
5. Select
.
You can store objects both internally and externally. You can
also copy them between the internal memory and the Memory
Stick Duo. See Folders in Getting to know your P800.
86 Messages
Page 87

This is the Internet version of the user’s guide. © Print only for private use.
Handling e-mails
Writing e-mails
To write a new e-mail
• Select an e-mail account and select
If you leave the message before sending it, it will automatically
be stored in the
Draft
folder (unless you edit a message which
already was located in Outbox).
To mark an e-mail as urgent
• On the address tab, select
Tip If you are creating several e-mails, and not using GPRS,
you can reduce connection time by sa ving them to
then connect and send them all at the same time.
To enter addresses from Contacts when writing an e-mail
1. Select
2. In the
To:
Select contact
dialogue select the check box for each
entry you want to send the e-mail to.
Done
3. Select
.
Tip To enter several addresses manually (without using
Contacts) in a text message, multimedia message or in an email: enter a comma between each address.
Message > New
High
in the
Priority
.
list.
Outbox
and
Sending e-mail
To sen d a n e-ma il me ssage
• Select
Send > Send immediately
.
Note If your P800 is connected to the Internet when you send
an e-mail, it will be sen t immediate ly an d your P800 will remain
connected to the Internet .If not, your P800 will connect to the
Internet and then send the e-mail.
To save an e-mail message and send it later
• Select
Send > Save to Outbox
.
To move an e-mail message f r om Outbox to Draft
• In your list of Outbox messages, tap to the left of the e-mail
(a tick appears), and select
Message > Move to draft
.
If you leave the message before sending it, it will automatically
Draft
be stored in the
folder (unless it was created from Outbox).
Adding attachments
To attach an entry to an e -mail message
1. On the attachment tab, select
Add.
2. Sel e ct the type of attachment you want to add.
3. Select the item.
Messages 87
Page 88

This is the Internet version of the user’s guide. © Print only for private use.
“Send as” e-mail
You can send the entry you ar e vi e w i n g as an attachme nt t o a
new e-mail from the following applications: Audio,
Calendar,
and
Pictures.
Video, Viewers, Internet,
Contacts, Tasks, Jotter, Voice
To attach a Calendar entry to an e-mail message
1. Open the entry in Cal e ndar and select
2. Select
e-mail > Done.
3. Complete the e-mail message and select
Calendar > Se nd As .
Send
.
To attach a Contact to an e-mail message
1. Open the contact details for the contact you wish to send and
select
Contacts > Send as.
2. Select
3. Complete the e-mail message and select
e-mail > Done.
Send
.
Receiving e-mail
E-mails must be fetched from the e-mail server on the internet or
at your office. This can be done manually using the
Get & send
function or automatically by requesting the P800 to check for
new e-mail at certain times
When you forward an e-mail, you can choose whether or not to
forward the attachment. Large attachments increase the size of an
e-mail and consequently the conne ction time nee de d to se nd it.
Receiving attachments
Any attachments to an e-mail message are displayed on the
tab. The icon next to an attachment in the list identi fie s the
type of attachment.
To view an attachment you need a viewer for that type of
file.Your P800 comes with pre-installed viewers for Microsoft
W ord, Excel, PowerPoint and Adobe Acrobat (PDF) files. More
viewers are available from the
Multimedia for P800
CD.
To save an attachment, for example a sound file
1. Open the e-mail message and select the tab.
2. Select the attachment, which opens the Audio application.
Save
3. Select
.
4. Select the location where you want to store the message.
Save
5. Select
.
You can store objects both internally and externally. You can
also copy them between the internal memory and the Memory
Stick Duo. See Folders in Getting to know your P800.
Reply with history
If messages is set up to reply with history, the original message
is included when you r eply to it, see “Messagi ng accounts” on
page 148.
88 Messages
Page 89

This is the Internet version of the user’s guide. © Print only for private use.
Downloading
Y ou can choose not to download large e-mails and receive just a
header instead. A header cont ains the subject line, sender’s
details, and date, but not the full message.
To specify a size limit for e-mail, above which you o nly rec eive
a header
1. Select
E-mail (select the e-mail account) > Ed it.
2. Select
3. Select an option from the
Control panel > Connections > Messagi ng accounts >
Inbox.
Download
list.
In your list of messages, headers are denot ed by .
To download the full mess a ge
1. In your list of messages, select the header.
2. Select
Get & Send
.
To download a series of messages
1. In your list of messages, select the check box to the left of
each entry (a tick appears).
2. Select
Get & Send
.
Note If you delete a header, or a whole message, the message is
no longer visible in yo ur m ess a ge list .
Downloading e-mails automatically
You can schedule your e-mail messages to be downloaded
automatically at certain times.
To download your e-mails automatically
1. In Control Panel, sel e ct
E-mail.
2. Select the required e-mail account and sele ct
3. Select
Inbox > Schedule.
4. Set time or interval for scheduled download and select
Connections > Messaging accounts >
Edit.
Done
Disconnecting and connecting
If your P800 is already connected to the Internet when you send
an e-mail, it will remain conne cted after se nding it. If you r P800
is not connected before sending an e-mail, it will connect and
send the message.
Note You can send text messages while connected to the
Internet. If your connection is CSD or HSCSD it must be
disconnected before you can make or receive a phon e call.
If your connection is GPRS, it may be suspended to enable a
phone call to be made or received. You may need to repeat the
data activity (web page fetch, get e-mail) after the call has
ended.
If your P800 cannot connect to t he e-mail account, automatic
download will fail, and will be displayed next to the e-mail
account.
.
Messages 89
Page 90

This is the Internet version of the user’s guide. © Print only for private use.
A scheduled download will fail if your P800 is engaged in a
voice call. It may fail if it is connected to another ISP that is,
through a different Internet account than specified for the e-mail
account.
If e-mail messages are not downloaded because a scheduled
download fails, they will be downlo aded during the next
successful connection.
Get and send
To get and send messages for one specific account
1. Select
Messages
2. Select the desired account (MMS or e-mail for example).
3. Select
Get&send.
To get and send messages for all your accounts
1. Select
2. Select
Outbox
Messages
Message > Get&send.
will now be sent and new messages not yet
downloaded will be downloaded to your P800.
Note If the e-mail account is set up to access the mail server
through a Secure access connection (see “Secure tokens” on
page 155) you must have the flip open when you use
If the flip is closed you will see an error message.
.
.
Any unsent messages in your
Get&send
.
Connecting and disconnecting from the Internet
To disconnect from the Internet
1. Select the connection icon (HSCSD/CSD or GPRS )
in the status bar.
2. Select
3. Th e dialog
4. Select
Disconnect
Yes
from the pop-up men u
Do you want to disconnect, Yes/No
.
appears.
Finding messages
In both the list of accounts and list of messages,
through the subject lines, senders’ details and dates.
In an open message, Find searches through the text of the
message and highlights the text it finds.
You can only search through e-mail messages that have been
fully downloaded.
Find
searches
Saving contact details
When you receive a message, you can save the contact details of
the person who sent you the message.
To save the sender’s details
From
• In the message select
.
90 Messages
Page 91

This is the Internet version of the user’s guide. © Print only for private use.
Note If you save an address from an e-mail synchronized from
your company PC, the corporate version of the address, rather
than the full Internet e-mail address, will be saved to Contacts.
If the corporate versi on of the ad dress is not an Internet address
(an X.400 address, or just the sender's name, for example), you
can use it to send e-mails from your synchronized account, but
you cannot use it in e- mails that you send directly from your
P800.
If your service provider or network is unavailable
Sometimes a message cannot be sent because your P800 ca nnot
connect to a network. Please check that the Messaging Account
and Internet Account information in the Control Panel is correct.
If you have both GPRS and Dial-Up Internet accounts, try
sending the e-mail message using an account of the other type.
GPRS Internet accounts use the GPRS network and Dial-Up
Internet accounts use the GSM network.
Synchronized e-mails
When you set up a synchronization with your PC, an account for
synchronized e-mail messages is automatically created on your
P800 and indicated by . You can have more than one account
for synchronized e -mails. If you send an e-mail as PC mail, the
mail will be sent via the PC when you have synchronized your
P800 with the PC.
If you set up a POP or IMAP account which accesses the same
mail server, the two accounts will contain the same messages.
Note that there is no connect ion between the accounts; the
copies in each account are separate.
Area information
Area information messages are text messages that are sent to all
subscrib ers in a certa in net wor k area , for ex ampl e, a loc al tra f fic
report. When you receive an area information message, the
message automatically appears on the screen. When you dismiss
the information, it will be stored in the
replaced by a new message received o n t he same channel.
Please consult your service provider for more information about
availability of area information services and area information
channel numbering. See“Area tab” on page 153 for more
information.
Area info
Inbox until it is
Messages 91
Page 92

This is the Internet version of the user’s guide. © Print only for private use.
Contacts
Contacts is like an address book, in whi ch you can store names,
phone numbers, e-mail addresses and other useful information,
including photographs.
The information stored in the SIM ph one book is also
accessible. SIM phone book entries can be imported to Contacts
and Contacts entries can be exported to the SIM phone book.
You can synchronize the contents in Cont acts with one of the
PIM applications in your PC supported by the P800. See
“Synchronization and backu p” on page 128.
Using Contacts with the flip closed
With the flip closed, you can make calls and send text or
multimedia messages.
Contacts has two views when the flip is closed:
List view
Detail view
An alphabetic al lis t of contacts. The li s t view is the
starting point for finding a contact.
The details for a contact.
Menus
In both views, you can use to access some of the P800’s
contact functions. The options will vary depending on the
situation.
Menu options in list view
SIM phone book
•
•
Send owner card
owner card” on page 96) via infrared or Bluetooth wireless
technology.
•
Find
– Search for a specific contact.
•
Undo delete
only if there is something to undo.
•
# Applications
Menu options (availability de pends on the ty pe of contac t detail,
for example mobile number, e-mail address) in deta il vi ew:
•
Call
– Call the active contact.
•
Send as
Bluetooth wireless technology.
•
Delete contact
•
Send SMS
– Display the contacts of the SIM card.
– Send your owner card (See “Making an
– Restore the last deleted contact. Will appear
– Access the application list view.
– Send the active contact via
– Delete the active contact.
– Send a text message to the active contact.
Send as
using infrared or
92 Contacts
Page 93

This is the Internet version of the user’s guide. © Print only for private use.
•
Send MMS
– Send a multimedia message to the active contact
Menu options in SIM phone book
•
View all
– Switch to Contacts list.
Find
– Search for a specific contact.
•
•
Service numbers
– Display the service numbers on the SIM
card.This option is only displayed if there are Service
numbers stored on the SIM card.
# Applications
•
– Will access the application list view.
Selecting a contact with the flip closed
To select a contact
1. Select .
2. Then either:
– Scroll down to the desired contact.
– Press a number key. The first contact corresponding to the
first letter of the key appears. To search further, continue
to enter the letters with the keys.
Find
– Select
3. Select a contac t an d pr e s s to open the detai l vi ew f or a
contact.
To return to the list view, press .
from the menu and search for the contact.
Note To make a call to a contact in the SIM phone book, select
SIM phone book
from the options menu. If there are service
numbers stored on the SIM card, you can also access them.
To make a call
1. Sel e ct a phone number.
2. Press t he Jog Dial or press .
or
1. Sel e ct a phone number.
2. Select
Call
from the options menu.
To sen d a text message
1. Sel e ct a phone number.
2. Select
Send SMS
from the options menu.
To send a multimedia message
1. Sel e ct a phone number.
2. Select
Send MMS
from the options menu.
To add a contact
You can create a new contact using informati on from a recently
received voice call or message.
Yes
1. Select
2. Enter contact name and edit the number, if require d.
when asked to add to contact s.
Contacts 93
Page 94

This is the Internet version of the user’s guide. © Print only for private use.
To delete a contact
1. Select the contact.
2. Select
Delete contact
• To restore a deleted contact, select
from the options menu.
Undo delete
from the
options menu.
Using contacts with the flip open
Open the flip and tap or select
launcher to open Contacts.
Contacts has three views when the flip is open:
List view
Detail view
Edit view
An alphabetic al lis t of contacts. The li s t view is the
starting point for finding a contact.
The details for a contact.
Contact details, displayed in a way that allow s you
to add and change the information.
Tab s at the botto m of the list view pro vi de a fast way to locate
information. To highlight the first entry that begins wit h the first
letter on a tab, select the tab once. To highlight the first entry
that begins with the next letter on the tab, select the tab again.
abc def ghi jkl mno pqr stu v-z
Contacts
in the Application
Making a call with the flip open
To open Cont acts
Contacts
• Tap or select
To search for an entry containing specific text
1. Select
Contacts > Find.
2. Enter the text string yo u wish to search for.
3. Select either
In all fields
4. When search is completed, all results are displayed.
Note Searching is not case sensitive and you do not have to
enter an entire word to locate a matching entry.
To make a call
1. If required, change category from the
2. Scroll down to the desired contact.
If the contact list is long, first selec t a tab at the bo ttom of th e
view.
3. Select the contact to display the contact details.
4. Depending on what you want to do, sel ect according to the
following:
– Select or or the phone number to make a call.
– Select or the e-mail address to send an e-mail.
– Select or URL to open a web page.
in the Application launcher .
or
In Names & Company
Folders
and tap
menu.
Find.
94 Contacts
Page 95

This is the Internet version of the user’s guide. © Print only for private use.
– Select to send a multimedia message.
– Select to send a text message.
Creating and managing contacts
You can sort the contacts according to first name, last name or
company. The contact entries can also be filtered by folder, such
Business
or
Personal
as
To create a new contact
1. Select
Contacts > New
2. Enter the desired information. When applicable, select from
the drop-down menus.
To add a voice dialling command
Voice dialling commands can be added while you are creating or
editing a contact.
1. Select at the bottom of the screen.
2. Select a numbe r.
3. Tap the
Record
tone.
Play
4. Tap
to check the quality of the recording.
• To remove a voice command, sel ect the
.
.
button and record a voice comman d aft er the
Del
button.
To add a note to a contact
1. Select .
2. Enter the text.
3. If you do not want the note to be included when you send,
Private
beam, or synchronize the co ntact, select the
check
box.
To add a photo or other picture to a contact
1. Sel e ct the photo view tab .
2. Select the picture space.
3. If required, change folder.
4. Select the picture to use.
Select
5. Select the
• To change a picture, select the old picture and select
image.
• To remove a picture, select the old picture and select
image.
button.
Replace
Delete
To personalize the ring melody for a contact
1. Against
Ring Tone
, select
Find Melody
from the drop-down
menu.
2. If required, change folder.
3. Select the required sound.
4. Tap and to preview the sound.
Contacts 95
Page 96

This is the Internet version of the user’s guide. © Print only for private use.
5. Tap
Select
to set this sound for the contact.
Note The selected ring melody will only be played if the
network provides a CLI (Calling Line Identity) to enable the
contact to be identified, otherwise the Defaul t Mel ody will be
played.
Note If the ring melody selected for this contact is later dele ted
or moved, the Default Melody will be played.
To change the details of a contact
1. Select a contact.
2. Select
Edit > Edit contact.
3. Change the desired information. When applicable, select
from the drop-down menus.
To add a field to a contact
1. Select the contact.
2. Select
3. Select
Edit > Edit contact.
Edit > Add field.
4. Sele ct the field to be added from t he drop-down list.
5. Select
Add.
To delete a contact
1. Select the contact.
2. Select
Contacts > Delete contact.
Managing the SIM phone book
You manage the SIM phone book the same wa y as th e Conta cts .
You can also copy information between the P800 and t he SIM
card.
To import contacts from SIM
1. Select
SIM phone book
in the folders menu to the right in the
menu bar.
2. Select
Edit > Copy all to Contacts
for importing all SIM entries
or
Tap a SIM entry to open it and select
Edit > Copy to Contacts
import the selected SIM entry.
To export contacts to SIM
1. Sele ct a contact.
2. Select
Edit > Export to SIM
.
3. If the contact has multiple telephone numbers, select the
number to export.
Done
4. Select
.
Making an owner card
You can create an electronic business ca rd, containing your
contact details, including notes and a photo. You can then send
this card to another de vic e .
to
96 Contacts
Page 97

This is the Internet version of the user’s guide. © Print only for private use.
To create your owner card
1. Select
2. Select
Contacts > New
Contacts > Set as owner card.
and enter your details.
Tip You can also create an owner card by viewing the detail
view of a contact and selecting the menu option
Set as owner card.
To send your owner card
1. Open the list view, and then select
2. Send the card using
Send as.
Contacts > Send owner card
To view or edit your owner card
1. Select
Contacts > View owner card
Sending and receiving contact details
You can send and receive the details for a single contact, your
owner card, or a set of contact detai l s .
• To send contact details for a single contact, select the contact
to open the detail view, and then select
• To send all contacts in one fold er, open that folder > select
Contacts > Sen d th is fo ld er
:
See “Sending and receiving items” on page 33
Contacts > Send as.
Preferences
To sort the contact list and show the preferred phone number
1. Select
2. Select the desired sorting option (first name, last name or
3. If you want a telephon e num ber to b e show n nex t to the na me
.
4. Select
To change the preferred phone nu mber
1. Sele ct a contact.
2. Select
3. Select
4. Select the number to be shown from the list.
5. Tap
Note If no number appears, ensure that
number
Edit > Preferences.
company) and tap
in list view, select
Done.
Show preferred phone number.
If no preferred number has been set up for th e contact, the
first telephone number will be used.
Done.
Edit > Edit cont a c t.
Edit > Show in li s t.
Done.
Show preferred phone
is checked in preferences.
Contacts 97
Page 98

This is the Internet version of the user’s guide. © Print only for private use.
Calendar
The Calendar function helps yo u to keep track of appoi ntments
and events, and you can also set reminder alarms for the entries.
A reminder is denoted by a .
Different views
You can see your Calendar entries in three views with the flip
open: Day, Week and Month. With the flip closed you will see
the Day view.
To change view in flip open
• Tap to display the Day view.
• Tap to display the Week view.
• Tap to display the Month view.
• Tap to navigate to the present day in the currently
displayed view.
If you tap an entry in week view, the subject and time for tha t
entry are shown.
To navigate backwards or forwards in the current view
• Tap the left and right-arrows in the button bar at the bottom
of the screen. You can also rotate the Jog Dial.
To navigate to a specific date in the current view
• Tap the day, week or month heading at the top of the display
to show a calendar pop-up in which you can select a specific
date.
Creating calendar entries
To create a new calendar entry
1. Select
2. Tap
3. Continue to enter information to the items on the detail page.
Calendar > New
entry. This is the description you see in the calendar.
Unfiled
(the folder menu) in the menu bar and select a
folder to store the entry in.
–
Type
- Specify if the entry is an appointment, reminder or
all day event.
Date
- Select the date to get a calendar where you can set a
–
date for the entry.
Time
- Set start and end time for the entry.
–
–
Location
- Specify a location or select a location you have
used before.
and enter a short description of the
98 Calendar
Page 99

This is the Internet version of the user’s guide. © Print only for private use.
–
Alarm
- Select the check box if you want your P800 to alert
you about the entry with a sound. Select the time and date
that appears for your settings.
Repeat
–
- Specify if you want to repeat the entry or not.
Read more about this below.
Private
–
- Select the check box to prevent the task from
being viewed by others than yourself if you synchronize
your calendar with, for example, your PC.
4. Select the note page tab to write a note to this entry.
5. Select to save and close the entr y.
You should delete old entries regularly to release memory in the
P800.
To create re-occurring entries
Repeat
and
.
.
Interval 2
means that the
1. When the entry is open, select
– Set repeating to
day
,
Yearly by date
–
Interval
- Specify how often the event will happen, for
example, by selecting
Daily, Weekly, Monthly by date, Monthly by
or
Yearly by day
Weekly
event will go off every two weeks on the specified day.
Forever/Until
–
- Set the time limit for the alarm or select
forever.
Select days
2.
- Weekly repeated events can be set to occur twice
or more in a week. For example, eating lu nch with a friend
Tuesday and Friday every week.
Note You cannot repeat All Day Events
To edit an entry
1. Open the entry by tapping it in the calendar.
2. Mak e th e changes in accordance with the inst ructions above.
Managing calendar entries
To find a certain entr y
1. Select
2. Enter a search word in the menu that appears.
3. Select where to search (
4. Select
5. Select an entry on the result list to open it.
T o delete an entry
• Open the entry and select
A deleted entry may be restored with
To delete all entries in a period of time
1. Select
2. Select the time period and select
Note Repeated entries will not be deleted.
Calendar > Find
Find
. A result list is then displayed.
Calendar > Remove entries
.
Everywhere, Future, Past
Calendar > Delete entry
Edit > Undo delete
.
Done
. All entries from that
time period are deleted from the Calendar.
).
.
.
Calendar 99
Page 100

This is the Internet version of the user’s guide. © Print only for private use.
To copy, cut or paste an entry
1. Open the entry.
2. Select
Edit > Copy entry/ Cut entry.
3. Go to the day where you want to place the entry.
4. Select
Paste entry.
To move a Calendar item to Tasks
• O pen the entry and select
Calendar > Move to Tasks
.
The entry is moved, not copied.
If you move an entry with an alarm, it will also sound in Tasks.
To cut or copy Calendar entries to the Tasks application
1. Open the entry and select
Edit > Cut entry or Copy entry.
2. Open Tasks.
3. Select
Edit > Paste entry.
Sending and receiving calendar entries
You can send and receive calendar entries using
to “Sending and receiving items” on page 33.
Send as
. Refer
Preferences
You can customize the calendar views and alarm settings to suit
your own needs.
To customize the calendar view, General tab
1. Select
2. Select the
To customize the alarm settings
1. Select
2. Select the
Now you can change the following settings:
•
•
To assign colours to your entries using the folders
1. In Calendar, select the folders m enu to the right in the menu
2. Select a folder and select
3. Select the colour box and select colour for that folder and
Edit > Preferences.
General
tab, and fill in the required details.
Edit > Preferences.
Alarm
tab.
Alarm precedes event by
goes off.
Alarm sound
bar and select
selecting
select
- select a sound for the alarm.
Edit folders.
Add
.
Done
.
- how long before an entry the alarm
Edit
or create a new folder by
100 Calendar
 Loading...