

Page 1

Shutter button
Pulsante otturatore
Bag
Custodia
Strap
Cinghia
This is the Internet version of the user’s guide
2
© Print only for private use.
Lens
Obiettivo
Page 2

Contents
English 4
Italiano 13
Additional information 23
Sony Ericsson MCA-25
Second edition (March 2003)
This manual is published by Sony Ericsson Mobile
Communications AB, without any warranty. Improvements and
changes to this manual necessitated by typographical errors,
inaccuracies of current information, or improvements to programs
and/or equipment, may be made by Sony Ericsson Mobile
Communications AB at any time and without notice. Such changes
will, how ever, be inco rporated into new editions o f this m anual.
All rights reserved.
©Sony Ericsson Mobile Communications AB, 2002
Publication number: LZT 108 6316/4 R2A
BLUETOOTH is a trademark of the Bluetooth SIG, Inc.
(Special Interest Group). The Bluetooth trademarks are
owned by Bluetooth SIG, Inc. USA.
This is the Internet version of the user’s guide
© Print only for private use.
3
Page 3

English
CommuniCam™
With the mobile camera CommuniCam™, you can
take pictures, view them in your phone’s display and
send them as e-mail attachments or using MMS
(Multimedia Message Service). To do this, you need a
subscription that supports these services. Please check
with your network operator or service provider.
The camera supports 24-bit colours, which means
16 million colours.
You can use a picture as a screen saver or as a
background in your phone’s display, or save it together
with a contact in your phone book so that the picture
appears when that person calls.
You can send your pictures to a Web album. Visit
wap.sonyericsson.com for more information.
Note: The camera works with Sony Ericsson mobile
phones T68i, T68ie, T300 and T310. For information
about other compatible Sony Ericsson mobile phones,
visit www.sonyericsson.com.
When you plug your CommuniCam™ into your
mobile phone, you automatically enter the camera
menu. You can also enter the camera menu by pressing
the shutter button on the camera or by scrolling to
Fun&Games,
This is the Internet version of the user’s guide
4
© Print only for private use.
YES
, CommuniCam,
YES
.
Page 4
Before you start
Before you send a picture using e-mail, you need to
enter settings for a data account and for an e-mail
account in your phone. Before you send a picture using
MMS, you need to enter your service centre number
and enter WAP settings in your phone. Your network
operator provides you with the settings. See also the
User’s Guide for your mobile phone.
The phone that you are sending the picture to needs to
support data transmission and MMS in order to receive
and show the picture.
Taking and sending pictures
If you want to change the picture size, you must do so
before taking the picture. See “Picture size” on page 9.
This is the Internet version of the user’s guide
© Print only for private use.
5
Page 5

To take and send a picture
1. Plug the camera into your mobile phone.
YES
2. Select Take pictures,
.
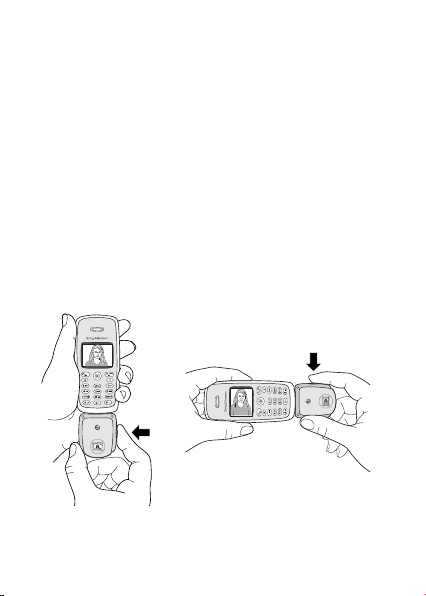
3. Hold the phone and the camera as shown in the
illustrations on the previous page. You can see the
subject in the phone display. In the bottom left corner
of the display, you can see the picture size. In the
bottom right corner, you can see how many pictures
you have taken.
4. Take a picture by pressing the shutter button or
5. You get a preview of the picture in the display. To
YES
accept the picture, press
.
6. A list of options appears:
Note: If you want to rotate a picture, you must do so
before saving it.
YES
• Save – press
to save the picture in View pictures in
the camera.
YES
• Send – press
and select a transfer method,
See the User’s Guide for your mobile phone on how to
send e-mail messages or multimedia messages.
The camera must stay plugged into your phone until
the picture has been sent. When the picture has been
sent, you get back to the list of options. To keep the
picture in your camera, select Save.
YES
• Rotate right – press
right. Accept by pressing
• Rotate left – press
Accept by pressing
This is the Internet version of the user’s guide
6
© Print only for private use.
to rotate the picture to the
YES
YES
YES
.
to rotate the picture to the left.
.
YES
YES
.
.
Page 6

Tip: Your CommuniCam™ gives the best results:
• At a distance of 0.4 metres or more.
• If you avoid subjects with sharp contrasts between
light and dark.
• If you keep the camera still and at a right angle
when taking the picture.
• In good lighting conditions.
The camera has a digital zoom. Move the phone’s
joystick sideways to zoom in or out while viewing the
subject in the phone’s display.
Note: Do not carry your phone using the
CommuniCam™ strap.
Saving and deleting pictures
When you accept a picture that you have taken, you
enter a list of options where you can select Save. The
picture is then saved in View pictures in the camera.
If Camera memory full appears, you cannot save any
more pictures until you have either deleted some from
View pictures or moved them to the phone. See
“Saving pictures in the phone” on page 8.
To delete pictures from the camera
1. Scroll to Fun&Games,
YES
View pictures,
.
, CommuniCam,
YES
,
YES
2. Select the picture you want to delete and press ,
YES
. To delete all pictures, press and select
YES
Delete all,
.
This is the Internet version of the user’s guide
© Print only for private use.
7
Page 7
Saving pictures in the phone
You can copy or move the picture to the phone so that
you can access the picture without plugging in the
camera. To do this, select View pictures in the camera
menu, press and select Copy to phone or Move to
phone.
When you have copied or moved a picture to the
phone, you can use the picture as a screen saver,
background or together with a contact in the phone
book. You can also send several pictures in one
multimedia message and send pictures using an
infrared link or Bluetooth wireless technology.
Viewing your pictures
You can view the pictures you have saved in the
YES
camera by scrolling to Fun&Games,
YES
CommuniCam,
YES
picture,
, View pictures,
.
YES
,
, select a
When you are in the list of pictures in View pictures,
you can scroll to a picture and press to:
YES
• Send the picture – press
and select Via MMS or
Via e-mail.
YES
• Get Picture info – press
to get picture info such as
the name, size and file type of the picture.
YES
• Copy to phone – press
to copy the picture to the
phone so that it is saved both in the camera and in the
phone under My pictures.
This is the Internet version of the user’s guide
8
© Print only for private use.
Page 8

• Move to phone – press
YES
to move the picture to
My pictures in the phone so that it is deleted from
the camera.
YES
• Delete picture – press
to delete the picture from
the camera.
YES
• Delete all – press
to delete all pictures from
the camera.
If you have saved pictures in your phone, you can
YES
view them by scrolling to Fun&Games,
YES
My pictures,
, select a picture,
YES
,
.
Settings
Picture size
You can choose between:
Extra large (XL (640x480)), Large (L (320x240)),
Medium (M (160x120)), Small (S (80x60)).
Note: You can send pictures in all sizes in an e-mail
attachment. In a multimedia message, a picture is
always sent in size 160x120, unless you choose size
80x60.
If you select a smaller picture size, you can save more
pictures before the camera memory becomes full. You
cannot change the picture size for a picture that you
have already taken.
This is the Internet version of the user’s guide
© Print only for private use.
9
Page 9

To set the picture size
1. Scroll to Fun&Games,
YES
Options,
, Picture size,
2. Select a picture size,
, CommuniCam,
YES
YES
.
.
YES
YES
White balance is a function for optimizing the colours
in a picture. We recommend that you keep the white
balance on, except in cases where you want to achieve
a special effect.
To turn white balance on or off
1. Scroll to Fun&Games,
YES
Options,
, White balance,
, CommuniCam,
YES
.
YES
YES
2. Select On or Off.
The quality of the picture is higher on a computer
screen than in the phone display. To adjust the
appearance of a picture in the phone, you can change
the contrast of the phone display.
To change the contrast of the phone display
YES
1. Scroll to Settings,
, Display,
2. Increase the contrast by pressing ,
contrast by pressing ,
Effects
You can add an effect to a picture, for example a
YES
.
YES
, Contrast,
YES
. Decrease the
decorative border. You must select an effect before you
take a picture. When you are satisfied with both the
subject and the effect, take the picture.
This is the Internet version of the user’s guide
10
© Print only for private use.
,
,
YES
.
Page 10

To add an effect
1. When the CommuniCam menu is displayed, select
YES
, Effect,
YES
Options,
.
You can also press when the camera is in
YES
viewfinder mode. Select Effect,
YES
2. Select an effect,
NO
3. Press
to return to the CommuniCam menu.
.
.
The effect applies until you select another effect or
YES
turn the effect off by selecting No effect,
.
Tip: When in viewfinder mode, press repeatedly
to view the different effects. When you take the picture,
the current effect in the display is selected. Press
to return to viewfinder mode without an effect.
Important information
Since the network on which your phone operates is
provided by a carrier independent from Sony Ericsson,
Sony Ericsson shall not be liable in any way for the
operation, availability, coverage, services, or ranges
of such a network. Sony Ericsson does not warrant
that the network connection will be uninterrupted or
error-free.
Do not expose your product to liquid or moisture or
to humidity.
Do not expose your product to extreme high or low
temperatures.
Do not expose your product to lit candles, cigarettes,
or cigars, or to open flames etc.
This is the Internet version of the user’s guide
© Print only for private use.
11
Page 11

Do not drop, throw or try to bend the product as rough
treatment could damage it.
Do not attempt to disassemble your product. The
product does not contain consumer serviceable
components.
Do not carry your phone using the CommuniCam™
strap.
Treat your product with care, keep it in a clean and
dust-free place.
DO NOT ALLOW CHILDREN TO PLAY WITH
YOUR PRODUCT SINCE IT CONTAINS SMALL
PARTS THAT COULD BECOME DETACHED
AND CREATE A CHOKING HAZARD.
The product should never be placed in municipal
waste. Please check local regulations for disposal of
electronic products.
Changes or modifications to this CommuniCam™
not expressly approved by Sony Ericsson may void
the user’s authority to operate the equipment.
Attach this CommuniCam™ only to Ericsson or
Sony Ericsson mobile phones intended for use with
this product.
For information about support and for User’s Guides
for Ericsson, Sony and Sony Ericsson mobile phones,
see http://www.SonyEricsson.com/support/.
This is the Internet version of the user’s guide
12
© Print only for private use.
Page 12

Italiano
CommuniCam™
Con la fotocamera digitale CommuniCam™, è possibile
scattare foto, visualizzarle sul display del telefono e
inviarle come allegati e-mail oppure tramite MMS
(Multimedia Message Service). A tal fine, è necessario
un abbonamento che supporti questi servizi. Contattare
il gestore di rete o il provider dei servizi.
La fotocamera supporta colori a 24 bit corrispondenti
a 16 milioni di colori.
È possibile utilizzare un'immagine come screen saver
o come sfondo sul display del telefono oppure salvarla
insieme a un nominativo nella rubrica in modo che,
quando si riceve una chiamata da quella persona,
venga visualizzata l'immagine.
È possibile inviare le immagini a un album Web.
Per ulteriori informazioni, visitare il sito
wap.sonyericsson.com.
Nota: La fotocamera funziona con i telefoni portatili
Sony Ericsson T68i, T68ie, T300 e T310. Per
informazioni sulla compatibilità di altri telefoni
portatili Sony Ericsson, visitare il sito
www.sonyericsson.com.
This is the Internet version of the user’s guide
© Print only for private use.
13
Page 13

Quando si collega la CommuniCam™ al telefono
portatile, si entra automaticamente nel menu della
fotocamera. È possibile accedere a questo menu anche
premendo il pulsante otturatore sulla fotocamera
oppure scorrendo fino a visualizzare Svago e giochi,
SÌ
, CommuniCam, SÌ.
Operazioni preliminari
Prima di inviare un'immagine tramite e-mail, è
necessario immettere nel telefono le impostazioni di
un account dati e di un account e-mail. Prima di inviare
un'immagine tramite MMS, è necessario immettere nel
telefono il numero del centro servizi e le impostazioni
WAP. Le impostazioni possono essere richieste al
gestore della rete. Vedere anche la guida dell'utente
del telefono portatile.
Il telefono al quale si invia l'immagine deve prevedere
il supporto della trasmissione dati e MMS per poter
ricevere e visualizzare l'immagine.
This is the Internet version of the user’s guide
14
© Print only for private use.
Page 14

Per scattare e inviare una foto
Se si desidera modificare le dimensioni di
un'immagine, è necessario eseguire tale operazione
prima di scattare la foto. Vedere “Dimensioni
dell'immagine” a pagina 19.
Per scattare e inviare una foto
1. Collegare la fotocamera al telefono portatile.
SÌ
2. Selezionare Scatta foto,
.
3. Tenere il telefono e la fotocamera come mostrato nelle
illustrazioni della pagina precedente. Il soggetto verrà
visualizzato sul display del telefono. Nell'angolo
inferiore sinistro del display è possibile vedere le
dimensioni della foto, mentre nell'angolo superiore
destro sarà visibile il numero di foto scattate.
4. Scattare una foto premendo il pulsante otturatore
SÌ
oppure
.
This is the Internet version of the user’s guide
© Print only for private use.
15
Page 15

5. Sul display viene visualizzata un'anteprima della foto.
SÌ
Per accettare la foto, premere
.
6. Viene visualizzata una lista di opzioni.
Nota: Se si desidera ruotare un'immagine, eseguire
tale operazione prima di salvarla.
SÌ
• Salva – premere
per salvare l'immagine in
Visual. immag. nella fotocamera.
SÌ
• Invia – premere
trasferimento,
e selezionare un metodo di
SÌ
.
Consultare la guida dell'utente del telefono portatile
per le modalità di invio di messaggi e-mail o
multimediali.
La fotocamera deve rimanere collegata al telefono
finché l'immagine non viene inviata. Una volta
completato l'invio, si torna alla lista di opzioni. Per
tenere l'immagine nella fotocamera, selezionare Salva.
SÌ
• Destra – premere
Per accettare, premere
• Sinistra – premere
Per accettare, premere
per ruotare a destra l'immagine.
SÌ
.
SÌ
per ruotare a sinistra l'immagine.
SÌ
.
Consiglio: La CommuniCam™ garantisce i risultati
migliori:
• Ad una distanza di almeno 0,4 metri.
• Se si evitano soggetti con contrasti accentuati tra
luce e ombra.
• Se si tiene ferma la fotocamera ad angolo retto
quando si scatta la foto.
• In buone condizioni di luminosità.
This is the Internet version of the user’s guide
16
© Print only for private use.
Page 16

La fotocamera dispone di uno zoom digitale. Spostare
lateralmente il joystick del telefono per ingrandire o
ridurre durante la visualizzazione del soggetto sul
display del telefono.
Nota: Non trasportare il telefono utilizzando la
cinghia della CommuniCam™.
Salvataggio ed eliminazione delle immagini
Quando si accetta una foto scattata, si entra in una lista
di opzioni dove si può selezionare Salva. L'immagine
viene quindi salvata in Visual. immag. nella
fotocamera.
Se viene visualizzato Memoria fotocamera piena,
non è possibile salvare altre immagini finché non se ne
eliminano alcune da Visual. immag. oppure finché non
si spostano nel telefono. Vedere “Salvataggio delle
immagini nel telefono” a pagina 17.
Per eliminare immagini dalla fotocamera
SÌ
1. Scorrere fino a visualizzare Svago e giochi,
SÌ
CommuniCam,
, Visual. immag., SÌ.
,
2. Selezionare l'immagine che si desidera eliminare e
SÌ
premere ,
premere e selezionare Elimina tutte,
. Per eliminare tutte le immagini,
SÌ
.
Salvataggio delle immagini nel telefono
È possibile copiare o spostare l'immagine nel telefono
in modo da potervi accedere senza dover collegare la
fotocamera. A tal fine, selezionare Visual. immag. nel
menu della fotocamera, premere e selezionare
Copia in tel. oppure Sposta in telef.
This is the Internet version of the user’s guide
© Print only for private use.
17
Page 17

Una volta copiata o spostata un'immagine nel
telefono, è possibile utilizzare l'immagine come screen
saver, come sfondo o insieme a un nominativo nella
rubrica. È anche possibile inviare più immagini nello
stesso messaggio multimediale o inviarle utilizzando
un collegamento a infrarossi o la tecnologia wireless
Bluetooth.
Visualizzazione delle immagini
È possibile visualizzare le immagini salvate nella
SÌ
fotocamera scorrendo fino a Svago e giochi,
SÌ
CommuniCam,
un'immagine,
, Visual. immag., SÌ, selezionare
SÌ
.
,
Dalla lista delle immagini in Visual. immag., è
possibile scorrere fino a visualizzare un'immagine e
premere per:
SÌ
• Inviare (Invia) l'immagine – premere
e selezionare
Come MMS oppure Come e-mail.
SÌ
• Visualizzare le Info immagine – premere
per
visualizzare informazioni sull'immagine, come il
nome, le dimensioni e il tipo di file.
• Copiare nel telefono (Copia in tel.) – premere
SÌ
copiare l'immagine nel telefono in modo che venga
salvata sia nella fotocamera che nel telefono in Immag.
person.
• Spostare nel telefono (Sposta in telef.) – premere
spostare l'immagine in Immag. person. nel telefono,
eliminandola quindi dalla fotocamera.
This is the Internet version of the user’s guide
18
© Print only for private use.
per
SÌ
per
Page 18

• Eliminare l'immagine (Elimina immag.) – premere
per eliminare l'immagine dalla fotocamera.
• Eliminare tutte le immagini (Elimina tutte) – premere
SÌ
per eliminare tutte le immagini dalla fotocamera.
Se sono state salvate immagini nel telefono, è
possibile vederle scorrendo fino a visualizzare Svago
SÌ
egiochi,
un'immagine,
, Immag. person., SÌ, selezionare
SÌ
.
Impostazioni
Dimensioni dell'immagine
È possibile scegliere tra:
Extra grande (XL (640x480)), grande (L (320x240)),
media (M (160x120)), piccola (S (80x60)).
Nota: In un allegato e-mail, è possibile inviare
immagini di tutte le dimensioni. In un messaggio
multimediale, un'immagine viene sempre spedita nelle
dimensioni 160x120 a meno che non si scelgano le
dimensioni 80x60.
Se si selezionano dimensioni inferiori, è possibile
salvare più immagini prima che la memoria della
fotocamera diventi piena. Non è possibile modificare
le dimensioni di un'immagine dopo che è già stata
scattata la foto.
Per impostare le dimensioni dell'immagine
SÌ
1. Scorrere fino a visualizzare Svago e giochi,
SÌ
CommuniCam,
, Opzioni, SÌ, Dimens. immagine, SÌ.
2. Selezionare le dimensioni dell'immagine,
,
SÌ
.
This is the Internet version of the user’s guide
© Print only for private use.
SÌ
19
Page 19

Il bilanciamento del bianco è una funzione concepita
per l'ottimizzazione dei colori di un'immagine. Si
consiglia di tenere sempre attivato il bilanciamento
del bianco, tranne nei casi in cui si desidera ottenere
un effetto speciale.
Per attivare o disattivare il bilanciamento del bianco
SÌ
1. Scorrere fino a visualizzare Svago e giochi,
SÌ
CommuniCam,
, Opzioni, SÌ, Bilanc. bianco, SÌ.
,
2. Selezionare Attiva o Disattiva.
La qualità dell'immagine è migliore sullo schermo di
un computer piuttosto che sul display del telefono. Per
regolare l'aspetto di un'immagine nel telefono, è
possibile modificare il contrasto del display dello stesso.
Per modificare il contrasto del display del telefono
SÌ
1. Scorrere fino a visualizzare Impostazioni,
SÌ
, Contrasto, SÌ.
2. Aumentare il contrasto premendo ,
SÌ
contrasto premendo ,
.
, Display,
SÌ
. Ridurre il
Effetti
È possibile aggiungere un effetto a un'immagine, ad
esempio un bordo decorativo. È necessario selezionare
un effetto prima di scattare una foto. Quando sia il
soggetto che l'effetto sono soddisfacenti, scattare la foto.
This is the Internet version of the user’s guide
20
© Print only for private use.
Page 20
Per aggiungere un effetto
1. Quando viene visualizzato il menu CommuniCam,
SÌ
selezionare Opzioni,
, Effetto, SÌ.
È anche possibile premere quando la fotocamera
si trova in modalità mirino. Selezionare Effetto,
SÌ
2. Selezionare un effetto,
NO
3. Premere
per tornare al menu CommuniCam.
.
L'effetto verrà applicato fino alla selezione di un altro
effetto o alla disattivazione dell'effetto selezionando
SÌ
Nessun effetto,
.
Consiglio: In modalità mirino, premere ripetutamente
per visualizzare i diversi effetti. Quando si scatta
la foto, viene selezionato l'effetto corrente sul display.
Premere per tornare alla modalità mirino senza
effetto.
Informazioni importanti
Poiché la rete sulla quale funziona il telefono viene
fornita da un operatore indipendente da Sony Ericsson,
Sony Ericsson non dovrà essere ritenuta in alcun modo
responsabile per il funzionamento, la disponibilità, la
copertura, i servizi o i raggi d'azione della suddetta
rete. Sony Ericsson non garantisce che la connessione
di rete sarà senza interruzioni o senza errori.
Non esporre il prodotto a umidità o immergerlo in
liquidi.
Non esporre il prodotto a temperature estreme.
Non collocare il prodotto in prossimità di candele,
sigarette o sigari accesi, fiamme vive e così via.
This is the Internet version of the user’s guide
© Print only for private use.
SÌ
.
21
Page 21

Non lasciare cadere, lanciare o cercare di piegare il
prodotto poiché potrebbe danneggiarsi.
Non tentare di smontare il prodotto. Il prodotto non
contiene parti riparabili dall'utente.
Non trasportare il telefono utilizzando la cinghia della
CommuniCam™.
Maneggiare il prodotto con cura, conservarlo in un
ambiente pulito e privo di polvere.
NON CONSENTIRE AI BAMBINI DI GIOCARE
CON IL PRODOTTO IN QUANTO CONTIENE
COMPONENTI DI DIMENSIONI RIDOTTE CHE
POTREBBERO STACCARSI, COMPORTANDO IL
RISCHIO DI SOFFOCAMENTO.
Il prodotto non deve mai essere gettato tra i rifiuti
normali. Attenersi alle disposizioni locali per lo
smaltimento dei prodotti elettronici.
Variazioni o modifiche a questa CommuniCam™
non espressamente approvate da Sony Ericsson
potrebbero invalidare l'autorizzazione dell'utente ad
utilizzare l'apparecchiatura.
Collegare questa CommuniCam™ esclusivamente a
telefoni portatili Ericsson o Sony Ericsson previsti per
essere utilizzati con questo prodotto.
Per informazioni sul supporto e per le guide dell'utente
dei telefoni portatili Ericsson, Sony e Sony Ericsson,
visitare il sito http://www.SonyEricsson.com/support/.
This is the Internet version of the user’s guide
22
© Print only for private use.
Page 22

Additional information
Declaration of conformity
We, Sony Ericsson Mobile Communications AB of
Nya Vattentornet
221 88 Lund, Sweden
declare under our sole responsibility that our product
Sony Ericsson type 408 0013
to which this declaration relates is in conformity with
the appropriate standards EN 301 489-7 and EN 60950,
following the provisions of EMC directive 89/336/EEC,
and Low voltage directive 73/23/EEC.
Lund, May 2002
Place & date of issue
Ulf Persson, Head of Product Business Unit Accessories
This is the Internet version of the user’s guide
© Print only for private use.
23
Page 23

FCC Statement
This device complies with Part 15 of the
FCC rules. Operation is subject to the
following two conditions: (1) This device
may not cause harmful interference, and
(2) This device must accept any
interference received, including
interference that may cause undesired
operation.
This is the Internet version of the user’s guide
24
© Print only for private use.
 Loading...