

Page 1

Contents
Sony Ericsson K200c Additional inform
Getting started . . . . . . . . . . . . . . . . . . . . . . . . . . . . 4
Calling . . . . . . . . . . . . . . . . . . . . . . . . . . . . . . . . . . 14
Contacts . . . . . . . . . . . . . . . . . . . . . . . . . . . . . . . . 21
Messaging . . . . . . . . . . . . . . . . . . . . . . . . . . . . . . . 24
Imaging . . . . . . . . . . . . . . . . . . . . . . . . . . . . . . . . . 39
Internet . . . . . . . . . . . . . . . . . . . . . . . . . . . . . . . . . 42
Infrared port . . . . . . . . . . . . . . . . . . . . . . . . . . . . . . 45
Sounds & Alerts . . . . . . . . . . . . . . . . . . . . . . . . . . . 46
Alarm clock/Alarms . . . . . . . . . . . . . . . . . . . . . . . 48
Settings . . . . . . . . . . . . . . . . . . . . . . . . . . . . . . . . . 49
Locks . . . . . . . . . . . . . . . . . . . . . . . . . . . . . . . . . . . 52
Extras . . . . . . . . . . . . . . . . . . . . . . . . . . . . . . . . . . . 55
Troubleshooting . . . . . . . . . . . . . . . . . . . . . . . . . . . 59
Important information . . . . . . . . . . . . . . . . . . . . . . 67
Index . . . . . . . . . . . . . . . . . . . . . . . . . . . . . . . . . . . 79
Congratulations on your purchase of the Sony Ericsson
K200c. For additional phone content, go to
www.sonyericsson.com/cn/fun.
Register now to get free online storage and special offers
at www.sonyericsson.com/myphone.
For product support, go to www.sonyericsson.com/cn.
This is the Internet version of the user's guide. © Print only for private use.
1
Page 2

Sony Ericsson
GSM 900/1800
This User guide is pub lished by Sony Ericsso n Mobile Communic ations
AB or its local affil iated compa ny, without any w arranty. Impr ovements
and changes to this User guide n ecessitated by typ ographical err ors,
inaccuracies of current information, or improvements to programs and/or
equipment, may be made by Sony Ericsson Mobile Communications AB
or its local affiliated company at any time and without notice. Such
changes will, howe ver, be incorporate d into new editions of this User
guide.
All rights reserved.
© Sony Ericsson Mobile Com munications AB, 2007
Publication numb er: EN/LZT 108 9387 R2A.
Please note:
Some of the serv ices in this User g uide are not sup ported by all ne tworks.
This also applies to the GSM Internation al Emergency Numb er 112.
Please contact your network operator or service provider if you are in
doubt whether yo u can use a particul ar service or not.
Please read the Guidelines for safe and efficient use and the Limited
warranty chapters before you use your mobile phone.
Your mobile phon e has the capabilit y to download, sto re and forward
additional content, e.g. ringtones. The use of such content may be
restricted or prohib ited by rights of third pa rties, including but no t limited
to restriction und er applicable cop yright laws. You, an d not Sony
Ericsson, are entirely responsible for additional content that you download
to or forward from your mobile phone. Prior to your use of any additional
content, pleas e verify that your i ntended use is pro perly licensed o r is
otherwise authorized. Sony Ericsson does not guarantee the accuracy,
integrity or quality of any addition al content or any other third party
content. Under no circumstances will Sony Ericsson be liable in any way
for your improper us e of additional co ntent or other third pa rty content.
The marble logo is a trademark or registered trademark of Son y Ericsson
Mobile Communications AB. Sony is a trademark or registered trademark
of Sony Corporation. Ericsson is a trademark or registered trademark of
Telefonaktiebo laget LM Erics son.
2
This is the Internet version of the user's guide. © Print only for private use.
Page 3
T9™ Text Input is a trademark or a registered trademark of Tegic
Communications.
T9™ Text Input is licensed und er one or more of the following:
U.S. Pat. Nos. 5,81 8,437, 5,953,54 1, 5,187,480, 5,94 5,928, and
6,011,554; Cana dian Pat. No. 1,33 1,057; United King dom Pat. No.
2238414B; Hong Kong Standard Pat. No. HK0940329; Republic of
Singapore Pat. No. 51 383; Euro. Pat. No. 0 8 42 463 (96927260 .8) DE/DK,
FI, FR, IT, NL, PT, ES, SE, GB; and additional patents are pending
worldwide.
Other product and company names may be the trademarks of their
respective owners.
Note: Sony Ericsson advises users to backup their personal data
information.
All illustrations are for illustration only and may not accurat ely depict the
actual phon e.
Any rights not expressly granted herein are reserved.
User guide symbols
The following instruction symbols appear in this User
guide:
This arrow points you to a page with more
%
information.
Use the navigation key to scroll and the selection
}
key to select.
Note
This symbol indicates that a service or function is
network-or subscription-dependent. Because of
this, all menus may not be available in your phone.
Please contact your network operator for more
information.
This is the Internet version of the user's guide. © Print only for private use.
3
Page 4
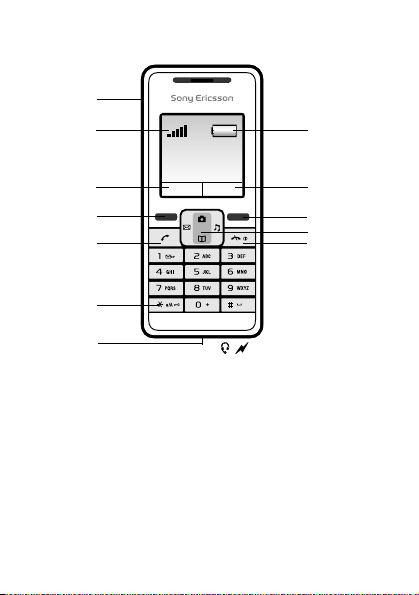
Getting started
1
28
3
4
5
6
7
1 Infrared port 6 Keylock
2 Strength of GSM network 7
3,9 Function of selection key 8 Battery status
4,10 Selection keys 11
5 Call key 12 End Call/On-Off key
4
This is the Internet version of the user's guide. © Print only for private use.
9
10
11
12
Headset and battery
charger connector
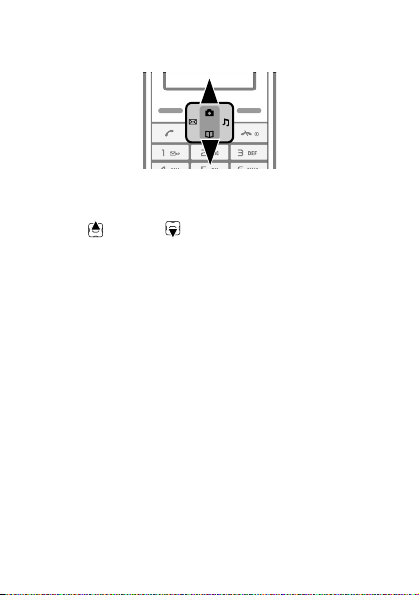
Navigation key with
shortcuts
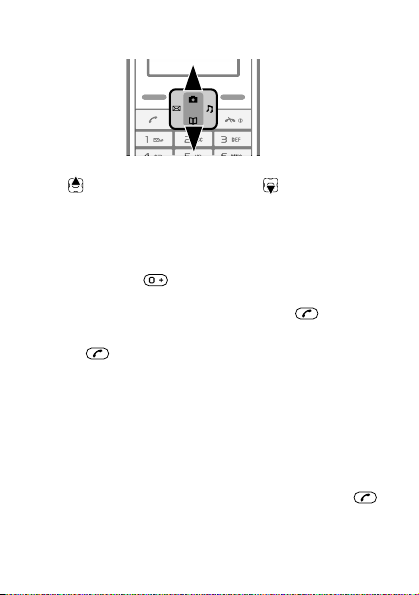
Page 5
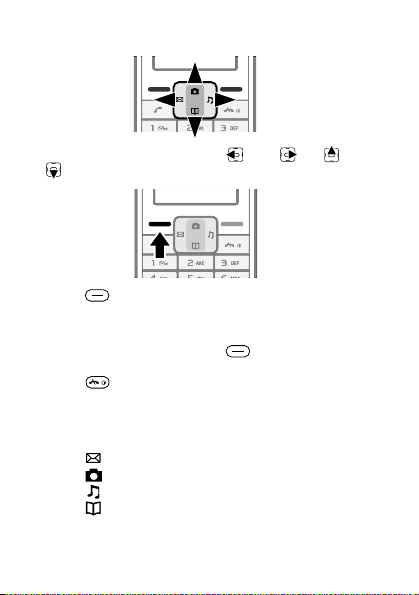
Keypad
• Press the navigation key left right up down
to navigate.
• Press to select the options shown immediately
above these keys on the screen.
To go back one level or end a function
• Press the right selection key to go back one level
in the menus.
• Press to end a function and go to standby.
Shortcuts
From standby, you can use the navigation keys to go
directly to a function:
• Press to write a text or picture message.
• Press to go to the camera.
• Press to set the ring volume.
• Press to go to your contacts.
This is the Internet version of the user's guide. © Print only for private use.
5
Page 6
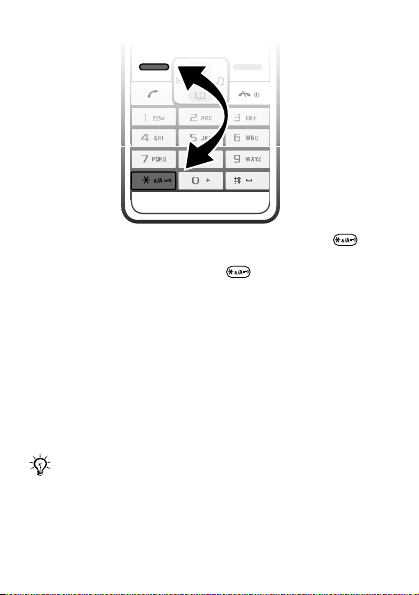
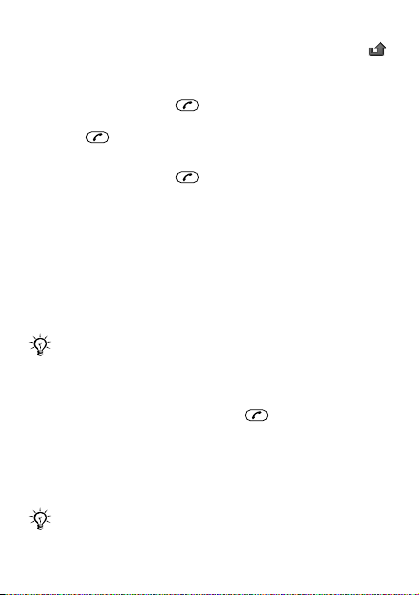
To lock or unlock the keypad
• To avoid dialling a number by accident, press and
select Lock keys.
• To unlock the keypad, press and select Unlock.
% 53 Keypad lock for more information.
To turn the screen light on
Press any key to turn the screen light on.
SIM card
When you register as a subscriber with a network
operator, you get a SIM (Subscriber Identity Module) card.
The SIM card keeps track of your phone number, the
services included in your subscription, and your contact
information, among other things.
If you have been using a SIM card in another phone,
make sure that your information is saved to the SIM
card before you remove it from the other phone.
6
This is the Internet version of the user's guide. © Print only for private use.
Page 7
PIN (Personal Identification Number)
You may need a PIN (Personal Identification Number) from
your network operator to activate the services in your
phone.
Each PIN digit appears as *, unless it starts with
emergency number digits, for example 112. This is so that
you can see and call an emergency number without
entering a PIN
% 16 Emergency calls. Press the right
selection key to correct mistakes.
If you enter the wrong PIN three times in a row, the
SIM card is blocked and the message PIN blocked
appears. To unblock it, you need to enter your PUK
(Personal Unblocking Key) % 53 SIM card lock.
This is the Internet version of the user's guide. © Print only for private use.
7
Page 8
Set up your phone
Insert the SIM card, attach and charge the battery and
turn on your phone.
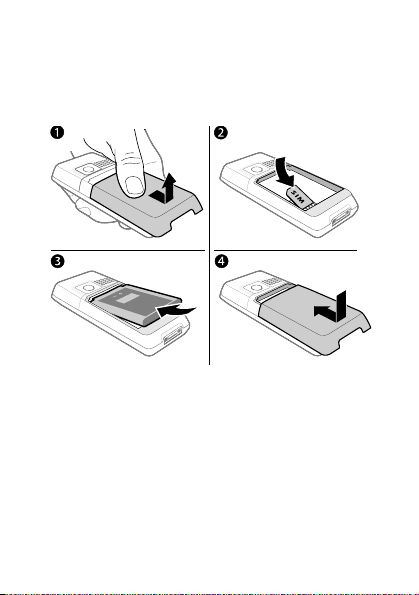
To insert the SIM card and battery
1 Gently pull the cover away from the phone.
2 Insert the SIM card. Make sure the SIM card is placed
under the silvery holders and that the contacts of the
SIM card face downwards.
3 Place the battery on the back of the phone with the
label side up and the connectors facing each other.
4 Replace the cover as shown in the picture.
8
This is the Internet version of the user's guide. © Print only for private use.
Page 9
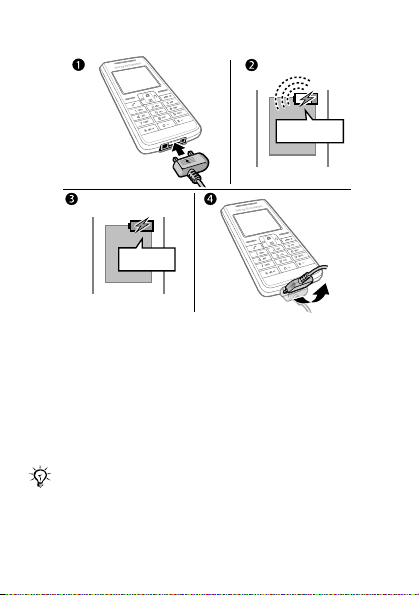
To charge the battery
≈ 30 min
≈ 2.5 h
1 Connect the battery charger to the phone.
2 It may take up to 30 minutes before the battery icon
appears on the screen.
3 Wait approximately 2.5 hours or until the battery icon
indicates that the battery is fully charged. If you do not
see the battery icon after this time, press any key above
the number keys to activate the screen.
4 Remove the battery charger by tilting it upwards.
The time and date are reset when you remove the
battery.
This is the Internet version of the user's guide. © Print only for private use.
9
Page 10
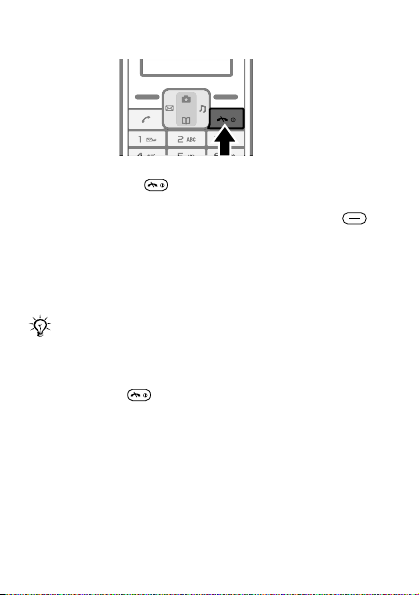
To turn on the phone
1 Press and hold until the screen lights up.
2 Enter your PIN code, if requested and select OK. Each
digit appears as *. Press the right selection key to
correct mistakes. If the screen turns dark, press any
key to illuminate the screen.
3 Scroll to a language and select Select.
4 Enter the time and select Save.
5 Enter the date and select Save.
If you enter the wrong PIN three times in a row, the
SIM card is blocked. To unblock it % 54 To unblock
your SIM card.
To turn off the phone
Press and hold .
Standby
After you have turned the phone on and entered your PIN,
the name of your operator appears on the screen. This is
called standby – you can now make and receive calls.
% 50 Networks for details.
10
This is the Internet version of the user's guide. © Print only for private use.
Page 11
Navigating the phone menus
From standby select Menu to go to the main menu. The
first menu you will see is Messaging.
Press up or down to scroll through the menus.
You can change the appearance of the main menu.
To change the main menu view
1 From standby select Menu } Settings } Advanced
} Main menu view.
2 Select Grid view or Single icon.
This is the Internet version of the user's guide. © Print only for private use.
11
Page 12
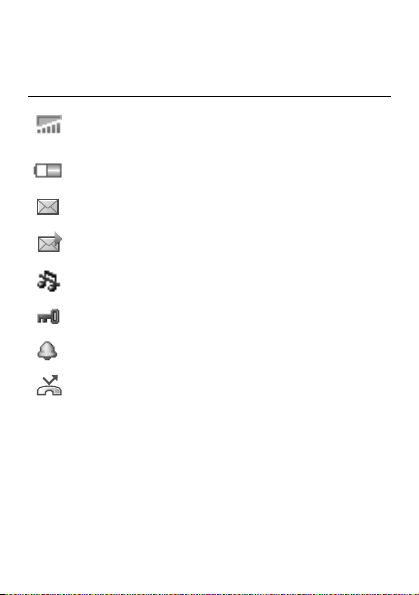
Icons
These icons appear on the screen to show status and new
events.
Icon Description
Shows the strength of the GSM network signal.
Five blue bars mean full network coverage.
% 50 Networks
Shows the battery status. A green battery means
fully charged. % 9 To charge the battery
You have received a new text or voice message*.
% 24 Text messages and % 23 Voice messages
You have received a new picture message.
% 35 Picture messages
The phone is set to silent. % 46 Sounds & Alerts
The keypad is locked. % 53 Keypad lock
An alarm is activated. % 48 Alarm clock/Alarms
Divert calls* is activated. % 16 Diverting calls
For more information, see www.sonyericsson.com/cn.
* Some items may be operator-, network- and
subscription-dependent.
12
This is the Internet version of the user's guide. © Print only for private use.
Page 13
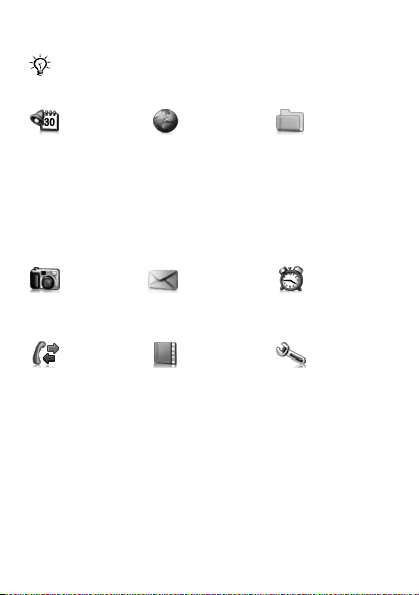
Menu overview
Some additional operator-, network- and
subscription-dependent menus may occur.
Extras Internet* My files*
Calendar
Timer
Stopwatch
Calculator
My Games
Camera Messaging Alarms*
Capture
Camera pics
Slide show
Calls Contacts Settings
Call list
Time and co st
Call settings
* These menus appear in grid view. In single icon view they
appear under Extras. % 11 To change the main menu
view.
This is the Internet version of the user's guide. © Print only for private use.
Homepage
Bookmarks
Go to URL
Edit bookmark
Show pictures
Push access
Push inbox
Clear cache
Internet pr ofile
Text message
Picture message
Settings
View contacts
Add contact
My number
Voicemail
Delete contacts
Speed dial
Copy all contacts
Send contacts
Settings
Camera pictures
My pictures
My sounds
Memory status
Sound & alerts
Wallpaper
Theme
Time and date
Language
Select network
Infrared port
Advanced
Phone status
13
Page 14
Calling
Making and receiving calls
Turn on the phone and make sure you are within range of
a network to make and receive calls % 10 To turn on the
phone.
If your subscription includes the Calling Line
Identification service and the caller’s number is identified,
the number is displayed. If you have saved the number in
Contacts, the name is displayed with an incoming call.
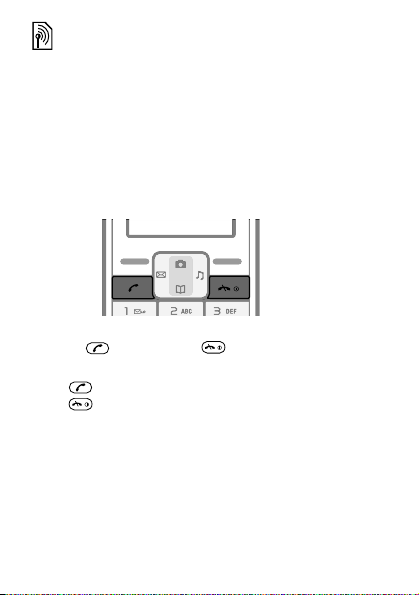
To make a call
1 Enter the area code and phone number.
2 Press to call. Press to end the call.
To answer or reject a call
Press to answer a call.
Press to reject a call.
To turn off the ringtone when receiving a call
Select Silent to turn off the ringtone without answering the
call.
14
This is the Internet version of the user's guide. © Print only for private use.
Page 15
To change the ear speaker volume during a call
Press to increase the volume and to decrease the
volume.
To select more options during a call
Select Options.
To make international calls
1 Press and hold until a + sign appears.
2 Enter the country/region code, area code (without the
leading zero), phone number and press
To put a call on hold
1 Press during a call to put it on hold.
.
2 select Retrieve to resume the call.
To turn off the microphone during a call
1 Select Options } Turn off mic..
2 To turn on the microphone again, select Mic. on.
To check your missed calls
1 When Missed calls: is displayed, select Details to
display the missed calls.
2 To call a number, scroll to the number and press .
This is the Internet version of the user's guide. © Print only for private use.
15
Page 16
Call list
Information about the last 30 calls is saved in Call list.
indicates that you have missed a call.
To call a number from the call list
1 From standby press and scroll to one of the
numbers.
2 Press to call.
To clear a number from the call list
1 From standby press and scroll to one of the
numbers.
2 Select Options } Delete } Yes.
Emergency calls
Your phone supports the international emergency
numbers, for example 112 and 911. This means that these
numbers can normally be used to make an emergency call
in any country/region, with or without a SIM card inserted,
if a GSM network is in range.
In some countries/regions, your network operator
may have saved additional local emergency numbers
on the SIM card.
To make an emergency call
Enter, for example, 112 and press . Press the right
selection key to correct mistakes.
Diverting calls
If you cannot answer incoming calls, you can divert them
to another number, for example, your answering service.
When the Restrict calls function is activated, some
Divert call options are not available.
16
This is the Internet version of the user's guide. © Print only for private use.
Page 17

To activate a call divert
1 From standby select Menu } Calls } Call settings
} Divert all calls.
2 Select an option.
3 Select Activate.
4 To divert the calls to your voicemail, select Divert calls
to voicemail. To find the contact you want your calls to
be diverted to, select Divert to saved contact. To enter
the phone number you want your calls to be diverted
to, select
To deactivate a call divert
Select the divert option and then select Deactivate.
Call waiting service
When call waiting is activated, you hear a beep if you
Enter number to divert to.
receive a second call.
To activate the call waiting service
From standby select Menu } Calls } Call settings
} Call waiting } Activate.
Receiving a second call
When call waiting is activated and you receive a second
call your phone will beep.
You can:
• Select Answer to answer the incoming call and put the
ongoing call on hold.
• Select Busy to show the second caller that you are
busy.
• Select Replace active call to end the first call and
answer the second call.
This is the Internet version of the user's guide. © Print only for private use.
17
Page 18
Handling two calls
If you have an ongoing call and a call on hold, you can:
• Select Switch to switch between the two calls.
• Press twice to end both calls.
You cannot answer a third call without ending or
replacing one of the first two calls or joining them
into a conference call.
Conference calls
Conference call supports only three participants including
yourself. A conference call is started by joining an ongoing
call and a call on hold.
To join the two calls into a conference call
After having answered a second call:
• Select Options } Join calls to join the two calls.
• Select Options } Release party to release one party,
select name or number of the party to release.
• Press twice to end both calls.
Contact your network operator to check if this
function is supported.
To add a new participant
1 To put the ongoing call on hold, press .
2 Enter the number you want to call and press .
3 To end the second call, press .
4 To continue the first call, select Retrieve.
18
This is the Internet version of the user's guide. © Print only for private use.
Page 19

My number
You can view and edit your own phone number(s).
To check your own phone number
From standby select Menu } Contacts } My number. If
your number is not automatically loaded from the SIM
card, you can enter it yourself.
Restricted dialling
Restrict outgoing and incoming calls when at home or
abroad. You need a password from your service provider.
If you divert incoming calls, you cannot activate
some restricted dialling options.
To activate call restriction
1 From standby select Menu } Calls } Call settings
} Restrict calls and select an option.
• All outgoing – all outgoing calls.
• Outgoing intl – all outgoing international calls.
• Outgoing intl roam. – all outgoing international
calls except to your home country/region.
• All incoming – all incoming calls.
• Inc. when roaming – all incoming calls when you
are abroad (when roaming).
• Deactivate all – enter password to deactivate all
restrictions.
• Change password – change the password needed
to activate call restrictions.
2 Select Activate.
3 Enter your password and select OK.
This is the Internet version of the user's guide. © Print only for private use.
19
Page 20

To cancel all call restrictions
1 From standby select Menu } Calls } Call settings
} Restrict calls } Deactivate all.
2 Enter your password and select OK.
Call time and cost balance
You can check call time, the amount of sent messages
and used data bytes. SIM may support cost balance but
this is operator dependant.
To check call time, sent messages and data bytes
From standby select Menu } Calls } Time and cost.
To reset time and cost counter
1 From standby select Menu } Calls } Time and cost.
2 Select Reset } Yes.
Showing or hiding your phone number
If your subscription supports CLIR (Calling Line
Identification Restriction), you can hide your phone
number for people you call.
To show or hide your phone number
From standby select Menu } Calls } Call settings
} Hide/show no. and select an option.
20
This is the Internet version of the user's guide. © Print only for private use.
Page 21
Contacts
You can save names and numbers in Contacts.
To add a contact
1 From standby select Menu } Contacts } Add contact.
• Select Save on SIM if you want the contact to be
saved on the SIM card.
• Select Save in phone if you want the contact to be
saved in the phone.
2 Enter the name and select Options } OK.
3 Scroll to the icon below the name.
4 Enter the number and select OK.
5 Select Save contact.
To call a contact
To call a name written in Chinese characters
1 From standby press .
2 Scroll to the contact you want to call; or press and hold
to switch the search mode to the Chinese, then
enter the first Pinyin letter of the name you want to call .
3 Select the contact and press .
This is the Internet version of the user's guide. © Print only for private use.
21
Page 22

To call a name written in Latin characters
1 From standby press .
2 Scroll to the contact you want to call or press and hold
to switch the search mode to English, then enter
the first letters of the name you want to call .
3 Select the contact and press .
To edit a contact
1 From standby press .
2 Scroll to and select the contact.
3 Select Options } Edit.
4 Edit the information and select Options } Save contact.
The option Edit, then call is a temporary change of
the contact and will not be saved in the memory.
To delete a contact
1 From standby press .
2 Scroll to and select the contact.
3 Select Options } Delete contact } Yes.
Enter the + sign and country/region code with all
contact numbers. They can then be used abroad or at
home % 15 To make international calls.
Contacts memory
The number of entries you can save in Contacts depends
on the capacity of your phone and SIM card.
To check the Contacts memory status
From standby select Menu } Contacts } Settings
} Memory status.
22
This is the Internet version of the user's guide. © Print only for private use.
Page 23

Voice messages
If your subscription includes an answering service, callers
can leave a voice message when you cannot answer a
call.
To call your voicemail service
From standby, press and hold , if you have saved your
voicemail number in the phone.
To enter your voicemail number
1 From standby select Menu } Contacts } Voicemail.
2 Add voicemail number? appears. Select Yes.
3 Enter the voicemail number that you get from your
service provider and select
Save.
This is the Internet version of the user's guide. © Print only for private use.
23
Page 24

Messaging
Your phone supports various messaging services. Contact
your service provider about the services you can use or for
more information, see www.sonyericsson.com/cn.
Before you start
If the number to your service centre is not saved on your
SIM card, you must specify the number yourself,
otherwise you cannot reply to received messages or send
your own. Your service centre number is usually provided
with your SIM card. If you do not have your service centre
number, please contact your service provider.
To check or add a service centre number
1 From standby select Menu } Messaging } Settings
} Text message } Service centre. The number is
shown if it is saved on the SIM card.
2 If there is no number, enter it, including the international
“+” sign and country/region code. Select
Text messages
Text messages can be sent to a mobile phone number or
to a contact.
To receive text messages
1 Read now? appears. Select View.
2 Scroll to the unread message and select Read.
Inbox and Unsent
Received messages are saved in Inbox. Messages that
fail to be sent are saved in Unsent
To read text messages
1 From standby select Menu } Messaging } Text
message } Inbox.
24
This is the Internet version of the user's guide. © Print only for private use.
.
Save.
Page 25
2 Scroll to a message and select Read. represents
unread messages.
Entering letters and characters
There are two methods to enter letters and characters:
• Multitap text input
• T9™ Text Input
To change writing method
When you enter letters, press and hold to switch
between Multitap and T9™ text input.
To write and send a text message
1 From standby press .
2 Select Text message and write your message. Select
Options, for example, to add a symbol.
3 When the message is ready, select Options } Send
message.
4 Retrieve a recently used number, or look-up from
contacts, or enter phone number or email address.
5 Select Send message.
To send the text message to an email address you
need to set the default message type to email
% 34 To set a default message type.
This is the Internet version of the user's guide. © Print only for private use.
25
Page 26

To enter letters using multitap text input
• Press – repeatedly until the desired letter
appears.
• Press to add a space.
• Press to add a comma, period, question mark, etc.
• Press to shift between capitals and lower case
letters.
• Press and hold – to enter numbers.
• Press to enter the + sign.
• Press the right selection key to delete characters.
• Press and hold to change text input method.
• Press and hold to change writing language.
Multitap input only applies when latin characters are
selected as input language.
T9™ Text Input
The T9™ Text Input method uses a dictionary to recognize
words. You press each key only once, even if the letter
you want is not the first letter on the key.
To enter letters using T9™ Text Input
1 From standby press .
2 Select Text message.
3 Press and hold to switch between Multitap and
T9™ text input.
4 Write your message, for example, to write the word
“Jane”, press
5 Accept a word and add a space by pressing . To
, , , .
accept a word without adding a space, press . If the
word shown is not the one you want, press or
repeatedly to view alternative words.
26
This is the Internet version of the user's guide. © Print only for private use.
Page 27

6 Continue writing your message. To enter a full stop or
other punctuation marks, press
repeatedly. Accept a word and add a space by
pressing
• Press the right selection key once to delete one
• Press and hold the right selection key to delete all
• Press and hold to change text input method.
• Press and hold to change writing language.
Chinese input
This mobile phone has different input methods for entering
Chinese characters:
• Stroke input
• Pinyin input
You can use these methods, for example, to enter
Chinese names and Chinese short messages.
Switching between Chinese input methods
In the Chinese editing mode, you can select and switch
quickly to another input method by pressing and holding
.
General instructions
Regardless of which input method you choose, your
phone has a function to speed up the entry of Chinese
characters. Whenever you enter a stroke or a Pinyin letter,
a candidate row of the most frequently used characters
containing that stroke or relating to that letter appears at
the bottom of the screen.
.
character at a time.
characters at once.
and then or
This is the Internet version of the user's guide. © Print only for private use.
27
Page 28

If the character you want is not displayed in the candidate
row, press to present another candidate row. Continue
pressing until the character you want is displayed.
Alternatively, you can enter the next stroke or Pinyin letter
and a new set of characters will immediately be displayed
in the candidate row. To go back to the previous row,
press . To select a character in the candidate row, press
the left selection key and press the key corresponding to
the number above the character you want to enter.
Stroke input
A Chinese character is built up of strokes. There are more
than 30 basic strokes, which are grouped into 5 stroke
categories. Each category is represented on the keypad
by one of the keys - . The Wild Card key , is
used when you are not sure of which stroke to use.
Stroke categories
The 5 stroke categories are defined in the table below:
Number
Stroke
Key
Category
28
This is the Internet version of the user's guide. © Print only for private use.
Basic
Stroke Name Character
Stroke
Over
Lift
Down
Down-Hook
Short
Slope Down
Long Left Slope
王 十 在 七 天
海 红 牡 状 习
中 业 上 门 丑
小 水 打 子 承
直 真 质 草
八 九 丹 风 片
Page 29

Number
Key
Stroke
Category
Basic
Stroke Name Character
Stroke
Over Slope
Short left Slope
Dot
Right Slope
Down-CurvedOver
Down-Over
Left Slope-Over
Left Slope-Dot
Down-Lift
Right SlopeHook
Down-Over-Hook
Down-OverCurved-Hook
Down-Over-Left
Slope
Down-OverDown-Hook
Down-OverDown
Over-Hook
Over-Down
香 千 匕 后 丢
而 页 面 学 殷
六 学 雷 心 性
人 火 又 送 林
四 西 酉 酸
山 巨 屯 母 凶
么 去 公 约 能
女 要 好 巡 巢
衣 以 饭 收 长
我 或 民 成 伐
心 必 思 忘
电 也 毛 兄 孔
专 传 转
马 与 张 号 费
鼎 鼐
写 字 皮 通 免
口 已 户 书 骨
This is the Internet version of the user's guide. © Print only for private use.
29
Page 30

Number
Stroke
Key
Category
? (Wild card key)
Components
The basic building units of Chinese characters are
components that are made up of strokes. After entering
the first two strokes of the desired character, the
component and character candidates that started with
that stroke are displayed in the candidate row.
30
This is the Internet version of the user's guide. © Print only for private use.
Basic
Stroke Name Character
Stroke
Over-Down-Hook
Over-Left Slope
Over-Down-OverLeft Slope
Over-Left SlopeCurved-Hook
Over-Down-OverHook
Over-Down-OverDown
Curved-Hook
Over-DownCurved-Hook
Over-Down-Over
Over-Down-Lift
力 习 也 同 永
又 之 登 多 社
及 极 廷 建
阿 队 陈 那 部
乃 透 鼐 隽 杨
凸
狗 豹 家 逐 狂
乙 九 瓦 飞 风
投 沿 船 凹
话 计 认 讯
Page 31

Using components is a fast method for entering complex
characters.
The smaller yellow candidates are components, and
the bigger blalck candidates are characters.
For example, to enter “信息”
1 Enter “ ”, “ ” and “ ”.
2 Press Select then press the key corresponding to the
number above the character to select “
信 ”.
3 Press Select then press the key corresponding to the
number above the character to select “
息 ”.
Example of using the wild card key
The wild card key , is used to supplement unclear
strokes in entering characters. If you want to enter “ 互 ”,
but you only know that “ 一 ” is the first and the last stroke
of the character and that the total number of strokes is
four, enter , , , . The character is
displayed in the candidate row.
This is the Internet version of the user's guide. © Print only for private use.
31
Page 32

Pinyin input
Press the keys containing the required Pinyin letters, and
the phone will make various proposals on the screen,
according to the pronunciation rules of Mandarin.
Below is the key mapping of Pinyin letters on the keypad.
Number Key Pinyin Letter
a b c
d e f
g h i
j k l
m n o
p q r s
t u ü
w x y z
On the keypad, the letter ü is replaced by v.
For example, to enter “信息”
1 Press , , .
2 When “xin” is underline, press Select then press the
key corresponding to the number above the character
to select “
suggested Pinyin combinations, press
信 ”. (If you want to enter any of the other
or to the
desired combination, then press Select).
3 Press Select then press the key corresponding to the
number above the character to select “
32
This is the Internet version of the user's guide. © Print only for private use.
息 ”.
Page 33

To view options when entering letters
Select Options to view options when entering letters.
• Send message – to send the composed message.
• Save – to save a draft of the composed message.
• Add symbol – use to move through
symbols.
• Writing lang. – a list of available languages is shown.
• Dictionary – turn T9™ text input on or off.
• Add item – to add a picture, sound, animation.
•Writing method – only visible when writing language is
Chinese. Change between different Chinese writing
methods.
To enter symbols in a text message
1 When you write a text message, select Options
} Add symbol.
2 Scroll to a symbol and select Insert.
To change writing language
1 When you write a text message, select Options
} Writing lang.
2 Select a language.
Unsent
Messages that you do not wish to send immediately can
be saved in Unsent.
To save a phone number from a text message
1 When a text message is displayed select Options
} Save sender no..
2 Select if the contact is to be saved on the SIM card or
in phone memory only.
3 Enter the name and select Options } OK.
4 Select Save contact.
This is the Internet version of the user's guide. © Print only for private use.
33
Page 34

To delete a message
When a text message is displayed select Options } Delete
} Yes.
To delete all messages
1 From standby select Menu } Messaging } Text
message } Delete msgs and select an option.
2 Delete all messages? appears. Select Yes.
Long messages
The number of characters allowed in a text message
depends on the language you are writing in. Long
messages are sent by automatic linking of two or more
messages. You are charged for each of the messages
linked in a long message. You may not receive all parts of
a long message at the same time.
Check with your service provider for the maximum
number of messages that can be linked.
Text message options
The phone supports different types of messages. Your
service provider may convert text message into a format
(email, for example) that suits the equipment that is going
to receive the message.
To set a default message type
From standby select Menu } Messaging } Settings
} Text message } Text message type and select an
option.
To get delivery status of a sent message
From standby select Menu } Messaging } Settings
} Delivery report and select an option.
34
This is the Internet version of the user's guide. © Print only for private use.
Page 35

Area information
Area information is a type of text message (for example,
a local traffic report) that is sent to all subscribers within
a certain network area.
Please contact your service provider for more
information about area information.
To turn area information on or off
From standby select Menu } Messaging } Settings
} Text message } Area information.
• Subscriptions – add name and number for the Area
information that the phone should subscribe to.
• Reception – set reception to On or Off.
• Language – select the language that you want the
information to be presented in.
• Cell info – information about what network cell the
phone is in contact with. Shown when the phone is in
Standby mode. Set to
Picture messages
Picture messages can contain text, pictures or camera
pictures. They are sent via MMS (Multimedia Messaging
Signatures) to a mobile phone.
Sending and receiving phones must have
subscriptions that support picture messaging.
On or Off.
This is the Internet version of the user's guide. © Print only for private use.
35
Page 36

Before you start
If settings are not already in your phone % 42 Settings.
To create and send a picture message
1 From standby press .
2 Select Picture messages } Options and select among
the options to build the message. When you have
added text or an item, select
continue building the message.
Options } Save to
3 When the message is ready, select } Options } Send.
4 Select an option.
• If you select email, enter the email address.
• If you select phone number, enter the phone
number, or retrieve a number that has recently
been used, or look-up from contacts.
5 Select Send.
The box in the upper right corner of the screen shows
the kilobytes of your created picture message.
To receive picture messages
When your phone has received new picture messages
1 Read now? appears. Select View.
2 Scroll to the unread message and select Read.
appears on the screen to remind you that you have
unread picture messages.
36
This is the Internet version of the user's guide. © Print only for private use.
Page 37

Inbox and Outbox
Received messages are saved in Inbox. Messages that
fail to be sent are saved in Outbox
Draft
Messages that you do not wish to send immediately can
.
be saved in Drafts.
To save a draft
When you write a message, select Options } Save.
The message is saved in Drafts.
To save an item in a received picture message
1 Scroll to the item and select Options.
2 Select Save picture or Save melody. Items are saved in
corresponding folders in Extras } My files.
To view options when creating a picture message
Select Options to view options when creating a picture
message:
• Send – to send your created picture message.
• Save – to save a draft of your created picture message.
• Add text/Delete text – to insert or delete text in a
picture message.
• Edit text – to edit text in a draft.
• Add picture – to insert or delete a picture in a picture
message.
• Add sound/Delete sound – to insert or delete an audio
file in a picture message.
• Add page – to extend your picture message with
another page.
• Page timing – to view the length of the picture message
in minutes and seconds.
• Preview – to preview your created picture message
before sending.
This is the Internet version of the user's guide. © Print only for private use.
37
Page 38

• Delete page – to delete an inserted page from a picture
message. Only available if the message includes more
than one page.
• Next page – to scroll to the next page. Only available if
the message includes more than one page.
• Previous page – to scroll to the previous page. Only
available if the message includes more than one page.
Automatic download
Select how to download your picture messages.
From standby select Menu } Messaging } Settings
} Picture message to select one of the following:
• Msg download – select if the phone should ask you
before downloading (Always ask), or if it should
download automatically (Always downl.), if ask to
download when not in home network (Roaming).
• Accept msgs – decide whether commercial and
anonymous messages should be accepted.
• Message server – enter a message server or service
centre address for MMS services.
• Internet profile – to select the WAP profile to be used
for MMS.
38
This is the Internet version of the user's guide. © Print only for private use.
Page 39

Imaging
Camera
Your phone has a digital camera to take pictures to save
or send. Use a picture as a screen saver, wallpaper or add
it to a contact.
Pictures taken with the camera are saved in Camera
} Camera pics. The format is JPEG.
Pictures downloaded via Picture messages, Internet or via
Infrared port are saved in Extras } My files } My pictures.
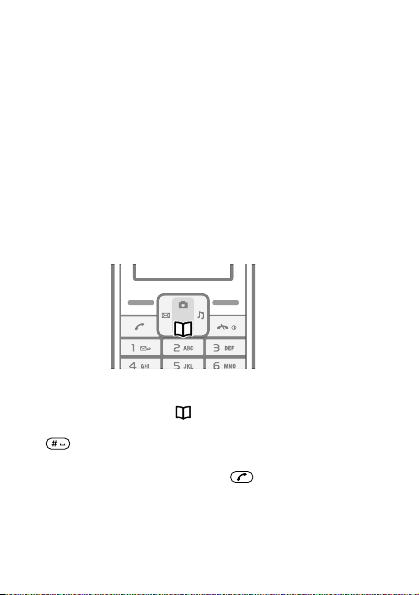
To start the camera and take a picture
1 From standby press .
2 Hold the phone as shown in the illustration. You can
see the subject on the phone screen.
3 Select Capture to take the picture.
A strong light source such as direct sunlight or a
lamp can make the screen black out or the picture
may be distorted.
This is the Internet version of the user's guide. © Print only for private use.
39
Page 40

To save a picture
When you have taken a picture, select Save. The picture is
saved in Camera } Camera pics.
When the memory is full, you need to delete items
before you can save the picture.
To delete a picture
1 When you have taken a picture, select Delete.
2 Delete picture? appears. Select Yes.
To delete a picture from Camera pics
1 From standby select Menu } Camera } Camera pics.
2 Scroll to a picture and select View.
3 Select Options } Delete } Yes.
To delete a picture from My pictures
1 From standby select Menu } Extras } My files
} My pictures.
2 Scroll to a picture and select View.
3 Select Options } Delete } Yes.
Sending pictures
Sending and receiving phones must have
subscriptions that support picture messaging. If
settings are not already in your phone % 42 Settings.
To send a picture from Camera pics
1 From standby select Menu } Camera } Camera pics.
2 Scroll to a picture and select View.
3 Select Options } Send message } Options } Send.
4 Enter phone number or email address.
5 Select Send.
40
This is the Internet version of the user's guide. © Print only for private use.
Page 41

To send a picture from My pictures
1 From standby select Menu } Extras } My files
} My pictures.
2 Scroll to a picture and select View.
3 Select Options } Send message } Options } Send.
4 Enter phone number or email address.
5 Select Send.
Wallpaper
If you set a picture as wallpaper, this picture is displayed
in standby mode.
To use a picture taken with camera as wallpaper
1 From standby select Menu } Camera } Camera pics.
2 Scroll to a picture and select View.
3 Select Options } Set wallpaper.
Picture options
• Delete – to delete the selected picture.
• Send message – to send the picture in a picture
message.
• Send via IR – to exchange the picture with another
device equipped with infrared.
• Set wallpaper – to set a picture as wallpaper.
• Rename – to rename the picture. The default naming
for a picture is YY/MM/DD/HH/MM/SS.
•Information – view file type、 file size and activation
status of the picture.
This is the Internet version of the user's guide. © Print only for private use.
41
Page 42

Internet
Internet appears either in the main menu or under
Extras % 11 To change the main menu view.
Settings
You need the correct settings in your phone to use
the Internet or messaging services.
Settings may be in your phone when you buy it. If not,
contact your network operator, service provider or go to
www.sonyericsson.com/cn for more information. To use
the Internet, and send and receive picture messages, you
need the following:
• A phone subscription that supports data transmission.
• The correct settings in your phone.
Entering settings
If settings are not in your phone, you can:
• Receive settings in a text message (SMS) from your
network operator.
• Use a computer to go to www.sonyericsson.com/cn to
request that a text message with the settings is sent to
your phone.
To install settings
1 When the message New settings received appears,
select Yes to install the settings. If settings already exist
in your phone you can either keep or replace them.
2 Select an Internet profile.
3 If you install settings for picture messages, select
a message server.
After the installation % 43 Internet menu.
42
This is the Internet version of the user's guide. © Print only for private use.
Page 43

Internet menu
The Internet menu contains the following:
• Homepage – go to the predefined homepage.
• Bookmarks – go directly to a saved Web page.
• Go to URL – enter a Web address manually or retrieve
one.
• Edit bookmark – edit the Web address of a saved
bookmark.
• Show pictures – allow if images to be shown on Web
pages.
• Push access – allow or reject reception of push
messages.
• Push inbox – WAP Push notification messages are
saved here.
• Clear cache – clear the internet browser cache
memory.
• Internet profile – select the WAP profile to be used for
Web browsing.
To select an Internet profile
1 From standby select Menu } Extras } Internet
} Internet profile.
2 Select a profile to use.
To start browsing
1 From standby select Menu } Extras } Internet
} Go to URL.
2 Enter a new Web address or select an already used
Web address.
To stop browsing
When you browse, select Back until you exit the Internet.
This is the Internet version of the user's guide. © Print only for private use.
43
Page 44

Options when browsing
When you browse, select Options. The menu contains the
following, but depends on the Web page you are visiting:
• View – open the marked Web address.
• Bookmarks – create, use or edit bookmarks to Web
pages.
• Go to URL – enter a Web address manually or retrieve
one.
• Add bookmark – add a new bookmark to the list.
• Reload – refresh the current Web page.
• Homepage – go to the predefined homepage.
•Exit browser – leave the Internet browser.
44
This is the Internet version of the user's guide. © Print only for private use.
Page 45

Infrared port
You can use infrared to send, for example, pictures to
another phone or a computer.
To turn on infrared
From standby select Menu } Settings } Infrared port
} On.
If set to On but not used, the Infrared port
automatically turns off after 10 minutes.
To connect two devices
<20 cm
(<8")
1 Turn on infrared in both devices.
2 Make sure the infrared port on your phone is facing the
infrared port on the other device with a maximum
distance of 20 cm (8 inches).
To transfer items using infrared
1 Select an item to transfer.
2 Select Options } Send via IR.
This is the Internet version of the user's guide. © Print only for private use.
45
Page 46

Sounds & Alerts
Your phone comes with a number of standard and
polyphonic melodies which can be used as ringtones.
Do not hold the phone to your ear when using high
ringtones as this can damage your hearing.
To select a ringtone
1 From standby select Menu } Settings } Sound & alerts
} Ringtone.
2 Select a ringtone. The sound is played when selected.
To set the ringtone to silent
• From standby press and select Silent.
To set the ring volume
• From standby press and select an option. The
sound is played when selected.
46
This is the Internet version of the user's guide. © Print only for private use.
Page 47

To select a key sound
From standby select Menu } Settings } Sound & alerts
} Key sound and select an option.
To set the key sound to silent
From standby select Menu } Settings } Sound & alerts
} Key sound } Silent.
Sounds and alerts options
Under Sound & alerts you can also set these options:
• Vibration – set the vibration ring style to On or On if in
Silent or Off.
• Message alert – select a message notification signal.
•Alarm sound – select an alarm signal.
This is the Internet version of the user's guide. © Print only for private use.
47
Page 48

Alarm clock/Alarms
Alarm clock/Alarms appears either in the main menu
or under Extras % 11 To change the main menu
view.
The alarm rings even if the phone is set to silent or turned
off. The alarm time is displayed in standby mode.
To set an alarm
1 From standby select Menu } Extras } Alarm clock.
2 Enter a time for the alarm and select Save.
3 Select an option.
• If Alarm is selected, select an alarm signal.
• If Recurrent alarm is selected, select what day/
days the alarm is going to sound. Scroll and mark/
unmark checkboxes, then select
To turn an alarm off when it rings
Select Stop, or Snooze to snooze for 9 minutes. Snooze is
automatically turned on if you do not press any key.
To disable an alarm
From standby select Menu } Extras } Alarm clock
} Alarm off.
To select an alarm signal
Do not hold the phone to your ear when using high
sounds as this can damage your hearing.
1 From standby select Menu } Settings } Sound & alerts
} Alarm sound.
2 Select a sound. The sound is played when selected.
48
This is the Internet version of the user's guide. © Print only for private use.
Done.
Page 49

Settings
Wallpaper
You can change the appearance of the screen by using
wallpapers. Your phone comes with predefined
wallpapers. The wallpaper activates when in idle mode for
a few seconds, to save power.
To select a wallpaper
1 From standby select Menu } Settings } Wallpaper and
select an option.
2 Preview and select.
To select a theme
From standby select Menu } Settings } Theme and select
a theme.
To adjust the screen brightness
1 From standby select Menu } Settings } Advanced
} Brightness.
2 Press to increase the brightness and to
decrease the brightness.
3 Select Save.
Time and date
To set the date
1 From standby select Menu } Settings } Time and date
} Date } Set date.
2 Enter the date and select Save.
To set the date format
From standby select Menu } Settings } Time and date
} Date } Date format and select an option.
This is the Internet version of the user's guide. © Print only for private use.
49
Page 50

To set the time
1 From standby select Menu } Settings } Time and date
} Time } Set time.
2 Enter the time and select Save.
To set the time format
From standby select Menu } Settings } Time and date
} Time } Time format and select an option.
Networks
When you turn on the phone, it automatically selects your
home network. If your home network is not within range,
you may use another network, provided your network
operator allows it. You can select the network you want to
use, or you can add a new network to your list of preferred
networks. Contact your network operator for details.
% 59 Troubleshooting for more information about
networks.
To view available networks
1 From standby select Menu } Settings } Select
network.
2 Select whether you want to do an Automatic search or
a Manual search.
A list of the currently available networks in the area is
presented after a while.
50
This is the Internet version of the user's guide. © Print only for private use.
Page 51

Master reset
You can reset all the settings in the phone to the way they
were when you bought your phone by performing a
master reset. All changes that you have made to settings
are deleted.
Resetting may take a few minutes.
To reset the phone
1 From standby select Menu } Settings } Advanced
} Master reset.
2 Select an option.
• Reset settings – resets settings only. User data as
contacts, messages, pictures and sounds are not
deleted.
• Reset all – deletes all settings and user data as
contacts, messages, pictures and sounds.
Languages
Select the language for phone menus or the languages
that you may use when writing. Most SIM cards
automatically set the language used in the menu to the
language of the country/region where you bought your
SIM card.
To change the phone language
From standby select Menu } Settings } Language and
select a language.
To select writing language
You can select writing language when writing a message
% 33 To change writing language.
This is the Internet version of the user's guide. © Print only for private use.
51
Page 52

Locks
Phone lock
The phone lock protects the phone against unauthorized
use if it is stolen and the SIM card is exchanged. You can
change the phone lock code (which is 0000 by default) to
any four-digit personal code.
To unlock the phone
If the phone lock is on, enter your code and select OK.
Automatic phone lock
If the phone lock is set to Automatic, you do not need to
enter your phone lock code until a different SIM card is
inserted in the phone.
It is important that you remember your code. If you
should forget it, you have to hand in your phone to
your local Sony Ericsson retailer.
To turn the phone lock code on or off
1 From standby select Menu } Settings } Advanced
} Security } Phone lock } Protection.
2 Select an option.
3 Enter the phone lock code and select OK.
To edit your phone lock code
1 From standby select Menu } Settings } Advanced
} Security } Phone lock } Change code.
2 Enter the old code and select OK.
3 Enter the new code and select OK.
4 Re-enter the new code to confirm and select OK.
52
This is the Internet version of the user's guide. © Print only for private use.
Page 53

Keypad lock
Lock the keypad to avoid dialling a number by accident.
You can still answer a call and the keypad locks again
after it. % 6 To lock or unlock the keypad.
Automatic keylock
Automatic keylock in standby means the keypad is locked
a short while after you last pressed a key.
To turn the automatic keylock on or off
From standby select Menu } Settings } Advanced
} Auto keylock and select an option.
Calls to the international emergency number 112 can
still be made, even when the keypad is locked.
SIM card lock
The SIM card lock protects your subscription, but not your
phone itself, from unauthorized use. If you change SIM
cards, the phone still works with the new SIM card.
Most SIM cards are locked at the time of purchase. If
the SIM card lock is on, you have to enter a PIN (Personal
Identity Number) every time you turn on your phone.
If you enter your PIN incorrectly three times in a row,
the SIM card is blocked. This is indicated by the message
PIN blocked. To unblock it, you need to enter your PUK
(Personal Unblocking Key). Your PIN and PUK are
supplied by your network operator. You can edit your PIN
and turn off your SIM card lock at any time.
If the message Passwords do not match appears
when you edit your PIN, you entered the PIN or PIN2
incorrectly.
This is the Internet version of the user's guide. © Print only for private use.
53
Page 54

To unblock your SIM card
1 When PIN blocked is displayed, enter your PUK and
select OK.
2 Enter a new four- to eight-digit PIN and select OK.
3 Re-enter the new PIN to confirm and select OK.
To turn the SIM card lock on or off
1 From standby select Menu } Settings } Advanced
} Security } SIM lock } Protection and select an
option.
2 Enter your PIN and select OK.
To edit your PIN
1 From standby select Menu } Settings } Advanced
} Security } SIM lock } Change PIN.
2 Enter your PIN and select OK.
3 Enter a new four- to eight-digit PIN and select OK.
4 Re-enter the new PIN to confirm and select OK.
To edit your PIN2
1 From standby select Menu } Settings } Advanced
} Security } SIM lock } Change PIN2.
2 Enter your PIN2 and select OK.
3 Enter a new four- to eight-digit PIN and select OK.
4 Re-enter the new PIN to confirm and select OK.
54
This is the Internet version of the user's guide. © Print only for private use.
Page 55

Extras
Alarm clock
% 48 Alarm clock/Alarms.
Internet
% 42 Internet.
Calendar
Your phone has a calendar where you can add notes.
Navigating in your calendar
Use the navigation key to move between days or weeks.
Today’s date will have a square around it. You can change
view under Options.
• View today – view the note for the selected day. If there
is more than one note, press and to scroll.
• View all – view all notes. Press and to scroll.
• Change date – enter a date to view another week or
month.
To add a new note
1 From standby select Menu } Extras } Calendar.
2 Scroll to the desired date and select Options
} Add a note.
3 Enter details and select Options } OK.
4 Select OK to confirm the date.
5 Select OK to confirm the time.
6 Select if you want a reminder signal.
• On – a reminder signal will sound in immediate
connection with the note.
• Off – no reminder signal.
This is the Internet version of the user's guide. © Print only for private use.
55
Page 56

To edit or delete a note
1 From standby select Menu } Extras } Calendar.
2 Scroll to the day for the note and select Options
} View today.
3 If there is more than one note, scroll to the desired
note.
4 Select Options.
5 Select to delete or edit the note.
To send and receive a note
1 From standby select Menu } Extras } Calendar.
2 Scroll to the day for the note and select Options
} View today.
3 Select Options } Send } Text message.
4 Write a text message and select Options
} Send message.
5 Enter phone number.
6 Select Options } Send message.
When you receive a note, follow the instructions that
appear.
Calendar settings
Under Calendar you also have these options:
• Delete – delete notes.
• Edit – edit a note.
• Add symbol – add a symbol to a note.
• Writing lang. – select language.
• Dictionary – turn T9™ text input on or off.
• Continue writing – if you receive an incoming call, this
alternative pops up.
• Don´t save – do not save changes.
56
This is the Internet version of the user's guide. © Print only for private use.
Page 57

•Starting day – Set starting day of weeks.
If Chinese is selected as the phone language, an
additional option apperars, Lunar calendar.
Timer
Your phone has a built-in timer. When the signal rings,
press the left selection key to turn it off.
To set the timer
1 From standby select Menu } Extras } Timer and enter
the hours, minutes and seconds for countdown.
2 Select OK to start.
Stopwatch
Your phone has a stopwatch that can save several laps.
To use the stopwatch
From standby select Menu } Extras } Stopwatch } Start.
• Select Start to start.
• Select Stop to stop.
• Select New lap to measure an additional lap.
• Select Options to save or reset etc.
• Select View to view saved laps.
• Select Delete to delete saved laps One at a time or
Delete all.
Calculator
The phone has a built-in calculator, which can add,
subtract, divide and multiply.
To use the calculator
1 From standby select Menu } Extras } Calculator.
2 Enter digits with the keypad, then press:
• or to get ÷, x.
This is the Internet version of the user's guide. © Print only for private use.
57
Page 58

• or to get +, -.
• to enter a decimal point.
• to change between positive and negative values.
• Select Clear to delete the figure.
• Select OK to get the result.
Please note that the accuracy of the calculator is
limited.
My Files
My files appears either in the main menu or under
Extras % 11 To change the main menu view.
Games
Your phone comes with games. Information and game
controls are given in help texts for each game.
To start and end a game
1 From standby select Menu } Extras } My Games.
2 Select a game.
3 To read help texts select Help.
4 To start a new game select New game.
5 Press to quit a game.
58
This is the Internet version of the user's guide. © Print only for private use.
Page 59

Troubleshooting
Some problems require that you call your service provider,
but most of the problems you can easily correct yourself.
Remove the SIM card before handing your phone in for
repair.
Common questions
Q: Why do I have problems with memory capacity and speed?
A: You need to restart your phone from time to time.
1 Turn off the phone and remove the battery cover
2 Remove the battery for 10 seconds and then insert it in
the phone.
3 Put the battery cover on.
This is the Internet version of the user's guide. © Print only for private use.
59
Page 60

4 Turn on the phone.
Q: My screen freezes or flickers, what should I do?
A: Do a master reset
% 51 Master reset.
Q: Why can’t I turn on my phone?
A: Charge the phone until it has finished charging.
Make sure that the phone is charged. Attach the charger
and charge the phone for 2.5 hours. The battery icon may
not appear until the phone has charged for 30 minutes.
A green battery
means the phone
battery is fully
charged. A white
battery means the
phone battery is
empty.
60
This is the Internet version of the user's guide. © Print only for private use.
Page 61

Q: Why can’t I charge my phone?
A: Attach the charger properly.
Look carefully at the picture to see how to attach the
charger and charge the phone.
Q: How do I change phone language?
A: From standby select Menu } Settings } Language and select a language.
Q: What is my phone lock code?
A: The default phone lock code is 0000.
A phone lock protects your phone against unauthorized
use. If a different SIM card is inserted in the phone, the
phone lock code has to be entered.
1 From standby select Menu } Settings } Advanced
} Security } Phone lock } Change code.
2 Enter the old code and select OK.
This is the Internet version of the user's guide. © Print only for private use.
61
Page 62

To turn the phone lock code on or off
1 Enter the new code and select OK.
2 Repeat the new code and select OK.
3 Select Protection and then select On.
4 Enter your phone lock code and select OK.
Q: How do I turn on and off T9™ text input when writing a text message?
A: Press and hold when entering text.
You will see “T9™” at the top of the text message when
™ is activated.
T9
Q: It says Searching for networks on the screen.
A: Try calling from a different location.
Searching for networks means that the radio receiver is
not picking up signals from the operator. This may be a
problem with your location. Move to a location where you
have received good network coverage earlier. You will get
better network coverage outdoors.
62
This is the Internet version of the user's guide. © Print only for private use.
Page 63

Five blue bars mean
full network coverage
Q: It says Emergency calls only on the screen.
A: Try calling from a different location.
When the screen shows Emergency calls only, your
phone is OK, but you are having problems accessing your
own network. Change location and see if the message
disappears. % 50 Networks for details.
Q: It says Insert SIM card on the screen.
A: Remove the SIM card and clean it.
% 65 Insert SIM card.
This is the Internet version of the user's guide. © Print only for private use.
63
Page 64

Q: The phone turns itself off.
A: Use the automatic key lock.
If your phone turns itself off when being transported,
something in your pocket or bag has probably activated
the on/off key. Turn on the automatic key lock function.
% 53 To turn the automatic keylock on or off.
Q: How do I set up SMS/text messages?
A: Check the service centre number in the phone.
If the number to your service centre is not saved on your
SIM card, you must specify the number yourself,
otherwise you cannot reply to received messages or send
your own.
Your service centre number is usually provided with your
SIM card. If you cannot find your service centre number,
please contact your service provider.
1 From standby select Menu } Messaging } Settings
} Text message } Service centre. The number is
shown if it is saved on the SIM card.
2 If there is no number, enter it, including the international
“+” sign and country/region code and select
Save.
Q: I have problems using SMS/text messages on my phone.
A: Enter the correct SMS/text message settings.
If you have problems sending or receiving text messages
on your phone, some of your phone settings are probably
incorrect. The settings are different for different operators,
contact your network operator for the correct SMS service
centre setting.
64
This is the Internet version of the user's guide. © Print only for private use.
Page 65

Error messages
Insert SIM card
Your SIM card is not inserted correctly or may be
damaged or dirty. Try one or more of the following:
• Remove the SIM card and insert it correctly.
% 8 To insert the SIM card and battery.
• Clean the connectors on the SIM card and phone with
a soft brush, a cloth or a cotton bud moistened with any
type of unflavoured colourless alcohol.
• Check if the SIM card is damaged.
• Contact your network operator to get a new SIM card.
Invalid SIM
This error message is shown in two cases:
• The phone only works with certain SIM cards. Insert the
correct SIM card.
• You entered your personal unblocking key code (PUK)
incorrectly 10 times in a row. Contact your operator. To
% 52 Locks.
unblock
Emergency calls only
You are having problems accessing your own network.
You can only make emergency calls from this location
% 16 Emergency calls.
Searching for networks
Your phone is not receiving a signal from a network
operator. Try moving to a location where you have
received good network coverage earlier.
Passwords do not match
You have entered your PIN or PIN2 incorrectly.
Enter the correct PIN or PIN2 and select Yes % 52 Locks.
This is the Internet version of the user's guide. © Print only for private use.
65
Page 66

PIN blocked or PIN2 blocked. Enter PUK2 provided by your operator.
You have entered your PIN or PIN2 incorrectly three times
in a row. To unblock your codes % 52 Locks.
Phone locked
The phone is locked. To unlock the phone % 52 Locks.
Phone lock code:
Your phone comes with the phone lock code 0000. You
can change it to any four-digit code % 52 Locks.
66
This is the Internet version of the user's guide. © Print only for private use.
Page 67

Important information
Sony Ericsson Consumer Web site
On www.sonyericss on.com/cn there is a support section where help and
tips are only a few clicks away. Here you will find the latest computer
software updates and tips on how to use your product more efficiently.
Guidelines for Safe and Efficient Use
Please read t his informat ion before us ing your mobi le
phone.
These instructio ns are intended for your safety. P lease
follow these guide lines. If the pro duct has been sub ject to
any of the conditions listed below or you have any doubt as
to its proper functio n make sure you have t he product
checked by a certif ied service part ner before charging or using it. Failur e
to do so might entail a risk of product ma lfunction or even a potential
hazard to your healt h.
Recommendations for safe use of product (mobile phone, battery, charger and other accessories)
• Always treat your product with care and keep it in a clean and dust-
free place.
• Warning! May explo de if disposed of in fire .
• Do not expose your product to liquid or moisture or humidit y.
• Do not exp ose your product to extremely high or low
temperatures. Do not expose the battery to temper atures
above +60°C (+140°F).
• Do not expose your product to open flames or lit
tobacco pr oducts.
• Do not drop, throw or try to bend your product.
• Do not paint your product.
• Do not atte mpt to disasse mble or modify yo ur product.
Only Sony Ericsson a uthorized person nel should
perform service.
• Do not use yo ur product near m edical equipme nt
without requesting permission from your treating physician or
authorized med ical staff.
This is the Internet version of the user's guide. © Print only for private use.
67
Page 68

• Do not use your product when in, or around aircraft, or areas showing
the sign “turn off t wo-way radio”.
• Do not use your product in an area where a potentially explosive
atmosphere ex ists.
• Do not place your product or install wireless equipment
in the area above an air bag in your car.
CHILDREN
KEEP OUT OF CHILDRENS REACH. DO NOT ALLOW
CHILDREN TO PLAY WITH YOUR MOBILE PHONE OR ITS
ACCESSORIES. THEY COULD HURT THEMSELVES OR
OTHERS, OR COULD ACCIDENTALLY DAMAGE THE
MOBILE PHONE OR ACCESSORY. YOUR MOBILE PHONE
OR ITS ACCESS ORY MAY CON TAIN SMALL PAR TS THAT
COULD BECOME DETACHED AND CREATE A CHOKING HAZARD.
Power supply (Charger)
Connect the AC p ower adapter on ly to designat ed power source s as
marked o n the pro duct. Make sure the cord is posit ioned so that it wi ll not
be subjected to damage or stress. To reduce risk of electric shock, unplug
the unit from any power source before attempting to clean it. The AC
power adapter must not be used outdoors or in damp areas. Never alter
the cord or plug . If the plug does not fit into th e outlet, have a proper out let
installed by a qual ified electricia n.
Use only Sony Ericsson branded original chargers intended for use with
your mobile phone. Other chargers may not be designed to the same
safety and performance standards.
Battery
We recommend that you fully charge the battery before you use your
mobile phone for the first time. A new battery or one that has not been
used for a long time could have reduced capacity the first few times it is
used. The battery should only be charged in temperatures between +5°C
(+41°F) and +45°C (+113°F).
Use only Sony Ericsson branded original batteries intended for use with
your mobile phone. Using other batteries and chargers could be
dangerous.
68
This is the Internet version of the user's guide. © Print only for private use.
Page 69

Talk and st andby times depend on several di fferent cond itions such as
signal strength , operating tem perature, app lication usage p atterns,
features selected and voice or data transmissions when the mobile phone
is being used. Under normal conditions, the stand-by time for this battery
is up to
300 hours.
Turn off your mobile pho ne before remov ing the battery. Do not put the
battery into your mouth. Battery electrolytes may be toxic if swallowed. Do
not let the metal contacts on the ba ttery touch ano ther metal objec t.
Doing this could short-circuit and damage the battery. Use the battery for
the intended pur pose only.
Personal medical devices
Mobile phones may affect the operation of pacemakers and other
implanted equipment. Please avoid placing the mobile phone over the
pacemaker, e. g. in your breast p ocket. When us ing the mobile phone, use
it at the ear on the opposite side of the body to the pacemaker. If a
minimum dist ance of 15 cm (6 in ches) is kept be tween the mob ile phone
and the pacemaker, the risk of interference is limited. If you have any
reason to suspect that interference is taking place, immediately turn off
your mobile phone. C ontact your cardiolog ist for more informati on.
For other medical devices, please consult your physician and the
manufacturer of the device.
Driving
Please check if loca l laws and regulati ons restrict the us e of mobile
phones while driv ing or require drivers to us e handsfree solu tions. We
recommend that you use only Sony Ericsson handsfree solutions intended
for use with your produ ct.
Please note that because of possible interference to electronic equipment,
some vehicle manufacturers forbid the use of mobile phones in their
vehicles unless a handsfree kit with an external antenna has been
installed.
Always pay full attention to driving and pull off the road and park before
making or answering a call if driving conditio ns so require.
Emergency calls
Mobile phones operate using radio signals, which cannot guarantee
connection in all co nditions. You should therefore never rely solely upon
any mobile phone for essential commu nications (e.g. med ical
emergencies) .
This is the Internet version of the user's guide. © Print only for private use.
69
Page 70

Emergency cal ls may not be poss ible in all areas, on all cellular netw orks,
or when certain network services and/or mobile phone features are in use.
Check with your lo cal service provide r.
Antenna
This phone contains a built-in antenna. Use of antenna devices not
marketed by Sony Ericsson specifically for this model could damage your
mobile phone, reduce performance, and produce SAR levels above the
established limit s (see below).
Efficient use
Hold your mobile phone as you would any other phone. Do not cover the
top of the phone when it is in use, as this affects call quality and may
cause the phone to operate at a higher power level than needed, thus
shortening ta lk and stan dby times.
Radio frequency (RF) exposure and Specific Absorption Rate (SAR)
Your mobile phone is a low-power rad io transmitter and re ceiver. When it
is turned on, it emits low levels of radio frequen cy energy (also known as
radio waves or radio frequency fields).
Governments aro und the world have adopted comprehen sive international
safety guidelines, d eveloped by scientif ic organizations, e.g. ICNIRP
(International Commission on Non-Ionizing Radiation Protection) and IEEE
(The Institute of Electrical and Elec tronics Engineers Inc.), through periodic
and thorough evaluation of scien tific studies. These guideline s establish
permitted levels of radio wave exposu re for the general popu lation. The
levels include a safety margin designed to assure the safety of all persons,
regardless of ag e and health, and to account for any v ariations in
measurements.
Specific Absorption Rate (SAR) is the unit of measurement for the amount
of radio frequ ency energy abs orbed by the bo dy when using a mobile
phone. The SAR value is determined at the highest certified power level in
laboratory condit ions, but the actual SAR level of the mobile phone while it
is operating can be well below this value . This is because the m obile
phone is designed to use the minimum power required to reach the
network.
70
This is the Internet version of the user's guide. © Print only for private use.
Page 71

Variations in SAR be low the radio freque ncy exposure guidel ines do not
mean that ther e are variation s in safety. While there may be di fferences in
SAR levels among mobile phones, all Sony Ericsso n mobile phone models
are designed to meet radio freq uency expos ure guidelines .
For phones sold in the U S, before a phone mo del is available for sal e to
the public, it must be tested and certified by the Federal Communications
Commission (FCC) that it does not exceed the limit established by the
government- adopted req uirement for safe exposure . The tests are
performed in positions and locations (that is, at the ear and worn on the
body) as required by the FCC for each model. For body-worn operation,
this phone has been tested and meets FCC RF exposure guidelines when
the handset is positioned a minimum of 15 mm from the body without any
metal parts in the vicinity of the phone or when used with the original Sony
Ericsson access ory intended for this phone and worn on the body. Use of
other accessorie s may not ensure compliance w ith FCC RF exposu re
guidelines.
A separate leaflet wi th SAR informati on about this mob ile phone model is
included with the material accompanying this mobile phone. This
information can als o be found, togethe r with more informa tion on radio
frequency exposure and SAR, on:
Accessible Solutions/Special Needs
For phones sold in the US, you can use your TTY terminal with your Sony
Ericsson mobile ph one (with the neces sary accessory). Fo r information on
Accessible Solutions for individuals with special needs call the Sony
Ericsson Special Needs Center on 877 878 1996 (TTY) or 877 207 2056
(voice), or visit the Sony Ericsson Special Needs Center at
www.sonyericsson-snc.com.
Disposal of old electrical and electronic equipment
This symbol indicates that all electrical and electronic
equipment included shall not be treated as household
waste. Instead it shall be left at the appropriate collection
point for recyclin g of electrical an d electronic eq uipment.
By ensuring this prod uct is disposed of corre ctly, you will help pre vent
potential negative consequences for the environment and human health,
which could otherwise be caused by inappropriate waste handling of this
product. The recycling of materials will help to conserve natural resources.
For more detailed informa tion about recycling this product, please contact
This is the Internet version of the user's guide. © Print only for private use.
www.sonyericsson.com/health.
71
Page 72

your local city office, your household waste disposal service or the shop
where you purchased the product.
Disposing of the battery
Please check local regulations for disposal of batteries or
call your local Sony Eri csson Call Center f or information.
The battery should never be placed in municipal waste. Use
a battery dispos al facility if available .
Declaration of substances
When this product is operated under the conditions in the product
manual, the environmental protection period (EPUP) is 20 years.
(Note: The environmental protectio n period (EPUP) of battery is
5 years. )
Toxic or hazardous substances
Polybromi
(Cr6+)
Polybromi
nated
biphenyls
(PBB)
nated
diphenyl
ethers
(PBDE)
Merc
Cadmi
Part Name
Battery
Accessories
and charger
O: Indicates that this toxic or hazardous substance contained in all
of the homogeneous materials for this part is below the limit
requirement in SJ/T 11363-2006.
X: Indicates that this toxic or hazardous substance contained in at
least one of the homogeneous materials used for this part is above
the limit requirement in SJ/T 11363-2006.( Currently there are no
alternative technologies available)
72
This is the Internet version of the user's guide. © Print only for private use.
Phone
Lead
ury
(Pb)
(Hg)
XO O O O O
XO O O O O
XO O O O O
um
(Cd)
Hexavalent
chromium
Page 73

Protection of personal information
To safeguard your privacy and prevent information being accessible to a
third party, you sho uld erase all perso nal data before selling or disposing
of the product. To delete personal data, perform a master reset.
DELETION OF MATERIAL FROM THE PHONE MEMORY DOES NOT
ENSURE THAT SAID INFORMATION CANNOT BE RECOVERED BY A
SUBSEQUENT USER. SONY ERICSSON DOES NOT WARRANT
AGAINST A SUBSEQUENT USER OF THE DEVICE ACCESSING YOUR
INFORMATION AND DOES NOT ASSUME ANY RESPONSIBILITY FOR
SUBSEQUENT DISCLOSURE OF SAID INFORMATION EVEN IF A
MASTER RESET HAS BEEN PERFORMED. If you are concerned about
such potential disclosure retain your device or secure its permanent
destruction.
Accessories
Sony Ericsson r ecommends us e of Sony Erics son original ac cessories for
safe and efficient use of its products. Use of third-party accessories may
decrease performance or pose a risk to your health or safety.
LOUDNESS WARNING:
Please adjust the au dio volume cautio usly when using thi rd-party audio
accessories to avoid volume levels that may be harmful to your hearing.
Sony Ericsson does not test use of third-party audio accessories with this
mobile phone. Sony Ericsson recommends using only Sony Ericsson
original audio accessories.
End User Licence Agreement
This wireless de vice, including w ithout limitat ion any media delivered with
the device, (“Device”) contains software owned by Sony Ericsson Mobile
Communication s AB and its affiliated com panies (“Sony Ericsson”) and its
third party suppliers and licensors (“Software”).
As user of this Device, Sony Ericsson grants you a non-exclusive, nontransferable, non -assignable li cense to use the So ftware solely in
conjunction with the Device on whic h it is installed and/ or delivered with .
Nothing herein shall be construed as a sale of the Software to a user of
this Device.
You shall not reproduce, modify, distribute, reverse engineer, decompile,
otherwise alter or use any other means to discover the source code of the
Software or any component of the Software. For avoidance of doubt, you
are at all time s entitled to transfer all ri ghts and obligations to the Software
to a third party, so lely together w ith the Device wit h which you recei ved
This is the Internet version of the user's guide. © Print only for private use.
73
Page 74

the Software, provided always that such third party agrees in writing to be
bound by these rules.
You are grante d this license fo r a term of the us eful life of this De vice. You
can terminate this license by trans ferring all your right s to the Device on
which you have rec eived the Softw are to a third party in w riting. If you fail
to comply with an y of the terms an d conditions set ou t in this license, it
will terminate w ith immediate e ffect.
Sony Ericsson and its third party supp liers and licensors are the sole and
exclusive owner of and retain all rights, title and interest in and to the
Software. Sony Ericsson, and, to the extent that the Software contains
material or code of a third party, such third party, shall be entitled third
party beneficiaries of these terms.
The validity, co nstruction and performance of t his license shall be
governed by the laws of Sweden. The f oregoing shall apply to the full
extent permitt ed by, when app licable, statutor y consumer rights .
Limited Warranty
Sony Ericsson Mob ile Communica tions AB, SE-221 88 Lund, Sweden,
(Sony Ericsson) or it s local affiliated com pany, provides this Limited
Warranty for your mobile phone and original accessory delivered with your
mobile phone (hereinafter referred to as “Product”).
Should your Prod uct need warrant y service, please return it to the dealer
from whom it was purc hased, or contact y our local Sony Erics son Call
Center (national rates may apply) or visit
further informatio n.
What we will do
If, during the warranty period, this Product fails to operate under normal
use and service, due to defects in design, materials or workmanship, Sony
Ericsson authoriz ed distributors or se rvice partners, in the country/re gion*
where you purchased the Product, will, at their option, either repair or
replace the Product in accordance with the terms and conditions
stipulated herein.
Sony Ericsson a nd its service partn ers reserve the rig ht to charge a
handling fee if a return ed Product is fou nd not to be unde r warranty
according to the con ditions below.
Please note that some of your personal settings, downloads and other
information may be los t when your Sony Eric sson Product is repa ired or
replaced. At present Sony Ericsson may be prevented by applicable law,
other regulation or t echnical restrictions from making a back up copy of
74
This is the Internet version of the user's guide. © Print only for private use.
www.sonyericsson.com/cn for
Page 75

certain downloads. Sony Ericsson does not take any responsibility for any
lost information of any kind and will not reim burse you for any suc h loss.
You should always make backup copies of all the information stored on
your Sony Ericsson Product such as downloads, calendar and contacts
before handing in your Sony Ericsson Product for repair or replacemen t.
Conditions
1 This Limited Warrant y is valid only if the origin al proof of purchase for
this Product issued by a Sony Ericsson authorized dealer specifying
the date of purchase and serial number**, is presented with the
Product to be repaired or replaced. Sony Ericsson reserves the right to
refuse warranty se rvice if this informa tion has been rem oved or
changed afte r the original pur chase of the Pro duct from th e dealer.
2 If Sony Ericsson repa irs or replaces the Pro duct, the repa ir for the
defect concerned, or the replaced Product shall be warranted for the
remaining time of th e original warranty p eriod or for thirty (30) d ays
from the date of repair, whichever is longer. Repair or replacement
may involve the us e of functionally equ ivalent reconditi oned units.
Replaced parts or components will become the property of Sony
Ericsson.
3 This warranty do es not cover any fa ilure of the Prod uct due to norm al
tear and wear, or due to misuse, including but not limited to use in
other than the normal and customary manner, in accordance with the
Sony Ericsson inst ructions for use an d maintenance of the Product.
Nor does this warranty cover any failure of the Product due to
accident, software or hardware modification or adjustment, acts of
God or damage result ing from liquid.
A rechargeabl e battery can be ch arged and di scharged more th an a
hundred times. Ho wever, it will eventually wear out - this is not a defect
and corresponds to normal wear an d tear. When the talk-time or
standby time is noticeably shorter, it is time to replace your battery.
Sony Ericsson recommends that you use only batteries and chargers
approved by Sony Ericsson.
Minor variations in di splay brightness a nd colour may occur b etween
the phones. There may be tiny bright or dark dots on the display.
These are called defective pixels and occur when individual dots have
malfunctioned and can not be adjusted. Two defective pixels are
deemed acceptable.
This is the Internet version of the user's guide. © Print only for private use.
75
Page 76

Minor variations in camera image appearance may occur between
phones. This is nothing uncommon and is not regarded as a defective
camera module.
4 Since the cellular system on which the Product is to operate is
provided by a carrier independent from Sony Ericsson, Sony Ericsson
will not be responsib le for the operation, av ailability, coverag e,
services or range of that system.
5 This warranty does not cover Product failures caused by installations,
modifications, or repair or opening of the Product performed by a nonSony Ericsson authorised person.
6 The warranty does not cover Product failures which have been caused
by use of accessories or other peripheral devices which are not Sony
Ericsson branded original accessories intended for use with the
Product.
Sony Ericsson disclaims any and all warranties, whether express or
implied, for failur es caused to the Product or periph eral devices as a
result of viruses, trojans horses, spyware, or other malicious software.
Sony Ericsson strongly recommends that you install appropriate virus
protection software on your Product and any peripheral devices
connected to it, as available, and update it regularly, to better protect
your device. It is understood, however, that such software will never
fully protect your Product or its peripheral devices and Sony Ericsson
disclaims all warran ties, whether exp ress or implied, in case of failure
by such antivirus software to fulfill its in tended purpose .
7 Tampering with an y of the seals on the Product will void t he warranty.
8 THERE ARE NO EXPRESS WARRANTIES, WHETHER WRITTEN OR
ORAL, OTHER THAN THIS PRINTED LIMITED WARRANTY. ALL
IMPLIED WARRANTIES, INCLUDING WITHO UT LIMITATION THE
IMPLIED WARRANTIES OF MERCHANTABILITY OR FITNESS FOR A
PARTICULAR PURPOSE, ARE LIMITED TO THE DURATION OF THIS
LIMITED WARRANTY. IN NO EVENT SHALL SONY ERICSSON OR ITS
LICENSORS BE LIABLE FOR INCIDENTAL OR CONSEQUENTIAL
DAMAGES OF ANY NATURE WHATSOEVER, INCLUDING BUT NOT
LIMITED TO LOST PROFITS OR CO MMERCIAL LOSS; TO THE FULL
EXTENT THOSE DAMAGES CAN BE DISCLAIMED BY LAW.
Some countries/s tates/regions d o not allow the exc lusion or limitatio n of
incidental or cons equential damag es, or limitation of th e duration of
implied warranties, so the preceding limitations or exclusions may not
apply to you.
76
This is the Internet version of the user's guide. © Print only for private use.
Page 77

The warranty pr ovided does not affect the cons umer's statuto ry rights
under applicable legislation in force, nor the consumer's rights against the
dealer arising from their sales / purchase contract.
*In some countries/regions additional information (such as a valid warranty
card) may be requested.
FCC Statement
This device complie s with Part 15 of the FCC rules.
Operation is subject to t he following t wo conditions:
(1) This device may not cause harmful interference, and
(2) This device must accept any interference received,
including interference that may cause undesired operation.
This is the Internet version of the user's guide. © Print only for private use.
77
Page 78

Declaration of Conformity
We, Sony Ericsson Mobile Communications AB of
Nya Vattentorn et
SE-221 88 Lund, Swe den
declare under our sole responsibility that our product
Sony Ericsson type AA A-1002051-BV
and in combination with our access ories, to which this declaration relate s
is in conformity with the appropriate standards 3GPP TS 51.010-1, EN
301489-7, EN 6095 0, following the provis ions of Radio Equipm ent and
Telecommunication Terminal Equipment directive 99/5/EC with
requirements covering EMC directive 89/336/EEC, and Low Voltage
directive 73/23/EEC.
Lund, January 2007
Shoji Nemoto, Head of Product B usiness Group GSM/UMTS
We fulfil the requirements of the R&TTE Directive (99/5/EC).
78
This is the Internet version of the user's guide. © Print only for private use.
Page 79

Index
A
alarms 48
answer a call 14
answering service 23
area information 35
assembling, phone 8
automatic keylock 53
B
battery 8
use and care 68
C
calculator 57
call list 16
call time and cost 20
call waiting 17
calling 14
calls
emergency 16
hold 15
restricted dialling 19
camera 39
codes
PIN 7, 53
PUK 7, 53
conference calls 18
contacts 21
D
date format 49
declaration of conformity 78
delivery status 34
diverting calls 16
E
emergency calls 16
end user licence
agreement 73
enter letters 26
error messages 65
G
grid view 11
GSM frequencies 2
H
hide phone number 20
I
icons 12
important information 67
inbox
picture messages 37
text messages 24
K
key press sound 47
keypad 5
keypad lock 6, 53
This is the Internet version of the user's guide. © Print only for private use.
79
Page 80

L
language
phone 51
writing 51
locks
keypad 6, 53
phone 66
SIM card 53
long messages 34
M
master reset 51
menu
change view 11
overview 13
message type 34
messaging 24
microphone, off/on 15
missed calls 15
MMS See picture
messages 35
multitap 26
my number 19
N
network search 50
P
phone lock 52, 66
phonebook See contacts 21
picture messages 35
PIN code 7, 53
PUK 7, 53
80
This is the Internet version of the user's guide. © Print only for private use.
R
reject a call 14
reset 51
restricted dialling 19
ringtone 46
S
safety guidelines 67
screen
brightness 49
light 12
security
keypad lock 6
phone lock 52
SIM card lock 53
service centre number 24
settings 49
time and date 49
shortcuts 5
silent
key sound 47
ringtone 46
SIM card 6
lock 53
unblock 54
single icon view 11
SMS See text messages 24
SOS numbers 16
speaker volume 15
standby 10
stopwatch 57
symbols 33
Page 81

T
T9™ Text Input 26
text input 26
text message options 34
text messages 24
time format 50
troubleshooting 59
turn on the phone 10
turning on/off
keypad lock 6, 53
phone lock code 52
ringtones, melodies 46
SIM card lock 54
two calls 18
V
voicemail 23
volume
ringtone 46
speaker 15
W
wallpaper 49
warranty 74
writing methods 25
This is the Internet version of the user's guide. © Print only for private use.
81
 Loading...