

Page 1
FM/MW/SW
Cassette
Car Stereo
3-044-363-11 (1)
Operating Instructions
®œ•Œª°©˙Æ—
For installation and connections, see the supplied installation/connections
manual.
ˆ©Û•ªæ˜™ ¶w À§Œ u Ù s±µ°A – —®£¥£®—
™ °ß¶w À°˛ u Ù s±µª°©˙Æ—°®°C
GB
CT
XR-C5604X
XR-4954X
2000 Sony Corporation
Page 2
Welcome !
Precautions
Thank you for purchasing this Sony Cassette
Player. This unit lets you enjoy a variety of
features using the following controller
accessory:
Supplied accessory
Card remote commander RM-X74
(XR-C5604X only)
Optional accessory
Rotary commander RM-X4S
XR-C5604X only:
In addition to the cassette playback and radio
operations, you can expand your system by
connecting an optional CD/MD unit*1.
When you operate this unit or a connected
optional CD unit with the CD TEXT function,
the CD TEXT information will appear in the
display when you play a CD TEXT disc*2.
*1You can connect a CD changer, an MD changer,
a CD player, or an MD player.
2
A CD TEXT disc is an audio CD that includes
*
information such as the disc name, artist name,
and track names.
This information is recorded on the disc.
• If your car was parked in direct sunlight
resulting in a considerable rise in
temperature inside the car, allow the unit to
cool off before operating it.
• If no power is being supplied to the unit,
check the connections first. If everything is
in order, check the fuse.
• If no sound comes from the speakers of a
two-speaker system, set the fader control to
the centre position.
• When a tape is played back for a long
period, the cassette may become warm
because of the built-in power amplifier.
However, this is not a sign of malfunction.
If you have any questions or problems
concerning your unit that are not covered in
this manual, please consult your nearest Sony
dealer.
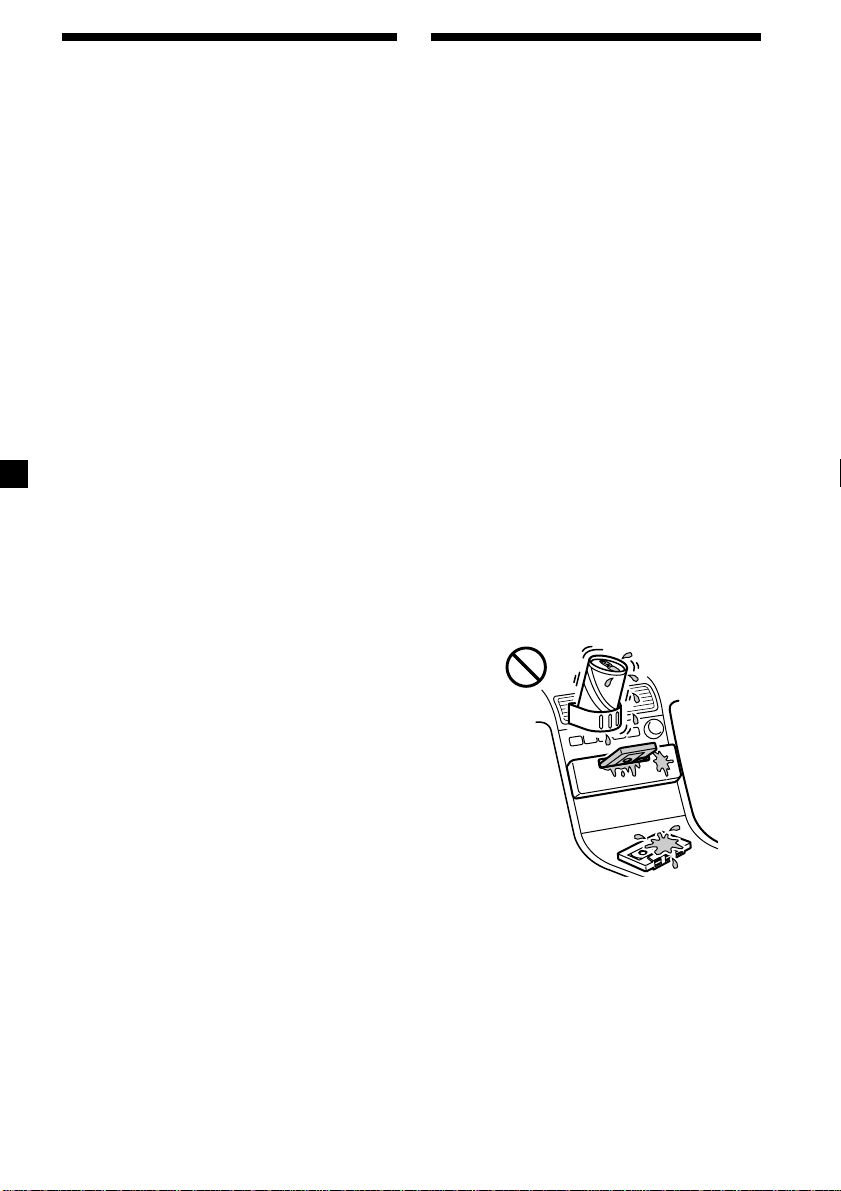
To maintain high quality sound
If you have drink holders near your audio
equipment, be careful not to splash juice or
other soft drinks onto the car audio. Sugary
residues on this unit or cassette tapes may
contaminate the playback heads, reduce the
sound quality, or prevent sound reproduction
altogether.
Cassette cleaning kits cannot remove sugar
from the tape heads.
2
Page 3

Notes on Cassettes
Cassette care
• Do not touch the tape surface of a cassette, as
any dirt or dust will contaminate the heads.
• Keep cassettes away from equipment with
built-in magnets such as speakers and
amplifiers, as erasure or distortion on the
recorded tape could occur.
• Do not expose cassettes to direct sunlight,
extremely cold temperatures, or moisture.
• Slack in the tape may cause the tape to be
caught in the machine. Before you insert the
tape, use a pencil or similar object to turn the
reel and take up any slack.
Slack
• Distorted cassettes and loose labels can cause
problems when inserting or ejecting tapes.
Remove or replace loose labels.
Cassettes longer than 90 minutes
The use of cassettes longer than 90 minutes is
not recommended except for long continuous
play. The tape used for these cassettes is very
thin and tends to stretch easily. Frequent
playing and stopping of these tapes may cause
them to become entangled in the cassette deck
mechanism.
• The sound may become distorted while
playing the cassette. The cassette player head
should be cleaned after each 50 hours of use.
3
Page 4

Table of Contents
This Unit Only
Location of controls ................................................. 5
Getting Started
Resetting the unit ................................................ 7
Detaching the front panel .................................. 7
Turning the unit on/off ...................................... 8
How to use the menu ......................................... 8
Setting the clock .................................................. 9
Cassette Player
Listening to a tape ............................................. 10
Playing a tape in various modes ......................11
Radio
Memorising stations automatically
— Best Tuning Memory (BTM) .................. 12
Memorising only the desired stations............ 12
Receiving the memorised stations .................. 12
Other Functions
Labelling the rotary commander .................... 14
Using the rotary commander .......................... 14
Adjusting the sound characteristics ............... 16
Attenuating the sound ..................................... 16
Changing the sound and display settings ..... 16
Boosting the bass sound
— D-bass ....................................................... 17
With Optional Equipment
CD/MD Unit (XR-C5604X only)
Playing a CD or MD ......................................... 17
Playing tracks repeatedly
— Repeat Play .............................................. 19
Playing tracks in random order
— Shuffle Play .............................................. 19
Additional Information
Maintenance....................................................... 19
Dismounting the unit ....................................... 20
Specifications ..................................................... 21
Troubleshooting guide ..................................... 22
4
Page 5
Location of controls
S
+
MENU
SOUND
OFF
C
I
D
SOURCE
P
R
S
T
-
D
I
S
C
DSPL
P
R
S
T
+
MODE
-
SEEK/AMS
ENTER
–
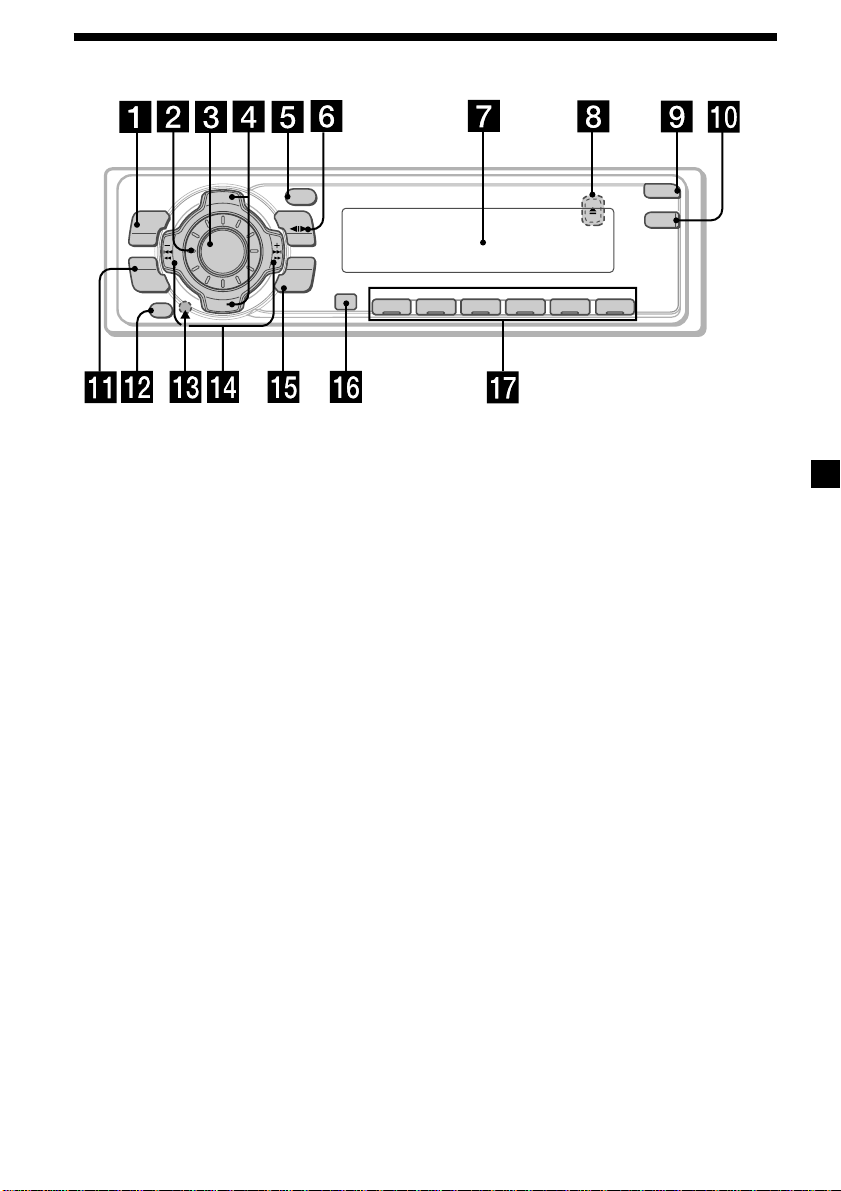
Refer to the pages listed for details.
1 MENU button 9, 11, 12, 13, 16, 18
2 Volume control dial
3 SOURCE (TUNER/TAPE/CD*1/MD*1)
button 8, 10, 12, 17
4 XR-C5604X:
PRST/DISC +/– (cursor up/down) buttons
8, 9, 11, 12, 13, 16, 18
XR-4954X:
PRST +/– (cursor up/down) buttons
8, 9, 11, 12, 13, 16, 18
During radio reception:
Preset stations select 12
During CD/MD playback*1:
Disc change 18
5 DSPL (display mode change) button*
11, 17, 18
6 MODE button 10, 11, 12, 17
During tape playback:
Playback direction change 10
During radio reception:
BAND select 12
During CD/MD playback*1:
CD/MD unit select 17
7 Display window
8
Z (eject) button (located on the front side
of the unit behind the front panel) 10
9 OPEN button 7, 10, 20
q; D-BASS button 17
qa SOUND button 16
REP SHUF
1 2 3 4 56
qs OFF button*2 7, 8, 10
qd Reset button (located on the front side
of the unit behind the front panel) 7
qf SEEK/AMS –/+ (cursor left/right) buttons
8, 9, 10, 11, 12, 13, 16, 18
Seek 13
Automatic Music Sensor 10, 18
Manual search 13, 18
qg ENTER button 9, 11, 12, 13, 16, 18
qh
Receptor for the card remote commander*
qj Number buttons
During radio reception:
Preset number select 12
1
During tape playback:
(1) REP 11
During CD/MD playback*1:
(1) REP 19
(2) SHUF 19
*1XR-C5604X only
*2Warning when installing in a car
without ACC (accessory) position on
the ignition key switch
Be sure to press (OFF) on the unit for
two seconds to turn off the clock display
after turning off the engine.
When you press (OFF) only momentarily,
the clock display does not turn off and this
causes battery wear.
OPEN
D-BASS
XR-C5604X
1
5
Page 6
Card remote commander RM-X74
(XR-C5604X only)
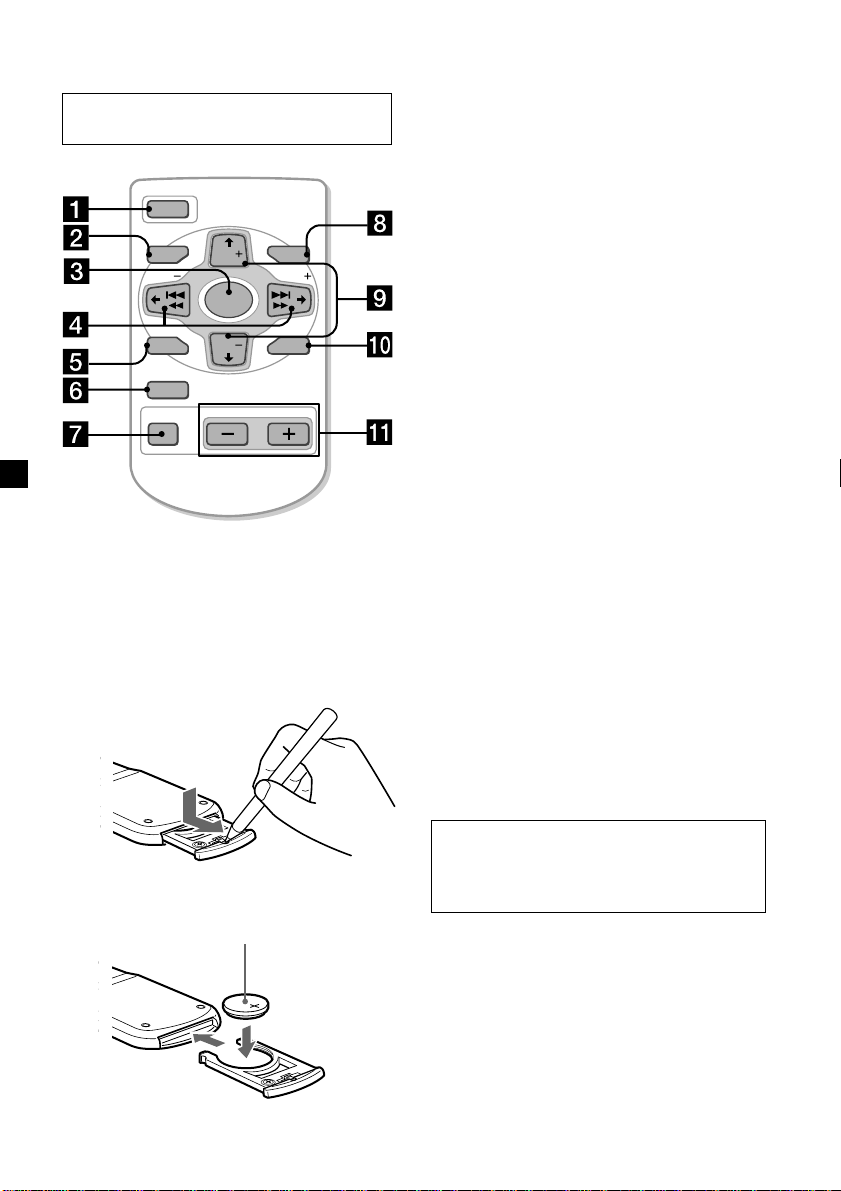
The corresponding buttons of the card
remote commander control the same
functions as those on this unit.
1 OFF button
2 MENU button
3 SOURCE button
4 SEEK/AMS (cursor </,) button
5 SOUND button
6 DSPL button
7 ATT button
8 MODE button
9 DISC/PRST (cursor M /m ) button
q;ENTER button
qa VOL button
DISC
SOURCE
DISC
OPEN/CLOSE
ENTER
VOLATT
OFF
MENU MODE
SEEK SEEK
SOUND
DSPL
A unit turned off by pressing (OFF) for two seconds cannot be operated with the card remote
commander unless (SOURCE) on the unit is pressed or a casette is inserted to activate the unit first.
Replacing the lithium battery
When the battery becomes weak, the range of
the card remote commander becomes shorter.
Replace the battery with a new CR2025 lithium
battery.
x
+ side up
6
Notes on lithium battery
•Keep the lithium battery out of the reach of
children. Should the battery be swallowed,
immediately consult a doctor.
•Wipe the battery with a dry cloth to assure a
good contact.
•Be sure to observe the correct polarity when
installing the battery.
•Do not hold the battery with metallic
tweezers, otherwise a short-circuit may
occur.
WARNING
Battery may explode if mistreated.
Do not recharge, disassemble, or dispose of
in fire.
Page 7
Getting Started
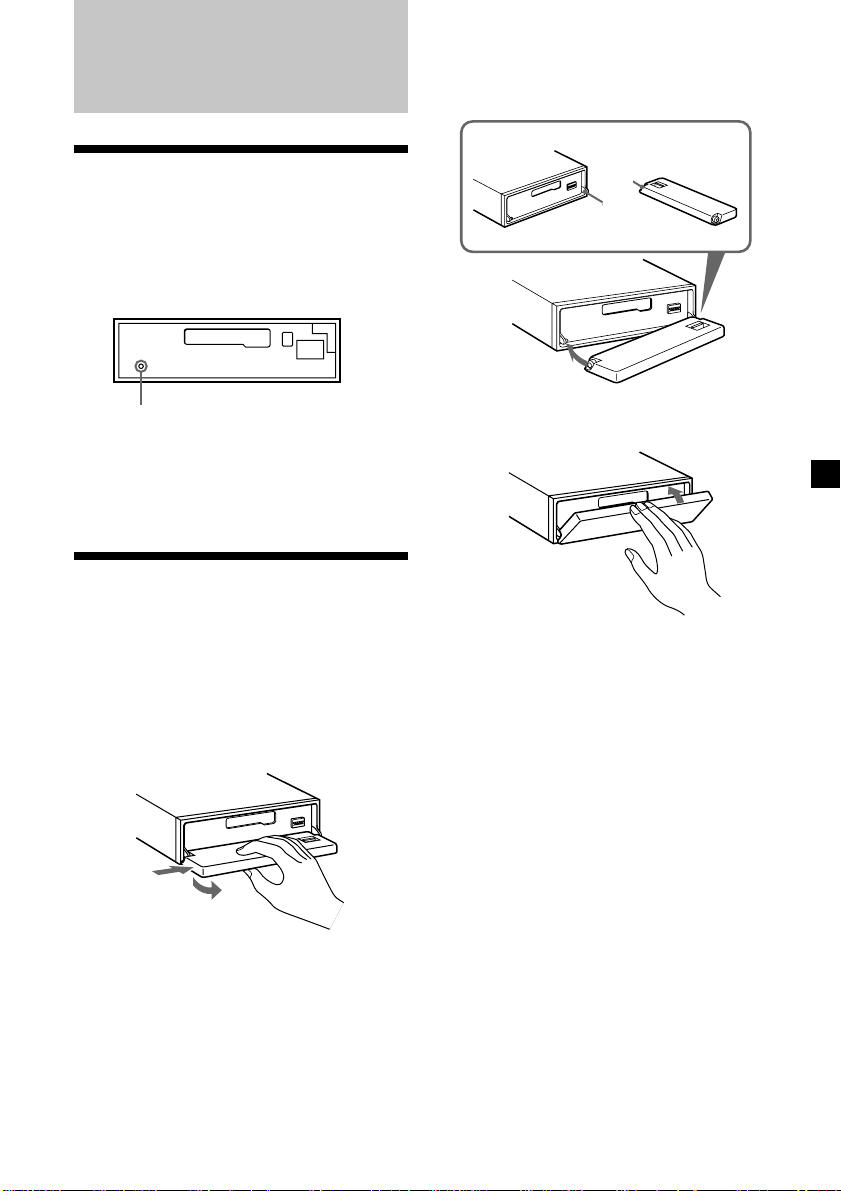
Attaching the front panel
Place the hole A of the front panel onto the
spindle B on the unit as illustrated, then push
the left side in.
Resetting the unit
Before operating the unit for the first time or
after replacing the car battery, you must reset
the unit.
Remove the front panel and press the reset
button with a pointed object, such as a
ballpoint pen.
Reset button
Note
Pressing the reset button will erase the clock
setting, preset memory and some memorised
functions.
Detaching the front panel
You can detach the front panel of this unit to
protect the unit from being stolen.
1 Press (OFF).
2 Press (OPEN), then slide the front panel
to the right side, and pull out from the
left side.
A
B
x
Notes
• Be careful not to attach the front panel upside
down.
• Do not press the front panel too hard against the
unit when attaching it.
• Do not press too hard or put excessive pressure
on the display window of the front panel.
• Do not expose the front panel to direct sunlight
or heat sources such as hot air ducts, and do not
leave it in a humid place. Never leave it on the
dashboard of a car parked in direct sunlight or
where there may be a considerable rise in
temperature.
1
2
Notes
• Be sure not to drop the panel when detaching it
from the unit.
• If you detach the panel while the unit is still
turned on, the power will turn off automatically
to prevent the speakers from being damaged.
• When you carry the front panel with you, use the
supplied front panel case.
Caution alarm
If you turn the car ignition off without
removing the front panel, the caution alarm
will beep for a few seconds.
If you connect an optional power amplifier and
do not use the built-in amplifier, the beep
sound will be deactivated.
7
Page 8
Turning the unit on/off
How to use the menu
Turning on the unit
Press (SOURCE) or insert a cassette in the unit.
For details on operation, refer to page 10
(cassette player) and page 12 (radio).
Turning off the unit
Press (OFF) to stop tape playback or FM/
MW/SW reception (the key illumination and
display remains on.)
Press (OFF) for two seconds to completely
turn off the unit.
Note
If your car has no ACC position on the ignition key
switch, be sure to turn the unit off by pressing
(OFF) for two seconds to avoid car battery wear.
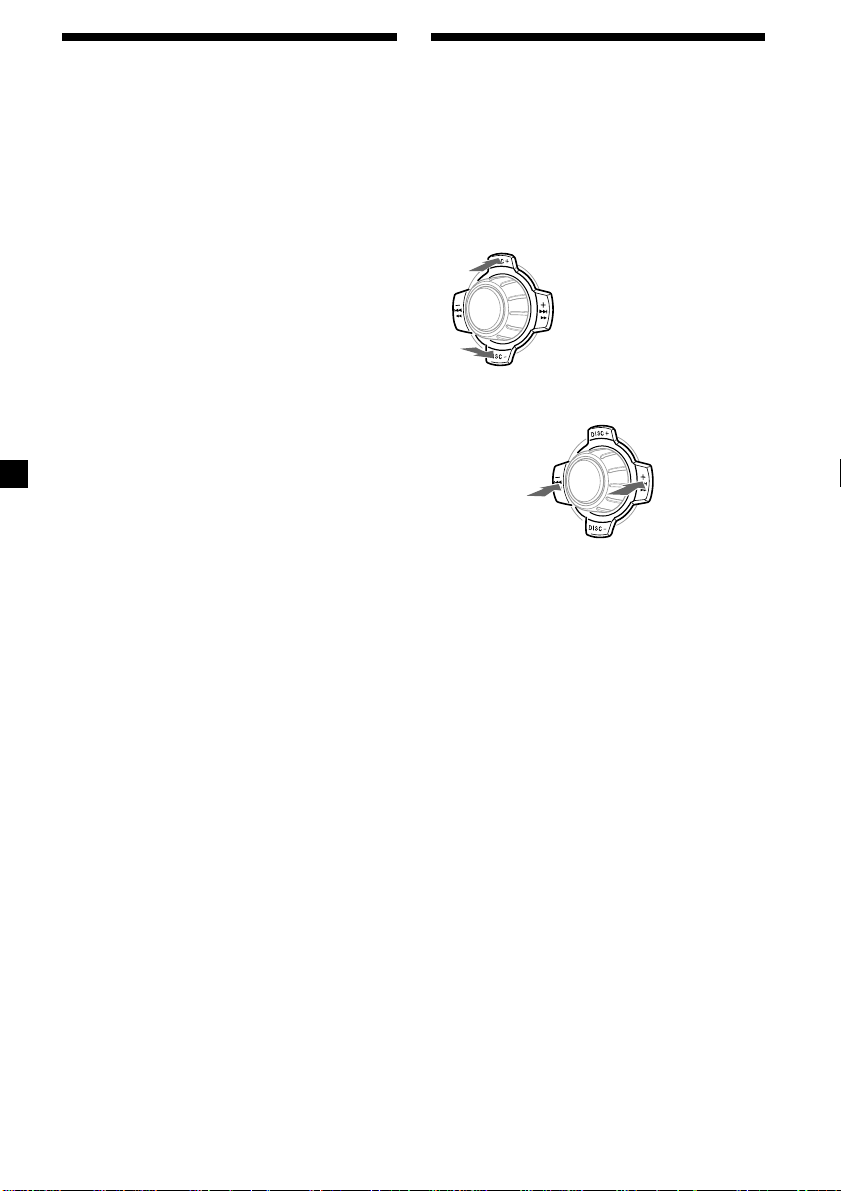
This unit is operated by selecting items from a
menu.
To select, first enter the menu mode and
choose up/down (+/– of (PRST/DISC) or
(PRST)), or choose left/right (–/+ of
(SEEK/AMS)).
(PRST/DISC) /(PRST)
(+) : To select upwards
SOURCE
(–) : To select downwards
(SEEK/AMS)
(–) : To select
leftwards
SOURCE
(+) : To select
rightwards
8
Page 9
Setting the clock
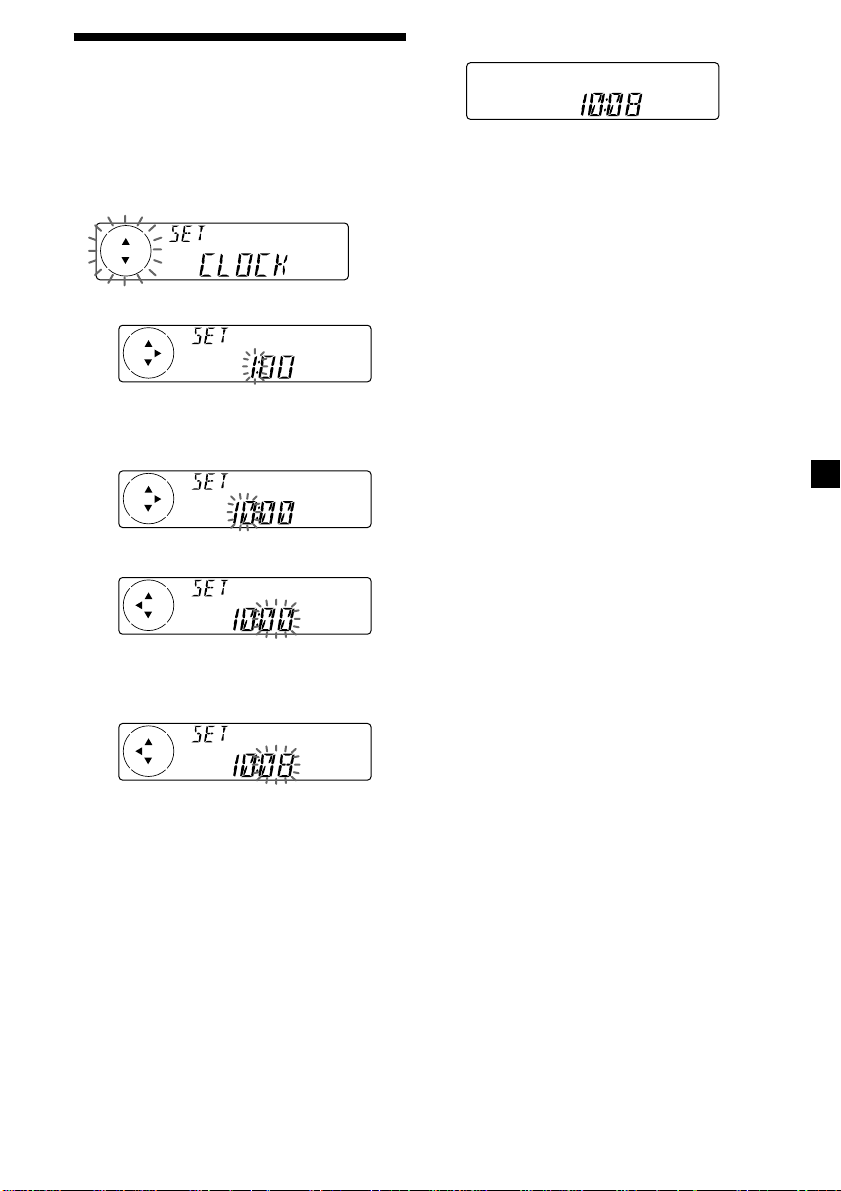
The clock uses a 12-hour digital indication.
2 Press (ENTER).
Example: To set the clock to 10:08
1 Press (MENU), then press either side of
(PRST/DISC) or (PRST) repeatedly until
“CLOCK” appears.
1 Press (ENTER).
The hour indication flashes.
2 Press either side of (PRST/DISC) or
(PRST) to set the hour.
3 Press (+) side of (SEEK/AMS).
The minute indication flashes.
4 Press either side of (PRST/DISC) or
(PRST) to set the minute.
The clock starts.
After the clock setting is complete, the
display returns to normal playback mode.
Tip
When the D.INFO mode is set to ON, the time is
always displayed (page 16).
9
Page 10
Cassette Player
Fast-winding the tape
During playback, press and hold either
side of (SEEK/AMS).
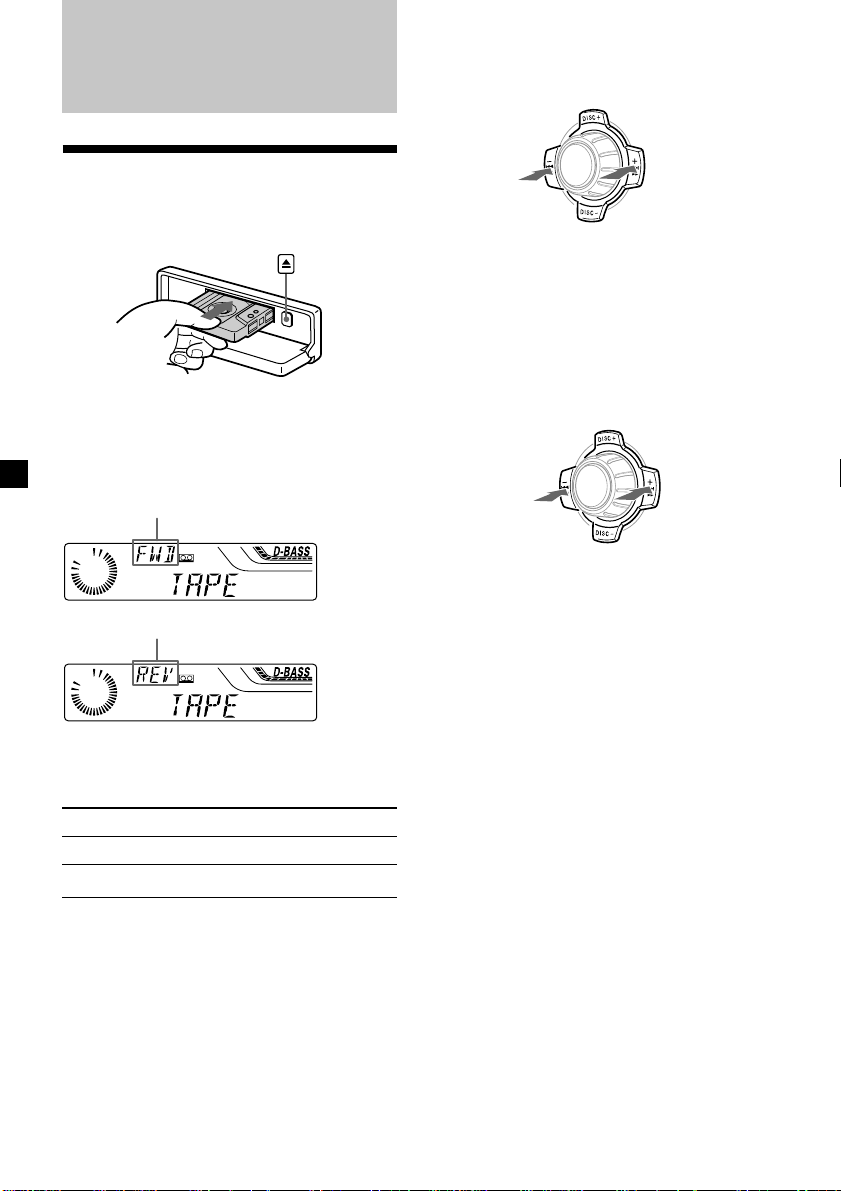
Listening to a tape
1 Press (OPEN) and insert a cassette.
Playback starts automatically.
2 Close the front panel.
If a cassette is already inserted, to start
playback, press (SOURCE) repeatedly until
“FWD” or “REV” appears.
The side facing up is played.
The side facing down is played.
Tip
To change the tape‘s playback direction, press
(MODE) (o).
To Press
Stop playback (OFF)
Eject the cassette (OPEN) then Z
Rewind
SOURCE
Fast-forward
To start playback during fast-forwarding or
rewinding, press (MODE) (o).
Locating a specific track
— Automatic Music Sensor (AMS)
During playback, press either side of
(SEEK/AMS) momentarily for each track
you want to skip.
You can skip up to nine tracks at one time.
To locate
preceding
tracks
Note
The AMS function may not work when:
— the blanks between tracks are shorter than
four seconds
— there is noise between tracks
— there are long sections of low volume or quiet
sections.
SOURCE
In the Motion Display mode, all the items are
scrolled in the display one by one in order.
Tip
The Motion Display mode can be turned off. (See
“Changing the sound and display settings” on
page 16).
To locate
succeeding
tracks
10
Page 11

Playing a tape in various
modes
You can play the tape in various modes:
•REP (Repeat Play) repeats the current track.
•BL SKP (Blank Skip) skips blanks longer than
eight seconds.
•ATA (Automatic Tuner Activation) turns on
the tuner automatically when fast-winding
the tape.
1 During playback, press (MENU).
2 Press either side of (PRST/DISC) or
(PRST) repeatedly until the desired item
appears.
Each time you press (–) side of (PRST/DISC)
or (PRST), the item changes as follows:
BL SKP t ATA
3 Press (+) side of (SEEK/AMS) to select
“ON.”
Playing tracks repeatedly
— Repeat Play
During playback, press (1) (REP)
repeatedly until “REP-ON” in the display
appears.
REP-ON y REP-OFF
MODE
-
SEEK/AMS
ENTER
Repeat Play starts.
To return to normal playback mode, select
“REP-OFF.”
Tip
During repeat playback, press (MODE). “REP”
disappears from the display and repeat mode is
cancelled.
REP SHUF
1 2 3 4 56
Play mode starts.
4 Press (ENTER).
To return to normal playback mode, select
“OFF” in step 3.
Tip
While the ATA function is activated, the display
(TAPE y TUNER) can be changed by pressing
(DSPL) (for the XR-4954X only on the optional
rotary commander).
11
Page 12
Radio
Memorising stations
automatically
— Best Tuning Memory (BTM)
The unit selects the stations with the strongest
signals and memorises them in the order of
their frequencies. You can store up to 6 stations
on each band (FM1, FM2, FM3, MW, SW1 and
SW2).
Caution
When tuning in stations while driving, use
Best Tuning Memory to prevent accidents.
1 Press (SOURCE) repeatedly to select the
tuner.
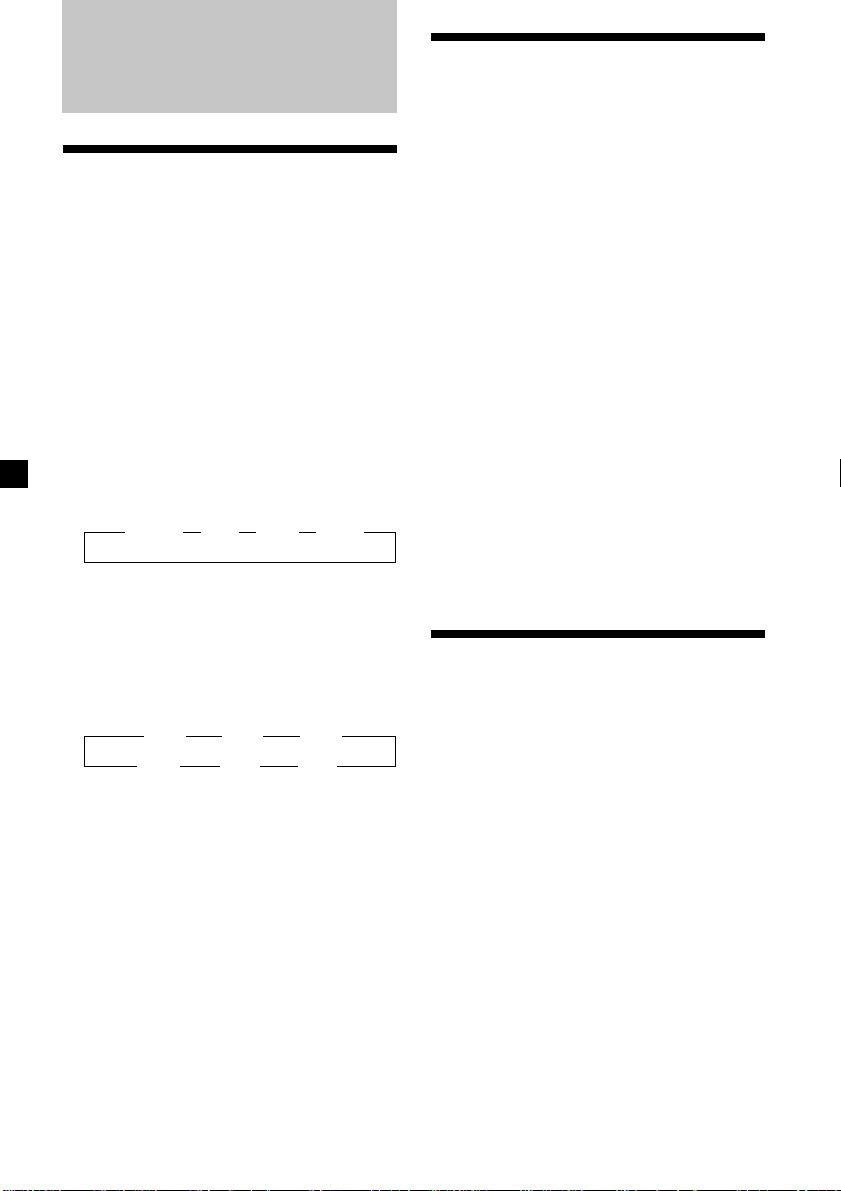
Each time you press (SOURCE), the source
changes as follows:
B TUNER B CD* B MD* B TAPE
* If the corresponding optional equipment is
not connected, this item will not appear
(XR-C5604X only).
Memorising only the
desired stations
You can preset up to 18 FM stations (6 each for
FM1, 2, and 3), up to 6 MW stations, and up to
12 SW stations (6 each for SW1 and 2) in the
order of your choice.
1 Press (SOURCE) repeatedly to select the
tuner.
2 Press (MODE) repeatedly to select the
band.
3 Press either side of (SEEK/AMS) to tune
in the station that you want to store on
the number button.
4 Press the desired number button ((1) to
(6)) until “MEM” appears.
The number button indication appears in
the display.
Note
If you try to store another station on the same
number button, the previously stored station will
be erased.
2 Press (MODE) repeatedly to select the
band.
Each time you press (MODE), the band
changes as follows:
B FM1 B FM2 B FM3
SW2 b SW1 b MW b
3 Press (MENU), then press either side of
(PRST/DISC) or (PRST) repeatedly until
“BTM” appears.
4 Press (ENTER).
The unit stores stations in the order of their
frequencies on the number buttons.
A beep sounds when the setting is stored.
Notes
• The unit does not store stations with weak
signals. If only a few stations can be received,
some number buttons will retain their former
setting.
• When a number is indicated in the display, the
unit starts storing stations from the one currently
displayed.
12
Receiving the memorised
stations
1 Press (SOURCE) repeatedly to select the
tuner.
2 Press (MODE) repeatedly to select the
band.
3 Press the number button ((1) to (6)) on
which the desired station is stored.
Tip
Press either side of (PRST/DISC) or (PRST) to
receive the stations in the order they are stored in
the memory (Preset Search Function).
Page 13

If you cannot tune in a preset
station
Press either side of (SEEK/AMS) to search
for the station (automatic tuning).
Scanning stops when the unit receives a
station. Press either side of (SEEK/AMS)
repeatedly until the desired station is
received.
Note
If the automatic tuning stops too frequently, press
(MENU), then press either side of (PRST/DISC) or
(PRST) repeatedly until “LOCAL” (local seek
mode) is displayed. Then press (+) side of
(SEEK/AMS) to select “LOCAL-ON.” Press (ENTER).
During local reception and station selection,
“L.SEEK” appears in the display.
Only the stations with relatively strong signals will
be tuned in.
If FM stereo broadcast becomes
monaural
If interference occurs, the “IF AUTO” function
of this unit will automatically avoid noise and
narrow the reception frequency. In such cases,
some FM stereo broadcasts may become
monaural. If you would like to listen to such
broadcasts in stereo, manually switch to the
“WIDE” setting.
1 During radio reception, press (MENU),
then press either side of (PRST/DISC) or
(PRST) repeatedly until “IF AUTO”
appears.
2 Press (+) side of (SEEK/AMS) until “WIDE“
appears.
Tip
If you know the frequency of the station you want
to listen to, press and hold either side of
(SEEK/AMS) until the desired frequency appears
(manual tuning).
If FM stereo reception is poor
— Monaural Mode
1 During radio reception, press (MENU),
then press either side of (PRST/DISC) or
(PRST) repeatedly until “MONO”
appears.
2 Press (+) side of (SEEK/AMS) until
“MONO-ON“ appears.
The sound improves, but becomes
monaural (“ST” disappears).
3 Press (ENTER).
To return to normal mode, select
“MONO-OFF” in step 2.
3 Press (ENTER).
Note
When you widen the frequency signal reception
setting (“WIDE“ mode), some interference may
occur.
In the Motion Display mode, all the items are
scrolled in the display one by one in order.
Tip
The Motion Display mode can be turned off. (See
“Changing the sound and display settings” on
page 16).
13
Page 14
Other Functions
Using the rotary
commander
You can also control this unit with the rotary
commander (optional).
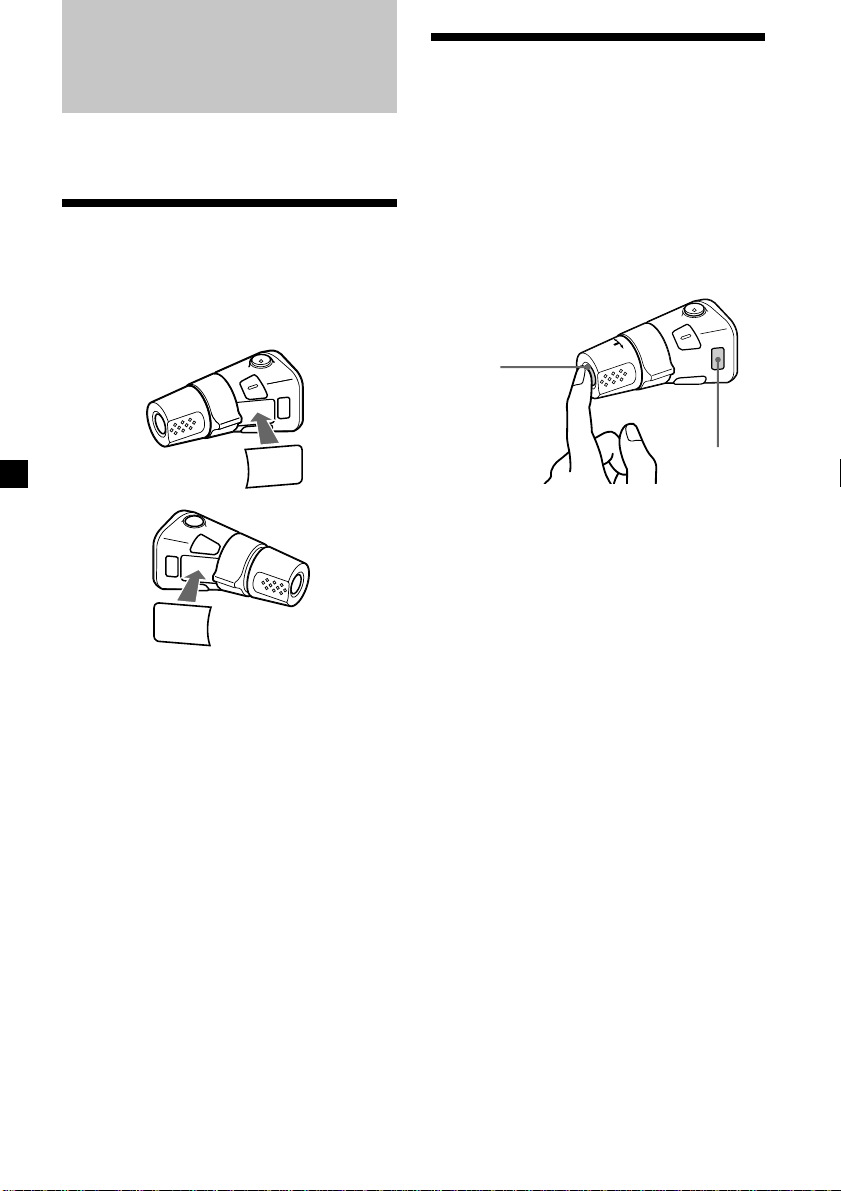
Labelling the rotary
commander
Depending on how you mount the rotary
commander, attach the appropriate label as
shown in the illustration below.
SOUND
MODE
DSPL
DSPL
MODE
SOUND
The rotary commander works by pressing
buttons and/or rotating controls.
XR-C5604X only:
You can also control the optional CD or MD
units with the rotary commander.
By pressing buttons
(the SOURCE and MODE buttons)
(SOURCE)
(MODE)
Each time you press (SOURCE), the
source changes as follows:
TUNER t CD* t MD* t TAPE
Pressing (MODE) changes the operation
in the following ways;
• Tuner : FM1 t FM2 t FM3 t MW
• Tape : playback direction
• CD unit* : CD1 t CD2 t …
• MD unit* : MD1 t MD2 t …
* If the corresponding optional equipment is
not connected, the item will not appear
(XR-C5604X only).
t SW1 t SW2
14
Page 15
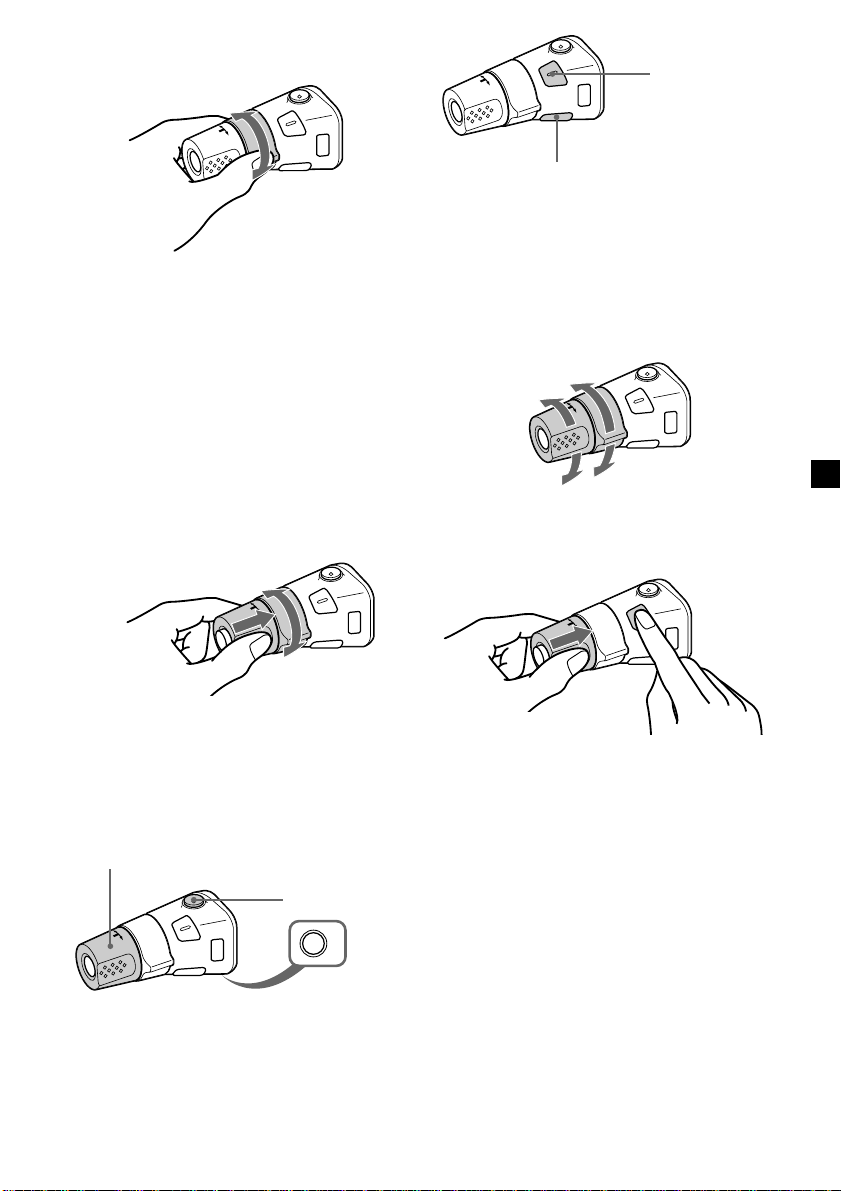
By rotating the control
(the SEEK/AMS control)
Rotate the control and release it to:
•Locate the beginnings of tracks on the
tape. Rotate and hold the control, and
release it to fast-wind the tape. To start
playback while fast-winding the tape,
press (MODE).
•Locate a specific track on a disc. Rotate
and hold the control until you locate the
specific point in a track, then release it to
start playback.
•Tune in stations automatically. Rotate and
hold the control to find a specific station.
By pushing in and rotating the
control (the PRESET/DISC control)
Press (SOUND) to
adjust the volume
and sound menu.
Press (DSPL) to change
the displayed items.
Tip
While the ATA function is activated, the display
(TAPE y TUNER) can be changed by pressing
(DSPL).
Changing the operative direction
The operative direction of controls is factoryset as shown below.
If you need to mount the rotary commander on
the right hand side of the steering column, you
can reverse the operative direction.
To increase
To decrease
Push in and rotate the control to:
•Receive the stations memorised on the
number buttons.
•Change the disc.
Other operations
Rotate the VOL control to
adjust the volume.
Note
When installing in a car without ACC (accessory)
position on the ignition key switch, press (OFF) for
two seconds to turn off the clock display after
turning off the engine.
Press (ATT) to
attenuate the
sound.
OFF
Press (OFF) to turn
off the unit.
Press (SOUND) for two seconds while
pushing the VOL control.
Tip
You can also change the operative direction of
these controls with the unit (see “Changing the
sound and display settings” on page 16).
15
Page 16

Adjusting the sound
characteristics
Changing the sound and
display settings
You can adjust the bass, treble, balance, and
fader.
You can store the bass and treble levels
independently for each source.
1 Select the item you want to adjust by
pressing (SOUND) repeatedly.
Each time you press (SOUND), the item
changes as follows:
BAS (bass) t TRE (treble) t
BAL (left – right) t FAD (front – rear)
2 Adjust the selected item by pressing
either side of (SEEK/AMS).
When adjusting with the rotary
commander, press (SOUND) and rotate the
VOL control.
Note
Adjust within three seconds after selecting the
item.
Attenuating the sound
Press (ATT) on the rotary commander or
card remote commander.
“ATT-ON” flashes momentarily.
To restore the previous volume level, press
(ATT) again.
Tip
When the interface cable of a car telephone is
connected to the ATT lead, the unit decreases the
volume automatically when a telephone call comes
in (Telephone ATT function).
The following items can be set:
•CLOCK (page 9).
•BEEP – to turn the beep sound on or off.
•RM (Rotary Commander) – to change the
operative direction of the rotary commander.
— Select “NORM” to use the rotary
commander as the factory-set position.
— Select “REV” when you mount the rotary
commander on the right side of the
steering column.
•D.INFO (Dual Information)*1 – to display the
clock and the play mode simultaneously
(ON), or to display the information
alternately (OFF).
•M.DSPL (Motion Display) – to turn the
motion display on or off.
•A.SCRL (Auto Scroll)*2 (page 18).
1 Press (MENU).
2 Press either side of (PRST/DISC) or
(PRST) repeatedly until the desired item
appears.
Each time you press (–) side of (PRST/DISC)
or (PRST), the item changes as follows:
CLOCK t BEEP t RM t D.INFO*1 t M.DSPL
t A.SCRL*
*1When the radio is off, or when no tape, CD,
2
*
Note
The displayed item will differ depending on the
source.
Tip
You can easily switch among categories (“SET”,
“DIS”, “P/M”and “EDT”) by pressing an holding
either side of (PRST/DISC) or (PRST) for two
seconds.
2
or MD is playing, this item will not appear.
When no CD or MD is playing, this item will
not appear (XR-C5604X only).
16
3 Press (+) side of (SEEK/AMS) to select the
desired setting (Example: ON or OFF).
4 Press (ENTER).
After the mode setting is complete, the
display returns to normal playback mode.
Page 17

Boosting the bass sound
— D-bass
You can enjoy a clear and powerful bass
sound. The D-bass function boosts the low
frequency signal and high frequency signal
with a sharper curve than conventional bass
boost.
You can hear the bass line more clearly even
while the vocal volume remains the same. You
can emphasize and adjust the bass sound
easily with the D-BASS button.
D.BASS-3
Level
0dB
Adjusting the bass curve
D.BASS-1 t D.BASS-2 t D.BASS-3 t
D.BASS-OFF (cancel)
Note
The bass sound may distort at same volume. If the
bass sound distorts, select less effective bass curve.
D.BASS-2
D.BASS-1
Frequency (Hz)
D.BASS-3
D.BASS-2
D.BASS-1
Press (D-BASS) repeatedly to select the
desired bass curve.
As the D-BASS number increases so does
the effect.
With Optional Equipment
CD/MD Unit (XR-C5604X only)
This unit can control external CD/MD units.
If you connect an optional CD unit with the
CD TEXT function, the CD TEXT information
will appear in the display when you play a CD
TEXT disc.
Playing a CD or MD
1 Press (SOURCE) repeatedly to select CD
or MD.
2 Press (MODE) until the desired unit
appears.
CD/MD playback starts.
When a CD/MD unit is connected, all the
tracks play from the beginning.
Changing the display item
Each time you press (DSPL) during CD, CD
TEXT, or MD playback, the item changes as
follows:
Elapsed playback time
Disc name*
V
V
1
/Artist name*
V
Track name*
2
3
*1If you have not labelled the disc or if there is no
disc name prerecorded on the MD, “DISC” and
“NO NAME” appears in the display.
2
If you play a CD TEXT disc, the artist name
*
appears in the display after the disc name.
(Only for CD TEXT discs with the artist name.)
3
If the track name of a CD TEXT disc or MD is not
*
prerecorded, “TRACK” and “NO NAME” appears
in the display.
continue to next page t
17
Page 18
After you select the desired item, the display
will automatically change to the Motion
Display mode after a few seconds.
In the Motion Display mode, all the items are
scrolled in the display one by one in order.
Tip
The Motion Display mode can be turned off. (See
“Changing the sound and display settings” on
page 16.)
Automatically scrolling a disc name
— Auto Scroll
If the disc name, artist name, or track name on
a CD TEXT disc or MD exceeds 8 characters
and the Auto Scroll function is on, information
automatically scrolls across the display as
follows:
• The disc name appears when the disc has
changed (if the disc name is selected).
• The track name appears when the track has
changed (if the track name is selected).
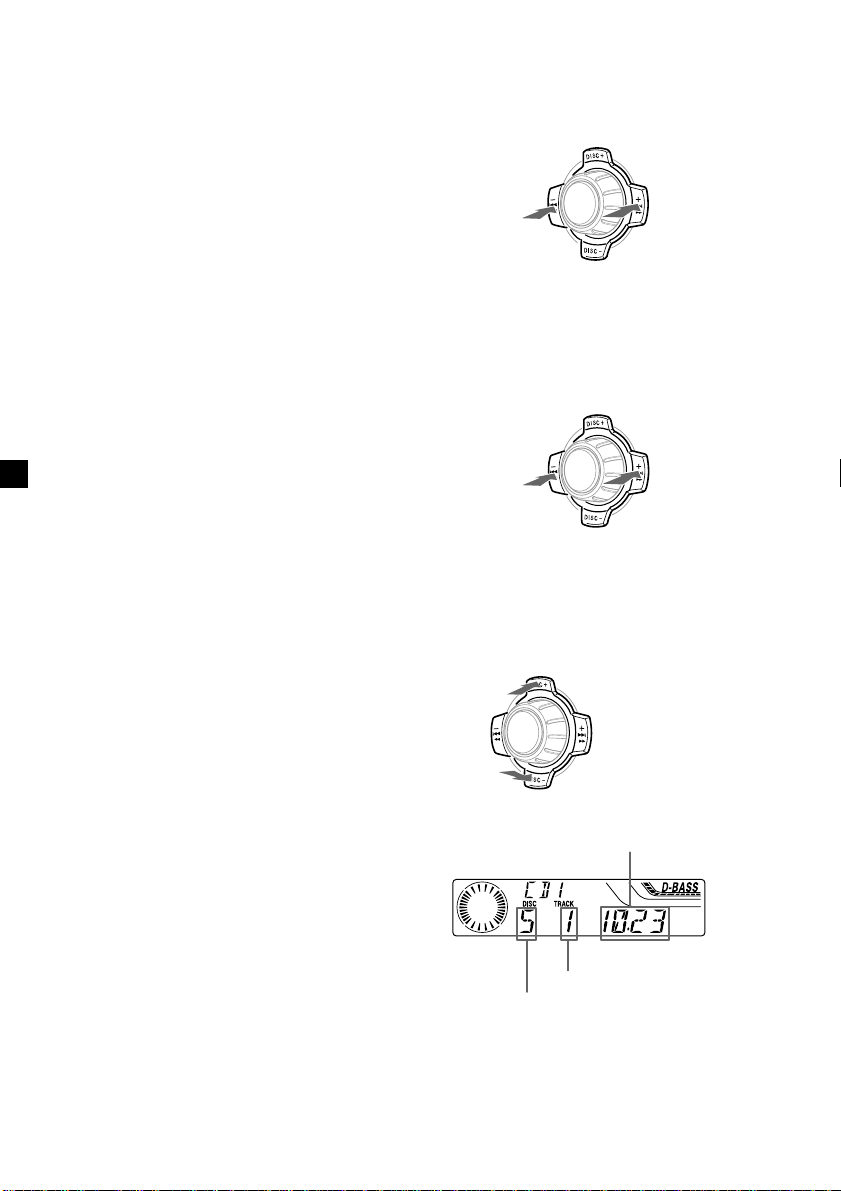
Locating a specific track
— Automatic Music Sensor (AMS)
During playback, press either side of
(SEEK/AMS) momentarily for each track
you want to skip.
SOURCE
To locate
preceding tracks
To locate
succeeding tracks
Locating a specific point in a track
— Manual Search
During playback, press and hold either
side of (SEEK/AMS). Release when you
have found the desired point.
If you press (DSPL) to change the display
item, the disc or track name of the MD or CD
TEXT disc is scrolled automatically whether
you set the function on or off.
1 During playback, press (MENU).
2 Press either side of (PRST/DISC) or
(PRST) repeatedly until “A.SCRL”
appears.
3 Press (+) side of (SEEK/AMS) to select
“A.SCRL-ON.”
4 Press (ENTER).
To cancel Auto Scroll, select “A.SCRL-OFF” in
step 3.
Note
For some discs with very many characters, the
following cases may happen:
— Some of the characters are not displayed
— Auto Scroll does not work.
SOURCE
To search
backward
To search
forward
Switching to other discs
During playback, press either side of
(PRST/DISC)or (PRST).
The desired disc in the current unit begins
playback.
For succeeding
discs
SOURCE
For preceding
discs
Elapsed playback time
Track number
Disc number
18
Page 19
Playing tracks repeatedly
— Repeat Play
You can select:
•REP-1 – to repeat a track.
•REP-2 – to repeat a disc.
During playback, press (1) (REP)
repeatedly until the desired setting
appears.
B REP-1 B REP-2
REP-OFF b
Repeat Play starts.
To return to normal playback mode, select
“REP-OFF.”
Additional
Information
Maintenance
Fuse replacement
When replacing the fuse, be sure to use one
matching the amperage rating stated on the
original fuse. If the fuse blows, check the
power connection and replace the fuse. If the
fuse blows again after replacement, there may
be an internal malfunction. In such a case,
consult your nearest Sony dealer.
Playing tracks in random
order — Shuffle Play
You can select:
•SHUF-1 – to play the tracks on the current
disc in random order.
•SHUF-2 – to play the tracks in the current
unit in random order.
•SHUF-ALL* – to play all the tracks in all the
units in random order.
During playback, press (2) (SHUF)
repeatedly until the desired setting
appears.
B SHUF-1 B SHUF-2
SHUF-OFF b SHUF-ALL* b
Shuffle Play starts.
* “SHUF-ALL” is only available when you
connect two or more optional CD/MD units.
To return to normal playback mode, select
“SHUF-OFF.”
Fuse (10 A)
Warning
Never use a fuse with an amperage rating
exceeding the one supplied with the unit as
this could damage the unit.
19
Page 20
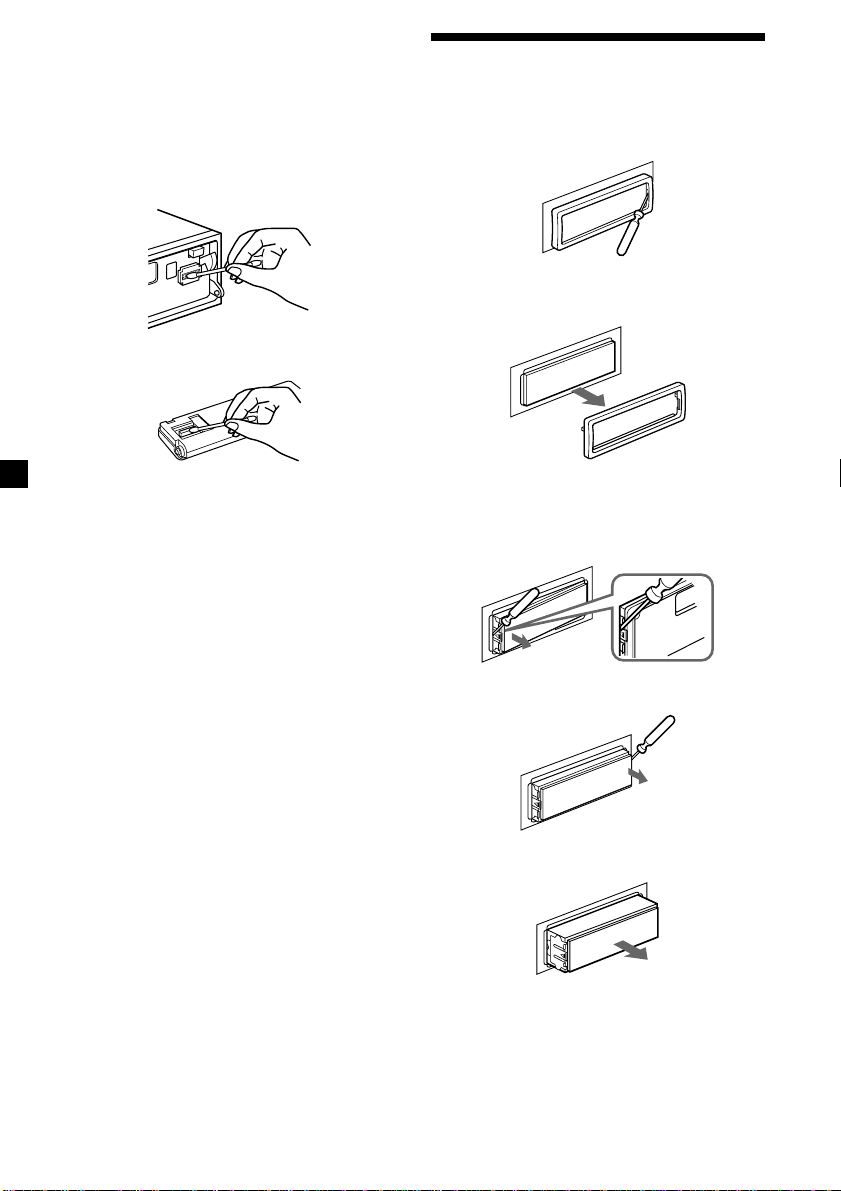
Cleaning the connectors
The unit may not function properly if the
connectors between the unit and the front
panel are not clean. In order to prevent this,
open the front panel by pressing (OPEN), then
detach it and clean the connectors with a
cotton swab dipped in alcohol. Do not apply
too much force. Otherwise, the connectors may
be damaged.
Main unit
Dismounting the unit
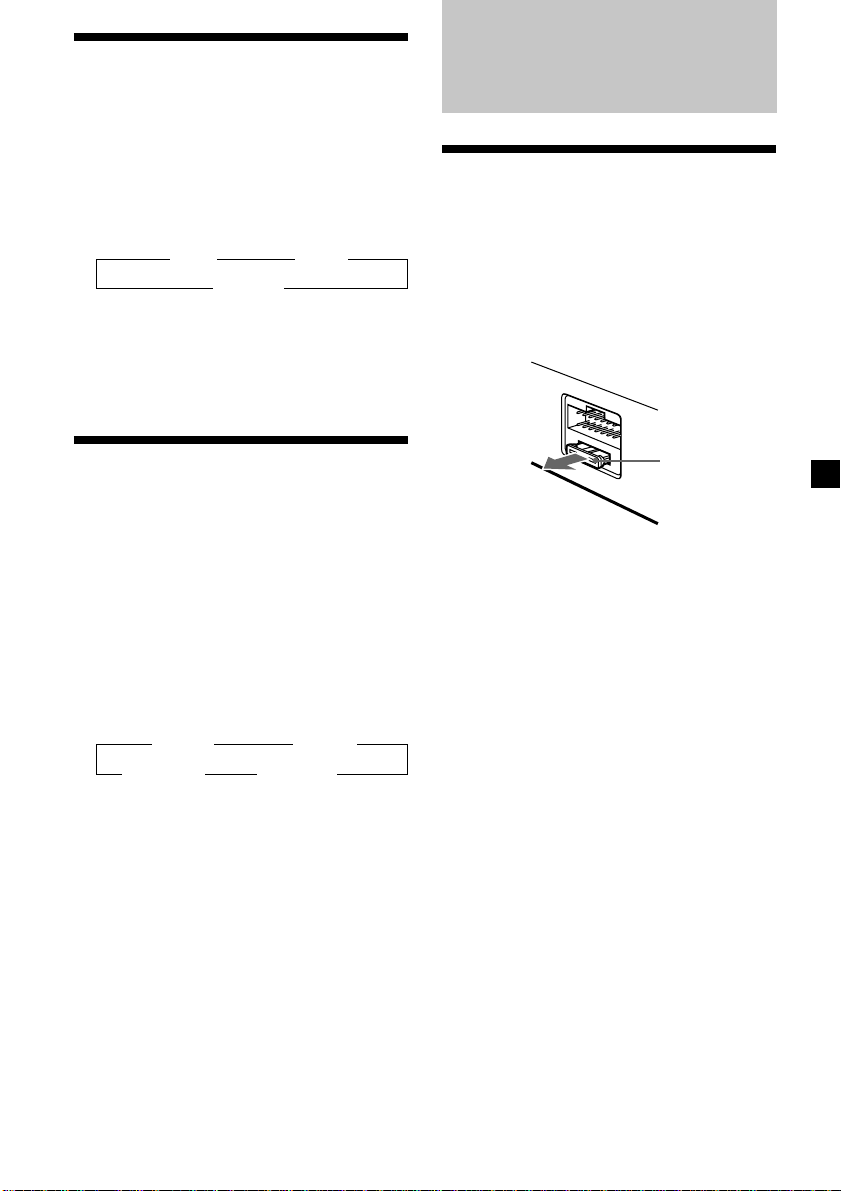
1 Press the clip inside the front cover with
a thin screwdriver, and pry the front
cover free.
2 Repeat step 1 on the left side.
The front cover is removed.
Back of the front panel
Notes
• For safety, turn off the engine before cleaning
the connectors and remove the key from the
ignition switch.
• Never touch the connectors directly with your
fingers or with any metal device.
3 Use a thin screwdriver to push in the clip
on the left side of the unit, then pull out
the left side of the unit until the catch
clears the mounting.
4 Repeat step 3 on the right side.
5 Slide the unit out of the mounting.
20
Page 21

Specifications
Cassette player section
Tape track 4-track 2-channel stereo
Wow and flutter 0.08 % (WRMS)
Frequency response 30 – 18,000 Hz
Signal-to-noise ratio 58 dB
Tuner section
FM
Tuning range 87.5 – 108.0 MHz
Aerial terminal External aerial connector
Intermediate frequency 10.7 MHz/450 kHz
Usable sensitivity 8 dBf
Selectivity 75 dB at 400 kHz
Signal-to-noise ratio 66 dB (stereo),
Harmonic distortion at 1 kHz
Separation 35 dB at 1 kHz
Frequency response 30 – 15,000 Hz
72 dB (mono)
0.6 % (stereo),
0.3 % (mono)
MW
Tuning range 531 – 1,602 kHz
SW
Tuning range SW tuning interval:
Aerial terminal External aerial connector
Intermediate frequency 10.7 MHz/450 kHz
Sensitivity 30 µV
SW1: 2,940 – 7,735 kHz
SW2: 9,500 – 18,135 kHz
(except for 10,140 – 11,575
kHz)
Power amplifier section
Outputs Speaker outputs
Speaker impedance 4 – 8 ohms
Maximum power output 50 W × 4 (at 4 ohms)
(sure seal connectors)
General
Outputs Audio output
Tone controls Bass ±9 dB at 100 Hz
Power requirements 12 V DC car battery
Dimensions Approx. 178 × 50 × 183 mm
Mounting dimensions Approx. 182 × 53 × 162 mm
Mass Approx. 1.2 kg
Supplied accessories Parts for installation and
Optional accessories Rotary commander
Optional equipment XR-C5604X:
Design and specifications are subject to change
without notice.
Power aerial relay control
lead
Power amplifier control
lead
Telephone ATT control
lead
Treble ±9 dB at 10 kHz
(negative earth)
(w/h/d)
(w/h/d)
connections (1 set)
Front panel case (1)
Card remote commander
RM-X74 (1) (XR-C5604X
only)
RM-X4S
BUS cable (supplied with
an RCA pin cord)
RC-61 (1 m), RC-62 (2 m)
CD changer (10 discs)
CDX-838, CDX-828,
CDX-737, CDX-636
MD changer (6 discs)
MDX-65
Other CD/MD changers
with the Sony-BUS system
Source selector
XA-C30
21
Page 22
Troubleshooting guide
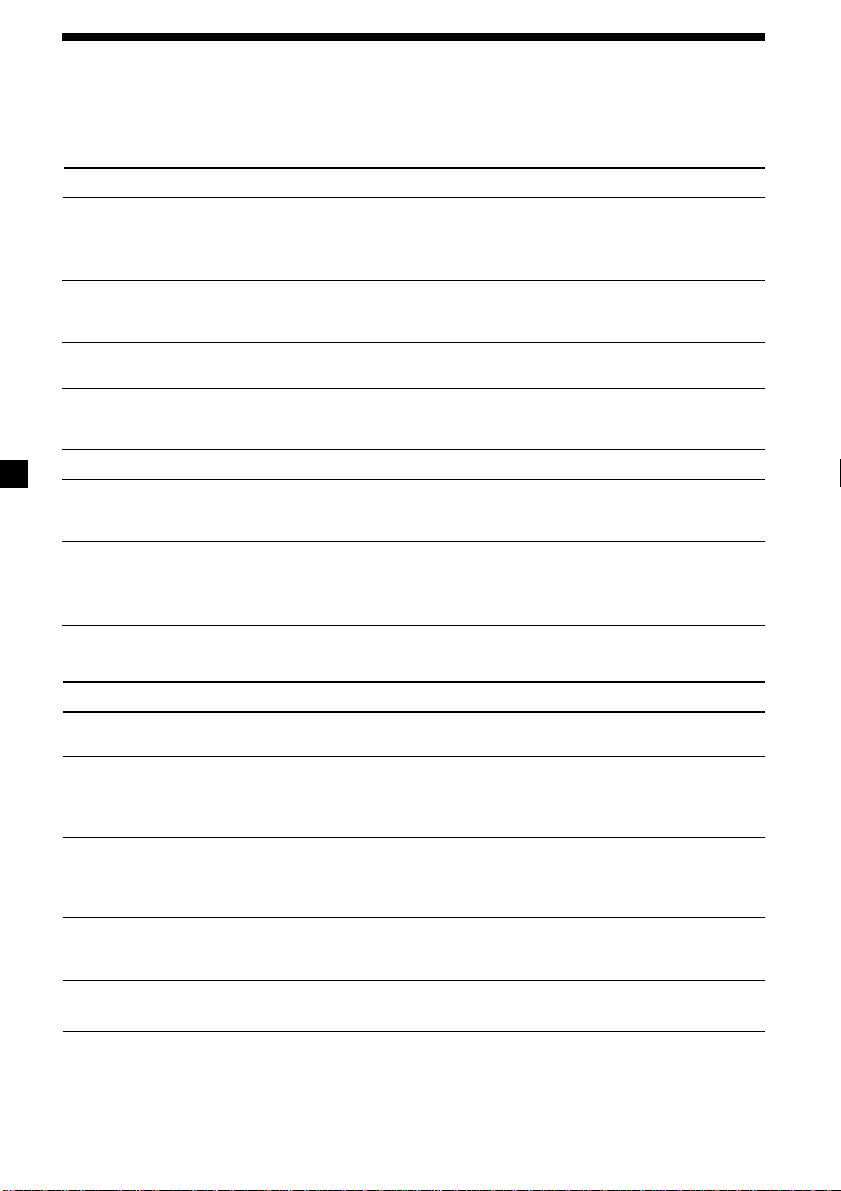
The following checklist will help you remedy the problems you may encounter with your unit.
Before going through the checklist below, check the connections and operating procedures.
General
Problem
No sound.
The contents of the memory
have been erased.
Indications do not appear
in the display.
Tape playback
Problem
The sound is distorted.
The AMS does not operate
correctly.
Cause/Solution
•Cancel the ATT function.
•Set the fader control to the centre position for two-speaker
systems.
•Rotate the dial clockwise to adjust the volume.
• The power cord or battery has been disconnected.
• The reset button was pressed.
t Store again into the memory.
Remove the front panel and clean the connectors. See
“Cleaning the connectors” (page 20) for details.
Cause/Solution
The tape head is contaminated.
t Clean the head with a commercially available dry-type
cleaning cassette.
• There is noise in the space between tracks.
• A blank space is too short (less than four seconds).
• A long pause, or a passage of low frequencies or very low
sound level is treated as a blank space.
Radio reception
Problem
Preset tuning is not possible.
Automatic tuning is not
possible.
The stations cannot be
received.
The sound is hampered by
noises.
The “ST” indication flashes.
Interference occurs during FM
reception.
22
Cause/Solution
• Store the correct frequency in the memory.
• The broadcast signal is too weak.
•The broadcast signal is too weak.
t Use manual tuning.
•The local seek mode is set to ON.
t Set the local seek mode to OFF (page 13).
Connect a power aerial control lead (blue) or accessory power
supply lead (red) to the power supply lead of a car’s aerial
booster. (When your car has built-in FM/MW/SW aerial in the
rear/side glass only.)
•Tune in the frequency accurately.
•The broadcast signal is too weak.
t Set to the MONO mode (page 13).
The WIDE mode is selected.
t Set the IF mode to IF AUTO (page 13).
Page 23
CD/MD playback (XR-C5604X only)
Problem
The sound skips.
Cause/Solution
A dirty or defective disc.
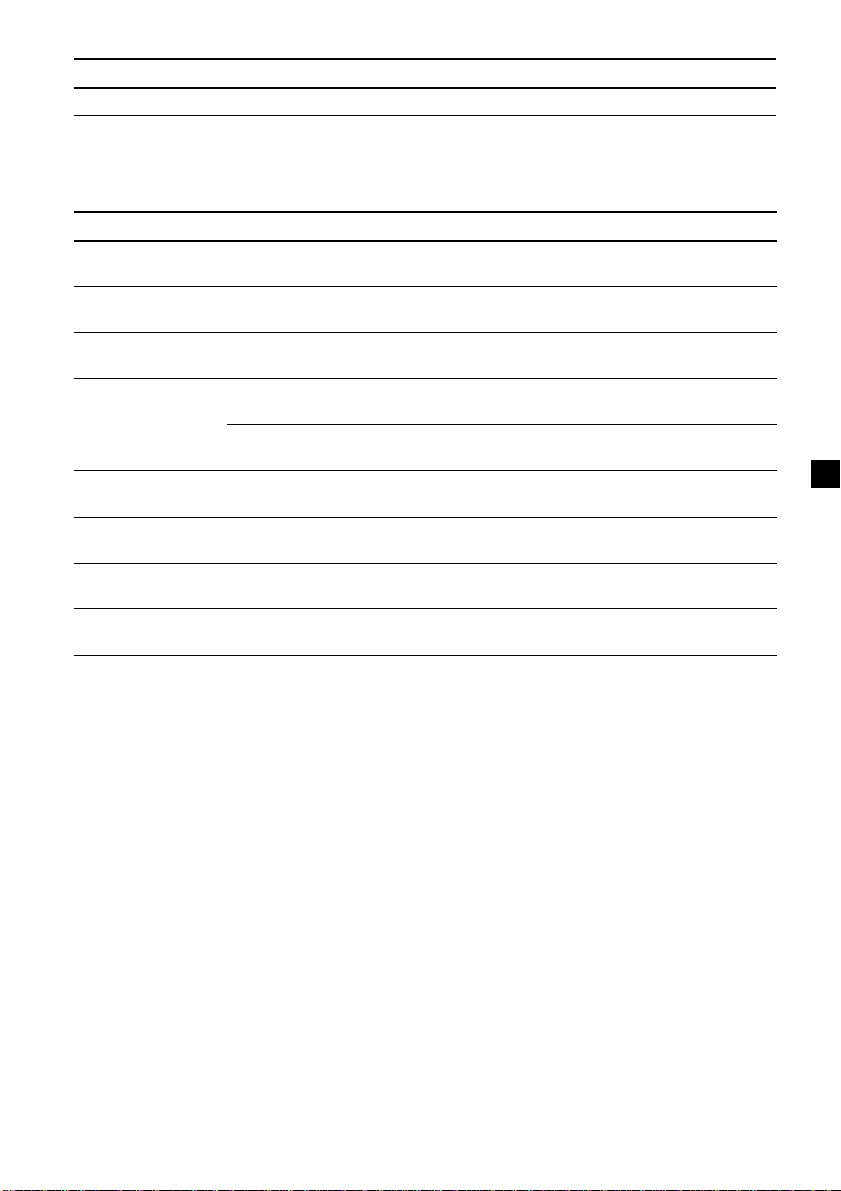
Error displays (when an optional CD/MD unit is connected) (XR-C5604X only)
The following indications will flash for about five seconds, and an alarm sound will be heard.
Display
NO MAG
NO DISC
NG DISCS
ERROR
BLANK
RESET
NO READY
HI TEMP
*1 When an error occurs during playback of a CD or MD, the disc number of the CD or MD does not appear
in the display.
2
The disc number of the disc causing the error appears in the display.
*
Cause
The disc magazine is not inserted in
the CD/MD unit.
No disc is inserted in the CD/MD unit.
A CD/MD cannot play because of
some problem.
A CD is dirty or inserted upside
2
down.*
1
*
An MD does not play because of some
problem.*
No tracks have been recorded on an
1
*
MD.*
The CD/MD unit cannot be operated
because of some problem.
The lid of the MD unit is open or MDs
are not inserted properly.
The ambient temperature is more than
50°C.
2
2
Solution
Insert the disc magazine in the CD/
MD unit.
Insert discs in the CD/MD unit.
Insert another CD/MD.
Clean or insert the CD correctly.
Insert another MD.
Play an MD with tracks recorded on
it.
Press the reset button of the unit.
Close the lid or insert the MDs
properly.
Wait until the temperature goes
down below 50°C.
If the above-mentioned solutions do not help improve the situation, consult your nearest Sony
dealer.
23
 Loading...