

Page 1
FM/MW/LW
Cassette
Car Stereo
3-865-670-41 (1)
Operating Instructions
Instrukcje Obsługi
Návod k obsluze
Οδηγίεσ Λειτουργίασ
Kullanım kılavuzu
For installation and connections, see the supplied installation/connections
manual.
Szczegóły dotyczące instalacji i podłączeń, proszę sprawdzić w dostarczonym,
osobnym podręczniku
Informace o instalaci a zapojení naleznete v přiložené příručce Instalace /
zapojení.
Για την εγκατάσταση και τισ συνδέσεισ, δείτε το συνοδευτικ εγχειρίδιο
Εγκατάσταση/Συνδέσεισ.
Kurma ve bağlantı işlemleri için ünite beraberindeki Kurma/Bağlantılar kılavuzuna
bakınız.
XR-5890R
XR-5880R
XR-4890
GB
PL
CZ
GR
TR
XR-4880
1999 by Sony Corporation
Page 2

Welcome !
Table of Contents
Thank you for purchasing this Sony Cassette
Player. This unit lets you enjoy a variety of
features as well as an optional rotary
commander.
Location of controls ............................................ 3
Getting Started
Resetting the unit ................................................ 4
Detaching the front panel .................................. 4
Setting the clock .................................................. 5
Cassette Player
Listening to a tape ............................................... 6
Playing a tape in various modes ....................... 7
Radio
Memorizing stations automatically
— Best Tuning Memory (BTM).................... 7
Memorizing only the desired stations ............. 8
Receiving the memorized stations ................... 8
RDS (XR-5890R/5880R only)
Overview of the RDS function .......................... 9
Displaying the station name.............................. 9
Retuning the same programme automatically
— Alternative Frequencies (AF) ................ 10
Listening to traffic announcements ................ 12
Presetting the RDS stations with the AF
and TA data................................................... 12
Locating a station by programme type .......... 13
Setting the clock automatically ....................... 14
Other Functions
Labelling the rotary commander .................... 15
Using the rotary commander .......................... 15
Adjusting the sound characteristics ............... 17
Attenuating the sound ..................................... 17
Changing the sound and display settings ..... 17
Boosting the bass sound
— D-bass ....................................................... 18
Additional Information
Precautions......................................................... 18
Maintenance....................................................... 19
Dismounting the unit ....................................... 20
Specifications ..................................................... 21
Troubleshooting guide ..................................... 22
2
Page 3

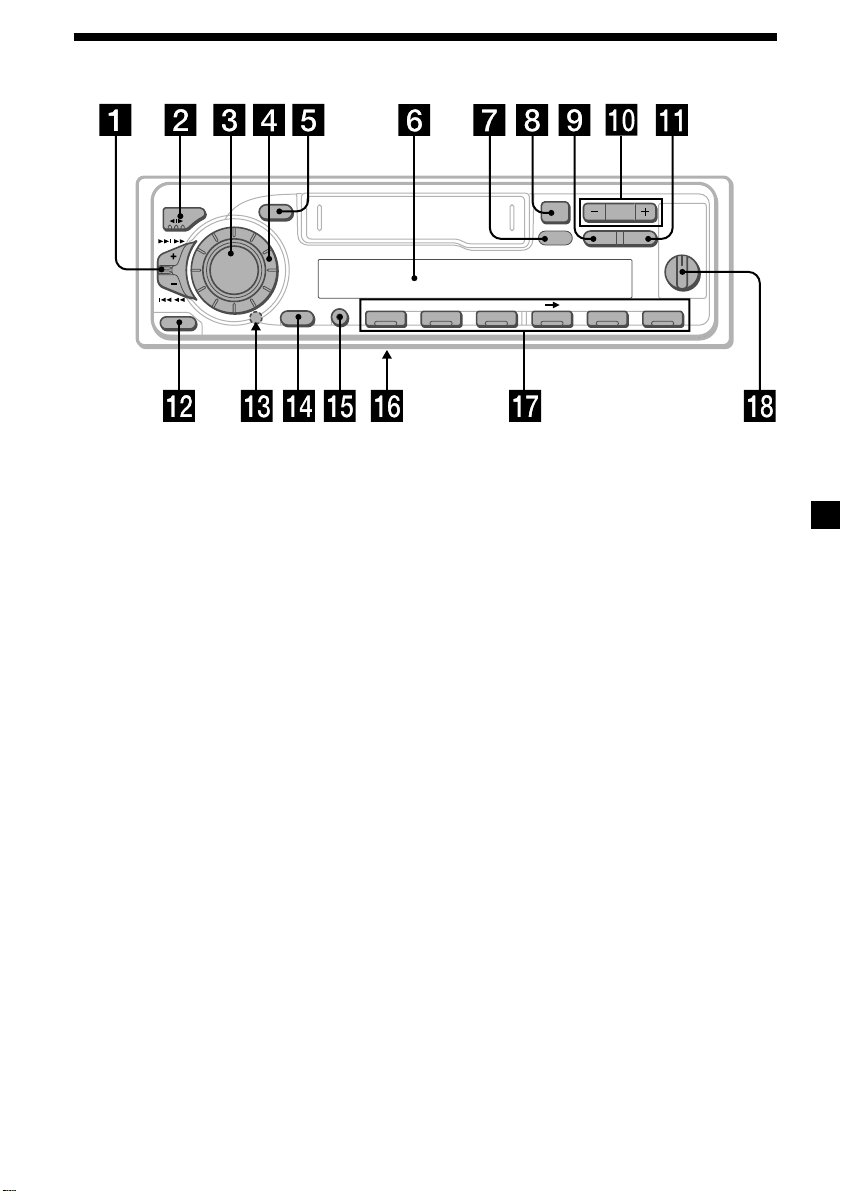
Location of controls
MODE
SEEK / AMS
SOUND
SOURCE
6
D-BASS
AF/TAPTYDSPL
1
2
OFF
3
+
–
PRST
SHIFT SET UP
RELEASE
OFF
Refer to the pages listed for details.
1 SEEK/AMS (seek/Automatic Music
Sensor/manual search) control
6, 8, 11, 14
2 MODE (*) button
During tape playback:
Playback direction change 6
During radio reception:
BAND select 7, 8
3 SOURCE (TAPE/TUNER) button 6, 7, 8,
12
4 Dial (volume/bass/treble/left-right/rear-
front control) 5, 17
5 SOUND button 17
6 Display window
7 DSPL (display mode change) button
6, 9, 10
8 6 (eject) button 6
9 PTY button *
RDS Programme 14
PLAY MODE
564321
XR-5890R/5880R
!º PRST button
During radio reception:
Preset stations select 8
!¡ AF/TA button* 10, 11, 12, 13
!™ RELEASE (front panel release) button
4, 20
!£ Reset button (located on the front side
of the unit behind the front panel) 4
!¢ OFF button 4, 6
!∞ SHIFT button
PLAY MODE 7, 8, 11, 13
SET UP 5, 14, 17
!§ POWER SELECT switch
(located on the bottom of the unit)
See “POWER SELECT switch” in the
Installation/Connections manual.
!¶ Number buttons 8, 11, 13
!• D-BASS control 18
* XR-5890R/5880R only
3
Page 4

Getting Started
Resetting the unit
Before operating the unit for the first time or
after replacing the car battery, you must reset
the unit.
Remove the front panel and press the reset
button with a pointed object, such as a
ballpoint pen.
Reset button
Note
Pressing the reset button will erase the clock
setting and some memorized functions.
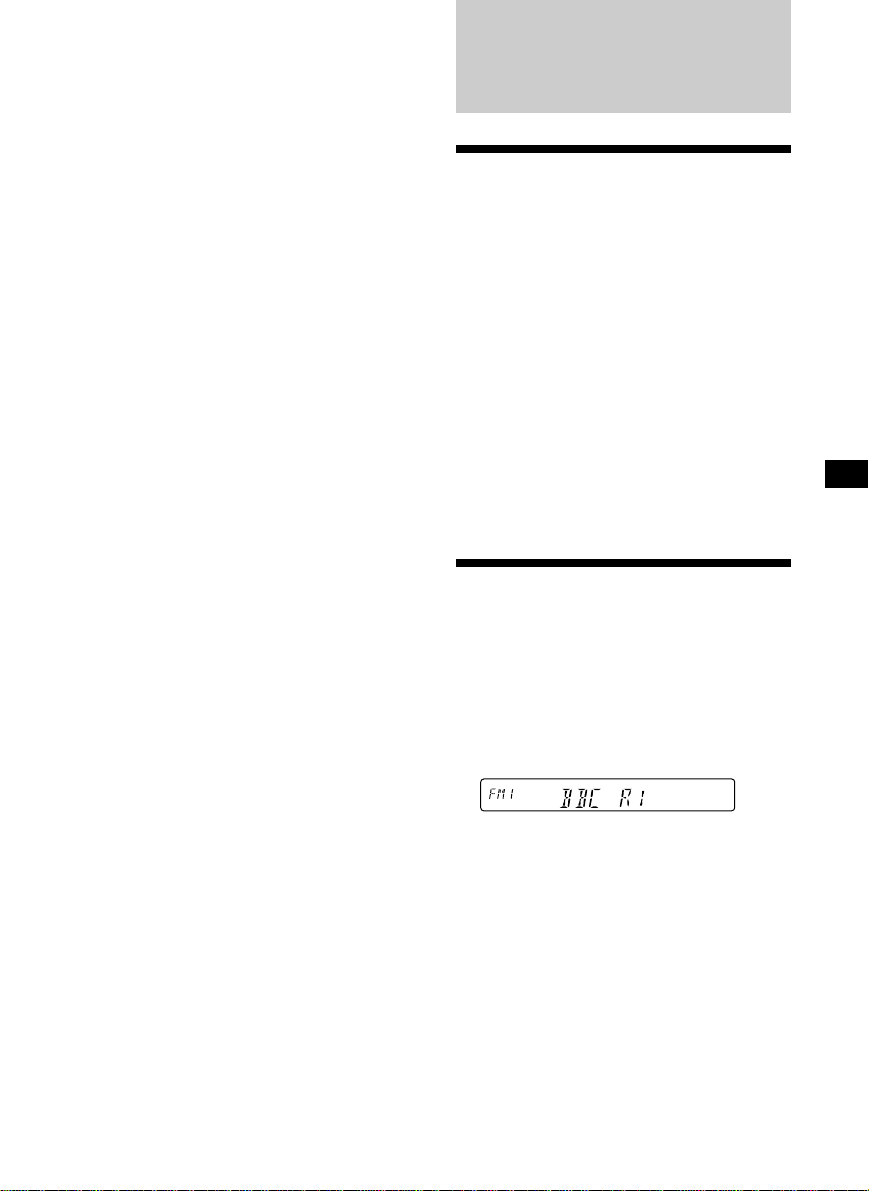
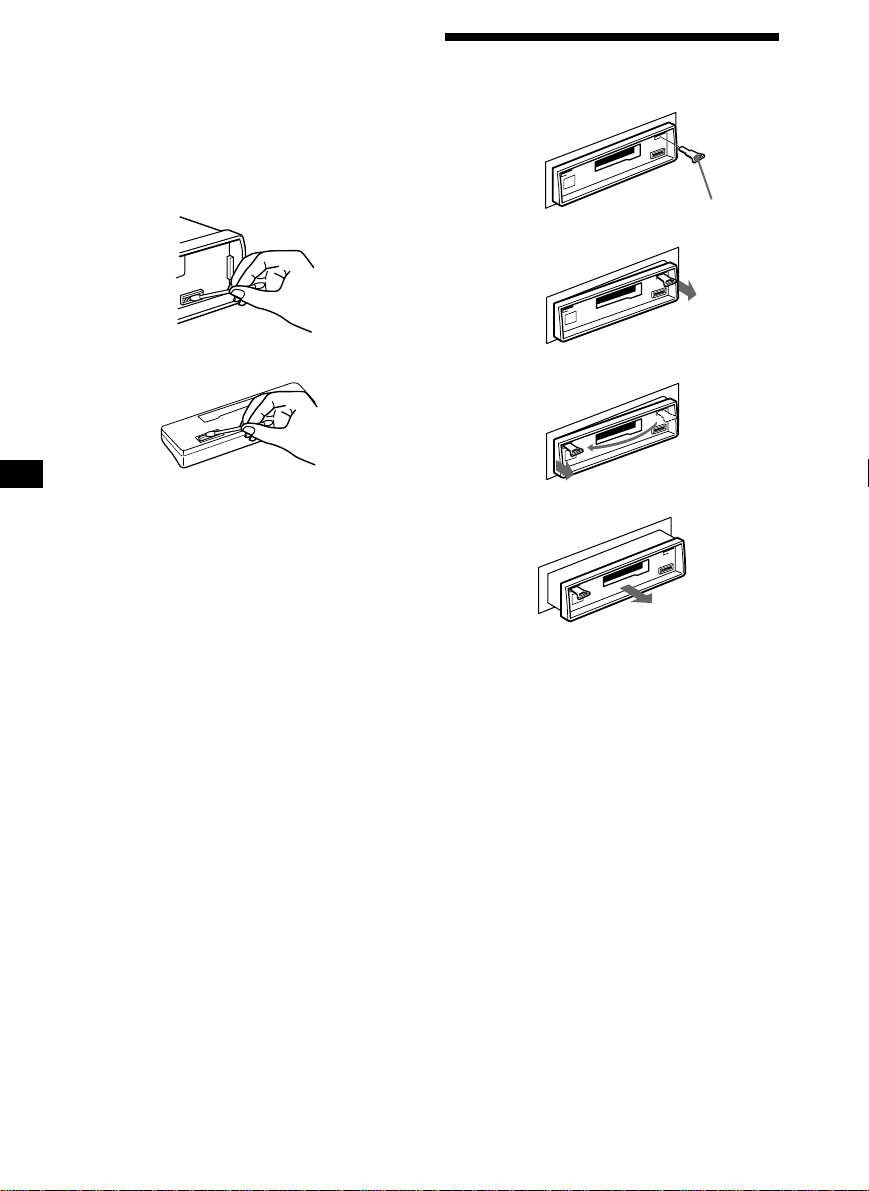
Detaching the front panel
You can detach the front panel of this unit to
protect the unit from being stolen.
1 Press (OFF).
2 Press (RELEASE), then slide the front
panel a little to the left, and pull it off
towards you.
(OFF)
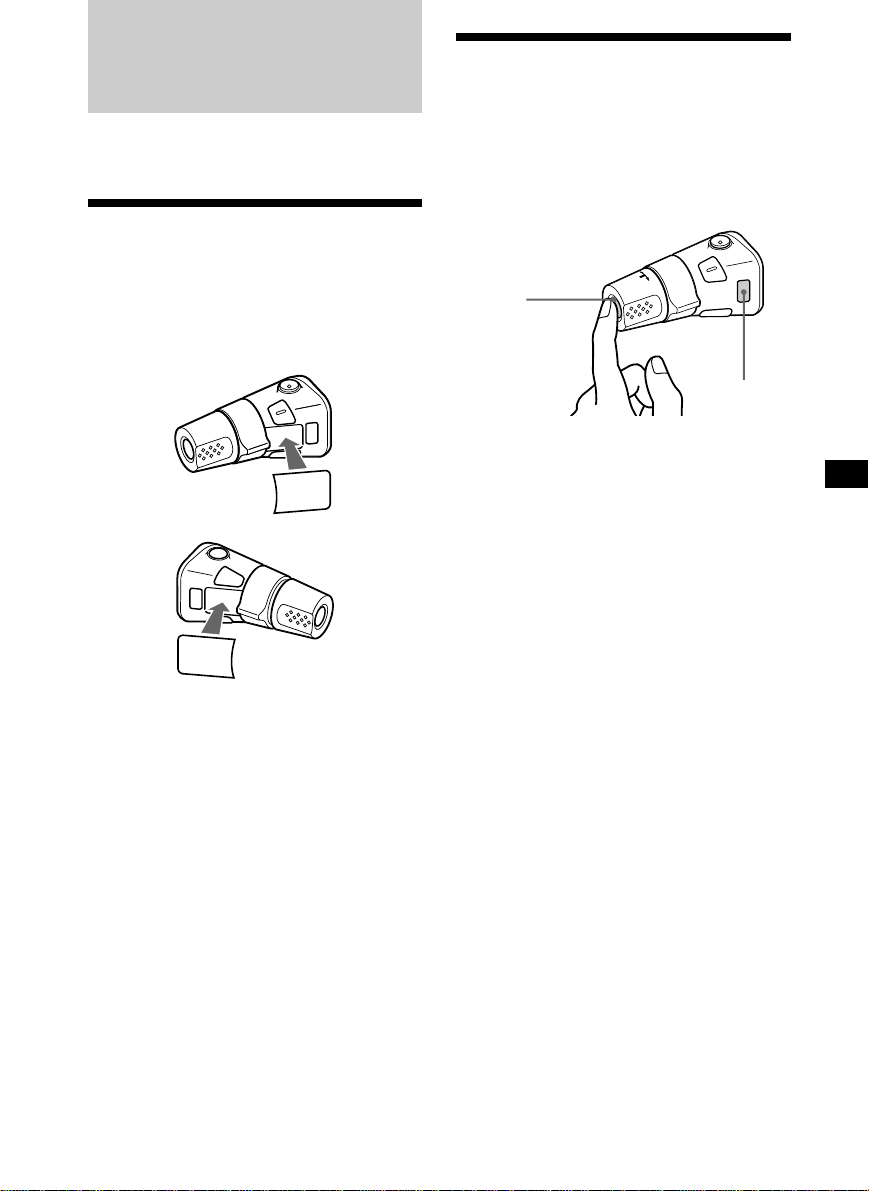
Attaching the front panel
Attach part a of the front panel to part b of
the unit as illustrated and push the left side
into position until it clicks.
a
b
Notes
• Be sure not to attach the front panel upside
down.
• Do not press the front panel too hard against the
unit when attaching it.
• Do not press too hard or put excessive pressure
on the display window of the front panel.
• Do not expose the front panel to direct sunlight
or heat sources such as hot air ducts, and do not
leave it in a humid place. Never leave it on the
dashboard of a car parked in direct sunlight or
where there may be a considerable rise in
temperature.
Caution alarm
If you turn the ignition key switch to the OFF
position without removing the front panel, the
caution alarm will beep for a few seconds
(only when the POWER SELECT switch on the
bottom of the unit is set to the A position).
(RELEASE)
Notes
• Be sure not to drop the panel when detaching it
from the unit.
• If you detach the panel while the unit is still
turned on, the power will turn off automatically
to prevent the speakers from being damaged.
• When carrying the front panel with you, use the
supplied front panel case.
4
Page 5

Setting the clock
The clock uses a 24-hour digital indication.
Example: To set the clock to 10:08
1 Press (SHIFT), then press (2) (SET UP)
repeatedly until “CLOCK” appears.
1 Press (4) (n).
The hour indication flashes.
2 Set the hour.
to go backward
to go forward
3 Press (4) (n).
The minute indication flashes.
2 Press (SHIFT).
The clock starts.
3 Press (SHIFT).
After the clock setting is complete, the
display returns to normal playback mode.
Note
If the POWER SELECT switch on the bottom of the
unit is set to the B position, turn the power on
first, then set the clock.
4 Set the minute.
to go backward
to go forward
5
Page 6

Cassette Player
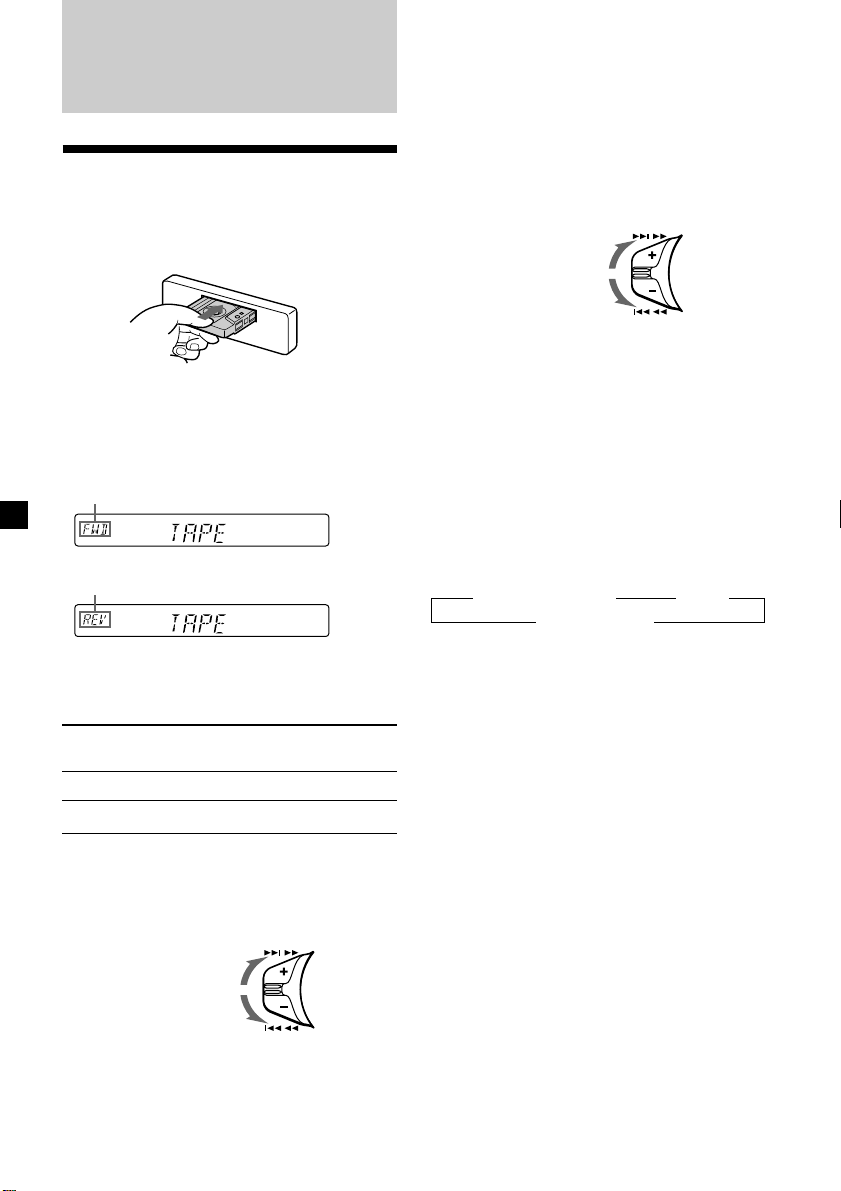
Fast-winding the tape
During playback, push the SEEK/AMS
control up or down and hold.
SEEK / AMS
Fast-forward
Listening to a tape
Insert a cassette.
Playback starts automatically.
If a cassette is already inserted, press
(SOURCE) repeatedly until “FWD” or “REV”
appears to start playback.
The side facing up is played.
The side facing down is played.
Tip
To change the tape‘s playback direction, press
(MODE) (*).
To Press
Stop playback (OFF)
Eject the cassette 6
Rewind
To start playback during fast-forwarding or
rewinding, press (MODE) (*).
Locating a specific track
— Automatic Music Sensor (AMS)
During playback, push the SEEK/AMS
control up or down and release for each
track you want to skip.
You can skip up to nine tracks at one time.
To locate
succeeding tracks
To locate
preceding tracks
Note
The AMS function may not work when:
— the blanks between tracks are shorter than
four seconds
— there is noise between tracks
— there are long sections of low volume or quiet
sections.
SEEK / AMS
Changing the display item
Each time you press (DSPL), the item changes
as follows:
z Tape playback z Clock
Frequency*Z
* While either of the following functions are
activated.
— ATA function
— AF/TA function (XR-5890R/5880R)
After you select the desired item, the display
will automatically change to the Motion
Display mode after a few seconds.
In the Motion Display mode, all the above
items are scrolled in the display one by one in
order.
Tip
The Motion Display mode can be turned off. (See
“Changing the sound and display settings” on
page 17).
6
Page 7

Playing a tape in various
modes
You can play the tape in various modes:
•REP (Repeat Play) repeats the current track.
•METAL (Metal)* lets you play a metal or
CrO2 tape.
•BL SKP (Blank Skip) skips blanks longer than
eight seconds.
•ATA (Automatic Tuner Activation) turns on
the tuner automatically when fast-winding
the tape.
1 During playback, press (SHIFT).
“SHIFT-ON” appears in the display.
2 Press (3) (PLAY MODE) repeatedly until
the desired play mode appears.
Each time you press (3) (PLAY MODE),
the item changes as follows:
REP n METAL*n BL SKP n ATA
* XR-5890R/4890 only
3 Press (4) (n) to select “ON.”
Play mode starts.
4 Press (SHIFT).
To return to normal playback mode, select
“OFF” in step 3 above.
Note
If the “SFT” indication appears, press (SHIFT) to
complete the mode setting.
Radio
Memorizing stations
automatically
— Best Tuning Memory (BTM)
The unit selects the stations with the strongest
signals and memorizes them in the order of
their frequencies. You can store up to 6 stations
on each band (FM1, FM2, FM3, MW, and LW).
Caution
When tuning in stations while driving, use
Best Tuning Memory to prevent accidents.
1 Press (SOURCE) repeatedly to select the
tuner.
Each time you press (SOURCE), the source
changes as follows:
TUNER ˜ TAPE
2 Press (MODE) repeatedly to select the
band.
Each time you press (MODE), the band
changes as follows:
z FM1 z FM2 z FM3 z MW z LW
3 Press (SHIFT), then press (3) (PLAY
MODE) repeatedly until “B.T.M” appears.
4 Press (4) (n).
The unit stores stations in the order of their
frequencies on the number buttons.
A beep sounds when the setting is stored.
5 Press (SHIFT).
Notes
• The unit does not store stations with weak
signals. If only a few stations can be received,
some number buttons will retain their former
setting.
• When a number is indicated in the display, the
unit starts storing stations from the one currently
displayed.
7
Page 8

Memorizing only the
desired stations
You can preset up to 18 FM stations (6 each for
FM1, 2, and 3), up to 6 MW stations, and up to
6 LW stations in the order of your choice.
1 Press (SOURCE) repeatedly to select the
tuner.
2 Press (MODE) repeatedly to select the
band.
3 Push the SEEK/AMS control up or down
to tune in the station that you want to
store on the number button.
4 Press and hold the desired number
button ( (1) to (6)) until “MEM” appears.
The number button indication appears in
the display.
Note
If you try to store another station on the same
number button, the previously stored station will
be erased.
Receiving the memorized
stations
1 Press (SOURCE) repeatedly to select the
tuner.
2 Press (MODE) repeatedly to select the
band.
If you cannot tune in a preset
station
Push and release the SEEK/AMS control
up or down to search for the station
(automatic tuning).
Scanning stops when the unit receives a
station. Push the SEEK/AMS control up or
down repeatedly until the desired station is
received.
Note
If the automatic tuning stops too frequently, press
(SHIFT), then press (3) (PLAY MODE) repeatedly
until “LOCAL” (local seek mode) is displayed. Then
press (4) (n) to select “LOCAL-ON.” Press (SHIFT).
Only the stations with relatively strong signals will
be tuned in.
Tip
If you know the frequency of the station you want
to listen to, push the SEEK/AMS control up or
down and hold until the desired frequency
appears (manual tuning).
If FM stereo reception is poor
— Monaural Mode
1 During radio reception, press (SHIFT),
then press (3) (PLAY MODE) repeatedly
until “MONO” appears.
2 Press (4) (n) repeatedly until “MONO-
ON“ appears.
The sound improves, but becomes
monaural (“ST” disappears).
3 Press (SHIFT).
To return to normal mode, select “MONOOFF” in step 2 above.
3 Press the number button ((1) to (6)) on
which the desired station is stored.
Tip
Press either side of (PRST) to receive the stations
in the order they are stored in the memory (Preset
Search Function).
8
Page 9
Changing the display item
Each time you press (DSPL), the item changes
as follows:
Frequency (Station Name)* ˜ Clock
* When you tune in an FM station that transmits
RDS data, the station name appears (XR-5890R/
5880R only).
After you select the desired item, the display
will automatically change to the Motion
Display mode after a few seconds.
In the Motion Display mode, all the above
items are scrolled in the display one by one in
order.
Tip
The Motion Display mode can be turned off. (See
“Changing the sound and display settings” on
page 17).
RDS (XR-5890R/5880R only)
Overview of the RDS
function
Radio Data System (RDS) is a broadcasting
service that allows FM stations to send
additional digital information along with the
regular radio programme signal. Your car
stereo offers you a variety of services. Here are
just a few: retuning the same programme
automatically, listening to traffic
announcements, and locating a station by
programme type.
Notes
• Depending on the country or region, not all of
the RDS functions are available.
• RDS may not work properly if the signal strength
is weak or if the station you are tuned to is not
transmitting RDS data.
Displaying the station
name
The name of the current station lights up in the
display.
Select an FM station (page 7).
When you tune in an FM station that
transmits RDS data, the station name
appears in the display.
Note
The “*” indication means that an RDS station is
being received.
9
Page 10

Changing the display item
Each time you press (DSPL), the item changes
as follows:
Station Name (Frequency) ˜ Clock
After you select the desired item, the display
will automatically change to the Motion
Display mode after a few seconds.
In the Motion Display mode, all the above
items are scrolled in the display one by one in
order.
Tip
The Motion Display mode can be turned off. (See
“Changing the sound and display settings” on
page 17).
Note
“NO NAME” appears if the received station does
not transmit RDS data (XR-5890R/5880R only).
Retuning the same
programme automatically
— Alternative Frequencies (AF)
The Alternative Frequencies (AF) function
automatically selects and retunes the station
with the strongest signal in a network. By
using this function, you can continuously
listen to the same programme during a longdistance drive without having to retune the
station manually.
Frequencies change automatically.
98.5MHz
Station
1 Select an FM station (page 7).
2 Press (AF/TA) repeatedly until “AF-ON”
appears.
The unit starts searching for an alternative
station with a stronger signal in the same
network.
96.0MHz
102.5MHz
10
Note
When there is no alternative station in the area
and you do not need to search for an alternative
station, turn the AF function off by pressing
(AF/TA) repeatedly until “AF TA-OFF” appears.
Page 11

Changing the display item
Each time you press (AF/TA), the item changes
as follows:
” TA-ON ” AF TA-ON*
* Select this to turn on both the AF and TA
functions.
Notes
• When “NO AF” and the station name flash
alternately, it means that the unit cannot find an
alternative station in the network.
• If the station name starts flashing after selecting
a station with the AF function on, this indicates
that no alternative frequency is available. Push
the SEEK/AMS control up or down while the
station name is flashing (within eight seconds).
The unit starts searching for another frequency
with the same PI (Programme Identification) data
(“PI SEEK” appears and no sound is heard). If the
unit cannot find another frequency, “NO PI”
appears, and the unit returns to the previously
selected frequency.
AF-ON “ AF TA-OFF “
Listening to a regional programme
The “REG-ON” (regional on) function lets you
stay tuned to a regional programme without
being switched to another regional station.
(Note that you must turn the AF function on.)
The unit is factory preset to “REG-ON,” but if
you want to turn off the function, do the
following.
Local link function (United
Kingdom only)
The Local Link function lets you select other
local stations in the area, even if they are not
stored on your number buttons.
1 Press a number button that has a local
station stored on it.
2 Within five seconds, press the number
button of the local station again.
3 Repeat this procedure until the desired
local station is received.
1 During radio reception, press (SHIFT),
then press (3) (PLAY MODE) repeatedly
until “REG” appears.
2 Press (4) (n) repeatedly until “REG-OFF”
appears.
3 Press (SHIFT).
Note that selecting “REG-OFF” might cause
the unit to switch to another regional
station within the same network.
To return to regional on, select “REG-ON” in
step 2 above.
Note
This function does not work in the United
Kingdom and in some other areas.
11
Page 12

Listening to traffic
announcements
The Traffic Announcement (TA) and Traffic
Programme (TP) data let you automatically
tune in an FM station that is broadcasting
traffic announcements even if you are listening
to other programme sources.
Presetting the volume of traffic
announcements
You can preset the volume level of the traffic
announcements beforehand so you won’t
miss the announcement. When a traffic
announcement starts, the volume will be
automatically adjusted to the preset level.
1 Select the desired volume level.
Press (AF/TA) repeatedly until “TA-ON”
or “AF TA-ON” appears.
The unit starts searching for traffic
information stations. “TP” appears in the
display when the unit finds a station
broadcasting traffic announcements.
When the traffic announcement starts,
“TA” flashes. The flashing stops when the
traffic announcement is over.
Tip
If the traffic announcement starts while you are
listening to another programme source, the unit
automatically switches to the announcement and
goes back to the original source when the
announcement is over.
Notes
“NO TP” flashes for five seconds if the received
•
station does not broadcast traffic announcements.
Then, the unit starts searching for a station that
broadcasts it.
• When “EON” appears with “TP” in the display,
the current station makes use of broadcast traffic
announcements by other stations in the same
network.
To cancel the current traffic
announcement
Press (AF/TA) or (SOURCE).
To cancel all traffic announcements, turn off
the function by pressing (AF/TA) until “AF
TA-OFF” appears.
2 Press (AF/TA) for two seconds.
”TA“ appears and the setting is stored.
Receiving emergency
announcements
If an emergency announcement comes in while
you are listening to the radio, the programme
will automatically switch to it. If you are
listening to a source other than the radio, the
emergency announcements will be heard if
you set AF or TA to on. The unit will then
automatically switch to these announcements
no matter which source you are listening to at
the time.
Presetting the RDS
stations with the AF and
TA data
When you preset RDS stations, the unit stores
each station’s data as well as its frequency, so
you don’t have to turn on the AF or TA
function every time you tune in the preset
station. You can select a different setting (AF,
TA, or both) for individual preset stations, or
the same setting for all preset stations.
12
Page 13

Presetting the same setting for all
preset stations
1 Select an FM band (page 7).
Locating a station by
programme type
2 Press (AF/TA) repeatedly to select either
“AF-ON,” “TA-ON” or “AF TA-ON” (for
both AF and TA functions).
Note that selecting “AF TA-OFF” stores not
only RDS stations, but also non-RDS
stations.
3 Press (SHIFT), then press (3) (PLAY
MODE) repeatedly until “B.T.M” appears.
4 Press (4) (n) until “B.T.M” flashes.
5 Press (SHIFT).
Presetting different settings for
each preset station
1 Select an FM band, and tune in the
desired station.
2 Press (AF/TA) repeatedly to select either
“AF-ON,” “TA-ON” or “AF TA-ON” (for
both AF and TA functions).
3 Press the desired number button and
hold until “MEM” appears.
Repeat from step 1 to preset other stations.
Tip
If you want to change the preset AF and/or TA
setting after you tune in the preset station, you
can do so by turning the AF or TA function on or
off.
You can locate the station you want by
selecting one of the programme types shown
below.
Programme types Display
News NEWS
Current Affairs AFFAIRS
Information INFO
Sports SPORT
Education EDUCATE
Drama DRAMA
Culture CULTURE
Science SCIENCE
Varied VARIED
Popular Music POP M
Rock Music ROCK M
Easy Listening EASY M
Light Classical LIGHT M
Classical CLASSICS
Other Music Type OTHER M
Weather WEATHER
Finance FINANCE
Children’s Programmes CHILDREN
Social Affairs SOCIAL A
Religion RELIGION
Phone In PHONE IN
Travel TRAVEL
Leisure LEISURE
Jazz Music JAZZ
Country Music COUNTRY
National Music NATION M
Oldies Music OLDIES
Folk Music FOLK M
Documentary DOCUMENT
Not specified NONE
Note
You cannot use this function in some countries
where no PTY (Programme Type selection) data is
available.
continue to next page n
13
Page 14

1 Press (PTY) during FM reception until
“PTY” appears.
Setting the clock
automatically
The current programme type name appears
if the station is transmitting the PTY data.
“- - - - -” appears if the received station is
not an RDS station, or if the RDS data has
not been received.
2 Press (PTY) repeatedly until the desired
programme type appears.
The programme types appear in the order
shown in the above table. Note that you
cannot select “NONE” (Not specified) for
searching.
3 Push the SEEK/AMS control up or down.
The unit starts searching for a station
broadcasting the selected programme type.
When the unit finds the programme, the
programme type appears again for five
seconds.
“NO” and the programme type appear
alternately for five seconds if the unit
cannot find the programme type. It then
returns to the previously selected station.
The CT (Clock Time) data from the RDS
transmission sets the clock automatically.
1 During radio reception, press (SHIFT),
then press (2) (SET UP) repeatedly until
“CT” appears.
2 Press (4) (n) repeatedly until “CT-ON”
appears.
The clock is set.
3 Press (SHIFT) to return to the normal
display.
To cancel the CT function
Select “CT-OFF” in step 2 above.
Notes
• The CT function may not work even though an
RDS station is being received.
• There might be a difference between the time
set by the CT function and the actual time.
14
Page 15
Other Functions
Using the rotary
commander
You can also control this unit with an optional
rotary commander.
Labelling the rotary
commander
Depending on how you mount the rotary
commander, attach the appropriate label as
shown in the illustration below.
SOUND
MODE
DSPL
DSPL
MODE
SOUND
The rotary commander works by pressing
buttons and/or rotating controls.
By pressing buttons
(the SOURCE and MODE buttons)
(SOURCE)
(MODE)
Each time you press (SOURCE), the
source changes as follows:
TUNER ˜ TAPE
Pressing (MODE) changes the operation
in the following ways;
• Tape : playback direction
• Tuner : FM1 n FM2 n FM3 n MW n LW
Tip
When the POWER SELECT switch is set to position
B, you can turn on this unit by pressing (SOURCE)
on the rotary commander.
15
Page 16
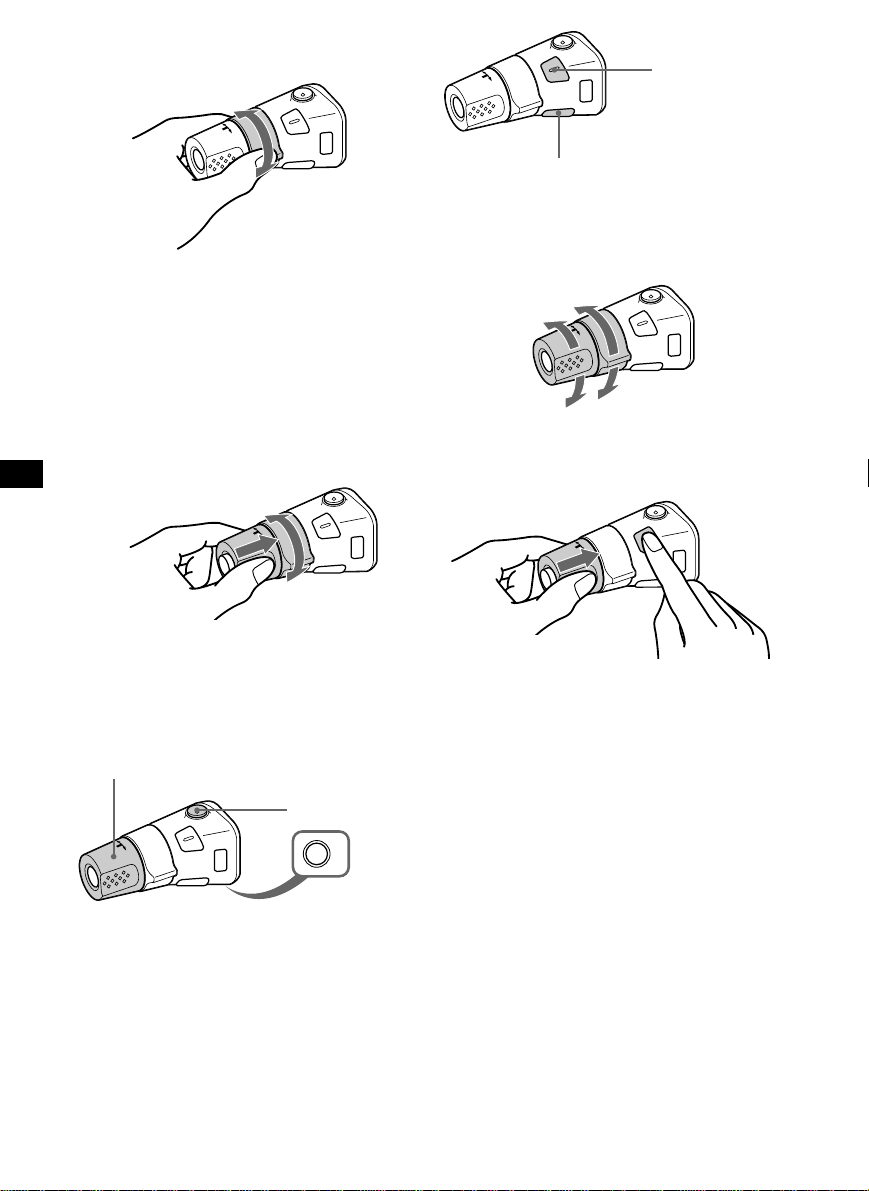
By rotating the control
(the SEEK/AMS control)
Rotate the control and release it to:
•Locate the beginnings of tracks on the
tape. Rotate and hold the control, and
release it to fast-wind the tape. To start
playback while fast-winding the tape,
press (MODE).
•Tune in stations automatically. Rotate and
hold the control to find a specific station.
By pushing in and rotating the
control (the PRESET/DISC control)
Press (SOUND) to
adjust the volume
and sound menu.
Press (DSPL) to change
the displayed items.
Changing the operative direction
The operative direction of controls is factoryset as shown below.
To increase
To decrease
If you need to mount the rotary commander on
the right hand side of the steering column, you
can reverse the operative direction.
Push in and rotate the control to:
Receive the stations memorized on the
number buttons.
Other operations
Rotate the VOL control to
adjust the volume.
16
Press (ATT) to
attenuate the
sound.
OFF
Press (OFF) to turn
off the unit.
Press (SOUND) for two seconds while
pushing the VOL control.
Tip
You can also change the operative direction of
these controls with the unit (see “Changing the
sound and display settings” on page 17).
Page 17

Adjusting the sound
characteristics
Changing the sound and
display settings
You can adjust the bass, treble, balance, and
fader.
You can store the bass and treble levels
independently for each source.
1 Select the item you want to adjust by
pressing (SOUND) repeatedly.
VOL (volume) n BAS (bass) n
TRE (treble) n BAL (left-right) n
FAD (front-rear)
2 Adjust the selected item by rotating the
dial.
Adjust within three seconds after selecting
the item. (After three seconds, the dial
function reverts to volume control.)
Attenuating the sound
Press (ATT) on the optional rotary
commander.
“ATT-ON” flashes momentarily.
To restore the previous volume level, press
(ATT) again.
Tip
The unit decreases the volume automatically when
a telephone call comes in (Telephone ATT
function) (XR-5890R/4890 only).
The following items can be set:
•CLOCK (page 5).
•CT (Clock Time)* (page 14).
•AMBER/GREEN – to change the
illumination colour to amber or green.
• BEEP – to turn the beep sound on or off.
•RM (Rotary Commander) – to change the
operative direction of the rotary commander.
— Select “NORM” to use the rotary
commander as the factory-set position.
— Select “REV” when you mount the rotary
commander on the right side of the
steering column.
•M.DSPL – to turn the motion display on or
off.
1 Press (SHIFT).
2 Press (2) (SET UP) repeatedly until the
desired item appears.
Each time you press (2) (SET UP), the item
changes as follows:
CLOCK n CT* n AMBER/GREEN n BEEP
n RM n M.DSPL
* XR-5890R/5880R only.
Note
The displayed item will differ depending on
the source.
3 Press (4) ( n) to select the desired
setting (Example: ON or OFF).
4 Press (SHIFT).
After the mode setting is complete, the
display returns to normal playback mode.
Note
If the “SFT” indication appears, press (SHIFT) to
complete the mode setting.
17
Page 18

Boosting the bass sound
— D-bass
You can enjoy a clear and powerful bass
sound. The D-bass function boosts the low
frequency signal with a sharper curve than
conventional bass boost.
You can hear the bass line more clearly even
while the vocal volume remains the same. You
can emphasize and adjust the bass sound
easily with the D-BASS control.
D-BASS 3
Level
0dB
Adjusting the bass curve
Turn the D-BASS control to adjust the
bass level (1, 2, or 3).
“D-BASS” appears in the display.
To cancel, turn the control to OFF.
Note
If the bass sound becomes distorted, adjust the
D-BASS control or volume.
D-BASS 2
D-BASS 1
Frequency (Hz)
Additional
Information
Precautions
•If your car was parked in direct sunlight
resulting in a considerable rise in
temperature inside the car, allow the unit to
cool off before operating it.
•If no power is being supplied to the unit,
check the connections first. If everything is in
order, check the fuse.
•If no sound comes from the speakers of a
two-speaker system, set the fader control to
the centre position.
•When the tape is played back for a long
period, the cassette may become warm
because of the built-in power amplifier.
However, this is not a sign of malfunction.
If you have any questions or problems
concerning your unit that are not covered in
this manual, please consult your nearest Sony
dealer.
To maintain high quality sound
If you have drink holders near your audio
equipment, be careful not to splash juice or
other soft drinks onto the car audio. Sugary
residues on this unit or cassette tapes may
contaminate the playback heads, reduce the
sound quality, or prevent sound reproduction
altogether.
Cassette cleaning kits cannot remove sugar
from the tape heads.
18
Page 19
Notes on Cassettes
Cassette care
•Do not touch the tape surface of a cassette, as
any dirt or dust will contaminate the heads.
•Keep cassettes away from equipment with
built-in magnets such as speakers and
amplifiers, as erasure or distortion on the
recorded tape could occur.
•Do not expose cassettes to direct sunlight,
extremely cold temperatures, or moisture.
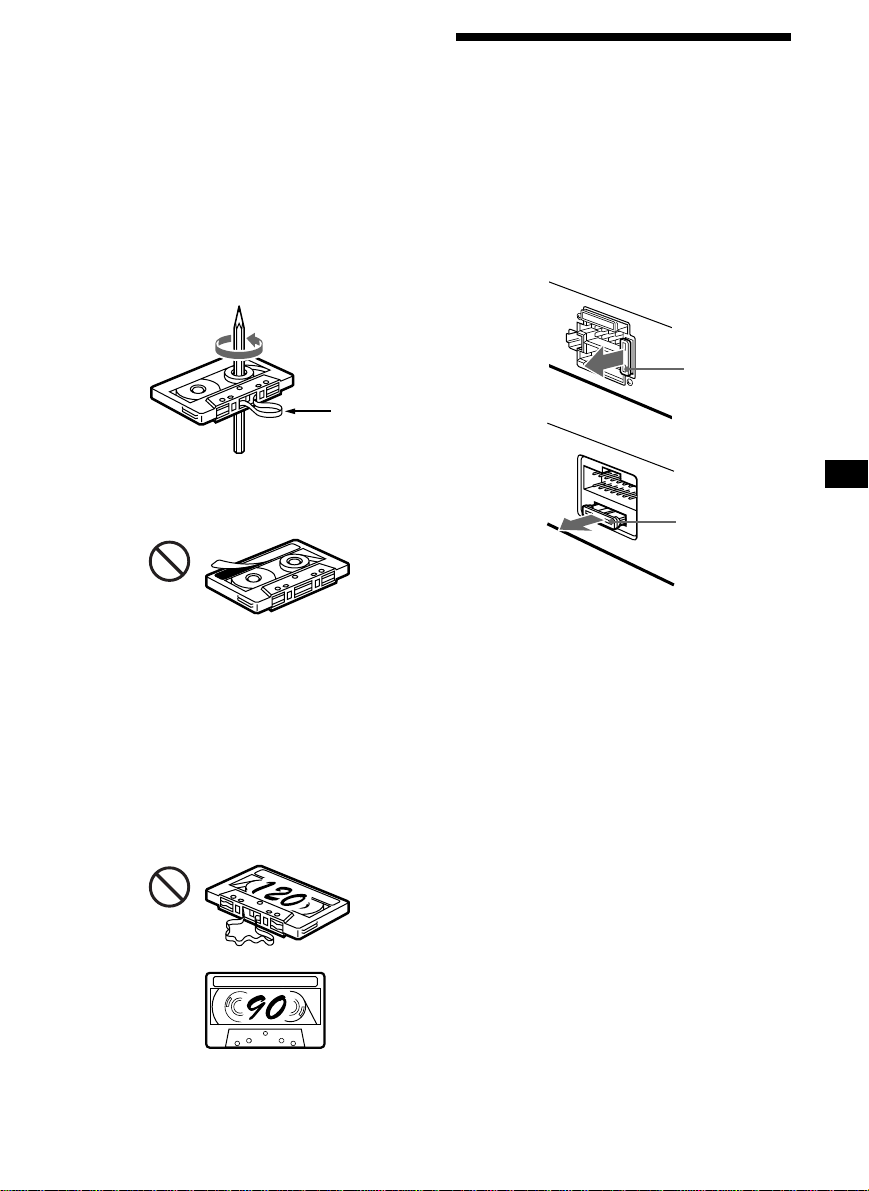
•Slack in the tape may cause the tape to be
caught in the machine. Before you insert the
tape, use a pencil or similar object to turn the
reel and take up any slack.
Maintenance
Fuse replacement
When replacing the fuse, be sure to use one
matching the amperage rating stated on the
original fuse. If the fuse blows, check the
power connection and replace the fuse. If the
fuse blows again after replacement, there may
be an internal malfunction. In such a case,
consult your nearest Sony dealer.
XR-5890R/5880R:
Fuse (10 A)
Slack
•Distorted cassettes and loose labels can cause
problems when inserting or ejecting tapes.
Remove or replace loose labels.
• The sound may become distorted while
playing the cassette. The cassette player head
should be cleaned after each 50 hours of use.
Cassettes longer than 90 minutes
The use of cassettes longer than 90 minutes is
not recommended except for long continuous
play. The tape used for these cassettes is very
thin and tends to stretch easily. Frequent
playing and stopping of these tapes may cause
them to become entangled in the cassette deck
mechanism.
XR-4890/4880:
Fuse (10 A)
Warning
Never use a fuse with an amperage rating
exceeding the one supplied with the unit as
this could damage the unit.
19
Page 20
Cleaning the connectors
The unit may not function properly if the
connectors between the unit and the front
panel are not clean. In order to prevent this,
open the front panel by pressing (RELEASE),
then detach it and clean the connectors with a
cotton swab dipped in alcohol. Do not apply
too much force. Otherwise, the connectors may
be damaged.
Main unit
Dismounting the unit
1
Release key (supplied)
2
3
Back of the front panel
Notes
• For safety, turn off the engine before cleaning
the connectors and remove the key from the
ignition switch.
• Never touch the connectors directly with your
fingers or any metal device.
4
20
Page 21

Specifications
Cassette player section
Tape track 4-track 2-channel stereo
Wow and flutter 0.08 % (WRMS)
Frequency response 30 – 18,000 Hz
Signal-to-noise ratio
Cassette type
TYPE II, IV* 61 dB
TYPE I 58 dB
* XR-5890R/4890 only
Tuner section
FM
Tuning range 87.5 – 108.0 MHz
Aerial terminal External aerial connector
Intermediate frequency 10.7 MHz
Usable sensitivity 9 dBf
Selectivity 75 dB at 400 kHz
Signal-to-noise ratio 65 dB (stereo),
Harmonic distortion at 1 kHz
Separation 35 dB at 1 kHz
Frequency response 30 – 15,000 Hz
MW/LW
Tuning range MW: 531 – 1,602 kHz
Aerial terminal External aerial connector
Intermediate frequency 10.7 MHz/450 kHz
Sensitivity MW: 30 µV
68 dB (mono)
0.7 % (stereo),
0.4 % (mono)
LW: 153 – 281 kHz
LW: 50 µV
General
Outputs Power aerial relay control
Tone controls Bass ±8 dB at 100 Hz
Power requirements 12 V DC car battery
Dimensions Approx. 188 × 58 × 181 mm
Mounting dimensions Approx. 182 × 53 × 164 mm
Mass Approx. 1.2 kg
Supplied accessories Parts for installation and
Optional accessories Rotary commander
Design and specifications are subject to change
without notice.
lead
Telephone ATT control
lead (XR-5890R/4890 only)
Treble ±8 dB at 10 kHz
(negative earth)
(w/h/d)
(w/h/d)
connections (1 set)
Front panel case (1)
RM-X4S
Power amplifier section
Outputs Speaker outputs
Speaker impedance 4 – 8 ohms
Maximum power output 35 W × 4 (at 4 ohms)
(sure seal connectors)
21
Page 22

Troubleshooting guide
The following checklist will help you remedy the problems you may encounter with your unit.
Before going through the checklist below, check the connections and operating procedures.
General
Problem
No sound.
The contents of the memory
have been erased.
Indications do not appear in the
display.
Tape playback
Problem
The sound is distorted.
The AMS does not operate
correctly.
Cause/Solution
•Cancel the ATT function.
•Set the fader control to the centre position for two-speaker
systems.
•Rotate the dial clockwise to adjust the volume.
• The power cord or battery has been disconnected.
• The reset button was pressed.
n Store again into the memory.
Remove the front panel and clean the connectors. See
“Cleaning the connectors” (page 20) for details.
Cause/Solution
The tape head is contaminated.
n Clean the head with a commercially available dry-type
cleaning cassette.
• There is noise in the space between tracks.
• A blank space is too short (less than four seconds).
• The SEEK/AMS control was pushed up immediately before
the following track.
• The SEEK/AMS control was pushed down immediately after
the track starts.
• A long pause, or a passage of low frequencies or very low
sound level is treated as a blank space.
Radio reception
Problem
Preset tuning is not possible.
Automatic tuning is not
possible.
The “ST” indication flashes.
22
Cause/Solution
• Memorize the correct frequency.
• The broadcast signal is too weak.
The broadcast signal is too weak.
n Use manual tuning.
•Tune in the frequency accurately.
•The broadcast signal is too weak.
n Set to MONO mode (page 8).
Page 23

RDS (XR-5890R/5880R only)
Problem
The SEEK starts after a few
seconds of listening.
No traffic announcements.
PTY displays “NONE.”
If the above-mentioned solutions do not help improve the situation, consult your nearest Sony
dealer.
Cause/Solution
The station is non-TP or has a weak signal.
n Press (AF/TA) repeatedly until “AF TA-OFF” appears.
•Activate “TA.”
•The station does not broadcast any traffic announcements
despite being TP.
n Tune to another station.
The station does not specify the programme type.
23
Page 24

Witamy
Tylko dla tego sprzętu
Dziękujemy za nabycie Odtwarzacza Taśm
Kasetowych Sony. Nowy sprzęt umożliwi
korzystanie z wielu funkcji a opcjonalny,
rotacyjny pilot zdalnego sterowania ułatwi
operacje urządzenia.
Umiejscowienie kontrolek ...................................3
Przygotowania wstępne
Zerowanie sprzętu .......................................... 4
Zdejmowanie przedniego panelu.................... 4
Nastawianie zegara......................................... 5
Magnetofon
Słuchanie taśm ............................................... 6
Odtwarzanie taśmy w różnych trybach
pracy .......................................................... 7
Radio
Automatyczne kodowanie stacji
nadawczych w pamięci sprzętu
— Tryb Best Tuning Memory (BTM =
pamięć najlepszego strojenia).................... 7
Kodowanie wyłącznie wybranych stacji
nadawczych ............................................... 8
Odbiór zapisanych w pamięci stacji
nadawczych ............................................... 8
RDS (tylko dla XR-5890R/5880R)
Opis funkkcji RDS ...........................................9
Wyświetlanie wskaźnika nazwy stacji
nadawczej .................................................. 9
Automatyczne, ponowne strojenie tego
samego programu
— Funkcja Alternatywnych częstotliwości
(Alternative Frequencies) (AF) .................. 10
Odbiór migawek o ruchu drogowym ............ 12
Kodowanie stacji nadawczych oferujących
serwis RDS o sygnałach AF oraz TA........ 12
Zlokalizowanie stacji według rodzaju
transmitowanego programu ..................... 13
Automatyczne nastawianie zegara ............... 14
Pozostałe funkcje
Naklejanie etykietek na pilot rotacyjny ......... 15
Korzystanie z rotacyjnego pilota zdalnego
sterowania ................................................ 15
Regulacja charakterystyk dźwięku ............... 17
Wyciszanie dźwięku ...................................... 17
Zmienianie wstępnych nastawów dźwięku i
wskaźników wyświetlacza ....................... 17
Wspomaganie tonów niskich Funkcja
— D-bass .................................................18
Informacje dodatkowe
Środki Ostrożności ....................................... 18
Konserwacja ................................................. 19
Wymontowanie sprzętu ................................ 20
Dane techniczne ........................................... 21
Usuwanie usterek ......................................... 22
2
Page 25
Umiejscowienie kontrolek
MODE
SEEK / AMS
SOUND
SOURCE
6
D-BASS
AF/TAPTYDSPL
1
2
OFF
3
+
–
PRST
SHIFT SET UP
RELEASE
OFF
Szczegóły znajdują się na stronach podanych w spisie.
1 Kontrolka SEEK/AMS (seek/Automatic
!º Przycisk PRST
Music Sensor/manual search =
przeszukiwanie/automatyczny czujnik
muzyki/manualne przeszukiwanie)
6, 8, 11, 14
2 Przycisk trybu pracy MODE (*)
Podczas odtwarzania taśmy:
Zmiana kierunku odtwarzania 6
Podczas odbioru audycji radiowych:
!¡ Przycisk AF/TA* 10, 11, 12, 13
!™ Przycisk RELEASE (zwolnienie
!£ Przycisk zerowania (umieszczony z
Wybór pasma BAND 7, 8
3 Przycisk wyboru źródła odtwarzania
SOURCE (TAPE/TUNER) 6, 7, 8, 12
4 Regulator ( regulujący głośność/basy/
!¢ Przycisk wyłączania OFF 4, 6
!∞ Przycisk SHIFT
tony wysokie/lewy-prawy/tył-przód)
5, 17
5 Przycisk SOUND 17
!§ Przełącznik wyboru źródła zasilania
6 Wyświetlacz
7 Przycisk DSPL (tryb zmiany
wskaźników wyświetlacza) 6, 9, 10
8 Przycisk 6 6
9 Przycisk PTY*
Program RDS 14
!¶ Przyciski numeryczne 8, 11, 12
!• Kontrolka D-BASS 18
PLAY MODE
564321
XR-5890R/5880R
Podczas odbioru audycji radiowych:
Wybór wstępnie zakodowanych stacji
radiowych 8
przedniego panelu) 4, 20
przodu korpusu sprzętu, za panelem
przednim) 4
PLAY MODE (tryb odtwarzania)
7, 8, 9, 11, 13
SET UP 5, 14, 17
POWER SELECT
(umieszczony na dolnej powierzchni
sprzętu)
Patrz pod “Przełącznik POWER SELECT”
w instrukcjach Montażu/Podłączeń.
* Tylko dla XR-5890R/5880R
3
Page 26

Przygotowania
wstępne
Zerowanie sprzętu
Sprzęt należy wyzerować przed rozpoczęciem
eksploatacji poraz pierwszy lub po wymianie
akumulatora pojazdu.
Zdjąć przedni panel i szpiczasto zakończonym
przedmiotem, np. długopisem, nacisnąć
przycisk zerowania (reset).
Przycisk zerowania
Uwaga
Naciśnięcie przycisku zerowania spowoduje
wymazanie nastawów zegara i niektórych funkcji,
zakodowanych w pamięci sprzętu.
Zdejmowanie przedniego panelu
Sporzęt można zabezpieczyć przed kradzieżą
przez zdjęcie przedniego panelu.
1 Proszę nacisnąć przycisk (OFF).
Zakładanie przedniego panela
Część, na ilustracji oznaczoną a, należy
umocować w miejscu oznaczonym b, na
głównym korpusie sprzętu, następnie
docisnąć lewą stronę, do zaskoczenia.
a
b
Uwagi
•
Proszę uważać by panel nie został umocowany
górą na dół.
•
Przy zakładaniu, nie dociskać panelu do sprzętu.
•
Nie wywierać zbytniego nacisku na wyświetlacz
przedniego panelu.
•
Unikać narażania przedniego panelu na nadmierne
działanie promieni słonecznych lub ciepłego
powietrza pochodzącego z systemu ogrzewczego
pojazdu, nie pozostawiać w miejscach wilgotnych.
Nie pozostawiać panelu na desce rozdzielczej
samochodu zaparkowanego na nasłonecznionym
miejscu, ze względu na możliwość znacznego
wzrostu temperatury.
Alarm ostrzegawczy
Jeżeli przedni panel nie został uprzednio
zdjęty, alarm ostrzegawczy włączy się na parę
sekund po przełączeniu kluczyka zapłonu na
pozycję OFF. (tylko w przypadku kiedy
przełącznik źródła zasilania “POWER SELECT”
znajduje się w pozycji A).
2 Nacisnąwszy (RELEASE), przesunąć
przedni panel lekko w lewo i zdjąć
pociągając do siebie.
(OFF)
(RELEASE)
Uwagi
•
Proszę uważać by przy zdejmowaniu panela nie
upuścić go.
•
Zdejmowanie panelu przy jednocześnie włączonym
zasilaniu, spowoduje automatyczne wyłączenie
sprzętu, chroniąc głośniki przed ewentualnym
uszkodzeniem.
•
Zabierając przedni panel ze sobą, proszę
przechowywać w przeznaczonym do tego celu etui
ochronnym.
4
Page 27

Nastawianie zegara
Zegar działa na zasadzie cyfrowego systemu
24-godzinnego.
Przykład: Nastawienie zegara na godzinę
10:08
1 Nacisnąć (SHIFT), następnie kilkakrotnie
przycisk (2) (SET UP) do wyświetlenia
wskaźnika “CLOCK”.
1 Nacisnąć (4) (n).
Wskaźnik godziny miga.
2 Nastawić godzinę.
aby cofnąć
aby przesunąć naprzód
3 Nacisnąć (4) (n).
2 Nacisnąć (SHIFT).
Zegar rozpoczyna działanie.
3 Nacisnąć (SHIFT).
Po zakończeniu nastawiania zegara, na
wyświetlacz powracają wskaźniki
normalnego trybu odtwarzania.
Uwaga
Jeżeli przełącznik POWER SELECT, umieszczony na
dolnej powierzchni sprzętu, nastawiono na pozycję
B
, proszę włączyć zasilanie przed rozpoczęciem
nastawiania zegara.
Wskaźnik minut miga.
4 Nastawić minuty.
aby cofnąć
aby przesunąć naprzód
5
Page 28
Magnetofon
Słuchanie taśm
Wsunąć kasetę.
Odtwarzanie rozpoczyna się
automatycznie.
Jeżeli kaseta została już uprzednio wsunięta,
proszę przed rozpoczęciem odtwarzania,
kilkakrotnie nacisnąć przycisk (SOURCE), do
wyświetlenia wskaźnika “FWD” lub “REV”.
Odtwarzana jest strona kasety skierowana ku
górze.
Odtwarzana jest strona kasety skierowana ku
dołowi.
Wskazówka
Aby zmienić kierunek odtwarzania taśmy, proszę
nacisnąć
(MODE)
(*)
.
Aby Proszę
Zatrzymać odtwarzanie (OFF)
Wyjąć kasetę 6
Szybkie przewijanie taśmy
Podczas odtwarzania, przesunąć
kontrolkę SEEK/AMS ku górze lub w dół
i przytrzymać.
Szybki transport
naprzód
Cofnięcie taśmy
nacisnąć przycisk
SEEK / AMS
Zlokalizowanie poszczególnych tytułów
— Automatic Music Sensor (AMS -
automatyczny czujnik muzyki)
Podczas odtwarzania, przesunąć
kontrolkę SEEK/AMS w górę lub w dół i
zwolnić dla każdego tytułu, który
zostanie pominięty.
Pominąć można każdorazowo
maksymalnie dziewięć tytułów.
Aby zlokalizować
kolejne tytuły
Aby zlokalizować
poprzednie tytuły
Uwaga
Funkcja AMS może nie działać w następujących
przypadkach:
—
odstępy między poszczególnymi tytułami
wynoszą mniej niż cztery sekundy
—
dźwięki występujące w przerwach między
poszczególnymi tytułami
—
długie fragmenty niskiego poziomu głośności lub
fragmenty bardzo spokojnej muzyki.
SEEK / AMS
Zmienianie się wskaźników
informacyjnych
Każdorazowe naciśnięcie przycisku (DSPL),
zmienia wyświetlane wskaźniki w następującej
kolejności:
z Odtwarzanie taśmy z Zegar
Częstotliwość* “
*
Jeżeli jedna z następujących funkcji została
uaktywniona
—
Funkcja ATA
—
Funkcja AF/TA (XR-5890R/5880R)
Parę sekund po wybraniu preferowanej
pozycji, wyświetlacz automatycznie powraca
do trybu Ruchomego Ekranopisu (Motion
Display).
W trybie Ruchomego Ekranopisu, wszystkie
wyżej wymienione wskaźniki, przesuną się
kolejno na wyświetlaczu.
Wskazówka
Tryb Ruchomego Ekranopisu można wyłączyć. Patrz
“Zmienianie wsępnych nastawów dźwięku i
wskaźników wyświetlacza” na stronie 17).
Aby rozpocząć odtwarzanie podczas szybkiego
transportu naprzód lub podczas cofania taśmy,
proszę nacisnąć przycisk (MODE) (*).
6
Page 29

Odtwarzanie taśmy w
różnych trybach pracy
Taśmę można odtworzyć w różnych trybach
pracy:
•REP (Repeat Play= powtórne odtworzenie)
powtórne odtworzenie aktualnie
odgrywanego tytułu.
•Tryb METAL (metal)* zezwala na
odtworzenie taśmy metalowej lub CrO2.
•BL SKP (Blank Skip= omijanie przerw między
tytułami) omijanie przerw powyżej 8 sekund.
•ATA (Automatic Tuner Activation =
automatycznie włączanie tunera)
automatyczne włączenie tunera podczas
szybkiego transportu taśmy.
1 Podczas odtwarzania, nacisnąć (SHIFT).
Na wyświetlaczu ukazuje się wskaźnik
“SHIFT-ON”.
2 Kilkakrotnie naciskać przycisk (3)
(PLAY MODE), do ukazania się
wskaźnika wybranego trybu pracy.
Każdorazowe naciśnięcie przycisku (3)
(PLAY MODE), zmienia wyświetlane
wskaźniki w następującej kolejności:
REP n METAL*n BL SKP n ATA
*
Tylko dla XR-5890R/4890
Radio
Automatyczne kodowanie
stacji nadawczych w
pamięci sprzętu
— Tryb Best Tuning Memory
(BTM = pamięć najlepszego strojenia)
Jest to funkcja wybierania radiowych stacji
nadawczych o najsilniejszych sygnałach emisji
i kodowania ich według częstotliwości w
pamięci sprzętu. Zakodować można
maksymalnie 6 stacji nadawczych dla każdego
z pasm (FM1, FM2, FM3, MW i LW).
Uwaga
Ze względu na bezpieczeństwo jazdy, do
nastrojenia radia podczas prowadzenia pojazdu
należy korzystać z funkcji Best Tuning Memory
(metoda optymalnego strojenia pamięciowego).
1 Proszę kilkakrotnie nacisnąć (SOURCE) i
wybrać pozycję “tuner”.
Każdorazowe naciśnięcie przycisku
(SOURCE), zmienia kolejność wyświetlania
wskaźników źródła odtwarzania w
następujący sposób:
TUNER ˜ TAPE
3 Nacisnąć przycisk (4) (n) i wybrać
nastaw “ON.”
Odtwarzanie rozpoczyna się w wybranym
trybie.
4 Proszę nacisnąć (SHIFT).
Naciśnięcie “OFF” w etapie 3, powyżej,
przywraca normalny tryb odtwarzania.
Uwaga
Jeżeli zostanie wyświetlony wskaźnik “SFT”,
nacisnąć
(SHIFT)
pracy.
aby zakończyć nastawianie trybu
2 Proszę kilkakrotnie nacisnąć przycisk
(MODE) celem wybrania pasma.
Każdorazowe naciśnięcie przycisku
(MODE), zmienia kolejność wyświetlania
wskaźników pasm w następujący sposób:
z FM1 z FM2 z FM3 z MW z LW
3 Kilkakrotnie nacisnąć przycisk (SHIFT),
następnie (3) (PLAY MODE) do
wyświetlenia wskaźnika “B.T.M”.
ciąg dalszy na następnej stronie n
7
Page 30

4 Proszę nacisnąć (4) (n).
Stacje radiowe są kodowane pod
przyciskami numerycznymi według
częstotliwości.
Zapisanie stacji w pamięci sprzętu jest
potwierdzane sygnałem akustycznym.
Odbiór zapisanych w
pamięci stacji
nadawczych
5 Proszę nacisnąć (SHIFT).
Uwagi
•
Stacje nadawcze o słabym sygnale emisji nie
zostaną zapisane w pamięci sprzętu. Jeżeli sprzęt
odbiera tylko kilka radiowych stacji nadawczych,
pod niektórymi przyciskami numerycznymi
pozostaną poprzednio dokonane zapisy
pamięciowe.
•
Jeżeli na wyświetlaczu widoczny jest wskaźnik
numeryczny, sprzęt rozpoczyna kodowanie stacji
od aktualnie wyświetlanego numeru wzwyż.
Kodowanie wyłącznie
wybranych stacji
nadawczych
Wstępnie zakodować można maksymalnie 18
stacji pasma FM (po 6 dla pasm FM1, 2, i 3)
oraz po 6 dla pasm MW i LW, w dowolnej
kolejności.
1 Proszę kilkakrotnie nacisnąć przycisk
(SOURCE) i wybrać nastaw tuner.
2 Kilkakrotnie naciskać przycisk (MODE)
celem wybrania pasma.
3 Przesunąć kontrolkę SEEK/AMS w górę
lub w dół celem dostrojenia radiowej
stacji nadawczej, która zostanie
zakodowana w pamięci sprzętu, pod
odpowiednim numerem wywoławczym.
4 Naciskać właściwy przycisk numeryczny
((1) do (6)) do wyświetlenia wskaźnika
“MEM”.
Na wyświetlaczu ukazuje się cyfra
odpowiadająca wybranemu przyciskowi
numerycznemu.
1 Proszę kilkakrotnie nacisnąć przycisk
(SOURCE) i wybrać pozycję tuner.
2 Proszę kilkakrotnie nacisnąć przycisk
(MODE) i wybrać pasmo.
3 Nacisnąć przycisk numeryczny ((1) do
(6)) pod którym zapisano poszukiwaną
stację nadawczą.
Wskazówka
Naciśnięcie jednej ze stron przycisku
umożliwia odbiór stacji nadawczych w kolejności, w
której zostały wprowadzone do pamięci sprzętu
(Funkcja Preset Search = funkcja przeszukiwania
zakodowanych w pamięci danych).
W przypadku trudności z dostrojeniem
zakodowanej stacji nadawczej
Odszukać stację przez przesunięcie
kontrolki SEEK/AMS w górę lub w dół,
zwolnić kontrolkę (automatyczne
strojenie).
Przeszukiwanie zostaje zakończone w
momencie odebrania sygnałów
transmisyjnych. Kilkakrotnie przesunąć
kontrolkę SEEK/AMS w górę lub w dół do
nastrojenia wybranej stacji nadawczej.
Uwaga
Jeżeli automatyczne strojenie jest zbyt często
przerywane, proszę nacisnąć przycisk
następnie kilkakrotnie nacisnąć przycisk
MODE) do wyświetlenia wskaźnika “LOCAL” (local
seek mode=tryb przeszukiwania lokalnego). Teraz
proszę nacisnąć
ON”. - Nacisnąć
Dostrojone zostaną wyłącznie stacje nadawcze
emitujące relatywnie silny sygnał.
Wskazówka
Jeżeli wiadoma jest częstotliwość wybranej stacji,
proszę przesunąć kontrolkę SEEK/AMS w górę lub
dół i przytrzymać do momentu wyświetlenia
wskaźnika poszukiwanej częstotliwości (strojenie
manualne).
(4) (n
) i wybrać pozycję “LOCAL-
(SHIFT)
.
(PRST)
(SHIFT)
(3)
,
(PLAY
Uwaga
Zapisanie nowej stacji nadawczej pod zajętym
przyciskiem numerycznym, anuluje poprzednio
dokonany zapis.
8
Page 31

Jeżeli jakość odbioru
stereofonicznego na paśmie FM jest
niezadowalająca
— Tryb monofoniczny
1 Podczas odbioru audycji radiowych
nacisnąć (SHIFT), następnie
kilkakrotnie (3) (PLAY MODE) do
wyświetlenia wskaźnika “MONO”.
2 Kilkakrotnie naciskać (4) (n) do
wyświetlenia wskaźnika “MONO-ON”.
Jakość dźwięku ulega poprawie, lecz
przechodzi na tryb monofoniczny (wskaźnik
“ST” znika).
3 Proszę nacisnąć (SHIFT).
Aby powrócić do normalnego trybu
odtwarzania, w etapie 2 powyżej wybrać
pozycję “MONO-OFF”.
Zmienianie się wyświetlonych
wskaźników
Każdorazowe naciśnięcie przycisku (DSPL), w
następujący sposób zmienia kolejność
wyświetlanych wskaźników:
Częstotliwość (Nazwa stacji)* ˜ Zegar
Dostrojenie stacji pasma FM, emitującej dane
*
serwisu RDS, jest sygnalizowane wyświetleniem
nazwy stacji (tylko dla XR-5890R/5880R).
Parę sekund po wybraniu preferowanej
pozycji, wyświetlacz automatycznie powraca
do trybu Ruchomego Ekranopisu (Motion
Display).
W trybie Ruchomego Ekranopisu, wszystkie
wyżej wymienione wskaźniki, przesuną się
kolejno na wyświetlaczu.
RDS (tylko dla XR-5890R/5880R)
Opis funkkcji RDS
Radio Data System (RDS = radiowy system
danych) jest serwisem usługowym rozgłośni
radiowych, umożliwijący stacjom nadawczym
emitowanie dodatkowych informacji,
równolegle z normalnym sygnałem ich
programów. Nabyty stereofoniczny zestaw
samochodowy oferuje cały wachlarz usług
tego typu. Oto niektóre z nich: automatyczne,
powtórne strojenie wybranego programu,
migawki o ruchu drogowym i lokalizowanie
stacji nadawczych według rodzaju
nadawanych przez nie programów.
Uwagi
•
Dostępność funkcji RDS zależy od kraju lub rejonu.
•
Funkcja RDS może nie działać prawidłowo, jeżeli
emitowany sygnał jest zbyt słaby lub jeżeli
nastrojona stacja nie transmituje serwisu RDS.
Wyświetlanie wskaźnika
nazwy stacji nadawczej
Nazwa aktualnie odbieranej stacji zostaje
wyświetlona.
Wybrać stację pasma FM (strona 7).
Dostrojenie stacji pasma FM, emitującej
dane serwisu RDS, jest sygnalizowane
wyświetleniem nazwy stacji.
Wskazówka
Tryb Ruchomego Ekranopisu można wyłączyć. Patrz
“Zmienianie wsępnych nastawów dźwięku i
wskaźników wyświetlacza” na stronie 17).
Uwaga
Wskaźnik “
sygnał serwisu RDS.
*
” informuje, że odbierana stacji emituje
ciąg dalszy na następnej stronie n
9
Page 32

Zmienianie wyświetlonych
wskaźników
Każdorazowe naciśnięcie przycisku (DSPL), w
następujący sposób zmienia kolejność
wyświetlanych wskaźników:
Nazwa stacji (Częstotliwość) ˜ Zegar
Parę sekund po wybraniu preferowanej
pozycji, wyświetlacz automatycznie powraca
do trybu Ruchomego Ekranopisu (Motion
Display).
W trybie Ruchomego Ekranopisu, wszystkie
wyżej wymienione wskaźniki, przesuną się
kolejno na wyświetlaczu.
Wskazówka
Tryb Ruchomego Ekranopisu można wyłączyć. Patrz
“Zmienianie wsępnych nastawów dźwięku i
wskaźników wyświetlacza” na stronie 17).
Uwaga
Jeżeli nastrojona stacja nadawcza nie emituje
sygnałów serwisu RDS, zostaje wyświetlony
wskaźnik “NO NAME” (tylko dla XR-5890R/5880R).
Automatyczne, ponowne
strojenie tego samego
programu
— Funkcja Alternatywnych
częstotliwości (Alternative
Frequencies) (AF)
Funkcja alternatywnych częstotliwości (AF)
służy automatycznemu wybieraniu i
ponownemu dostrajaniu stacji nadawczych o
nasilniejszym sygnale nadawczym. Funkcja ta
umożliwia nieprzerwany odbiór tego samego
programu podczas długodystansowej jazdy,
bez potrzeby manualnego przestrajania stacji
nadawczej.
Częstotliwości zmieniają się automatycznie.
98,5 MHz
96,0 MHz
Stacja
102,5 MHz
1 Wybrać stację pasma FM (strona 7).
2 Kilkakrotnie naciskać przycisk (AF/TA)
do wyświetlenia wskaźnika “AF-ON”.
Sprzęt rozpoczyna poszukiwanie
alternatywnej stacji nadawczej o
silniejszym sygnale, na tej samej sieci.
Uwaga
Jeżeli w danym rejonie nie ma alternatywnej stacji i
nie ma potrzeby poszukiwania jej, proszę wyłączyć
funkcję AF przez naciskanie przycisku
wyświetlenia wskaźnika “AF TA-OFF”.
(AF/TA)
do
10
Page 33

Znmienianie wyświetlonych
wskaźników
Każdorazowe naciśnięcie przycisku (AF/TA),
następująco zmienia kolejność wyświetlanych
wskaźników:
” TA-ON ” AF TA-ON*
AF-ON “ AF TA-OFF “
Proszę nacisnąć ten przycisk aby włączyć funkcje
*
AF i TA.
Funckja lokalnego połączenia (tylko
dla Wielkiej Brytanii)
Funkcja lokalnego połączenia umożliwia
wybranie innych lokalnych stacji nadawczych
danego rejonu, niekoniecznie zakodowanych
w pamięci sprzętu.
1 Nacisnąć przycisk numeryczny, pod
którym zapisano lokalną stację
nadawczą.
Uwagi
•
Miganie wskaźnika “NO AF” oraz nazwy stacji
radiowej na zmianę, informuje, że na tej sieci nie
udało się zlokalizować alternatywnej stacji nadawczej.
•
Jeżeli po wybraniu stacji nadawczej funkcją AF,
nazwa stacji miga, oznacza to, że nie ma dostępu
do alternatywnej częstotliwości. W trakcie migania
nazwy stacji, proszę (w przeciągu ośmiu sekund),
przesunąć kontrolkę (SEEK/AMS) w górę lub w dół.
Sprzęt rozpoczyna poszukiwanie alternatywnej
częstotliwości o tych samych danych
identyfikacyjnych PI (Identyfikacja Programu)
(ukazuje się wskaźnik “PI SEEK” a dźwięk zostaje
wyłączony). Wskaźnik “NO PI”ukazuje się jeżeli nie
udało się zlokalizować innej częstotliwości, a sprzęt
powraca do poprzednio wybranej częstotliwości.
Odbiór programu regionalnego
Funkcja “REG-ON” (regionalny uaktywniony)
umożliwia stały odbiór wybranego programu
regionalnego, bez potrzeby przełączania na
inną stację regionalną. (Zakładając, że funkcja
AF została uprzednio uaktywniona). Sprzęt
został fabrycznie nastawiony na funkcję
“REG-ON”, aby wyłączyć funkcję, proszę
wykonać następujące operacje.
1 Podczas odbioru audycji radiowych,
nacisnąć (SHIFT), następnie kilkakrotnie
(3) (PLAY MODE) do wyświetlenia
wskaźnika “REG”.
2 Kilkakrotnie naciskać (4) (n), do
wyświetlenia wskaźnika “REG-OFF”.
2 W przeciągu pięciu sekund ponownie
nacisnąć przycisk numeryczny lokalnej
stacji nadawczej.
3 Proszę powtarzać wyżej opisane
operacje do momentu uzyskania odbioru
wybranej, lokalnej stacji nadawczej.
3 Proszę nacisnąć (SHIFT).
Wybranie pozycji “REG-OFF” może
spowodować przełączenie na inną
regionalną stację nadawczą tej samej sieci.
Aby powrócić do pozycji auktywnienia
nastawu stacji regionalnej, proszę w etapie 2,
powyżej, wybrać pozycję “REG-ON”.
Uwaga
Wyżej opisana funkcja nie działa w Wielkiej Brytanii i
w kilku innych rejonach.
11
Page 34

Odbiór migawek o ruchu
drogowym
Dane funkcji Migawek o ruchu Drogowym (TA
= Traffic Announcement) oraz Programu
Informacji Drogowych (TP = Traffic
Programme), zezwalają na automatyczne
dostrojenie stacji pasma FM transmitującej
migawki o ruchu drogowym, podczas odbioru
programów z innych źródeł.
Nastawianie poziomu głośności dla
migawek o ruchu drogowym
Poziom głośności dla transmisji migawek o
ruchu drogowym można uprzednio
wyregulować, zapewniając dobry odbiór
informacji. W momencie rozpoczęcia
transmisji, nastawiony poziom głośności
zostanie automatycznie doregulowany.
1 Proszę wybrać odpowiedni poziom
głośności.
Kilkakrotnie naciskać przycisk (AF/TA)
do wyświetlenia wskaźnika “TA-ON” lub
“AF TA-ON”.
Sprzęt rozpoczyna poszukiwanie stacji
nadawczych transmitujących informacje o
ruchu drogowym. Po zlokalizowaniu
odpowiedniej stacji nadawczej, ukazuje się
wskaźnik “TP”.
W momencie rozpoczęcia transmisji
migawek o ruchu drogowym, wskaźnik
“TA” miga do zakończenia transmisji.
Wskazówka
Jeżeli transmisja migawek o ruchu drogowym
rozpocznie się podczas odbioru programu z innego
źródła, sprzęt automatycznie przełączy na migawki o
ruchu drogowym i po zakończeniu transmisji powróci
do uprzednio wybranego źródła odbioru.
Uwagi
•
Jeżeli odbierana stacji nadawcza nie transmituje
migawek o ruchu drogowym, przez pięć sekund
miga wskaźnik “NO TP”. Następnie, sprzęt
rozpocznie poszukiwanie odpowiedniej stacji
nadawczej, oferującej ten serwis.
•
Jednoczesne wyświetlenie wskaźnika “EON” wraz
ze wskaźnikiem “TP”, informuje, że aktualnie
odbierana stacja nadawcza korzysta z transmisji
migawek o ruchu drogowym, oferowanym przez
inne stacje tej samej sieci.
Wyłączanie funkcji aktualnych
migawek o ruchu drogowym
Nacisnąć (AF/TA) lub (SOURCE).
Aby wyłączyć wszystkie transmisje
migawek o ruchu drogowym, proszę
wyłączyć funkcję przez naciskanie
przycisku (AF/TA) do wyświetlenia
wskaźnika “AF TA-OFF”.
2 Przez dwie sekundy naciskać przycisk
(AF/TA).
Ukazuje się wskaźnik “TA” i nastaw zostaje
zapisany w pamięci sprzętu.
Odbiór ogłoszeń alarmowych
Transmisja ogłoszeń alarmowych podczas
odbioru programu radiowego, automatycznie
przełącza sprzęt na odbiór ogłoszenia
alarmowego. Podczas odbioru programu z
innych źródeł, ogłoszenia alarmowe można
odebrać wyłącznie po uprzednim nastawieniu
funkcji AF lub TA na pozycję “on”. Sprzęt
wówczas automatycznie przełączy się na
odbiór ogłoszeń alarmowych, bez względu na
aktualnie odbierane źródło programów.
Kodowanie stacji
nadawczych oferujących
serwis RDS o sygnałach
AF oraz TA
Zapisanie stacji serwisu RDS, koduje
jednocześnie rodzaj informacji oraz
częstotliowść każdej z odpowiednich stacji,
bez konieczności każdorazowego włączania
funkcji AF lub TA po dostrojeniu wybranej
stacji nadawczej. Dla każdej, indywidualnie
zakodowanej stacji nadawczej, można wybrać
odrębne nastawy (AF, TA, lub oba) lub też
identyczne nastawy dla wszystkich
zapisanych w pamięci stacji nadawczych.
12
Page 35

Kodowanie tego samego nastawu dla
wszystkich, zapisanych w pamięci
stacji nadawczych
1 Wybrać stację pasma FM (strona 7).
2 Proszę kilkakrotnie nacisnąć przycisk
(AF/TA) i wybrać nastaw “AF-ON”, “TAON” lub “AF TA-ON” (dla funkcji AF oraz
TA).
Zaznacza się, że wybranie pozycji “AF TAOFF” koduje zarówno stacje RDS jak
również stacje nie oferujące serwisu RDS.
3 Proszę kilkakrotnie naciskać (SHIFT),
następnie (3) (PLAY MODE) do
wyświetlenia wskaźnika “B.T.M”.
4 Naciskać (4) (n) do ukazania się
migającego wskaźnika “B.T.M”.
5 Nacisnąć (SHIFT).
Kodowanie różnych nastawów dla
każdej, zapisanej w pamięci stacji
nadawczej
1 Wybrać pasmo FM i dostroić wybraną
stację nadawczą.
2 Proszę kilkakrotnie nacisnąć przycisk
(AF/TA) i wybrać pozycję “AF-ON”, “TAON” lub “AF TA-ON” (dla funkcji AF oraz
TA).
3 Naciskać odpowiedni przycisk
numeryczny do wyświetlenia wskaźnika
“MEM”.
Powtórzyć operacje od etapu 1-go aby
zakodować dalsze stacje nadawcze.
Wskazówka
Aby zmienić zakodowany nastaw AF oraz/lub TA po
dostrojeniu zakodowanej w pamięci sprzętu stacji
nadawczej, należy włączyć lub wyłączyć funkcję AF
lub TA.
Zlokalizowanie stacji
według rodzaju
transmitowanego
programu
Poszukiwaną stację nadawczą można
zlokalizować przez wybranie rodzaju programu
z poniżej podanego spisu.
Rodzaj programu Wskaźnik
Wiadomości NEWS
Wydarzenia aktualne AFFAIRS
Informacje INFO
Sport SPORT
Edukacja EDUCATE
Dramaturgia DRAMA
Kultura CULTURE
Nauka SCIENCE
Różne VARIED
Muzyka popularna POP M
Muzyka Rock ROCK M
Muzyka łatwa EASY M
Lekka muzyka klasyczna LIGHT M
Muzyka klasyczna CLASSICS
Inne rodzaje muzyki OTHER M
Pogoda WEATHER
Finanse FINANCE
Programy dla dzieci CHILDREN
Sprawy społeczne SOCIAL A
Religia RELIGION
Programy z telefonicznym PHONE IN
udziałem słuchaczy
Podróże TRAVEL
Odpoczynek LEISURE
Muzyka jazzowa JAZZ
Muzyka typu “Country” COUNTRY
Muzyka narodowa NATION M
Stare szlagiery OLDIES
Muzyka ludowa FOLK M
Programy dokumentalne DOCUMENT
Wyżej nie NONE
wyspecyfikowane
Uwaga
W krajach, gdzie dane PTY (Programme Type
selection = wybór rodzaju programu) są niedostępne,
nie można korzystać z tej funkcji.
13
Page 36

1 Podczas odbioru transmisji na paśmie
FM, proszę naciskać przycisk (PTY) do
wyświetlenia wskaźnika “PTY”.
Nazwa rodzaju programu zostanie
wyświetlona, jeżeli stacja nadawcza
transmituje dane PTY. Wskaźnik “- - - - -”
ukazuje się jeżeli odbierana stacja
nadawcza nie jest stacją oferującą RDS lub
jeżeli sygnał danych RDS nie został
odebrany.
2 Proszę kilkakrotnie nacisnąć przycisk
(PTY) do ukazania się nazwy rodzaju
programu.
Rodzaj programu zostaje wyświetlony w
wyżej podanej kolejności. Nie można
wybrać nastawu “NONE” (nie
wyspecyfikowany), aby rozpocząć
poszukiwania odpowiedniej stacji.
3 Przesunąć kontrolkę SEEK/AMS w górę
lub w dół.
Sprzęt rozpoczyna poszukiwanie stacji
nadawczej, transmitującej wybrany rodzaj
programu. Po zlokalizowaniu programu,
nazwa rodzaju zostaje przez pięć sekund
ponownie wyświetlona.
Jeżeli typu poszukiwanego programu nie
uda się zlokalizować, przez pięć sekund
wyświetlane są na zmianę wskaźniki “NO” i
typ programu. Następnie przywrócony
zostaje odbiór poprzednio nastrojonej stacji
nadawczej.
Automatyczne nastawianie zegara
Emitowane przez serwis RDS dane funkcji CT
(Czas Zegar), automatycznie nastawiają zegar
sprzętu.
1 Podczas odbioru adudycji radiowej,
nacisnąć (SHIFT), następnie kilkakrotnie
(2) (SET UP) do wyświetlenia wskaźnika
“CT”.
2 Proszę kilkakrotnie naciskać przycisk
(4) (n) do wyświetlenia wskaźnika
“CT-ON”.
Zegar jest teraz nastawiony.
3 Proszę nacisnąć przycisk (SHIFT) aby
przywrócić normalny stan wyświetlacza.
Wyłączenie funkcji CT
W etapie 2, powyżej, wybrać nastaw
“CT-OFF”.
Uwagi
•
Nawet przy odbiorze stacji RDS, funkcja CT może
nie działać.
•
Godzina nastawiona w trybie CT może być
niedokładna w relacji do czasu rzeczywistego.
14
Page 37

Pozostałe funkcje
Pilot rotacyjny umożliwia również sterowanie
pracą opcjonalnego sprzętu.
Naklejanie etykietek na
pilot rotacyjny
Rotacyjny pilot zdalnego sterowania, działa
przez naciskanie oraz/lub przekręcanie
kontrolek.
SOUND
MODE
DSPL
Korzystanie z rotacyjnego pilota zdalnego sterowania
W zależności od przewidzianego miejsca
montażu pilota, proszę umieścić odpowiednie
etykietki, według ilustracji poniżej.
Przez naciskanie przycisków
(SOURCE oraz MODE przycisków)
(SOURCE)
(MODE)
Każdorazowe naciśnięcie przycisku
(SOURCE), w następujący sposób
zmienia wyświetlanie wskaźników źródła
odtwarzania:
TUNER ˜ TAPE
MODE
SOUND
DSPL
Naciskanie przycisku (MODE) zmienia
operacje w następującej kolejności;
• Taśma: kierunek odtwarzania
• Tuner: FM1 n FM2 n FM3 n MW n LW
Wskazówka
Jeżeli przełącznik POWER SELECT nastawiono na
B
pozycję
przycisku
, sprzęt można włączyć przez naciśnięcie
(SOURCE)
na pilocie rotacyjnym.
15
Page 38

Przez obracanie kontrolki
(kontrola funkcji SEEK/AMS)
Przekręcić i zwolnić kontrolkę aby:
• Zlokalizować początki tytułów na taśmie.
Obracać i przytrzymywać kontrolkę,
zwolnić aby w szybkim trybie przewinąć
taśmę. Naciśnięcie przycisku (MODE)
włącza odtwarzanie podczas szybkiego
przewijania taśmy.
• Automatycznie dostroić stacje
nadawcze. Przekręcać i przytrzymać
kontrolkę do zlokalizowania
poszukiwanej stacji.
Wciskać i przkręcać kontrolkę
(sterowanie funkcją PRESET/DISC)
Nacisnąć przycisk
(SOUND) aby
wyregulować poziom
głośności i menu
właściwości dźwięku.
Nacisnąć (DSPL) aby
zmienić wyświetlane
wskaźniki informacyjne.
Zmiana operatywnego kierunku
Kierunek operatywny kontrolek został
fabrycznie nastawiony, jak pokazano na
ilustracji poniżej.
Aby zwiększyć
Aby zredukować
Jeżeli pilot rotacyjny będzie montowany po
prawej stronie kolumny kierownicy, kierunek
operacyjny kontrolek można dla wygody
obsługującego zmienić.
Wcisnąć i przekręcić kontrolkę, aby:
Nastawić odbiór stacji nadawczych,
zakodowanych w pamięci pod przyciskami
numerycznymi.
Pozostałe operacje
Przekręcić kontrolkę VOL
aby wyregulować poziom
głośności.
Nacisnąć przycisk
(OFF) aby wyłączyć
sprzęt.
16
Nacisnąć (ATT)
aby stłumić
dźwięk.
OFF
Proszę przez dwie sekundy naciskać
przycisk (SOUND), jednocześnie
wciskając kontrolkę VOL.
Wskazówka
Zmienić można również kierunek operatywny niżej
wymienionych kontrolek (patrz “Zmienianie
wstępnych nastawów dźwięku i wskaźników
wyświetlacza” na stronie 17).
Page 39

Regulacja
charakterystyk dźwięku
Wyregulować można nastawy basów, tonów
wysokich, równowagi akustycznej, i funkcję
wyciszania.
Dla każdego źródła odtwarzania można
odrębnie zakodować nastawione poziomy
basów i tonów wysokich.
1 Przez kilkakrotne naciskanie przycisku
(SOUND), wybrać element do
wyregulowania.
VOL (głośność) n BAS (basy) n
TRE (tony wysokie) n BAL (równowaga
lewy-prawy) n FAD (przednie-tylne)
2 Wyregulować wybraną pozycję przez
przekręcanie pierścienia kontrolki.
Regulację przeprowadzić w przeciągu
trzech sekund od wybrania pozycji. (Po
upływie trzech sekund, funkcja kontrolki
ponownie służy regulacji poziomu
głośności.)
Wyciszanie dźwięku
Zmienianie wstępnych
nastawów dźwięku i
wskaźników
wyświetlacza
Zakodować można następujące pozycje:
•CLOCK - zegar (strona 5).
•CT (Clock Time = Zegar Czas)* (strona 14).
•AMBER/GREEN – aby zmienić kolor
luminacji na pomarańczowy lub zielony.
•BEEP – aby włączyć lub wyłączyć
sygnalizację akustyczną.
•RM (Pilot Rotacyjny) – aby zmienić kierunek
operatywny pilota rotacyjnego.
— Wybrać pozycję “NORM” w celu
przywrócenia fabrycznych nastawów
pilota rotacyjnego.
— Wybrać pozycję “REV” jeżeli pilot
rotacyjny będzie montowany na prawo od
kolumny kierownicy.
•M.DSPL – włączenie lub wyłączenie
ruchomego ekranopisu.
1 Proszę nacisnąć (SHIFT).
2 Kilkakrotnie nacisnąć (2) (SET UP) do
wyświetlenia wskaźnika wybranej
pozycji.
Na opcjonalnym pilocie rotacyjnym
nacisnąć przycisk (ATT).
Przez moment miga wskaźnik “ATT-ON”.
Aby przywrócić poprzedni poziom głośności,
ponownie nacisnąć przycisk (ATT).
Wskazówka
Sprzęt automatycznie wycisza dźwięk w momencie
zarejestrowania rozmowy telefonicznej (funkcja
Telephone-ATT) (tylko dla XR-5890R/4890).
Każdorazowe naciśnięcie przycisku (2)
(SET UP) w następujący sposób zmienia
kolejność wyświetlanych wskaźników:
CLOCK n CT* n AMBER/GREEN n BEEP
n RM n M.DSPL
Tylko dla XR-5890R/5880R.
*
Uwaga
Wyświetlony wskaźnik zależy od aktualnie
eksploatowanego źródła dźwięku.
3 Nacisnąć przycisk (4) (n) w celu
wybrania właściwego nastawu (na
przykład: ON (wł.) lub OFF (wył)).
4 Nacisnąć (SHIFT).
Po zakończeniu nastawiania trybu pracy,
zostają przywrócone wskaźniki normalnego
trybu odtwarzania.
Uwaga
Jeżeli zostanie wyświetlony wskaźnik “SFT”,
(SHIFT)
nacisnąć
pracy.
aby zakończyć nastawianie trybu
17
Page 40

Wspomaganie tonów
niskich Funkcja — D-bass
Użytkownik ma możliwość korzystania z
czystego i wzmocnionego dźwięku basów.
Funkcja D-bass wspomaga sygnały o niskiej
częstotliwości efektywniej niż konwencjonalne
metody wspomagania basów.
Wyraźniejszy odbiór tonów niskich przy
normalnym poziomie głośności dźwięków
wokalnych. Kontrolka D-BASS ułatwia
uwydatnianie i regulację tonów niskich.
D-BASS 3
D-BASS 2
Poziom
0dB
Regulacja korektora graficznego
tonów niskich
Proszę przekręcić kontrolkę D-BASS
aby wyrównać poziom tonów niskich (1,
2, lub 3).
Wskaźnik “D-BASS” zostaje wyświetlony.
Aby anulować, przestawić kontrolkę na
pozycję OFF.
D-BASS 1
Częstotliwość (Hz)
Informacje
dodatkowe
Środki Ostrożności
•Jeżeli pojazd był zaparkowany w
nasłonecznionym miejscu, co mogło
spowodować znaczny wzrost temperatury w
jego wnętrzu, należy przed rozpoczęciem
użytkowania, odczekać by sprzęt uległ
schłodzeniu.
•W przypadku gdy do sprzętu nie dochodzi
zasilanie, należy przede wszystkim
sprawdzić łącza. Jeżeli są one prawidłowo
podłączone, proszę sprawdzić bezpiecznik.
•W przypadku braku dźwięku z głośników w
systemie 2-głośnikowym, proszę ustawić
kontrolkę funkcji “fader” (zanik) w pozycji
środkowej.
•Sprzęt jest wyposażony we własny
wzmacniacz mocy, co może spowodować
nagrzanie się kasety, odtwarzanej przez
dłuższy czas. Ten objaw nie jest sygnałem
defektu sprzętu.
Z ewentualnymi pytaniami lub niejasnościami
związanymi z użytkowaniem zakupionego
sprzętu, które nie zostały omówione w
instrukcji obsługi, należy zwrócić się do
fachowców najbliższego punktu sprzedaży
produktów firmy Sony.
Uwaga
Jeżeli basy zostaną znieksztalcone, proszę
wyregulować galką D-BASS lub przyciskiem
“volume” (poziom glośności).
18
Aby utrzymać wysoką jakość
odtwarzanego dźwięku
Jeżeli pojazd jest wyposażony w umieszczone
w pobliżu sprzętu obsady do przechowywania
puszek z napojami, proszę uważać by na
sprzęt nie wylać soków lub innych napoji.
Większość tego rodzaju napoji zawiera cukier,
którego resztki mogą spowodować
zanieczyszczenie kaset i tym sposobem
głowic odtwarzających, redukując jakość
dźwięku lub powodując jego całkowity zanik.
Zestawy czyszczące głowice odtwarzające nie
są w stanie oczyścić lepkich zanieczyszczeń.
Page 41

Uwagi dotyczące Kaset
Środki ostrożności dotyczące kaset
•Nie dotykać powierzchni taśmy, gdyż brud
lub kurz mogą zanieczyścić głowice
odtwarzające.
•Kasety należy przechowywać z dala od
sprzętu wyposażonego w magnesy, takiego
jak np. głośniki lub wzmacniacze mocy, gdyż
mogłoby to spowodować wymazanie
nagrania lub zniekształcenie dźwięku.
•Nie poddawać kaset bezpośredniemu
działaniu słońca, bardzo niskich temperatur
lub wilgoci.
•Rozciągnięte taśmy mogą zostać wciągnięte
przez mechanizm odtwarzacza. Przed
wsunięciem kasety, proszę przy pomocy
ołówka lub innego, podobnego przedmiotu,
przekręcić rolkę aby zlikwidować luz taśmy.
Luz taśmy
•Zniekształcona kaseta i odstające etykiety
mogą spowodować komplikacje przy
wsuwaniu i wysuwaniu kaset. Proszę usunąć
lub wymienić luźne etykietki.
Konserwacja
Wymiana bezpiecznika
Przed wymianą bezpiecznika, należy
sprawdzić czy ilość amperów odpowiada
ilości podanej na oryginalnym bezpieczniku.
Jeżeli bezpiecznik przepalił się, należy
sprawdzić podłączenie zasilania i wymienić
bezpiecznik. Jeżeli bezpiecznik ponownie
przepali się, może być to sygnałem
wewnętrznego defektu sprzętu. W takim
wypadku, proszę skonsultować się z
najbliższym punktem obsługi firmy Sony.
XR-5890R/5880R:
Bezpiecznik
(10 A)
XR-4890/4880:
Bezpiecznik
(10 A)
•Podczas odtwarzania kasety może nastąpić
zniekształcenie dźwięku. Głowice
magnetofonowe nałeży oczyszczać po około
50 godzinach pracy.
Kasety o dłuższym niż 90 minut czasie
odtwarzania
Nie jest zalecane korzystanie z kaset o
dłuższym niż 90 minut czasie odtwarzania, z
wyjątkiem odtwarzania w trybie ciągłym.
Taśmy takich kaset są bardzo cienkie i łatwiej
rozciągają się. Częste odtwarzanie i
zatrzymywanie może spowodować
wciągnięcie taśmy przez mechanizm
magnetofonu.
Ostrzeżenie
Nie należy nigdy korzystać z bezpiecznika o
wyższej, od podanej na dostarczonym ze
sprzętem bezpieczniku, wartości znamionowej
amperów, gdyż mógłby on spowodować
uszkodzenie sprzętu.
19
Page 42

Oczyszczanie łączy
Sprzęt może nie działać prawidłowo jeżeli
łącza pomiędzy panelem a głównym
korpusem są zanieczyszczone. Aby temu
zapobiec, należy otworzyć przedni panel przez
lekkie naciśnięcie w miejscu oznaczonym
(RELEASE), zdjąć panel i wyczyścić łącza
wacikiem, lekko zwilżonym alkoholem. Nie
należy wywierać nacisku. W przeciwnym
wypadku można uszkodzić łącza.
Wymontowanie sprzętu
1
Klucz zwalniający
(dostarczony)
2
Główny korpus sprzętu
Wewnętrzna powierzchnia
przedniego panelu
Uwagi
•
Z uwagi na bezpieczeństwo, przed rozpoczęciem
oczyszczania złączy, należy wyłączyć silnik i wyjąć
kluczyk ze stacyjki.
•
Złączy nie dotykać bezpośrednio gołą ręką lub
przedmiotami metalowymi.
3
4
20
Page 43

Dane techniczne
Magnetofon
Ścieżka taśmy 4-ścieżkowy 2-kanałowy
Kołysanie i drżenie dźwięku
Odpowiedź częstotliwościowa
Odstęp psofometryczny
stereo
0,08 % (WRMS)
30 – 18.000 Hz
Rodzaje kaset
TYPE II, IV* 61 dB
TYPE I 58 dB
* Tylko dla XR-5890R/
4890
Tuner
FM
Zakres strojenia 87.5 – 108.0 MHz
Gniazdko anteny Łącze anteny zewnętrznej
Częstotliwość pośrednia 10.7 MHz
Czułość używalna 9 dBf
Wyborczość 75 dB przy 400 kHz
Odstęp psofometryczny 65 dB (stereo),
Harmoniczne zniekształcenie przy 1 kHz
Rozdzielczość 35 dB at 1 kHz
Odpowiedź częstotliwościowa
MW/LW
Zakres strojenia MW: 531 – 1.602 kHz
Gniazdko anteny Łącze anteny zewnętrznej
Częstotliwość pośrednia 10,7 MHz/450 kHz
Czułość MW: 30 µ V
68 dB (mono)
0,7 % (stereo),
0,4 % (mono)
30 – 15.000 Hz
LW: 153 – 281 kHz
LW: 50 µ V
Ogólne
Wyjścia Przewód sterowania
Regulacje barwy dźwięku Bass ±8 dB at 100 Hz
Zapotrzebowanie mocy Akumulator 12 V DC
Wymiary Około 188 × 58 × 181 mm
Wymiary montażowe Około 182 × 53 × 164 mm
Waga Około 1,2 kg
Dostarczony osprzęt Elementy instalacyjne i
Osprzęt opcjonalny Pilot rotacyjny RM-X4S
Wygląd zewnętrzny oraz dane techniczne, mogłą
ulec zmianie bez uprzedzenia.
przekaźnikiem
automatycznej anteny
Przewód sterowania
telefonicznego ATT (Tylko
dla XR-5890R/4890)
Wysokie ±8 dB przy
10 kHz
(uziemienie ujemne)
(szer./wys./gł.)
(szer./wys./gł.)
łączeniowe (1 zestaw)
Etui na przedni panel (1)
Wzmacniacz
Wyjścia Wyjścia głośnikowe
Impedancja głośników 4 – 8 ohmów
Maksymalna moc na wyjściu
(złączniki szczelne)
35 W × 4 (przy 4 ohmach)
21
Page 44

Usuwanie usterek
Niżej podana lista kontrolna służy jako pomoc w usuwaniu ewentualnych błędów, które mogą
wystąpić podczas eksploatacji sprzętu.
Przed skorzystaniem z listy kontrolnej, zaleca się sprawdzenie podłączeń i czynności operacyjnych.
Ogólne
Usterka
Brak dźwięku.
Dane zaprogramowane w
pamięci sprzętu, zostały
wymazane.
Brak wskaźników na
wyświetlaczu.
Odtwarzanie taśmy
Usterka
Dźwięk ulega zniekształceniu.
Funkcja AMS nie działa
prawidłowo.
Przyczyna/Sposób usunięcia usterki
• Anulować funkcję ATT.
• Przy dwu-głośnikowych systemach, ustawić kontrolkę zaniku
w pozycji środkowej.
• Pierścień regulacyjny regulujący poziom głośności przekręcać
w kierunku przeciwnym do ruchu wskazówek zegara.
• Odłączony przewód zasilania lub akumulator.
• Naciśnięto przycisk zerowania.
n Ponownie zakodować w pamięci sprzętu.
Zdjąć przedni panel i oczyścić złącza. Szczegóły, patrz
“Oczyszczanie złączy” (strona 20).
Przyczyna/Sposób usunięcia usterki
Zanieczyszczona głowica taśmy.
n Oczyścić głowicę, dostępną w handlu kasetą czyszczącą
na sucho.
• Szmery w przerwach między tytułami.
• Przerwa między tytułami jest za krótka (mniej niż cztery
sekundy).
• Kontrolka SEEK/AMS została przesunięta ku górze
bezpośrednio przed odtworzeniem następnych tytułów.
• Kontrolka SEEK/AMS została przesunięta w dół bezpośrednio
po rozpoczęciu odtwarzania tytułu.
• Długa przerwa lub część nagrania o niskiej częstotliwości lub
bardzo niskim poziomie dźwięku, jest traktowana przez
sprzęt jako przerwa w nagraniu.
Odbiór audycji radiowych
Usterka
Zaprogramowane strojenie nie
działa.
Automatyczne strojenie nie
funkcjonuje.
Wskaźnik “ST” miga.
22
Przyczyna/Sposób usunięcia usterki
• W pamięci zakodować właściwą częstotliwość.
• Sygnał transmitowanej audycji jest za słaby.
Sygnał emitowanej audycji jest za słaby.
n Proszę dostroić manualnie.
• Dokładnie dostroić częstotliwość.
• Sygnał transmitowanej audycji jest za słaby.
n Nastawić na tryb MONO (strona 9).
Page 45

Funkcje RDS (tylko dla XR-5890R/5880R)
Usterka
Tryb poszukiwania SEEK
włącza się po paru sekundach
słuchania.
Brak migawek o ruchu
drogowym.
PTY wyświetla wskaźnik
“NONE”.
Jeżeli wyżej podane wskazówki nie pomogą w usunięciu usterki, należy skonsultować się z
najbliższym punktem obsługi lub sprzedaży produktów firmy Sony.
Przyczyna/Sposób usunięcia usterki
Stacja nie emituje serwisu TP lub emitowany sygnał jest słaby.
n Naciskać przycisk (AF/TA) do wyświetlenia wskaźnika
“AF TA-OFF”.
• Uaktywnić funkcję “TA”.
• Stacja, wbrew wskaźnikowi TP nie transmituje migawek o
ruchu drogowym.
n Proszę dostroić inną stację nadawczą.
Stacja nie wysyła sygnałów indetyfikujących rodzaje
programów.
23
Page 46

Vítejte! Obsah
Děkujeme vám, že jste se rozhodli pro koupi
autorádia s magnetofonem Sony. Tento
přístroj je vybaven celou řadou funkcí a
můžete na něj zapojit také přídavný dálkový
ovladač.
Popis tlačítek .................................................. 3
Uvedení do provozu
Vynulování přístroje ........................................ 4
Odstranění předního panelu ........................... 4
Nastavení hodin ..............................................5
Přehrávač kazet
Poslech pásku ................................................ 6
Různé režimy při přehrávání pásku ................ 7
Rádio
Automatické ukládání stanic do paměti
— Best Tuning Memory
(BTM - pamě» ladění) ................................. 7
Ukládání pouze požadovaných stanic ............8
Vyvolávání stanic, uložených do paměti ......... 8
RDS (pouze XR-5890R/5880R)
Přehled funkcí RDS ......................................... 9
Znázornění jména stanice ...............................9
Automatické přelaïování jedné stanice
— Alternative Frequencies
(AF - alternativní frekvence) ..................... 10
Poslech dopravního hlášení .......................... 12
Přednastavení stanic RDS s údaji AF a TA ...12
Vyhledávání stanice podle druhu
programu ................................................. 13
Automatické nastavení hodin ....................... 14
Další funkce
Nalepení nálepky na otočný dálkový
ovladač ..................................................... 15
Použití otočného dálkového ovladače .......... 15
Nastavení zabarvení zvuku ........................... 17
Ztlumení zvuku.............................................. 17
Změna nastavení zvuku a displeje ................17
Zvýraznění basů
— D-bass .................................................18
Dodatečné informace
Bezpečnostní opatření ..................................18
Údržba .......................................................... 19
Demontáž přístroje ....................................... 20
Technické údaje ............................................ 21
Odstranění drobných závad ......................... 22
2
Page 47

Popis tlačítek
MODE
SEEK / AMS
SOURCE
SOUND
6
D-BASS
AF/TAPTYDSPL
1
2
OFF
3
+
–
PRST
RELEASE
SHIFT SET UP
OFF
PLAY MODE
Na uvedených stránkách naleznete další podrobné informace.
1 Spínač SEEK/AMS (vyhledávání/
Automatic Music Sensor - automatický
hudební senzor/manuální vyhledávání)
6, 8, 11, 14
2 Tlačítko MODE (*)
Během přehrávání pásku:
změna směru přehrávání 6
Během příjmu rozhlasového vysílání:
volba pásma - BAND 7, 8
3 Tlačítko SOURCE (TAPE/TUNER) - zdroj
6, 7, 8, 12
4 Nastavení (tlačítko hlasitost/basy/
výšky/vlevo-vpravo/zadní-přední) 5, 17
5 Tlačítko SOUND 17
6 Displej
7 Tlačítko DSPL (změna režimu displeje)
6, 9, 10
8 Tlačítko 6 (vysunutí) 6
9 Tlačítko PTY*
!º Tlačítko PRST
Během příjmu rozhlasového vysílání:
Volba stanic uložených do paměti 8
!¡ Tlačítko AF/TA* 10, 11, 12, 13
!™ Tlačítko RELEASE (uvolnění předního
panelu) 4, 20
!£ Tlačítko pro vynulování (umístěné na
přední straně přístroje za předním
panelem) 4
!¢ Tlačítko OFF 4, 6
!∞ Tlačítko SHIFT
PLAY MODE 7, 8, 11, 13
SET UP 5, 14, 17
!§ Spínač POWER SELECT
(umístění na spodní straně přístroje)
Viz “spínač POWER SELECT” v návodu k
instalaci/Zapojení.
!¶ Číselná tlačítka 8, 11, 13
!• Knoflík D-BASS 18
Program RDS 14
*
Pouze XR-5890R/5880R
564321
XR-5890R/5880R
3
Page 48

Uvedení do provozu
Vynulování přístroje
Než začnete s tímto přístrojem poprvé
pracovat nebo po každé výměně autobaterie
musíte přístroj vynulovat.
Sejměte přední panel a stiskněte tlačítko pro
vynulování špičatým nástrojem jako např.
kuličkovým perem.
Tlačítko Reset - vynulování
Poznámka
Stisknutím tlačítka pro vynulování dojde k vymazání
času na hodinách a k vymazání funkcí, uložených do
paměti přístroje.
Odstranění předního
panelu
Z tohoto přístroje můžete sejmout přední
panel, abyste ho tak zajistili proti krádeži.
1 Stiskněte (OFF).
Nasazení předního panelu
Nasaïte stranu a předního panelu na stranu
b na přístroji podle ilustrace a zatlačte na
levou stranu, dokud nezaklapne.
a
b
Poznámky
•
Dbejte na to, abyste nepohybovali předním
panelem nahoru a dolů.
•
Při nasazování netlačte přední panel příliš silně na
přístroj.
•
Netlačte příliš silně ani nenarážejte ničím na displej
na předním panelu.
•
Nevystavujte přední panel přímému slunečnímu
záření, zdrojům tepla jako např. vedení teplého
vzduchu, ani ho nenechávejte ve vlhkém prostředí.
Nikdy ho nenechávejte na přístrojové desce apod.
auta zaparkovaného na slunci, kdy by mohla
teplota uvnitř auta nepřiměřeně stoupnout.
Bezpečnostní upozornění
Jestliže vypnete klíček od zapalování, aniž
byste odstranili přední panel, začne na několik
vteřin pípat bezpečnostní alarm (pouze jestliže
je spínač POWER SELECT - volba napětí
přepnut do polohy A).
2 Stiskněte (RELEASE), potom posuňte
přední panel lehce doleva a sejměte ho
směrem k sobě.
(RELEASE)
Poznámky
•
Dbejte na to, aby vám panel při snímání nevypadl z
ruky.
•
Jestliže uvolníte přední panel a přístroj přitom bude
stále zapnutý, dojde k automatickému vypnutí
přístroje, aby nedošlo k poškození reproduktorů.
•
Jestliže chcete nosit přední panel s sebou,
ukládejte ho vždy do příslušného pouzdra, které je
součástí příslušenství.
(OFF)
4
Page 49

Nastavení hodin
2 Stiskněte (SHIFT).
Hodiny mají 24-hodinový ukazatel.
Příklad: nastavení hodin na 10:08
1 Stiskněte tlačítko (SHIFT), potom
tiskněte opakovaně (2) (SET UP), dokud
se na displeji neobjeví “CLOCK”
(hodiny).
1 Stiskněte (4) (n).
Číslice pro hodinu začnou blikat.
2 Nastavte hodinu.
zpět
dopředu
3 Stiskněte (4) (n).
Číslice pro minuty začnou blikat.
Hodiny se rozejdou.
3 Stiskněte (SHIFT).
Jakmile je nastavení hodin ukončeno,
nastaví se na displeji normální režim
přehrávání.
Poznámka
Jestliže je spínač POWER SELECT na spodní straně
přístroje nastaven do polohy
přístroj a potom nastavte hodiny.
B
, zapněte napřed
4 Nastavte minuty.
zpět
dopředu
5
Page 50

Přehrávač kazet
Rychlé přetáčení pásku
Behem přehrávání posuňte spínač
SEEK/AMS nahoru nebo dolů a držte ho.
SEEK / AMS
Rychle dopředu
Poslech pásku
Vložte kazetu.
Přehrávání se spustí automaticky.
Jestliže je kazeta již vložená, tiskněte
opakovaně tlačítko (SOURCE), dokud se na
displeji neobjeví “FWD” nebo “REV”, abyste
spustili přehrávání.
Přehrávání horní strany kazety.
Přehrávání dolní strany kazety.
Tip
Chcete-li změnit směr přehrávání kazety, stiskněte
(MODE)
(*)
tlačítko
Funkce Tlačítko
Zastavení přehrávání (OFF)
Vysunutí kazety 6
.
Dozadu
Chcete-li během rychlého převíjení dopředu
nebo dozadu začít s poslechem, stiskněte
tlačítko (MODE) (*).
Vyhledávání určité skladby
— Automatic Music Sensor (AMS)
(automatický hudební senzor)
Během přehrávání posuňte spínač
SEEK/AMS nahoru nebo dolů a uvolněte
ho pro každou skladbu, kterou hccete
přeskočit.
Můžete najednou přeskočit až devět
skladeb.
Vyhledávání
následujících skladeb
Vyhledávání
předešlých skladeb
Poznámka
Funkce AMS nefunguje, jestliže:
—
jsou nenahrané úseky mezi skladbami kratší než
4 sekundy
—
jsou mezi skladbami nahrané šumy
—
jsou na kazetě dlouhé tiché pasáže.
SEEK / AMS
Změna položek na displeji
Při každém stisknutí tlačítka (DSPL), se budou
měnit položky následovně:
z Přehrávání pásku z Hodiny
Frekvence* Z
*
Když je aktivovaná jedna z následujícíh funkcí.
—
funkce ATA
—
funkce AF/TA (XR-5890R/5880R)
Po zadání požadované položky se displej po
několika sekundách automaticky nastaví do
režimu Motion Display - akční displej.
V režimu akčního displeje se budou výše
uvedené položky postupně měnit na dispeji.
Tip
Režim akčního displeje můžete vypnout. (Viz “Změna
nastavení zvuku a displeje” na straně 17).
6
Page 51

Různé režimy při
přehrávání pásku
Pásek můžete přehrávat různými režimy:
•REP (opakované přehrávání) opakování
aktuální skladby.
•METAL (Metal)* přehrávání pásků typu metal
nebo CrO2.
•BL SKP (Blank Skip-přeskakování prázdných
míst) přeskakování nenahraných úseků,
trvajících déle než osm sekund.
•ATA (Automatic Tuner Activation-
automatická aktivace tuneru) automatické
zapnutí rádia při rychlém převíjení pásku.
1 Během přehrávání stiskněte tlačítko
(SHIFT).
Na displeji se objeví “SHIFT-ON”.
Rádio
Automatické ukládání
stanic do paměti
— Best Tuning Memory
(BTM - pamě» ladění)
Tato funkce vybírá stanice s nejsilnějším
signálem a ukládá je do paměti v pořadí jejich
frekvencí. Můžete uložit do paměti až 6 stanic
pro každé pásmo (FM1, FM2, FM3, MW, a LW).
Bezpečnostní upozornění
Jestliže ladíte stanice během řízení, používejte
funkci automatického ladění, abyste předešli
případné nehodě.
2 Tiskněte opakovaně (3) (PLAY MODE),
dokud se neobjeví požadovaný režim
přehrávání.
Při každém stisknutí tlačítka (3) (PLAY
MODE), se bude položka měnit
následovně:
REP n METAL*n BL SKP n ATA
*
Pouze XR-5890R/4890
3 Stiskněte (4) (n), abyste zadali “ON.”
Režim přehrávání začíná.
4 Stiskněte (SHIFT).
Chcete-li se vrátit k režimu normálního
přehrávání zadejte “OFF” v kroku 3 výše.
Poznámka
Jestliže se na displeji objeví indikace “SFT”, stiskněte
(SHIFT)
, abyste ukončili nastavení režimu.
1 Tiskněte opakovaně (SOURCE), abyste
zadali přijímač.
Při každém stisknutí tlačítka (SOURCE), se
zdroje mění v následujícím pořadí:
TUNER ˜ TAPE
2 Tiskněte opakovaně (MODE), abyste
zadali pásmo.
Při každém stisknutí tlačítka (MODE), se
pásma mění v následujícím pořadí:
z FM1 z FM2 z FM3 z MW z LW
3 Stiskněte (SHIFT), potom tiskněte
opakovaně (3) (PLAY MODE), dokud se
na displeji neobjeví “B.T.M”.
4 Stiskněte (4) (n).
Tento přístroj ukládá stanice do paměti v
pořadí jejich frekvencí a přiřazuje je k
číselným tlačítkům.
Jakmile je ladění ukončeno, ozve se
zapípání.
5 Stiskněte (SHIFT).
Poznámky
•
Přístroj neuloží do paměti stanice s přiliš slabým
signálem. Jestliže lze naladit pouze několik stanic,
zůstanou u některých tlačítek přiřazené jejich
původní stanice.
•
Jestliže je na displeji znázorněné číslo stanice,
bude přístroj ukládat stanice do paměti počínajíce
od znázorněného čísla.
7
Page 52

Ukládání pouze
požadovaných stanic
Můžete uložit do paměti až 18 stanic na FM
(po 6-ti pro FM1, 2, a 3), až 6 stanic na MW SV a až 6 stanic na LW - DV v pořadí podle
vaší volby.
1 Tiskněte opakovaně (SOURCE), abyste
zadali přijímač.
2 Tiskněte opakovaně (MODE), abyste
zadali pásmo.
3 Posuňte spínač SEEK/AMS nahoru nebo
dolů, abyste naladili stanici, kterou
chcete uložit do paměti pod určitým
číselným tlačítkem.
4 Stiskněte a držte stisknuté požadované
číselné tlačítko ((1) až (6)), dokud se na
displeji neobjeví “MEM”.
Na displeji se objeví indiakce příslušného
číselného tlačítka.
Poznámka
Jestliže se pokusíte uložit na již obsazené tlačítko
další stanici, dojde k vymazání původně uložené
stanice.
Vyvolávání stanic,
uložených do paměti
1 Tiskněte opakovaně (SOURCE), abyste
zadali přijímač.
Jestliže nemůžete naladit
přednastavenou stanici
Posuňte a pus»te spínač SEEK/AMS
nahoru nebo dolů, abyste spustili ladění
stanic (automatické ladění).
Vyhledávání se zastaví, jakmile je stanice
naladěna. Posouvejte opakovaně spínač
SEEK/AMS nahoru nebo dolů, dokud
nenaladíte požadovanou stanici.
Poznámka
Jestliže se automatické ladění zastavuje příliš často,
(SHIFT)
stiskněte
(PLAY MODE), dokud se na displeji neobjeví
“LOCAL” (local seek mode - režim lokálního
vyhledávání). Potom stiskněte
“LOCAL-ON”. Stiskněte
Nyní budou vyhledávány pouze stanice s relativně
silným signálem.
Tip
Jestliže znáte frekvenci stanice, kterou chcete
poslouchat, posuňte spínač SEEK/AMS nahoru nebo
dolů a držte ho, dokud nenaladíte požadovanou
stanici (manuální ladění).
, potom tiskněte opakovaně
(4) (n
(SHIFT)
.
(3)
), abyste zadali
Jestliže je stereofonní příjem na FM
rušený — monofonní režim
1 Během poslechu rádia stiskněte (SHIFT),
potom tiskněte opakovaně (3) (PLAY
MODE), dokud se na displeji neobjeví
“MONO”.
2 Tiskněte opakovaně (4) (n), dokud se
na displeji neobjeví “MONO-ON”.
Kvalita zvuku se zlepší, zvuk však bude
monofonní (Indikace “ST” zmizí).
3 Stiskněte (SHIFT).
Chcete-li se vrátit k normálnímu režimu,
zadejte v kroku 2 výše “MONO-OFF” (vyp.).
2 Tiskněte opakovaně (MODE), abyste
zadali pásmo.
3 Stiskněte číselné tlačítko ((1) až (6)), ke
kterému je přiřazená požadovaná
stanice.
Tip
Stiskněte jednu ze stran
pořadí, ve kterém jsou stanice uloženy do paměti
(Preset Search Function - funkce vyhledávání
přednastavení).
(PRST)
, aby se znázornilo
8
Page 53

Změna položek na displeji
Při každém stisknutí tlačítka (DSPL), se
položky budou měnit následovně:
Frekvence (Jméno stanice)* ˜ Hodiny
*
Jestliže naladíte stanici FM, která vysílá údaje RDS,
objeví se na displeji jméno stanice
(pouze XR-5890R/5880R).
Po zadání požadované položky se displej po
několika sekundách automaticky nastaví do
režimu Motion Display - akční displej.
V režimu akčního displeje se budou výše
uvedené položky postupně měnit na dispeji.
Tip
Režim akčního displeje můžete vypnout. (Viz “Změna
nastavení zvuku a displeje” na straně 17).
RDS (pouze XR-5890R/5880R)
Přehled funkcí RDS
Radio Data System (RDS) je služba vysílacích
stanic, která umožňuje vysílat na pásmu FM
doprovodné digitální informace spolu s
běžnými signály rozhlasového vysílání. Vaše
stereofonní rádio vám nabízí celou řadu
služeb. Jen několik z nich: automatické
naladění stejného programu, poslech
dopravního hlášení, ladění stanic podle jejich
druhu.
Poznámky
•
V závislosti na zemi a oblasti nemusí být všechny
funkce RDS dostupné.
•
RDS nebude řádně fungovat, jestliže je signál příliš
slabý nebo jestliže naladěná stanice tyto signály
RDS nevysílá.
Znázornění jména
stanice
Na displeji se objeví jméno právě naladěné
stanice.
Nalaïte stanici FM (strana 7).
Jestliže naladíte stanici FM, která vysílá
údaje RDS, objeví se na displeji jméno
stanice.
Poznámka
Indikace “
*
” znamená, že je přijímána stanice RDS.
9
Page 54

Změna položek na displeji
Při každém stisknutí tlačítka (DSPL), se
položky budou měnit následovně:
Jméno stanice (Frekvence) ˜ Hodiny
Po zadání požadované položky se displej po
několika sekundách automaticky nastaví do
režimu Motion Display - akční displej.
V režimu akčního displeje se budou výše
uvedené položky postupně měnit na dispeji.
Tip
Režim akčního displeje můžete vypnout. (Viz “Změna
nastavení zvuku a displeje” na straně 17).
Poznámka
Na displeji se objeví “NO NAME” (žádné jméno),
jestliže naladěná stanice nevysílá údaje RDS (pouze
XR-5890R/5880R).
Automatické
přelaïování jedné
stanice
— Alternative Frequencies
(AF - alternativní frekvence)
Funkce alternativní frekvence (AF) automaticky
vybírá a přelaïuje stanici s nejsilnějším
signálem v síti. Při použití této funkce můžete
průběžně poslouchat stejný program i při
dalekých cestách, aniž byste museli dolaïovat
stanici manuálně.
Automatická změna frekvencí.
98,5 MHz
96,0 MHz
Stanice
102,5 MHz
1 Nalaïte stanici FM (strana 7).
2 Tiskněte opakovaně (AF/TA), dokud se
na displeji neobjeví “AF-ON”.
Přístroj začne vyhledávat alternativní stanici
se silnějším signálem ve stejné síti.
Poznámka
Jestliže ve vaší oblasti není žádná alternativní stanice
a jestliže nepotřebujete vyhledávat žádnou
alternativní stanici, vypněte funkci AF opakovaným
tisknutím tlačítka
neobjeví “AF TA-OFF”.
(AF/TA)
, dokud se na displeji
10
Page 55

Změna položek na displeji
Při každém stisknutí tlačítka (AF/TA), se
budou položky měnit následovně:
” TA-ON ” AF TA-ON*
AF-ON “ AF TA-OFF “
Obě funkce - AF a TA zapnuté.
*
Poznámky
•
Jestliže na displeji střídavě svítí “NO AF” a jméno
stanice, znamená to, že přístroj nemůže nalézt v síti
alternativní stanici.
•
Jestliže po zadání stanice za pomoci funkce AF
začne jméno stanice blikat, znamená to, že není
dostupná žádná alternativní stanice. Posuňte
spínač SEEK/AMS nahoru nebo dolů, dokud jméno
stanice bliká (do osmi sekund). Přístroj začne
vyhledávat další frekvenci se stejnou programovou
identifikací PI (Programme Identification) (na displeji
se objeví “PI SEEK” a zvuk se ztratí). Jestliže
přístroj nenalezne žádnou jinou frekvenci, na
displeji se objeví “NO PI” a přístroj se vrátí k
původně zadané frekvenci.
Poslech regionálního programu
Funkce “REG-ON” (regionální) na tomto
přístroji vám umožňuje ponechat naladěný
regionální program, aniž by došlo k přepínání
na jiné regionální stanice (Zapamatujte si, že
funkce AF musí zůstat zapnutá). V tomto
přístroji je tato funkce výrobcem nastavena na
“REG-ON”, jestliže ji však chcete vypnout,
postupujte podle následujícího popisu.
Funkce lokálního vyhledávání (pouze
ve Spojeném království)
Funkce lokálního vyhledávání vám umožňuje
ladit další lokální stanice ve vaší zemi, i když
tyto nejsou uložené do paměti.
1 Stiskněte číselné tlačítko, ke kterému je
lokální stanice přiřazena.
2 Během pěti sekund stiskněte opět
číselné tlačítko pro volbu lokální stanice.
3 Tento postup opakujte, dokud
nenaladíte požadovanou lokální stanici.
1 Během poslechu rádia stiskněte tlačítko
(SHIFT), potom tiskněte opakovaně (3)
(PLAY MODE), dokud se na displeji
neobjeví “REG”.
2 Tiskněte opakovaně (4) (n), dokud se
na displeji neobjeví “REG-OFF” (vyp.).
3 Stiskněte (SHIFT).
Zapamatujte si, že když bude tato funkce
vypnutá “REG-OFF”, může dojít k tomu, že
přístroj naladí jinou regionální stanici ve
stejné síti.
Chcete-li se vrátit opět k funkci lokálního
vyhledávání, zadejte v kroku 2 výše “REG-ON”
(zap.).
Poznámka
Tato funkce nefunguje ve Spojeném království a v
několika dalších zemích.
11
Page 56

Poslech dopravního
hlášení
Funkce dopravní hlášení (TA) a dopravní
programy (TP) vám umožní automatické ladění
stanice FM, která vysílá dopravní hlášení, i
když posloucháte jiné zdroje.
Tiskněte opakovaně (AF/TA), dokud se
na displeji neobjeví “TA-ON” nebo “AF
TA-ON”.
Přístroj začne vyhledávat stanice, vysílající
dopravní hlášení. Jakmile přístroj nalezne
stanici vysílající dopravní hlášení, rozsvítí se
na displeji “TP”.
Na začátku dopravního hlášení začne “TA”
blikat, po skončení dopravního hlášení se
blikání zastaví.
Tip
Jestliže dopravní hlášení začne v době, kdy budete
poslouchat jiný zdroj programu, přístroj se
automaticky přepne na toto hlášení a po jeho
skončení se vrátí k původnímu zdroji programu.
Poznámky
•
“NO TP” bude na displeji blikat po dobu pěti
sekund, jestliže že naladěná stanice dopravní
hlášení nevysílá. Potom bude přístroj pokračovat ve
vyhledávání stanice s dopravním hlášením.
•
Jestliže se na displeji objeví zároveň “EON” a “TP”,
přenáší naladěná stanice dopravní hlášení jiné
stanice ve stejné síti.
Zrušení aktuálního dopravního hlášení
Stiskněte (AF/TA) nebo (SOURCE).
Chcete-li zrušit všechna dopravní hlášení,
vypněte tuto funkci stisknutím (AF/TA),
dokud se na displeji neobjeví “AF TA-OFF”.
Nastavení hlasitosti dopravních
hlášení
Máte možnost nastavit předem úroveň
hlasitosti dopravních hlášení abyste tato
hlášení nepřeslechli. Na začátku dopravního
hlášení se hlasitost automaticky nastaví na
přednastavenou úroveň.
1 Zadejte požadovanou úroveň hlasitosti.
2 Stiskněte (AF/TA) na dvě sekundy.
Na displeji se objeví “TA” a nastavení je
uloženo do paměti.
Příjem nouzových hlášení
Jestliže je vysíláno nouzové hlášení a vy
posloucháte rádio, bude program automaticky
přepnut na toto hlášení. Jestliže posloucháte
jiný zdroj než rádio, uslyšíte nouzové hlášení
pouze tehdy, když budete mít zapnutou funkci
AF nebo TA. Přístroj se potom automaticky
přepne na toto hlášení, bez ohledu na to, co
budete v tu dobu právě poslouchat.
Přednastavení stanic
RDS s údaji AF a TA
Když uložíte do paměti stanice RDS, přístroj
uloží průvodní údaje pro stanici stejně tak jako
její frekvenci, takže nemusíte při každém
naladění předladěné stanice zapínat funkce AF
nebo TA. Pro jednotlivé předladěné funkce
můžete zadat různá nastavení (AF, TA, nebo
obě) nebo ale také stejné nastavení pro
všechny předladěné stanice.
12
Page 57

Stejné nastavení pro všechny
přednastavené stanice
1 Nalaïte stanici FM (strana 7).
Vyhledávání stanice
podle druhu programu
2 Tiskněte opakovaně (AF/TA), abyste
zadali buï “AF-ON,” “TA-ON” nebo “AF
TA-ON” (pro obě funkce AF a TA).
Zapamatujte si, že vypnutím funkce
dopravního hlášení - “AF TA-OFF” bude
toto nastavení uloženo u stanic RDS i u
stanic bez RDS.
3 Stiskněte (SHIFT), potom tiskněte
opakovaně (3) (PLAY MODE), dokud se
ne displeji neobjeví “B.T.M”.
4 Stiskněte (4) (n), dokud bude blikat
“B.T.M”.
5 Stiskněte (SHIFT).
Různá nastavení pro jednotlivé
přednastavené stanice
1 Zadejte pásmo FM a nalaïte
požadovanou stanici.
2 Tiskněte opakovaně (AF/TA), abyste
zadali buï “AF-ON,” “TA-ON” nebo “AF
TA-ON” (pro obě funkce AF a TA).
3 Stiskněte požadované číselné tlačítko a
držte ho, dokud se na displeji neobjeví
“MEM”.
Chcete-li nastavit jiné stanice, opakujte
postup od kroku 1.
Tip
Jestliže chcete po naladění stanice změnit nastavení
AF a/nebo TA, můžete tak učinit zapnutím/vypnutím
funkce AF nebo TA.
Požadovanou stanici můžete vyhledat
zadáním jednoho z druhů programů podle
tabulky níže.
Druh programů Displej
Zprávy NEWS
Aktuální události AFFAIRS
Informace INFO
Sport SPORT
Vzdělání EDUCATE
Divadlo DRAMA
Kultura CULTURE
Věda SCIENCE
Pestré prog. VARIED
Populární hudba POP M
Rocková hudba ROCK M
Oddechová hudba EASY M
Vážná hudba LIGHT M
Klasická hudba CLASSICS
Jiný druh hudby OTHER M
Počasí WEATHER
Finance FINANCE
Dětské programy CHILDREN
Sociální záležitosti SOCIAL A
Náboženství RELIGION
Telefonáty PHONE IN
Cestování TRAVEL
Volný čas LEISURE
Jazzová hudba JAZZ
Country COUNTRY
Lidová hudba NATION M
Oldies OLDIES
Folklórní hudba FOLK M
Dokumentární vys. DOCUMENT
Bez specifikace NONE
Poznámka
Tuto funkci nemůžete používat v některých zemích,
které nevysílají údaje PTY (Programme Type
selection - volba typu programu).
pokračování na další straně n
13
Page 58

1 Stiskněte (PTY) během poslechu na FM,
aby se na displeji objevilo “PTY”.
Automatické nastavení
hodin
Jestliže stanice vysílá údaje PTY, objeví se
na displeji označení druhu právě
poslouchaného programu. Jestliže stanice
nevysílá RDS nebo jestliže není možné
přijímat signály RDS, objeví se na displeji
“- - - - -”.
2 Tiskněte opakovaně (PTY), aby se
objevil požadovaný druh programu.
Druh programu se objeví v pořadí
uvedeném v předchozí tabulce.
Zapamatujte si, že pro vyhledávání
nemůžete zadat “NONE” (bez specifikace).
3 Posuňte spínač SEEK/AMS nahoru nebo
dolů.
Přístroj začne s vyhledváním stanice
vysílající zadaný druh programu. Jakmile je
program nalezen, objeví se na pět sekund
opět druh programu.
Jestliže přístroj zadaný druh programu
nenalezne, bude na displeji střídavě blikat
Jestliže přístroj nenalezne zadaný druh
programu, bude na displeji střídavě blikat
“NO” a druh programu po dobu pěti
sekund, přístroj se poté automaticky
přepne na přenos naposledy přijímané
stanice.
Údaje CT (Clock Time - hodiny) přenášené
společně s údaji RDS nastaví hodiny
automaticky.
1 Během poslechu rádia stiskněte tlačítko
(SHIFT), potom tiskněte opakovaně (2)
(SET UP), dokud se na displeji neobjeví
“CT”.
2 Tiskněte opakovaně (4) (n), dokud se
na displeji neobjeví “CT-ON”.
Hodiny jsou nastavené.
3 Stiskněte (SHIFT), abyste se vrátili k
normálnímu displeji.
Zrušení funkce CT
V kroku 2 výše zadejte “CT-OFF” (vyp.).
Poznámky
•
Může se stát, že funkce CT nebude fungovat i přes
příjem stanice RDS.
•
Může se stát, že čas nastavený funkcí CT nebude
přesný.
14
Page 59

Další funkce
Použití otočného
dálkového ovladače
Tento přístroj můžete také ovládat přídavným
otočným dálkovým ovladačem.
Nalepení nálepky na
otočný dálkový ovladač
Podle toho, kam otočný dálkový ovladač
umístíte, nalepte příslušnou nálepku podle
ilustrace níže.
SOUND
MODE
DSPL
DSPL
MODE
SOUND
Dálkový ovladač reaguje na stisknutí tlačítek
a/nebo otáčení knoflíků.
Tlačítka
(SOURCE - zdroj a MODE - režim)
(SOURCE)
(MODE)
Při každém stisknutí tlačítka (SOURCE),
se bude zdroj měnit následovně:
TUNER ˜ TAPE
Stisknutím
• Pásek: směr přehrávání
• Tuner: FM1 n FM2 n FM3 n MW n LW
Tip
Jestliže je spínač POWER SELECT nastaven do
polohy
(SOURCE)
(MODE)
se funkce mění následovně;
B
, můžete zapnout tento přístroj stisknutím
na otočném dálkovém ovladači.
15
Page 60

Otočný knoflík
(SEEK/AMS - vyhledávání)
Otáčejte knoflíkem a pus»te ho, jestliže
chcete:
• Vyhledávat začátky skladeb na pásku.
Otočte a držte knoflík, a uvolněte ho,
chcete-li rychle přetáčet pásek. Chcete-li
začít s přehráváním během rychlého
převíjení pásku, stiskněte (MODE).
• Automaticky ladit stanice. Otočte a držte
knoflík, abyste naladili konkrétní stanici.
Zatlačený knoflík, otáčení s ním
(funkce PRESET/DISC nastavení/disk)
Stiskněte (SOUND),
chcete-li nastavil
hlasitost a zvuk.
Stiskněte (DSPL), chcete-li
změnit položky na displeji.
Změna směru funkce
Směr funkcí knoflíku je výrobcem nastaven
podle ilustrace níže.
Zvyšování
Snižování
Jestliže jste nuceni upevnit dálkový ovladač na
pravé straně sloupku volantu, můžete směr
funkcí otočit.
Držte zatlačený knoflík a otáčejte jím,
jestliže chcete:
Poslouchat stanice přiřazené číselným
tlačítkům.
Další funkce
Otáčejte knoflíkem VOL, jestliže
chcete nastavit hlasitost.
16
Stiskněte (ATT),
chcete-li ztlumit
zvuk.
OFF
Stiskněte (OFF),
chcete-li přístroj
vypnout.
Stiskněte (SOUND) na dvě sekundy a
zatlačte přitom na knoflík VOL.
Tip
Směr funkcí těchto ovládacích prvků můžete také
změnit na přístroji (viz “Změna nastavení zvuku a
displeje” na straně 17).
Page 61

Nastavení zabarvení
zvuku
Změna nastavení zvuku
a displeje
Můžete nastavit basy, výšky, vyvážení vpravovlevo a vepředu-vzadu.
Úroveň basů a výšek můžete uložit nezávisle
pro každý zdroj.
1 Zadejte položku, kterou chcete nastavit,
opakovaným tisknutím tlačítka (SOUND).
VOL (hlasitost) n BAS (basy) n TRE
(výšky) n BAL (vlevo-vpravo) n FAD
(vepředu-vzadu)
2 Zadanou položku nastavte otáčením
knoflíku.
Položku nastavte do tří sekund po jejím
zadání. (Po třech sekundách bude knoflík
opět fungovat jako knoflík pro ovládání
hlasitosti.)
Ztlumení zvuku
Stiskněte (ATT) na přídavném dálkovém
ovladači.
“ATT-ON” se krátce rozsvítí.
Chcete-li nastavit zpět původní hlasitost,
stiskněte opět tlačítko (ATT).
Tip
Přístroj automaticky ztlumí hlasitost, když zazvoní
telefon (funkce Telefon ATT) (pouze XR-5890R/4890).
Následující položky mohou být nastaveny:
•CLOCK (hodiny) (strana 5).
•CT (Clock Time - čas na hodinách)* (strana
14).
•AMBER/GREEN – změna barvy osvětlení na
oranžovou nebo zelenou.
•BEEP – zapínání a vypínání pípání.
•RM (Rotary Commander – otočný dálkový
ovladač) – změna směru funkcí otočného
dálkového ovladače.
— Zadejte “NORM”, chcete-li používat
dálkový ovladač tak, jak byl nastaven
výrobcem.
— Zadejte “REV”, jestliže je otočný dálkový
ovladač umístěn na pravé straně sloupku
volantu.
•M.DSPL – zapínání a vypínání funkce
monitoru displeje.
1 Stiskněte (SHIFT).
2 Tiskněte opakovaně (2) (SET UP),
dokud se neobjeví požadovaná položka.
Při každém stisknutí (2) (SET UP), se
budou položky měnit následovně:
CLOCK n CT* n AMBER/GREEN n BEEP
n RM n M.DSPL
Pouze XR-5890R/5880R.
*
Poznámka
Položka an displeji se bude odlišovat podle druhu
zdroje.
3 Stiskněte (4) (n), abyste zvolili
požadované nastavení (například: ON
nebo OFF).
4 Stiskněte (SHIFT).
Jakmile je nastavení režimu ukončeno, vrátí
se diplej do režimu normálního přehrávání.
Poznámka
Jestliže se na displeji objeví indikace “SFT”, stiskněte
(SHIFT)
, abyste ukončili nastavení režimu.
17
Page 62
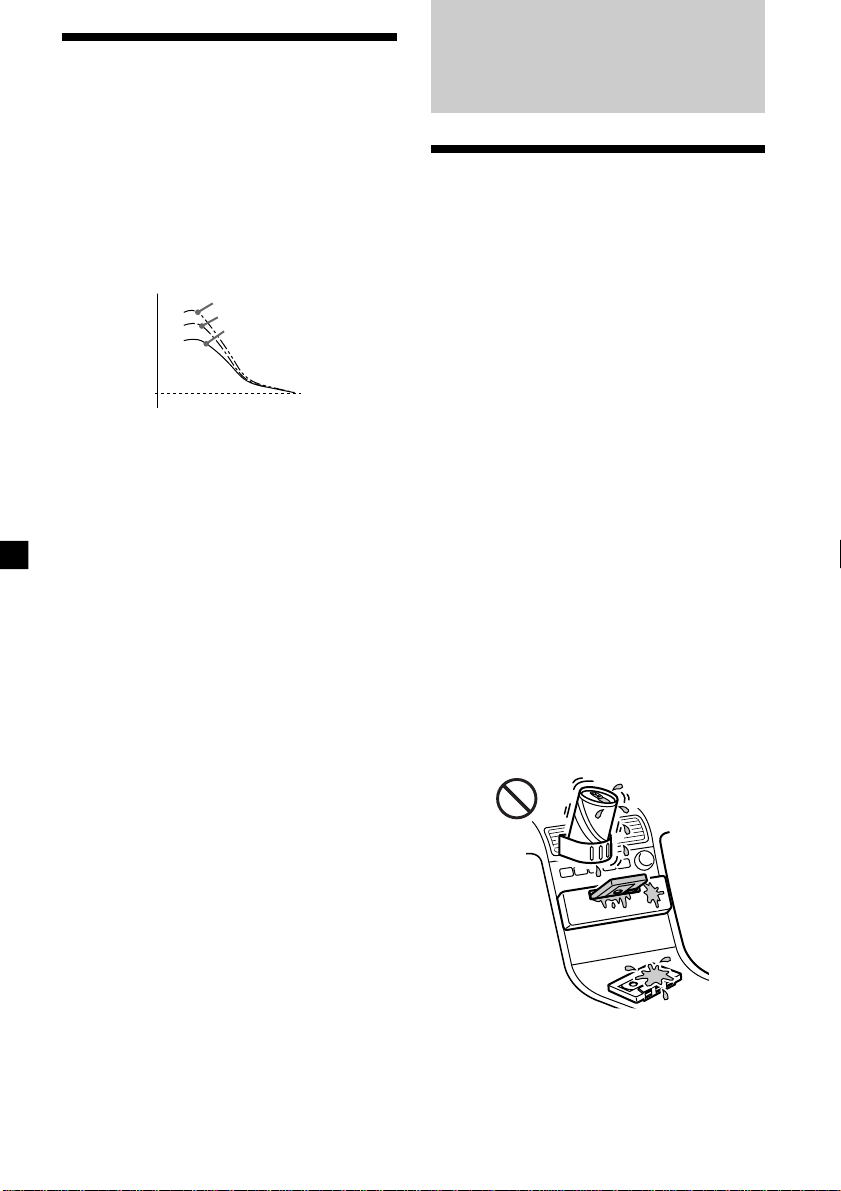
Zvýraznění basů
— D-bass
Můžete se těšit z poslechu jasných a silných
basů. Funkce D-bass zvýrazňuje signály s
nižšími frekvencemi s ostřejší křivkou než
konvenční bass boost.
Basy uslyšíte mnohem jasněji, i když budou
vokály nastaveny na stejnou hlasitost. Basy
můžete zvýraznit a nastavit snadno za pomoci
knoflíku D-BASS.
D-BASS 3
D-BASS 2
Úroveň
0dB
Nastavení křivky basů
Otáčejte knoflíkem D-BASS, abyste
nastavili úroveň basů (1, 2, nebo 3).
Na displeji se objeví “D-BASS”.
Chcete-li nastavení zrušit, otočte knoflík na
OFF - vypnuto.
Poznámka
Jsou-li basy rušené, nastavte je za pomoci tlačítka DBASS nebo tlačítka pro nastavení hlasitosti.
D-BASS 1
Frekvence (Hz)
Dodatečné
informace
Bezpečnostní opatření
•Bylo-li vaše auto zaparkováno na přímém
slunci a došlo-li k velkému zvýšení teploty
uvnitř auta, nechte přístroj vychladnout, než
ho uvedete do provozu.
•Není-li přístroj pod proudem, zkontrolujte
napřed jeho zapojení. Je-li vše v pořádku,
zkontrolujte pojistku.
•Jestliže se z reproduktorů neozývá žádný
zvuk, když jsou zapojené 2 reproduktory,
nastavte vyvážení reproduktorů do středové
polohy.
•Jestliže delší dobu posloucháte kazetu,
může se stát, že se zahřeje od
zabudovaného zesilovače. Není to však
znakem poruchy.
Vyskytnou-li se další otázky nebo problémy
týkající se vašeho přístroje, které nejsou
popsány v tomto návodu k použití, obra»te se
na nejbližší zastoupení firmy Sony.
Udržení vysoké kvality zvuku
Jestliže jsou v blízkosti vašeho rádia umístěné
držáky na nápoje, dbejte na to, aby se do
vašeho autorádia nedostaly ovocné š»ávy, ani
jiné nápoje. Zbytky cukru na tomto přístroji
nebo na kazetách by mohly zašpinit hlavy pro
přehrávání, snížit kvalitu zvuku nebo
všeobecně zhoršit reprodukci zvuku.
Soupravy na čistění kazet nemohou odstranit
cukr z hlav na přehrávání.
18
Page 63
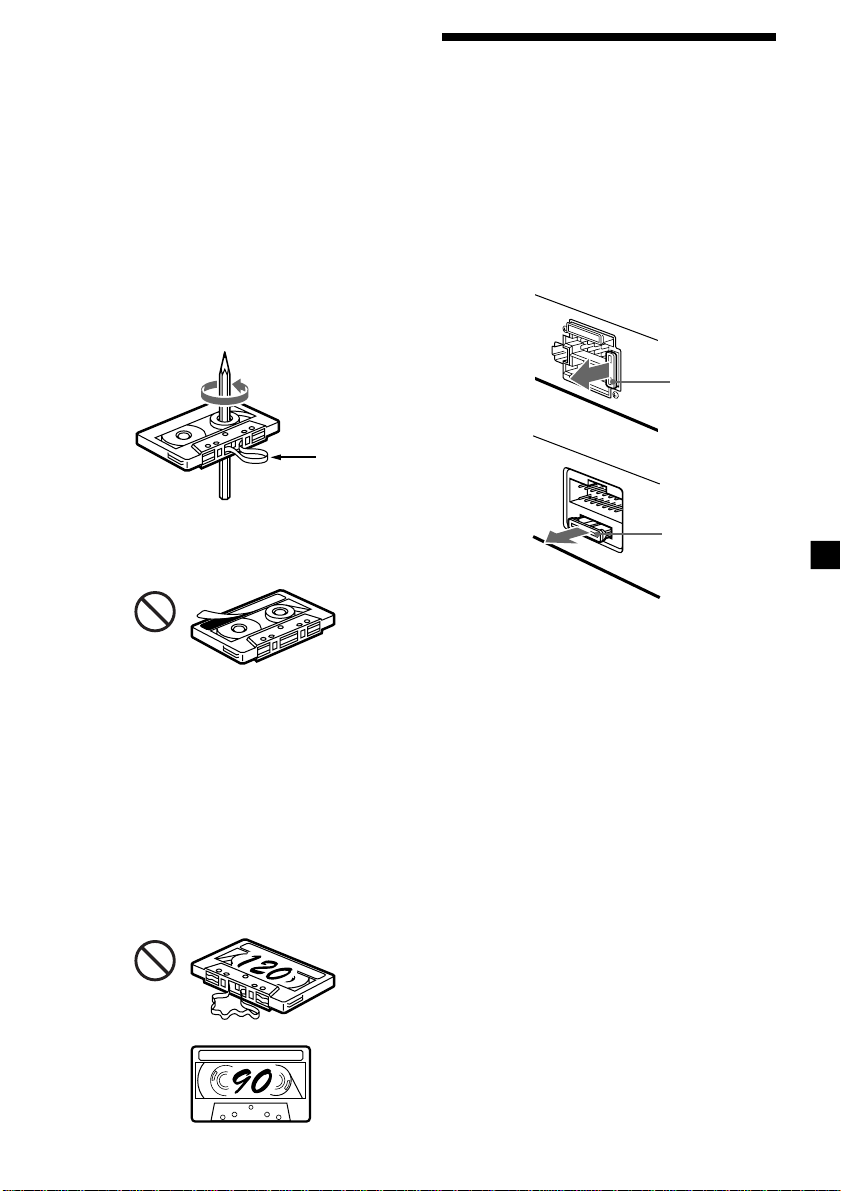
Poznámky ke kazetám
Péče o kazety
•Nedotýkejte se povrchu pásku v kazetě,
protože by případné nečistoty nebo vlhkost
zašpinily hlavy.
•Nepřibližujte kazety do blízkosti zařízení se
silnými zabudovanými magnety jako jsou
reproduktory a zesilovače, protože by mohlo
dojít k vymazání nebo poškození nahrávky
na nahraném pásku.
•Nevystavujte kazety přímému slunečnímu
záření, extrémně nízkým teplotám, ani
vlhkosti.
•Případné smyčky na pásku by mohly
způsobit zamotání pásku v přístroji. Než
vložíte kazetu, napněte pásek za pomoci
tužky nebo podobného předmětu - otáčením
jednoho z koleček.
Smyčka
Údržba
Výměna pojistky
Při výměně pojistky se ujistěte, abyste užili
pojistku se správnou hodnotou, která je
uvedena na povrchu originální pojistky.
Jestliže pojistka praskne, zkontrolujte zapojení
proudu a pojistku vyměňte. Jestliže pojistka
po výměně opět praskne, může to být v
důsledku poruchy přístroje. V tom případě se
obra»te na nejbližší zastoupení Sony.
XR-5890R/5880R:
Pojistka (10 A)
XR-4890/4880:
•Zdeformované kazety nebo částečně
odlepené nálepky mohou způsobovat
problémy při zasouvání a vysouvání kazet.
Odstraňte, příp. nahraïte uvolněné nálepky.
•Může se stát, že bude zvuk při přehrávání
kazety rušený. Hlavy magnetofonu by měly
být čistěny po každých 50 hodinách
provozu.
Kazety delší než 90 minut
Nedoporučujeme přehrávání kazet delších než
90 minut s vyjímkou dlouhého souvislého
přehrávání. Nedoporučujeme přehrávání kazet
delších než 90 minut s vyjímkou dlouhého
souvislého přehrávání. Pásky užívané pro tyto
kazety jsou velmi slabé, proto může snadno
dojít k jejich natažení. Jejich časté přehrávání
a zastavování může vést k tomu, že se
navinou na hlavy mechaniky.
Pojistka (10 A)
Upozornění
Nikdy nepoužívejte pojistky s vyšší ampérovou
hodnotou, než jaké jsou v přístroji, protože by
to mohlo způsobit poškození přístroje.
19
Page 64

Čistění konektorů
Jestliže jsou konektory mezi přístrojem a
předním panelem znečistěné, nebude přístroj
fungovat řádně. Abyste tomu předešli,
uvolněte přední panel stisknutím tlačítka
(RELEASE), sejměte ho a potom vyčistěte
konektory smotkem bavlněného hadříku
navlhčeného v alkoholu. Na kontakty přitom
příliš netlačte, abyste je nepoškodili.
Hlavní přístroj
Zadní strana předního panelu
Poznámky
•
Pro vaši bezpečnost vypněte před čištěním
konektorů motor a vytáhněte klíček na zapalování
ze spínací skříňky.
•
Nikdy se nedotýkejte konektorů přímo prsty ani
žádnými kovovými předměty.
Demontáž přístroje
1
Uvolňovací klíč
(součást příslušenství)
2
3
4
20
Page 65

Technické údaje
Magnetofon
Stopy na pásku 4 stopy, 2-kanálový
stereofonní zvuk
Kolísání a odchylka 0,08 % (WRMS)
Frekvence 30 – 18,000 Hz
Odstup signálu od šumu
Bez Dolby NR
TYPE II, IV* 61 dB
TYPE I 58 dB
* pouze XR-5890R/4890
Rádio
FM
Kmitočtový rozsah 87,5 – 108,0 MHz
Konektor pro anténu Externí konektor pro
anténu
Mezifrekvenční kmitočet 10,7 MHz
Citlivost 9 dBf
Selektivita 75 dB při 400 kHz
Odstup signálu od šumu
65 dB (stereo),
68 dB (mono)
Harmonická distorze při 1 kHz
0,7 % (stereo),
0,4 % (mono)
Rozlišení 35 dB při 1 kHz
Frekvence 30 – 15.000 Hz
MW/LW (SV/DV)
Kmitočtový rozsah MW (SV): 531 – 1,602 kHz
LW (DV): 153 – 281 kHz
Konektor pro anténu Externí konektor pro
anténu
Mezifrekvenční kmitočet 10,7 MHz/450 kHz
Citlivost MW (SV): 30 µV
LW (DV): 50 µV
Všeobecně
Výstupy pro kabel na ovládání
Ovládání zvuku Basy ±8 dB při 100 Hz
Napájení autobaterie - stejnosměrný
Rozměry Přibl. 188 × 58 × 181 mm
Rozměry pro montáž Přibl. 182 × 53 × 164 mm
Hmotnost Přibl. 1,2 kg
Dodávané příslušenství 1 souprava pro montáž a
Doplňky, které lze dokoupit
Design a technické parametry mohou být změněny
bez předchozího upozornění.
elektrické antény
kabel k telefonu ATT
(pouze XR-5890R/4890)
Výšky ±8 dB při 10 kHz
proud 12 V
(negativní uzemnění)
(š/v/h)
(š/v/h)
zapojení
Pouzdro na přední panel
(1)
Otočný dálkový ovladač
RM-X4S
Zesilovač
Výstupy Výstupy pro reproduktory
(bezpečnostní konektory)
Impedance reproduktorů
4 – 8 ohmů
Maximální výstup 35 W × 4 (při 4 ohmech)
21
Page 66

Odstranění drobných závad
Následující přehled vám pomůže odstranit většinu závad, se kterými se při obsluze vašeho
přístroje případně setkáte.
Než začnete se čtením následujícího přehledu, seznamte se s instrukcemi pro napojení a obsluhu.
Všeobecně
Problém
Žádný zvuk.
Údaje uložené do paměti byly
vymazány.
Na displeji se neobjeví žádné
indikace.
Přehrávání pásku
Problém
Zvuk je rušený.
AMS řádně nefunguje.
Příčina/Odstranění
• Zrušení funkce ATT.
• Nastavte vyvážení do středové polohy, jestliže máte zapojeny
dva reproduktory.
• Otáčejte knoflíkem ve směru hodinových ručiček, abyste
nastavili hlasitost.
• Přívodní kabel nebo baterie byly odpojené.
• Došlo k stisknutí tlačítka pro vynulování.
n Uložte údaje znovu do paměti.
Sejměte přední panel a vyčistěte konektory. V kapitole “Čistění
konektorů” (strana 20) naleznete další informace.
Příčina/Odstranění
Hlavy pro záznam resp. přehrávání jsou zašpiněné.
n Vyčistěte hlavy komerčně dostupnou suchou kazetou na
čistění hlav.
• Mezi jednotlivými skladbami se ozývají šumy.
• Nenahraná místa jsou příliš krátká (méně než čtyři sekundy).
• Spínač SEEK/AMS byl posunut nahoru bezprostředně před
následující skladbou.
• Spínač SEEK/AMS byl posunut dolů bezprostředně po
začátku skladby.
• Dlouhý úsek nebo pasáž s nízkými frekvencemi nebo velmi
slabým zvukem je považovaná za pauzu.
Poslech rádia
Problém
Není možné naladit stanici
uloženou v paměti.
Automatické ladění nefunguje.
Indikátor “ST” bliká.
22
Příčina/Odstranění
• Zadejte do paměti správnou frekvenci.
• Vysílaný signál je příliš slabý.
Vysílání je příliš slabé.
n Nalaïte stanici ručně.
• Nalaïte přesnou frekvenci.
• Vysílaný signál je příliš slabý.
n Zadejte režim MONO (strana 8).
Page 67

Funkce RDS (pouze XR-5890R/5880R)
Problém
Funkce SEEK začíná po
několika sekundách poslechu.
Žádná dopravní hlášení.
Funkce PTY ukazuje “NONE”.
Nepodaří-li se Vám odstranit závadu na základě uvedených postupů, obra»te se na nejbližší
zastoupení firmy Sony.
Příčina/Odstranění
Jedná se o stanici bez TP nebo o stanici se slabým signálem.
n Tiskněte opokovaně (AF/TA), abyste zadali “AF TA-OFF” (vyp.).
• Zaktivujte “TA”.
• Stanice nevysílá žádné dopravní hlášení i přes TP.
n Nalaïte jinou stanici.
Stanice neoznačuje druh programu.
23
Page 68

Καλώσ ήρθατε!
Περιεχµενα
Σασ ευχαριστούµε που αγοράσατε αυτ το
Στερεοφωνικ Κασετφωνο Αυτοκινήτου
Sony. Αυτή η συσκευή σασ επιτρέπει να
απολαύσετε έναν αριθµ δυνατοτήτων,
πωσ και ένα προαιρετικ περιστροφικ
χειριστήριο.
2
Μνο η Συσκευή
Θέση χειρισµών ............................................ 3
Ξεκινώντασ
Επαναρύθµιση τησ συσκευήσ ......................4
Απσπαση τησ πρσοψησ ............................ 4
Ρύθµιση του ρολογιού ................................. 5
Κασετφωνo
Aκραση µιασ κασέτασ .................................6
Αναπαραγωγή µιασ κασέτασ σε διάφορεσ
λειτουργίεσ ...............................................7
Ραδιφωνο
Αυτµατη καταχώρηση σταθµών
στη µνήµη
— Μνήµη Ισχυρτερων Σταθµών
(BTM = Best Tuning Memory) ................. 7
Καταχώρηση στη µνήµη µνο των
επιθυµητών σταθµών .............................. 8
Λήψη των σταθµών που είναι
καταχωρηµένοι στη µνήµη ..................... 8
RDS (µνο στα XR-5890R/5880R)
Γενικά για τη λειτουργία RDS ..................... 9
Εµφάνιση του ονµατοσ σταθµού .............. 9
Αυτµατοσ επανασυντονισµσ του ίδιου
προγράµµατοσ
— Εναλλακτικέσ Συχντητεσ
(AF = Alternative Frequencies) ..............10
Ακραση κυκλοφοριακών
ανακοινώσεων ........................................12
Προρύθµιση των σταθµών RDS µε
δεδοµένα AF και TA ...............................12
Εντοπισµσ σταθµού µε τον τύπο
προγράµµατοσ ........................................ 13
Αυτµατη ρύθµιση του ρολογιού.............. 14
Αλλεσ Λειτουργίεσ
Μαρκάρισµα του περιστροφικού
τηλεχειριστηρίου ................................... 15
Χρήση του περιστροφικού
χειριστηρίου ........................................... 15
Ρύθµιση των χαρακτηριστικών του
ήχου ......................................................... 17
Εξασθένηση του ήχου ................................17
Αλλαγή των ρυθµίσεων ήχου
και οθνησ .............................................. 17
Ενίσχυση των µπάσων
D-bass ..................................................... 18
Πρσθετεσ Πληροφορίεσ
Προφυλάξεισ ............................................... 18
Συντήρηση ...................................................19
Αφαίρεση τησ συσκευήσ ............................ 20
Τεχνικά Χαρακτηριστικά ............................ 21
Οδηγσ Αντιµετώπισησ προβληµάτων ..... 22
Page 69

Θέση χειρισµών
MODE
SEEK / AMS
SOUND
SOURCE
6
D-BASS
AF/TAPTYDSPL
1
2
OFF
3
+
–
PRST
RELEASE
SHIFT SET UP
OFF
PLAY MODE
Για περισστερεσ πληροφορίεσ, δείτε τισ σελίδεσ που αναφέρονται.
1 Χειρισµσ SEEK/AMS (αναζήτηση/
Αυτµατοσ Μουσικσ Αισθητήρασ/
χειροκίνητη αναζήτηση)6, 8, 11, 14
2 Πλήκτρο MODE (*)
Κατά την αναπαραγωγή κασέτασ:
Αλλαγή κατεύθυνσησ αναπαραγωγήσ 6
Κατά τη ραδιοφωνική λήψη:
Επιλογή BAND (µπάντασ)7, 8
3 Πλήκτρο SOURCE (ΚΑΣΕΤΑ/
∆ΕΚΤΗΣ)6, 7, 8, 12
4 Περιστροφικ χειριστήριο (χειρισµσ
έντασησ/µπάσα/πρίµα/αριστερά-δεξιά/
πίσω-εµπρσ)5, 17
5 Πλήκτρο SOUND17
6 Παράθυρο ενδείξεων
7 Πλήκτρο DSPL (αλλαγή λειτουργίασ
οθνησ)6, 9, 10
8 Πλήκτρο 66
9 Πλήκτρο PTY*
RDS Πργραµµα14
!º Πλήκτρο PRST
Κατά τη ραδιοφωνική λήψη:
Επιλογή προρυθµισµένων σταθµών8
!¡ Πλήκτρο AF/TA*10, 11, 12, 13
!™ Πλήκτρο RELEASE (απελευθέρωση
πρσοψησ)4, 20
!£ Πλήκτρο Reset (Επανεκκίνηση)
(βρίσκεται στο εµπρσ τµήµα τησ
συσκευήσ, πίσω απ την πρσοψη)4
!¢ Πλήκτρο OFF4, 6
!∞ Πλήκτρο SHIFT
PLAY MODE (ΛΕΙΤΟΥΡΓΙΑ
ΑΝΑΠΑΡΑΓΩΓΗΣ)7, 8, 9, 11, 13
SET UP (ΑΡΧΙΚΗ ΡΥΘΜΙΣΗ)5, 14, 17
!§ ∆ιακπτησ POWER SELECT
(βρίσκεται στο κάτω µέροσ τησ
συσκευήσ)
∆είτε “∆ιακπτησ POWER SELECT”
στο εγχειρίδιο Εγκατάστασησ/
Σύνδεσησ.
!¶ Αριθµητικά πλήκτρα8, 11, 13
!• Χειρισµσ D-BASS18
564321
XR-5890R/5880R
* mνο στα XR-5890R/5880R
3
Page 70

Ξεκινώντασ
Επαναρύθµιση τησ
συσκευήσ
Πριν θέσετε τη συσκευή σε λειτουργία για
πρώτη φορά ή αφού αντικαταστήσετε την
µπαταρία του αυτοκινήτου, θα πρέπει να
επαναρυθµίσετε τη συσκευή.
Αφαιρέστε την πρσοψη και πατήστε το
πλήκτρο επαναρύθµισησ µε ένα αιχµηρ
αντικείµενο, πωσ ένα στυλ για
παράδειγµα.
Πλήκτρο επαναρύθµισησ
Σηµείωση
Εάν πιέσετε το πλήκτρο reset, µηδενίζεται η
ρύθµιση του ρολογιού και κάποιεσ λειτουργίεσ
καταχωρηµένεσ στη µνήµη.
Απσπαση τησ
πρσοψησ
Μπορείτε να αποσπάσετε την πρσοψη
αυτήσ τησ συσκευήσ για να την
προστατεύσετε απ κλοπή.
Σηµειώσεισ
• Προσέξτε να µη σασ πέσει η πρσοψη κατά την
απσπασή τησ απ τη συσκευή.
• Εάν αποσπάσετε την πρσοψη ενώ είναι
ενεργοποιηµένη η συσκευή, η τροφοδοσία
διακπτεται αυτµατα ώστε να µην πάθουν
ζηµιά τα ηχεία.
• ταν µεταφέρετε την πρσοψη µαζί σασ,
χρησιµοποιείτε την παρεχµενη θήκη τησ.
Τοποθέτηση τησ πρσοψησ
Τοποθετήστε το σηµείο a τησ πρσοψησ
στο σηµείο b τησ συσκευήσ, πωσ
φαίνεται στην εικνα, και σπρώξτε το
αριστερ τµήµα στη θέση του µέχρι να
κουµπώσει.
a
b
Σηµειώσεισ
• Προσέξτε να µην τοποθετήσετε ανάποδα την
πρσοψη.
• Κατά την τοποθέτηση, µην πιέζετε την πρσοψη
δυνατά επάνω στη συσκευή.
• Μην πιέζετε δυνατά ή εξασκείτε δύναµη στο
παράθυρο ενδείξεων τησ πρσοψησ.
• Μην εκθέτετε την πρσοψη στον ήλιο ή σε
πηγέσ θερµτητασ πωσ σε στµια καλοριφέρ,
και µην την αφήνετε σε µέρη µε υγρασία. Ποτέ
µην την αφήσετε στο ταµπλ ενσ αυτοκινήτου
παρκαρισµένου στον ήλιο, που η θερµοκρασία
ανεβαίνει σηµαντικά.
1 Πατήστε το (OFF) .
2 Πατήστε (RELEASE), κατπιν
µετακινήστε την πρσοψη λίγο προσ τα
αριστερά και τραβήξτε τη προσ τα εσάσ.
(OFF)
(RELEASE)
4
Συναγερµσ υπενθύµισησ
Εάν γυρίσετε το κλειδί τησ ανάφλεξησ στη
θέση OFF χωρίσ να έχετε αφαιρέσει την
πρσοψη, ο συναγερµσ υπενθύµισησ ηχεί
για λίγα δευτερλεπτα (µνο εάν ο
διακπτησ POWER SELECT βρίσκεται στη
θέση A).
Page 71

Ρύθµιση του ρολογιού
2 Πιέστε (SHIFT).
Το ρολι χρησιµοποιεί 24-ωρη ψηφιακή
ένδειξη.
Παράδειγµα: Για να ρυθµίσετε το ρολι
στισ 10:08
1 Πατήστε (SHIFT), και µετά πατήστε
επανειληµµένα (2) (SET UP) µέχρι να
εµφανιστεί η ένδειξη “CLOCK”.
1 Πιέστε (4) (n).
Αναβοσβήνει η ένδειξη τησ ώρασ.
2 Ρυθµίστε την ώρα.
για να πάτε πίσω
για να πάτε εµπρσ
3 Πιέστε (4) (n).
Αναβοσβήνει η ένδειξη των λεπτών.
Το ρολι ξεκινάει.
3 Πιέστε (SHIFT).
Αφού ολοκληρωθεί η ρύθµιση του
ρολογιού, η οθνη επιστρέφει σε
κανονική λειτουργία αναπαραγωγήσ.
Σηµείωση
Εάν ο διακπτησ POWER SELECT στο κάτω
µέροσ τησ συσκευήσ είναι στη θέση B,
ενεργοποιήστε τη συσκευή πρώτα και µετά
ρυθµίστε το ρολι.
4 Ρυθµίστε τα λεπτά.
για να πάτε πίσω
για να πάτε εµπρσ
5
Page 72

Κασετφωνo
Aκραση µιασ κασέτασ
Eισάγετε µια κασέτα.
Η αναπαραγωγή ξεκινάει αυτµατα.
Εάν έχετε ήδη εισάγει µια κασέτα, πατήστε
επανειληµµένα το (SOURCE) µέχρι να
εµφανιστεί “FWD” ή “REV” και αρχίσει η
αναπαραγωγή.
Παίζει η πλευρά που βρίσκεται προσ τα επάνω.
Παίζει η πλευρά που βρίσκεται προσ τα κάτω.
Συµβουλή
Για να αλλάξετε την κατεύθυνση αναπαραγωγήσ
τησ κασέτασ, πατήστε (MODE) (*).
Για να Πιέστε
Σταµατήσετε την (OFF)
αναπαραγωγή
Εξάγετε την κασέτα 6
6
Γρήγορη περιέλιξη τησ κασέτασ
Κατά την αναπαραγωγή, πατήστε το
διπλ πλήκτρο SEEK/AMS επάνω ή κάτω
και κρατήστε.
Γρήγορη περιέλιξη
προσ τα εµπρσ
Γρήγορη περιέλιξη
προσ τα πίσω
SEEK / AMS
Για να ξεκινήσετε αναπαραγωγή κατά τη
γρήγορη περιέλιξη προσ τα εµπρσ ή πίσω,
πατήστε (MODE) (*).
Εντοπισµσ συγκεκριµένου κοµµατιού
— Αυτµατοσ Μουσικσ Αισθητήρασ
(AMS)
Κατά την αναπαραγωγή, πατήστε το
διπλ πλήκτρο SEEK/AMS επάνω ή κάτω
και αφήστε το σε κάθε κοµµάτι που
θέλετε να προσπεράσετε.
Μπορείτε να προσπεράσετε µέχρι εννέα
κοµµάτια κάθε φορά.
Για να εντοπίσετε
επµενα κοµµάτια
Για να εντοπίσετε
προηγούµενα
κοµµάτια
Σηµείωση
Το AMS µπορεί να µη λειτουργεί ταν:
— τα κενά µεταξύ των κοµµατιών είναι
µικρτερα απ τέσσερα δευτερλεπτα
— υπάρχει θρυβοσ µεταξύ των κοµµατιών
— υπάρχουν µεγάλα τµήµατα χαµηλήσ έντασησ
ή χωρίσ ήχο.
SEEK / AMS
Αλλαγή ενδείξεων στην οθνη
Κάθε φορά που πιέζετε το (DSPL), οι
ενδείξεισ στην οθνη αλλάζουν ωσ
ακολούθωσ:
z Αναπαραγωγή κασέτασ z Ρολι
Συχντητα* Z
* Ενώ είναι ενεργοποιηµένη µια απ τισ
ακλουθεσ λειτουργίεσ.
— Λειτουργία ATA
— Λειτουργία AF/TA (XR-5890R/5880R)
Αφού επιλέξετε το στοιχείο που θέλετε, η
οθνη αλλάζει αυτµατα σε λειτουργία
Οθνησ Κίνησησ µετά απ λίγα
δευτερλεπτα.
Στη λειτουργία Οθνησ Κίνησησ, λα τα
παραπάνω στοιχεία µετακινούνται στην
οθνη ένα-ένα µε τη σειρά.
Συµβουλή
Η λειτουργία Οθνησ Κίνησησ µπορεί να
απενεργοποιηθεί. (∆είτε “Αλλαγή των ρυθµίσεων
ήχου και οθνησ” στη σελίδα 17).
Page 73

Αναπαραγωγή µιασ
κασέτασ σε διάφορεσ
λειτουργίεσ
Ραδιφωνο
Μπορείτε να παίξετε µια κασέτα σε
διάφορεσ λειτουργίεσ:
•REP (Επαναλαµβανµενη Αναπαραγωγή)
επαναλαµβάνει το τρέχον κοµµάτι.
•METAL (Μετάλλου)* σασ επιτρέπει να
παίξετε µια κασέτα µετάλλου ή CrO2
(χρωµίου).
•BL SKP (Υπερπήδηση Κενών) προσπερνά
τα κενά που είναι µεγαλύτερα απ οκτώ
δευτερλεπτα.
•ATA (Αυτµατη Ενεργοποίηση ∆έκτη)
ενεργοποιεί αυτµατα το δέκτη κατά τη
γρήγορη περιέλιξη τησ κασέτασ.
1 Κατά την αναπαραγωγή, πατήστε (SHIFT).
Στην οθνη εµφανίζεται η ένδειξη
“SHIFT-ON”.
2 Πιέστε επανειληµµένα (3) (PLAY
MODE) µέχρι να εµφανιστεί η επιθυµητή
λειτουργία αναπαραγωγήσ.
Κάθε φορά που πιέζετε (3) (PLAY
MODE), οι ενδείξεισ αλλάζουν ωσ
ακολούθωσ:
REP n METAL* n BL SKP n ATA
* mνο στα XR-5890R/4890R
3 Πιέστε (4) (n) για να επιλέξετε “ON”.
Ξεκινάει η λειτουργία αναπαραγωγήσ.
Αυτµατη καταχώρηση
σταθµών στη µνήµη
— Μνήµη Ισχυρτερων Σταθµών
(BTM = Best Tuning Memory)
Η συσκευή επιλέγει τουσ σταθµούσ µε το
ισχυρτερο σήµα και τουσ καταχωρεί στη
µνήµη µε τη σειρά τησ συχντητάσ τουσ.
Μπορείτε να αποθηκεύσετε µέχρι 6
σταθµούσ σε κάθε µπάντα (FM1, FM2, FM3,
MW, και LW).
Προσοχή
ταν συντονίζετε σταθµούσ ενώ οδηγείτε,
χρησιµοποιείτε τη λειτουργία Μνήµησ
Ισχυρτερων Σταθµών για µεγαλύτερη
ασφάλεια.
1 Για να επιλέξετε το δέκτη, πιέστε
επανειληµµένα το (SOURCE).
Κάθε φορά που πιέζετε το (SOURCE), η
πηγή αλλάζει ωσ ακολούθωσ:
TUNER ˜ TAPE
2 Πιέστε επανειληµµένα το (MODE) για να
επιλέξετε µπάντα.
Κάθε φορά που πιέζετε το (MODE), η
µπάντα αλλάζει ωσ ακολούθωσ:
z FM1 z FM2 z FM3 z MW z LW
3 Πιέστε (SHIFT), κατπιν πατήστε
επανειληµµένα (3) (PLAY MODE) µέχρι
να εµφανιστεί η ένδειξη “B.T.M”.
4 Πιέστε (SHIFT).
Για να επιστρέψετε σε κανονική λειτουργία
αναπαραγωγήσ, επιλέξτε “OFF” στο βήµα 3
παραπάνω.
Σηµείωση
Εάν εµφανιστεί η ένδειξη “SFT”, πατήστε (SHIFT)
για να ολοκληρώσετε τη ρύθµιση λειτουργίασ.
4 Πιέστε (4) (n).
Η συσκευή αποθηκεύει στα αριθµητικά
πλήκτρα τουσ σταθµούσ µε τη σειρά
συχντητάσ τουσ.
ταν αποθηκεύεται η ρύθµιση,
ακούγεται ένα µπιπ.
5 Πιέστε (SHIFT).
συνέχεια στην επµενη σελίδα n
7
Page 74

Σηµειώσεισ
• Η συσκευή δεν αποθηκεύει σταθµούσ µε
ασθενέσ σήµα. Εάν λαµβάνονται µνο λίγοι
σταθµοί, κάποια αριθµητικά πλήκτρα διατηρούν
την προηγούµενη ρύθµισή τουσ.
• ταν εµφανίζεται ένασ αριθµσ στην οθνη, η
συσκευή ξεκινάει την αποθήκευση σταθµών
απ τον εµφανιζµενο αριθµ.
Λήψη των σταθµών που
είναι καταχωρηµένοι
στη µνήµη
1 Για να επιλέξετε το δέκτη, πιέστε
επανειληµµένα το (SOURCE).
Καταχώρηση στη µνήµη
µνο των επιθυµητών
σταθµών
Μπορείτε να προρυθµίσετε µέχρι 18
σταθµούσ FM (6 για κάθε µια µπάντα απ
τισ FM1, 2 και 3), µέχρι 6 σταθµούσ MW
(Μεσαία) και µέχρι 6 σταθµούσ LW
(Βραχέα), µε τη σειρά που θέλετε.
1 Για να επιλέξετε το δέκτη, πιέστε
επανειληµµένα το (SOURCE).
2 Πιέστε επανειληµµένα (MODE) για να
επιλέξετε µπάντα.
3 Πατήστε το διπλ πλήκτρο SEEK/AMS
επάνω ή κάτω για να συντονίσετε το
σταθµ που θέλετε να αποθηκεύσετε
στο αριθµητικ πλήκτρο.
4 Πιέστε και κρατήστε πατηµένο το
αριθµητικ πλήκτρο ((1) έωσ (6)) που
θέλετε, µέχρι να εµφανιστεί η ένδειξη
“MEM”.
Η ένδειξη αριθµητικού πλήκτρου
εµφανίζεται στην οθνη.
Σηµείωση
Εάν προσπαθήσετε να αποθηκεύσετε έναν άλλο
σταθµ στο ίδιο αριθµητικ πλήκτρο, ο σταθµσ
που ήταν αποθηκευµένοσ διαγράφεται.
2 Για να επιλέξετε την µπάντα, πιέστε
επανειληµµένα το (MODE).
3 Πιέστε το αριθµητικ πλήκτρο ((1) έωσ
(6)) στο οποίο είναι αποθηκευµένοσ ο
σταθµσ που θέλετε.
Συµβουλή
Για να ακούσετε τουσ σταθµούσ µε τη σειρά που
είναι αποθηκευµένοι στη µνήµη, πατήστε ένα
απ τα δύο άκρα του πλήκτρου (PRST)
(Λειτουργία Αναζήτησησ Προρυθµισµένων
Σταθµών).
Εάν δεν µπορείτε να συντονίσετε σε
κάποιον προρυθµισµένο σταθµ
Πιέστε και αφήστε το πλήκτρο SEEK/
AMS επάνω ή κάτω, για να αναζητήσετε
το σταθµ (αυτµατοσ συντονισµσ).
Η σάρωση σταµατάει ταν λάβει η συσκευή
ένα σταθµ. Πιέστε επανειληµµένα το
πλήκτρο SEEK/AMS επάνω ή κάτω, µέχρι
να λάβετε το σταθµ που θέλετε.
Σηµείωση
Εάν ο αυτµατοσ συντονισµσ σταµατάει πολύ
συχνά, πατήστε (SHIFT), κατπιν πατήστε
επανειληµµένα (3) (PLAY MODE) µέχρι να
εµφανιστεί η ένδειξη “LOCAL” (λειτουργία
τοπικήσ αναζήτησησ). Κατπιν πατήστε (4) (n)
για να επιλέξετε “LOCAL-ON.” Πιέστε (SHIFT).
Θα συντονιστούν µνο οι σταθµοί µε σχετικά
ισχυρ σήµα.
Συµβουλή
Εάν ξέρετε τη συχντητα του σταθµού που
θέλετε να ακούσετε, πατήστε το πλήκτρο SEEK/
AMS επάνω ή κάτω και κρατήστε πατηµένο µέχρι
να εµφανιστεί η συχντητα που θέλετε
(χειροκίνητοσ συντονισµσ).
8
Page 75

Εάν δεν είναι καλή η στερεοφωνική
λήψη στα FM
— Μονοφωνική λειτουργία
1 Κατά τη ραδιοφωνική λήψη, πατήστε
(SHIFT), και µετά πατήστε
επανειληµµένα (3) (PLAY MODE), µέχρι
να εµφανιστεί η ένδειξη “MONO”.
2 Πιέστε επανειληµµένα (4) (n) µέχρι να
εµφανιστεί η ένδειξη “MONO-ON”.
Ο ήχοσ βελτιώνεται, αλλά γίνεται
µονοφωνικσ (εξαφανίζεται η ένδειξη
“ST”).
3 Πιέστε (SHIFT).
Για να επιστρέψετε σε κανονική
λειτουργία, επιλέξτε “MONO-OFF” στο
βήµα 2 παραπάνω.
Αλλαγή των ενδείξεων τησ οθνησ
Κάθε φορά που πιέζετε (DSPL), οι
ενδείξεισ αλλάζουν ωσ ακολούθωσ:
Συχντητα (νοµα Σταθµού)* ˜ Ρολι
* ταν συντονίζετε σε ένα σταθµ FM που
εκπέµπει µε RDS, εµφανίζεται το νοµα του
σταθµού (µνο στα XR-5890R/5880R).
Αφού επιλέξετε το στοιχείο που θέλετε, η
οθνη αλλάζει αυτµατα σε λειτουργία
Οθνησ Κίνησησ µετά απ λίγα
δευτερλεπτα.
Στη λειτουργία Οθνησ Κίνησησ, λα τα
παραπάνω στοιχεία µετακινούνται στην
οθνη ένα-ένα µε τη σειρά.
Συµβουλή
Η λειτουργία Οθνησ Κίνησησ µπορεί να
απενεργοποιηθεί. (∆είτε “Αλλαγή των ρυθµίσεων
ήχου και οθνησ” στη σελίδα 17).
RDS (µνο στα XR-5890R/5880R)
Γενικά για τη λειτουργία
RDS
To Σύστηµα Μετάδοσησ ∆εδοµένων Μέσω
Ραδιοφώνου (RDS = Radio Data System)
είναι µια λειτουργία εκποµπήσ, η οποία
δίνει τη δυναττητα στουσ σταθµούσ FM
να µεταδίδουν επιπλέον ψηφιακέσ
πληροφορίεσ µαζί µε το κανονικ σήµα
ραδιοφωνικού προγράµµατοσ. Το
στερεοφωνικ αυτοκινήτου σασ, σασ
προσφέρει µια ποικιλία λειτουργιών. Να
µερικέσ απ αυτέσ: αυτµατοσ
επανασυντονισµσ του ίδιου
προγράµµατοσ, ακραση κυκλοφοριακών
ανακοινώσεων και εντοπισµσ ενσ
σταθµού απ τον τύπο προγράµµατοσ.
Σηµειώσεισ
• Ανάλογα τη χώρα ή την περιοχή, δεν υπάρχουν
λεσ οι λειτουργίεσ RDS.
• Εάν το σήµα δεν είναι ισχυρ ή εάν ο σταθµσ
που είστε συντονισµένοι δεν εκπέµπει
δεδοµένα RDS, πιθανν το σύστηµα RDS να µη
λειτουργεί σωστά.
Εµφάνιση του ονµατοσ
σταθµού
Στην οθνη εµφανίζεται το νοµα του
σταθµού που λαµβάνετε.
Επιλέξτε ένα σταθµ FM (σελίδα 7).
ταν συντονίζετε σε ένα σταθµ FM
που εκπέµπει µε RDS, εµφανίζεται το
νοµα του σταθµού.
Σηµείωση
Η ένδειξη “ *” σηµαίνει τι λαµβάνετε ένα
σταθµ µε RDS.
9
Page 76

Εναλλαγή των εµφανιζµενων στην
οθνη
Κάθε φορά που πιέζετε το (DSPL), οι
ενδείξεισ αλλάζουν ωσ ακολούθωσ:
νοµα Σταθµού (Συχντητα) ˜ Ρολι
Αφού επιλέξετε το στοιχείο που θέλετε, η
οθνη αλλάζει αυτµατα σε λειτουργία
Οθνησ Κίνησησ µετά απ λίγα
δευτερλεπτα.
Στη λειτουργία Οθνησ Κίνησησ, λα τα
παραπάνω στοιχεία µετακινούνται στην
οθνη ένα-ένα µε τη σειρά.
Συµβουλή
Η λειτουργία Οθνησ Κίνησησ µπορεί να
απενεργοποιηθεί. (∆είτε “Αλλαγή των ρυθµίσεων
ήχου και οθνησ” στη σελίδα 17).
Σηµείωση
Εάν ο λαµβανµενοσ σταθµσ δεν εκπέµπει µε RDS,
στην οθνη εµφανίζεται η ένδειξη “NO NAME”
(µνο στα XR-5890R/5880R).
Αυτµατοσ
επανασυντονισµσ του
ίδιου προγράµµατοσ
— Εναλλακτικέσ Συχντητεσ
(AF = Alternative Frequencies)
Η λειτουργία Εναλλακτικών Συχνοτήτων
(AF) επιλέγει και επανασυντονίζει
αυτµατα το σταθµ µε το ισχυρτερο
σήµα σε ένα δίκτυο. Χρησιµοποιώντασ
αυτή τη λειτουργία, µπορείτε να ακούτε
συνέχεια το ίδιο πργραµµα, σε µακρινά
ταξίδια, χωρίσ να απαιτείται χειροκίνητοσ
επανασυντονισµσ του σταθµού.
Οι συχντητεσ αλλάζουν αυτµατα.
98.5 MHz
96.0 MHz
Σταθµσ
102.5 MHz
1 Επιλέξτε ένα σταθµ FM (σελίδα 7).
2 Πιέστε επανειληµµένα (AF/TA) µέχρι να
εµφανιστεί η ένδειξη “AF-ON”.
Η συσκευή ξεκινάει την αναζήτηση ενσ
εναλλακτικού σταθµού µε ισχυρτερο
σήµα, που βρίσκεται στο ίδιο δίκτυο.
Σηµείωση
ταν δεν υπάρχει εναλλακτικσ σταθµσ στην
περιοχή, και δε θέλετε να αναζητήσετε εναλλακτικ
σταθµ, απενεργοποιήστε τη λειτουργία AF
πιέζοντασ επανειληµµένα το πλήκτρο (AF/TA) µέχρι
να εµφανιστεί η ένδειξη “AF TA-OFF”.
10
Page 77

Εναλλαγή των εµφανιζµενων στην
οθνη
Κάθε φορά που πιέζετε (AF/TA), οι
ενδείξεισ αλλάζουν ωσ εξήσ:
” TA-ON ” AF TA-ON*
AF-ON “ AF TA-OFF “
* Επιλέξτε για να ενεργοποιήσετε τισ λειτουργίεσ
AF και TA.
Σηµειώσεισ
• ταν στην οθνη εναλλάσσονται η ένδειξη “NO
AF” και το νοµα του σταθµού, αυτ
υποδηλώνει τι η συσκευή δε βρίσκει
εναλλακτικ σταθµ στο δίκτυο.
• Εάν το νοµα ενσ σταθµού αρχίσει να
αναβοσβήνει αφού τον επιλέξετε µε τη
λειτουργία AF ενεργοποιηµένη, αυτ
υποδηλώνει τι δεν υπάρχει εναλλακτική
συχντητα. Πιέστε το πλήκτρο SEEK/AMS
επάνω ή κάτω, ενώ αναβοσβήνει το νοµα του
σταθµού (µέσα σε οκτώ δευτερλεπτα). Η
συσκευή αρχίζει να αναζητά άλλη συχντητα
µε τα ίδια δεδοµένα PI (Programme
Identification ή Αναγνώριση Προγράµµατοσ)
(εµφανίζεται η ένδειξη “PI SEEK” ενώ δεν
ακούγεται ήχοσ). Εάν η συσκευή δε βρίσκει
άλλη συχντητα, εµφανίζεται η ένδειξη “NO
PI”, και η συσκευή επιστρέφει στη συχντητα
που είχατε επιλέξει προηγουµένωσ.
Ακραση τοπικού προγράµµατοσ
Η λειτουργία “REG-ON” (τοπικού
συντονισµού) σασ δίνει τη δυναττητα να
παραµείνετε συντονισµένοι σε ένα τοπικ
πργραµµα χωρίσ να γίνει εναλλαγή σε
κάποιον άλλο τοπικ σταθµ. (Σηµειώστε
τι πρέπει να ενεργοποιήσετε τη
λειτουργία AF.) Η συσκευή είναι
προρυθµισµένη απ το εργοστάσιο στο
“REG-ON,” αλλά εάν θέλετε να
απενεργοποιήσετε τη λειτουργία, κάντε τα
ακλουθα.
Για να επανέρθετε στη λειτουργία regional
on, επιλέξτε “REG-ON” στο βήµα 2
παραπάνω.
Σηµείωση
Αυτή η λειτουργία δεν ισχύει στο Ηνωµένο
Βασίλειο και σε κάποιεσ άλλεσ περιοχέσ.
Λειτουργία τοπικήσ σύνδεσησ (Local
link) (µνο στο Ηνωµένο Βασίλειο)
Η λειτουργία τοπικήσ σύνδεσησ σασ
επιτρέπει να επιλέξετε και άλλουσ
τοπικούσ σταθµούσ στην περιοχή, ακµη
και εάν δεν είναι ανάµεσα στουσ
προρυθµισµένουσ σασ σταθµούσ.
1 Πιέστε ένα αριθµητικ πλήκτρο που έχει
αποθηκευµένο έναν τοπικ σταθµ.
2 Μέσα σε πέντε δευτερλεπτα, πατήστε
και πάλι το αριθµητικ πλήκτρο του
τοπικού σταθµού.
3 Επαναλάβετε αυτή τη διαδικασία µέχρι
να λάβετε τον τοπικ σταθµ που
θέλετε.
1 Κατά τη ραδιοφωνική λήψη, πατήστε
(SHIFT), και µετά πατήστε
επανειληµµένα (3) (PLAY MODE), µέχρι
να εµφανιστεί η ένδειξη “REG”.
2 Πιέστε επανειληµµένα (4) (n) µέχρι να
εµφανιστεί η ένδειξη “REG-OFF”.
3 Πιέστε (SHIFT).
Σηµειώστε τι η επιλογή τησ ρύθµισησ
“REG-OFF” µπορεί να έχει ωσ
αποτέλεσµα την εναλλαγή τησ
συσκευήσ σε έναν άλλο τοπικ σταθµ
του ίδιου δικτύου.
11
Page 78

Ακραση
κυκλοφοριακών
ανακοινώσεων
Τα δεδοµένα Κυκλοφοριακών
Ανακοινώσεων (TA = Traffic Announcement)
και Κυκλοφοριακών Προγραµµάτων (TP =
Traffic Programme), σασ δίνουν τη
δυναττητα να συντονίσετε αυτµατα σε
κάποιο σταθµ FM που µεταδίδει
ανακοινώσεισ για την κυκλοφορία, ακµη
και εάν ακούτε άλλεσ πηγέσ
προγράµµατοσ.
Πιέστε επανειληµµένα (AF/TA) µέχρι να
εµφανιστεί η ένδειξη “TA-ON” ή “AF
TA-ON”.
Η συσκευή αρχίζει να αναζητά σταθµούσ
µε κυκλοφοριακέσ πληροφορίεσ. ταν η
συσκευή βρει ένα σταθµ που εκπέµπει
κυκλοφοριακέσ ανακοινώσεισ, στην
οθνη εµφανίζεται η ένδειξη “TP”.
ταν ξεκινήσει η ανακοίνωση για την
κυκλοφορία, αναβοσβήνει το “TA”, και
σταµατάει να αναβοσβήνει ταν
τελειώσει η ανακοίνωση για την
κυκλοφορία.
Συµβουλή
Εάν ξεκινήσει µια ανακοίνωση για την
κυκλοφορία ενώ ακούτε κάποια άλλη πηγή
προγράµµατοσ, η συσκευή γυρίζει αυτµατα στην
ανακοίνωση και επανέρχεται στην αρχική πηγή
ταν τελειώσει η ανακοίνωση.
Σηµειώσεισ
• Εάν ο σταθµσ που λαµβάνετε δεν εκπέµπει
κυκλοφοριακέσ ανακοινώσεισ, για πέντε
δευτερλεπτα αναβοσβήνει η ένδειξη “NO TP”.
Κατπιν, η συσκευή αρχίζει την αναζήτηση
ενσ σταθµού που εκπέµπει κυκλοφοριακέσ
ανακοινώσεισ.
• Εάν στην οθνη εµφανιστούν οι ενδείξεισ
“EON” και “TP”, ο τρέχον σταθµσ
χρησιµοποιεί µετάδοση κυκλοφοριακών
ανακοινώσεων µέσω άλλων σταθµών του ίδιου
δικτύου.
Για να ακυρώσετε την τρέχουσα
ανακοίνωση για την κυκλοφορία
Πιέστε (AF/TA) ή (SOURCE).
Για να ακυρώσετε λεσ τισ
κυκλοφοριακέσ ανακοινώσεισ,
απενεργοποιήστε τη λειτουργία
πιέζοντασ το πλήκτρο (AF/TA) µέχρι να
εµφανιστεί η ένδειξη “AF TA-OFF”.
Προρύθµιση τησ έντασησ των
ανακοινώσεων για την κυκλοφορία
Μπορείτε να προρυθµίσετε απ πριν την
ένταση των ανακοινώσεων για την
κυκλοφορία, ώστε να µη χάσετε κάποια
ανακοίνωση. ταν ξεκινήσει η ανακοίνωση
για την κυκλοφορία, η ένταση ρυθµίζεται
αυτµατα στην προρυθµισµένη στάθµη.
1 Επιλέξτε την ένταση που θέλετε.
2 Πιέστε το πλήκτρο (AF/TA) για δύο
δευτερλεπτα.
Εµφανίζεται το “TA” και η ρύθµιση
αποθηκεύεται.
Λήψη ανακοινώσεων για την
κυκλοφορία
Εάν λάβετε κάποια έκτακτη ανακοίνωση
ενώ ακούτε ραδιφωνο, το πργραµµα
γυρίζει αυτµατα σε αυτή. Εάν ακούτε
κάποια άλλη πηγή εκτσ του ραδιοφώνου,
οι έκτακτεσ ανακοινώσεισ ακούγονται εάν
ενεργοποιήσετε τη λειτουργία AF ή TA. Η
συσκευή γυρίζει αυτµατα σε αυτέσ τισ
ανακοινώσεισ, ανεξάρτητα απ την πηγή
που εκείνη τη στιγµή ακούτε.
Προρύθµιση των
σταθµών RDS µε
δεδοµένα AF και TA
ταν προρυθµίζετε τουσ σταθµούσ RDS, η
συσκευή αποθηκεύει τα δεδοµένα, πωσ
και τη συχντητα κάθε σταθµού, ώστε να
µη χρειάζεται να ενεργοποιείτε τη
λειτουργία AF ή TA, κάθε φορά που
συντονίζετε στον προρυθµισµένο σταθµ.
Για κάθε προρυθµισµένο σταθµ µπορείτε
να επιλέξετε διαφορετική ρύθµιση (AF, TA,
ή και τα δύο), ή τισ ίδιεσ ρυθµίσεισ για
λουσ τουσ προρυθµισµένουσ σταθµούσ.
12
Page 79

Προρύθµιση τησ ίδιασ ρύθµισησ για
λουσ τουσ προρυθµισµένουσ
σταθµούσ
1 Επιλέξτε ένα σταθµ FM (σελίδα 7).
2 Πιέστε επανειληµµένα (AF/TA) για να
επιλέξετε είτε “AF-ON,” “TA-ON” ή “AF
TA-ON” (και για τισ δύο λειτουργίεσ AF
και TA).
Σηµειώστε τι η επιλογή τησ
λειτουργίασ “AF TA-OFF” αποθηκεύει
χι µνο τουσ σταθµούσ µε RDS, αλλά
και αυτούσ χωρίσ RDS.
3 Πιέστε (SHIFT), κατπιν πατήστε
επανειληµµένα (3) (PLAY MODE) µέχρι
να εµφανιστεί η ένδειξη “B.T.M”.
4 Πιέστε (4) (n) µέχρι να αρχίσει να
αναβοσβήνει η ένδειξη “B.T.M”.
5 Πιέστε (SHIFT).
Προρύθµιση διαφορετικών ρυθµίσεων
για κάθε προρυθµισµένο σταθµ
1 Επιλέξτε µια µπάντα FM, και συντονίστε
στο σταθµ που θέλετε.
2 Πιέστε επανειληµµένα (AF/TA) για να
επιλέξετε είτε “AF-ON,” “TA-ON” ή “AF
TA-ON” (και για τισ δύο λειτουργίεσ AF
και TA).
3 Πιέστε το αριθµητικ πλήκτρο που
θέλετε και κρατήστε το πατηµένο µέχρι
να εµφανιστεί η ένδειξη “MEM”.
Επαναλάβετε απ το βήµα 1 για να
προρυθµίσετε και άλλουσ σταθµούσ.
Συµβουλή
Εάν θέλετε να αλλάξετε την προρυθµισµένη
ρύθµιση AF και/ή TA, αφού συντονίσετε στον
προρυθµισµένο σταθµ, µπορείτε να το κάνετε
ενεργοποιώντασ ή απενεργοποιώντασ τη
λειτουργία AF ή TA.
Εντοπισµσ σταθµού µε
τον τύπο προγράµµατοσ
Μπορείτε να εντοπίσετε το σταθµ που
θέλετε, επιλέγοντασ έναν απ τουσ τύπουσ
προγράµµατοσ που αναφέρονται
παρακάτω.
Τύποι προγράµµατοσ Εµφανίζεται στην
οθνη
Ειδήσεισ NEWS
Επίκαιρα Θέµατα AFFAIRS
Πληροφορίεσ INFO
Αθλητικά SPORT
Μρφωση EDUCATE
∆ράµα DRAMA
Πολιτιστικά CULTURE
Επιστήµη SCIENCE
∆ιάφορα VARIED
Μουσική ποπ POP M
Μουσική ροκ ROCK M
Απαλή Μουσική EASY M
Ελαφριά Κλασσική LIGHT M
Κλασσική CLASSICS
Αλλοι Τύποι Μουσικήσ OTHER M
Καιρσ WEATHER
Οικονοµικά FINANCE
Παιδικά προγράµµατα CHILDREN
Κοινωνικά Θέµατα SOCIAL A
Θρησκεία RELIGION
Τηλεφωνικά PHONE IN
προγράµµατα
Ταξιδιωτικά TRAVEL
Ψυχαγωγία LEISURE
Μουσική Τζαζ JAZZ
Μουσική Country COUNTRY
Εθνική Μουσική NATION M
Παλιά Τραγούδια OLDIES
Φολκλορική Μουσική FOLK M
Ντοκιµαντέρ DOCUMENT
∆εν αναφέρεται NONE
Σηµείωση
Μπορείτε να χρησιµοποιείτε αυτή τη λειτουργία
σε µερικέσ χώρεσ που δεν εκπέµπονται
δεδοµένα PTY (Programme Type selection =
Επιλογή Τύπου Προγράµµατοσ).
συνέχεια στην επµενη σελίδα n
13
Page 80

1 Πιέστε (PTY) κατά τη λήψη FM, µέχρι να
εµφανιστεί η ένδειξη “PTY”.
Αυτµατη ρύθµιση του
ρολογιού
Εάν ο σταθµσ εκπέµπει δεδοµένα PTY,
εµφανίζεται το νοµα του τρέχοντοσ
τύπου προγράµµατοσ. Εάν ο σταθµσ
που λαµβάνετε δεν είναι RDS σταθµσ
ή δε λαµβάνονται τα δεδοµένα RDS,
εµφανίζεται το “- - - - -”.
2 Πιέστε επανειληµµένα το (PTY) µέχρι
να εµφανιστεί ο τύποσ προγράµµατοσ
που θέλετε.
Οι τύποι προγραµµάτων εµφανίζονται
µε τη σειρά που φαίνεται στον
παραπάνω πίνακα. Σηµειωτέον τι δεν
µπορείτε να επιλέξετε για αναζήτηση το
“NONE” (∆εν αναφέρεται).
3 Πιέστε το πλήκτρο SEEK/AMS επάνω ή
κάτω.
Η συσκευή αρχίζει να αναζητά κάποιο
σταθµ που µεταδίδει τον επιλεγµένο
τύπο προγράµµατοσ. ταν η συσκευή
βρει το πργραµµα, ο τύποσ
προγράµµατοσ εµφανίζεται και πάλι για
πέντε δευτερλεπτα.
Εάν η συσκευή δε βρίσκει τον τύπο
προγράµµατοσ, στην οθνη
εµφανίζονται εναλλάξ για πέντε
δευτερλεπτα η ένδειξη “NO” και ο
τύποσ προγράµµατοσ. Επανέρχεται
κατπιν στο σταθµ που είχατε επιλέξει
προηγουµένωσ.
Τα δεδοµένα CT (Ώρα Ρολογιού) απ την
εκποµπή RDS, ρυθµίζουν αυτµατα το
ρολι.
1 Κατά τη ραδιοφωνική λήψη, πατήστε
(SHIFT), και µετά πατήστε
επανειληµµένα (2) (SET UP), µέχρι να
εµφανιστεί η ένδειξη “CT”.
2 Πιέστε επανειληµµένα (4) (n) µέχρι να
εµφανιστεί η ένδειξη “CT-ON”.
Το ρολι ρυθµίστηκε.
3 Πιέστε (SHIFT) για να επιστρέψετε στην
κανονική οθνη.
Ακύρωση τησ λειτουργίασ CT
Επιλέξτε “CT-OFF” στο βήµα 2
παραπάνω.
Σηµειώσεισ
• Η λειτουργία CT πιθαν να µην ισχύει ακµη
και εάν λαµβάνετε κάποιο σταθµ RDS.
• Πιθανν να υπάρχει διαφορά µεταξύ τησ ώρασ
που ρύθµισε η λειτουργία CT και τησ
πραγµατικήσ ώρασ.
14
Page 81

Αλλεσ Λειτουργίεσ
Μπορείτε επίσησ να χειρίζεστε αυτή τη
συσκευή µε ένα προαιρετικ περιστροφικ
χειριστήριο.
Χρήση του
περιστροφικού
χειριστηρίου
Το περιστροφικ χειριστήριο λειτουργεί µε
την πίεση πλήκτρων και/ή περιστροφικών
χειρισµών.
Μαρκάρισµα του
περιστροφικού
τηλεχειριστηρίου
Ανάλογα µε πώσ θα τοποθετήσετε το
περιστροφικ τηλεχειριστήριο,
τοποθετήστε την κατάλληλη ετικέτα, πωσ
φαίνεται στην παραπάνω εικνα.
SOUND
MODE
DSPL
DSPL
MODE
SOUND
Με πίεση των πλήκτρων
(τα πλήκτρα SOURCE και MODE)
(SOURCE)
(MODE)
Κάθε φορά που πιέζετε (SOURCE), η
πηγή αλλάζει ωσ ακολούθωσ:
TUNER ˜ TAPE
Με πίεση του (MODE) η λειτουργία
αλλάζει µε τουσ ακλουθουσ τρπουσ;
• Κασετφωνο: κατεύθυνση αναπαραγωγήσ
• ∆έκτησ: FM1 n FM2 n FM3 n MW
Συµβουλή
ταν ο διακπτησ POWER SELECT βρίσκεται στη
θέση B, µπορείτε να ενεργοποιείτε αυτή τη
συσκευή πιέζοντασ το πλήκτρο (SOURCE) στο
περιστροφικ τηλεχειριστήριο.
n LW
15
Page 82

Με περιστροφή του ρυθµιστή
(ο ρυθµιστήσ SEEK/AMS)
Γυρίστε το ρυθµιστή στιγµιαία και
αφήστε τον για να:
• Εντοπίστε την αρχή των κοµµατιών
τησ κασέτασ. Γυρίστε και κρατήστε
γυρισµένο το ρυθµιστή, και αφήστε
τον για να τυλίξετε γρήγορα την
κασέτα. Για να ξεκινήσετε
αναπαραγωγή ενώ τυλίγετε γρήγορα
την κασέτα, πατήστε (MODE).
• Συντονίσετε αυτµατα σε σταθµούσ.
Στρέψτε και κρατήστε στραµµένο το
χειριστήριο για να βρείτε ένα
συγκεκριµένο σταθµ.
Σπρώχνοντασ προσ τα µέσα και
στρέφοντασ το χειριστήριο
(το χειριστήριο PRESET/DISC)
Πιέστε το
πλήκτρο
(SOUND) για
να ρυθµίσετε
την ένταση
και το µενού
ήχου.
Πιέστε (DSPL) για να αλλάξετε τισ
εµφανιζµενεσ ενδείξεισ.
Αλλαγή τησ κατεύθυνσησ λειτουργίασ
Η λειτουργική κατεύθυνση των χειρισµών
είναι προρυθµισµένη απ το εργοστάσιο
πωσ φαίνεται παρακάτω.
Αύξηση
Μείωση
Εάν θέλετε να τοποθετήσετε το
περιστροφικ τηλεχειριστήριο στη δεξιά
πλευρά τησ κολνασ του τιµονιού,
µπορείτε να αντιστρέψετε τη λειτουργική
κατεύθυνση.
Πιέστε προσ τα µέσα και περιστρέψτε
ταυτχρονα το ρυθµιστή για να:
Λάβετε τουσ σταθµούσ που είναι
καταχωρηµένοι στα αριθµητικά
πλήκτρα.
Αλλοι χειρισµοί
Γυρίστε το ρυθµιστή VOL
για να ρυθµίσετε την
ένταση του ήχου.
16
Πιέστε το (ATT)
για να
εξασθενήσετε
τον ήχο.
OFF
Πιέστε το (OFF)
για να κλείσετε
τη συσκευή.
Πιέστε το (SOUND) για δύο
δευτερλεπτα ενώ πιέζετε προσ τα
µέσα το ρυθµιστή VOL.
Συµβουλή
Μπορείτε επίσησ να αλλάξετε τη λειτουργική
κατεύθυνση αυτών των χειρισµών απ τη
συσκευή (δείτε την “Αλλαγή των ρυθµίσεων ήχου
και οθνησ” στη σελίδα 17).
Page 83

Ρύθµιση των
χαρακτηριστικών του
ήχου
Μπορείτε να ρυθµίσετε τα µπάσα, τα πρίµα
και την ισοστάθµιση δεξιά-αριστερά και
εµπρσ-πίσω.
Μπορείτε να αποθηκεύσετε ανεξάρτητα
για κάθε πηγή τισ στάθµεσ για τα µπάσα και
τα πρίµα.
1 Επιλέξτε το στοιχείο που θέλετε να
ρυθµίσετε, πιέζοντασ επανειληµµένα το
(SOUND).
VOL (ένταση) n BAS (µπάσα ή χαµηλέσ
συχντητεσ) n TRE (πρίµα ή υψηλέσ
συχντητεσ) n BAL (Αριστερά-∆εξιά)
n FAD (Εµπρσ-Πίσω)
2 Ρυθµίστε την επιλεγµένη ένδειξη
στρέφοντασ τον περιστροφικ
επιλογέα.
Κάντε τη ρύθµιση µέσα σε τρία
δευτερλεπτα απ την επιλογή τησ
ένδειξησ. (Μετά απ τρία
δευτερλεπτα, η λειτουργία επιλογήσ
επιστρέφει στη ρύθµιση τησ έντασησ.)
Αλλαγή των ρυθµίσεων
ήχου και οθνησ
Μπορούν να οριστούν οι ακλουθεσ
ρυθµίσεισ:
• CLOCK (σελίδα 5).
• CT (Ώρα Ρολογιού)* (σελίδα 14).
• AMBER/GREEN – αλλαγή του χρώµατοσ
φωτισµού σε πορτοκαλί ή πράσινο.
• BEEP – ενεργοποίηση ή απενεργοποίηση
του µπιπ.
• RM (Περιστροφικ Τηλεχειριστήριο) –
αλλαγή τησ λειτουργικήσ κατεύθυνσησ
στο περιστροφικ τηλεχειριστήριο.
— Επιλέξτε “NORM” για να
χρησιµοποιήσετε το περιστροφικ
τηλεχειριστήριο στην εργοστασιακά
προρυθµισµένη θέση του.
— Επιλέξτε “REV” εάν τοποθετήσετε το
περιστροφικ τηλεχειριστήριο στη
δεξιά πλευρά τησ κολνασ του
τιµονιού.
• M.DSPL – ενεργοποίηση και
απενεργοποίηση τησ οθνησ
παρακολούθησησ.
1 Πιέστε (SHIFT).
2 Πιέστε επανειληµµένα (2) (SET UP)
µέχρι να εµφανιστεί η ένδειξη που
θέλετε.
Εξασθένηση του ήχου
Πατήστε (ATT) στο προαιρετικ
περιστροφικ χειριστήριο.
Η ένδειξη “ATT-ON” αναβοσβήνει
στιγµιαία.
Για να επαναφέρετε την προηγούµενη
ένταση, πατήστε (ATT) και πάλι.
Συµβουλή
Η συσκευή µειώνει αυτµατα την ένταση ταν
δέχεστε µια τηλεφωνική κλήση (Λειτουργία
Τηλεφώνου-ATT) (mνο στα XR-5890R/4890).
Κάθε φορά που πιέζετε το πλήκτρο (2)
(SET UP), η ένδειξη αλλάζει ωσ
ακολούθωσ:
CLOCK n CT* n AMBER/GREEN n BEEP
n RM n M.DSPL
* mνο στα XR-5890R/5880R.
Σηµείωση
Η εµφανιζµενη ένδειξη διαφέρει ανάλογα
την πηγή.
3 Πιέστε (4) (n) για να επιλέξετε τη
ρύθµιση που θέλετε (για παράδειγµα:
ON ή OFF).
4 Πιέστε (SHIFT).
Αφού ολοκληρωθεί η ρύθµιση τησ
λειτουργίασ, η οθνη επανέρχεται σε
κανονική λειτουργία αναπαραγωγήσ.
Σηµείωση
Εάν εµφανιστεί η ένδειξη “SFT”, πατήστε (SHIFT)
για να ολοκληρώσετε τη ρύθµιση λειτουργίασ.
17
Page 84

Ενίσχυση των µπάσων
— D-bass
Μπορείτε να απολαµβάνετε καθαρά και
δυνατά µπάσα. Η λειτουργία D-bass
ενισχύει το σήµα χαµηλήσ συχντητασ µε
πιο οξεία καµπύλη απ τη συµβατική
ενίσχυση των µπάσων.
Η γραµµή µπάσων ακούγεται πιο καθαρά
ακµη και εάν η ένταση των φωνητικών
παραµένει η ίδια. Με τη ρύθµιση D-BASS
µπορείτε να τονίσετε και να ρυθµίσετε
εύκολα τα µπάσα.
D-BASS 3
D-BASS 2
Στάθµη
0dB
Ρύθµιση τησ καµπύλησ µπάσων
Γυρίστε το ρυθµιστή D-BASS για να
ρυθµίσετε τη στάθµη των µπάσων (1, 2, ή
3).
Στην οθνη εµφανίζεται το “D-BASS”.
Για ακύρωση, γυρίστε το διακπτη στη
θέση OFF.
Σηµείωση
Aν ο ήχοσ των µπάσων είναι παραµορφωµένοσ,
ρυθµίστε το D-bass ή την ένταση του ήχου
ανάλογα.
D-BASS 1
Συχντητα (Hz)
Πρσθετεσ
Πληροφορίεσ
Προφυλάξεισ
•Εάν το αυτοκίνητ σασ παρέµεινε στον
ήλιο, µε αποτέλεσµα να ανέβει σηµαντικά
η θερµοκρασία στο εσωτερικ του,
αφήστε τη συσκευή να κρυώσει πριν τη
λειτουργήσετε.
•Εάν δεν τροφοδοτείται η συσκευή,
ελέγξτε πρώτα τισ συνδέσεισ. Εάν οι
συνδέσεισ είναι εντάξει, ελέγξτε την
ασφάλεια.
•Εάν δεν ακούγεται ήχοσ απ τα ηχεία
ενσ συστήµατοσ 2-ηχείων, ρυθµίστε την
κατανοµή ήχου εµπρσ-πίσω στην
κεντρική θέση.
•Εάν παίζετε µια κασέτα για πολύ ώρα, η
κασέτα πιθαν να ζεσταθεί απ τον
ενσωµατωµένο ενισχυτή. Ωστσο, αυτ
δεν είναι δείγµα κακήσ λειτουργίασ.
Εάν έχετε κάποιεσ απορίεσ ή προβλήµατα
µε τη συσκευή σασ, τα οποία δεν
καλύπτονται απ αυτ το εγχειρίδιο,
παρακαλώ συµβουλευτείτε το τοπικ σασ
κατάστηµα τησ Sony.
Για να διατηρήσετε την υψηλή
ποιτητα ήχου
Εάν υπάρχουν θέσεισ ποτών κοντά στο
στερεοφωνικ σασ, προσέξτε να µη χυθεί
χυµσ ή άλλα αναψυκτικά επάνω σε αυτ.
Υπολείµµατα ζάχαρησ στη συσκευή ή στισ
κασέτεσ µπορούν να λερώσουν τισ
κεφαλέσ αναπαραγωγήσ, να αλλοιώσουν
την ποιτητα του ήχου, ή να εµποδίσουν
εντελώσ την αναπαραγωγή ήχου.
Τα κιτ κασετών καθαρισµού δεν µπορούν
να αφαιρέσουν τη ζάχαρη απ τισ κεφαλέσ
τησ συσκευήσ.
18
Page 85

Σηµειώσεισ σχετικά µε τισ Κασέτεσ
Φροντίδα των κασετών
•Μην αγγίζετε την επιφάνεια τησ ταινίασ
µιασ κασέτασ, διτι η τυχν σκνη ή
βρωµιά θα λερώσει τισ κεφαλέσ.
•Μην αφήνετε τισ κασέτεσ κοντά σε
εξοπλισµ µε ενσωµατωµένουσ
µαγνήτεσ, πωσ ηχεία και ενισχυτέσ, διτι
µπορεί να προκληθεί διαγραφή ή
παραµρφωση τησ εγγραφήσ τησ.
•Μην αφήνετε τισ κασέτεσ στον ήλιο, σε
ιδιαίτερα χαµηλέσ θερµοκρασίεσ ή σε
υγρασία.
•Εάν η ταινία τησ κασέτασ είναι χαλαρή,
αυτ µπορεί να έχει ωσ αποτέλεσµα την
εµπλοκή τησ στο µηχανισµ τησ
συσκευήσ. Πριν εισάγετε µια κασέτα,
χρησιµοποιήστε ένα µολύβι ή κάποιο
παρµοιο αντικείµενο για να τεντώσετε
την ταινία.
Χαλάρωµα
•Οι παραµορφωµένεσ κασέτεσ και οι
ξεκολληµένεσ ετικέτεσ µπορεί να
προκαλέσουν προβλήµατα κατά την
εισαγωγή ή εξαγωγή µιασ κασέτασ.
Αφαιρέστε ή αντικαταστήστε τισ
ξεκολληµένεσ ετικέτεσ.
κασετών µπορεί να έχει ωσ αποτέλεσµα
την εµπλοκή τουσ στο µηχανισµ του
κασετοφώνου.
Συντήρηση
Αντικατάσταση Ασφαλειών
ταν αντικαθιστάτε µια ασφάλεια,
βεβαιωθείτε τι χρησιµοποιείτε κάποια τησ
ίδιασ έντασησ ρεύµατοσ µε την αρχική
ασφάλεια. Εάν καεί η ασφάλεια, ελέγξτε τη
σύνδεση τροφοδοσίασ και αντικαταστήστε
την ασφάλεια. Εάν η ασφάλεια καεί και
πάλι µετά την αντικατάσταση, πιθαν να
υπάρχει κάποια εσωτερική βλάβη. Σε
τέτοια περίπτωση, συµβουλευτείτε το
τοπικ κατάστηµα τησ Sony.
XR-5890R/5880R:
•Ο ήχοσ µπορεί να ακούγεται
παραµορφωµένοσ κατά την αναπαραγωγή
τησ κασέτασ. Η κεφαλή του κασετοφώνου
πρέπει να καθαρίζεται µετά απ 50 ώρεσ
χρήσησ.
Κασέτεσ µεγαλύτερεσ απ 90 λεπτά
Η χρήση κασετών µεγαλύτερων των 90
λεπτών δε συνιστάται, εκτσ απ την
περίπτωση συνεχούσ αναπαραγωγήσ
µεγάλησ διάρκειασ. ∆ε συνιστάται η χρήση
κασετών µεγαλύτερων απ 90 λεπτά, εκτσ
τησ συνεχούσ αναπαραγωγήσ µεγάλησ
διάρκειασ. Η ταινία που χρησιµοποιείται σε
αυτέσ τισ κασέτεσ είναι πολύ λεπτή και
ξεχειλώνει εύκολα. Το συχν ξεκίνηµα και
σταµάτηµα αναπαραγωγήσ αυτών των
Ασφάλεια (10 A)
XR-4890/4880:
Ασφάλεια (10 A)
Προσοχή
Ποτέ µη χρησιµοποιείτε µια ασφάλεια για
µεγαλύτερο ρεύµα απ την αρχική, διτι
κάτι τέτοιο µπορεί να καταστρέψει τη
συσκευή.
19
Page 86

Καθαρισµσ των Επαφών
Εάν οι επαφέσ µεταξύ τησ συσκευήσ και
τησ πρσοψησ δεν είναι καθαρέσ, η
συσκευή µπορεί να µη λειτουργεί σωστά.
Για να αποφύγετε κάτι τέτοιο,
απελευθερώστε την πρσοψη πιέζοντασ το
(RELEASE), και µετά βγάλτε την και
καθαρίστε τισ επαφέσ µε ένα ξυλάκι για τα
αυτιά βουτηγµένο σε οινπνευµα. Μην
εξασκείτε µεγάλη δύναµη, διτι µπορεί να
καταστρέψετε τισ επαφέσ.
Κυρίωσ συσκευή
Πίσω τµήµα τησ πρσοψησ
Σηµειώσεισ
• Για λγουσ ασφαλείασ, πριν καθαρίσετε τισ
υποδοχέσ, σβήστε τον κινητήρα και βγάλτε το
κλειδί απ το διακπτη ανάφλεξησ.
• Ποτέ µην αγγίζετε τισ υποδοχέσ µε τα δάχτυλά
σασ ή άλλα µεταλλικά αντικείµενα.
Αφαίρεση τησ συσκευήσ
1
Κλειδί απελευθέρωσησ
(παρέχεται)
2
3
4
20
Page 87

Τεχνικά Χαρακτηριστικά
Κασετφωνο
Κανάλι εγγραφήσ κασέτασ
Wow & flutter 0.08 % (WRMS)
Απκριση συχντητασ 30 – 18,000 Hz
Λγοσ Σήµατοσ/Θρυβο (S/N)
Στερεοφωνικ 2καναλιών αναπαραγωγήσ
4-καναλιών εγγραφήσ
Τύποι καoέτασ
TYPE II, IV* 61 dB
TYPE I 58 dB
* mνο στα XR-5890R/
4890
∆έκτησ
FM
Περιοχή συντονισµού 87.5 – 108.0 MHz
Επαφή κεραίασ Υποδοχή εξωτερικήσ
Ενδιάµεση συχντητα 10.7 MHz
Ωφέλιµη ευαισθησία 9 dBf
Επιλεξιµτητα 75 dB στα 400 kHz
Λγοσ Σήµατοσ-προσ-θρυβο
Αρµονική παραµρφωση στα 1 kHz
∆ιαχωρισµσ 35 dB στα 1 kHz
Απκριση συχντητασ 30 – 15,000 Hz
MW/LW
Περιοχή συντονισµού MW: 531 – 1,602 kHz
Επαφή κεραίασ Υποδοχή εξωτερικήσ
Ενδιάµεση συχντητα 10.7 MHz/450 kHz
Ευαισθησία MW: 30 µV
κεραίασ
65 dB (στερεοφωνικά),
68 dB (µονοφωνικά)
0.7 % (στερεοφωνικά),
0.4 % (µονοφωνικά)
LW: 153 – 281 kHz
κεραίασ
LW: 50 µV
Γενικά
Έξοδοι Ακροδέκτησ ελέγχου
Ρυθµίσεισ τνου Μπάσα ±8 dB στα
Απαιτήσεισ ισχύοσ Μπαταρία αυτοκινήτου
∆ιαστάσεισ Περίπου 188 × 58 ×
∆ιαστάσεισ τοποθέτησησ
Βάροσ Περίπου 1.2 kg
Συνοδευτικά εξαρτήµατα
Προαιρετικά εξαρτήµατα
Η σχεδίαση και τα χαρακτηριστικά µπορούν να
αλλάξουν χωρίσ προειδοποίηση.
ρελέ ηλεκτρικήσ κεραίασ
Ακροδέκτησ ελέγχου
τηλεφώνου ATT (mνο
στα XR-5890R/4890)
100 Hz
Πρίµα ±8 dB στα 10 kHz
12 V DC
(αρνητική γείωση)
181 mm (π/υ/β)
Περίπου 182 × 53 ×
164 mm (π/υ/β)
Εξαρτήµατα για την
εγκατάσταση και τισ
συνδέσεισ (1 σετ)
Θήκη πρσοψησ (1)
Περιστροφικ
τηλεχειριστήριο
RM-X4S
Ενισχυτήσ
Έξοδοι Έξοδοι ηχείων
(µονωµένεσ υποδοχέσ)
Σύνθετη αντίσταση ηχείων
4 – 8 ohms
Μέγιστη ισχύσ εξδου 35 W × 4 (στα 4 ohms)
21
Page 88

Οδηγσ Αντιµετώπισησ προβληµάτων
Η ακλουθη λίστα θα σασ βοηθήσει να επιλύσετε τα προβλήµατα που πιθανν να
συναντήσετε µε τη συσκευή σασ.
Πριν διαβάσετε την παρακάτω λίστα, ελέγξτε τισ συνδέσεισ και τισ διαδικασίεσ χειρισµού.
Γενικά
Πρβληµα
Καθλου ήχοσ.
Τα περιεχµενα τησ µνήµησ
διαγράφτηκαν.
∆εν εµφανίζονται ενδείξεισ
στην οθνη.
Αναπαραγωγή κασέτασ
Πρβληµα
Ο ήχοσ είναι παραµορφωµένοσ.
Ο Αυτµατοσ Μουσικσ
Αισθητήρασ δε λειτουργεί
σωστά.
Αιτία/Λύση
•Ακυρώστε τη λειτουργία ATT.
•Σε συστήµατα δύο ηχείων, ρυθµίστε την ισοστάθµιση
εµπρσ-πίσω στην κεντρική θέση.
•Για να ρυθµίσετε την ένταση, στρέψτε δεξιστροφα τον
επιλογέα.
• Το καλώδιο τροφοδοσίασ ή η µπαταρία αποσυνδέθηκαν.
• Πατήθηκε το πλήκτρο επανεκκίνησησ (reset).
n Αποθηκεύστε πάλι στη µνήµη.
Αφαιρέστε την πρσοψη και καθαρίστε τισ επαφέσ. Για
περισστερεσ λεπτοµέρειεσ δείτε τον “Καθαρισµ των
επαφών” (σελίδα 20).
Αιτία/Λύση
Η κεφαλή έχει λερωθεί.
n Καθαρίστε την κεφαλή µε µια κασέτα καθαρισµού
στεγνού τύπου του εµπορίου.
•Υπάρχει θρυβοσ µεταξύ των κοµµατιών.
•Κάποιο κεν είναι πολύ σύντοµο (λιγτερο απ τέσσερα
δευτερλεπτα).
•Το πλήκτρο SEEK/AMS πιέζεται επάνω αµέσωσ πριν τα
ακλουθα κοµµάτια.
•Το πλήκτρο SEEK/AMS πιέζεται κάτω αµέσωσ µετά το
ξεκίνηµα του κοµµατιού.
•Μια µεγάλη παύση, ή ένα πέρασµα χαµηλών συχνοτήτων
ή µια στάθµη πολύ χαµηλού ήχου λαµβάνεται ωσ κεν
στην κασέτα.
Ραδιοφωνική λήψη
Πρβληµα
Ο συντονισµσ
προρυθµισµένων σταθµών
είναι αδύνατοσ.
Ο αυτµατοσ συντονισµσ
είναι αδύνατοσ.
Αναβοσβήνει η ένδειξη “ST”.
22
Αιτία/Λύση
•Καταχωρήστε τη σωστή συχντητα στη µνήµη.
•Το εκπεµπµενο σήµα είναι πολύ ασθενέσ.
Η µετάδοση είναι πολύ χαµηλή.
n Χρησιµοποιήστε χειροκίνητο συντονισµ.
•Συντονίστε µε ακρίβεια στη συχντητα.
•Το εκπεµπµενο σήµα είναι πολύ ασθενέσ.
n Γυρίστε σε λειτουργία MONO (σελίδα 9).
Page 89

Λειτουργίεσ RDS (µνο στα XR-5890R/5880R)
Πρβληµα
Αρχίσει η ΑΝΑΖΗΤΗΣΗ µετά
απ λίγα δευτερλεπτα
ακρασησ.
∆εν ακούγονται ανακοινώσεισ
για την κυκλοφορία.
Ο Τύποσ Προγράµµατοσ
εµφανίζει “NONE”.
Εάν οι λύσεισ που αναφέρονται παραπάνω δε βοηθούν στη βελτίωση τησ κατάστασησ,
συµβουλευτείτε το τοπικ κατάστηµα τησ Sony.
Αιτία/Λύση
Ο σταθµσ δεν έχει TP ή έχει ασθενέσ σήµα.
n Πατήστε επανειληµµένα (AF/TA) µέχρι να εµφανιστεί η
ένδειξη “AF TA-OFF”.
•Ενεργοποιήστε το “TA”.
•Ο σταθµσ δε µεταδίδει ανακοινώσεισ για την
κυκλοφορία µολοντι είναι TP.
n Συντονίστε σε κάποιον άλλο σταθµ.
Ο σταθµσ δεν καθορίζει τον τύπο προγράµµατοσ.
23
Page 90

Hoşgeldiniz!
İçindekiler
Sony kasetçaları satın aldığınız için teşekkür
ederiz. Bu ünite ile çeşitli özelliklerin yanı sıra
tercihe bağlı bir döner kumandayı zevkle
kullanabilirsiniz.
Kontrol düğmelerinin yeri ................................ 3
Başlarken
Ünitenin ayarı ..................................................4
Ön panelin sökümü .........................................4
Saatin ayarlanması ......................................... 5
Kasetçalar
Kaset dinlenmesi ............................................. 6
Kasetin çeşitli kiplerde çalınması ....................7
Radyo
İstasyonların otomatik olarak hafızaya alınması
— Best Tuning Memory (BTM) .................. 7
Yalnız arzu edilen istasyonların hafızaya
alınması ...................................................... 8
Hafızaya alınmış istasyonların dinlenmesi ......8
RDS (yalnız XR-5890R/5880R için)
RDS fonksiyonu hakkında ............................... 9
İstasyon isminin görülmesi ..............................9
Aynı programın otomatik olarak tekrar
ayarlanması
— Alternative Frequences (AF) ................ 10
Trafik haberlerinin dinlenmesi .......................12
RDS istasyonlarını AF ve TA verilerine
ayarlamak ................................................. 12
İstasyonun program tipine göre
yerleştirilmesi ........................................... 13
Saatin otomatik ayarı .................................... 14
Diğer Fonksiyonlar
Döner kumandanın etiketlendirilmesi ............15
Döner kumandanın kullanılması ................... 15
Ses özelliklerinin ayarlanması....................... 17
Sesin kısılması ..............................................17
Ses ve gösterge ayarlarının değiştirilmesi .... 17
Basın yükseltilmesi
— D-bass ................................................. 18
Ek bilgi
Tedbirler ........................................................18
Bakım ............................................................19
Ünitenin sökülmesi ........................................20
Özellikler ....................................................... 21
Problem arama kılavuzu ............................... 22
2
Page 91
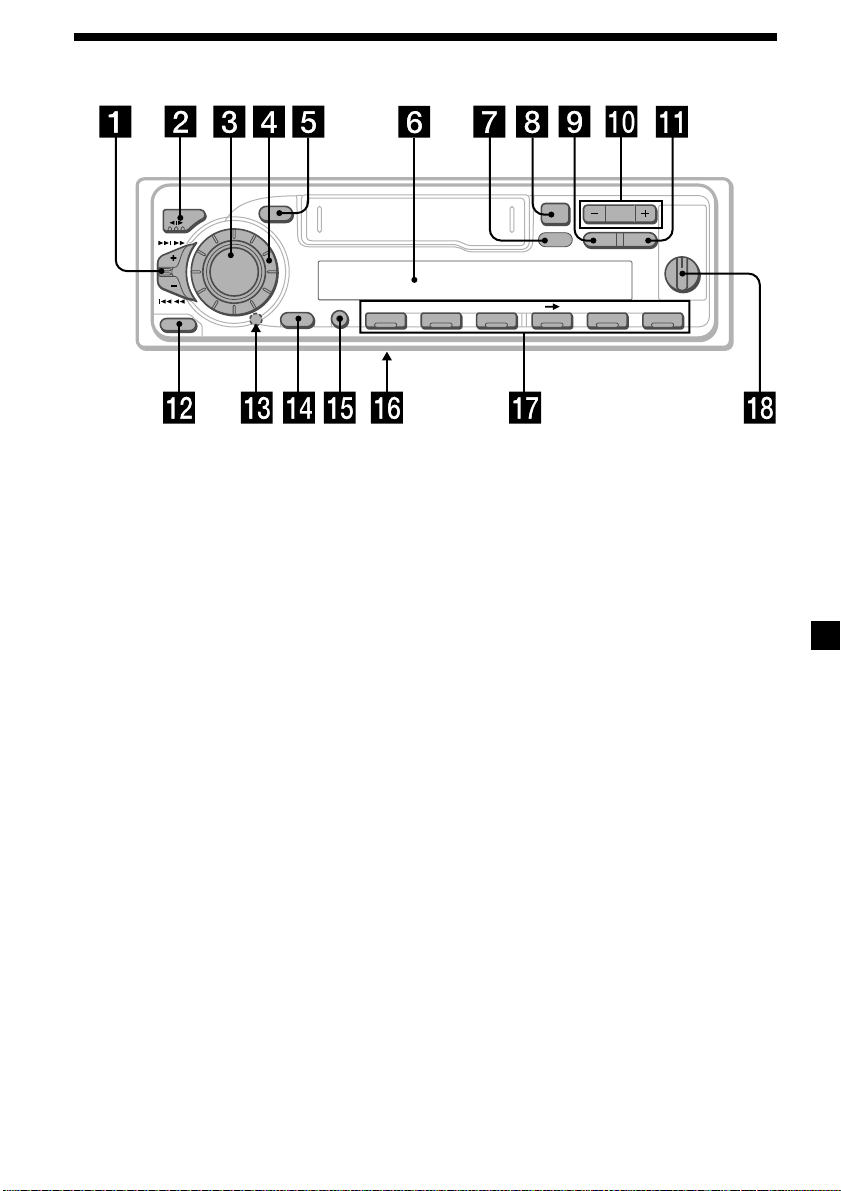
Kontrol düğmelerinin yerleri
MODE
SEEK / AMS
SOUND
SOURCE
6
D-BASS
AF/TAPTYDSPL
1
2
OFF
3
+
–
PRST
SHIFT SET UP
RELEASE
OFF
Detaylar için listedeki sayfalara başvurunuz.
1 SEEK/AMS (seek/Automatic Music
Sensor/manual search) kontrolü
6, 8, 11, 14
2 MODE (*)tuşu
Kaset çalışı sırasında:
Çalış yönünün değiştirilmesi 6
Radyo yayını sırasında:
BAND seçimi 7, 8
3 SOURCE (TAPE/RADYO) tuşu
6, 7, 8, 12
4 Kadran (ses/bas/tiz/sol-sağ/arka-ön
kontrolü) 5, 17
5 SOUND tuşu 17
6 Gösterge penceresi
7 DSPL (gösterge kipini değiştirme) tuşu
6, 9, 10
8 6 (eject) tuşu 6
9 PTY tuşu*
RDS Program 14
PLAY MODE
564321
XR-5890R/5880R
!º PRST tuşu
Radyo yayını sırasında:
Kaydedilmiş istasyonların seçimi 8
!¡ AF/TA tuşu* 10, 11, 12, 13
!™ RELEASE (ön paneli sökme) tuşu 4, 20
!£ Ayar tuşu (ünitenin ön yüzüne ön
panelin arkasına yerleştirilmiştir) 4
!¢ OFF tuşu 4, 6
!∞ SHIFT tuşu
PLAY MODE 7, 8, 11, 13
SET UP 5, 14, 17
!§ POWER SELECT düğmesi
(ünitenin üzerinde)
Kurma/Bağlantılar kılavuzunda “POWER
SELECT düğmesi” ne bakınız.
!¶ Numara tuşları 8, 11, 13
!• D-BASS kontrolü 18
* yalniz XR-5890R/5880R için
3
Page 92

Başlarken
Ünitenin ayarı
Üniteyi ilk bağlamanızdan önce veya
otomobilin aküsünü değiştirdikten sonra,
üniteyi ayarlamalısınız.
Ön paneli çıkarınız ve ayar düğmesine
tükenmez kalem gibi sivri uçlu bir obje ile
basınız.
Ayar tuşu
Not
Ayar tuşuna basmak saat ayarını ve bazı kaydedilmiş
işlevleri siler.
Ön panelin sökümü
Üniteyi çalınmaktan korumak için bu ünitenin
ön panelini sökebilirsiniz.
1 (OFF) tuşuna basınız.
Ön paneli takmak
Ön panelin a parçasını ünitenin b parçasına
gösterildiği üzere takınız ve sola doğru yerine
oturup klik sesi gelene kadar itiniz.
a
b
Notlar
• Ön paneli baş aşağı takmamaya dikkat ediniz.
• Ön paneli takarken üniteye doğru sert şekilde
bastırmayınız.
• Ön panelin gösterge penceresine sert şekilde
bastırmayınız veya aşırı basınç uygulamayınız.
• Ön paneli direkt güneş ışığına veya sıcak hava
kanalları gibi ısı kaynaklarına tabi bırakmayınız ve
nemli bir yerde muhafaza etmeyiniz. Ön paneli
hiçbir zaman ısının bir hayli artabileceği direkt
güneş ışığına park edilmiş bir otomobilin kontrol
paneline koymayınız.
Dikkat ikazı
Ön paneli çıkarmadan kontak anahtarını OFF
pozisyonuna getirirseniz, bir kaç saniye için
dikkat ikazı çalar (yalnızca POWER SELECT
düğmesi A pozisyonuna getirilmiş ise).
2 (RELEASE) tuşuna basınız, ardından ön
paneli biraz sola doğru kaydırınız ve
kendinize doğru çekerek çıkarınız.
(OFF)(OFF)
(OFF)
(OFF)(OFF)
(RELEASE)(RELEASE)
(RELEASE)
(RELEASE)(RELEASE)
Notlar
• Paneli üniteden sökerken düşürmemeye dikkat
ediniz.
• Paneli ünite hala açık iken sökerseniz, hoparlörlerin
zarar görmemesi için güç otomatik olarak kesilir.
• Ön paneli yanınızda taşıdığınızda, ön panel
çantasını kullanınız.
4
Page 93

Saatin ayarlanması
2 (SHIFT) tuşuna basınız.
Saat 24-saatlik dijital bir işaret kullanır.
Örnek: Saati 10:08’e ayarlamak
1 (SHIFT) tuşuna basınız, ardından
“CLOCK” görülene kadar tekrar tekrar
(2) (SET UP) tuşuna basınız.
11
1 (4) (n) tuşuna tuşuna basınız.
11
Saat işareti yanıp söner.
22
2 Saati ayarlayınız.
22
geriye gitmek için
ileri gitmek için
33
3 (4) (n) tuşuna tuşuna basınız.
33
Dakika işareti yanıp söner.
Saat çalışmaya başlar.
3 (SHIFT) tuşuna basınız.
Saatin ayarı bittikten sonra, gösterge
normal çalış kipine geri döner.
Not
Ünitenin üzerindeki POWER SELECT düğmesi B
pozisyonuna ayarlı ise, önce gücü açınız, sonra saati
ayarlayınız.
44
4 Dakikayı ayarlayınız.
44
geriye gitmek için
ileri gitmek için
5
Page 94
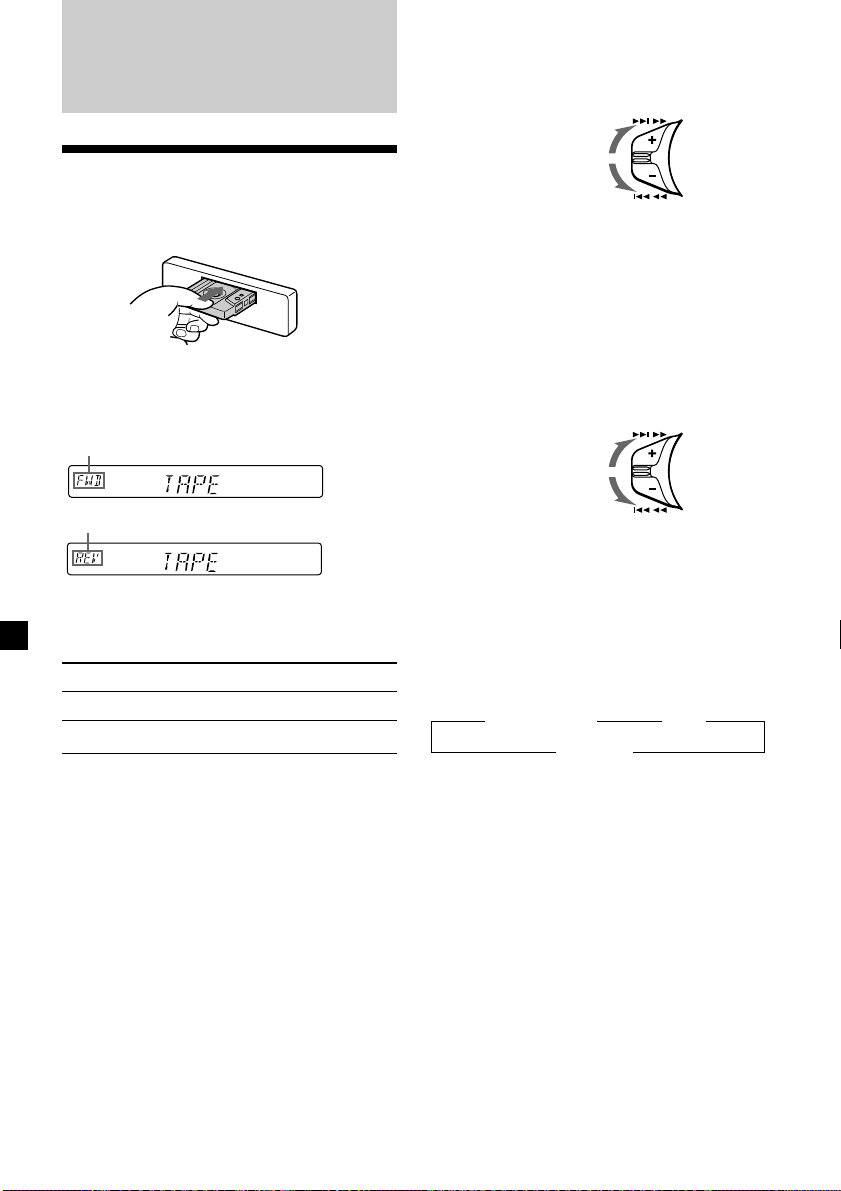
Kasetçalar
Kasetin sarılması
Çalış sırasında, SEEK/AMS düğmesini
yukarı veya aşağı itip tutunuz.
SEEK / AMS
İleri
Kaset dinlenmesi
Bir kaset yerleştiriniz.
Çalış otomatik olarak başlar.
Bir kaset yerleştirilmiş ise, çalmaya başlamak
için “FWD” veya “REV” görülene kadar tekrar
tekrar (SOURCE) tuşuna basınız.
Yukarı yüz çalıyor.
Aşağı yüz çalıyor.
Öneri
Teybin çalış yönünü değiştirmek için, (MODE) (*)
tuşuna basınız.
Aşağıdakilerden biri için Basınız
Çalışı durdurmak (OFF)
Kaseti çıkarmak 6
Geri
İleri veya geri sararken teybi çalmak için,
(MODE) (*) tuşuna basınız.
Belirli bir parçanın bulunması
— Automatic Music Sensor (AMS)
Çalış esnasında SEEK/AMS kontrolü
yukarı veya aşağı itiniz ve atlamak
istediğiniz her parça için düğmeyi
bırakınız.
Bir seferde 9 parçaya kadar atlayabilirsiniz.
Sonraki parçayı
bulmak için
Öneki parçayı
bulmak için
Not
AMS işlevi çalışmaz, eğer:
— parçaların aralarındaki boşluklar dört saniyeden
daha kısa ise
— parçaların arasında ses varsa
— kısık sesli veya sessiz uzun bölümler varsa.
SEEK / AMS
Gösterge işaretlerinin değiştirilmesi
(DSPL) tuşuna her bastığınızda, işaret
aşağıdaki gibi değişir:
z Teybin çalması z Saat
Frekans* Z
* Aşağıdaki işlevlerden biri açık iken.
— ATA işlevi
— AF/TA işlevi (XR-5890R/5880R)
Dilediğiniz işareti seçtikten sonra gösterge bir
kaç saniye sonra otomatik olarak hareket
gösterge kipine geçer.
Hareket Gösterge kipinde yukarıdaki tüm
işaretler bir bir sırayla göstergeden geçer.
Öneri
Hareket Gösterge kipi kapatılabilir. (“Ses ve gösterge
ayarlarının değiştirilmesi” ne bakınız: sayfa 17).
6
Page 95
Kasetin çeşitli kiplerde
çalınması
Kaseti çeşitli kiplerde çalabilirsiniz:
• REP (Repeat Play) çalan parçayı tekrarlar.
• METAL (Metal)* metal veya CrO2 bir kaset
çalmanızı sağlar.
• BL SKP (Blank Skip) sekiz saniyeden uzun
boşlukları atlar.
• ATA (Automatic Radio Activation) teybi
sararken otomatik olarak radyoya döner.
1 Çalış sırasında (SHIFT) tuşuna basınız.
Göstergede “SHIFT-ON” görülür.
2 Dilediğiniz çalış kipi görülene kadar
tekrar tekrar (3) (PLAY MODE) tuşuna
basınız.
(3) (PLAY MODE) tuşuna her bastığınızda
işaret aşağıdaki gibi değişir:
REP n METAL* n BL SKP n ATA
* yalniz XR-5890R/4890 için
3 “ON” işlevini seçmek için (4) (n)
tuşuna basınız.
Çalış kipi başlar.
Radyo
İstasyonların otomatik
olarak hafızaya alınması
— Best Tuning Memory (BTM)
Ünite en güçlü sinyalleri yayan istasyonları
seçer ve onları frekansları sırasınca kaydeder.
Her bantta (FM1, FM2, FM3, MW, ve LW) altı
istasyona kadar kaydedebilirsiniz.
Dikkat
İstasyonları sürüş sırasında ayarlıyorsanız,
kazaları önlemek için “Best Tuning Memory”
işlevini kullanınız.
1 Radyoyu seçmek için tekrar tekrar
(SOURCE) tuşuna basınız.
(SOURCE) tuşuna her basışınızda,
kaynaklar şu şekilde görülür:
TUNER ˜ TAPE
2 Bandı seçmek için tekrar tekrar (MODE)
tuşuna basınız.
(MODE) tuşuna her bastığınızda, bandlar
şu şekilde görülür:
z FM1 z FM2 z FM3 z MW z LW
4 (SHIFT) tuşuna basınız.
Normal çalış kipine dönmek için yukarıda adım
3’deki “OFF” tuşunu seçiniz.
Not
“SFT” işareti görülürse, kip ayarını tamamlamak için
(SHIFT) tuşuna basınız.
3 (SHIFT) tuşuna basınız, ardından
“B.T.M” görülene kadar tekrar tekrar (3)
(PLAY MODE) tuşuna basınız.
4 (4) (n) tuşuna basınız.
Ünite frekans sırasına göre istasyonları
numara tuşlarına kaydeder.
Ayar kaydedildiğinde bir uyarı sinyali
duyulur.
5 (SHIFT) tuşuna basınız.
Notlar
• Ünite zayıf sinyal yayan istasyonları kaydetmez.
Yalnız birkaç istasyon alınabiliyorsa, bazı numara
tuşları eski ayarlarını korur.
• Göstergede bir numara görülüyorsa, ünite
istasyonları görülen numaradan itibaren
kaydetmeye başlar.
7
Page 96

Yalnız arzu edilen
istasyonların hafızaya
alınması
18 FM istasyonunu (FM1, 2, ve 3'ün her biri
için 6), 6 MW istasyonunu ve 6 LW
istasyonunu dilediğiniz.
1 Radyoyu seçmek için (SOURCE) tuşuna
tekrar tekrar basınız.
2 Bandı seçmek için tekrar tekrar (MODE)
tuşuna basınız.
3 Ayar numara tuşuna kayıt etmek
istediğiniz istasyonu ayarlamak için
SEEK/AMS kontrolü yukarı veya aşağı
itiniz.
Daha önce ayarlanan bir istasyonu
bulamıyorsanız
İstasyonu aramak için SEEK/AMS
kontrolü yukarı veya aşağı itip bırakınız
(otomatik ayarlama).
Tarama ünite bir istasyon bulduğunda
durur. Dilediğiniz istasyonu bulana kadar
SEEK/AMS kontrolü tekrar tekrar yukarı
veya aşağı itiniz.
Not
Otomatik ayar çok sık duruyorsa, (SHIFT) tuşuna
basınız, ardından “LOCAL” (yerli arama kipi) görülene
kadar tekrar tekrar (3) (PLAY MODE) tuşuna
basınız. Ardından “LOCAL-ON.” işlevini seçmek için
(4) (n) tuşuna basınız. (SHIFT) tuşuna basınız.
Yalnız oldukça güçlü sinyal yayan istasyonlar
ayarlanacaktır.
Öneri
Dinlemek istediğiniz istasyonun frekansını biliyorsanız
SEEK/AMS düğmesini dilediğiniz frekans görülene
kadar yukarı veya aşağı itip tutunuz (manüel ayar).
4 “MEM” görülene kadar dilediğiniz ((1)
den (6) ya kadar) numara tuşunu basıp
tutunuz.
Göstergede numara tuşunun işareti görülür.
Not
Aynı numara tuşuna başka bir istasyonu
kaydederseniz, daha önce kaydedilen istasyon silinir.
Hafızaya alınmış
istasyonların dinlenmesi
1 Radyoyu seçmek için tekrar tekrar
(SOURCE) tuşuna basınız.
2 Bandı seçmek için tekrar tekrar (MODE)
tuşuna basınız.
3 Dilediğiniz istasyonun kayıtlı olduğu
numara tuşuna ((1) den (6) ya kadar)
basınız.
Öneri
İstasyonları hafızada kayıtlı oldukları sıra ile dinlemek
PRST
için (
(Preset Search Function).
) düğmesinin iki tuşuna birden basınız
FM Stereo sinyali zayıf ise
— Mono kipi
1 Radyo yayını sırasında (SHIFT) tuşuna
basınız, ardından “MONO” görülene
kadar tekrar tekrar (3) (PLAY MODE)
tuşuna basınız.
2 “MONO-ON” görülene kadar tekrar
tekrar (4) (n) tuşuna basınız.
Ses yükselir, fakat mono olur (“ST” kaybolur).
3 (SHIFT) tuşuna basınız.
Normal kipe geri dönmek için yukarıda adım
2’deki “MONO-OFF” işlevini seçiniz.
8
Page 97

Gösterge işaretinin değiştirilmesi
(DSPL) tuşuna her bastığınızda, işaret
aşağıdaki gibi değişir:
Frekans (İstasyon İsmi)*
* RDS verisi yayan bir FM istasyonu ayarladığınızda,
istasyonun ismi görülür (yalnız XR-5890R/5880R
için).
Dilediğiniz işareti seçtikten sonra gösterge bir
kaç saniye sonra otomatik olarak hareket
gösterge kipine geçer.
Hareket Gösterge kipinde yukarıdaki tüm
işaretler bir bir sırayla göstergeden geçer.
Öneri
Hareket Gösterge kipi kapatılabilir. (“Ses ve gösterge
ayarlarının değiştirilmesi” ne bakınız: sayfa 17).
˜˜
˜ Saat
˜˜
RDS (yalnız XR-5890R/5880R için)
RDS fonksiyonu
hakkında
Radio Data System (RDS), FM istasyonlarının
normal radyo program sinyalleri ile ek dijital
bilgi göndermesini sağlayan bir yayın servisidir.
Oto Stereo çeşitli servis imkanları sunmaktadır.
Bunlardan bir kaçı şunlardır: aynı programı
otomatik olarak tekrar ayarlamak, trafik
haberlerini dinlemek ve bir istasyonu program
türüne göre yerleştirmek.
Notlar
• Ülkeye ve bölgeye göre tüm RDS’nin tüm
fonksiyonları çalışmayabilir.
• Sinyal gücünün zayıf olduğu hallerde veya istasyon
RDS verileri aktarmaya ayarlanmamış ise RDS tam
anlamıyla çalışmayabilir.
İstasyon isminin
görülmesi
İstasyon isminin ışıkları göstergede görülür.
Bir FM istasyonu seçiniz (sayfa 7).
RDS verisi aktaran bir FM istasyonu
ayarladığınızda, göstergede istasyonun
ismi görülür.
Not
“ *” işareti bir RDS istasyonunun ayarlandığını
gösterir.
9
Page 98

Göstergedeki işaretlerin değiştirilmesi
(DSPL) tuşuna her bastığınızda, işaret
aşağıdaki gibi değişir:
İstasyonun ismi (Frekans)
Dilediğiniz işareti seçtikten sonra gösterge bir
kaç saniye sonra otomatik olarak hareket
gösterge kipine geçer.
Hareket Gösterge kipinde yukarıdaki tüm
işaretler bir bir sırayla göstergeden geçer.
Öneri
Hareket Gösterge kipi kapatılabilir. (“Ses ve gösterge
ayarlarının değiştirilmesi” ne bakınız: sayfa 17).
Not
İstasyon RDS verileri aktarmıyorsa “NO NAME”
görülür (yalnız XR-5890R/5880R için).
˜˜
˜ Saat
˜˜
Aynı programın otomatik
olarak tekrar
ayarlanması
— Alternative Frequences (AF)
Alternative Frequences (AF) fonksiyonu
otomatik olarak ağdaki en kuvvetli sinyali veren
istasyonu bulur ve ayarlar. Bu fonksiyon
sayesinde uzun bir yolculuk esnasında aynı
programı manüel bir ayar yapmak zorunda
kalmadan dinleyebilirsiniz.
Frekanslar otomatik olarak değişir.
98,5MHz
İstasyon
1 Bir FM istasyonu seçiniz (sayfa 7).
2 “AF-ON” görülene kadar tekrar tekrar
(AF/TA) tuşuna basınız.
Ünite aynı ağda daha güçlü sinyal veren bir
diğer istasyonu aramaya başlar.
96,0MHz
102,5MHz
10
Not
Bölgede başka bir istasyon yoksa ve başka bir
istasyon aramanız gerekmiyorsa, AF işlevini “AF TAOFF” görülene kadar tekrar tekrar (AF/TA) tuşuna
basarak kapatınız.
Page 99

Göstergedeki işaretlerin değiştirilmesi
(AF/TA) tuşuna her bastığınızda, işaret
aşağıdaki şekilde değişir:
” TA-ON ” AF TA-ON*
AF-ON “ AF TA-OFF “
* Bu işareti hem AF, hem de TA fonksiyonları için
seçiniz.
Notlar
• “NO AF” ve istasyonun ismi değişerek yanıp
sönüyorsa, bu ünitenin ağda başka bir istasyon
bulamadığı anlamına gelir.
• İstasyonun ismi AF işlevi açık olan bir istasyonu
seçtikten sonra yanıp sönüyorsa, bu başka bir
istasyonun bulunamadığını gösterir. İstasyonun ismi
yanıp sönerken (sekiz saniye içinde) SEEK/AMS
düğmesini yukarı veya aşağı itiniz. Ünite aynı PI
(Programme Identification) verisine sahip başka bir
frekans aramaya başlar (“PI SEEK” görülür ve ses
duyulmaz). Ünite başka bir frekans bulamazsa, “NO
PI” görülür ve ünite daha önce seçilen frekansa geri
döner.
Bölgesel bir programın dinlenmesi
“REG-ON” (bölgesel açık) işlevi başka bir
bölgesel istasyona atlamadan bölgesel
programlara ayarlı kalmanızı sağlar (AF işlevini
açmanıza gerek olmadan). Ünitenin fabrika
ayarı “REG-ON”dur, ancak bu işlevi kapatmak
istiyorsanız, aşağıdakileri yapınız.
1 Radyo yayını sırasında (SHIFT) tuşuna
basınız, ardından “REG” görülene kadar
tekrar tekrar (3) (PLAY MODE) tuşuna
basınız.
Yerli bağlantı fonksiyonu (Yalnız
İngiltere için geçerli)
Yerli bağlantı fonksiyonu, ayarlarınıza dahil
olmasa bile, diğer yerli istasyonları seçmenizi
sağlar.
1 Yerli bir istasyonun kayıtlı olduğu bir
numara tuşuna basınız.
2 Beş saniye içinde, yerli istasyonun
numara tuşuna tekrar basınız.
3 Bu işlemi dilediğiniz yerli programı
buluncaya kadar tekrarlayınız.
2 “REG-OFF” görülene kadar tekrar tekrar
(4) (n) basınız.
3 (SHIFT) tuşuna basınız.
“REG-OFF” işlevini seçmek ünitenin aynı
ağ içindeki başka bölgesel istasyonlara
geçmesine yol açabilir.
Bölgeselin açık olması için, yukarıda adım
2’deki “REG-ON” işlevini seçiniz.
Not
Bu fonksiyon İngiltere’de ve diğer bazı bölgelerde
çalışmaz.
11
Page 100

Trafik haberlerinin
dinlenmesi
Traffic Announcement (TA) ve Traffic
Programme (TP) verileri başka program
kaynaklarını dinleseniz dahi otomatik olarak
trafik haberleri veren bir FM istasyonunu
ayarlamanızı sağlar.
“TA-ON” veya “AF TA-ON” görülene
kadar tekrar tekrar (AF/TA) tuşuna
basınız.
Ünite trafik haberleri veren istasyonları
aramaya başlar. Ünite trafik haberleri
yayınlayan bir istasyon bulduğunda
göstergede “TP” görülür.
Trafik haberleri başlayınca göstergede “TA”
yanıp söner. Yanıp sönme trafik haberleri
bittiğinde son bulur.
Öneri
Trafik haberleri siz başka bir program kaynağını
dinlerken başlarsa, ünite otomatik olarak trafik
haberlerine geçer ve haberler bittiğinde otomatik
olarak daha önce dinlenilen program kaynağına
döner.
Notlar
• Dinlediğiniz istasyon trafik haberleri yayınlamıyorsa
beş saniye boyunca “NO TP” yanıp söner. Ardından
ünite trafik haberleri yayınlayan bir istasyon
aramaya başlar.
• Göstergede “EON” “TP” ile beraber görülürse ,
çalan istasyon aynı ağdaki başka istasyonların trafik
haberlerini yayınlıyordur.
Yayınlanan trafik haberlerinin iptal
edilmesi
(AF/TA) veya (SOURCE) tuşuna basınız.
Tüm trafik haberlerini iptal etmek için, “AF
TA-OFF” işlevi görülene kadar (AF/TA)
tuşuna basarak kapatabilirsiniz.
Trafik haberlerinin ses ayarı
Haberleri kaçırmamak için trafik haberlerinin
ses seviyesini önceden ayarlayabilirsiniz.
Trafik haberleri başladığında ses otomatik
olarak önceden ayarladığınız seviyeye gelir.
1 Arzu ettiğiniz ses seviyesini seçin.
2 İki saniye için (AF/TA) tuşuna basınız.
“TA” görülür, ayar hafızaya alınmıştır.
Acil haberlerin dinlenmesi
Radyo dinlerken acil bir duyuru gelirse
program otomatik olarak ona geçecektir.
Radyodan başka bir kaynak dinliyorsanız acil
duyurular AF veya TA açık olarak ayarlı ise
duyulacaktır. Ünite bundan sonra o sırada
hangi kaynağı dinlerseniz dinleyin otomatik
olarak duyurulara geçer.
RDS istasyonlarını AF ve
TA verilerine ayarlamak
RDS istasyonlarını ayarlarken ünite istasyon
verilerini ve frekanslarını kayıt eder, böylece
ayarladığınız istasyonu her dinleyişinizde AF
veya TA fonksiyonlarını açmanız gerekmez.
Özel kaydedilmiş istasyonlar için farklı bir ayar
(AF, TA, veya ikisi birden) veya bütün
kaydedilmiş istasyonlar için aynı ayarları
seçebilirsiniz.
12
 Loading...