

Page 1
FM/MW/LW
Cassette Car
Stereo
3-861-995-11 (1)
Operating Instructions
Mode d’emploi
Manual de instrucciones
Kullanım kılavuzu
For installation and connections, see the supplied installation/connections
manual.
En ce qui concerne l’installation et les connexions, consulter le manuel
d’installation/connexions fourni.
Con respecto a la instalación y las conexiones, consulte el manual de Instalación/
Conexiones suministrado.
Kurma ve bağlantı işlemleri için ünite beraberindeki Kurma/Bağlantılar kılavuzuna
bakınız.
EN
F
ES
TU
XR-2800
1998 by Sony Corporation
Page 2

Welcome!
Thank you for purchasing the Sony Cassette
Car Stereo. This unit lets you enjoy a variety of
features by using an optional rotary
commander.
Table of contents
Getting Started
Resetting the unit ................................................ 3
Cassette Player
Listening to a tape ............................................... 3
Playing a tape in various modes....................... 4
Radio
Memorising stations automatically
— Best Tuning Memory (BTM) ................... 5
Memorising only the desired stations.............. 5
Receiving the memorised stations .................... 5
Other Functions
Adjusting the sound characteristics ................. 6
Attenuating the sound ....................................... 6
Changing the sound and beep tone ................. 7
EN
Additional Information
Precautions........................................................... 7
Maintenance......................................................... 8
Removing the unit .............................................. 8
The rotary commander labels ........................... 9
Location of controls .......................................... 10
Specifications ..................................................... 11
Troubleshooting guide ..................................... 12
Index ................................................................... 13
2
Page 3

Getting Started
Cassette Player
Resetting the unit
Before operating the unit for the first time or
after replacing the car battery, you must reset
the unit.
Press the reset button with a pointed object,
such as a ballpoint pen.
Reset button
Note
Pressing the reset button will erase all the memorised
programme and memory functions.
Listening to a tape
Insert a cassette.
Playback will start automatically.
If a cassette is already inserted, press
(SOURCE) repeatedly until “TAPE” is
displayed.
TAPE
The side facing up is being played.
TAPE
The side facing down is being played.
Tip
To change the tape transport direction, press (MODE)
(*) during tape playback.
To
Stop playback
Eject the cassette
Press
(OFF)
6
EN
Getting Started/Cassette Player
Fast-winding the tape
During playback, press either side of
(SEEK/AMS) for one second.
Fast-forward
SEEK
AMS
Rewind
To start playback during fast-forwarding or
rewinding, press (MODE) (*).
3
Page 4

Locating the beginning of a track
— Automatic Music Sensor (AMS)
You can skip up to nine tracks at one time.
During playback, press either side of
(SEEK/AMS) momentarily.
To locate the succeeding tracks
SEEK
AMS
To locate the preceding tracks
Note
The AMS function may not work when :
• the blanks between tracks are shorter than 4 seconds
• there is noise between tracks
• there are long sections of low volume or quiet sections.
Changing the displayed items
Each time you press (DSPL) momentarilly
during tape playback, the displayed item
changes as follows:
Tape playback ˜ Frequency*
EN
* While the ATA function is activated.
Playing a tape in various
modes
Searching for the desired track
— Intro scan
Press (1) during playback.
“INTRO” appears on the display.
Playing a CrO2 or Metal tape
Press (4) when you want to listen to a
CrO2 (TYPE II) or metal (TYPE IV) tape.
“METAL” appears on the display.
To cancel this mode, press (4) again.
Switching to the radio while fastwinding a tape
— Automatic Tuner Activation (ATA)
Press (5) during playback.
“ATA” appears on the display.
When fast-forwarding or rewinding with
(SEEK/AMS) for two seconds, the tuner will
turn on automatically.
To cancel this mode, press (5) again.
Skipping blanks during tape
playback — Blank skip
Press (6) during playback.
“BL SKIP” appears on the display.
Blanks longer than eight seconds will
automatically be skipped during tape
playback.
To cancel this mode, press (6) again.
The first 10 seconds of all the tracks are played.
When you find the desired track, press again.
The unit returns to the normal playback mode.
To cancel this mode, press (1) again.
Playing tracks repeatedly
— Repeat play
Press (2) during playback.
“REP” appears on the display.
When the current played track is over, it will
be played again from the beginning.
To cancel this mode, press (2) again.
4
Page 5

Radio
Memorising stations
automatically
— Best Tuning Memory (BTM)
This function selects from the currently
received band the stations with the strongest
signals and Memorises them in order of their
frequency.
PREVENTING ACCIDENTS!
When tuning in while driving, use the
automatic tuning instead of manual tuning.
1 Press (SOURCE) repeatedly to select the
tuner.
Each time you press (SOURCE), the source
changes as follows:
TAPE ˜ TUNER
Memorising only the
desired stations
Up to 6 stations on each band (FM1, FM2, FM3,
MW and LW) can be stored on the preset
number buttons in the order of your choice.
Therefore, 18 FM stations can be Memorised.
If you try to store another station on the same
preset number button, the most recently stored
station will be erased.
1 Press (SOURCE) repeatedly to select the
tuner.
2 Press (MODE) repeatedly to select the
band.
3 Press (SEEK/AMS) to search for the
station you wish to store on a preset
number button.
4 Press the desired preset number button
((1) to (6)) for two seconds.
EN
Cassette Player/Radio
2 Press (MODE) repeatedly to select the
band.
Each time you press (MODE), the band
changes as follows:
FM1 n FM2 n FM3 n MW n LW
3 Press (BTM) for two seconds.
Notes
• The unit will not store stations with weak signals on the
preset number buttons. If there are only a few stations
received, some preset number buttons will remain empty.
• When a preset number indicated on the display, the unit
starts storing station from the one currently display.
The number of the selected preset number
button appears on the display.
Receiving the memorised
stations
1 Press (SOURCE) repeatedly to select the
tuner.
2 Press (MODE) repeatedly to select the
band.
3 Press the preset number button
momentarily ((1) to (6)) on which the
desired station is stored.
5
Page 6

If you cannot tune in to a preset
station
Press either side of (SEEK/AMS)
momentarily to search for the station
(automatic tuning).
Scanning stops when a station is received.
Press either side of (SEEK/AMS) repeatedly
until the desired station is received.
Note
If the automatic tuning stops too frequently, press
(LCL) to light up “LCL” on the display (local seek mode).
Only the stations with relatively strong signals are tuned
in.
Tip
If you know the frequency, press and hold either side of
(SEEK/AMS) until the desired station is received (manual
tuning).
EN
Other Functions
Adjusting the sound
characteristics
1 Select the item you want to adjust by
pressing (SEL) repeatedly.
VOL (volume) n BAS (bass) n TRE
(treble) n BAL (left-right) n FAD (frontrear)
2 Adjust the selected item by pressing
either (+) or (–).
Adjust within three seconds after selecting.
(After three seconds the button will again
serve as the volume control button.)
Attenuating the sound
Press (ATT).
The “ATT” indication flashes.
To restore the previous volume level, press
again.
6
Page 7
Changing the sound and
beep tone
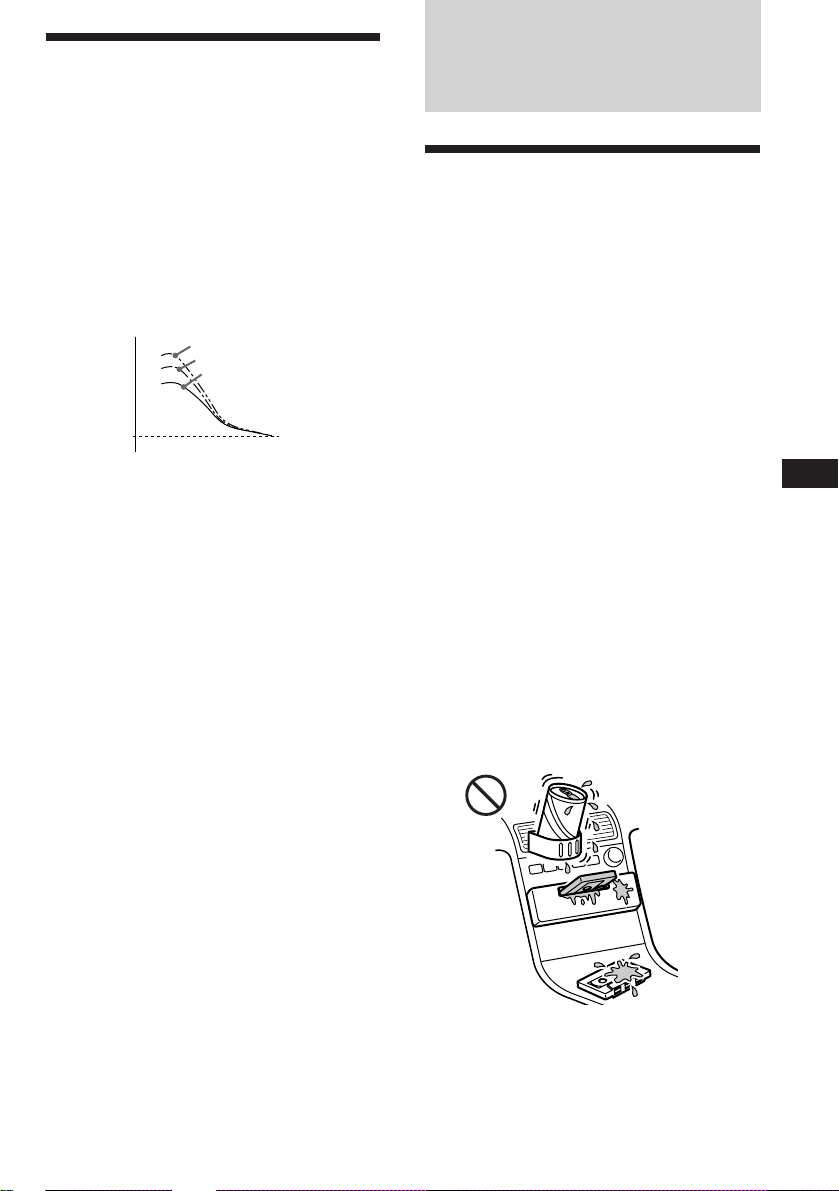
Boosting the bass sound — D-Bass
To enjoy clear and powerful bass sound, you
can boost only the low frequency signal with a
sharp curve. This is the effect you get when
use an optional subwoofer system.
For example, you can hear the bass line more
clearly even if the vocal volume remains the
same. You can emphasize and adjust the bass
sound easily with the D-BASS control.
Analog D-BASS
D-BASS 3
Level
0dB
Adjusting the bass curve
Turn the D-BASS control to adjust the
bass level (1, 2 or 3).
“D-BASS” appears in the display.
To cancel, turn the control to the OFF position.
Note
If the bass sound becomes distorted, adjust the D-BASS
control or the volume button.
Attenuating the beep tone
Press (6) while pressing (SEL).
To obtain the beep tone again, press these
buttons again.
D-BASS 2
D-BASS 1
Frequency (Hz)
Additional
Information
Precautions
• If your car was parked in direct sunlight
resulting in a considerable rise in
temperature inside the car, allow the unit to
cool off before operating it.
• If no power is being supplied to the unit,
check the connections first. If everything is in
order, check the fuse.
• If no sound comes from the speakers of a
2-speaker system, set the fader control to the
center position.
• When the tape is played back for a long
period, the cassette may become warm
because of the built-in power amplifier.
However, this is not a sign of malfunction.
If you have any questions or problems
concerning your unit that are not covered in
this manual, please consult your nearest Sony
dealer.
To maintain high quality sound
If you have drink holders near your audio
equipment, be careful not to splash juice or
other soft drinks onto the car audio. Sugary
residues on this unit or cassette tapes may
contaminate the playback heads, reduce the
sound quality, or prevent sound reproduction
altogether.
Cassette cleaning kits cannot remove sugar
from the tape heads.
EN
Radio/Other Functions/Additional Information
7
Page 8

Notes on Cassettes
Cassette care
• Do not touch the tape surface of a cassette, as
any dirt or dust will contaminate the heads.
• Keep cassettes ataryway from equipment
with built-in magnets such as speakers and
amplifiers, as erasure or distortion on the
recorded tape could occur.
• Do not expose cassettes to direct sunlight,
extremely cold temperatures or moisture.
• Slack in the tape may cause the tape to be
caught in the machine. Before you insert the
tape, use a pencil or similar object to turn the
reel and take up any slack.
EN
• Distorted cassettes and loose labels can cause
problems when inserting or ejecting tapes.
Remove or replace loose labels.
Maintenance
Fuse Replacement
When replacing the fuse, be sure to use one
with the correct amperage which is stated on
the fuse case. Never use a fuse whose
amperage rating exceeds the one supplied to
the unit as this could cause a malfunction of
the unit.
Warning
Never use a fuse with an amperage rating
exceeding the one supplied with the unit as
this could damage the unit.
Removing the unit
Slack
Cassettes longer than 90 minutes
The use of cassettes longer than 90 minutes is
not recommended except for long continuous
play. The tapes used for these cassettes are
very thin and tend to be stretched easily.
Frequent playing and stopping of these tapes
may cause them to be pulled into the cassette
deck mechanism.
8
To prevent the unit from being stolen
When you leave your car, remove the unit
from the bracket and take it away with you.
Caution
Be careful when you remove the unit. The rear
of the unit becomes very hot just after
operating it because of a built-in power
amplifer.
Page 9

The rotary commander
labels
You can control this unit with the optional
rotary commander (RM-X4S).
Some labels are supplied with the rotary
commander. Attach that label which matches
the functions of the master unit and the
mounting position of the rotary commander.
When you mount the rotary commander,
attach the appropriate label, as in the
illustration below.
DSPL
MODE
SEL
SEL
MODE
DSPL
EN
Additional Information
9
Page 10
Location of controls
SOURCE
SEEK
AMS
MODE
ATT
OFF
SEL
EN
Refer to the pages for further details.
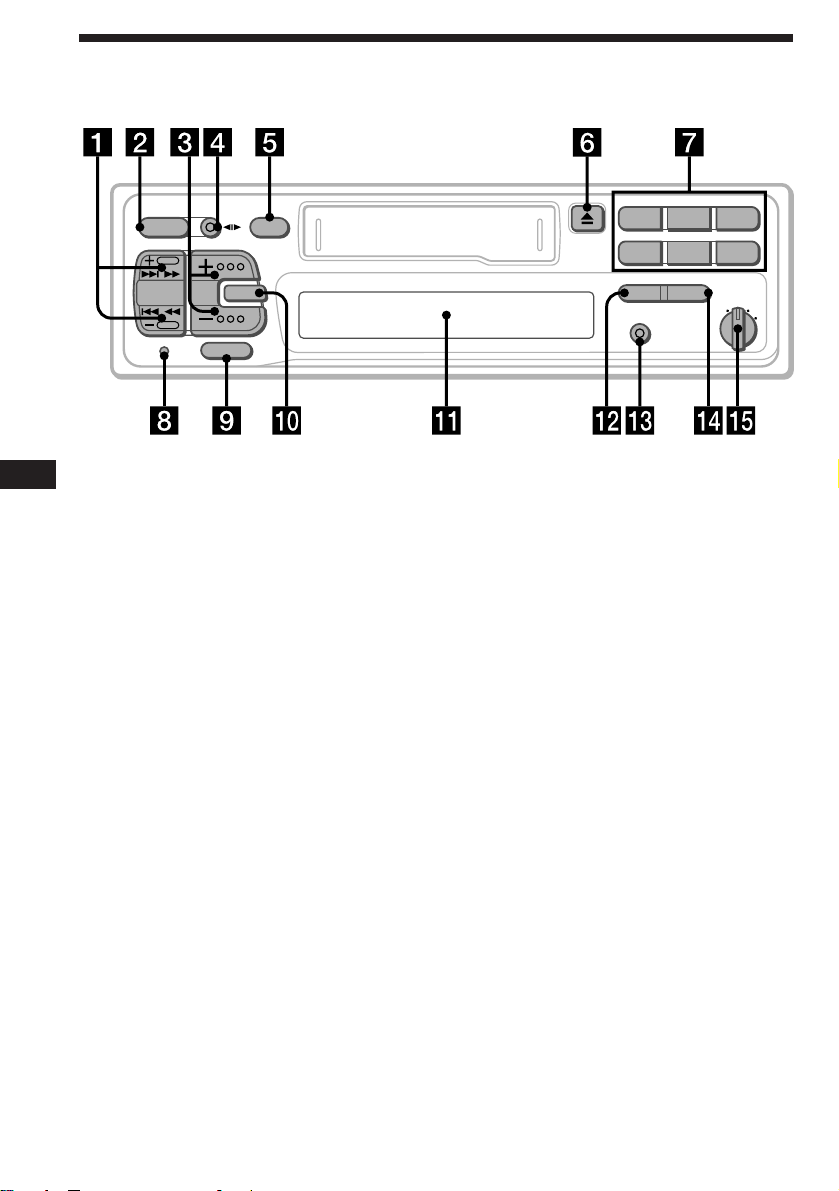
1 SEEK/AMS button 3, 4, 5, 6
2 SOURCE button (TAPE/TUNER) 3, 5
3 (+)(–) (volume/bass/treble/left-right/
front-rear control) button 6
4 MODE (*) button
During tuner reception:
BAND select 5
During tape playback:
Transport direction change 3
5 OFF button 3
6 6 (eject) button 3
7 During radio reception:
Preset number buttons 5
During tape playback:
(1) INTRO button 4
(2) REPEAT button 4
INTRO REPEAT
213
METAL
ATA BL SKIP
546
BTM LCL
DSPL
D-BASS
OFF
1
2
(4) METAL button 4
(5) ATA (Automatic Tuner
Activation) button 4
(6) BL SKIP (Blank Skip) button 4
8 Reset button 3
Press this button when you use this unit
for the first time, when you have changed
the car battery, or when the buttons of this
unit do not function properly.
9 ATT button 6
!º SEL (control mode select) button 6, 7
!¡ Display window
!™ BTM (Best tuning memory) button 5
!£ DSPL (display mode change) button 4
!¢ LCL button 6
!∞ D-BASS control 7
3
10
Page 11

Specifications
Cassette player section
Tape track 4-track 2-channel stereo
Wow and flutter 0.08 % (WRMS)
Frequency response 30 – 20,000 Hz
Signal-to-noise ratio 58 dB
Tuner section
FM
Tuning range 87.5 – 108.0 MHz
Antenna terminal External antenna connector
Intermediate frequency 10.7 MHz
Usable sensitivity 8 dBf
Selectivity 75 dB at 400 kHz
Signal-to-noise ratio 65 dB (stereo),
Harmonic distortion at 1 kHz
Separation 35 dB at 1 kHz
Frequency response 30 – 15,000 Hz
Capture ratio 2 dB
68 dB (mono)
0.5 % (stereo),
0.3 % (mono)
MW/LW
Tuning range MW: 531 – 1,602 kHz
Antenna terminal External antenna connector
Intermediate frequency 10.71 MHz/450kHz
Sensitivity MW: 30 µV
LW: 153 – 281 kHz
LW: 50 µV
Power amplifier section
Outputs Speaker outputs
Speaker impedance 4 – 8 ohms
Maximum power output 35 W × 4 (at 4 ohms)
(sure seal connectors)
General
Outputs Power antenna control
Tone controls Bass ±8 dB at 100 Hz
Power requirements 12 V DC car battery
Dimensions Approx. 188 × 58 × 183
Mounting dimensions Approx. 182 × 53 × 164 mm
Mass Approx. 1.6 kg
Supplied accessories Parts for installation and
Optional accessories Rotary commander
Design and specifications are subject to change without
notice.
lead
Treble ±8 dB at 10 kHz
(negative ground)
mm (w/h/d)
(w/h/d)
connections (1 set)
RM-X4S
EN
Additional Information
11
Page 12

Troubleshooting guide
The following checklist will assist in the correction of most problems you may encounter with your
unit.
Before going through the checklist below, refer to the operating procedures.
General
Problem
No sound.
No beep tone.
Tape playback
Problem
Playback sound is distorted.
The AMS does not operate
correctly.
EN
Radio reception
Problem
Preset tuning is not possible.
Automatic tuning is not possible.
Cause/Solution
• Adjust the volume with (+).
• Set the fader control to the center position for 2-speaker
systems.
The beep tone is attenuated.
Cause/Solution
Contamination of the tape head. n Clean the head.
• There is noise in the space between tracks.
• A blank space is too short (less than four seconds).
• + on (SEEK/AMS) is pressed immediately before the
following track.
• = on (SEEK/AMS) is pressed immediately after the track
starts.
• A long pause, or a passage of low frequencies or very low
sound level is treated as a blank space.
Cause/Solution
• Store the correct frequency.
• The broadcast is too weak.
The broadcast is too weak. n Use manual tuning.
If the above-mentioned solutions do not help to improve the situation, consult your nearest Sony
dealer.
12
Page 13

Index
A
ATT 6
Automatic Music Sensor (AMS) 4
Automatic tuning 6
Automatic Tuner Activation (ATA) 4
B, C
BAL (left-right) 6
BAS (bass) 6
Best Tuning Memory (BTM) 5
Blank skip 4
D, E
D-BASS (D-Bass) 7
Display 4
F, G, H
FAD (front-rear) 6
Fast-forward 3
Fuse 8
I, J, K
Intro scan 4
L
Local seek mode (LCL) 6
EN
Additional Information
M, N, O, P, Q
Manual tuning 6
Metal 4
R, S
Radio 5
Repeat play 4
Reset 3
Rewind 3
Rotary commander 9
T, U, V, W, X, Y, Z
Tape playback 3
TRE (treble) 6
13
Page 14

Bienvenue!
Table des matières
Nous vous remercions d’avoir fait l’acquisition
d’un radiocassette stéréo Sony. Cet appareil
vous permet d’exploiter de nombreuses
fonctions par l’intermédiaire d’un satellite de
commande proposé en option.
F
Prise en main
Réinitialisation de l’appareil ............................. 3
Lecteur de cassettes
Ecouter une cassette............................................ 3
Différents modes de lecture de cassette........... 4
Radio
Mémorisation automatique des stations
— Mémorisation du meilleur
accord (BTM) .................................................. 5
Mémorisation de stations particulières ........... 5
Réception des stations mémorisées .................. 5
Autres fonctions
Réglage du son .................................................... 6
Atténuation du son ............................................. 6
Modification du son et du bip........................... 7
Informations supplémentaires
Précautions........................................................... 7
Entretien ............................................................... 8
Retrait de l’appareil ............................................ 8
Etiquettes du satellite de commande ............... 9
Nomenclature des touches .............................. 10
Spécifications ..................................................... 11
Guide de dépannage ........................................ 12
Index ................................................................... 13
2
Page 15
Prise en main
Lecteur de cassettes
Réinitialisation de
l’appareil
Avant la mise en service de l’appareil ou après
le remplacement de la batterie de la voiture,
vous devez réinitialiser l’appareil.
Appuyez sur la touche de réinitialisation avec
un stylo-bille ou un autre objet pointu.
Touche de réinitialisation
Remarque
En appuyant sur la touche de réinitialisation, vous effacez
tous les programmes mémorisés ainsi que les fonctions de
mémoire.
Ecouter une cassette
Introduisez la cassette.
La lecture démarre automatiquement.
Lorsqu’une cassette est déjà introduite,
appuyez plusieurs fois sur (SOURCE) jusqu’à
ce que “TAPE” s’affiche.
TAPE
La face avant de la cassette est reproduite.
TAPE
La face arrière de la cassette est reproduite.
Conseil
Pour changer le sens de défilement de la bande, appuyez
sur (MODE) (*) pendant la lecture de la cassette.
Pour
Arrêter la lecture
Ejecter la cassette
Avance rapide de la cassette
En cours de lecture, appuyez sur l’un ou
l’autre côté de la touche (SEEK/AMS)
pendant au moins un secondes.
Avance rapide
SEEK
AMS
Rembobinage
Appuyez sur
(OFF)
6
F
Prise en main/Lecteur de cassettes
Pour commencer la lecture pendant le
rembobinage ou l’avance rapide, appuyez sur
(MODE) (*).
3
Page 16

Localiser le début d’une plage
— AMS (Détecteur Automatique de
Musique)
Vous pouvez sauter jusqu’à neuf plages à la
fois.
En cours de lecture, appuyez brièvement
sur l’un ou l’autre côté de (SEEK/AMS).
Pour localiser une plage suivante
SEEK
AMS
Pour localiser une plage précédente
Remarque
La fonction AMS peut se révéler inopérante lorsque:
• les espaces entre les plages font moins de 4 secondes
• Il y a des parasites entre les plages
• les plages comportent de longs passages à faible volume
ou silencieux.
Changement des paramètres
affichés
Chaque fois que vous appuyez sur (DSPL)
pendant la lecture de la cassette, le paramètre
change selon la séquence suivante:
Lecture de cassette ˜ Fréquence*
F
* Quand la fonction ATA est en service.
Différents modes de
lecture de cassette
Recherche de la plage désirée
— Fonction de lecture des intros
Appuyez sur (1) pendant la lecture.
“INTRO” apparaît sur l’afficheur.
Lecture d’une cassette CrO
2 ou
Métal
Appuyez sur (4) si vous voulez écouter
une cassette CrO2 (TYPE II) ou Métal
(TYPE IV).
“METAL” apparaît sur l’afficheur.
Pour annuler ce mode, appuyez sur (4).
Commutation de la radio en cours
d’avance rapide de la cassette
— Activation automatique de la radio (ATA)
Appuyez sur (5) pendant la lecture.
“ATA” apparaît sur l’afficheur.
Si (SEEK/AMS) est enfoncée pendant deux
secondes quand vous actionnez l’avance rapide
ou le rembobinage, l a radio est
automatiquement mise en fonction.
Pour annuler ce mode, appuyez sur (5).
Saut des passages blancs pendant
la lecture d’une cassette
— Saut des blancs
Appuyez sur (6) pendant la lecture.
“BL SKIP” apparaît sur l’afficheur.
Les blancs de plus de huit secondes sont
automatiquement omis pendant la lecture de
la cassette.
Pour annuler ce mode, appuyez sur (6).
Vous entendez les dix premières secondes de
chaque plage.
Quand vous avez atteint la plage désirée,
appuyez une nouvelle fois sur la touche.
L’appareil revient au mode de lecture normale.
Pour annuler ce mode, appuyez sur (1).
Lecture répétée
— Fonction de lecture répétée
Appuyez sur (2) pendant la lecture.
“REP” apparaît sur l’afficheur.
Quand la plage en cours de lecture arrive à sa
fin, vous l’entendez à nouveau depuis le début.
Pour annuler ce mode, appuyez sur (2).
4
Page 17

Radio
Mémorisation
automatique des stations
— Mémorisation du meilleur accord (BTM)
Cette fonction sert à sélectionner et mémoriser
dans l’ordre des fréquences les stations dont le
signal est puissant.
EVITEZ LES ACCIDENTS!
Quand vous conduisez, utilisez l’accord
automatique, plutôt que l’accord manuel.
1 Appuyez plusieurs fois de suite sur
(SOURCE) pour sélectionner le
syntonisateur.
Chaque fois que vous appuyez sur
(SOURCE), le syntonisateur change selon la
séquence suivante:
TAPE ˜ TUNER
2 Appuyez plusieurs fois de suite sur
(MODE) pour sélectionner la bande de
fréquence.
Chaque fois que vous appuyez sur
(MODE), la bande de fréquence change
selon la séquence suivante:
FM1 n FM2 n FM3 n MW n LW
3 Appuyez sur (BTM) pendant au moins
deux secondes.
Mémorisation de stations
particulières
Six stations peuvent être mémorisées dans
chaque gamme d’ondes (FM1, FM2, FM3, PO
et GO) dans l’ordre que vous voulez. Ainsi,
vous disposez de 18 présélections FM.
Si vous mémorisez une station sous un
numéro déjà occupé, la présélection
précédente est effacée.
1 Appuyez plusieurs fois de suite sur
(SOURCE) pour sélectionner le
syntonisateur.
2 Appuyez plusieurs fois de suite sur
(MODE) pour sélectionner la bande de
fréquence.
3 Appuyez sur (SEEK/AMS) pour rechercher
la station à mémoriser sous la touche de
présélection.
4 Appuyez sur la touche de présélection
voulue ((1) à (6)) pendant au moins
deux secondes.
Le numéro de présélection sélectionné apparaît
dans la fenêtre d’affichage.
Réception des stations
mémorisées
F
Lecteur de cassettes/Radio
Remarques
• L’appareil ne mémorisera pas sous les touches de
présélection les stations dont les signaux d’émission sont
faibles. Si vous ne recevez que quelques stations,
certaines touches de présélection resteront vides.
• S’il y a un numéro de présélection affiché, l’appareil
mémorise les stations sous tous les numéros disponibles à
partir de celui indiqué.
1 Appuyez plusieurs fois de suite sur
(SOURCE) pour sélectionner le
syntonisateur.
2 Appuyez plusieurs fois de suite sur
(MODE) pour sélectionner la bande de
fréquence.
3 Appuyez brièvement sur la touche de
présélection ((1) à (6)) sous laquelle la
station voulue est mémorisée.
5
Page 18

Si vous ne parvenez pas à accorder
une station préréglée
Appuyez brièvement sur l’un des côtés
de (SEEK/AMS) pour chercher la station
(syntonisation automatique).
Le balayage des fréquences cesse dès
qu’une station est reçue. Appuyez de
manière répétée sur un des côtés de
(SEEK/AMS) jusqu’à la réception de la
station désirée.
Remarque
Si la syntonisation automatique s’arrête trop fréquemment,
appuyez brièvement sur (LCL) de façon à ce que
l’indication “LCL” (mode de recherche locale) s’allume
dans la fenêtre d’affichage. Seules les stations suffisamment
puissantes peuvent être accordées.
Conseil
Si vous connaissez la fréquence, appuyez et maintenez
enfoncé l’un des côtés de (SEEK/AMS) jusqu’à réception de
la station désirée (syntonisation manuelle).
F
Autres fonctions
Réglage du son
1 Choisissez le paramètre que vous voulez
régler en appuyant plusieurs fois sur
(SEL).
VOL (volume) n BAS (grave) n TRE
(aigu) n BAL (gauche-droite) n FAD
(avant-arrière)
2 Réglez le paramètre en appuyant sur
(+) ou (–).
Faites le réglage dans les trois secondes du
choix du paramètre. (Après trois secondes, ces
touches servent à nouveau au réglage du
volume.)
Atténuation du son
Appuyez sur (ATT).
“ATT” clignote dans la fenétre d’affichage.
Pour rétablir le niveau de volume, appuyez à
nouveau sur la touche.
6
Page 19

Modification du son et du
bip
Renforcement des graves — D-Bass
Pour exploiter des graves plus puissantes et
sonores, vous pouvez accentuer uniquement
les signaux de basse fréquence suivant une
courbe plus précise. Cet effet est similaire à ce
que vous obtenez avec un haut-parleur
d’extrêmes graves en option.
Par exemple, vous distinguez les graves avec
une plus grande clarté, même si le volume de
la partie vocale est réglé au même niveau.
Vous pouvez accentuer et régler les graves
simplement à l’aide de la commande D-BASS.
D-BASS analogique
D-BASS 3
D-BASS 2
D-BASS 1
Niveau
0dB
Fréquence (Hz)
Réglage de la courbe des graves
Tournez la molette D-BASS pour régler le
niveau des graves (1, 2 ou 3).
“D-BASS” apparaît dans la fenêtre
d’affichage.
Pour annuler, mettez le disque en position
OFF.
Remarque
Si les graves comportent des distorsions, adjustez la
commande D-BASS ou la touche de volume.
Atténuation des bips sonores
Appuyez sur (6) tout en maintenant
(SEL) enfoncée.
Pour rétablir le bip, appuyez à nouveau sur
ces touches.
Informations
supplémentaires
Précautions
• Si votre voiture est parquée en plein soleil et
si la température à l’intérieur de l’habitacle a
considérablement augmenté, laissez refroidir
l’appareil avant de l’utiliser.
• Si l’appareil n’est pas alimenté, vérifiez
d’abord les connexions. Si tout est en ordre,
vérifiez le fusible.
• Si aucun son n’est diffusé par les hautparleurs d’un système à deux haut-parleurs,
réglez la commande de balance de volume
avant-arrière sur la position centrale.
• Lorsqu’une cassette est reproduite pendant
une longue période, il est possible que la
cassette s’échauffe en raison de
l’amplificateur intégré. Il ne s’agit pas d’un
signe de dysfonctionnement.
Si vous avez des questions ou des problèmes
concernant le fonctionnement de cet appareil
qui ne sont pas abordés dans le présent mode
d’emploi, consultez votre revendeur Sony.
Pour préserver la qualité sonore
Si les porte-gobelets se trouvent à proximité de
votre installation audio, veillez à ce qu’aucune
éclaboussure de jus de fruit ou de boisson
rafraîchissante ne soit projetée sur votre
autoradio. Des résidus de sucre sur cet
appareil ou sur la bande magnétique d’une
cassette risquent d’encrasser les têtes de
lecture, entraînant ainsi une altération de la
qualité sonore ou empêchant carrément la
reproduction sonore.
Les cassettes de nettoyage ne permettent pas
d’éliminer les résidus de sucre sur les têtes de
lecture.
F
Radio/Autres fonctions/Informations supplémentaires
7
Page 20

Remarques à propos des cassettes
Entretien des cassettes
•Evitez de toucher la bande magnétique d’une
cassette parce que la poussière et les
souillures entraînent un encrassement des
têtes.
•Gardez les cassettes à l’écart des appareils
intégrant des aimants, tels que des hautparleurs et des amplificateurs qui risquent de
provoquer une distorsion ou un effacement
des cassettes enregistrées.
•N’exposez pas les cassettes au rayonnement
direct du soleil, à des températures
extrêmement basses ou à de l’humidité.
•Si la bande magnétique de la cassette est
détendue, elle risque de s’emmêler dans le
mécanisme interne de l’appareil. Avant
d’introduire une cassette, tendez
correctement la bande magnétique en
tournant les bobines à l’aide d’un stylo ou
d’un tournevis.
Entretien
Remplacement du fusible
Si vous devez remplacer le fusible, veillez à
respecter l’ampérage inscrit sur le portefusible. N’utilisez jamais de fusible d’un
ampérage supérieur à celui fourni avec
l’appareil; le risque est réel.
Avertissement
N’utilisez jamais de fusible dont l’intensité
dépasse celle du fusible fourni avec l’appareil,
car vous risqueriez d’endommager l’appareil.
Retrait de l’appareil
F
•Les cassettes déformées et les étiquettes qui
se décollent risquent de poser des problèmes
lors de l’introduction ou de l’éjection. Retirez
ou remplacez les étiquettes qui se décollent.
Cassettes de plus de 90 minutes
Les cassettes d’une durée supérieure à 90
minutes sont déconseillées, sauf dans le cas
d’un enregistrement ou d’une lecture continus
de longue durée. La bande magnétique de ces
cassettes est très fine et a tendance à se
détendre plus facilement. Des opérations de
lecture et arrêt répétées avec de telles cassettes
risquent d’emmêler la bande magnétique dans
le mécanisme d’entraînement.
Jeu
Pour éviter le vol de l’appareil
Lorsque vous quittez votre voiture, retirez
l’appareil de son support et emmenez-le avec
vous.
Attention
Soyez prudent lorsque vous retirez L’appareil.
L’appareil de l’appareil s’échauffe fortement
en raison de la présence de l’amplificateur de
puissance intégré.
8
Page 21

Etiquettes du satellite de
commande
Cet appareil peut être télécommandé avec le
satellite de commande (RM-X4S).
Des étiquettes d’identification de touche sont
fournies avec le satellite de commande.
Apposez les étiquettes correspondant aux
fonctions de l’appareil principal raccordé et à
la position de montage du satellite de
commande.
Quand vous installez le satellite de commande,
collez l’étiquette comme indiqué ci-dessous.
DSPL
MODE
SEL
SEL
MODE
DSPL
F
Informations supplémentaires
9
Page 22

Nomenclature des touches
SOURCE
SEEK
AMS
Voyez les pages pour les détails.
F
MODE
ATT
OFF
SEL
1 Touche SEEK/AMS 3, 4, 5, 6
2 Touche SOURCE (TAPE/TUNER) 3, 5
3 Touche (+) (–) (volume/grave/aigu/
gauche-droite/avant-arrière) 6
4 Touche MODE (*)
En cours de réception radio:
sélection de la gamme d’ondes 5
En cours de lecture d’une cassette:
changement du sens de défilement 3
5 Touche OFF 3
5 Touche d’éjection 6 3
7 Pendant la réception radio:
Touches des numéros de présélection 5
Pendant la lecture cassette:
(1) Touche INTRO 4
(2) Touche REPEAT 4
(4) Touche METAL 4
(5) Touche ATA (Activation
automatique de la radio) 4
(6) Touche BL SKIP (saut des
passages blancs) 4
INTRO REPEAT
213
METAL
ATA BL SKIP
546
BTM LCL
DSPL
D-BASS
OFF
1
2
3
8 Touche de réinitialisation 3
Appuyez sur cette touche si vous utilisez
cet appareil pour la première fois, lorsque
vous avez remplacé la batterie de la
voiture ou encore si les touches de
l’appareil ne fonctionnent pas
correctement.
9 Touche ATT (atténuation du son) 6
!º Touche SEL (sélection du mode de
commande) 6, 7
!¡ Fenêtre d’affichage
!™ Touche BTM (mémorisation du meilleur
accord) 5
!£ Touche DSPL (changement d’affichage)
4
!¢ Touche LCL 6
!∞ Commande D-BASS 7
10
Page 23

Spécifications
Section lecteur de cassette
Pistes 4 pistes 2 canaux stéréo
Pleurage et scintillement 0,08 % (Val. eff. pond.)
Réponse en fréquence 30 – 20.000 Hz
Rapport signal/bruit 58 dB
Section tuner
FM
Plage d’accord 87,5 – 108,0 MHz
Entrée antenne Connecteur pour antenne
Fréquence intermédiaire 10,7 MHz
Sensibilité utile 8 dBf
Sélectivité 75 dB à 400 kHz
Rapport signal/bruit 65 dB (stéréo),
Distorsion harmonique à 1 kHz
Séparation 35 dB à 1 kHz
Réponse en fréquence 30 – 15.000 Hz
Taux de capture 2 dB
PO/GO
Plage d’accord PO: 531 – 1.602 kHz
Entrée antenne Connecteur pour antenne
Fréquence intermédiaire 10,71 MHz/450 kHz
Sensibilité: PO: 30 µV
extérieure
68 dB (mono)
0,5 % (stéréo),
0,3 % (mono)
GO: 153 – 281 kHz
extérieure
GO: 50 µV
Section amplificateur de puissance
Sorties Haut-parleurs (connecteurs
Impédance des haut-parleurs
Puissance maximum 35 W × 4 (sur 4 ohms)
de sécurité)
4 – 8 ohms
Généralités
Sorties Fil de commande
Réglages de tonalité Graves: ±8 dB à 100 Hz
Alimentation Batterie de voiture 12 V
Dimensions env. 188 × 58 × 183 mm
Dimensions de montage env. 182 × 53 × 164 mm
Poids env. 1,6 kg
Accessoires fournis Pièces de montage et de
Accessoires en option Satellite de commande
Conception et spécifications modifiables sans préavis.
d’antenne électrique
Aiguës: ±8 dB à 10 kHz
(masse négative)
(l/h/p)
(l/h/p)
raccordement (1 jeu)
RM-X4S
F
Informations supplémentaires
11
Page 24

Guide de dépannage
Les vérifications suivantes vous aideront à résoudre la plupart des problèmes que vous pourriez
rencontrer avec cet appareil.
Avant de parcourir la liste suivante, consultez à nouveau les procédures de fonctionnement.
Généralités
Problème
Pas de son.
Pas de bip.
Lecture cassette
Problème
Distorsion du son.
L’AMS ne fonctionne pas
correctement.
F
Réception radio
Problème
Impossible de faire une
présélection.
Accord automatique impossible.
Cause/Solution
• Réglez le volume en appuyant sur (+).
• Si vous avez une installation à deux haut-parleurs, réglez la
balance avant-arrière sur la position centrale.
Le bip est atténué.
Cause/Solution
Contamination de la tête de lecture. n Nettoyez la tête.
• Bruit dans les blancs entre les plages.
• Un blanc est trop court (moins de 4 secondes).
• + sur (SEEK/AMS) est enfoncé immédiatement avant la
plage suivante.
• = sur (SEEK/AMS) est enfoncé immédiatement après le
début de la plage.
• Une longue pause, un passage de basses fréquences ou un
passage de faible volume sont considérés comme un blanc.
Cause/Solution
• Mémorisez la fréquence correcte.
• L’émission est trop faible.
L’émission est trop faible. n Faites l’accord manuellement.
En cas d’échec, adressez-vous au revendeur Sony le plus proche.
12
Page 25

Index
A
Activation automatique de la radio (ATA) 4
ATT 6
Avance rapide 3
B, C
BAL (gauche-droite) 6
BAS (avant-arrière) 6
D, E
D-Bass 7
Détecteur automatique de musique (AMS) 4
F, G, H, I, J, K
FAD (avant-arrière) 6
Fenêtre d’affichage 4
Fusible 8
L
Lecture des intros 4
Lecture d’une cassette 3
Lecture répétée 4
M, N, O, P, Q
Mémorisation du meilleur accord (BTM) 5
Metal 4
Mode de recherche locale (LCL) 6
R
Radio 5
Reinitialisation 3
Rembobinage 3
S
Satellite de commande 9
Saut des passages blancs 4
Syntonisation automatique 6
Syntonisation manuelle 6
T, U, V, W, X, Y, Z
TRE (aigu) 6
F
Informations supplémentaires
13
Page 26

¡Bienvenido!
Indice
Enhorabuena por la adquisición del sistema
estéreo de cassettes para automóvil de Sony.
Esta unidad permite disfrutar de diversas
funciones mediante un mando rotativo
opcional
ES
Procedimientos iniciales
Restauración de la unidad ................................. 3
Reproductor de cassettes
Escucha de cintas ................................................ 3
Reproducción de la cinta en varios modos ..... 4
Radio
Memorización automática de emisoras
— Función de memorización de la mejor
sintonía (BTM)................................................ 5
Memorización de las emisoras deseadas......... 5
Recepción de emisoras memorizadas .............. 5
Otras funciones
Ajuste de las características del sonido............ 6
Atenuación del sonido ....................................... 6
Cambio de los ajustes de sonido y tono del
pitido ............................................................... 7
Información complementaria
Precauciones ........................................................ 7
Mantenimiento .................................................... 8
Extracción de la unidad ..................................... 8
Etiquetas del mando rotativo ............................ 9
Ubicación de los controles ............................... 10
Especificaciones................................................. 11
Guía para la solución de problemas............... 12
Indice alfabético ................................................ 13
2
Page 27

Procedimientos
Reproductor de
iniciales
Restauración de la unidad
Antes de emplear la unidad por primera vez, o
bien después de sustituir la batería del
automóvil, es necesario restaurar dicha
unidad.
Presione la tecla de restauración con un objeto
puntiagudo, como un bolígrafo.
Tecla de restauración
Nota
Al presionar la tecla de restauración se borrarán todos los
programas memorizados y las funciones de memoria.
cassettes
Escucha de cintas
Inserte el cassette.
La reproducción se iniciará de forma
automática.
Si ya ha insertado un cassette, presione
(SOURCE) varias veces hasta que aparezca
“TAPE”.
TAPE
La cara superior está reproduciéndose.
TAPE
La cara inferior está reproduciéndose.
Consejo
Para cambiar la dirección de transporte de cinta, presione
(MODE) (*) durante la reproducción.
Para
Detener la reproducción
Expulsar el cassette
Presione
(OFF)
6
ES
Procedimientos iniciales/Reproductor de cassettes
Bobinado rápido de cintas
Durante la reproducción, presione
cualquier lado de (SEEK/AMS) durante un
segundo.
Avance rápido
SEEK
AMS
Rebobinado
Para iniciar la reproducción durante el
rebobinado o el avance rápido, presione
(MODE) (*).
3
Page 28

Localización del comienzo de los
temas
— Sensor de música automático (AMS)
Es posible omitir un máximo de nueve temas
de una vez.
Durante la reproducción, presione
momentáneamente cualquier lado de
(SEEK/AMS).
Para localizar los temas posteriores
SEEK
AMS
Para localizar los temas anteriores
Nota
La función AMS puede no activarse si:
• el espacio en blanco entre temas es inferior a 4 segundos.
• hay ruido entre los temas.
• existen largas secciones con volumen bajo, o bien
secciones sin sonido.
Cambio de los elementos
mostrados
Cada vez que presione (DSPL)
momentáneamente durante la reproducción de
la cinta, los elementos mostrados cambian de
la siguiente forma:
Reproducción de cintas ˜ Frecuencia*
ES
* Mientras la función ATA esté activada.
Reproducción de la cinta
en varios modos
Reproducción repetida de temas
— Función de reproducción repetida
Presione (2) durante la reproducción.
Aparece “REP” en el visor.
Cuando finalice la reproducción del tema
actual, éste volverá a reproducirse desde el
principio.
Para cancelar este modo, presione (2) de
nuevo.
Reproducción de cintas CrO2 o de
metal
Presione (4) para escuchar cintas CrO2
(TYPE II) o de metal (TYPE IV).
“METAL” aparece en el visor.
Para cancelar este modo, presione (4) de
nuevo.
Sintonización de la radio durante el
bobinado rápido de cintas
— Activación automática del sintonizador
(ATA)
Presione (5) durante la reproducción.
“ATA” aparece en el visor.
Al utilizar (SEEK/AMS) para el avance rápido o
el rebobinado de la cinta durante dos segundos,
el sintonizador se activará automáticamente.
Para cancelar este modo, presione (5) de
nuevo.
Búsqueda de un tema determinado
— Función de exploración de introducciones
Presione (1) durante la reproducción.
“INTRO” aparece en el visor.
Se reproducen los 10 primeros segundos de
todos los temas.
Cuando localice el tema que desee, vuelva a
presionar la tecla. La unidad vuelve al modo
de reproducción normal.
Para cancelar este modo, presione (1) de
nuevo.
4
Omisión de los espacios en blanco
durante la reproducción de cintas
— Omisión de espacios en blanco
Presione (6) durante la reproducción.
“BL SKIP” aparece en el visor.
Los espacios en blanco superiores a ocho
segundos se omitirán automáticamente
durante la reproducción de cintas.
Para cancelar este modo, presione (6) de
nuevo.
Page 29

Radio
Memorización automática
de emisoras
— Función de memorización de la mejor
sintonía (BTM)
Esta función selecciona las emisoras de señal
más intensa dentro de la banda actualmente
seleccionada y las memoriza por orden de su
frecuencia.
¡PARA EVITAR ACCIDENTES!
Durante la conducción se recomienda emplear
la función de sintonización automática en vez
de la manual.
1 Presione (SOURCE) varias veces para
seleccionar el sintonizador.
Cada vez que presione (SOURCE), la fuente
cambia de la siguiente forma:
TAPE ˜ TUNER
2 Presione (MODE) varias veces para
seleccionar la banda.
Cada vez que presione (MODE), la banda
cambia de la siguiente forma:
FM1 n FM2 n FM3 n MW n LW
Memorización de las
emisoras deseadas
Podrá almacenar en la memoria hasta 6
emisoras de cada banda (FM1, FM2, FM3, MW,
y LW) en las teclas numéricas de memorización
en el orden que desee. De esta forma, pueden
memorizarse 18 emisoras en FM.
Si intenta almacenar otra emisora en la misma
tecla numérica de memorización, la
previamente almacenada se borrará.
1 Presione (SOURCE) varias veces para
seleccionar el sintonizador.
2 Presione (MODE) varias veces para
seleccionar la banda.
3 Presione (SEEK/AMS) para buscar la
emisora que quiere programar en una
tecla numérica de memorización.
4 Presione la tecla numérica de
memorización que desee ((1) a (6))
durante dos segundos.
El número de la tecla numérica de
memorización seleccionada aparecerá en el
visor.
ES
Reproductor de cassettes/Radio
3 Presione (BTM) durante dos segundos.
Notas
• La unidad no almacenará en las teclas numéricas de
memorización emisoras de señales débiles. Si se reciben
pocas emisoras, algunos de las teclas mencionadas
permanecerán vacías.
• Cuando se indique un número de memorización en el
visor, la unidad almacenará emisoras a partir del número
visualizado.
Recepción de emisoras
memorizadas
1 Presione (SOURCE) varias veces para
seleccionar el sintonizador.
2 Presione (MODE) varias veces para
seleccionar la banda.
3 Presione un instante la tecla numérica de
memorización ((1) a (6)) en la que está
programada la emisora deseada.
5
Page 30

Si no es posible sintonizar una
emisora memorizada
Presione ligeramente cualquier lado de
(SEEK/AMS) para buscar la emisora
(sintonización automática).
La exploración se detiene al recibirse una
emisora. Presione cualquier lado de
(SEEK/AMS) varias veces hasta recibir la
emisora que desee.
Nota
Si la sintonización automática se detiene con demasiada
frecuencia, presione (LCL) hasta que “LCL” se ilumine en
el visor (modo de búsqueda local). Sólo podrán sintonizarse
emisoras con señales relativamente intensas.
Consejo
Si conoce la frecuencia, mantenga presionado cualquier
lado de (SEEK/AMS) hasta recibir la emisora que desee
(sintonización manual).
Otras funciones
Ajuste de las
características del sonido
1 Seleccione el elemento que desee ajustar
presionando repetidamente (SEL).
VOL (volumen) n BAS (graves) n TRE
(agudos) n BAL (izquierdo-derecho) n
FAD (delantero-trasero)
2 Ajuste el elemento seleccionado
presionando (+) o (–).
Realice el ajuste antes de que transcurran tres
segundos desde la selección (después de tres
segundos, la tecla volverá a funcionar como
tecla de control de volumen).
ES
Atenuación del sonido
Presione (ATT).
La indicación “ATT” parpadea.
Para restaurar el nivel previo de volumen,
vuelva a presionarla.
6
Page 31

Cambio de los ajustes de
sonido y tono del pitido
Refuerzo de los graves — D-Bass
Para disfrutar de graves intensos y nítidos,
puede reforzar sólo la señal de frecuencias
bajas con una curva marcada. Este efecto es el
obtenido cuando se utiliza un sistema opcional
de altavoces potenciadores de graves.
Por ejemplo, es posible escuchar la línea de
graves con mayor nitidez aunque el sonido
vocal se encuentre al mismo nivel. Igualmente,
es posible enfatizar y ajustar los graves
fácilmente con el control D-BASS.
D-BASS analógico
D-BASS 3
D-BASS 2
D-BASS 1
Nivel
0dB
Frecuencia (Hz)
Ajuste de la curva de graves
Gire el control D-BASS para ajustar el
nivel de graves (1, 2 o 3).
“D-BASS” aparece en el visor.
Para cancelar esta acción, sitúe el control en la
posición OFF.
Nota
Si los graves se distorsionan, ajuste el control D-BASS o la
tecla de volumen.
Atenuación de los pitidos
Presione (6) mientras presiona (SEL).
Para volver a activar los pitidos, presione
de nuevo estas teclas.
Información
complementaria
Precauciones
•Si aparca el automóvil bajo la luz solar
directa y se produce un considerable
aumento de temperatura en su interior, deje
que la unidad se enfríe antes de utilizarla.
•Si la unidad no recibe alimentación,
compruebe las conexiones en primer lugar. Si
todo está en orden, examine el fusible.
•Si los altavoces no emiten sonido con un
sistema de dos altavoces, ajuste el control de
equilibrio en la posición central.
•Si reproduce la cinta durante mucho tiempo,
es posible que el cassette se caliente debido al
amplificador de potencia incorporado. Esto
es normal.
Si desea realizar alguna consulta o solucionar
algún problema referentes a la unidad que no
se mencionen en este manual, póngase en
contacto con el proveedor Sony más próximo.
Para mantener una alta calidad de
sonido
Si existen soportes para bebidas cerca del
equipo de audio, tenga cuidado de que no
salpiquen zumos u otras bebidas dulces sobre
el mismo, ya que la existencia de residuos
azucarados en la unidad o en las cintas de
cassette pueden ensuciar los cabezales de
reproducción, reducir la calidad de sonido o
eliminar el sonido de reproducción.
Los kits de limpieza para cassettes no eliminan
las sustancias azucaradas de los cabezales de
cinta.
ES
Radio/Otras funciones/Información complementaria
7
Page 32

Notas sobre los cassettes
Cuidados de los cassettes
•No toque la superficie de la cinta del cassette,
ya que la suciedad o el polvo ensucian los
cabezales.
•Mantenga los cassettes alejados de equipos
provistos de imanes incorporados, como
altavoces y amplificadores, ya que el sonido
de la cinta grabada podría borrarse o
distorsionarse.
•No exponga los cassettes a la luz solar
directa, a temperaturas extremadamente frías
ni a la humedad.
•La existencia de holguras en la cinta puede
provocar que ésta se enrede en el mecanismo.
Antes de insertarla, utilice un lápiz o un
objeto similar para girar la bobina y eliminar
holguras.
•Los cassettes deformados y las etiquetas mal
ES
adheridas pueden causar problemas al
insertar o expulsar las cintas. Retire o adhiera
con firmeza las etiquetas.
Mantenimiento
Sustitución del fusible
Para reemplazar el fusible, cerciórese de
utilizar otro del amperaje correcto indicado en
el portafusible. No utilice nunca un fusible de
amperaje superior al del suministrado con la
unidad, ya que podría provocar el mal
funcionamiento de la misma.
Advertencia
No utilice nunca un fusible con un amperaje
superior al del suministrado con la unidad, ya
que ésta podría dañarse.
Extracción de la unidad
Holgura
Cassettes de duración superior a 90 minutos
No se recomienda el uso de cassettes de
duración superior a 90 minutos, salvo para
reproducciones extensas y continuas. Las
cintas utilizadas para estos cassettes son muy
finas y tienden a estirarse con facilidad. Las
operaciones frecuentes de reproducción y
parada de estas cintas puede causar que se
enreden en el mecanismo de la platina de
cassettes.
8
Para evitar que la unidad sea robada
Cuando deje el coche, retire la unidad del
soporte y llévesela consigo.
Precaución
Tenga cuidado cuando extraiga la unidad. La
parte posterior de la unidad estará muy
caliente después de haberla utilizado debido a
su amplificador de potencia incorporado.
Page 33

Etiquetas del mando
rotativo
Usted podrá controlar esta unidad con un
mando rotativo (RM-X4S) opcional.
Con el mando rotativo se suministran ciertos
tipos de etiquetas. Adhiera la etiqueta que
coincida con la función de la unidad principal
y la posición de montaje del mando rotativo.
Cuando monte el mando rotativo, adhiérale la
etiqueta como se muestra en la ilustración
siguiente.
DSPL
MODE
SEL
SEL
MODE
DSPL
ES
Información complementaria
9
Page 34

Ubicación de los controles
SOURCE
SEEK
AMS
MODE
ATT
OFF
SEL
Para más información, consulte las páginas.
1 Tecla de búsqueda/Sensor de música
ES
automático (SEEK/AMS) 3, 4, 5, 6
2 Tecla SOURCE (TAPE/TUNER) 3, 5
3 (+) (–) Tecla de control de volumen/
graves/agudos/equilibrio entre los
altavoces derechos e izquierdos/
equilibrio entre los altavoces delanteros
y traseros 6
4 Tecla MODE (*)
Durante la recepción del sintonizador:
Selección de banda 5
Durante la reproducción de cintas:
Cambio del sentido de cinta 3
5 Tecla de desconexión (OFF) 3
6 Tecla de expulsión del cassette 6 3
7 Durante la radiorecepción:
Teclas numéricas de memorización de
emisoras 5
Durante la reproducción de una cinta:
(1) Tecla de reproducción de
introducciones (INTRO) 4
(2) Tecla de reproducción repetida
(REPEAT) 4
INTRO REPEAT
213
METAL
ATA BL SKIP
546
BTM LCL
DSPL
D-BASS
OFF
1
2
3
(4) Tecla para cintas de metal
(METAL) 4
(5) Tecla de activación automática
del sintonizador (ATA) 4
(6) Tecla de omisión de espacios en
blanco (BL SKIP) 4
8 Tecla de restauración 3
Presiónela cuanda utilice esta unidad por
primera vez, después de cambiar la batería
del automóvil o cuando las teclas de esta
unidad no funcionen correctamente.
9 Tecla de atenuación (ATT) 6
!º Tecla de selección de modo de control
(SEL) 6, 7
!¡ Visor
!™ Tecla de memorización de la mejor
sintonía (BTM) 5
!£ Tecla de cambio de visualización (DSPL)
4
!¢ Tecla LCL 6
!∞ Control D-BASS 7
10
Page 35

Especificaciones
Sección del reproductor de
cassettes
Pistas de la cinta 4 pistas, 2 canales, estéreo
Fluctuación y trémolo 0,08 % (ponderación eficaz)
Respuesta en frecuencia 30 – 20.000 Hz
Relación señal-ruido 58 dB
Sección del sintonizador
FM
Gama de sintonía 87,5 – 108,0 MHz
Terminal de antena Conector para antena
Frecuencia intermedia 10,7 MHz
Sensibilidad útil 8 dBf
Selectividad 75 dB a 400 kHz
Relación señal-ruido 65 dB (estéreo),
Distorsión armónica a 1 kHz
Separación entre canales 35 dB a 1 kHz
Respuesta en frecuencia 30 – 15.000 Hz
Relación de captura 2 dB
MW/LW
Gama de sintonía MW: 531 – 1.602 kHz
Terminal de antena Conector para antena
Frecuencia intermedia 10,71 MHz/450 kHz
Sensibilidad MW: 30 µV
exterior
68 dB (monoaural)
0,5 % (estéreo),
0,3 % (monoaural)
LW: 153 – 281 kHz
exterior
LW: 50 µV
Sección del amplificador de
potencia
Salidas Salidas para altavoces
Impedancia de los altavoces
Salida máxima de potencia
(conectores herméticos de
seguridad)
4 – 8 ohmios
35 W × 4 (a 4 ohmios)
Generales
Salidas Cable de control de antena
Controles de tono Graves ±8 dB a 100 Hz
Alimentación Batería de automóvil de
Dimensiones Aprox. 188 × 58 × 183 mm
Dimensiones de montaje Aprox. 182 × 53 × 164 mm
Masa Aprox. 1,6 kg
Accesorios suministrados Componentes de
Accesorios opcionales Mando rotativo
Diseño y especificaciones sujetos a cambio sin previo aviso.
motorizada
Agudos ±8 dB a 10 kHz
12 V CC (negativo a masa)
(an/al/prf)
(an/al/prf)
instalación y conexiones
(1 juego)
RM-X4S
ES
Información complementaria
11
Page 36

Guía para la solución de problemas
La lista de comprobaciones siguiente le ayudará a solucionar la mayoría de los problemas que pueda
encontrar con su unidad.
Antes de pasar a la lista de comprobaciones siguiente, repase los procedimientos de operación.
Generales
Problema
Ausencia de sonido.
Ausencia de pitidos.
Reproducción de cintas
Problema
El sonido de reproducción se
distorsiona.
AMS no funciona
correctamente.
ES
Causa/Solución
• Ajuste el volumen con (+).
• Con un sistema de dos altavoces, sitúe el control de equilibrio
en la posición central.
Ha atenuado los pitidos.
Causa/Solución
Contaminación del cabezal de cinta.
n Límpielo.
• Se produce ruido en el espacio entre temas.
• Un espacio en blanco es demasiado corto (inferior a cuatro
segundos).
• Ha presionado + en (SEEK/AMS) inmediatamente antes de
los temas siguientes.
• Ha presionado = en (SEEK/AMS) inmediatamente después
de que se inicie el tema.
• Una pausa larga o una parte de bajas frecuencias, o un nivel de
sonido muy bajo se interpreta como un espacio en blanco.
Radiorecepción
Problema
No es posible realizar la
sintonización memorizada.
No es posible realizar la
sintonización automática.
Si las soluciones anteriormente mencionadas no ayudan a mejorar la situación, consulte al proveedor
Sony local.
Causa/Solución
• Memorice la frecuencia correcta.
• La señal de radiodifusión es débil.
La señal de radiodifusión es débil.
n Emplee la sintonización manual.
12
Page 37

Indice alfabético
A
Activación automática del sintonizador
(ATA) 4
ATT 6
Avance rápido 3
B, C
BAL (izquierdo-derecho) 6
BAS (graves) 6
D
D-BASS (D-Bass) 7
E
Exploración de introducciones 4
F, G, H, I, J, K, L
FAD (delantero-trasero) 6
Función de memorización de la mejor sintonía
(BTM) 5
Fusible 8
M, N
Mando rotativo 9
Metal 4
Modo de búsqueda local (LCL) 6
S
Sensor de música automático (AMS) 4
Sintonización automática 6
Sintonización manual 6
T, U
TRE (agudos) 6
V, W, X, Y, Z
Visor 4
ES
Información complementaria
O, P, Q
Omisión de espacios en blanco 4
R
Radio 5
Rebobinado 3
Reproducción de cintas 3
Reproducción repetida 4
Restauración 3
13
Page 38

Hoşgeldiniz!
İçindekiler
Sony Casette Car Stereo’yu satın aldığınız için
teşekkür ederiz. Bu ünite beraberindeki döner
uzaktan kumanda yardımıyla bir çok müziği
zevkle dinlemenizi sağlayacaktır.
TU
Başlarken
Ünitenin ayarı .................................................. 3
Kasetçalar
Kasetin dinlenmesi .......................................... 3
Bir kasetin çeşitli kiplerde çalınması ............... 4
Radyo
İstasyonların otomatik olarak hafızaya alınması
— Best Tuning Memory (BTM) ..................5
Yalnız arzu edilen istasyonların hafızaya
alınması ......................................................5
Hafızaya alınmış istasyonların dinlenmesi ...... 5
Diğer Fonksiyonlar
Ses özelliklerinin ayarlanması.........................6
Sesin kısılması ................................................6
Sesin ve uyarı sinyalinin değiştirilmesi............7
Ek bilgi
Tedbirler ..........................................................7
Bakım ..............................................................8
Ünitenin sökülmesi ..........................................8
Döner kumandanın etiketleri ...........................9
Kontrol düğmelerinin yeri .............................. 10
Özellikler ....................................................... 11
Problem arama kılavuzu ............................... 12
İndeks ........................................................... 13
2
Page 39

Başlarken
Kasetçalar
Ünitenin ayarı
Ünitenin ilk kullanımından önce veya
otomobilin aküsünü değiştirdikten sonra,
üniteyi ayarlamalısınız.
Ayar tuşuna tükenmez kalem gibi sivri uçlu bir
obje ile basınız.
Ayar tuşu
Not
Ayar tuşuna bastığınızda hafızadaki tüm programlar
ve fonksiyonlar silinir.
Kasetin dinlenmesi
Bir kaset yerleştiriniz.
Kaset otomatik olarak çalmaya başlar.
Eğer kaset yerleştirilmişse, göstergede “TAPE”
yansıyıncaya kadar tekrar tekrar (SOURCE)
tuşuna basınız.
TAPE
TAPE
Önerimiz
Kasetin çalış yönünü değiştirmek için kaset çalarken
(MODE) (*) tuşuna basınız.
Fonksiyon
Kaseti durdurmak
Kaseti çıkarmak
Kasetin üst yüzü çalınıyor.
Kasetin alt yüzü çalınıyor.
Tuş
(OFF)
6
TU
Başlarken/Kasetçalar
Kasetin sarılması
Kaset çalarken (SEEK/AMS)’ın iki tuşuna
birden iki saniyeden uzun olmak üzere
basınız.
İleri
SEEK
AMS
Geri
İleri ya da geri sararken kasetin çalması için
(MODE) (*) tuşuna basınız.
3
Page 40

Parça başlangıcının belirlenmesi
— Automatic Music Sensor (AMS)
Bir seferde azami dokuz parça atlayabilirsiniz.
Kaset çalarken (SEEK/AMS)’ın iki tuşuna
birden hafifçe basınız.
Sonraki parçaya gelmek için
SEEK
AMS
Önceki parçaya dönmek için
Not
AMS fonksiyonu çalışmayabilir, eğer:
• Parça aralarındaki boşluklar 4 saniyeden az ise
• Parçalar arasında ses varsa
• Kısık sesli uzun bölümler veya sessiz bölümler
varsa.
Göstergedeki işaretlerin değiştirilmesi
Kaset çalarken (DSPL) tuşuna her
bastığınızda, göstergedeki işaretler şu şekilde
değişir:
Kasetçalar
* ATA fonksiyonu açıkken
˜˜
˜ Frekans*
˜˜
CrO2 veya metal bir kasetin çalınması
CrO2 (TYPE II) veya metal (TYPE IV) bir
kaset dinlemek istiyorsanız (4) tuşuna
basınız.
Göstergede “MTL” görülür.
Bu fonksiyonu iptal etmek için (4) tuşuna
basınız.
Kaset sarılırken radyonun açılması
— Automatic Tuner Activation (ATA)
Çalış esnasında (5) tuşuna basınız.
Göstergede “ATA” görülür.
(SEEK/AMS) ile bir iki saniye için ileri ya da geri
sararsanız, radyo otomatik olarak açılır.
Bu fonksiyonu iptal etmek için (5) tuşuna
basınız.
Kaset çalarken boşlukların atlanması
— Blank skip
Kaset çalarken (6) tuşuna basınız.
Göstergede “BL SKIP” görülür.
Bir kasetin çeşitli
kiplerde çalınması
TU
Arzu edilen parçanın aranması
— Intro scan
Kaset çalarken (1) tuşuna basınız.
Göstergede “INTRO” görülür.
Tüm parçaların ilk 10 saniyeleri çalınır.
Dilediğiniz parçayı bulduğunuzda tekrar
basınız. Ünite normal çalış kipine geçer.
Bu fonksiyonu iptal etmek için (1) tuşuna
basınız.
Parçaların tekrar çalınması
— Repeat play
Kaset çalarken (2) tuşuna basınız.
Göstergede “REP” görülür.
Çalan parça bittiğinde tekrar baştan
çalınacaktır.
Bu fonksiyonu iptal etmek için (2) tuşuna
basınız.
Sekiz saniyeden daha uzun olan boşluklar
kaset çalarken otomatik olarak atlanır.
Bu fonksiyonu iptal etmek için (6) tuşuna
basınız.
4
Page 41

Radyo
Yalnız arzu edilen
istasyonların hafızaya
alınması
İstasyonların otomatik
olarak hafızaya alınması
— Best Tuning Memory (BTM)
Bu fonksiyon o an alınan bandlardan en
kuvvetli sinyalleri veren istasyonları seçer ve
frekanslarını hafızasına alır.
KAZALARI ÖNLEMEK!
Otomobili sürerken manüel ayar yerine
otomatik ayar veya hafıza ayar arama
fonksiyonunu kullanınız.
1 Radyoyu seçmek için tekrar tekrar
(SOURCE) tuşuna basınız.
(SOURCE) tuşuna her bastığınızda,
kaynaklar şu şekilde görülür:
˜˜
TAPE
˜ TUNER
˜˜
2 Bandı seçmek için tekrar tekrar (MODE)
tuşuna basınız.
(MODE) tuşuna her bastığınızda, bandlar
şu şekilde görülür:
nn
nn
nn
FM1
n FM2
n FM3
nn
nn
3 (BTM) tuşuna iki saniye basınız.
Notlar
• Ünite zayıf sinyal veren istasyonları ayar numara
tuşlarında hafızaya almayacaktır. Yalnız bir kaç
istasyon alınabiliyorsa, bazı ayar numara tuşları boş
kalır.
• Göstergede bir ayar numarası görülüyorsa, ünite
görülen numarayı izleyen, tüm ayar numara
tuşlarında istasyonları yükleyecektir.
n MW
nn
nn
n LW
nn
Dilediğiniz bandda (FM1, FM2, FM3, MW ve
LW) azami 6 istasyon olmak üzere ayar
numara tuşlarına kaydedilebilir. Bu yüzden 18
FM istasyonunu hafızaya alabilirsiniz.
Ayar numara tuşunda başka bir istasyonu
hafızaya alırsanız daha önce hafızaya alınan
istasyon silinir.
1 Radyoyu seçmek için tekrar tekrar
(SOURCE) tuşuna basınız.
2 Bandı seçmek için tekrar (MODE) tuşuna
basınız.
3 Ayar numara tuşunda hafızaya almak
istediğiniz istasyonu aramak için
(SEEK/AMS) tuşuna basınız.
4 İki saniye boyunca seçtiğiniz ayar
numara tuşuna ((1) ile (6) arası)
basınız.
Seçtiğiniz ayar numara tuşunun numarası
göstergede görülür.
Hafızaya alınmış
istasyonların dinlenmesi
1 Radyoyu seçmek için tekrar tekrar
(SOURCE) tuşuna basınız.
2 Bandı seçmek için tekrar tekrar (MODE)
tuşuna basınız.
TU
Kasetçalar/Radyo
3 Hafifçe arzu edilen istasyonun
bulunduğu ayar numara tuşuna ((1) ile
(6) arası) basınız.
5
Page 42

Daha önce ayarlanan bir istasyonu
bulamıyorsanız
İstasyonu aramak için (otomatik ayar)
hafifçe (SEEK/AMS)’ın iki tuşuna birden
basınız.
Bir istasyon bulunduğunda arama sona
erecektir. Dilediğiniz istasyonu bulana
kadar (SEEK/AMS)’ın iki tuşa birden
basınız.
Not
Otomatik ayar çok sık duruyorsa, hafifçe (LCL)
tuşuna basınız. Göstergede “LCL” görülür (yerli
arama kipi).Yalnız oldukça güçlü sinyal alan
istasyonlar için ince ayar yapılabilir.
Önerimiz
Frekansı biliyorsanız, dilediğiniz istasyonu buluncaya
kadar (SEEK/AMS)’ın iki tuşuna birden basıp tutunuz.
(manüel ayar).
TU
Diğer Fonksiyonlar
Ses özelliklerinin
ayarlanması
1 (SEL) tuşuna tekrar tekrar basarak
dilediğiniz işareti seçiniz.
VOL (ses) n BAS (bas) n TRE (tiz) n
BAL (sağ-sol) n FAD (ön-arka)
2 (+) veya (–) tuşuna basarak seçtiğiniz
işareti ayarlayınız.
Seçtikten 3 saniye içinde ayarlayınız. (Ses
kontrol tuşu gibi üç saniye sonra hizmete
geçecektir.)
Sesin kısılması
(ATT) tuşuna basınız.
“ATT” işareti yanıp söner.
Daha önceki ses seviyesini kaydetmek için
tekrar basınız.
6
Page 43

Sesin ve uyarı sinyalinin
değiştirilmesi
Basın yükseltilmesi — D-Bass
Net ve güçlü bir bas dinlemek için yalnız alçak
frekans sinyalini sivri bir kavis ile
yükseltebilirsiniz. Ek bir Subwoofer sistemi
kullanıldığındaki etkiyi elde edersiniz.
Örneğin vokal ses aynı yükseklikte kalsa dahi
bası net şekilde duyabilirsiniz. D-BASS
kontrolü ile bası kolayca vurgulayabilir ve
ayarlayabilirsiniz.
Analog D-BASS
D-BASS 3
D-BASS 2
Seviye
0dB
Bas kavisinin ayarlanması
Bas seviyesini ayarlamak için D-BASS
kontrol düğmesini çeviriniz (1, 2 veya 3).
Göstergede “D-BASS” görülür.
İptal etmek için kontrol düğmesini “OFF”
pozisyonuna getiriniz.
Not
Bas kötü çıkıyorsa D-BASS düğmesini veya ses
tuşunu ayarlayınız.
D-BASS 1
Frekans (Hz)
Ek bilgi
Tedbirler
• Eğer otomobilinizi direkt güneş ışığına tabi bir
yere park ettiyseniz ve otomobilin iç ısısı
önemli ölçüde arttı ise, üniteyi çalıştırmadan
önce soğumasını bekleyiniz.
• Eğer üniteye güç gitmiyorsa, önce
bağlantıları kontrol ediniz. Eğer herşey
yolunda ise sigortayı kontrol ediniz.
• İki hoparlörlü sistemin hoparlörlerinden ses
gelmiyorsa fader kontrol düğmesini orta
pozisyona getiriniz.
• Kaset uzun süre çalarsa takılı güç
amplifikatörü dolayısıyla ısınabilir. Ancak bu
fonksiyonun kusurlu olduğuna işaret etmez.
Ünite hakkında kullanım kılavuzunda yer
almayan soru ve problemleriniz olduğu
takdirde en yakın Sony bayiine danışınız.
Yüksek kaliteli ses sağlanması
Audio aletinin yanında içecek tutucuları varsa
ünitenin üzerine meyve suyu veya başka bir
içecek dökmemeye dikkat ediniz. Ünite veya
kaset üzerindeki şekerli artıklar kafaları kirletir
ve böylece ses kalitesi azalır veya ses üretimi
tamamen engellenir.
Kaset temizleme kitleri kafalardaki şekeri
temizleyemez.
TU
Radyo/Diğer Fonksiyonlar/Ek bilgi
Uyarı sinyalinin kısılması
(SEL) tuşuna basarak (6) tuşuna
basınız.
Uyarı sinyalini tekrar elde etmek için tuşlara
tekrar basınız.
7
Page 44

Kaset notları
Kasetin bakımı
• Kasetin teyp yüzeyine dokunmayınız, her
türlü kir ve toz kafaları kirletir.
• Kasetleri hoparlör ve amplifikatör gibi
mıknatıs takılı aletlerden uzak tutunuz. Aksi
takdirde kayıtlı kasetlerde silinme veya
bozulma olabilir.
• Kasetleri direkt güneş ışığına, aşırı soğuğa
veya neme tabi bırakmayınız.
• Teypdeki gevşeklik ünitenin teybi sarmasına
yol açabilir.
Kaseti yerleştirmeden önce kurşunkalemle
veya benzeri bir obje ile makarayı çevirip
gevşekliği gideriniz.
Bakım
Sigortanın değiştirilmesi
Sigortayı değiştirirken uygun amper gücünde
bir sigorta kullanmaya dikkat ediniz. Amper
gücü sigortanın kutusunda yazılıdır. Hiç bir
zaman ünite beraberindeki sigorgatın amper
gücünden daha güçlü bir sigorta
kullanmayınız, bu ünitenin bozulmasına yol
açabilir.
Uyarı
Hiç bir zaman üniteye takılı sigortanın amper
gücünden daha güçlü bir sigorta
kullanmayınız, aksi takdirde üniteye zarar
verebilirsiniz.
• Bozuk kasetler ve gevşek etiketler kaseti
yerleştirirken veya çıkarırken problem
çıkarabilir. Gevşek etiketleri çıkarınız veya
yenisi ile değiştiriniz.
TU
90 dakikadan uzun kasetler
90 dakikadan uzun kasetlerin kullanılması
uzun süreli çalınmasının dışında tavsiye
edilmez. Bu tür kasetlerde kullanılan teypler
çok incedir ve kolaylıkla kopmaya meyillidir. Bu
kasetleri devamlı çalıp durdurmak kasetçalar
mekanizmasına takılmasına yol açabilir.
Gevşeklik
Ünitenin sökülmesi
Üniteyi çalınmaktan korumak için
Otomobilden inerken üniteyi sökünüz ve
yanınıza alınız.
Dikkat
Üniteyi sökerken çok dikkatli olunuz. Ünite
çalışmasının ardından takılı bir güç
amplifikatörü nedeniyle çok sıcak olabilir.
8
Page 45

Döner kumandanın
etiketleri
Bu üniteyi ek bir döner kumanda ile idare
edebilirsiniz (RM-X4S).
Döner kumanda beraberinde etiketler
bulunmaktadır. Ana ünitenin fonksiyonlarına ve
döner kumandanın montaj yerine uyan
etiketleri yapıştırınız.
Döner kumandayı monte ederken aşağıda
gösterildiği üzere uygun etiketi yapıştırınız.
DSPL
MODE
SEL
SEL
MODE
DSPL
TU
Ek bilgi
9
Page 46

Kontrol düğmelerinin yeri
SOURCE
SEEK
AMS
MODE
ATT
OFF
SEL
Ayrıntılar için aşağıdaki sayfalara bakınız.
1 SEEK/AMS düğmesi 3, 4, 5, 6
2 SOURCE tuşu (TAPE/TUNER) 3, 5
TU
3 (+) (–) (ses/bas/tiz/sağ-sol/ön-arka
kontrol) tuşu 6
4 (MODE) (*) tuşu
Radyo yayını sırasında:
BAND seçimi 5
Kaset çalarken :
Kaset yönünün değiştirilmesi 3
5 OFF tuşu 3
6 6 (eject) tuşu 3
7 Radyo yayını sırasında
Numara tuşunu ayarlayın 5
Kaset çalarken:
(1) INTRO tuşu 4
(2) REPEAT tuşu 4
(4) MTL (metal) tuşu 4
INTRO REPEAT
213
METAL
ATA BL SKIP
546
BTM LCL
DSPL
D-BASS
OFF
1
2
3
(5) ATA (Otomatik Radyo Aktivasyonu)
tuşu 4
(6) BL SKIP (Blank Skip) tuşu 4
8 Ayar tuşu (Ön panelin arkasında,
ünitenin ön yüzünde bulunmaktadır) 3
Ünitenin ilk kullanımında, otomobil aküsü
değiştirildiğinde veya bu ünitenin tuşları
tam anlamıyla çalışmıyorsa bu tuşa
basınız.
9 ATT tuşu 6
!º SEL (kontrol kip seçimi) tuşu 6, 7
!¡ Gösterge penceresi
!™ BTM (Best Tuning Memory) tuşu 5
!£ DSPL (gösterge kip değişimi/saat ayarı)
tuşu 4
!¢ LCL tuşu 6
!∞ D-BASS kontrolü 7
10
Page 47

Özellikler
Kasetçalar bölümü
Kaset parçaları 4-parça 2-kanal stereo
Wow and flutter 0,08 % (WRMS)
Frekans cevabı 30-20.000 Hz
Ses sinyal oranı 58 dB
Radyo bölümü
FM
Ayar sırası 87,5 - 108,0 MHz
Anten terminali Dış anten terminali
Ortalama frekans 10,7 Mhz
Kullanılabilir ince ayar 8 dBf
Seçicilik 400 kHz’de 75dB
Ses sinyal oranı 65 dB (stereo),
68 dB (mono)
Harmonik bozulma 1kHz 0,5% (stereo)
0,3% (mono)
Separasyon 1kHz’de 35 dB
Frekans cevabı 30 - 15.000 Hz
Zaptetme oranı 2 dB
MW/LW
Ayar cetveli MW:531 -1.602 kHz
LW: 153 -281 kHz
Anten terminali Harici anten konektörü
Ortalama frekans 10,71 MHz/450kHz
Duyarlılık MW:30 µV
LW: 50 µV
Güç amplifikatör bölümü
Çıkışlar Hoparlör çıkışı
(mühürlü konektörler)
Hoparlör empedansı 4 – 8 ohms
Azami güç çıkışı 35 W × 4 (4 ohm’da)
Genel
Çıkışlar Anten yayını kontrol
Ton kontrolleri Bas 100 Hz’de ±8 dB
Güç gereksinimi 12V DC otomobil aküsü
Boyutlar Azami 188 × 58 × 183 mm
Montaj boyutları Azami 182 × 53 × 164 mm
Ağırlık Azami 1,6 kg
Beraberindeki aksesuarlarKurma ve bağlantı
Tercihe bağlı aksesuarlar Döner kumanda RM-X4S
Dizayn ve özellikleri değiştirilebilir.
kablosu
Tiz 10 Hz’de ± 8 dB
(negatif toprak)
parçaları (1 set)
Ön panel çantası (1)
TU
Ek bilgi
11
Page 48

Problem arama kılavuzu
Aşağıdaki kontrol listesi ünitenizde karşılaşacağınız problemlerin büyük çoğunluğunun
düzeltilmesinde size yardımcı olacaktır.
Kontrol listesine bakmadan önce kullanım kılavuzuna bakınız.
Genel
Problem
Ses çıkmıyor.
Uyarı sinyali çıkmıyor.
Kaset çalınması
Problem
Çalınan ses bozuk.
AMS tam anlamıyla çalışmıyor.
TU
Radyo yayını
Problem
Hafıza ayarı mümkün değil.
Otomatik ayar mümkün değil.
Sebep/çözüm
• Sesi (+) tuşu ile ayarlayınız.
• Fader kontrol düğmesini çift hoparlör için orta pozisyona
getiriniz.
Uyarı sinyali kısılmış.
Sebep/çözüm
Teyp kafasının pislenmesi. n Kafayı temizleyiniz.
• Parçalar arasındaki boşluklarda ses var.
• Boşluk çok kısa (dört saniyeden daha az).
• + Bir sonraki parça başlamadan hemen önce (SEEK/AMS)
tuşuna basılmış.
• = Bir sonraki parça başladıktan hemen sonra (SEEK/AMS)
tuşuna basılmış.
• Uzun bir ara veya alçak frekanslı pasaj veya çok alçak ses
seviyesi boşluk olarak işlem görmüş.
Sebep/çözüm
• Doğru frekansı kaydediniz.
• Yayın çok zayıf.
Yayın çok zayıf. n Manüel ayarı kullanınız.
Yukarıda açıklanan çözümlerden bir fayda sağlanamıyorsa, en yakın Sony bayiine başvurunuz.
12
Page 49

İndeks
A
ATT 6
Automatic Music Sensor (AMS) 4
Automatic Tuner Activation (ATA) 4
Ayar 3
B, C, Ç
BAL (sağ-sol) 6
BAS (bas) 6
Best Tuning Memory (BTM) 5
Blank skip 4
D, E
D-BASS (D-Bass) 7
Döner kumanda 9
F
FAD (ön-arka) 6
G, H
Geri 3
Gösterge 4
I, i, J
Intro scan 4
İleri 3
O, Ö
Otomatik ayar 6
R, S, Ş
Radyo 5
Sigorta 8
T, U, Ü, V, W, X, Y, Z
Tekrar çalma 4
TRE (tiz) 6
TU
Ek bilgi
K
Kasetin çalınması 3
L
Local seek mode (LCL) 6
M, N
Manüel ayar 6
METAL 4
13
 Loading...