


Installation Installation Instalación Kurma
53 mm
182 mm
######
Precautions
•Choose the installation location
carefully so that the unit will not
interfere with driving.
•Avoid installing the unit where it
would be subject to high temperatures,
such as from direct sunlight or hot air
from the heater, or where it would be
subject to dust, dirt or excessive
vibration.
•Use only the supplied mounting
hardware for a safe and secure
installation.
Mounting angle adjustment
Adjust the mounting angle to less than
20°.
Mounting Example
Installation in the dashboard
1
Bracket
Support
Soporte
Destek
######
Précautions
• Choisir soigneusement l’emplacement
de l’installation, pour que l’appareil ne
gêne pas la conduite.
• Eviter d’installer l’appareil dans un
endroit exposé à des températures
élevées, comme en plein soleil ou à
proximité d’une bouche d’air chaud,
ou à de la poussière, saleté ou
vibrations violentes.
• Pour garantir un montage sûr,
n’utiliser que le matériel fourni.
Réglage de l’angle de montage
Ajuster l’inclinaison à un angle inférieur
à 20°.
Exemple de montage
Installation dans le tableau de bord
2
Remove the bracket.
Retirez le support.
Retire el soporte.
Desteği çıkarınız.
######
Use 2 to adjust the length as required by the car model.
Utilisez 2 pour régler la longueur requise par le modèle de voiture.
Utilice 2 para ajustar la longitud según el modelo de su vehículo.
Otomobilinizin modeline uygun uzunluğu ayarlamak için 2 yi
kullanınız.
Precauciones
• Elija cuidadosamente el lugar de
montaje de forma que la unidad no
interfiera con las funciones normales
de conducción.
• Evite instalar la unidad donde pueda
quedar sometida a altas temperaturas,
como a la luz solar directa, al aire de
calefacción, o a polvo, suciedad, o
vibraciones excesivas.
• Para realizar una instalación segura y
firme, utilice solamente la ferretería de
montaje suministrada.
Ajuste del ángulo de montaje
Ajuste el ángulo de montaje a menos de
20°.
Ejemplo de montaje
Instalación en el salpicadero
Dashboard
Tableau de bord
Salpicadero
Kontrol paneli
#####
1
Tedbirler
• Sürücüye sürüş esnasında engel
olmamak için kurma mekanını dikkatle
seçiniz.
• Üniteyi doğrudan güneş ışığı veya
ısıtıcıdan çıkan sıcak hava gibi yüksek
ısıya veya toz, kir ve aşırı vibrasyona
maruz kalacak yerlerde monte
etmeyiniz.
• Kurma işleminin emniyetli ve güvenli
olabilmesi için yalnız ünite ile verilen
montaj aletini kullanınız.
Montaj açı ayarı
Montaj açısını 20°’nin altına ayarlayınız.
Montaj örneği
Kontrol panelini kurma
Fire wall
Paroi ignifuge
Panel cortafuegos
Yangın muhafazası
####
#####
4
2
3
To a metal point of the car
A un point métallique de la voiture
A un punto de metal del automóvil
Arabanın metal bir noktasına
#######
• ########
######
####
• ########
######
####
• ########
######
####
########
###################
###############
######
#############
###Ar###
43
Bend these claws for a tight fit,
if necessary.
Si nécessaire, plier ces griffes.
Si es necesario, doble estas uñas.
Gerektiği takdirde bu tırnakları eğebilirsiniz.
Note for Connecting
If there is alternator noise (a whining
sound when raising engine speed), earth
the bracket 1 by connecting it to a metal
point of the car with the supplied chassis
earth cord 4. Connect the earth cord to
the bracket with part 2 as shown in the
step 2.
Removing the Unit Retrait de l’appareil Extracción de la unidad Ünitenin sökümü
####
Remarque sur le raccordement
Si l’alternateur génère des interférences
(pleurage lorsque le régime moteur
augmente), reliez le support 1 à la
masse en le raccordant à un point
métallique de la voiture au moyen du fil
de masse pour châssis 4 fourni.
Raccordez le fil de masse sur le support
au moyen de l’accessoire 2 comme
illustré à l’étape 2.
Nota sobre conexión
Si el alternador produce ruido (un
zumbido al aumentar la velocidad del
motor), ponga el soporte 1 a tierra
conectándolo a un punto metálico del
automóvil con el cable de puesta a tierra
de chasis 4 suministrado. Conecte el
cable de puesta a tierra al soporte con la
pieza 2 como se muestra en el paso 2.
Bağlantı notu
Eğer ek bir ses çıkıyorsa (otomobilin
motoru hızlanırken çıkan vızıltılı bir ses),
desteği 1 otomobilin metal bir noktası
ile şasi toprak kablosuna 4 bağlayarak
topraklayınız.
Adım 2’de gösterildiği üzere toprak
kablosunu desteğe parça 2 ile
bağlayınız.
###
####
####
####
####
#######
This prevents your car stereo set from being stolen.
Cela empêchera le vol de votre combiné autoradio.
De esta forma se evita el robo de la unidad.
Bu oto stereo setinizin çalınmasını engeller.
##########
3
2
1
Caution
Be careful when you remove the unit. The rear of the unit becomes very
hot just after operating it because of a built-in power amplifer.
Attention
Soyez prudent lorsque vous retirez l’appareil. L’arrière de l’appareil
s’échauffe fortement en raison de la présence de l’amplificateur de
puissance intégré.
Precaución
Tenga cuidado cuando extraiga la unidad. La parte posterior de la
unidad estará muy caliente después de haberla utilizado debido a su
amplificador de potencia incorporado.
Dikkat
Üniteyi sökerken çok dikkatli olunuz. Ünite çalışmasının ardından takılı
bir güç amplifikatörü nedeniyle çok sıcak olabilir.
#####################
#####
##########
#############
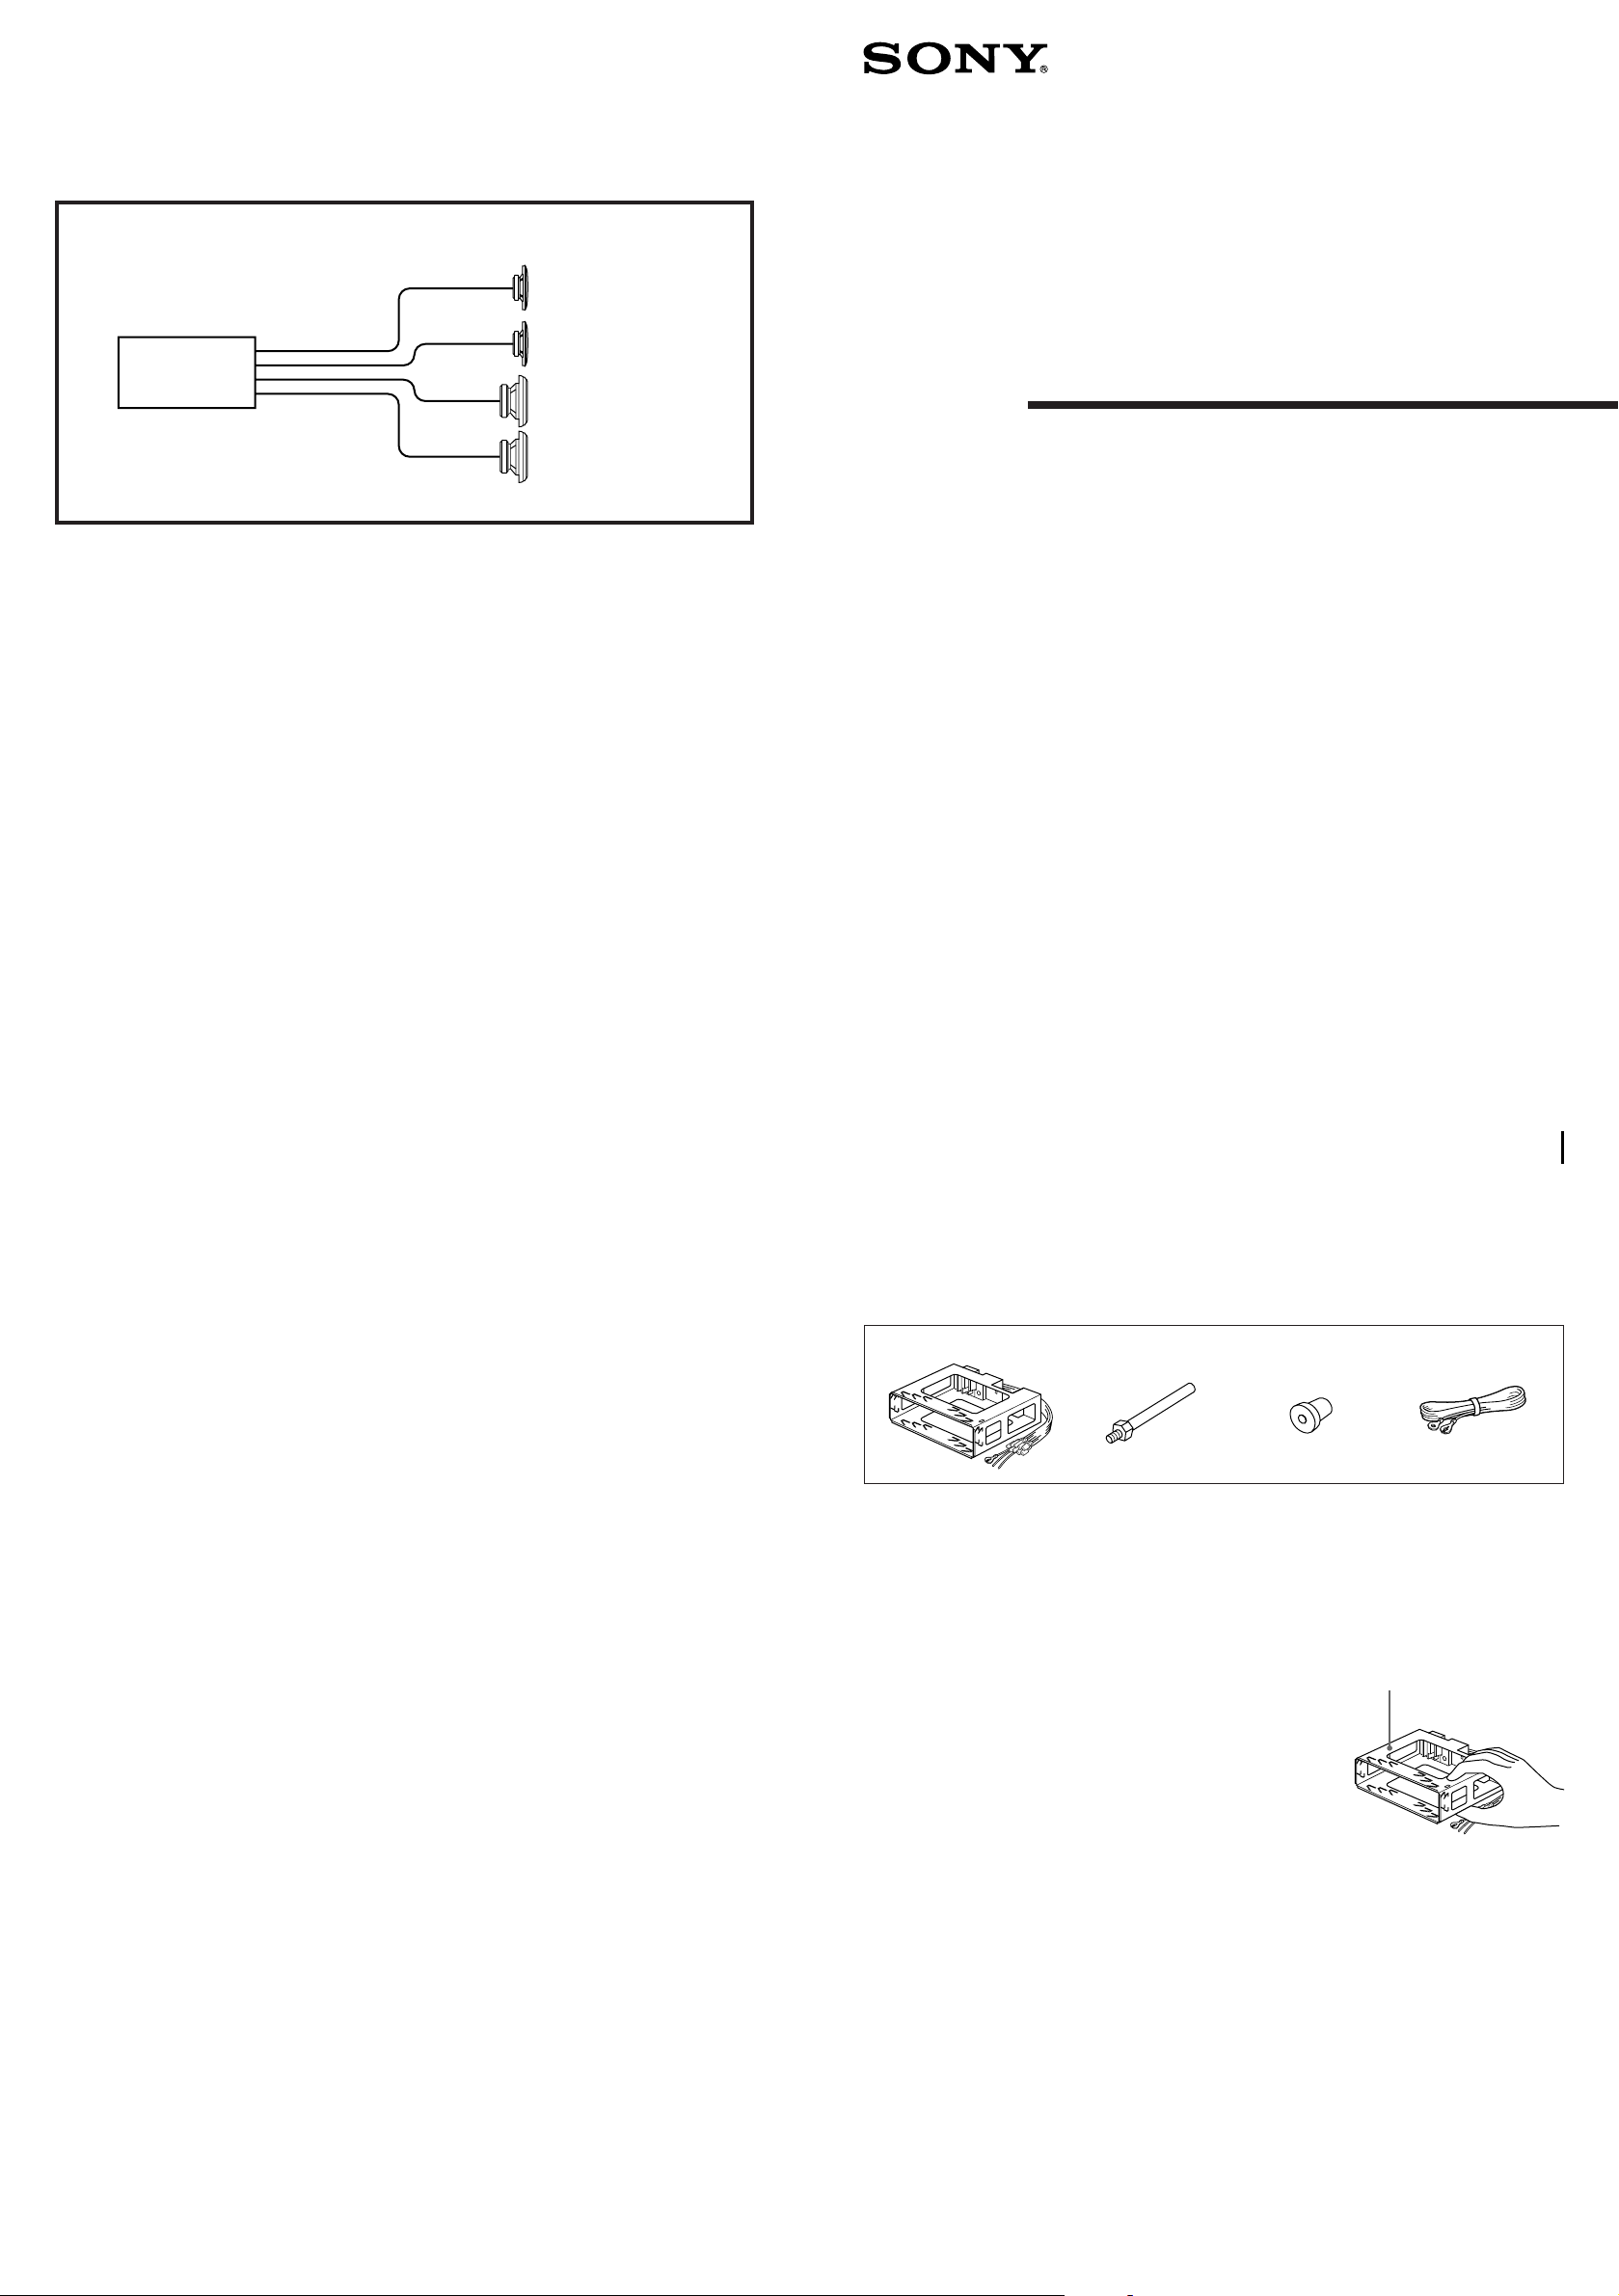
Connection diagram
Schéma de connexion
Diagrama de conexiones
Bağlantı şeması
################
Example/Exemple/Ejemplo/Örnek/######
XR-2800
Front speakers
Haut-parleurs avant
Altavoces delanteros
Ön hoparlörler
############
Rear speakers
Haut-parleurs arrière
Altavoces traseros
Arka hoparlörler
############
3-861-996-11 (1)
FM/MW/LW
Cassette Car
Stereo
Installation/Connections
Installation/Connexions
Instalación/Conexiones
Kurma/Bağlantılar
########/######
XR-2800
Sony Corporation 1998 Printed in Malaysia
Parts for Installation and Connections
Pièces de montage et de raccordement
Componentes de montaje y conexiones
Kurma ve bağlantı parçaları
#########################
1
Caution
Cautionary notice for handling the bracket 1.
Handle the bracket carefully to avoid injuring your fingers.
Attention
Remarque importante pour la manipulation du support 1.
Manipulez précautionneusement le support pour éviter de vous
blesser aux doigts.
Precaución
Advertencia sobre la manipulación del soporte 1.
Tenga mucho cuidado al manipular el soporte para evitar posibles
lesiones en los dedos.
Dikkat
Destekle 1 ilgili dikkat ikazı.
Parmaklarınızın yaralanmaması için desteğe dokunurken dikkat
ediniz.
2
3
####
####
####
####
4
Bracket
Support
Soporte
Destek
###

Connections
Connexions
Conexiones
Bağlantılar
####
Caution
•This unit is designed for negative
ground 12 V DC operation only.
•Before making connections, disconnect
the ground terminal of the car battery
to avoid short circuits.
•Connect the yellow and red power
input leads only after all other leads
have been connected.
•Be sure to connect the red power input
lead to the positive 12 V power
terminal which is energized when the
ignition key is in the accessory
position.
•Run all earth wires to a common
earth point.
•Connect the yellow cord to a free car
circuit rated higher than the unit‘s fuse
rating.
If you connect this unit in combination
with other stereo components, the car
circuit they are connected to must be
rated higher than the sum of the
individual component‘s fuse rating.
If there are no car circuits rated as high
as the unit‘s fuse rating, connect the
unit directly to the battery.
If no car circuits are available for
connecting this unit, connect the unit
to a car circuit rated higher than the
unit‘s fuse rating in such a way that if
the unit blows its fuse, no other
circuits will be cut off.
Précautions
•Cet appareil est uniquement conçu
pour fonctionner sur un courant
continu de 12 V avec masse négative.
•Avant d’effectuer les connexions,
débrancher la borne de terre de la
batterie du véhicule pour éviter tout
court-circuit.
•Brancher les fils d’entrée
d’alimentation jaune et rouge
seulement après avoir terminé tous les
autres branchements.
•Veiller à ne pas raccorder le fil rouge
d’entrée d’alimentation à la borne
positive de 12 V qui est alimentée
quand la clé de contact est sur la
position accessoires.
•Rassembler tous les fils de terre en un
point de masse commun.
•Branchez le fil jaune sur un circuit libre
de la voiture d’une intensité nominale
supérieure à l’intensité nominale du
fusible. Si vous raccordez cet appareil
en série avec d’autres appareils stéréo,
le circuit de la voiture auquel ils sont
raccordés doit présenter une intensité
nominale supérieure à la somme de
l’intensité nominale des fusibles des
différents appareils. Si la voiture ne
comporte aucun circuit d’une intensité
nominale supérieure à l’intensité
nominale du fusible, branchez
directement l’appareil sur la batterie. Si
la voiture ne comporte aucun circuit
disponible pour le raccordement de cet
appareil, raccordez l’appareil à un
circuit de la voiture dont l’intensité
nominale est supérieure à l’intensité
nominale du fusible de telle sorte que
si l’appareil grille son fusible, aucun
autre circuit ne sera coupé.
Precauciones
•Esta unidad ha sido diseñada para
alimentarse con 12 V CC, negativo a
masa, solamente.
•Antes de realizar las conexiones,
desconecte el conductor de puesta a
masa de la batería del automóvil a fin
de evitar cortocircuitos.
•Conecte los cables conectores de
alimentación amarillo y rojo
solamente después de haber conectado
los demás.
•Cerciórese de conectar el cable
conector de alimentación rojo a un
terminal de 12 V positivo que se
energice al poner la llave de encendido
en la posición para accesorios.
•Conecte todos los conductores de
puesta a masa a un punto común.
•Conecte el cable amarillo a un circuito
libre del automóvil con una potencia
nominal superior a la del fusible de la
unidad. Si conecta ésta en combinación
con otros componentes estéreo, la
potencia nominal del circuito del
automóvil al que se conecte debe ser
superior a la suma de la de los fusibles
de los componentes individuales. Si no
hay ningún circuito en el automóvil
con una potencia nominal tan alta
como la del fusible de la unidad,
conecte ésta directamente a la batería.
Si no hay circuitos en el automóvil
disponibles para conectar esta unidad,
conéctela a un circuito con una
potencia nominal superior a la del
fusible de la unidad de forma que si
dicho fusible se funde no se vean
afectados otros circuitos.
Dikkat
•Bu ünite yalnız 12V DC negatif
topraklama işlemi için tasarlanmıştır.
•Bağlantılara başlamadan önce, kısa
devre yapmaması için otomobilin
aküsündeki toprak terminal bağlantısını
çözünüz.
•Sarı ve kırmızı güç giriş kablolarını
ancak diğer kabloları bağladıktan
sonra bağlayınız.
•Kırmızı güç giriş kablosunu kontak
anahtarı özel pozisyonda olduğunda
çalışan +12 V güç terminaline
bağladığınıza emin olunuz.
•Tüm toprak kablolarını ortak bir yere
çekiniz.
•Sarı kabloyu otomobilin ünitenin
sigortasından daha güçlü boş bir
devresine bağlayınız. Eğer bu üniteyi
diğer stereo parçalarla birlikte
bağlarsanız, bağlı oldukları otomobil
sigortasının gücü diğer sigorta
parçalarının toplamından daha güçlü
olmak zorundadır. Eğer ünitenin
sigortası kadar güçlü bir otomobil
devresi yoksa, üniteyi doğrudan aküye
bağlayınız. Bu üniteyi bağlamak için
otomobil devresi yoksa, ünitenin
sigortası attığında diğer sigortaları
etkilemeyecek şekilde, kendi
sigortasından daha güçlü bir araba
devresine bağlayınız.
###############
•##########
#########
#####
•#####
#####
#########
#####
•##########
#########
#####
•##########
#########
#####
Reset button
When the installation and connections
are complete, be sure to press the reset
button with a ballpoint pen etc.
Notes on the control leads
• The power antenna control lead (blue) supplies
+12 V DC when you turn on the tuner or when
you activate the ATA (Automatic Tuner
Activation) Function.
• A power antenna without relay box cannot be
used with this unit.
Memory hold connection
When the yellow power input lead is connected,
power will always be supplied to the memory
circuit even when the ignition key is turned off.
Notes on speaker connection
• Before connecting the speakers, turn the unit off.
• Use speakers with an impedance of 4 to 8 ohms,
and with adequate power handling capacities.
Otherwise, the speakers may be damaged.
• Do not connect the terminals of the speaker
system to the car chassis, and do not connect the
terminals of the right speaker with those of the
left speaker.
• Do not attempt to connect the speakers in
parallel.
• Do not connect any active speakers (with built-in
amplifiers) to the speaker terminals of the unit.
Doing so may damage the active speakers.
Therefore, be sure to connect passive speakers to
these terminals.
Touche de réinitialisation
Quand l’installation et les connexions
sont terminées, appuyer sur la touche de
réinitialisation avec un stylo bille ou un
objet pointu.
Remarque sur les fils de commande
• Le fil de commande de l’antenne électrique (bleu)
fournit du courant continu de +12 V quand le
tuner est mis sous tension ou quand la fonction
ATA (Automatic Tuner Activation) est activée.
• Une antenne électrique sans boîtier de relais ne
peut pas être utilisée avec cet appareil.
Connexion pour le maintien de la mémoire
Lorsque le fil d’entrée d’alimentation jaune est
connecté, le circuit de la mémoire est alimenté en
permanence même si la clé de contact est sur la
position d’arrêt.
Remarques sur la connexion des hautparleurs
• Avant de raccorder les haut-parleurs, mettre
l’appareil hors tension.
• Utiliser des haut-parleurs ayant une impédance
de 4 à 8 ohms et une capacité adéquate sous peine
de les endommager.
• Ne pas raccorder les bornes du système de hautparleurs au châssis de la voiture et ne pas
connecter les bornes du haut-parleur droit à
celles du haut-parleur gauche.
• Ne pas tenter de raccorder les haut-parleurs en
parallèle.
• Ne pas connecter d'enceintes acoustiques actives
(avec amplificateurs intégrés) aux bornes
d'enceintes de cet appareil pour éviter de les
endommager. Veiller à raccorder des enceintes
passires.
Botón de reposición
Cuando finalice la instalación y las
conexiones, cerciórese de presionar el
botón de reposición con un bolígrafo,
etc.
Reset button
Touche de réinitialisation
Botón de reposición
Ayar tuşu
###############
Nota sobre los conductores de control
• El conductor de control de la antena motorizada
(azul) suministrará +12 V CC cuando conecte la
alimentación del sintonizador o cuando active la
función de activación automática del
sintonizador (ATA).
• Con esta unidad no podrá emplearse una antena
motorizada desprovista de caja de relé.
Conexión para protección de la memoria
Si se conecta conductor de entrada de alimentación
amarillo, el circuito de memoria siempre recibirá
alimentación aunque desactive la llave de
encendido.
Notas sobre la conexión de los altavoces
• Antes de conectar los altavoces, desconecte la
alimentación de la unidad.
• Utilice altavoces con una impedancia de 4 a
8 ohmios, y con la potencia máxima admisible
adecuada, ya que de lo contrario podría dañarlos.
• No conecte los terminales del sistema de altavoces
al chasis del automóvil, ni los del altavoz
izquierdo a los del derecho.
• No intente conectar los altavoces en paralelo.
• No conecte altavoces activos (con amplificadores
incorporados) a los terminales de altavoces de la
unidad. Si lo hiciese, podría dañar tales altavoces.
Por lo tanto, cerciórese de conectar altavoces
pasivos a estos terminales.
Ayar tuşu
Kurma ve bağlantı işlemleri bittiğinde
ayar tuşunu tükenmez kalem vb. ile
itmeyi unutmayınız.
Kontrol işlev notu
• Radyoyu veya ATA’yı (Automatic Tuner
Activation) açtığınızda güç anteni kontrol
kablosuna + 12V DC verir.
• Röle kutusu olmayan motorlu antenler bu
cihazla beraber kullanılamaz.
Hafızada tutma bağlantısı
Sarı renkteki güç giriş teli kullanıldığında
arabanın kontağı kapalı durumundayken bile
cihazın elektronik devresine akım gelecektir.
Hoparlör bağlantı notları
• Hoparlörleri bağlamadan önce üniteyi
kapatınız.
• 4 ile 8 ohm empedansa ve yeterli güç
kapasitesine sahip hoparlörler kullanınız.
Aksi takdirde hoparlörler zarar görebilir.
• Hoparlör sistemin terminallerini otomobilin
şasisine bağlamayınız. Sağ hoparlörün
terminallerini de diğer hoparlörün
terminallerine bağlamayınız.
• Hoparlörleri paralel olarak kesinlikle
bağlamayınız.
• Ünitenin spiker terminallerine, çalışan başka
bir hoparlör (amplifikatör takılı olan)
takmayınız. Bunu yaparsanız çalışan
hoparlörlere zarar verirsiniz. Bu yüzden bu
terminallere taktığınız terminallerin pasif
olmasına dikkat ediniz.
######
######
########
##########
#######
##################
##########
################
###########
#######
##################
##########
################
###########
#####################
###################•
###############
###################•
###############
###################•
###############
###################•
###############
###################•
###############

Connection example Connexions de l’exemple Ejemplo de conexiones Bağlantı örneği #########
Rotary remote RM-X4S
(Not supplied)
(Non fourni)
(No suministrado)
from car aerial
de l’antenne de la voiture
de la antena del automóvil
otomobil anteninden
Front speakers
Haut-parleurs avant
Altavoces delanteros
Ön hoparlörler
############
Left
Gauche
Izquierdo
Sol
###
Right
Droit
Derecho
Sağ
###
##########
White
Blanc
Blanco
Beyaz
#####
Black striped
Rayé noir
Con raya negra
Siyah çizgili
#######
Gray
Gris
Gris
Gri
#######
Black striped
Rayé noir
Con raya negra
Siyah çizgili
#######
REMOTE IN
Blue
Bleu
Azul
Mavi
###
Max. supply current 0.1 A
Courant max. fourni 0,1 A
Corriente máx. de alimentación de 0,1 A
Azami güç desteği 0,1 A
#####
Red
Rouge
Rojo
Kırmızı
####
ANT REM
(Alet beraberinde değil)
to power aerial control lead or power supply lead of aerial booster amplifier
<Note> If you do not use a power aerial or aerial booster, it is not necessary
to connect this lead.
vers le fil de commande de l’antenna électrique ou le fil d’alimentation de
l’amplificateur d’antenne
<Remarque> S’il n’y a pas d’antenne électrique ni d’amplificateur d’antenne,
il n’est pas nécessaire de raccorder ce fil.
al cable de control de la antena motorizada, o al cable de fuente de
alimentación del amplificador de antena
<Nota> En caso de no instalar la antena motorizada o el amplificador de
antena, no es necesario conectar este cable.
Antenin kuvvetlendirici amplifikatörünün güç anteni kontrol kablosuna veya
güç destek kablosuna
<Not> Eğer güç anteni veya anten kuvvetlendiricisi kullanmıyorsanız, bu
kabloyu bağlamanıza gerek yoktur.
to the +12 V power terminal which is energized in the accessory position of
the ignition key switch
Be sure to connect the black ground lead to it first.
à la borne +12 V qui est alimentée quand la clé de contact est sur la position
accessoires.
Raccordez d‘abord le fil de masse noir.
al terminal de alimentación de +12 V que se energice en la posición para
accesorios de la llave de encendido
Asegúrese de conectar primero a este terminal el conductor de puesta a masa
negro.
Kontak anahtarı özel pozisyonda olduğunda çalışan +12 V güç terminaline
İlk olarak siyah kabloyu bağladığınıza emin olunuz.
###########
###########
#############
###################
###########
######
#######
Rear speakers
Haut-parleurs arrière
Altavoces traseros
Arka hoparlörler
############
Left
Gauche
Izquierdo
Sol
###
Right
Droit
Derecho
Sağ
###
Green
Vert
Verde
Yeşil
####
Black striped
Rayé noir
Con raya negra
Siyah çizgili
#######
Purple
Mauve
Púrpura
Pembe
####
Black striped
Rayé noir
Con raya negra
Siyah çizgili
#######
Yellow
Jaune
Amarillo
Sarı
####
Black
Noir
Negro
Siyah
####
Fuse (10A)
Fusible (10 A)
Fusible (10 A)
Sigorta (10 A)
#####
to the +12 V power terminal which is energized at all times
Be sure to connect the black ground lead to it first.
à la borne +12 V qui est alimentée en permanence.
Raccordez d‘abord le fil de masse noir.
al terminal de alimentación de +12V que esté permanentemente energizado
Asegúrese de conectar primero a este terminal el conductor de puesta a masa
negro.
Her zaman çalışan +12 V güç terminaline
İlk olarak siyah kabloyu bağladığınıza emin olunuz.
to a metal point of the car
First connect the black ground lead, then connect the yellow and red power
input leads.
à un point métallique de la voiture
Branchez d‘abord le fil de masse noir et, ensuite, les fils d‘entrée
d‘alimentation jaune et rouge.
a un punto metálico del automóvil
En primer lugar conecte el conductor de puesta a tierra negro y, a
continuación, los cables de entrada de alimentación amarillo y rojo.
Otomobilin metal bir parçasına
İlk olarak siyah toprak kablonuzu bağlayınız. Ardından sarı ve kırmızı güç
giriş kablolarını bağlayınız.
###################
###################
###########
#############
###########
#############
 Loading...