

Page 1

FM/MW/LW
Cassette
Car Stereo
3-044-698-41 (1)
Operating Instructions
Instrukcje Obsługi
Návod k obsluze
Kullanım kılavuzu
Руководство по эксплуатации
For installation and connections, see the supplied installation/connections
manual.
Szczegóły dotyczące instalacji i podłączeń, proszę sprawdzić w dostarczonym,
osobnym podręczniku
Informace o instalaci a zapojení naleznete v přiložené příručce Instalace /
zapojení.
Kurma ve bağlantı işlemleri için ünite beraberindeki Kurma/Bağlantılar kılavuzuna
bakınız.
П орядок установки и подключения магнитолы описан в прилагаемой
инструкции об установке/подключении.
GB
PL
CZ
TR
RU
XR-1300R
2000 Sony Corporation
Page 2

Welcome ! Precautions
Thank you for purchasing this Sony Cassette
Player.
• If your car was parked in direct sunlight
resulting in a considerable rise in
temperature inside the car, allow the unit to
cool off before operating it.
• If no power is being supplied to the unit,
check the connections first. If everything is in
order, check the fuse.
• If no sound comes from the speakers of a
two-speaker system, set the fader control to
the centre position.
• When a tape is played back for a long period,
the cassette may become warm because of
the built-in power amplifier. However, this is
not a sign of malfunction.
If you have any questions or problems
concerning your unit that are not covered in
this manual, please consult your nearest Sony
dealer.
To maintain high quality sound
If you have drink holders near your audio
equipment, be careful not to splash juice or
other soft drinks onto the car audio. Sugary
residues on this unit or cassette tapes may
contaminate the playback heads, reduce the
sound quality, or prevent sound reproduction
altogether.
Cassette cleaning kits cannot remove sugar
from the tape heads.
22
Page 3
Notes on Cassettes
Cassette care
• Do not touch the tape surface of a cassette, as
any dirt or dust will contaminate the heads.
• Keep cassettes away from equipment with
built-in magnets such as speakers and
amplifiers, as erasure or distortion on the
recorded tape could occur.
• Do not expose cassettes to direct sunlight,
extremely cold temperatures, or moisture.
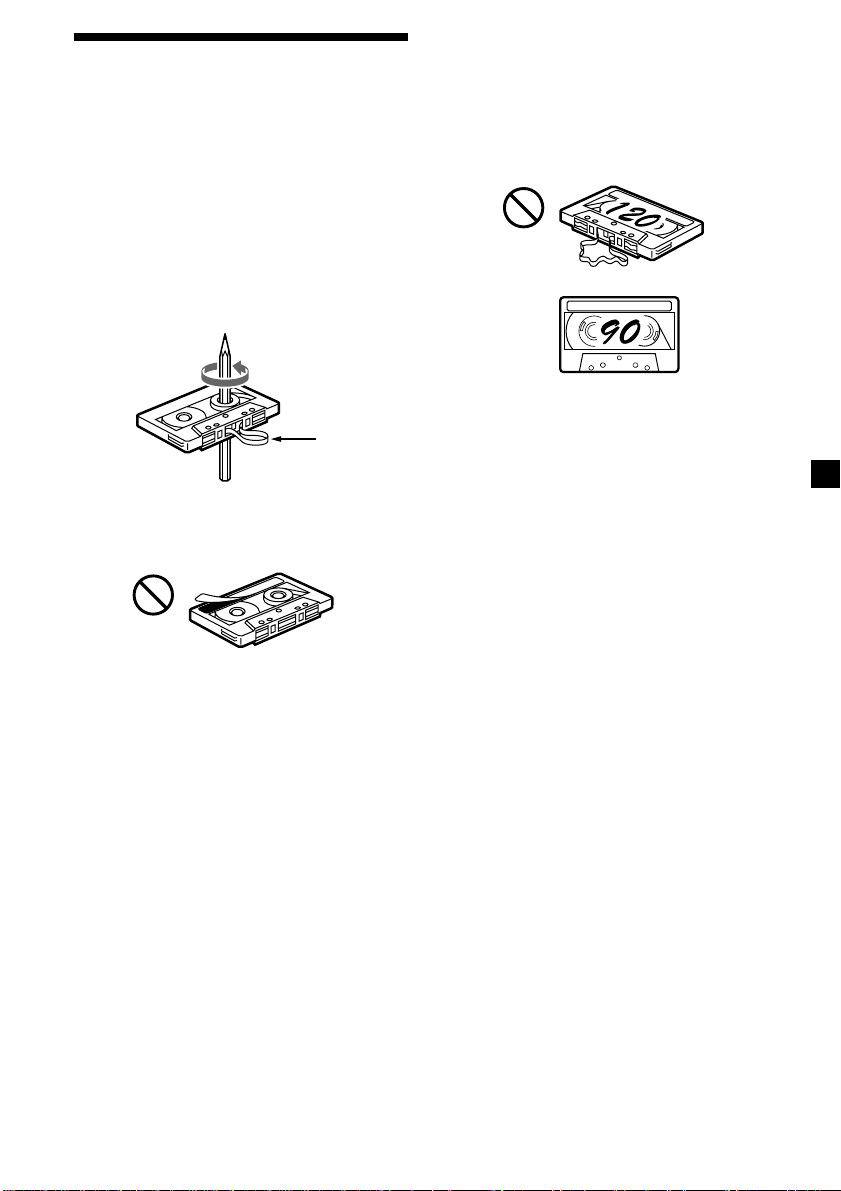
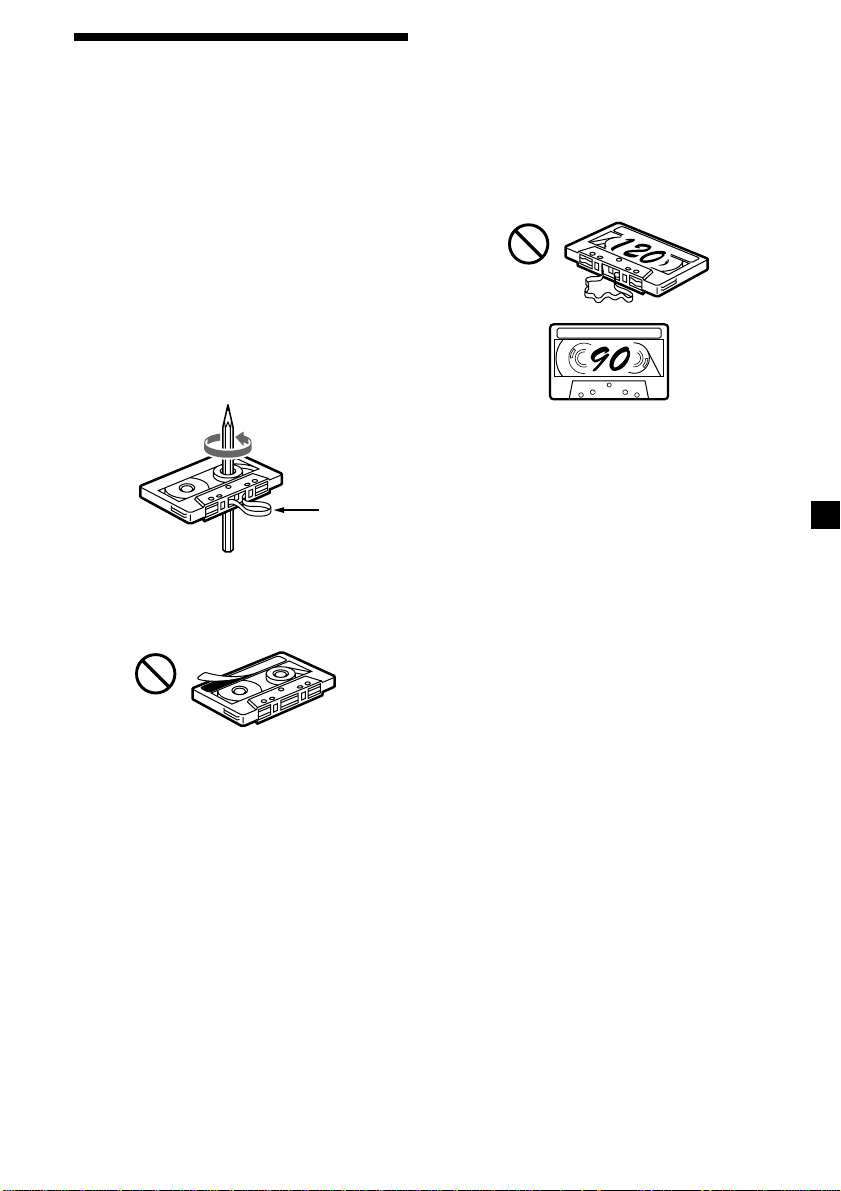
• Slack in the tape may cause the tape to be
caught in the machine. Before you insert the
tape, use a pencil or similar object to turn the
reel and take up any slack.
Slack
• Distorted cassettes and loose labels can cause
problems when inserting or ejecting tapes.
Remove or replace loose labels.
Cassettes longer than 90 minutes
The use of cassettes longer than 90 minutes is
not recommended except for long continuous
play. The tape used for these cassettes is very
thin and tends to stretch easily. Frequent
playing and stopping of these tapes may cause
them to become entangled in the cassette deck
mechanism.
• The sound may become distorted while
playing the cassette. The cassette player head
should be cleaned after each 50 hours of use.
33
Page 4

Table of Contents
Location of controls ................................................. 5
Getting Started
Resetting the unit ................................................ 6
Detaching the front panel .................................. 6
How to use the menu ......................................... 6
Setting the clock .................................................. 7
Cassette Player
Listening to a tape ............................................... 7
Radio Reception during Fast-forwarding or
Rewinding of a Tape
— ATA (Automatic Tuner Activation) ........ 8
Radio
Memorizing stations automatically
— Best Tuning Memory (BTM) .................... 8
Memorizing only the desired stations ............. 9
Receiving the memorized stations.................... 9
RDS
Overview of the RDS function ........................ 10
Displaying the station name............................ 10
Retuning the same programme automatically
— Alternative Frequencies (AF) ................ 10
Listening to traffic announcements ................ 12
Presetting the RDS stations with the AF and TA
data ................................................................ 12
Locating a station by programme type .......... 13
Setting the clock automatically ....................... 14
Additional Information
Maintenance....................................................... 16
Dismounting the unit ....................................... 17
Specifications ..................................................... 18
Troubleshooting guide ..................................... 19
Other Functions
Adjusting the sound characteristics ............... 15
Changing the sound and display settings ..... 15
Boosting the bass sound
— D-bass ....................................................... 16
44
Page 5
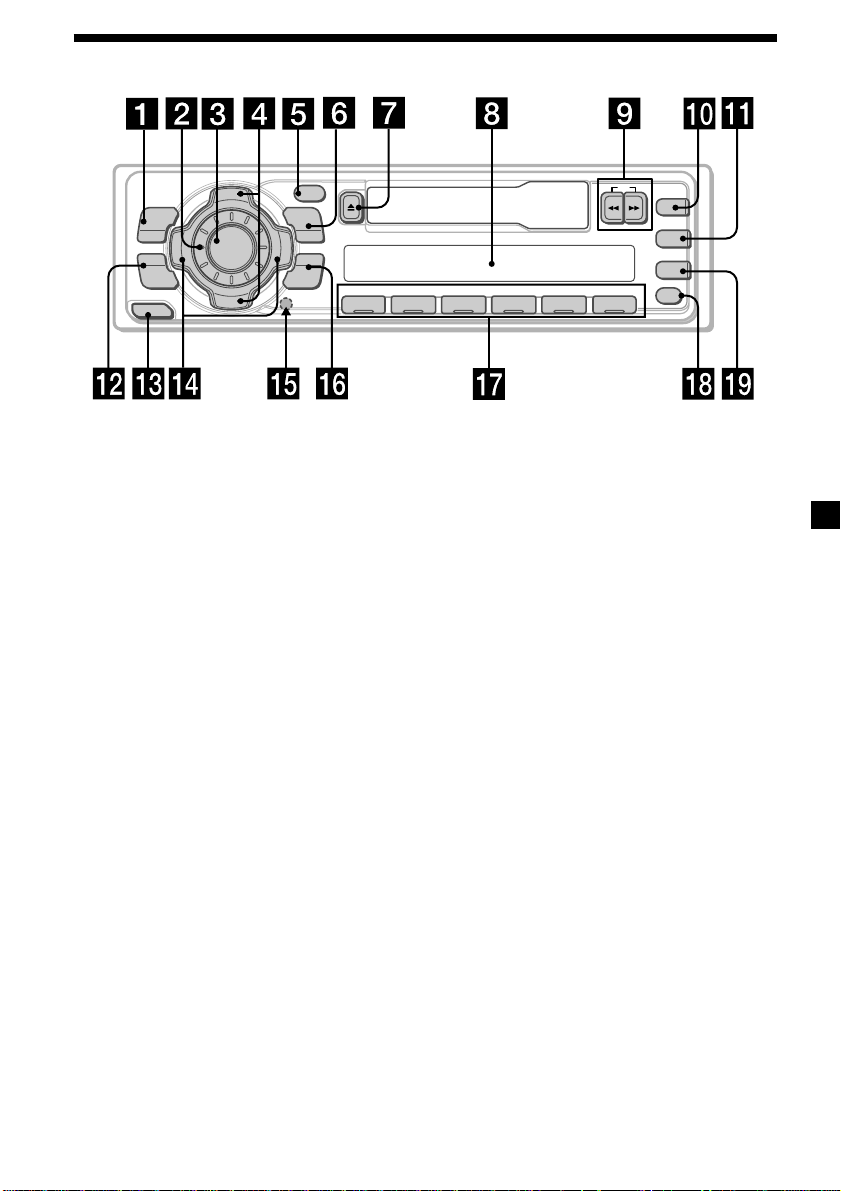
Location of controls
PTY
S
+
T
MENU
SOUND
RELEASE
R
P
–
K
E
TUNER
E
S
P
R
S
T
DSPL
MODE
S
E
E
K
+
ENTER
–
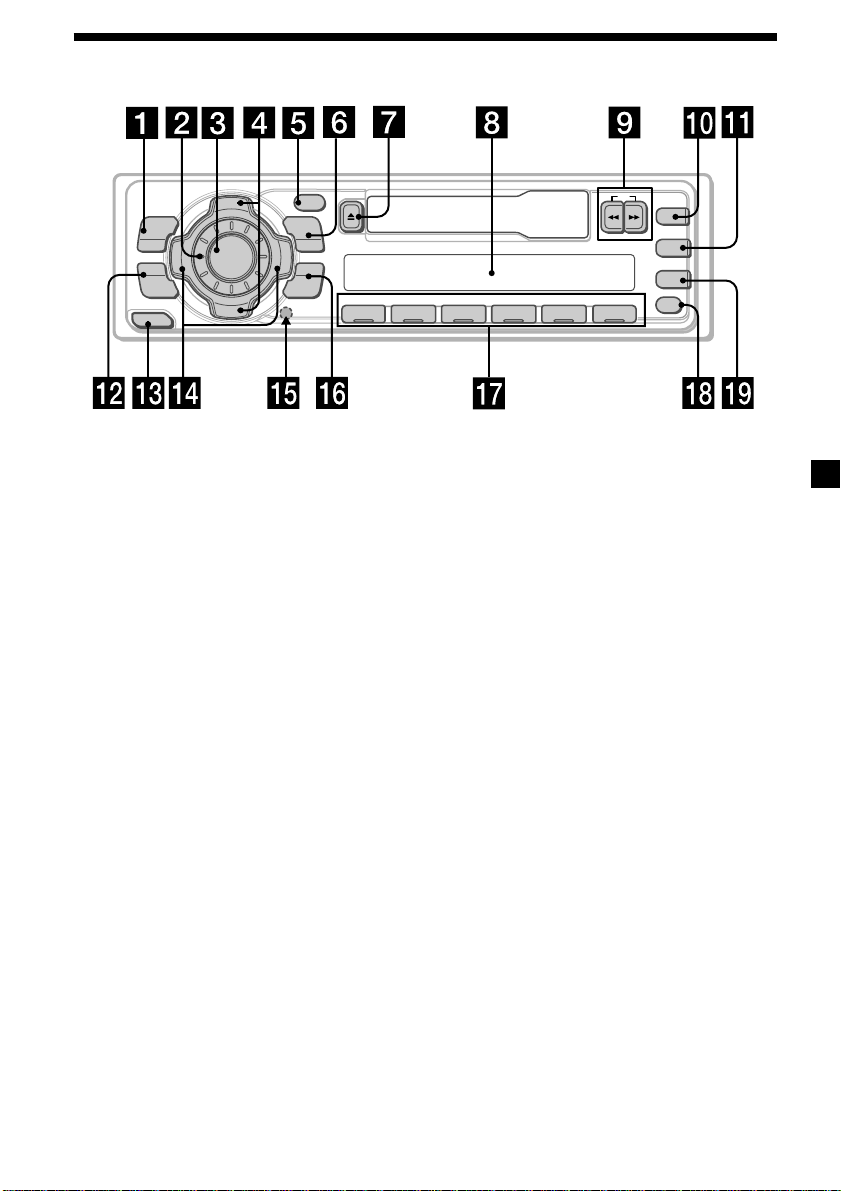
Refer to the pages listed for details.
1 MENU button
7, 8, 9, 11, 13, 14, 15
2 Volume control dial
3 TUNER button 8, 9, 12
4 PRST +/– (cursor up/down) buttons
7, 8, 9, 11, 13, 14, 15
During radio reception:
Preset stations select 8, 9
5 DSPL/PTY (display mode change/
programme type) button 14
6 MODE button
During radio reception:
BAND select 8, 9
7 Z (eject) button 7
8 Display window
9 m/M (fast winding)/DIR (tape
transport direction change) buttons 7
q; D-BASS button 16
DIR
D-BASS
1 2 3 4 56
OFF
XR-1300R
qa TA button 12, 13
qs SOUND button 15
qd RELEASE (front panel release) button
6, 17
qf SEEK –/+ (cursor left/right) buttons
7, 8, 9, 11, 13, 14, 15
seek 9
qg Reset button (located on the front side
of the unit behind the front panel) 6
qh ENTER button 7, 8, 9, 11, 13, 14, 15
qj Preset number buttons 9, 11
qk OFF button* 6
ql AF button 10, 11, 13
* Warning when installing in a car
without ACC (accessory) position on
the ignition key switch
Be sure to press (OFF) on the unit for two
seconds to turn off the clock display after
turning off the engine.
When you press (OFF) momentarily, the
clock display does not turn off and this
causes battery wear.
TA
AF
55
Page 6
Getting Started
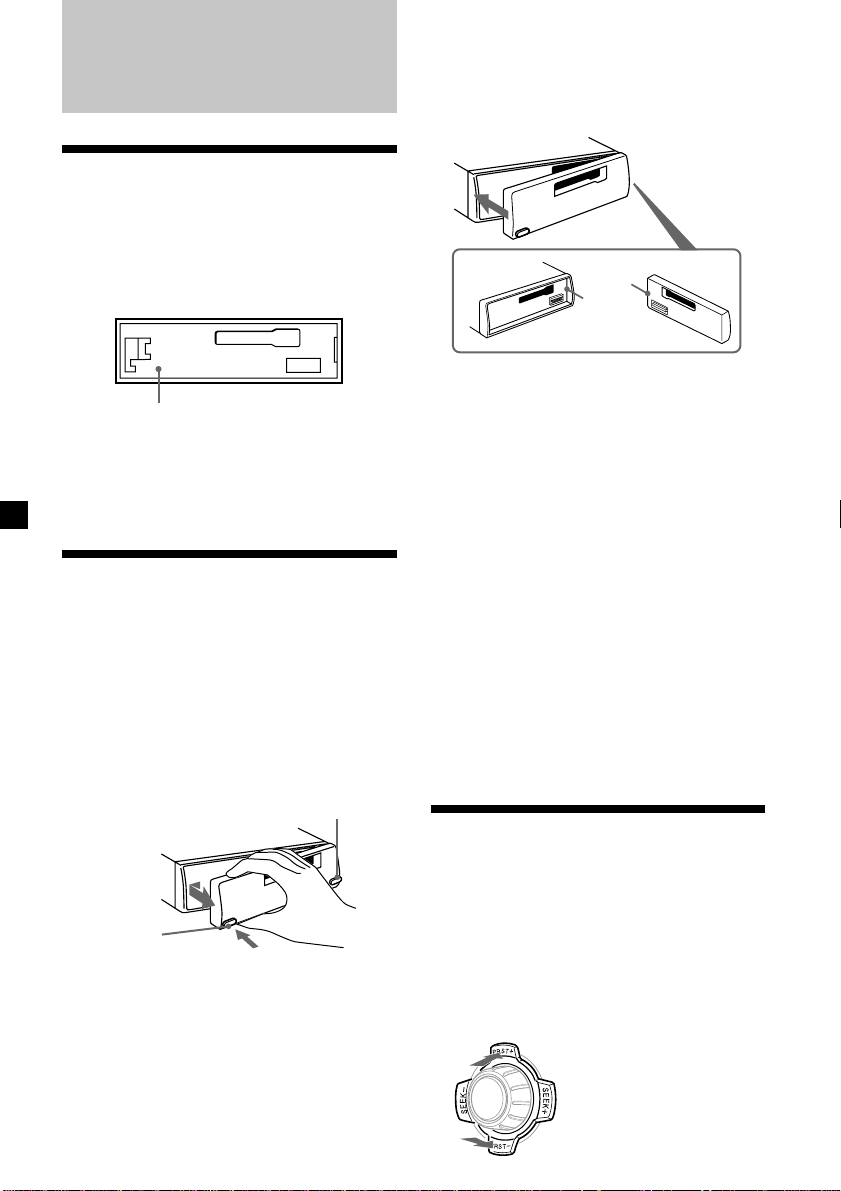
Resetting the unit
Before operating the unit for the first time or
after replacing the car battery, you must reset
the unit.
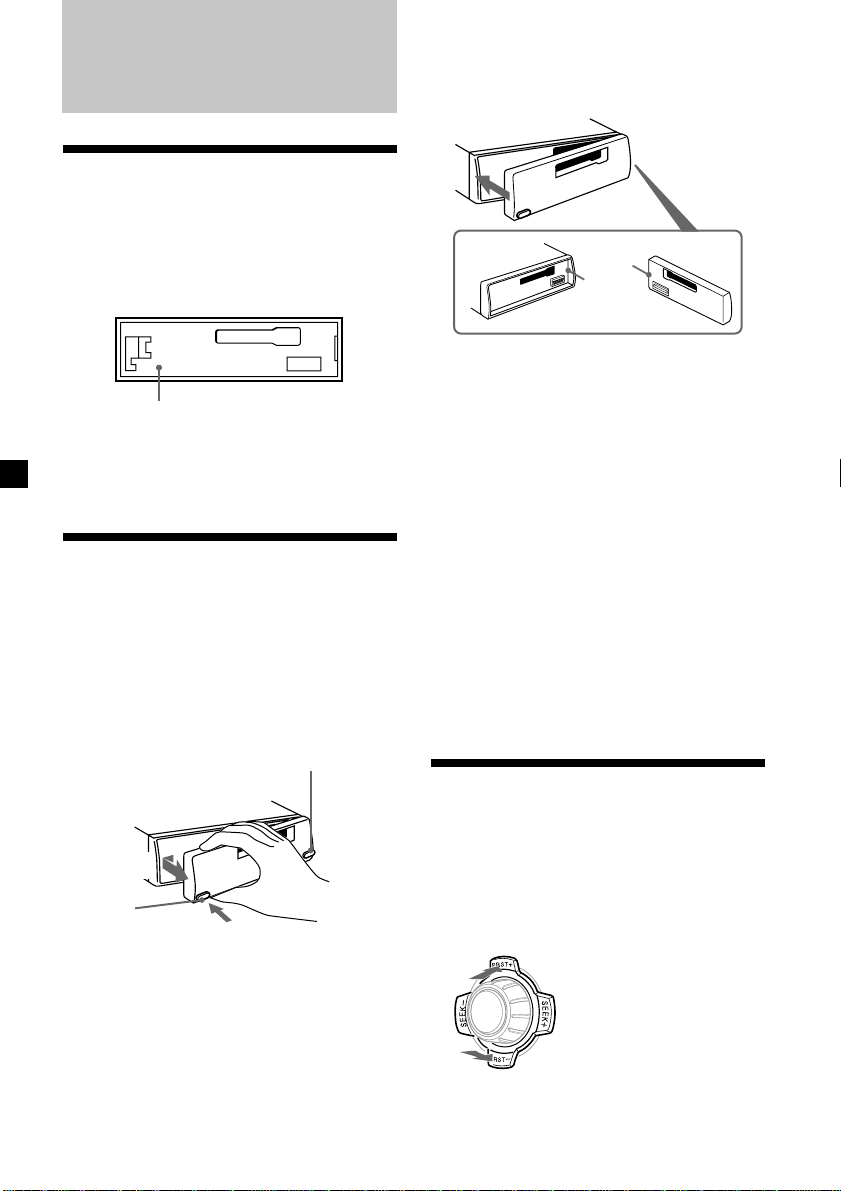
Remove the front panel and press the reset
button with a pointed object, such as a
ballpoint pen.
Reset button
Note
Pressing the reset button will erase the clock
setting and some memorized functions.
Detaching the front panel
You can detach the front panel of this unit to
protect the unit from being stolen.
1 Press (OFF).
2 Press (RELEASE), then slide the front
panel a little to the left, and pull it off
towards you.
(OFF)
(RELEASE)
Notes
• Be sure not to drop the panel when detaching it
from the unit.
• If you detach the panel while the unit is still
turned on, the power will turn off automatically
to prevent the speakers from being damaged.
• When carrying the front panel with you, use the
supplied front panel case.
Attaching the front panel
Attach part A of the front panel to part B of
the unit as illustrated and push the left side
into position until it clicks.
A
B
Notes
• Be sure not to attach the front panel upside
down.
• Do not press the front panel too hard against the
unit when attaching it.
• Do not press too hard or put excessive pressure
on the display window of the front panel.
• Do not expose the front panel to direct sunlight
or heat sources such as hot air ducts, and do not
leave it in a humid place. Never leave it on the
dashboard of a car parked in direct sunlight or
where there may be a considerable rise in
temperature.
Caution alarm
If you turn the car ignition off without
removing the front panel, the caution alarm
will beep for a few seconds.
If you connect an optional power amplifier and
do not use the built-in amplifier, the beep
sound will be deactivated.
How to use the menu
This unit is operated by selecting items from a
menu.
To select, first enter the menu mode and
choose up/down (+/– of (PRST)), or choose
left/right (–/+ of (SEEK)).
(PRST)
(+) : To select upwards
TUNER
(–) : To select downwards
66
Page 7
(SEEK)
(–) : To select
leftwards
TUNER
(+) : To select
rightwards
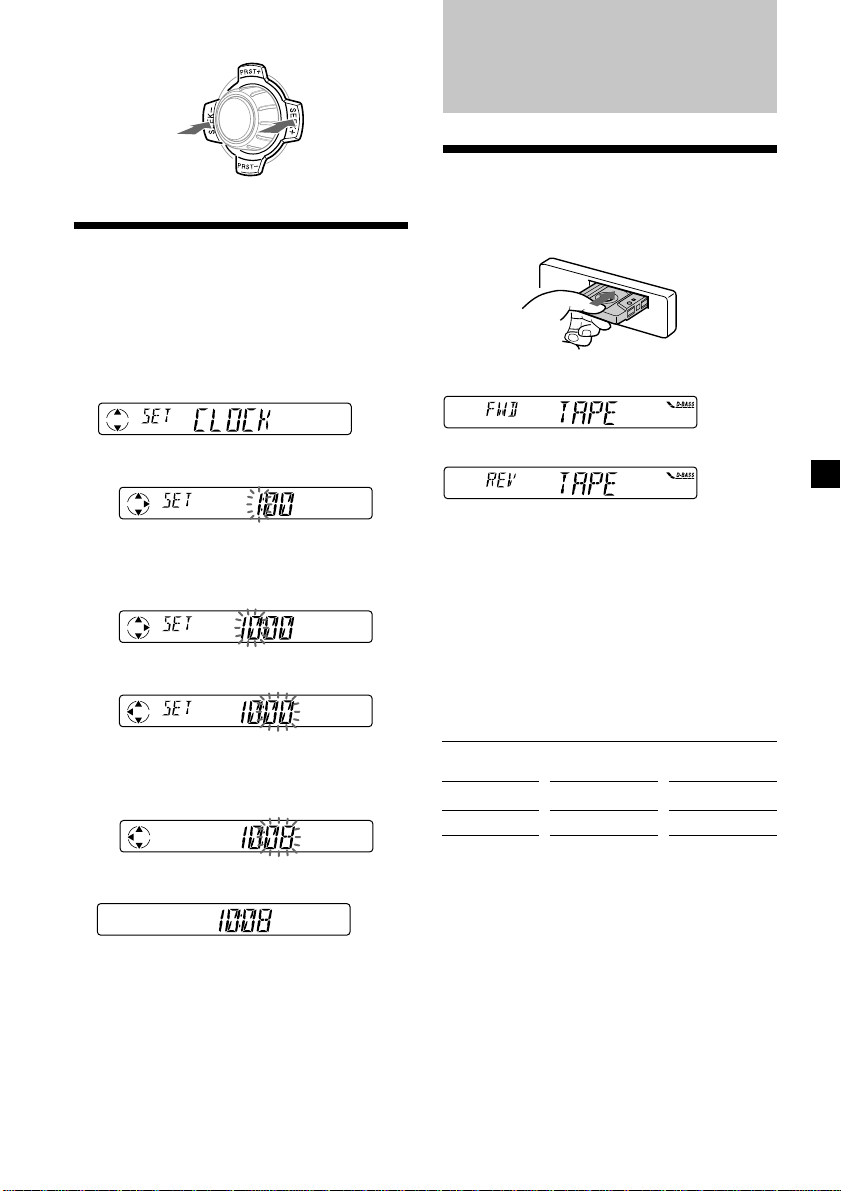
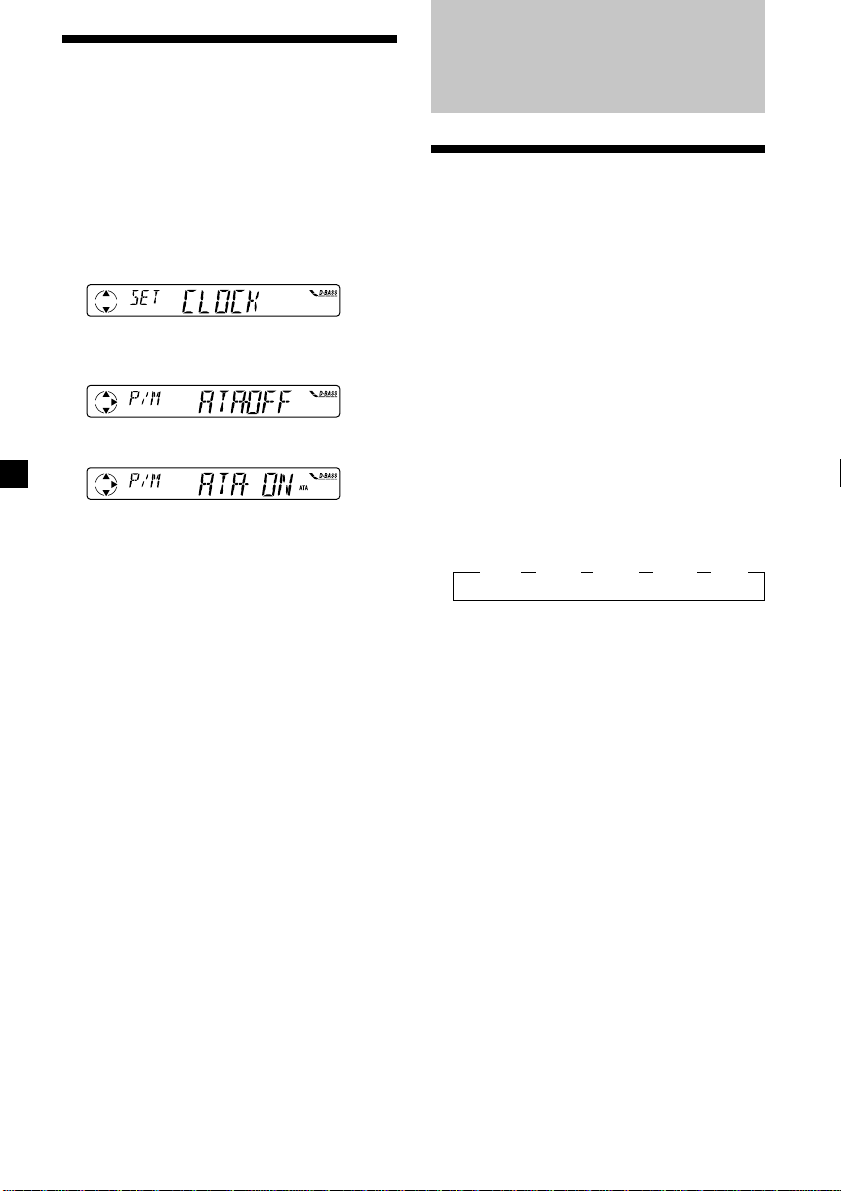
Setting the clock
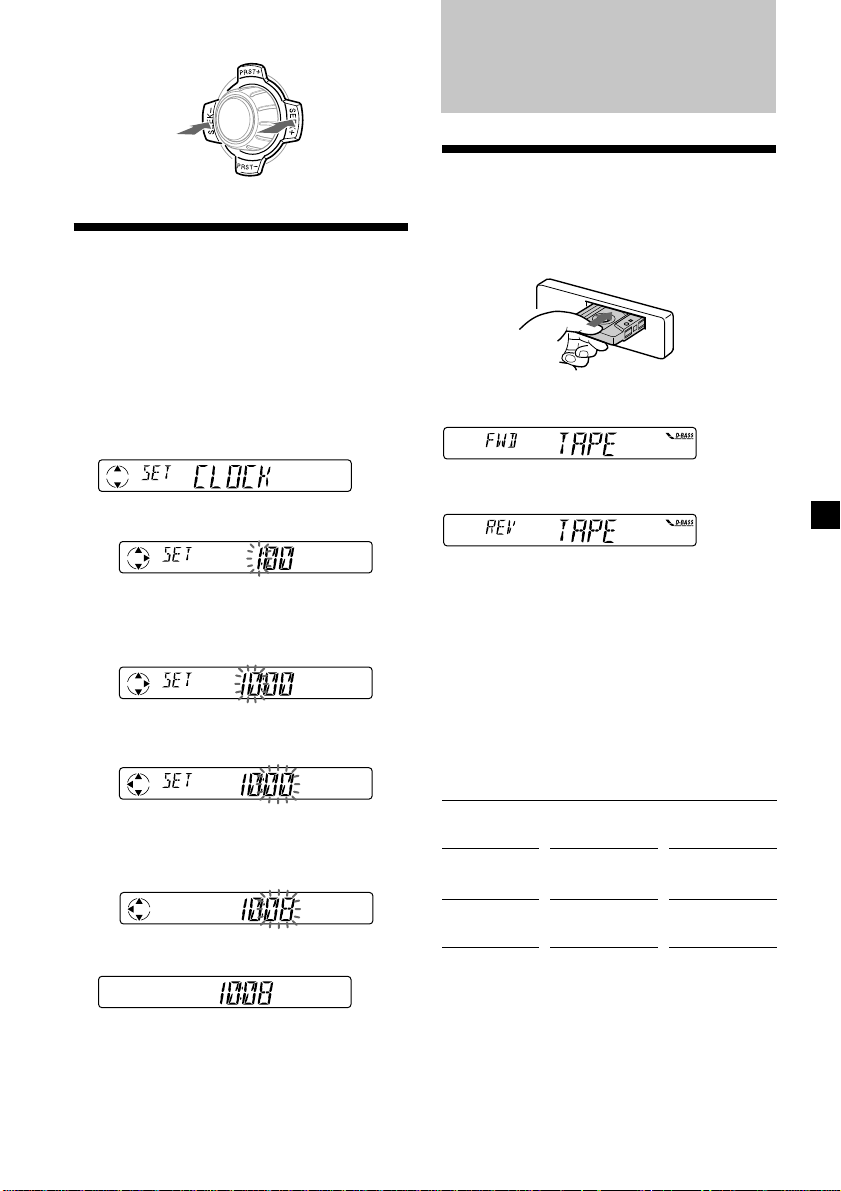
The clock uses a 24-hour digital indication.
Example: To set the clock to 10:08
1 Press (MENU), then press either side of
(PRST) repeatedly until “CLOCK”
appears.
Cassette Player
Listening to a tape
Insert a cassette.
Playback starts automatically.
The side facing up is played.
1 Press (ENTER).
The hour indication flashes.
2 Press either side of (PRST) to set the
hour.
3 Press + side of (SEEK).
The minute indication flashes.
4 Press either side of (PRST) to set the
minute.
2 Press (ENTER).
The clock starts.
After the clock setting is complete, the
display returns to normal playback mode.
The side facing down is played.
Tip
To change the tape‘s playback direction, press m
and M.
To stop playback and eject the
cassette
Press Z.
Fast-winding the tape
During playback, press m or M.
Direction
indicator*
FWD
REV
* The < > indicator will flash while fast-winding
the tape.
To start playback during fast-forwarding or
rewinding, press the other fast-winding button
partially until the locked button is released.
To advance
M
m
To rewind
m
M
77
Page 8
Radio Reception during
Fast-forwarding or
Rewinding of a Tape
— ATA (Automatic Tuner Activation)
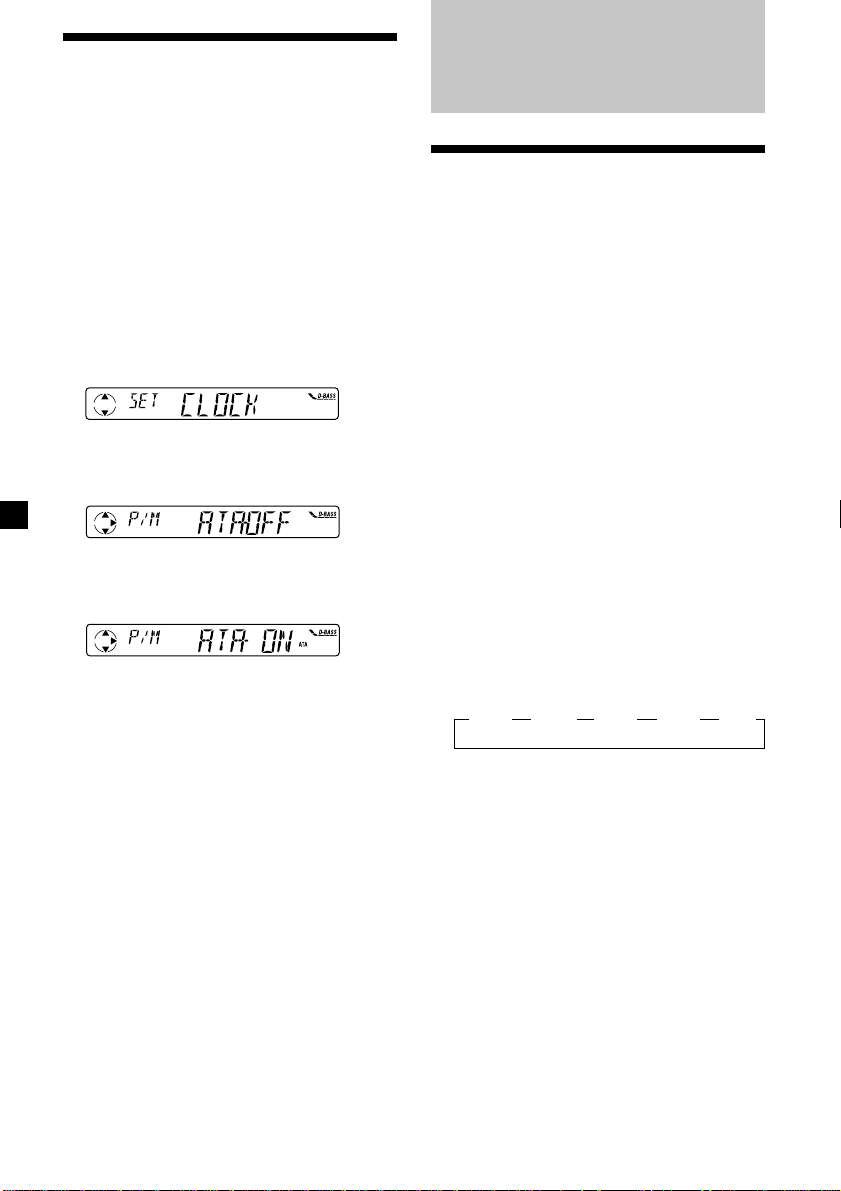
When fast-forwarding or rewinding with the
m or M button, the tuner will turn on
automatically.
1 During playback, press (MENU).
2 Press either side of (PRST) repeatedly
until “ATA” appears.
Radio
Memorizing stations
automatically
— Best Tuning Memory (BTM)
The unit selects the stations with the strongest
signals and memorizes them in the order of
their frequencies. You can store up to 6 stations
on each band (FM1, FM2, FM3, MW, and LW).
Caution
When tuning in stations while driving, use
Best Tuning Memory to prevent accidents.
3 Press + side of (SEEK) to select “ON.”
Play mode starts.
4 Press (ENTER).
To return to normal playback mode, select
“OFF” in step 3 above.
1 Press (TUNER).
The tuner is turned on.
2 Press (MODE) repeatedly to select the
band.
Each time you press (MODE), the band
changes as follows:
B FM1 B FM2 B FM3 B MW B LW
3 Press (MENU), then press either side of
(PRST) repeatedly until “BTM” appears.
4 Press (ENTER).
The unit stores stations in the order of their
frequencies on the number buttons.
A beep sounds when the setting is stored.
Notes
• The unit does not store stations with weak
signals. If only a few stations can be received,
some number buttons will retain their former
setting.
• When a number is indicated in the display, the
unit starts storing stations from the one currently
displayed.
88
Page 9

Memorizing only the
desired stations
You can preset up to 18 FM stations (6 each for
FM1, 2, and 3), up to 6 MW stations, and up to
6 LW stations in the order of your choice.
1 Press (TUNER).
The tuner is turned on.
2 Press (MODE) repeatedly to select the
band.
3 Press either side of (SEEK) to tune in the
station that you want to store on the
number button.
4 Press and hold the desired number
button ((1) to (6)) until “MEM” appears.
The number button indication appears in
the display.
Note
If you try to store another station on the same
number button, the previously stored station will
be erased.
Receiving the memorized
stations
1 Press (TUNER).
The tuner is turned on.
2 Press (MODE) repeatedly to select the
band.
If you cannot tune in a preset
station
Press either side of (SEEK) to search for
the station (automatic tuning).
Scanning stops when the unit receives a
station. Press either side of (SEEK)
repeatedly until the desired station is
received.
Note
If the automatic tuning stops too frequently, press
(MENU), then press either side of (PRST)
repeatedly until “LOCAL” (local seek mode) is
displayed. Then press + side of (SEEK) to select
“LOCAL-ON.” Press (ENTER).
Only the stations with relatively strong signals will
be tuned in.
Tip
If you know the frequency of the station you want
to listen to, press and hold either side of (SEEK)
until the desired frequency appears (manual
tuning).
If FM stereo reception is poor
— Monaural Mode
1 During radio reception, press (MENU),
then press either side of (PRST)
repeatedly until “MONO” appears.
2 Press + side of (SEEK) until “MONO-ON“
appears.
The sound improves, but becomes
monaural (“ST” disappears).
3 Press (ENTER).
To return to normal mode, select “MONO-
OFF” in step 2 above.
3 Press the number button ((1) to (6)) on
which the desired station is stored.
Tip
Press either side of (PRST) to receive the stations
in the order they are stored in the memory (Preset
Search Function).
99
Page 10
RDS
Overview of the RDS
function
Radio Data System (RDS) is a broadcasting
service that allows FM stations to send
additional digital information along with the
regular radio programme signal. Your car
stereo offers you a variety of services. Here are
just a few: retuning the same programme
automatically, listening to traffic
announcements, and locating a station by
programme type.
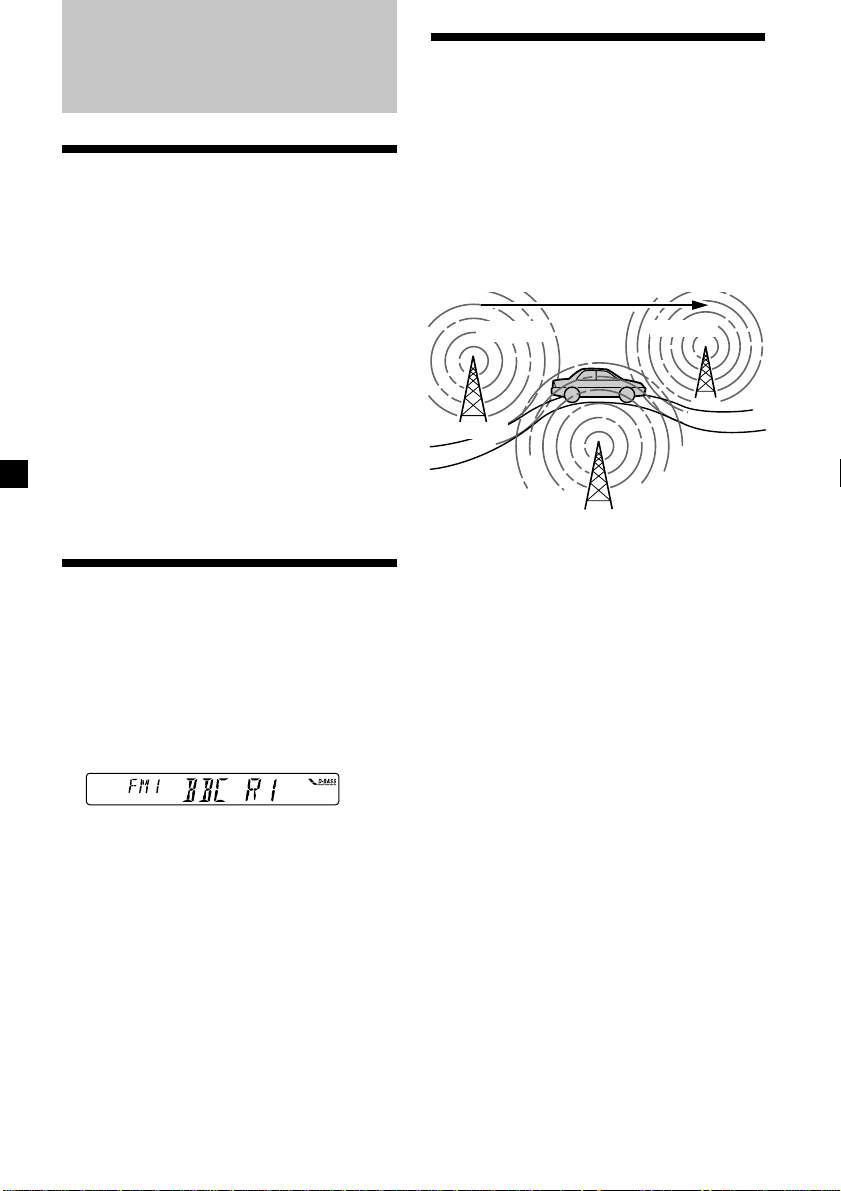
Retuning the same
programme automatically
— Alternative Frequencies (AF)
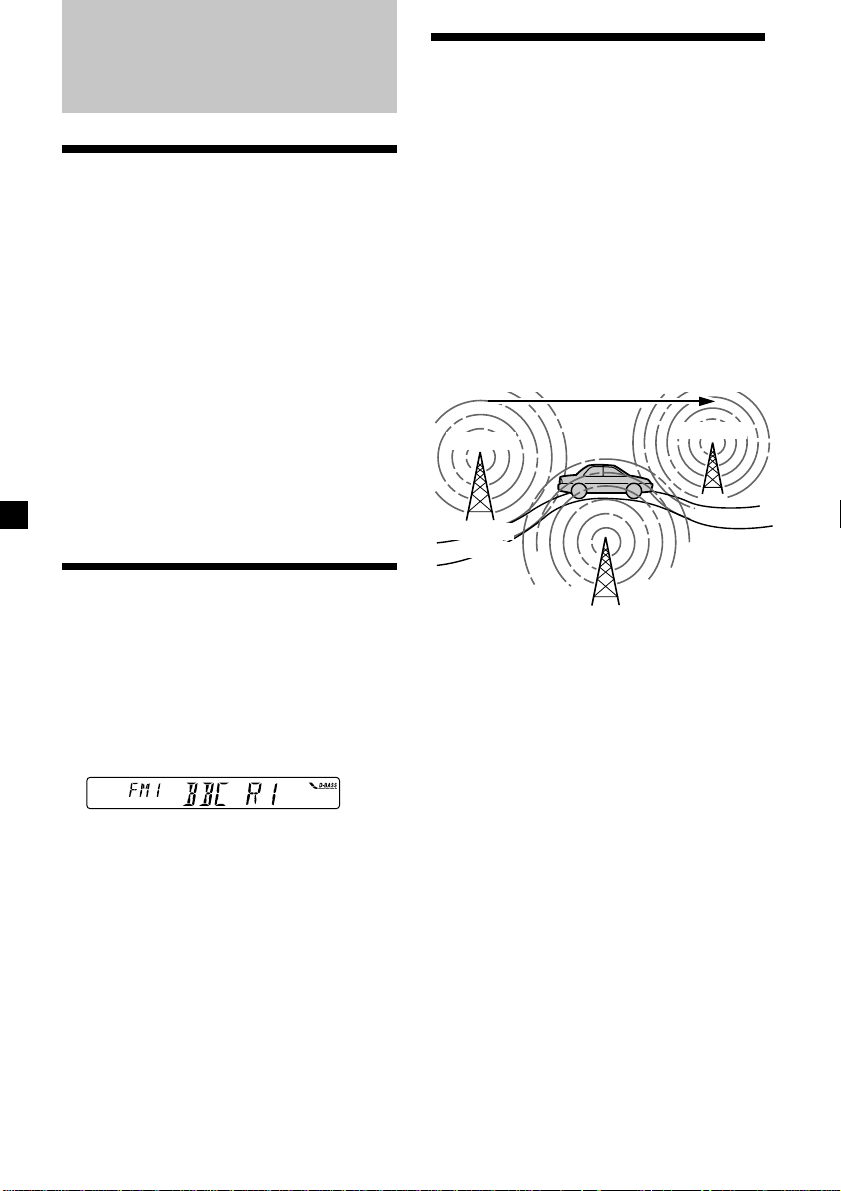
The Alternative Frequencies (AF) function
automatically selects and retunes the station
with the strongest signal in a network. By
using this function, you can continuously
listen to the same programme during a longdistance drive without having to retune the
station manually.
Frequencies change automatically.
98.5MHz
96.0MHz
Notes
• Depending on the country or region, not all of
the RDS functions are available.
• RDS may not work properly if the signal strength
is weak or if the station you are tuned to is not
transmitting RDS data.
Displaying the station
name
The name of the current station lights up in the
display.
Select an FM station (page 9).
When you tune in an FM station that
transmits RDS data, the station name
appears in the display.
Note
The “*” indication means that an RDS station is
being received.
Station
102.5MHz
1 Select an FM station (page 9).
2 Press (AF) repeatedly until “AF-ON”
appears.
The unit starts searching for an alternative
station with a stronger signal in the same
network.
Note
When there is no alternative station in the area
and you do not need to search for an alternative
station, turn the AF function off by pressing (AF)
repeatedly until “AF-OFF” appears.
10
Page 11

Changing the display item
Each time you press (AF), the item changes as
follows:
AF-ON y AF-OFF
Notes
• When “NO AF” and the station name flash
alternately, it means that the unit cannot find an
alternative station in the network.
• If the station name starts flashing after selecting
a station with the AF function on, this indicates
that no alternative frequency is available. Press
either side of (SEEK) while the station name is
flashing (within eight seconds). The unit starts
searching for another frequency with the same PI
(Programme Identification) data (“PI SEEK”
appears and no sound is heard). If the unit
cannot find another frequency, “NO PI” appears,
and the unit returns to the previously selected
frequency.
Listening to a regional programme
The “REG-ON” (regional on) function lets you
stay tuned to a regional programme without
being switched to another regional station.
(Note that you must turn the AF function on.)
The unit is factory preset to “REG-ON,” but if
you want to turn off the function, do the
following.
1 During radio reception, press (MENU),
then press either side of (PRST)
repeatedly until “REG” appears.
Local link function
(United Kingdom only)
The Local Link function lets you select other
local stations in the area, even if they are not
stored on your number buttons.
1 Press a number button that has a local
station stored on it.
2 Within five seconds, press the number
button of the local station again.
3 Repeat this procedure until the desired
local station is received.
2 Press + side of (SEEK) until “REG-OFF”
appears.
3 Press (ENTER).
Note that selecting “REG-OFF” might cause
the unit to switch to another regional
station within the same network.
To return to regional on, select “REG-ON” in
step 2 above.
Note
This function does not work in the United
Kingdom and in some other areas.
11
Page 12

Listening to traffic
announcements
The Traffic Announcement (TA) and Traffic
Programme (TP) data let you automatically
tune in an FM station that is broadcasting
traffic announcements even if you are listening
to other programme sources.
Presetting the volume of traffic
announcements
You can preset the volume level of the traffic
announcements beforehand so you won’t
miss the announcement. When a traffic
announcement starts, the volume will be
automatically adjusted to the preset level.
1 Select the desired volume level.
Press (TA) repeatedly until “TA-ON”
appears.
The unit starts searching for traffic
information stations. “TP” appears in the
display when the unit finds a station
broadcasting traffic announcements.
When the traffic announcement starts,
“TA” flashes. The flashing stops when the
traffic announcement is over.
Tip
If the traffic announcement starts while you are
listening to another programme source, the unit
automatically switches to the announcement and
goes back to the original source when the
announcement is over.
Notes
“NO TP” flashes for five seconds if the received
•
station does not broadcast traffic announcements.
Then, the unit starts searching for a station that
broadcasts it.
• When “EON” appears with “TP” in the display,
the current station makes use of broadcast traffic
announcements by other stations in the same
network.
To cancel the current traffic
announcement
Press (TA) or (TUNER).
To cancel all traffic announcements, turn off
the function by pressing (TA) until
“TA-OFF” appears.
2 Press (TA) for two seconds.
“TA” appears and the setting is stored.
Receiving emergency
announcements
If an emergency announcement comes in while
you are listening to the radio, the programme
will automatically switch to it. If you are
listening to a source other than the radio, the
emergency announcements will be heard if
you set AF or TA to on. The unit will then
automatically switch to these announcements
no matter which source you are listening to at
the time.
Presetting the RDS
stations with the AF and
TA data
When you preset RDS stations, the unit stores
each station’s data as well as its frequency, so
you don’t have to turn on the AF or TA
function every time you tune in the preset
station. You can select a different setting (AF,
TA, or both) for individual preset stations, or
the same setting for all preset stations.
12
Page 13

Presetting the same setting for all
preset stations
1 Select an FM band (page 9).
Locating a station by
programme type
2 Press (AF) or/and (TA) to select “AF-ON”
or/and “TA-ON.”
Note that selecting “AF-OFF” or “TA-OFF”
stores not only RDS stations, but also nonRDS stations.
3 Press (MENU), then press either side of
(PRST) repeatedly until “BTM” appears.
4 Press + side of (SEEK) until “BTM”
flashes.
5 Press (ENTER).
Presetting different settings for
each preset station
1 Select an FM band, and tune in the
desired station.
2 Press (AF) or/and (TA) to select “AF-ON”
or/and “TA-ON.”
3 Press the desired number button and
hold until “MEM” appears.
Repeat from step 1 to preset other stations.
Tip
If you want to change the preset AF and/or TA
setting after you tune in the preset station, you
can do so by turning the AF or TA function on or
off.
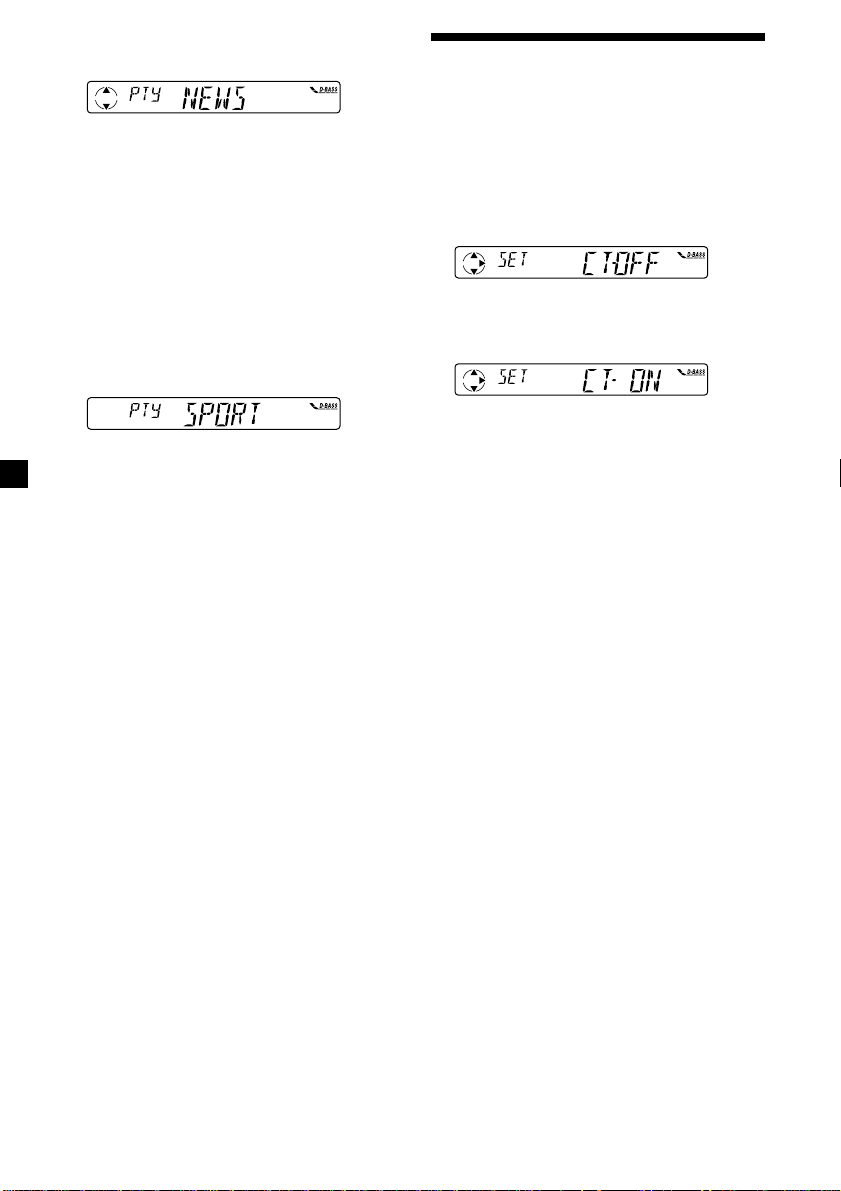
You can locate the station you want by
selecting one of the programme types shown
below.
Programme types Display
News NEWS
Current Affairs AFFAIRS
Information INFO
Sports SPORT
Education EDUCATE
Drama DRAMA
Culture CULTURE
Science SCIENCE
Varied VARIED
Popular Music POP M
Rock Music ROCK M
Easy Listening EASY M
Light Classical LIGHT M
Classical CLASSICS
Other Music Type OTHER M
Weather WEATHER
Finance FINANCE
Children’s Programmes CHILDREN
Social Affairs SOCIAL A
Religion RELIGION
Phone In PHONE IN
Travel TRAVEL
Leisure LEISURE
Jazz Music JAZZ
Country Music COUNTRY
National Music NATION M
Oldies Music OLDIES
Folk Music FOLK M
Documentary DOCUMENT
Not specified NONE
Note
You cannot use this function in some countries
where no PTY (Programme Type selection) data is
available.
13
Page 14
1 Press (DSPL/PTY) during FM reception
until “PTY” appears.
Setting the clock
automatically
The current programme type name appears
if the station is transmitting the PTY data.
“- - - - -” appears if the received station is
not an RDS station, or if the RDS data has
not been received.
If the TA function is ON, the unit starts
searching for the next station.
2 Press (PRST) repeatedly until the desired
programme type appears.
The programme types appear in the order
shown in the above table. Note that you
cannot select “NONE” (Not specified) for
searching.
3 Press (ENTER) repeatedly until the
desired station is received.
The unit starts searching for a station
broadcasting the selected programme type.
When the unit finds the programme, the
programme type appears again for five
seconds.
“NO” and the programme type appear
alternately for five seconds if the unit
cannot find the programme type. It then
returns to the previously selected station.
The CT (Clock Time) data from the RDS
transmission sets the clock automatically.
1 During radio reception, press (MENU),
then press either side of (PRST)
repeatedly until “CT” appears.
2 Press + side of (SEEK) repeatedly until
“CT-ON” appears.
The clock is set.
3 Press (ENTER) to return to the normal
display.
To cancel the CT function
Select “CT-OFF” in step 2 above.
Notes
• The CT function may not work even though an
RDS station is being received.
• There might be a difference between the time
set by the CT function and the actual time.
14
Page 15

Other Functions
Adjusting the sound
characteristics
You can adjust the bass, treble, balance, and
fader.
You can store the bass and treble levels
independently for each source.
Changing the sound and
display settings
The following items can be set:
•CLOCK (page 7).
•CT (Clock Time) (page 14).
•BEEP – to turn the beep sound on or off.
•D.INFO (Dual Information) to display the
clock and the play mode at the same time
(ON) or to display the information
alternately (OFF).
•M.DSPL (Motion Display) – to turn the
motion display on or off.
1 Select the item you want to adjust by
pressing (SOUND) repeatedly.
BAS (bass) t TRE (treble) t
BAL (left-right) t FAD (front-rear)
2 Adjust the selected item by pressing
either side of (SEEK).
Adjust within three seconds after selecting
the item.
1 Press (MENU).
2 Press either side of (PRST) repeatedly
until the desired item appears.
Each time you press (–) side of (PRST), the
item changes as follows:
CLOCK t CT t BEEP t D.INFO t M.DSPL
3 Press (+) side of (SEEK) to select the
desired setting (Example: ON or OFF).
4 Press (ENTER).
After the mode setting is complete, the
display returns to normal playback mode.
15
Page 16

Boosting the bass sound
— D-bass
You can enjoy a clear and powerful bass
sound. The D-bass function boosts the low
frequency signal and high frequency signal
with a sharper curve than conventional bass
boost.
You can hear the bass line more clearly even
while the vocal volume remains the same. You
can emphasize and adjust the bass sound
easily with the D-BASS control.
D.BASS-3
Level
0dB
Adjusting the bass curve
Press (D-BASS) repeatedly to select the
desired bass curve.
As the D-BASS number increases so does
the effect.
D.BASS-1 t D.BASS-2 t D.BASS-3 t
D.BASS-OFF
Note
The bass sound may distort at same volume. If the
bass sound distorts, select less effective bass curve.
D.BASS-2
D.BASS-1
Frequency (Hz)
D.BASS-3
D.BASS-2
D.BASS-1
Additional
Information
Maintenance
Fuse replacement
When replacing the fuse, be sure to use one
matching the amperage rating stated on the
original fuse. If the fuse blows, check the
power connection and replace the fuse. If the
fuse blows again after replacement, there may
be an internal malfunction. In such a case,
consult your nearest Sony dealer.
Fuse (10 A)
Warning
Never use a fuse with an amperage rating
exceeding the one supplied with the unit as
this could damage the unit.
16
Page 17
Cleaning the connectors
The unit may not function properly if the
connectors between the unit and the front
panel are not clean. In order to prevent this,
open the front panel by pressing (RELEASE),
then detach it and clean the connectors with a
cotton swab dipped in alcohol. Do not apply
too much force. Otherwise, the connectors may
be damaged.
Main unit
Back of the front panel
Notes
• For safety, turn off the engine before cleaning
the connectors and remove the key from the
ignition switch.
• Never touch the connectors directly with your
fingers or any metal device.
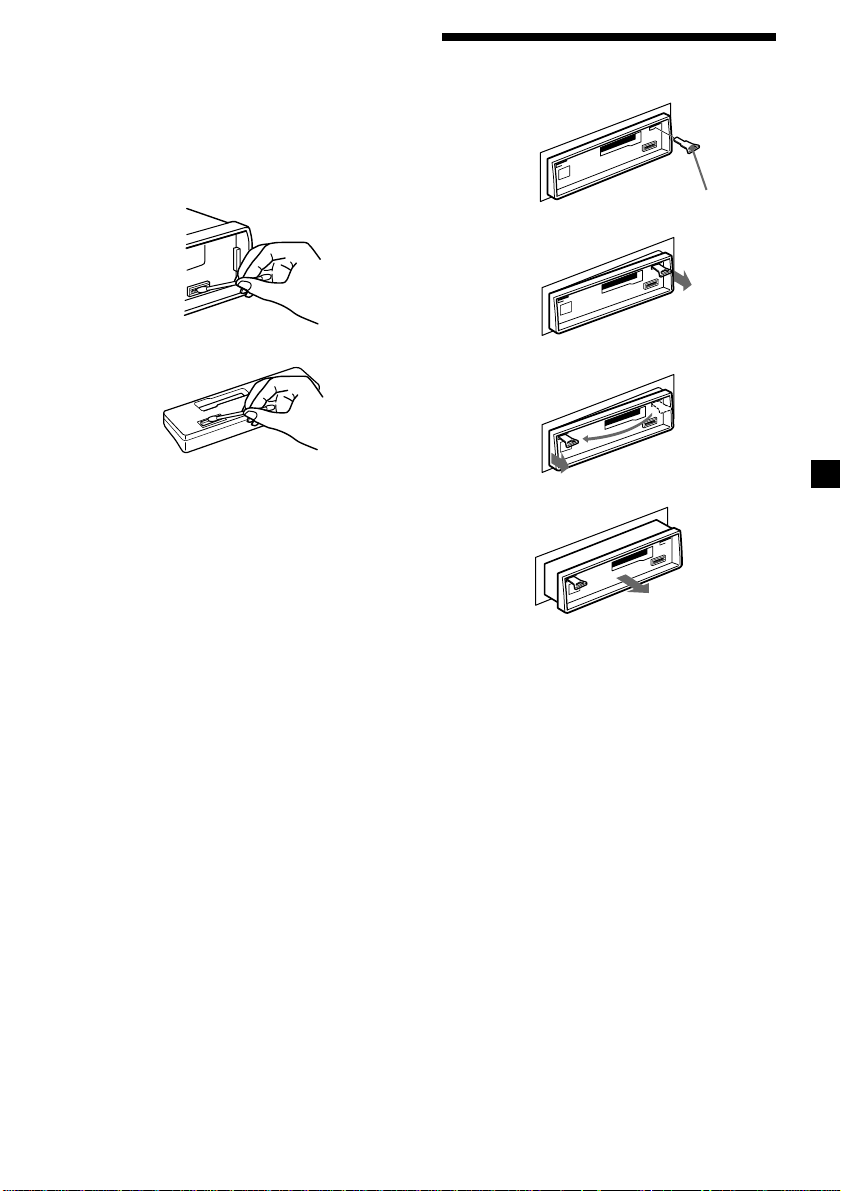
Dismounting the unit
1
Release key (supplied)
2
3
4
17
Page 18

Specifications
Cassette player section
Tape track 4-track 2-channel stereo
Wow and flutter 0.13 % (WRMS)
Frequency response 30 – 15,000 Hz
Signal-to-noise ratio 55 dB
Tuner section
FM
Tuning range 87.5 – 108.0 MHz
Aerial terminal External aerial connector
Intermediate frequency 10.7 MHz
Usable sensitivity 9 dBf
Selectivity 75 dB at 400 kHz
Signal-to-noise ratio 65 dB (stereo),
Harmonic distortion at 1 kHz
Separation 35 dB at 1 kHz
Frequency response 30 – 15,000 Hz
68 dB (mono)
0.7 % (stereo),
0.4 % (mono)
MW/LW
Tuning range MW: 531 – 1,602 kHz
Aerial terminal External aerial connector
Intermediate frequency 10.7 MHz/450 kHz
Sensitivity MW: 30 µV
LW: 153 – 279 kHz
LW: 50 µV
Power amplifier section
Outputs Speaker outputs
Speaker impedance 4 – 8 ohms
Maximum power output 45 W × 4 (at 4 ohms)
(sure seal connectors)
General
Outputs Power aerial relay control
Tone controls Bass ±8 dB at 100 Hz
Power requirements 12 V DC car battery
Dimensions Approx. 188 × 58 × 182 mm
Mounting dimensions Approx. 182 × 53 × 163 mm
Mass Approx. 1.2 kg
Supplied accessories Parts for installation and
Design and specifications are subject to change
without notice.
lead
Power amplifier control
lead
Treble ±8 dB at 10 kHz
(negative earth)
(w/h/d)
(w/h/d)
connections (1 set)
Front panel case (1)
18
Page 19
Troubleshooting guide
The following checklist will help you remedy the problems you may encounter with your unit.
Before going through the checklist below, check the connections and operating procedures.
General
Problem
No sound.
The contents of the memory
have been erased.
Indications do not appear
in the display.
Tape playback
Problem
The sound is distorted.
Radio reception
Problem
Preset tuning is not possible.
Automatic tuning is not
possible.
The stations cannot be
received.
The sound is hampered by
noises.
The “ST” indication flashes.
Cause/Solution
•Set the fader control to the centre position for two-speaker
systems.
•Rotate the dial clockwise to adjust the volume.
• The power cord or battery has been disconnected.
• The reset button was pressed.
t Store again into the memory.
Remove the front panel and clean the connectors. See
“Cleaning the connectors” (page 17) for details.
Cause/Solution
The tape head is contaminated.
t Clean the head with a commercially available dry-type
cleaning cassette.
Cause/Solution
• Memorize the correct frequency.
• The broadcast signal is too weak.
The broadcast signal is too weak.
t Use manual tuning.
Connect an power aerial control lead (blue) or accessory power
supply lead (red) to the power supply lead of a car’s aerial
booster. (When your car has built-in FM/MW/LW aerial in the
rear/side glass only.)
•Tune in the frequency accurately.
•The broadcast signal is too weak.
t Set to MONO mode (page 9).
Continued to next page t
19
Page 20

RDS
Problem
The SEEK starts after a few
seconds of listening.
No traffic announcements.
PTY displays “NONE.”
Cause/Solution
The station is non-TP or has a weak signal.
t Press (AF) or (TA) repeatedly until “AF-OFF” or
“TA-OFF” appears.
•Activate “TA.”
•The station does not broadcast any traffic announcements
despite being TP.
t Tune to another station.
The station does not specify the programme type.
20
Page 21

21
Page 22

Witamy!
Dziękujemy za zakupienie odtwarzacza kaset
firmy Sony.
Środki Ostrożności
•Jeżeli pojazd był zaparkowany w
nasłonecznionym miejscu, co mogło
spowodować znaczny wzrost temperatury w
jego wnętrzu, należy przed rozpoczęciem
użytkowania, odczekać by sprzęt uległ
schłodzeniu.
•W przypadku gdy do sprzętu nie dochodzi
zasilanie, należy przede wszystkim
sprawdzić łącza. Jeżeli są one prawidłowo
podłączone, proszę sprawdzić bezpiecznik.
•W przypadku braku dźwięku z głośników w
systemie 2-głośnikowym, proszę ustawić
kontrolkę funkcji “fader” (zanik) w pozycji
środkowej.
•Sprzęt jest wyposażony we własny
wzmacniacz mocy, co może spowodować
nagrzanie się kasety, odtwarzanej przez
dłuższy czas. Ten objaw nie jest sygnałem
defektu sprzętu.
Z ewentualnymi pytaniami lub niejasnościami
związanymi z użytkowaniem zakupionego
sprzętu, które nie zostały omówione w
instrukcji obsługi, należy zwrócić się do
fachowców najbliższego punktu sprzedaży
produktów firmy Sony.
Aby utrzymać wysoką jakość
odtwarzanego dźwięku
Jeżeli pojazd jest wyposażony w umieszczone
w pobliżu sprzętu obsady do przechowywania
puszek z napojami, proszę uważać by na
sprzęt nie wylać soków lub innych napojów.
Większość tego rodzaju napojów zawiera
cukier, którego resztki mogą spowodować
zanieczyszczenie kaset i tym sposobem
głowic odtwarzających, redukując jakość
dźwięku lub powodując jego całkowity zanik.
Zestawy czyszczące głowice odtwarzające nie
są w stanie oczyścić lepkich zanieczyszczeń.
2
Page 23
Uwagi dotyczące Kaset
Środki ostrożności dotyczące kaset
•Nie dotykać powierzchni taśmy, gdyż brud
lub kurz mogą zanieczyścić głowice
odtwarzające.
•Kasety należy przechowywać z dala od
sprzętu wyposażonego w magnesy, takiego
jak np. głośniki lub wzmacniacze mocy, gdyż
mogłoby to spowodować wymazanie
nagrania lub zniekształcenie dźwięku.
•Nie poddawać kaset bezpośredniemu
działaniu słońca, bardzo niskich temperatur
lub wilgoci.
•Rozciągnięte taśmy mogą zostać wciągnięte
przez mechanizm odtwarzacza. Przed
wsunięciem kasety, proszę przy pomocy
ołówka lub innego, podobnego przedmiotu,
przekręcić rolkę aby zlikwidować luz taśmy.
Luz taśmy
•Zniekształcona kaseta i odstające etykiety
mogą spowodować komplikacje przy
wsuwaniu i wysuwaniu kaset. Proszę usunąć
lub wymienić luźne etykietki.
Kasety o dłuższym niż 90 minut czasie
odtwarzania
Nie jest zalecane korzystanie z kaset o
dłuższym niż 90 minut czasie odtwarzania, z
wyjątkiem odtwarzania w trybie ciągłym.
Taśmy takich kaset są bardzo cienkie i łatwiej
rozciągają się. Częste odtwarzanie i
zatrzymywanie może spowodować
wciągnięcie taśmy przez mechanizm
magnetofonu.
•Podczas odtwarzania kasety może nastąpić
zniekształcenie dźwięku. Głowice
magnetofonowe nałeży oczyszczać po około
50 godzinach pracy.
3
Page 24

SPIS TREŚCI
Umiejscowienie kontrolek ...................................5
Przygotowania wstępne
Zerowanie sprzętu .......................................... 6
Zdejmowanie przedniego panelu.................... 6
Sposób korzystania z menu ........................... 6
Nastawianie zegara ......................................... 7
Magnetofon
Słuchanie taśm ............................................... 7
Odbiór radia podczas szybkiego przewijania do
przodu lub przewijania taśmy wstecz
— Funkcja ATA (Automatyczne uaktywnienie
się dostrajacza) .......................................... 8
Radio
Automatyczne kodowanie stacji nadawczych
w pamięci sprzętu
— Tryb Best Tuning Memory
(BTM = pamięć najlepszego strojenia) .......8
Kodowanie wyłącznie wybranych stacji
nadawczych ............................................... 9
Odbiór zapisanych w pamięci stacji
nadawczych ............................................... 9
RDS
Opis funkkcji RDS .........................................10
Wyświetlanie wskaźnika nazwy stacji
nadawczej ................................................ 10
Automatyczne, ponowne strojenie tego
samego programu
— Funkcja Alternatywnych częstotliwości
(Alternative Frequencies) (AF) .................. 10
Odbiór migawek o ruchu drogowym ............ 12
Kodowanie stacji nadawczych oferujących
serwis RDS o sygnałach AF oraz TA ........12
Zlokalizowanie stacji według rodzaju
transmitowanego programu ..................... 13
Automatyczne nastawianie zegara ............... 14
Informacje dodatkowe
Konserwacja ................................................. 16
Wymontowanie sprzętu ................................ 17
Dane techniczne ........................................... 18
Usuwanie usterek ......................................... 19
Pozostałe funkcje
Regulacja charakterystyk dźwięku ............... 15
Zmienianie wstępnych nastawów dźwięku i
wskaźników wyświetlacza ....................... 15
Wspomaganie tonów niskich
— funkcja D-bass .................................... 16
4
Page 25
Umiejscowienie kontrolek
PTY
S
+
T
MENU
SOUND
RELEASE
R
P
–
K
E
TUNER
E
S
P
R
S
T
DSPL
MODE
S
E
E
K
+
ENTER
–
1 2 3 4 56
Szczegóły znajdują się na stronach podanych w spisie.
1 Przycisk MENU 7, 8, 9, 11, 13, 14, 15
qf Przyciski SEEK/AMS –/+ (kursor lewo/
2 Pokrętło regulacji poziomu głośności
3 Przycisk TUNER 8, 9, 12
4 Przyciski PRST +/– (kursor góra/dół)
qg Przycisk zerowania (umieszczony z
7, 8, 9, 11, 13, 14, 15
Podczas odbioru audycji radiowych:
Wybór wstępnie zakodowanych stacji
radiowych 8, 9
5 Przycisk DSPL/PTY (wyświetlenie
zmiany trybu/typu programu) 14
6 Przycisk trybu pracy MODE
qh Przycisk ENTER 7, 8, 9, 11, 13, 14, 15
qj Zaprogramowane przyciski
qk Przycisk wyłączania OFF* 6
ql Przycisk AF 10, 11, 13
Podczas odbioru audycji radiowych:
Wybór pasma BAND 8, 9
* Ostrzeżenie w przypadku instalacji w
7 Przycisk Z 7
8 Wyświetlacz
9 Przyciski m/M (szybkie przewijanie
taśmy)/DIR (zmiana kierunku transportu
taśmy) 7
q; Przycisk D-BASS 16
qa Przycisk TA 12, 13
qs Przycisk SOUND 15
qd Przycisk RELEASE (zwolnienie
przedniego panelu) 6, 17
DIR
D-BASS
TA
AF
OFF
XR-1300R
prawo) 7, 8, 9, 11, 13, 14, 15
przeszukiwanie 9
przodu korpusu sprzętu, za panelem
przednim) 6
numeryczne 9, 11
pojeździe nie posiadającym pozycji ACC
na stacyjce (pomocnicza pozycja)
Proszę się upewnić, że przycisk (OFF), na
sprzęcie, został przyciśnięty przez dwie
sekundy, aby wyłączyć wyświetlanie
wskazań zegara po wyłączeniu silnika.
Jeżeli przycisk (OFF) zostanie tylko przez
moment naciśnięty, wtedy wskazania zegara
będą nadal widoczne, co powoduje
niepotrzebne zużycie mocy akumulatora.
5
Page 26
Przygotowania
wstępne
Zerowanie sprzętu
Sprzęt należy wyzerować przed rozpoczęciem
eksploatacji poraz pierwszy lub po wymianie
akumulatora pojazdu.
Zdjąć przedni panel i szpiczasto zakończonym
przedmiotem, np. długopisem, nacisnąć
przycisk zerowania (reset).
Przycisk zerowania
Uwaga
Naciśnięcie przycisku zerowania spowoduje
wymazanie nastawów zegara i niektórych funkcji,
zakodowanych w pamięci sprzętu.
Zdejmowanie
przedniego panelu
Sprzęt można zabezpieczyć przed kradzieżą
przez zdjęcie przedniego panelu.
1 Proszę nacisnąć przycisk (OFF).
2 Nacisnąwszy (RELEASE), przesunąć
przedni panel lekko w lewo i zdjąć
pociągając do siebie.
(OFF)
Zakładanie przedniego panelu
Część, na ilustracji oznaczoną A, należy
umocować w miejscu oznaczonym B, na
głównym korpusie sprzętu, następnie
docisnąć lewą stronę, do zaskoczenia.
A
B
Uwagi
• Proszę uważać by panel nie został umocowany
górą na dół.
• Przy zakładaniu, nie dociskać panelu do sprzętu.
• Nie wywierać zbytniego nacisku na wyświetlacz
przedniego panelu.
• Unikać narażania przedniego panelu na nadmierne
działanie promieni słonecznych lub ciepłego
powietrza pochodzącego z systemu ogrzewczego
pojazdu, nie pozostawiać w miejscach wilgotnych.
Nie pozostawiać panelu na desce rozdzielczej
samochodu zaparkowanego na nasłonecznionym
miejscu, ze względu na możliwość znacznego
wzrostu temperatury wewnątrz pojazdu.
Alarm ostrzegawczy
Przekręcenie kluczyka zapłonu przed zdjęciem
panelu powoduje włączenie się
kilkusekundowego alarmu ostrzegawczego.
Podłączenie opcjonalnego wzmacniacza mocy
i nie wykorzystanie zintegrowanego ze
sprzątem wzmacniacza, deaktywuje sygnał
akustyczny.
Sposób korzystania z
menu
(RELEASE)
Uwagi
• Proszę uważać by przy zdejmowaniu panela nie
upuścić go.
• Zdejmowanie panelu przy jednocześnie włączonym
zasilaniu, spowoduje automatyczne wyłączenie
sprzętu, chroniąc głośniki przed ewentualnym
uszkodzeniem.
• Zabierając przedni panel ze sobą, proszę
przechowywać w przeznaczonym do tego celu etui
ochronnym.
6
Praca sprzętu jest sterowana odpowiednio
wybranymi elementami menu.
Aby nastawić, należy wprowadzić tryb pracy
menu i dokonać wyboru kontrolki góra/dół (+/
– przycisku (PRST)), lub lewy/prawy (–/+
przycisku (SEEK)).
(PRST)
(+) : Aby wybrać w górę
TUNER
(-) : Aby wybrać w dół
Page 27
(SEEK)
(-) : Aby
wybrać w lewo
TUNER
(+) : Aby
wybrać w
prawo
Nastawianie zegara
Zegar działa na zasadzie cyfrowego systemu
24-godzinnego.
Przykład: Nastawienie zegara na godzinę
10:08
1 Proszę nacisnąć przycisk (MENU),
następnie kilkakrotnie jedną ze stron
przycisku (PRST) do momentu
wyświetlenia symbolu “CLOCK”.
1 Nacisnąć (ENTER).
Wskaźnik godziny miga.
2 Aby nastawić godzinę, nacisnąć
jedną ze stron przycisku (PRST).
Magnetofon
Słuchanie taśm
Wsunąć kasetę.
Odtwarzanie rozpoczyna się
automatycznie.
Odtwarzana jest strona kasety skierowana ku
górze.
Odtwarzana jest strona kasety skierowana ku
dołowi.
Wskazówka
Aby zmienić kierunek odtwarzania taśmy, proszę
nacisnąć m i M.
Zatrzymanie odtwarzania i wysunięcie
kasety
Proszę nacisnąć przycisk Z.
3 Proszę nacisnąć przycisk (SEEK) po
stronie oznakowanej +.
Wskaźnik minut miga.
4 Aby nastawić minuty, nacisnąć jedną
ze stron przycisku (PRST).
2 Nacisnąć (ENTER).
Zegar rozpoczyna działanie.
Po zakończeniu nastawiania zegara, na
wyświetlacz powracają wskaźniki
normalnego trybu odtwarzania.
Szybkie przewijanie taśmy
Podczas odtwarzania proszę nacisnąć
przycisk m lub M.
Wskaźnik
kierunku *
FWD
(do przodu)
REW
(wstecz)
* Wskaźnik < > będzie migał podczas szybkiego
przewijania taśmy.
Aby rozpocząć odtwarzanie podczas
szybkiego przewijania taśmy do przodu lub
przewijania taśmy wstecz, proszę lekko
wcisnąć drugi przycisk szybkiego przewijania
taśmy do momentu zwolnienia wciśniętego
przycisku.
Przejście do
przodu
M
m
Przewinięcie
wstecz
m
M
7
Page 28
Odbiór radia podczas
szybkiego przewijania
do przodu lub
przewijania taśmy
wstecz
— Funkcja ATA (Automatyczne
uaktywnienie się dostrajacza)
Jeżeli taśma jest szybko przewijana do przodu
lub wstecz i skorzystano do tego celu z
przycisku m lub przycisku M, dostrajacz
włączy się automatycznie.
1 Podczas odtwarzania, nacisnąć (MENU).
Radio
Automatyczne kodowanie
stacji nadawczych w
pamięci sprzętu
—
Tryb Best Tuning Memory (BTM =
pamięć najlepszego strojenia)
Jest to funkcja wybierania radiowych stacji
nadawczych o najsilniejszych sygnałach emisji
i kodowania ich według częstotliwości w
pamięci sprzętu. Zakodować można
maksymalnie 6 stacji nadawczych dla każdego
z pasm (FM1, FM2, FM3, MW i LW).
2 Proszę nacisnąć kilkakrotnie jedną ze
stron przycisku (PRST) do momentu
wyświetlenia symbolu “ATA”.
3 Proszę nacisnąć stronę przycisku
(SEEK) oznakowaną symbolem + ,
celem wybrania pozycji “ON.”
Odtwarzanie rozpoczyna się w wybranym
trybie.
4 Proszę nacisnąć (ENTER).
Naciśnięcie “OFF” w etapie 3, powyżej,
przywraca normalny tryb odtwarzania.
8
Ostrzeżenie
Ze względu na bezpieczeństwo jazdy, do
nastrojenia radia podczas prowadzenia pojazdu
należy korzystać z funkcji Best Tuning Memory
(metoda optymalnego strojenia pamięciowego).
1 Proszę nacisnąć (TUNER).
Tuner jest włączony.
2 Proszę kilkakrotnie nacisnąć przycisk
(MODE) i wybrać pasmo.
Każdorazowe naciśnięcie przycisku
(MODE), zmienia kolejność wyświetlania
wskaźników pasm w następujący sposób:
B FM1 B FM2 B FM3 B MW B LW
3 Proszę nacisnąć przycisk (MENU),
następnie kilkakrotnie jedną ze stron
przycisku (PRST) do momentu
wyświetlenia symbolu “BTM”.
4 Proszę nacisnąć (ENTER).
Stacje radiowe są kodowane pod
przyciskami numerycznymi według
częstotliwości.
Zapisanie stacji w pamięci sprzętu jest
potwierdzane sygnałem akustycznym.
Uwagi
•
Stacje nadawcze o słabym sygnale emisji nie zostaną
zapisane w pamięci sprzętu. Jeżeli sprzęt odbiera
tylko kilka radiowych stacji nadawczych, pod
niektórymi przyciskami numerycznymi pozostaną
poprzednio dokonane zapisy pamięciowe.
• Jeżeli na wyświetlaczu widoczny jest wskaźnik
numeryczny, sprzęt rozpoczyna kodowanie stacji
od aktualnie wyświetlanego numeru wzwyż.
Page 29

W przypadku trudności z dostrojeniem
Kodowanie wyłącznie
zakodowanej stacji nadawczej
wybranych stacji nadawczych
Wstępnie zakodować można maksymalnie 18
stacji pasma FM (po 6 dla pasm FM1, 2, i 3) oraz
po 6 dla pasm MW i LW, w dowolnej kolejności.
1 Proszę nacisnąć (TUNER).
Tuner jest włączony.
Proszę nacisnąć jedną ze stron przycisku
(SEEK)
, aby znaleźć stację (automatyczne
dostrojenie).
Przeszukiwanie kończy się w momencie
uzyskania sygnału stacji. Proszę nacisnąć
kilkakrotnie jedną ze stron przycisku
(SEEK)
do momentu uzyskania odbioru
pożądanej stacji radiowej.
2 Proszę kilkakrotnie nacisnąć przycisk
(MODE) i wybrać pasmo.
3 Proszę nacisnąć jedną ze stron
przycisku (SEEK) w celu dostrojenia
stacji radiowej, która ma zostać
zaprogramowana pod danym
przyciskiem numerycznym.
4 Naciskać właściwy przycisk numeryczny
((1) do (6)) do wyświetlenia wskaźnika
“MEM”.
Na wyświetlaczu ukazuje się cyfra
odpowiadająca wybranemu przyciskowi
numerycznemu.
Uwaga
Zapisanie nowej stacji nadawczej pod zajętym
przyciskiem numerycznym, anuluje poprzednio
dokonany zapis.
Odbiór zapisanych w
pamięci stacji
nadawczych
1 Proszę nacisnąć (TUNER).
Tuner jest włączony.
2 Proszę kilkakrotnie nacisnąć przycisk
(MODE) i wybrać pasmo.
3 Nacisnąć przycisk numeryczny ((1) do
(6)) pod którym zapisano poszukiwaną
stację nadawczą.
Wskazówka
Proszę nacisnąć jedną ze stron przycisku (PRST),
celem uzyskania odbioru stacji w kolejności, w jakiej
są one zapisane w pamięci sprzętu (funkcja Preset
Search Function (szukania zaprogramowanych
pozycji).
Uwaga
Jeżeli funkcja automatycznego strojenia zatrzymuje
się zbyt często, proszę nacisnąć przycisk (MENU),
następnie kilkakrotnie nacisnąć jedną ze stron
przycisku (PRST) do momentu wyświetlenia
symbolu “LOCAL” (tryb przeszukiwania lokalnych
stacji). Następnie proszę nacisnąć stronę przycisku
(SEEK) oznakowaną symbolem +, celem wybrania
pozycji “LOCAL-ON.” Proszę nacisnąć przycisk
(ENTER).
Dostrajane będą wyłącznie stacje radiowe, których
sygnał jest stosunkowo wyraźny.
Wskazówka
Jeżeli znana jest częstotliwość stacji, którą chce się
odbierać, proszę nacisnąć i trzymać przyciśniętą
jedną ze stron przycisku (SEEK) do momentu
wyświetlenia częstotliwości żądanej stacji (strojenie
manualne).
Jeżeli jakość odbioru
stereofonicznego na paśmie FM jest
niezadowalająca
— Tryb monofoniczny
1 Proszę podczas odbioru radia nacisnąć
przycisk (MENU), następnie kilkakrotnie
jedną ze stron przycisku (PRST) do
momentu wyświetlenia symbolu
“MONO”.
2 Proszę nacisnąć stronę przycisku
(SEEK) oznakowaną symbolem + do
momentu wyświetlenia symbolu “MONOON”.
Jakość odbieranego dźwięku poprawia się,
ale odbiór jest monofoniczny (symbol “ST”
gaśnie).
3 Proszę nacisnąć (ENTER).
Aby powrócić do normalnego trybu
odtwarzania, w etapie 2 powyżej wybrać
pozycję “MONO-OFF”.
9
Page 30
RDS
Opis funkkcji RDS
Radio Data System (RDS = radiowy system
danych) jest serwisem usługowym rozgłośni
radiowych, umożliwijący stacjom nadawczym,
pasma FM emitowanie dodatkowych
informacji, równolegle z normalnym sygnałem
ich programów. Nabyty stereofoniczny zestaw
samochodowy oferuje cały wachlarz usług
tego typu. Oto niektóre z nich: automatyczne,
powtórne strojenie wybranego programu,
migawki o ruchu drogowym i lokalizowanie
stacji nadawczych według rodzaju
nadawanych przez nie programów.
Uwagi
• Dostępność funkcji RDS zależy od kraju lub rejonu.
• Funkcja RDS może nie działać prawidłowo, jeżeli
emitowany sygnał jest zbyt słaby lub jeżeli
nastrojona stacja nie transmituje serwisu RDS.
Automatyczne, ponowne
strojenie tego samego
programu
— Funkcja Alternatywnych
częstotliwości (Alternative
Frequencies) (AF)
Funkcja alternatywnych częstotliwości (AF)
służy automatycznemu wybieraniu i
ponownemu dostrajaniu stacji nadawczych o
nasilniejszym sygnale nadawczym. Funkcja ta
umożliwia nieprzerwany odbiór tego samego
programu podczas długodystansowej jazdy,
bez potrzeby manualnego przestrajania stacji
nadawczej.
Częstotliwości zmieniają się automatycznie.
98,5 MHz
Stacja
96,0 MHz
Wyświetlanie wskaźnika
nazwy stacji nadawczej
Nazwa aktualnie odbieranej stacji zostaje
wyświetlona.
Wybrać stację pasma FM (strona 9).
Dostrojenie stacji pasma FM, emitującej
dane serwisu RDS, jest sygnalizowane
wyświetleniem nazwy stacji.
Uwaga
Wskaźnik “ *” informuje, że odbierana stacji emituje
sygnał serwisu RDS.
10
102,5 MHz
1 Wybrać stację pasma FM (strona 9).
2 Kilkakrotnie naciskać przycisk (AF) do
wyświetlenia wskaźnika “AF-ON”.
Sprzęt rozpoczyna poszukiwanie
alternatywnej stacji nadawczej o
silniejszym sygnale, na tej samej sieci.
Uwaga
Jeżeli w danym rejonie nie ma alternatywnej stacji i
nie ma potrzeby poszukiwania jej, proszę wyłączyć
funkcję AF przez naciskanie przycisku (AF) do
wyświetlenia wskaźnika “AF-OFF”.
Page 31

Zmienianie wyświetlonych
wskaźników
Każdorazowe naciśnięcie przycisku (AF),
następująco zmienia kolejność wyświetlanych
wskaźników:
AF-ON y AF-OFF
Uwagi
• Miganie wskaźnika “NO AF” oraz nazwy stacji
radiowej na zmianę, informuje, że na tej sieci nie
udało się zlokalizować alternatywnej stacji nadawczej.
• Jeżeli nazwa stacji miga po wybraniu tej stacji przy
włączonej funkcji AF oznacza to, że nie istnieje
alternatywna częstotliwość dla tej stacji. Proszę
nacisnąć jedną ze stron przycisku (SEEK), gdy
nazwa stacji miga (w przeciągu ośmiu sekund).
Sprzęt rozpoczyna szukanie innej częstotliwości
posiadającej ten sam PI (identyfikator programu)
(wyświetlany jest symbol “PI SEEK”, a dźwięk
zanika). Jeżeli sprzęt nie znajdzie innej
częstotliwości, wyświetlany jest symbol “NO PI”.
Wtedy sprzęt powraca do poprzednio wybranej
częstotliwości.
Odbiór programu regionalnego
Funkcja “REG-ON” (regionalny uaktywniony)
umożliwia stały odbiór wybranego programu
regionalnego, bez potrzeby przełączania na
inną stację regionalną. (Zakładając, że funkcja
AF została uprzednio uaktywniona). Sprzęt
został fabrycznie nastawiony na funkcję
“REG-ON”, aby wyłączyć funkcję, proszę
wykonać następujące operacje.
Funckja lokalnego połączenia
(tylko dla Wielkiej Brytanii)
Funkcja lokalnego połączenia umożliwia
wybranie innych lokalnych stacji nadawczych
danego rejonu, niekoniecznie zakodowanych
w pamięci sprzętu.
1 Nacisnąć przycisk numeryczny, pod
którym zapisano lokalną stację
nadawczą.
2 W przeciągu pięciu sekund ponownie
nacisnąć przycisk numeryczny lokalnej
stacji nadawczej.
3 Proszę powtarzać wyżej opisane
operacje do momentu uzyskania odbioru
wybranej, lokalnej stacji nadawczej.
1 Proszę podczas odbioru radia nacisnąć
przycisk (MENU), następnie proszę
nacisnąć kilkakrotnie jedną ze stron
przycisku (PRST) do momentu
wyświetlenia symbolu “REG”.
2 Proszę naciskać stronę przycisku
(SEEK) oznakowaną symbolem + do
momentu wyświetlenia symbolu “REGOFF”.
3 Proszę nacisnąć (ENTER).
Wybranie pozycji “REG-OFF” może
spowodować przełączenie na inną
regionalną stację nadawczą tej samej sieci.
Aby powrócić do pozycji auktywnienia
nastawu stacji regionalnej, proszę w etapie 2,
powyżej, wybrać pozycję “REG-ON”.
Uwaga
Wyżej opisana funkcja nie działa w Wielkiej Brytanii i
w kilku innych rejonach.
11
Page 32

Odbiór migawek o ruchu
drogowym
Dane funkcji Migawek o ruchu Drogowym (TA
= Traffic Announcement) oraz Programu
Informacji Drogowych (TP = Traffic
Programme), zezwalają na automatyczne
dostrojenie stacji pasma FM transmitującej
migawki o ruchu drogowym, podczas odbioru
programów z innych źródeł.
Nastawianie poziomu głośności dla
migawek o ruchu drogowym
Poziom głośności dla transmisji migawek o
ruchu drogowym można uprzednio
wyregulować, zapewniając dobry odbiór
informacji. W momencie rozpoczęcia
transmisji, nastawiony poziom głośności
zostanie automatycznie doregulowany.
1 Proszę wybrać odpowiedni poziom
głośności.
Kilkakrotnie naciskać przycisk (TA) do
wyświetlenia wskaźnika “TA-ON”.
Sprzęt rozpoczyna poszukiwanie stacji
nadawczych transmitujących informacje o
ruchu drogowym. Po zlokalizowaniu
odpowiedniej stacji nadawczej, ukazuje się
wskaźnik “TP”.
W momencie rozpoczęcia transmisji
migawek o ruchu drogowym, wskaźnik
“TA” miga do zakończenia transmisji.
Wskazówka
Jeżeli transmisja migawek o ruchu drogowym
rozpocznie się podczas odbioru programu z innego
źródła, sprzęt automatycznie przełączy na migawki o
ruchu drogowym i po zakończeniu transmisji powróci
do uprzednio wybranego źródła odbioru.
Uwagi
• Jeżeli odbierana stacja nadawcza nie transmituje
migawek o ruchu drogowym, przez pięć sekund
miga wskaźnik “NO TP”. Następnie, sprzęt
rozpocznie poszukiwanie odpowiedniej stacji
nadawczej, oferującej ten serwis.
• Jednoczesne wyświetlenie wskaźnika “EON” wraz
ze wskaźnikiem “TP”, informuje, że aktualnie
odbierana stacja nadawcza korzysta z transmisji
migawek o ruchu drogowym, oferowanym przez
inne stacje tej samej sieci.
Wyłączanie funkcji aktualnych
migawek o ruchu drogowym
Nacisnąć (TA) lub (TUNER).
Aby wyłączyć wszystkie transmisje
migawek o ruchu drogowym, proszę
wyłączyć funkcję przez naciskanie
przycisku (TA) do wyświetlenia wskaźnika
“TA-OFF”.
2 Przez dwie sekundy naciskać przycisk
(TA).
Ukazuje się wskaźnik “TA” i nastaw zostaje
zapisany w pamięci sprzętu.
Odbiór ogłoszeń alarmowych
Transmisja ogłoszeń alarmowych podczas
odbioru programu radiowego, automatycznie
przełącza sprzęt na odbiór ogłoszenia
alarmowego. Podczas odbioru programu z
innych źródeł, ogłoszenia alarmowe można
odebrać wyłącznie po uprzednim nastawieniu
funkcji AF lub TA na pozycję “on”. Sprzęt
wówczas automatycznie przełączy się na
odbiór ogłoszeń alarmowych, bez względu na
aktualnie odbierane źródło programów.
Kodowanie stacji
nadawczych oferujących
serwis RDS o sygnałach
AF oraz TA
Zapisanie stacji serwisu RDS, koduje
jednocześnie rodzaj informacji oraz
częstotliowść każdej z odpowiednich stacji,
bez konieczności każdorazowego włączania
funkcji AF lub TA po dostrojeniu wybranej
stacji nadawczej. Dla każdej, indywidualnie
zakodowanej stacji nadawczej, można wybrać
odrębne nastawy (AF, TA, lub oba) lub też
identyczne nastawy dla wszystkich
zapisanych w pamięci stacji nadawczych.
12
Page 33

Kodowanie tego samego nastawu dla
wszystkich, zapisanych w pamięci
stacji nadawczych
1 Wybrać stację pasma FM (strona 9).
2 Proszę nacisnąć przycisk (AF) albo/oraz
przycisk (TA), celem wybrania pozycji
“AF-ON” albo/oraz “TA-ON”.
Zwracamy Państwa uwagę na fakt, że
wybranie pozycji “AF-OFF” lub pozycji “TAOFF” zapisuje w pamięci sprzętu zarówno
stacje przesyłające w dane RDS, jak
również stacje bez RDS.
3 Proszę nacisnąć przycisk (MENU),
następnie kilkakrotnie jedną ze stron
przycisku (PRST) do momentu
wyświetlenia symbolu “BTM”.
4 Proszę naciskać stronę przycisku
(SEEK) oznakowaną symbolem + do
momentu wyświetlenia migającego
symbolu “BTM”.
5 Nacisnąć (ENTER).
Kodowanie różnych nastawów dla
każdej, zapisanej w pamięci stacji
nadawczej
1 Wybrać pasmo FM i dostroić wybraną
stację nadawczą.
2 Proszę nacisnąć przycisk (AF) lub/oraz
(TA), celem wybrania pozycji “AF-ON”
lub/oraz pozycji “TA-ON”.
3 Naciskać odpowiedni przycisk
numeryczny do wyświetlenia wskaźnika
“MEM”.
Powtórzyć operacje od etapu 1-go aby
zakodować dalsze stacje nadawcze.
Wskazówka
Aby zmienić zakodowany nastaw AF oraz/lub TA po
dostrojeniu zakodowanej w pamięci sprzętu stacji
nadawczej, należy włączyć lub wyłączyć funkcję AF
lub TA.
Zlokalizowanie stacji
według rodzaju
transmitowanego
programu
Poszukiwaną stację nadawczą można
zlokalizować przez wybranie rodzaju programu
z poniżej podanego spisu.
Rodzaj programu Wskaźnik
Wiadomości NEWS
Wydarzenia aktualne AFFAIRS
Informacje INFO
Sport SPORT
Edukacja EDUCATE
Dramaturgia DRAMA
Kultura CULTURE
Nauka SCIENCE
Różne VARIED
Muzyka popularna POP M
Muzyka Rock ROCK M
Muzyka łatwa EASY M
Lekka muzyka klasyczna LIGHT M
Muzyka klasyczna CLASSICS
Inne rodzaje muzyki OTHER M
Pogoda WEATHER
Finanse FINANCE
Programy dla dzieci CHILDREN
Sprawy społeczne SOCIAL A
Religia RELIGION
Programy z telefonicznym PHONE IN
udziałem słuchaczy
Podróże TRAVEL
Odpoczynek LEISURE
Muzyka jazzowa JAZZ
Muzyka typu “Country” COUNTRY
Muzyka narodowa NATION M
Stare szlagiery OLDIES
Muzyka ludowa FOLK M
Programy dokumentalne DOCUMENT
Wyżej nie NONE
wyspecyfikowane
Uwaga
W krajach, gdzie dane PTY (Programme Type
selection = wybór rodzaju programu) są niedostępne,
nie można korzystać z tej funkcji.
13
Page 34

1 Podczas odbioru transmisji na paśmie
FM, proszę naciskać przycisk
(DSPL/PTY) do wyświetlenia wskaźnika
“PTY”.
Nazwa rodzaju programu zostanie
wyświetlona, jeżeli stacja nadawcza
transmituje dane PTY. Wskaźnik “- - - - -”
ukazuje się jeżeli odbierana stacja
nadawcza nie jest stacją oferującą RDS lub
jeżeli sygnał danych RDS nie został
odebrany.
Jeśli włączona jest funkcja TA, urządzenie
rozpocznie wyszukiwanie następnej stacji.
2 Proszę kilkakrotnie nacisnąć przycisk
(PRST) do ukazania się nazwy rodzaju
programu.
Rodzaj programu zostaje wyświetlony w
wyżej podanej kolejności. Nie można
wybrać nastawu “NONE” (nie
wyspecyfikowany), aby rozpocząć
poszukiwania odpowiedniej stacji.
Automatyczne
nastawianie zegara
Emitowane przez serwis RDS dane funkcji CT
(Zegar Czas), automatycznie nastawiają zegar
sprzętu.
1 Proszę podczas odbioru radia nacisnąć
przycisk (MENU), następnie kilkakrotnie
jedną ze stron przycisku (PRST) do
momentu wyświetlenia symbolu “CT”.
2 Proszę kilkakrotnie nacisnąć stronę
przycisku (SEEK) oznakowaną
symbolem + do momentu wyświetlenia
symbolu “CT-ON”.
Zegar jest teraz nastawiony.
3 Proszę nacisnąć przycisk (ENTER) aby
przywrócić normalny stan wyświetlacza.
3 Proszę naciskać przycisk (ENTER), aż
do odnalezienia żądanej stacji.
Sprzęt rozpoczyna poszukiwanie stacji
nadawczej, transmitującej wybrany rodzaj
programu. Po zlokalizowaniu programu,
nazwa rodzaju zostaje przez pięć sekund
ponownie wyświetlona.
Jeżeli typu poszukiwanego programu nie
uda się zlokalizować, przez pięć sekund
wyświetlane są na zmianę wskaźniki “NO” i
typ programu. Następnie przywrócony
zostaje odbiór poprzednio nastrojonej stacji
nadawczej.
Wyłączenie funkcji CT
W etapie 2, powyżej, wybrać nastaw
“CT-OFF”.
Uwagi
• Nawet przy odbiorze stacji RDS, funkcja CT może
nie działać.
• Godzina nastawiona w trybie CT może być
niedokładna w relacji do czasu rzeczywistego.
14
Page 35

Pozostałe funkcje
Regulacja
charakterystyk dźwięku
Wyregulować można nastawy basów, tonów
wysokich, równowagi akustycznej i funkcję
wyciszania.
Dla każdego źródła odtwarzania można
odrębnie zakodować nastawione poziomy
basów i tonów wysokich.
1 Przez kilkakrotne naciskanie przycisku
(SOUND), wybrać element do
wyregulowania.
BAS (basy) t TRE (tony wysokie) t BAL
(równowaga lewy-prawy) t FAD
(przednie-tylne)
2 Wyregulować wybrany element przez
naciskanie jednej ze stron przycisku
(SEEK).
Regulację przeprowadzić w przeciągu
trzech sekund od wybrania pozycji. (Po
upływie trzech sekund, funkcja kontrolki
ponownie służy regulacji poziomu
głośności.)
Zmienianie wstępnych
nastawów dźwięku i
wskaźników
wyświetlacza
Zakodować można następujące pozycje:
•CLOCK - zegar (strona 7).
•CT (Clock Time = Zegar Czas) (strona 14).
•BEEP – aby włączyć lub wyłączyć
sygnalizację akustyczną.
•D.INFO (Podwójna informacja) - wyświetlenie
wskazań zegara i trybu odtwarzania w tym
samym czasie (ON) lub na zmianę (OFF).
•M.DSPL (Motion Display = Ruchomy
Ekranopis) - włączenie lub wyłączenie
ruchomego ekranopisu.
1 Proszę nacisnąć (MENU).
2 Proszę nacisnąć kilkakrotnie jedną ze
stron przycisku (PRST) do momentu
wyświetlenia żądanej pozycji.
Każde naciśnięcie strony przycisku
(PRST) oznakowanej symbolem (–)
powoduje zmianę wyświetlanej pozycji w
następujący sposób:
CLOCK t CT t BEEP t D.INFO t M.DSPL
3 Proszę nacisnąć stronę przycisku
(SEEK) oznakowaną symbolem (+),
celem wybrania pożądanego ustawienia
(np.: ON lub OFF).
4 Nacisnąć (ENTER).
Po zakończeniu nastawiania trybu pracy,
zostają przywrócone wskaźniki normalnego
trybu odtwarzania.
15
Page 36

Wspomaganie tonów
niskich — funkcja D-bass
Użytkownik ma możliwość korzystania z
czystego i wzmocnionego dźwięku basów.
Funkcja D-bass wspomaga sygnały o niskiej
częstotliwości efektywniej niż konwencjonalne
metody wspomagania basów.
Wyraźniejszy odbiór tonów niskich przy
normalnym poziomie głośności dźwięków
wokalnych. Kontrolka D-BASS ułatwia
uwydatnianie i regulację tonów niskich.
D.BASS-3
D.BASS-2
Poziom
0dB
D.BASS-1
Częstotliwość (Hz)
Regulacja korektora graficznego
tonów niskich
Kilkakrotnie nacisnąć przycisk (D-BASS)
aby wybrać odpowiednią krzywą
poziomu basów.
W miarę zwiększania się wartości D-BASS,
proporcjonalnie wzmacnia się efekt
basów.
D.BASS-1 t D.BASS-2 t D.BASS-3 t
D.BASS-OFF
Uwaga
Przy pewnym poziomie głośności mogą wystąpić
zniekształcenia tonów niskich. W takim przypadku
zaleca się wybranie mniej efektywnej krzywej basów.
D.BASS-3
D.BASS-2
D.BASS-1
Informacje
dodatkowe
Konserwacja
Wymiana bezpiecznika
Przed wymianą bezpiecznika, należy
sprawdzić czy ilość amperów odpowiada
ilości podanej na oryginalnym bezpieczniku.
Jeżeli bezpiecznik przepalił się, należy
sprawdzić podłączenie zasilania i wymienić
bezpiecznik. Jeżeli bezpiecznik ponownie
przepali się, może być to sygnałem
wewnętrznego defektu sprzętu. W takim
wypadku, proszę skonsultować się z
najbliższym punktem obsługi firmy Sony.
Bezpiecznik
(10 A)
Ostrzeżenie
Nie należy nigdy korzystać z bezpiecznika o
wyższej, od podanej na dostarczonym ze
sprzętem bezpieczniku, wartości znamionowej
amperów, gdyż mógłby on spowodować
uszkodzenie sprzętu.
16
Page 37

Oczyszczanie łączy
Sprzęt może nie działać prawidłowo jeżeli
łącza pomiędzy panelem a głównym
korpusem są zanieczyszczone. Aby temu
zapobiec, należy otworzyć przedni panel przez
lekkie naciśnięcie w miejscu oznaczonym
(RELEASE), zdjąć panel i wyczyścić łącza
wacikiem, lekko zwilżonym alkoholem. Nie
należy wywierać nacisku. W przeciwnym
wypadku można uszkodzić łącza.
Wymontowanie sprzętu
1
Klucz zwalniający
(dostarczony)
2
Główny korpus sprzętu
Wewnętrzna powierzchnia przedniego panelu
Uwagi
• Z uwagi na bezpieczeństwo, przed rozpoczęciem
oczyszczania złączy, należy wyłączyć silnik i wyjąć
kluczyk ze stacyjki.
• Złączy nie dotykać bezpośrednio gołą ręką lub
przedmiotami metalowymi.
3
4
17
Page 38

Dane techniczne
Magnetofon
Ścieżka taśmy 4-ścieżkowy 2-kanałowy
Kołysanie i drżenie dźwięku
Odpowiedź częstotliwościowa
Odstęp psofometryczny 55 dB
stereo
0,13 % (WRMS)
30 – 15.000 Hz
Tuner
FM
Zakres strojenia 87,5 – 108,0 MHz
Gniazdko anteny Łącze anteny zewnętrznej
Częstotliwość pośrednia 10,7 MHz
Czułość używalna 9 dBf
Wyborczość 75 dB przy 400 kHz
Odstęp psofometryczny 65 dB (stereo),
Harmoniczne zniekształcenie przy 1 kHz
Rozdzielczość 35 dB przy 1 kHz
Odpowiedź częstotliwościowa
68 dB (mono)
0,7 % (stereo),
0,4 % (mono)
30 – 15.000 Hz
MW/LW
Zakres strojenia MW: 531 – 1.602 kHz
Gniazdko anteny Łącze anteny zewnętrznej
Częstotliwość pośrednia 10,7 MHz/450 kHz
Czułość MW: 30 µV
LW: 153 – 279 kHz
LW: 50 µV
Wzmacniacz
Wyjścia Wyjścia głośnikowe
Impedancja głośników 4 – 8 ohmów
Maksymalna moc na wyjściu
(złączniki szczelne)
45 W × 4 (przy 4 ohmach)
Ogólne
Wyjścia Przewód sterowania
Regulacje barwy dźwięku Bass ±8 dB przy 100 Hz
Zapotrzebowanie mocy Akumulator 12 V DC
Wymiary Około 188 × 58 × 182 mm
Wymiary montażowe Około 182 × 53 × 163 mm
Waga Około 1,2 kg
Dostarczony osprzęt Części montażowe i
Wygląd zewnętrzny oraz dane techniczne, mogą ulec
zmianie bez uprzedzenia.
przekaźnikiem
automatycznej anteny
Przewód sterowania
zasilaniem wzmacniacza
mocy
Wysokie ±8 dB przy 10 kHz
(uziemienie ujemne)
(szer./wys./gł.)
(szer./wys./gł.)
podłączeniowe (1 zestaw)
Etui na przedni panel (1)
18
Page 39

Usuwanie usterek
Niżej podana lista kontrolna służy jako pomoc w usuwaniu ewentualnych błędów, które mogą
wystąpić podczas eksploatacji sprzętu.
Przed skorzystaniem z listy kontrolnej, zaleca się sprawdzenie podłączeń i czynności operacyjnych.
Ogólne
Usterka
Brak dźwięku.
Dane zaprogramowane w
pamięci sprzętu, zostały
wymazane.
Brak wskaźników na
wyświetlaczu.
Odtwarzanie taśmy
Usterka
Dźwięk ulega zniekształceniu.
Odbiór audycji radiowych
Usterka
Zaprogramowane strojenie nie
działa.
Automatyczne strojenie nie
funkcjonuje.
Nie można odebrać sygnału
stacji.
Dźwięk jest zniekształcony w
wyniku szumów.
Wskaźnik “ST” miga.
Przyczyna/Sposób usunięcia usterki
• Przy dwu-głośnikowych systemach, ustawić kontrolkę
zaniku w pozycji środkowej.
• Pierścień regulacyjny regulujący poziom głośności
przekręcać w kierunku zgodnym z ruchem wskazówek
zegara.
• Odłączony przewód zasilania lub akumulator.
• Naciśnięto przycisk zerowania.
t Ponownie zakodować w pamięci sprzętu.
Zdjąć przedni panel i oczyścić złącza. Szczegóły, patrz
“Oczyszczanie łączy” (strona 17).
Przyczyna/Sposób usunięcia usterki
Zanieczyszczona głowica taśmy.
t Oczyścić głowicę, dostępną w handlu kasetą czyszczącą
na sucho.
Przyczyna/Sposób usunięcia usterki
• W pamięci zakodować właściwą częstotliwość.
• Sygnał transmitowanej audycji jest za słaby.
Sygnał emitowanej audycji jest za słaby.
t Proszę dostroić manualnie.
Proszę podłączyć (niebieski) kabel sterowania zasilania anteny
lub dodatkowy (czerwony) kabel zasilania prądem do złącza
zasilania pobudzacza antenowego pojazdu (tylko, jeżeli pojazd
posiada antenę pasm FM/MW/LW wbudowaną w tylnej/
bocznej szybie).
• Dokładnie dostroić częstotliwość.
• Sygnał transmitowanej audycji jest za słaby.
t Nastawić na tryb MONO (strona 9).
ciąg dalszy na następnej stronie t
19
Page 40

Funkcje RDS
Usterka
Tryb poszukiwania SEEK,
włącza się po paru sekundach
słuchania.
Brak migawek o ruchu
drogowym.
PTY wyświetla wskaźnik
“NONE”.
Przyczyna/Sposób usunięcia usterki
Stacja nie emituje serwisu TP lub emitowany sygnał jest słaby.
tProszę kilkakrotnie nacisnąć przycisk (AF) lub przycisk
(TA) do momentu wyświetlenia symbolu “AF-OFF” lub
symbolu “TA-OFF”.
• Uaktywnić funkcję “TA”.
• Stacja, wbrew wskaźnikowi TP nie transmituje migawek o
ruchu drogowym.
t Proszę dostroić inną stację nadawczą.
Stacja nie wysyła sygnałów indetyfikujących rodzaje
programów.
20
Page 41

21
Page 42

Vítejte!
Děkujeme, že jste se rozhodli pro tento Sony
Cassette Player.
Bezpečnostní opatření
•Bylo-li vaše auto zaparkováno na přímém
slunci a došlo-li k velkému zvýšení teploty
uvnitř auta, nechte přístroj vychladnout, než
ho uvedete do provozu.
•Není-li přístroj pod proudem, zkontrolujte
napřed jeho zapojení. Je-li vše v pořádku,
zkontrolujte pojistku.
•Jestliže se z reproduktorů neozývá žádný
zvuk, když jsou zapojené 2 reproduktory,
nastavte vyvážení reproduktorů do středové
polohy.
•Jestliže delší dobu posloucháte kazetu,
může se stát, že se zahřeje od
zabudovaného zesilovače. Není to však
znakem poruchy.
Vyskytnou-li se další otázky nebo problémy
týkající se vašeho přístroje, které nejsou
popsány v tomto návodu k použití, obrate se
na nejbližší zastoupení firmy Sony.
Udržení vysoké kvality zvuku
Jestliže jsou v blízkosti vašeho rádia umístěné
držáky na nápoje, dbejte na to, aby se do
vašeho autorádia nedostaly ovocné šávy, ani
jiné nápoje. Zbytky cukru na tomto přístroji
nebo na kazetách by mohly zašpinit hlavy pro
přehrávání, snížit kvalitu zvuku nebo
všeobecně zhoršit reprodukci zvuku.
Soupravy na čistění kazet nemohou odstranit
cukr z hlav na přehrávání.
2
Page 43

Poznámky ke kazetám
Péče o kazety
•Nedotýkejte se povrchu pásku v kazetě,
protože by případné nečistoty nebo vlhkost
zašpinily hlavy.
•Nepřibližujte kazety do blízkosti zařízení se
silnými zabudovanými magnety jako jsou
reproduktory a zesilovače, protože by mohlo
dojít k vymazání nebo poškození nahrávky
na nahraném pásku.
•Nevystavujte kazety přímému slunečnímu
záření, extrémně nízkým teplotám, ani
vlhkosti.
•Případné smyčky na pásku by mohly
způsobit zamotání pásku v přístroji. Než
vložíte kazetu, napněte pásek za pomoci
tužky nebo podobného předmětu - otáčením
jednoho z koleček.
Smyčka
•Zdeformované kazety nebo částečně
odlepené nálepky mohou způsobovat
problémy při zasouvání a vysouvání kazet.
Odstraňte, příp. nahrate uvolněné nálepky.
Kazety delší než 90 minut
Nedoporučujeme přehrávání kazet delších než
90 minut s vyjímkou dlouhého souvislého
přehrávání. Pásky užívané pro tyto kazety jsou
velmi slabé, proto může snadno dojít k jejich
natažení. Jejich časté přehrávání a
zastavování může vést k tomu, že se navinou
na hlavy mechaniky.
•Může se stát, že bude zvuk při přehrávání
kazety rušený. Hlavy magnetofonu by měly
být čistěny po každých 50 hodinách
provozu.
3
Page 44

Obsah
Popis tlačítek .................................................. 5
Uvedení do provozu
Vynulování přístroje......................................... 6
Odstranění předního panelu ........................... 6
Práce s menu ..................................................6
Nastavení hodin .............................................. 7
Přehrávač kazet
Poslech pásku ................................................ 7
Poslech rozhlasu během rychlého převíjení
kazety dopředu nebo dozadu
— ATA (automatická aktivace tuneru) ........ 8
Rádio
Automatické ukládání stanic do paměti
— Best Tuning Memory
(BTM - pamě ladění) ................................. 8
Ukládání pouze požadovaných stanic ............9
Vyvolávání stanic, uložených do paměti .........9
RDS
Přehled funkcí RDS ....................................... 10
Znázornění jména stanice .............................10
Automatické přelaování jedné stanice
— Alternative Frequencies
(AF - alternativní frekvence) ..................... 10
Poslech dopravního hlášení .......................... 12
Přednastavení stanic RDS s údaji AF a TA ... 12
Vyhledávání stanice podle druhu programu . 13
Automatické nastavení hodin ....................... 14
Dodatečné informace
Údržba .......................................................... 16
Demontáž přístroje........................................ 17
Technické údaje ............................................ 18
Odstranění drobných závad.......................... 19
Další funkce
Nastavení zabarvení zvuku ........................... 15
Změna nastavení zvuku a displeje ................15
Zvýraznění basů
— D-bass .................................................16
4
Page 45

Popis tlačítek
PTY
S
+
T
MENU
SOUND
RELEASE
R
P
–
K
E
TUNER
E
S
P
R
S
T
DSPL
MODE
S
E
E
K
+
ENTER
–
1 2 3 4 56
Na uvedených stránkách naleznete další podrobné informace.
1 Tlačítko MENU 7, 8, 9, 11, 13, 14, 15
2 Knoflík pro ovládání hlasitosti
3 Tlačítko TUNER zdroj 8, 9, 12
4 Tlačítka PRST +/– (kurzor nahoru/
dolů) 7, 8, 9, 11, 13, 14, 15
Během příjmu rozhlasového vysílání:
Volba stanic uložených do paměti
8, 9
5 Tlačítko DSPL/PTY (změna režimu
displeje/druh programu) 14
6 Tlačítko MODE
Během příjmu rozhlasového vysílání:
volba pásma - BAND 8, 9
7 Tlačítko Z (vysunutí) 7
8 Displej
9 Tlačítka m/M (rychlé převíjení)/DIR
(změna směru přetáčení pásku) 7
q; Tlačítko D-BASS 16
qa Tlačítko TA 12, 13
qd Tlačítko RELEASE (uvolnění předního
panelu) 6, 17
qf Tlačítka SEEK –/+ (kurzor doleva/
doprava) 7, 8, 9, 11, 13, 14, 15
vyhledávání 9
qg Tlačítko pro vynulování (umístěné na
přední straně přístroje za předním
panelem) 6
qh Tlačítko ENTER 7, 8, 9, 11, 13, 14, 15
qj Číselná tlačítka pro předvolbu 9, 11
qk Tlačítko OFF* 6
ql Tlačítko AF 10, 11, 13
* Upozornění pro instalaci v autě bez
mezipolohy klíčku od zapalování
Předsvědčte se, abyste stiskli (OFF) na
přístroji na dvě sekundy, abyste vypnuli
hodiny na displeji po vypnutí motoru.
Jestliže stisknete (OFF) pouze krátce,
nevypne se displej s hodinami a to vede k
vybíjení baterie.
qs Tlačítko SOUND 15
DIR
D-BASS
TA
AF
OFF
XR-1300R
5
Page 46

Uvedení do provozu
Vynulování přístroje
Než začnete s tímto přístrojem poprvé
pracovat nebo po každé výměně autobaterie
musíte přístroj vynulovat.
Sejměte přední panel a stiskněte tlačítko pro
vynulování špičatým nástrojem jako např.
kuličkovým perem.
Tlačítko Reset - vynulování
Poznámka
Stisknutím tlačítka pro vynulování dojde k vymazání
času na hodinách a k vymazání funkcí, uložených do
paměti přístroje.
Odstranění předního
panelu
Z tohoto přístroje můžete sejmout přední
panel, abyste ho tak zajistili proti krádeži.
1 Stiskněte (OFF).
Nasazení předního panelu
Nasate stranu A předního panelu na stranu
B na přístroji podle ilustrace a zatlačte na
levou stranu, dokud nezaklapne.
A
B
Poznámky
• Dbejte na to, abyste nepohybovali předním
panelem nahoru a dolů.
• Při nasazování netlačte přední panel příliš silně na
přístroj.
• Netlačte příliš silně ani nenarážejte ničím na displej
na předním panelu.
• Nevystavujte přední panel přímému slunečnímu
záření, zdrojům tepla jako např. vedení teplého
vzduchu, ani ho nenechávejte ve vlhkém prostředí.
Nikdy ho nenechávejte na přístrojové desce apod.
auta zaparkovaného na slunci, kdy by mohla
teplota uvnitř auta nepřiměřeně stoupnout.
Bezpečnostní upozornění
Když vypnete klíček od zapalování - poloha
OFF a nesejmete přední panel, ozve se na
několik sekund bezpečnostní zvukový signál.
Jestliže zapojíte přídavný zesilovač a
nebudete používat zabudovaný zesilovač,
bude zvukový signál deaktivovaný.
2 Stiskněte (RELEASE), potom posuňte
přední panel lehce doleva a sejměte ho
směrem k sobě.
(OFF)
(RELEASE)
Poznámky
• Dbejte na to, aby vám panel při snímání nevypadl z
ruky.
• Jestliže uvolníte přední panel a přístroj přitom bude
stále zapnutý, dojde k automatickému vypnutí
přístroje, aby nedošlo k poškození reproduktorů.
• Jestliže chcete nosit přední panel s sebou,
ukládejte ho vždy do příslušného pouzdra, které je
součástí příslušenství.
6
Práce s menu
Tento přístroj pracuje na základě výběru
položek z menu.
Chcete-li zvolit položku, zadejte nejprve režim
menu a zvolte nahoru/dolů (+/– tlačítka
(PRST)), nebo zvolte doleva/doprava (–/+
tlačítka (SEEK)).
(PRST)
(+) : zadávání nahoru
TUNER
(–) : zadávání dolů
Page 47

(SEEK/AMS)
(–) : zadávání
doleva
TUNER
(+) : zadávání
doprava
Nastavení hodin
Hodiny mají 24-hodinový ukazatel.
Příklad: nastavení hodin na 10:08
1 Stiskněte (MENU), potom tiskněte
opakovaně jednu ze stran (PRST),
dokud se neobjeví “CLOCK”.
1 Stiskněte (ENTER).
Číslice pro hodinu začnou blikat.
Přehrávač kazet
Poslech pásku
Vložte kazetu.
Přehrávání se spustí automaticky.
Přehrávání horní strany kazety.
Přehrávání dolní strany kazety.
Tip
Chcete-li změnit směr přehrávání kazety, stiskněte
tlačítko m a M.
2 Stiskněte jednu ze stran (PRST),
abyste nastavili hodiny.
3 Stiskněte stranu + tlačítka (SEEK).
Číslice pro minuty začnou blikat.
4 Stiskněte jednu ze stran (PRST),
abyste nastavili minuty.
2 Stiskněte (ENTER).
Hodiny se rozejdou.
Jakmile je nastavení hodin ukončeno,
nastaví se na displeji normální režim
přehrávání.
Chcete-li ukončit přehrávání a
vysunout kazetu
Stiskněte Z.
Rychlé přetáčení pásku
Během přehrávání stiskněte m nebo
M.
Indikátor
směru*
FWD
REV
* Indikátor < > bude svítit během rychlého převíjení
kazety.
Chcete-li spustit přehrávání během rychlého
převíjení dopředu nebo dozadu, stiskněte
částečně jiné tlačítko pro rychlé převíjení,
dokud se neuvolní zablokované tlačítko.
Dopředu
M
m
Dozadu
m
M
7
Page 48

Poslech rozhlasu během
rychlého převíjení kazety
dopředu nebo dozadu
— ATA (automatická aktivace tuneru)
Jestliže přetáčíte kazetu rychle dopředu nebo
dozadu za pomoci tlačítka m nebo M,
zapne se tuner automaticky.
1 Během přehrávání stiskněte tlačítko
(MENU).
2 Tiskněte opakovaně jednu ze stran
(PRST), dokud se neobjeví “ATA”.
Rádio
Automatické ukládání
stanic do paměti
— Best Tuning Memory
(BTM - pamě ladění)
Tato funkce vybírá stanice s nejsilnějším
signálem a ukládá je do paměti v pořadí jejich
frekvencí. Můžete uložit do paměti až 6 stanic
pro každé pásmo (FM1, FM2, FM3, MW, a LW).
Bezpečnostní upozornění
Jestliže ladíte stanice během řízení, používejte
funkci automatického ladění, abyste předešli
případné nehodě.
3 Stiskněte stranu + tlačítka (SEEK),
abyste zadali “ON”.
Režim přehrávání začíná.
4 Stiskněte (ENTER).
Chcete-li se vrátit k režimu normálního
přehrávání zadejte “OFF” v kroku 3 výše.
1 Stiskněte (TUNER).
Přijímač je zapnutý.
2 Tiskněte opakovaně (MODE), abyste
zadali pásmo.
Při každém stisknutí tlačítka (MODE), se
pásma mění v následujícím pořadí:
B FM1 B FM2 B FM3 B MW B LW
3 Stiskněte tlačítko (MENU), potom
tiskněte opakovaně jednu ze stran
(PRST), dokud se neobjeví “BTM”.
4 Stiskněte (ENTER).
Tento přístroj ukládá stanice do paměti v
pořadí jejich frekvencí a přiřazuje je k
číselným tlačítkům.
Jakmile je ladění ukončeno, ozve se
zapípání.
Poznámky
• Přístroj neuloží do paměti stanice s přiliš slabým
signálem. Jestliže lze naladit pouze několik stanic,
zůstanou u některých tlačítek přiřazené jejich
původní stanice.
• Jestliže je na displeji znázorněné číslo stanice,
bude přístroj ukládat stanice do paměti počínajíce
od znázorněného čísla.
8
Page 49

Ukládání pouze
požadovaných stanic
Můžete uložit do paměti až 18 stanic na FM
(po 6-ti pro FM1, 2, a 3), až 6 stanic na MW SV a až 6 stanic na LW - DV v pořadí podle
vaší volby.
Jestliže nemůžete naladit
přednastavenou stanici
Stiskněte jednu ze stran (SEEK), abyste
vyhledali stanici (automatické ladění).
Vyhledávání se zastaví, jakmile přístroj
nalezne stanici. Tiskněte opakovaně jednu
ze stran (SEEK), dokud nenaladíte
požadovanou stanici.
1 Stiskněte (TUNER).
Přijímač je zapnutý.
2 Tiskněte opakovaně (MODE), abyste
zadali pásmo.
3 Stiskněte jednu ze stran (SEEK), abyste
naladili stanici, kterou chcete uložit do
paměti pod číselným tlačítkem.
4 Stiskněte a držte stisknuté požadované
číselné tlačítko ((1) až (6)), dokud se na
displeji neobjeví “MEM”.
Na displeji se objeví indiakce příslušného
číselného tlačítka.
Poznámka
Jestliže se pokusíte uložit na již obsazené tlačítko
další stanici, dojde k vymazání původně uložené
stanice.
Vyvolávání stanic,
uložených do paměti
1 Stiskněte (TUNER).
Přijímač je zapnutý.
2 Tiskněte opakovaně (MODE), abyste
zadali pásmo.
Poznámka
Jestliže se automatické ladění zastavuje příliš často,
stiskněte (MENU), potom tiskněte opakovaně jednu
ze stran (PRST), dokud se na displeji neobjeví
“LOCAL” (režim lokálního ladění). Potom stiskněte
stranu + tlačítka (SEEK), abyste zadali
“LOCAL-ON”. Stiskněte (ENTER).
Nyní budou naladěny pouze stanice s relativně
silným signálem.
Tip
Jestliže znáte frekvenci stanice, kterou chcete
poslouchat, stiskněte a držte jednu ze stran
(SEEK), dokud se neobjeví požadovaná frekvence
(manuální ladění).
Jestliže je stereofonní příjem na FM
rušený — monofonní režim
1 Během příjmu rozhlasového vysílání
stiskněte (MENU), potom tiskněte
opakovaně jednu ze stran (PRST),
dokud se neobjeví “MONO”.
2 Stiskněte stranu + tlačítka (SEEK),
dokud se neobjeví “MONO-ON”.
Zvuk se zlepší, ale bude monofonní (“ST”
zmizí).
3 Stiskněte (ENTER).
Chcete-li se vrátit k normálnímu režimu,
zadejte v kroku 2 výše “MONO-OFF” (vyp.).
3 Stiskněte číselné tlačítko ((1) až (6)), ke
kterému je přiřazená požadovaná
stanice.
Tip
Stiskněte jednu ze stran (PRST), abyste vyvolali
stanice v pořadí, v jakém jsou uloženy v paměti
(funkce vyhledávání předvoleb).
9
Page 50

RDS
Přehled funkcí RDS
Radio Data System (RDS) je služba vysílacích
stanic, která umožňuje vysílat na pásmu FM
doprovodné digitální informace spolu s
běžnými signály rozhlasového vysílání. Vaše
stereofonní rádio vám nabízí celou řadu
služeb. Jen několik z nich: automatické
naladění stejného programu, poslech
dopravního hlášení, ladění stanic podle jejich
druhu.
Poznámky
• V závislosti na zemi a oblasti nemusí být všechny
funkce RDS dostupné.
• RDS nebude řádně fungovat, jestliže je signál příliš
slabý nebo jestliže naladěná stanice tyto signály
RDS nevysílá.
Znázornění jména
stanice
Automatické
přelaování jedné
stanice
— Alternative Frequencies
(AF - alternativní frekvence)
Funkce alternativní frekvence (AF) automaticky
vybírá a přelauje stanici s nejsilnějším
signálem v síti. Při použití této funkce můžete
průběžně poslouchat stejný program i při
dalekých cestách, aniž byste museli dolaovat
stanici manuálně.
Automatická změna frekvencí.
98,5 MHz
Stanice
102,5 MHz
1 Nalate stanici FM (strana 9).
96,0 MHz
Na displeji se objeví jméno právě naladěné
stanice.
Nalate stanici FM (strana 9).
Jestliže naladíte stanici FM, která vysílá
údaje RDS, objeví se na displeji jméno
stanice.
Poznámka
Indikace “ *” znamená, že je přijímána stanice RDS.
10
2 Tiskněte opakovaně (AF), dokud se na
displeji neobjeví “AF-ON”.
Přístroj začne vyhledávat alternativní stanici
se silnějším signálem ve stejné síti.
Poznámka
Jestliže ve vaší oblasti není žádná alternativní stanice
a jestliže nepotřebujete vyhledávat žádnou
alternativní stanici, vypněte funkci AF opakovaným
tisknutím tlačítka (AF), dokud se na displeji neobjeví
“AF-OFF”.
Page 51

Změna položek na displeji
Při každém stisknutí tlačítka (AF), se budou
položky měnit následovně:
AF-ON y AF-OFF
Poznámky
• Jestliže na displeji střídavě svítí “NO AF” a jméno
stanice, znamená to, že přístroj nemůže nalézt v síti
alternativní stanici.
• Jestliže jméno stanice začne blikat po zadání
stanice za pomoci funkce AF, znamená to, že není
k dispozici žádná alternativní frekvence. Stiskněte
jednu ze stran tlačítka (SEEK), dokud bliká jméno
stanice (během osmi sekund). Přístroj začne
vyhledávat jinou frekvenci se stejnými parametry PI
(programovou identifikací) (objeví se “PI SEEK” a
nebude slyšet žádný zvuk).Jestliže přístroj nemůže
najít jinou frekvenci, objeví se “NO PI” a přístroj se
vrátí k původně zadané frekvenci.
Poslech regionálního programu
Funkce “REG-ON” (regionální) na tomto
přístroji vám umožňuje ponechat naladěný
regionální program, aniž by došlo k přepínání
na jiné regionální stanice (Zapamatujte si, že
funkce AF musí zůstat zapnutá). V tomto
přístroji je tato funkce výrobcem nastavena na
“REG-ON”, jestliže ji však chcete vypnout,
postupujte podle následujícího popisu.
1 Během poslechu rádia stiskněte
(MENU), potom tiskněte opakovaně
jednu ze stran (PRST), dokud se
neobjeví “REG”.
Funkce lokálního vyhledávání
(pouze ve Spojeném království)
Funkce lokálního vyhledávání vám umožňuje
ladit další lokální stanice ve vaší zemi, i když
tyto nejsou uložené do paměti.
1 Stiskněte číselné tlačítko, ke kterému je
lokální stanice přiřazena.
2 Během pěti sekund stiskněte opět
číselné tlačítko pro volbu lokální stanice.
3 Tento postup opakujte, dokud
nenaladíte požadovanou lokální stanici.
2 Stiskněte stranu + tlačítka (SEEK),
dokud se neobjeví “REG-OFF”.
3 Stiskněte (ENTER).
Zapamatujte si, že když bude tato funkce
vypnutá “REG-OFF”, může dojít k tomu, že
přístroj naladí jinou regionální stanici ve
stejné síti.
Chcete-li se vrátit opět k funkci lokálního
vyhledávání, zadejte v kroku 2 výše “REG-ON”
(zap.).
Poznámka
Tato funkce nefunguje ve Spojeném království a v
několika dalších zemích.
11
Page 52

Poslech dopravního
hlášení
Funkce dopravní hlášení (TA) a dopravní
programy (TP) vám umožní automatické ladění
stanice FM, která vysílá dopravní hlášení, i
když posloucháte jiné zdroje.
Tiskněte opakovaně (TA), dokud se na
displeji neobjeví “TA-ON”.
Přístroj začne vyhledávat stanice, vysílající
dopravní hlášení. Jakmile přístroj nalezne
stanici vysílající dopravní hlášení, rozsvítí se
na displeji “TP”.
Na začátku dopravního hlášení začne “TA”
blikat, po skončení dopravního hlášení se
blikání zastaví.
Tip
Jestliže dopravní hlášení začne v době, kdy budete
poslouchat jiný zdroj programu, přístroj se
automaticky přepne na toto hlášení a po jeho
skončení se vrátí k původnímu zdroji programu.
Poznámky
• “NO TP” bude na displeji blikat po dobu pěti
sekund, jestliže že naladěná stanice dopravní
hlášení nevysílá. Potom bude přístroj pokračovat ve
vyhledávání stanice s dopravním hlášením.
• Jestliže se na displeji objeví zároveň “EON” a “TP”,
přenáší naladěná stanice dopravní hlášení jiné
stanice ve stejné síti.
Zrušení aktuálního dopravního hlášení
Stiskněte (TA) nebo (TUNER).
Chcete-li zrušit všechna dopravní hlášení,
vypněte tuto funkci stisknutím (TA), dokud
se na displeji neobjeví “TA-OFF”.
Nastavení hlasitosti dopravních
hlášení
Máte možnost nastavit předem úroveň
hlasitosti dopravních hlášení abyste tato
hlášení nepřeslechli. Na začátku dopravního
hlášení se hlasitost automaticky nastaví na
přednastavenou úroveň.
1 Zadejte požadovanou úroveň hlasitosti.
2 Stiskněte (TA) na dvě sekundy.
Na displeji se objeví “TA” a nastavení je
uloženo do paměti.
Příjem nouzových hlášení
Jestliže je vysíláno nouzové hlášení a vy
posloucháte rádio, bude program automaticky
přepnut na toto hlášení. Jestliže posloucháte
jiný zdroj než rádio, uslyšíte nouzové hlášení
pouze tehdy, když budete mít zapnutou funkci
AF nebo TA. Přístroj se potom automaticky
přepne na toto hlášení, bez ohledu na to, co
budete v tu dobu právě poslouchat.
Přednastavení stanic
RDS s údaji AF a TA
Když uložíte do paměti stanice RDS, přístroj
uloží průvodní údaje pro stanici stejně tak jako
její frekvenci, takže nemusíte při každém
naladění předladěné stanice zapínat funkce AF
nebo TA. Pro jednotlivé předladěné funkce
můžete zadat různá nastavení (AF, TA, nebo
obě) nebo ale také stejné nastavení pro
všechny předladěné stanice.
12
Page 53

Stejné nastavení pro všechny
přednastavené stanice
1 Nalate stanici FM (strana 9).
Vyhledávání stanice
podle druhu programu
2 Stiskněte (AF) nebo/a (TA), abyste
zadali “AF-ON” nebo/a “TA-ON”.
Zapamatujte si, že zadáním “AF-OFF” nebo
“TA-OFF” nebudou ukládány do paměti
pouze stanice RDS, ale také stanice bez
RDS.
3 Stiskněte (MENU), potom tiskněte
opakovaně jednu ze stran (PRST),
dokud se neobjeví “BTM”.
4 Stiskněte stranu + tlačítka (SEEK),
dokud nezačne blikat “BTM”.
5 Stiskněte (ENTER).
Různá nastavení pro jednotlivé
přednastavené stanice
1 Zadejte pásmo FM a nalate
požadovanou stanici.
2 Stiskněte (AF) nebo/a (TA), abyste
zadali “AF-ON” nebo/a “TA-ON”.
3 Stiskněte požadované číselné tlačítko a
držte ho, dokud se na displeji neobjeví
“MEM”.
Chcete-li nastavit jiné stanice, opakujte
postup od kroku 1.
Tip
Jestliže chcete po naladění stanice změnit nastavení
AF a/nebo TA, můžete tak učinit zapnutím/vypnutím
funkce AF nebo TA.
Požadovanou stanici můžete vyhledat
zadáním jednoho z druhů programů podle
tabulky níže.
Druh programů Displej
Zprávy NEWS
Aktuální události AFFAIRS
Informace INFO
Sport SPORT
Vzdělání EDUCATE
Divadlo DRAMA
Kultura CULTURE
Věda SCIENCE
Pestré prog. VARIED
Populární hudba POP M
Rocková hudba ROCK M
Oddechová hudba EASY M
Vážná hudba LIGHT M
Klasická hudba CLASSICS
Jiný druh hudby OTHER M
Počasí WEATHER
Finance FINANCE
Dětské programy CHILDREN
Sociální záležitosti SOCIAL A
Náboženství RELIGION
Telefonáty PHONE IN
Cestování TRAVEL
Volný čas LEISURE
Jazzová hudba JAZZ
Country COUNTRY
Lidová hudba NATION M
Oldies OLDIES
Folklórní hudba FOLK M
Dokumentární vys. DOCUMENT
Bez specifikace NONE
Poznámka
Tuto funkci nemůžete používat v některých zemích,
které nevysílají údaje PTY (Programme Type
selection - volba typu programu).
13
Page 54

1 Stiskněte (DSPL/PTY) během poslechu
na FM, aby se na displeji objevilo “PTY”.
Automatické nastavení
hodin
Jestliže stanice vysílá údaje PTY, objeví se
na displeji označení druhu právě
poslouchaného programu. Jestliže stanice
nevysílá RDS nebo jestliže není možné
přijímat signály RDS, objeví se na displeji
“- - - - -”.
Je-li funkce TA zapnuta, začne přístroj
hledat další stanici.
2 Tiskněte opakovaně (PRST), aby se
objevil požadovaný druh programu.
Druh programu se objeví v pořadí
uvedeném v předchozí tabulce.
Zapamatujte si, že pro vyhledávání
nemůžete zadat “NONE” (bez specifikace).
3 Opakovaně tiskněte tlačítko (ENTER),
dokud se nenaladí požadovaná stanice.
Přístroj začne s vyhledváním stanice
vysílající zadaný druh programu. Jakmile je
program nalezen, objeví se na pět sekund
opět druh programu.
Jestliže přístroj nenalezne zadaný druh
programu, bude na displeji střídavě blikat
“NO” a druh programu po dobu pěti
sekund, přístroj se poté automaticky
přepne na přenos naposledy přijímané
stanice.
Údaje CT (Clock Time - hodiny) přenášené
společně s údaji RDS nastaví hodiny
automaticky.
1 Během poslechu rozhlasového vysílání
stiskněte (MENU), potom tiskněte
opakovaně jednu ze stran (PRST),
dokud se neobjeví “CT”.
2 Tiskněte opakovaně stranu + tlačítka
(SEEK), dokud se neobjeví “CT-ON”.
Hodiny jsou nastavené.
3 Stiskněte (ENTER), abyste se vrátili k
normálnímu displeji.
Zrušení funkce CT
V kroku 2 výše zadejte “CT-OFF” (vyp.).
Poznámky
• Může se stát, že funkce CT nebude fungovat i přes
příjem stanice RDS.
• Může se stát, že čas nastavený funkcí CT nebude
přesný.
14
Page 55

Další funkce
Nastavení zabarvení
zvuku
Můžete nastavit basy, výšky, vyvážení vpravovlevo a vepředu-vzadu.
Úroveň basů a výšek můžete uložit nezávisle
pro každý zdroj.
Změna nastavení zvuku
a displeje
Následující položky mohou být nastaveny:
•CLOCK (hodiny) (strana 7).
•CT (Clock Time - čas na hodinách) (strana
14).
•BEEP – zapínání a vypínání pípání.
•D.INFO (Dual Information) pro znázornění
hodin a režimu přehrávání zároveň (ON) nebo
pro střídavé znázornění informace (OFF).
•M.DSPL (Motion Display - akční displej) –
zapínání a vypínání funkce monitoru displeje.
1 Zadejte položku, kterou chcete nastavit,
opakovaným tisknutím tlačítka (SOUND).
BAS (basy) t TRE (výšky)
BAL (vlevo-vpravo) t FAD (vepředu-vzadu)
t
2 Zvolenou položku nastavte stisknutím
jedné ze stran tlačítka (SEEK).
Položku nastavte do tří sekund po jejím
zadání. (Po třech sekundách bude knoflík
opět fungovat jako knoflík pro ovládání
hlasitosti.)
1 Stiskněte (MENU).
2 Tiskněte opakovaně jednu ze stran
(PRST), dokud se neobjeví požadovaná
položka.
Při každém stisknutí strany (–) tlačítka
(PRST) se bude položka měnit
následovně:
CLOCK t CT t BEEP t D.INFO t M.DSPL
3 Stiskněte stranu (+) tlačítka (SEEK),
abyste zadali požadované nastavení
(Příklad: ON nebo OFF).
4 Stiskněte (ENTER).
Jakmile je nastavení režimu ukončeno, vrátí
se diplej do režimu normálního přehrávání.
15
Page 56

Zvýraznění basů
— D-bass
Můžete poslouchat jasný a silný basový zvuk.
Funkce D-bass zesiluje signály o nízké
frekvenci a o vysoké frekvenci s ostřejší
křívkou než konvenční funkce zesíleni basů.
Basy uslyšíte mnohem jasněji, i když budou
vokály nastaveny na stejnou hlasitost. Basy
můžete zvýraznit a nastavit snadno za pomoci
knoflíku D-BASS.
D.BASS-3
D.BASS-2
Úroveň
0dB
D.BASS-1
Frekvence (Hz)
Nastavení křivky basů
Tiskněte opakované (D-BASS), abyste
zadali požadovanou křivku basů.
Podle toho, jak se zvyšuje čísio D-BASS,
se zvyšuje požadovany efekt.
D.BASS-1 t D.BASS-2 t D.BASS-3 t
D.BASS-OFF
Poznámka
Může se stát, že budou basy při určité hlasitosti
rušeny. Jestliže dojde k rušení basů, zadejte nižší
činnou křivku pro basy.
D.BASS-3
D.BASS-2
D.BASS-1
Dodatečné
informace
Údržba
Výměna pojistky
Při výměně pojistky se ujistěte, abyste užili
pojistku se správnou hodnotou, která je
uvedena na povrchu originální pojistky.
Jestliže pojistka praskne, zkontrolujte zapojení
proudu a pojistku vyměňte. Jestliže pojistka
po výměně opět praskne, může to být v
důsledku poruchy přístroje. V tom případě se
obrate na nejbližší zastoupení Sony.
Pojistka (10 A)
Upozornění
Nikdy nepoužívejte pojistky s vyšší ampérovou
hodnotou, než jaké jsou v přístroji, protože by
to mohlo způsobit poškození přístroje.
16
Page 57

Čistění konektorů
Jestliže jsou konektory mezi přístrojem a
předním panelem znečistěné, nebude přístroj
fungovat řádně. Abyste tomu předešli,
uvolněte přední panel stisknutím tlačítka
(RELEASE), sejměte ho a potom vyčistěte
konektory smotkem bavlněného hadříku
navlhčeného v alkoholu. Na kontakty přitom
příliš netlačte, abyste je nepoškodili.
Hlavní přístroj
Zadní strana předního panelu
Poznámky
• Pro vaši bezpečnost vypněte před čištěním
konektorů motor a vytáhněte klíček na zapalování
ze spínací skříňky.
• Nikdy se nedotýkejte konektorů přímo prsty ani
žádnými kovovými předměty.
Demontáž přístroje
1
Uvolňovací klíč
(součást příslušenství)
2
3
4
17
Page 58

Technické údaje
Magnetofon
Stopy na pásku 4 stopy, 2-kanálový
stereofonní zvuk
Kolísání a odchylka 0,13 % (WRMS)
Frekvence 30 – 15.000 Hz
Odstup signálu od šumu 55 dB
Rádio
FM
Kmitočtový rozsah 87,5 – 108,0 MHz
Konektor pro anténu Externí konektor pro
anténu
Mezifrekvenční kmitočet 10,7 MHz
Citlivost 9 dBf
Selektivita 75 dB při 400 kHz
Odstup signálu od šumu
65 dB (stereo),
68 dB (mono)
Harmonická distorze při 1 kHz
0,7 % (stereo),
0,4 % (mono)
Rozlišení 35 dB při 1 kHz
Frekvence 30 – 15.000 Hz
MW/LW (SV/DV)
Kmitočtový rozsah MW (SV): 531 – 1.602 kHz
LW (DV): 153 – 279 kHz
Konektor pro anténu Externí konektor pro
anténu
Mezifrekvenční kmitočet 10,7 MHz/450 kHz
Citlivost MW (SV): 30 µV
LW (DV): 50 µV
Zesilovač
Výstupy Výstupy pro reproduktory
(bezpečnostní konektory)
Impedance reproduktorů
4 – 8 ohmů
Maximální výstup 45 W × 4 (při 4 ohmech)
Všeobecně
Výstupy Pro kabel na ovládání
Ovládání zvuku Basy ±8 dB při 100 Hz
Napájení Autobaterie - stejnosměrný
Rozměry Přibl. 188 × 58 × 182 mm
Rozměry pro montáž Přibl. 182 × 53 × 163 mm
Hmotnost Přibl. 1,2 kg
Dodávané příslušenství Součásti pro instalaci a
Design a technické parametry mohou být změněny
bez předchozího upozornění.
elektrické antény
Pro ovládání zesilovače
Výšky ±8 dB při 10 kHz
proud 12 V
(negativní uzemnění)
(š/v/h)
(š/v/h)
zapojení (1 souprava)
Pouzdro na přední panel (1)
18
Page 59

Odstranění drobných závad
Následující přehled vám pomůže odstranit většinu závad, se kterými se při obsluze vašeho
přístroje případně setkáte.
Než začnete se čtením následujícího přehledu, seznamte se s instrukcemi pro napojení a obsluhu.
Všeobecně
Problém
Žádný zvuk.
Údaje uložené do paměti byly
vymazány.
Na displeji se neobjeví žádné
indikace.
Přehrávání pásku
Problém
Zvuk je rušený.
Poslech rádia
Problém
Není možné naladit stanici
uloženou v paměti.
Automatické ladění nefunguje.
Stanice nemohou být přílímány.
Zvuk je rušen šumy.
Indikátor “ST” bliká.
Příčina/Odstranění
• Nastavte vyvážení do středové polohy, jestliže máte zapojeny
dva reproduktory.
• Otáčejte knoflíkem ve směru hodinových ručiček, abyste
nastavili hlasitost.
• Přívodní kabel nebo baterie byly odpojené.
• Došlo k stisknutí tlačítka pro vynulování.
t Uložte údaje znovu do paměti.
Sejměte přední panel a vyčistěte konektory. V kapitole “Čistění
konektorů” (strana 17) naleznete další informace.
Příčina/Odstranění
Hlavy pro záznam resp. přehrávání jsou zašpiněné.
t Vyčistěte hlavy komerčně dostupnou suchou kazetou na
čistění hlav.
Příčina/Odstranění
• Zadejte do paměti správnou frekvenci.
• Vysílaný signál je příliš slabý.
Vysílání je příliš slabé.
t Nalate stanici ručně.
Zapojte kabel pro elektrické ovládáni antény (modrý) nebo
přídavný kabel pro napájení antény (červený) na kabel pro
napájení zesilovače antény.
(Pouze jestliže má Vaše auto zabudovanou anténu FM/MW/LW
na zadním/postranním skle.)
• Nalate přesnou frekvenci.
• Vysílaný signál je příliš slabý.
t Zadejte režim MONO (strana 9).
pokračování na další straně t
19
Page 60

Funkce RDS
Problém
Funkce SEEK začíná po
několika sekundách poslechu.
Žádná dopravní hlášení.
Funkce PTY ukazuje “NONE”.
Příčina/Odstranění
Jedná se o stanici bez TP nebo o stanici se slabým signálem.
t Tiskněte opakovaně (AF) nebo (TA), dokud se neobjeví
“AF-OFF” nebo “TA-OFF”.
• Zaktivujte “TA”.
• Stanice nevysílá žádné dopravní hlášení i přes TP.
t Nalate jinou stanici.
Stanice neoznačuje druh programu.
20
Page 61

21
Page 62

Hoşgeldiniz!
Tedbirler
Sony kaset çaları satın aldığınız için teşekkür
ederiz.
• Eğer otomobilinizi direkt güneş ışığına tabi bir
yere park ettiyseniz ve otomobilin iç ısısı
önemli ölçüde arttı ise, üniteyi çalıştırmadan
önce soğumasını bekleyiniz.
• Eğer üniteye güç gitmiyorsa, önce
bağlantıları kontrol ediniz. Eğer her şey
yolunda ise sigortayı kontrol ediniz.
• İki hoparlörlü sistemin hoparlörlerinden ses
gelmiyorsa fader kontrol düğmesini orta
pozisyona getiriniz.
• Kaset uzun süre çalarsa takılı güç
amplifikatörü dolayısıyla ısınabilir. Ancak bu
işlevin kusurlu olduğuna işaret etmez.
Ünite hakkında kullanım kılavuzunda yer
almayan soru ve problemleriniz olduğu
takdirde en yakın Sony bayiine danışınız.
Yüksek kaliteli ses sağlanması
Audio aletinin yanında içecek tutucuları varsa
ünitenin üzerine meyve suyu veya başka bir
içecek dökmemeye dikkat ediniz. Ünite veya
kaset üzerindeki şekerli artıklar kafaları kirletir
ve böylece ses kalitesi azalır veya ses üretimi
tamamen engellenir.
Kaset temizleme kitleri kafalardaki şekeri
temizleyemez.
2
Page 63

Kaset notları
Kasetin bakımı
• Kasetin teyp yüzeyine dokunmayınız, her
türlü kir ve toz kafaları kirletir.
• Kasetleri hoparlör ve amplifikatör gibi
mıknatıs takılı aletlerden uzak tutunuz. Aksi
takdirde kayıtlı kasetlerde silinme veya
bozulma olabilir.
• Kasetleri direkt güneş ışığına, aşırı soğuğa
veya neme tabi bırakmayınız.
• Teypdeki gevşeklik ünitenin teybi sarmasına
yol açabilir. Kaseti yerleştirmeden önce
kurşunkalemle veya benzeri bir obje ile
makarayı çevirip gevşekliği gideriniz.
Gevşeklik
• Bozuk kasetler ve gevşek etiketler kaseti
yerleştirirken veya çıkarırken problem
çıkarabilir. Gevşek etiketleri çıkarınız veya
yenisi ile değiştiriniz.
90 dakikadan uzun kasetler
90 dakikadan uzun kasetlerin kullanılması
uzun süreli çalınmasının dışında tavsiye
edilmez. Bu kasetlerde kullanılan bantlar çok
incedir ve kolayca kopmaya meyillidirler. Bu
teyplerin sürekli çalınması ve durdurulması
kasetin teyp mekanizmasına takılmasına yol
açar.
• Kaseti çalarken ses bozulabilir. Kaset çalar
kafası her 50 saatlik kullanımdan sonra
temizlenmelidir.
3
Page 64

İçindekiler
Kontrol düğmelerinin yerleri ................................ 5
Başlarken
Ünitenin ayarı ..................................................6
Ön panelin sökümü .........................................6
Menü nasıl kullanılır ........................................6
Saatin ayarlanması ......................................... 7
Kasetçalar
Kaset dinlenmesi ............................................. 7
Kaseti ıleri veya geri sararken radyo yayını
— ATA (Automatic Tuner Activation) ......... 8
Radyo
İstasyonların otomatik olarak hafızaya alınması
— Best Tuning Memory (BTM) .................. 8
Yalnız arzu edilen istasyonların hafızaya
alınması...................................................... 9
Hafızaya alınmış istasyonların dinlenmesi ......9
RDS
RDS işlevi hakkında ...................................... 10
İstasyon isminin görülmesi ............................10
Aynı programın otomatik olarak tekrar
ayarlanması
— Alternative Frequences (AF)................ 10
Trafik haberlerinin dinlenmesi .......................12
RDS istasyonlarını AF ve TA verilerine
ayarlanması .............................................. 12
İstasyonun program tipine göre
yerleştirilmesi ........................................... 13
Saatin otomatik ayarı .................................... 14
Ek bilgi
Bakım ............................................................16
Ünitenin sökülmesi ........................................17
Özellikler ....................................................... 18
Problem arama kılavuzu ............................... 19
Diğer işlevler
Ses özelliklerinin ayarlanması ....................... 15
Ses ve gösterge ayarlarının değiştirilmesi .... 15
Basın yükseltilmesi
— D-bass ................................................. 16
4
Page 65

Kontrol düğmelerinin yerleri
PTY
S
+
T
MENU
SOUND
RELEASE
R
P
–
K
E
TUNER
E
S
P
R
S
T
DSPL
MODE
S
E
E
K
+
ENTER
–
1 2 3 4 56
Detaylar için listedeki sayfalara bakınız.
11
1 MENU tuşu 7, 8, 9, 11, 13, 14, 15
11
2 Ses kontrol kadranı
3 TUNER tuşu 8, 9, 12
4 PRST +/– (kursör yukarı/aşağı)
düğmeleri 7, 8, 9, 11, 13, 14, 15
Radyo yayını sırasında:
Kaydedilmiş istasyonların seçimi 8, 9
5 DSPL/PTY (gösterge kipini değiştirme/
program tipi) tuşu 14
6 MODE tuşu
Radyo yayını sırasında:
BAND seçimi 8, 9
7 Z (eject) tuşu 7
8 Gösterge penceresi
mm
9
MM
m/
M (ileri sarış)/DIR (kaset sarış
mm
MM
yönünü değiştirme) tuşları 7
DIR
D-BASS
TA
AF
OFF
XR-1300R
q; D-BASS tuşu 16
qa TA tuşu 12, 13
qs SOUND tuşu 15
qd RELEASE (ön paneli sökme) düğmesi
6, 17
qf SEEK –/+ (kursör sol/sağ) düğmeleri
7, 8, 9, 11, 13, 14, 15
Arama 9
qg Ayar tuşu (ünitenin ön yüzüne ön
panelin arkasına yerleştirilmiştir) 6
qh ENTER tuşu 7, 8, 9, 11, 13, 14, 15
qj Hafıza numara tuşları 9, 11
qk OFF tuşu* 6
ql AF düğmesi 10, 11, 13
* Kontakt anahtarı yuvasında ACC
(accesory) pozisyonu olmayan bir
otomobile kurarken dikkat
Motoru kapattıktan sonra saat
göstergesini kapatmak için ünitedeki
(OFF) düğmesine iki saniye için
bastığınıza emin olunuz.
(OFF) tuşuna bir an için basarsanız, saatin
göstergesi kapanmaz ve bu akünün
zayıflamasına neden olur.
5
Page 66

Başlarken
Ünitenin ayarı
Üniteyi ilk bağlamanızdan önce veya
otomobilin aküsünü değiştirdikten sonra,
üniteyi ayarlamalısınız.
Ön paneli çıkarınız ve ayar düğmesine
tükenmez kalem gibi sivri uçlu bir obje ile
basınız.
Ayar tuşu
Not
Ayar tuşuna basmak saat ayarını ve bazı kaydedilmiş
işlevleri siler.
Ön panelin sökümü
Üniteyi çalınmaktan korumak için bu ünitenin
ön panelini sökebilirsiniz.
1 (OFF) tuşuna basınız.
2 (RELEASE) tuşuna basınız, ardından ön
paneli biraz sola doğru kaydırınız ve
kendinize doğru çekerek çıkarınız.
(OFF)
Ön panelin takılması
Ön panelin A parçasını ünitenin B parçasına
gösterildiği üzere takınız ve sola doğru yerine
oturup klik sesi gelene kadar itiniz.
A
B
Notlar
• Ön paneli baş aşağı takmamaya dikkat ediniz.
• Ön paneli takarken üniteye doğru sert şekilde
bastırmayınız.
• Ön panelin gösterge penceresine sert şekilde
bastırmayınız veya aşırı basınç uygulamayınız.
• Ön paneli direkt güneş ışığına veya sıcak hava
kanalları gibi ısı kaynaklarına tabi bırakmayınız ve
nemli bir yerde muhafaza etmeyiniz. Ön paneli
hiçbir zaman ısının bir hayli artabileceği direkt
güneş ışığına park edilmiş bir otomobilin kontrol
paneline koymayınız.
Dikkat ikazı
Otomobilin kontakt anahtarını ön paneli
çıkarmadan kapatırsanız, uyarı sinyali birkaç
saniye için duyulur.
Tercihe bağlı bir güç amplifikatörü bağlarsanız
ve dahili amplifikatörü kullanmazsanız, uyarı
sinyali kapanacaktır.
Menü nasıl kullanılır
(RELEASE)
Notlar
• Paneli üniteden sökerken düşürmemeye dikkat
ediniz.
• Paneli ünite hala açık iken sökerseniz, hoparlörlerin
zarar görmemesi için güç otomatik olarak kesilir.
• Ön paneli yanınızda taşıdığınızda, ön panel
çantasını kullanınız.
6
Bu ünite bir menüden birimlerin seçilmesi ile
işler.
Seçim için önce menünün kipini giriniz ve
yukarı/aşağı ((PRST) tuşunda +/–) veya sol/
sağ ((SEEK) tuşunda +/–) yönünü seçiniz.
(PRST)
(+) : Yukarıyı seçmek için
TUNER
(–) : Aşağıyı seçmek için
Page 67

(SEEK/AMS)
(–) : Sol yönü
seçmek için
TUNER
(+) : Sağ yönü
seçmek için
Saatin ayarlanması
Saat 24-saatlik dijital bir işaret kullanır.
Örnek: Saati 10:08’e ayarlamak
1 (MENU) tuşuna basınız, ardından
“CLOCK” görülene kadar (PRST)
tuşlarının iki tarafına birden tekrar tekrar
basınız.
11
1 (ENTER) tuşuna tuşuna basınız.
11
Saat işareti yanıp söner.
22
2 Saati ayarlamak için (PRST) tuşunun
22
iki tarafına birden basınız.
Kasetçalar
Kaset dinlenmesi
Bir kaset yerleştiriniz.
Çalış otomatik olarak başlar.
Yukarı yüz çalıyor.
Aşağı yüz çalıyor.
Öneri
Teybin çalış yönünü değiştirmek için,
tuşuna basınız.
Çalışı durdurup kaseti çıkarmak için
ZZ
Z tuşuna basınız.
ZZ
m
ve
M
33
3 (SEEK) tuşunun iki tarafına birden
33
basınız.
Dakika işareti yanıp söner.
44
4 Dakikayı ayarlamak için (PRST)
44
tuşunun iki tarafına birden basınız.
2 (ENTER) tuşuna basınız.
Saat çalışmaya başlar.
Saatin ayarı bittikten sonra, gösterge
normal çalış kipine geri döner.
Kasetin sarılması
Çalış sırasında,
basınız.
Yön
gösterici*
FWD
REV
* < > işareti kaseti sararken yanıp söner.
İleri veya geri sararken çalmaya başlamak için,
diğer ileri sarma tuşunun yanına, tuş dışarı
çıkana kadar basınız.
mm
m veya
mm
İleri sarmak
için
MM
M
MM
mm
m
mm
MM
M tuşlarına
MM
Geri sarmak
için
mm
m
mm
MM
M
MM
7
Page 68

Kaseti ıleri veya geri
sararken radyo yayını
— ATA (Automatic Tuner Activation)
m veya M tuşları yardımı ile ileri veya geri
sarıyorsanız, radyo otomatik olarak açılacaktır.
1 Çalış sırasında (MENU) tuşuna basınız.
2 “ATA” görülene kadar tekrar tekrar
(PRST) tuşlarının iki tarafına birden
basınız.
3 “ON” işlevini seçmek için (SEEK)
tuşunun iki tarafına birden basınız.
Çalış kipi başlar.
4 (ENTER) tuşuna basınız.
Normal çalış kipine dönmek için yukarıda adım
3’deki “OFF” tuşunu seçiniz.
Radyo
İstasyonların otomatik
olarak hafızaya alınması
— Best Tuning Memory (BTM)
Ünite en güçlü sinyalleri yayan istasyonları
seçer ve onları frekansları sırasınca kaydeder.
Her bantta (FM1, FM2, FM3, MW, ve LW) altı
istasyona kadar kaydedebilirsiniz.
Dikkat
İstasyonları sürüş sırasında ayarlıyorsanız,
kazaları önlemek için “Best Tuning Memory”
işlevini kullanınız.
1 (TUNER) tuşuna basınız.
Radyo açılır.
2 Bandı seçmek için tekrar tekrar (MODE)
tuşuna basınız.
(MODE) tuşuna her bastığınızda, bandlar
şu şekilde görülür:
BB
B FM1
BB
BB
B FM2
BB
BB
B FM3
BB
BB
B MW
BB
BB
B LW
BB
3 (MENU) tuşuna basınız, ardından “BTM”
görülene kadar tekrar tekrar (PRST)
tuşlarının iki tarafına birden basınız.
4 (ENTER) tuşuna basınız.
Ünite frekans sırasına göre istasyonları
numara tuşlarına kaydeder.
Ayar kaydedildiğinde bir uyarı sinyali
duyulur.
Notlar
• Ünite zayıf sinyal yayan istasyonları kaydetmez.
Yalnız birkaç istasyon alınabiliyorsa, bazı numara
tuşları eski ayarlarını korur.
• Göstergede bir numara görülüyorsa, ünite
istasyonları görülen numaradan itibaren
kaydetmeye başlar.
8
Page 69

Yalnız arzu edilen
istasyonların hafızaya
alınması
18 FM istasyonunu (FM1, 2, ve 3'ün her biri
için 6), 6 MW istasyonunu ve 6 LW
istasyonunu dilediğiniz gibi hafızaya
alabilirsiniz.
1 (TUNER) tuşuna basınız.
Radyo açılır.
2 Bandı seçmek için tekrar tekrar (MODE)
tuşuna basınız.
3 Numara tuşuna kaydetmek istediğiniz
istasyonu ayarlamak için (SEEK)
tuşunun iki tarafına birden basınız.
4 “MEM” görülene kadar dilediğiniz ((1)
den (6) ya kadar) numara tuşunu basıp
tutunuz.
Göstergede numara tuşunun işareti görülür.
Not
Aynı numara tuşuna başka bir istasyonu
kaydederseniz, daha önce kaydedilen istasyon silinir.
Daha önce ayarlanan bir istasyonu
bulamıyorsanız
Istasyonu aramak için (SEEK) tuşunun
iki tarafına birden basınız (otomatik
ayar).
Ünite bir istasyon bulduğunda tarama durur.
Dilediğiniz istasyonu bulana kadar
(SEEK) tuşunun iki tarafına birden tekrar
tekrar basınız
Not
Otomatik ayar çok sık duruyorsa (MENU) tuşuna
basınız, ardından “LOCAL” (yerli arama kipi) görülene
kadar tekrar tekrar (PRST) tuşlarının iki tarafina birden
basınız. Sonra “LOCAL-ON.” işlevini seçmek için
(SEEK) tuşunun iki tarafına birden basınız.
(ENTER) tuşuna basınız.
Yalnız oldukça güçlü sinyal yayan istasyonlar
ayarlanacaktır.
Öneri
Dinlemek istediğiniz istasyonun frekansını
biliyorsanız, dilediğiniz frekans görelene kadar
(SEEK) tuşunun iki tarafına birden basıp tutunuz
(manüel ayar).
FM Stereo sinyali zayıf ise
— Mono kipi
1 Radyo yayını sırasında, (MENU) tuşuna
basınız, ardından “MONO” görülene
kadar tekrar tekrar (PRST) tuşlarının iki
tarafına birden basınız.
Hafızaya alınmış
istasyonların dinlenmesi
1 (TUNER) tuşuna basınız.
Radyo açılır.
2 Bandı seçmek için tekrar tekrar (MODE)
tuşuna basınız.
3 Dilediğiniz istasyonun kayıtlı olduğu
numara tuşuna ((1) den (6) ya kadar)
basınız.
Öneri
İstasyonu hafızaya kayıtlı sıra ile almak için (Preset
Search Function) (PRST) tuşlarının iki tarafına birden
basınız.
2 “MONO-ON” görülene kadar (SEEK)
tuşunun iki tarafına birden basınız.
Ses yükselir, fakat mono olur (“ST”
görülmez).
3 (ENTER) tuşuna basınız.
Normal kipe geri dönmek için yukarıda adım
2’deki “MONO-OFF” işlevini seçiniz.
9
Page 70

RDS
RDS işlevi hakkında
Radio Data System (RDS), FM istasyonlarının
normal radyo program sinyalleri ile ek dijital
bilgi göndermesini sağlayan bir yayın servisidir.
Oto Stereo çeşitli servis imkanları sunmaktadır.
Bunlardan bir kaçı şunlardır: aynı programı
otomatik olarak tekrar ayarlamak, trafik
haberlerini dinlemek ve bir istasyonu program
türüne göre yerleştirmek.
Notlar
• Ülkeye ve bölgeye göre tüm RDS’nin tüm işlevleri
çalışmayabilir.
• Sinyal gücünün zayıf olduğu hallerde veya istasyon
RDS verileri aktarmaya ayarlanmamış ise RDS tam
anlamıyla çalışmayabilir.
İstasyon isminin
görülmesi
Aynı programın otomatik
olarak tekrar
ayarlanması
— Alternative Frequences (AF)
Alternative Frequences (AF) işlevi otomatik
olarak ağdaki en kuvvetli sinyali veren
istasyonu bulur ve ayarlar. Bu işlev sayesinde
uzun bir yolculuk esnasında aynı programı
manüel bir ayar yapmak zorunda kalmadan
dinleyebilirsiniz.
Frekanslar otomatik olarak değişir.
98,5MHz
İstasyon
1 Bir FM istasyonu seçiniz (sayfa 9).
96,0MHz
102,5MHz
İstasyon isminin ışıkları göstergede görülür.
Bir FM istasyonu seçiniz (sayfa 9).
RDS verisi aktaran bir FM istasyonu
ayarladığınızda, göstergede istasyonun
ismi görülür.
Not
“ *” işareti bir RDS istasyonunun ayarlandığını
gösterir.
10
2 “AF-ON” görülene kadar tekrar tekrar
(AF) tuşuna basınız.
Ünite aynı ağda daha güçlü sinyal veren bir
diğer istasyonu aramaya başlar.
Not
Bölgede başka bir istasyon yoksa ve başka bir
istasyon aramanız gerekmiyorsa, AF işlevini “AFOFF” görülene kadar tekrar tekrar (AF) tuşuna
basarak kapatınız.
Page 71

Göstergedeki işaretlerin değiştirilmesi
(AF) tuşuna her bastığınızda, işaret aşağıdaki
şekilde değişir:
yy
AF-ON
y AF-OFF
yy
Notlar
• “NO AF” ve istasyonun ismi değişerek yanıp
sönüyorsa, bu ünitenin ağda başka bir istasyon
bulamadığı anlamına gelir.
• İstasyonun ismi AF işlevi açık olan bir istasyonu
seçtikten sonra yanıp sönüyorsa, bu başka bir
frekansın bulunamadığını gösterir. İstasyonun ismi
yanıp sönerken (sekiz saniye içinde) (SEEK)
tuşunun iki tarafına birden basınız. Ünite aynı PI
(Programme Identification) verisine sahip başka bir
frekans aramaya başlar. (“PI SEEK” görülür ve ses
duyulmaz). Ünite başka bir frekans bulamazsa, “NO
PI” görülür ve ünite daha önce seçilen frekansa
döner.
Bölgesel bir programın dinlenmesi
“REG-ON” (bölgesel açık) işlevi başka bir
bölgesel istasyona atlamadan bölgesel
programlara ayarlı kalmanızı sağlar (AF işlevini
açmanıza gerek olmadan). Ünitenin fabrika
ayarı “REG-ON”dur, ancak bu işlevi kapatmak
istiyorsanız, aşağıdakileri yapınız.
1 Radyo yayını sırasında, (MENU) tuşuna
basınız, ardından “REG” görülene kadar
(PRST) tuşlarının iki tarafına birden
tekrar tekrar basınız.
Yerli bağlantı işlevi
(Yalnız İngiltere için geçerli)
Yerli bağlantı işlevi, ayarlarınıza dahil olmasa
bile, diğer yerli istasyonları seçmenizi sağlar.
1 Yerli bir istasyonun kayıtlı olduğu bir
numara tuşuna basınız.
2 Beş saniye içinde, yerli istasyonun
numara tuşuna tekrar basınız.
3 Bu işlemi dilediğiniz yerli programı
buluncaya kadar tekrarlayınız.
2 “REG-OFF” görülene kadar (SEEK)
tuşunun iki tarafına birden basınız.
3 (ENTER) tuşuna basınız.
“REG-OFF” işlevini seçmek ünitenin aynı
ağ içindeki başka bölgesel istasyonlara
geçmesine yol açabilir.
Bölgeselin açık olması için, yukarıda adım
2’deki “REG-ON” işlevini seçiniz.
Not
Bu işlev İngiltere’de ve diğer bazı bölgelerde
çalışmaz.
11
Page 72

Trafik haberlerinin
dinlenmesi
Traffic Announcement (TA) ve Traffic
Programme (TP) verileri başka program
kaynaklarını dinleseniz dahi otomatik olarak
trafik haberleri veren bir FM istasyonunu
ayarlamanızı sağlar.
“TA-ON” görülene kadar tekrar tekrar
(TA) tuşuna basınız.
Ünite trafik haberleri veren istasyonları
aramaya başlar. Ünite trafik haberleri
yayınlayan bir istasyon bulduğunda
göstergede “TP” görülür.
Trafik haberleri başlayınca göstergede “TA”
yanıp söner. Yanıp sönme trafik haberleri
bittiğinde son bulur.
Öneri
Trafik haberleri siz başka bir program kaynağını
dinlerken başlarsa, ünite otomatik olarak trafik
haberlerine geçer ve haberler bittiğinde otomatik
olarak daha önce dinlenilen program kaynağına
döner.
Notlar
• Dinlediğiniz istasyon trafik haberleri yayınlamıyorsa
beş saniye boyunca “NO TP” yanıp söner. Ardından
ünite trafik haberleri yayınlayan bir istasyon
aramaya başlar.
• Göstergede “EON” “TP” ile beraber görülürse ,
çalan istasyon aynı ağdaki başka istasyonların trafik
haberlerini yayınlıyordur.
Yayınlanan trafik haberlerinin iptal
edilmesi
(TA) veya (TUNER) tuşuna basınız.
Tüm trafik haberlerini iptal etmek için, “TAOFF” işlevi görülene kadar (TA) tuşuna
basarak kapatabilirsiniz.
Trafik haberlerinin ses ayarı
Haberleri kaçırmamak için trafik haberlerinin
ses seviyesini önceden ayarlayabilirsiniz.
Trafik haberleri başladığında ses otomatik
olarak önceden ayarladığınız seviyeye gelir.
1 Arzu ettiğiniz ses seviyesini seçiniz.
2 İki saniye için (TA) tuşuna basınız.
“TA” görülür, ayar hafızaya alınmıştır.
Acil haberlerin dinlenmesi
Radyo dinlerken acil bir duyuru gelirse
program otomatik olarak ona geçecektir.
Radyodan başka bir kaynak dinliyorsanız acil
duyurular AF veya TA açık olarak ayarlı ise
duyulacaktır. Ünite bundan sonra o sırada
hangi kaynağı dinlerseniz dinleyin otomatik
olarak duyurulara geçer.
RDS istasyonlarını AF ve
TA verilerine
ayarlanması
RDS istasyonlarını ayarlarken ünite istasyon
verilerini ve frekanslarını kayıt eder, böylece
ayarladığınız istasyonu her dinleyişinizde AF
veya TA işlevlerini açmanız gerekmez. Özel
kaydedilmiş istasyonlar için farklı bir ayar (AF,
TA, veya ikisi birden) veya bütün kaydedilmiş
istasyonlar için aynı ayarları seçebilirsiniz.
12
Page 73

Tüm ayarlanmış istasyonların aynı
ayara getirmesi
1 Bir FM istasyonu seçiniz (sayfa 9).
2 “AF-ON” veya/ve “TA-ON” işlevlerini
seçmek için (AF) veya/ve (TA) tuşlarına
basınız.
“AF-OFF” veya “TA-OFF” işlevini
seçmezsiniz, yalnız RDS istasyonları değil,
RDS olmayan istasyonların da
kaydedilileceğini unutmayız.
3 (MENU) tuşuna basınız, ardından “BTM”
görülene kadar tekrar tekrar (PRST)
tuşlarının iki tarafına birden basınız.
4 “BTM” yanıp sönene kadar (SEEK)
tuşunun iki tarafına birden basınız.
5 (ENTER) tuşuna basınız.
Ayarlanmış kanalların ayrı ayrı ayarı
1 Bir FM bandı seçiniz ve istenilen
istasyona ayarlayınız.
2 “AF-ON” veya/ve “TA-ON” işlevini
seçmek için (AF) veya/ve (TA) tuşlarına
basınız.
3 “MEM” görülene kadar dilediğiniz
numara tuşuna basıp tutunuz.
Başka istasyonları kaydetmek için adım
1’den itibaren tekrarlayınız.
Öneri
Kaydedilmiş AF ve/veya TA ayarlarını bir istasyonu
ayarladıktan sonra değiştirmek istiyorsanız, bunu AF
veya TA işlevlerini açarak veya kapayarak
yapabilirsiniz.
İstasyonun program
tipine göre
yerleştirilmesi
Arzu ettiğiniz istasyonu aşağıda belirtilen
program tiplerine göre yerleştirebilirsiniz.
Program tipleri Gösterge
Haberler NEWS
Güncel olaylar AFFAIRS
Enformasyon INFO
Spor SPORT
Eğitim EDUCATE
Drama DRAMA
Kültür CULTURE
Bilim SCIENCE
Çeşitli VARIED
Popüler müzik POP M
Rock müzik ROCK M
Hafif müzik EASY M
Light Klasik LIGHT M
Klasik CLASSICS
Diğer müzik tipleri OTHER M
Hava Durumu WEATHER
Finans FINANCE
Çocuk programları CHILDREN
Sosyal olaylar SOCIAL A
Din RELIGION
Çağrı PHONE IN
Seyahat TRAVEL
Boş vakit LEISURE
Caz müzik JAZZ
Country müzik COUNTRY
Milli müzik NATION M
Oldies müzik OLDIES
Folk müzik FOLK M
Belgesel DOCUMENT
Belirsiz NONE
Not
Bu işlevi PTY (Programme Type selection) verisinin
bulunmadığı bazı ülkelerde kullanamazsınız.
13
Page 74

1 FM yayını sırasında “PTY” görülene
kadar (DSPL/PTY) tuşuna basınız.
İstasyon PTY verileri yayınlıyorsa program
tipinin ismi görülür. İstasyon eğer RDS
istasyonu değilse ve gönderilen RDS
verilerini alamıyorsa göstergede “- - - - -”
görülür.
TA işlevi ON (açık) konumundaysa, ünite
bir sonraki istasyonu aramaya başlar.
Saatin otomatik ayarı
RDS’den aktarılan CT (Saat Tarih) verisi saati
otomatik olarak ayarlar.
1 Radyo yayını sırasında, (MENU) tuşuna
basınız, ardından “CT” görülene kadar
tekrar tekrar (PRST) tuşlarının iki
tarafına birden basınız.
2 Arzu edilen program tipi görülene dek
(PRST) tuşuna tekrar tekrar basınız.
Program tipleri önceki tablo sırası ile
görülür. Ararken “NONE” u
seçemeyeceğinizi unutmayınız.
3 İstediğiniz istasyon görülünceye kadar
(ENTER) tuşuna basın.
Ünite seçilen program tipinde yayın yapan
bir istasyonu aramaya başlar. Ünite
programı bulunca, program tipi göstergede
beş saniye süreyle tekrar görülür.
Ünite program tipini bulamazsa beş saniye
boyunca “NO” ve program tipi ardarda
yanar söner. Ünite ardından daha önce
seçilen istasyona geri döner.
2 “CT-ON” görülene kadar tekrar tekrar
(SEEK) tuşunun iki tarafına birden
basınız.
Saat kaydedilmiş olur.
3 Göstergenin normal haline dönmek için
(ENTER) tuşuna basınız.
CT işlevinin iptal edilmesi
Yukarıda adım 2’deki “CT-OFF” işlevini
seçiniz.
Notlar
• Bir RDS istasyonu alınabildiği halde CT işlevi
çalışmayabilir.
• CT işlevi ve aktüel ses kontrolü ile ayarlanan saatler
arasında farklılık olabilir.
14
Page 75

Diğer işlevler
Ses özelliklerinin
ayarlanması
Bas, tiz, balans ve “fader” özelliklerini
ayarlayabilirsiniz.
Bas ve tiz seviyelerini her kaynak için ayrı
kaydedebilirsiniz.
Ses ve gösterge
ayarlarının değiştirilmesi
Bu birimleri ayarlayabilirsiniz:
• CLOCK (sayfa 7).
• CT (Saat Tarih) (sayfa 14).
• BEEP – uyarı sinyalini açmak veya kapatmak
için.
• D.INFO (Dual Information) saat ve çalış
kipinin aynı anda görülmesi için (ON) veya bu
bilgilerin değişerek görülmesi için (OFF).
• M.DSPL (Hareket Göstergesi) – monitör
göstergesini açmak veya kapamak için.
1 (SOUND) tuşuna tekrar tekrar basarak
dilediğiniz işareti seçiniz.
BAS (bas) t TRE (tiz) t BAL (sağ-sol)
FAD (ön-arka)
2 (SEEK) tuşunun iki tarafına basarak
seçili birimi ayarlayınız.
İşareti seçtikten sonraki üç saniye içinde
ayarlayınız.
1 (MENU) tuşuna basınız.
2 Arzu edilen birim görülene kadar tekrar
t
tekrar (PRST) tuşlarının iki tarafına
birden basınız.
(PRST/DISC) tuşunun (–) tarafına her
bastığınızda, birim aşağıdaki gibi değişir:
CLOCK t CT t BEEP t D.INFO t M.DSPL
3 Arzu edilen ayarı seçmek için (Örnek:
ON veya OFF), (SEEK) tuşunun iki
tarafına birden basınız.
4 (ENTER) tuşuna basınız.
Kip ayarı bittikten sonra, gösterge normal
çalış kipine döner.
15
Page 76

Basın yükseltilmesi
— D-bass
Zevkle temiz ve güçlü bir bas sesi
dinleyebilirsiniz. D-bass işlevi alçak frekans
sinyallerini ve yüksek frekans sinyallerini
alışılagelmiş bas güçlendiricilerinden daha
keskin bir eğri ile yükseltir.
Vokal ses seviyesi aynı kalsa dahi bası daha
temiz duyabilirsiniz. D-BASS kontrolü yardımı
ile bası kolaylıkla vurgulayabilir ve
ayarlayabilirsiniz.
D.BASS-3
D.BASS-2
Seviye
0dB
D.BASS-1
Bas kavisinin ayarlanması
Arzu edilen bas kavisini seçmek için
tekrar tekrar (D-BASS) tuşuna basınız.
D-BASS numarası yükseldikçe etki de
yükselecektir.
D.BASS-1 t D.BASS-2 t D.BASS-3 t
D.BASS-OFF
Not
Bas sesi aynı ses seviyesinde bozulabilir. Bas sesi
bozulursa daha az etkili bir bas eğrisi seçiniz.
D.BASS-3
D.BASS-2
D.BASS-1
Frekans (Hz)
Ek bilgi
Bakım
Sigortanın değiştirilmesi
Sigortayı değiştirirken orijinal sigortanın amper
gücünde bir sigorta kullanmaya dikkat ediniz.
Sigorta attığı takdirde güç bağlantısını kontrol
edip sigortayı değiştiriniz. Sigorta
değiştirildikten sonra tekrar atarsa, bu dahili bir
işlev bozukluğuna işaret eder. Böyle bir
durumda en yakın SONY bayiine başvurunuz.
Sigorta (10 A)
Uyarı
Hiçbir zaman üniteye takılı sigortanın amper
gücünden daha güçlü bir sigorta takmayınız,
aksi takdirde üniteye zarar verebilirsiniz.
16
Page 77

Bağlantıların temizlenmesi
Ünite ile ön panel arasındaki bağlantılar temiz
değil ise, ünite tam anlamıyla çalışmayabilir.
Bunu önlemek için (RELEASE) tuşuna basarak
ön paneli açınız ve alkole batırılmış bir pamuk
çubuk ile konektörleri temizleyiniz. Fazla
kuvvet kullanmayınız. Aksi takdirde
konektörlere zarar verebilirsiniz.
Ana ünite
Ön panelin arkası
Notlar
• Emniyetiniz için, konektörleri temizlemeden önce,
motoru kapatınız ve anahtarı kontaktan çıkarınız.
• Konektörlere hiçbir zaman direkt ellerinizle veya
metal bir aletle dokunmayınız.
Ünitenin sökülmesi
1
Söküm anahtarı
(üniteye dahil)
2
3
4
17
Page 78

Özellikler
Kasetçalar bölümü
Kaset parçaları 4-parça 2-kanal stereo
Duyarlılık 0,13 % (WRMS)
Frekans cevabı 30 – 15.000 Hz
Ses sinyal oranı 55 dB
Radyo bölümü
FM
Ayar sırası 87,5 – 108,0 MHz
Anten terminali Harici anten konektörü
Ortalama frekans 10,7 MHz
Kullanılabilir ince ayar 9 dBf
Seçicilik 400 kHz’de 75dB
Ses sinyal oranı 65 dB (stereo),
68 dB(mono)
Harmonik bozulma 1kHz
0,7% (stereo),
0,4% (mono)
Separasyon 1 kHz’de 35 dB
Frekans cevabı 30 – 15.000 Hz
MW/LW
Ayar cetveli MW: 531 – 1.602 kHz
LW: 153 – 279 kHz
Anten terminali Harici anten konektörü
Ortalama frekans 10,7 MHz/450 kHz
Duyarlılık MW: 30 µV
LW: 50 µV
Güç amplifikatör bölümü
Çıkışlar Hoparlör çıkışı
(mühürlü konektörler)
Hoparlör empedansı 4 – 8 ohm
Azami güç çıkışı 45 W × 4 (4 ohm’da)
Genel
Çıkışlar Güç anteni yayın kontrol
Ton kontrolleri Bas 100 Hz’de ±8 dB
Güç gereksinimi 12 V DC otomobil aküsü
Boyutlar Azami 188 × 58 × 182 mm
Montaj boyutları Azami 182 × 53 × 163 mm
Ağırlık Azami 1,2 kg
Beraberindeki aksesuarlar
Dizayn ve özellikleri değiştirme hakki mahfuzdur.
kablosu
Güç amplifikatör kontrol
kablosu
Tiz 10 kHz’de ±8 dB
(negatif toprak)
Kurma ve bağlantı
parçaları (1 set)
Ön panel çantası (1)
18
Page 79

Problem arama kılavuzu
Aşağıdaki liste üniteniz ile karşılaşacağınız problemleri çözmenize yardım edecektir.
Aşağıdaki kontrol listesine bakmadan önce bağlantıları ve çalışma tarzını kontrol ediniz.
Genel
Problem
Ses çıkmıyor.
Hafızanın içeriği silinmiş.
İşaretler göstergede
görülmüyor.
Kaset çalınması
Problem
Ses kötü çıkıyor.
Radyo yayını
Problem
Hafıza ayarı mümkün değil.
Hafıza ayarı mümkün değil.
İstasyonlar bulunamıyor.
Ses gürültülerle bozuluyor.
“ST” işareti yanıp sönüyor.
Sebep/çözüm
• İki hoparlörlü sistem için “fader” kontrolü orta pozisyona
getiriniz.
• Sesi ayarlamak için kadranı saat yönünde döndürünüz.
• Güç kablosunun veya akünün bağlantısı kesilmiş.
• Ayar tuşuna basılmış.
t Tekrar hafızaya kaydediniz.
Ön paneli çıkarıp konektörleri temizleyiniz. Detaylar için
“Bağlantıların temizlenmesi”ne (sayfa 17) bakınız.
Sebep/çözüm
Teybin kafası kirlenmiş.
t Kafayı satın alabileceğiniz kuru tip bir temizleme kaseti ile
temizleyiniz.
Sebep/çözüm
• Doğru frekansın hafızaya alınması.
• Yayın sinyali çok zayıf.
Yayın çok zayıf.
t Manüel ayarı kullanınız.
Anten kontrol kablosunu (mavi) veya ek güç destek kablosunu
(kırmızı) otomobilin anten kutusunun güç destek kablosuna
bağlayınız. (Yalnız otomobilinizin arka/yan camda dahili FM/
MW/LW anteni varsa).
• Frekansı ayarlayınız.
• Yayın sinyali çok zayıf.
t MONO kipini ayarlayınız (sayfa 9).
devamı bir sonraki savfada
tt
t
tt
19
Page 80

RDS
Problem
SEEK dinlemeye başladıktan
bir kaç saniye sonra çalışmaya
başlar.
Trafik açıklamaları yok.
PTY “NONE” işareti veriyor.
Sebep/Çözüm
İstasyon TP türünde değil veya sinyali zayıf.
t “AF-OFF” veya “TA-OFF” görülene kadar tekrar tekrar (AF)
veya (TA) tuşlarına basınız.
• “TA”yı çalıştırınız.
• İstasyon TP olduğu halde trafik açıklamaları yayınlamıyor.
t Başka bir istasyonu ayarlayınız.
İstasyon program tipini ayrımsamıyor.
20
Page 81

21
Page 82

Поздравляем с покупкой!
Благодарим Вас за приобретение
магнитофона Sony.
Кacceтнaя cтepeофоничecкaя
aвтомaгнитолa c диaпaзоном
FM/MW/LW
Cдeлaно в Малайзии
Меры
предосторожности
• В случае если Ваш автомобиль был
запаркован на солнцепеке, в результате
чего произошло значительное повышение
температуры в его салоне, дайте
магнитоле остыть, прежде чем начать ее
эксплуатацию.
• В случае если на магнитолу не поступает
питание, проверьте сначала контакты.
Если все в порядке, проверьте
предохранитель.
• В случае если с громкоговорителей
стереосистемы с двумя
громкоговорителями не поступает звук,
установите регулятор балансировки
переднего/заднего громкоговорителей в
среднее положение.
• При длительном прослушивании одной и
той же кассеты она может нагреться от
встроенного усилителя. Это, однако, не
является признаком неисправности.
В случае возникновения у Вас каких-либо
вопросов или проблем, связанных с Вашей
магнитолой и нерассмотренных в данном
Руководстве по эксплуатации, обратитесь,
пожалуйста, за консультацией к
ближайшему дилеру фирмы “Sony”.
Во избежание ухудшения качества
звука
Если вблизи магнитолы в салоне Вашего
автомобиля расположены подставки для
стаканов, следите за тем, чтобы на нее не
пролились соки или другие
прохладительные напитки. Сахарный
налет, оставшийся от них на деталях
аппарата или на магнитной ленте, может
загрязнить воспроизводящие головки,
ухудшив тем самым качество звучания или
вообще сделав воспроизведение звука
невозможным.
Загрязненные сахарным налетом
магнитофонные головки не поддаются
очистке с помощью приспособлений для
чистки кассет.
2
Page 83

Примечания о кассетах
Уход за кассетами
• Не прикасайтесь к поверхности
магнитной ленты, поскольку
появляющаяся на них грязь или пыль
будет загрязнять головки.
• Держите кассеты вдали от оборудования
со встроенными магнитами, такого, как
громкоговорители и усилители, поскольку
в противном случае запись на ленте может
оказаться стертой или искаженной.
• Не подвергайте кассеты воздействию
прямого солнечного света, слишком
низких температур или влаги.
• Слабое натяжение ленты в кассете
может привести к ее втягиванию в
лентопротяжный механизм. Перед тем
как вставить кассету, подтяните в ней
слабонатянутую ленту, провернув одну из
катушек с помощью карандаша или
аналогичного предмета.
Петля
Кассеты с продолжительностью
звучания более 90 минут
Использование кассет с
продолжительностью звучания более 90
минут не рекомендуется за исключением
случаев, когда необходимо долгое,
непрерывное воспроизведение. Магнитная
лента, используемая в таких кассетах,
очень тонка и легко растягивается. Частое
воспроизведение и остановка таких лент
может привести к их запутыванию в
лентопротяжном механизме кассетного
магнитофона.
• Деформация корпуса кассет или
отстающие от кассет наклейки могут
создавать проблемы при установке или
извлечении кассет из магнитолы. Если
наклейка отстает от кассеты, снимите
или замените ее.
• Во время прослушивания кассеты может
происходить искажение звука. Магнитную
головку следует чистить после каждых 50
часов работы магнитофона.
3
Page 84

Содержание
Расположение органов управления .................5
Начальные операции
Переустановка параметров аппарата ......... 6
Снятие передней панели ............................. 6
Как пользоваться меню ............................... 6
Установка часов ........................................... 7
Проигрыватель кассет
Прослушивание кассет ................................ 7
Прием радиопередач во время быстрой
перемотки ленты вперед или назад
— ATA (Автоматическая активация
тюнера) ..................................................... 8
Радиоприемник
Автоматическое занесение станций в
память
— Функция памяти оптимальной
настройки станции (BTM) ........................ 8
Занесение в память только желаемых
станций ...................................................... 9
Прием занесенных в память станций ......... 9
RDS
Обзор функции RDS ................................... 10
Индикация названия станции .................... 10
Автоматическая перенастройка на ту же
программу
— Альтернативные частоты (AF) ......... 10
Прослушивание дорожных сообщений ..... 12
Предустановка станций RDS с данными
AF и TА .................................................... 12
Обнаружение станции по типу программы 13
Автоматическая установка часов ............. 14
Дополнительная информация
Технический уход ........................................ 16
Демонтаж аппарата .................................... 17
Технические характеристики ..................... 18
Устранение неполадок ............................... 19
Прочие функции
Подстройка характеристик звука ............. 15
Изменение заданных параметров звука и
дисплея ................................................... 15
Усиление низкочастотных звуков
— D-bass ................................................. 16
4
Page 85

Расположение органов управления
DIR
MENU
SOUND
RELEASE
PTY
S
+
T
R
P
–
K
E
TUNER
E
S
P
R
S
T
DSPL
MODE
S
E
E
K
+
ENTER
–
1 2 3 4 56
За подробностями обращайтесь к указанным соответствующим страницам.
1 Клавиша MENU 7, 8, 9, 11, 13, 14, 15
2 Поворотный регулятор звука
3 Клавиша TUNER 8, 9, 12
4 Клавиши PRST +/– (Курсор вверх/
вниз) 7, 8, 9, 11, 13, 14, 15
При приеме радиопередач:
Выбор предустановленных
станций 8, 9
5 Клавиша DSPL/PTY (иэменение
режима дисплея/тип программы) 14
6 Клавиша MODE
При приеме радиопередач:
BAND select(выбор диапазона) 8, 9
7 Кнопка Z (извлечение кассеты) 7
8 Окошко дисплея
9 Клавиши m/M (быстрая
перемотка)/DIR (изменение
направления движения ленты) 7
q; Клавиша D-BASS 16
qa Клавиша TA 12, 13
qs Клавиша SOUND (звук) 15
qd Клавиша RELEASE (открепление
передней панели) 6, 17
qf Клавиши SEEK –/+ (Курсор влево/
вправо) 7, 8, 9, 11, 13, 14, 15
Поиск 9
qg Клавиша переустановки
(расположена на лицевой стороне
прибора под передней панелью) 6
qh Клавиша ENTER 7, 8, 9, 11, 13, 14, 15
qj Номерные клавиши
предустановленных станций 9, 11
qk Клавиша OFF (ВЫКЛ.)* 6
ql Клавиша AF 10, 11, 13
* Меры предосторожности в случае
установки аппарата в автомобиле, замок
зажигания которого не имеет
специальной позиции ACC (для
отключения подсоединенной
аппаратуры)
Не забудьте после выключения
двигателя на две секунды нажать на
аппарате клавишу (OFF), чтобы
отключить дисплей часов.
При более кратком нажатии (OFF)
дисплей часов не отключится, что
приведет к ненужному расходованию
энергии аккумулятора.
D-BASS
TA
AF
OFF
XR-1300R
5
Page 86

Начальные
операции
Переустановка
параметров аппарата
Перед первым использованием аппарата
или после замены автомобильного
аккумулятора Вы должны произвести
переустановку заложенных в память
магнитолы параметров.
Снимите переднюю панель и нажмите
кнопку переустановки с помощью
заостренного предмета, например
шариковой ручки.
Клавиша переустановки
Примечание
Нажатие клавиши переустановки стирает
установленное на часах время и некоторые
другие занесенные в память параметры.
Установка передней панели
Сначала присоедините часть A передней
панели к части B магнитолы, как это
показано на рисунке, а затем вдвиньте
другой край панели до легкого щелчка.
A
B
Примечания
• Не устанавливайте переднюю панель верхней
стороной вниз.
• При установке панели не прижимайте ее
слишком сильно к магнитоле.
• Не надавливайте и не нажимайте слишком
сильно на окошко дисплея, расположенное на
передней панели.
• Не подвергайте переднюю панель прямому
воздействию солнечных лучей, источников
тепла, таких, как автомобильная печка, и не
оставляйте ее во влажном месте. Никогда не
оставляйте ее на приборной доске автомобиля,
запаркованного на солнцепеке, из-за которого
возможно значительное повышение
температуры в салоне автомобиля.
Снятие передней панели
В целях предотвращения кражи аппарата
Вы можете снять с него переднюю панель.
1 Нажмите (OFF).
2 Нажмите клавишу (RELEASE), а затем,
осторожно сдвинув панель влево,
снимите ее, потянув на себя.
(OFF)
(RELEASE)
Примечания
• Старайтесь не уронить переднюю панель при
ее отсоединении от аппарата.
• Если Вы снимаете панель при включенном
питании, оно автоматически отключится для
предотвращения повреждения
громкоговорителей.
• Если Вы берете переднюю панель с собой,
поместите ее в прилагаемый специальный
футляр.
6
Предупреждающий сигнал
Если Вы, повернув ключ зажигания,
перевели его в положение OFF (ВЫКЛ.), не
отсоединив переднюю панель, в течение
нескольких секунд будет слышен
сигнальный зуммер.
В случае если Вы не пользуетесь
встроенным усилителем, а подключаете
дополнительный, зуммер работать не
будет.
Как пользоваться меню
Данная магнитола работает при помощи
выбора параметров из меню.
Для выбора введите сначала режим меню,
а затем выберите вверх/вниз (+/– клавишей
(PRST)), или выберите влево/вправо (–/+
клавишей (SEEK)).
(PRST)
(+) : Для выбора вверх
TUNER
(–) : Для выбора вниз
Page 87

(SEEK)
(–) : Для
выбора влево
TUNER
(+) : Для
выбора
вправо
Установка часов
Часы имеют 24-часовую индикацию
Пример: установка часов на 10:08
1 Нажмите (MENU), затем
последовательно нажимайте на
любую сторону клавиши (PRST) до
появления на дисплее надписи
“CLOCK”.
1 Нажмите (ENTER).
Начинает мигать индикатор часа.
2 Нажимайте любую сторону
клавиши (PRST) для установки
часа.
Проигрыватель
кассет
Прослушивание кассет
Вставьте кассету.
Воспроизведение начинается
автоматически.
Воспроизводится сторона, обращенная вверх.
Воспроизводится сторона, обращенная вниз.
Совет
Для изменения направления движения ленты при
воспроизведении нажмите клавишу m и M.
Для того чтобы остановить
воспроизведение и извлечь кассету
Нажмите Z.
3 Нажмите на помеченную знаком +
сторону регулятора (SEEK).
Начинает мигать индикатор минут.
4 Нажимайте любую сторону
клавиши (PRST) для установки
минуты.
2 Нажмите (ENTER).
Часы пошли.
По окончании установки часов дисплей
возвращается в обычный режим
воспроизведения.
Быстрая перемотка ленты
Во время воспроизведения нажмите
m или M.
Указатель
направления
движения
ленты*
FWD (слева
направо)
REV (справа
налево)
* Во время быстрой перемотки ленты будет
мигать индикатор < >.
Для начала воспроизведения во время
быстрой перемотки вперед или назад
слегка притопите другую клавишу быстрой
перемотки, с тем чтобы высвободить ранее
нажатую клавишу перемотки.
Для
быстрой
перемотки
вперед
M
m
Для
быстрой
перемотки
назад
m
M
7
Page 88

Прием радиопередач
во время быстрой
перемотки ленты
вперед или назад
— ATA (Автоматическая активация
тюнера)
При осуществлении быстрой перемотки
вперед или назад с помощью клавиши m
или M тюнер включается автоматически.
1 Во время воспроизведения нажмите
(MENU).
2 Последовательно нажимайте на
любую сторону клавиши (PRST) до
появления на дисплее надписи
“ATA”.
Радиоприемник
Автоматическое
занесение станций в
память
— Функция памяти оптимальной
настройки станции (BTM)
Аппарат выбирает станции с наиболее
сильным сигналом и запоминает их в
порядке их рабочих частот. Вы можете
занести в память до 6 станций в каждом
диапазоне (FM1, FM2, FM3, MW и LW).
Предостережение
При настройке на станции во время
управления автомобилем во избежание
аварий используйте функцию памяти
оптимальной настройки.
3 Нажатием на помеченную знаком +
сторону регулятора (SEEK) выведите
на дисплей надпись “ON”.
Воспроизведение начинается.
4 Нажмите (ENTER).
Чтобы вернуться в обычный режим
воспроизведения, в вышеописанной
операции 3 выберите “OFF”.
1 Hажмите (TUNER).
Радиоприемник включен.
2 Последовательным нажатием (MODE)
выберите желаемый диапазон.
При каждом нажатии (MODE) диапазон
меняется следующим образом:
B FM1 B FM2 B FM3 B MW B LW
3 Нажмите (MENU), затем
последовательно нажимайте на
любую сторону клавиши (PRST) до
появления на дисплее надписи
“BTM”.
4 Нажмите (ENTER).
Прибор заносит в память под
номерными клавишами станции в
порядке очередности их частот.
Звуковой сигнал зуммера означает, что
установка занесена в память.
Примечания
• Прибор не заносит в память станции со слабым
сигналом. Если принимается только
незначительное количество станций, некоторые
номерные клавиши останутся незанятыми.
• Если на дисплее высвечен какой-либо
предустановленный номер, аппарат начинает
занесение станций в память с этого
высвеченного номера.
8
Page 89

Занесение в память
только желаемых
станций
Вы можете занести в память до 18 станций
FM (по 6 станций на каждый из
поддиапазонов: FM1, FM2 и FM3), до 6
станций MW и до 6 станций LW в любой
последовательности по своему выбору.
1 Hажмите (TUNER).
Радиоприемник включен.
2 Последовательным нажатием (MODE)
выберите диапазон волн.
3 Нажатием на любую сторону
регулятора (SEEK) настройтесь на
волну станции, которую Вы хотите
занести в память под данной
номерной клавишей.
4 Нажмите и удерживайте в нажатом
положении номерную клавишу (с (1)
по (6)) до появления на дисплее
надписи “MEM”.
На дисплее загорается номер данной
клавиши.
Примечание
Если Вы попытаетесь занести в память другую
станцию под той же номерной клавишей,
предыдущая занесенная в память станция будет
стерта.
Прием занесенных в
память станций
1 Hажмите (TUNER).
Радиоприемник включен.
2 Последовательным нажатием (MODE)
выберите диапазон волн.
Если Вы не можете настроиться на
предустановленную станцию
Для начала поиска нужной станции
нажмите на любую сторону
регулятора (SEEK) (автоматическая
настройка).
Сканирование прекращается, когда
приемник находит какую-либо станцию.
Последовательно нажимайте на любую
сторону регулятора (SEEK) до тех пор,
пока не настроитесь на волну нужной
станции.
Примечание
Если автоматическая настройка
останавливается слишком часто, нажмите
клавишу (MENU), а затем последовательно
нажимайте на любую сторону клавиши
(PRST) до появления на дисплее надписи
“LOCAL” (режим локального поиска). После этого
нажатием помеченной знаком + стороны
регулятора (SEEK) выберите “LOCAL-ON”.
Нажмите (ENTER).
Настройка будет производится только на
станции с относительно сильным сигналом.
Совет
Если Вам известна рабочая частота станции,
передачу которой Вы хотите слушать, нажмите
на любую сторону регулятора (SEEK) и
удерживайте ее в нажатом положении до тех
пор, пока на дисплее не появится эта частота
(ручная настройка).
При слабом приеме стереопрограмм
УКВ
— Монофонический режим
1 Во время приема радиопередачи
нажмите (MENU), затем
последовательно нажимайте на
любую сторону клавиши (PRST) до
появления на дисплее надписи
“MONO”.
2 Нажимайте на помеченную знаком +
сторону регулятора (SEEK) до
появления на дисплее надписи
“MONO-ON”.
Слышимость улучшится, но звук станет
монофоническим (при этом с дисплея
исчезнет надпись “ST”).
3 Нажмите номерную клавишу (с (1) по
(6)), под которой в память занесена
нужная Вам станция.
Совет
Для приема передач станций в том порядке, в
котором они заложены в память, нажимайте на
любую сторону клавиши (PRST) (Функция поиска
предустановленных станций).
3 Нажмите (ENTER).
Для возвращения к обычному режиму в
описанной выше операции 2 выберите
“MONO-OFF”.
9
Page 90

RDS
Обзор функции RDS
Система передачи радиоданных (RDS) это трансляционная служба, которая
позволяет станциям FM передавать
дополнительную цифровую информацию
вместе с обычным сигналом
радиопрограмм. Ваша автомобильная
стереосистема предоставляет Вам
множество возможностей. Вот только
некоторые из них: автоматическая
перенастройка на ту же программу,
прослушивание дорожных сообщений и
обнаружение станции по типу программы.
Примечания
• В зависимости от страны и региона могут быть
доступны не все функции RDS.
• Система RDS может не сработать должным
образом, если передаваемый сигнал слишком
слаб или если станция, на волну которой Вы
настроились, не передает данные RDS.
Автоматическая
перенастройка на ту
же программу
— Альтернативные частоты (AF)
Функция альтернативных частот (AF)
автоматически выбирает и
перенастраивается на станцию с наиболее
сильным сигналом в радиотрансляционной
сети. Благодаря этой функции Вы можете
во время дальних поездок непрерывно
слушать одну и ту же программу, не
испытывая необходимости перенастраивать
приемник с одной волны на другую.
Смена частот осуществляется автоматически.
98,5MHz
Станция
96,0MHz
102,5MHz
Индикация названия
станции
Название принимаемой в данный момент
станции высвечивается на дисплее.
Выберите станцию FM (УКВ) (см. стр. 9).
Если Вы настроились на станцию FM,
которая передает данные RDS, название
станции загорается на дисплее.
Примечание
Индикация “*” означает, что принимается сигнал
станции RDS.
10
1 Выберите станцию FM (см. стр. 9).
2 Последовательно нажимайте (AF) до
появления на дисплее надписи “AFON”.
Аппарат начинает поиск
альтернативной станции с более
сильным сигналом в этой же
радиотрансляционной сети.
Примечание
Когда в Вашем районе есть только одна станция
и Вам не нужно искать другую, выключите
функцию AF многократным нажатием (AF) до
появления на дисплее надписи “AF-OFF”.
Page 91

Изменение показаний дисплея
При каждом нажатии Вами (AF) показания
дисплея меняются следующим образом:
AF-ON y AF-OFF
Примечания
• Если на дисплее попеременно мигают надпись
“NO AF” и название станции, это означает, что
приемник не может найти никакой
альтернативной станции в данной
радиотрансляционной сети.
• Если название станции начинает мигать после
ее выбора при включенной функции AF, это
указывает на отсутствие альтернативной
частоты. Пока название станции мигает на
дисплее (в течение восьми секунд), нажмите на
любую сторону регулятора (SEEK). Аппарат
начнет поиск другой частоты с теми же
данными PI (Программная идентификация) (на
дисплее появляется надпись “PI SEEK”, и звук
не слышен). Если аппарат не может найти
другую частоту, на дисплее появляется “NO
PI”, и аппарат возвращается к ранее
выбранной частоте.
Прослушивание региональной
программы
Функция “REG-ON” (региональная
функция) данного приемника позволяет
Вам оставаться настроенным на
региональную программу без
переключения на другую региональную
станцию. (заметьте, что при этом Вы
должны включить функцию AF.)
Изготовителем приемник установлен на
“REG-ON”, но если Вы хотите отключить
эту функцию, сделайте следующее.
1 Во время приема радиопередачи
нажмите (MENU), затем
последовательно нажимайте на
любую сторону клавиши (PRST) до
появления на дисплее надписи
“REG”.
2 Нажимая на помеченную знаком +
сторону регулятора (SEEK), выведите
на дисплей надпись
“REG-OFF”.
3 Нажмите (ENTER).
Заметьте, что при отключенной
региональной функции (положение
“REG-OFF”) приемник может
переключаться на другую региональную
станцию в той же радиотрансляционной
сети.
Для того, чтобы вновь включить
региональную функцию, в вышеописанной
операции 2 выберите “REG-ON”.
Примечание
Данная функция не работает в Соединенном
Королевстве и некоторых других странах.
Фукнция местной увязки
(только в Соединенном
Королевстве)
Функция местной увязки позволяет Вам
настраиваться на волну других местных
станций в данном районе, даже если они не
занесены в память Вашего приемника под
номерными клавишами.
1 Нажмите номерную клавишу, за
которой закреплена какая-либо
местная станция.
2 Не позже чем через пять секунд
вновь нажмите эту номерную
клавишу, за которой закреплена
местная станция.
3 Повторяйте эту операцию до тех пор,
пока не настроитесь на волну нужной
Вам станции.
11
Page 92

Прослушивание
дорожных сообщений
Транслируемые данные дорожных
сообщений (TA) и дорожных программ (TP)
позволяют Вам автоматически
настраиваться на станцию FM,
передающую дорожные сообщения, даже
если Вы в это время слушаете другой
программный источник.
Предустановка громкости
дорожных сообщений
Вы можете заранее задать уровень
громкости дорожных сообщений, чтобы не
пропустить какое-либо из них. Когда
начинается дорожное сообщение,
громкость будет автоматически настроена
на предустановленный уровень.
1 Выберите желательный уровень
громкости.
Последовательно нажимайте (TA) до
появления на дисплее “TA-ON”.
Приемник начинает поиск станций,
передающих информацию о дорожном
движении. При нахождении станции,
передающей дорожные сообщения, на
дисплее загорается “TP”.
Когда начинается дорожное сообщение,
индикатор “TA” загорается и мигает до
тех пор, пока сообщение не закончится.
Совет
Если дорожное сообщение начинается во время
прослушивания Вами другого программного
источника, приемник автоматически
переключается на это сообщение, а по его
окончании возвращается к первоначальному
источнику.
Примечания
• Если станция, на волну которой Вы
настроились, не передает дорожных
сообщений, на дисплее в течение пяти секунд
мигает “NO TP”. Затем аппарат начинает поиск
передающей данную программу станции.
• Если вместе с “TP” на дисплее появляется
надпись “EON”, это означает, что данная
станция использует транспортные сообщения
других станций в той же радиотрансляционной
сети.
Для отключения текущего
дорожного сообщения
Нажмите (TA) или (TUNER).
Чтобы отменить все дорожные
объявления, отключите данную
функцию, нажимая (TA) до появления
на дисплее “TA-OFF”.
2 Нажмите (TA) на две секунды.
На дисплее появляется “TA”, и
установка заносится в память.
Прием аварийных сообщений
Если во время прослушивания Вами
радиопередачи поступает аварийное
сообщение, программа автоматически
переключается на него. Если же Вы
слушаете не приемник, аварийные
сообщения будут слышны только при
включенной функции AF или TA. Аппарат
автоматически переключается на эти
сообщения независимо от того, какой
источник Вы прослушиваете в данный
момент.
Предустановка
станций RDS с
данными AF и TА
Во время предустановки Вами станций
RDS приемник заносит в память данные
каждой станции, а также ее частоту, так
что при настройке на предустановленную
станцию Вам не нужно каждый раз
включать функцию AF или TA. Вы можете
выбрать различные установки (AF, TA или
обе) для отдельных станций или одни и те
же установки для всех занесенных в
память станций.
12
Page 93

Занесение в память одной
установки для всех
предустановленных станций
1 Выберите диапазон FM (см. стр. 9).
2 Нажатием (AF) или/и (TA) выберите
“AF-ON” или/и “TA-ON.”
Имейте в виду, что в положении
“AF-OFF” или “TA-OFF” в память
заносятся не только станции RDS, но и
обычные станции.
3 Нажмите (MENU), затем
последовательно нажимайте на
любую сторону клавиши (PRST) до
появления на дисплее надписи
“BTM”.
4 Нажимайте на помеченную знаком +
сторону регулятора (SEEK) до тех
пор, пока на дисплее не замигает
надпись “BTM”.
5 Нажмите (ENTER).
Занесение в память различных
установок для каждой
предустановленной станции
1 Выберите диапазон FM и настройтесь
на нужную Вам станцию.
2 Нажимая (AF) или/и (TA), выберите
“AF-ON” или/и “TA-ON.”
3 Нажмите и удерживайте в нажатом
положении соответствующую
номерную клавишу до появления на
дисплее “MEM”.
Для занесения в память других станций
повторите все шаги, начиная с операции
1.
Совет
Если Вы хотите изменить занесенные в память
параметры AF и/или TA после настройки на
предустановленную станцию, Вы можее это
сделать посредством включения/выключения
функции AF или TА.
Обнаружение станции
по типу программы
Вы можете найти нужную Вам станцию,
выбрав один из перечисленных ниже типов
программ.
Типы программ Дисплей
Новости NEWS
Текущие события AFFAIRS
Информация INFO
Спорт SPORT
Образование EDUCATE
Радиоспектакли DRAMA
Культура CULTURE
Наука SCIENCE
Разное VARIED
Поп-музыка POP M
Рок-музыка ROCK M
Легкая музыка EASY M
Легкая классика LIGHT M
Классика CLASSICS
Прочие типы музыки OTHER M
Погода WEATHER
Финансы FINANCE
Программы для детей CHILDREN
Общественная жизнь SOCIAL A
Религия RELIGION
Звонки в прямой эфир PHONE IN
Путешествия TRAVEL
Досуг LEISURE
Джазовая музыка JAZZ
Музыка кантри COUNTRY
Национальная музыка NATION M
Старые шлягеры OLDIES
Народная музыка FOLK M
Документальные DOCUMENT
программы
Без определения NONE
Примечание
В некоторых странах, где данные PTY (выбор
типа программы) не доступны, Вы не сможете
использовать эту функцию.
13
Page 94

1 Нажимайте (DSPL/PTY) во время
приема в диапазоне FM (УКВ) до
появления на дисплее “PTY”.
В случае если станция транслирует
данные PTY, на дисплее появляется
название типа, к которому относится
прослушиваемая передача. Если же
принимаемая станция на является
станцией RDS или если данные RDS не
принимаются, на дисплее появляется
“- - - - -”.
Ecли фyнкция TA включeнa, ycтpойcтво
нaчнeт поиcк cлeдyющeй cтaнции.
Автоматическая
установка часов
Часы приемника устанавливаются
автоматически при приеме данных CT
(время), передаваемых станциями RDS.
1 Во время приема радиопередачи
нажмите (MENU), затем
последовательно нажимайте на
любую сторону клавиши (PRST) до
появления на дисплее “CT”.
2 Многократно нажимайте (PRST) до
появления нужного Вам типа
программы.
Типы программ появляются на дисплее
в указанном выше порядке. Заметьте,
что Вы не можете выбрать для поиска
“NONE” (без определения).
3 Многократно нaжимaйтe (ENTER),
покa нe нacтpоитecь нa нyжнyю
cтaнцию.
Приемник начинает поиск станции,
транслирующей выбранный тип
программы. По нахождении программы
название типа программы снова
появляется на дисплее на пять секунд.
В случае если приемник не может найти
данный тип программы, на дисплее в
течение пяти секунд попеременно
появляются “NO” и название типа
программы. Затем аппарат
возвращается к ранее выбранной
станции.
2 Последовательно нажимайте на
помеченную знаком + сторону
регулятора (SEEK) до появления на
дисплее надписи “CT-ON”.
Часы установлены.
3 Нажатием (ENTER) вернитесь к
обычному дисплею.
Чтобы отменить функцию СT
При осуществлении вышеописанной
операции 2 выберите “CT-OFF”.
Примечания
• Функция CT может не работать, даже если
осуществляется прием передачи станции RDS.
• Время, установленное с помощью функции CT,
может отличаться от фактического времени.
14
Page 95

Прочие функции
Подстройка
характеристик звука
Вы можете подстроить низкие частоты,
высокие частоты, баланс каналов и баланс
передних и задних громкоговорителей.
На каждом источнике могут быть
предустановлены свои отдельные уровни
низких и высоких частот.
1 Многократным нажатием клавиши
(SOUND) выберите параметр, который
Вы хотите подстроить.
BAS (низкие частоты) t TRE (высокие
частоты) t BAL (баланс лев./прав.
каналов) t FAD (балансировка
передних и задних громкоговорителей)
2 Отрегулируйте выбранный параметр
нажатием любой стороны клавиши
(SEEK).
Проводите подстройку в первые три
секунды после выбора нужного
параметра на дисплее.
Изменение заданных
параметров звука и
дисплея
Вы можете установить следующие
параметры:
• CLOCK (часы) (стр. 7).
• CT (Время) (стр. 14).
• BEEP – для включения или выключения
звукового сигнала.
• D.INFO (Двойная информация) - для
выведения циферблата часов и
информации о режиме воспроизведения
на дисплей одновременно (ON) или
попеременно (OFF).
• M.DSPL (Движущийся дисплей) – для
включения/выключения движущегося
дисплея.
1 Нажмите (MENU).
2 Последовательно нажимайте на
любую сторону клавиши (PRST) до
появления на дисплее нужного Вам
параметра.
При каждом нажатии Вами помеченной
знаком (–) стороны клавиши (PRST)
параметр меняется следующим
образом:
CLOCK t CT t BEEP t D.INFO t M.DSPL
3 Нажатием помеченной знаком (+)
стороны регулятора (SEEK) выберите
нужную Вам установку (например: ON
или OFF).
4 Нажмите (ENTER).
По окончании установки режима
аппарат возвращается в обычный
режим воспроизведения.
15
Page 96

Усиление
низкочастотных звуков
— D-bass
Магнитола дает Вам возможность
наслаждаться четким и мощным звуком на
низких частотах. Функция D-bass уиливает
как низкочастотный, так и
высокочастотный сигнал, придавая
большую крутизну частотной кривой, чем в
случае обычного усиления басов.
Вы можете четко слышать низкочастотные
звуки даже при неизменном уровне
громкости в диапазоне голосовых частот.
При помощи функции D-BASS Вы можете
легко акцентировать и подстраивать
характеристики низкочастотных звуков.
D.BASS-3
D.BASS-2
Уровень
0dB
Подстройка низкочастотной
характеристики
Последовательно нажимая (D-BASS),
выберите нужную Вам кривую
низкочастотной характеристики.
По мере увеличения порядкового
номера кривой D-BASS увеличивается и
эффект усиления басов.
D.BASS-1 t D.BASS-2 t D.BASS-3 t
D.BASS-OFF
Примечание
При том же уровне громкости может
происходить искажение басов. В таком случае
выберите частотную кривую, соответствующую
меньшей степени усиления низких частот.
D.BASS-1
D.BASS-3
D.BASS-2
D.BASS-1
Частота (Гц)
Дополнительная
информация
Технический уход
Замена плавкого предохранителя
При замене убедитесь, что
устанавливаемый Вами новый
предохранитель рассчитан на ту же силу
тока, что и предохранитель, изначально
установленный изготовителем. В случае
перегорания предохранителя проверьте
подключение питания и замените
предохранитель. Если после замены
предохранитель перегорает снова, это
может быть результатом внутренней
неполадки. В таком случае
проконсультируйтесь с ближайшим
дилером фирмы “Sony”.
Плавкий
предохранитель
(10 A)
Предупреждение
Никогда не используйте предохранители,
рассчитанные на большую силу тока, чем
изначально установленный в магнитоле
предохранитель, поскольку это может
привести к повреждению магнитолы.
16
Page 97

Очистка контактов
В функционировании магнитолы могут
происходить сбои, если контакты между
ней и передней панелью загрязнены. Во
избежание этого откройте переднюю
панель нажатием клавиши (RELEASE),
затем снимите ее и очистите контакты
ватным тампоном, смоченным в спиртовом
растворе. Не прилагайте при этом
излишнюю силу. В противном случае Вы
можете повредить контакты.
Демонтаж аппарата
1
Демонтажный ключ
(прилагается)
2
Основной аппарат
Тыльная сторона передней панели
Примечания
• В целях безопасности перед очисткой
контактов выключите двигатель автомобиля и
выньте ключ из замка зажигания.
• Ни при каких обстоятельствах не прикасайтесь
к контактам непосредственно пальцами или
какими бы то ни было металлическими
предметами.
3
4
17
Page 98

Технические характеристики
Магнитофонная секция
Kоличество звуковых дорожек
Плавание и дрожание звука
Частотная характеристика
Отношение полезного сигнала к шуму
4-дорожечное 2канальное стерео
0,13 % (WRMS)
30 – 15.000 Гц
55 дБ
Секция радиоприемника
УКВ
Частотный диапазон 87,5 – 108,0 МГц
Антенный вход Разъем внешней
Промежуточная частота
Используемая чувствительность
Избирательность 75 дБ при 400 кГц
Отношение полезного сигнала к шуму
Коэффициент гармонических искажений при 1 кГц
Разделение 35 дБ при 1 кГц
Частотная характеристика
СВ/ДВ
Частотный диапазон СВ: 531 – 1.602 кГц
Антенный вход Разъем внешней
Промежуточная частота 10,7 Мгц/450 кГц
Чувствительность СВ: 30 мкВ
антенны
10,7 МГц
9 dBf
65 дБ (стерео),
68 dB (моно)
0,7 % (стерео),
0,4 % (моно)
30 – 15.000 Гц
ДВ: 153 – 279 кГц
антенны
ДВ: 50 мкВ
Общие параметры
Выходы Провод релейного
Регуляторы тембра Низкие частоты ±8 дБ
Требования к питанию автомобильный
Размеры прибл. 188 × 58 × 182 мм
Монтажные габариты прибл. 182 × 53 × 163 мм
Масса Прибл. 1,2 кг
Входящие в комплект принадлежности
Конструкция и технические характеристики могут
быть изменены без извещения.
управления антенной с
электрическим приводом
Провод управления
усилителем
при 100 Гц
Высокие частоты ±8 дБ
при 10 кГц
аккумулятор 12 В
постоянного тока
(отрицательная масса)
(ш/в/г)
(ш/в/г)
Детали для установки и
соединений (1 набор)
Футляр для передней
панели (1)
Секция усилителя
Выходы Выходы для
Полное сопротивление громкоговорителей
Максимальная выходная мощность
громкоговорителей
(с соединительными
фиксаторами)
4 – 8 ом
45 Вт × 4 (при 4 омах)
18
Page 99

Устранение неполадок
Приводимый ниже справочный перечень поможет Вам в устранении проблем, которые
могут возникнуть с Вашей магнитолой.
Перед просмотром этого перечня загляните сначала в инструкции по подсоединению и
эксплуатации магнитолы.
Общие проблемы
Проблема
Нет звука.
Было стерто содержание
памяти.
Индикация не выводится на
дисплей.
Воспроизведение кассетной записи
Проблема
Искажение звука.
Причина/Способ устранения
• В случае стереосистемы с двумя громкоговорителями
установите регулятор баланса средних и задних
громкоговорителей в среднее положение.
• Вращением кольцевого регулятора по часовой стрелке
подстройте уровень громкости.
• Шнур питания или аккумулятор были отсоединены.
• Была нажата клавиша переустановки.
t Снова произведите занесение в память.
Снимите переднюю панель и очистите контакты.
Подробнее об этом см. в разделе “Очистка контактов”
(стр. 17).
Причина/Способ устранения
Загрязнена магнитная головка.
t Очистите головку при помощи имеющейся в продаже
кассеты сухого типа для очистки головок.
Прием радиопрограмм
Проблема
Настройка по предустановке
невозможна.
Автоматическая настройка
невозможна.
Не удается настроиться на
нужные радиостанции.
Слышны помехи.
На дисплее мигает “ST”.
Причина/Способ устранения
• Занесите в память правильную частоту.
• Транслируемый сигнал слишком слаб.
Транслируемый сигнал слишком слаб.
t Осуществите ручную настройку.
Подсоедините провод питания электроприводной
антенны (синий) или провод питания дополнительной
аппаратуры (красный) к питающему проводу
автомобильного антенного усилителя. (Только в том
случае, если Ваш автомобиль оснащен антенной для УКВ/
СВ/ДВ, встроенной в заднее/боковое стекло.)
• Правильно настройтесь на частоту.
• Транслируемый сигнал слишком слаб.
t Переключитесь на режим MONO (см. стр. 9).
продолжение на следующей странице t
19
Page 100

RDS
Проблема
После нескольких секунд
прослушивания включается
функция SEEK.
Нет дорожных сообщений.
На дисплее PTY
высвечивается “NONE”.
Причина/Способ устранения
Станция не передает TP (дорожных программ) или ее
сигнал слишком слаб.
t Последовательно нажимайте (AF) или (TA) до
появления на дисплее надписи “AF-OFF” или “TA-OFF”.
• Активируйте функцию “TA”.
• Станция не транслирует дорожных сообщений, хотя и
относится к типу TP.
t Настройтесь на другую станцию.
Станция не указывает тип программы.
Sony Corporation Printed in Malaysia
20
 Loading...